Mailshake Review

If you’re looking for an in-depth Mailshake review to decide if it’s the right tool for your business, this article is for you.

Mailshake is a popular sales management platform for modern sales teams with over 47,000 customers worldwide. It allows you to run impactful outreach campaigns, send timely follow-up emails, and track your conversations with a single dashboard view.

Mailshake is also among the most widely used email outreach tools for PR and link building. It gives marketers and SEOs plenty of features to generate leads and run mass outreach campaigns with persuasive messaging.

But is it the right tool for your business? 

To help you answer this question, we’ll evaluate all the key Mailshake features in this article and see if it is indeed the solution you’re looking for.

Mailshake Pros and Cons

Pros

  • Intuitive platform with an excellent user experience
  • Impressive email deliverability rates in large-scale campaigns
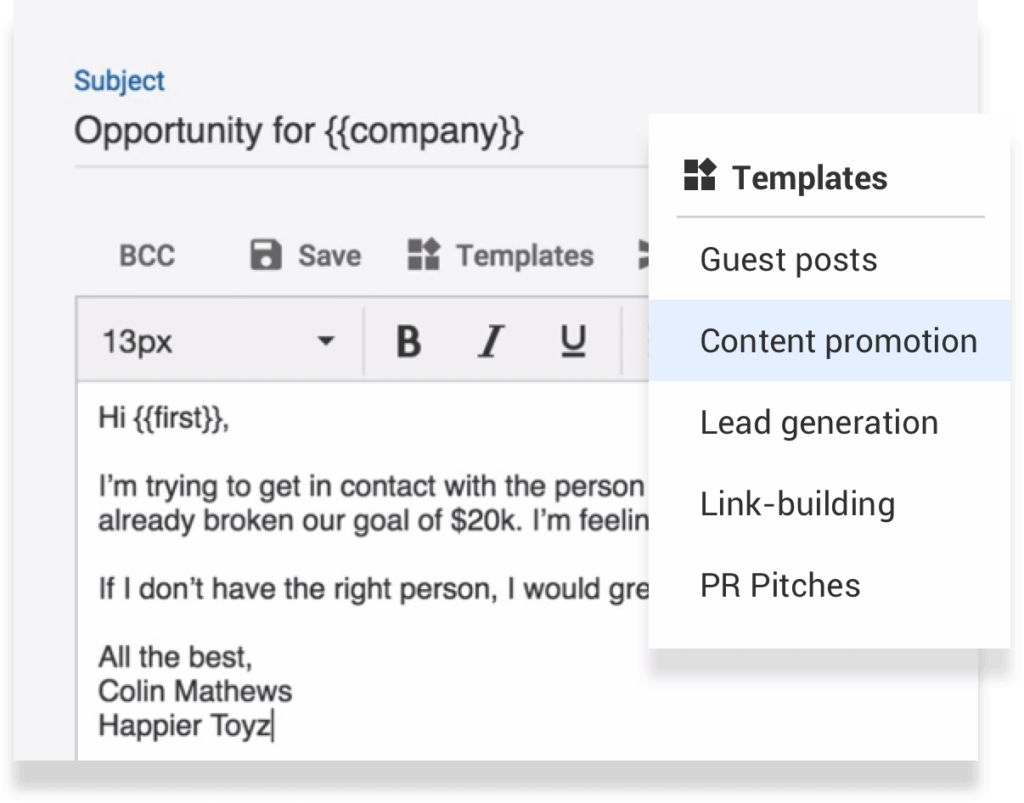
  • Template library with tested email scripts for various marketing objectives
  • Allows you to fully personalize and customize your messaging
  • Robust automation features to run condition-based campaigns
  • Automated follow-ups simplify outreach
  • Integrates with Salesforce, Hubspot, and Pipedrive CRMs
  • Supports GSuite and SMTP email accounts for outreach campaigns
  • Detailed email tracking to help you dissect your campaigns
  • Seamlessly integrates phone and social platforms with email outreach
  • Automatically highlights the leads with higher conversion potential
  • Offers courses and training to help users make the most of its features
  • Impressive email A/B testing features
  • 1000+ third-party app integrations via Zapier
  • 30-day money-back guarantee

Cons

  • Scheduling campaigns for different timezones is a hassle
  • You have to create Zapier integrations to perform more complex tasks
  • A bit more expensive than the other outreach tools
  • No free trial
  • No product walkthrough or intro video for prospects 

Mailshake Features

Mailshake comes packed with email outreach and lead generation features tailored for SEO for content marketers, PR companies, and sales professionals.

It significantly improves your response and conversion rates by ensuring that your campaigns are different from the usual spammy outreach emails these days.

Let’s take a close look at some of Mailshake’s core features to see how it can help you start more conversations and close more deals.

Run Mass Outreach Campaigns With High Deliverability

Email deliverability is one of the biggest challenges in running successful mass outreach campaigns. 

Most bulk email campaigns either land in the recipients’ spam folder or don’t get delivered at all because of bulk email restrictions.

This is where Mailshake is different from other tools.

It uses an intelligent email scheduling system that sends thousands of emails while ensuring deliverability. Every email is sent after a fixed gap, ensuring that your emails are not marked as spam and delivered right to the recipient’s inbox folder as one-to-one emails.

Depending on your plan, Mailshake allows you to send up to 10,000 emails per outreach campaign. You can spread your campaigns over several days or weeks to ensure that emails are sent in a natural pattern.

Similarly, you can also schedule your email campaigns to send them when your recipients are the most likely to respond.

Personalize Campaigns With Mail Merge

Creating a mail merge in Mailshake helps you save time while ensuring that your participants receive personalized one-on-one emails.

Mail merge is an email campaign type in which you send the message to an extensive email list but personalize it so that every recipient receives it individually.

You can set up a mail merge in Mailshake by adding the recipients manually one by one or by uploading a CSV file of your contact database with the necessary customer details arranged in separate columns.

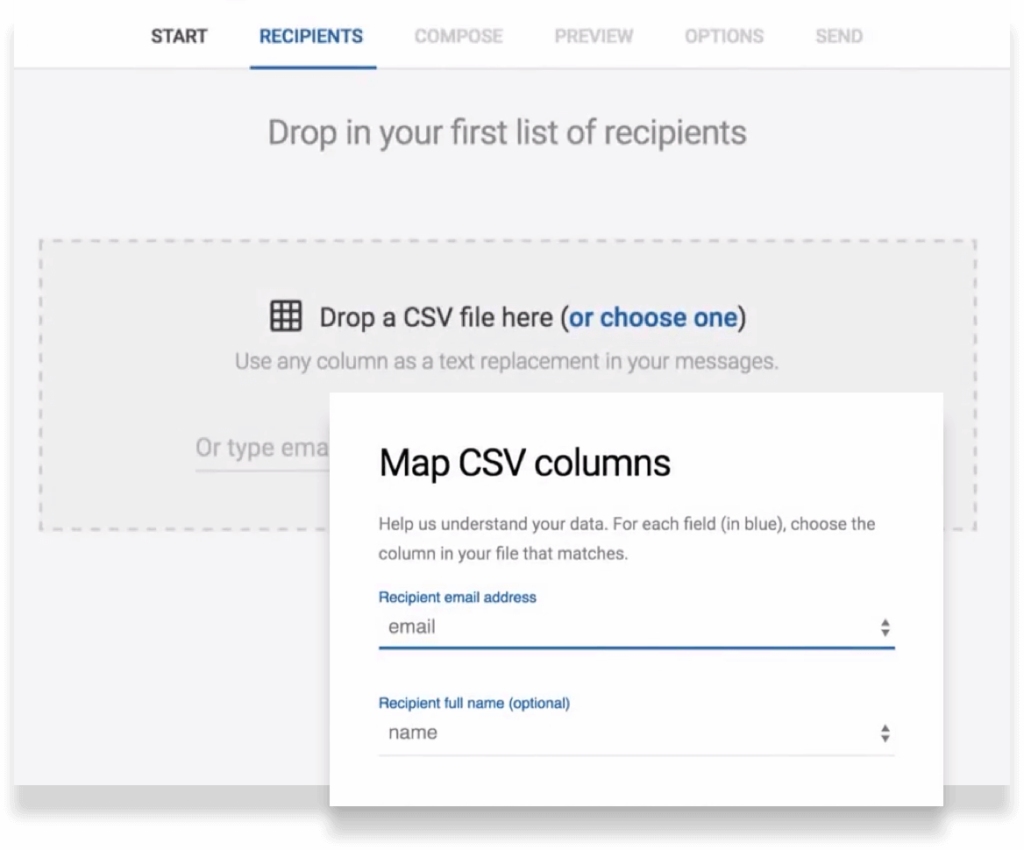
If your CSV file has incomplete information for some of your recipients, you can manually add it once you upload it to Mailshake.

With the right customer information, you can completely personalize your email campaigns and make them look as if they were designed separately for every customer.

Let’s say you have the following information of your leads arranged in separate columns in a CSV file.

  • First and last names
  • Email address
  • City
  • Country
  • Phone Number
  • Company name
  • Designation

You can use this information to personalize your messages using tags in Mailshake.

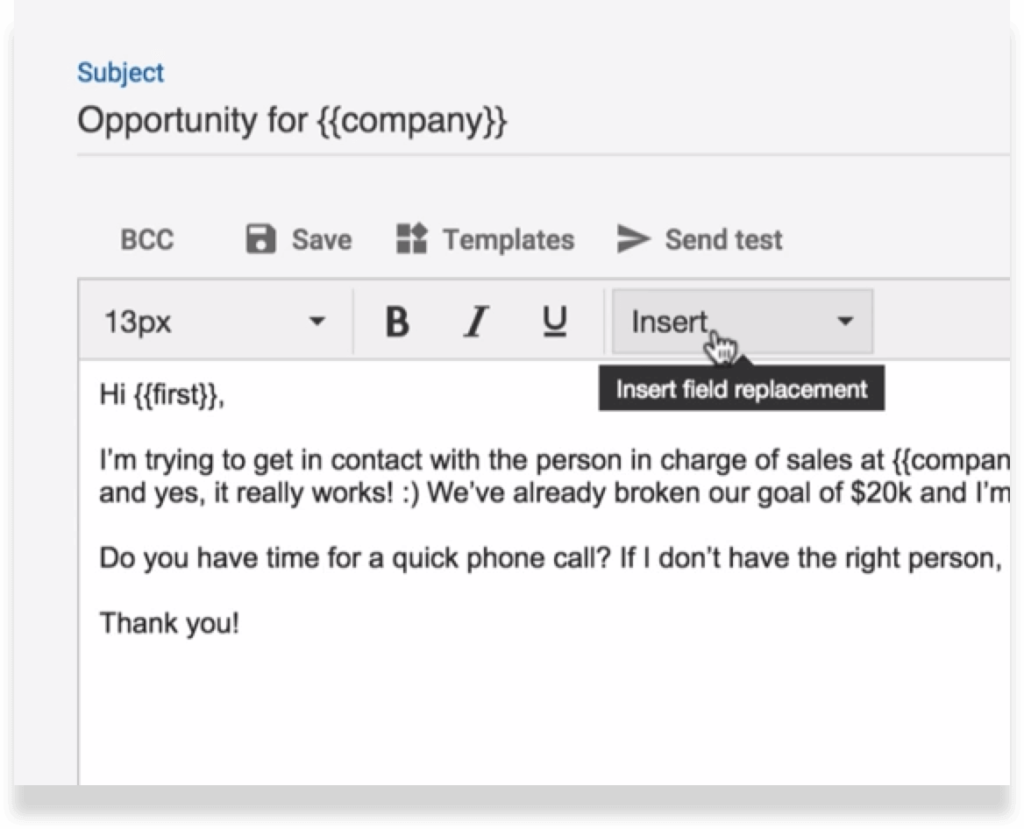
You can insert the relevant tags in your email messages from the Insert menu in your email editor. You can also manually add more personalization to each recipient’s email before you push your campaign live.

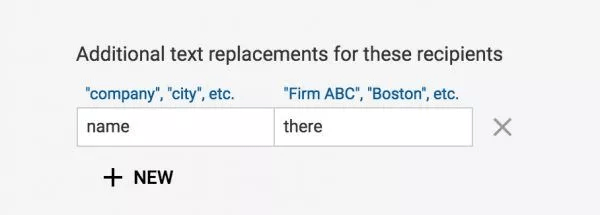
You can also set conditions to use replacement text if specific information is not available for a customer.

For example, you can use “there” if you don’t have a person’s name in your email database for it to say “Hi there,” or change it to just say “Hello.”

This makes your cold outreach emails much more credible and considerably increases your campaign response rates.

Automate Follow-ups To Increase Response Rate

Whether you’re running an outreach campaign for link building, PR, or lead generation, follow-ups are critical to your success.

But following up in mass email campaigns is hard to manage because of the number of recipients. To make this task simpler, Mailshake helps you configure automated follow-ups based on various conditions.

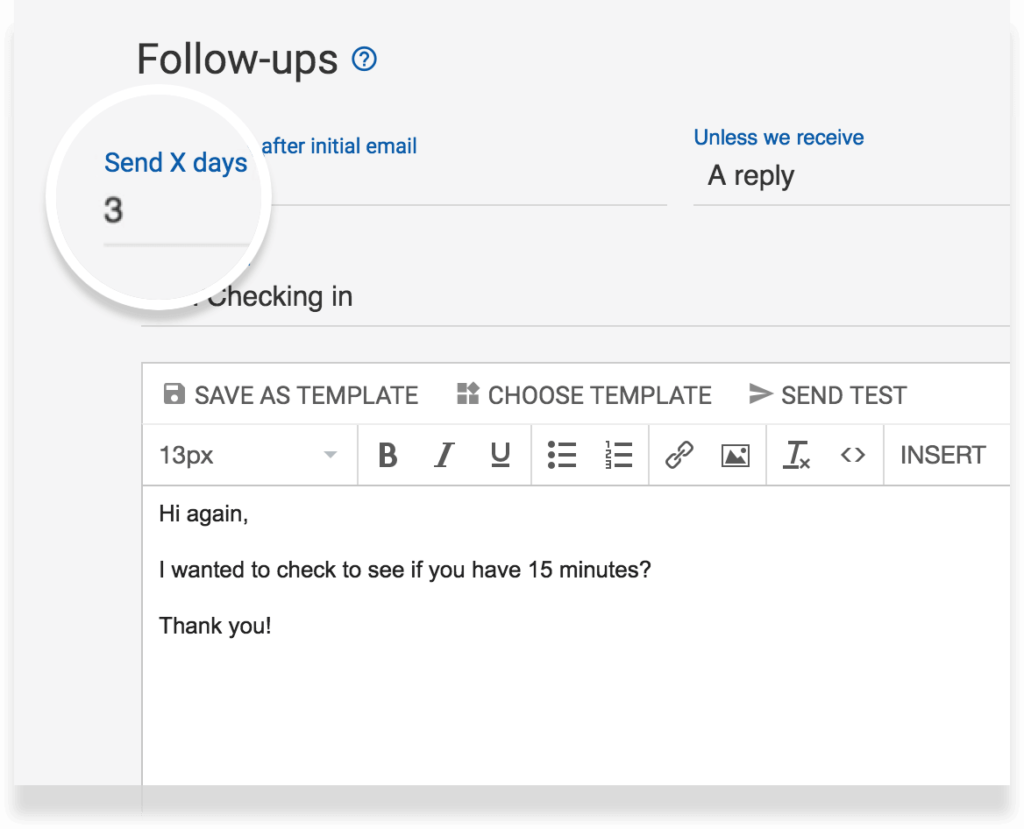
Instead of manually tracking the users who haven’t responded to your initial email, you can set an automatic follow-up email after a specific duration.

For example, you could configure follow-up emails to be sent three days after the initial email if there’s no response from a lead.

You can also use additional qualifying conditions like excluding the leads from your follow-up sequence who’ve opened your email or clicked on a specific link.

Similarly, you could also use link-tracking for triggering follow-ups.

Again, you have complete control over when a follow-up email is sent.

Mailshake gives you a handful of proven and tested follow-up email scripts for various business goals to improve your response rate. Instead of writing a follow-up email from scratch, you can simply use one of the scripts and modify them before sending (if needed.)

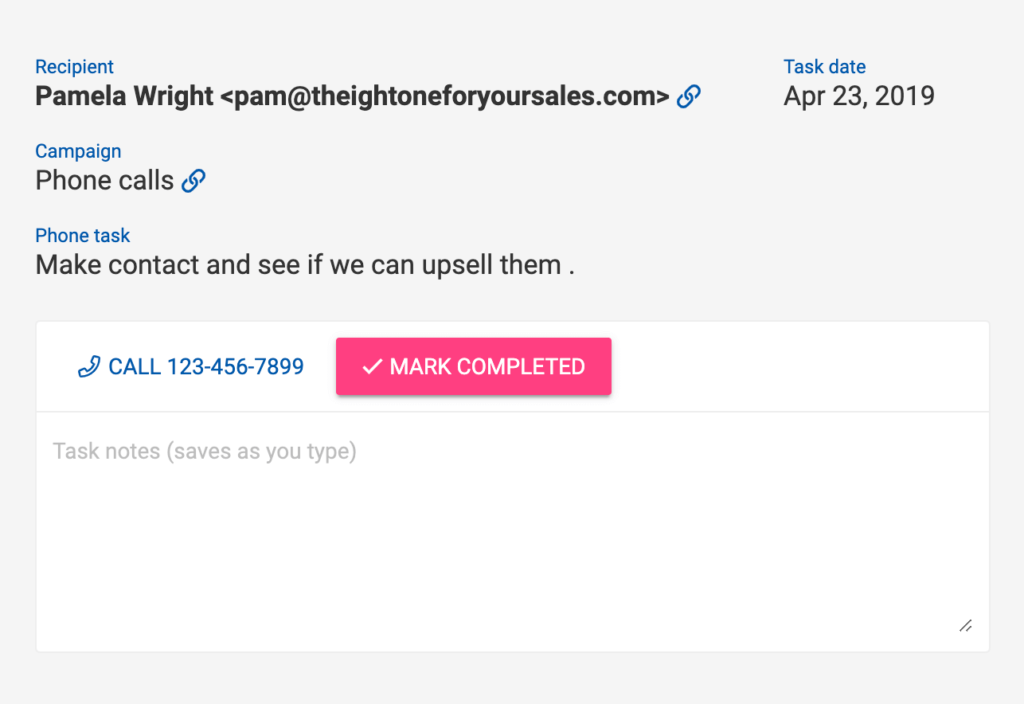
You can also set up tasks within your sales sequences to connect with prospects over the phone and on social media. Once you or someone from your team follow-up on call, you can mark them as completed to continue the automated sequence.

Overall, Mailshake offers some pretty impressive and robust email follow-up capabilities that save your time and help you close more leads faster.

Streamline Communication With Lead Catcher

Lead catcher is a lead management feature in Mailshake that allows you to interact with your leads, assign them to your team members, and perform several other lead management tasks.

It is enabled by default in all your outreach campaigns. Once a recipient responds to your emails, Mailshake marks them as a lead.

This means all your follow-up sequences are immediately stopped for the lead, and you decide how to take the communication forward.

Lead catcher allows you to define the exact criteria to qualify a contact as a lead using multiple conditions.

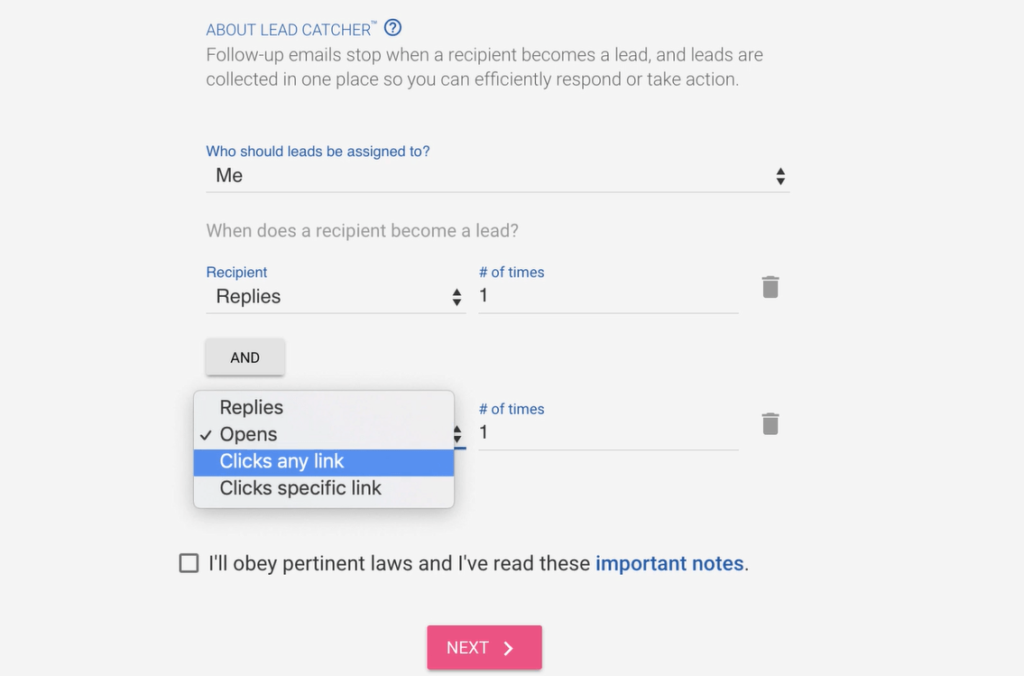
You decide who on your team will communicate with the lead and the exact conditions contacts need to fulfill to qualify as a lead.

Lead Catcher organizes all your leads in a single dashboard view and gives you controls to decide what happens to each lead quickly.

From the same interface, you can mark leads as “won,” “lost,” or “ignored.” Or assign the lead to another team member for following up.

You get the complete history of your communication with a lead in a thread format that allows you to quickly move back and forth if you need any information.

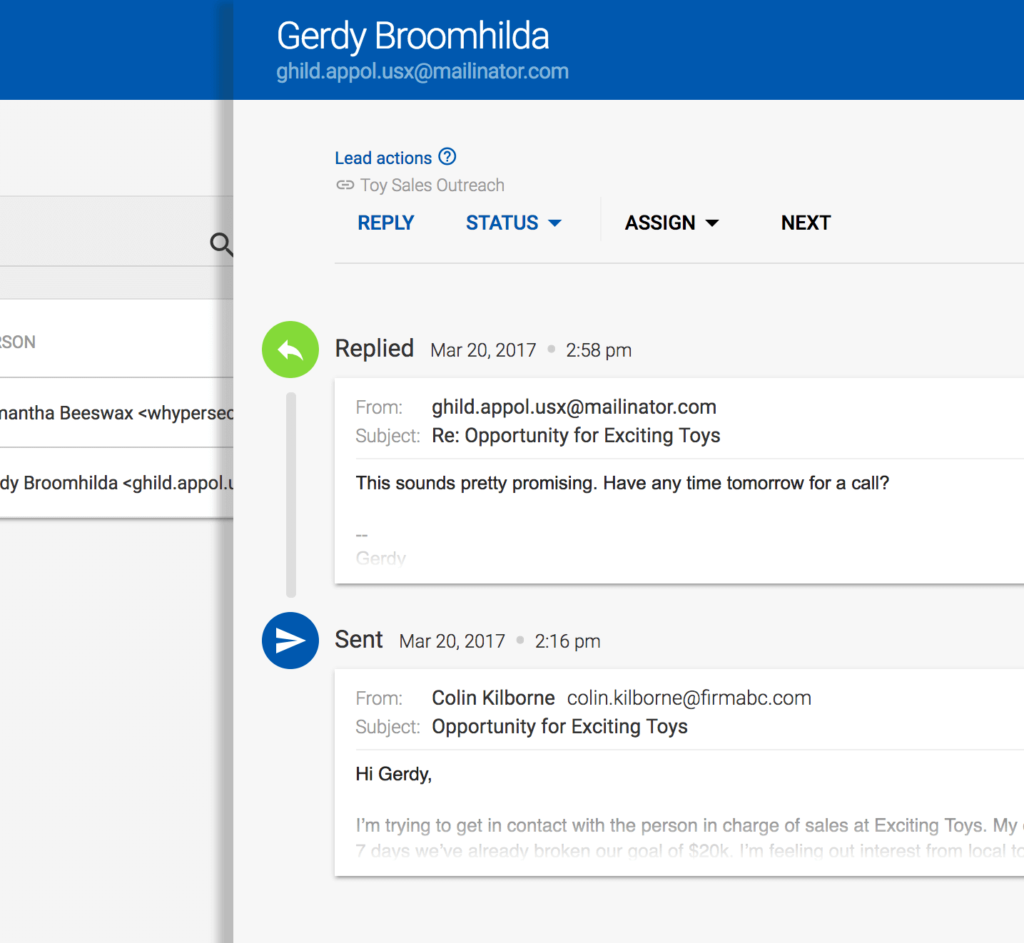
You can also use the same interface to send new emails to a lead and mark them as “won” in your database.

Once you’re done managing a lead, Lead Catcher immediately moves you to the next lead with all the information we’ve just discussed.

For busy sales managers and marketers running large-scale link-building campaigns, Lead Catcher is a time-saver that provides them all the information they need when interacting with leads.

Get More Out Of Mailshake With Integrations

Mailshake is already a powerful tool that offers you all the necessary lead management and follow-up features. But it becomes even more useful when you integrate it with the various CRMs or marketing and data management applications.

Mailshake directly integrates with CRMs like Salesforce, HubSpot, and Pipedrive. This means you can run your complete outreach campaigns and update your lead status by integrating with your favorite CRMs.

Apart from these apps, Mailshake supports 1000+ integrations via Zapier, including Google Sheets, Slack, Outlook, Facebook, Drift, LinkedIn, Calendly, and many other applications.

New integrations are also available from time to time, making it easier for users to move data between different applications to streamline the lead generation process.

Mailshake Pricing and Package Options

Mailshake offers two paid subscription plans for different types of users. Each plan comes with a 30-day money-back guarantee.

However, there’s no free plan or free trial with Mailshake. You need to pay upfront to start using it.

Here’s what Mailshake’s plans cost:

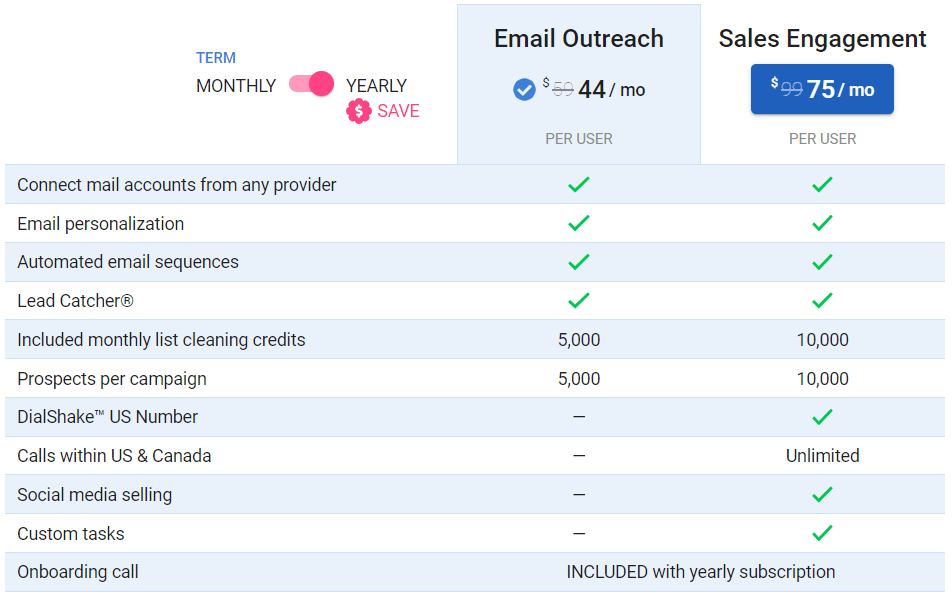
The Email Outreach plan costs $59 per month per user with monthly billing. The Sales Engagement plan costs $99 per month per user with monthly billing.

But if you switch to annual billing, you can get the Email Outreach plan for $44/month per user and the Sales Engagement plan for $75/month per user, saving you a significant amount of money over twelve months.

Still, it’s an expensive option when compared with some of the other mainstream outreach products.

Let’s explore each of these plans in more detail and see what value they offer for your money.

Email Outreach

The Email Outreach plan is designed for SEO companies and agencies that primarily use Mailshake for link building and PR campaigns. 

It provides you all the necessary email outreach features like email personalization, follow-up automation, Lead Catcher, and custom email address integration. You also get up to 5000 emails per campaign and 5000 monthly list cleaning credits.

There are no phone calling or social selling features in this plan.

Sales Engagement

The Sales Engagement plan is designed for the more traditional sales teams that rely on both email and phone calls to connect and follow up with leads.

It offers everything in the Email Outreach plan and several calling features such as the DialShake US calling number and unlimited calls within the US and Canada.

You also get up to 10,000 email prospects per campaign with 10,000 list cleaning credits. The plan also includes social selling and custom tasks in your Mailshake account.

Mailshake Reputation

A detailed analysis of some of the most popular SaaS review sites, discussion forums, and social media platforms such as LinkedIn and Twitter shows that Mailshake has a strong reputation among sales professionals, experienced SEO managers, and PR strategists.

Most users are impressed by its intuitive interface and robust features that simplify creating and managing outreach campaigns.

However, some users have pointed out that Mailshake’s custom support lacks urgency and takes unnecessarily long to resolve issues.

Some customers also pointed out problems in third-party integrations.

But these mainly were isolated cases. The general perception about the product is quite favorable, with people strongly recommending it for all kinds of outreach campaigns.

Who Should Invest In Mailshake?

As you’ve seen in this detailed review, there’s a lot to like about Mailshake. Its robust lead management, automation, and communication features make it an ideal product for sales professionals, SEO managers, and PR experts.

We strongly recommend it for companies looking to scale their lead generation campaigns and automating their workflows for faster and more efficient lead management.

However, for beginner SEOs or companies with budget limitations, Mailshake might not be the most suitable option for now.

A Community-Driven Site with Eleventy: Preparing for Contributions

I’ve recently found myself reaching for Eleventy (aka 11ty) above all other tools when I want to develop a website. It’s hard to beat a static site generator that provides advanced templating opportunities while otherwise getting out of your way and allowing you to just create.

One of those sites is Style Stage, a modern CSS showcase styled by community contributions. Eleventy was perfect for this community-driven project in several ways:

  • Its exceptionally fast builds locally and on a production host
  • It’s un-opinionated about how to construct templates
  • Its ability to create any file type with complete control over how and where files are rendered
  • Its ability to intermix templating languages, such as HTML, Markdown, and Nunjucks
  • It’s highly performant because it compiles to static HTML with no required dependencies for production

The number one reason Eleventy is a great choice for creating a community-driven site is the ability to dynamically create site pages from data sources. We’ll review how to use this feature and more when we create our sample community site.

Article Series:

  1. Preparing for Contributions (You are here!)
  2. Building the Site (Coming tomorrow!)

What goes into creating a community-driven site?

In the not-so-distant past, creating a community-driven site could potentially be a painful process involving CMS nightmares trying to create contributor workflows. Armed with Eleventy and a few other modern tools, this is now nearly fully automatable with a minimum of oversight.

Before we get to inviting contributors, we’ve got some work to do ourselves.

1. Determine what content contributors will have access to modify

This will guide a lot of the other decisions. In the case of using Eleventy for Style Stage, I created a JSON file that contributors can use to create pull requests to modify and provide their own relevant metadata that’s used to create their pages.

An early version of the JSON file which initially had an “Example” for contributors to reference. This screenshot also shows the first two contributors details.

Perhaps you also want to allow access to include additional assets, or maybe it makes sense to have multiple data files for the ease of categorizing and querying data. Or maybe contributors are able to add Markdown files within a particular directory.

Consider the scope of what contributors can modify or submit, and weigh that against an estimate of your availability to review submissions. This will help enable a successful, manageable community.

GitHub actions can make it possible to label or close a pull request with invalid files if you need advanced automated screening of incoming content.

2. Create contributor guidelines

Spending time upfront to think through your guidelines can help with your overall plan. You may identify additional needed features, or items that can be automated.

Once your guidelines are prepared, it’s best to include them in a special file in your GitHub repository called CONTRIBUTING.md. The all-caps filename is the expected format. Having this file creates an automatic extra link for contributors when they are creating their pull request or issues in a prompt that ask them to be sure they’ve reviewed the guidelines:

Screenshot courtesy of the GitHub documentation.

How to handle content licensing and author attribution are things that fall into this category. For example, Style Stage releases contributed stylesheets under the CC BY-NC-SA license but authors retain copyright over original graphics. As part of the build process, the license and author attribution are appended to the styles, and the authors attribution metadata is updated within the style page template.

You’ll also want to consider policies around acceptable content and what would cause submissions to be rejected. Style Stage states that:

Submissions will be rejected for using obscene, excessively violent, or otherwise distasteful imagery, violating the above guidelines, or other reasons at the discretion of the maintainer.

3. Prepare workflow and automations

While Eleventy takes care of the site build, the other key players enabling Style Stage contributions are Netlify and GitHub.

Contributors submit a pull request to the Style Stage repo on GitHub and, when they do, Netlify creates a deploy preview. This allows contributors to verify that their submission works as expected, and saves me time as the maintainer by not having to pull down submissions to ensure they meet the guidelines.

The status of the Netlify deploy updates in real-time on the pull request review page. Once the last item (“/deploy-preview”) displays “Deploy preview ready!” clicking “Details” will launch the live link to the preview.

All discussion takes place through GitHub. This has the added advantage of public accountability which helps dissuade bad actors.

If the contributor needs to make a change, they can update their pull request or request a re-deploy of the branch preview if it’s a remote asset that has changed. This re-deploy is a very small manual step, and it may not be needed for every PR — or even at all, depending on how you accept contributions.

The last step is the final approval of the PR and merging into the main branch. Once the pull request is merged, Netlify immediately deploys the changes to production.

Eleventy is, of course, a static site generator, and several hosts offer webhooks to trigger a build. Netlify’s build plugins are a good example of that. But if you need to refresh data more often than each time a PR is merged, one option is to use IFTTT or Zapier to set up daily deploys, or deploys based on a variety of other triggers.

Example of completed setup of a daily deploy via webhook from IFTTT

It’s worth noting that what we’re talking about here does limit your contributor audience to having a GitHub account. However, GitHub contributions can be done entirely via the web interface, so it’s very possible to provide guidance so that other users — even those who don’t code — can still participate.

4. Choose a method for contributor and community updates

The first consideration here is to decide how critical it is for contributors to know about updates to your site by evaluating the likely impact of the change.

In the case of Style Stage, the core will be unchanging, but there is some planned optional functionality. I went with a weekly(-ish) newsletter. That way, it is something folks can opt into and there is value for contributors and users alike.

Matthew Ström’s “Using Netlify Forms and Netlify Functions to Build an Email Sign-Up Widget” is a great place to learn how to add subscribers to your newsletter with a static form in Eleventy. It also covers a function for sending the subscriber’s email to Buttondown, a lightweight email service. For an example of how to manage your Buttondown email template and content in Eleventy, review the Style Stage setup which shows how to exclude the newsletter from the published site build.

If you’re only expecting low priority updates, then GitHub’s repo notifications might be sufficient for communication. Creating releases is another way to go. Or, hey, it’s even possible to to incorporate notifications on the site itself.

5. Find and engage with potential contributors

Style Stage was an idea that I vetted by tossing out a poll on Twitter. I then put out a “call for contributors” and engaged with responders as well as those who retweeted me. A short timeline also helped find motivated contributors who helped Style Stage avoid launching without any submissions. Many of those contributors became evangelists that introduced Style Stage to even more people. I also promoted a launch livestream which doubled as promotional material.

This is what it means to “engage” with contributors. Creating avenues for engagement and staying engaged with them helps turn casual contributors into “fans” who encourage others to participate.

Remember that the site content is a great place to encourage participation! Style Stage dedicates its entire page to encouraging submissions. If that’s not possible for you, then you might consider using prompts for contributions where it makes sense.

6. Finalize repo settings and include community health files

Finally, ensure that your repository is published publicly and that it includes applicable “community health” files. These are meant to be documents that help establish guidelines, set good expectations with community members, define a code of conduct, and other information that contribute to the overall “health” of the community. There are a bunch of examples, suggestions and tips on how to do this in the GitHub docs.

While there are a half dozen files noted in the documentation, in my experience so far, the three files you’ll need at minimum are:

  • a README.md file at the root of the project that includes the project’s name and a good description of what it is. GitHub will display the contents below the list of files in the repo.
  • a CONTRIBUTING.md file that describes the submission process for contributions. Be explicit as far as what steps are involved and what constitutes a “good” submission.
  • a pull request template. I wouldn’t exactly say this is a mandatory thing, but it’s worth adding to this list because it further solidifies the expectations for submitting contributions. Many templates will even include a checklist that details requirements for approval.

Oh, and having a branch protection rule on the main branch is another good idea. You can do this by going to SettingsBranches from the repo and selecting the “Add rule” option. “Require pull request reviews before merging” and “Require review from Code Owners” are the two key settings to enable. You can check the GitHub docs to learn more about this protection.

Coming up next…

What we covered here is a starting point for creating a community-driven site with Eleventy. The point is that there are several things that need to be considered before we jump straight into code. Communities need care and that requires a few steps that help establish an engaged and healthy community.

You’re probably getting anxious to start coding a community site with Eleventy! Well, that’s coming up in the next installment of this two-parter.  Together, we’ll develop an Eleventy starter from scratch that you can extend for your own community (or personal) site.

Article Series:

  1. Preparing for Contributions (You are here!)
  2. Building the Site (Coming tomorrow!)


The post A Community-Driven Site with Eleventy: Preparing for Contributions appeared first on CSS-Tricks.

You can support CSS-Tricks by being an MVP Supporter.

Vue 3.0 has entered Release Candidate stage!

Vue is in the process of a complete overhaul that rebuilds the popular JavaScript framework from the ground up. This has been going on the last couple of years and, at long last, the API and implementation of Vue 3 core are now stabilize. This is exciting for a number of reasons:

  • Vue 3 promises to be much more performant than Vue 2.
  • Despite being a complete rewrite, the surface API hasn’t changed drastically, so there’s no need to forget what you already know about Vue.
  • The Vue documentation was completely migrated revised. (If you see me celebrating that, it’s because I helped work on it.)
  • There are several new features — like the Composition API (inspired by React Hooks) — that are additive and helpful for composition between multiple components.

Here’s how you can get your hands on the Vue 3 release candidate:

There is more information about DevTools, experimental features and more in the release notes.

Docs updates, now in beta

Why am I so excited about the Vue doc updates? Because the updates include but are not limited to:

We are still actively working on things, of course, so if you see to-dos or unresolved work, please let us know! Feel free to open an issue or PR over at GitHub but, please, note that large requests will likely be closed out while we’re still refining our current work.

All in all we think you’ll enjoy it! It’s all the features you know and love, with some extra lovely bits, plus excellent performance.


The post Vue 3.0 has entered Release Candidate stage! appeared first on CSS-Tricks.

You can support CSS-Tricks by being an MVP Supporter.

How Building in the Open Can Change Our Industry

I have to admit, I'm a developer who hasn't built a website. When I first read Chris's question, I sat in silence for at least a minute. Which technical topic did I want to discuss? A new library, programming language or best practice? Nothing, in particular, came to mind. Is that because I'm a new developer?

I've been coding for about one year now and got my first job a month ago. Even though I've been coding for that time, I wouldn't say I've built a website. I've contributed to a couple of open-source projects whose output was websites, but I've spent a lot of time practicing technical tests in order to get into the industry and now I'm writing Kotlin for the Guardian Newspaper's Android application.

After a couple minutes thinking about this question, I realized I wanted to write about who gets to build websites and how and where we choose to build them in order to welcome new people. I've spent this year giving conference talks on this topic because I have first-hand knowledge of what it's like to become a developer with little time and money. It's not easy being on the "outside" trying to get into our industry. How can we make it easier for new people to join us here? How can we welcome under-represented groups to the table? In 2020 you can make a huge difference to our industry by welcoming new developers, especially those from under-represented groups.

It's been five years since the most well-known tech companies first released diversity reports, revealing that workforces were overwhelmingly white or Asian men. Despite their business successes, though, none of these big tech companies have made much progress in diversifying their workforces.

In 2014, Apple, one of the largest tech companies by revenue, had 20% women in its technical staff. This increased to only 23% in 2018 (Apple). At Google, the share of US technical employees who are black was 2.0% in 2014 and only rose to 2.8% in 2018 (Google). At Facebook in the US, there were 3% Hispanic technical staff in 2014. Last year there were 3.1% (Facebook).

Continuing our homogenous engineering community is a risk. We are less likely to build products best for our diverse user groups. For example, there have been numerous reports of facial recognition systems misidentifying black people. A US Government study found a top-performing system misidentified black people 5-10x more than white people. In addition, "according to a 2011 study by the National Institute of Standards and Technologies (Nist), facial recognition software is actually more accurate on Asian faces when it's created by firms in Asian countries, suggesting that who makes the software strongly affects how it works" (Guardian 2017).

Thankfully, there are a number of things you can do in 2020 to contribute to a more diverse engineering community. Building websites in the open, in ways that welcome new people, can have a hugely positive impact on our industry and on the websites that we as an engineering industry produce.

First, how can building open source websites help us welcome new people? You can help with this by being a great open-source citizen and upholding best practices by giving positive and constructive code reviews, keeping documentation up to date and useful, offering help to new contributors and remote pairing with them if at all possible. Some amazing developers like Suz Hinton (@noopkat) live stream their open source contributions, which is phenomenal.

GitHub's research has shown that documentation is highly valued, but frequently overlooked. As a new contributor, I really value clear and useful documentation, especially on installation, raising a PR and where to get help if I get stuck. Mozilla found that the most significant barrier to engaging in on-ramping others is unclear communications and unfriendly community. Using positive language in your documentation can really encourage first-time contributors to your project. For example, by expressly indicating that you welcome new contributors with instructions on how they can get involved.

We want to create an engineering community highly attractive to under-represented groups. One of the ways that we can do this is by supporting new developers to get a foothold into the profession. There are so many ways we can do this!

The first thing we can do with new developers is to help them by pairing and giving code reviews. Open source projects are perfect for this! By giving constructive code reviews you can help newbies level up their coding skills. You can also set up a Slack channel for your repo where you can answer technical questions. I have met superstar open source heroes who spent time pairing with me, which, if available to you, is an amazing way to help new people.

The greatest challenge I faced when teaching myself to code was finding a job. You can give new developers an insight into your company or your day to day working life by writing an article on Medium, posting a Twitter thread, or making a YouTube video. Some developers offer their own office hours which they do on a live stream or some offer a few one-off mentoring calls with new developers.

Who we welcome into the room to build websites with us says something about who we are and our values. In 2020, let's welcome new people, especially those from under-represented groups to join us. We've discussed how amazing open-source projects are for this and how we can practically contribute to supporting new people. Let's challenge ourselves to support at least one person from an under-represented group trying to get into the engineering industry in 2020. Together we can change who has the privilege to build the web.

The post How Building in the Open Can Change Our Industry appeared first on CSS-Tricks.

How to Contribute to an Open Source Project

The following is going to get slightly opinionated and aims to guide someone on their journey into open source. As a prerequisite, you should have basic familiarity with the command line and Git. If you know the concepts and want to dive right into the step by step how-to guide, check out this part of the article.

Truly, there is no one way to contribute to an open source project, and to be involved often means more than code slinging. In this article, though, we’re going to focus on the nitty-gritty of contributing a pull request (PR) to someone else’s project on GitHub.

Let's set the stage...

You come across someone's project on Github and you love it! You may even decide to use it in your own project. But there’s one small thing you notice... it could be a bug. It could be an enhancement to what’s already there. Maybe you looked through the code and found a nice, optimized way of writing things that’s a little more legible, even as small as an extra indentation in the code.

Here are some initial suggestions and instructions on where to go from here.

Look for a CONTRIBUTING.md document or Contributing Guide in the documentation

Many open source projects know that other people might want to contribute. If they find themselves answering the same question again and again, this document intends to make it easier to get everyone on the same page.

Some things you might find in a Contributing guide:

  • Style guidelines
  • Prerequisites for submitting a PR
  • How to add your change to their documentation
  • A checklist for contribution
  • Explaining the project’s architecture and setup

This document can be as simple as a few notes, or it can be so robust that it takes you a little while to read through it all (like Atom’s Contributing guide, for example).

For larger projects, it makes sense to communicate contributing guidelines up front because PRs and issues can pile up and be a real drag on a maintainer's time, sorting through contributions that might be out of the project's scope. Make sure to take some of your own time reading through this guide if it exists because your PR will require some of the maintainer's time as well.

Look through the existing issues and PRs

Before adding a new issue or submitting a PR, it’s good to check what else is out there. You might find someone has already asked about the same thing, or submitted something similar. You can check in the project's search box — I usually search through issues that are both open and closed, as it’s important to know if someone already raised my concern and perhaps the maintainer decided to go in another direction. Again, it's about saving both you and the maintainer time.

Submit an issue

Submitting issues is a core part of the PR submission process. They provide an opportunity to articulate the situation, establish context around it, and provide a forum for discussion that can be attached to the PR itself.

When submitting an issue, I like to write out what my concern is and then re-read it as if I was on the receiving end. People are human — even if what you say is technically correct, you’re not likely to get buy-in for your idea if your tone is off-putting. Consider this: you may be asking for someone to do a lot of work in their spare time. If someone asks you to do work on a Saturday, are you more likely to do so if they ask respectfully with condescension? You get the picture.

When submitting an issue, make sure you give them all the details they need to get the work done. Some things you might note:

  • If it’s a bug, then what environment you’re seeing the problem in? Is it development or production? Perhaps somewhere else?
  • If it’s a feature request, then explain the problem. Sometimes framing this from the perspective of the end user in the form of user stories can be helpful, both to conceptualize the situation and abstract it from any personal feelings.
  • If it’s a general question, then state that up front so the maintainer can avoid spending time trying to figure out if you’re asking for a bug or a feature.
  • If you’d like to submit a PR to improve on the issue, mention that you’d like to do this, then ask permission to proceed (because sometimes maintainers have other items planned you may be unaware of).

Make considerations before starting work

You're probably eager to start working on your PR by this point. But first, there are still a few customary things to check off before you dig in.

Ask first

I’m a big fan of people asking in an issue if a PR makes sense before they work on one. I don’t hold it as a strict rule, but sometimes I can save them buckets of time and going in the wrong direction if we can clarify what we both want together first. It also helps others know to not implement the same thing (assuming they, too, look through open and closed PRs.

Use labels

If you do submit an issue and everyone agrees a PR is a good idea, then it’s nice for you (or the owner of the repo) to add the label in progress. You can search labels so it’s really clear to everyone you’re working on it.

Work in small chunks!

As a maintainer, it’s frustrating when someone put in a lot of work and submits a giant honking PR that does 10 different things. It’s really tough to review, and inevitably, they’re doing six things you want, and four things you don’t. Not only that, it’s usually spread out over multiple files which is difficult to untangle. I’ve definitely closed PRs with some high-quality code I would like just because it would take forever for to review and manage it. (I will communicate that this is the issue if they would like to resubmit the work as separate PRs, though.)

In my opinion, you have about 1,000% more chance of getting your PR merged and your time spent honored if you split things over multiple, smaller PRs. I love it when people submit a PR per topic. And it can be nice, not required, if each submission is a little spaced out as well to help with the cognitive overload.

Submit your PR

These are the steps I personally use to submit a PR. You can get this done other ways, of course, but I have found the following to be effective in my experiences. Also, anything in the commands that are written in ALL CAPS is information you will need to change for your use.

First off, go to the repo, and fork a copy of the project to your personal GitHub account. Clone it locally and change directory (cd) to where it's located. (I use HTTPS, but SSH is totally fine as well.)

git clone https://github.com/YOUR-USERNAME/YOUR-FORKED-REPO.git
cd into/cloned/fork-repo

Next up, add a remote upstream to the original branch. This means it will share a connection with that original branch so that you can keep in sync and pull down any updates to the project when they happen.

git remote add upstream https://github.com/ORIGINAL-DEV-USERNAME/REPO-YOU-FORKED-FROM.git
git fetch upstream

Now you can create a new branch and give it a name that relates to the PR topic. Note that a maintainer might have a specific naming convention in mind that is documented in the repo.

git checkout -b GOOD-FORKIN-NAME

Go forth and work on your changes. Be sure to make good commit messages along the way:

git add -A
git commit -m “ADDING IN A TACO DISPENSER”
git push origin GOOD-FORKIN-NAME

GitHub will see the new fork and prompt you to make the PR, which is a nice, helpful touch. You click the button and fill in details: what issue does it close? you can refer to them by their number and GitHub will automatically associate it:

On the PR:

Shows a referenced issue on a <abbr>PR</abbr>

In the Issue:

Shows what the reference looks like in the issue

What are some of the things to note in the PR? These details help the maintainer understand context. These can be all the changes you made, they can be larger strategy or context.

And you’re on your way! 🎉

You may find you need to keep your fork up-to-date with the remote, and pull their changes into yours. To do so, you would run this command:

git pull upstream master

Props to Christina Solana for her Gist which I’ve used as a reference for years and years now.

Always remember: maintainers are often swamped, sacrificing nights and weekends to keep open source projects active and updated. Being respectful, both in terms of their time, and in tone, can set you up for success in contributing.


Open source can be extremely rewarding! Knowing other people are benefitting and directly using something you contributed can be a great way to give back to the community and learn.

The post How to Contribute to an Open Source Project appeared first on CSS-Tricks.

How to Increase Your Page Size by 1,500% with webpack and Vue

Disclaimer: This article is mostly satire. I do not think that I am better than you because I once wrote some TypeScript nor do I think that it’s a good thing for us to make web pages bigger. Feel free to misrepresent these views to maximize clicks.

You know, there are a lot of articles out there telling you how to make your page smaller: optimize your images, remove extraneous CSS rules, re-write the whole thing in Dreamweaver using framesets. Look,  Walmart just reduced their page size by some numbers, give or take.

What we don’t have are enough articles showing you how to increase your page size. In fact, the only article I could find was this one from the Geek Squad which ended up being about making the font size bigger. This is a good start, but I think we can do better.

Put on some weight

Now, why would you want to increase your page size? Isn’t that a not-very-nice thing for people on low bandwidth connections? Well, there are several excellent and in no-way-contrived reasons and here are three of them since things that come in threes are more satisfying.

  1. You have a gigabyte connection and you live in Tennessee so surely everyone else is in better shape than you are.
  2. Browsers do caching, silly. That means that you only have to download the site once. Stop complaining. First world problems.
  3. You don’t care whether or not people ever visit your site because you, "work to live, not live to work."

If any of those completely relatable reasons resonates with you, I’d like to show you how I increased the size of my CSS by 1,500% — and you can too, with one simple webpack trick.

One weird trick

It all started when I decided to refactor my retirement plan project called The Urlist over to the Bulma CSS framework.

The original incarnation of the site was all hand-rolled and my Sass looked like an episode of Hoarders.

"Burke, you don’t need 13 different .button styles. Why don’t you pick one and we can get rid of these other 12 so you have somewhere to sleep?"

Bulma also includes things like modals that I used third-party Vue components to make.

It also has a hamburger menu because it’s a well-known scientific fact that you cannot have a successful site without a hamburger.

Look, I don’t make the rules. This is just how business works.

I was quite happy with the result. Bulma styles are sharp, and the layout system is easy to learn. It’s almost as if someone somewhere understands CSS and also doesn’t hate me. That’s just a hard combination to find these days.

After a few weeks of refactoring (during which I would ask myself, "WHAT ARE YOU EVEN DOING MAN?!? THE SITE ALREADY WORKS!"), I finally finished. As a side note, the next time you think about refactoring something, don’t. Just leave it alone. If you don’t leave any technical debt for the next generation, they’re going to be extremely bored and that’s going to be on you.

When I built the project, I noticed something odd: the size of my CSS had gone up pretty significantly. My hand-crafted abomination was only 30KB gzipped and I was up to 260KB after the refactor.

And, to make matters worse, the Vue CLI was lecturing me about it...

Which, of course, I ignored. I don’t take instructions from robots.

What I did instead was deploy it. To production. On the internet. Because I did not spend all of this time refactoring to not deploy it. Yeah, sunk costs and all that, but excuse me if I’m more pragmatic than your poster of logical fallacies. All I’m saying is I came to party and I was not going home without a buzz.

Then I took to Twitter to announce my accomplishment to the ambivalent masses. As one does.

Shortly thereafter, Jeremy Thomas, who created Bulma (and clearly loves Dragon Ball) responded. It was quick, too. It’s like there is a bat signal that goes out whenever a moron tweets.

Duplicate styles? 13 times? What the heck is a namespace? Is that a π symbol or a custom Jeremy Thomas logo?

It’s at this moment that I realized that I have no idea what I’m doing.

Put the Sass down and back away slowly

I’ll be the first to admit that I don’t know a lot about CSS, and even Less about Sass. Get it? Less about Sass? Forget it. I don’t want your pity laugh.

When I setup my Vue CLI project to use Bulma, I created a src/styles folder and dropped in a bulma-but-not-all-of-bulma-only-some-of-it.scss file. They say naming things is hard, but I don’t see why.

That file imports the pieces of Bulma that I want to use. It’s Bulma, but not all of it. Only some of it.

@import "bulma/sass/utilities/_all.sass";
@import "bulma/sass/base/_all.sass";

@import "bulma/sass/form/shared.sass";
@import "bulma/sass/form/input-textarea.sass";

// etc...

Then I imported that file into a custom Sass file which I called... site.scss. I like to keep things simple.

@import "./bulma-but-not-all-of-bulma-only-some-of-it.scss";

html,
body {
  background-color: #f9fafc;
}

// etc...

I wanted to import these files into Vue globally so that I could use them in every component. And I wanted to do it the right way; the canonical way. I think it’s clear from my willingness to deploy 2+ MB of CSS into production that I like to do things the "right way".

I read this excellent blog post from Sarah Drasner called, "How to import a Sass file into every component in your Vue app." She shows how to do it by modifying the webpack build process via the vue.config.js file.

module.exports = {
  css: {
    loaderOptions: {
      sass: {
        data: `@import "@/styles/site.scss";`
      }
    }
  }
}

What I did not understand is that this imports Sass into every component in a Vue app. You know, like the title of the blog post literally says. This is also how I ended up with a bunch of duplicate styles that had a data-v- attribute selector on them. I have scoped styles to thank for that.

How Vue handles `scoped`

Vue allows you to "scope" styles to a component. This means that a style only affects the component that it’s in, and not the rest of the page. There is no magic browser API that does this. Vue pulls it off by dynamically inserting a data- attribute in both the element and the selector. For example, this:

<template>
  <button class="submit">Submit</button>
<template>

<style lang="scss" scoped>
.submit {
  background-color: #20ae96;
}
</style>

...becomes this:

<button class="submit" data-v-2929>Submit</button>

<style>
.submit[data-v-2929] {
  background-color: #20ae96;
}
</style>

That dynamic data tag gets added to every child element in the component as well. So every element and every style for this component will have a data-v-2929 on them at runtime.

If you import a Sass file into your component that has actual styles in it, Vue (via webpack) will pull in those styles and "namespace" them with that dynamic data- attribute. The result is that is you include Bulma in your app 13 damn times with a bunch of data-v weirdness in front of it.

But this begs the question: if webpack renders the CSS in every single component, why would you ever want to use the vue.config.js approach? In a word: variables.

The variable sharing problem

You can’t define a Sass variable in one component and reference it from another. That would also be kind of hard to manage since you would be defining and using variables all over the place. Only I would write code like that.

You, on the other hand, would probably put all your variables in a variables.scss file. Each component would then reference that central store of variables. Importing a variables file into every single component is redundant. It’s also excessive. And unnecessary. And long-winded.

This is precisely the problem that Sarah’s article is solving: importing a Sass file into every component in your project.

It’s OK to import something like variables into every component because variables aren’t rendered. If you import 200 variables and only reference one of them, who cares? Those variables don’t exist in the rendered CSS anyway.

For example, this:

<style lang="scss" scoped>
$primary: #20ae96;
$secondary: #336699;

.submit {
  background-color: $primary
}
</style>

...becomes this:

<style>
.submit[data-v-2929] {
  background-color: #20ae96;
}
</style>

So, there are really two problems here:

  1. Bulma needs to be global.
  2. Bulma’s variables should be accessible from the components.

What we need is a clever combination of Sarah’s technique, along with a little proprietary knowledge about how Bulma is structured.

Using Bulma with the Vue

We’re going to accomplish this with the least amount of duplication by having three files in the src/styles directory:

variables.scss: This file will be where you pull in Bulma’s variables and override/define your own. Note that you have to include the following three files to get all of Bulma’s variables. And they have to be in this order...

// Your variables customizations go up here

// Include Bulma's variables
@import "bulma/sass/utilities/initial-variables.sass";
@import "bulma/sass/utilities/functions.sass";
@import "bulma/sass/utilities/derived-variables.sass";

bulma-custom.scss: This file is where you pull in the pieces of Bulma that you want. It should reference the variables.scss file.

@import "./variables.scss";

/* UTILTIES */
@import "bulma/sass/utilities/animations.sass";
@import "bulma/sass/utilities/controls.sass";
@import "bulma/sass/utilities/mixins.sass";

// etc...

site.scss: This pulls in the bulma-custom.scss file and is also where you define global styles that are used across the whole project.

@import url("https://use.fontawesome.com/releases/v5.6.3/css/all.css");
@import "./bulma-custom.scss";

html,
body {
  height: 100%;
  background-color: #f9fafc;
}

// etc...

Import the site.scss file into your main.js file. Or in my case, main.ts. Does it make me better than you that I use TypeScript? Yes. Yes it does.

import Vue from "vue";
import App from "./App.vue";
import router from "./router";

// import styles
import "@/styles/site.scss";

This makes all of the Bulma pieces we are using available in every component. They are global, but only included once.

Per Sarah’s article, add the variables.scss file to the vue.config.js file.

module.exports = {
  css: {
    loaderOptions: {
      sass: {
        data: `@import "@/styles/variables.scss";`
      }
    }
  }
}

This makes it so that you can reference any of the Bulma variables or your own from any .vue component.

Now you have the best of both worlds: Bulma is available globally and you still have access to all Bulma variables in every component.

Total size of CSS now? About 1,500% smaller...

Take that, Walmart.

Redemption via PR

In an effort to redeem myself, I’ve submitted a PR to the Bulma docs that walks through how to customize Bulma in a Vue CLI project. It’s an act of contrition for taking to Twitter and making Bulma seem like the problem when really Burke is the problem.

And you would think that by now I would have this figured out: Burke is always the problem.

The post How to Increase Your Page Size by 1,500% with webpack and Vue appeared first on CSS-Tricks.

Bringing A Healthy Code Review Mindset To Your Team

Bringing A Healthy Code Review Mindset To Your Team

Bringing A Healthy Code Review Mindset To Your Team

Sandrina Pereira

A ‘code review’ is a moment in the development process in which you (as a developer) and your colleagues work together and look for bugs within a recent piece of code before it gets released. In such a moment, you can be either the code author or one of the reviewers.

When doing a code review, you might not be sure of what you are looking for. On the other side, when submitting a code review, you might not know what to wait for. This lack of empathy and wrong expectations between the two sides can trigger unfortunate situations and rush the process until it ends in an unpleasant experience for both sides.

In this article, I’ll share how this outcome can be changed by changing your mindset during a code review:

👩‍💻👨‍💻 Working As A Team

Foster Out A Culture Of Collaboration

Before we start, it’s fundamental to understand the value of why code needs to be reviewed. Knowledge sharing and team cohesion are beneficial to everyone, however, if done with a poor mindset, a code review can be a huge time consumer with unpleasant outcomes.

The team attitude and behavior should embrace the value of a nonjudgmental collaboration, with the common goal of learning and sharing — regardless of someone else’s experience.

Include Code Reviews In Your Estimations

A complete code review takes time. If a change took one week to be made, don’t expect the code review to take less than a day. It just doesn’t work like that. Don’t try to rush a code review nor look at it as a bottleneck.

Code reviews are as important as writing the actual code. As a team, remember to include code reviews in your workflow and set expectations about how long a code review might take, so everyone is synced and confident about their work.

Save Time With Guidelines And Automatization

An effective way to guarantee consistent contributions is to integrate a Pull Request template in the project. This will help the author to submit a healthy PR with a complete description. A PR description should explain what’s the change purpose, the reason behind it, and how to reproduce it. Screenshots and reference links (Git issue, design file, and so on) are the final touches for a self-explanatory submission.

Doing all of this will prevent early comments from reviewers asking for more details. Another way of making code reviews seem less nitpicky is to use linters to find code formatting and code-quality issues before a reviewer even gets involved. Whenever you see a repetitive comment during the review process, look for ways to minimize it (being with better guidelines or code automatization).

Stay A Student

Anyone can do a code review, and everyone must receive a code review — no matter the seniority level. Receive any feedback gratefully as an opportunity to learn and to share knowledge. Look at any feedback as an open discussion rather than a defensive reaction. As Ryan Holiday says:

“An amateur is defensive. The professional finds learning (and even, occasionally, being shown up) to be enjoyable; they like being challenged and humbled, and engage in education as an ongoing and endless process. (...)”

— Ryan Holiday, Ego Is the Enemy

Stay humble because the second you stop being a student, your knowledge becomes fragile.

The Art Of Selecting Reviewers

In my opinion, picking the reviewers is one of the most important decisions for an effective and healthy code review as a team.

Let’s say your colleague is submitting a code review and decides to tag “everyone” because, unconsciously, she/he might want to speed up the process, deliver the best code possible or making sure everyone knows about the code change. Each one of the reviewers receives a notification, then opens the PR link and sees a lot of people tagged as reviewers. The thought of “someone else will do it” pops up in their minds, leading to ignore the code review and close the link.

Since nobody started the review yet, your colleague will remind each one of the reviewers to do it, i.e. creating pressure on them. Once the reviewers start to do it, the review process takes forever because everyone has their own opinion and it’s a nightmare to reach a common agreement. Meanwhile, whoever decided to not review the code, is then spammed with zillions of e-mail notifications with all of the review comments, thus creating noise in their productivity.

This is something I see happening more than I’d like: Pull Requests with a bunch of people tagged as reviewers and ending, ironically, in a non-productive code review.

There are some common effective flows when selecting the reviewers: A possible flow is to pick two to three colleagues who are familiar with the code and ask them to be reviewers. Another approach, explained by Gitlab team is to have a chained review flow in which the author picks one reviewer who picks another reviewer until at least two reviewers agree with the code. Regardless of the flow you choose, avoid having too many reviewers. Being able to trust your colleagues’ code’s judgment is the key to conduct an effective and healthy code review.

Have Empathy

Spotting pieces of code to improve is just a part of a successful code review. Just as important is to communicate that feedback in a healthy way by showing empathy towards your colleagues.

Before writing a comment, remember to put yourself in the other people’s shoes. It’s easy to be misunderstood when writing, so review your own words before sending them. Even if a conversation starts being ugly, don’t let it affect you — always stay respectful. Speaking well to others is never a bad decision.

Know How To Compromise

When a discussion isn’t solved quickly, take it to a personal call or chat. Analyze together if it’s a subject worth paralyzing the current change request or if it can be addressed in another one.

Be flexible but pragmatic and know how to balance efficiency (delivering) and effectiveness (quality). It’s a compromise to be made as a team. In these moments I like to think of a code review as an iteration rather than a final solution. There’s always room for improvement in the next round.

In-Person Code Reviews

Gathering the author and the reviewer together in a pair programming style can be highly effective. Personally, I prefer this approach when the code review involves complex changes or there’s an opportunity for a large amount of knowledge sharing. Despite this being an offline code review, it’s a good habit to leave online comments about the discussions taken, especially when changes need to be made after the meeting. This is also useful to keep other online reviewers up to date.

Learn From Code Review Outcomes

When a code review has suffered a lot of changes, took too long or has already had too many discussions, gather your team together and analyze the causes and which actions can be taken from it. When the code review is complex, splitting a future task into smaller tasks makes each code review easier.

When the experience gap is big, adopting pair programming is a strategy with incredible results — not only for knowledge sharing but also for off-line collaboration and communication. Whatever the outcome, always aim for a healthy dynamic team with clear expectations.

📝 As An Author

One of the main concerns when working on a code review as an author is to minimize the reviewer’s surprise when reading the code for the first time. That’s the first step to a predictable and smooth code review. Here’s how you can do it.

Establish Early Communication

It’s never a bad idea to talk with your future reviewers before coding too much. Whenever it’s an internal or external contribution, you could do a refinement together or a little bit of pair programming at the beginning of the development to discuss solutions.

There’s nothing wrong in asking for help as a first step. In fact, working together outside the review is a first important step to prevent early mistakes and guarantee an initial agreement. At the same time, your reviewers get aware of a future code review to be made.

Follow The Guidelines

When submitting a Pull Request to be reviewed, remember to add a description and to follow the guidelines. This will save the reviewers from spending time to understand the context of the new code. Even if your reviewers already know what it is about, you can also take this opportunity as a way to improve your writing and communication skills.

Be Your First Reviewer

Seeing your own code in a different context allows you to find things you would miss in your code editor. Do a code review of your own code before asking your colleagues. Have a reviewer mindset and really go through every line of code.

Personally, I like to annotate my own code reviews to better guide my reviewers. The goal here is to prevent comments related to a possible lack of attention and making sure you followed the contribution guidelines. Aim to submit a code review just as you would like to receive one.

Be Patient

After submitting a code review, don’t jump right into a new private message asking your reviewers to “take a look, it only takes a few minutes” and indirectly craving for that thumbs-up emoji. Trying to rush your colleagues to do their work is not a healthy mindset. Instead, trust your colleagues’ workflow as they trust you to submit a good code review. Meanwhile, wait for them to get back to you when they are available. Don’t look at your reviewers as a bottleneck. Remember to be patient because hard things take time.

Be A Listener

Once a code review is submitted, comments will come, questions will be asked, and changes will be proposed. The golden rule here is to not take any feedback as a personal attack. Remember that any code can benefit from an outside perspective.

Don’t look at your reviewers as an enemy. Instead, take this moment to set aside your ego, accept that you make mistakes, and be open to learning from your colleagues, so that you can do a better job the next time.

👀 As A Reviewer

Plan Ahead Of Your Time

When you are asked to be a reviewer, don’t interrupt things right away. That’s a common mistake I see all the time. Reviewing code demands your full attention, and each time you switch code contexts, you are decreasing your productivity by wasting time in recalibrating your focus. Instead, plan ahead by allocating time slots of your day to do code reviews.

Personally, I prefer to do code reviews first thing in the morning or after lunch before picking any other of my tasks. That’s what works best for me because my brain is still fresh without a previous code context to switch off from. Besides that, once I’m done with the review, I can focus on my own tasks, while the author can reevaluate the code based on the feedback.

Be Supportive

When a Pull Request doesn’t follow the contribution guidelines, be supportive — especially to newcomers. Take that moment as an opportunity to guide the author to improve his/her contribution. Meanwhile, try to understand why the author didn’t follow the guidelines in the first place. Perhaps there’s room for improvement that you were not aware of before.

Check Out The Branch And Run It

While reviewing the code, make it run on your own computer — especially when it involves user interfaces. This habit will help you to better understand the new code and spot things you might miss if you just used a default diff-tool in the browser which limits your review scope to the changed code (without having the full context as in your code editor).

Ask Before Assuming

When you don’t understand something, don’t be afraid to say it and ask questions. When asking, remember to first read the surrounding code and avoid making assumptions.

Most of the questions fit in these two types of categories:

  1. “How” Questions
    When you don’t understand how something works or what it does, evaluate with the author if the code is clear enough. Don’t mistake simple code with ignorance. There’s a difference between code that is hard to read and code that you are not aware of. Be open to learn and use a new language feature, even if you don’t know it deeply yet. However, use it only if it simplifies the codebase.
  2. “Why” Questions
    When you don’t understand the “why”, don’t be afraid of suggesting to commenting the code, especially if it’s an edge case or a bug fix. The code should be self-explanatory when it comes to explaining what it does. Comments are a complement to explaining the why behind a certain approach. Explaining the context is highly valuable when it comes to maintainability and it will save someone from deleting a block of code that thought was useless. (Personally, I like to comment on the code until I feel safe about forgetting it later.)

Constructive Criticism

Once you find a piece of code you believe it should be improved, always remember to recognize the author’s effort in contributing to the project and express yourself in a receptive and transparent way.

  • Open discussions.
    Avoid formalizing your feedback as a command or accusation such as “You should…” or “You forgot…”. Express your feedback as an open discussion instead of a mandatory request. Remember to comment on the code, not the author. If the comment is not about the code, then it shouldn’t belong in a code review. As said before, be supportive. Using a passive voice, talking in the plural, expressing questions or suggestions are good approaches to emphasize empathy with the author.
Instead of “Extract this method from here…” prefer “This method should be extracted…” or “What do you think of extracting this method…”
  • Be clear.
    A feedback can easily be misinterpreted, especially when it comes to expressing an opinion versus sharing a fact or a guideline. Always remember to clear that right away on your comment.
Unclear: “This code should be….”

Opinion: “I believe this code should be…”

Fact: “Following [our guidelines], this code should be…”.
  • Explain why.
    What’s obvious for you, might not be for others. It’s never too much explaining the motivation behind your feedback, so the author not only understands how to change something but also what’s the benefit from it.
Opinion: “I believe this code could be…”

Explained: “I believe this code could be (…) because this will improve readability and simplify the unit tests.”
  • Provide examples.
    When sharing a code feature or a pattern which the author is not familiar with, complement your suggestion with a reference as guidance. When possible, go beyond MDN docs and share a snippet or a working example adapted to the current code scenario. When writing an example is too complex, be supportive and offer to help in person or by a video call.
Besides saying something such as “Using filter will help us to [motivation],” also say, “In this case, it could be something like: [snippet of code]. You can check [an example at Finder.js]. Any doubt, feel free to ping me on Slack.”
  • Be reasonable.
    If the same error is made multiple times, prefer to just leave one comment about it and remember the author to review it in the other places, too. Adding redundant comments only creates noise and might be contra-productive.

Keep The Focus

Avoid proposing code changes unrelated to the current code. Before suggesting a change, ask yourself if it’s strictly necessary at that moment. This type of feedback is especially common in refactors. It’s one of the many trade-offs between efficiency and effectiveness that we need to make as a team.

When it comes to refactors, personally, I tend to prefer small but effective improvements. Those are easier to review and there’s less chance of having code conflicts when updating the branch with the target branch.

Set Expectations

If you leave a code review half-done, let the author know about it, so time expectations are under control. In the end, also let the author know if you agree with the new code or if you would like to re-review it once again later.

Before approving a code review, ask yourself if you are comfortable about the possibility of touching that code in the future. If yes, that’s a sign you did a successful code review!

Learn To Refuse A Code Review

Although nobody admits it, sometimes you have to refuse a code review. The moment you decide to accept a code review but try to rush it, the project’s quality is being compromised as well as your team’s mindset.

When you accept to review someone’s else code, that person is trusting your capabilities — it’s a commitment. If you don’t have the time to be a reviewer, just say no to your colleague(s). I really mean it; don’t let your colleagues wait for a code review that will never be done. Remember to communicate and keep expectations clear. Be honest with your team and — even better — with yourself. Whatever your choice, do it healthily, and do it right.

Conclusion

Given enough time and experience, doing code reviews will teach you much more than just technical knowledge. You’ll learn to give and receive feedback from others, as well as make decisions with more thought put into it.

Each code review is an opportunity to grow as a community and individually. Even outside code reviews, remember to foster a healthy mindset until the day it comes naturally to you and your colleagues. Because sharing is what makes us better!

Further Reading on SmashingMag:

Smashing Editorial (ra, yk, il)

Taking the “human” out of “human resources”: How chatbots can help streamline HR strategies

I work for a small PR firm, but chatbots have always been a fascination of mine; how do they work? How are they able to generate human-like responses? Why are they so helpful on some websites and so frustrating on others? Lately, I’ve been doing some of my own research, specifically into what it would take to make my own bot and do some trial and error. To my surprise, I was able to find a bevy of helpful resources at my disposal. Amazon recently launched a bot information site that answered all my bot questions and walked me through the process, and there are countless websites out there that can help with bot hosting and building. Once I started to learn more, I started to get the bot itch – I wanted to build my own, and I wanted to test it out on my coworkers. Never one to ignore my own great ideas, I did just that.

Essentially, the bot I built was pretty basic. For a small fee, I was able to construct an extremely simple chatbot named Chaz, who would pop up in the Google Hangouts chat window of my coworkers and ask them simple questions throughout the week. Thankfully, my coworkers agreed to this little experiment, despite the slight annoyance of having an automated system hurling queries at them. The questions all related to personal experience and company culture: How are you feeling this week? What do you think of the current state of things in the office? How is your workload? The results came back to me at the end of the week, totally anonymously. With each question, the user would be able to choose from four possible responses. For example, if the question was “How are you feeling this week?” the possible responses would be something along the lines of “Great, good, below average, bad.” Not super in-depth, but at least it would serve as a decent tool to take the temperature of the overall mood of the office.

The response was overwhelming. To be totally honest, I really only expected a few people to participate. Sure, the chatbot annoyed you until you answered, but you could easily close the window and go on with your day’s work. Judging by the results, it seemed like people actually wanted to respond and vent a little about how they felt, despite the rather limited response options offered by my bot. I think the reason for this is simple – the bot represented an opportunity to unload with some distance. Let me explain a little more, as that probably doesn’t make a whole lot of sense. Imagine you’re at the water cooler (or your more modern office’s equivalent) and there’s an issue that’s been bothering you. The culture around the office has taken a dip, as people’s workloads have increased and overall mood has declined. You want to bring it up to your coworkers, but you don’t want to step on anyone’s toes or make it seem like you are the resident complainer in the office. What’s a better outlet than a human-like chatbot, which allows you to let out your frustrations in an anonymous manner?

While this small experiment was certainly interesting, I think that there are wider HR implications here. For one, there are wider implications at my company, as I plan on implementing this chatbot permanently due to the overwhelmingly positive response. It also got me thinking – if I could accomplish so much with just a simple bot I built using guides on the internet, what else could be streamlined? There are a thousand moving components that require constant maintenance for a human resources department to function effectively. What if, and I know this is going to sound sacrilegious, some of the more basic components could be automated? I’m not suggesting that we take the “human” out of “human resources,” at least not totally. I am suggesting giving employees a little bit of space to vent and complain to someone (or something, in this case) that they feel they can be totally honest with. An extremely important aspect of any HR department’s workload is hiring, which may seem a little bit difficult to automate from the outset. However, I think even this process can be streamlined with chatbots.

While this might not be as relevant to smaller companies, chatbots can be a great tool during large-scale hiring campaigns. Candidates will invariably be sending in follow-ups and questions by the dozen, swamping the already heavy workload of the average corporate HR representative. Here’s where the chatbot comes in – it can be scripted to provide the answers to frequently asked questions, taking some of the correspondence weight off of the human reps who would normally be taking care of them. On top of this, in many cases, the candidate might be nervous and, despite having an important question, wouldn’t want to email HR and bring it to their attention. This way, they can get their questions answered in a low stakes environment, and everyone comes out happy. Bots can also be put to use in the onboarding process, or to help employees (especially new hires) with basic scheduling issues and other simple inquiries. From my small experiment, I was able to conclude that people aren’t afraid of bots in the workplace. Why not put a good thing to use?

If you’re looking for a key takeaway here, it’s that you shouldn’t be afraid to experiment a little with new ideas, especially when it comes to office culture and the way that things are currently being run. Chatbots might not be the answer for you, but keep an open mind – sometimes things that might sound a little odd at first can actually turn out to be valuable solutions.

This is a guest article by John Van Duyn.

Get the Word Out With Public Relations

You’ve launched an amazing product or service. Now what? Now, you need to get the word out.

But you’re on a budget and can’t afford the $10K a month to hire a fancy agency and put out press releases. That’s fine. You’re better off executing you’re on strategy or hiring a really awesome consultant.

When done well, good PR can be much more effective and less expensive than advertising. For cost-conscious businesses, ROI is crucial. Every penny spent on marketing should generate revenue. PR is no different. Here are the steps you should take to form a successful strategy for your business:

1. Let go of the agency allure

The sad truth about PR is that existing process are broken. They’re outdated, costly, and inefficient.

  1. Many agencies are still buying very expensive ‘media lists’ and blasting our press releases and pitches to hundreds of journalists at a time.
  2. It’s hard for the PR industry to track and measure the value of what they do.
  3. Press release blasts entirely miss the mark on target audiences.

To succeed with PR, you need to focus less on the appeal of an agency and focus more heavily to focus on results. Prioritize what you want to achieve, not outdated ‘best practices.’ If you want to get in front of journalists, for instance, you are likely better off forming 1:1 relationships than bombarding them with irrelevant pitches.

2. Know When to Use a Press Release

A press release is worthwhile if your announcement is over-the-top catchy and newsworthy. But here’s the thing — most press releases read like giant sales pitches. If you think that journalists and publishers are going to be attracted to lukewarm content, guess again. They’re not. They don’t care. Their email inboxes fill up with 100s of spam messages again.

We hate to say it but marketers — get your head out of the clouds. The world does not revolve around your business, and journalists could care less about what you have to say.

If your goal is to get targeted placements for your brand, you will be better off cultivating a unique and thoughtful pitch in your area of specialty. A press release won’t cut it. Position your organization as a valuable, reliable, and trustworthy source of information instead.

3. Focus on Building Relationships and Making Connections

The problem with PR is ‘spray and prey’ or ‘broadcast’ mentality. If you shout at journalists with a megaphone, they’re not going to listen.

Above all, journalists care about compelling stories. They want to hear about your founders’ emotional journeys. They want to know what problem your company is solving and what motivates your team to wake up and come to work in the mornings.

Treat journalists like trusted business partners, not eyeballs. Develop a conversation. Let them ask questions.

Strategic Planning Wins the Race

Every so often, you’ll come across startups that generate insane amounts of traction on almost zero budget. You might think that it’s the outcome of luck — most likely, that isn’t the case. The more likely scenario is careful, strategic planning. WIth online media, Hollywood success stories are few and far between. Behind the scenes, marketers are hard at work — building key relationships with key stakeholders.

Karen X Cheng founded Dance in a Year, a platform that helps users learn anything in a year.

Dance in a Year

Karen learned to dance in a year and videotaped her entire journey. The outcome was an amazing video that went viral on YouTube. In just a few short months, her video has amassed millions of views. She makes the experience of learning to dance look seamlessly easy. She makes the process of making a viral video look pretty darn easy too.

That’s how you know that she put some real muscle behind the process.

Dance in a Year YouTube

  1. First, she posted her video to Facebook and Twitter, as well as social news sites like Reddit and Hacker News. She asked her friends to share the it and tweeted it to established bloggers. She also reached to bloggers who had previously written about viral dance video. Of the channels she pursued, Reddit was the top performer. The video gained attention and made its way to the top of the GetMotivated subreddit page. After day 1, she received 80K views.
  2. Day 2 was discovery day. The bloggers who had seen her video previously began telling her story on sites like Mashable, Jezebel, and the Huffington Post. These blogs were significant traffic drivers to Karen’s video. This coverage amplified her web traffic numbers to 800K views.
  3. The video’s popularity pushed Karen to the YouTube homepage. That chain of events helped take Karen to 1.8 million pageviews on the third day.

Karen also leveraged her video to connect with potential sponsors and stakeholders in her project. These included companies like Lululemon and American Apparel – two organizations that she was happy to support. Some of these companies supported Karen and shared her video on their social networks too.

She also released her video on Tuesday, guessing that on Monday, people are most likely to be catching up on emails from the weekend.

Use Public Relations Tools

The problem with PR is that the supply/demand ratio is completely imbalanced. PR seekers are constantly spamming writers, journalists, and bloggers for attention.

A service called Help a Reporter Out (HARO) can help to alleviate some of this crunch. Using this service, journalists can find sources to interview for upcoming stories. People seeking PR can monitor journalist queries and join the conversation where they’re qualified to contribute.

You can sign up for a simple e-mail digest that looks like this:

HARO Email Digest

Here is what it’s like using HARO as a journalist:

For some queries, they’ll receive 50+ responses and most of the pitches I get are totally irrelevant. They make the journalist jump through hoops to get the information they need.

The thing to know about journalists is that they’re incredibly strapped for time and working under short deadlines.

From a journalist’s perspective, here are some tips for making your HARO query stand out:

  • Answer the question specified in your pitch. Don’t assume the journalist can hop on a call. Tell they the story you want told upfront — offer to schedule a phone conversation as a follow-up. Send ready-to-quote material instead.
  • Don’t send a generic pitch. Send a unique, compelling story. Share something that stands out from a typical PR blast.

  • Stop bombarding the writer. Journalists work on a deadline but do not necessarily know when their work will be published. Don’t bombard journalists with follow-up questions. Don’t harass them on LinkedIn, and don’t aggressively talk them via multiple email addresses. If you don’t hear a response, move on to the next story. Don’t be offended. HARO writers receive a ton of emails, and it’s impossible to respond to each and every one.
  • Write a really compelling email headline. Instead of just replying to the query, take the time to craft a unique headline that summarizes your story’s value proposition. Remember that there is a human being on the other end of the computer screen. Make it really, really easy to deliver your message, and the reporter will be more likely to open your email message.
  • Set-up Google Alerts. Make sure that you have Google Alerts set-up for the keywords you’re monitoring about your brand. Especially with HARO, you may not know when a writer will feature your story. Don’t bombard the writer with questions. Run Google Alerts to help you keep your eyes peeled.

Use Tools To Save Time

Save yourself the time and hassle of combing through spreadsheets and sending hundreds of emails. Use tools that have been developed to solve your exact pain point — scale with limited resources.

One example resource is BuzzStream — a CRM (customer relationship management) platform that helps PR professionals build relationships, monitor conversations, and maintain historical records of conversations with PR and media platforms.

Features include:

  • Automated tools for researching link-building prospects
  • Resources for identifying campaign opportunities
  • Team-based tools for building and managing relationships with influencers
  • The ability to prioritize a human, relationship-based touch

BuzzStream lets you automate mundane tasks like saving information about key contacts and partners. Teams can also collaborate on initiatives and delegate outreach tasks.

Collaborate With Other Business to Boost Your PR

Content marketing means that brands are becoming publishers and building their own audience bases. Companies, like you, are looking to connect with key audiences through PR and distribution.

Team up with fellow-business blogs who are looking to reach the same audiences as your organization. There are two ways to get going — guest post on industry blogs, or invite others to create content for your blog.

Grasshopper, a virtual phone system for entrepreneurs, uses its blog as a platform for giving props to their best customers. The company has a “submit your story” program and will write about their customers who have something awesome to share. For Grasshopper, PR is an invaluable way to say “thanks” to their trusted business partners.

Grasshopper PR Story Form

Give Samples of Your Product or Service

One way to get press coverage is to give away trials or samples of your product or service. Reach out to prominent journalists and bloggers, and ask if they would be open to doing a product review. Give them a free trial or sample to try.

Engadget Phone Reviews

Always Say Thank You

When a journalist, blogger, or fellow business writes about you or your company — reach out and say thank you. Offer yourself as a resource for future stories. Position your organization as a company that wants to return the favor and help.

PR is, first and foremost, about building relationships. To the best extent that you can, maintain a personal touch. Take journalists out to dinner as a ‘thank you’ (not a bribe) for writing about you.

Show that you are grateful, and you’ll stand apart from the crowd of people who aren’t. Add value to your industry — don’t extract it. Pay it forward whenever you can. Connection karma, and you never know when something small will materialize into something much, much bigger.

Key Takeaways

  • PR is an inefficient and frustrating rat race. Cut through the noise by zeroing in on the results you want to achieve.
  • Treat PR like business development. Build key relationships with journalists.
  • Put yourself in the shoes of a journalist. Craft meaningful, compelling pitches. Don’t ‘spray and pray’ a salesy advertising message.
  • Personalize pitches to the journalists’ needs and interest.
  • Develop a powerful brand story to share.
  • Give more than you get. Say thanks. Offer to add as much value as you possibly can.

Open-Source IoT Edge Projects

Edge computing is a key trend this year in the IoT industry. This past week, Baidu announced a new open-source project, called OpenEdge, that targets edge computing. OpenEdge is certainly not the first open-source project for edge computing. Over the last number of years, there have been many new open-source projects started to address edge computing. Therefore, I thought it would be interesting to see how some projects are doing in terms of community and popularity.

It appears most of the projects in the survey have an active core contributor community. Most projects are supported by a main contributing company and accept PR and issues from the wider community. Over time, it will be interesting to see if one of these projects does develop a more robust open-source community of contributors.