Create Per-Post Social Media Images With the Social Image Generator WordPress Plugin

Auto-generated decorative image for the post, showcasing the Social Image Generator output.

It was a bit of a low-key announcement when Daniel Post introduced Social Image Generator to the world in February via tweet. But, when you get repped by Chris Coyier of CSS-Tricks and the co-founder of WordPress uses your plugin (come on, Matt, set a default image), it means your product is on the right track.

I am not easily impressed by every new plugin to fly across my metaphorical desk. I probably install at least a couple dozen every week. Sometimes, I do so because something looks handy on the surface, and I want to see if I can find some use for it. Other times, I think it might be worth sharing with Tavern readers. More often than not, I consider most of them cringeworthy. I have high standards.

As I chatted with Post about this new plugin, I was excited enough to call Social Image Generator one of those OMG-where-have-you-been? types of plugins. You will not hear that from me often.

Post quit his day job to venture out earlier this year, creating his one-man WordPress agency named Posty Studio. Social Image Generator is its first product.

“I kept seeing tutorials on my Twitter feed on how to automatically generate images for your social media posts, but unfortunately, they all used a similar approach (Node.js) that just wasn’t suitable for WordPress,” said Post of the inspiration for the plugin. “This got me thinking: would it be possible to make this for WordPress? I started playing around with image generation in PHP, and when I got my proof of concept working, I realized that this might actually be something I should pursue.”

In our chat over Slack, we actually saw the plugin in action. As he shared Coyier’s article from CSS-Tricks, the chatting platform displayed the social image in real-time.

Social image displayed via a Slack article preview.
Auto-generated image appearing via Slack.

Maybe it was fate. Maybe Post knew it would happen and thought it would be a good idea to show off his work as we talked about his project. Either way, it was enough to impress the writer who is unafraid to call your plugin a dumpster fire if he smells smoke.

Post seems to be hitting all the right notes with this commercial plugin. It has a slew of features built into version 1.x, which we will get to shortly. It is dead simple to use. It is something nearly any website owner needs, assuming they want to share their content via social networks. And, with a $39/year starting price, it is not an overly expensive product for those on the fence about buying.

How the Plugin Works

After installing and activating Social Image Generator, users are taken to the plugin’s settings screen. Other than a license key field and a button for clearing the image cache, most users will want to dive straight into the template editor.

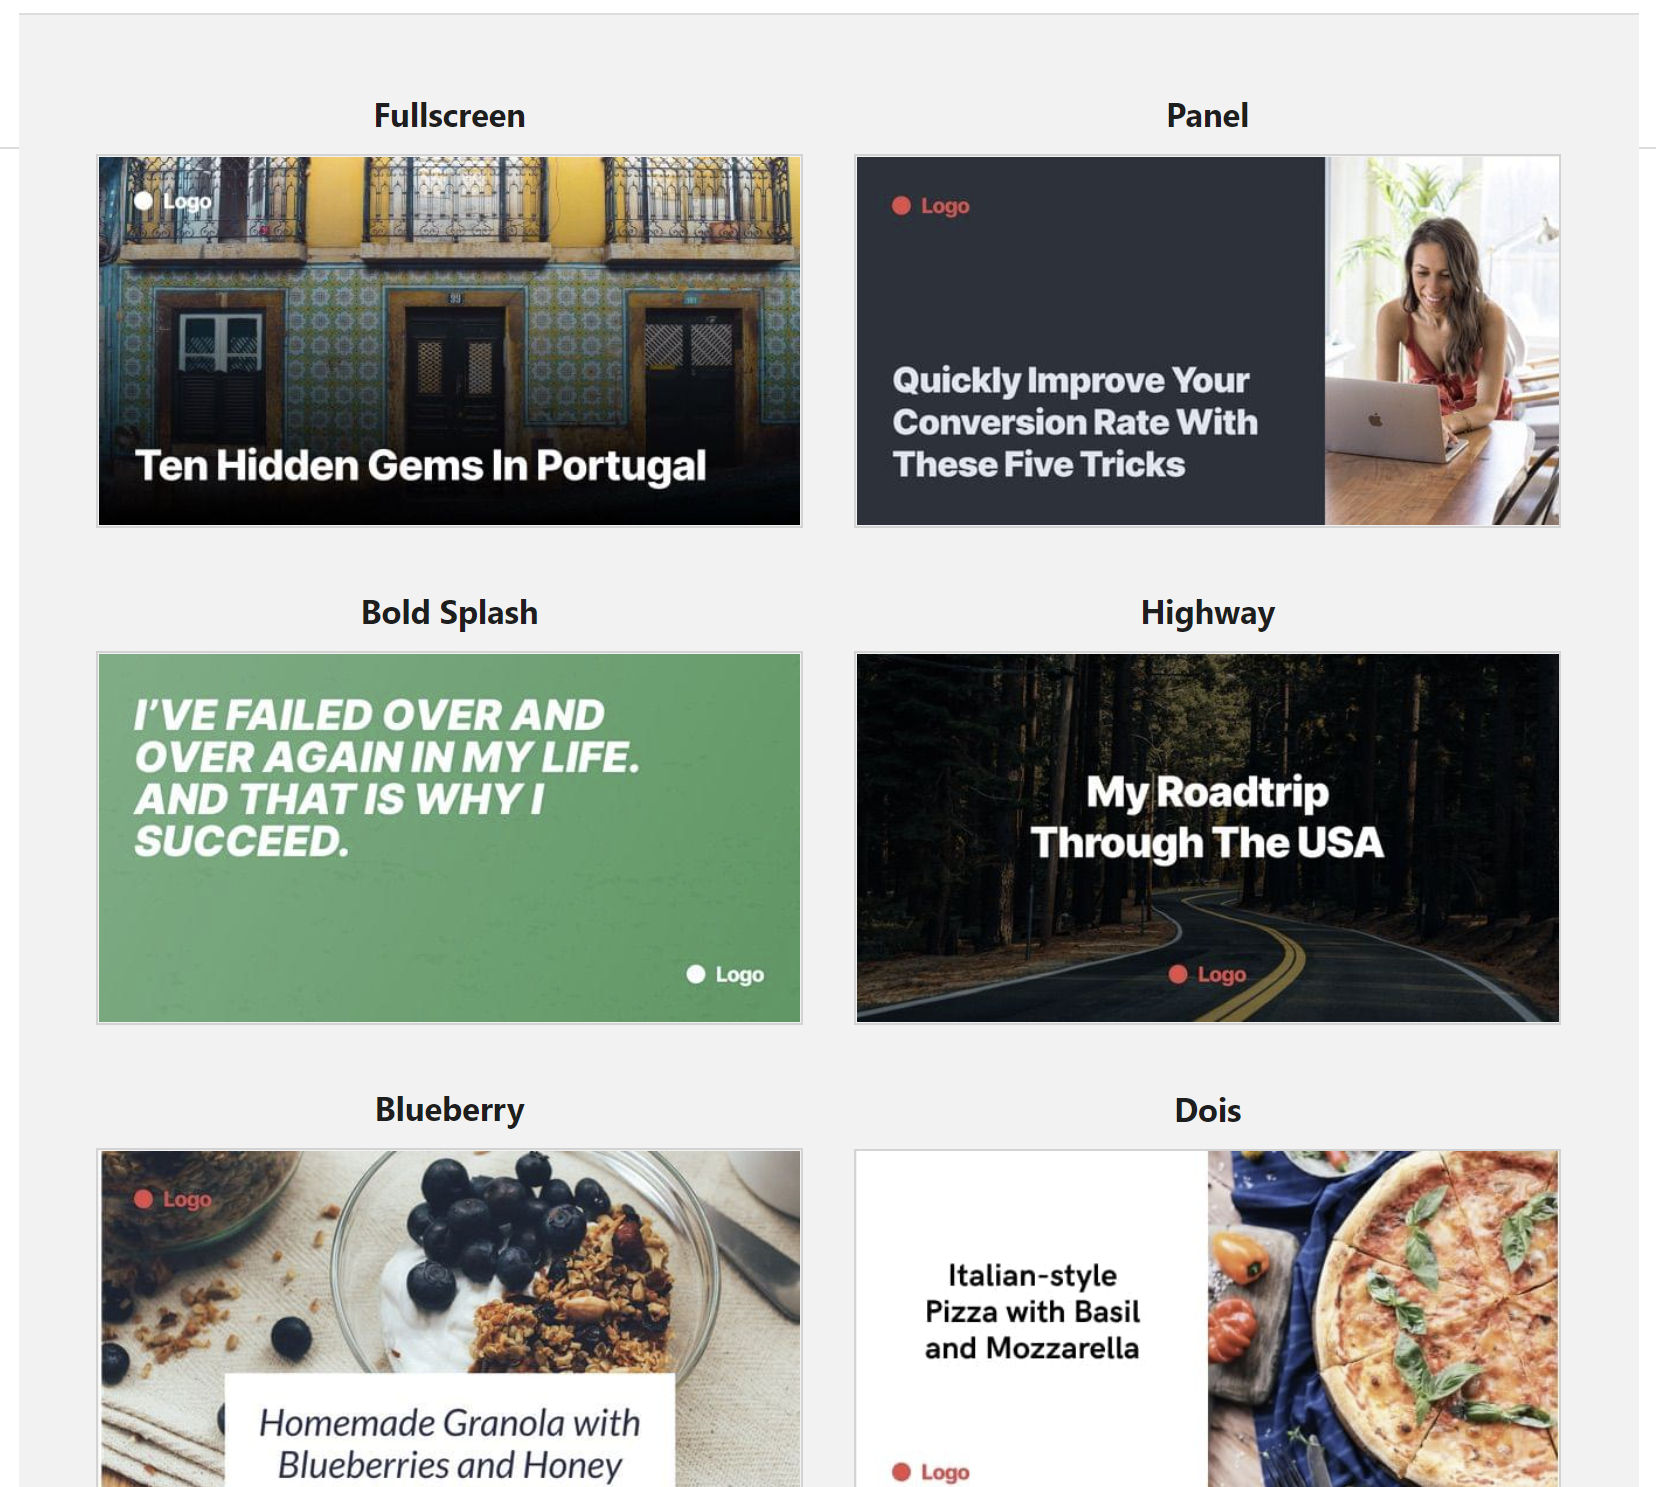
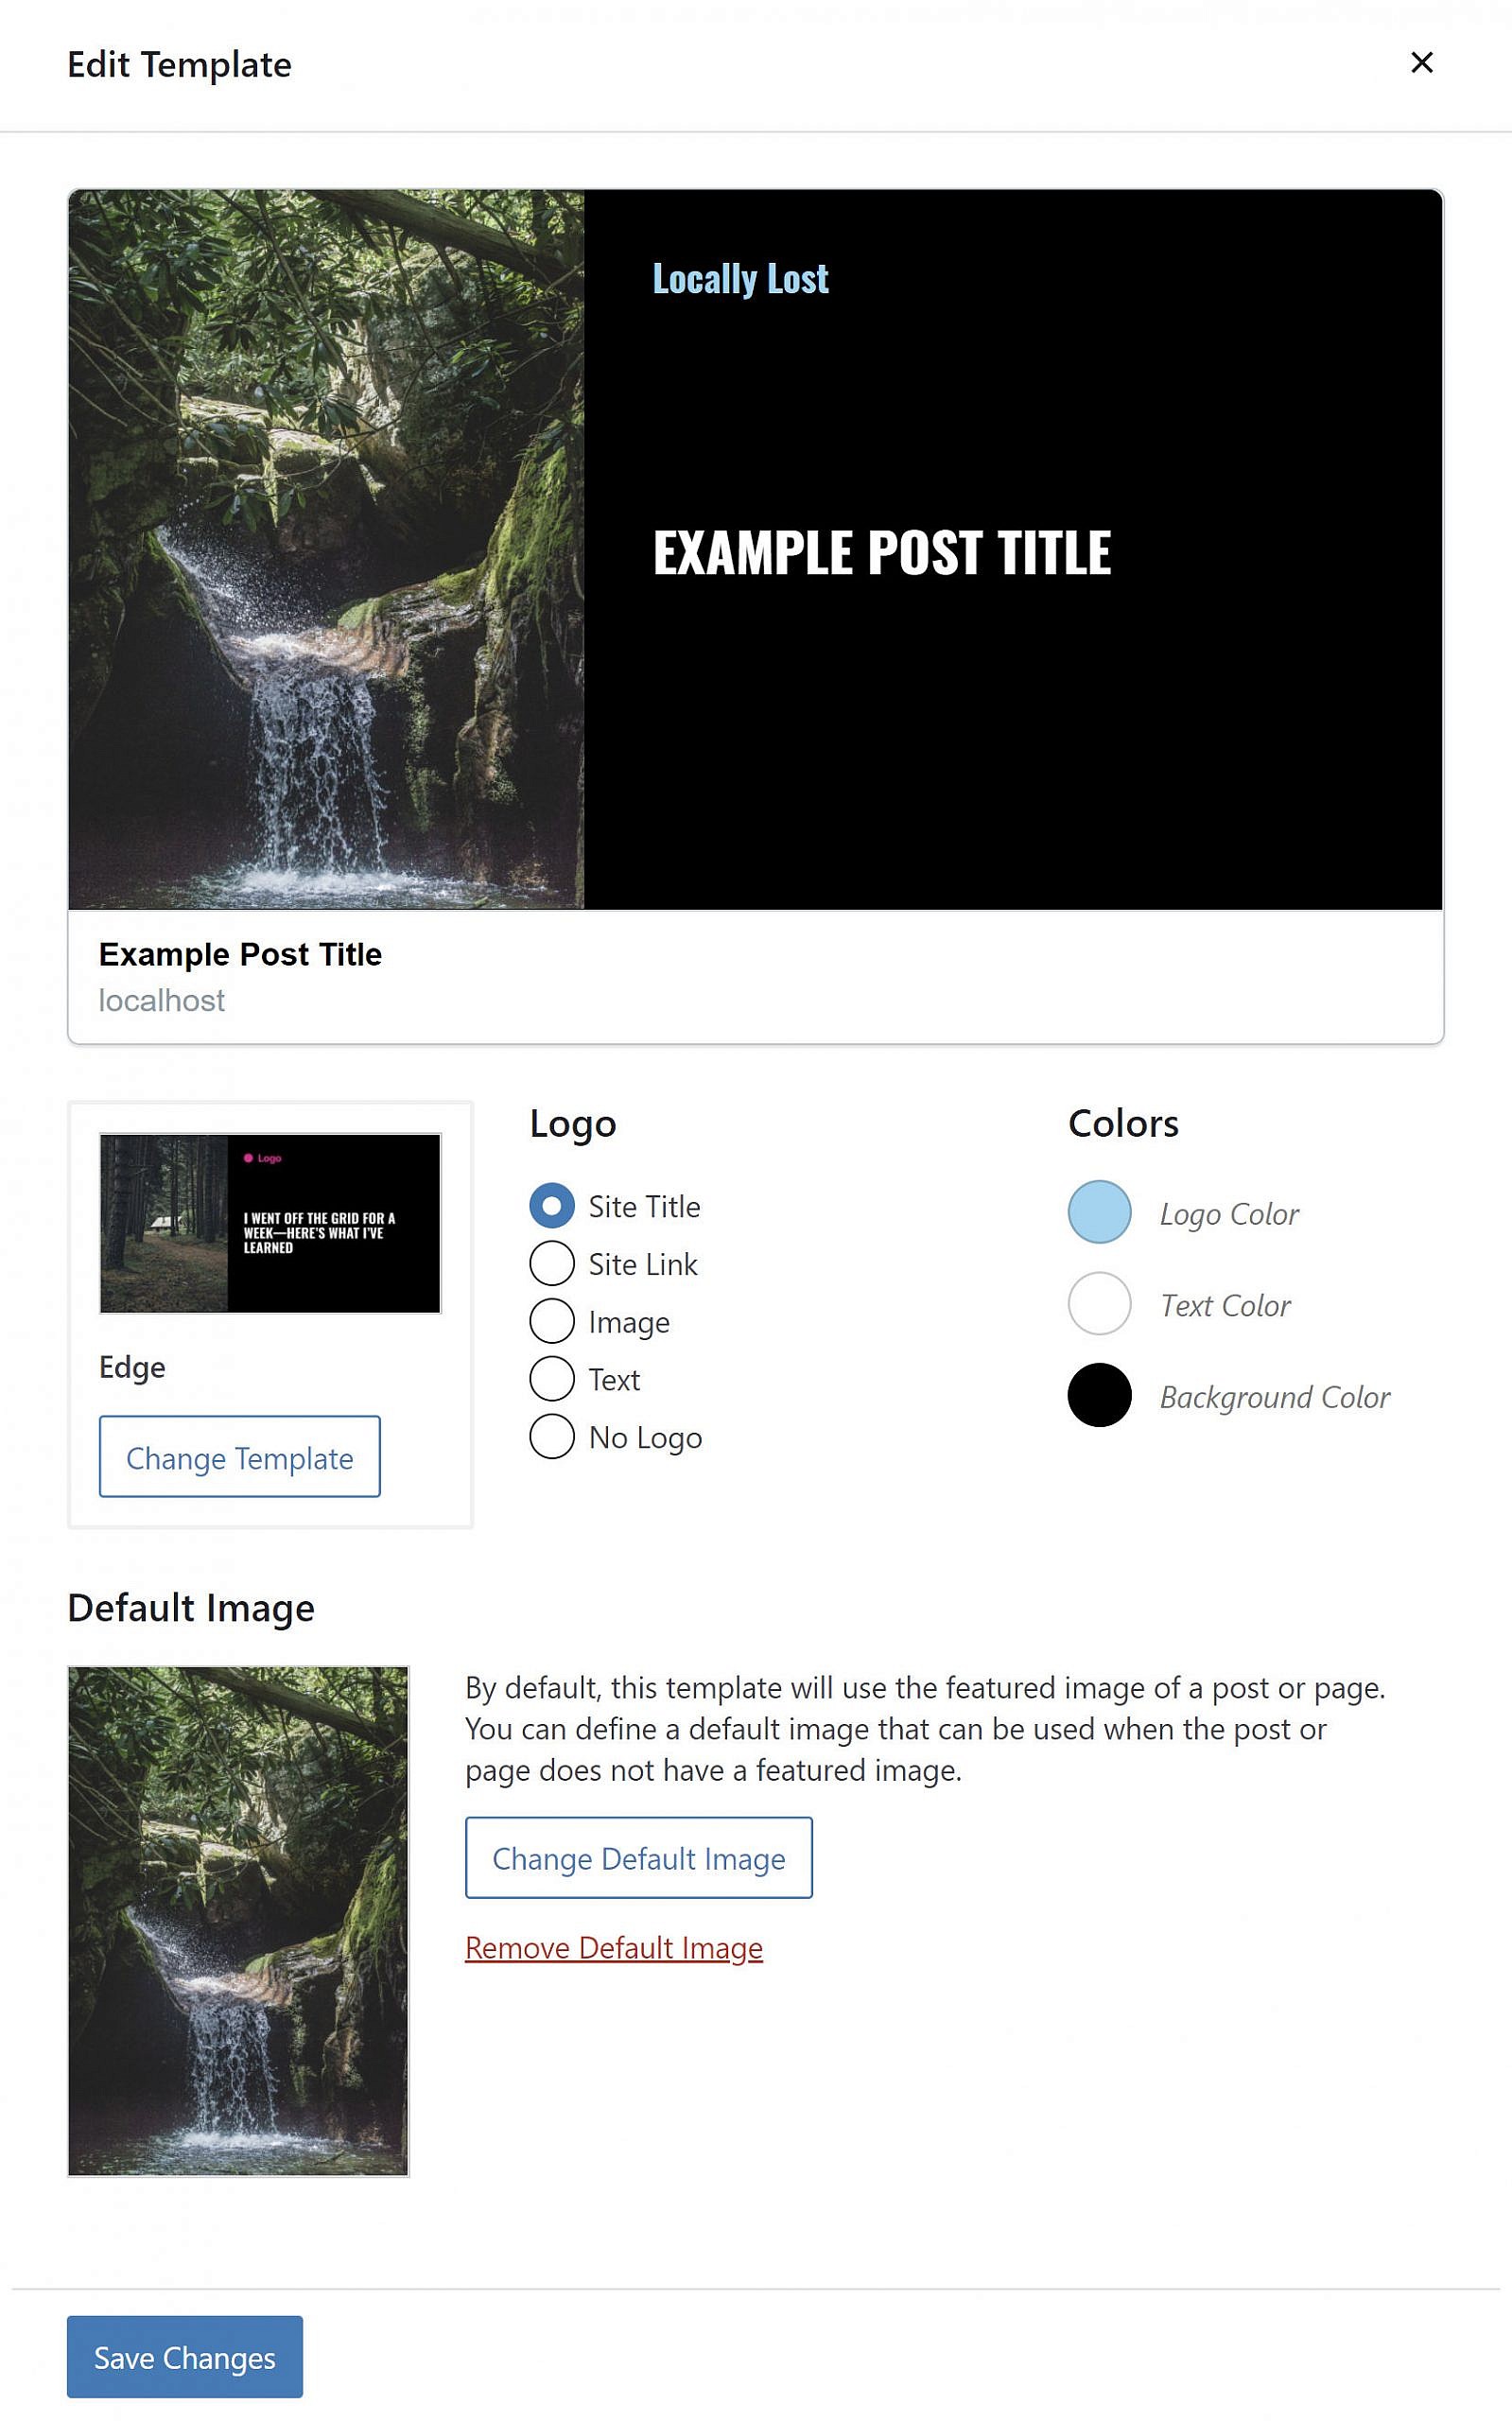
At the moment, the plugin includes 23 templates. From Twenty Seventeen to Twenty Twenty-One, each of the last four default WordPress themes also has a dedicated template. After selecting one, users can customize the colors for the logo, post title, and more — the amount of customization depends on the chosen template.

Screenshot of several of the Social Image Generator plugin's built-in templates.
Browsing the plugin’s templates.

Aside from selecting colors, users can choose between various logo and text options. They can also upload a default image for posts without featured images.

Template editing popup/overlay for the Social Image Generator WordPress plugin.
Editing a template from Social Image Generator.

When it comes time to publish, the plugin adds a meta box to the post sidebar. Users can further customize their social image and text on a per-post basis.

Customizing the social image via a sidebar meta box from the WordPress post editor.
Social image preview box on the post-editing screen.

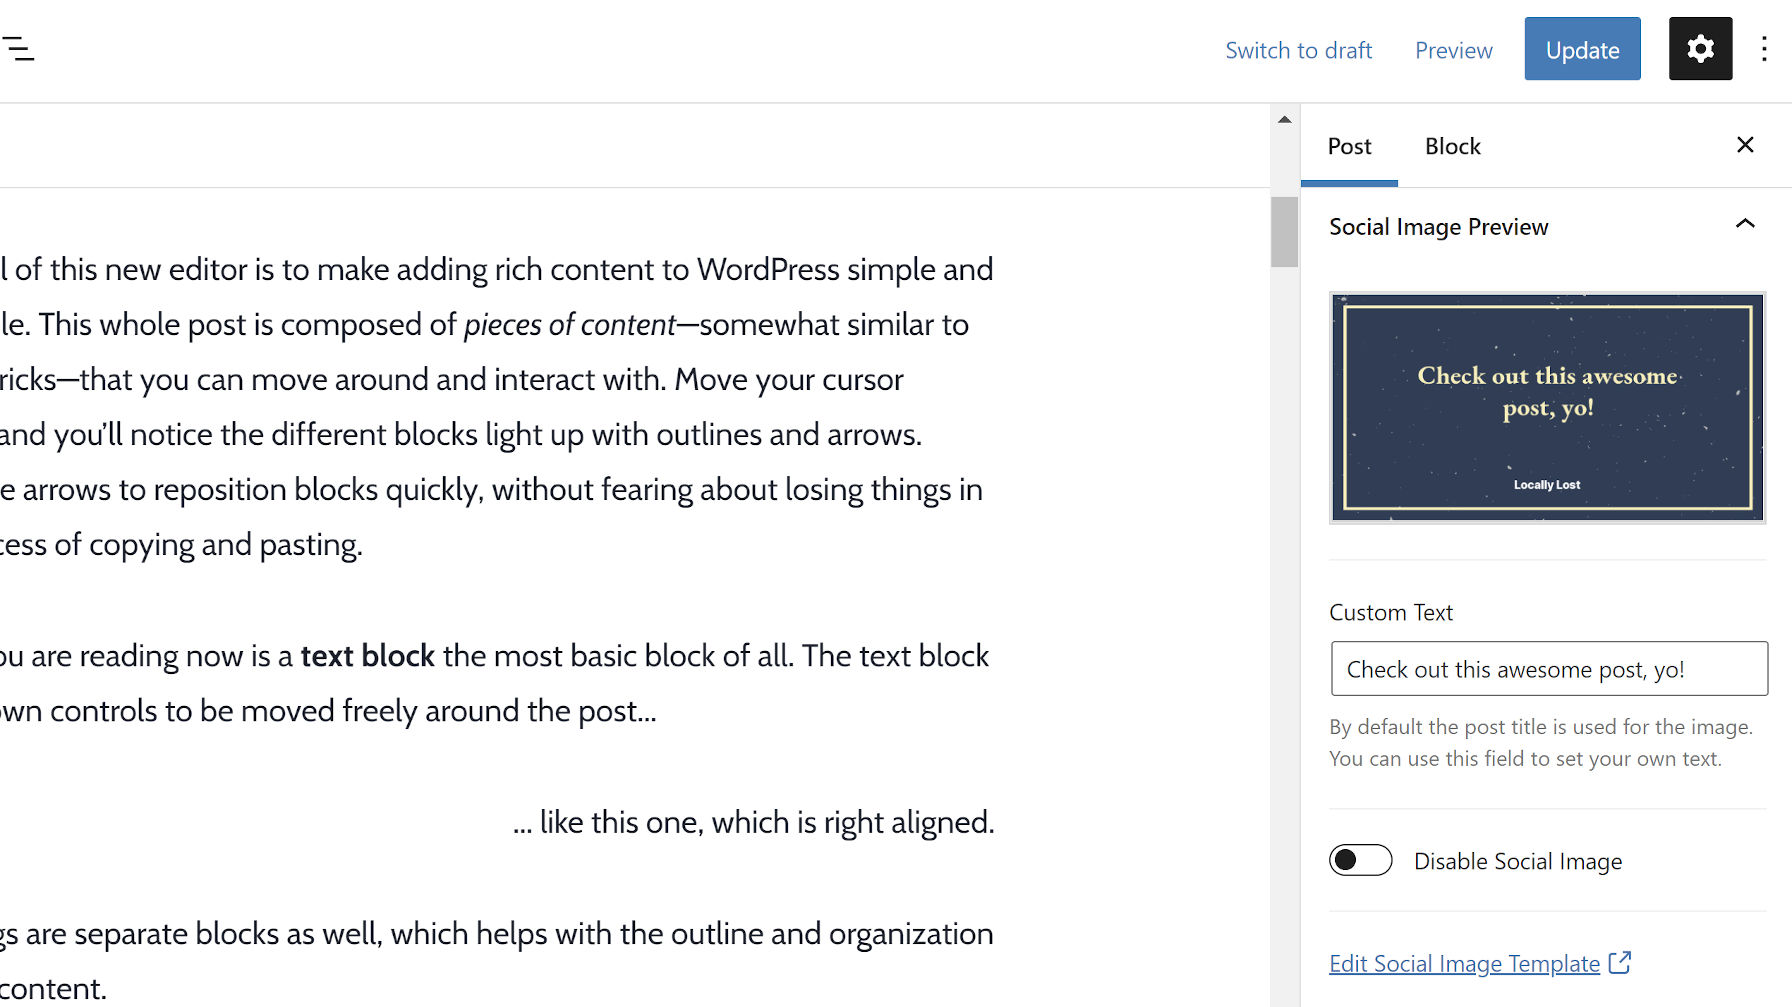
Once published, the plugin creates an image that will appear when a post is shared on social media.

On the whole, there is a ton that anyone can do with the built-in templates. There is also an API for developers to create their own. For a first outing, it is a robust offering. However, there is so much more that can be done to make the plugin more flexible.

Version 2.0 and Beyond

Thus far, Post said he has received tons of positive feedback along with feature requests. Primarily, users are asking for more customization options and the ability to create and use multiple templates. These are the focus areas for the next version. With a 1,718% increase in revenue in the past month, it seems he might have the initial financial backing to invest in them.

“I’ve started building a completely overhauled drag-n-drop editor, which will allow you to create basically any custom image you want,” he said. “It will be heavily inspired by the block editor, and I want to keep the UI and UX as close to the block editor as possible.”

The new template editor would allow users to create multiple layers, an idea similar to how Photoshop, Gimp, and other image-editing software works. The difference would be that it can pull in data from WordPress.

“For example, an ‘Image’ layer will have options such as height/width and positioning, as well as some stylistic options like color filters and gradient overlays,” said Post. “A ‘Text’ layer can be any font, color, and size and can show predefined options (post title, date, etc.) or whatever you want. You can add an infinite number of layers and order them however you’d like.”

He seems excited about opening up new possibilities with an overhauled editor. Users could potentially create social image templates for each post type. A custom layer might pull in post metadata, such as displaying product pricing or ratings from eCommerce plugins like WooCommerce.

“The prebuilt templates will still exist, similar to Block Patterns in the block editor,” said the plugin developer. “They will, however, serve as a starting point rather than the final product. I’ll also try to implement theme styling as much as possible.

“The possibilities here are so endless, and I’m incredibly excited for this next part.”

Show and Hide Content via the Block Visibility WordPress Plugin

Nick Diego’s Block Visibility is not the only plugin to take on the challenge of controlling when blocks are visible on the front end. Other plugins like EditorsKit do a fine job of it. However, Block Visibility is a solution users should not overlook, even if they have already begun testing other options.

Diego first released the plugin in August 2020. Since then, he has added routine updates that have added value without shifting its focus.

One of the biggest reasons to use this plugin is that it is a standalone project. It is purely about doing one thing and doing it well. Its settings are all about giving users complete control over how they want to manage block visibility. From my experience with it, the plugin does its job better than alternatives.

It may not have a large number of installs, but if its five-star rating on WordPress.org is any indication, it at least has a happy user base.

Diego does have plans for a pro add-on. The tentative release date is set for Spring 2021. He seems to be moving forward with that launch after adding some foundational code in the recent version 1.4 release.

“As Block Visibility grows, there will be advanced and/or niche functionality that will be useful for certain users,” wrote Diego in the 1.4 release announcement. “Think integrations with other third-party plugins. There will always be a free version of the plugin but some of these additional features will ultimately be provided by a premium (paid) add-on called Block Visibility Pro.”

In my previous job, one of my primary products focused on membership solutions. There is a seemingly endless number of possibilities that users dream up to control content visibility. I have little doubt that a pro add-on is necessary for catching all of the edge cases.

How the Plugin Works

Block Visibility is easy to use. End-users click a toggle switch, select from a date-picker, or tick a radio box. Their blocks are shown or hidden on the front end based on their selections. It does not get much simpler than that.

The plugin adds a new “Visibility” tab for each block, which displays the visibility controls. The exception to this is for inner blocks. For example, the Columns block has controls, but the inner Column blocks do not. However, this can be enabled for inner blocks via the “Full Control Mode” on the plugin’s settings screen.

There are three primary types of options:

  • Hide the block from everyone.
  • Time-based start and stop dates for displaying.
  • Visibility by user role.
Block Visibility plugin controls in the WordPress block editor.
Block Visibility’s controls in the inspector.

Hiding the block from everyone might be useful for users who are testing on a page or for blocks that are a work in progress. Start and stop dates create the potential for drip or trial content on membership-based sites, especially when combined with the role-based visibility options.

These basic options will cover the majority of scenarios that the average user will need them for.

One of the nicer features of the plugin is that it adds a transparent gray overlay, dashed border, and icon to each block that has visibility options set. This is shown when the block is not selected in the editor. It is one of those small touches that make the plugin useful.

Block Visibility plugin gray overlay when a block is not selected.
Overlay for blocks with visibility options.

There is one confusing piece of the UI. There are two instances where there is a “public” option. That label immediately makes me think that the block should be visible to everyone. However, reading the description is necessary. These options are for showing content to logged-out users only. I would rather see these two options renamed to “logged out” for clarity.

A Promising Future

While Block Visibility is a solid plugin right now, we are barely scratching the surface of what will be possible in the long run. In version 1.4, released two weeks ago, Diego added preliminary compatibility with Full Site Editing. This means visibility options will no longer be confined to the post or page content.

“Once every piece of content on a website is a ‘block,’ you will be able to easily control the visibility of practically anything on a WordPress website,” wrote Diego in the version 1.4 announcement post. “From dynamic navigation menus to user specific headers and footers, the possibilities are endless!”

Gutenberg’s site editor is a beta feature right now, but the plugin’s integration seems to already work well. I ran a quick test to show a custom nav menu to shop customers only. I had no problems on my end.

Using the Block Visibility plugin with the Gutenberg site editor.
Setting visibility options for a menu in Gutenberg’s site editor.

Users will not be limited to such basic needs in the future. Imagine showing ads in a sidebar to logged-out users. Imagine adding a time-sensitive holiday sale banner in the header. Imagine designing a homepage template that displays different content to subscribers vs. visitors.

There are ways to do all of this today by piecing various plugins together, using custom shortcodes, or writing code. However, when an entire site is made of blocks, you only need one method to control anything’s visibility. Literally.

Build Editor Blocks for Clients With the Genesis Custom Blocks Plugin

In early September, WP Engine announced the launch of Genesis Custom Blocks, a block-creation plugin made possible by its StudioPress team. The concept should feel familiar to developers who have made use of Advanced Custom Fields and similar plugins. However, the focus of this new plugin is entirely on blocks.

The plugin is more of a framework than a plug-and-play extension for WordPress. It requires some PHP knowledge to handle the front-end output. The goal is to make it easy for developers to create custom blocks without JavaScript knowledge. It allows them to render blocks on the server-side via custom templates.

Genesis Custom Blocks handles all the dirty work on the backend while leaving the basic PHP, HTML, and CSS of the front end completely up to developers.

The plugin seemed to slip through the cracks of the plugin directory’s guideline against frameworks — the Plugin Review Team started disallowing new framework-type plugins in 2016. Team rep Mika Epstein confirmed that the plugin should not have been approved. She also said that she would talk to the developers, explain why it’s not good, and see about finding a path forward.

Setting guideline issues aside, the plugin is a nice addition to the toolbox of any developer who needs to quickly knock out custom blocks for clients.

How the Plugin Works

Genesis Custom Blocks is currently a lightweight field manager for custom blocks. It provides an admin interface for creating, editing, and managing those blocks. Developers use this interface to essentially create block options in which a user can configure via the editor.

The free version of the plugin includes 13 standard form fields, such as text, image, URL, color, and more. The commercial version includes an additional six field types and allows users to import or export their custom blocks.

Genesis Custom Blocks block-editing screen.
Editing the test block included with the plugin.

For the block to output anything on the front end, the developer must create custom templates and use the Genesis Custom Blocks API. This template will render the output in the editor too, at least until the user clicks on the block, which takes them into editing mode.

Editing a block from Genesis Custom Blocks in the WordPress editor.
Inserting and editing a custom block in the editor.

Without anything other than a cursory reading of the docs, I was able to build a custom block and its associating template in minutes. What makes the plugin stand out is the simplicity of its system. It does not try to do too much. It provides enough basic fields for most developers to create the custom blocks they need for clients. I am certain that many of them will get a ton of mileage out of it.

It also does the extra things that developers should expect from a StudioPress-caliber product like allowing developers to create custom block categories, pick an icon, and set up keywords for each block.

One missing element is the ability to set custom blocks to full and wide-width. Developers may need to write custom CSS for both the editor and front end to handle such use cases. They can create custom inspector (block options sidebar) controls for width or alignment too. However, it would be a nice bonus if the plugin handled the standard WordPress alignments.

The Big Problem

The plugin commits the greatest sin of WordPress development. It fails to prefix or namespace its custom functions. It is a mistake that is expected of rookie developers. However, for a seasoned company such as StudioPress to create block_field(), block_value(), and similarly-named functions in the global namespace is almost unforgivable.

The problem this creates, particularly given the size of the Genesis development community, is that it is basically stealing potential function names from WordPress. If the core platform ever decides to add these functions, fatal errors will ensue on 1,000s of sites.

If the functions were limited in scope to the plugin itself, it would be an easy fix. However, these functions are meant for direct use by developers who are building with the plugin.

Given the plugin’s short time out in the wild, I hope the development team reconsiders their naming scheme and transitions it to something that does not run the risk of a future fatal error.

Convert Classic Content to Blocks With the Bulk Block Converter Plugin

Organic Themes released the Bulk Block Converter WordPress plugin last month and updated it in the past week. The plugin allows users to convert classic content, written in the old editor, to the new block format.

Unless end-users have the Classic Editor plugin installed, their old content is placed into the classic block in the newer block editor. WordPress provides an option for transforming this content into individual blocks from the block-editor interface. However, this must be done on a per-post basis.

“Going back and converting each post and page with a classic block to individual blocks can be a very long and tedious process,” said David Morgan, co-founder of Organic Themes. “The Bulk Block Converter plugin quickly scans all your posts and pages for classic blocks, and allows you to quickly convert them all to individual blocks within one interface.”

Originally, Organic Themes built the plugin for internal use at their company. “We developed the plugin to help us convert the content of our theme demos to blocks more efficiently,” said Morgan. The company had to convert over 40 theme-demo sites with an average of 50 posts and pages per site. They built this plugin to avoid a long and painstaking process. Then decided to share it. “We thought the tool could be very useful for other users migrating to Gutenberg.”

For users with a lot of old content, Bulk Block Converter could be the key to moving it all to the new block editor system. Based on the conversions I ran on a couple of test installations, it worked flawlessly.

How the Plugin Works

Screenshot of the Tools > Block Conversion plugin screen in the admin.
Bulk Block Converter admin screen for converting content.

The Bulk Block Converter plugin adds a new “Block Conversion” sub-menu item to the WordPress “Tools” menu in the admin. Once on that screen, it provides a “Scan Content” button. When clicked, it checks all of your posts, pages, and other custom post types for classic content. It then builds a list table of all the content.

From that point, you can choose between converting each post individually or running a bulk conversion of all posts. I always recommend being cautious with such plugins by converting and checking a couple of individual posts before trying bulk conversions.

The process for converting posts was snappy during my tests. In just a few moments, I converted all of my old content over without issue.

Like any plugin that modifies content in this way, it is prudent to store a backup of your site before converting the posts. This is also a one-way conversion process. Once a post is transformed, there is no going back.