How to Start a Fashion Blog (and Make Money) – Step by Step

Are you looking to start a fashion blog but don’t know where to begin?

It is easy to start a blog, but the tricky part is to be successful and make money from it.

In this article, we will show you how to start a fashion blog and share tips on how to make money from fashion blogging.

Starting a fashion blog to make money online

Here is a quick overview of the topics we will cover in this article:

Why You Should Start a Fashion Blog?

If you are passionate about fashion and style, then you may have already seen some top fashion bloggers and influencers on Instagram or other social media platforms.

Fashion blogs not only provide a platform for bloggers, but they also bring lots of opportunities for these content creators.

You might be surprised to discover how fashion bloggers make money from their blogs. According to Harper’s Bazaar, designers and top brands spend over a BILLION dollars each year advertising on Instagram alone.

That means that fashion blogging provides an excellent opportunity to make money online.

Top Fashion Blog Examples That Are Crushing It

Fashion blog examples

Apart from making money, a fashion blog allows you to express yourself more creatively. Here are some of the top fashion blog examples you can follow for inspiration:

One thing you’ll notice about each of the top fashion blog examples above is that they all have their unique voice, personality, and taste in fashion. These fashion bloggers bring their unique perspectives to highlight their favorite products, merchandise, and brands.

If you believe that you have a unique take on fashion and style, then you should start a fashion blog.

While setting up the fashion blog part is easy, like all essential things in life, making a blog popular and monetizing it requires effort.

However, if you do it right, then you’ll undoubtedly find the experience to be rewarding and fulfilling.

What You’ll Need to Start Your Fashion Blog

Fashion blogging essentials

First, you need to choose the right platform to build your own fashion blog. You have plenty of choices, but each one of them has its own pros and cons (see our comparison of the best blogging platforms).

For example, you could start a free blog on a platform like WordPress.com, Tumblr, Blogger, and so on.

These are called free blogs, and they are very limited in terms of features and flexibility when it comes to growing your personal brand. The most important limitation is your ability to make money from your content.

What about Starting a Fashion Blog with Instagram?

Instagram is awesome, but you don’t own it. You can build a huge following, which can go away immediately if Instagram decides that your content violated one of their policies.

We are not saying that you shouldn’t use Instagram.

You must use it to build a large audience, but you will need a central platform that you can control where you can keep your audience coming back for years to come.

The best way to build your fashion blog is by creating your own website with complete ownership and full control.

Now, the question is, how could a beginner with no knowledge of coding build a website?

This is where WordPress.org comes in. It is a powerful website builder that gives you absolute control and full ownership of your website and its content.

Keep in mind that it’s important not to confuse WordPress.org with WordPress.com since they are two different platforms. (See our comparison of WordPress.com vs. WordPress.org for more details).

There are three things you need to start a fashion blog using WordPress.org:

  1. Domain name – This will be your website’s address and what users will type in the browser to visit your blog (For example, wpbeginner.com).
  2. Web hosting – This will be your blog’s home and where you will store all your website files.
  3. Your undivided attention for 30 mins

Yes, you can start a brand new fashion blog in 30 minutes, and we will walk you through the whole setup step by step.

Ready? Let’s get started.

Setting Up a Fashion Blog Using WordPress

A domain name typically costs $14.99 / year, and web hosting normally costs $7.99 / month.

That’s a lot for beginners who are just starting.

Luckily, our friends at Hostinger are offering a free domain, a free SSL, and an 81% discount on hosting to our readers.

Basically, you can get started for as low as $2.24 / month.

NOTE: At WPBeginner, we believe in transparency. If you sign up with Hostinger using our referral link, then we will earn a small commission at no extra cost to you (in fact, you will save money and get a free domain). We would get this commission for recommending just about any WordPress hosting company, but we only recommend products that we personally use and believe will add value to our readers.

Let’s go ahead and set up your web hosting + domain so you can get started.

First, you need to go to the Hostinger website and click on the ‘Claim Deal’ button.

Next, you will be asked to choose a plan. We recommend the Premium plan. You can always upgrade later if you need to.

Hostinger pricing plans for WPBeginner users

Next, you’ll be asked to choose a hosting period.

The 48-month period gives you the best discount.

Hostinger pricing periods

After that, you will fill in your personal information and choose a payment method.

Proceed with the payment to complete your purchase.

Finish Hostinger payment

Upon completing the transaction, you will be able to select your desired domain name during the hosting setup process.

A domain name is your website’s address, and this is what your users will type in their browsers to visit your fashion blog.

Claim free domain name

You need to choose a domain name that reflects your personal voice. It should be unique, creative, and interesting. For more details, see our tips on choosing a great domain name for your website.

Once you have purchased hosting, the next step is to install WordPress.

Simply go to the Websites section in your Hostinger account dashboard and click ‘Create or migrate a website.’

Installing WordPress on Hostinger

This will bring up a website setup wizard. You will be asked what kind of website you want to create (like an online store, business, blog, and so on).

Choose ‘Blog’ for now to continue.

Choose blog as your website type

On the next screen, you will be asked if you want to create a new website or migrate an existing website.

Click ‘Select’ under the ‘Create a new website’ option.

Create or migrate a website

After that, you will be asked to choose a platform.

You need to select ‘WordPress with AI’ to continue.

Select platform

After that, the setup wizard will guide you to set up your WordPress website step by step.

Simply follow the on-screen instructions to finish the setup.

Once finished, you can log in to your WordPress website from your hosting account dashboard.

login to WordPress

This will bring you to your WordPress website’s admin dashboard.

It will look something like this:

WordPress dashboard

Now that you have WordPress installed, you can start working on your fashion blog.

Choosing a Design for Your Fashion Blog

Fashion blog templates

A blog about fashion and style shouldn’t have a plain-looking business or blogging layout. Your website needs a design that represents your unique sense of style and creativity.

Most fashion bloggers are not website designers, so how do you create a website design that is unique, elegant, stylish, and creative?

Luckily, there are thousands of pre-made WordPress templates that you can choose from.

We have hand-picked the best WordPress themes for fashion blogs that you can check out. All of the themes in the list feature creative designs with flexible options to easily make them uniquely yours. Most importantly, all of them are responsive (aka mobile-friendly), which means they look good on mobile and tablets as well.

Each of these themes comes with its own settings page. This is where you will set up the theme, add your website logo, choose colors, and select basic settings.

Depending on which theme you choose, you will find tons of customization options. We recommend striving for simplicity in your website’s design for a cleaner look.

Add Useful Content to Your Fashion Blog

Adding content to your fashion blog

Once you have a functioning design, you can start working on content. We recommend adding the static content first.

Static content refers to non-changing pages that are common among all websites on the internet. These include a contact form page, an about us page, and a privacy policy page.

If your theme includes a page builder plugin, then you can use it to create other static landing pages as well.

Next, you will want to start adding articles/blog posts to your fashion website. See our guide on how to add a new blog post in WordPress and learn how to utilize all the features.

Now, this is where you will develop your own voice. Your blog posts need to be entertaining, informative, and helpful.

We recommend choosing a consistent frequency for your articles. Busier and larger websites post new content every day. You can start by adding a few posts per week and then gradually increase your frequency to daily updates.

To come up with regular blog post ideas, you can visit popular blogs in the fashion industry to gather inspiration. See what these top blogs are doing and replicate it on your blog.

Fashion content on Instagram

We are not saying that you should just steal/recreate the same content.

You just need to gather topics, collect ideas, and get inspiration. After that, you should use those ideas on your blog by adding your unique voice, style, and flavor to it.

Bonus Tip: Check out our guide on how to generate 100+ blog post ideas quickly, or try out our blog post ideas generator.

Optimize Your Fashion Blog to Get More Visitors

Once you start adding useful content, the next step is to make sure that users can find your website when they search for fashion topics online.

Here is how you ensure that your website gets visitors and those people actually engage with your content.

Start Working on Your Website’s SEO

Fashion blog SEO

Most popular blogs get a lot of their traffic from search engines like Google and Bing. Marketers use SEO, also known as Search Engine Optimization, to optimize their websites for higher rankings in the search results.

WordPress itself is quite SEO-friendly out of the box, but there are still things you can do to optimize it further.

The easiest way to do this is by using All in One SEO for WordPress. It is the best WordPress SEO plugin on the market that allows you to easily optimize your fashion blog SEO like a pro.

For more details, follow our step-by-step WordPress SEO guide for improving your website rankings.

Improve Website Speed

Website performance

Speed is one of the most important factors that affects the user experience on your website. It also affects your website’s search engine rankings, as Google considers speed one of the top ranking factors.

You can make your website significantly faster by implementing certain performance tweaks in WordPress. We have created a complete step-by-step guide on how to speed up WordPress and boost performance.

Track User Engagement

Track user engagement

Actions your users take after arriving on your website are called user engagement. A highly engaged audience means more page views and more success for your fashion blog.

This is where you’ll need MonsterInsights. It allows you to easily install Google Analytics in WordPress.

MonsterInsights helps you track your website traffic using Google Analytics. It shows where your users are coming from, what content is popular on your blog, which products make the most profits, and more.

For more on this topic, you can see our article on tracking user engagement in WordPress using Google Analytics.

Start Making Money From Your Fashion Blog

Making money with a fashion blog

Ever wondered how fashion bloggers can afford their clothes, makeup, and accessories? Actually, they don’t have to.

Most successful fashion bloggers promote sponsored content where brands pay them to advertise specific products.

Paid and sponsored content is the major source of revenue for many fashion bloggers. Here, we will list the most effective ways you can start making money from your fashion blog when you’re first starting out.

1. Display Ads Using Google AdSense

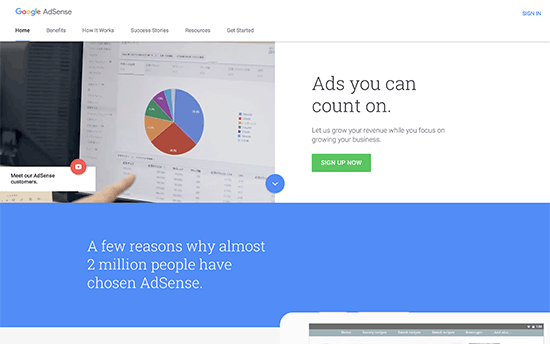
Most websites on the internet rely on ads to generate revenue. Google AdSense allows you to easily display ads on your website and make money from your blog even when you’re just starting.

See our step-by-step guide on how to properly add Google AdSense in WordPress for detailed instructions.

2. Affiliate Marketing

Affiliate marketing allows you to recommend products you love. You get a referral commission when your users purchase a product after clicking on your link.

To make money with affiliate marketing, you will need to find fashion products and brands with an affiliate program.

The biggest affiliate partner you can sign up for is Amazon Affiliates. They have tons of products in fashion, clothing, and accessories that you can recommend and get paid for.

See our guide on how to start affiliate marketing, or take a look at how to add and manage affiliate links in WordPress.

3. Build an Instagram Following

Instagram is arguably the top social network for fashion and style influencers. You will need to join Instagram and start posting content with relevant hashtags to make sure that your posts reach the right audience.

The best way to come up with an Instagram strategy is by following other top fashion blogs on Instagram. Study their posts, descriptions, and hashtags, and try to replicate the same effect with your Instagram posts.

For more details, you can see our complete social media cheat sheet.

You should also network with other influencers and do S4S, share for share, campaigns. In this strategy, each party will share the other’s Instagram posts and tag them. It helps both people increase their following.

Another easy way to build an Instagram following is by sharing your Instagram posts on your WordPress blog.

4. Brand Promotions

Contact for promotions

You can also reach out to brands, fashion startups, and agencies to partner with them. The best way to find which companies are doing blog promotions is to keep an eye on top fashion bloggers and their Instagram posts.

For more ways to generate revenue from your fashion blog, see our guide on proven ways to make money from your blog.

Mastering WordPress Skills

WordPress is easy to use and beginner-friendly. However, whenever you start using a new platform, there are always new things to discover and learn. This is where WPBeginner can help.

WPBeginner is the largest free WordPress resource site for beginners. We have lots of helpful content that is created specifically for beginners, business owners, and bloggers.

To expand your WordPress skills, you should check out:

  • WPBeginner Dictionary – Our WordPress glossary is the best place to familiarize yourself with the WordPress lingo.
  • WPBeginner Videos – New WordPress users can start with these videos to master WordPress.
  • WPBeginner Blog – The central place for all our WordPress tutorials and guides.
  • WPBeginner Engage – Our Facebook group, with more than 97,000 WordPress users who can give feedback and help you with your blog.

You can also subscribe to our YouTube Channel, where we regularly upload new video tutorials to help you learn WordPress.

We hope this article helped you start your fashion blog and make money from it. You may also want to see our ultimate WordPress security guide to keep your blog safe and our expert pick of the best WordPress plugins to grow your website.

If you liked this article, then please subscribe to our YouTube Channel for WordPress video tutorials. You can also find us on Twitter and Facebook.

The post How to Start a Fashion Blog (and Make Money) – Step by Step first appeared on WPBeginner.

JXSE and Equinox Tutorial, Part 2

JXSE and Equinox Tutorial, Part 2


NOTE: As of January 2015, you can integrate JXTA in OSGI through an update site. The WIKI  At chaupal.org  gives detailed instructions on how to use the new 2.8.x JXSE bundles for OSGI.Many of the features covered here are implemented by default.

Abstract

In the first post of this series, we covered the quickest way to get JXSE 2.7x working in Equinox and, with some considerations, probably other OSGI frameworks as well. The approach aimed to get the same functionality as you would get by using the jar file in a regular JAVA setting, but as I demonstrated, Equinox does have the benefit of allowing multiple JXSE instances to run simultaneously, which is a great benefit when developing JXSE applications.

In this second tutorial, we will cover some ways of improving the functionality by severing the dependency on the 4.2x version of Jetty (which has just released it's 9.0 version!) and we will introduce some basic tools to visualize the properties and functions of JXSE. This will improve the development cycle of JXSE applications even more.

JXSE and Equinox Tutorial, Part 1

Abstract

NOTE: As of January 2015, you can integrate JXTA in OSGI through an update site. The WIKI  At chaupal.org  gives detailed instructions on how to use the new 2.8.x JXSE bundles for OSGI.

This extended series of tutorials will cover the various ways that the JAVA P2P framework JXSE (formerly popularly known as JXTA, and currently the most up-to-date JAVA implementation of the JXTA specifications) can be made to work with Equinox (the engine on which Eclipse runs). It would be tempting to replace Equinox with OSGI, and indeed many of the issues covered here will work fine with alternative OSGI implementations such as Apache Felix or Knopflerfish, but I will concentrate on Equinox because it will allow us to do a few things with JXSE that requires a bit more handwork on other OSGI platforms. Besides this, I have tested the code on Equinox alone, so I don't want to get ahead of myself. This tutorial is work in progress, so the document will be re-edited a few times.

This tutorial not meant to cover the principles behind P2P in general, and JXTA/JXSE in particular. If you are interested in this, I'd recommend the (free) book Practical Jxta II by Jérôme Verstrynge, or to go through the online manuals for JXTA 2.5, JXSE 2.6 and 2.7. This first tutorial is aimed to get you started with JXSE 2.7x in an Equinox environment. The reader is expected to have a good understanding on developing plugins with the Eclipse IDE. If you are new to Eclipse I would advise you to read the excellent articles on developing plugins by Lars Vogel and brush up on OSGI and Equinox while you're at it.

Architecture as Code With C4 and Plantuml

Introduction

I'm lucky enough to currently work on a large microservices-based project as a solution architect. I'm responsible for designing different architecture views, each targeting very different audiences, hence different preoccupations:

  • The application view dealing with modules and data streams between them (targeting product stakeholders and developers)
  • The software view (design patterns, database design rules, choice of programming languages, libraries...) that developers should rely upon;
  • The infrastructure view (middleware, databases, network connections, storage, operations...) providing useful information for integrators and DevOps engineers;
  • The sizing view dealing with performance;
  • The security view, which is mainly transversal.

NOTE

How to Find Your Saved Drafts in WordPress (Beginner’s Guide)

Are you trying to find your saved drafts in WordPress?

Most of the time it’s easy to find your drafted posts and pages, but sometimes they can go missing.

In this article, we will share several ways to find your saved drafts in WordPress.

How to find your saved drafts in WordPress

Why Can’t You Find Your Saved Drafts in WordPress?

When you’re getting started with your WordPress site, it takes time to learn the admin area. 

You might save a draft, and then move on to another task. Then when you want to continue working on that draft, you may struggle to find your post. 

It may be in a place you don’t expect, or it may have been accidentally deleted, especially if you have a multi-author blog with other users who have access to your drafts.

If you can’t find your draft, don’t panic. Even if it was deleted, there are still ways to get it back.

In this guide, we will cover five different ways to find your saved drafts in WordPress. If you prefer to jump straight to a particular method, then you can use the links below.

Check the Quick Draft Box for Missing Drafts

If you used the Quick Draft tool in the dashboard, then your drafts may seem to vanish when you click on the ‘Save Draft’ button.

The WordPress Quick Draft box

If you recently created the draft, then you should still be able to find it in your WordPress Dashboard. 

Simply click on ‘Dashboard’ in the left-hand menu and find the Quick Draft box. You’ll see all of your most recent drafts in this box.

To carry on working on any of these drafts, simply click on its blue title.

The WordPress Quick Draft box

If the Quick Draft section is missing, then you can bring it back by clicking on the Screen Options tab on the top right of the page.

Just make sure the ‘Quick Draft’ checkbox is checked, and it should reappear.

check Quick Draft in screen options

Find Missing Drafts in the WordPress Pages and Posts Menus

Another easy way to find your saved drafts in your WordPress blog is to head over to Posts » All Posts for your posts, or Pages » All Pages for pages.

Once you’ve done that, you should see a ‘Drafts’ tab.

The WordPress 'Drafts' tab

After clicking on the Drafts tab, you’ll see all of your saved draft posts.

You can now see options to edit, trash, or preview any of these posts by hovering your mouse over the draft.

Opening a WordPress draft for editing

Another option is to jump straight to the ‘Drafts’ screen using a direct link.

To start, make sure you’re logged into your WordPress dashboard. For more information, please see our guide on how to find your WordPress login URL.

Once you’ve done that, you’ll need to add some text to the end of your website’s URL. This text will be different depending on whether you want to see your drafted posts or pages

To find all of your drafted posts, add the following to the end of your website’s URL:

/wp-admin/edit.php?post_status=draft&post_type=post

For example, if your website’s URL was ‘www.example.com’ then you would need to paste the following into your browser’s address bar:

www.example.com/wp-admin/edit.php?post_status=draft&post_type=post

The URL for your drafted WordPress posts

Then just press the Enter key on your keyboard. You will now be redirected to a screen showing all your drafted WordPress posts.

To see all of your drafted pages instead, add the following to the end of your website’s URL and press Enter:

/wp-admin/edit.php?post_status=draft&post_type=page

Once you’ve done that, WordPress will show a screen containing all of your drafted pages.

The URL for your drafted WordPress pages

Check Your WordPress Trash for Missing Drafts

Have you checked the ‘Drafts’ tab, but still can’t find your drafted page or post?

If a draft is missing, there’s a chance it may have been deleted by accident. If you’ve added other WordPress users or authors to your site, then it’s possible someone else may have deleted your draft.

Luckily, WordPress makes it easy to restore deleted posts and pages.

Just like your computer, WordPress moves deleted items into a ‘Trash’ folder. These pages and posts will no longer show up in your ‘Drafts’ tab, but they’re not deleted permanently right away.

By default, WordPress will keep items in the trash folder for 30 days. If you want to change how often your trash is emptied, then please see our guide on how to limit or disable the trash being automatically emptied in WordPress.

To look inside your trash folder, either go to Pages » All Pages, or Posts » All Posts.

Once you’ve done that, simply click on the ‘Trash’ tab.

The WordPress 'Trash' tab

Here you’ll find all your deleted posts or pages. If you see your missing draft, then hover your mouse over it.

After that, just click on the ‘Restore’ link. 

Restoring a deleted WordPress draft

Now, you can find this drafted page or post in your ‘Drafts’ tab following the same process described above.

Check Your WordPress Database to Recover Lost Drafts

Can’t find the missing draft in your WordPress ‘Trash’ folder?

Another option is to check your WordPress database. You can’t recover the deleted draft using this method, but you can get its content.

Once you do, then you can copy and paste it into a new draft in your WordPress admin area.

This method is more advanced, so it isn’t recommended for absolute beginners.

If you decide to go ahead with this method, then it’s a good idea to create a backup. Backups allow you to quickly restore your WordPress site in case something bad was to happen. You can see our expert pick of the best WordPress backup plugins to get started.

To reach your WordPress database, you’ll first need to log into your web hosting account. This is usually supplied by your WordPress hosting provider.

For example, if you’re a Bluehost customer then you just need to log into your cPanel dashboard.

Once you’ve logged into your control panel, look for any ‘phpMyAdmin’ settings. For Bluehost customers, you need to click on Advanced » phpMyAdmin in the left-hand menu.

Bluehost's PhpMyAdmin tool

You can then click on the ‘Databases’ tab.

In the left-hand menu, find the name of your WordPress database.

Bluehost's cPanel web hosting dashboard

NOTE: If you’re not sure what your database name is, then you can find this information in your wp-config.php file.

In the left-hand menu find an option that has ‘posts’ in its name. Then, click to select this option. You will now see all of your WordPress posts and pages.

The PhpMyAdmin tool

Next, find the draft that you want to restore.

You can then go ahead and click on its ‘Edit’ button.

Finding a draft post in WordPress

Once you’ve done that, phpMyAdmin will show this draft in HTML format.

To restore this draft, simply copy everything in the ‘post_content’ section.

A post with HTML formatting

Now it’s time to switch back to your WordPress admin screen. Here, you can create a new WordPress page or post.

In the upper-right corner, click on the icon that shows a line of dots.

After that, click on ‘Code editor.’

The WordPress code editor

This will open this page or post in the WordPress code editor

Now simply paste the HTML code you copied in the previous step. Once you’ve done that, click on ‘Exit code editor.’ 

Exiting the WordPress code editor

You’ll now see all of the content you copied from your WordPress database. To check how this draft will look to the people who visit your website, click on the ‘Preview’ button.

You can now work on this draft in the WordPress editor. For example, you’ll want to give your new draft an SEO-friendly title and add a focus keyphrase

We hope this article helped you learn how to find your saved drafts in WordPress. You may also want to see our guide on how to add keywords and meta descriptions in WordPress, and see our expert pick of the best WordPress SEO plugins and tools that you should use.

If you liked this article, then please subscribe to our YouTube Channel for WordPress video tutorials. You can also find us on Twitter and Facebook.

The post How to Find Your Saved Drafts in WordPress (Beginner’s Guide) first appeared on WPBeginner.

How to Fix Error 521 with WordPress and Cloudflare

Are you looking for a way to fix ‘Error 521’ with WordPress and Cloudflare? 

If you’re seeing this error message, then so is everyone who tries to visit your website. This is bad news for the visitor experience and your conversion rates. It may even cost you your search engine rankings.

In this article, we will show you how to fix the 521 error with WordPress and Cloudflare.

How to fix error 521 with WordPress and Cloudflare

What Causes Error 521 with WordPress and Cloudflare?

If you see a 521 error when trying to visit your WordPress website, this means your browser is connecting to Cloudflare successfully, but Cloudflare isn’t connecting to the server that hosts your website.

Often this is because your server is offline.

There’s also a chance your WordPress hosting server may be online, but it’s blocking Cloudflare. Typically this WordPress error happens when a server mistakes Cloudflare for a security threat. This is usually due to a problem with how your server or Cloudflare is set up.

But don’t worry, we have five troubleshooting steps that you can follow to fix this error quickly.

If you’re unsure what’s causing your 521 error, then we recommend starting with step 1 and working your way through the each step. If you prefer to jump straight to a particular step, then you can use the links below.

  1. Contact Your Hosting Provider
  2. Check Whether Your Server Is Offline
  3. Whitelist All of Cloudflare’s IP Addresses 
  4. Ask Your Hosting Provider to Enable Port 443 
  5. Create and Upload a Cloudflare Origin Certificate 

1. Contact Your Hosting Provider

When you get a 521 error, there are steps you can take to fix the problem yourself. However some of them can be time-consuming and technical.

With that in mind, the easiest way to fix a 521 error is by contacting your WordPress hosting provider. A good web host should be able to tell you why you’re getting this error. They may even be able to fix the problem for you.

If you’re unsure how to contact support, then head over to your hosting provider’s website. You can then look for any Contact Us or Support pages. 

The Bluehost support settings

To help you fix this problem as quickly as possible, we recommend choosing live support options where available. For example, live chat or business phone support is almost always faster than ticketing portals or email. 

If you’re unable to get support from your hosting provider right away, then you can try the following steps.

2. Check Whether Your Server Is Offline

When you get a 521 error, it’s always worth checking whether your server is online. 

If it’s still online, then you can try other troubleshooting steps.

To do this, you’ll need to know your server’s IP address. This is a string of numbers that identifies a piece of hardware on a network.

You can use this IP address to ‘ping’ the physical server that hosts your WordPress website. If the server responds, you’ll know that it’s online. 

If it doesn’t respond, then your server is offline and this is what’s causing your 521 error. 

To get your IP address, you’ll need to log into your website’s control panel. This is usually supplied by your hosting provider, and is typically either cPanel or a custom panel.

Once you’re logged in you can look for any settings labeled ‘IP address.’ 

If you’re a Bluehost customer, then you just need to log into your cPanel dashboard. You can then click on Advanced in the left sidebar.

The Bluehost cPanel dashboard

On this screen, find the General Information section.

Bluehost will show your server’s IP address under ‘Shared IP address.’

Getting your IP address in cPanel

If you’re struggling to find this IP address, it’s always worth checking your hosting provider’s website or online documentation. Many web hosts have detailed tutorials showing you how to find your IP address.

Once you have this information, head over to the HTTP Header Checker tool. You can use this tool to ‘ping’ your website’s server and see whether it responds. 

To do this test, simply paste your IP address into the ‘URL’ field. 

Then add ‘http://’ in front of your IP address. This turns this string of numbers into a web address. For example:

56.18.270.000

Becomes:

http://56.18.270.000

The HTTP Header Checker tool

Next, click on the Check button. HTTP Header Checker will now try to talk to your server.

If your server is offline, then you’ll see a message such as ‘Failed to connect’ or ‘Host Not Found.’ 

This explains why you’re getting the 521 error. In this case, you’d need to contact your hosting provider to fix it.

If your server is online, HTTP Header Checker will show a ‘2XX’ status code. You may also see a ‘3XX’ status code if your server is online but is temporarily redirecting to a new location.

If your server is online, then an outage or server downtime isn’t causing your 521 error. In that case, you can continue following this guide to fix the error.

3. Whitelist All of Cloudflare’s IP Addresses 

Your server may be online, but blocking Cloudflare’s IP addresses. This can cause the 521 error when you try to visit your WordPress website.

The solution is to whitelist all the IP addresses that Cloudflare uses. By whitelisting an IP address, you’re telling your server to allow all requests coming from that address.

You can add whitelisted IPs to your website’s .htaccess file. This is an important configuration file that tells the server how it should act.

To edit your .htaccess file, you’ll need an FTP client such as FileZilla.

If you haven’t used an FTP client before, you may want to see our guide on how to use FTP. This post shows you how to connect to your server using an FTP client. 

Once you’re connected to your server, you’ll need to open your website’s root folder. To reach it, simply open the folder that shows your website’s address. 

Next, open the ‘public_html’ folder. 

The FileZilla FTP client

You should now see your website’s .htaccess file.

Some FTP clients hide sensitive files by default. If you don’t see an .htaccess file, then you’ll need to enable the ‘show hidden files’ option in your FTP client. 

If you’re using FileZilla, just select Server from the toolbar. Then click on ‘Force showing hidden files.’

Showing hidden files in FileZilla

If you’re still struggling to find .htaccess, then please see our guide on how to find the .htaccess file in WordPress.

When you’re ready to edit this file, simply Control-click on the .htaccess file.

Then, select View/Edit. 

Editing the .htaccess file

This will open .htaccess in your computer’s default text editing program. 

Inside this file, find the ‘​​# BEGIN’ line. You’ll need to add all the Cloudflare IP addresses above this line.

Fixing error 521 with WordPress and Cloudflare

To start, type the following on a new line:

order deny,allow

How to fix error 521 using .htaccess

In a new tab, open the list of Cloudflare IP ranges

To whitelist an IP address, you’ll need to type ‘allow from’ and then either copy/paste or type the IP address. This means that:

103.21.244.0/22

Becomes:

allow from 103.21.244.0/22

You’ll also need to add each IP address on a new line.

Whitelisting the Cloudflare IP address

After adding all the Cloudflare IP addresses, save your changes. You can now close the .htaccess file.

Now you can go ahead and visit your site, to see whether this has fixed ‘Error 521.’ 

4. Ask Your Hosting Provider to Enable Port 443 

Cloudflare has a few different encryption modes.

Did you switch to Full or Full (Strict) mode, right before getting the 521 error? This may have caused the problem. 

When Cloudflare is in Full or Full (Strict) mode, it needs access to port 443. However, some servers prevent Cloudflare from accessing this port, which will trigger the ‘Error 521′ error.

The solution is to enable port 443 on your server. 

This process will vary depending on your hosting provider and your server’s settings. With that in mind, we recommend contacting your hosting provider and asking them to enable port 443 for you. 

5. Create and Upload a Cloudflare Origin Certificate 

Even with port 443 enabled, you may still get the 521 error when using Cloudflare’s Full or Full (Strict) mode. 

This is because some servers only allow connections on port 443 if you have a valid Cloudflare Origin Certificate. This certificate encrypts the traffic between Cloudflare and your web server.

If you don’t provide an Origin Certificate, you may get an ‘Error 521.’ 

The good news is that Cloudflare can walk you through the process of creating this certificate, step by step.

To get started, log into your Cloudflare account. Then go to SSL/TLS » Origin Server.

How to create a Cloudflare Origin Certificate

Next click on the Create Certificate button. 

Cloudflare will now ask for a private key and a Certificate Signing Request (CSR). 

Do you already have a private key and CSR? Then simply select the ‘Use my private key and CSR’ checkbox.

Creating a private key

You can now type your CSR into the ‘Certificate Signing Request (CSR)’ box. 

If you don’t have a CSR and key, don’t panic! Cloudflare can create these two things for you. 

To get started, select ‘Generate private key and CSR with Cloudflare.’

Fixing error 521 with WordPress and Cloudflare

You can now choose whether to create an RSA key or an ECC key. 

Most security experts agree that ECC and RSA are equally secure. However, ECC has a shorter key length. This means that ECC keys are faster. 

For this reason, we recommend you create an ECC key.

Once you’ve made your decision, open the ‘Private key type’ dropdown. You can then select either RSA or ECC.

Creating a private key for Cloudflare

Next, scroll to the Hostnames field. Here you can add all the hostnames that you want to protect. This may sound complicated, but Cloudflare does a lot of the work for you. 

You’ll see that Cloudflare has already added your root domain name

Cloudflare also automatically adds a wildcard, which is your website’s domain plus a * symbol. This is a ‘catch-all’ that makes sure your subdomains are properly protected. For example, if your root domain is ‘www.example.com’ then this wildcard will ensure your ‘store.youurwebsite.com’ subdomain is also protected. For more details, see our complete guide to subdomains

These default values should be enough to protect most websites. However, if you need to add more hostnames then you can just type them into the ‘Hostnames’ field.

Adding hostnames to Cloudflare

Next scroll to the ‘Certificate validity’ section.

Your certificate will be valid for 15 years by default. 

Need more time? Then just open the ‘Certificate validity’ dropdown and choose a new value. 

Changing your certificate validity

When you’re happy with all the information you’ve entered, click on the Create button.

Cloudflare will now create your certificate. 

Fixing error 521 with a Cloudflare certificate

Cloudflare will then show an Origin Certificate and Private Key. You’ll need to copy this information into separate files.

NOTE: You won’t be able to see the Private Key again after leaving this screen. With that in mind, make sure you store this key somewhere safe.

You can now upload your Origin Certificate to your web server. The steps may vary depending on your hosting provider and server.

To help you out, Cloudflare has published instructions for the different types of web servers.

Once you’ve installed the Origin Certificate on your server, the final step is updating your SSL/TLS encryption mode. 

In your Cloudflare dashboard, go to SSL/TLS.

The Cloudflare dashboard

Now find the ‘SSL/TLS encryption mode’ section. 

In this section select ‘Full (strict).’ 

Changing your Cloudflare mode

Cloudflare is now using your Origin Certificate. You can now check your site to see whether this has fixed the ‘Error 521’

We hope this article helped you learn how to fix ‘Error 521’ with WordPress and Cloudflare. You may also want to see our guide on best managed WordPress hosting if you’d like your hosting company to deal with the technical details, or see our roundup of the best business VoIP providers for small businesses.

If you liked this article, then please subscribe to our YouTube Channel for WordPress video tutorials. You can also find us on Twitter and Facebook.

The post How to Fix Error 521 with WordPress and Cloudflare first appeared on WPBeginner.

How To Highlight Similar Item/s and Fix Bugs in VB (Search ListView)

So my problem is that when I type for example "prod" in the SrchTBox and then click SrchBtn, it will only highlight "Product 2" but not "Product 1" even though they both have "prod" in their item name, how can I highlight any 2 or more relevant items? Also, how can I search items without the problem of worrying about case-sensitivity? That happened when I typed "prod" and it highlights the last item which is "Product 2" but not "Product 1." How can I also fix the bug where the program cannot read the text that I typed? (For example, I typed "rod" in the SrchTBox and a pop-up message shows up and it said, "No match has been found.")

NOTE: The problem is in SrchBtn.

Dim prdt As String() = New String(3) {}
Dim slctprdt As ListViewItem

Dim prdtName As String
Dim price As String
Dim qtty As String
Private Sub Form1_Load(ByVal sender As System.Object, ByVal e As System.EventArgs) Handles MyBase.Load

    ProductListView.View = View.Details
    ProductListView.GridLines = True
    ProductListView.FullRowSelect = True

    ProductListView.Columns.Add("Product Name", 126)
    ProductListView.Columns.Add("Price", 93)
    ProductListView.Columns.Add("Quantity", 93)

    prdt(0) = "Product 1"
    prdt(1) = "100"
    prdt(2) = "10"
    slctprdt = New ListViewItem(prdt)
    ProductListView.Items.Add(slctprdt)

    prdt(0) = "Product 2"
    prdt(1) = "200"
    prdt(2) = "20"
    slctprdt = New ListViewItem(prdt)
    ProductListView.Items.Add(slctprdt)

End Sub
Private Sub SlctBtn_Click(ByVal sender As System.Object, ByVal e As System.EventArgs)

    If ProductListView.SelectedItems.Count = 0 Then
        MsgBox("ERROR: No items selected")
    Else
        prdtName = ProductListView.SelectedItems.Item(0).SubItems(0).Text
        price = ProductListView.SelectedItems.Item(0).SubItems(1).Text
        qtty = ProductListView.SelectedItems.Item(0).SubItems(2).Text

        MsgBox(prdtName & " " + price & " " & qtty)
    End If

End Sub
Private Sub AddPrdtBtn_Click(ByVal sender As System.Object, ByVal e As System.EventArgs)

    Dim prdt As String() = New String(3) {}
    Dim slctprdt As ListViewItem

    If PrNTBox.Text <> Trim("") And PTBox.Text <> Trim("") And QTBox.Text <> Trim("") Then
        prdt(0) = PrNTBox.Text
        prdt(1) = PTBox.Text
        prdt(2) = QTBox.Text
        slctprdt = New ListViewItem(prdt)
        ProductListView.Items.Add(slctprdt)
        PrNTBox.Clear()
        PTBox.Clear()
        QTBox.Clear()
    Else
        MsgBox("ERROR: Incomplete textboxes")
    End If

End Sub

Private Sub SrchBtn_Click(ByVal sender As System.Object, ByVal e As System.EventArgs) Handles SrchBtn.Click

    Dim srchTxt = Me.SrchTBox.Text

    If srchTxt = String.Empty Then
        MsgBox("Please enter the search box first.")
    Else
        Dim strtIndx = 0
        Dim prdt As ListViewItem = Nothing

        If Me.ProductListView.SelectedItems.Count = 1 AndAlso Me.ProductListView.SelectedItems(0).Text = srchTxt Then
            strtIndx = Me.ProductListView.SelectedIndices(0) + 1
        End If

        If strtIndx < Me.ProductListView.Items.Count Then
            Do
                prdt = Me.ProductListView.FindItemWithText(srchTxt, False, strtIndx)

                If prdt Is Nothing OrElse prdt.Text = srchTxt Then
                    Exit Do
                End If

                strtIndx = prdt.Index + 1

                If strtIndx >= Me.ProductListView.Items.Count Then
                    Exit Do
                End If
            Loop
        End If

        Me.ProductListView.SelectedItems.Clear()

        If prdt Is Nothing Then
            MsgBox("No match has been found.")
        Else
            prdt.Selected = True
            prdt.EnsureVisible()
            Me.ProductListView.Select()
        End If
    End If
End Sub

Can anyone help me to solve this code?

Write a program that checks the pressure of soda cans coming from a production line using a function. For each soda, the pressure value must be CLOSE to its ideal value. However, due to manufacturing problems the pressure value from can to can.

First, the program will read the number of cans (numCan) as an int. Then, the ideal pressure value will be given (idealPsi) as a double followed by lower tolerance level (lowerTLevel) as a double and upper tolerance level (upperTLevel) as a double. Lastly, one by one the pressure values for each can will be given as double values.

The program will check the pressure value of each can using a function (isPressureAcceptable) that gets necessary items as parameters and returns a bool value. The main function will print out the index of the defective items as int values. An item that is OUTSIDE the tolerance boundary is a defective item.

The tolerance boundary can be calculated with the following formulas;

Lower Boundary = idealPsi (idealPsi * lowerTlLevel)

Upper Boundary = idealPsi + (idealPsi * upperTlLevel)

NOTE: The pressure acceptability check MUST be done in the function and printing the result to the screen MUST be done in the main function.

NOTE: The index number of the first product is 1, NOT 0.

The inputs and outputs should be :

Input;
4 92 0.12 0.2
100 92 200 8

Output;
3 4

Input;
8 55.3 0.04 0.1
55 55.1 58 55.2 55.6 69.8 55 54.9

Output;
6

Input;
6 72 0.2 0
72 70 73 72.1 72 72.01

Output;
3 4 6

How Redux Reducers Work

In this tutorial, we’re going to learn the concept of reducers and how they work, specifically in React applications. In order to understand and better use Redux, a solid understanding of reducers is essential. Reducers provide a way to update an application’s state using an action. It is an integral part of the Redux library.

This tutorial is for developers who want to learn more about Redux Reducers. An understanding of React and Redux would be beneficial. At the end of the tutorial, you should have a better understanding of the role Reducers play in Redux. We’ll be writing code demos and an application to better understand Reducers and how it affects the state in an application.

What Is A Reducer

A Reducer is a pure function that takes the state of an application and action as arguments and returns a new state. For example, an authentication reducer can take an initial state of an application in form of an empty object and an action that tells it that a user has logged in and returned a new application state with a logged-in user.

Pure functions are functions that do not have any side effects and will return the same results if the same arguments are passed in.

Below is an example of a pure function:

const add = (x, y) => x + y;

add(2, 5);

The example above returns a value based on the inputs, if you pass 2 and 5 then you’d always get 10, as long as it's the same input nothing else affects the output you get, that’s an example of a pure function.

Below is an example of a reducer function that takes in a state and an action.

const initialState = {};
const cartReducer = (state = initialState, action) => {
  // Do something here
}

Let’s define the two parameters that a reducer takes in, state and action.

State

A state is the data that your component(s) is working with — it holds the data that a component requires and it dictates what a component renders. Once a state object changes, the component re-renders. If an application state is managed by Redux, then the reducer is where state changes happen.

Action

An action, is an object that contains the payload of information. They are the only source of information for the Redux store to be updated. Reducers update store based on the value of the action.type. Here we will define the action.type as ADD_TO_CART.

According to the official Redux documentation, actions are the only things that trigger changes in a Redux application, they contain the payload for changes to an application store. Actions are JavaScript objects that tell Redux the type of action to be performed, usually they’re defined as functions like the one below:

const action = {
  type: 'ADD_TO_CART',
  payload: {
    product: 'margarine',
    quantity: 4
  }
}

The code above is a typical payload value that contains what a user is sending and it will be used to update the state of the application. As you can see from above, the action object contains the type of action and a payload object that would be necessary for this particular action to be performed.

Updating State Using Reducers

To show how reducers work, let’s look at the number counter below:

const increaseAction = {
  type: 'INCREASE',
}; 

const decreaseAction = {
  type: 'DECREASE'
}; 


const countReducer = (state = 0, action) => {
  switch(action.type){
  case INCREASE: 
    return state + 1;

  case DECREASE : 
    return state -1;

  default: 
 return state;

  }
};

In the code above, increaseAction and decreaseAction are actions used in the reducer to determine what the state is updated to. Next, we have a reducer function called countReducer, which takes in an action and an initial state whose value is 0. If the value of action.type is INCREASE, we return a new state that is incremented by 1, else if it is DECREASE a new state that is decremented by 1 is returned. In cases where none of those conditions are meant, we return state.

Updating State Using Reducers: The Spread Operator

State can’t be directly changed, to create or update state, we can use the JavaScript spread operator to make sure we don’t change the value of the state directly but instead to return a new object that contains a state passed to it and the payload of the user.

const contactAction = {
  type: 'GET_CONTACT',
  payload: ['0801234567', '0901234567']
};

const initialState = {
  contacts: [],
  contact: {},
};

export default function (state = initialState, action) {
  switch (action.type) {
    case GET_CONTACTS: 
      return {
        ...state,
        contacts: action.payload,
    };
  default: 
    return state;
  }

In the code above, we are using a spread operator to make sure we don’t change the state value directly, this way we can return a new object that is filled with the state that is passed to it and the payload that’s sent by the user. By using a spread operator, we can make sure that the state stays the same as we add all new items to it and also replace the contacts field in the state if it was present before.

Redux Reducers In Action — A Demo

To better understand Redux Reducers and how they work, we will be implementing a simple Movie details finder app, the code and working version can be found here on Codesandbox. To get started, go to your terminal and initialize a react app using the command below:

create-react-app movie-detail-finder

Once our project initialized, next let’s install the packages we’d need for our application.

npm i axios reactstrap react-redux redux redux-thunk

Once, the packages are installed, let’s start our development server using the command:

npm start

The above command should start our project development server in our browser. Next let’s open our project in our text editor of choice, inside our project src folder, delete the following files: App.css, App.test.js, serviceWorker.js and setupTests.js. Next, let’s delete all code that references the deleted files on our App.js.

For this project, we will be using Open Movie Database API to get our movie information, content and images for our application, here is a link to the API, you’d need to register and get access keys in order to use it for this application, Once you’re done, let’s proceed with our application by building components.

Building App Components

First, inside of our src folder in our project directory, create a folder called components and inside the folder, let’s create two folders called Movie and Searchbar, our component should look like the image below:

Building Movie Component

Let’s build the Movies component, which will outline the structure of the movie details we will be getting from our API. To do this, inside the Movies folder of our component, create a new file Movie.js, next create a class based component for the API results, let’s do that below.

import React, { Component } from 'react';
import { Card, CardImg, CardText, CardBody, ListGroup, ListGroupItem, Badge } from 'reactstrap';
import styles from './Movie.module.css';

class Movie extends Component{
    render(){
        if(this.props.movie){
            return (
                <div className={styles.Movie}>
                    <h3 className="text-center my-4">
                      Movie Name: {this.props.movie.Title}
                    </h3>
                    <Card className="text-primary bg-dark">
                        <CardImg className={styles.Img}
                          top src={this.props.movie.Poster} 
                          alt={this.props.movie.Title}/>
                        <CardBody>
                            <ListGroup className="bg-dark">
                              <ListGroupItem>
                                <Badge color="primary">Actors:</Badge>
                                  {this.props.movie.Actors}
                                  </ListGroupItem>
                          <ListGroupItem>
                            <Badge color="primary">Genre:</Badge>
                            {this.props.movie.Genre}
                          </ListGroupItem>
                          <ListGroupItem>
                            <Badge color="primary">Year:</Badge>
                            {this.props.movie.Year}
                          </ListGroupItem>
                          <ListGroupItem>
                            <Badge color="primary">Writer(s):</Badge> 
                            {this.props.movie.Writer}
                          </ListGroupItem>
                        <ListGroupItem>
                          <Badge color="primary">IMDB Rating:</Badge> 
                            {this.props.movie.imdbRating}/10
                        </ListGroupItem>
                    </ListGroup>
                      <CardText className="mt-3 text-white">
                        <Badge color="secondary">Plot:</Badge>
                          {this.props.movie.Plot}
                        </CardText>
                      </CardBody>
                    </Card>
                </div>
            )
        }
        return null
    }
}
export default Movie;

In the code above, Using components from the package reactstrap, you can check out the documentation here. We built a Card component that includes the movie name, Image, genre, actor, year, movie writer, rating, and plot. To make it easier to pass data from this component, we built data to be as props to other components. Next, let’s build our Searchbar component.

Building Our Searchbar Component

Our Searchbar component will feature a search bar and a button component for searching movie components, let’s do this below:

import React from 'react';
import styles from './Searchbar.module.css';
import { connect } from 'react-redux';
import { fetchMovie } from '../../actions';
import Movie from '../Movie/Movie';

class Searchbar extends React.Component{
render(){
        return(
            <div className={styles.Form}>
                <div>
                    <form onSubmit={this.formHandler}>
                        <input 
                            type="text" 
                            placeholder="Movie Title" 
                            onChange={e => this.setState({title: e.target.value})}
                            value={this.state.title}/>
                        <button type="submit">Search</button>
                    </form>
                </div>
                <Movie movie={this.props.movie}/>
            </div>
        )
    }
}

In the code above, we are importing connect from react-redux which is used to connect a React component to the Redux store, provides the component with information from the store and also provides functions used to dispatch actions to the store. Next, we imported the Movie component and a function fetchMovie from actions.

Next, we have a form tag with an input box for entering our movie titles, using the setState hook from React, we added an onChange event and value that will set the state of title to the value entered in the input box. We have a button tag to search for movie titles and using the Movie component that we imported, we passed the properties of the component as props to the result of the search.

Next for us is to write a function to submit our movie title to the API in order to send results to us, we also need to set the initial state of the application. let’s do that below.

class Searchbar extends React.Component{

    state = {
        title: ''
    }
    formHandler = (event) => {
        event.preventDefault();
        this.props.fetchMovie(this.state.title);
        this.setState({title: ''});
    }

Here, we set the initial state of the application to empty strings, we created a function formHandler that takes in an event parameter and passes the fetchMovie function from action and setting the title as the new state of the application. To complete our application, let’s export this component using the connect property from react-redux, to do this we’d use the react redux mapToStateProps property to select the part of the data our component would need, you can learn more about mapToStateProps here.

const mapStateToProps = (state) => {
    return { movie: state.movie }
}
export default connect(mapStateToProps, { fetchMovie })(Searchbar)

Let’s add styles to our form by creating a file Searchbar.module.css and adding the styles below:

.Form{
  margin: 3rem auto;
  width: 80%;
  height: 100%;
}
input{
  display: block;
  height: 45px;
  border: none;
  width: 100%;
  border-radius: 0.5rem;
  outline: none;
  padding: 0 1rem;
}
input:focus, select:focus{
  border: 2px rgb(16, 204, 179) solid;
}

.Form button{
  display: block;
  background: rgb(16, 204, 179);
  padding: 0.7rem;
  border-radius: 0.5rem;
  width: 20%;
  margin-top: 0.7rem;
  color: #FFF;
  border: none;
  text-decoration: none;
  transition: all 0.5s;
}
button:hover{
  opacity: 0.6;
}
@media(max-width: 700px){
  input{
      height: 40px;
      padding: 0 1rem;
  }
  .Form button{
      width: 40%;
      padding: 0.6rem;
  }
}

Once we’ve done the above, our search bar component should look similar to the image below:

Creating Actions For Application

In this component, we will be setting up Redux actions for our application, First, inside the src directory, create a folder named actions and inside the folder, we’d create an index.js file. Here we’d create a function fetchMovie that takes in a title parameter, and fetches movie from the API using Axios. Let’s do this below:

import axios from 'axios';

export const fetchMovie = (title) =>
    async (dispatch) => {
        const response = await 
          axios.get(
            https://cors-anywhere.herokuapp.com/http://www.omdbapi.com/?t=${title}&apikey=APIKEY);
        dispatch({
            type: 'FETCH_MOVIE',
            payload: response.data
        })
    }

In the code above, we imported axios and created a function called fetchMovie which takes in a title parameter by using async/await so that we can make a request to the API server. We have a dispatch function that dispatches to the Redux the action object that is passed to it. From what we have above, we’re dispatching an action with the type FETCH_MOVIE and the payload that contains the response we got from the API.

NOTE: The apikey in the request will be replaced with your own apikey after registering at OmdbAPI.

Creating App Reducers

In this section, we are going to create reducers for our application.


const fetchMovieReducer = (state = null, action) => {
    switch(action.type){
        case 'FETCH_MOVIE':
            return action.payload;
        default:
            return state;
    }
}
const rootReducer = (state, action) => {
    return { 
        movie: fetchMovieReducer(state, action)
    }
}
export default rootReducer;

In the code above, we created a fetchMovieReducer that takes in a default state of null and an action parameter, using a switch operator, for case FETCH_MOVIE we will return the value of the action.payload which is the movie we got from the API. If the action we tried performing isn’t in the reducer, then we return our default state.

Next, we created a rootReducer function that will accept the current state and an action as input and returns the fetchMovieReducer.

Putting It Together

In this section, we’d finish our app by creating our redux store in the index.js, let’s do that below:

import React from 'react';
import ReactDOM from 'react-dom';
import { Provider } from 'react-redux';
import { createStore, applyMiddleware } from 'redux';
import thunk from 'redux-thunk';
import App from './App';
import 'bootstrap/dist/css/bootstrap.min.css';
import './index.css';
import reducers from './reducers';

const store = createStore(reducers, applyMiddleware(thunk))
ReactDOM.render(
    <Provider store={store}>
        <>
          <App/>
        </>
    </Provider>,
    document.getElementById('root')
)

In the code above, we created the application store using the createStore method by passing the reducer we created and a middleware. Middlewares are addons that allow us to enhance the functionalities of Redux. Here we are making use of the Redux Thunk middleware using applyMiddleware. The Redux Thunk middleware is necessary for our store to do asynchronous updates. This is needed because by default, Redux updates the store synchronously.

To make sure our application knows the exact store to use, we wrapped our application in a Provider component and passed the store as a prop, by doing this, other components in our application can connect and share information with the store.

Let’s add a bit of style to our index.css file.

*{
  margin: 0;
  padding: 0;
  box-sizing: border-box;
}
body{
  background: rgb(15, 10, 34);
  color: #FFF;
  height: 100vh;
  max-width: 100%;
}

Rendering And Testing A Movie Detail Finder

In this section, we are going to conclude our application by rendering our application in our App.js, to do this, let’s create a class-based component named App and initialize our Searchbar and input field.

import React from 'react';
import Searchbar from './components/Searchbar/Searchbar';
import styles from './App.module.css';
class App extends React.Component{

    render(){
        return(
            <div className={styles.App}>
                <h1 className={styles.Title}>Movies Search App</h1>
                <Searchbar/>
            </div>

        )
    }
}
export default App;

Here, we created an App class based component with a h1 that says Movie Search App and added our Searchbar component. Our application should look like the image below:

A working demo is available on Codesandbox.

Conclusion

Reducers are an important part of Redux state management, with reducers we can write pure functions to update specific areas of our Redux applications without side effects. We’ve learned the basics of Redux reducers, their uses, and the core concept of reducers, state, and arguments.

You can take this further by seeing the documentation on Redux reducers here. You can take this further and build more on Redux reducers, let me know what you build.

Resources

How to Start a WordPress Blog the RIGHT WAY in 7 Easy Steps (2020)

Do you want to start a WordPress blog the right way? We know that starting a blog can be a terrifying thought specially when you are not geeky. Guess what – you are not alone. Having helped over 370,000+ users create a blog, we have decided to create the most comprehensive guide on how to start a WordPress blog without any technical knowledge.

Start a WordPress blog

The process is easy to follow whether you are 20 years old or 60 years old. However if you need help, our expert team will help you setup your blog for free. → Click Here to Get Your Free WordPress Blog Setup! ←

What do you need to start a WordPress blog?

There are three things you need to create a WordPress blog:

  1. A domain name idea (this will be the name of your blog i.e wpbeginner.com)
  2. A web hosting account (this is where your website live on the internet)
  3. Your undivided attention for 30 minutes.

Yes, you read it right. You can start a blog from scratch in less than 30 minutes, and we will walk you through the whole process, step by step.

In this tutorial, we will cover:

  • How to Register a Domain Name for Free
  • How to Choose the Best Web Hosting
  • How to Install and Setup WordPress Blog
  • How to Change Your Blog Design Template
  • How to Write Your First Blog Post
  • How to Customize WordPress Blog with Plugins
  • How to Add a Contact Form
  • How to Setup Google Analytics Tracking
  • How to Optimize Your Website for SEO
  • How to Make Money From Your Blog
  • Resources to Learn and Master WordPress

Ready? Let’s get started.

Video Tutorial

If you don’t like the video or need more instructions, then continue reading.

Step 1. Setup

The biggest mistake beginners make when building a blog is choosing the wrong blogging platform. Thankfully you’re here, so you won’t be making that mistake.

For 95% of users, it makes more sense to use WordPress.org also known as self-hosted WordPress. Why?

Because it is free to use, you can install plugins, customize your blog design, and most importantly make money from your blog without any restrictions (see the difference between WordPress.com vs WordPress.org).

WordPress is also the number one website platform used by all successful blogs. To put in perspective, 34% of all websites on the internet use WordPress!

Now you might be wondering why is WordPress free? What’s the catch?

There’s no catch. It’s free because you have to do the setup and host it yourself.

In other words, you need a domain name and web hosting.

A domain name is what people type to get to your website. It’s your website’s address on the internet. Think google.com or wpbeginner.com

Web hosting is where your website files live. It’s your website’s house on the internet. Every website needs web hosting.

A domain name typically costs around $14.99 / year, and web hosting normally costs $7.99 / month.

That’s a lot of money for beginners who are just starting out.

Thankfully, Bluehost, an official WordPress recommended hosting provider, has agreed to offer our users a free domain name and over 60% off on web hosting.

→ Click here to Claim this Exclusive Bluehost offer ←

Bluehost is one of the oldest web hosting companies on the internet. They are also the largest brand name when it comes to WordPress hosting because they host millions of websites including many of our own.

On top of all this, Bluehost has been working with WordPress since 2005, and they are committed to giving back. That’s why they have promised us that if you cannot get your blog online within 30 minutes by following this tutorial, then our expert team will complete the process for you without any cost. They will compensate us, so you don’t have to. Contact us for free blog setup help.

NOTE: At WPBeginner we believe in transparency. If you sign up with Bluehost using our referral link, we will earn a small commission at no extra cost to you (in fact, you will save money and get a free domain). We would get this commission for recommending just about any WordPress hosting company, but we only recommend products that we use personally use and believe will add value to our readers.

Let’s go ahead and purchase your domain + hosting.

Open up Bluehost in a new window and follow along.

First thing you need to do is click on the green Get Started Now button to get started.

Get started with Bluehost

On the next screen, select the plan that you need (basic and plus are the most popular).

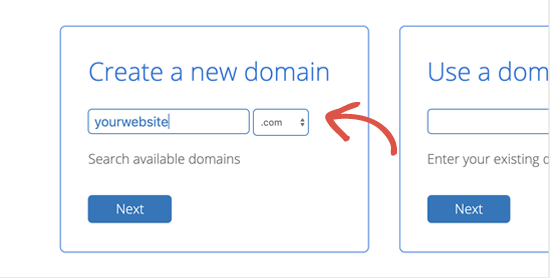
After that, you will be asked to enter the domain name for your website.

Select your domain name

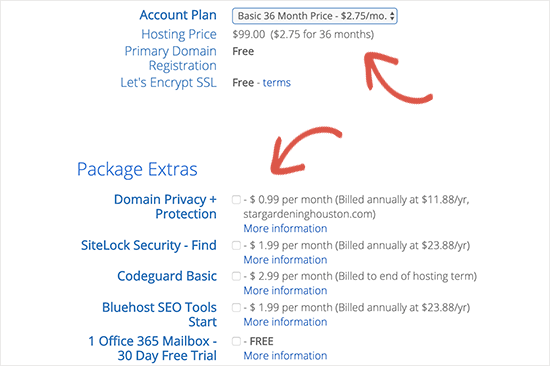
Lastly, you will need to add your account information and finalize the package info to complete the process. We recommend going with the 36-month plan because that’s the best value.

On this screen, you will see optional extras that you can purchase. It’s entirely up to you whether or not you purchase these, but we generally don’t recommend purchasing them right away. You can always add them later on, if you decide that you need them.

Hosting checkout for starting a blog

Once completed, you will receive an email with details on how to login to your web hosting control panel (cPanel). This is where you manage everything from support, emails, among other things. But most importantly, this is where you install WordPress.

Step 2. Install WordPress

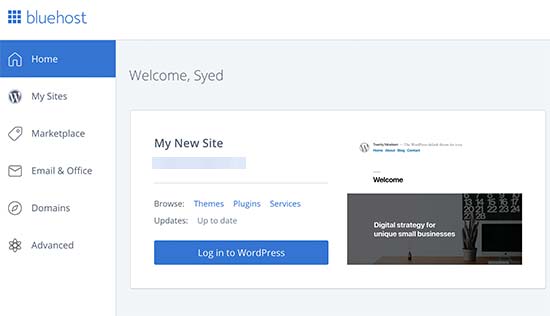
When you signup with the new version of Bluehost using our link, they will automatically install WordPress for you. This new version was recently launched to make it easier for non-techy users to create their blog.

What this means is you simply need to login to your Bluehost account, and then click the Login to WordPress button to get started.

Log in to your WordPress blog from Bluehost dashboard

You can also login to WordPress by simply going to yoursite.com/wp-admin/ directly from your browser.

If you are using a different WordPress blog hosting service like SiteGround, HostGator, WP Engine, etc, then you can see our comprehensive guide on how to install WordPress for step by step instructions for those providers.

Once WordPress is setup, you’re ready to customize your blog’s appearance to make it your own and start blogging.

Step 3. Selecting Your WordPress Theme

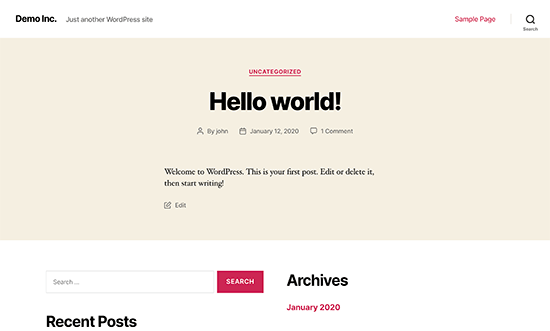
The visual appearance of your WordPress blog is controlled by themes. When you first visit your blog, it will look something like this:

Default WordPress theme

This is not very appealing to most people.

Customizing the look and feel of your blog is by far one of the most exciting and rewarding part in the journey of creating your WordPress blog.

There are thousands of pre-made WordPress themes that you can install on your site. Some of them are free themes, while others are paid.

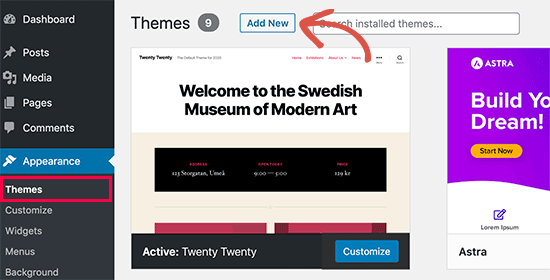
You can change your theme by going to your WordPress dashboard and clicking on Appearance » Themes.

Add new WordPress theme

Go ahead and click on the Add New button.

On the next screen, you will able to search from 7,400+ free WordPress themes that are available in the official WordPress.org themes directory. You can sort by popular, latest, featured, as well as other feature filters (i.e industry, layout, etc).

Select a theme

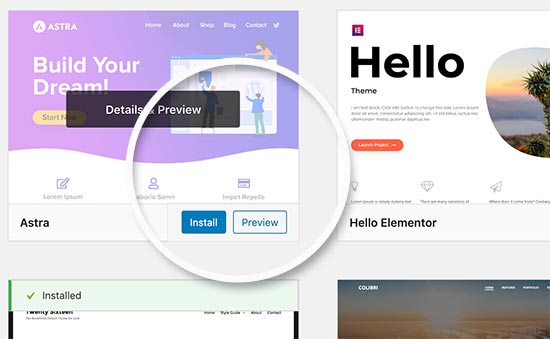
You can take your mouse over to a theme, and you will see a Preview button. Clicking on it will open the theme preview where you can see how the design would look on your website.

Preview theme

The preview of your theme may not look exactly as shown in the screenshot, which is normal as you will get to customize and set it up later. What you need to look for is design, colors, typography, and other elements.

The best tip to select the perfect WordPress theme is to strive for simplicity in design. It helps you keep things clean and clear while offering a good experience to your users.

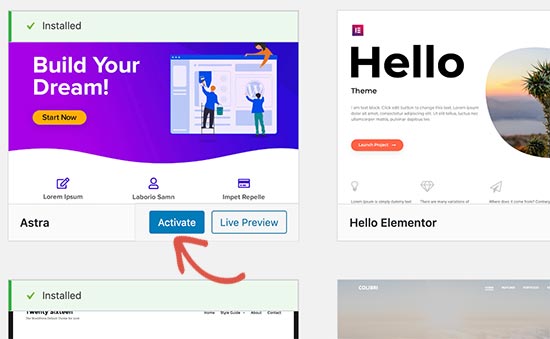
When you have found the theme that you like, simply bring your mouse on it, and it will show the Install button. Click on it and wait for the theme to be installed. After that, the install button will be replaced with an Activate button. You need to click on it to Activate the theme.

Install and activate the WordPress theme

Once you have installed your theme, you can customize it by clicking on the Customize link under the Appearance menu.

If you need help selecting a theme, then please refer to our guide on 9 things you should consider when selecting a perfect WordPress theme.

Once you have selected your WordPress theme, you are now ready to create your first blog post.

Step 4. Creating Your First Blog Post

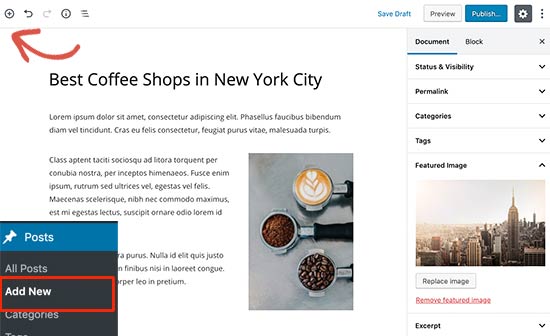
To write a blog post, click on the Posts » Add New menu in your WordPress dashboard.

You will see an editor area where you can write your first blog post.

Writing a blog post in WordPress

WordPress uses a block-based editor where each element is a block. This allows you to create beautiful content layouts for your blog posts.

To familiarize yourself with the editor, see our WordPress block editor tutorial.

Once you’re done writing, go ahead and click on the Publish button on the top-right corner of the screen to make your blog post publicly available.

Publish blog post

On the posts screen, you will notice several other sections such as Categories and Tags. You can use these to organize your blog posts into sections. We have a great writeup on the difference between categories vs tags, which we highly recommend that you read.

To utilize all the features on the posts screen, you should read our article on how to add a new post in WordPress (video included).

Often beginners are confused between posts and pages menu in the WordPress dashboard. That’s why we have also written a complete guide on the difference between posts vs pages in WordPress.

Step 5. Plugins & Customizations

Once you have written your first sample blog post, you probably want to get started with adding other usual elements on your website such as contact forms, galleries, sliders, newsletter subscription form, etc.

To add all these additional features, you need to use plugins.

WordPress plugins are apps that allow you to add new features to your website (without writing any code).

There are over 55,000 WordPress plugins available in the free WordPress plugin directory alone. This means no matter what you want to accomplish, there is a plugin for it.

We have a step by step guide on how to install a WordPress plugin.

That being said, let’s take a look at how to use plugins to add some essential features to your WordPress blog.

How to Create a Contact Form in WordPress

Every website needs a contact form. It allows your users to email you directly. Since WordPress doesn’t come with a built-in contact form, you will need a WordPress form builder plugin to add a contact form on your site.

We recommend using the WPForms Lite plugin. It is a free version of the popular WPForms plugin, which is #1 in our list of best contact form plugins for WordPress.

Over 3 million websites use WPForms!

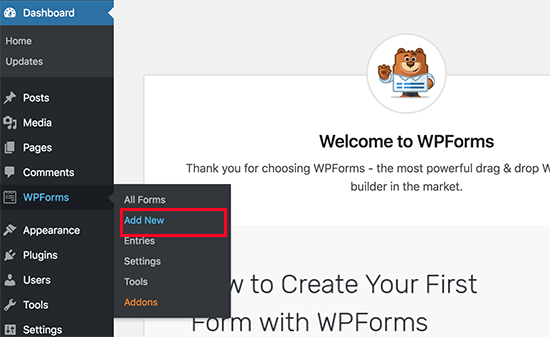
You can install the plugin by going to Plugins » Add New page and typing WPForms in the search box. Next, you need to click “Install” and then “Activate”. Upon activation, you need to head over to WPForms » Add New page to create your first form.

Adding a new contact form in WordPress

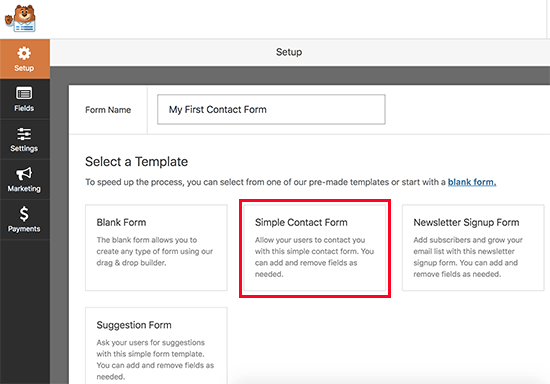
This will open the WPForms builder interface.

First, you need to enter a name for your contact form and then click on ‘Simple Contact Form’ template.

Simple contact form

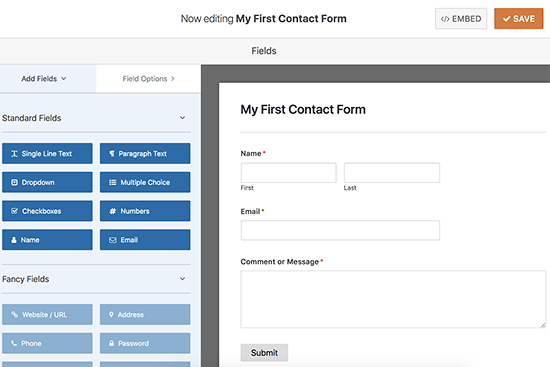
WPForms will now create a simple contact form for you with all the required fields. You can click on any field to change it, or add a new field from the left column.

Editing your contact form

Once you are done editing the form, click on the save button at the top right corner and then exit the form builder.

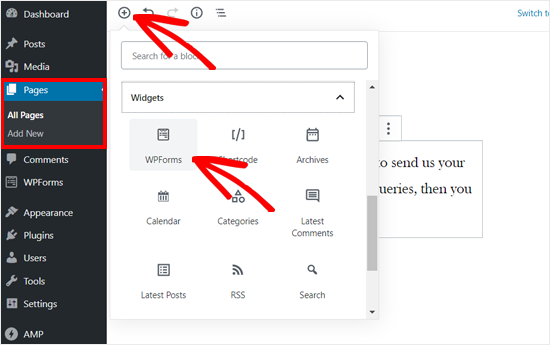
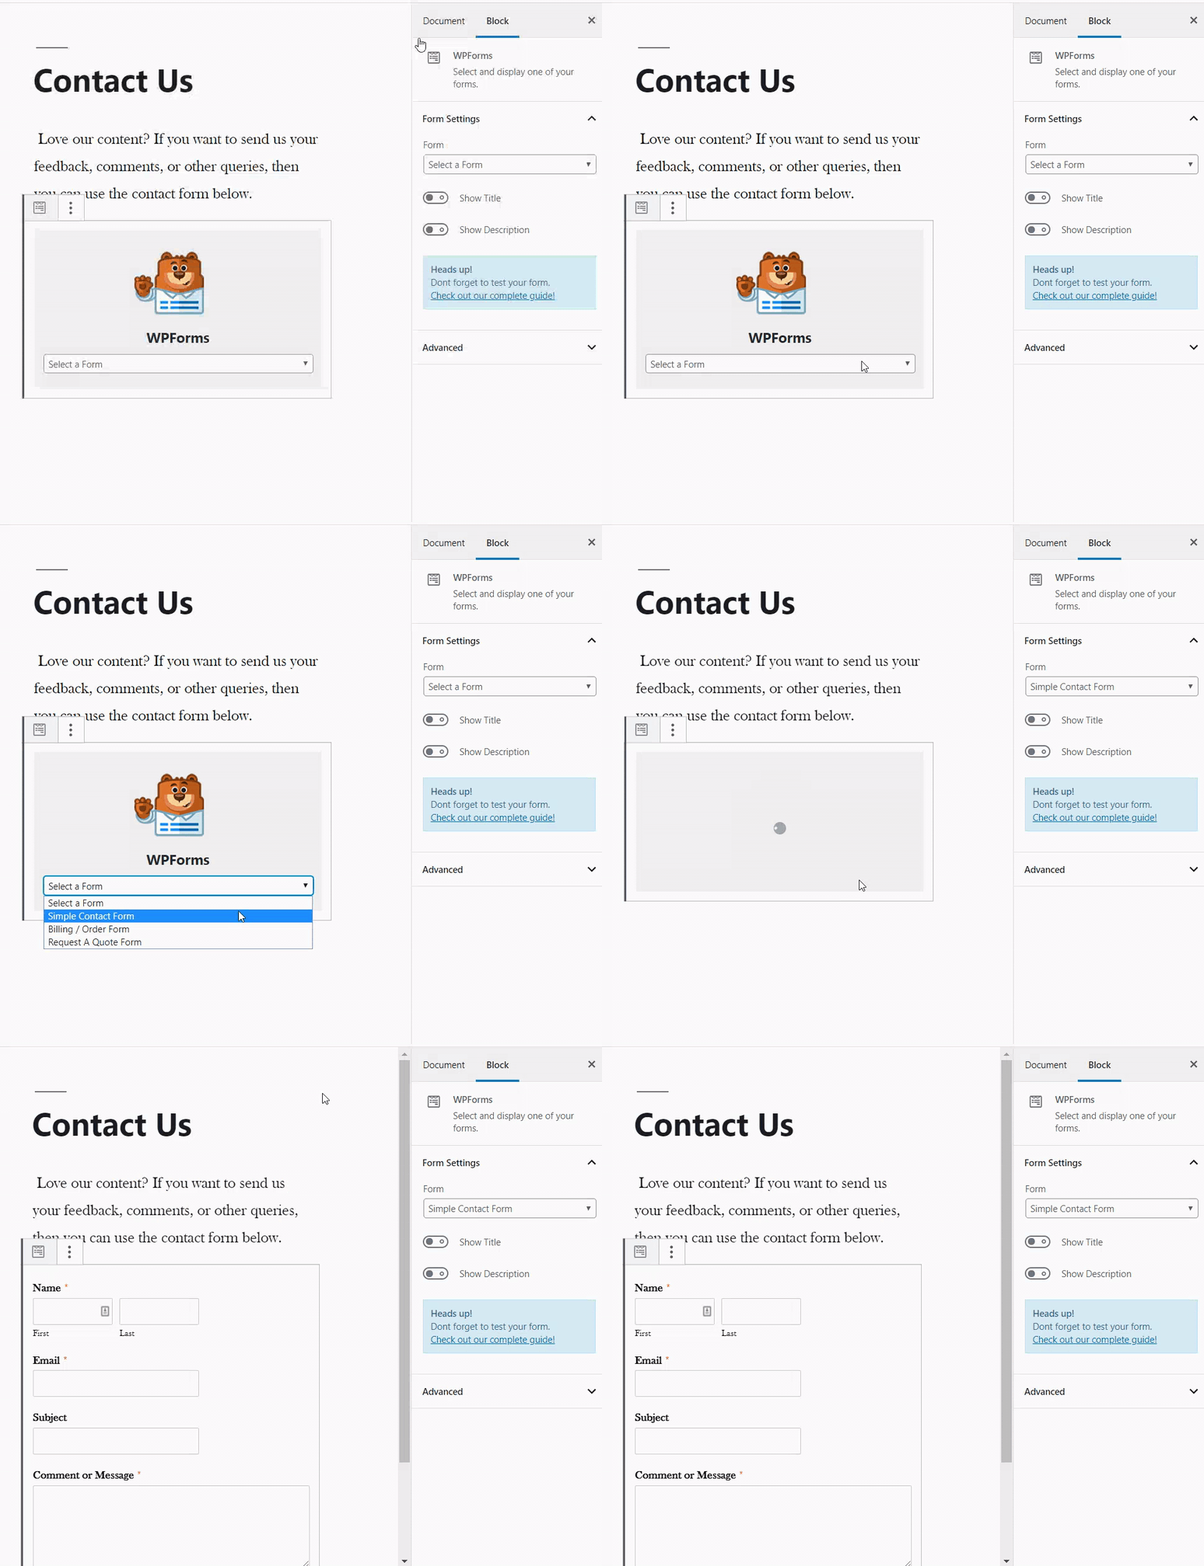
You can now create a new page in WordPress by going to Pages » Add New and call it ‘Contact’. On the edit screen, you need to enter the WPForms block into the editor.

Add WPForms block to the editor

After that, select the form you created earlier from the drop down menu and WPForms will load a live preview of the form in the editor.

Select your contact form

You can now save and publish the page and visit it in your browser to see your contact form in action.

If you need more detailed instructions, then see our step by step guide on how to create a contact form in WordPress.

How to Setup Google Analytics Tracking

Google Analytics helps you see how many people are visiting your blog, where they are coming from, and what are they doing on your website?

It is best to install Google Analytics when starting your blog, so you can see how much your blog has grown over time.

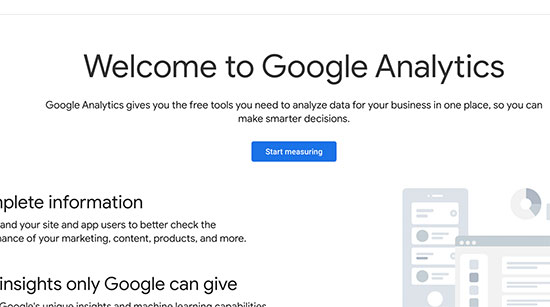
First, you need to visit Google Analytics website and sign in using your Gmail account.

Once you are logged in, you can go ahead and sign up for a free Google Analytics account.

Google Analytics sign up

You will be asked to provide your information and website URL. After that, you will be presented with your Google Analytics tracking code.

You can stop here because we will be using a plugin to automatically fetch and add this code to your blog (along with setting up proper WordPress tracking).

Switch to your WordPress admin area to install and activate the MonsterInsights plugin. It is the free version of the best Google Analytics plugin for WordPress, and it is the easiest way to add Google Analytics on your site (trusted by over 2 million websites).

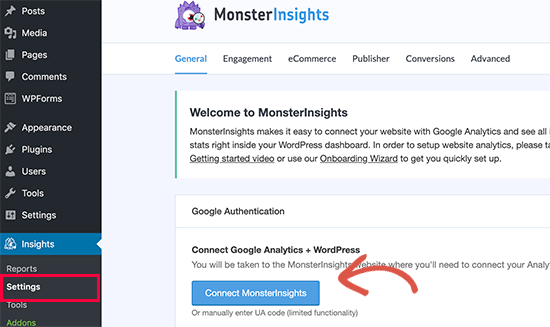
Upon activation, you need to visit Insights » Settings page to configure the plugin settings.

Connect Google Analytics using MonsterInsights

On the settings page, click on the ‘Connect MonsterInsights’ button to connect Google Analytics to your WordPress site.

Follow the on-screen instructions to complete the setup. Once done, you will be able to see your website analytics report straight from your WordPress dashboard under the MonsterInsights tab.

Website stats reports in MonsterInsights

For detailed instructions, see our article on how to install Google Analytics in WordPress.

How to Optimize Your WordPress Blog for SEO

Most beginners don’t optimize for SEO when creating a blog. SEO or search engine optimization helps users find your blog in search engines. If you want more traffic, then it’s crucial that you optimize your blog for SEO from the beginning.

To get started, first you need to install and activate the Yoast SEO plugin. It is the complete WordPress SEO plugin that will help you optimize your blog.

Upon activation, you will see a new menu item labeled ‘SEO’. Clicking on it will take you to the plugins settings page.

Yoast SEO settings

The plugin comes with a quick configuration wizard to help you walk through the set up. You can also follow the instructions in our Yoast SEO guide for manual set up.

We also recommend you to follow our complete step by step WordPress SEO guide to set up your blog’s SEO.

More WordPress Plugins and Customizations

There are a ton of others WordPress plugins that you can install. Often beginners find it a bit overwhelming to search for the plugins they need.

At WPBeginner, we often feature the best WordPress plugins to help you add the functionality that you need.

Here is our expert pick of the best WordPress plugins that you should check out.

If you are curious about the plugins and tools we use on our site, then check out WPBeginner’s Blueprint. It has all the plugins and tools that we use on the WPBeginner blog.

Need more recommendations? See our expert-pick of the must have WordPress plugins and tools for all websites (hand-picked by our founder, Syed Balkhi).

Step 6. Making Money From Your Blog

Now that you’ve created your blog and customized it to your liking, you are probably wondering how can I actually make money from my blog?

There are a lot of different ways to successfully monetize your blog. However there is no such thing as a get rich quick scheme.

Don’t be fooled by the pictures of expensive cars and mansions because those are all fake.

Unlike other “make money online” articles, we have created the most comprehensive guide on how to make money from your blog using WordPress.

Make Money Online Blogging with WordPress

That’s a 4000+ word guide that everyone who want to make money with their blog needs to read. We have shared our 15+ years of online wisdom in that ultimate guide.

As long as you’re willing to put in the hard work and effort, you’ll reap the reward. Remember, there are no shortcuts.

Here are some of the best ways to make money from your blog.

1. Google AdSense

Google AdSense

Many bloggers make money by showing ads on their blog. If you make a blog with monetization in mind, then Google AdSense is the best way to do this.

It is the largest advertising platform for bloggers and publishers. Acting as a middleman between you and the advertiser, Google allow advertisers to bid for keywords matching your content. This allows you to get the best rates possible for the ads.

For more details, see our article on how to properly add Google AdSense to your WordPress blog.

2. Affiliate Marketing

Affiliate Marketing

Affiliate marketing is the second most commonly used monetization strategy among bloggers. Basically, you recommend your favorite products / services to your readers, and when they make a purchase you get a referral commission.

The key in affiliate marketing is to recommend high-quality products and services that you already use and trust. There are plenty of affiliate marketing plugins and tools for WordPress that can help you make more money when promoting affiliate products.

We also have a complete step by step affiliate marketing guide for beginners, that will help you get started.

3. Online Store

Add an online store to your WordPress blog

Many bloggers make money by selling things directly from their blog. This could be physical products, digital downloads like ebooks, artwork, music, and more. Some bloggers even offer consulting services.

We recommend using WooCommerce because it is the best eCommerce plugin for WordPress. It is also the most commonly used eCommerce platform in the world.

For detailed instructions, see our guide on how to easily create an online store using WordPress.

On top of the 3 methods above, you can do so much more with your WordPress blog. You can make WordPress blogs specifically for reviews, fashion blogging, food blogging with recipes, and more. Each of these blog types brings you more unique opportunities to make money.

You can also turn your blog into a membership site to offer premium content and courses.

Step 7. Mastering WordPress

Business Learning and Support

WPBeginner is the largest free WordPress resource site for beginners.

At WPBeginner, our main goal is to provide cutting-edge helpful WordPress tutorials that are easy to understand for small businesses, bloggers, and non-techy WordPress website owners (see more about us).

To expand your WordPress knowledge, you should check out:

  • WPBeginner Dictionary – The best place for beginners to start and familiarize themselves with the WordPress lingo
  • WPBeginner Videos – New to WordPress? Watch these 23 videos to master WordPress.
  • WPBeginner Blog – The central place for all our WordPress tutorials.

For more discussions, you may want to join our free Facebook group WPBeginner Engage. With more than 24,000 members, the group is focused on helping beginners and non-techy users do more with WordPress.

You can also subscribe to WPBeginner’s YouTube Channel where we regularly share video tutorials to help you learn WordPress.

Lastly, you can use Google to type your question and add WPBeginner in front of it. Our users find this trick to be always helpful because it makes it easy for you to find the RIGHT answer for your WordPress questions.

In case you don’t find an answer to your question, don’t worry. Simply use our contact form to send us a message. Our always helpful, full time WPBeginner support team, will be happy to assist. We love helping users get started with WordPress.

Frequently Asked Questions (FAQs)

Having helped thousands of people start a blog, we have answered quite a lot of questions. Below are the answers to the most frequently asked questions about creating a blog.

Can I create a blog without WordPress?

Yes, there are several other blogging platforms available. We have compared them all, and WordPress is by far the best solution in the market to make a blog with complete ownership and freedom.

Can I build a blog without hosting?

No, that’s not possible. Web hosting is where your website files are stored. All websites need web hosting.

How much does it cost to start a blog?

The cost depends on the add-ons that you buy. We have a complete guide on how much does a WordPress website cost as well as tips on how to save money.

Can I create a blog without my parents knowing about it?

Yes. You can make your WordPress blog private and hide it from the internet. Here is a step by step guide on how to make your WordPress blog completely private.

Can I start a WordPress blog and make money with Google Adsense?

Yes, you can use your WordPress blog to earn money from Google AdSense. We have a step by step guide on how to add Google AdSense in WordPress.

How can I create a blog and remain anonymous?

If you want to have a public-facing blog but want to remain anonymous, then you need to make sure that your domain has WHOIS privacy turned on. Often people use a pseudonym / nickname to write under. You should also create a unique email just for your blog. It goes without saying, don’t post your pictures or anything on the blog. For more detailed instructions, see our article on how to blog anonymously using WordPress.

How do I add a podcast to my WordPress blog?

WordPress makes it super easy to start a blog and add a podcast to it. We have a step by step guide on how to start a podcast with WordPress.

How do I come up with blogging ideas to write about?

Here’s an excellent guide that has 103 blog post ideas that you can write about today. Here’s another guide on 73 types of blog posts that are proven to work.

You can also follow this tutorial from Blogtyrant on how to write a good blog post (12 expert tips) which will help you write great content.

Can I build a blog in my own language?

Yes, you can use WordPress in other languages. You can select your language during installation or from Settings page in WordPress admin area. WordPress is fully translated in more than 56 languages and partially translated into dozens of other languages. Many top WordPress themes and plugins are also available in multiple languages. You can also translate a theme or a plugin that you want to use on your website.

How do I create a blog in multiple languages?

Want to start a blog in Hindi, Spanish, or multiple languages? Here’s a step by step guide on how to create a multilingual website in WordPress.

Can I design a blog with no coding skills?

Absolutely. You don’t need any programming, coding, or design skills to create a professional-looking WordPress blog.

WordPress themes are easy to customize and you can just point and click to set up your theme. There are WordPress themes like Astra which comes with ready-made starter websites that you can import with one-click.

There are other powerful themes like Divi which give you complete drag & drop design options for customizing your blog.

Then there are powerful drag and drop page builders like Beaver Builder and Divi builder that works with any WordPress theme. You can use it to just drag and drop items and design your own pages.

You can even create your own custom theme without writing any code.

Can I add a photography gallery to my blog?

Yes, WordPress comes with a built-in gallery feature that makes it easy for you to add photo galleries in your blog posts.

Professional photographers can also use premium WordPress gallery plugins to better showcase their photos and even sell photos to make money from their photography business.

How can I create a professional email address for my blog?

If you’re serious about your blog, then we highly recommend that you create a professional business email address (it’s free).

All successful bloggers use professional email address to stand out and make better partnership deals to grow their blog.

We hope that you found our tutorial on how to start a WordPress blog to be helpful. You may also want to check out our article on 19 actionable tips to drive traffic to your new WordPress site.

If you liked this article, then please subscribe to our YouTube Channel for WordPress video tutorials. You can also find us on Twitter and Facebook.

The post How to Start a WordPress Blog the RIGHT WAY in 7 Easy Steps (2020) appeared first on WPBeginner.

Need some help with secure attribute access

So I've successfully written a metaclass that gives python the functionality of private attributes in classes.

Q: But what about inst.__private?
A:

>>> class A(object):
    __slots__ = ['__private']

    def __new__(cls):
        inst = object.__new__(cls)
        inst.__private = 10
        return inst

    def showprivate(inst):
        return inst.__private

>>> inst = A()
>>> inst.showprivate()
10
>>> inst._A__private = 20 # security through obscurity never works
>>> inst.showprivate() # sorry not private
20

With my metaclass, private attributes are inaccessible outside native and super-native namespaces:

class A(object, metaclass=privatetype):
    __slots__ = ['A']
    __private__ = ['B'] # NOTE: __slots__ is enforced for security regardless of local definition

    def __new__(cls): # native
        inst = object.__new__(cls)
        inst.B = 10 # can only be accessed here
        return inst

class B(A):
    # NOTE: __slots__ = ['B'] is not allowed
    __private__ = A.__private__ # inheritance would add insecurity
    # ^ with this we can restrict specific private attributes to superclasses

    def method(inst):
        return inst.B # or here (including further subclasses)

# NOTE: you can not add methods after class creation and expect to access private attributes.

So how does it work?
The answer is frame validation, to make sure we're in a native namespace before looking up private attributes from an external dictionary.

Since the code for this is currently written in python,
it's currently exploitable by accessing __closure__[1].cell_contents of either B.__getattribute__ or B.__setattr__ (both are the same function).
This will give you access to a mappingproxy (read-only dict) of ['attr'](inst, *val) functions,
the functions return either static values, or the result of a member_descriptor (__get__/__set__) call.

What's __closure__[0].cell_contents?
It's a frozenset (read-only set) containing native code objects the function uses to validate frame f_code objects with.
This would only be useful to a hacker if they could modify it, allowing them to add "native" functions to classes to manipulate private attributes.

So there's 2 things I want to ask here before I show the code for the metaclass.

1: is it possible to restrict access to the mappingproxy to close the final backdoor and prevent external access to manipulating private attributes??

2: I'm having an issue with super-native functions where calling a super-native while supplying the class/instance operates on super-class private attributes...

To explain this a bit further:

class A(object, metaclass=privatetype):
    __private__ = ['B']

    B = {'A':10, 'B':20} # static

    def __new__(cls):
        inst = object.__new__(cls)

        for k,v in inst.B.items():
            print( '%s = %s'%(k,v) )

        return inst

class B(A):
    __private__ = A.__private__

    B = {'A':30, 'B':40, 'C':50} # static

    def __new__(cls):
        return A.__new__(cls)

When we call inst = B() the result prints this: (hash order ignored)

A = 10
B = 20

This is because we're calling A.__new__ which has the private context of class A instead of B as expected

How can I use the context of class B without compromising security??

For the metaclass code, keep in mind this isn't final, so it's still a bit messy:

from sys import _getframe, _functools import reduce
class _c(object): __slots__=['_a']; _m=lambda i: None
mappingproxy = _c.__dict__.__class__; method = _c()._m.__class__; del _c # yeeted

getstatic = lambda value: lambda inst, *val: None if val else value # getset for static items
newtype = type.__new__
class privatetype(type):
    def __new__( typ, name, bases, NS ):
        # won't be so hacky in C
        def __getsetattr__(inst,attr,*val):
            # return typical methods from super-class (extended security for preventing access here)
            if attr == '__setattr__': return None if val else super(cls,inst).__setattr__
            if attr == '__getattribute__': return None if val else super(cls,inst).__getattribute__
            try:
                f = _getframe(1)
                return privateattrs[attr](inst,*val) if f.f_code in nativecodes else( # getset private attribute
                    super(cls,inst).__setattr__(attr,*val) if val else super(cls,inst).__getattribute__(attr) ) # normal attribute
            finally: del f
        NS['__getattribute__'] = NS['__setattr__'] = __getsetattr__
        oldslots = NS.get('__slots__',frozenset()) # backup

        # check for subclass globalization of private attributes
        superprivateslots = reduce(frozenset.union, (frozenset(getattr(cls,'__private__', frozenset())) for cls in bases))
        for attr in oldslots:
            if attr in superprivateslots:
                raise AttributeError("can't make private attribute '%s' public."%attr)

        # remove private static attributes from NS
        nativecodes = { None, __getsetattr__.__code__ }; addnativecode = nativecodes.add
        privateattrs = {}
        privateslots = set(NS.get('__private__', set()))
        for privateattr in privateslots:
            if privateattr in NS: # make static
                item = NS.pop(privateattr)
                privateattrs[privateattr] = getsetstatic(item)
                addnativecode(getattr(item, '__code__', None)) # private methods are native too

        # create private members
        NS['__slots__'] = frozenset(oldslots).union(frozenset(privateslots.difference(privateattrs))) # exclude static
        cls = newtype(typ, name, bases, NS)

        # remove remaining private items and add super-natives
        for attr in dir(cls): # dir() to get ALL public items, not just cls.__dict__ local items
            item = getattr(cls,attr)
            if isinstance(item, staticmethod): item = item.__func__
            if isinstance(item, property):
                for a in ('fget','fset','fdel'): addnativecode(getattr(getattr(item,a), '__code__', None))
            else: addnativecode(getattr(item, '__code__', None))
            if attr in privateslots:
                delattr(cls, attr)
                privateattrs[attr] = method(lambda dsc, inst,*val: dsc.__set__(inst,*val) if val else dsc.__get__(inst), item) # getset method

        # freeze to prevent modification (won't be so easy to access once written in C)
        nativecodes = frozenset(nativecodes)
        privateattrs = mappingproxy(privateattrs) # not sure why this isn't builtin
        # note that private mutable objects can still be modified

        cls.__slots__ = oldslots
        return cls

No I will not follow PEP8, I'm sorry if you're offended.