21 Little-Known Ways to Use Expiring Posts in WordPress

You may already know that WordPress lets you schedule posts to publish at a later date, but did you know that you can also schedule posts to automatically unpublish after a set time period?

In a previous article, we looked at the best post scheduling plugins for WordPress. Depending on the nature of your content, however, you may also want posts to automatically unpublish after having served their purpose.

In this article, we look at practical ways to use expiring posts in WordPress and plugins that will help you automate this.

We’ll cover the following areas:

21 Ways to Use Expiring Posts

Here are 21 ways to improve your content and marketing strategy using expiring posts in WordPress:

1. Time-Sensitive Promotions

If you run time-limited sales announcements, promotions, offers, or contests on your website, scheduling expiring posts lets you automatically remove or update those posts once the promotional period has ended.

Scheduling posts to automatically expire at the end of a promotional campaign ensures that visitors and customers are not presented with outdated offers or information, preventing confusion and avoiding disappointment, and helps to maintain your brand’s credibility.

For example, let’s say you have a retail store or an eCommerce website and are planning to run a week-long flash sale on selected items. You could create a series of posts promoting different products and schedule them to automatically expire at the end of the sale period, ensuring that customers only see your active promotions.

2. Seasonal Updates

Scheduling expiring posts can be really useful if your business has seasonal products, services, or events.

Automatically expiring posts that contain seasonal content, such as holiday greetings, seasonal sales, or event announcements (e.g. festivals, growers markets, etc.) helps to keep your website’s content aligned with the current season and relevant throughout the year, and avoids showcasing outdated products or information.

This is not only useful for businesses that offer seasonal products or services, such as gardening supplies or holiday-specific decorations, but also seasonal offers or services.

For example, if you have a holiday-specific campaign, you can schedule the corresponding posts to expire once the holiday is over, saving you the effort of manually having to remove or update content every season.

Or, let’s say your client runs a travel agency and wants to showcase different holiday destinations throughout the year (or promote destinations that match discounted airfares from different airlines). They could create posts highlighting specific locations and set them to automatically expire once the corresponding season ends, keeping their website content aligned with the current season.

3. Event Management

Setting expiration dates for event-related posts ensures that outdated event details are automatically removed, maintaining accurate and up-to-date information for attendees.

For example, if your company organizes events, you can schedule posts to expire after the event has taken place. This helps manage event-specific content, such as registration details, agenda updates, or speaker information, and ensures that your website stays relevant before and after the event.

Similarly, if your business organizes conferences, you could create posts promoting each session and speaker and then schedule these to expire after the session has taken place, ensuring that outdated session details are automatically removed.

4. Limited-Time Offers

Promoting exclusive deals or discounts by scheduling posts to expire when the offer period ends creates a sense of urgency for visitors and encourages customers to make timely purchases.

This is ideal for online retailers planning to launch a one-day or weekend sale with posts featuring discounted products.

By scheduling posts to automatically publish when the event kicks off and then setting the posts to expire at the end of the sale, they would not only create a sense of urgency but automate the entire process so they wouldn’t even have to monitor it (think of all those limited-time sales that end at midnight…you could be sleeping and still be making money!)

5. News and Updates

When you have important announcements or releases that need to be shared at a specific time, such as product launches, press releases, or scheduled events, scheduling expiring posts ensures that the information becomes available and expires automatically according to your desired schedule.

Scheduling your news articles, press releases, or industry updates posts to automatically expire when the information loses its relevance or becomes outdated after a certain period helps to keep your website current, maintains a current and accurate representation of the news landscape, and ensures that readers are always presented with the latest news stories.

6. Product Launches

Scheduling posts to expire after a product launch prevents outdated information about previous releases from cluttering your website.

If you are a technology company planning to release a new version of its software, foir example, you could create a series of posts providing information and updates about the upcoming release, then schedule these to expire shortly after the launch to prevent users from accessing outdated software details.

7. Temporary Notices or Alerts

Displaying time-sensitive notices or alerts, such as maintenance notifications or temporary closures, that automatically expire once the issue or event has passed, ensures that visitors no longer see the closure notice.

For example, a small business could display a notice on its website about a temporary closure due to personal reasons (e.g. owners travelling overseas or a death of a key business team member), and schedule the post to expire once the business reopens.

8. Membership or Subscription Expiration

Automatically expiring posts that are accessible only to members or subscribers after their membership or subscription period ends, encourages them to renew or upgrade.

A good example of this is where a membership-based website grants access to premium content for a specific subscription period and sets users’ access to posts and resources to automatically expire at the end of their subscription.

9. Course or Lesson Availability

Controlling access to course or lesson content by scheduling posts to expire based on the duration of the course or availability of the material encourages students to progress through the course within a designated timeframe.

For example, an online learning platform could provide access to course materials for a limited duration with each lesson post scheduled to expire after a certain number of days.

10. Contest or Giveaway End Dates

Setting posts to expire when a contest or giveaway ends ensures that the information remains accurate and helps to avoid confusion for participants.

A practical use of this could be where a social media influencer runs a giveaway and promotes it through posts on their website. The posts are then scheduled to expire at the end of the giveaway, ensuring that participants can no longer enter after the specified deadline.

11. Archiving Outdated Content

Automatically expiring and archiving posts that are no longer relevant or useful keeps your website clutter-free and ensures a better user experience.

For example, suppose your company blog features posts about past product releases. As new products are launched, the corresponding posts are then scheduled to expire and automatically move to an archive section, keeping the main blog focused on current offerings.

12. Regulatory Compliance

If you need to comply with specific regulations regarding the removal or expiration of certain types of content, scheduling posts to expire can help you meet those requirements.

An example of where setting posts to expire once a required duration has passed to ensure compliance with regulations would be where a financial-related institution publishes posts with legal disclaimers that must be displayed for a specific time period.

13. Legal Compliance

Similar to the above, you can automatically expire posts that contain time-limited legal disclaimers, privacy policies, terms of service, or cookie notices to ensure compliance with changing regulations.

For example, let’s say that an online service provider includes a cookie notice on their website. The post containing the notice can be scheduled to expire after the required consent duration, ensuring compliance with data privacy regulations.

14. Expiring Downloads or Resources

You can also schedule posts to expire when downloadable files, resources, or documents are no longer available or have been updated.

Scheduling posts related to older versions to expire once new updates are released ensures that users access only the most recent and relevant resources and prevents them from accessing outdated information.

15. Scheduled Content Updates

Plan ahead by scheduling posts to expire and automatically trigger updates or new content, ensuring a consistent publishing schedule and reducing manual intervention.

So, if you run a magazine-style website publishing articles on a weekly basis, you could schedule posts to automatically expire at the time of each new publication, allowing for seamless content updates without manual intervention.

16. A/B Testing

Using expiring posts to test different versions of content or design elements by setting expiration dates lets you compare performance and make data-driven decisions.

For example, suppose you run an e-commerce website and want to test two different versions of a product description. You could create two posts, each featuring a different description, and schedule them to expire after a set period. You can then analyze the metrics and determine which version performs better.

17. Content Rotation

Automatically cycling through a set of posts by scheduling them to expire and publishing new content allows you to create a dynamic and ever-changing website experience.

Suppose an art gallery website wants to showcase different artists. They could schedule posts featuring different artists’ works to automatically expire and publish new posts showcasing other artists, providing a constantly changing selection for visitors.

18. User Engagement

Encouraging regular visits to your website by regularly expiring and replacing content helps to entice users to return for fresh information and increased engagement.

An example of this would be where a lifestyle blog regularly features “Tip of the Week” posts. Each post is scheduled to automatically expire after a week, encouraging readers to return for fresh tips.

19. Content Freshness

By scheduling non-evergreen posts to expire, you ensure that your website or blog remains up-to-date with fresh content. This is particularly important if you publish time-sensitive information, such as news, promotions, or event announcements on a regular basis.

Once a post expires, it can automatically be removed or replaced with new content, keeping your website content fresh and relevant.

20. Content Cleanup

Schedule posts to expire and be removed from your website’s public view to maintain a clean and organized content repository.

For example, suppose your blog includes guest posts or paid posts that are only relevant for a limited time. You can schedule guest posts to expire and be removed from your website after the agreed-upon period, keeping your content repository well maintained, clean, and focused.

21. Editorial Workflow

Scheduling expiring posts allows you to plan your content publishing in advance. This can help streamline your content creation process and manage your editorial calendar more effectively.

By pre-scheduling expiration dates, you can focus on creating new content rather than constantly monitoring and manually updating old posts.

This is useful for businesses with news-like websites that follow an editorial calendar. They can schedule posts to expire according to the planned publication schedule, ensuring a steady flow of new content while seamlessly removing outdated articles from the website.

Expiring Offer Post Example
Why stay up all night to unpublish posts when you can set these to automatically expire?

Expiring Post Plugins for WordPress

Here are some post expiration plugins for WordPress you can use to publish a post for a limited time and have your posts be automatically unpublished after the period has expired:

PublishPress Future

PublishPress Future
PublishPress Future lets you automatically unpublish posts in WordPress.

PublishPress Future (formerly Post Expirator) is a simple and easy-to-use plugin that not only lets you automatically unpublish posts, pages, and other content types in WordPress, but also delete your post, change its status, update the post categories, or make other changes.

With PublishPress Future installed, you can:

  • Choose expiry dates for content in any post type.
  • Select expiry dates in the right sidebar when editing posts.
  • Modify, remove or completely delete content when the expiry date arrives.
  • Modify expiry dates using “Quick Edit” and “Bulk Edit”.
  • Receive email notifications when your content expires.
  • Show expiry dates in your content, automatically or with shortcodes.

After installing and activating the plugin, you will see the plugin’s editor block (if using the Block Editor) or settings panel (Classic editor) when creating or editing a post, giving you flexibility and control over when your content will expire.

Simply enter the date and time that you want your post to expire using the intuitive interface…

PublishPress Future Block
Use the plugin’s editor block to set your post’s expiry date and time.

And choose what should happen to the post when it expires by selecting an option from the “Action To Run” section…

PublishPress Future block - Actions menu
Choose what happens to your post after it expires.

You have various options for future actions on expired posts.

For example, you can:

  • Change the status to Draft, Private, or Trash.
  • Delete the post.
  • Keep all existing categories, and add new categories.
  • Remove all existing categories, and add new categories.
  • Keep all existing categories, except for those specified in this change.
  • Enable the “Stick to the top of the blog” option.
  • Disable the “Stick to the top of the blog” option.
  • Move the post to a custom status (Pro version)

PublishPress Future gives you complete control of scheduling and managing post expirations via its extensive settings panel. A Pro version of the plugin is available offering additional features and support.

PublishPress Future Settings panel
The plugin puts you in complete control of your post expiration’s settings.

The PublishPress Future plugin includes the following additional features and functionalities:

Quick and Bulk Edit

Use the convenience of the plugin’s “Quick Edit” and “Bulk Edit” options to make changes to expiry dates. and manage a large number of posts.

PublishPress Future - Quick Edit feature
Set posts to expire using the plugin’s convenient Quick Edit and Bulk Edit options.

Email Notifications

Receive notifications when your posts are due to expire so you can stay informed about your content’s expiry and never miss a critical update.

Display Expiry Dates in Your Content

PublishPress Future allows you to automatically show expiry or action dates within your articles. This feature adds a date stamp at the bottom of your post.

Post Expiry Status
Display the post expiry status to provide transparency to your audience.

You can also use customizable shortcodes to display the expiration date inside your posts, tailoring the format to meet your specific needs.

Expiry Defaults for Post Types

The plugin not only lets you customize default expiry options for each post type within your WordPress site, but you can also configure default expiry settings for all of your content.

PublishPress Future expiry options
Automate your content scheduling even further by configuring default post expiry options.

Advanced Features & Detailed Logs

The Pro version of the plugin offers additional functionalities, such as moving posts to a custom status upon expiration and keeps a comprehensive log of all changes made to your posts.

Seamless Cron Job Integration

WP-CRON is a built-in feature of WordPress used to schedule recurring tasks, such as publishing scheduled posts or processing queued tasks in plugins.

PublishPress Future uses custom cron jobs to execute expiration events efficiently, reducing server overhead for busy websites. To fully leverage the plugin’s capabilities, make sure that WP-CRON is properly set up and functional on your web host.

More details: PublishPress Future

Note: When using plugins that require WP-CRON, it’s essential to monitor the performance and resource usage of your site, as WP-CRON can consume significant resources when running heavy or frequent tasks.

If you notice performance issues, you may need to optimize the plugin settings, offload tasks to external services, or use a real server-side cron job to improve efficiency and prevent performance degradation on your hosting account.

If your sites run on WPMU DEV hosting,  rest assured that any WordPress plugins that require WP-CRON will run just fine.Learn more about our hosting

For the best experience running plugins that require WP-CRON functionality, consult the WPMU DEV support team to ensure your website is running optimally on your selected hosting plan.

Auto Post Expiration

Auto Post Expiration
Manage post lifespan in WordPress with the Auto Post Expiration plugin.

Auto Post Expiration is another plugin you can use to easily set expiration dates for your posts in WordPress.

With just a few clicks, you can schedule posts to automatically change to “draft” status, ensuring they are no longer visible on the front end of your site.

Key features of this plugin include:

Set Post Expiration Date and Time

The plugin provides an intuitive feature that lets you easily select the desired date and time for your posts to expire and transition to the “draft” status.

Admin Column Display

Auto Post Expiration shows the expiration date and post status directly in the admin column, making it easy to stay organized and keep track of when posts are scheduled to expire.

Gutenberg and Classic Editor Support

The plugin seamlessly integrates with the block and classic editors, so you can use your preferred editing interface when creating or editing posts.

The plugin also offers a Pro version that lets you unlock advanced features, such as setting expiration dates for single posts, pages, products, and custom post types, WooCommerce Support (set expiration dates for your WooCommerce products), and email notifications for Admin.

More info: Auto Post Expiration

From Inspired Content To Expired Posts

Hopefully, this article has inspired you to use expired posts. Auto expiring posts can help you streamline your content management processes, control the lifespan of your content, and keep your website current, fresh, and relevant to enhance user experience.

For complete WordPress automation, consider becoming a WPMU DEV member. Our all-in-one WordPress platform is ideal for web developers and agencies and includes robust site management tools and Pro plugins that will automate all aspects of your WordPress sites.

Introducing Email Signature Generator – Designing Professional Email Signatures Made Easy

Have you ever wished you could give business cards to people you meet online?

Wouldn’t it be nice if there was an easy way to let people know how to connect with you WITHOUT spending a dime for an expensive marketing tool?

If you’re like me and most other smart business owners, then you have at least wished for this solution a couple of times in your business journey.

Today, I am excited to release a new FREE tool, WPBeginner’s Email Signature Generator, which helps you let people know who you are and how to reach out to you.  

We built this tool because we want to make it easy and FREE for everyone to create a stunning email signature.

announcing email signature generator tool

What is WPBeginner’s Email Signature Generator?

Our Email Signature Generator is a powerful FREE online tool that enables you to design aesthetically pleasing email signatures in a few minutes.

No need to hire a designer or use an expensive tool. If you can point and click with a mouse, you can design beautiful email signatures quickly and easily.

The best part is that our email signature builder generates an HTML signature, which is supported by every email client available in the market, including Gmail, Outlook, Yahoo Mail, Apple Mail, and more.

email signature builder

As opposed to image-only signatures, HTML signatures reduce the likelihood of your emails being flagged as spam by spam filters.

While a well-designed email signature can help make a good first impression, most people don’t use a signature at all because it’s not easy to design one.

This is why we decided to build the Email Signature tool at WPBeginner and make it free for all our readers.

Below are a few benefits of using an email signature for your emails.

  • Your digital business card: Email signatures have the same purpose as a business card. It shows you who you are and the brand you represent.
  • Real person: It reassures your email recipients that they’re communicating with a human being rather than a bot.
  • Brand awareness: It helps in brand awareness and enables you to show your contact details, website URL, social media profiles, and more.

How to Use WPBeginner’s Email Signature Generator

First of all, head over to WPBeginner’s Email Signature Generator page. To create a unique signature, choose a signature template you like the most.

choose a template for email signature

Now you’ll be directed to our email signature builder, where you can add signature details like name, email address, phone number, website URL, and more. The builder even lets you change the signature template as you customize your signature details.

The signature builder comes with 4 options to tweak your signatures the way you want.

  • General: Add more info like your name, email address, company name, your position at the company, and the department you work at.
  • Theme: This is where you pick a different template design if you change your mind.
  • Addons: Add even more details, like social media profiles, and change the avatar and a logo URL. 
  • Styling: Make advanced changes like fonts and spacing, and make your signature unique.
copy email signature code

Next, you’ll be prompted to sign up for the WPBeginner newsletter. And finally, you can copy the HTML signature embed code and paste it into your preferred email client.

Our Signature Generator Improves Deliverability

To improve email deliverability, our Email Signature Generator helps you build HTML email signatures.

Unlike image-only signatures, HTML signatures are not likely to be flagged by spam filters.

That’s because spam filters take text:image ratio into account to figure out whether an email is legitimate or spam.

Using only an image as your signature could potentially reduce the text:image ratio and increases the likelihood of your emails getting flagged by spam filters.

Customize Email Signature the Way You Want

Another benefit of creating HTML signatures is that it’s highly customizable. With our free tool, you can easily add as many or as few details as you want to your email signature.

For example, you can add important details like your first and last name, your business name, job title, and department.

If you want, you can add even more details such as:

  • Your recent photograph
  • Your company logo
  • Social media profile links
  • And so much more…

Set Up a Professional Email Address for FREE!

Alongside a stunning email signature, we highly recommend using a professional email address. A professional email address uses your company name instead of the generic name, like Gmail, Outlook, or Yahoo.

Here’s what a professional email address looks like: john@examplebusiness.com. And here’s an example of a generic email address: john.smith2019@gmail.com.

When a professional email address is used alongside a professional email signature, you can win trust when dealing with other businesses and customers. 

On the other hand, since anyone can create generic email accounts, it becomes harder for customers and other businesses to trust generic email addresses as legitimate business email accounts.

Setting up a professional email address is free if you already have a website. If you don’t have a WordPress website yet, you can build one with Bluehost, which offers a free domain name, free business email address, and 60% OFF web hosting.

For more details, check out how to create a business email address for free.

What’s Coming Next?

Our Email Signature Generator is a great tool for designing an email signature that creates a lasting first impression.

At WPBeginner, we’ll continue to build more powerful tools for small businesses, so they can grow and compete with the big guys.

We have an exciting roadmap ahead of us, and in the coming weeks, hopefully, we’ll deliver more free tools at your disposal.

Email Signature Generator is just one of the tools that we’ve recently launched.

Here are a few more business tools that you can use RIGHT NOW.

If you have ideas on how we can make WPBeginner’s Email Signature Generator or other tools more helpful for you, then share your thoughts in the comments.

As always, I want to thank you for your continued support of WPBeginner, and we look forward to continue serving you for years to come.

Yours Truly,

Syed Balkhi
Founder of WPBeginner

The post Introducing Email Signature Generator – Designing Professional Email Signatures Made Easy first appeared on WPBeginner.

Introducing UserFeedback – Easy Survey Tool to Uncover What Users are Really Thinking

Do you want to know why your website visitors abandon your site?

Ever wished there was an easy way to read your website visitors’ minds WITHOUT learning telepathy or using an expensive user survey tool that costs a fortune?

If you’re like me and most other smart website owners, then you have at least wished for this solution a couple of times in your WordPress journey.

Today, I’m excited to share the launch of my free UserFeedback plugin, which enables you to collect real user feedback quickly and easily.

We built this tool because we want to know the “why” behind every website visitor’s action that Google Analytics won’t tell you.

announcing userfeedback plugin

When you know the why or the intent behind users’ actions, you can easily figure out why your visitors buy or do not buy your products.

Background Story

In 2016, I acquired a Google Analytics plugin for WordPress, completely revamped it, and launched it as MonsterInsights.

The goal of this plugin was to help users make informed decisions by showing them the data that matters to their businesses.

For example, you can easily see which products or pages are the most popular or where your most profitable traffic comes from.

As the plugin grows, I often get asked by our users: is there a way to understand the intent of every website visitors’ actions?

When you know the intent … the “why” behind users’ actions, you can figure out why customers purchased from you or, better yet, why they did NOT purchase from you.

Unfortunately, Google Analytics only tells you half the story: “What is happening on your website?”. It’s not built to answer the other half of the question: “Why are your visitors doing that?”

In fact, most of the customer feedback tools in the market charge exorbitantly high prices, which aren’t affordable to small businesses.

After a lot of thought and consideration, we decided to release a brand-new plugin called UserFeedback, which enables you to understand user intent by collecting real time feedback from them.

With UserFeedback, you can:

  • Create a demographic survey to fill out your buyer personas
  • Ask website visitors to leave their phone number for a callback
  • Run customer satisfaction surveys to see what buyers think about your products
  • Run NPS surveys
  • Ask for feedback on your website design
  • Run product surveys to find out what buyers are actually using your products for
  • And so much more

What is UserFeedback?

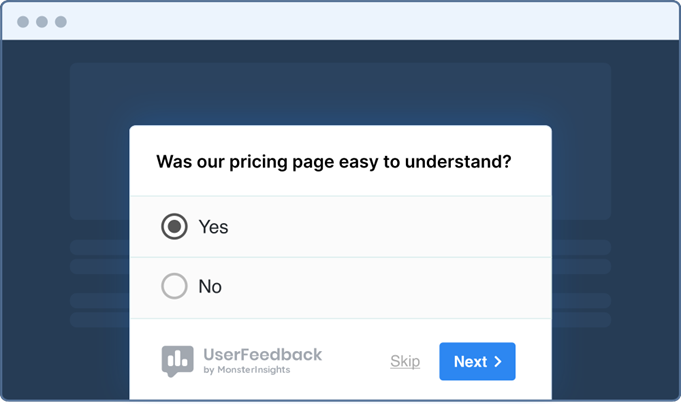
UserFeedback is a free and powerful WordPress plugin that lets you launch in-the-moment surveys to collect quality feedback from your website visitors.

pricing page survey tool

It comes with built-in templates and questions to make creating feedback surveys quick and effortless, including:

  • Website feedback/experience
  • Ecommerce store survey
  • NPS survey
  • Post purchase review
  • Product usage survey
  • Competitive research
  • And so much more!

Anything you’ve ever dreamed of being able to easily ask your customers, you can ask with UserFeedback.

In combination with a powerful analytics tool like MonsterInsights, website owners can finally see both the “why” and the “what” of their users’ behavior on their WordPress websites.

When you have direct access to your visitors’ wants and needs, you can make changes that will take your website and business to the next level.

My plan is to continuously add more helpful templates and addons to make UserFeedback even more powerful and essential to understanding your website visitors.

Collect Feedback in Minutes, not Hours

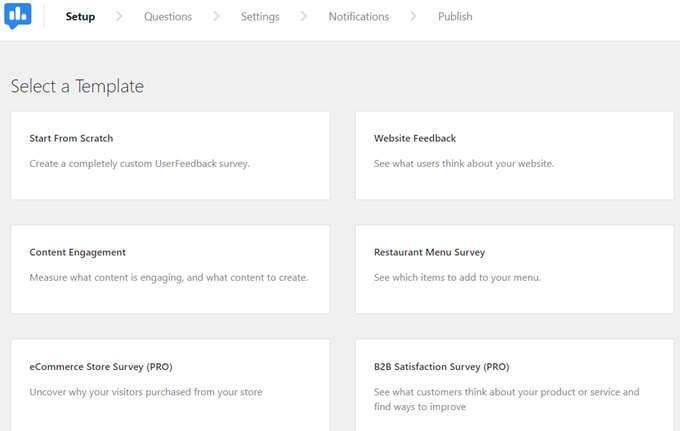
UserFeedback makes it super easy to launch a survey in minutes, not hours. Its 20+ survey templates give you a head start, so you don’t always have to start a feedback survey from scratch.

userfeedback surveys

Each of those templates is pre-designed for different user needs. Based on your requirements, choose the right template, make quick changes, and publish it on your website.

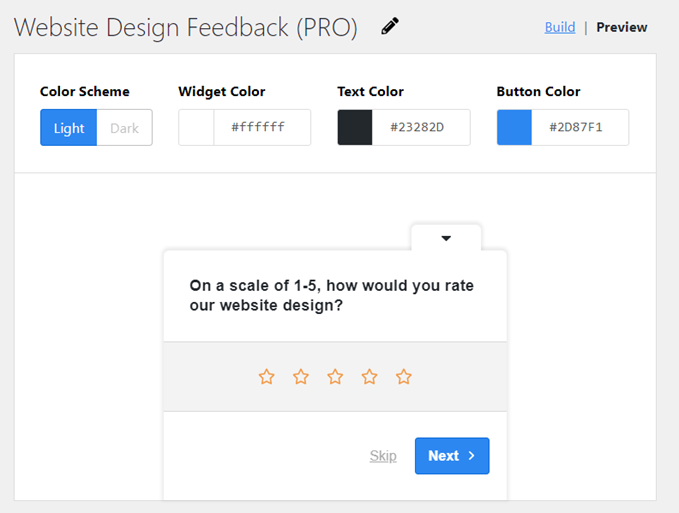
For example, the Website Design Feedback template comes with a star-rating question, whereas the NPS Survey template lets your users grade their loyalty on a scale of 1 to 10.

star rating feedback

The best part is that you can build and preview your design within the dashboard.

Get Best Results with Laser Targeted Surveys

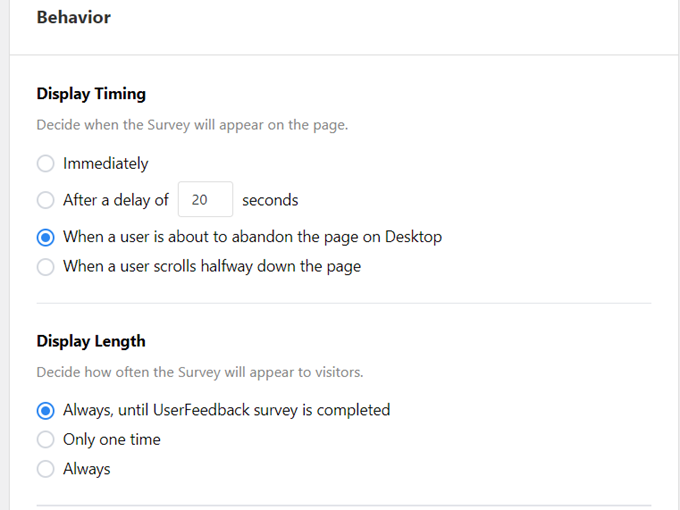
UserFeedback enables you to display the right surveys at the right time to the right users. Here are some targeting options you can use for the best results.

survey targeting options
  • Logged in status: Choose to show your surveys only to logged in or not logged in users.
  • Page URL: Show it only on certain pages
  • Traffic source: Display it based on the traffic source, like organic traffic, PPC ads, social media, and so on.
  • Device type: Choose which types of devices the survey should appear
  • Display timing: Choose the right time to show the survey.
  • Exit intent / scroll targeting: You can show it to users who abandon the site on desktop or show when a user scrolls halfway down the page.
  • And much more…

Now that you know how UserFeedback works, let’s take a look at how our customers are using UserFeedback to grow their businesses.

1. Focus on What to Prioritize Next

Are you looking to redesign your website? Wondering how to improve your website copy to boost sales and conversions?

One of the best things about UserFeedback is that it lets you collect feedback score on every page of your site. That way, you can quickly find pages that aren’t resonating well with your audience and prioritize those pages while redesigning.

2. Get Feedback to Validate Your Plans

Pushing out new changes on your site can be intimidating. It’s especially true when you change the pricing plan on your website.

With UserFeedback, you can validate your plans with a survey and learn what users think about your latest plans.

3. Boost Profit by Reducing Customer Churn

UserFeedback comes with several targeting options, including exit intent. This targeting option helps you understand why users are leaving by collecting feedback at the exact moment when people churn.

4. Collect a Constant Stream of Great Suggestions

Do you want to encourage users to provide you with suggestions to improve your product?

One of the reasons most people hesitate to provide feedback is that it’s not easy to do so. With an on-site survey, you can make it convenient for them to send you feedback. Plus, you can collect a constant stream of suggestions to improve your product.

5. Fix the Problems Before They Develop

The biggest benefit of collecting feedback is that it helps you quickly identify problems before they develop. That means you can quickly rectify your problems before your customers start complaining about it.

Get Unlimited Everything – Questions, Responses, and Sessions

A big reason why we built UserFeedack is that most feedback tools are just too expensive. They slow down your site and charge you based on the number of responses and sessions …

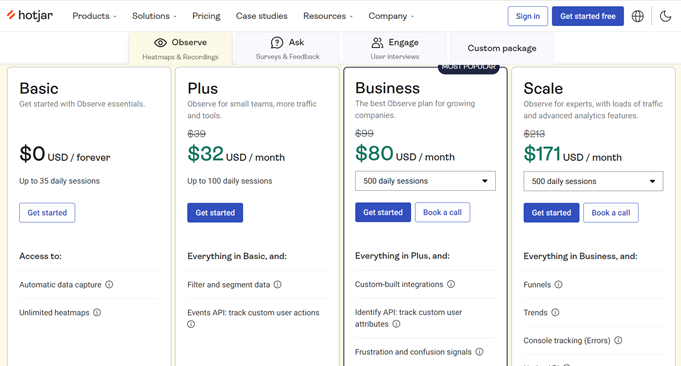
Let’s take a look at how UserFeedback surveys compare to another feedback tool, Hotjar.

hotjar pricing
As you can see while the basic plan is free, it only allows you to get responses for up to 35 daily sessions.

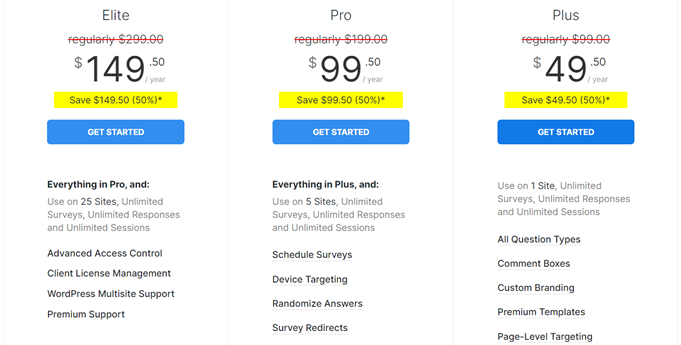
On the other hand, UserFeedback lets you ask unlimited questions and get unlimited responses without a daily session limit!

userfeedback pricing

What’s Coming Next for UserFeedback?

UserFeedback is a great tool that helps you uncover more insights about your website visitors that Google Analytics won’t tell you. I’m extremely pleased with the community response so far, as everyone is loving the new features.

We have lots of great features coming, including:

  • Customizable survey designs so you can fully tweak them to match your website’s colors, fonts, and personality.
  • Advanced integrations to automatically let you send a special email, add entries to a spreadsheet, and so on.
  • Additional prebuilt templates to collect feedback for a variety of additional websites.

We’re truly building something special here. If you have ideas on how we can make the plugin more helpful to you, please send us your suggestions.

As always, I want to thank you for your continued support of WPBeginner, and we look forward to continuing to serve you for years to come.

Yours Truly,

Syed Balkhi
Founder of WPBeginner

P.S. Want us to acquire or invest in your WordPress business? Learn more about the WPBeginner Growth Fund.

The post Introducing UserFeedback – Easy Survey Tool to Uncover What Users are Really Thinking first appeared on WPBeginner.

Introducing WPBeginner SEO Analyzer: Free SEO Audit Tool to Boost Rankings

Do you want to optimize your website for search engines?

Ever wished there was any easy way to perform an SEO (search engine optimization) audit to find critical errors on your site WITHOUT the high costs?

If you’re like me and most other smart website owners, then you have at least wished for this solution a couple of times in your WordPress journey.

Today, I’m excited to release a new free tool, WPBeginner SEO Analyzer, which helps you make informed decisions on how to fix SEO errors and grow your organic traffic.

We built this tool because we believe everyone should be able to optimize their site for SEO regardless of their skill set.

seo analyzer announcement

What is an SEO Analyzer Tool?

WPBeginner’s SEO Analyzer is a powerful FREE online tool that makes it easy to run an SEO audit of your website, find critical errors, and generate a FREE SEO report with recommendations so you can fix the errors. 

It’s completely FREE for all WPBeginner readers … no signup or registration is required.

Most websites fail in SEO because they don’t know what keeps their website from getting high rankings and organic traffic. While there are several advanced SEO analysis tools available on the market, most of them cost a fortune.

And not every website has the budget or resources to hire an expert SEO consultant to detect and fix their SEO errors. At WPBeginner, we want to fix it once and for all.

This is why we decided to build the SEO Analyzer tool and make it free for all WPBeginner readers.

free seo analyzer

Some of the benefits of our SEO Analyzer are…

  • Get an analysis of the good, bad, and the ugly part of your website’s SEO
  • Get instant recommendations and download the complete WordPress SEO analysis report
  • No signup or installation is required for SEO analysis. It’s absolutely FREE!

How to Use WPBeginner’s SEO Analyzer

First of all, head over to WPBeginner’s SEO Analyzer tool. Next, type in your website URL to detect SEO errors and click Analyze.

Our SEO Analyzer grades your website’s SEO on a scale of 1-100, where 1 is the least, and 100 is the perfect score.

For best results, it’s recommended to aim for a score of 70 or above.

seo analyzer report

Aside from providing you with an SEO score, it creates a detailed SEO report on what works on your site and what doesn’t. You’ll also get customized recommendations on how to make the right changes to boost your SEO score.

The SEO Analyzer gives you suggestions based on 4 primary SEO factors as follows:

  1. Basic SEO: It analyzes if your website is following basic SEO practices, like using an SEO title, meta tag, if the site is optimized for any keywords, and so on.  
  2. Advanced SEO: Get custom-tailored advanced SEO recommendations for your site.
  3. Site performance: It helps you monitor page loading time and provides suggestions to improve it.
  4. Site security: It helps you ensure your website never gets blacklisted by Google and other search engines.

Improve Search Rankings and Organic Traffic

For your best interest, after doing an SEO audit, you’ll need to follow the recommendations provided by our SEO checkup tool.

Here are a few suggestions to fix your critical SEO errors:

For more details on how to optimize your website for SEO, we highly recommend our detailed guide on WordPress SEO made easy.

Perform an SEO Audit Right Within WordPress

Do you want to perform an SEO audit right inside your WordPress dashboard? Then, we recommend using the All in One SEO (AIOSEO) WordPress plugin.

SEO audit

Its free plugin comes with all the basic features that help you optimize your site for search engines, including the SEO Analysis tool.

There is also a premium version of AIOSEO that offers advanced features like a redirection manager, schema markup, powerful sitemap tools, and more.

What’s Coming Next?

Our SEO Analyzer is a great tool to help step up your website’s SEO strategy.

Our goal at WPBeginner is to build more powerful tools for small businesses, so they can grow and compete with the big guys.

SEO Analyzer is just one of the tools we’ve recently launched.

We have an exciting roadmap ahead of us, and in the coming weeks, hopefully, we’ll deliver more free tools at your disposal.

Here are a few more business tools that you can use RIGHT NOW.

Our goal is to continue to build best-in-class tools to help you level the playing field.

If you have ideas on how we can make WPBeginner’s SEO Analyzer or other tools more helpful for you, then share your thoughts in the comments.

As always, I want to thank you for your continued support of WPBeginner, and we look forward to continue serving you for years to come.

Yours Truly,

Syed Balkhi
Founder of WPBeginner

The post Introducing WPBeginner SEO Analyzer: Free SEO Audit Tool to Boost Rankings first appeared on WPBeginner.

Announcing WPBeginner’s Blog Post Idea Generator – Create Your Yearly Content Calendar in a Second

Do you want to quickly generate content ideas for your blog?

Ever wished there was any easy way to create a year’s worth of content ideas without having to spend hours if not days for researching and mind mapping?

If you’re like me and most other smart bloggers, then you have at least wished for this solution a couple of times in your WordPress journey.

Today, I’m excited to release a free WPBeginner tool, Blog Post Idea Generator, which helps you come up with a year worth of content ideas in a second.

We built this tool because we believe content ideas are the backbone of a blog, and every blogger should be able to create tons of ideas quickly and easily.

What is a Blog Post Idea Generator?

WPBeginner’s Blog Post Idea Generator is a powerful FREE online tool that makes it easy to come up with a lot of content ideas instantly.

It’s completely FREE for all WPBeginner readers… no signup or registration is required.

Without entering your email address, you can generate up to 29 ideas for the topic or noun you enter. If you want an extensive list of 250 blog post ideas, you can enter your email address and download the list right away.

Introducing Blog Post Generator

One of the biggest reasons why most WordPress blogs fail is because they don’t brainstorm blog post ideas and plan their editorial calendar ahead of time.

Unfortunately, planning blog post ideas could be tedious and time-consuming. But it doesn’t have to be that way.

Backed by data, our free tool analyzes the blog topic or noun you enter and provides you with content ideas that are proven to attract your target audience.

Some of the benefits of our blog post generator are…

  • Get loads of actionable blog post name ideas for FREE without hiring a content marketer
  • Download or export the ideas in a sheet for further analysis
  • Save time and money on topic research

How to Use WPBeginner’s Blog Post Idea Generator

First things first. Head over to WPBeginner’s Blog Post Idea Generator tool. Next, type in a noun or a topic in the search bar and click Get Ideas.

blog post ideas

The tool will instantly generate up to 29 post ideas, which you can copy individually and add to your editorial calendar. If you provide your email address, then you can get 250+ additional ideas and download the sheet instantly.

Once you have a list of potential ideas, you can fix a publishing schedule for your blog and start creating stunning blog posts that attract your audience.

#1 Reason Why Most Blogs Fails and How to Fix It

Most beginner bloggers fail because they seek instant gratification from blogging. As soon as they publish a blog post, they want readers to come in, post a comment, share it on social media, and so on.

But what they fail to realize is that blogging is a marathon, not a sprint. To win the blogging marathon, the first thing you’ll need to do is to get your content ideas ready… not just a week ahead, but a year ahead or at least a month ahead.

When post ideas aren’t prepared ahead of time, most beginners tend to publish mediocre content that fails to create an impact. This eventually hurts their motivation and causes them to stop publishing.

WPBeginner’s Blog Post Idea Generator gives you a head start on brainstorming content ideas. Once you generate the ideas, you can refine them and add them to your content calendar.

Use Headline Analyzer to Refine Your Ideas

Now you know how to generate content ideas and add them to your publishing calendar.

After preparing content ideas, you can also use the headline analyzer to make sure the post headlines are click-worthy before publishing the blog posts.

A headline analyzer analyzes your final post headline, grades it on a scale of 1-100, and offers suggestions to improve it.

You can then follow those recommendations and re-analyze your title to see if it improves your score. Then you can repeat the process until you get a great score. The general rule of thumb is to aim for a score of 70+.

You can do so free by installing and activating either the free All in One SEO plugin or the free MonsterInsights plugin.

Both of these plugins give you access to the headline analyzer right inside the WordPress post editor.

Click the SEO headline analyzer button

Alternatively, you can use our online headline analyzer tool, which offers similar headline analysis and can be accessed for free without installing a plugin or signing up for a newsletter.

What’s Coming Next?

Our blog post generator is a great tool to help step up your content strategy game.

We’ll continue to deliver more powerful tools for small businesses, so they can grow and compete with the big guys.

We have an exciting roadmap ahead of us, and in the coming weeks, hopefully, we’ll deliver more free tools at your disposal.

Here are a few more business tools that you can use RIGHT NOW.

Our goal is to continue to build best-in-class tools to help you level the playing field.

If you have ideas on how we can make WPBeginner’s Blog Post Idea Generator or other tools more helpful for you, then share your thoughts in the comments.

As always, I want to thank you for your continued support of WPBeginner, and we look forward to continue serving you for years to come.

Yours Truly,

Syed Balkhi
Founder of WPBeginner

The post Announcing WPBeginner’s Blog Post Idea Generator – Create Your Yearly Content Calendar in a Second first appeared on WPBeginner.

Microsoft Releases Pricing Info for Surface Tablets, Taking Pre-Orders

Earlier today, the Microsoft Store updated with pricing information and details about the new Microsoft Surface tablets running Windows RT. We haven't yet seen pricing information about the Surface Pro, but today's update shows us details about three versions of the Surface running Windows RT, which is the low-end version of the upcoming Windows 8 operating system.

Options

There will be three options for the Surface tablet with Windows RT:

Microsoft Aims to Take Over IoT with Windows 10

Everybody's trying to get in on the big-money future of IoT, and now "everybody" includes Microsoft with Windows 10. Larry Dignan at ZDNet put together a look at Windows 10's role in IoT - as it's been described by Microsoft CEO Satya Nadella at the Gartner Symposium ITXpo, at least - which suggests that the new OS will be a central platform for IoT systems of all types. Specifically:

Windows will be able to run on everything from sensors to wearables to whatever computing shift emerges.

Live-updated Apple Announcement Coverage

 Apple is expected to make a big announcement today, holding a special press event that has generated a lot of buzz in the past few weeks.

Rumors abound about what Apple will announce, with popular speculation that two new iPhones will be revealed -- the iPhone 5S, the successor to the current-gen iPhone, and the cheaper iPhone 5C, an economical version of the iPhone meant to compete with Samsung in emerging markets.

Introducing Headline Analyzer – Writing Captivating Headlines Made Easy

Do you want to write captivating headlines that boost traffic?

Have you ever wished there was an EASY tool that helps everyone write great headlines regardless of their skill set or having to hire an elite copywriter?

If you’re like me and most other smart website owners, then you have at least wished for this solution a couple of times in your WordPress journey.

Today, I’m excited to release a free WPBeginner tool, Headline Analyzer, which enables you to write irresistible headlines that your users can’t help but click.

We built this tool because we believe headlines are the single most important factor that can make or break your content.

Introducing Headline Analyzer – Writing Captivating Headlines Made Easy

With our tool, we want to empower all bloggers and website owners to write great headlines so they can compete with the big guys and drive more traffic.

What is Headline Analyzer Tool?

WPBeginner’s Headline Analyzer tool is a powerful FREE online tool that makes it easy to write compelling headlines that drive website traffic and shares and rank better in search results.

And it is a FREE tool… no signup or registration is required!

wpbeginner headline analyzer tool

One of the reasons most people fail to make their headlines compelling is that there is no clear-cut way to write one. This is why I decided to build a headline analyzer at WPBeginner.

Backed by data, our free tool reviews your headlines and provides suggestions to help you earn the highest number of click-throughs.

To analyze your title, the headline checker considers a few different factors, including word balance, power words, headline sentiment, headline type, word count, and more.

Some of the benefits of our title analyzer include…

Why Writing Great Headlines is Important?

Did you know 4 out 5 people will NEVER click through to read your articles?

That means even if your site gets on the first page of Google for relevant keywords, only a minority of your target audience will visit your website.

Fortunately, there is an easy way to improve your chances of driving more visitors to your site… and that is by writing a click-worthy headline.

A click-worthy headline can mean the difference between the search results your users will notice and click on Google – and the search results they’ll skip right over.

With WPBeginner’s Headline Analyzer, it takes less than 2 minutes to write a perfect title for your content… and you don’t have to be an SEO or copywriting guru to do so.

How to Use WPBeginner’s Headline Analyzer Tool

The first thing you’ll need to do is head over to the WPBeginner’s Headline Analyzer tool.

Next, type in your headline in the search bar and click Analyze.

Backed by data, our tool analyzes your headline, grades it on a scale of 1-100, and offers suggestions to improve it.

You can then follow those recommendations and re-analyze your title to see if it improves your score. Then you can repeat the process until you get a great score. The general rule of thumb is to aim for a score of 70+.

headline analysis report

To get the best results from the analyzer, follow the below recommended practices.

Always Come Up with Multiple Headline Ideas

It is recommended to come up with around 3 to 5 headlines for your content. When you brainstorm multiple headline ideas, you’re more likely to think out of the box, which in turn helps you create great headlines.

After the analysis, you can pick the one that has a better score and then refine it until it gets a better score.  

Choose the Optimal Length for Your Titles

Choosing the optimal length for your titles is important. If it is too lengthy, it might get cut off from Google Search results, email inbox, social media feeds, and so on.

word balance headline analyzer

Generally speaking, too short headlines fail to incite curiosity, leading to a drop in click-throughs.

Most WordPress SEO plugins and tools recommend keeping the number of characters under 60 to ensure the title fits in the search snippet and other marketing channels.

Improve Your Workflow with Headline Analyzer

Want to get the headline analyzer inside the WordPress post editor?

You can do so free by installing and activating either the free All in One SEO plugin or the free MonsterInsights plugin.

Both of these plugins give you access to the same headline analyzer except right inside the WordPress post editor.

Click the SEO headline analyzer button

What’s Coming Next?

At WPBeginner, we always strive to build powerful tools for small businesses, so they can grow and compete with the big guys.

Headline Analyzer is just one of the new tools that we’ve launched.

We have an exciting roadmap ahead of us, and in the coming weeks, hopefully, we’ll deliver more free tools at your disposal.

Here are a few more business tools that you can use RIGHT NOW.

Our goal is to continue to build best-in-class tools to help you level the playing field.

If you have ideas on how we can make WPBeginner’s Headline Analyzer or other tools more helpful for you, then share your thoughts in the comments.

As always, I want to thank you for your continued support of WPBeginner, and we look forward to continue serving you for years to come.

Yours Truly,

Syed Balkhi
Founder of WPBeginner

The post Introducing Headline Analyzer – Writing Captivating Headlines Made Easy first appeared on WPBeginner.

Introducing Broken Link Checker – Never Have Dead Links On Your WordPress Site Again

Are you tired of finding and fixing broken links on your WordPress site?

Have you ever wished there was a foolproof method to periodically monitor all internal and external links easily WITHOUT the high costs?

If you’re like me and most other smart website owners, then you have at least wished for this solution a couple of times in your WordPress journey.

Today, I’m excited to announce my new product, Broken Link Checker, which works silently in the background on your site, giving you peace of mind.

We built this tool to help you quickly check your site for broken links and easily fix them to improve search engine optimization (SEO).

introducing broken link checker for wordpress by aioseo

What is Broken Link Checker?

Broken Link Checker is a powerful WordPress plugin that crawls your website periodically and checks every link to ensure it is not broken.

It is built as a SaaS service, so it never puts load on your WordPress hosting server or slow your website down.

The Broken Link Checker plugin was developed by the same team behind AIOSEO (All in One SEO), the best SEO plugin for WordPress.

When broken links are found, the plugin makes it easy for you to fix them right from within the plugin without even having to visit individual pages where those links were added.

Why Do You Need Broken Link Checker?

Broken links can frustrate your website visitors and cause them to leave your site. They can even hurt your website’s SEO, conversions, and sales.

On WordPress sites, broken links typically occur when moving a site to a new domain name, or when deleting a post or page without proper redirection.

Sometimes broken links can also happen due to a typo, and they can go unnoticed for months if not years. But worse, if you ever link to an external website that’s not yours, and they change the page, delete it, or shut down the site, then your site will have broken links.

This is why monitoring broken links on a regular basis is important for your WordPress website.

While there are SaaS broken link checkers in the market, most are either crazy expensive or not built specifically with WordPress websites in mind.

So I decided to work with my team to finally create a beginner-friendly broken link checker for WordPress.

With Broken Link Checker, you can…

  • scan all links on your site every 3 days
  • detect valid links, broken links, and redirects
  • set which post types (posts, pages, or custom post types) and statuses (published, draft, and so on) to monitor
  • exclude certain URLs from being checked

… and a whole lot more.

If you’re serious about your website and want to grow your online business, then you know how important it is to offer a seamless website browsing experience to your visitors.

The last thing you want your readers to see is a big 404 page not found error message serving as a dead end on your WordPress site.

How to Use Broken Link Checker in WordPress

The first thing you’ll need to do is install and activate Broken Link Checker on your site.

aioseo broken link checker

For more details, see our step by step guide on how to install a WordPress plugin.

Next, you’ll need to connect the plugin to your Broken Link Checker account.

Upon connecting the plugin with your account, you can turn the toggle on to stop search engines from following broken links. You can even set it not to update the modified date for a page/post when a link is updated via the plugin.

link tweaks broken links tool

When you click the Broken Links tab, you can see that the plugin has automatically scanned the entire site, and links are categorized into broken, redirects, and dismissed.

The Broken Link Checker plugin lets you fix broken links quickly and easily right within your plugin. To replace a broken link, simply click Edit URL.

Alternatively, if you want to remove the link, just click Unlink and the link will be removed from the page.  

edit url in broken link checker

After updating the link, you can recheck if the link is still broken by clicking the Recheck option. If you want, you can even dismiss the message from the plugin.

Get More Details About Each Link

Broken Link Checker gives you additional details for each link, like how long the link has been broken and response header information, HTTP Status code, and more.

get status details for broken links

Control Which Types of Pages are Scanned

Another important aspect of Broken Link Checker is its advanced settings, which give you full control over which pages get scanned. Within the plugin, you can set which post types (posts, pages, or custom post types) and statuses (published, draft, and so on) to monitor.

You can also exclude certain pages from being checked.

advanced settings of broken link checker

This helps you better manage the crawl budget, so you can ensure you’re not wasting the link scan credits.

Scanning Your Site the Right Way

Broken Link Checker scans both external (links from your website to others) and internal links (links from one page on your site to another page) on your site.

Unlike other WordPress plugins, Broken Link Checker uses an external private server to scan (or, in other words, ping) for broken links on your site. That’s because repeatedly pinging external sites from your servers can make your site look suspicious to internet service providers, putting your sites at risk of being blacklisted.

This is why most WordPress hosting companies put traditional broken link checker plugins in their block list.

Since Broken Link Checker uses an external private server for pinging external links, you can rest assured that you’re in safe hands.

What’s Coming Next?

Broken Link Checker is a product by my AIOSEO team which is a leading WordPress SEO plugin with over 3 million installs.

Our goal is to continue to build best-in-class SEO tool to ensure your website is always outranking your competitors.

Broken Link Checker is just one of the new tools that we’ve launched.

We have an exciting roadmap ahead of us to make this plugin even more powerful, and I am very proud of our team.

If you have ideas on how we can make the Broken Link Checker platform or other SEO tools more helpful for you, then please send us your suggestions.

As always, I want to thank you for your continued support of WPBeginner, and we look forward to continue serving you for years to come.

Yours Truly,

Syed Balkhi
Founder of WPBeginner

P.S. Want us to acquire or invest in your WordPress business? Learn more about the WPBeginner Growth Fund.

The post Introducing Broken Link Checker – Never Have Dead Links On Your WordPress Site Again first appeared on WPBeginner.

Ultimate WordPress Migration Guide for Beginners (Step by Step)

Are you looking to move your website to WordPress, or thinking about migrating an existing WordPress site to a new domain or host?

WordPress is the most popular website builder powering over 43% of all websites on the internet. That’s because it’s easy to use and gives you control over every aspect of your website.

In this article, we’ll show you how to migrate your blog or website to WordPress with little downtime and without losing SEO. We’ll also show you how to move your WordPress site to a new server or domain.

Ultimate WordPress Migration Guide for Beginners (Step by Step)

Why Migrate Your Website to WordPress?

Small businesses and individuals are starting websites all the time. They realize that having an online blog or website have significant benefits that help them grow their brand and keep in touch with clients.

However, many beginners choose a blogging platform other than WordPress. These platforms help them get started quickly, but as their websites grow, they begin to run into limitations.

For example, they may not be able to install plugins that add the features they need, there may be limited options in customizing the appearance of their site, or the platform may become too expensive as their requirements grow.

We believe that self-hosted WordPress outperforms all other blogging and website platforms. It is powerful, easy to use, affordable, and the most flexible of all available blogging platforms. Here are all the reasons why you should use WordPress.

Note: When we speak of self-hosted WordPress, we mean WordPress.org. This is different from WordPress.com, which is a hosting service. We show you how to migrate from WordPress.com to self-hosted WordPress at the end of this article.

The good news is, that you can migrate your blog to WordPress and begin to take advantage of its power and flexibility.

How to Migrate Your Blog to WordPress Yourself

Migrating a blog isn’t as simple as just moving information from one platform to another. However, that’s definitely something you need to get right, otherwise, you may lose content.

It’s also essential to choose a reputable WordPress hosting company that’s fast and reliable. Luckily, most hosting services will install WordPress for you automatically and free of charge.

You also need to make sure you don’t lose SEO so that your posts rank lower on Google. You should also set up an SEO-friendly URL structure for your future posts.

Now you don’t want your visitors or search engines to lose track of your posts because the old URLs stop working. You need to take care of this by creating redirects.

Besides these, there may be some additional steps you need to take to migrate everything over and improve your blog.

That’s a lot to keep track of, so we created specific step-by-step guides on how to migrate from your specific blogging platform to WordPress:

1. Migrating Self-Hosted WordPress to a New Server or Domain

You may already be using a self-hosted WordPress website and decide to migrate it to a new hosting service or domain. For example, you may decide to upgrade to a more reliable web hosting company.

You will need to move your WordPress files and databases from the old provider to the new one. If you’re not careful, then you may lose data, or take your website down and lose sales.

That’s why we created a step-by-step tutorial that shows you how to safely migrate WordPress to a new host or server without any downtime.

However, if you are moving your website to a new domain name, then you have a little more work to do. This would be if you are changing the URL of your website from, say, johnsmith.com to smithconsultingservices.com.

In that case, you simply need to follow our detailed guide on how to easily move WordPress to a new domain.

Tip: Some hosting providers, such as SiteGroundHostingerWP Engine, and GreenGeeks offer a free migration service for WPBeginner users. It might not be listed on their website, so all you have to do is ask.

2. Migrating From Blogger to WordPress

Blogger is a free blogging service by Google. It offers a quick and easy way to create a blog for non-tech-savvy users. All you need is a Google account to start a free blog on Blogger.

However, as your website grows, you will be limited to basic blogging tools and won’t be able to add new features. There are also not many ways to customize the appearance of your blog.

WordPress, on the other hand, gives you complete ownership of your website and allows you to add the necessary features to grow and monetize your blog. We have created a detailed side-by-side comparison of WordPress vs Blogger.

The good news is that WordPress is set up to natively import your Blogger posts. However, you will need to follow our instructions carefully, or your new blog’s URLs might not match.

If you have a free Blogger account, then you will have a website address that looks like myblog.blogspot.com. In that case, you should follow our guide on how to switch from Blogger to WordPress without losing Google rankings.

However, Blogger also allows users to connect custom domain names to their blogs such as myblog.com. If you have a custom domain Blogger blog, then you will need to follow our guide on how to move a custom domain Blogger blog to WordPress.

3. Migrating From Ghost to WordPress

Ghost is a minimalist blogging platform with features entirely focused on writing blog posts. It is available as a hosted platform, and also as software that you can install, though many users find installing it difficult.

While a simplified user interface can be a good thing, it also means your options for customizing Ghost’s features and appearance are very limited. This can become frustrating.

On the other hand, WordPress allows you to customize your site by installing plugins and themes. It is also much easier to install yourself. You can learn more about the differences between these platforms in our side-by-side comparison of Ghost vs. WordPress.

Unfortunately, migrating from Ghost is difficult because the default Ghost export file does not use a format supported by WordPress. So we decided to fix this issue and created the Ghost to WordPress Importer tool.

We show you how to use this free tool to migrate your blog in our guide on how to properly move from Ghost to WordPress.

4. Migrating From GoDaddy Website Builder to WordPress

GoDaddy is one of the biggest hosting and domain name companies in the world. To help their many users get started with building their website, they offer a basic website builder tool called GoDaddy Website Builder.

Many users choose this tool because it’s a convenient way to get started. However, it is missing many of the key features of more powerful blogging platforms, as you can see in our detailed comparison between GoDaddy Website Builder vs WordPress.

This means that users will quickly realize its many limitations and want to move their website to a more flexible and powerful platform like WordPress.

Unfortunately, there is no export tool to move your site from GoDaddy Website Builder to WordPress. That means that the process will be time-consuming and have a lot of manual steps, making it easy to make a mistake.

You’ll find every step clearly explained in our guide on how to move a GoDaddy Website Builder site to WordPress.

5. Migrating From Gumroad to WordPress

Gumroad

Gumroad is a popular eCommerce platform that allows users to sell digital goods online, such as games, music, courses, and videos. However, many users are looking to switch away from the platform because they have raised their fees to 10% for each transaction.

This fee does not include credit card processing or PayPal fees. Plus, an additional 10% fee is charged if a product is sold through the ‘Gumroad Discover’ feature or their ‘Global Affiliates’ program. That’s a lot of fees.

On the other hand, WordPress is free and doesn’t charge you any fee for the items you sell. Unlike Gumroad, it also lets you sell physical goods and you can use any payment gateway you want and promote your website freely.

You can easily install a plugin like Easy Digital Downloads to make WordPress the perfect platform for selling digital goods. We have even partnered with SiteGround, and they are offering special EDD hosting for our readers.

You can learn how to do this in around 30 minutes by following our guide on how to switch from Gumroad to WordPress.

6. Migrating From Joomla to WordPress

Joomla

Joomla is a good content management system that has a lot in common with WordPress. For example, they are both open-source software written in the PHP programming language and use a MySQL database.

They also have similar requirements, which means you won’t need to change hosting companies.

However, Joomla is more complicated to use. It is also not as powerful or flexible as WordPress because there are fewer extensions and designs available for you.

On the other hand, WordPress is easier to use and offers tons of extensions and design choices. See our comparison of Joomla vs WordPress for more details.

Luckily, there is a plugin you can use to easily import your Joomla content into WordPress. We carefully take you through every step you need in our guide on how to easily move your site from Joomla to WordPress.

7. Migrating From Medium to WordPress

Medium is a good blogging platform for new writers. It allows you to publish your posts with very little setup. But because you don’t own the platform, content from other authors often gets displayed below your own story.

The platform is quite limited compared to WordPress. When you switch from Medium to WordPress, you will own your own blog and can add all the features you need using plugins.

Simply follow our complete step-by-step guide to help you properly move all your content from Medium to WordPress.

You can retain the look of your old blog by installing a Medium-style theme or go for a new blog design using one of the best and most popular WordPress themes.

Tip: If you’re not ready to completely migrate away from Medium, then you can learn how to embed Medium blog posts in WordPress.

8. Migrating From Shopify to WordPress

Shopify is an all-in-one eCommerce solution that makes it easy for you to create an online store, accept payments, and manage your inventory, all from a single platform.

You don’t need to worry about the technical aspects of managing an eCommerce site, but it comes with slightly higher costs and limited control of your website.

On the other hand, you can turn WordPress into a full-featured online store by installing the WooCommerce plugin and customize every aspect of your store. You can compare the differences between the platforms in our comparison of Shopify vs WooCommerce.

Unfortunately, migrating away from Shopify is difficult because it doesn’t provide an easy way to export data to a WordPress-supported format. So we built an easy importer tool to help you do the Shopify to WooCommerce migration for free.

We take you through the entire migration process step-by-step in our guide on how to properly move from Shopify to WooCommerce.

Note: If you’re not ready to completely migrate away from Shopify, then you can learn how to easily integrate Shopify with WordPress.

9. Migrating From Squarespace to WordPress

Squarespace is a website-building service that focuses on small business owners. It allows you to create beautiful websites using easy drag-and-drop tools.

However, compared to WordPress, it costs more and offers less scope for design and flexibility. And while it does offer a limited set of extensions and integrations, they don’t compare with the power and breadth of the WordPress plugin ecosystem.

Unfortunately, it is difficult to migrate away from Squarespace because it offers limited export functionality. Depending on what content you have on your site, you may need to manually copy and paste some content from your Squarespace website.

In our guide on how to properly move from Squarespace to WordPress, we clearly list the content that can be automatically exported, and the content you will have to move manually to successfully migrate your site.

10. Migrating From Tumblr to WordPress

Tumblr is a little different than other blogging platforms. It is a microblogging platform with social networking features like following other blogs, reblogging, and built-in sharing tools.

The platform is easy to use and comes with its own audience. As a microblogging tool, Tumblr makes it easy to quickly blog videos, GIFs, images, and audio formats.

However, unlike WordPress, Tumblr’s features are limited and cannot be extended. To learn more about WordPress and what you can do with it, please see our complete WordPress review with pros and cons.

If you’re thinking about migrating from Tumblr to WordPress, then you will be glad to know that WordPress can natively import your Tumblr posts.

However, there is a lot involved in a website migration, and you’ll find all the steps in our comprehensive guide on how to properly move your blog from Tumblr to WordPress.

11. Migrating From Weebly to WordPress

Weebly is a well-known website builder platform owned by Square’s payment platform. It offers easy-to-use website-building tools for business websites and eCommerce stores along with free blog templates that you can add to your website.

However, that free plan has limited features and bandwidth, and upgrading to a paid subscription is expensive compared to top blogging websites. Besides that, Weebly’s blogging and SEO features are just not as powerful as other blogging platforms.

By contrast, WordPress can be hosted on any server and has all the features you can dream of like online stores, contact forms, galleries, portfolios, SEO, and more. When you compare Weebly vs WordPress you might start to think about switching.

The migration will take about an hour, and it’s worth it. Don’t worry, we’ve helped hundreds of people switch with the step-by-step directions in our guide on how to properly move from Weebly to WordPress.

12. Migrating From Wix to WordPress

Wix is a popular hosted platform that lets you quickly create simple websites using a drag-and-drop website builder. You can add a blog using the Wix Blog app.

However, when you compare Wix vs WordPress you see that Wix has incredibly limited options and adding extra features can become quite expensive.

For all but the simplest websites, WordPress is by far the better choice because it has a much larger range of themes and layouts, as well as a huge selection of plugins that add new features to your website.

Unfortunately, Wix makes it quite difficult to move your content away, but after reviewing various different ways to move from Wix to WordPress, we believe the easiest method is by importing your blog posts via RSS.

We show you how to do this step-by-step in our guide on how to properly switch from Wix to WordPress. On an average Wix blog, the migration takes around an hour.

13. Migrating From WordPress.com to Self-Hosted WordPress

WordPress.com is a blog hosting service offered by Automattic, a company created by WordPress.org co-founder Matt Mullenweg. Basic blog hosting is free and you can purchase additional options like a custom domain name, additional storage, and premium services.

This appeals to new users because no setup is required. However, compared with a self-hosted WordPress website, there are limited options to extend your blog. For example, you can’t use custom themes and plugins for customizing your blog.

You can learn more by viewing our comparison chart on WordPress.com vs WordPress.org.

If you’re ready to move from WordPress.com to a self-hosted WordPress blog, then see our guide on how to properly move your blog from WordPress.com to WordPress.org. Make sure you follow our steps carefully so you don’t lose data, visitors, or SEO.

After you migrate to a self-hosted WordPress blog, you may find you are missing some features you enjoyed on WordPress.com. Don’t worry, you can easily add those features by following our guide on how to get WordPress.com features on self-hosted WordPress blogs.

Special Offer: Our Team of Experts Can Move Your Blog for Free

Here’s a special offer. If you wish to migrate from Blogger, Medium, Weebly, or WordPress.com to a self-hosted WordPress website, then we can do it for you for free.

One of our expert team members will do the entire migration for you (100% free). Yes, you can literally switch from any of those specific platforms to WordPress without any risk.

There are just two conditions:

  • First, you need to sign up for your new web hosting service using our link. This will make sure you get the best price on hosting.
  • Second, your blog can’t have more than 1,000 posts. We can offer a migration service for larger blogs, but that will be a paid service.

Sound good? You can learn more on our Free WordPress Blog Setup page. We’ve already helped over 100,000 people, so get started now.

Free Blog Setup

We hope this tutorial helped you learn how to migrate your website to self-hosted WordPress. You may also want to see our guide on how to create an email newsletter the right way, or our expert pick on must have WordPress plugins to grow your site.

If you liked this article, then please subscribe to our YouTube Channel for WordPress video tutorials. You can also find us on Twitter and Facebook.

The post Ultimate WordPress Migration Guide for Beginners (Step by Step) first appeared on WPBeginner.

What’s New in WordPress 6.2 (Features and Screenshots)

WordPress 6.2 has just been released, and it is the first major WordPress release of 2023.

This new version is packed with significant improvements and new features. Many of them focused on the block editor and site editing in WordPress.

In this article, we’ll show you what’s new in WordPress 6.2 and which features you should try after the update.

An overview WordPerss 6.2 release with features and screenshots

Note: WordPress 6.2 is a major release, and unless you are on a managed WordPress hosting service, you’ll have to initiate the update manually. Here’s how to safely update WordPress.

Important: Don’t forget to create a complete WordPress backup before updating.

That being said, here’s all that’s new in WordPress 6.2.

WordPress Site Editor Comes out of Beta

The site editor comes out of the beta.

It has been around for the past few WordPress releases, the removal of the beta label is merely an invitation for more users to try it.

Site editor comes out of beta

This also indicates the completion of phase 2 of the WordPress development roadmap which started out with the release of the new block editor back in WordPress 5.0 (late 2018).

WordPress 6.2 includes several new features added to the site editor, including some brand-new tools which we’ll talk about later in this article.

Note: Full site editor is available with block themes that support this feature. You can try it out even if you are using the older classic editor with a block-enabled theme.

Improved Navigation Menu Block

Navigation menus help you define your website layout to your users. However, creating them in the full site editor had been a bit difficult for beginners.

WordPress 6.2 now comes with an improved ‘Navigation’ block.

You can now create and manage the Navigation block by editing items in the sidebar.

Managing menu items in block panel

To add a new menu item, simply click on the ‘add (+)’ button. You can also drag and drop menu items to rearrange them.

Want to use a different menu? You can now easily switch between menus you have created earlier by clicking on the Three-dot menu in the sidebar.

Manage menus

Overall, this is a significant improvement to the older Navigation block where you had to edit items inline which was not a good experience for beginners.

Improved Template Browsing Experience

WordPress 6.2 comes with a new template browsing experience.

This allows users to browse different templates to find out which one they need to edit if they want to make changes to a certain area of their website.

Template browser in WordPress 6.2

To edit a template or template part, simply click to load it inside the preview window. After that, just click on the preview window to start editing.

Want to exit the site editor?

Simply click on the WordPress or your site logo at the top left corner of the screen to enter the template browser. Then click again to exit and return to the WordPress dashboard.

Exit site editor

The template browser screen will now also show you that you have unsaved changes.

It also offers an improved saving experience showing what changes you are saving.

Unsaved changes in site editor

Template Parts Highlighted with Colors

A template in the site editor may include several template parts, like the header and footer.

These are global elements that can be used in multiple places on your WordPress website. If you edit a template part on one page, those changes will be reflected all over your site.

Previously when editing a template part, the only indication was the label at the top changed to show the template part name.

Template part editing before WordPress 6.2

Editing template parts affects all templates that include those elements. This makes it important to indicate that users are editing a global template part and not simply the page they are looking at.

WordPress 6.2 now makes this more noticeable by adding colors and an icon to indicate that you are editing a template part.

Template part edited in WordPress 6.2

Modify Your Theme With The Style Book

WordPress 6.2 comes with a style book feature in the site editor.

This is basically one convenient place to browse how your theme displays all the blocks. To access it you need to switch to the Styles panel and then click on the Style Book icon. It is the one that looks like an eye.

Style book shows all block styles at one place

This will show you all the blocks, and how they are styled in your theme. They are organized into different categories so that you can easily locate the block you want to edit.

Click to start editing a block and you will see all the tools that you can use in the sidebar panel. Changes you make here will apply globally to your theme.

Edit block directly from style book

Basically, you can change the appearance of your entire theme by editing individual blocks here and creating a completely new style of your own.

Want to edit block styles individually? Don’t worry there are even more design tools at your disposal to edit blocks.

Ability to Add Custom CSS to Your Theme or Blocks

By default, the site editor hides the legacy Theme Customizer interface. Many users added their custom CSS in the ‘Additional CSS’ panel available with the legacy customizer.

Until 6.2, it was a problem to add custom CSS using the default tools available.

WordPress 6.2, however, now allows you to add custom CSS that applies to your entire site. Simply click on the Styles panel and choose Custom CSS under the three-dot menu.

Custom CSS in site editor

You can also add custom CSS to individual blocks as well.

Switch to the Style panel and then click on Blocks.

Block styles

Now, you need to select the block that you want to modify.

After that, click on the ‘Additional Block CSS’ tab to enter your custom CSS code.

Block styles custom CSS

WordPress 6.2 makes it easier to add custom CSS if you need to. However, it comes with a ton of built-in design tools which are much easier to use than adding custom CSS.

Copy and Paste Block Styles

Another styling feature that reduces the need to add custom CSS is the ability to simply copy and paste block styles.

Let’s say that you just made some changes to a block and want to make the same changes on another block as well.

With WordPress 6.2 you can simply click on ‘Copy styles’ under the block options.

Copy styles

After that, click on the block options for the block where you want to paste the style and select ‘Paste styles.’

Note: Your browser will ask for permission to allow your website to view the contents of the clipboard. You need to click ‘Allow’ to continue.

Paste styles

Improved Pattern Insertion

WordPress block patterns are a collection of pre-made design elements that you can use for creating custom content layouts faster.

By default, WordPress comes with several built-in patterns. Your WordPress theme may also include its own pattern. Plus, you can find more patterns in WordPress Patterns Directory.

WordPress 6.2 comes with an improved pattern insertion interface.

Easier pattern insertion

Openverse Free Media Library Integration

WordPress 6.2 now adds a ‘Media’ tab in the inserter as well.

Here, you can choose media from your own WordPress media library or browse royalty-free images from Openverse.

Openverse Integration in WordPress 6.2

Openverse is a sister project of WordPress.org. It allows openly licensed and public domain works to be discovered and used by everyone.

Once you select an image it will be inserted into the editor and downloaded to your WordPress media library as well.

WordPress will also save the image caption which may include a link back to the original source. You can delete this caption if the image is in the public domain.

New Sub Panels for Block Settings & Styles

WordPress 6.2 now uses sub-panels to separate block settings and styles.

This helps users understand where they need to look if they want to change the appearance of a block.

Sub panels for block settings and styles

New Distraction-Free Mode

Historically, WordPress has always provided options to hide the formatting buttons and toolbars on the post editor screen.

Here is how it looked in WordPress 4.1 with the older classic editor.

Distraction free mode in older classic editor

However, the block editor had the option to be used in full-screen mode. WordPress 5.4 started using the full-screen mode as the default.

This allowed users to have a much cleaner writing interface, but there was no distraction-free mode.

Full-screen mode

WordPress 6.2 now comes with a completely clean and calm distraction-free mode.

Users will be able to choose it from the editor settings, and it removes all toolbars and editing panels from the screen.

Distraction free mode in WordPress 6.2

Import Classic Widgets as Template Parts in Block Themes

WordPress 6.2 provides a nice fallback for importing classic legacy widgets in block themes when switching themes.

Users with classic widget themes lost their legacy widgets when they switched to a block theme. Now, you can import them as template parts.

Simply create a new template part by clicking on the ‘Add New Block’ button (+).

Import classic widgets into template part

From the template part settings panel, click on the Advanced tab to expand it, and you’ll find the option to import a widget area from your previous theme.

Miscellaneous Enhancements

WordPress 6.2 contains a ton of enhancements. It merges 10 Gutenberg releases (‘Gutenberg’ is the codename for the original block editor project) into WordPress core so there are many refinements and new features to explore.

Here are some of the most useful enhancements.

1. Captions Button in Image Block Toolbar

Previously WordPress automatically added the caption area below the image and moved the cursor automatically to the caption.

This led many users to continue writing their text not realizing that they are writing it in the caption area.

WordPress 6.2 fixes this by adding a caption button to the toolbar. Users can now use it to add a caption if needed.

Add caption button

2. Improved Calendar Block

The calendar block now comes with more color options.

Improved color block

3. The List, Outline, and Info Panels are Merged

The list view, outline, and info panel are now merged into one convenient location.

List block now shows outline and information panel

4. Group Block Layout

The ‘Group’ block now lets you choose a layout.

Group block layout

5. The Download Link for Media Files

The media screen will now show a ‘Download File’ link in the list view.

Download link for media files

6. New Icon for Settings Panel

The icon to display the settings panel previously used a gear icon. It is now presented with a panels icon.

Settings icon

Under The Hood Changes

WordPress 6.2 also includes a ton of changes intended for developers. Following are some of these changes:

  • A new HTML API called WP_HTML_Tag_Processor is introduced. (Details)
  • A new client-side filter called blockEditor.useSetting.before is introduced. It allows developers to change block settings before the editor is rendered. (Details)
  • Patterns API extended to include template_types property. (Details)
  • Faster updates by moving directories instead of copying them. (Details)
  • A new switch_to_user_locale() function is introduced. (Details)
  • Create autosave revisions only when content is changed. (Details)
  • Add a style variation tag to themes that use style variations. (Details)

We hope this article helped you uncover what’s new in WordPress 6.2 and which new features to try out. We are particularly excited about all the changes to the site editor and performance improvements for block themes.

If you liked this article, then please subscribe to our YouTube Channel for WordPress video tutorials. You can also find us on Twitter and Facebook.

The post What’s New in WordPress 6.2 (Features and Screenshots) first appeared on WPBeginner.

Welcome WP101 to the WPBeginner Family of Products

Today, I’m extremely excited to share that WP101 is joining Awesome Motive, and they’re now part of the WPBeginner family of products.

WP101 is one of the most trusted premium WordPress video training providers in the market. Over 3 million users have learned WordPress from their WordPress video tutorials. The WP101 Plugin allows WordPress agencies and service providers an easy way to offer white-labeled professional WordPress training videos to their clients.

WP101 is joining the WPBeginner Family

Introduction to WP101 – Quick Overview

WP101 offers professionally-produced WordPress training videos to help you learn WordPress, fast. It’s a perfect solution for small businesses owners, large corporations, and government agencies who want to offer professional WordPress training videos in their employee onboarding process.

With WP101, you get access to over 200+ WordPress training videos that cover everything you need to learn the WordPress user interface in a university style format.

In addition to the popular WordPress 101 series for both Gutenberg and the Classic Editor, the current library also includes video tutorials for top WordPress plugins including WooCommerce, WPForms, Elementor, Beaver Builder, and more.

WP101 Course Library

The WP101 Plugin makes it easy for WordPress developers and agencies to offer white-label training videos to their clients, right inside the WordPress dashboard.

It gives you the ability to add your own custom videos as well as selective show / hide videos based on client’s needs.

WP101 WordPress Training Videos inside WordPress Dashboard

Whether you’re a small business owner or large corporation, I highly recommend adding WP101 training to your employee onboarding process.

If you’re a WordPress freelancer or agency, then you should consider adding the WP101 Plugin to your client and build a recurring revenue stream.

Background Story – Why WP101? 

Both WPBeginner and WP101 started around the same time with a similar mission: making it easy for people to learn WordPress.

At WPBeginner, we did it with our easy to understand written tutorials, while Shawn at WP101 offered premium video training.

I have been friends with Shawn Hesketh, founder of WP101 for a long time, and we have enjoyed over a decade of coopetition. I have a lot of admiration and respect for the massive impact he’s had in the growth of the WordPress community.

Syed Balkhi and Shawn Hesketh at Pressnomics

After 14+ years of creating WordPress training videos, when Shawn was ready to move on to the next chapter of his life, we started talking about the future of WP101 and carrying his legacy forward.

Given my experience running the largest WordPress resource site, it made perfect sense for us to be the future custodian of the WP101 brand. 

It gives me great joy to be there for a friend and offer him the exit that he deserves as he pursues the next chapter of his career. At the same time, it’s an honor and a privilege that Shawn trusted us to carry the mission forward.

Note: Want to join our remote team to work on something awesome & make an impact? We’re hiring. Come work alongside me and help shape the future of the web.

What’s Coming Next? 

Our work is just starting.

My goal is to create the best class-room style WordPress training videos to help WordPress grow in enterprise, government agencies, as well as at the school and collegiate level. 

I’m really excited about the latter because I believe that education helps level the playing field, and that’s the mission of my Balkhi Foundation.

WordPress is an open source platform, and open source is one of the greatest ideas of our generation. It has the power to transform the lives of so many people across the world, like it did for me when I first immigrated to the US.

While talent is everywhere, opportunities are not. I want to use the WP101 training platform to bring opportunities everywhere, so we can help shape the future of the web for billions worldwide.

This is a big mission, and I need your help. If you have experience with instructional design or higher-ed, I would love to chat with you to see how we can work together to bring WordPress to classrooms and universities. Please send me a message via WPBeginner contact form.

If you’re passionate about teaching WordPress and want to be a part of our mission, we’re hiring content creators and trainers. While the listings for these roles aren’t public, just send me a brief message via our contact form with your resume, and I’ll get in touch with you.

As always, I want to thank you for your continued support of WPBeginner. 

Every time I share an announcement like this, I realize that I’m only able to do what I love every day because of you, our amazing readers, and I’m extremely grateful for your support throughout the years.

WPBeginner and Awesome Motive would not be here without YOU, and I just want to say how much I appreciate all of you.

I look forward to continuing serving you, and the larger WordPress / web ecosystem for years to come.

Yours Truly,

Syed Balkhi
Founder of WPBeginner

P.S. Want us to acquire or invest in your WordPress business? Learn more about the WPBeginner Growth Fund.

The post Welcome WP101 to the WPBeginner Family of Products first appeared on WPBeginner.

What’s Coming in WordPress 6.2 (Features and Screenshots)

WordPress 6.2 Beta arrived a few days ago and it is expected to be released on March 28th, 2023. It will be the second major release of 2023 and will come with significant new features and improvements.

We have been closely monitoring the development and trying out new features on our test sites.

In this article, we’ll give you a sneak peek into what features are coming in WordPress 6.2 with details and screenshots.

What new features are coming in WordPress 6.2

Note: You can try out the beta version on your computer or on a staging environment by using the WordPress Beta Tester plugin. Please keep in mind that some of the features in the beta may not make it into the final release.

Here is a quick overview of changes coming in WordPress 6.2:

Full Site Editor Comes Out of Beta

The new full site editor feature in WordPress will come out of beta with the final release of WordPress 6.2.

Site editor comes out of beta

This completes a significant part of the WordPress development roadmap.

The site editor feature is now stable for the community to create block-based themes and experiment with their own WordPress websites, plugins, or themes.

Note: Full site editor is available with block themes that support this feature. You can try it out even if you are using the older classic editor with a block-enabled theme.

Browse and Choose Templates to Edit

Previously the Site Editor loaded the Home template of your theme by default. This left many beginners wondering which template or template part they needed to edit.

With WordPress 6.2, the site editor will load the template preview window first. From here, you can browse different templates and see a preview of what it looks like.

Template browser

Then you can simply click on the Edit button to start working on the selected template.

Once you are done editing the template, don’t forget to click on the Save button to make your changes go live.

After that, you can click on the WordPress logo in the upper-left corner of the screen to bring back the template browser sidebar.

Site editor navigation

Now if you need to edit a different template, then you can choose it from here. Otherwise, you can simply click on the WordPress logo again and exit the Site Editor.

Add Custom CSS to Your Theme or Specific Blocks

In the last few WordPress releases, the site editor hid the ‘Theme Customizer‘ which made it difficult for users to add custom CSS to their themes.

WordPress 6.2 will allow users to switch to the Styles panel and select Custom CSS from the menu.

Custom CSS in site editor

From here, users will be able to save Custom CSS that applies to their entire theme.

What if you wanted to save custom CSS that only applied to a specific block?

WordPress 6.2 will also allow you to add custom CSS for specific blocks. From the Style panel, click on the Blocks menu.

Block styles

On the next screen, you will see a list of blocks. Simply click on the block where you want to apply your custom CSS.

Under the block styles, click on the Additional CSS tab.

Block styles custom CSS

If you want to conditionally add CSS or keep your custom styles outside of theme specific settings, then we recommend using the free WPCode plugin.

New and Improved Navigation Menus

Adding navigation menus in the full site editor has been a bit difficult for users. WordPress 6.2 will try to solve this by improving the way users can create and manage menus while using the site editor.

First, instead of editing the menu items inline, you can now add, remove, and edit menu items in a subpanel under the Navigation block.

Managing menu items in block panel

From here, you can add a new menu item by clicking on the Add Block (+) button. You can also just drag and drop menu items to rearrange them.

Want to create a new blank menu or reload an older one? Simply click on the three-dot menu and then choose a menu you created earlier or create a new one.

Manage menus

Colors to Indicate Template Parts Being Edited

WordPress 6.2 will also highlight the template part that you are editing, and that changes will be made on a side-wide, global scale.

The element will be bordered in a color and have a template part icon attached.

Template part editing in site editor

This will help users realize that instead of editing the specific page or post, they are now editing a template part and this change will affect other pages on their site as well.

See Styles for All Blocks in The Style Book

The site editor in WordPress 6.2 will ship with a ‘Style Book.’ Simply switch to the Styles panel and then click on the style book icon.

This will show you all the blocks, and how they are styled in your theme.

Style book shows all block styles at one place

You can locate a block much more quickly this way, and then click to edit it directly.

After that, you can change its appearance and style and customize it to your own requirements.

Edit block directly from style book

Copy and Paste Block Styles

Now that editing block styles and appearance has become so much easier, there is a need to easily copy and paste these styles.

WordPress 6.2 will allow you to simply copy block styles by clicking on block options and then selecting ‘Copy Styles’.

Copy styles

After that, you can click to edit a different block and select ‘Paste styles’ from the block options.

Your browser will ask for permission to allow your website to view the contents of the clipboard. You need to click ‘Allow’ to continue.

Paste styles

Classic Widgets Import as Template Parts in Block Themes

Users with classic widget themes lost their legacy widgets when they switched to a block theme. WordPress 6.2 will provide a nice fallback to that by converting legacy widgets into special Template Parts when switching themes.

You’ll need to enter the site editor and edit the template where you want to import the widgets. After that, create a new template part by clicking on the Add New Block button (+).

Import classic widgets in block themes

From the template part settings panel, click on the Advanced tab to expand it and you’ll find the option to import a widget area from your previous theme.

Separate Sub Panels for Block Settings and Styles

With WordPress 6.2, the editor will show two sub-panels for a block. One for the block settings and the other one for styles.

This will help users understand where they need to look if they want to change the appearance of a block.

Sub panel for Styles

A New Distraction-Free Mode is Introduced

Historically, WordPress has always provided options to hide the formatting buttons and toolbars on the post editor screen.

However, WordPress 5.4 made the editor full-screen by default. This allowed users to have a much cleaner writing interface, but there was no distraction-free mode.

WordPress 6.2 will remedy that and will come with a completely clean and calm distraction-free mode. Users will be able to choose it from the editor settings.

Launch distraction free mode

Once chosen, the distraction-free mode hides all editor control elements.

As you can see below, toolbars, side panels, and the top bar are nowhere to be seen.

Distraction free editor in WordPress 6.2

Improved Pattern Insertion with New Categories

WordPress 6.2 will simplify the Pattern Insertion panel. Instead of showing previews and a drop-down menu of categories, it will show the categories first.

Pattern insertion

There are two new categories of Patterns added for the Header and Footer sections.

Clicking on a category will show you the available patterns that you can use.

Browse patterns in a category

You can then just click to insert a pattern into your template and start editing it.

For more details, see our tutorial on how to use patterns in WordPress.

Miscellaneous Changes

Download Link For Media Files – The media screen will now show a Download File link in the list view.

Download file link in the Media Library

Openverse Integration to Add Free Images – Openverse offers royalty-free open-source images.

With WordPress 6.2, users will be able to find and add those images from Add New panel.

Openverse Integration

New Icon for the Settings Panel – The icon to display the settings panel previously used a gear icon.

It is now represented with a panels icon.

Settings icon

Under The Hood Changes

There are a ton of changes in WordPress 6.2 intended for developers. Here are some of the changes that you will find in the update:

  • Faster updates by moving directories instead of copying them. (Details)
  • A new switch_to_user_locale() function is introduced. (Details)
  • Create autosave revisions only when content is changed. (Details)
  • Add a style variation tag to themes that use style variations. (Details)

Overall WordPress 6.2 beta 1 includes 292 enhancements, 354 bug fixes for the editor, and more than 195 tickets for the WordPress 6.2 core.

We hope this article provided you with a glimpse of what’s coming in WordPress 6.2.

Comment below to let us know what features you find interesting and what you’d look to see in a future WordPress release!

If you liked this article, then please subscribe to our YouTube Channel for WordPress video tutorials. You can also find us on Twitter and Facebook.

The post What’s Coming in WordPress 6.2 (Features and Screenshots) first appeared on WPBeginner.

Major Earthquake in Turkey Today | 7.8 Magnitude

A devastating earthquake with a magnitude of 7.8 hit southeast Turkey, causing widespread destruction and loss of life. The quake was recorded by the US Geological Survey and struck at 04:17 local time, at a depth of 17.9 km near the city of Gaziantep. The impact of the quake was felt in ten cities including […]

VoIP Starter Guide: Learn the Basics

After several weeks of in-depth research, we found Nextiva to be the best VoIP provider because of its high performance and quality standards. Get a free trial to experience the platform today.

If you’ve ever used a service like Zoom or Google Voice, you’ve already experienced the convenience and cost-saving benefits of Voice over Internet Protocol (VoIP). In this article, we’ll explore what VoIP is and how it works and discuss key VoIP features that make it an extraordinary telephone service.

If you‘re a business owner looking to cut costs or simply looking for an alternative to traditional phone service, read on to get a comprehensive understanding of VoIP and its potential advantages for your business.

The Best 12 VoIP Phone Services for VoIP Calling

To experience the benefits of VoIP, you have to choose a reliable phone service provider. The good news is we‘ve already reviewed over 25 brands to shortlist the best VoIP phone services that are worthy of your time and money.

  • Nextiva — Best Overall VoIP Provider
  • RingCentral — Best for Hybrid and Remote Work Environments
  • Ooma — Best for Small Businesses That Want Simple Setups
  • 8×8 — Best VoIP Provider for International Calling
  • Dialpad — Best AI Functionality for VoIP Phone Systems
  • GoTo Connect — Best Feature-Packed Entry-Level VoIP Plan
  • Phone.com — Best For Businesses on a Tight Budget
  • Google Voice — Best Simple and Lightweight VoIP Phone Service
  • Aircall — Best Built-In Call Management Tools
  • CallHippo — Best VoIP Phone System for Industry-Specific Compliance
  • 11Sight — Best One-Click Audio and Video Calling for Sales and Marketing Teams
  • Zoom — Best Call Monitoring Features For Business Users

What is VoIP?

Voice over Internet Protocol, or VoIP, lets you make phone calls using a broadband internet connection instead of a regular phone line. It’s an advanced technology that converts your voice into a digital signal and then transmits it over the internet instead of traditional phone lines. It can be on-premise or hosted in the cloud by a VoIP provider.

One of the (many) reasons VoIP has become increasingly popular in recent years is it offers several advantages over traditional phone service. 

For example, it’s cheaper (at times, even free!), especially for making long-distance or international calls. It also offers a range of features, such as the ability to forward calls to multiple devices and conduct conference calls with multiple participants, which isn’t available with traditional phone service. 

It’s also incredibly flexible, where you can use a VoIP app on your computer or smartphone or a VoIP adapter to connect your regular phone to the internet.

How Does VoIP Work?

Here’s a quick rundown of how a VoIP call works:

  1. Your call is passed from your device to a router.
  2. The router passes your call over the internet, reaching a VoIP phone service server.
  3. Your call is then transmitted via local internet to the other end of the receiver’s router.
  4. Your call connects to the receiver’s IP device. 

As long as you have a high-speed internet connection (a router and modem), you’re ready to use VoIP.

Nextiva infographic explaining how VoIP works
Nextiva offers an easy-to-use VoIP system that can be managed from a single portal.

Generally speaking, a VoIP configuration involves a desk phone and a session initiation protocol (SIP) server, which is also your VoIP service provider. 

As VoIP runs over the internet, your data is stored in the cloud. You can manage the VoIP system through an online dashboard. You can adjust contacts, forward calls, and add new phone numbers directly on the dashboard.

Overall, VoIP is a convenient and simple way to make phone calls using the internet. You can communicate with anyone, anywhere in the world—provided both parties have a stable internet connection and a VoIP service-compatible device.

What are the Advantages of VoIP? 

The following are a few reasons why you should choose a VoIP service over traditional phone lines: 

Value for Money

Most VoIP phone providers offer unlimited missed calls for free. While international calls are chargeable, it’s still quite cheap. 

Moreover, most VoIP services are cloud-based, which means they don’t require hardware. This saves you money on repairs and maintenance, which you likely pay to your landline phone provider.

Greater Flexibility

VoIP eliminates the need to be at a specific place to make or receive phone calls. 

Instead of being in an office, on-premise, or sitting by your desk, you can take calls from anywhere using the app on your device. This is a big advantage for remote or hybrid teams or f you travel frequently.

List of benefits of using Nextiva's VoIP phone system
Companies like Nextiva offer advanced features with their VoIP phone systems.

Improved Scalability

With VoIP, you can grow easily and cost-effectively, whether you’re opening a new office in a new city or hiring more staff.

Unlike a traditional phone service that typically involves spending more money on expensive hardware to get a dedicated line, you can add team members with just a few clicks inside your VoIP service‘s account dashboard. 

The fact that VoIP works on all smartphones means you don’t have to spend more on additional equipment costs while freeing up disk space.

Improved Privacy 

VoIP allows you to add a second line to your cell phone, helping you avoid sharing your personal number with strangers.

Small business owners wanting to protect their privacy can set up a VoIP line for their customers in minutes. This is a great security feature keeping in mind the recent rise of phone hacking.

What are the Disadvantages of VoIP?

Next, let’s review the disadvantages of VoIP:

Lack of Offline Functionality

This is the obvious disadvantage of VoIP.

If you don’t have reliable internet, your clients and team members cannot reach you through your business number. But the good news is VoIP systems will directly send the caller to voicemail if service is unavailable.  

In addition to a good internet connection, you also need a continuous power supply. Otherwise, you’ll have to wait until power is restored or invest in a backup power supply.

If you receive VoIP calls through Wi-Fi, you may also have to step out of the office, depending on the provider, and switch to your data plan to talk. 

Potential Connection Issues

As mentioned, VoIP sends small packets of data across the internet and reassembles those packets at the recipient’s IP address. 

This creates three potential issues:

  • Packet loss: occurs when data packets fail to reach their destination, resulting in dropped calls. 
  • Jitter: when packets reach the destination but arrive in the wrong order, resulting in unintelligible calls. 
  • Latency: the lag in time between when you speak and when the person on the other line hears what you say.

No Built-in Emergency Services

The good thing about non-fixed VoIP phones is they aren’t tied to a physical location. But this also means there’s no way for emergency services like 911 to trace your location. 

Suppose you have a physical address linked to your VoIP account. When you’re on the go, emergency workers may be dispatched to the wrong location.

The 11 Key VoIP Features that Help Boost Productivity 

VoIP’s advanced feature set is one of the main reasons it’s currently the most popular phone system in use. Here are some of its best features in detail to help you understand how your business can benefit from this technology:

  1. Interactive Voice Response (IVR): This feature uses pre-recorded voice prompts and speech recognition to allow customers to interact via a dial pad and direct their calls to the proper departments or individual agents. In other words, it automates business processes that either eliminate the need for your callers to speak to a live agent or drastically cut down call times.
  2. Call forwarding: This feature lets you easily forward calls to another number or device when you’re unable to answer a call or are away from your desk.
  3. Virtual receptionist: Certain VoIP services offer a virtual receptionist feature for small businesses that don’t have a dedicated receptionist. This means you can set up an automated greeting and menu system for incoming calls. 
  4. Call blocking: This feature allows you to block unwanted calls from specific numbers.
  5. Conference calls: Thanks to this feature, you can conduct conference calls with multiple participants at once. This facilitates collaboration with remote coworkers or clients.
  6. Integration with other tools: VoIP services are also incredibly flexible, meaning you can integrate the tech with other business tools, such as customer relationship management (CRM) software and project management software, to streamline communication and improve overall productivity.
  7. Voicemail: Voicemail allows you to receive and listen to messages when you cannot answer a call.
  8. Call waiting: This feature will notify you of all incoming calls if you or your team members are already on the phone, ensuring you don’t miss out on important calls.
  9. Call transfer: With VoIP, you can transfer calls to other extensions or numbers to ensure your caller is talking to a suitable person or department for their query.
  10. Call holding: The call hold feature allows you to temporarily put a call on hold and return to it later. 
  11. Auto-dialers: This feature simplifies reaching out to potential customers from a list of leads and extends the duration of calls. It eliminates the need for agents to manually dial phone numbers, allowing them to connect to calls only when a prospect is available to speak. 

What to Look for in a VoIP Provider?

Now that you know the key advantages of VoIP for your business, let’s quickly review how we at Quick Sprout identified the best VoIP providers.

The following are our core criteria for a good VoIP phone service:

  • User-friendly
  • Stress-free administration
  • Service quality and reliability
  • Mobile access
  • Simple call management features
  • Number porting options
  • International call capabilities
  • Reasonable pricing
  • Excellent customer service

While your individual use case may differ, ensure your shortlisted phone service provider has the above functionalities.

Final Thoughts About VoIP

Switching to VoIP is a no-brainer if you want a cost-effective and user-friendly option to make phone calls without being confined to a specific area. While there are a few drawbacks, VoIP is still a reliable technology that’s revolutionizing how we communicate compared to the traditional landline.

Once you optimize your VoIP network, you can stay connected and streamline customer interactions to enhance your workflows and improve productivity.

Welcome Duplicator to the WPBeginner Family of Products

Today, I’m extremely excited to share that Duplicator is joining Awesome Motive, and they’re now part of the WPBeginner family of products.

Duplicator is a top-rated WordPress backup and site migration plugin. Over 1,500,000+ smart website owners use Duplicator to make reliable and secure WordPress backups to protect their websites. Along with backups, you can also use Duplicator to easily migrate your website from one host to another within minutes.

Welcome Duplicator to the WPBeginner Family of Products

Introduction to Duplicator – Quick Overview

Duplicator makes it easy for website owners to protect their websites with reliable and secure cloud backups. You can use it to create manual or scheduled WordPress backups and store them on any cloud service like Google Drive, Dropbox, Amazon S3, etc.

You can also use Duplicator to easily migrate and restore your website from one hosting provider to another, or even from local server to live.

This is why over 1,500,000 smart website owners and developers use Duplicator to backup or migrate websites while saving time.

What makes Duplicator stand out is that it’s both EASY and POWERFUL.

It comes with all the powerful backup features that you need including complete WordPress files & database backup, scheduled backups, recovery points to allow for quick rollbacks, archive encryption for enhanced security, and integrations with all the popular cloud storage platforms like Amazon S3, Dropbox, Google Drive, Microsoft OneDrive, FTP / SFTP, and any S3 compatible storage service like Wasabi, etc.

Duplicator Cloud Backup Integrations

When it comes to WordPress site migrations, Duplicator really stands out from competition. It has an easy migration wizard, streamlined installer, custom search & replace, support for larger websites & managed hosting, server-to-server import, ability to migrate WordPress multisite to standalone or vice-versa, shared database support, and more.

Easily Migrate WordPress Websites from One Location to Another with Duplicator Plugin

For developers and agencies, Duplicator helps eliminate the rework by allowing you to create pre-configured sites that you can quickly set up with just a few clicks. Instead of manually configuring the same themes and plugins over and over, just configure one site and bundle it into a Duplicator package. Install the package to create a pre-configured site on as many locations as you want!

Aside from that, you can brand the installer with your own logo, and it comes with tons of developer hooks for further customization.

Smart developers and agencies use Duplicator as their preferred tool because it’s always reliable and it helps simplify even the large complex website migrations.

Duplicator - Branded Pre-configured WordPress Installer for Agencies and Developers

Whether you’re a small business owner or developer, I highly recommend adding Duplicator to your WordPress toolkit.

You can also use the free version of Duplicator to get started. 

Background Story – Why Duplicator? 

As you know, every year I do a WPBeginner reader survey where I ask for your suggestions on what new tutorials we should write, plugins we should build, new features we should add to our existing plugins, and so on.

For the last several years, the number of requests for us to build a beginner-friendly WordPress backup & migration plugin has been increasing.

So in 2020, I finally decided to reach out to Bob & Cory (co-founders of Duplicator) to see if they would be interested in joining Awesome Motive. The reason why I picked Duplicator was because I have used it numerous times for our various website migrations, and it was always the most reliable solution especially when dealing with complex migrations.

Not to mention we have written about them in numerous WPBeginner tutorials, so you already know that I am a fan of the product.

Well 2020 was a crazy year for everyone, so the timing wasn’t right for an acquisition, but nonetheless we stayed in touch. Fast forward to 2022, we came to an agreement for Duplicator to join WPBeginner family of products.

The two co-founders will not be joining the team as they want to move on to the next chapter of their life, but the entire Duplicator team will be joining us in the journey ahead, and I am very excited to work alongside them to build the features that you have been asking for.

As you know, my goal at Awesome Motive & WPBeginner is to help small businesses grow and compete with the big guys. Our software today powers over 21 million websites and helps shape the web for billions worldwide.

I believe that a reliable website backup solution is a critical part of every website because it helps you protect your website in case something goes wrong.

And that’s why I’m really excited to have Duplicator join the AM family.

Note: Want to join our remote team to work on something awesome & make an impact? We’re hiring. Come work alongside me and help shape the future of the web.

What’s Coming Next? 

Our work is just starting.

We have an extensive list of ideas and feature roadmap from the feedback that you, the WPBeginner audience, have shared with us in the survey.

I’m looking forward to making those ideas come to life.

This is truly going to be a game changer!

Whether you’re a small business owner or a developer, I think you will want to choose Duplicator to protect your website with our reliable secure backups, and easily migrate your website when you’re looking to switch hosts.

If you have suggestions on features you’d like to see in the Duplicator plugin, then please let us know by sending us a message via WPBeginner contact form.

As always, I want to thank you for your continued support of WPBeginner. 

WPBeginner and Awesome Motive would not be here without YOU, and I just want to say how much I appreciate all of you.

And I look forward to continuing serving you and the larger WordPress / web ecosystem for years to come.

Yours Truly,

Syed Balkhi
Founder of WPBeginner

The post Welcome Duplicator to the WPBeginner Family of Products first appeared on WPBeginner.

Useful Accessibility And Usability Examples To Help Improve Your Designs

This article is a sponsored by Extensis

This article is ideal for your lunch break. It highlights five quite straightforward (dare I even say simple) graphic communication problems. I then expand on them, showing the problem, remedy, and what can be learned. It will give you an insight into accessibility, also the easily looked-over area of access structures, and usability showing that they are a major factor in so many things, like design, communication, technology, objects, and systems. But we are not done there — I will also help you think about some new ways to make your designs much better and help you consider some aspects that you have never even considered before on your current projects, right now, today.

Adding A Basic Scroll Bar To A User Interface Menu Makes Items Easier To Find And Use

If we look at the menu by clicking on the Fonts drop-down menu in Microsoft Word Mac version 16 or any version of Microsoft Word, we can see that everything looks normal:

There is a list of fonts installed on the computer in alphabetical order. However, when we go to perform a task using the menu, like going to the font Verdana at the end of the list, we have to move our mouse all the way down to the bottom of the menu list, then hover over the down arrow, then wait 3 or 4 seconds, or more, until it gets to the bottom of the menu, near V, before we can select Verdana. Yes, we could also type the font name at the top, but maybe you are not sure what font you want to use or what it is called.

Problem

It takes many seconds to get to a font that is below B or at the end of the list; the current solution does not allow quick access. Furthermore, if you make a mistake, or your mouse goes off the menu, or if you are not able to control the mouse cursor that well, it will cause the menu to close, and then you have to start this interaction all over again, because if the mouse goes off or clicks out of the menu, it closes it. These issues are certainly not ideal for most of us who are busy and who want to get things done quickly and efficiently, like designers.

The problem of not having a scroll bar is often experienced in website vertical or side-navigation menus (sidenavs). The side-navigation menus might not even need to have a scroll bar, as the content inside the menu is not larger than the vertical screen height. However, if the website or smartphone browser is made a lot shorter vertically in height, there is often no scroll bar shown. So, you cannot scroll to the end of the side navigation’s content within the menu, and you might not even know to try to scroll more vertically, as no scroll bar is shown. Not ideal or great, hey?

Solution

One of the things that would be really easy to do, and is found a lot in software user interfaces and websites, is to add a simple scroll bar to the right of the font menu. How difficult is that to do? Not very. This would allow users to scroll more quickly to the font they want, reducing the time to find and select a font in the menu by at least half (50%). Why do they not do this? I am not really sure.

What Can We Learn?

If the software developers and user interface designers used a scroll bar to the right of the font menu, it would allow users to find any font much quicker, increase workflow productivity, reduce stress, confusion, and enable a much quicker and better interaction. Audit, test users, and find out what people want to do, or else you cannot be sure you have effectively designed the thing. Maybe you are not even aware of the ways users want to use your design, communication, object, or system. That is why it is so important to understand the following:

  • What people will want to do with your thing;
  • Different people will want to use your design, information, and communication in different ways;
  • Different people will want to achieve different things.
Better Font Software = Faster, Easier, And Better Results

As another example, if we compare font organizing software like Font Book on a Mac or the Fonts option in Control Panel on Windows. Yes, we have these two types of software, but do you actually use them to install fonts, or do you install them manually by copying the font files into the Fonts folders? Do you use them to view, compare, and get information about fonts? Can you use this software to manage, organize, and share fonts for your design team? Probably not, as they lack the features.

Well, the creative folks at Extensis have created just what you need: Connect Fonts. It is clearly better than Font Book on a Mac or the Fonts option in Control Panel on Windows for a number of reasons:

  • It has a better display of a font’s glyphs;
  • It shows the name of the glyph, Unicode value, and Glyph ID;
  • It has a better grid display, QuickType, Waterfall, ABC 123, and punctuation (many of these options are not available in Font Book);
  • Connect Fonts is a more advanced and technology-advanced software than Font Book on a Mac, or the Fonts option in Control Panel on Windows.

Here are additional features not offered by Font Book on a Mac or the Fonts option in Control Panel on Windows:

  • Use a font vault that is a single, secure, managed repository for all your fonts;
  • Sort options for all fonts (Name, Postscript Name, Type, Foundry, Class, Family, Version, Font Sense, Classification, Activation, Favourites, Date Added, Location);
  • Add Google Fonts;
  • Manage Adobe Creative Cloud fonts;
  • Zoom in and out;
  • All glyph panels and search;
  • Glyph information (Name, Unicode, Glyph ID, Keystrokes);
  • View categories of glyphs (Entire Font (123 Glyphs), Alphabetic Presentation Forms, Basic Latin, Combining Diacritical Marks, Currency Symbols, Cyrillic, General Punctuation, Geometric Shapes, Greek and Coptic, Latin Extended Additional, Latin Extended-A, Latin Extended-B, Latin-1 Supplement, Letterlike Symbols, Mathematical Operators, Number Forms, Spacing Modifier Letters, Superscripts and Subscripts);
  • Desktop and online in browser versions, both connected;
  • Cloud libraries and synchronize fonts;
  • Setup team libraries across desktop and online versions;
  • Share any digital files and documents;
  • Font analytics and reports;
  • Full admin account settings;
  • Very useful for large organizations to control fonts available for use and to manage permissions and rights;
  • Add tags.

Also:

  • Works with Adobe Creative Cloud, Sketch, Affinity Designer/Photo/Publisher;
  • View and preview fonts (Tile, QuickType, Waterfall and customized Waterfall, ABC 123, and punctuation).
Use ‘Access Structures’ To Excel Your Communication Success

An annual review gives interested people information about the business, charity, or organization, promotes what they do, and showcases what they have done in the last year to shareholders and other interested people. We designed an annual review (a printed publication showcasing a charity’s achievements, news, and financial activities for the year) more than ten years ago.

Problem

One of the standout issues that we soon realized from reading, laying out, and designing the annual review, was that there were many mentions of different towns within a country, mentioned throughout the text in the annual review, that the charity supports and works with. However, there was no easy or obvious way to know where they were or how to envisage where they were.

Solution

What was missing that the client had not done or envisaged in the past? A map on the inside back flap of the publication showing where the different towns were within the main country. It is not rocket science — maybe even just good old common sense.

What Can We Learn?

Can you see what we are doing? We tried to envisage and dig out what people will want to do with the thing and see if there is anything we can do to make the communication better, more accessible, and usable, and to better describe and help people to use the annual review. The annual review could have been an electronic PDF or HTML — the same problems exist whatever media. But would you have envisaged or thought about adding a map that the client never even thought about or even asked for? Sometimes, designers have to go the extra mile and push the boat out for their clients in need.

This issue of making information easier to understand and consciously helping people to understand and use it by adding clever features, in this case, a map, has to do with the area of accessibility. It could easily be considered usability because it makes the information and publication more usable; however, it is more about the area of accessibility. Being even more precise and specific, it has to do with things called access structures, as highlighted in 1979 by information designer and educator Robert Waller who runs the Simplification Centre and who has been the Professor of Information Design between 2007–2011 at the well-known Department of Typography & Graphic Communication at the University of Reading in the United Kingdom, just outside London. In the JS Party (Episode #36) podcast Suz Hinton, Safia Abdalla and Kevin Ball have also highlighted that there is more to accessibility than a disability people may have, and what devices they may use to help them.

Access structures are not commonly talked about in the now huge and popular world of accessibility. Yes, we talk of people, their physical issues (vision impairment, aging, dyslexia, physical disabilities, and so on), or what supportive devices they may use to make things easier (magnifying glass, screenreader, vision impairment stick, and so on), or even what legal issues and implications there might be because of bad accessibility. But we rarely talk about adding elements like access structures to help people with their content comprehension, processing and reading style strategies, such as:

  • Browse;
  • Skim/preview;
  • Search/scan;
  • Intense study;
  • Review.

And to just expand a bit more (if I may?), maybe you have used the audio hosting website SoundCloud. Among many of its great features, it has a search option just the same as any other search option, a horizontal box, then a search button (so nothing unusual or out of the ordinary here yet). It allows users to search through the whole website and content rather than having to go through and read millions of web pages (well, you knew that anyway). Expanding a bit more, when you search, it of course, returns the search results in a vertical list, just like a search on Google, Microsoft, and Twitter. However, on the left of the search results webpage are some really interesting and very useful search refinement options, as follows:

  • Everything
    The user’s search term searches through everything and the below.
  • SoundCloud Go+ tracks
    If selected, will only search through this offline and ad-free listening service from Soundcloud. There are then two further sub-search filter options:
    • Added any time,
    • Any length.
  • Tracks
    Apply user’s search to just audio content. There are then two further sub-search filter options:
    • Added any time,
    • Any length,
    • To listen to.
  • People
    Apply user’s search to just people, for example, user/profile account names. There are then nine further sub-search filter options that somehow seem to know the countries associated with your search:
    • Location. (9 country names associated with your search.)
  • Albums
    Apply user’s search to albums, for example, collected tracks within a grouped album option. They are then filtered by tag options:
    • Electronic,
    • Techno,
    • Hip-Hop & Rap,
    • Drum & Bass,
    • House,
    • Ambient,
    • Electronica,
    • Dance & EDM,
    • Deep House.
  • Playlists
    Apply user’s search to user-curated playlists collection, once again with the previous filter by tag options:
    • Same as previous.

So, you might think, well, this is all fairly standard and default stuff. However, not only is a user able to search for something; they are then given many very handy and useful sub-access structures that are very helpful in allowing them to further refine and edit their search term. I cannot stress how useful and important this is. This is basically the definition and whole bowls of what design, accessibility, usability, information, and communication are together.

Think about it. What would you do, and what would the result be if you could only perform a search, i.e. just search for something and then had no further refinement options? Users would not able to further refine what they are trying to do and achieve.

Providing An Electronic Business Card Increases The Chance Of Being Contacted And Getting New Business

I run a graphic communication design and text editing business in the United Kingdom called User Design, Illustration, and Typesetting, working for book publishers and also other types of organizations. We also do information design, user testing, website design, and research. We contact quite a lot of art, design, and production managers at U.K. book publishers, and one of the things we realized about seven years ago, is that they get a lot of emails every day from people offering the same services and making the same inquiry as us.

Problem

We realized that we need to increase the chance and any chance of our business’s details being used and spread, at and within their organization, and by whatever communication method they use, typically a computer, from staff-to-staff or colleague-to-colleague, to ultimately increase the chance of them contacting us (this is the goal anyway while the reality is another matter, but keep reading).

Solution

What we did, and it is really simple and easy to do (but we hardly ever see anyone do it), we made a link available to a digital business card in PDF, PNG, RTF, and vCard formats, on our homepage and contact us webpages. Do you provide a business card on your website, portfolio, or client’s website? Probably not. It is these types of things we need to try and realize and find out as designers because it improves the chances of communication success, and the ultimate end objective that was to get people to make an inquiry and contact us (an action).

What Can We Learn?

By making our main contact details more easily available and reusable, and in different electronic formats, it makes it quicker and easier to share and exchange our details, and also in different types of software (remember, not all of us like to use the same software program or system) thus leading to more chance of people in organizations contacting us (well, I have already said that three times). Would you have thought of this? How can you apply this to the project you are currently working on? Furthermore, the next important question is how can you measure if it is working and having an impact, or indeed if it is not? It is very important in design and communication to actually know the following:

  • What is working and what is not;
  • What areas could be optimized and what areas could be better;
  • Or what areas are not working well and are underperforming.

Basing design success measurements on what people think or feel is highly subjective, and soooooooooo last century.

The Fastest Internet Speed In 2022 Is Still 4 kbps

Current times in 2022 are challenging throughout the world (there is no denying that). Over the last few years, we have noticed the truly awful impact, performance, and results of websites for users, because of lazy loading images, infinite scroll, and content shifting on page load to save on internet data bandwidth usage — both on the user’s end and server-side (that delivers the website).

Problem

In essence, lazy loading means that an image or content will not be loaded until it becomes available or requested by the user in the visible screen area. Because of this lazy (late) loading, users frequently have to wait a few seconds for content to load, even with today’s amazing technology.

Infinite scroll is essentially the same principle as lazy load images, but the non-visible vertical webpage content not in the screen’s visible screen area, is not loaded until you scroll down. Lazy load can also be used with painful pagination features (like go to page 1, 2, 3, 4, 5, 6, 7, 8, 9, 10 as seen on large e-commerce websites and as Vitaly Friedman has outlined in his article, “Perfect Infinite Scroll UX”).

Content shifting on page load basically refers to a mixture of lazy loading content (text, images, and webpage layout) being delayed and loaded late, causing the content, when it does load, to load late, shifting the vertical and horizontal height of the web page’s content, cause elements and call-to-action buttons to shift and move around, as also highlighted by Michael Scharnagl on Smashing Magazine. This issue is especially problematic if you are trying to work quickly on a slowish or sluggish machine or device. However, not even a fast machine seems to make a difference regarding this issue.

All of these three issues create really bad user interactions, especially with longer-length web pages, although they are promoted and regarded as good webpage performance techniques.

Solution

Give people the content when it should be there and when they need it, as fast as you can. I understand that for very long webpages, some off-visible screen lazy loading and infinite scroll could be beneficial to save on unnecessary loading of content. But for everything else, just give it to users as fast as possible experience. We have incredible technology these days, and let’s not over-design and overthink.

What Can We Learn?

It could be said that when using lazy loading or infinite scroll in 2022, we are still dialing up with 4 kbps modems just like we did back in the year 2000. The amount of times and the delivery of information and images is the same: very, very slow. Nothing has changed. We are still looking at blank or block-colored images waiting for them to load... while 20 years of the internet have passed. The average speed of a computer and mobile internet in 2022 is 30.78 mbps, and we are still getting the same performance as in the year 2000 — as if on 4kbps modems. User experience is what matters, not technical wizardry.

Total Overload Of User’s First Website Interaction

Problem

Another example of bad usability is webpages that have very demanding first-visit user requirements. I am sure you all experience and struggle with the following on a daily basis (maybe you are even doing it now, arghhhh go away cookie policy box? Yes, no?):

  1. Cookie policy “accept/deny warning box” pops up when you 1st visit a webpage that distracts and blocks natural use.
  2. Email newsletter box pops up asking if you want to subscribe. That is another thing you have to do, even before you have started to use and read the webpage!
  3. A “do you want to receive update/news notifications” box appears.
  4. “Do you want to allow or block access to your physical location” box appears.
  5. Another box appears asking if you want to save 50% if you order in the next three days.
  6. A chat box appears asking if you want to chat with someone [well, maybe, but not at the moment].
  7. Then, finally, a “do you want to save your password” box appears.

Solution

Do not overcomplicate the 1st interaction with your thing. It is a bit like comparing it to bumping into someone when you are in a hurry and have to go, and all they keep doing is talking to you and telling you their life story. If people find their 1st interaction with you displeasing, they will turn away. If you have to provide options like cookie warning boxes, email newsletter subscribe boxes, and other notifications, leave them optional or in a place that everyone knows they can visit, like a universal options link or button in the top right of a webpage, where they can customize and setup these things, as they like.

What Can We Learn?

All of this creates a hard-to-use and over-demanding graphic communication. That distracts, over-complicates, and creates extra barriers to information that are very costly for your business or organization because it increases the chance of your users leaving and rejecting your item. Say goodbye to your users and customers in less than 3 seconds. It gives your brand a bad feeling and experience, and maybe they decide not to order something through your website. These are the everyday realities of bad usability because of your over-demanding and difficult-to-use design, information, and communication. It is not difficult:

  • Think about how people will want to use your design.
  • Make it as easy and least demanding as possible.
  • Test with them in real time.
Clothing Measurement Sizes On Fashion E-commerce

The next example has to do with measurements such as millimeters (mm), centimeters (cm), and inches (in). It doesn’t bring that much confusion with it, but surprisingly, it can still cause quite a lot of confusion and problems worldwide.

Problem

Measurements such as millimeters (mm), centimeters (cm) and inches (in) may not seem that interesting, but if you were to try to order a polo t-shirt online, you’ll notice that it may take you longer to do than expected. By measuring the width between your armpits across your breast area to get your bust (chest) circumference, and you may have measured 60 cm on the front, i.e. you have to multiply this number by 2 for the whole circumference of 60 cm (front) × 2 (front and back) to get a result of 120 cm.

Let’s say you finally find a polo t-shirt that you really like on a French clothing e-commerce website. You choose the color of the polo t-shirt you like and search for your size (we know that it is 120 cm, this sounds like we’re back in a Maths class, bear with me), but the only available sizes from that French clothing company are the following:

  • 2 – XS
  • 3 – S
  • 4 – M
  • 5 – L
  • 6 – XL
  • 7 – XXL
  • 8 – 3XL
  • 9 – 4XL
  • 10 – 5XL
  • 11 – 6XL

The above measurements are a bit helpful but certainly not accurate. They are not accurate because there is still no measurement information in millimeters, centimeters, or inches. However, the information above is a link titled Size guide. Okay, let's give that a go and see what it does. A slide-in panel appears, and there is a drop-down list with the following information:

  • 2 – XS = (bust circumference: 87 cm/34 in, pant waist circumference: 73 cm/28 inch).
  • 3 – S = (bust circumference: 90–93 cm/35–37 in, pant waist circumference: 77–81 cm/30–31 in).
  • 4 – M = (bust circumference: 97–101 cm/38–40 in, pant waist circumference: 85–89 cm/33–35 in).
  • 5 – L = (bust circumference: 105–109 cm/41–43 in, pant waist circumference: 93–97 cm/36–38 in).
  • 6 – XL = (bust circumference: 113–117 cm/44–46 in, pant waist circumference: 101–106 cm/39–42 in).
  • 7 – XXL = (bust circumference: 121–125 cm/48–49 in, pant waist circumference: 111–116 cm/44–46 in).
  • 8 – 3XL = (bust circumference: 129 cm/51 in, pant waist circumference: 121 cm/48 in).
  • 9 – 4XL = (bust circumference: 134 cm/53 in, pant waist circumference: 126 cm/50 in).
  • 10 – 5XL = that now, strangely, in the Size guide slide-in panel seems to say 1XG = (bust circumference: 139 cm/55 in, pant waist circumference: 131 cm/52 in).
  • 11 – 6XL = that now, strangely, in the Size guide slide-in panel seems to say 2XG = (bust circumference: 144 cm/57 in, pant waist circumference: 136 cm/54 in).

Are you starting to get a headache? I told you, keep reading and we will find the remedy!

Our bust (chest) circumference, as we know, is 120 cm, so it seems by the information in the above Size guide panel, that this size (entry):

  • 7 – XXL = (bust circumference: 121–125 cm / 48–49 in, pant waist circumference: 111–116 cm/44–46 in).

It is going to be a really good and safe size (because it is slightly larger than 120 cm by 1–4 cm). So it seems that there is no problem here, and in fact, the website has given good and flexible information because measurement sizes have been provided in three different measurements: cm, mm and in.

Another related question is whether all clothing websites display their polo t-shirts measurement like the French clothing company above. Well, no. Here is an example from a British clothing company, and we are going to use our pre-measured bust (chest) circumference, which we know is 120 cm once again, to order a different polo t-shirt from the British clothing company. So I have selected a polo t-shirt from the British clothing company’s e-commerce website, and the sizes that it gives are:

  • 36
  • 38
  • 40
  • 42
  • 44
  • 46

If we look at the drop-down list information from the French clothing company, we really cannot see anything that says 36, 38, 40, 42, 44, 46. However, once again, there is a View guide link on this British clothing website, so we click that, and see what happens (as it might be able to give us some more information).

Two options are available:

  • Top half (bust, chest),
  • Bottom half (waist).

We want the Top half (bust, chest) option because we measured the distance from armpit-to-armpit, then multiplied by 2 to give our total circumference in cm, as previously. The tables say:

Top half (bust, chest)

36 38 40 42 44 46
Chest (inches) 36 38 40 42 44 46
Chest (cm) 92 97 102 107 112 117
XS S M L XL XXL XXXL
Chest (inches) 32–34 35–37 38–40 41–43 44–46 47–49 50–52
Chest (cm) 81–86 89–94 97–102 104–109 112–117 119–124 127–132

We have to remember that the only available sizes in this polo t-shirt are 36, 38, 40, 42, 44, and 46. So it would seem 46 is the largest size they offer, and the circumference in cm of 46 (inches circumference) is 117 cm circumference. As you can see, 117 cm is not large enough. There is not enough flex (leeway) in this size because we know that our already measured armpit-to-armpit circumference in cm is 120 cm.

Solution

The French clothing company provided a good range of measurements in 2 measurements, inches and cm. The British clothing company, however, provided two tables, and it would be more advisable to actually not offer users the second table because it is basically a whole range table for all their clothing and is not valid for the polo t-shirt we selected, where only 36, 38, 40, 42, 44, 46 were available (yes, it is confusing). If we really want to clarify even more, the initial sizes of 36, 38, 40, 42, 44, and 46 would maybe be better written like this:

  • 36 in (92 cm), 38 in (97 cm), 40 in (102 cm), 42 in (107 cm), 44 in (112 cm), 46 in (117 cm).

Then there is much less misunderstanding, and users can relate the values better to their information and size.

What Can We Learn?

Yes, we can learn a lot. The interesting points to note are that the French clothing company’s website offered fairly useful and practical information. The British clothing company initially gave us six measurements in inches (36, 38, 40, 42, 44, 46) that made no sense to us, but when we went to the View guide link, we were able to decode the two tables, although it really was not made blatant (obvious enough) that this range only goes up to 46 inches bust (chest) circumference. And in fact, there were two tables provided, and it could have been very easy to read the second table (one below) and see that there is a size of XXL (119–124). Since the table has been provided, it will be available in XXL (119–124), but, of course, it is not for the polo t-shirt we selected.

Only give information relevant to the product and task, and remove any information that is not applicable or useful, especially when dealing with measurements. Furthermore, and you are going to like this if you are a designer or working in sales, if we consider the further-down-the-line consequences, you could very easily, as people do:

  • Make an order thinking the size will be alright when really it is not (we have all done this, hey).
  • Type in all your details.
  • Pay for it.
  • Wait for it to be delivered (maybe missing a day of work, or picking it up from somewhere else, as no one was in where you live).
  • Try it on, and it does not fit.
  • Get packaging to return it to them undamaged.
  • Complete another refund/return form.
  • Do more paperwork.
  • Send it back to them (maybe missing a day of work, so someone can pick it up from where you live or travel to a post/courier office).
  • Check your bank account over the next 30 days to see if you have been refunded.
  • Oh, I forgot, what about writing the postal address that the return needs to go to? Do you write it on the front in a pen, print out an A4 page, then sellotape it on, or do you do something else?

As you can see, user errors and mistakes are very time-consuming for the users themselves, and even more costly for the supplier of the product who has to process the return, i.e. giving them masses of more work to do. Good design makes a lot of sense for all involved.

Concluding Observations, What Did We Learn From All Of The Examples?

The results of getting good at the accessibility and usability issues previously mentioned are:

  • Be a better designer;
  • Designs will work better for people;
  • Enable people to achieve what they want to with your design and information;
  • Designs will increase business success;
  • Designs will reduce task interaction time and will allow users to achieve what they want to do faster;
  • Reduce stress, confusion, and unnecessary work;
  • Increase customer loyalty and quality perception of the brand.

What We Have Explored And Learned In This Article

  • Microsoft Word Font Menu
    Rather than accepting a design and what is there, we understood and found out how people will want to use the thing. We then looked at a very simple solution to make this as quick and efficient as possible. It leads to increased workflow speed, productivity, better actions, and a reduction in time, stress, and confusion.
  • Font Software
    We saw default operating software that lacked needed features.
  • Map In An Annual Review
    We found out, explored, and understood how people are going to use the thing, interface, content, or system. We then provided a very simple map that improves access to the content to allow easier and more chance of comprehending the information, and to increase the chance of people doing what we intend and enabling it to happen more easily.
  • Electronic Business Card On Websites
    We were able to increase the chances of people doing something (in our case, to contact us) by thinking about how we could make that easier to do by providing different electronic files to help people do this.
  • Modern (considered) good practice web performance techniques
    Current-day website design performance methods, like lazy load and infinite scroll, are rendering websites to load at 4kbps speeds that we had around the year 2000, that is 22 years ago. This makes websites difficult to use and interferes with the user’s original intention and goal.
  • Total Overload Of User’s First Interaction
    We saw many websites requiring a user’s first interaction to deal with, sometimes, 13 option settings and sorting, before they even get a chance to engage and complete their original task. Showing a high amount of information overload and digital information pollution.
  • Seemingly Straightforward And Assumed Easily Usable Information
    When it comes to information, even seemingly very mundane and standard information (if it is not designed, communicated, and provided to users in a logical and easy way) creates masses of problems and work for all involved (as was the case in the online polo t-shirt ordering examples).
Ways To Come Up With New Accessibility And Usability Ideas, For Your Current Project Right Now!
How can you simplify (I mean really reduce) the work, energy, and tasks for users to complete and get something done?
  • Reduce complexity and demands (for instance, by not bombarding them with options, notifications, and things to sort out, even before they have started their originally intended task).
  • Reduce steps, stages, and clicks.
  • Strengthen and reduce the complexity and unnecessary difficulty in design, communication, user interfaces, and systems.
  • Ask for feedback and try to get good-quality questionnaires.
  • Conduct real-time diagnostic user testing.
How would you make your design and information more obvious and easier to access, find, process and scan through for users?
  • Search options on a website (enabling people to search through all of your content)?
  • Sitemap or index (allow people to quickly find what they are looking for)?
  • Navigation menu for a website or contents page for a publication (allows people to get an overview of all of the website or system content).
  • Add a map, graph, or data visualization (to help people envisage and see the content in better and different ways)?
  • Make the content available as audio (either online or able to transfer to a portable physical device)?
  • Could you use heading hierarchy levels like heading 1, heading 2, or heading 3, bullet lists, boxes, or icons to split up, better chunk, and highlight information?
  • Do you provide your communication in a range of different medias like online, print, audio, video, braille, large print, and easy read (that will increase the chances of it being used and being used in different people’s most ideal format?).
  • What about a conclusion, summary, or recap after a lot of information to help reprocess and reinforce the main points from lengthy content?
  • What kind of navigational elements could you use or introduce to help users move and navigate around your system: running heads, breadcrumb navigation, go to the top link, scroll spy elements, where you are a feature, progress indicator, grid or list of thumbnails to give a whole overview?
  • How can you help and make users discover and enjoy more of your hopefully useful content and information?
How can you understand, envisage and get to know more about people and their requirements?
  • Find out, think, explore, ask and watch people using the thing.
  • Ask users and find out what they want to do with your thing.
  • How can you make it easier for them to do what they want and achieve what they want as quickly as possible?
  • Do user testing and set people tasks to do and see where they struggle and if they can do it within a reasonable amount of time.
  • Learn about different people’s needs, like people who are aging, dyslexic, with vision, physical or hearing issues.
  • Find out about different categories of people by reading about user personas.
  • Better sectioning or navigation features.
How can you provide the information people may want in different formats to allow better and easier use of your information?
  • Maybe: HTML, SMS, RTF, PDF, VCARD, TXT, XML?
  • How can you allow people to customize your website, interface, or system:
    • If people use your website or system a lot, maybe they would like to customize the colors, typeface, or layout to avoid boredom.
    • How could you deliver age-specific or more fitting and relevant content (text and images) to this category of users, or other age categories of users?
    • How could you allow people to customize your website so they can use it how they wish and use it in their most ideal presentation?

Thank you for reading. I hope you enjoyed the issues raised in this article and how tools like Extensis can help — some show the latetst strategies and methods (sadly, not that advanced) that we have been using here for the past twenty years. Accessibility and usability are really not that difficult — they just need to be done better.