It's a new year, and many of us in IT and testing are reflecting on how we can improve our processes and strategies. As we set our 2024 quality resolutions, let's reconsider our impulse toward ever-increasing test automation. Are we falling into the trap of trying to eat faster to lose weight? By only accelerating our efforts, we fail to confront the real root causes of inefficiencies.
Just as diet fads promise thinness through gimmicks, we’ve been sold a fantasy that more test automation will solve all problems. But while judicious automation provides value, many teams over-invest relative to the challenges they face. When you have a hammer, everything looks like a nail, so teams hammer away endlessly to construct vast automated architectures. Meanwhile, quality lingers at the same mediocre levels.
As another year comes to a close, we wanted to take a moment to express our gratitude to all of our readers, supporters, writers, and sponsors. Without your continued support and engagement, we wouldn’t be able to bring you our experiments and tutorials and invite amazing writers to contribute.
As we look back on the past year, we’re proud to have published a wide range of articles, tutorials, and experiments that cover a variety of topics and technologies related to frontend development. In particular, we focused on bringing you the latest and most innovative web experiments, as well as providing inspiration for your web design and UI projects. We also delved into the world of WebGL and Three.js, offering comprehensive tutorials and resources to help you get started with these powerful tools.
As we move into 2022, we’re excited to continue bringing you inspiration and exciting demos, and keeping you updates with the latest frontend news!
We’ll be sending out our Collective to our newsletter subscribers first, so make sure to subscribe, to get hand-picked fresh links from the frontend community. In addition, we’d love to send you the occasional exclusive goodie, so don’t miss out!
We look forward to seeing what the new year will bring. Here’s to a joyful and transformative 2022!
With the new year sinking in and everyone’s resolutions still being put to the test, we are slowly returning back to our day-to-day projects. And as we do so, we focus on the new targets for 2021: improving accessibility, conversion, engagement, retention, and of course web performance. We all have different personal goals for this year, but one thing unites us all: improving the web for everyone.
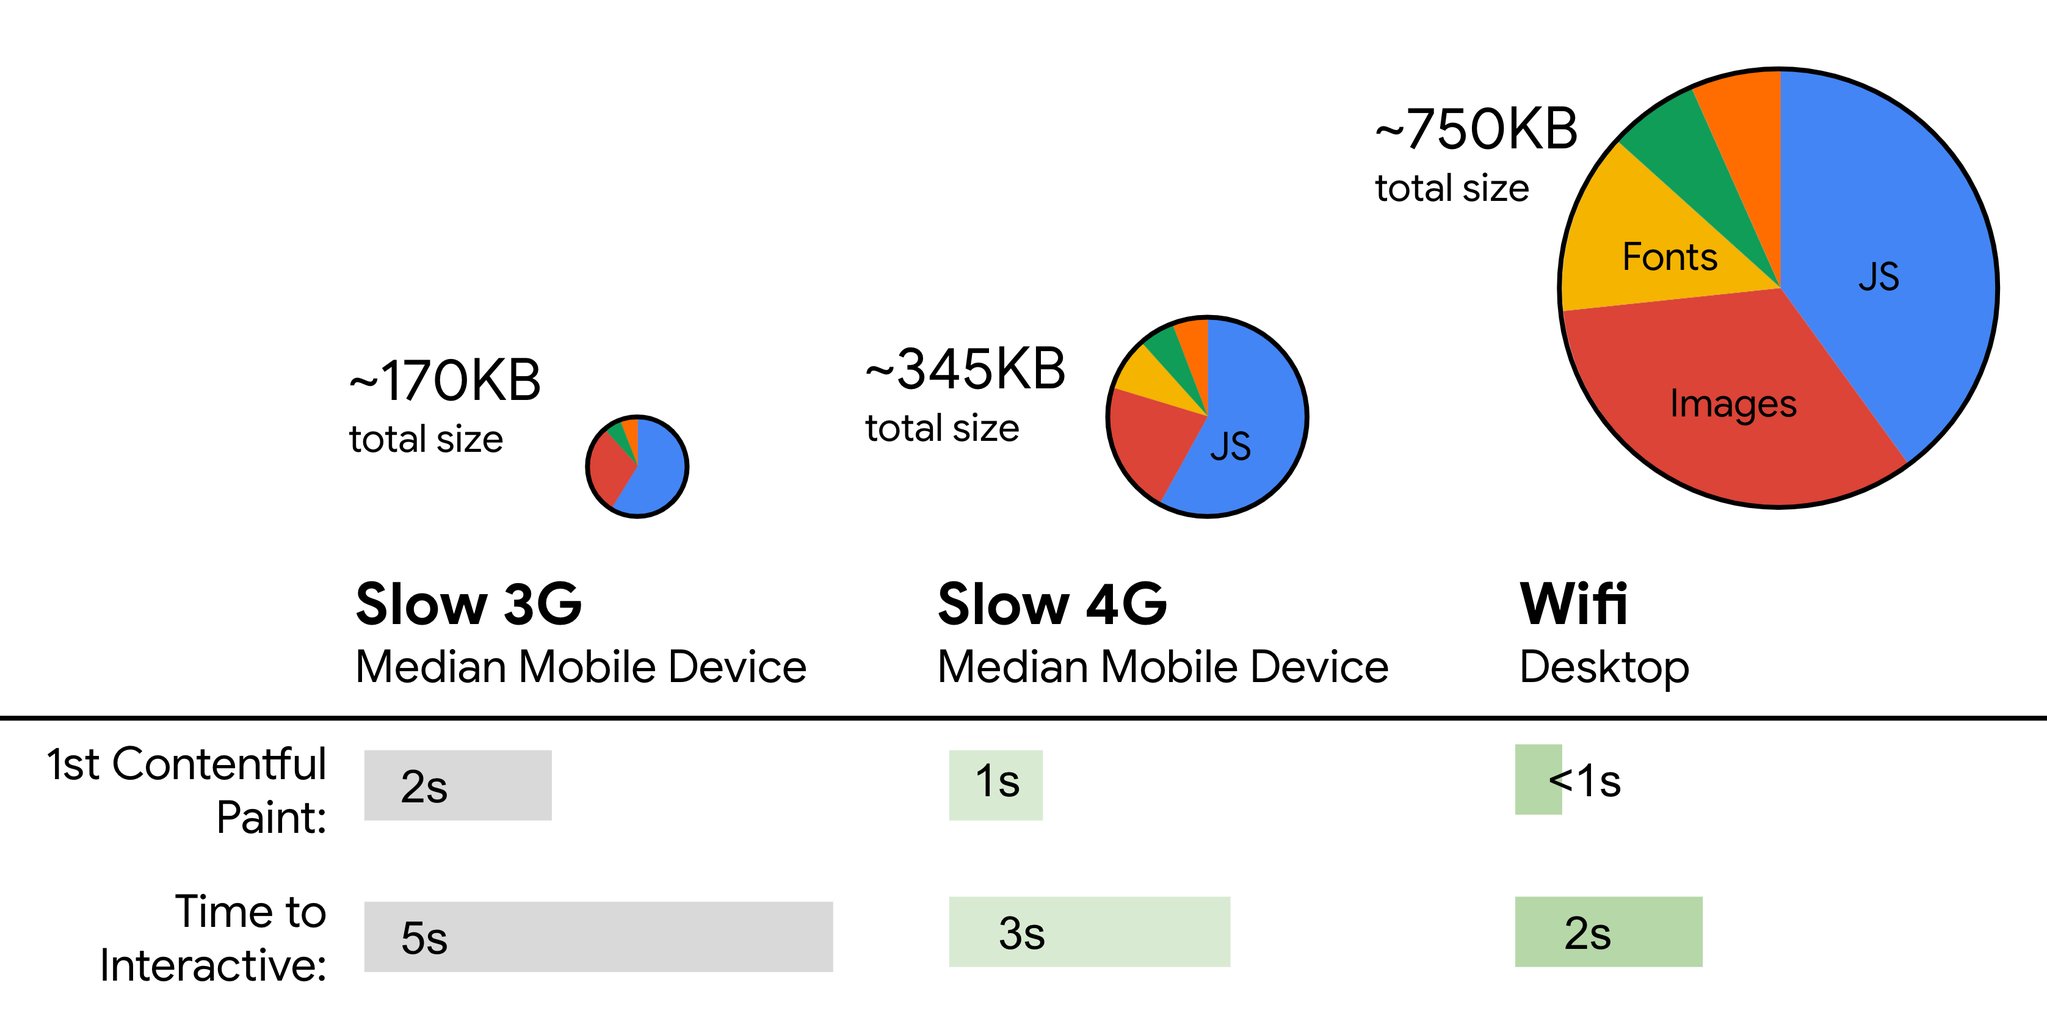
The time between the years is always a great time to calm down; but it's also a wonderful time to do some reseach, thinking, writing and perhaps even unsolicited coding and designining. And almost as if it was an annual tradition (it actually is), Vitaly has been reading through everything that happened in front-end in 2021, and compiling it all in the front-end performance checklist 2021 yet again.
This guide covers pretty much everything you need to build fast experiences on the web today — from metrics to tooling and front-end techniques and strategies. It has proved to be quite useful to many readers in the past years, so hopefully it will be useful for you, too. You can also edit the checklist (PDF, MS Word Doc and Apple Pages) and adjust it to your own personal needs, or even use it for your organization.
Now, without further ado, let’s take a look at what the Smashing team has in store for you in the next months.
Plan Your Year Ahead With Online Workshops
Have you attended one of our workshops yet? We are thrilled each and every time we run practical, online workshops with all of the wonderful attendees from all over the world coming together to learn together. It has proved to be a great opportunity to connect with people around the world, and share experiences live. So many ideas have been brought to life thanks to the live design and coding sessions, and there are many folks that have found new friends, too!
It gets even better: We now have workshop bundles from which you can choose 3, 5 or even 10 tickets for the workshops of your choice — ongoing, upcoming or the ones happening in the future! Pick the online workshops of your choice — at the best price and at the best dates — for yourself, your team or your agency. Jump to workshop bundles.
We keep working on the program for this year, and there are more workshops to announce. Let us know if you'd like to run one, get in touch on Twitter DM and we promise to do our best to make it happen. Also, feel free to subscribe here if you’d like to be the first to be notified when new workshops come up. Plus, you get access to early-bird tickets as well.
New: Smashing Online Audits on Front-End & UX
Just last week we've silently launched our new little product — online audits — 30–60 mins video review along with a written report of our findings. It's a simple quick way to validate your ideas and get an honest, unbiased feedback (for now just from Vitaly) on the front-end & UX of your website, app, or mock-ups. Plus, guidelines and action points to do better.
Book an audit of your choice and share some details about your website, app, or mock-ups, and we’ll get back to you in almost no time!
Smashing Podcast: Tune In And Get Inspired
This year, we’ve published a new Smashing Podcast episode every two weeks, and the feedback has been awesome! With over 56k downloads (just over a thousand per week, and growing!), we’ve had 34 guests on the podcast with different backgrounds and so much to share!
If you don’t see a topic you’d like to hear and learn more about, please don’t hesitate to reach out to host Drew McLellan or get in touch via Twitter anytime — we’d love to hear from you!
Stay tuned for the next episode coming out on January 26!
Smashing Newsletter: Best Picks
With our weekly newsletter, we aim to bring you useful, practical tidbits and share some of the helpful things that folks are working on in the web industry. There are so many talented folks out there working on brilliant projects, and we’d appreciate it if you could help spread the word and give them the credit they deserve!
Also, by subscribing, there are no third-party mailings or hidden advertising, and your support really helps us pay the bills. ❤️
Interested in sponsoring? Feel free to check out our partnership options and get in touch with the team anytime — they’ll be sure to get back to you as soon as they can.
Below are some of the popular newsletter pieces that we've shared in our newsletter recently:
Default Local Fonts Compatibility
Default fonts vary significantly across different operating systems. To provide an easy way to look up a system’s default fonts, especially the ones that need to be available through CSS font-family, Zach Leatherman built Font Family Reunion.
The compatibility table works like a Can I Use for default local fonts: Once you enter a font-family, it will tell you if it is supported, as well es what the five standard CSS keyword font-families (serif, sans-serif, monospace, and the lesser known fantasy and cursive) are aliased to in each operating system. One for the bookmarks.
Improving Google Fonts Performance
Self-hosting fonts is widely accepted to be the fastest option when using web fonts. However, Google Fonts can be speedy, too: their ability to serve the tiniest possible font files to specific user agents and platforms and their relatively new support for font-display via the URL parameter &display=swap are already a good base. And, as Harry Roberts shows, there are quite some things that you can do to improve their performance even further and mitigate a lot of the issues that Google Fonts are commonly known for.
For his article “The Fastest Google Fonts,” Harry went down the performance testing rabbit hole to find the best combination for fast Google Fonts: asynchronously loading CSS, asynchronously loading font files, opting into FOFT, fast-fetching asynchronous CSS files, and warming up external domains. All of these techniques combined might sound a bit overwhelming at first, but Harry concludes his article with a slim and maintainable snippet that helps you get the most out of Google Fonts.
#### Responsive Emails Made Easy
Coding clean, responsive emails that provide a solid experience in all popular email clients can be a time-consuming challenge. HEML is here to change that. The open-source markup language gives you the native power of HTML without having to deal with all of the email quirks. There are no special rules or styling paradigms to master, so if you know HTML and CSS, you are ready to start.
MJML is based on the same idea of simplifying the process of creating responsive emails. The markup language is based on a semantic syntax that makes the process straightforward while an open-source engine does the heavy lifting and translates the MJML you wrote into responsive HTML. A library of standard components saves you extra time and lightens your email code base. And if you want to build your own, Modular Template System Guide might help, too. Promising!
Bulletproof HTML Email Templates
Making an HTML email work across email clients ain’t an easy task. Fortunately, there are plenty of reliable tools, templates and frameworks to make it easier to get your work done. For example, Maizzle is a framework that helps you quickly build HTML emails with Tailwind CSS and advanced, email-specific post-processing. It also provides a few ready-made projects (Maizzle Starters) that you can start with right away.
Cerberus and HTML Email provide small collections of reliable, solid patterns for responsive HTML emails that are well-tested in 50+ email clients, including Gmail, Outlook, Yahoo, AOL, and many others. EmailFrame.work allows you to build responsive HTML email templates with pre-built grid options and basic components, supported in over 60+ email clients.
Imagine that you just need to find CSS triangle styles for elements and pseudo-elements. Or perhaps refine the color palette a bit by exploring tints and shades of a given color. Or perhaps generate a linear and radial CSS gradient for a section of the page. There is no need to do it all manually or try to find those CSS snippets all over the web. You can always find them on Omatsuri.
Omatsuri means festival in Japanese, and the site is a lovely little festival of open-source browser tools for everyday use. On the site, you’ll find a triangle generator, a color shades generator, a gradient generator, page dividers, SVG compressor, SVG → JSX converter, a fake data generator, CSS cursors, and keyboard event codes. Designed and built by Vitaly Rtishchev and Vlad Shilov. The source code of the site is available as well.
CSS Shadow Generator
Looking for a tool that’ll automatically generate CSS code for really smooth, layered box-shadows? Well, you’re going to love SmoothShadow. Inspired by an article written by Tobias Ahlin Bjerrome, this nifty tool was created to help anyone generate the code they need on the spot.
Once you’ve given it a try, it will be difficult to not use it. The little tool allows you to visually design a layered smooth box-shadow, but also tweak alpha, offset and blur with individual easing curves. And it gets even better: The creator of the tool, Philipp Brumm, has also released SmoothShadow as a Figma plugin, so you can optimize your workflow just like you’ve always wanted to!
Understanding CSS Variables
CSS variables are powerful. They cascade normally, inherit, make it possible to reuse code, and they are extremely permissive. But what can you actually put in a CSS variable to make full use of its potential? Since some of the things aren’t that obvious, Will Boyd explored the possibilities in a blog post.
From unit values to pre-defined keywords, content strings, images, and even fancy animated values, Will’s summary shines a light on the most common things that you might want to use in combination with a CSS variable. A great overview.
Never Stop Learning
The learning never stops. And since it’s often the little insights, code tidbits, and tips that turn out to be the most useful, Stefan Judis started “Today I Learned”.
Whether it’s the awareness that SVG filters can be inlined in CSS or how to tell browsers that your site supports color schemes, for each little thing he learned, Stefan shares a brief summary — not only related to CSS but also accessibility, bash, git, GraphQL, HTML, JavaScript, and much more. Samantha Ming’s code tidbits are also a treasure chest of quick but invaluable web dev wisdom that is bound to make your live easier.
And That's A Wrap Up!
We sincerely wish you a truly wonderful year this time around — full of laughs, memorable moments and remarkably smashing experiences. For one, we can't wait to see you online or in person, but one thing is certain: we sincerely appreciate you being smashing month after month, and for that we are eternally grateful.
Do you want to automatically drip content in your WordPress site?
If you’re running a membership site or selling premium content, then you may want to set up drip content instead of showing all your posts, pages, and other content right away.
In this article, we will show you how to add automatic drip content to your WordPress website.
Why Add Drip Content in WordPress?
Drip content is where you gradually release posts, pages, videos, and other content instead of giving it away all at once.
If you have a membership website then releasing content automatically at regular intervals can keep members engaged for a long time.
If you have a library of previously-published content then new members may assume these posts are old and outdated. However, content dripping can make old content seem new and exciting, particularly if you let members know about the content using automated drip notifications or personalized email marketing.
Content dripping is also useful if you offer monthly memberships, sincce people will want to renew their subscription in order to keep unlocking content.
You can also use drip content to sell more online courses.
Instead of giving students access to the entire course, you can release lessons across a scheduled training period so your students don’t feel overwhelmed. This can improve the learning experience, which will encourage students to buy more of your courses.
How to Add Automatically Drip Content in Your WordPress Site
To start, you’ll need a WordPress membership plugin that allows you to schedule drip content on your website.
It is the best WordPress membership plugin on the market. It allows you to create paid subscriptions and set rules about who can access your content, and when. This makes it easy to create an advanced drip content schedule.
Once you’ve configured the gateway, click on ‘Update Options’ to save your settings.
You may be able to get more sales and improve the customer experience by allowing users to choose a payment method. To add multiple gateways to your site, simply click on Add Payment Method and repeat the same process described above.
Once you’ve added one or more payment methods, it’s time to add a membership plan.
Simply go to MemberPress » Memberships and then click on the Add New button.
On the next screen, you need to type in a title for your membership plan. This will appear in your WordPress admin area and will also be visible to the people who visit your site.
After that, you can type an optional description into the main post editor.
Next, type how much this membership will cost into the ‘Price’ field.
After that, open the ‘Billing Type’ dropdown and choose whether this is a one-time or recurring payment.
If you choose ‘Recurring’ then you can use the settings to charge members on a weekly, monthly, quarterly, or annual basis.
By accepting recurring payments in WordPress, you can automate the billing process. This can save you a ton of time and generally leads to fewer payment delays and errors. It also means you don’t have to send invoices manually.
The other option is a one-time payment, which can improve the user experience by giving members full control over whether they renew their subscription.
If you choose ‘One-Time’ then open the new ‘Access’ dropdown and choose between expire or fixed expire. ‘Expire’ lets you set how many days, months, weeks, or years the membership will last.
Meanwhile, ‘Fixed expire’ allows you to set a calendar date when the membership will expire.
‘Fixed expire’ may be useful if you want to keep all members on the same schedule. For example, all your memberships should expire on the 1st of the month.
The final choice is ‘Lifetime.’ Content dripping encourages people to renew their subscription, so you may want to avoid offering lifetime membership.
After choosing a billing type, there might be some extra settings you need to configure such as choosing whether to offer a trial.
Most of these settings are fairly straightforward, so after completing them scroll to the ‘Membership Options’ box which has all the different settings for your membership plan.
There are lots of different settings that you can look through, including a few that could improve the user experience.
After checking these boxes, use the settings to create your customized message.
Tip: If you click on ‘Send Test’ and don’t receive an email, then there may be a problem with your WordPress configuration. If this happens then an SMTP service provider can improve your email deliverability rates.
When you’ve finished setting up your membership plan, click on the ‘Publish’ button to make it live.
To create more membership levels, just follow the same process described above.
Pro Tip: Once you’ve created at least one membership level, you’re ready to create drip content rules. However, there are still lots more features you can add to your membership website. To learn more, see our ultimate guide to creating a WordPress membership site.
Scheduling Automatically Drip Content Rules
MemberPress is a powerful plugin that lets you restrict access to your content in lots of different ways. For example, you can restrict WordPress pages by user role.
You can use these advanced rules to drip content and offer your members ongoing value.
To create a drip schedule, simply head over to MemberPress » Rules and click on the Add New button.
This takes you to a screen where you can create your rules.
MemberPress lets you restrict access to specific pages and posts. For example, you may only allow members to access a particular blog post after they’ve been a member for 10 days.
This may work well if you have a small amount of content, or you want to build a very detailed and precise schedule.
However, if you have lots of content then scheduling each page or post individually can take a lot of time and effort.
Thankfully, MemberPress also lets you create rules for specific categories and tags. This lets you release sets of related content, for example you might give members access to all posts tagged ‘Beginner’s Guide’ during their first week of membership.
You might even go through your content library and label all the posts that you want to release together. For example, you might create a ‘First Week’ tag.
When you’re ready, open the ‘Protected content’ dropdown and choose the content that should use this rule, such as ‘A Single Post,’ ‘Posts Categorized,’ ‘Child Pages Of,’ or any other option in the list.
Depending on what you choose, you’ll get access to some extra settings. For example, if you select ‘A Single Page’ then you’ll need to type in the page that you want to use in the rule.
If you select ‘Posts Tagged’ then you can type in one or more tags.
Next, open the dropdown in the ‘Access Conditions’ section and select ‘Members.’
You can then simply open the second dropdown and choose the membership level this rule will apply to.
Next, you can tell MemberPress when to drip the content.
Scroll to ‘Drip /Expiration’ and check the ‘Enable Drip’ box to reveal some new drip settings.
To start, use the dropdown to choose whether to release this content after a certain number of days, weeks, months or years.
You can then type in a number. For example, in the following image we’re releasing the content after 1 week.
Once you’ve done that, use the ‘after’ dropdown to choose the event that should trigger the countdown. For example, you might drip the content 2 week after the member registers or 1 week after they buy a particular product.
If you’re working with time-sensitive content, then you can even choose a fixed date. For example, you might publish a new post on Black Friday or announce a New Year giveaway or contest on the 1st of January.
Optionally, you can set an expiration date by checking the ‘Enable Expiration’ box.
This can create a sense of urgency, since the content is only available for a limited time. It can also encourage more people to buy memberships, so they don’t miss out on the time-restricted content.
Once you’ve done that, scroll to ‘Unauthorized Access’ and decide what MemberPress will show to visitors who try to access the content without authorization.
One option is to tease visitors by showing an ‘Excerpt’ of the restricted content such as the first 100 characters or the post excerpt.
If you don’t set a custom message, then MemberPress will show the default unauthorized access message to all users. For this reason, we recommend creating your own message by opening the ‘Unauthorized’ message dropdown and choosing ‘Custom.’
For example, you might let visitors know they can unlock this content by buying a membership subscription.
Finally, it’s a good idea to show the MemberPress login form just in case the unathorized visitor already has an account with your website. To do this, open the ‘Login form’ dropdown and click on ‘Show.’
Once you’re done, scroll to the top of the page and click on the ‘Save Rule’ button.
To add more rules simply follow the same process described above.
Tips on Managing Drip Content in WordPress
When used correctly, drip content can keep members happy and engaged, and get you lots of new registrations.
Here are a few tips to help you get even more new members, and keep those people engaged for a long time.
1. Plan a Smooth Content Strategy
It’s important to plan your schedule carefully. You don’t want to give away all of your content straight away, but there should be enough content to satisfy new members.
For this reason, it’s a good idea to create different membership accounts and test the customer experience. You can then fine-tune your content dripping rules so you’re providing a good experience to all users.
When testing your site, it’s important to hide your WordPress pages from Google and other search engines. If your premium content gets cached by the search engines during testing then unauthorized users may be able to access it for free.
Email marketing is one of the most cost-effective ways to promote your drip content and get members back to your site. An email can also reinforce that this is new and exciting content that members should look at.
We recommend using Constant Contact to integrate your drip content strategy with your email marketing.
Constant Contact is the best email marketing service for small businesses and comes with easy automation tools that can help you set up automated campaigns for new subscribers.
By monitoring what’s working and what’s not working on your membership site, you can continuously fine-tune your content dripping to get even more signups and renewals.
So you are at the beginning of 2020 and probably have committed to a New Year's resolution as a tester to leap into automation testing. However, to automate your test scripts, you need to get your hands dirty on a programming language, and that is where you are stuck!
Or you are already proficient in automation testing through a single programming language and are thinking about venturing into new programming languages for test automation, along with their respective frameworks. You are bound to be confused about picking your next milestone. After all, there are numerous programming languages to choose from.
It’s not just that time of the month. It’s also that time of the New Year and that time of the new decade. I may never get to say that again! So, what time is it? It’s time for the first monthly DC-Area API meetup of both the year and the decade. I, along with the General Service Administration’s Senior API Strategist Gray Brooks are hosting the January 2020 edition of the meetup this coming Tuesday, January 7.
Practically everything runs in the cloud these days. Cloud technology and the multiple platforms available today certainly make running apps and web services in the cloud easier. At the same time, cloud infrastructure has new features that expand its capabilities, including deployment features like containers and advanced administrative tools.
It is relatively easy to set up a capable cloud environment for any app or service. The real challenge is creating an environment that is both effective and efficient, especially in terms of setup and running costs. With the New Year already moving quickly, every business is no doubt looking for ways to run smoother and more economically. Thankfully, cloud cost optimization can be done in many different ways across multiple services.
Heya! It is time to, officially, ring in the New Year with the January 2019 roundup of web comics with CodeinWP. With Santa taking some time off, it is up to us to bring you a monthly gift of joy and goodwill to keep your spirits up!
This guest post is by Marcela De Vivo of Gryffin.co.
Recently ProBlogger discussed how to brand your blog, how to find your voice, and how to build your authority.
Image courtesy stock.xchng user panoramadi
These articles are powerful, but often I find myself speaking with people who don’t have a blog yet, or are using Blogger or custom made, cumbersome platforms. Just this week alone I went through these steps with four different people who want to jump on the blogging bandwagon.
In this article we will go back to basics for those who haven’t started their blog yet, or who are on platforms that are hindering their progress.
If one of your New Year’s Resolutions was to improve your blogging presence—or start a new one—read on!
We’ll go through a step-by-step process, including tools and resources for each step, to set up a WordPress blog that is optimized for social and search marketing success.
Setting up your WordPress blog
WordPress is currently the most popular content management platform. It can be used for static pages or as a blog. You can add plugins for a shopping cart, image galleries, and much more.
Here’s how to set it up.
Register your domain with sites like Register.com, Godaddy.com, or Enom.com
Create a hosting account with sites like BlueHost.com, WPEngine, or HostGator. If you would like to do more research on hosting companies, check out WhoIsHostingThis.
Select a WordPress theme. I personally love using StudioPress as the themes are clean, functional, and easy to work with. Search for a responsive theme so your blog will be accessible to mobile users.
Is your site running on a different CMS or platform? Consider using a blog migration service, such as BlogWranglers, to move your current site over to WordPress. Hundreds of thousands have done it, with no regrets.
Upload WordPress to your hosting account, and customize with your relevant theme. If you are not a techie, this is the part where you’ll need some help. Check out Elance.com, Freelancer.com, or a site like Craiglist.org to find someone who can help you set up and customize your template.
Install WordPress plugins.
Let’s take a deeper look at the plugins you’ll need.
Setting up your plugins
Social media
These are the social media plugins I recommend you consider.
Disqus or CommentLuv for comments
Digg Digg for social engagement
The Slide to recommend related articles
Social Metrics for a quick look at your social engagement from your Dashboard
MailChimp to collect email addresses for email marketing
SEO plugins
My favorite SEO plugins include these ones.
WordPress by Yoast
BWP Google XML SiteMaps
ScribeSEO
Outbrain for related articles at the end of each post
Usability
Usability plugins can be a huge help. Consider these:
WP Smush It
Broken Link Checker
Contact Form 7
WP Recaptcha for captcha
Doing keyword research
To gain exposure from search engines, you need to have your blog focused on a theme. Select a primary keyword within this general theme for each page of the site. You can read more about keyword research in this ProBlogger article.
Select keywords by identifying low-competition and high-search terms for your industry from Google’s Keyword tool.
Other tools you can use include:
WordTracker
Keyword Discovery
Keyword Spy
Spy Fu
Market Samurai
.
Prepare content for your static pages and images
While a designer/programmer is working on setting up your site, you can start by writing and preparing content for your site.
A well-optimized page includes the primary keywords in the Title of the page, Meta Description tag, H1 tag, once or twice in the body, and in an outbound link.
As you’re preparing your content, remember these elements of an excellent blog post:
Post title: creative and compelling
Social share icons: make sharing your content easy
Image: an image speaks louder than words
Opening paragraph: include keywords in a teaser into the introduction
Body copy: use headers and bold words
Lists: make your content easy to scan
Conclusion: include a teaser for your next article
Related posts: give them more content to consume
Comment section: Always respond to comments
Read Darren’s compilation from earlier this year for more information on each element in The Anatomy of a Better Blog Post.
Connect your site for optimum findability
Create your Webmaster Tools account on Bing and Google.
Use BWP Sitemap tools to create and upload an XML sitemap.
Set up Google Analytics and connect it to your blog.
Set up your Author tag on Google Plus.
By this point you should have a WordPress blog with a range of enhancements made possible by plugins and other customizations. You will have SEO plugins to improve your on-page SEO, page load times, keyword density, site maps, and other relevant SEO features.
You will also have a selection of social plugins so that you can encourage social shares from your site. You will have other features such as contact forms, tracking, reporting, and an email signup box to build your email list.
Incorporating keyword research will help you to deliver the content that people are looking for in a way that lets it be found. You can write articles based on long-tail terms, answer questions that your audience may have, and target hundreds of keywords by writing articles specific to each one.
So what are you waiting for? Make your New Year’s Resolution a reality and start your new blog today. And if you have any suggestions of plugins, tools, or services to add to this list, please do share!
Marcela De Vivo is a freelance writer who writes about blogging, SEO and social media at Gryffin.co/blog.
The post Keep Your New Year’s Resolution: Set up a Social, Search-optimized WordPress Blog … Today appeared first on ProBlogger.
Keep Your New Year’s Resolution: Set up a Social, Search-optimized WordPress Blog … Today https://problogger.com/keep-your-new-years-resolution-set-up-a-social-search-optimized-wordpress-blog-today/ http://www.problogger.net/archives/category/blog-networks/feed/ Blog Networks – ProBlogger Blog Tips to Help You Make Money Blogging – ProBlogger https://problogger.com/wp-content/uploads/powerpress/problogger_podcast-891.jpg
I wish you a happy New Year! But although we write another number now — 2016 — your habits and goals won’t change overnight. That is why I’m not convinced of New Year’s resolutions. You should have goals, resolutions and you should try to improve yourself.
But bear in mind to make these goals reasonable, actually achievable for you, and re-iterate in smaller periods than just once a year. I think that works way better than having one large resolution and then feeling bad because, of course, you failed to reach your big goal. Make the small things count and improve in small steps!