How We Use a Video Membership Site to Grow Our Email List

Our WPBeginner video site is a membership community where we offer free WordPress courses to our readers.

Many of you have asked how we benefit from offering these free resources.

Our main goal is to help users learn WordPress and bridge the knowledge gap. Our secondary goal is to promote our business by growing our email list.

In this article, we will show you how we use a video membership site to grow our email list, which helps us reach more customers and grow our business.

Growing email list with a video membership website

Note: This article is part of our WPBeginner Insider series, where we talk about the products we use to grow our business. WPBeginner Insider is published every other Thursday.

Here is a list of topics we will cover in this article:

Why Make a Video Membership Website?

Videos are the most engaging form of content, and building a membership community around videos helps us leverage that user engagement.

In fact, users are more likely to follow a video course online than other interactive training and educational materials.

The motivation behind offering free WordPress video courses on WPBeginner is to bridge the knowledge gap and help beginners learn WordPress for free.

Here is how Syed Balkhi, Founder and CEO of WPBeginner, puts it:

I am tired of self-proclaimed “blogging experts” charging hundreds of dollars to teach how to use WordPress. I believe basic education like this should be FREE. I created WPBeginner to offer users what I wish I had when starting out.

Syed Balkhi – Founder & CEO of WPBeginner

The following are some of the benefits of running a membership website.

  • Building authority in your niche – A membership community helps you establish your brand as an authority in the industry.
  • Make money online – We don’t monetize WPBeginner videos because we believe basic education like this should be free. However, you can replicate our strategy and monetize your membership site to generate recurring revenue for your business.
  • Build an Email List – A membership community can be used to build an email list and capture leads to grow your business.

Online membership subscriptions are a multi-billion dollar industry expected to be worth $1.5 trillion by 2025.

Plus, more than 48% of people do not mind paying a subscription fee to access exclusive content. (Source: Creator Economy Statistics)

You can use our video membership site marketing playbook to build a successful membership website and generate recurring revenue for your business.

How Does Our Video Membership Site Work?

As we explained earlier, we believe basic WordPress education should be free. That’s our main motivation behind WPBeginner’s video membership site.

Users simply visit the WPBeginner Videos website. From here, they can browse individual videos from our YouTube channel or sign up for our free WordPress courses.

WPBeginner's WordPress courses

After creating their free account, they will get access to all our WordPress courses. In return, we add users to our email list, where they get subscribed to our weekly WPBeginner newsletter.

These courses are designed to be comprehensive and well-structured. Users can follow them at their own pace. And they can move on to a different course at any time.

That said, let’s take a detailed look at how we use our membership site to grow our email list.

1. Build Authority With a Video Membership Website

We use MemberPress for our video membership website. It is the best WordPress membership plugin on the market that makes it very easy to build a subscription-based membership community online.

MemberPress

It also has a built-in LMS (learning management system), which allows you to easily create and sell courses online.

Why Do We Use MemberPress?

  • It is incredibly easy to use and set up. This is important because we didn’t want to spend too much time managing software instead of creating content.
  • It comes with MemberPress Courses, which allows us to easily add and manage courses.
  • Courses are presented to the users in an easy-to-follow layout. This was important for us because our users are mostly beginners.
  • It integrates with other tools and services like email marketing services, contact form plugins, top WordPress page builders, and more.

Adding Courses in MemberPress

Adding courses in MemberPress is quite easy. You can create a curriculum with sections and lessons, add quizzes to your courses, and more.

Creating courses in MemberPress

Another feature that many course creators may find useful is the ability to drip content instead of just giving it all at once.

Access Control for Subscribers Only

As a membership plugin, MemberPress lets us restrict courses behind a free membership plan (you can add paid subscriptions, too).

MemberPress access control

Users are required to sign up and then log in to access these courses. Users are then added to our mailing list to receive weekly WPBeginner updates.

Free but premium subscriber-only content helps us build a loyal following of users. It also establishes the WPBeginner brand as a go-to resource for all things WordPress.

2. Build an Email List With a Loyal Following

At WPBeginner, we use Drip for email marketing.

One of the top reasons we switched from Mailchimp to Drip was its automation features and integrations with other WordPress plugins and tools.

Drip website

Why Do We Use Drip?

  • Drip offers powerful automation features that help marketers create workflows for better user engagement.
  • You can personalize emails based on user data and activity on your site. When this personalization is combined with automation, emails become more relevant, meaningful, and beneficial for customers.
  • User segmentation allows you to target users based on the data they share and their activity on your site.

Adding Video Membership Subscribers to Drip

MemberPress comes with integrations for all top email marketing companies, including Drip.

MemberPress Drip integration

This allows you to automatically add users to your Drip email list when they sign up.

Optionally, you can use tags to segment video membership site users. This helps you target those users with personalized messages and on-boarding emails.

3. Convert Visitors Into Leads With a High-Converting Signup Page

MemberPress does a fantastic job of displaying courses. However, we still needed to create landing pages for our video membership website.

We have an in-house design team and developers, so we can afford a custom theme that matches our brand’s design and style.

If you’d rather design the page by yourself, we recommend using a WordPress page builder plugin like SeedProd.

SeedProd

Why Do We Recommend SeedProd?

  • SeedProd comes with an intuitive page builder, which makes it incredibly easy to create custom, on-demand landing pages.
  • It also includes many landing page designs optimized for conversion and sales. Just replace it with your text and images, and you are good to go.
  • You can easily add registration, user login, and sign-up forms. Plus, it works with major email marketing platforms, helping you easily add users to your email list.
  • SeedProd works regardless of which WordPress theme you are using. It can even be used to create custom WordPress themes without writing any code.

Transform Your Pages into a Lead-Generating Machine

We use landing pages for different sections of the video membership website.

For example, on the default landing page, we showcase videos from our YouTube channel.

WPBeginner video membership site homepage

These videos are always publicly available on the WPBeginner YouTube channel.

However, showcasing them here provides users with free content immediately. Users can watch the videos without leaving the page.

There are also calls to action on the landing page to join WPBeginner Academy (our course subscription).

WPBeginner video membership call to action

Clicking on the sign-up button takes users to our sign-up page. Now, if you have run an eCommerce business, then you might already be familiar with abandoned carts.

Many users leave at this point before signing up. To convince them to join our video membership site, this page showcases testimonials and course features, along with a sign-up form.

This allows us to further explain the benefits of our online videos and convince people to sign up for these free resources.

For more information, you can see our guide to the anatomy of a high-converting landing page.

WPBeginner video site sign up page

4. Craft Unique Sign-Up and Login Forms for Enhanced User Interaction

As a website administrator, you will need to provide a seamless and coherent user experience throughout your website.

WordPress themes don’t come with sign-up or login forms by default. This can hurt the user experience as forms across your website will not be consistent.

We use WPForms to create custom sign-up and login forms for our video membership site. It is the best WordPress form builder on the market and allows you to create all types of forms for your site, including login and sign-up forms.

WPForms

Why Do We Use WPForms?

  • It is easy and creates beautiful forms that look great on all devices.
  • It lets us create custom login and registration forms, which we use on our video membership sign-up landing page and the login screen.
  • It supports the biggest email services, allowing us to easily add emails to Drip (the email marketing platform we use).

How We Use WPForms?

We use a custom sign-up form made with WPForms on our sign-up landing page.

For details on how to do this, you can see our tutorial on how to create a custom user registration form in WordPress.

Custom sign-up form created with WPForms

We also use a custom login form on the login page for our video membership site.

We created this page using block editor and WPForms. However, you can also create custom login pages with SeedProd.

WPBeginner video site login form

5. Use Bonus Tools to Generate More Leads on a Membership Website

Apart from the technology stack we mentioned above, you can use the following tools to boost new sign-ups further.

1. OptinMonster

OptinMonster website

OptinMonster is the best lead generation software on the market. It allows you to nudge users into signing up with beautiful marketing campaigns like lightbox popups, slide-in popups, countdown timers, sticky header/footer, and more.

Related: See our case study for more methods we use to grow our email list.

2. PushEngage

PushEngage website

PushEngage is a push notification software that allows you to send custom messages to user browsers regardless of which device they are using.

It has powerful personalization and targeting rules, allowing you to create personalized messages that are more effective. This enables you to target users once they have left your website and prompt them to return.

Case Study: In an earlier WPBeginner Insider article, we shared how we use push notifications to grow return traffic.

3. Smash Balloon

SmashBalloon

A video membership website helps you build a loyal following, which you can then send to your social media accounts to boost your followers.

Smash Balloon helps you bring your socials to your WordPress site. We use it on our community tab to showcase our X (formerly Twitter) and YouTube posts. It also works with Instagram, TikTok, and Facebook.

For more details, you can see our tutorial on how to add your social media feeds to WordPress.

4. All in One SEO for WordPress

All in One SEO website

All in One SEO for WordPress is the best WordPress SEO plugin with the most comprehensive SEO toolkit for WordPress websites.

Apart from the usual SEO tools, it has advanced XML sitemaps, a redirect manager, comprehensive schema markup support, Link Assistant, search stats, and more. (See more AIOSEO features).

We use it across our entire website, including our video membership website, to improve our SEO and get more traffic from search engines.

Related: How to double your SEO traffic in 6 months (with case studies).

5. MonsterInsights

MonsterInsights

All your marketing efforts need to be properly tracked to monitor their success and make data-driven decisions. Otherwise, you won’t know if your strategies are actually helping you get more signups to your membership site.

We use MonsterInsights for that. It is the best Google Analytics plugin for WordPress and helps you track site visitors. It helps you track conversions, which lets you measure the success of your video membership site, email forms, landing pages, and more.

MonsterInsights even allows you to track the customer journey on membership websites if you are using MemberPress. This lets you see the steps that users take to sign up on your video membership site and use that information to get more signups.

We hope this article helped you learn about using membership websites to grow your email list and your business. You may also want to see these proven tips to grow your business online and our ultimate guide on how to make a membership site.

If you liked this article, then please subscribe to our YouTube Channel for WordPress video tutorials. You can also find us on Twitter and Facebook.

The post How We Use a Video Membership Site to Grow Our Email List first appeared on WPBeginner.

How to Create a Video Membership Site in WordPress

Do you want to make a video membership site?

A video membership website allows you to create subscription plans for your video content. Instead of relying on ads, you can let your users pay directly to watch your video content.

In this article, we’ll show you how to create a video membership site in WordPress with step by step instructions.

Making a video membership website in WordPress

What Do You Need to Start a Video Membership Website?

Making a video membership website these days is quite easy.

Using WordPress as your website platform gives you access to all the tools you’ll need to make a custom video membership website.

Here is what you’ll need to get started:

  1. A domain name. This will be your website’s address (e.g. wpbeginner.com).
  2. A website hosting account. This where all your website files will be stored.
  3. A membership addon to create subscription plans and restrict access to paid content.
  4. A video hosting platform so that you can securely deliver videos only to paid subscribers.

Basically, you can create a fully functional video membership website in less than 60 minutes, and we’ll walk you through every step of the way.

Below are the steps that we will cover to help you make a powerful membership website with WordPress.

  1. Getting Started with a Video Membership Website
  2. Choosing a Video Membership Addon
  3. Setting Up Your Video Membership Website
  4. Adding Payment Methods
  5. Creating Subscription Plans
  6. Creating Access Rules
  7. Creating Members Only Content
  8. Uploading Your Members-Only Videos
  9. Create a Pricing Page for Video Subscriptions
  10. Create Sign up and Login Forms
  11. Edit Outgoing Email Templates
  12. Growth Hacking a Video Membership Website

Ready? Let’s get started.

Step 1. Getting Started with a Video Membership Website

The easiest way to build a video membership website is by using WordPress. It is the best website builder on the market and allows you to create any kind of website imaginable.

Before you get started, you’ll need to make sure you are using the right type of WordPress. There are two kind of WordPress on the market.

First, there is WordPress.com which is a website hosting service. Then, there is WordPress.org also known as self-hosted WordPress. For details, see our comparison of WordPress.com vs WordPress.org.

We’ll be using self-hosted WordPress.org as it gives you complete freedom and instant access to all WordPress features out of the box.

For a self-hosted WordPress website you’ll need a domain name and a website hosting account.

A domain name typically costs about $14.99 per year and web hosting plans start from $7.99 per month.

If you are just starting out, then you would want to cut costs whenever possible without compromising your business.

Luckily, Bluehost has agreed to offer WPBeginner users a generous discount on hosting with a free domain. Basically, you can get started for $2.75 per month.

Bluehost is one of the largest hosting companies on the market and they are an officially recommended WordPress hosting provider.

Once you have signed up for your hosting account, Bluehost will automatically install WordPress for you. You can simply login to your WordPress dashboard directly from your hosting account.

Login to your WordPress dashboard

If you need more help, see our WordPress installation tutorial or follow our step by step guide on how to start a blog.

Step 2. Choosing a WordPress Video Membership Addon

There are several WordPress membership addons that allow you to create a membership website. However, each one of them has their own pros and cons.

For more details, see our full comparison of the best WordPress membership plugins.

Before you choose a membership addon, first, you need to choose what kind of video membership site you want to make.

For instance, if you just want users to register and be able to download a few small videos, then you can do that with WPForms. It comes with support for popular payment gateways like PayPal and Stripe.

Plus, you can redirect users to download a file or to any URL once they have submitted a form.

However, if you want proper access control, subscription plans, multi-level subscriptions, and more, then you’ll need a complete WordPress video membership addon like MemberPress.

MemberPress website

MemberPress is the best WordPress membership plugin on the market. It allows you to accept payments, create membership levels, restrict access to video pages based on levels, and more.

You can also use it to sell courses online. Plus, if you choose to host your videos on AWS (more on this later), then MemberPress comes with an extension to host your video files on the cloud.

Basically, it has all the features you’ll need to run a video membership website and integrates with all the tools that you may want to use to grow your business.

Step 3. Setting Up Your WordPress Video Membership Website

We’ll be using MemberPress to set up a video membership website in WordPress.

First, you need to install and activate the MemberPress plugin. For more details, see our step by step guide on how to install a WordPress plugin.

Upon activation, you need to visit the MemberPress » Settings page to configure the plugin settings.

MemberPress settings

We’ll walk you through the most important settings to configure in the next few steps.

Step 4. Adding Payment Methods

The settings page is divided into different tabs. The first thing you need to set up is a payment gateway, because it allows you to accept payments on your membership site.

Setup payments method

Out of the box, MemberPress supports PayPal (Standard, Express, and Pro), Stripe, and Authorize.net. You simply need to select the payment method you want to set up and provide the required credentials.

Optionally, you can also choose to add multiple payment methods. For instance, you can add Stripe and then add PayPal for users who prefer not to share their credit card details.

After adding payment methods, don’t forget to click on the Update Options button to save your settings before moving on to the next step.

Step 5. Creating Subscription Plans for Video Membership Site

Next, you need to create different subscription levels that users can subscribe to.

For instance, you can create plans with different perks, access levels, and features. You can even create a free membership plan where users can watch demo videos and access free content.

To create a new membership plan, simply go to the MemberPress » Memberships page and click on the ‘Add New’ button at the top.

New membership plan

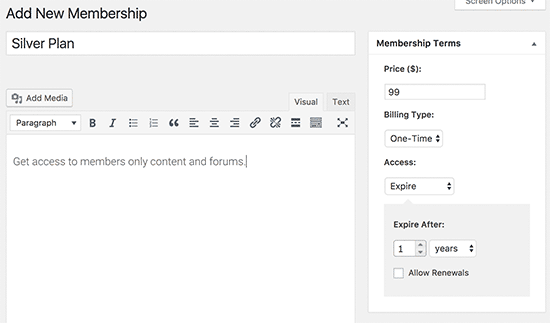
On the next screen, you need to provide a title for the membership plan and then add details in the post editor.

Next, you need to set the pricing, billing type, interval, and expiration for this plan under the ‘Membership Terms’ section in the right column.

Enter membership plan details

For instance, in the above screenshot, we created a video membership plan with recurring monthly payments.

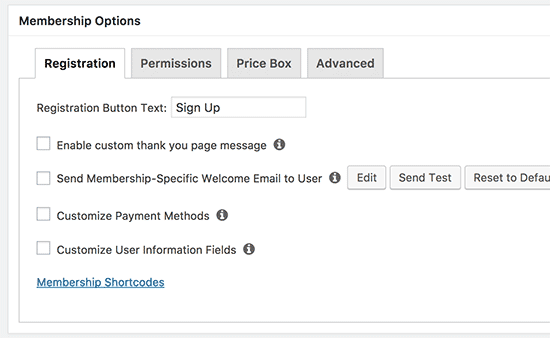
Now, you need to scroll down to the Membership Options box below the editor. From here, you can customize plan permissions and membership options.

Configure plan options

After you are satisfied with the plan, you can go ahead and publish it.

If you want to create more membership levels, then simply repeat the process to create other membership plans as needed.

Step 6. Create Access Rules for Video Membership Plans

Now that you have set up membership levels, the next step is to set up access rules.

MemberPress comes with powerful access control rules, which allow you to restrict access to any content on your website based on a user’s membership plan.

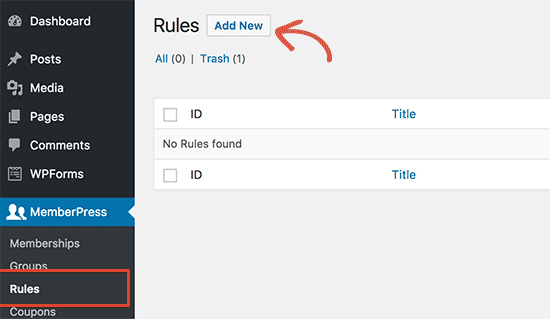
To set up rules, simply head over to the MemberPress » Rules page and click on the Add New button to create a new rule.

Add new rule

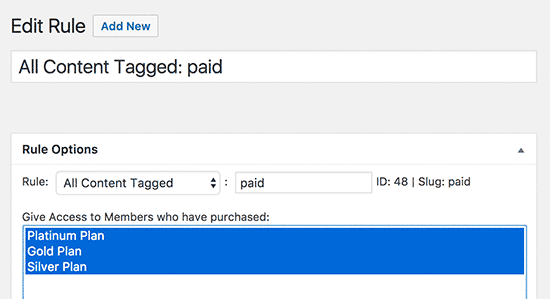
The rule edit page allows you to select different conditions and associate them to any membership plan.

For instance, you can select all content that matches a particular tag or category to be available only to members with the Plus plan.

Setting up access rules

You can also target specific posts and pages, a specific URL, and more.

Setting Up Drip Content Rules

MemberPress also comes with a drip content feature. This allows you to automatically give users access to your videos on a schedule, instead of giving them access to all premium content as soon as they sign up.

The drip content feature allows you to keep users engaged for longer, which provides you opportunities to upsell more products or simply offer users a better experience.

For instance, you can create a separate rule for posts with a specific tag to be available one week after a user registers.

Drip content

Once you are satisfied with the Rules settings, you can go ahead and click on the Save Rule button to apply it.

Feel free to create more rules for your video membership plans as needed.

Step 7. Adding Members-Only Content in MemberPress

MemberPress makes it very easy to add members-only content to your website.

First, you will need to create a post or page where you will be adding your video and restrict access to that page as needed.

After that, we will show you how to embed members-only videos with privacy and security, so that they are not easily stolen from your website.

To get started, simply create a new post or page in WordPress and then add the tag or category that you previously added as a rule in Step 6.

Restrict content in MemberPress

When it’s ready, you can simply go ahead and publish your restricted post or page.

Step 8. Uploading Members-Only Videos in MemberPress

One of the major challenges that video subscription websites face is how to offer the best viewing experience with full control on who has access to paid videos.

We strongly recommend that you do not just upload videos to your WordPress media library and add them to your posts and pages.

First, it is not secure or private. Secondly, video files take a lot of bandwidth, storage, and server resources, which will slow down or even crash your website.

For more on this topic, see our article on why you should never upload videos in WordPress.

We recommend two possible solutions that will work reliably for your video membership website: Vimeo or AWS.

Method 1. Embedding Members-Only Videos via Vimeo

The first one is Vimeo. Their paid plans give you greater privacy controls to easily embed videos on your membership website.

With Vimeo Plus you can:

  • Make your videos private
  • Make videos unavailable on Vimeo itself. You can still upload and manage videos from your Vimeo dashboard, but others cannot view them on Vimeo.
  • Set domain level restriction so your members-only videos can only be embedded and played on your own website.
  • Password protect videos
  • and more.
Vimeo pricing

Apart from privacy and security features, Vimeo also offers a much better streaming experience for your users.

Embedding Vimeo videos in your members-only website is super easy. You only need to copy and paste the video URL in your content and WordPress will automatically fetch and embed it.

Embedding Vimeo video in WordPress

Method 2. Upload Members-Only Videos via AWS

For this method, you’ll be hosting your videos on Amazon’s AWS platform. This allows you to only programmatically give MemberPress access to your video files which are stored on Amazon cloud servers.

Note: Amazon Web Services is a pay-as-you-go service. They have a limited free tier, then after that, you’ll be charged for bandwidth and storage used by your videos.

First, you need to visit the Amazon Web Services (AWS) website and sign up for an account.

Sign up for AWS account

AWS comes with a bunch of cloud services that you can use. For a video membership website, we’ll be using Amazon S3 cloud storage to host our video files.

Simply click on the Services menu at the top and then look for S3.

Add Amazon S3 service to your account

This will bring you to the S3 cloud storage dashboard. S3 cloud storage is organized in buckets. You can create multiple buckets for each of your websites or projects.

Let’s create a bucket to store our members-only video files.

Create bucket for your video files

On the next screen, you need to provide a name for your bucket and choose a region.

Make sure that your bucket name is in lowercase only and that you use a region close to most of your users.

Bucket settings

You can leave the rest of the settings as they are and click on the ‘Create Bucket’ button to continue.

AWS will now create a bucket where you can upload files. Simply click on your bucket name to open it and click on the Upload button to add your first video.

Upload your video files

Repeat the process if you need to upload more files right now or later in the future.

Once you have uploaded video files to AWS, they are not publicly visible. To do that, you will need to generate security credentials first.

Simply click on your Account title at the top right corner of the screen and then select ‘Security Credentials’.

Generating security credentials

On the next screen, click on the Access Keys tab to expand it. From here, you need to click on the ‘Create New Access Key’ button to generate new keys.

Generate new access keys

This will bring up a popup where you need to click on the Show Access Keys link and then copy your Access Key ID and Secret Access Key.

Copy your access keys

Copy and paste both keys to a text file as you’ll need them later.

Next, switch to the admin area of your WordPress website and go to the MemberPress » Add-ons page.

From here, you need to scroll down to Amazon Web Services (AWS) and click on the Install Add-on button.

MemberPress AWS Add-on

After that, you need to connect MemberPress to your AWS account.

Simply go to the MemberPress » Settings page and switch to the AWS tab.

Configure AWS

Here, you need to copy paste the Access and Secret Keys you copied earlier.

Below that, check the box next to the V4 Signature option and then select your AWS region. This is the same region that you choose when setting up your S3 Bucket.

Don’t forget to click on the Update Options button to save your settings.

Adding AWS Hosted Videos to Your WordPress Site

Now that you have connected MemberPress to your AWS account, you can go ahead and add your videos to your members-only posts and pages.

You will need to embed video using a shortcode like this:

[mepr-s3-video src=”demoincvids/video-tutorial-001.mp4″]

You’ll simply need to replace the part in quotes, which is the video’s location.

You can find your video’s location in the S3 dashboard for your Amazon AWS account. Simply click on your bucket and then the file name and you’ll see file location.

File location in your S3 storage

After adding the shortcode, you can save your post or page and preview it to see your video embed in action.

AWS video embed preview

Repeat the process to add more members-only videos to your website.

Step 9. Create a Pricing Page for Your Membership Plans

Now if you have multiple plans, then you may want to create a pricing page where users can compare and choose a plan.

Users who try to access the restricted or paid areas of your website will also be redirected to your pricing page.

You can configure this by going to MemberPress » Groups page and clicking on the Add New button at the top.

MemberPress groups

On the next screen, you need to provide a title for your pricing page. It will also be used in your group pricing page URL.

Below that, you need to choose which plans you want to include.

Add memberships to your pricing group

You can also select a theme for the pricing table. MemberPress comes with few ready-made templates for that.

Once satisfied, click on the ‘Publish’ button to make your plan publicly visible.

To preview your pricing page, click on the ‘View Group’ link after publishing it.

Pricing page example

Redirecing Users to Your Membership Plans Page

Now that you have created a pricing page, you would want to automatically redirect users to compare plans and make a purchase.

To do that, first you need to visit MemberPress » Groups page and copy the URL next to the group you created earlier.

Copy your plan URL

After that, go to MemberPress » Settings page and switch to the Pages tab. From here, you need to scroll down to the ‘Unauthorized Access’ section.

You need to check the box next to ‘Redirect unauthorized visitors to a specific URL’ option and then paste the group URL you copied earlier.

Don’t forget to click on the ‘Update Options’ button to save your settings.

Now unauthorized users will be redirected to the pricing plans page when they try to access your members-only content or videos.

Step 10. Create Login and Sign Up Forms for Your Video Membership Site

Now that everything is set up, let’s allow users to easily login to their accounts or signup.

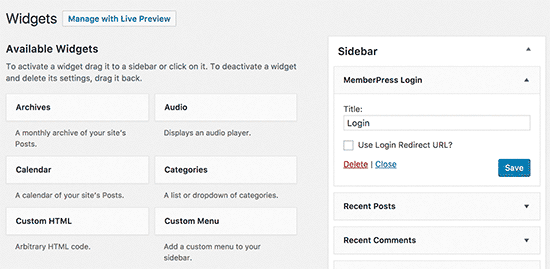
MemberPress makes it very easy to add login forms to your website. Simply go to the Appearance » Widgets page and add the ‘MemberPress login’ widget to a sidebar.

MemberPress login widget

Don’t forget to click on the Update button to save your widget settings.

Next, let’s add a link to the pricing page to your website’s navigation menu.

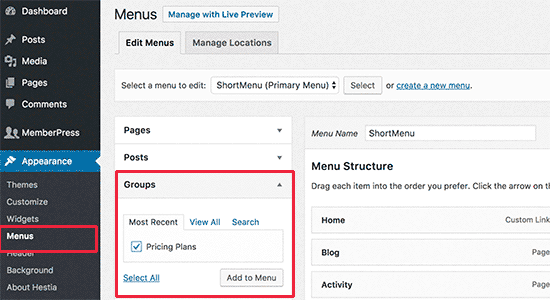
Simply go to the Appearance » Menus page and click on the Groups tab to expand it. Select your pricing plan group you created earlier and then click on the Add to Menu button.

Link to Pricing page

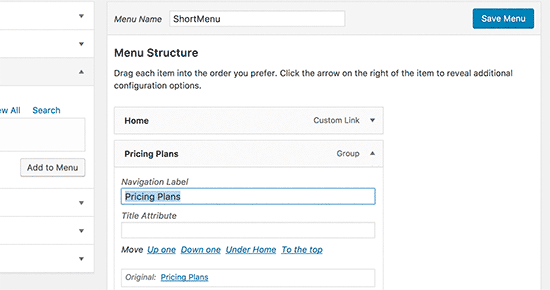
Don’t forget to click on the Save button to store your changes.

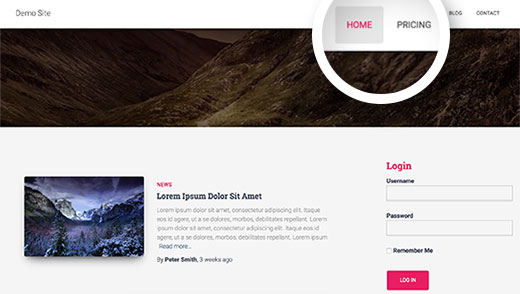
You can now log out of the admin area and visit your website to see everything in action.

Video membership site preview

Step 11. Customizing Email Templates for Your Membership Site

Your video membership website will send users emails when they sign up or forget a password, when their membership is about to expire, and so on.

You can customize these email templates in MemberPress.

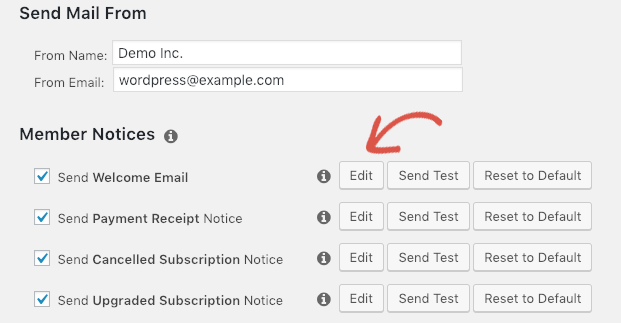
Simply go to the MemberPress » Settings page and switch to the Emails tab. From here, you’ll see the list of emails your video membership site will send, and you can edit any of them.

Edit emails

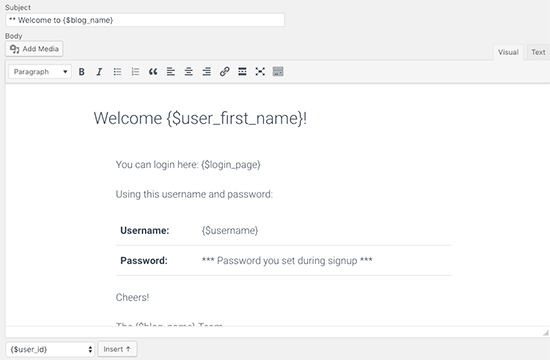
This will open the email template in a plain text editor. You can use smart tags below to personalize messages and match them to your own brand’s tone and messaging.

Email template

Important: Don’t forget to send test emails to make sure they are working. For more help, see our guide on how to fix WordPress not sending email issue.

Step 12. Growing Your Video Membership Website

Now that your video membership site is ready, let’s talk about how to get more users to visit your website and sign up.

Luckily, using MemberPress and WordPress gives you access to incredibly powerful tools to grow your business.

  1. OptinMonster – It is the best lead generation and conversion optimization tool on the market and allows you to easily convert website visitors into paid subscribers.
  2. All in One SEO – It is the best WordPress SEO plugin that allows you to optimize your videos and entire website for search engines without any technical skills.
  3. SeedProd – The best WordPress page builder plugin to easily create beautiful custom landing pages for your video membership website.
  4. WPForms – It is the best WordPress form builder on the market and allows you to create contact forms, login and sign up forms, user registration forms, and more.
  5. MonsterInsights – Allows you to easily track your website performance using Google Analytics. It shows beginner friendly reports to see your top content and track conversions to boost sales.

Need more recommendations? See our list of the must-have WordPress plugins for all websites.

We hope this article helped you build a video membership website in WordPress. You may also want to see these tips on improving WordPress speed and our tested hacks to grow an online business.

If you liked this article, then please subscribe to our YouTube Channel for WordPress video tutorials. You can also find us on Twitter and Facebook.

The post How to Create a Video Membership Site in WordPress first appeared on WPBeginner.

22 Popular Types of Websites You Can Make in WordPress (+Examples)

Wondering what types of websites you can create with WordPress?

We are often asked by beginners about what kind of websites they can make using WordPress. Our short answer is ‘almost any type of website imaginable’.

In this article, we’ll show you top examples of types of websites you can create with WordPress.

Popular Types of Websites You Can Create with WordPress

Getting Started With WordPress

WordPress powers more than 42% of all websites on the internet, which makes it the most popular website builder on the market.

There are two types of WordPress websites. First, there is WordPress.com which is a web hosting company. Then, there is WordPress.org also known as self-hosted WordPress. To learn more, see our guide on the difference between WordPress.com vs WordPress.org.

Through out this article, when we say WordPress, we are talking about self-hosted WordPress websites. We recommend using WordPress.org because it gives you full access to all WordPress functionality out of the box.

To get started, you’ll need WordPress hosting and a domain name.

We recommend using Bluehost. They are offering a generous discount + free domain name to WPBeginner users. Basically, you can get started for $2.75 per month.

→ Click Here to Claim This Exclusive Bluehost Offer ←

We have a step by step guide on how to make your website with WordPress.

If you just want to play around with WordPress, then you can install it on your computer. Take a look at our tutorials on how to install WordPress on Windows and Mac computers.

That being said, let’s take a look at some of the most popular types of websites you can create with WordPress.

1. Blog or Personal Website

Example of a WordPress blog

WordPress started out as a simple blogging tool and quickly evolved into a powerful content management system. During the last 18 years, those blogging and personal website components didn’t disappear.

They have become more polished, sophisticated, and powerful. WordPress is still the best blogging platform in the world used by small websites as well as large publications.

Due to its flexibility, WordPress is equally good for a personal blog as well as multi-author blogs. It allows you to create content-rich websites that can be easily grown into a business.

For more details, see our guide on how to start a WordPress blog with step-by-step instructions for a beginner blogger.

2. Business Website

Business website made with WordPress

WordPress is the easiest way to build a professional-looking business website. It is so powerful that many big name brands use WordPress to power their websites.

Business owners love its ease of use and flexibility. By using WordPress plugins, you can add social media integrations, optimize your site for search engines, track marketing data, and add any other feature you need.

You can choose from thousands of themes and easily customize the design, all without hiring a web designer.

To get started, see our complete guide on how to make a small business website using WordPress.

3. Ecommerce Website / Online Store

Ecommerce website

WordPress with WooCommerce is the world’s most popular eCommerce platform. It supports top payment gateways like PayPal and Stripe so you can easily accept payments online.

You can use WooCommerce to sell both physical and digital products. It allows you to easily add any type of product to your store, and has tools to manage inventory, orders, shipping, taxes, and more.

For step by step instructions, you can check out our tutorial on how to start an online store.

Apart from WooCommerce, there are other eCommerce plugins for WordPress like Easy Digital Downloads and MemberPress that can be used to sell digital goods and subscriptions.

4. Membership Website

Membership website

Membership websites sell subscriptions. This allows you to put some of your content behind a paywall, sell pay-per-view content, or run an online community.

MemberPress is the best WordPress membership plugin. It comes with powerful access control, subscription management, user management, and integrations with third-party tools and payment gateways.

For more details, take a look at our step-by-step tutorial on how to create a membership website.

5. Online Courses

Online courses website

WordPress can be used to easily sell courses and build an online learning community.

MemberPress Courses is the best WordPress LMS platform to sell online courses from your website. It comes with an easy to use interface to create courses, control access, and sell subscriptions.

To learn more, check out our tutorial on how to make online courses website with WordPress.

6. Online Marketplace Website

Marketplace website

Don’t have any products to sell? How about creating a marketplace for other vendors to sell their products online?

WordPress has some incredible plugins that turn your website into an online marketplace. Third-party sellers can then list their own products on your website, and you earn a fee on each order.

For details, see our tutorial on how to create an online marketplace in WordPress.

7. Podcast Website

Podcast website

WordPress and podcasting go hand in hand. Most popular podcasters on the web are using WordPress for their podcasting websites.

There are several excellent podcasting themes and plugins for WordPress which make the whole process way easier. Plus, you can integrate any podcast hosting service to seamlessly serve files from your own website.

For more on this topic, check out our step by step guide on how to start a podcast with WordPress.

8. Dropshipping Website

Dropshipping website

Dropshipping is a type of eCommerce store that doesn’t keep the products in stock. Instead, when a customer purchases a product, the store owner places the order with a third-party vendor who ships the item directly to the customer.

WordPress has some excellent dropshipping plugins that help you easily add third-party products to your website.

For more on this topic, take a look how to make a dropshipping website with step by step instructions.

9. Affiliate Website

Affiliate website

Want to make a commission by referring your users to products and services?

WordPress is used by millions of marketers to create highly successful affiliate websites. It has a ton of affiliate marketing tools and plugins that will help you boost your earnings.

You can sign up for individual affiliate programs, or you could create an Amazon affiliate store that relies on just one giant affiliate network.

For more details, see our complete affiliate marketing guide for beginners.

10. Coupons Website

Coupons website

Want to earn affiliate commissions from thousands of websites offering special discounts on their products and services? Then you can use WordPress to make a coupons site.

With the right plugins, you can easily add coupons to your site. You can control the expiration dates and other details, and your users can even rate and vote for their favorite coupons.

Need more details? Take a look at our tutorial on how to make a coupon site in WordPress with detailed instructions.

11. Micro Job Website

Microjob website example

A micro job website is an online marketplace where employers can list tasks or gigs and individuals can apply for them. As the website owner, you can make money by charging a fee on each listing.

For more instructions, check out our tutorial on how to create a micro job website like Fiverr.

12. Job Board Website

Job board website

Several popular sites like Smashing Magazine, ProBlogger, and others use job boards as an extra source of income. There is a growing demand for niche job boards catering to the needs of a specific industry or specialization.

WordPress allows you easily create a job board where employers can post job listings and professionals can respond to them.

13. Business Directory

Business directory

Just like job boards, there is an increasing demand for niche business directories on the web. There are some great WordPress business directory plugins which allow you to easily create a business directory.

We have a guide on how to create a web directory like Angie’s List or Yelp.

14. Auction Websites

Online auction website

Want to run your own eBay-like auction website? With WordPress, you can create a fully functional auction website. Users can bid online and make payments, and you get to earn by simply providing a platform for your niche auctions.

See our tutorial on how to make an auction website for detailed instructions.

15. Non-Profits and Religious Websites

Non-profit websites

WordPress is free as in freedom (see our guide why is WordPress free?). This makes it an ideal solution for nonprofit organizations.

With WordPress plugins, you can easily add a donation form to raise money for your cause. There are also many great WordPress themes for churches and nonprofits.

16. Portfolio Websites

Portfolio website example

Need a place to showcase your work? You can easily add a portfolio to your WordPress site with stunning image galleries and beautiful slideshows.

You can use your portfolio site to feature your writing skills, showcase your music, embed videos, or display your photography.

WordPress can be used to provide a very sleek and polished user experience for your portfolio site, making it easier for others to browse and learn about your work.

17. Travel Website

Travel blog

WordPress is the perfect platform to make a travel website. You can share your own travels or launch destination guides and build a business upon that.

For examples and instructions, take a look at our guide on how to make a travel website for beginners.

18. Fashion / Lifestyle Website

Fashion website

WordPress is a popular choice among fashion and lifestyle businesses. That’s because it’s easy to create professional-looking website or blog, and you can even sell your own products or affiliate products.

For more on this topic, take a look at this guide on how to make a fashion website using WordPress.

19. Multilingual Websites

Want to create a website in multiple languages? WordPress has you covered.

Out of the box, WordPress is available in dozens of languages. Plus, it can also be used to create multilingual website using WordPress translation plugins.

Need help? See our guide on how to create a multilingual website in WordPress.

20. Online Forums Website

Forums website

Online forums are a popular way to build a community and leverage user generated content to bring more search engine traffic to your website.

With bbPress, you can easily add online forums to your website. bbPress helps you convert your website into an easy to manage forum. Plus, you can still use the same website for other features like a blog, online store, or a business site.

For more details, see our tutorial on how to add an online forum in WordPress.

21. Social Network Website

Social Network website

Want to build a more active and engaged online community? WordPress allows you to easily build your own social network website with BuddyPress.

Users will be able to join your community, manage profiles, view activity, join groups, and more.

For more details, take a look at our step by step guide on how to build a social network with BuddyPress.

22. Wiki / Knowledge Base Website

Knowledge base / wiki

Want to create a knowledgebase or wiki-like website?

WordPress allows you to easily add a documentation or knowledgebase section to your website. This allows you to use a powerful CMS to manage all your content under one dashboard.

You can pick any of these WordPress knowledge base plugins to start your own wiki website.

We hope this article gave you a good idea of the types of websites you can create using WordPress. You may also want to see our beginner’s guide to the most important things you need to do after installing WordPress.

If you liked this article, then please subscribe to our YouTube Channel for WordPress video tutorials. You can also find us on Twitter and Facebook.

The post 22 Popular Types of Websites You Can Make in WordPress (+Examples) appeared first on WPBeginner.

Ultimate Guide to Creating a WordPress Membership Site

Do you want to build a membership website? For a long time, website owners relied solely on advertising and affiliate revenue to monetize their content.

A membership website allows you to make money online by allowing users to pay for premium content, features, and access to the community.

You will need a platform that has features for managing users, memberships, payments, etc. Luckily, there are some really great membership plugins for WordPress that make it super easy.

In this step by step guide, we will show you how to easily create a WordPress membership site without any coding knowledge.

Creating a WordPress membership website

What Do You Need to Start a WordPress Membership Website?

Unlike 10 years ago, it’s quite easy to make a website these days. Out of all the platforms and website builders, WordPress makes it the easiest for anyone to build their own membership website and start selling with little to no technical skills.

You’ll need the following three things to start:

  1. A domain name. This will be your website’s address (Example, wpbeginner.com).
  2. A web hosting account. This is where your website files are stored.
  3. A membership addon (It will convert your regular website into a membership platform).

You can set up a fully functional membership website with WordPress in less than 30 minutes, and we’ll walk you through every step of the process.

Below are the steps that we will cover to help you make a powerful membership website with WordPress.

  1. Getting started with a membership site
  2. Choosing a WordPress membership plugin
  3. Setting up your membership website
  4. Adding payment methods
  5. Adding membership levels
  6. Restricting access based on membership plans
  7. Creating members only content
  8. Creating a pricing page
  9. Adding sign up and login forms
  10. Customizing email templates
  11. Viewing reports to grow your website
  12. Extending your membership website

Ready? Let’s get started.

Step 1. Getting Started with a WordPress Membership Site

To create a membership site, you must make sure that you are using the right WordPress platform. Yes, there are two types of WordPress.

We recommend using the self-hosted WordPress.org version because it gives you unrestricted access to all features and tools that you need (see the full comparison of WordPress.com vs WordPress.org).

For a self hosted WordPress site, you’ll need a WordPress hosting account, domain name, and a SSL certificate.

Typically, a domain name costs around $14.99 / year, web hosting around $7.99 / month, and SSL certificate costs around $69.99 / year.

If you are just starting out, then these startup costs can add up quickly.

Thankfully, we have a way to fix that.

Bluehost, an official WordPress recommended hosting provider, has agreed to offer our users a free domain name, free SSL certificate, and a discount on web hosting.

Basically, you can get all of the above for $2.75 per month.

→ Click here to Claim this Exclusive Bluehost offer ←

Note: At WPBeginner we believe in full transparency. If you sign up with Bluehost using our referral link, then we will earn a small commission at no extra cost to you (in fact, you will save money and get a free domain + SSL certificate). We would get this commission for recommending just about any WordPress hosting service, but we only recommend products that we use personally and believe will add value to our readers.

Once you have signed up for hosting, the next step is to install WordPress. Follow the instructions in our step by step guide on how to start a WordPress blog, and you’ll be up and running in no time.

Since Bluehost already comes with WordPress pre-installed, you can move on to setting up your WordPress membership site.

Step 2. Choosing a WordPress Membership Plugin

There are plenty of free and paid WordPress membership plugins that you can use. However, each one of them has its own pros and cons. We have a full comparison of the best WordPress membership plugins.

To choose the right WordPress membership plugin, you need to decide what kind of membership website do you want to build and what features will you need?

If you just want to allow user registration on your WordPress site, then you can use WPForms. It is a WordPress form builder plugin that allows you to easily create user login and registration forms. You can even allow users to submit articles without accessing the WordPress admin area.

On the other hand, if you want to sell subscriptions, paid content, or digital downloads, then you’ll need a more robust WordPress membership plugin, like MemberPress.

MemberPress comes with advanced membership features that allow you to accept payments, create membership levels, restrict access based on levels, and more.

Selling online courses can be another possible scenario. In this case, you’ll need LearnDash, a complete WordPress LMS plugin with all the learning management features.

You can also integrate LearnDash into MemberPress to create a powerful website with online courses as well as membership subscriptions.

That being said, let’s start setting up your WordPress membership website.

Step 3. Setting up Your WordPress Membership Website

We are choosing MemberPress as our go-to plugin because it has all the features we mentioned above, and it works perfectly with third-party plugins necessary for the growth of your business.

First thing you need to do is install and activate the MemberPress plugin. For more details, see our step by step guide on how to install a WordPress plugin.

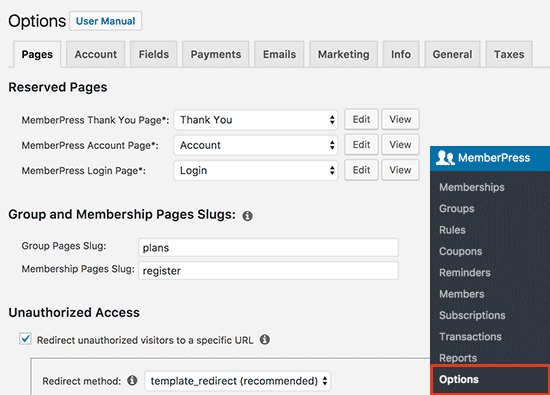
Upon activation, you need to visit the MemberPress » Options page to configure the plugin settings.

MemberPress options page

Step 4. Add a Payment Method

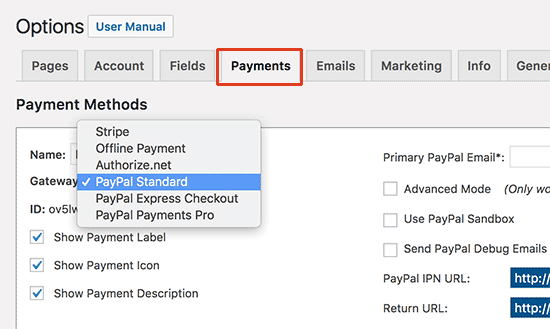
The options page is divided into different tabs. The first thing you need to set up is a payment gateway because it allows you to accept payments on your membership site.

You can do this by switching to the ‘Payments’ tab and then selecting your payment gateway.

MemberPress payments

MemberPress supports PayPal (Standard, Express, and Pro), Stripe, and Authorize.net out of the box. You need to select the payment method you want to setup and provide the required credentials.

You can also add multiple payment methods by clicking on the add button to add another payment method.

We typically use two options: Stripe for credit cards and PayPal as a secondary option because some users prefer PayPal over giving out credit card details.

Don’t forget to click on the ‘Update Options’ button at the bottom of the page to save your settings.

Step 5. Creating Membership Levels

The next step is to create membership levels that your users can purchase. Each membership level can have different pricing plans, perks, and access. You can even have a free membership plan.

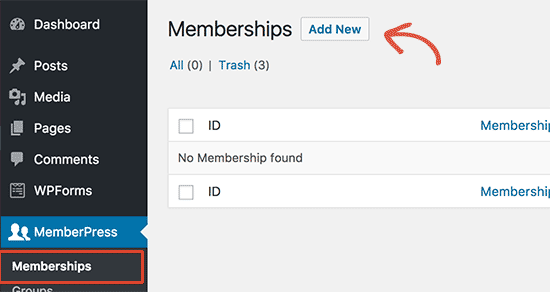
To create a membership level, you need to go to MemberPress » Memberships page and click on the ‘Add New’ button at the top.

Add membership level

On the next page, enter a title for this particular membership plan and then provide the plan details in the post editor.

You will need to set the pricing and expiration for this plan under the membership terms section.

Membership plan

In the example above, we have created a yearly membership plan.

After that, you need to scroll down to the membership options meta box below the post editor. This is where you can customize permissions and membership options for this particular plan.

Membership options

Once you are satisfied with the membership plan, you can click on the publish button to make it available.

Go ahead and repeat this process to create as many membership plans that you need.

Step 6. Restrict Access for Membership Plans

The next step is to select which content would be available to different membership plans on your website. MemberPress makes it very easy to control access using ‘Rules’.

You can setup rules by visiting the MemberPress » Rules page and clicking on the Add New button at the top.

Add new rules

The rule edit page allows you to select different conditions and associate them to a membership plan.

For example, you can select all content that matches a particular tag or category to be available only to members with the silver subscription plan.

Add a rules set to MemberPress

You can also create more specific rules. For example, a single post or page, child pages, or a specific URL.

Below the rules editor, you’ll see the content drip and expiration options.

Drip content allows you to gradually release content to users instead of giving it all away at once. The expiration option makes the content unavailable after a defined period of time.

If you are not sure, then you should leave them unchecked.

Once you are satisfied, go ahead and click on the ‘Save Rule’ button to save your rule settings.

Repeat the process to create more rules as needed for your membership site.

Step 7. Adding Members Only Content

MemberPress makes it super easy to create members-only content using Rules.

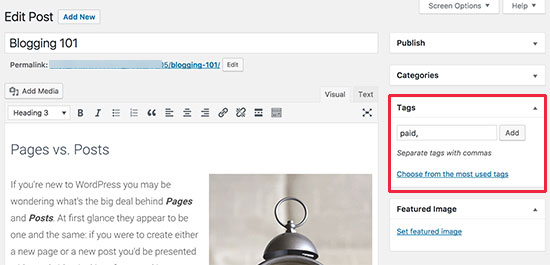
In the above example, we created a rule that restricted all content tagged as paid to be restricted. Now all we need to do is to create our paid content and add the paid tag to it.

Adding members only content

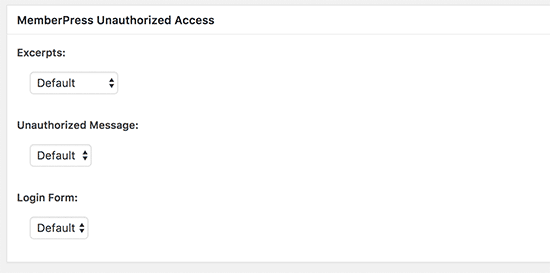
MemberPress also adds ‘MemberPress Unauthorized Access’ metabox below the post editor. This allows you to select what logged out users (non-members) will see when they reach this content.

Restricted content options

You can use the global default settings, or you can show excerpts, login form, or a custom message.

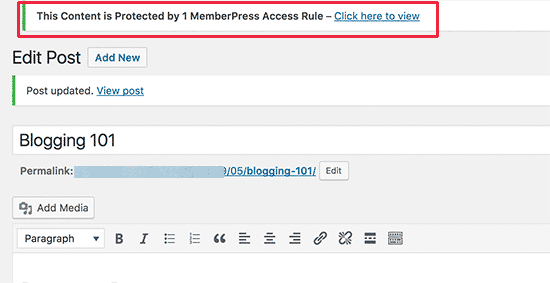
Once you have added members-only content, you can go ahead and publish it. As the page reloads, you will see a success message that this content is protected.

Protected content

Step 8. Create a Pricing Page

This is the page your users will see when they want to sign up for a membership plan. On this page, users will be able to select a membership plan and then move to the payment page.

Users who try to access the restricted or paid areas of your website will also be redirected to this page.

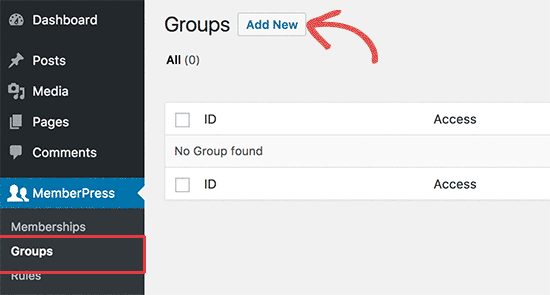
You can configure this by going to MemberPress » Groups page and clicking on the Add New button at the top.

Creating a group

First, enter a title for the group plan page. This will also be the title for the plans page that users will see.

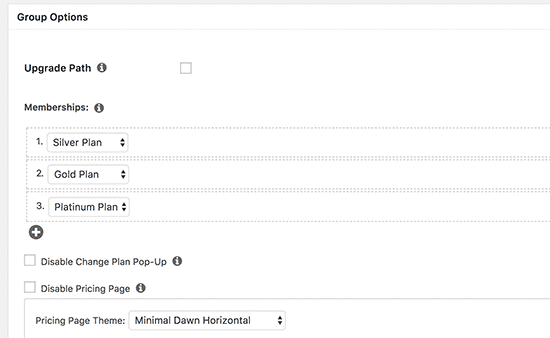
Next, go down to ‘Group options’ metabox and add memberships that you want to display on the page.

Pricing group options

You can also select a theme for the pricing table. MemberPress comes with few ready-made templates for that.

Once satisfied, click on the ‘Publish’ button to make your plan publicly visible.

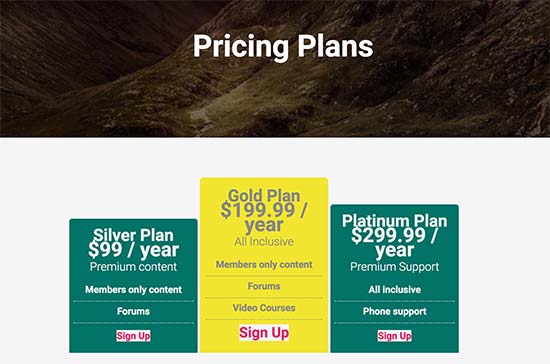
To preview your pricing page, click on the ‘View Group’ link after publishing it.

Pricing page

Redirect users to pricing page

Now that we have the pricing page ready, the next step is to redirect unauthorized users to the pricing page.

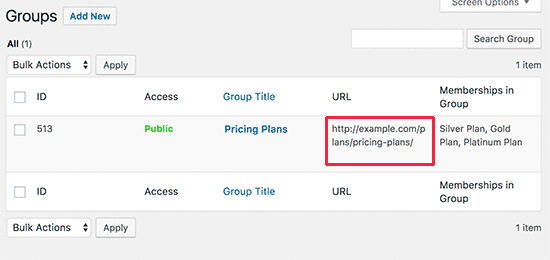
To do that, first you need to visit MemberPress » Groups page and copy the URL next to the group you created in the previous step.

Pricing page URL

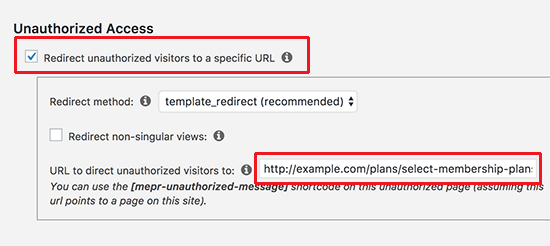
After that, go to MemberPress » Options page and scroll down to the ‘Unauthorized Access’ section.

You need to check the box next to ‘Redirect unauthorized visitors to a specific URL’ option and then paste the group URL you copied earlier.

Redirect unauthorized users to pricing page

Click on the ‘Update Options’ button to save your settings.

Now unauthorized users will be redirected to the pricing plans page when they try to access a members only area.

Step 9. Add Sign up and User Login Forms

Now that you have everything set up, it is time to allow your users to easily find their way around your website.

First, you need to add a user login form so that members can sign in to their accounts.

Go to Appearance » Widgets and add ‘MemberPress login’ widget to a sidebar.

MemberPress login widget

Next, we will be adding the pricing page link to the navigation menu, so that new users can select a plan and register.

You can do this by visiting the Appearance » Menus page in your WordPress admin. From the left column, you need to click on the Groups tab to expand it. It will show the pricing plan group you created earlier.

Add pricing plans to the menu

Check the box next to your pricing page and then click on the ‘Add to menu’ button.

The pricing plan page will now appear in the right column. You can drag and drop to rearrange its position in the menu. You can also edit it and change the link text.

Edit menu item

Don’t forget to click on the save menu button to store your changes.

You can now log out of the WordPress admin area and visit your website to see everything in action.

Membership website preview

Step 10. Customizing Membership Email Templates

Your WordPress membership plugin will send several email notifications to members. MemberPress allows you to easily edit those emails and make changes to include your own branding.

Simply go to MemberPress » Options page and click on the ‘Emails’ tab. From here you can manage email notifications sent by MemberPress.

Editing email notifications in MemberPress

You will see all the email notifications sent by MemberPress to members as well as Administrators. You can click on the edit button to customize any of these notices.

Edit email notices

You can use a simple text editor to edit the email message with basic formatting options and smart tags to insert dynamic items like names, username, membership level, and more.

Make sure that you click on ‘Send Test’ button to send yourself a couple of test notifications. This will ensure that MemberPress can send email notifications.

If you are having trouble receiving email notifications, then see our guide on how to fix WordPress not sending email issue.

Step 11. Viewing Reports to Grow your Membership Website

To grow any business, you need data to make informed decisions. MemberPress comes with built-in reports to see how your membership website is doing.

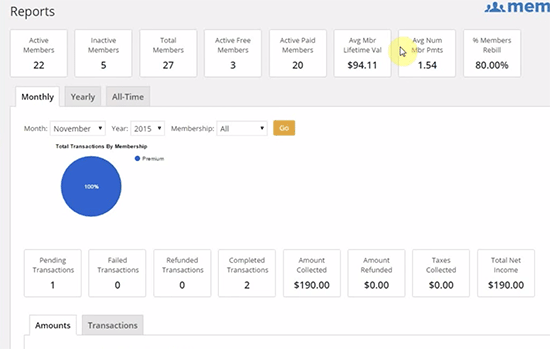
Simply go to the MemberPress » Reports page. From here, you can sort reports by monthly, yearly, or all time data.

MemberPress reports

It will show you number of active, inactive, free, paid, and total members. It will also show you average member lifetime value and other data. You can scroll below to see more charts and click on a date to view transactions.

However, the most important metric of judging a membership website’s success is user engagement.

This is where you’ll need Google Analytics. It allows you to see where your users are coming from and what they do when they are on your website.

MonsterInsights, the most popular Google Analytics plugin for WordPress, offers a complete MemberPress integration that makes it easy to enable Enhanced Ecommerce Tracking for MemberPress.

For detailed instructions, see our guide on how to track user engagement using Google Analytics in WordPress.

Taking Your Membership Website to The Next Level

MemberPress is a powerful WordPress membership plugin. It allows you to easily grow your membership website.

It works beautifully with LearnDash, which allows you to easily create courses and leave the selling part to MemberPress.

You can also use it alongside BuddyPress and bbPress.

Here are some other useful resources to help you grow your WordPress membership site.

That’s all, we hope this article helped you setup your WordPress membership website. You may also want to see our step by step WordPress SEO guide for beginners.

If you liked this article, then please subscribe to our YouTube Channel for WordPress video tutorials. You can also find us on Twitter and Facebook.

The post Ultimate Guide to Creating a WordPress Membership Site appeared first on WPBeginner.