That title is from the opening tweet of a thread from Benjamin De Cock. I wouldn’t go that far, myself. What I like about the term is that ‘Front-End’ literally means the browser, and while the job has been changing quite a lot — and is perhaps fracturing before our eyes — the fact that the job is about doing browser work is still true. We’re browser people. This was a point I tried to make in my “Ooooops I guess we’re full-stack developers now” talk.
I really like Benjamin’s sentiment though. There is a scourge of implementations of things on the web that are both heavier and worse because they re-implement something that the browser offers better and “for free.” Think sliders: scrolling behavior, snap points, fixed/sticky positioning, form controls, animation, etc.
Our industry seems to have acknowledged that backend and frontend developers require very different skills (even though they often use the exact same language), and yet it’s struggling to see there’s too much bundled into the term “front-end developer”.
That’s the tricky part. That’s at the heart of The Great Divide. There’s an awful lot of front-end developers where their job solely focuses on JavaScript. You could call them “JavaScript Engineers” or “JavaScript Developers,” and that feels OK. However, I’m not sure what you call someone who’s a great front-end developer, not particularly focused on JavaScript, but is on other aspects of the front end.
The modern frontend developer is most often than not a “Jack of all trades” mastering JS (or even just a framework) and barely tolerating HTML/CSS as a necessary evil. That’s understandable. I strongly think it’s a different specialization, and it’s too much for a single person.
Yep, it’s OK! The divide isn’t a bad thing; it’s just a thing. Front-end teams need JavaScript specialists and CSS specialists and accessibility specialists and performance specialists and animation specialists and internationalization specialists and, and, and, and. They don’t have to all be separate people. People can be good at multiple things. It’s just exceptionally rare that people are good at everything, even when scoped only to front-end skills.
Vue.JS is a JavaScript library that has taken the world of frontend developers by storm. Even for one of the latest libraries on JavaScript, Vue stands a stiff competition for the existing leaders like React and Angular.
As for recent stats, here is a comparison between the popularity of these three JavaScript frameworks:
When you create a production build for your React App, the output folder contains the main index.html file and associated JavaScript and CSS files are added in the /static/js and /static/css folders respectively.
If you are to combine all these JS and CSS files of React App in a single bundle, you can use gulp. Here’s how:
Go to the command line and install the gulp packages as dev dependencies in your package.json file.
The gulp task will add the inline attribute to the <script> and the <link> tags. The inlinesource module will read these inline attributes in the html file and replace them with the actual content of the corresponding files.
Run npm run build or npx react-scripts build to create an optimized production build for your React App and then run the command npx gulp to bundle all the JS and CSS files in the static build folder into the single main html file.
Do you know which programming language was used to develop your favorite online game? Many people will immediately think about HTML5 and C++, and they are actually right. These are the most common options. But what about JavaScript?
JS is considered to be the most popular and well-known programming language in the modern world. Its popularity is caused by a number of reasons, including user-friendly code and versatility. Indeed, JavaScript can also be an excellent helper when developing online games. Its scripts make it possible to easily combine JS codes with HTML5 and CSS, thereby creating excellent cross-platform applications.
Here’s a great thread by Kevin Powell that's making the rounds. He believes so many folks see CSS as a frustrating and annoying language:
That's just as unintuitive as JS starting to count at 0, but since you learned that and accept it, it's fine.
The real issue isn't with CSS. If you struggle with it, or ever call it unintuitive, it's probably because you don't really understand how CSS is meant to work.
Why do people respect JavaScript or other languages enough to learn them inside-out, and yet constantly dunk on CSS? Well, all this reminds me of what Jeremy Keith wrote a while back when he argued that CSS is simple, but not easy:
Unlike a programming language that requires knowledge of loops, variables, and other concepts, CSS is pretty easy to pick up. Maybe it’s because of this that it has gained the reputation of being simple. It is simple in the sense of “not complex”, but that doesn’t mean it’s easy. Mistaking “simple” for “easy” will only lead to heartache.
I think that’s what’s happened with some programmers coming to CSS for the first time. They’ve heard it’s simple, so they assume it’s easy. But then when they try to use it, it doesn’t work. It must be the fault of the language, because they know that they are smart, and this is supposed to be easy. So they blame the language. They say it’s broken. And so they try to “fix” it by making it conform to a more programmatic way of thinking.
There have been time where I’ve sat down with engineers to pair with them about a tricky layout issue and the CSS is treated as being beneath them — as if the language is somehow too unpredictable to warrant learning and mastering. Perhaps this has something to do with the past, where we’ve spent years fighting the way browsers render things differently. But this is mostly a solved problem. I can’t remember the last time I fought against browsers like that.
Instead, I reckon the biggest issue that engineers face — and the reason why they find it all so dang frustrating — is that CSS forces you to face the webishness of the web. Things require fallbacks. You need to take different devices into consideration, and all the different ways of seeing a website: mobile, desktop, no mouse, no keyboard, etc. Sure, you have to deal with that when writing JavaScript, too, but it’s easier to ignore. You can’t ignore your the layout of your site being completely broken on a phone.
Side note: We have a guide to centering in CSS not because CSS is busted and dumb, but because there’s so many variables to the extent that a simple question like, “How do I center text?” is actually much more complicated than it appears. There’s so much context that’s missed.
This reminds me of one of my favorite blog posts of all time, where Brandon Smith argues that CSS is awesome and we should respect the language and learn how it works under the hood:
CSS is hard because its properties interact, often in unexpected ways. Because when you set one of them, you're never just setting that one thing. That one thing combines and bounces off of and contradicts with a dozen other things, including default things that you never actually set yourself.
One rule of thumb for mitigating this is, never be more explicit than you need to be. Web pages are responsive by default. Writing good CSS means leveraging that fact instead of overriding it. Use percentages or viewport units instead of a media query if possible. Use min-width instead of width where you can. Think in terms of rules, in terms of what you really mean to say, instead of just adding properties until things look right. Try to get a feel for how the browser resolves layout and sizing, and make your changes and additions on top of that judiciously. Work with CSS, instead of against it.
The Data Science Career Track is a 6-month, self-paced online course that equips students with the skills and hands-on experience to get hired in data science.
Eric Karjaluoto has a very distinct view on the role of the designer. He writes: “It’s hard to produce suitable work when you think about design as a form of expression.”
In a new series, Rachel Andrew breaks down the CSS Grid Layout specification and takes a detailed look at what happens when you create a grid container.
As part of the “Composing Software” series on learning functional programming and compositional software techniques in JavaScript ES6+, Eric Elliott explores the topic of object composition.
RSocket is a binary, asynchronous, one-to-one, stateless, symmetrical protocol that relies on one between TCP, WebSocket, Aeron, and HTTP/2 streams to be used as a transport protocol behind the curtains.
This week, we welcome Veronica Hanus (@veronica_hanus) as our PyDev of the Week! Veronica is a regular tech speaker at Python and other tech conferences and meetups. You can see some of her talks and her schedule on her website. She has been active in the Python community for the past few years. Let's take a few moments to get to know her better!
Can you tell us a little about yourself (hobbies, education, etc):
“a scripting or programming language that allows you to implement complex things on web pages — every time a web page does more than just sit there and display static information for you to look at — displaying timely content updates, interactive maps, animated 2D/3D graphics, scrolling video jukeboxes, etc. — you can bet that JavaScript is probably involved.”
Essentially JavaScript, often abbreviated as JS, is used to power the interactive content/media on a page. JS helps you do more with your content so you can provide the user with animations, content relevant to them based on certain parameters, and special graphics. This is used far and wide by websites and global companies for a variety of purposes. Some popular examples include:
Netflix distributed services
Facebook’s creation of React
Walmart marketplaces
In this article we are analyzing the top five JavaScript frameworks for 2019.
What’s a Framework?
A framework is “an abstraction in which software providing generic functionality can be selectively changed by additional user-written code, thus providing application-specific software.” Frameworks are built on top of languages to speed up processes and develop specific tools, you can see some examples of CSS frameworks for design here.
Vue is a progressive framework for building user interfaces. Vue is designed from the ground up to be incrementally adoptable, making it easier for integrations and connecting to existing projects.
Vue is also super-fast, with 20KB min+gzip Runtime and minimal optimization needed to power your applications.
The way Vue works is through template styles similar to Angular. It is a fast and easy language to work with for apps, UI, and interactive interface development, and it has the ability to power single web page projects too.
One of the biggest reasons people like Vue over some of the other frameworks is because a lot of time is saved during rendering. Vue tracks the component’s dependencies so the system already knows which components need to be re-rendered when something changes.
See examples of cool websites, apps, and projects made with vue.js.
Angular is built for the future. The framework is maintained by a team of engineers who share a passion for making web development feel effortless. They believe that writing beautiful apps should be joyful and fun. Learn more about Angular here.
Angular is useful today because it utilizes cutting edge Typescript for larger applications. Typescript is defined as ‘JavaScript that scales’. Because of the way Typescript was designed, millions of developers are able to use existing JavaScript code, incorporate popular JavaScript libraries, and call TypeScript code from JavaScript. This makes it a much easier process for large projects with lots of collaborators. Having Angular built on top of this is efficient and allows developers to focus more on speed and performance.
Angular follows a classic MVP (Model View Presenter) pattern for complex applications. This is a concept people use to break down large projects into specific ‘separation of concerns’ and areas to focus on developmentally. You can read more about this concept here.
Check out made with angular to see cool examples of projects built on this framework.
React is a JavaScript library for building user interfaces. React was created by Facebook, initially for use in the newsfeed and Instagram applications. The framework was open-sourced at JSConf US in May 2013.
Similar to Vue, React is efficient in rendering and only changing necessary components when interacting with the state. React also changes the way people can interact with states and works to evolve the development process. It is component based, meaning each encapsulated section can manage its own state, which is important in large scale and complex UIs.
What is React?
This video does a great job breaking down exactly what React is and how it is used.
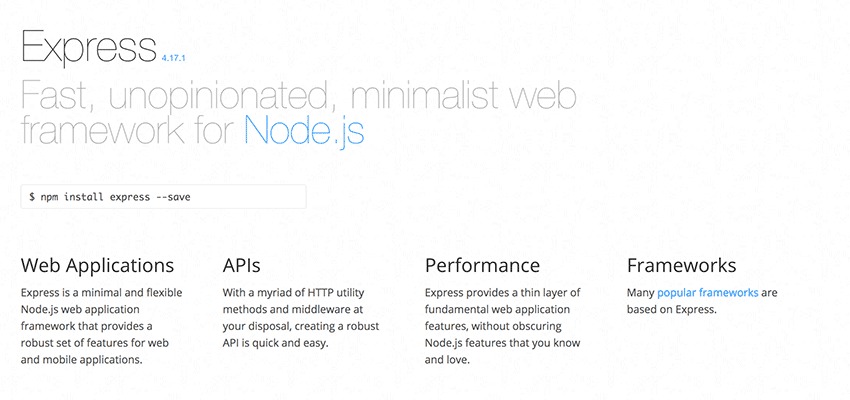
Express is a minimalist framework that runs on top of Node.js, a JavaScript runtime built on Chrome’s V8 JavaScript engine and used by many large scale applications.
Express is a fast and minimal web app framework for both web and mobile applications. Think of it as the framework for building websites. Express helps you quickly get your apps live, while providing a number of methods for creating APIs easily, too.
A lot of other popular frameworks are built on top of Express because of the simplicity and ease of integration. You can view the full list here.
Express.js Tutorial: Build RESTful APIs with Node and Express
Recommended video from Programming with Mosh on Express:
Redux is a data management system that is mainly used with React. For large scale projects with lots of moving parts, Redux helps to organize the data and keep everything running predictably even in vastly different environments.
Redux places a focus on debugging and ease of use. They write:
“The Redux DevTools make it easy to trace when, where, why, and how your application’s state changed. Redux’s architecture lets you log changes, use “time-travel debugging”, and even send complete error reports to a server.”
One important thing to note about Redux is that you should not use it unless absolutely necessary! According to the Redux FAQ, “the need to use Redux should not be taken for granted.” Multiple early contributors to the project proclaim that it is something you’ll know when you need, and that you only need when other problems arise.
Dan Abramov says: “I would like to amend this: don’t use Redux until you have problems with vanilla React.”
So just keep that in mind before jumping in full steam to this powerful, and somewhat advanced framework. It is definitely useful, but only at large scale and when dealing with large amounts of data changing over time.
Feathers, a framework for real-time applications and REST APIs, recently announced its Feathers 4 (Crow) release. The Feathers web-framework allows developers to create real-time applications and REST APIs with JavaScript or Typescript with Node.JS, React Native and a browser.
Some people outright hate the idea of CSS-in-JS. Just that name is offensive. Hard no. Styling doesn't belong in JavaScript, it belongs in CSS, a thing that already exists and that browsers are optimized to use. Separation of concerns. Anything else is a laughable misstep, a sign of not learning from the mistakes of the past (like the <font> tag and such.)
Some people outright love the idea of CSS-in-JS. The co-location of templates and functionality, à la most JavaScript frameworks, has proven successful to them, so wrapping in styles seems like a natural fit. Vue's single file components are an archetype here.
(Here's a video on CSS-in-JS I did with Dustin Schau if you need a primer.)
What does CSS-in-JS not rid you of needing to understand:
How styles are applied to the DOM
How inheritance works
How CSS properties work
How CSS layout works
CSS-in-JS doesn't absolve you of learning CSS. Mostly, anyway.
I've heard lots of pushback on CSS-in-JS in the vein of "you people are reaching for CSS-in-JS because you don't understand CSS" or "You're doing this because you're afraid of the cascade. I already know how to scope CSS." I find that stuff to be more poking across the isles that isn't particularly helpful.
Laura buns has a wonderfully two-sided article titled "The web without the web" part of which is about React and CSS-in-JS:
I hate React because CSS-in-JS approaches by default encourage you to write completely self-contained one off components rather than trying to build a website UI up as a whole.
You don't need to use CSS-in-JS just because you use React, but it is popular, and that's a very interesting and fair criticism. If you scope everything, aren't you putting yourself at higher risk of inconsistency?
I've been, so far, a fan of CSS modules in that it's about as light as you get when it comes to CSS-in-JS, only handling scoping and co-location and that's about it. I use it with Sass so we have access to mixins and variables that help consistency, but I could see how it could allow a slide into dangerous too-many-one-offs territory.
And yet, they would be disposable one-offs. Code-splittable one-offs. Everything exists in balance.
Laura goes on to say she likes CSS-in-JS approaches for some of the power and flexibility it offers:
I like the way CSS-in-JS gives you enough abstraction to still use tricks like blind owl selectors while also giving you the full power of using JS to do stuff like container queries.
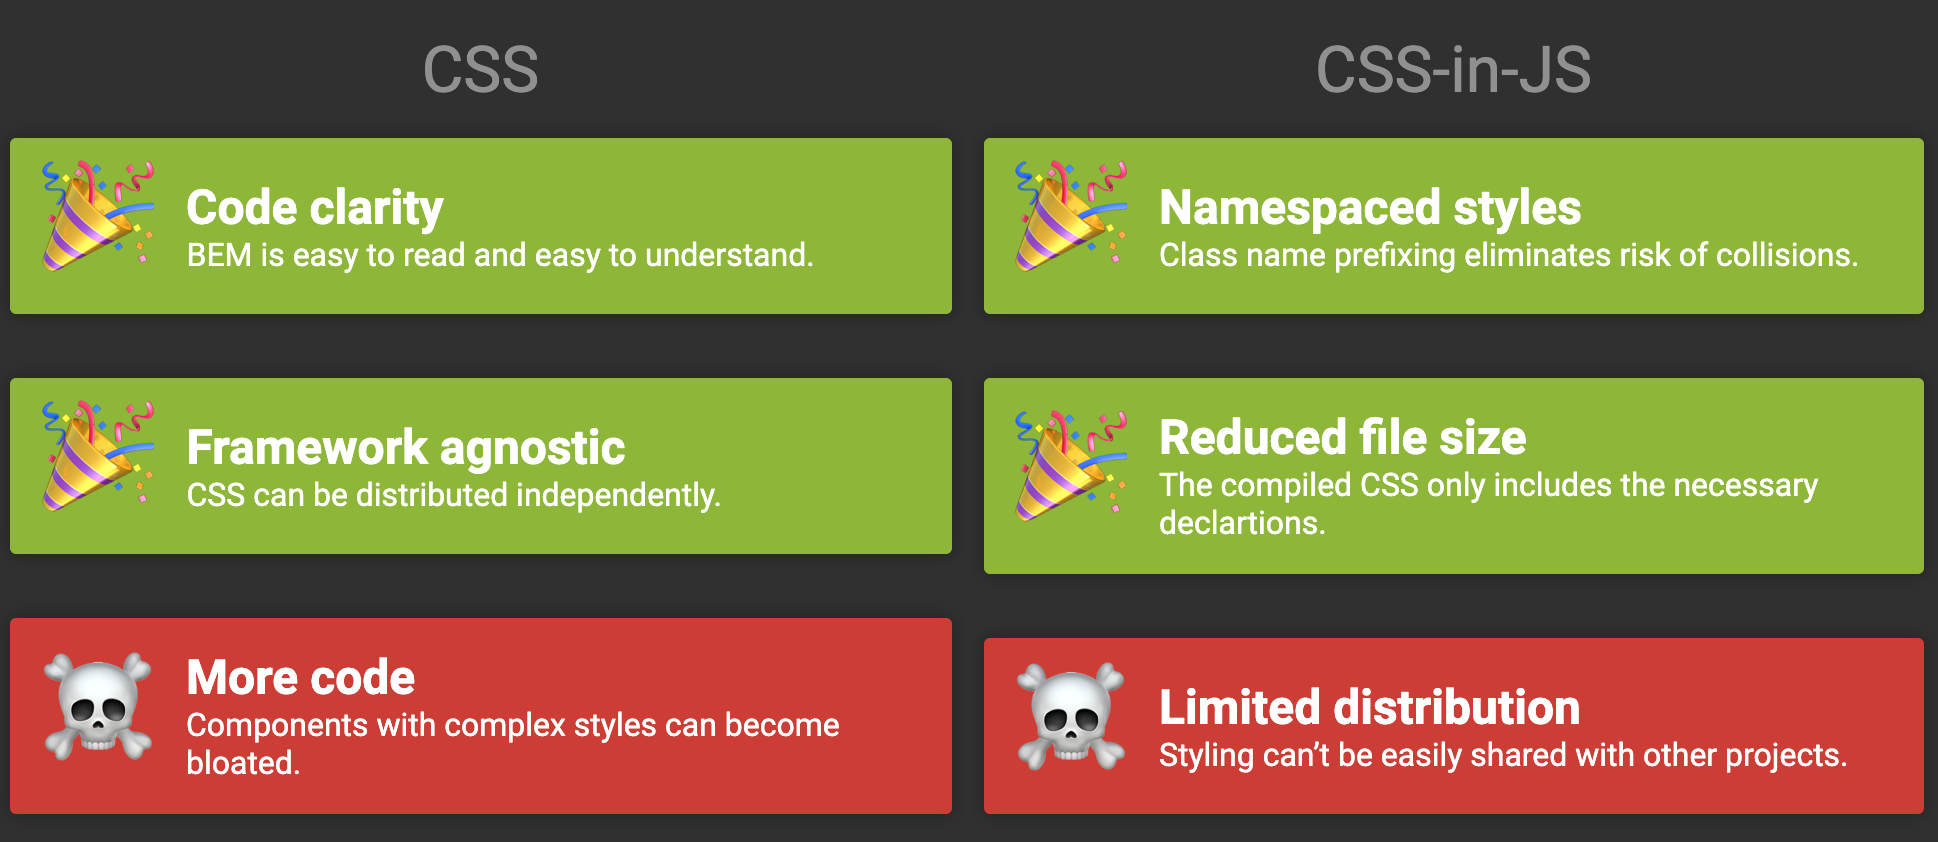
Martin Hofmann created a site comparing BEM vs. Emotion that looks at one little "alert" component. I like how it's an emotionless (literally, not referencing the library) comparison that looks at syntax. BEM has some advantages, notably, requiring no tooling and is easily sharable to any web project. But the Emotion approach is cleaner in many ways and looks easier to handle.
I'd like to see more emotionless comparisons of the technologies. Choice A does these three things well but is painful here and here, while choice B does these other things well and solves a few other pain points.
We recently linked up Scott Jehl's post that looks into loading CSS asynchronously. Scott's opening line:
One of the most impactful things we can do to improve page performance and resilience is to load CSS in a way that does not delay page rendering.
It's notable that an all-in CSS-in-JS approach gets this ability naturally, as styling is bundled into JavaScript. It's bundled at a cost. A cost to performance. But we get some of that cost back if we're eliminating other render-blocking things. That's interesting stuff worthy of more data, at least.
I might get my butt kicked for this, but I'm a bit less interested in conversations that try to blame CSS-in-JS for raising the barrier to entry in the industry. That's a massive thing to consider, but we aren't talking about shutting down CSS here and forcing everyone to some other language. We're talking about niche libraries for certain types of projects at certain scales.
I think it's worth taking a look at CSS-in-JS ideas if...
You're working on a component-heavy JavaScript project anyway.
You're already co-locating templates, functionality, and data queries.
You think you can leverage it without harming user experience, like gaining speed back elsewhere.
Your team is comfortable with the required tech, as in, you aren't pushing away talent.
Max Stoiber is an unabashed fan. His post on the topic talks about the confidence this style brings him and the time he saves in finding what he needs, both things I've found to be true. But he also thinks the approach is specifically for JavaScript framework apps.
If you are using a JavaScript framework to build a web app with components, CSS-in-JS is probably a good fit. Especially if you are part of a team where everybody understands basic JavaScript.
I'd love to hear y'all thoughts on this in the comments. Have you worked out your feelings on all this? Madly in love? Seething with dislike? I'd be most interested in hearing success stories or failure stories on real projects.
If you are a WordPress developer, you may have used the WordPress hook wp_print_scripts to add any necessary inline JavaScript. Alternately, you may have used the function wp_localize_script() to add your inline scripts. But did you know that not too long ago, WordPress added a new function for adding inline JavaScript? Yep, as of WordPress version 4.5 and better, we can use the superior function wp_add_inline_script() to do the job.
One of the nice things about this newer function is that you can associate it with any registered script AND include more than just JavaScript variables. This DigWP article explains how wp_add_inline_script() works, why it's better than either of the alternate inline methods, and how to support older (pre-4.5) versions of WordPress. Along the way, we'll look at some example code that you can customize and use in your own WordPress projects.
Inline scripts via wp_print_scripts
In the past, one way to add inline scripts to the frontend was to use the action hook wp_print_scripts (and/or admin_print_scripts for the Admin Area). Here is an example function adapted from one of my plugins:
// inline script via wp_print_scripts
function shapeSpace_print_scripts() {

	?>

	<script>
		var var1 = <?php echo json_encode('var1'); ?>;
		var var2 = <?php echo json_encode('var2'); ?>;
		var var3 = <?php echo json_encode('var3'); ?>;
	</script>

	<?php

}
add_action('wp_print_scripts', 'shapeSpace_print_scripts');
This function defines three variables based on plugin options, and then outputs them to the head section (on the front-end) using the wp_print_scripts hook. To instead add the script to the Admin Area, we would replace wp_print_scripts with admin_print_scripts and call it a day.
Pros
Works every time to add any scripts to the <head> section of your web pages. No restriction on the code that is added; you can add JS variables, conditionals, methods, functions, or whatever you want.
Cons
No way to associate the added code with any registered script. You can sort of control the relative location of the added code using the $priority parameter of the add_action() function. But mostly the output code depends on other factors, so not any real, consistent way to control output location.
Inline scripts via wp_localize_script()
Another common way that developers include inline JavaScript is the function, wp_localize_script(). This function is meant for localizing JavaScript variables for use with internationalization and language translation. But I think a lot of developers use it just to add inline scripts. Here is an example:
// inline scripts via wp_localize_script()
function shapeSpace_enqueue_scripts() {

	wp_enqueue_script('shapeSpace_script', get_template_directory_uri() .'/js/script.js', array(), '1.0', true);

	$array = array(
		'var1' => __('Value for Variable 1', 'shapeSpace'),
		'var2' => __('Value for Variable 2', 'shapeSpace'),
		'var3' => __('Value for Variable 3', 'shapeSpace'),
	);

	wp_localize_script('shapeSpace_script', 'shapeSpace', $array);

}
add_action('wp_enqueue_scripts', 'shapeSpace_enqueue_scripts');
This example function enqueues our JavaScript file and gives it a handle/ID of shapeSpace_script. Then an associative array that contains our variables is defined. And lastly, the variables are passed to wp_localize_script() to be included inline along with the registered script, shapeSpace_script. This enables us to use any of the added JS variables like shapeSpace.var1, etc.
Pros
This technique is nice because it enables (read: requires) association with an existing/registered script. So it provides a consistent way to manage the relative location of your custom script output.
Cons
The only real downside to this otherwise robust technique is that you can only add JavaScript variables (i.e., var = 'value';). So if you need to add other types of inline scripts, like equations, conditionals, functions or whatever, it's just not possible to do with wp_localize_script().
BEST: inline scripts via wp_add_inline_script()
Now that we've seen the pros and cons of the two alternate inline-script techniques, let's look at a better way using the new(er) WordPress function, wp_add_inline_script(). In practice, it looks quite similar to wp_localize_script(), but can do a LOT more. Here is an example:
This may not look like much, but it's actually super awesome. We have the best of BOTH worlds:
add ANY JavaScript snippet
associate with any registered script
That means we have full control over script content and its relative location. Also note the third parameter, $position. That enables us to include the $script either before or after the $handle, shapeSpace_script.
Pro Tip: Always escape your inline JavaScript using json_encode() or equivalent.
Pros
All pros. Add literally any JavaScript code inline, located either before or after the registered script, which itself may be included in the head section or footer. So you have full control.
Cons
None. All good.
Complete Example: Inline Script with Fallback
Putting everything together, we can fashion a complete technique for adding inline scripts that works in virtually ANY version of WordPress. For example, I use the following 3-function technique in my front-end posts plugin.
That's the magic ticket right there. Three simple functions. First we enqueue our JavaScript file. From there, we call the second function, which adds our inline script using wp_add_inline_script() for WordPress versions 4.5 and better. Then the third and final function is the fallback for older versions of WordPress. Anything older than 4.5 will add our inline script via the wp_print_scripts hook. So bottom line is that the above technique works perfectly to add inline scripts to any version of WordPress going back to like 2.1 or something crazy.
Recap
Here is a recap just FYI. Adding inline scripts to WordPress:
wp_print_scripts / admin_print_scripts — Add any code to the header
wp_localize_script() — Add any JS variables to any registered script
wp_add_inline_script() — Add any JS code to any registered script
Also: Want to add inline CSS/style instead of JavaScript? WordPress provides a set of "add style" functions that are similar to those used for adding scripts. For example, check out wp_add_inline_style() and wp_print_styles.
How To Build A Sketch Plugin With JavaScript, HTML And CSS (Part 1)
How To Build A Sketch Plugin With JavaScript, HTML And CSS (Part 1)
Matt Curtis
This tutorial is intended for people who know and use the Sketch app and are not afraid of dabbling with code. To profit from it the most, you will need to have at least some basic experience writing JavaScript (and, optionally, HTML/CSS).
The plugin we’ll be creating is called “Mosaic”. In part one, we’ll learn about the basic files that make up a Sketch plugin; we’ll write some JavaScript and create a user interface for our plugin with the help of some HTML and CSS. The next article will be about how to connect the user interface to the core plugin code, how to implement the plugin’s main features, and at the end of it, you will also learn how to optimize the code and the way the plugin works.
I’ll also be sharing the plugin’s code (JS, HTML, CSS) and files which you’ll be able to examine and use for learning purposes.
What Are Sketch Plugins, And How Do They Work?
In Sketch, plugins are a way to add features and functionality that aren’t present in Sketch “out of the box.” Considering that there’s almost always going to be some missing feature or integration in any given program (especially given the vast number of needs any individual designer might have!), one can begin to imagine how plugins might be especially useful and powerful. Sketch plugins are able to do pretty much everything you’d expect, like manipulating the color, shape, size, order, style, grouping, and effects of layers, but also able to do things like make requests to internet resources, present a user interface, and much, much more!
On the programming side, all Sketch plugins are written in JavaScript code. Well, actually, that’s not entirely true. It’s more accurate to say that most Sketch plugins are written in JavaScript, as it’s also possible to write a Sketch plugin in one of Apple’s programming languages, Objective-C and Swift, though even they require a small amount of JavaScript knowledge.
Don’t worry though. In this article, we’ll focus on how to build Sketch plugins using JavaScript, HTML, and CSS alone. We won’t be going over the basics of HTML, CSS, or JavaScript — this article assumes at least some knowledge and experience with all of these three. The MDN developer website provides a great place to learn more about web development.
Let’s Get Started!
Firstly, What Are We Making?
In this tutorial, I’ll teach you how to build a basic, beginner-friendly plugin that will be able to create, duplicate, and modify layers, as well as present the user with a nice user interface. By doing so, my goal is to establish a fundamental knowledge on which you can build on and use it to create your own plugins.
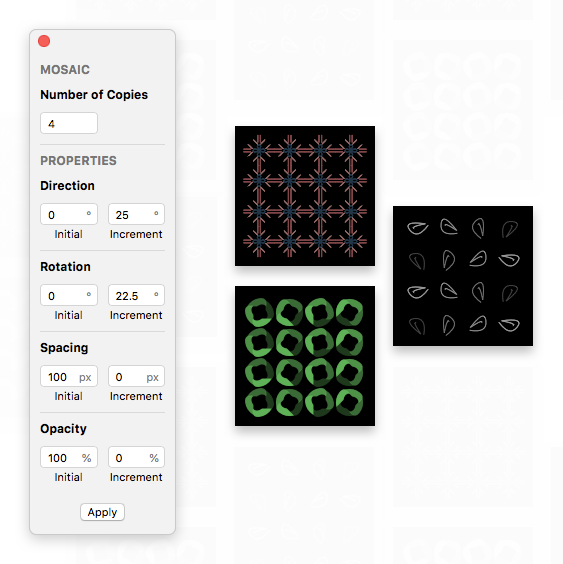
The plugin we’ll be building is called Mosaic, and is effectively a “pattern generator”. Feed it your layers, tweak a few settings, and it’ll create a pattern:
The Mosaic’s UI, and some examples of patterns made with it. (Large preview)
A bit of history: Mosaic is inspired in large part by an old-school Adobe Fireworks plugin called Twist-and-Fade. Twist-and-Fade was pretty powerful, able to duplicate a layer any number of times while adjusting its hue, position, rotation, size, and opacity. The plugin was even able to generate animated GIFs, like this one, where it created the frames for the two rotating elements in the cassette tape:
For the purposes of this tutorial, we’ll be building a somewhat similar plugin for Sketch, though intentionally simplified so as to keep the tutorial as accessible as possible. Specifically, our plugin will be able to:
Duplicate any Sketch layer (bitmap or vector) and tweak the duplicates’ layer’s position, rotation, and opacity. This will give us an introduction to manipulating layers using Sketch’s JavaScript APIs.
Display a user interface created using HTML, CSS, and JS, which will teach you about how to easily create an interface for the plugin, by using web technologies that you may already be familiar with. The plugin interface is pretty important since it’s how we’ll gather the user’s inputs regarding how the user wants the resulting mosaic image to look.
Creating Our Base Plugin In Ten Seconds Flat
First, we’ll be creating the “base” (or template) for the plugin we want to build. We could create all the necessary files and folders that make up a plugin manually, but luckily we don’t have to — because Sketch can do it for us. After we’ve generated the template plugin, we’ll be able to customize it as we see fit.
There’s a really quick and easy technique we can use to create the template plugin, which is pretty much my go-to method when I need to whip a plugin together to solve whatever problem I’m dealing with at a given moment. Here’s how it works:
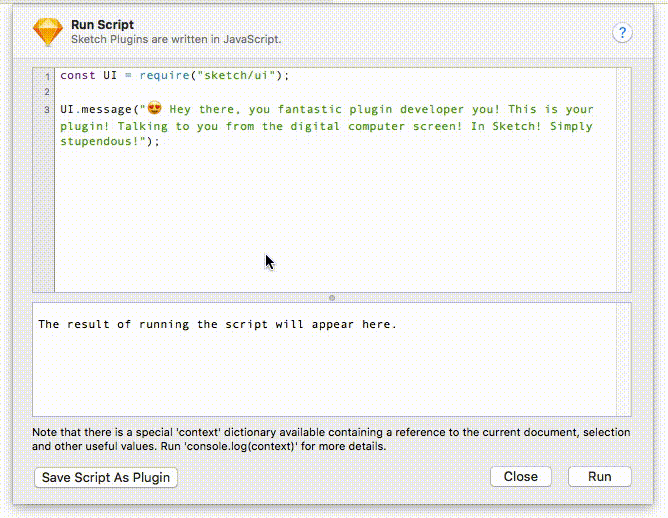
With Sketch open, check the menu bar at the top of the screen and click Plugins -> Run Script. This will open up a dialog box that we can use to test and run the code. We can also save any code we enter in it as a plugin, which is the part we’re specifically interested in right now.
Clear whatever code is already in this dialog and replace it with the following demo code:
const UI = require("sketch/ui");

UI.message("😍 Hey there, you fantastic plugin developer you! This is your plugin! Talking to you from the digital computer screen! In Sketch! Simply stupendous!");
Next, hit Save Script as Plugin in the bottom-left of the window, enter whatever name you’d like for this plugin to have (in our case, this is “Mosaic”), then Save Script as Plugin once more.
Press “Save” in the bottom-left of the window and enter whatever name you'd like for this plugin to have. (Large preview)
Believe it or not, we’re already done — all that’s left is to eat the cake we just baked. Here comes the fun part. Opening the Plugins menu once again, you should see something like this: your brand-spanking-new plugin listed as “Mosaic”! Click on it!
Congratulations, you’ve just written your first Sketch plugin!
What you should see after clicking “Mosaic” should be like the short video above, with an unobtrusive tooltip message appearing at the bottom of the screen beginning with the words “Hey there…” — which is exactly what the code we pasted in tells it to do. This is what it makes this technique so great: it makes it easy to paste, modify and test code without having to build a plugin from scratch. If you’re familiar with or have ever played with your browser’s web console, this is basically that. Having this tool in your back pocket as you build and test code is a must-have.
Let’s do a quick rundown of what the code you added does:
First, it imports the sketch/uimodule of Sketch’s built-in JS library, and assigns it to the UI variable. This module contains a couple of useful interface-related methods, one of which we’ll use:
const UI = require("sketch/ui");
Next, it calls the message method (which is part of the sketch/ui module) with the string of text we want displayed in the tooltip we saw:
UI.message("😍 Hey there, you fantastic plugin developer you! This is your plugin! Talking to you from the digital computer screen! In Sketch! Simply stupendous!");
The message() method provides a great way to present an unobtrusive message to the user; it’s great for cases where you don’t need to steal focus (non-modal) and don’t need any fancy buttons or text fields. There’s also other ways to present common UI elements like alerts, prompts, and such, some of which we’ll be using as we build Mosaic.
Customizing Our Plugin’s Metadata
We now have a basic plugin to start from, but we still need to tweak it further and make it truly ours. Our next step will be to change the plugin’s metadata.
For this step, we’ll need to peek into what’s called the plugin bundle. When you hit save in the ‘Run Script’ window, Sketch saved your plugin as a folder named Mosaic.sketchplugin that you can find in the
~/Library/Application Support/com.bohemiancoding.sketch3/Plugins directory. That’s a bit long and annoying to remember; as a shortcut, you can also pull it up via Plugins -> Manage Plugins -> (right-click your plugin) -> Reveal Plugins Folder. Even though it appears in Finder as a single file, it’s actually a folder containing everything our plugin needs for Sketch to run it. The reason it appears as a single file despite being a folder is because when you first installed Sketch, Sketch registered the .sketchplugin extension as a “bundle” (a special kind of folder that appears as a file) and asked for it to automatically open in Sketch when opened.
Let’s take a peek inside. Right-click Mosaic.sketchplugin, then click “Show Package Contents”. Inside, you should see the following directory structure:
You might be wondering why there’s a file in there with the extension .cocoascript. Don’t worry — it’s just a regular JavaScript file, and only contains the code we entered earlier. Go ahead and rename this file to index.js, which will change the directory structure to look like the one below:
The most common way of organizing the files inside a plugin bundle is as follows: your code (JavaScript) and manifest.json belong in Sketch/, and resources (think images, audio files, text files, etc.) belong in Resources/.
Let’s start by tweaking the file named manifest.json. Open it inside your favorite code editor, such as Visual Studio Code or Atom.
You’ll see that at the moment there’s relatively little inside here, but we’ll add more soon. The plugin manifest serves primarily two purposes:
First, it provides metadata that describes the plugin to the user — things like its name, version, the author’s name, and so on. Sketch uses this information in the Sketch -> Preferences -> Plugins dialog to create a listing and description for your plugin.
Second, it also tells Sketch about how to get down to your business; that is, it tells Sketch how you’d like your plugin’s menu to look, what hotkeys to assign to your plugin, and where your plugin’s code lives (so Sketch can run it).
Considering purpose #1, describing the plugin to the user, you’ll probably notice that right now there’s no description or author given, which would be confusing for the user and make the plugin difficult to identify. Let’s fix that by adjusting the relevant keys’ values to:
{
        "description": "Generate awesome designs and repeating patterns from your layers!",
        "author": "=> Your name here <="
}
Next, let’s adjust the plugin’s identifier. This identifier uses what is called a “reverse domain notation” which is a really concise (or boring, take your pick) way to say “take your site’s domain, reverse the order, then put your product’s name at the end.” This will come out something like: com.your-company-or-your-name-its-not-that-big-a-deal.yourproduct.
You don’t have to stick to this naming convention — you can put whatever you want here, so long as it’s unique enough to avoid conflicts with other plugins (though it’s probably a good idea to stick to the RDN format, especially as it provides a simple, reusable system for your plugin identifiers).
To that effect, change your identifier to com.your-name.mosaic:
{
    "identifier": "com.your-name.mosaic"
}
I personally like to take all metadata related keys (title, author, identifier, etc.) and group them near the top of the manifest so they’re not spread out all over the place and help preserve my sanity when I need to find them.
Next, let’s take a look at the menu and commands keys. These two are responsible for telling Sketch what code to call and in response to what.
If you look at the menu key, you’ll see it contains a title key, whose value is the name our plugin will show up with in the Plugins menu. It also has an items key, which is a list of command identifiers:
Right now there’s only one command identifier in this list, "com.bohemiancoding.sketch.runscriptidentifier". Command identifiers always point to a command in the commands list. Right now our plugin only has one command, which is the one with this identifier:
Whenever you add a command identifier to a menu entry, Sketch will look up the command entry that has that identifier and will display the value of its name key (which in this case is “Mosaic”) and will show it in your plugin’s menu instead of the identifier.
As for the role commands play, we can think of a command entry as a way to tell Sketch what function in our plugin’s JavaScript code we want to run when that command is invoked, the “invocation” usually being the user’s click on the associated menu item. The command entry doesn’t do anything on its own, it’s just JSON — it simply provides a description to Sketch of where to look for the JavaScript it needs to run when the command is invoked.
So far, we’ve talked about what a command’s name and identifier keys do, but there are two other keys in a command that need to be addressed: script and handlers.
The script key tells Sketch where the JavaScript file that it should run is. Note how Sketch assumes that the script file in question is in the Sketch/ folder, which is why for simplicity’s sake you’ll want to make sure all your JavaScript code lives somewhere under the Sketch/ folder. Before we move on from this key it’s important that you make sure you change this key’s value to index.js, just like we renamed the file earlier. Otherwise, Sketch won’t be able to find and run your JavaScript file.
The value of the handlers key is what Sketch looks at to determine what function in your JavaScript to call. Here, we only have one handler set: run, with the value onRun. run is the name of a predefined, built-in Sketch action. This run action will always be called when a user clicks a menu item that references this command. onRun is the name of a function in the auto-generated script.cocoascript file (which we renamed to index.js), and the function we want to be called when the run event occurs, i.e., when the user clicks the menu item.
In the example we have so far, this process plays out something like this:
The user clicks our menu item.
Sketch finds the command associated with that menu item.
Sketch finds the script file the command refers to and runs it (which in this case means it executes the JavaScript in index.js).
Since this command was invoked by a menu item click, it’s considered a run action. That means Sketch will look at the command’s handlers.run value for the function to call next, which in this case is onRun.
Sketch calls the onRun function.
Commands are most commonly called in response to a user clicking on one of your menu items, but they can also be called in response to other user actions, such as the user changing the selection or a property on a layer. However, for this plugin, we won’t be using any of these other actions. (You can learn more about actions and how they work in the Action API help page.)
Before we move on from this manifest, we’ll want to make two other tweaks. Right now, our menu has the structure:
…which is a bit redundant since our plugin only has one menu item. It also adds a bit of unnecessary friction for our user as our plugin now takes two clicks to invoke rather than one. We can fix this by adding isRoot: true to our menu:
As for our second tweak, let’s go ahead and rename this command identifier to something less unwieldy. Since command identifiers only need to be unique within the context of an individual plugin, we can safely rename it to something more concise and obvious, like "open":
Before we move on, it’s useful to note that menus can contain also other menus. You could easily create a sub-menu by nesting another { title: ..., items: ... } entry inside another menu’s items list:
So far, we’ve written some demo code and customized our plugin’s manifest. We’ll now move on to creating its user interface, which is essentially a web page embedded in a window (similarly to the browsers you’re familiar with using):
Mosaic’s user interface design has its own window, which we can consider the most basic component; we’ll start with it. In order to create and display a window, we’ll have to make use of a class that’s built into macOS by default, called NSWindow. Over the remainder of this tutorial, we’ll actually be doing this quite a bit (using built-in APIs like NSWindow) which might seem a little daunting if you’re unfamiliar with it, but don’t worry — I’ll explain everything along the way!
Note: While we’re talking about built-in APIs, the reason we’re able to use this class at all is thanks to a bridge present in the JavaScript runtime used by Sketch plugins. This bridge automatically imports these built-in classes, methods, and functions that would normally only be available to native applications.
Open Sketch/index.js in your code editor, delete what’s already there, and paste in the following:
Let’s take a look at what this first bit of code does:
function onRun(context){
Remember earlier when we talked about commands and how they function, and we told Sketch to call in response to a menu-click was called onRun? (If you need a refresher, revisit that part above, then come back.) All this bit does is create that function. You’ll also notice our onRun function takes a context argument. This is an argument Sketch will call your command handlers with that can provide us with certain information. Later on, we’ll use it in order to get the URL of our plugin bundle on the user’s computer.
First, we call alloc() on NSWindow; this basically means “set aside some memory for an instance of NSWindow”. It’s sufficient to know that you’ll have to do this for every instance of a native class you want to create. The alloc method is available in every native class.
Next, we call NSWindow’s initializer method (that is, the method that actually creates an instance of NSWindow), which is named initWithContentRect:styleMask:backing:defer:. You’ll notice that’s different from what we call in our code above — it’s got a bunch of colons (:) between every argument. Since we can’t use that syntax in JavaScript, Sketch conveniently renames it to something we can actually use by replacing the colons with underscores, which is how we get its JS name: initWithContentRect_styleMask_backing_defer.
Next, we pass in each of the arguments the method needs. For the first argument, contentRect, we supply a rectangle with a size large enough for our user interface.
For styleMask, we use a bitmask which says that we want our window to have a close button, a title bar, and to be resizable.
The next two arguments, backing and defer, are always going to be set to NSBackingStoreBuffered and false, so we don’t really need to worry about them. (The documentation for this method goes into further detail as to why this is.)
Here we set NSWindow’s releasedWhenClosed property to false, which means: “Hey! don’t delete this window from memory just because the user closes it.” Then we call makeKeyAndOrderFront(null) which means: “Move this window to the forefront, and give it keyboard focus.”
Web View: The Interface
To make things easier, I’ve already written the HTML and CSS code of the plugin’s web user interface we’re going to be using; the only remaining code we’re going to have to add to it will deal with making sure we’re able to communicate between it and our Sketch plugin code.
Next, download the HTML and CSS code. Once you’ve downloaded it, extract it, then move the folder named “web-ui” into our plugin’s Resources folder.
Note: Writing and optimizing the actual HTML/CSS code is outside of the scope of this tutorial, as its focus is on JavaScript which powers the plugin’s core features; but there are a ton of tutorials on the web on this topic, should you want to learn more.
If you run our plugin now, you’ll see that it shows a window — yay, progress! But it’s empty, without a title, and not particularly useful yet. We need to get it to show our web interface. In order to do that, we’ll need to use another native class, WKWebView, which is a view specifically made for displaying web content.
We’ll add the code needed to create our WKWebView beneath the code we wrote for our window:
function onRun(context){
// Create window
const window = NSWindow.alloc().initWithContentRect_styleMask_backing_defer(
  NSMakeRect(0, 0, 145, 500),
  NSWindowStyleMaskClosable | NSWindowStyleMaskTitled | NSWindowStyleMaskResizable,
  NSBackingStoreBuffered,
  false
);
window.releasedWhenClosed = false;
// Create web view, and set it as the view for our window to display
const webView = WKWebView.alloc().init();
window.contentView = webView;
// Load our UI into the web view
const webUIFolderURL = context.scriptURL
  .URLByDeletingLastPathComponent()
  .URLByAppendingPathComponent("../Resources/web-ui/");
const indexURL = webUIFolderURL.URLByAppendingPathComponent("index.html");
webView.loadFileURL_allowingReadAccessToURL(indexURL, webUIFolderURL);
// Make window key and move to front
window.makeKeyAndOrderFront(nil);
};
If we run our plugin now, we’ll see that now we’ve got a window open that displays our web user interface. Success!
Again, before moving on, let’s examine what the code we added does:
const webView = WKWebView.alloc().init();
This should look familiar — it’s basically the same as what we did when we made our NSWindow: allocate memory for a web view, then initialize it.
window.contentView = webView;
This line of code tells our window to display the web view we just made.
Here our goal is to create a URL that points to the web-ui folder that we made earlier. In order to get that URL, we need some way to figure out where our plugin’s bundle is in the user’s filesystem. Here we use the context.scriptURL property, which gives us the URL of the currently running script. However, this doesn’t give us a JavaScript String as you might expect, but an instance of a native class, NSURL, that has a few methods on it that make manipulating URL strings easier.
Calling URLByDeletingLastPathComponent() again gives us file://path-to-your-plugin/Contents/
And lastly, adding Resources/web-ui/ onto the end using URLByAppendingPathComponent("Resources/web-ui/") gives us file://path-to-your-plugin/Contents/Resources/web-ui/
We also need to create a second URL that points directly to the index.html file:
Alright. So far, we have a window that displays our web user interface, just like we wanted. However, it’s not quite yet complete — our original design doesn’t have a title bar (or “chrome”), but our current window does. There’s also the fact that when we click inside a Sketch document, that document moves in front of our window, which isn’t what we want — we want the user to be able to interact with the plugin window and the Sketch document without having to constantly refocus from one window to the other.
To fix this, we first need to get rid of the default window chrome and keep only the buttons. Adding the two lines of code below will get rid of the title bar.
Note:Like before, all of the properties and methods we’re using below are documented in NSWindow’s documentation page.
These next two lines of code will remove the window buttons (also known as “traffic lights” in MacOS lingo) that we don’t need — “zoom” and “minimize” — leaving only the “close” button:
Next, we need to do something to keep our floating plugin window on top of other windows, so the user can interact with their Sketch documents without having to worry about the Mosaic’s window disappearing. We can use a special type of NSWindow for this, called NSPanel, which is able to “stay on top” of other windows. All that’s needed for this is to change NSWindow to NSPanel, which is a single-line code change:
We can also tweak our window so that it automatically reopens in the last position it was at:
window.frameAutosaveName = "mosaic-panel-frame";
This line basically says “remember this window’s position by saving it with Sketch’s preferences under the key mosaic-panel-frame”.
All together, we now have the following code:
function onRun(context){
// Create window
const window = NSPanel.alloc().initWithContentRect_styleMask_backing_defer(
NSMakeRect(0, 0, 145, 500),
NSWindowStyleMaskClosable | NSWindowStyleMaskTitled | NSWindowStyleMaskResizable,
NSBackingStoreBuffered,
false
);
window.becomesKeyOnlyIfNeeded = true;
window.floatingPanel = true;
window.frameAutosaveName = "mosaic-panel-frame";
window.releasedWhenClosed = false;
window.standardWindowButton(NSWindowZoomButton).hidden = true;
window.standardWindowButton(NSWindowMiniaturizeButton).hidden = true;
window.titlebarAppearsTransparent = true;
window.titleVisibility = NSWindowTitleHidden;
window.backgroundColor = NSColor.colorWithRed_green_blue_alpha(1, 0.98, 0.98, 1);
// Create web view, and set it as the view for our window to display
const webView = WKWebView.alloc().init();
window.contentView = webView;
// Load our UI into the webview
const webUIFolderURL = context.scriptURL
.URLByDeletingLastPathComponent()
.URLByAppendingPathComponent("../Resources/web-ui/");
const indexURL = webUIFolderURL.URLByAppendingPathComponent("index.html");
webView.loadFileURL_allowingReadAccessToURL(indexURL, webUIFolderURL);
// Make window key and move to front
window.makeKeyAndOrderFront(nil);
};
Organizing The Code
Before we move to the next part, it’s a good idea to organize our code so that it’s easier to navigate and tweak. Since we still have a lot more code to add and we want to avoid index.js becoming a messy dumping ground for all of our code, let’s split things up a bit and move our UI-specific code into a file named ui.js, under the Sketch folder. We’ll also extract some of the UI tasks we do, like creating the web view and window, into their own functions.
Create a new file called ui.js and insert the code below inside it:
There are a couple of key changes we made here that are important to note. Besides the fact that we’ve created specific functions for the creation, hiding and showing of our window and its web view, we’ve also modularized our user interface code.
Notice the module.exports = { loadAndShow, cleanup } line at the bottom? This is a way for us to specify exactly what objects and functions scripts who import this UI code can use (and hiding those we don’t want to them to worry about), which means we now have a more organized API for interacting with, showing and destroying our UI.
Let’s see what this looks like in practice. Back in index.js, remove the old code and add the following:
const UI = require("./ui");

function onRun(context){
        UI.loadAndShow(context.scriptURL);
};
We’re using a special function that Sketch automatically makes available to us, require, to import our ui.js code and assign the returned module to the UI variable. This gives us access to a simplified API for triggering our user interface. Things are much tidier now and easy to find!
Conclusion
Well done — you’ve come far! In the next part of this tutorial, we’ll give our web UI the ability to send us a message when the “Apply” button is clicked, and we’ll focus on the main plugin functionality: actually generating layer mosaics!
Last month, I had a conversation on Twitter about the difference between “scoped” styles (generated in a build process) and “nested” styles native to CSS. I asked why, anecdotally, developers avoid the specificity of ID selectors, while embracing “scoped styles” generated by JavaScript? Keith Grant suggested that the difference lies in balancing the cascade* and inheritance, i.e. giving preference to proximity over specificity. Let’s take a look.
Importance defined by the !important flag, and style origin (user > author > browser)
Specificity of the selectors used (inline > ID > class > element)
Source Order of the code itself (latest takes precedence)
Proximity is not mentioned anywhere — the DOM-tree relationship between parts of a selector. The paragraphs below will both be red, even though #inner p describes a closer relationship than #outer p for the second paragraph:
See the Pen [Cascade: Specificity vs Proximity](https://codepen.io/smashingmag/pen/OexweJ/) by Miriam Suzanne.
<section id="outer">
  <p>This text is red</p>
  <div id="inner">
    <p>This text is also red!</p>
  </div>
</section>
#inner p {
  color: green;
}

#outer p {
  color: red;
}
Both selectors have the same specificity, they are both describing the same p element, and neither is flagged as !important — so the result is based on source-order alone.
BEM And Scoped Styles
Naming conventions like BEM (“Block__Element—Modifier”) are used to ensure that each paragraph is “scoped” to only one parent, avoiding the cascade entirely. Paragraph “elements” are given unique classes specific to their “block” context:
See the Pen [BEM Selectors & Proximity](https://codepen.io/smashingmag/pen/qzPyeM/) by Miriam Suzanne.
These selectors still have the same relative importance, specificity, and source order — but the results are different. “Scoped” or “modular” CSS tools automate that process, re-writing our CSS for us, based on the HTML. In the code below, each paragraph is scoped to its direct parent:
See the Pen [Scoped Style Proximity](https://codepen.io/smashingmag/pen/NZaLWN/) by Miriam Suzanne.
<section outer-scope>
  <p outer-scope>This text is red</p>
  <div outer-scope inner-scope>
    <p inner-scope>This text is green!</p>
  </div>
</section>
p[inner-scope] {
  color: green
}

p[outer-scope] {
  color: red;
}
Inheritance
Proximity is not part of the cascade, but it is part of CSS. That’s where inheritance becomes important. If we drop the p from our selectors, each paragraph will inherit a color from its closest ancestor:
See the Pen [Inheritance: Specificity vs Proximity](https://codepen.io/smashingmag/pen/mZBGyN/) by Miriam Suzanne.
Since #inner and #outer describe different elements, our div and section respectively, both color properties are applied without conflict. The nested p element has no color specified, so the results are determined by inheritance (the color of the direct parent) rather than cascade. Proximity takes precedence, and the #inner value overrides the #outer.
But there’s a problem: In order to use inheritance, we are styling everything inside our section and div. We want to target the paragraph color specifically.
(Re-)Introducing Custom Properties
Custom properties provide a new, browser-native solution; they inherit like any other property, but they don’t have to be used where they are defined. Using plain CSS, without any naming conventions or build tools, we can create a style that is both targeted and contextual, with proximity taking precedence over the cascade:
See the Pen [Custom Props: Specificity vs Proximity](https://codepen.io/smashingmag/pen/gNGdaO/) by Miriam Suzanne.
The custom --paragraph property inherits just like the color property, but now we have control over exactly how and where that value is applied. The --paragraph property acts similar to a parameter that can be passed into the p component, either through direct selection (specificity-rules) or context (proximity-rules).
I think this reveals a potential for custom properties that we often associate with functions, mixins, or components.
Custom “Functions” And Parameters
Functions, mixins, and components are all based on the same idea: reusable code, that can be run with various input parameters to get consistent-but-configurable results. The distinction is in what they do with the results. We’ll start with a striped-gradient variable, and then we can extend it into other forms:
html {
  --stripes: linear-gradient(
    to right,
    powderblue 20%, pink 20% 40%, white 40% 60%, pink 60% 80%, powderblue 80%
  );
}
That variable is defined on the root html element (could also use :root, but that adds unnecessary specificity), so our striped variable will be available everywhere in the document. We can apply it anywhere gradients are supported:
See the Pen [Custom Props: Variable](https://codepen.io/smashingmag/pen/NZwrrm/) by Miriam Suzanne.
Functions are used like variables, but define parameters for changing the output. We can update our --stripes variable to be more function-like by defining some parameter-like variables inside it. I’ll start by replacing to right with var(--stripes-angle), to create an angle-changing parameter:
html {
  --stripes: linear-gradient(
    var(--stripes-angle),
    powderblue 20%, pink 20% 40%, white 40% 60%, pink 60% 80%, powderblue 80%
  );
}
There are other parameters we could create, depending on what purpose the function is meant to serve. Should we allow users to pick their own stripe colors? If so, does our function accept 5 different color parameters or only 3 that will go outside-in like we have now? Do we want to create parameters for color-stops as well? Every parameter we add provides more customization at the cost of simplicity and consistency.
There is no universal right answer to that balance — some functions need to be more flexible, and others need to be more opinionated. Abstractions exist to provide consistency and readability in your code, so take a step back and ask what your goals are. What really needs to be customizable, and where should consistency be enforced? In some cases, it might be more helpful to have two opinionated functions, rather than one fully-customizable function.
To use the function above, we need to pass in a value for the --stripes-angle parameter, and apply the output to a CSS output property, like background-image:
/* in addition to the code above… */
html {
  --stripes-angle: 75deg;
  background-image: var(--stripes);
}
See the Pen [Custom Props: Function](https://codepen.io/smashingmag/pen/BgwOjj/) by Miriam Suzanne.
I defined the --stripes function on the html element out of habit. Custom properties inherit, and I want my function available everywhere, so it makes some sense to put it on the root element. That works well for inheriting variables like --brand-color: blue, so we might also expect it to work for our “function” as well. But if we try to use this function again on a nested selector, it won’t work:
See the Pen [Custom Props: Function Inheritance Fail](https://codepen.io/smashingmag/pen/RzjRrM/) by Miriam Suzanne.
div {
  --stripes-angle: 90deg;
  background-image: var(--stripes);
}
The new --stripes-angle is ignored entirely. It turns out we can’t rely on inheritance for functions that need to be re-calculated. That’s because each property value is computed once per element (in our case, the html root element), and then the computed value is inherited. By defining our function at the document root, we don’t make the entire function available to descendants — only the computed result of our function.
That makes sense if you frame it in terms of the cascading --stripes-angle parameter. Like any inherited CSS property, it is available to descendants but not ancestors. The value we set on a nested div is not available to a function we defined on the html root ancestor. In order to create a universally-available function that will re-calculate on any element, we have to define it on every element:
See the Pen [Custom Props: Universal Function](https://codepen.io/smashingmag/pen/agLaNj/) by Miriam Suzanne.
The universal selector makes our function available everywhere, but we can define it more narrowly if we want. The important thing is that it can only re-calculate where it is explicitly defined. Here are some alternatives:
/* make the function available to elements with a given selector */
.stripes { --stripes: /* etc… */; }

/* make the function available to elements nested inside a given selector */
.stripes * { --stripes: /* etc… */; }

/* make the function available to siblings following a given selector */
.stripes ~ * { --stripes: /* etc… */; }
See the Pen [Custom Props: Scoped Function](https://codepen.io/smashingmag/pen/JQMvGM/) by Miriam Suzanne.
This can be extended with any selector logic that doesn’t rely on inheritance.
Free Parameters And Fallback Values
In our example above, var(--stripes-angle) has no value and no fallback. Unlike Sass or JS variables that must be defined or instantiated before they are called, CSS custom properties can be called without ever being defined. This creates a “free” variable, similar to a function parameter that can be inherited from the context.
We can eventually define the variable on html or :root (or any other ancestor) to set an inherited value, but first we need to consider the fallback if no value is defined. There are several options, depending on exactly what behavior we want
For “required” parameters, we don’t want a fallback. As-is, the function will do nothing until --stripes-angle is defined.
For “optional” parameters, we can provide a fallback value in the var() function. After the variable-name, we add a comma, followed by the default value:
var(--stripes-angle, 90deg)
Each var() function can only have one fallback — so any additional commas will be part of that value. That makes it possible to provide complex defaults with internal commas:
By setting fallback values in var() rather than defining the custom property explicitly, we ensure that there are no specificity or cascade restrictions on the parameter. All the *-angle parameters are “free” to be inherited from any context.
Browser Fallbacks Versus Variable Fallbacks
When we’re using variables, there are two fallback paths we need to keep in mind:
What value should be used by browsers without variable support?
What value should be used by browsers that support variables, when a particular variable is missing or invalid?
p {
  color: blue;
  color: var(--paragraph);
}
While old browsers will ignore the variable declaration property, and fallback to blue — modern browsers will read both and use the latter. Our var(--paragraph) might not be defined, but it is valid and will override the previous property, so browsers with variable support will fallback to the inherited or initial value, as if using the unset keyword.
That may seem confusing at first, but there are good reasons for it. The first is technical: browser engines handle invalid or unknown syntax at “parse time” (which happens first), but variables are not resolved until “computed-value time” (which happens later).
At parse time, declarations with invalid syntax are ignored completely — falling back on earlier declarations. This is the path that old browsers will follow. Modern browsers support the variable syntax, so the previous declaration is discarded instead.
At computed-value time the variable is compiled as invalid, but it’s too late — the previous declaration was already discarded. According to the spec, invalid variablevalues are treated the same as unset:
See the Pen [Custom Props: Invalid/Unsupported vs Undefined](https://codepen.io/smashingmag/pen/VJMGbJ/) by Miriam Suzanne.
html {
  color: red;

  /* ignored as *invalid syntax* by all browsers */
  /* - old browsers: red */
  /* - new browsers: red */
  color: not a valid color;
  color: var(not a valid variable name);

  /* ignored as *invalid syntax* by browsers without var support */
  /* valid syntax, but invalid *values* in modern browsers */
  /* - old browsers: red */
  /* - new browsers: unset (black) */
  --invalid-value: not a valid color value;
  color: var(--undefined-variable);
  color: var(--invalid-value);
}
This is also good for us as authors, because it allows us to play with more complex fallbacks for the browsers that support variables, and provide simple fallbacks for older browsers. Even better, that allows us to use the null/undefined state to set required parameters. This becomes especially important if we want to turn a function into a mixin or component.
Custom Property “Mixins”
In Sass, the functions return raw values, while mixins generally return actual CSS output with property-value pairs. When we define a universal --stripes property, without applying it to any visual output, the result is function-like. We can make that behave more like a mixin, by defining the output universally as well:
As long as --stripes-angle remains invalid or undefined, the mixin fails to compile, and no background-image will be applied. If we set a valid angle on any element, the function will compute and give us a background:
div {
  --stripes-angle: 30deg; /* generates the background */
}
Unfortunately, that parameter-value will inherit, so the current definition creates a background on the divand all descendants. To fix that, we have to make sure the --stripes-angle value doesn’t inherit, by resting it to initial (or any invalid value) on every element. We can do that on the same universal selector:
See the Pen [Custom Props: Mixin](https://codepen.io/smashingmag/pen/ZdXMJx/) by Miriam Suzanne.
In some cases, we need the parameter to be set dynamically from outside CSS — based on data from a back-end server or front-end framework. With custom properties, we can safely define variables in our HTML without worrying about the usual specificity issues:
See the Pen [Custom Props: Mixin + Inline Style](https://codepen.io/smashingmag/pen/qzPMPv/) by Miriam Suzanne.
Inline styles have a high specificity, and are very hard to override — but with custom properties, we we have another option: ignore it. If we set the div to background-image: none (for example) that inline variable will have no impact. To take it even farther, we can create an intermediate variable:
We can also re-frame our “mixin” as a “component” by applying it to an explicit selector, and making the parameters optional. Rather than relying on the presence-or-absence of --stripes-angle to toggle our output, we can rely on the presence-or-absence of a component selector. That allows us to set fallback values safely:
See the Pen [Custom Props: Component](https://codepen.io/smashingmag/pen/QXqVmM/) by Miriam Suzanne.
By putting the fallback inside the var() function, we can leave --stripes-angle undefined and “free” to inherit a value from outside the component. This is a great way to expose certain aspects of a component style to contextual input. Even “scoped” styles generated by a JS framework (or scoped inside the shadow-DOM, like SVG icons) can use this approach to expose specific parameters for outside influence.
Isolated Components
If we don’t want to expose the parameter for inheritance, we can define the variable with a default value:
[data-stripes] {
  --stripes-angle: to right;
  --stripes: linear-gradient(
    var(--stripes-angle, to right),
    powderblue 20%, pink 20% 40%, white 40% 60%, pink 60% 80%, powderblue 80%
  );
  background-image: var(--stripes);
}
These components would also work with a class, or any other valid selector, but I chose the data-attribute to create a namespace for any modifiers we want:
[data-stripes='vertical'] { --stripes-angle: to bottom; }
[data-stripes='horizontal'] { --stripes-angle: to right; }
[data-stripes='corners'] { --stripes-angle: to bottom right; }
See the Pen [Custom Props: Isolated Components](https://codepen.io/smashingmag/pen/agLaGX/) by Miriam Suzanne.
I often wish I could use data-attributes to set a variable — a feature supported by the CSS3 attr()specification, but not yet implemented in any browsers (see the resources tab for linked issues on each browser). That would allow us to more closely associate a selector with a particular parameter:
<div data-stripes="30deg">...</div>
/* Part of the CSS3 spec, but not yet supported */
/* attr(, ) */
[data-stripes] {
--stripes-angle: attr(data-stripes angle, to right);
}
In the meantime, we can achieve something similar by using the style attribute:
See the Pen [Custom Props: Style Selectors](https://codepen.io/smashingmag/pen/PrJdBG/) by Miriam Suzanne.
<div style="--stripes-angle: 30deg">...</div>


/* The `*=` atttribute selector will match a string anywhere in the attribute */
[style*='--stripes-angle'] {
  /* Only define the function where we want to call it */
  --stripes: linear-gradient(…);
}
This approach is most useful when we want to include other properties in addition to the parameter being set. For example, setting a grid area could also add padding and background:
[style*='--grid-area'] {
  background-color: white;
  grid-area: var(--grid-area, auto / 1 / auto / -1);
  padding: 1em;
}
Conclusion
When we start to put all these pieces together, it becomes clear that custom properties go far beyond the common variable use-cases we’re familiar with. We’re not only able to store values, and scope them to the cascade — but we can use them to manipulate the cascade in new ways, and create smarter components directly in CSS.
This calls for us to re-think many of the tools we’ve relied on in the past — from naming conventions like SMACSS and BEM, to “scoped” styles and CSS-in-JS. Many of those tools help work around specificity, or manage dynamic styles in another language — use-cases that we can now address directly with custom properties. Dynamic styles that we’ve often calculated in JS, can now be handled by passing raw data into the CSS.
At first, these changes may be seen as “added complexity” — since we’re not used to seeing logic inside CSS. And, as with all code, over-engineering can be a real danger. But I’d argue that in many cases, we can use this power not to add complexity, but to move complexity out of third-party tools and conventions, back into the core language of web design, and (more importantly) back into the browser. If our styles require calculation, that calculation ought to live inside our CSS.
All of these ideas can be taken much further. Custom properties are just starting to see wider adoption, and we’ve only begun to scratch the surface of what’s possible. I’m excited to see where this goes, and what else people come up with. Have fun!


 Can you tell us a little about yourself (hobbies, education, etc):