

Not a single project today will get away without some sort of version control with Git under the hood. Knowing Git well helps you become a better developer, boost your developer’s workflow and truly improve the quality of your code base. However, that requires going a little bit outside of the comfort zone that we are all familiar with. As it turns out, there is a bit more to Git than just commit, push and pull.
Some developers stay true to the main principles in Git, and often that’s absolutely understandable. In the front-end world of ours, there are just so many sophisticated things to understand and get better at, that frankly Git is often not a high priority. As a side effect, many of the valuable techniques that can boost a developer’s workflow remain unnoticed and rarely discovered.
In this article, we'll explore four advanced Git tools, and hopefully, whet your appetite to learn even more about Git!
Recovering Deleted Commits
You’re convinced that you’ve programmed yourself into a dead end because your last two commits lead nowhere! Understandably, you might want to undo them and start over.

Here’s one way to do this:
$ git reset --hard 2b504be
But let’s also say that, moments later, you notice that you made a mistake: actually, the commits contained important data and you just lost valuable work! 😱
Your heart starts pumping, the sweat starts running — you know the drill. 🤯
Now, the million-dollar question is: How can we get those seemingly deleted commits back? Luckily, there is an answer: the "Reflog"!
Using the Reflog to Recover Lost States
You can think of the Reflog as Git’s "diary": it’s the place where Git protocols every movement of the HEAD pointer. Or, in other words: all of the more interesting actions like when you commit, merge, checkout, rebase, cherry-pick and others. This, of course, makes it a perfect tool for those inevitable situations when things go wrong.
Let’s open the Reflog for our example scenario and see how it can help us:
$ git reflog

The first and most important thing to know about the Reflog is that it’s ordered chronologically. And indeed: the topmost (in other words: newest) item is our mishap when we had hastily used git reset and lost some commits.
The solution to fix our problem is pretty easy: we can simply return to the state before the mistake. And that state is clearly protocoled in the Reflog, right below our fatal reset command. To undo our mistake, we can simply use git reset once more to recover this seemingly lost state:
$ git reset e5b19e4
You can also accomplish the same result a little bit faster. As a group of friendly and passionate developers on "Tower" Git desktop GUI, we’ve been aiming to resolve common pain points around Git heads-on. So in our little tool, you can achieve the same results by simply hitting CMD + Z — as if you wanted to correct a simple typo in your text editor. In fact, the same hotkey is available for a family of different actions, e.g. when you’ve wrongfully deleted a branch, made a mistake with a merge operation, or committed something on the wrong branch.

to correct this mistake, we’ll initiate an Interactive Rebase session, starting at the faulty commit’s parent revision:
git rebase -i 2b504be
An editor window will then open and allow us to manipulate the selected part of our commit history:

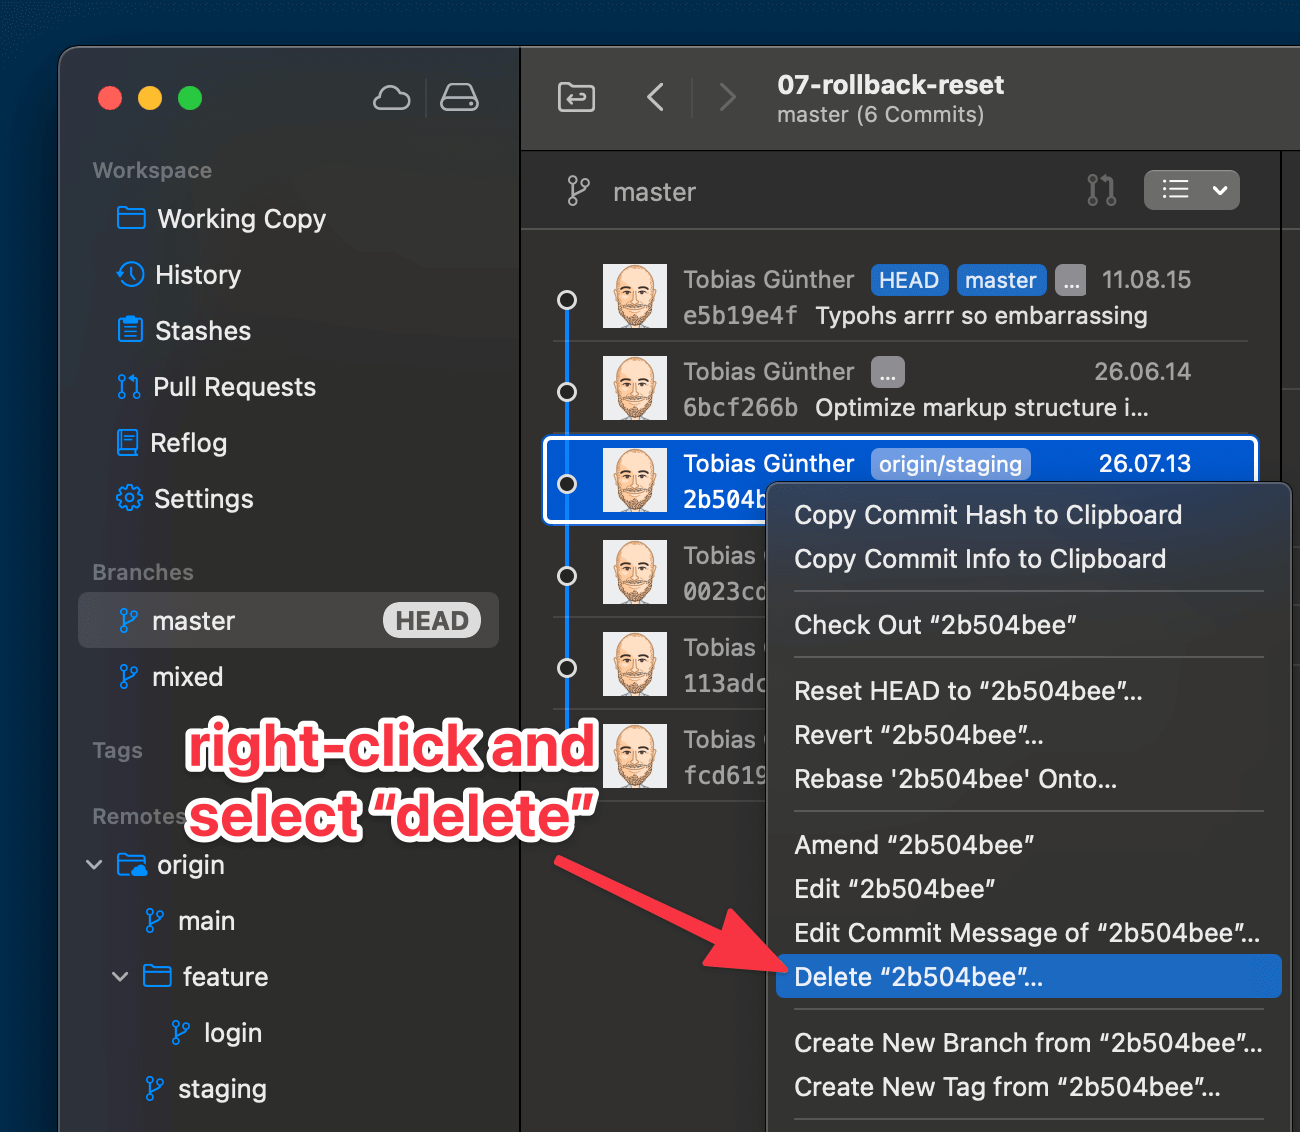
In our case, since we want to delete a commit, we simply mark up the respective line in the editor with the drop action keyword. Once we hit "Save" in our editor and close the window, the Interactive Rebase is completed — and the unwanted commit will have disappeared!
(Just a quick note: again, if you’re using a desktop GUI like Tower, you can take a shortcut: simply right-click the unwanted commit and select the "Delete..." option from the contextual menu.)
As mentioned above, Interactive Rebase has a lot more use cases to offer! If you’d like to learn more about Interactive Rebase and what it can do, take a look at the free “First Aid Kit for Git”: a collection of short, helpful, and free videos, all around undoing mistakes with Git.
Using Submodules To Manage Third-Party Code
In today’s complex software world, there’s hardly a project that doesn't include code from other sources: a module or library from a third party or even from your own team. Managing these modules in an elegant, pragmatic way greatly helps to reduce headaches!
In theory, you could simply copy and paste the necessary code files into your project and then commit them to your code base. But this comes with a couple of downsides. Most importantly, you’ll have a very hard time updating third-party code when new versions become available. You’d have to download the code again and copy-paste it — again and again.
Additionally, it’s considered bad practice if you squeeze multiple projects (your actual project and all the third-party libraries you might need) into a single Git repository. This mixes external code with our own, unique project files.
A much better way to do this is to use Git’s "Submodule" structure: this allows you to include third-party code simply as a Git repository inside your actual project’s Git repository. This means that all code bases remain neatly separated.
Including a third-party module / library is as easy as executing the following Git command:
$ git submodule add https://github.com/djyde/ToProgress
This command will download a clone of the specified Git repository into your project. You’ll be left with a fully-functional, nicely separated Git repository of your third-party code. Tidy, clean and flexible.
Submodules, admittedly, are quite a complex topic when it comes to handling them in practice. If you want to understand them a bit more thoroughly, check out the “Submodules” chapter of the free "Learn Version Control with Git" online book.
Composing Commits With Precision
There’s a golden rule in version control: a commit should only contain changes from a single issue! When you stick to this rule, you will create commits that are easy to understand. When you don’t — when multiple issues and topics get crammed into the same commit — you will inflict chaos on your code base in almost no time.
In practice, this means that you create separate commits for each and every topic. Even if it’s just a small bug fix where you’re changing only a semicolon: it’s a topic of its own, so it gets a commit of its own!
But in the messy real world, we often don’t work at only one topic at a time. Or we think we do, and only later discover that our code from the last three hours actually involves three different topics. This trickles down to individual files: often, the changes in a single file belong to multiple topics.
That’s when adding a complete file to the next commit isn’t the best strategy anymore.
Staging Selected Parts of Your Changed Files
In the example case below, you can see that we currently have two chunks (= parts or areas) of modifications in our file imprint.html:

Let’s say that the first chunk belongs to one topic (maybe we’re in the process of unifying and cleaning up all page titles in our project). And let’s also say that the second chunk belongs to another, completely unrelated topic.
A simple git add imprint.html, i.e. adding the whole file to Staging, would cram all of its changes into the same commit. Our colleagues, then, would have a hard time understanding what this particular commit was really about. Seeing some titles being changed, they might think it was only about the “title clean-up project”, but they might very well overlook the other changes.
Luckily, Git allows us to precisely select the chunks we want to put into the next commit! All we have to do is add the -p flag to our git add command:
$ git add -p imprint.html

Git now takes us by the hand and walks us through each and every chunk of changes in that file. And for each one, it asks us a simple question: “Stage this chunk?”
Let’s type Y (for “Yes”) for the first one and N for the second one. When we then actually make our commit, only the first chunk of changes will be included. The second one remains as an uncommitted local change in our working copy for a later, separate commit.
If you’re using Git in a desktop GUI, you might be able to do this right through the interface:

Becoming More Productive with Git
This short article was just a short glimpse into some of the advanced features in Git. But I sincerely hope it shows that Git has so many powerful features under the hood! From Interactive Rebase to Submodules and from the Reflog to File History, it pays to learn these advanced features because they help you become more productive and make fewer mistakes.
If you want to dive deeper, here are some helpful (and free) resources:
- Git Cheat Sheet
If you want to keep the most important commands at hand, the “Git Cheat Sheet" might be for you. Available in English, German, Spanish, Portuguese, Arabic and Chinese. - Undoing Mistakes
Git is a perfect safety net for when things go wrong. Learning about the different “undo” features in Git is time well spent for any developer. The "First Aid Kit for Git", a collection of short videos, provides a great introduction.
Have fun becoming a better developer!
