In this tutorial, we will add Google reCAPTCHA v3 to a PHP form and submit it without leaving the page, using Ajax. If you have had a contact form or any such form on your website, you know how annoying it is to receive spam messages from bots. Google reCAPTCHA protects you from spam and other automated abuse. To follow along this tutorial, you need to have some basic knowledge of HTML, jQuery and PHP.
Why Google reCAPTCHA v3?
We have all had the frustrating experience of trying to quickly submit some information through a form only to be faced by a Captcha challenge in the end. We’ve had to type in random characters and wondered, “Is that two Vs or a W?”, “Should I add that space or not?”.

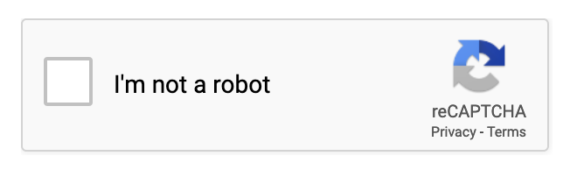
And then we’ve had to select all the images that have zebra crossing or bridges to prove that we are humans. Thankfully, these days, a lot of websites have added Google reCAPTCHA v2 which just displays a checkbox – “I’m not a Robot”.
However, in 2018, Google released the next version – reCAPTCHA v3 which doesn’t need any user interaction at all. It works behind the scenes observing the user’s behavior. This version provides us (developers) with a score that indicates how suspicious an interaction is. We could use that score and prevent spam. Read how it works at Google’s official webmaster blog.
Now let’s learn how to add this to a simple form.
Register reCAPTCHA v3 keys
You need to first register your website and get the keys here – https://www.google.com/recaptcha/admin/create. Add a label, select reCAPTCHA v3, type your domain name(s) and submit.
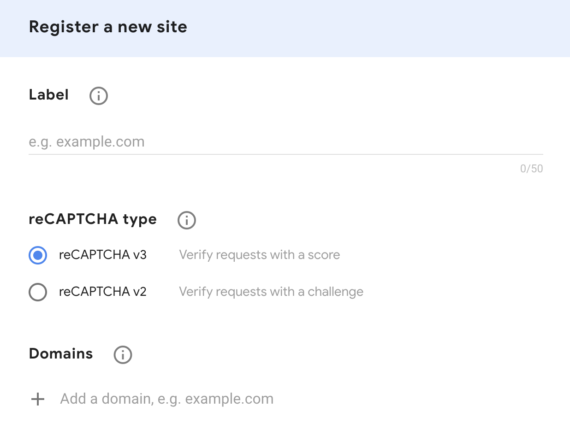
This will generate a “site key” and a “secret key”. Copy both and keep them safe. We will need them soon.
HTML Form
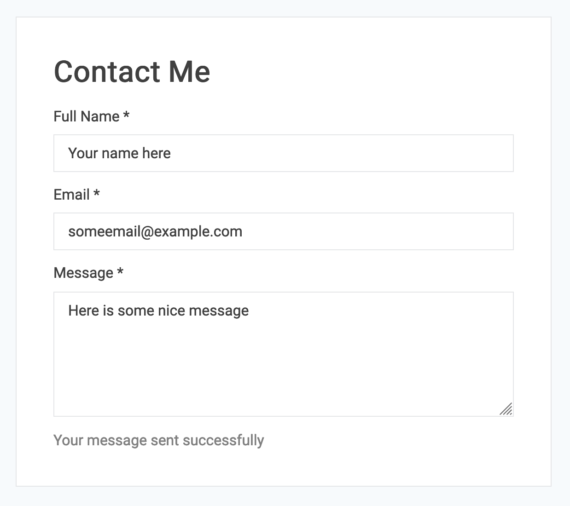
Let’s take a simple contact form with Full name, Email and Message fields

The HTML
For the sake of simplicity of this tutorial, only the HTML code is displayed below. For CSS used in the above screenshot, download the full source code at the end of this tutorial.
<form id="contact-form" method="post">
   <p class="label">Full Name *</p>
   <input type="text" name="name" placeholder="Full Name" required>
   <p class="label">Email *</p>
   <input type="email" name="email" placeholder="Email" required>
   <p class="label">Message *</p>
   <textarea name="message" rows="6" placeholder="Type your message here" required></textarea>
   <!-- A hidden div “alert” below to display the message received from server once form is submitted-->
   <div id="alert"></div>
   <button id="submit-button" type="submit">Send Message</button>
</form>
Ajax Form Submission
Let’s work on the form submission using Ajax before we add the reCAPTCHA, for which we need the jQuery library. Load it using a CDN. Paste this line before the closing body tag in your HTML.
<script src="https://cdnjs.cloudflare.com/ajax/libs/jquery/3.5.1/jquery.min.js"></script>
We need to make the Ajax request on form submission.
<script>
   $('#contact-form').submit(function(event) {
       event.preventDefault(); // Prevent direct form submission
       $('#alert').text('Processing...').fadeIn(0); // Display "Processing..." to let the user know that the form is being submitted
       $.ajax({
           url: 'contact.php',
           type: 'post',
           data: $('#contact-form').serialize(),
           dataType: 'json',
           success: function( _response ){
               // The Ajax request is a success. _response is a JSON object
               var error = _response.error;
               var success = _response.success;
               if(error != "") {
                   // In case of error, display it to user
                   $('#alert').html(error);
               }
               else {
                   // In case of success, display it to user and remove the submit button
                   $('#alert').html(success);
                   $('#submit-button').remove();
               }
           },
           error: function(jqXhr, json, errorThrown){
               // In case of Ajax error too, display the result for demo purpose
               var error = jqXhr.responseText;
               $('#alert').html(error);
           }
       });
   });
</script>
With this code, if you hit “Submit”, you will get a 404 error displayed because contact.php doesn’t exist yet. Let’s do that next.
PHP
Create contact.php. On the server side, we need to validate the data received and send a JSON response. We will integrate reCAPTCHA in a while.
<?php

// Server side validation
function isValid() {
   // This is the most basic validation for demo purposes. Replace this with your own server side validation
   if($_POST['name'] != "" && $_POST['email'] != "" && $_POST['message'] != "") {
       return true;
   } else {
       return false;
   }
}

$error_output = '';
$success_output = '';

if(isValid()) {
   $success_output = "Your message sent successfully";
} else {
   // Server side validation failed
   $error_output = "Please fill all the required fields";
}

$output = array(
   'error'     =>  $error_output,
   'success'   =>  $success_output
);

// Output needs to be in JSON format
echo json_encode($output);

?>
Perfect! We have the complete flow of form submission using Ajax. Now it’s time to integrate reCAPTCHA v3 and you will see how simple it really is, if you carefully follow along.
Client Side Integration
First step is to load the JavaScript API with your sitekey. Paste this below your jQuery CDN link.
<script async src="https://www.google.com/recaptcha/api.js?render=YOUR_SITE_KEY_HERE"></script>
IMPORTANT: Replace YOUR_SITE_KEY_HERE with the site key that you copied earlier.
If you look at the reCAPTCHA v3 docs, we need to call the grecaptcha.execute on each action we wish to protect. In our case, it is the form submission. This call generates a token, which needs to be sent along with our form data to be verified on the server side. Best way to do that is to include a hidden input field in our form like this and dynamically assign the token value to this field:
<input type="hidden" name="recaptcha_response" id="recaptchaResponse">
Call this below function just outside of the Ajax request and populate the hidden input field with token value. This will automatically include the token value along with other form data when the Ajax request is made.
grecaptcha.ready(function () {
   grecaptcha.execute('YOUR_SITE_KEY_HERE', { action: 'contact' }).then(function (token) {
      var recaptchaResponse = document.getElementById('recaptchaResponse');
      recaptchaResponse.value = token;
      // Make the Ajax call here
   });
});
IMPORTANT: Replace YOUR_SITE_KEY_HERE with the site key that you copied earlier.
The ‘action’ value is specific to this action of contact form submission. Different actions help you analyse data all over your website when you add reCAPTCHA in multiple places.
NOTE: reCAPTCHA tokens expire every two minutes. Which is why, we need to generate this token only after the user clicks on the submit button and just before we make the Ajax request.
This completes client side integration.
Server Side Integration
Once we validate the data (Name, Email and Message) on the server-side, we need to fetch the score from Google to verify if it’s a human interaction or not. Inside the if(isvalid()){ } block, add the below code to make the API request to get the score.
// Build POST request to get the reCAPTCHA v3 score from Google
$recaptcha_url = 'https://www.google.com/recaptcha/api/siteverify';
$recaptcha_secret = 'YOUR_SECRET_KEY_HERE'; // Insert your secret key here
$recaptcha_response = $_POST['recaptcha_response'];

// Make the POST request
$recaptcha = file_get_contents($recaptcha_url . '?secret=' . $recaptcha_secret . '&response=' . $recaptcha_response);
IMPORTANT: Replace YOUR_SECRET_KEY_HERE with the secret key that you copied earlier. Secret key is for server-side only.
The response received is a JSON object.
{
"success": true|false, // whether this request was a valid reCAPTCHA token for your site
"score": number // the score for this request (0.0 – 1.0)
"action": string // the action name for this request (important to verify)
"challenge_ts": timestamp, // timestamp of the challenge load (ISO format yyyy-MM-dd’T’HH:mm:ssZZ)
"hostname": string, // the hostname of the site where the reCAPTCHA was solved
"error-codes": […] // optional
}
Let’s decode the JSON object $recaptcha and check for success, score and action. Score varies from 0.0 to 1.0. By default, you can use a threshold of 0.5.
$recaptcha = json_decode($recaptcha);
// Take action based on the score returned
if ($recaptcha->success == true && $recaptcha->score >= 0.5 && $recaptcha->action == 'contact') {
   // This is a human. Insert the message into database OR send a mail
   $success_output = "Your message sent successfully";
} else {
   // Score less than 0.5 indicates suspicious activity. Return an error
   $error_output = "Something went wrong. Please try again later";
}
You’re all set! Hit that Submit button, and if you integrated everything correctly, you should see a response that your message was sent successfully.
Bonus tip:
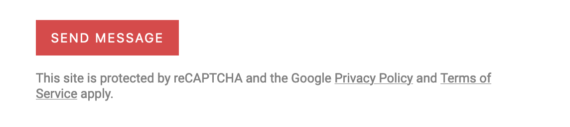
Once you added the javascript API, you might have noticed an annoying reCAPTCHA badge at the bottom right corner of your page that looks like this.

This might not go well with your website design. Guess what? This FAQ here says that you are allowed to hide this badge provided you include the following text in the user flow
This site is protected by reCAPTCHA and the Google
   <a href="https://policies.google.com/privacy">Privacy Policy</a> and
   <a href="https://policies.google.com/terms">Terms of Service</a> apply.
So add this within a p element below your “Submit” button.
Now, to actually hide the badge, just add this into your CSS.
.grecaptcha-badge {
   visibility: hidden;
}
Congratulations! You have successfully set up Google reCAPTCHA v3 into your form. Now you will receive messages only from humans – without them having to face a Captcha challenge AND without leaving the page.
Download full source code here.
DOWNLOAD SOURCE CODE