Designing A Textbox, Unabridged

Designing A Textbox, Unabridged

Designing A Textbox, Unabridged

Shane Hudson

Ever spent an hour (or even a day) working on something just to throw the whole lot away and redo it in five minutes? That isn’t just a beginner’s code mistake; it is a real-world situation that you can easily find yourself in especially if the problem you’re trying to solve isn’t well understood to begin with.

This is why I’m such a big proponent of upfront design, user research, and creating often multiple prototypes — also known as the old adage of “You don’t know what you don’t know.” At the same time, it is very easy to look at something someone else has made, which may have taken them quite a lot of time, and think it is extremely easy because you have the benefit of hindsight by seeing a finished product.

This idea that simple is easy was summed up nicely by Jen Simmons while speaking about CSS Grid and Piet Mondrian’s paintings:

“I feel like these paintings, you know, if you look at them with the sense of like ‘Why’s that important? I could have done that.’ It's like, well yeah, you could paint that today because we’re so used to this kind of thinking, but would you have painted this when everything around you was Victorian — when everything around you was this other style?”

I feel this sums up the feeling I have about seeing websites and design systems that make complete sense; it’s almost as if the fact they make sense means they were easy to make. Of course, it is usually the opposite; writing the code is the simple bit, but it’s the thinking and process that goes into it that takes the most effort.

With that in mind, I’m going to explore building a text box, in an exaggeration of situations many of us often find ourselves in. Hopefully, by the end of this article, we can all feel more emphatic to how the journey from start to finish is rarely linear.

A Comprehensive Guide To User Testing

So you think you’ve designed something that’s perfect, but your test tells you otherwise. Let’s explore the importance of user testing. Read more →

Brief

We all know that careful planning and understanding of the user need is important to a successful project of any size. We also all know that all too often we feel to need to rush to quickly design and develop new features. That can often mean our common sense and best practices are forgotten as we slog away to quickly get onto the next task on the everlasting to-do list. Rinse and repeat.

Today our task is to build a text box. Simple enough, it needs to allow a user to type in some text. In fact, it is so simple that we leave the task to last because there is so much other important stuff to do. Then, just before we pack up to go home, we smirk and write:

<input type="text">

There we go!

Oh wait, we probably need to hook that up to send data to the backend when the form is submitted, like so:

<input type="text" name="our_textbox">

That’s better. Done. Time to go home.

How Do You Add A New Line?

The issue with using a simple text box is it is pretty useless if you want to type a lot of text. For a name or title it works fine, but quite often a user will type more text than you expect. Trust me when I say if you leave a textbox for long enough without strict validation, someone will paste the entire of War and Peace. In many cases, this can be prevented by having a maximum amount of characters.

In this situation though, we have found out that our laziness (or bad prioritization) of leaving it to the last minute meant we didn’t consider the real requirements. We just wanted to do another task on that everlasting to-do list and get home. This text box needs to be reusable; examples of its usage include as a content entry box, a Twitter-style note box, and a user feedback box. In all of those cases, the user is likely to type a lot of text, and a basic text box would just scroll sideways. Sometimes that may be okay, but generally, that’s an awful experience.

Thankfully for us, that simple mistake doesn’t take long to fix:

<textarea name="our_textbox"></textarea>

Now, let’s take a moment to consider that line. A <textarea>: as simple as it can get without removing the name. Isn’t it interesting, or is it just my pedantic mind that we need to use a completely different element to add a new line? It isn’t a type of input, or an attribute used to add multi-line to an input. Also, the <textarea> element is not self-closing but an input is? Strange.

This “moment to consider” sent me time traveling back to October 1993, trawling through the depths of the www-talk mailing list. There was clearly much discussion about the future of the web and what “HTML+” should contain. This was 1993 and they were discussing ideas such as <input type="range"> which wasn’t available until HTML5, and Jim Davis said:

“Well, it's far-fetched I suppose, but you might use HTML forms as part of a game playing interface.”

This really does show that the web wasn’t just intended to be about documents as is widely believed. Marc Andreessen suggested to have <input type="textarea"> instead of allowing new lines in the single-line text type, [saying]: (http://1997.webhistory.org/www.lists/www-talk.1993q4/0200.html)

“Makes the browser code cleaner — they have to be handled differently internally.”

That’s a fair reason to have <textarea> separate to text, but that’s still not what we ended up with. So why is <textarea> its own element?

I didn’t find any decision in the mailing list archives, but by the following month, the HTML+ Discussion Document had the <textarea> element and a note saying:

“In the initial design for forms, multi-line text fields were supported by the INPUT element with TYPE=TEXT. Unfortunately, this causes problems for fields with long text values as SGML limits the length of attributea literals. The HTML+ DTD allows for up to 1024 characters (the SGML default is only 240 characters!)”

Ah, so that’s why the text goes within the element and cannot be self-closing; they were not able to use an attribute for long text. In 1994, the <textarea> element was included, along with many others from HTML+ such as <option> in the HTML 2 spec.

Okay, that’s enough. I could easily explore the archives further but back to the task.

Styling A <textarea>

So we’ve got a default <textarea>. If you rarely use them or haven’t seen the browser defaults in a long time, then you may be surprised. A <textarea> (made almost purely for multi-line text) looks very similar to a normal text input except most browser defaults style the border darker, the box slightly larger, and there are lines in the bottom right. Those lines are the resize handle; they aren’t actually part of the spec so browsers all handle (pun absolutely intended) it in their own way. That generally means that the resize handle cannot be restyled, though you can disable resizing by setting resize: none to the <textarea>. It is possible to create a custom handle or use browser specific pseudo elements such as ::-webkit-resizer.

The default <code>&lt;textarea&gt;</code> looks very small with a grey border and three lines as a resize handle.
A default textarea with no styling (Large preview)

It’s important to understand the defaults, especially because of the resizing ability. It’s a very unique behavior; the user is able to drag to change the size of the element by default. If you don’t override the minimum and maximum sizes then the size could be as small as 9px × 9px (when I checked Chrome) or as large as they have patience to drag it. That’s something that could cause mayhem with the rest of the site’s layout if it’s not considered. Imagine a grid where <textarea> is in one column and a blue box is in another; the size of the blue box is purely decided by the size of the <textarea>.

Other than that, we can approach styling a <textarea> much the same as any other input. Want to change the grey around the edge into thick green dashes? Sure here you go: border: 5px dashed green;. Want to restyle the focus in which a lot of browsers have a slightly blurred box shadow? Change the outline — responsibly though, you know, that’s important for accessibility. You can even add a background image to your <textarea> if that interests you (I can think of a few ideas that would have been popular when skeuomorphic design was more celebrated).

Scope Creep

We’ve all experienced scope creep in our work, whether it is a client that doesn’t think the final version matches their idea or you just try to squeeze in a tiny tweak and end up taking forever to finish it. So I ( enjoying creating the persona of an exaggerated project manager telling us what we need to build) have decided that our <textarea> just is not good enough. Yes, it is now multi-line, and that’s great, and yes it even ‘pops’ a bit more with its new styling. Yet, it just doesn’t fit the very vague user need that I’ve pretty much just thought of now after we thought we were almost done.

What happens if the user puts in thousands of words? Or drags the resize handle so far it breaks the layout? It needs to be reusable, as we have already mentioned, but in some of the situations (such as a ‘Twittereqsue’ note taking box), we will need a limit. So the next task is to add a character limit. The user needs to be able to see how many characters they have left.

In the same way we started with <input> instead of <textarea>, it is very easy to think that adding the maxlength attribute would solve our issue. That is one way to limit the amount of characters the user types, it uses the browser’s built-in validation, but it is not able to display how many characters are left.

We started with the HTML, then added the CSS, now it is time for some JavaScript. As we’ve seen, charging along like a bull in a china shop without stopping to consider the right approaches can really slow us down in the long run. Especially in situations where there is a large refactor required to change it. So let’s think about this counter; it needs to update as the user types, so we need to trigger an event when the user types. It then needs to check if the amount of text is already at the maximum length.

So which event handler should we choose?

  • change
    Intuitively, it may make sense to choose the change event. It works on <textarea> and does what it says on the tin. Except, it only triggers when the element loses focus so it wouldn’t update while typing.
  • keypress
    The keypress event is triggered when typing any character, which is a good start. But it does not trigger when characters are deleted, so the counter wouldn’t update after pressing backspace. It also doesn’t trigger after a copy/paste.
  • keyup
    This one gets quite close, it is triggered whenever a key has been pressed (including the backspace button). So it does trigger when deleting characters, but still not after a copy/paste.
  • input
    This is the one we want. This triggers whenever a character is added, deleted or pasted.

This is another good example of how using our intuition just isn’t enough sometimes. There are so many quirks (especially in JavaScript!) that are all important to consider before getting started. So the code to add a counter that updates needs to update a counter (which we’ve done with a span that has a class called counter) by adding an input event handler to the <textarea>. The maximum amount of characters is set in a variable called maxLength and added to the HTML, so if the value is changed it is changed in only one place.

var textEl = document.querySelector('textarea')
var counterEl = document.querySelector('.counter')
var maxLength = 200
    
textEl.setAttribute('maxlength', maxLength)
textEl.addEventListener('input', (val) => {
var count = textEl.value.length
counterEl.innerHTML = ${count}/${maxLength}
})

Browser Compatibility And Progressive Enhancement

Progressive enhancement is a mindset in which we understand that we have no control over what the user exactly sees on their screen, and instead, we try to guide the browser. Responsive Web Design is a good example, where we build a website that adjusts to suit the content on the particular size viewport without manually setting what each size would look like. It means that on the one hand, we strongly care that a website works across all browsers and devices, but on the other hand, we don’t care that they look exactly the same.

Currently, we are missing a trick. We haven’t set a sensible default for the counter. The default is currently “0/200” if 200 were the maximum length; this kind of makes sense but has two downsides. The first, it doesn’t really make sense at first glance. You need to start typing before it is obvious the 0 updates as you type. The other downside is that the 0 updates as you type, meaning if the JavaScript event doesn’t trigger properly (maybe the script did not download correctly or uses JavaScript that an old browser doesn’t support such as the double arrow in the code above) then it won’t do anything. A better way would be to think carefully beforehand. How would we go about making it useful when it is both working and when it isn’t?

In this case, we could make the default text be “200 character limit.” This would mean that without any JavaScript at all, the user would always see the character limit but it just wouldn’t feedback about how close they are to the limit. However, when the JavaScript is working, it would update as they type and could say “200 characters remaining” instead. It is a very subtle change but means that although two users could get different experiences, neither are getting an experience that feels broken.

Another default that we could set is the maxlength on the element itself rather than afterwards with JavaScript. Without doing this, the baseline version (the one without JS) would be able to type past the limit.

User Testing

It’s all very well testing on various browsers and thinking about the various permutations of how devices could serve the website in a different way, but are users able to use it?

Generally speaking, no. I’m consistently shocked by user testing; people never use a site how you expect them to. This means that user testing is crucial.

It’s quite hard to simulate a user test session in an article, so for the purposes of this article, I’m going to just focus on one point that I’ve seen users struggle with on various projects.

The user is happily writing away, gets to 0 characters remaining, and then gets stuck. They forget what they were writing, or they don’t notice that it had stopped typing.

This happens because there is nothing telling the user that something has changed; if they are typing away without paying much attention, then they can hit the maximum length without noticing. This is a frustrating experience.

One way to solve this issue is to allow overtyping, so the maximum length still counts for it to be valid when submitted but it allows the user to type as much as they want and then edit it before submission. This is a good solution as it gives the control back to the user.

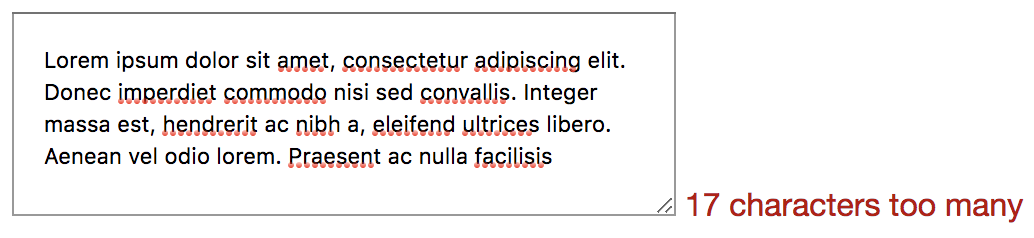
Okay, so how do we implement overtyping? Instead of jumping into the code, let’s step through in theory. maxlength doesn’t allow overtyping, it just stops allowing input once it hits the limit. So we need to remove maxlength and write a JS equivalent. We can use the input event handler as we did before, as we know that works on paste, etc. So in that event, the handler would check if the user has typed more than the limit, and if so, the counter text could change to say “10 characters too many.” The baseline version (without the JS) would no longer have a limit at all, so a useful middle ground could be to add the maxlength to the element in the HTML and remove the attribute using JavaScript.

That way, the user would see that they are over the limit without being cut off while typing. There would still need to be validation to make sure it isn’t submitted, but that is worth the extra small bit of work to make the user experience far better.

An example showing “17 characters too many” in red text next to a <code>&lt;textarea&gt;</code>.
Allowing the user to overtype (Large preview)

Designing The Overtype

This gets us to quite a solid position: the user is now able to use any device and get a decent experience. If they type too much it is not going to cut them off; instead, it will just allow it and encourage them to edit it down.

There’s a variety of ways this could be designed differently, so let’s look at how Twitter handles it:

A screenshot from Twitter showing their textarea with overtyped text with a red background.
Twitter's <textarea> (Large preview)

Twitter has been iterating its main tweet <textarea> since they started the company. The current version uses a lot of techniques that we could consider using.

As you type on Twitter, there is a circle that completes once you get to the character limit of 280. Interestingly, it doesn’t say how many characters are available until you are 20 characters away from the limit. At that point, the incomplete circle turns orange. Once you have 0 characters remaining, it turns red. After the 0 characters, the countdown goes negative; it doesn’t appear to have a limit on how far you can overtype (I tried as far as 4,000 characters remaining) but the tweet button is disabled while overtyping.

So this works the same way as our <textarea> does, with the main difference being the characters represented by a circle that updates and shows the number of characters remaining after 260 characters. We could implement this by removing the text and replacing it with an SVG circle.

The other thing that Twitter does is add a red background behind the overtyped text. This makes it completely obvious that the user is going to need to edit or remove some of the text to publish the tweet. It is a really nice part of the design. So how would we implement that? We would start again from the beginning.

You remember the part where we realized that a basic input text box would not give us multiline? And that a maxlength attribute would not give us the ability to overtype? This is one of those cases. As far as I know, there is nothing in CSS that gives us the ability to style parts of the text inside a <textarea>. This is the point where some people would suggest web components, as what we would need is a pretend <textarea>. We would need some kind of element — probably a div — with contenteditable on it and in JS we would need to wrap the overtyped text in a span that is styled with CSS.

What would the baseline non-JS version look like then? Well, it wouldn’t work at all because while contenteditable will work without JS, we would have no way to actually do anything with it. So we would need to have a <textarea> by default and remove that if JS is available. We would also need to do a lot of accessibility testing because while we can trust a <textarea> to be accessible relying on browser features is a much safer bet than building your own components. How does Twitter handle it? You may have seen it; if you are on a train and your JavaScript doesn’t load while going into a tunnel then you get chucked into a decade-old legacy version of Twitter where there is no character limit at all.

What happens then if you tweet over the character limit? Twitter reloads the page with an error message saying “Your Tweet was over the character limit. You’ll have to be more clever.” No, Twitter. You need to be more clever.

Retro

The only way to conclude this dramatization is a retrospective. What went well? What did we learn? What would we do differently next time or what would we change completely?

We started very simple with a basic textbox; in some ways, this is good because it can be all too easy to overcomplicate things from the beginning and an MVP approach is good. However, as time went on, we realized how important it is to have some critical thinking and to consider what we are doing. We should have known a basic textbox wouldn’t be enough and that a way of setting a maximum length would be useful. It is even possible that if we have conducted or sat in on user research sessions in the past that we could have anticipated the need to allow overtyping. As for the browser compatibility and user experiences across devices, considering progressive enhancement from the beginning would have caught most of those potential issues.

So one change we could make is to be much more proactive about the thinking process instead of jumping straight into the task, thinking that the code is easy when actually the code is the least important part.

On a similar vein to that, we had the “scope creep” of maxlength, and while we could possibly have anticipated that, we would rather not have any scope creep at all. So everybody involved from the beginning would be very useful, as a diverse multidisciplinary approach to even small tasks like this can seriously reduce the time it takes to figure out and fix all the unexpected tweaks.

Back To The Real World

Okay, so I can get quite deep into this made-up project, but I think it demonstrates well how complicated the most seemingly simple tasks can be. Being user-focussed, having a progressive enhancement mindset, and thinking things through from the beginning can have a real impact on both the speed and quality of delivery. And I didn’t even mention testing!

I went into some detail about the history of the <textarea> and which event listeners to use, some of this can seem overkill, but I find it fascinating to gain a real understanding of the subtleties of the web, and it can often help demystify issues we will face in the future.

Smashing Editorial (ra, il)

HTML to WordPress Theme Tutorial: Step 1 – Converting Your HTML to PHP

For many of us, our first experience of coding for WordPress is when we write our first theme.

After all, every WordPress site needs a theme, and if you want something bespoke then it makes sense to code it yourself.

When I started out with WordPress in 2010, I’d never worked with a content management system (CMS) before. But I’d coded plenty of HTML and CSS, either within large sites that used HTML for content as part of a CMS, or for small client sites I built from scratch.

I spent weeks weighing up the pros and cons of different CMSes I could use for client sites (remember, this was before WordPress became the dominant force it is today) and decided on WordPress for two reasons. The first was the awesome community of users and developers that we’re all a part of. And the second was the fact that with some HTML experience, it’s not that hard to create a WordPress theme.

Continue reading, or jump ahead using these links:

In this series of three posts, I’m going to walk you through the process of creating your own WordPress theme from static HTML. We’ll start with a single HTML file and a CSS stylesheet, and convert those into a WordPress theme with all the bells and whistles that entails.

The posts will work through the process in order:

  1. Creating your index.php file, adding in template tags and a loop.
  2. Creating additional template files and template parts such as the header, sidebar and footer files.
  3. Adding functionality, including widgets and a navigation menu, and getting your functions file set up.

In this post I’ll create a single file – index.php. That will be based on the index.html file from my static site, but I’ll remove the content and replace it with template tags and a loop.

So let’s get started!

What You’ll Need

To follow along with this series, you’ll need a few tools:

  • A development installation of WordPress, preferably on your local machine.
  • A code editor.
  • A static site – if you don’t have one you’re working from, you can download the files I’m using.

Make sure you do this work on a development site, not a live site – you don’t want the world to see your theme until it’s ready.

The Starting Code

The starting site has just two files – our index.html and style.css. I’ve deliberately kept things simple, and used a pared down version of my site. Here’s how it looks:

Our starting home page

You can find the contents of the index.html and style.css files on Github – I’m not going to show the code here as there’s a lot!

Note: This is a basic set of code designed to help you create your own theme. If you want to use it for live sites, you’ll probably have to add extra styling etc. to it. It wouldn’t pass the theme directory requirements. Please just use it for learning, not to power a live site.

Setting Up Your Theme

To create your theme, you’ll need a folder for it in your WordPress installation. Using your code editor or file manager, go to wp-content/themes and create a new folder. Give it whatever name you want. I’m going to call mine wpmudev-theme-part1.

Copy your index.html and style.css files to that folder. They won’t do anything yet, but they will soon.

Now you have a folder with two files in it. You’re getting started!

Right now, WordPress doesn’t know that you have a theme. Any theme needs just two files: index.php and style.css. As you’ll see while following along with this series, you normally need more than that, but the theme will function with just two.

Let’s start by adding commented out text to your stylesheet. Open your style.css file and add the following:

This gives WordPress the information it needs to recognise that this is the theme stylesheet. Feel free to edit the details, adding your own name and URL and changing the name of the theme if you like.

The next thing to do is change the filename of your index.html file to index.php. You now have the two files that will get your theme working.

However you haven’t added any PHP yet. To do that we’ll need to add some template tags and a loop. Let’s do that.

Adding Template Tags

A template tag is a special WordPress function that you use in a theme template file. It can do any one of a wide variety of things – to see the range of template tags on offer, check out the codex.

Here we’re going to add template tags for two things:

  • Calling the stylesheet
  • Automatically generated classes and IDs for CSS

Calling the Stylesheet

Right now if you open up your site with your new theme activated, you’ll notice that none of your styling is loading. Here’s how mine looks:

My site with no CSS

Don’t panic! You just need to add a stylesheet call to the head section of your index file.

Note: In part three of this series, I’ll show you how to move this to the theme functions file, which is best practice. For now we’re just working with two files: the stylesheet and index.php files, so we’ll stick with those.)

Open up your index.php file. Find this line:

Edit it so instead of calling a static file, it uses PHP to load the theme stylesheet:

This uses the bloginfo() template tag, a useful tag that fetches all kinds of information about your website from the database. In this case it’s fetching the url of the theme and then accessing the file in that folder called style.css.

Now refresh your home page. You’ll find that the styles load. Here’s my page now:

My site with styles working

You’ll notice that it looks exactly like your old static site. That doesn’t mean we’re done though – nowhere near! The content is pulling through from static content in that index.php file, which we’ll correct by adding a loop. But first let’s add some more template tags.

Creating Automatically Generated Classes and IDs

It’s really useful to be able to get WordPress to automatically generate CSS classes and IDs for your posts and your <body> element. This means you can later use those classes for styling, targeting specific post types, categories and more.

Open your index.php file. Find the opening <body> tag. It’ll be sitting on its own line, after the closing </head> tag.

Edit it so it reads like this:

This uses the body_class() template tag, which will detect what kind of page your website visitors are on at any given time and generate CSS classes based on that.

If you refresh your page and inspect the code you’ll find that WordPress automatically adds some CSS classes for you:

These will vary according to the page you’re on in your site and which type of content it’s displaying. You can use this to target your CSS at certain content types such as single posts, certain categories or anything you want.

Now let’s do this for your individual post. Find this line in your index.php file:

Edit that line so it reads like this:

This uses two template tags:

  • The the_ID() tag fetches the post ID and uses that to give the post a unique ID.
  • The post_class() tag works in a similar way to the body_class() tag, adding a list of classes to the article element that correspond to the type of post this is. Note that right now this won’t work properly as you’re not fetching a post from the database – but when we add the loop next, it will.

Adding a Loop

Now for the fun bit. Right now, the content of your page is hard-coded in. You want it to be populated from a call to the database, so that the correct content will be displayed whatever page you’re on.

In your index.php file, find the code inside the <article> tag (the one you already added the ID and closes to with template tags).

Edit that code so it reads like this:

There’s a lot of code there – if you want to understand what’s going on, check out our post explaining the loop.

Now if you refresh your home page you’ll see some very different content – your posts. If this is a brand new WordPress install you’ll see the default post that’s added when you install WordPress:

My site now has a loop

Adding Hooks

The final step in this first part of our series is to add a couple of important hooks to our code. These are placed in the head section and the footer, and they’re essential for many plugins to work.

In your head section, add this before the closing </head> tag:

Now move down to the end of your index.php file. Before the closing </body> tag, add the wp_footer() hook:

That adds a special hook to the top and bottom of every page in your site – these are essential for your themes and your site to work properly, so don’t skip them.

Now save your file.

What Comes Next

You now have the beginnings of a WordPress theme. However there’s still work to do. In the next part of this series I’ll walk you through the process of splitting your theme up into multiple template files. You’ll create separate files for the header, sidebar and footer, an include file of the loop, and a separate file for each of pages and archives.

How to Customize Email Messages Sent by Google Forms

When a visitor submits your Google Form, you can automatically send them a confirmation email and also send an email to the form owner letting them know that a new form response has been received.

The email notifications send through Google Forms can be easily customized using HTML tags. Similar to Gmail Mail Merge, you can also include dynamic form data in your email messages using the double curly braces notation.

customized-form-emails.png

If you enclose a question title inside double curly braces, it becomes a variable field. The add-on, at the time of sending the email, will replace all such variable fields using corresponding answers from the form response.

Dynamic form fields can be included in the email subject, the body of the confirmation email and also the PDF file name. You can either add the variables manually or click the “+Add” drop-down menu to quickly access all the variables that are available for your form.

In addition to question titles, the following variables are available:

  • {{All Answers}} - Include all non-blank answers in the email, formatted as a table.
  • {{Response Date}} - The date and time of form submission
  • {{Response Id}}  - A unique id of the form entry
  • {{Response Number}} - Inserts the entry number of the form response
  • {{Response Url}} - Secret link to edit the current form submission

Please note that tracking details like browser name or IP address of the person who filled out the form cannot be captured as Google Forms does not provide this data via the API.

dyamic-form-fields.png

The form notification email is written in HTML and thus can be formatted using any HTML tags. For instance, if you use Dear {{Full Name}} in the body, the name will be italicized in the actual email. Similarly enclosing any text or variable field inside tag will make it bold.

How to Include Logos and Images in Form Emails

If you would like to include your brand logo image in the form email, go to image hosting service and upload the image. Next copy-paste the tag anywhere in the email body.

You can also use HTML Mail to generate beautiful emails.

5 Techniques for Spotting Mistaks Before They Go Live

Launching a new website can be exciting and nerve-wracking at the same time. You want to show off what you’ve been building, what you’ve learned, and the creative solutions you’ve come up with. You can already taste that first celebratory taco. You go live.

At first, you get a lot of comments from your friends saying, “Hey, that looks great!” Then the bug reports come in. A feature isn’t working as intended. A bit of CSS is playing merry hell with the live content in ways you couldn’t foresee. A link is broken. And worst of all: you have typos. So many typos.

Okay, most of the time, it won’t be as bad as all that. Veteran designers and developers usually have processes in place to reduce the amount of errors that go live. New designers usually build smaller sites, so the number of errors is reduced in any case. Still, if you’re new to web design, and you want to spend as little time fixing things post-launch as possible, we can help.

1. Follow a Checklist

As you are the designer and/or developer, you are the first and last line of defense against mistakes. However, even the best of us can just plain forget things. One of the easiest ways to avoid this is to use a pre-launch checklist for every website you build. The checklist would include things like making sure all of the links work, making sure the contact forms work as intended, making sure your hosting is set up right, and so on.

You can write your own checklist, and as you develop your own way of working through projects, you might want to. In the meantime, you can adapt any number of pre-made checklists to your projects. Here are a couple to get you started:

And there are a few more here: 45 Incredibly Useful Web Design Checklists and Questionnaires

2. Get More Eyeballs

For clarity’s sake (and because this is the Internet) these eyeballs should remain attached to their original owners. What you want to do is get some people who aren’t experts in computing, be they relatives, friends, or passing salesmen, and direct their eyeballs at your design, before you launch. Get some basic user testing in by asking these people to perform basic tasks on your site.

This has the double benefit of providing you with some usability testing data, as well as an easy way to find out if anything important is broken. After they’ve followed the main calls to action, ask them to click around on anything they find interesting, to help you check other links.

3. Hire Professional Eyeballs

This may not be feasible for projects with smaller budgets, but if you have the money, it couldn’t hurt to hire a professional or two. For example, you could hire another designer to check for common bugs, peek at the source, and so on. Have them test how the layout handles on their devices, and give you feedback.

If you want to take this further, there are services that will test your site under myriad conditions, in all sorts of browsers, on all sorts of devices. Given that most of us lack a browser testing lab, and these services generally aren’t expensive, they can be worth it.

Here are some of the more popular options (as defined by Google search results):

Lastly, consider hiring a proofreader and/or editor, if your website is text-heavy. They can drastically help you to improve the quality and clarity of your writing, as well as help you to avoid the dreaded typos.

4. Take a Break Before Launch

One of the biggest contributors to screwing up is stress. Launching websites can be stressful, especially if you’ve been working on the same thing, day in and day out. For future projects, it might be a good idea to schedule in a break before launch time. And I mean a proper break, as in one day as a bare minimum. Giving your brain time to think about other things is a known and proven tactic for creativity, but it also works for spotting mistakes.

Take that time off, come back, and run through your pre-flight checklist when you’re rested, and can think straight. Your brain, your heart, your users, and your clients will thank you.

5. Validation and Linting

If you’re developing the site yourself, you can take advantage of services that help you clean up, or “lint”, your code by pointing out problems in your HTML, CSS, or JavaScript. How you do this will depend on what text editor you’re using. Just about every major text editor (Sublime Text, Atom, Brackets, etc.) has a number of plugins to help you with this. There’s no one right tool for this job, so you’re going to have to do some Googling.

You should also run your HTML and CSS through the validating services provided by the W3C. These services won’t catch every bug, but they can help point out potential problems in your markup.

Conclusion

So what happens if you do all of these things, and still miss a few things at launch? Realistically, the world just keeps on turning. We’re imperfect creatures, and we’ll never get everything right, all of the time. And that’s fine. When mistakes are inevitably spotted in your newly-launched site, fix them fast and move on.

Constant perfection will have to wait until our robot overlords get here.

LAST DAY: Zelda – A Beautiful and Classy Script Font – only $7!

Source

WordPress Feature Review: New Features You Missed in 2012, Part 1

This guest post is by Michael Scott of WPHub.com.

One of the great things about WordPress is that it never stands still. The platform is constantly evolving beyond its blogging roots, with more great features being added every year.

WordPress used to release small updates frequently, but at the end of 2009 they changed this policy. They now aim to release three major updates every year, with small infrequent updates in between to address security issues.

The three major releases in 2011 were 3.1 (February 2011) and 3.2 (July 2011) and 3.3 (December 2011).

Today I’d like to walk you through the new features which were introduced in 2012, in WordPress 3.4 and 3.5.

I’ll be focusing on the features that are most relevant to bloggers and explaining how they can help you.

New features in WordPress 3.4

Released in June, WordPress 3.4 was a solid release that is best remembered for introducing the new theme customizer.

It also included a lot of other great new features such as Twitter embedding, HTML in captions, and flexible header images.

New feature: Live preview

Live preview enables you to preview themes before they are activated on your blog.

Browsing and installing themes and plugins directly from the WordPress admin area is one of WordPress’s greatest strengths. It’s amazing that you can modify your blog so much without even leaving your blog’s Admin area.

In the past, clicking on the Preview link for a theme would load up an overlay which displayed the theme over the current page.

live-preview-old

But the process of browsing WordPress designs changed in WordPress 3.4. In the past, the design was listed with Install and Preview links, and a full description.

Descriptions are now hidden by default, though you can view the description of a theme by clicking on the new Description link. This may seem like a small change, but it made browsing for designs within the Admin area much more user friendly.

live-preview-1

Themes are now previewed on their own dedicated Preview page. The page shows the theme on the right-hand side. On the left side, the theme name, thumbnail, rating and description are shown. To save you from having to click the Back button, themes can now be installed via this new Preview area.

live-preview-2

Once a theme has been installed on your WordPress blog, the Preview option becomes much more useful as it loads up the new theme customizer and lets you see how this design will look on your live website. This enables you to preview the theme using your menus, posts, pages and more.

live-preview-3

Being able to see how themes will look with your existing content has greatly improved the process of installing WordPress designs via your Admin area, and changed the way bloggers choose their themes.

New feature: Theme customizer

This feature allows you to configure your theme via a user-friendly Options area.

The WordPress customizer allows users to configure many different areas of their design, such as the header, background and navigation via a dedicated Options area. Older WordPress themes do not support the customizer but can be modified appropriately with a few simple edits to the theme functions.php file.

The Customize link can be found via the Themes link in the Appearance menu of your WordPress Admin area. Clicking on the link will take you directly to the theme customizer Options area.

theme-customizer-1

The options available to you in the customizer will depend on the theme itself. The default WordPress themes only had five or six different options, however over the last six months we have seen WordPress designers incorporate other options in their designs. Common options include site title and tagline, colors, background image, navigation menus, and whether posts or a static page were displayed on your home page.

theme-customizer-2

One of the reasons the theme customizer was so well received within the WordPress community was because changes can be seen in real time. Whenever you change your site name or adjust some colors, these are reflected in the theme preview. The changes are, however, only applied to your website after you have clicked the Save & Publish button.

theme-customizer-3

The theme customizer has made it possible for beginners to modify how their website looks without editing any templates. It’s very straightforward to use and since the release of WordPress 3.4, many designers have made sure their themes are compatible with it.

New feature: Twitter embedding

Now you can embed Twitter statuses directly into your blog posts and pages by simply entering the Twitter status URL.

Twitter is one of the most powerful tools available to bloggers. In addition to self promotion and networking, many bloggers use Twitter as a source of inspiration for their articles. The new Twitter embedding feature makes quoting Twitter statues simple and removes the need for taking screenshots or installing plugins to display a quote.

For example, simply enter this within your blog post:

https://twitter.com/problogger/status/271764815607898112

The corresponding Twitter status will be displayed:

twitter-embeds

The beauty of this new feature is its simplicity. There are no shortcodes to remember or buttons to click: you simply enter the URL of the Twitter status to embed it.

New feature: HTML in captions

This feature lets you add HTML directly to your image captions.

Captions have always been a great way of describing photographs and images to your readers. Being able to add HTML to captions has improved this considerably as you can now include links to photo credits, relevant articles, and websites directly inside the caption.

html-captions

Those who are using old WordPress themes may find that the new way WordPress adds captions has broken older image captions on your website. Upgrading to a new theme is recommended, though you could fix these issues manually by searching for posts with captions through your WordPress post area and updating the code.

New feature: Improved features for international users

Improved support is now offered for international WordPress users so that many locale-specific configurations can be modified from the core WordPress files.

As a native English speaker, localization is not something I ever have to deal with, so it’s easy to forget that around 44% of all websites are written in a language other than English.

WordPress 3.4 focused heavily on making WordPress more international. Some of the most important new features introduced for non-English users include:

  • Localizing commas: Many Asian and Middle Eastern languages do not use the comma (,). This causes a lot of problems for those users, as WordPress uses the comma as a delimiter for tags, quick edits and bulk edits. From 3.4, the comma can be translated to another character for languages where a comma isn’t used.
  • Translatable spellchecker language: The TinyMCE WYSIWYG editor can now be translated into any language.
  • Specify default time zone: Previously, the default timezone for all WordPress installations was set to GMT. This can now be modified so that the timezone does not have to be adjusted during the installation process.
  • Feed language: The language of your feed can now be set using the bloginfo_rss template tag.
  • Specifying start of week: You can now easily define the day the week starts.

If you don’t blog in English, many of these new features should make it easier for you to use WordPress in your native language.

New feature: Flexible header images

Header images are now responsive.

Custom headers were added to WordPress way back in 2007 (version 2.1). Previously WordPress allowed you to set the width and height of a header image, but all header images which were uploaded had to be cropped to fit these dimensions.

Now all images will resize dynamically to match the width of your header.

With so many people viewing blogs on mobile devices, flexible headers have made it easier for designs to accommodate any resolution. Check out Creating a responsive header in WordPress 3.4 at WebmasterDepot for a complete walkthrough of this new feature.

New feature: Login shortcodes

WordPress now offers more user-friendly login URLs.

WordPress users can log in using www.yoursite.com/wp-login.php and access the Admin area via www.yoursite.com/wp-admin/. Since version 3.4, you can log in using the more user-friendly URL www.yoursite.com/login. The Admin area can also be viewed by entering www.yoursite.com/admin or www.yoursite.com/dashboard.

There’s no denying that this is a small addition to WordPress, but I always welcome small things like this that make daily tasks such as logging in quicker and easier.

New feature: Comment via the post editor

Comments can now be added via the Post and Page editor pages.

For years the Post editing page has shown all the comments that were left on a post or page. In addition to viewing comments, there is now an option to leave a comment directly on a post from the post editor area. This saves you from having to load up the article in order to leave a comment.

add-comment-post-screen

New feature: Improved touch support

WordPress now offers vastly improved touch support in the user interface.

WordPress aimed to improve site usability on tablet devices such as the Apple iPad and Kindle Fire. Specifically, they added support for drag-and-drop functionality. This allows you to more easily customize the mobile user interface simply by moving things around.

New feature: Child themes added to the theme repository

The official WordPress themes directory now accepts child themes of WordPress themes that are already listed within the directory.

Child themes will be accepted within the theme directory if they can demonstrate sufficient difference from the parent theme to warrant inclusion.

I was particularly pleased with this feature, as it allows designers to take existing designs and modify them for different users. For example, designers will now be able to take a magazine-based theme and make it more blog-orientated, or remove features from designs that are too bloated.

child-themes

The theme installer supports child themes too. The great thing about this is that WordPress will automatically install a child theme’s parent theme if it isn’t already installed.

New feature: Scroll to top of Admin bar

Now, we can scroll to the top of the page by simply clicking the Admin bar.

This simple feature was missed by a lot of bloggers but it’s something that I’ve found myself using every day. Since WordPress 3.4, you can scroll to the top of the page by clicking in the empty area in the Admin bar. Simple but effective!

scroll-to-top

Other features added to WordPress 3.4

Since we’re short on space, here are some of the other great features that were added to WordPress 3.4:

  • The dashboard is now ready for high-resolution displays such as Apple’s retina display.
  • Multi-site improvements were made, such as auto-complete for adding new users and an increase in the default upload limit from 10mb to 100mb.
  • The Recent Comments widget had some small improvements.
  • Custom post types can now use the Distraction-free Editing mode (also known as Zen mode).
  • XML-RPC was improved to let WordPress interact with other applications more easily.

A full list of features added to WordPress in version 3.4 can be found in the WordPress codex.

That’s it for WordPress 3.4! Which of these features are you using, and which are your favorites? Let us know in the comments … and don’t miss Part 2 in this series, where I explain the handy new features available in WordPress 3.5.

Michael Scott has been working with WordPress themes and websites in varying capacities since 2007. It was mainly as a project manager where he quickly developed a love for their simplicity and scalability. As a strong advocate of all things WordPress, he enjoys any opportunity to promote its use across the Interweb and on WPHub.com .

The post WordPress Feature Review: New Features You Missed in 2012, Part 1 appeared first on ProBlogger.

WordPress Feature Review: New Features You Missed in 2012, Part 1
https://problogger.com/wordpress-feature-review-new-features-you-missed-in-2012-part-1/
http://www.problogger.net/archives/category/blog-networks/feed/
Blog Networks – ProBlogger
Blog Tips to Help You Make Money Blogging – ProBlogger
https://problogger.com/wp-content/uploads/powerpress/problogger_podcast-891.jpg

Powered by WPeMatico

Web Development Reading List #121: The Illusion Of Completeness, Client Hints, CSS Subgrids


Over the last two weeks, I had the chance to review about eighty job applications for a front-end position. The position requires strong JavaScript knowledge, but it also requires HTML and CSS. And here’s a thing: nearly no one could show off substantial markup skills, not to talk about accessibility.

Anatomy of a web app attack.

Although I only had the chance to review their personal websites or GitHub profiles and this might of course not be a full show-off of their knowledge, it assured my lately developed opinion on web developers. Many are not able to choose the right HTML elements, to explain why and how a clearfix works, or what ARIA roles are for, but they can use React and Angular. If you got some spare time over the next weeks, learn semantics and re-read the basics (or specs if you like the challenge) of HTML and CSS from time to time.

The post Web Development Reading List #121: The Illusion Of Completeness, Client Hints, CSS Subgrids appeared first on Smashing Magazine.

Powered by WPeMatico

Premium Plugins That Web Designers Should Use In Their Projects

I think I speak for all of us when I say that digital creatives like to work with the finest tools and resources available to us. However, it’s only natural that our lists of favorites should mutate as new trends and better solutions emerge. A series of products and services that were really killing it last year, simply don’t make the grade in the autumn of 2014.

[m2leep]
So, what are the plugins that you turn to most often nowadays, to build websites? In this article, you will find a selection of over a dozen premium solutions that I believe rock the industry right now.


LayerSlider Premium Multi-Purpose Slider Plugin

layerslider2


It is common knowledge that websites using slideshows, image galleries, or content sliders, hold a certain appeal with the audience. I am aware that the ways of integrating this type of elements in your website are manifold, yet my vote goes to the best there is: the premium solution named LayerSlider. It helps create slides that are responsive across most devices, and SEO-ready. Plus, the plugin is engineered to tackle multiple website creation platforms.

Users begin by choosing a skin. Overall, LayerSlider is available in 13 skins that set the stage for your creative endeavors. Furthermore, you are greeted by a drag-and-drop builder, which has timeline view and lets you preview everything you do in real time. Your options include choosing from 200 preset slide transitions with 2D and 3D effect, and working with a transition builder to devise custom animations. In terms of content,you are free to add HTML, text, Google Fonts, videos, and images.


PrestaNitro Product Inline Editor

product-inline-editor_url_name=product-inline-editor


My second favorite premium solution concerns e-commerce websites based on the popular software PrestaShop. PrestaNitro is a great back-end module, which even has an Envato award to show off for that. You will find that it supports multiple languages, not to mention multiple purposes.

You can use PrestaNitro in order to work straight from front office when setting up products for your online shop. In other words, you get to see the results of every template modification, and manage catalogs much easier. Basically, you have a clear path to inserting fields like name, reference, short and long description, stock, and price.


Madhai – Responsive PrestashopMegamenu

madhai-responsive-prestashop-megamenu


How do you usually go about creating megamenus for your PrestaShop websites? You need an advanced solution for that purpose. My recommendation is Madhai, a module based on Bootstrap, just like the default PrestaShop theme. Why would you go for it? For aesthetic reasons, to begin with. ‘Madhai’ means ‘beautiful’ and its designs stand by that denomination. What is more, this plugin is calibrated for swipe on touch-screens, and completely responsive to popular browsers and common devices.

Here, you can expect to find plenty of customization options, a 12-columns grid, as well as 50 animation effects to choose from for your drop down. Finally, Madhai is coupled with fast and helpful customer support.


Shortcode Ultimate Plugin for Joomla

shortcode-ultimate-joomla


In the instance where you’re creating websites on a platform like Joomla, you could make do with a plugin for shortcodes. I would recommend a premium solution such as Shortcode Ultimate Plugin. There are 60 essential shortcodes on the table, and you can use its intuitive drag-and-drop interface in order to create any number of varieties. You get to preview your work in real time, and are able to choose between working on front office, or not.


CollageMaker

Collage-Maker---WPEka


If your website tells a good story, then the public will rush in to see what it’s all about. One of the best and most visual ways to grip your audience is by setting up an image collage. For WordPress, CollageMaker does the trick. Use it with confidence to integrate tiled, tiled mosaic, or randomly-styled collages, display them in a sidebar, and even allow visitors the interactive function of moving them around. Images open in a lightbox, and You can insert a custom URL link on each of them.


Magento CustomerAttributes Extension

Magento-Customer-Attributes-Extension


Any web designer and web developer can testify to the importance of knowing your website users. Collecting data is all the more crucial in the case of Magento stores, since in e-commerce it’s easier to sell products that people actually need. Thus, you should consider the customer account area or checkout registration as opportune venues to ask pertinent questions. Feel free to use this extension, and create as many customer attributes as you please.


Lizatom Shortcodes Plugin

lizatom-plugin3


WordPress projects can always use some shortcodes, especially if they entail the forging of blogs or virtual stores. Why not have a go with Lizatom Shortcodes Plugin, and see what you think? I believe its colossal selection of shortcodes is worthy of attention. No less than 5000 shortcodes are ready to respond to your every request. You get CSS3 buttons, tooltips, info boxes, and pricing tables, and can easily add a 3D shadow effect to your images, add pricing tables, reveal text in accordion style, not to mention customize order lists.


UserPro

UserPro4


One of the essential characteristics of a great website is high-level user experience. Enhancing the way people interact on your website is a sure ticket to boost user experience on the whole. Therefore, it makes sense to turn to a premium plugin like UserPro, an excellent profile management tool. With it, you get loads of display options to set up site member directories. Besides, you can use it to create registration forms, assign them various roles, and let users reach social networks fast.


Monarch

monarch-dashboard-sm


The only reason why social sharing and following are so important to your website, is that they have the power to increase incoming traffic. So, you stand much to gain by enlisting the help of a premium plugin for social sharing. Monarch allows you to choose from 40 networks, style up buttons for some of the most popular ones, and show them on your web page in 8 different locations. Apart from that, Monarch also monitors user engagement in time.


Chimpy MailChimp WordPress Plugin

Chimpy_3


MailChimp is such a wonderful tool for e-mail marketing, don’t you agree? If you hold this statement to be true, then good MailChimp WordPress integration is desirable. Chimpy can really help you with that. You can use this premium plugin to create registration forms, display them in engaging pop-ups, show comment forms, and synchronize all users across WordPress. Lastly, you can also try the effective marketing stunt that only makes certain website content available to confirmed members.


iMapper

i-mapper-3


Nothing comes close to visual elements when you want website visitors to pay heed to its content. The importance of that appeal is even greater for web stores, so you have to find a proper way to display product images. If you were to map out each product image with informative pins, then this would serve to keep potential clients on the same page while getting to know their product. iMapper can help you customize a pin styles, or you can choose preset designs, and place the pins anywhere on your image.


Subscriptio

Subscriptio_3


Want a straightforward yet proficient tool to help you sell woocommerce subscriptions through your website? Say no more. I can vouch for a premium plugin that helps you ace that area. Subscriptio is a fine tool for dealing with every single detail that concerns your subscriptions, and it’s complete with hooks and filters for professionals. Among other things, you can use Subscriptio to establish the length of suspension periods for subscribers, and often they get to receive reminders.


Content Timeline

content-timeline3


The layout of your website content weighs tons when visitors are trying to decide whether it’s worth their time or not. On average, it takes a few seconds to come to a conclusion in that sense. Content timelines turn that decision into an easy one to make, and a possitive one at that. Care to transfigure your website’s user experience? Use the Content Timeline plugin and its 11 customization options. Display any amount of groups and numbers in chronological (or otherwise) points that show text to the left and to the right.


FrontEnd Page Builder

FrontendBuilder-3


How well do you usually handle time pressure? Web developers and web designers are no strangers to it, as every project has to be completed before a certain deadline. You know what really cuts corners? Code-exempting solutions. For example, you can opt for a special WordPress plugin that allows you to work in front office, and so finish projects faster. You need not worry, as FrontEnd Page Builder offers sophisticated features,and comes with first-class support.


Joomla On Exit Popup Box

joomla-on-exit-popup-box


You might also want to accelerate the marketing force of your websites. If they happen to be based on Joomla, use this clever plugin to display a pop-up for your readers just as they show signs of heading towards the exit. The pop-up is certainly bound to get their attention.


WP Awesome Support – Responsive Ticket System

wp-awesome-support-responsive-ticket-system


I am going to end my list of competent premium plugins with a responsive plugin for WordPress themes. Check out this premium solution for Awesome Support. A Responsive Ticket System is just what your website needs to keep clients happy, and make sure they are spreading news of your professional services.


– – –

This concludes my compilation of astute plugins. Although this has been a subjective account through and through, I believe that each and every solution presented here follows the current industry standards to the letter. As such, these premium plugins are bound to satisfy the demands of any web developer or web designer. I hope you enjoyed my article, and found helpful information in it. If you have anything to say, then please leave a comment.