When Words Cannot Describe: Designing For AI Beyond Conversational Interfaces

Few technological innovations can completely change the way we interact with computers. Lucky for us, it seems we’ve won front-row seats to the unfolding of the next paradigm shift.

These shifts tend to unlock a new abstraction layer to hide the working details of a subsystem. Generalizing details allows our complex systems to appear simpler & more intuitive. This streamlines coding programs for computers as well as designing the interfaces to interact with them.

The Command Line Interface, for instance, created an abstraction layer to enable interaction through a stored program. This hid the subsystem details once exposed in earlier computers that were only programmable by inputting 1s & 0s through switches.

Graphical User Interfaces (GUI) further abstracted this notion by allowing us to manipulate computers through visual metaphors. These abstractions made computers accessible to a mainstream of non-technical users.

Despite these advances, we still haven’t found a perfectly intuitive interface — the troves of support articles across the web make that evident. Yet recent advances in AI have convinced many technologists that the next evolutionary cycle of computing is upon us.

Layers of interface abstraction, bottom to top: Command Line Interfaces, Graphical User Interfaces, & AI-powered Conversational Interfaces. (Source: Maximillian Piras) (Large preview) The Next Layer Of Interface Abstraction

A branch of machine learning called generative AI drives the bulk of recent innovation. It leverages pattern recognition in datasets to establish probabilistic distributions that enable novel constructions of text, media, & code. Bill Gates believes it’s “the most important advance in technology since the graphical user interface” because it can make controlling computers even easier. A newfound ability to interpret unstructured data, such as natural language, unlocks new inputs & outputs to enable novel form factors.

Now our universe of information can be instantly invoked through an interface as intuitive as talking to another human. These are the computers we’ve dreamed of in science fiction, akin to systems like Data from Star Trek. Perhaps computers up to this point were only prototypes & we’re now getting to the actual product launch. Imagine if building the internet was laying down the tracks, AIs could be the trains to transport all of our information at breakneck speed & we’re about to see what happens when they barrel into town.

“Soon the pre-AI period will seem as distant as the days when using a computer meant typing at a C:> prompt rather than tapping on a screen.”

— Bill Gates in “The Age of AI Has Begun

If everything is about to change, so must the mental models of software designers. As Luke Wroblewski once popularized mobile-first design, the next zeitgeist is likely AI-first. Only through understanding AI’s constraints & capabilities can we craft delight. Its influence on the discourse of interface evolution has already begun.

Large Language Models (LLMs), for instance, are a type of AI utilized in many new applications & their text-based nature leads many to believe a conversational interface, such as a chatbot, is a fitting form for the future. The notion that AI is something you talk to has been permeating across the industry for years. Robb Wilson, the co-owner of UX Magazine, calls conversation “the infinitely scalable interface” in his book The Age of Invisible Machines (2022). Noah Levin, Figma’s VP of Product Design, contends that “it’s a very intuitive thing to learn how to talk to something.” Even a herald of GUIs such as Bill Gates posits that “our main way of controlling a computer will no longer be pointing and clicking.”

Microsoft Copilot is a new conversational AI feature being integrated across their office suite. (Source: Microsoft) (Large preview)

The hope is that conversational computers will flatten learning curves. Jesse Lyu, the founder of Rabbit, asserts that a natural language approach will be “so intuitive that you don’t even need to learn how to use it.”

After all, it’s not as if Data from Stark Trek came with an instruction manual or onboarding tutorial. From this perspective, the evolutionary tale of conversational interfaces superseding GUIs seems logical & echoes the earlier shift away from command lines. But others have opposing opinions, some going as far as Maggie Appleton to call conversational interfaces like chatbots “the lazy solution.”

This might seem like a schism at first, but it’s more so a symptom of a simplistic framing of interface evolution. Command lines are far from extinct; technical users still prefer them for their greater flexibility & efficiency. For use cases like software development or automation scripting, the added abstraction layer in graphical no-code tools can act as a barrier rather than a bridge.

GUIs were revolutionary but not a panacea. Yet there is ample research to suggest conversational interfaces won’t be one, either. For certain interactions, they can decrease usability, increase cost, & introduce security risk relative to GUIs.

So, what is the right interface for artificially intelligent applications? This article aims to inform that design decision by contrasting the capabilities & constraints of conversation as an interface.

Connecting The Pixels

We’ll begin with some historical context, as the key to knowing the future often starts with looking at the past. Conversational interfaces feel new, but we’ve been able to chat with computers for decades.

Joseph Weizenbaum invented the first chatbot, ELIZA, during an MIT experiment in 1966. This laid the foundation for the following generations of language models to come, from voice assistants like Alexa to those annoying phone tree menus. Yet the majority of chatbots were seldom put to use beyond basic tasks like setting timers.

It seemed most consumers weren’t that excited to converse with computers after all. But something changed last year. Somehow we went from CNET reporting that “72% of people found chatbots to be a waste of time” to ChatGPT gaining 100 million weekly active users.

What took chatbots from arid to astonishing? Most assign credit to OpenAI’s 2018 invention (PDF) of the Generative Pre-trained Transformer (GPT). These are a new type of LLM with significant improvements in natural language understanding. Yet, at the core of a GPT is the earlier innovation of the transformer architecture introduced in 2017 (PDF). This architecture enabled the parallel processing required to capture long-term context around natural language inputs. Diving deeper, this architecture is only possible thanks to the attention mechanism introduced in 2014 (PDF). This enabled the selective weighing of an input’s different parts.

Through this assemblage of complementary innovations, conversational interfaces now seem to be capable of competing with GUIs on a wider range of tasks. It took a surprisingly similar path to unlock GUIs as a viable alternative to command lines. Of course, it required hardware like a mouse to capture user signals beyond keystrokes & screens of adequate resolution. However, researchers found the missing software ingredient years later with the invention of bitmaps.

Bitmaps allowed for complex pixel patterns that earlier vector displays struggled with. Ivan Sutherland’s Sketchpad, for instance, was the inaugural GUI but couldn’t support concepts like overlapping windows. IEEE Spectrum’s Of Mice and Menus (1989) details the progress that led to the bitmap’s invention by Alan Kay’s group at Xerox Parc. This new technology enabled the revolutionary WIMP (windows, icons menus, and pointers)) paradigm that helped onboard an entire generation to personal computers through intuitive visual metaphors.

Computing no longer required a preconceived set of steps at the outset. It may seem trivial in hindsight, but the presenters were already alluding to an artificially intelligent system during Sketchpad’s MIT demo in 1963. This was an inflection point transforming an elaborate calculating machine into an exploratory tool. Designers could now craft interfaces for experiences where a need to discover eclipsed the need for flexibility & efficiency offered by command lines.

Parallel Paradigms

Novel adjustments to existing technology made each new interface viable for mainstream usage — the cherry on top of a sundae, if you will. In both cases, the foundational systems were already available, but a different data processing decision made the output meaningful enough to attract a mainstream audience beyond technologists.

With bitmaps, GUIs can organize pixels into a grid sequence to create complex skeuomorphic structures. With GPTs, conversational interfaces can organize unstructured datasets to create responses with human-like (or greater) intelligence.

The prototypical interfaces of both paradigms were invented in the 1960s, then saw a massive delta in their development timelines — a case study unto itself. Now we find ourselves at another inflection point: in addition to calculating machines & exploratory tools, computers can act as life-like entities.

But which of our needs call for conversational interfaces over graphical ones? We see a theoretical solution to our need for companionship in the movie Her, where the protagonist falls in love with his digital assistant. But what is the benefit to those of us who are content with our organic relationships? We can look forward to validating the assumption that conversation is a more intuitive interface. It seems plausible because a few core components of the WIMP paradigm have well-documented usability issues.

Nielsen Norman Group reports that cultural differences make universal recognition of icons rare — menus trend towards an unusable mess with the inevitable addition of complexity over time. Conversational interfaces appear more usable because you can just tell the system when you’re confused! But as we’ll see in the next sections, they have their fair share of usability issues as well.

By replacing menus with input fields, we must wonder if we’re trading one set of usability problems for another.

The Cost of Conversation

Why are conversational interfaces so popular in science fiction movies? In a Rhizome essay, Martine Syms theorizes that they make “for more cinematic interaction and a leaner production.” This same cost/benefit applies to app development as well. Text completion delivered via written or spoken word is the core capability of an LLM. This makes conversation the simplest package for this capability from a design & engineering perspective.

Linus Lee, a prominent AI Research Engineer, characterizes it as “exposing the algorithm’s raw interface.” Since the interaction pattern & components are already largely defined, there isn’t much more to invent — everything can get thrown into a chat window.

“If you’re an engineer or designer tasked with harnessing the power of these models into a software interface, the easiest and most natural way to “wrap” this capability into a UI would be a conversational interface”

— Linus Lee in Imagining Better Interfaces to Language Models

This is further validated by The Atlantic’s reporting on ChatGPT’s launch as a “low-key research preview.” OpenAI’s hesitance to frame it as a product suggests a lack of confidence in the user experience. The internal expectation was so low that employees’ highest guess on first-week adoption was 100,000 users (90% shy of the actual number).

Conversational interfaces are cheap to build, so they’re a logical starting point, but you get what you pay for. If the interface doesn’t fit the use case, downstream UX debt can outweigh any upfront savings.

Forgotten Usability Principles

Steve Jobs once said, “People don’t know what they want until you show it to them.” Applying this thinking to interfaces echoes a usability evaluation called discoverability. Nielsen Norman Group defines it as a user’s ability to “encounter new content or functionality that they were not aware of.”

A well-designed interface should help users discover what features exist. The interfaces of many popular generative AI applications today revolve around an input field in which a user can type in anything to prompt the system. The problem is that it’s often unclear what a user should type in to get ideal output. Ironically, a theoretical solution to writer’s block may have a blank page problem itself.

“I think AI has a problem with these missing user interfaces, where, for the most part, they just give you a blank box to type in, and then it’s up to you to figure out what it might be able to do.”

— Casey Newton on Hard Fork Podcast

Conversational interfaces excel at mimicking human-to-human interaction but can fall short elsewhere. A popular image generator named Midjourney, for instance, only supported text input at first but is now moving towards a GUI for “greater ease of use.”

This is a good reminder that as we venture into this new frontier, we cannot forget classic human-centered principles like those in Don Norman’s seminal book The Design of Everyday Things (1988). Graphical components still seem better aligned with his advice of providing explicit affordances & signifiers to increase discoverability.

There is also Jakob Nielsen’s list of 10 usability heuristics; many of today’s conversational interfaces seem to ignore every one of them. Consider the first usability heuristic explaining how visibility of system status educates users about the consequences of their actions. It uses a metaphorical map’s “You Are Here” pin to explain how proper orientation informs our next steps.

Navigation is more relevant to conversational interfaces like chatbots than it might seem, even though all interactions take place in the same chat window. The backend of products like ChatGPT will navigate across a neural network to craft each response by focusing attention on a different part of their training datasets.

Putting a pin on the proverbial map of their parametric knowledge isn’t trivial. LLMs are so opaque that even OpenAI admits they “do not understand how they work.” Yet, it is possible to tailor inputs in a way that loosely guides a model to craft a response from different areas of its knowledge.

One popular technique for guiding attention is role-playing. You can ask an LLM to assume a role, such as by inputting “imagine you’re a historian,” to effectively switch its mode. The Prompt Engineering Institute explains that when “training on a large corpus of text data from diverse domains, the model forms a complex understanding of various roles and the language associated with them.” Assuming a role invokes associated aspects in an AI’s training data, such as tone, skills, & rationality.

For instance, a historian role responds with factual details whereas a storyteller role responds with narrative descriptions. Roles can also improve task efficiency through tooling, such as by assigning a data scientist role to generate responses with Python code.

Roles also reinforce social norms, as Jason Yuan remarks on how “your banking AI agent probably shouldn’t be able to have a deep philosophical chat with you.” Yet conversational interfaces will bury this type of system status in their message history, forcing us to keep it in our working memory.

A theoretical AI chatbot that uses a segmented controller to let users specify a role in one click — each button automatically adjusts the LLM’s system prompt. (Source: Maximillian Piras) (Large preview)

The lack of persistent signifiers for context, like roleplay, can lead to usability issues. For clarity, we must constantly ask the AI’s status, similar to typing ls & cd commands into a terminal. Experts can manage it, but the added cognitive load is likely to weigh on novices. The problem goes beyond human memory, systems suffer from a similar cognitive overload. Due to data limits in their context windows, a user must eventually reinstate any roleplay below the system level. If this type of information persisted in the interface, it would be clear to users & could be automatically reiterated to the AI in each prompt.

Character.ai achieves this by using historical figures as familiar focal points. Cultural cues lead us to ask different types of questions to “Al Pacino” than we would “Socrates.” A “character” becomes a heuristic to set user expectations & automatically adjust system settings. It’s like posting up a restaurant menu; visitors no longer need to ask what there is to eat & they can just order instead.

“Humans have limited short-term memories. Interfaces that promote recognition reduce the amount of cognitive effort required from users.”

— Jakob Nielsen in “10 Usability Heuristics for User Interface Design

Another forgotten usability lesson is that some tasks are easier to do than to explain, especially through the direct manipulation style of interaction popularized in GUIs.

Photoshop’s new generative AI features reinforce this notion by integrating with their graphical interface. While Generative Fill includes an input field, it also relies on skeuomorphic controls like their classic lasso tool. Describing which part of an image to manipulate is much more cumbersome than clicking it.

Interactions should remain outside of an input field when words are less efficient. Sliders seem like a better fit for sizing, as saying “make it bigger” leaves too much room for subjectivity. Settings like colors & aspect ratios are easier to select than describe. Standardized controls can also let systems better organize prompts behind the scenes. If a model accepts specific values for a parameter, for instance, the interface can provide a natural mapping for how it should be input.

Most of these usability principles are over three decades old now, which may lead some to wonder if they’re still relevant. Jakob Nielsen recently remarked on the longevity of their relevance, suggesting that “when something has remained true for 26 years, it will likely apply to future generations of user interfaces as well.” However, honoring these usability principles doesn’t require adhering to classic components. Apps like Krea are already exploring new GUI to manipulate generative AI.

Prompt Engineering Is Engineering

The biggest usability problem with today’s conversational interfaces is that they offload technical work to non-technical users. In addition to low discoverability, another similarity they share with command lines is that ideal output is only attainable through learned commands. We refer to the practice of tailoring inputs to best communicate with generative AI systems as “prompt engineering”. The name itself suggests it’s an expert activity, along with the fact that becoming proficient in it can lead to a $200k salary.

Programming with natural language is a fascinating advancement but seems misplaced as a requirement in consumer applications. Just because anyone can now speak the same language as a computer doesn’t mean they know what to say or the best way to say it — we need to guide them. While all new technologies have learning curves, this one feels steep enough to hinder further adoption & long-term retention.

Prompt engineering as a prerequisite for high-quality output seems to have taken on the mystique of a dark art. Many marketing materials for AI features reinforce this through terms like “magic.” If we assume there is a positive feedback loop at play, this opaqueness must be an inspiring consumer intrigue.

But positioning products in the realm of spellbooks & shamans also suggests an indecipherable experience — is this a good long-term strategy? If we assume Steve Krug’s influential lessons from Don’t Make Me Think (2000) still apply, then most people won’t bother to study proper prompting & instead will muddle through.

But the problem with trial & error in generative AI is that there aren’t any error states; you’ll always get a response. For instance, if you ask an LLM to do the math, it will provide you with confident answers that may be completely wrong. So it becomes harder to learn from errors when we are unaware if a response is a hallucination. As OpenAI’s Andrej Karpathy suggests, hallucinations are not necessarily a bug because LLMs are “dream machines,” so it all depends on how interfaces set user expectations.

“But as with people, finding the most meaningful answer from AI involves asking the right questions. AI is neither psychic nor telepathic.”

— Stephen J. Bigelow in 5 Skills Needed to Become a Prompt Engineer

Using magical language risks leading novices to the magical thinking that AI is omniscient. It may not be obvious that its knowledge is limited to the training data.

Once the magic dust fades away, software designers will realize that these decisions are the user experience!

Crafting delight comes from selecting the right prompting techniques, knowledge sourcing, & model selection for the job to be done. We should be exploring how to offload this work from our users.

  • Empty states could explain the limits of an AI’s knowledge & allow users to fill gaps as needed.
  • Onboarding flows could learn user goals to recommend relevant models tuned with the right reasoning.
  • An equivalent to fuzzy search could markup user inputs to educate them on useful adjustments.

We’ve begun to see a hint of this with OpenAI’s image generator rewriting a user’s input behind the scenes to optimize for better image output.

Lamborghini Pizza Delivery

Aside from the cognitive cost of usability issues, there is a monetary cost to consider as well. Every interaction with a conversational interface invokes an AI to reason through a response. This requires a lot more computing power than clicking a button within a GUI. At the current cost of computing, this expense can be prohibitive. There are some tasks where the value from added intelligence may not be worth the price.

For example, the Wall Street Journal suggests using an LLM for tasks like email summarization is “like getting a Lamborghini to deliver a pizza.” Higher costs are, in part, due to the inability of AI systems to leverage economies of scale in the way standard software does. Each interaction requires intense calculation, so costs scale linearly with usage. Without a zero-marginal cost of reproduction, the common software subscription model becomes less tenable.

Will consumers pay higher prices for conversational interfaces or prefer AI capabilities wrapped in cost-effective GUI? Ironically, this predicament is reminiscent of the early struggles GUIs faced. The processor logic & memory speed needed to power the underlying bitmaps only became tenable when the price of RAM chips dropped years later. Let’s hope history repeats itself.

Another cost to consider is the security risk: what if your Lamborghini gets stolen during the pizza delivery? If you let people ask AI anything, some of those questions will be manipulative. Prompt injections are attempts to infiltrate systems through natural language. The right sequence of words can turn an input field into an attack vector, allowing malicious actors to access private information & integrations.

So be cautious when positioning AI as a member of the team since employees are already regarded as the weakest link in cyber security defense. The wrong business logic could accidentally optimize the number of phishing emails your organization falls victim to.

Good design can mitigate these costs by identifying where AI is most meaningful to users. Emphasize human-like conversational interactions at these moments but use more cost-effective elements elsewhere. Protect against prompt injections by partitioning sensitive data so it’s only accessible by secure systems. We know LLMs aren’t great at math anyway, so free them up for creative collaboration instead of managing boring billing details.

Generations Are Predictions

In my previous Smashing article, I explained the concept of algorithm-friendly interfaces. They view every interaction as an opportunity to improve understanding through bidirectional feedback. They provide system feedback to users while reporting performance feedback to the system. Their success is a function of maximizing data collection touchpoints to optimize predictions. Accuracy gains in predictive output tend to result in better user retention. So good data compounds in value by reinforcing itself through network effects.

While my previous focus was on content recommendation algorithms, could we apply this to generative AI? While the output is very different, they’re both predictive models. We can customize these predictions with specific data like the characteristics, preferences, & behavior of an individual user.

So, just as Spotify learns your musical taste to recommend new songs, we could theoretically personalize generative AI. Midjourney could recommend image generation parameters based on past usage or preferences. ChatGPT could invoke the right roles at the right time (hopefully with system status visibility).

This territory is still somewhat uncharted, so it’s unclear how algorithm-friendly conversational interfaces are. The same discoverability issues affecting their usability may also affect their ability to analyze engagement signals. An inability to separate signal from noise will weaken personalization efforts. Consider a simple interaction like tapping a “like” button; it sends a very clean signal to the backend.

What is the conversational equivalent of this? Inputting the word “like” doesn’t seem like as reliable a signal because it may be mentioned in a simile or mindless affectation. Based on the insights from my previous article, the value of successful personalization suggests that any regression will be acutely felt in your company’s pocketbook.

Perhaps a solution is using another LLM as a reasoning engine to format unstructured inputs automatically into clear engagement signals. But until their data collection efficiency is clear, designers should ask if the benefits of a conversational interface outweigh the risk of worse personalization.

Towards The Next Layer Of Abstraction

As this new paradigm shift in computing evolves, I hope this is a helpful primer for thinking about the next interface abstractions. Conversational interfaces will surely be a mainstay in the next era of AI-first design. Adding voice capabilities will allow computers to augment our abilities without arching our spines through unhealthy amounts of screen time. Yet conversation alone won’t suffice, as we also must design for needs that words cannot describe.

So, if no interface is a panacea, let’s avoid simplistic evolutionary tales & instead aspire towards the principles of great experiences. We want an interface that is integrated, contextual, & multimodal. It knows sometimes we can only describe our intent with gestures or diagrams. It respects when we’re too busy for a conversation but need to ask a quick question. When we do want to chat, it can see what we see, so we aren’t burdened with writing lengthy descriptions. When words fail us, it still gets the gist.

Avoiding Tunnel Visions Of The Future

This moment reminds me of a cautionary tale from the days of mobile-first design. A couple of years after the iPhone’s debut, touchscreens became a popular motif in collective visions of the future. But Bret Victor, the revered Human-Interface Inventor (his title at Apple), saw touchscreens more as a tunnel vision of the future.

In his brief rant on peripheral possibilities, he remarks how they ironically ignore touch altogether. Most of the interactions mainly engage our sense of sight instead of the rich capabilities our hands have for haptic feedback. How can we ensure that AI-first design amplifies all our capabilities?

“A tool addresses human needs by amplifying human capabilities.”

— Bret Victor in “A Brief Rant on the Future of Interaction Design”

I wish I could leave you with a clever-sounding formula for when to use conversational interfaces. Perhaps some observable law stating that the mathematical relationship expressed by D∝1/G elucidates that ‘D’, representing describability, exhibits an inverse correlation with ‘G’, denoting graphical utility — therefore, as the complexity it takes to describe something increases, a conversational interface’s usability diminishes. While this observation may be true, it’s not very useful.

Honestly, my uncertainty at this moment humbles me too much to prognosticate on new design principles. What I can do instead is take a lesson from the recently departed Charlie Munger & invert the problem.

Designing Backwards

If we try to design the next abstraction layer looking forward, we seem to end up with something like a chatbot. We now know why this is an incomplete solution on its own. What if we look at the problem backward to identify the undesirable outcomes that we want to avoid? Avoiding stupidity is easier than seeking brilliance, after all.

An obvious mistake to steer clear of is forcing users to engage in conversations without considering time constraints. When the time is right to chat, it should be in a manner that doesn’t replace existing usability problems with equally frustrating new ones. For basic tasks of equivalent importance to delivering pizza, we should find practical solutions not of equivalent extravagance to driving a Lamborghini. Furthermore, we ought not to impose prompt engineering expertise as a requirement for non-expert users. Lastly, as systems become more human-like, they should not inherit our gullibility, lest our efforts inadvertently optimize for exponentially easier access to our private data.

A more intelligent interface won’t make those stupid mistakes.

Thanks to Michael Sands, Evan Miller, & Colin Cowley for providing feedback on early drafts of this article.

Softphone Starter Guide: Learn the Basics

Nextiva is our top pick for the best cloud-based phone systems because of its enhanced ability to manage high-call volumes and incredible UCaaS offerings. Give Nextiva a try today.

If you’re considering switching to VoIP, chances are you’ve heard of softphones or software telephones. But you may not fully understand what they are or how they work. And that’s totally okay—it’s why we’ve created this guide.

Whether you‘re an SMB owner or an IT manager looking to implement a softphone into your business, we’ll tell you everything you need to know to get started, including how it works, its advantages, and potential drawbacks.

The 15 Best Cloud-Based Phone Systems

If you’re looking for a reliable softphone provider, check out our best cloud-based phone system guide to make the right choice.

  • Nextiva — Best All-Around Cloud-Based Phone System
  • RingCentral — Best for Hybrid or Remote Work
  • Ooma — Easiest Setup for Small Businesses
  • Zoom — Affordable Call Monitoring
  • Dialpad — Most Flexible
  • GoTo Connect — Easiest Call Flow Manager
  • 8×8 — Best for Global Companies
  • Avaya — Best for Toll-Free Phone Calls
  • Google Voice — Best for Solopreneurs
  • Grasshopper — Best for the Basics
  • OpenPhone — Best for Multiple Numbers
  • Aircall — Most Unique Call Management Features
  • 11Sight — Best for Sales and Marketing Teams
  • Net2Phone — Best for Reception Management
  • Webex — Best for Hardware Integration

What is a Softphone?

A softphone is an installable desktop and mobile phone app that lets you communicate over the internet. It functions much the same way as a regular phone app.

Users can dial numbers to make calls and access their VoIP features (do not disturb, voicemail, and auto-attendant) and other traditional features, such as mute, hold, and transfer.

A softphone is similar to a traditional phone in terms of functionality but has a more flexible setup and greater accessibility. Depending on the softphone provider you select, you can have an entirely cloud-based solution that gives you anytime-anywhere access, as long as you have a stable internet connection.

Softphone vs. Hardphone

Softphones and hard phones are the two types of VoIP devices. A hard phone is a physical, dedicated device that resembles old-school telephones but works through VoIP.

Here’s a quick comparison between the two:

Interface

Hard phones have physical buttons to serve as a dial pad, but they may also have a touchscreen with a full GUI. Softphones are software-based and have GUI elements.

Ease of Use

This depends on your personal preference.

If you’re familiar with traditional phone systems, you’ll find hard phones easier to use. If you’re familiar with software programs, softphones will feel more user-friendly. However, the latter typically involves some level of onboarding or training as opposed to a hard phone.

Call Quality

Both hard phones and softphones need a stable internet connection to work. But the former may have a slight edge over the latter when it comes to calling quality, being a dedicated device for handling calls. A softphone may suffer from sharing system resources with other software.

Deployment

Hard phones are slower to implement when done on a company-wide scale. Plus, you’ll have to purchase new physical hardware. Contrarily, softphone deployment and maintenance is quicker and easier, and it doesn’t involve purchasing additional equipment.

Costs

Hard phones are more expensive than softphones. They require physical hardware (for instance, a handset receiver and a base with a display, buttons, and a camera). On the other hand, the fact that no new hardware has to be purchased, except maybe a headset if needed, makes softphones less expensive.

How Does a Softphone Work?

To use a softphone, you’ll need a desktop computer/smartphone/tablet and a VoIP headset or microphone and speaker on your device for superior audio quality.

Generally speaking, a softphone works like any other phone. You open the app, dial a phone number, wait to be connected to the person you want to call, and that’s it. The only difference is that instead of dialing a physical keyboard, you’ll dial on a virtual one provided on the app on your cell phone or computer.

RingCentral webpage for how to use a softphone
Companies like RingCentral make it easy to record calls using your softphone.

Companies like RingCentral make it easy to record calls using your softphone.

During a VoIP call, your voice is converted into digital data through a codec. This data, known as “packets,” is then transmitted as a binary code between devices. The packets are then “decoded” back into the original voice at the receiving end, which the recipient can hear. 

Another technicality to keep in mind includes the endpoints of both your and the recipient’s devices supporting the same VoIP protocol and each having at least one common codec. Otherwise, the softphone won’t be able to communicate.

What are the Benefits of a Softphone?

If you are still wondering whether a softphone would make the right choice for your business, consider the following benefits to understand why they are growing so rapidly:

Cost-effective

For small businesses, making VoIP calls on a softphone is typically (much) cheaper as you don’t have to pay for expensive hardware. You can make international calls at a fraction of the cost of the general fees associated with making an international call.

Versatile

Being a software-based tool, a softphone runs on many types of devices, including iOS and Android smartphones, as well as Mac and Windows desktops. As long as you have a data connection, there’s no place you can’t stay connected with your team. This makes softphones ideal for businesses with multiple office locations, frequent travelers, and telecommuters.

Offers Multiple Integrations

Softphones offer multiple integrations with various business tools, expanding the capabilities of your teams. 

Because they do not require hardware, you have the option to enhance their functionality through integrations. For instance, integrating the softphone with messaging software allows your employees to send instant messages, and integrating with a CRM can provide access to important customer information like contact details and email addresses.

Private

With a softphone, you can answer calls from a mobile device without having to sync your personal contacts and information. Any calls you make on the app will show your business number and not your phone number.

So if you have a BYOD policy (bring your own device) for your organization, you won’t have to worry about compromising staff privacy.

Portable

Softphone apps allow you to take your communication with you, enabling 24/7 employee connectivity.

You and your team can take on calls from any device without being confined to your desk. Further, you can keep tabs on all communications and respond to colleagues quickly through text or video call where ever you go.

What are the Drawbacks of a Softphone?

Like two sides of a coin, you must also deal with certain drawbacks to using a softphone. Here’s a quick list:

Internet Connectivity Mandate

Softphones need an internet connection to function. If your internet connection is weak or drops out, you may experience disruptions in your phone service.

Compatibility Issues

Though versatile, softphones are not compatible with all devices and operating systems. 

Security Concerns

As with any software transmitting data over the internet, a softphone poses a risk of security vulnerabilities. You must ensure to use a reputable softphone provider and regularly update your software to protect your business and team members against potential security threats.

Large Upfront Costs

Softphones are a cost-effective solution for businesses, but they may require substantial upfront costs for purchasing or subscribing to the software. Let’s not forget to account for the ongoing costs of internet service and maintenance.

Overall, while softphones offer many benefits, you should also consider the potential drawbacks against your business needs and budget before deciding if a softphone app is suitable for you.

What are the Key Features of a Softphone?

Softphones provide a variety of features that can be tailored to your needs. Ideally, you will want a mix of basic and advanced features. Some key features to consider in a softphone include:

Instant Messaging

Softphones offer instant team chat messaging to facilitate real-time communication and collaboration, eliminating the need for email. Users can create private and public channels for different teams, departments, or projects and easily transition from chat to audio or video calls with a single click.

File sharing, real-time notifications, and whiteboarding are other collaborative features to improve team communication and productivity.

Call Waiting and Call Holding

Call waiting alerts agents when they have an incoming call while they are already on a call. This can help them prioritize more important calls. If an agent needs to take a second call, they can put the current caller on hold and transfer the call to another available agent. To avoid keeping callers on hold for extended periods, consider additional features like call queuing or customer callbacks.

Audio Conferencing and Call Bridge

Softphone users can participate in conference calls. Typically, 10-40 users can join a single session by clicking a link or dialing a phone number. A call bridge (a phone line that connects all participants) is another way for multiple people to join a conference call, regardless of their location. 

Call Forwarding

Call forwarding allows softphone systems to auto-forward calls to multiple phone numbers if the initial call goes unanswered. This increases the flexibility of the phone system.

For instance, you can get calls forwarded from an agent’s desk phone to their personal cell phone or through their home phone number and then to the department queue to connect them with an available agent.

Call Routing

Call routing directs inbound calls to the ideal agent based on predetermined criteria and calls flow path.

This way, the caller is immediately connected to an agent most suitable to help them out, cutting down on caller wait time. This system also prevents individual agents from being overloaded with calls while other agents hardly attend calls, ensuring an equal division of calls.

Voicemail

Admittedly, voicemail is a standard telephone feature. But modern voicemail offers several amazing features to boost functionality.

For instance, softphones facilitate voicemail audio files, pushing them directly to user emails or as push notifications. You can even request transcriptions, so it’s easier for your team to review and understand content in case making a call isn’t possible.

Contact Sharing

Softphone app users can subscribe to company contact lists and share their own contacts with coworkers. This is a particularly handy feature to boost productivity by allowing employees to find client contact details faster.

Auto-attendant and IVR

IVR (interactive voice response) is a type of interactive call menu that directs calls to the correct agent based on the caller’s answers to pre-recorded questions. Think of “Press 1 to learn more about your current account status. Press 2 to speak to our customer support agent.”

Callers can respond to auto-attendant or IVR prompts via the touchtone dialpad or by simply speaking.

Final Thoughts About Softphones

Softphones are a convenient and cost-effective way for businesses to manage their phone communication. 

By using these apps to make and receive calls, you can save on the cost of traditional hardware-based phones and enjoy advanced features, such as call forwarding and voicemail. That said, don’t forget to consider the potential drawbacks before deciding if it’s the right solution for your business. 

In case you need more help choosing a softphone provider, look at our guides for the best business phone services and the best office phone systems.

How to convert C# console app to Winforms or other GUI?

Hey guys I managed to get some code what works fine but it uses console application

I have tried to convert it by hand and change things around to get it to work but with no avail!

I'm certain it should be simple but I may be wrong :(

Thanks guys
ignore the vb.net

If you think I'm trying to be spoon fed I can post my converted code but it doesn't work and probably 99.9% wrong

Code

using System;
using System.Collections.Generic;
using System.ComponentModel;
using System.Data;
using System.Drawing;
using System.Linq;
using System.Text;
using System.Threading.Tasks;
using System.Windows.Forms;
using Microsoft.CognitiveServices.Speech;
using Microsoft.CognitiveServices.Speech.Audio;

namespace ConsoleApp1

public partial class Form1 : Form
{
    public Form1()
    {
        InitializeComponent();
    }

    private void Form1_Load(object sender, EventArgs e)
    {
         private const string cKey = "key";

    private const string cRegion = "region";


    public static async Task SpeechToTextAsync()

    {

        var config = SpeechConfig.FromSubscription(cKey, cRegion);

        using (var recognizer = new SpeechRecognizer(config))

            await Recognize(recognizer);

    }

    private static async Task Recognize(SpeechRecognizer recognizer)

    {

        var result = await recognizer.RecognizeOnceAsync();


        if (result.Reason == ResultReason.RecognizedSpeech)
        {

            Console.WriteLine($"Recognized: {result.Text}");

            SendKeys.SendWait(result.Text);
        }

        else if (result.Reason == ResultReason.NoMatch)

            Console.WriteLine("Speech could not be recognized.");

        else if (result.Reason == ResultReason.Canceled)

        {

            var cancellation =

                CancellationDetails.FromResult(result);

            Console.WriteLine

                ($"Cancelled due to reason={cancellation.Reason}");

            if (cancellation.Reason == CancellationReason.Error)

            {

                Console.WriteLine

                    ($"Error code={cancellation.ErrorCode}");

                Console.WriteLine

                    ($"Error details={cancellation.ErrorDetails}");

                Console.WriteLine

                    ($"Did you update the subscription info?");

            }

        }

    }

    static void Main()

    {

        SpeechToTextAsync().Wait();
        Console.WriteLine("Please press enter to exit.");
        Console.ReadLine();

    }
}

Useful Tools for Visualizing Databases on a Budget

A diagram is a graphical representation of information that depicts the structure, relationship, or operation of anything. Diagrams enable your audience to visually grasp hidden information and engage with them in ways that words alone cannot. Depending on the type of project, there are numerous ways to use diagrams. For example, if you want to depict the relationship between distinct pieces, we usually use an Entity Relationship Diagram (ERD). There are many great tools that can help you sketch out your database designs beautifully.

In this article, I will be sharing some of my favorite tools that I use to curate my data structures and bring my ideas to life.

Google Docs Drawing

The drawing function in Google Docs allows you to add illustrations to your pages. You can add custom shapes, charts, graphs, infographics, and text boxes to your document with the built-in drawing tool.

Screenshot of database entity relationships using Google Docs.

Sketching with Google Docs

Although it is simple to add a graphic to your Google Docs, the procedure is not totally visible. Here’s how:

1 . Open a new document on Google Docs.

Screenshot of a new document in Google Docs.

2 . Click on the insert button and select Drawing . Then, from the drop-down option, choose New to open the drawing screen.

Screenshot of adding a new Drawing in Google Docs.

3 . You can use the toolbox on this screen to add text boxes, select lines, and shapes, and modify the colors of your drawing.

Screenshot of selecting an Arrow in Google Docs.

4 . You may also use the cursor to adjust the size of your drawings and the color of your designs by using the toolbox at the top of your screen.

Screenshot of customizing a drawing in Google Docs.

5 . When finished, click the Save and close button. You can click on the “File” toolbar displayed on the top of your screen to download your document.

Features

CostFree.
CLI? GUI? Online?Online.
Requires an Account?Yes, a Google account is required.
Collaborative Editing?Yes, with Google Drive sharing.
Import SQLNot Applicable.
Export SQLNot Applicable.
Export Formats.doc, .pdf, .rtf, .odt, .txt, .html, .epub
Generate Shareable URLYes.

Google Docs offers amazing convenience. However, diagramming databases is not something it was intended for. You may find yourself frustrated with redrawing arrows and relationships if you are making frequent edits to your model.

Graphviz

Graphviz is a free graph visualization software that allows us to express information diagrammatically.

Screenshot of database entity relationships using Graphviz.

Graphviz implements the DOT language. The DOT language is an abstract grammar that makes use of terminals, non terminals, parentheses, square brackets, and vertical bars. More information about the DOT language can be found in its documentation.

Features

CostFree.
CLI? GUI? Online?CLI.
Visual Studio Code, Eclipse, and Notepad++.
Graphical Interfaces.
Requires an Account?No.
Collaborative Editing?Not Applicable.
Import SQLYes, using SQL Graphviz.
Export SQLYes, using SQL Graphviz.
Export Formats.gif, .png, .jpeg, .json, .pdf and more
Generate Shareable URLNot Applicable.

Graphviz has an impressive and supportive community. However, a high level of SQL support is only available when you install additional third-party software. This overhead may make it less approachable to users that are not comfortable setting up their computer to support these tools.

ERDPlus

ERDPlus is a database modeling tool that allows you to create Entity Relationship Diagrams, Relational Schemas, Star Schemas, and SQL DDL statements.

Screenshot of database entity relationships using ERDPlus.

It includes a brief guide on how to create your ER diagrams, which is especially useful for beginners. You can also easily convert your created ER diagrams to relation schemas.

Features

CostFree.
CLI? GUI? Online?Online.
Requires an Account?Not required, but recommended for saving.
Collaborative Editing?Not Applicable.
Import SQLNo.
Export SQLYes, with the support of SQL DDL statements.
Export Formats.png
Generate Shareable URLNot Applicable.

ERDPlus is suited for SQL. It does lack additional export formats and ability to share with teams, but these features are not necessary with import and export.

Diagrams.net

Diagrams.net (previously Draw.io) is a free online diagramming tool that can be used to create flowcharts, UML diagrams, database models, and other types of diagrams.

Screenshot of database entity relationships using Diagrams.net.

Features

CostFree.
CLI? GUI? Online?Desktop and Online.
Requires an Account?Not required, but recommended for saving.
Collaborative Editing?Sharing requires Google Drive or OneDrive.
Import SQLYes.
Export SQLNo.
Export Formats.png, .jpeg, .svg, .pdf, .html and more.
Generate Shareable URLYes, export as URL an option.

Diagrams.net is designed to support many different workflows. Its ability to easily integrate with third-party integrations such as Trello, Quip, Notion, and others distinguishes it from the other options. The ability to share and collaborate may make it work well for collaborative teams.

Conclusion

This article is based on using free database tools that could help visualize your ideas and their capabilities with limitations to great details on how to use these tools.

In my research, I also came across other excellent tools with free trials available for creating database diagrams like Lucidchart, EDrawMax, and, DrawSQL. However, these free trials have limitations which may make them less suited for developers working on multiple projects.

I strongly recommend that you read the documentation for each of these tools to determine what works best for you and, most importantly, to avoid any difficulties in using these tools.

Thank you for taking the time to read this far, and I hope you found what you were looking for. Have a wonderful day!


Useful Tools for Visualizing Databases on a Budget originally published on CSS-Tricks. You should get the newsletter.

Case Study: Windland — An Immersive Three.js Experience

In this article we’ll look at the creation of a mini-city full of post effects and micro-interactions using Three.js.

Visit Windland

See how you can create your own using this free boilerplate.

Introduction

I am an unconditional game lover. I’ve always dreamed of creating an interactive mini-city, using saturated colors, similar to SimCity and alike. The challenge was that I had neither enough 3D knowledge nor a library.

At the end of 2021, I finally decided to fulfill an old desire and I took Bruno Simon’s course – Three.js Journey. I’m a designer who likes to program. I ended up discovering myself as a creative developer because of this course, where I was able to use part of my dormant knowledge of ActionScript 2.0, from the late Macromedia Flash.

The entire project was created in approximately 2 weeks, between shifts at my work at Neotix. It felt amazing and I loved doing it, so I decided to share some interesting information about it, so that I could help in some way those who are at the beginning of this journey.

Creative challenge

It was crucial to use various post-processing effects present in games to give this city a decent level of realism without affecting performance. The artistic path I chose to follow was to use a mix of realistic lights with low-poly models.

image3.png
Image showing a 3D model of the city and the Three.js experience next to it.

Performance

Part of what I wanted with this project was to apply techniques that would perform well on different devices, especially mobile. It needed to work on as many devices as possible, with an acceptable frame rate (at least 30 fps). I also wanted the experience to load as quickly as possible, with a file size smaller than 2MB.

In order to accomplish this, I had to use a series of techniques that I will describe below.

Image showing the wireframe on the model within Blender of the model, where it all started.

Creating the 3D model in Blender

I used Blender to make the city model. I imported part of the buildings from free templates on the Internet. I modified a few of them to better match the setting. To make the terrain, I used Blender’s sculpt mode, creating valleys and peaks that look beautiful with light and shadow.

Image showing the 3D model in Blender in wireframe mode.

Each model was optimized considering the number of triangles when exporting. I chose to use the GLB format because the compression with Draco does incredible compression – sometimes 7x smaller, in file size. In addition, all project resources are also compressed at runtime, on the server with gzip, for a more reduced transfer.

Creating natural light

Lighting in games is fascinating – the way shadow interacts with the terrain in order to create a scene that’s pleasing to the eye while not being held back by reality. I used Blender’s global lighting system, with a “world” node, using “Nishita” ambient lighting. This allows for very natural lighting, with ambient settings that quickly give a pleasing result.

Image showing the lighting of the sun in different positions and superimposed on the blender’s nishita sun parameter.

Distributing trees in Blender with geometry nodes

Trees play an important role, as they help create a cast shadow that gives the terrain a touch of realism. I used Blender’s GeometryNodes to distribute the trees in the model and create a variation in size, shape, and rotation. I also used the material selector, to choose the regions that would have more or fewer trees, painting the density with the material selection.

Image showing the blender interface with the geometry nodes created to distribute the trees in the scene.

Bake lighting for export

In order for the experience to function and perform well in Three.js, it’s important that the scene loads the lighting baked into the textures. I created a single texture for the floor of 2048×2048, containing all of the shadows. The process of how to do the bake of shadows can be found in several tutorials on the internet. The end result is impressive and has no impact on performance.

Image showing the 3D model in blender with the baked lighting texture.

Export to Three.js and the tree performance issue

After finishing the bake and connecting the texture to the color node in the ground mesh, I exported all of the meshes to GLTF format. The entire model, using DRACO COMPRESSION, is 1.2MB. However, we have a problem with the trees: they cannot be exported all at once, as it would take too long for the GPU to finish the process.

I created the trees using the MESH SURFACE SAMPLER from Three.js, which serves exactly this purpose. You can use a model and distribute it on a surface, creating variations of the same model, but making modifications to each of them. Thus, the performance is incredible, even with a very large number of variations.

You can see an example of this in the official Three.js documentation.

Image showing the MeshSurfaceSampler code inside the VSCODE and the Three.js scene image with the projected trees.

Loading everything in Three.js

Using my boilerplate (see more about this at the end of the article), which I created to simplify things, I loaded the exported model. Afterwards, I spent a lot of time adjusting the light coloring, intensities, and other small details that make all the difference. The result of rendering in 3D is no always great for the experience in Three.js using the default parameters.

Image showing the evolution of the model within the Three.js and the color changes as a before and after.

It is essential to use the DAT.GUI to be able to visually adjust the parameters. It is impossible to get the colors and intensities right by guessing the numbers.

Image showing the Three.js DAT.GUI highlighted

Using VertexShader for the animation of the trees

One thing that brings reality to the scene is the smooth animation of the trees. Doing this is possible by exporting the animation directly from Blender, but performance would be greatly impacted – especially given the large number of trees.

The best approach in these cases is to animate using VertexShader, using GPU processing directly on the positioning of vertices in the 3D world. With that, the performance is very good and the animations are beautiful.

VSCODE screenshot showing part of the vertex shader responsible for animating the trees along with an image of the animated trees inside the Three.js

Animating the birds and other elements of the experience

The other animated elements of the experience, such as the helicopter, car, and wind turbines, were animated by changing the rotation of the model pieces directly in the render loop. It’s a very simple way to animate.

The birds were animated differently. I wanted them to have wing movement and a sense of grouping. So, I animated the whole group inside blender and exported the animation along with the GLFT file. I used the Animation Mixer to animate the wings while changing the group’s position. The result is quite convincing and very lightweight (only 200kb).

Image showing the birds and their animation timeline inside blender and the same birds inside Three.js.

Lights, shadows, and the night mode + apocalyptic

As the shadows are baked inside the imported GLB file, I was able to gain some performance by not having to use a dynamically generated shadow map inside Three.js.

I played around with the lighting effects, creating a night mode and an apocalyptic mode. It’s a lot of fun to have that kind of creative freedom without having to modify the template. The possibilities are endless.

The apocalyptic mode is an easter egg, accessible to anyone who knows how to activate it :).

Image showing night mode and apocalyptic mode.

Post Processing with Effect Composer

I’ve always loved the depth-of-field effect in games, but I thought it would be very difficult to use something like that in a Three.js experience. Thanks to the latest updates to the library, it’s much easier.

Using EffectComposer, I was able to use the BokehPass effect in day mode, which generates a dynamic depth-of-field effect, based on the distance from the camera. For night mode, I use UnrealBlooomPass, which makes the lights super exposed, ideal for this type of situation.

I change the effects between night and day mode for performance reasons – using the insertPass() and removePass() methods.

Clicking and Selecting a Building

A lot of people asked me how to make buildings clickable UI items. This was done using Three.js’ RayCaster, which detects an intersection between an invisible ray, fired by the camera, and the mouse. With this, I can detect when a building has been selected and – based on its name – trigger an event.

Image showing the source code inside the VSCODE responsible for making the object selection raycaster and the camera animation.

The animations that happen when clicking on a building were done using TWEEN.JS, by animating the initial camera position into the position of the clicked building. That way, I can place multiple buildings and have an animation generated automatically.

Responsive tweaks: Also working on mobile

Part of the work also involved tweaking the experience parameters to work well on mobile devices. Not just the responsive adjustments to the HTML and CSS, but also to the camera parameters, animation duration, and several other details.

image16.jpg
Image showing Windland running in mobile mode with responsiveness.

Dynamic quality: Adjusting performance dynamically with the power of the user device

Despite all the optimizations, some devices still cannot run all the effects, especially the post-processing ones. So I created a script that measures the FPS at the beginning of the experiment (during the loading process). That way, when the experiment starts, Three.js knows whether or not to activate certain effects to save on processing and ensure that the performance is within what is possible for that device.

image9.png
Image showing code inside the VSCODE responsible for detecting the FPS.

Also working on smartwatches

As a proof of concept, I wanted to demonstrate that experiments done in Three.js are not heavy to process and run even on a smartwatch. During this process, I found that the number of vertices in the model is what would most impact performance on these devices. So, I created an “ultra-low poly” mode of the model to be used on mobile devices. Ready! Nothing else in the code needed to be changed.

image8.png
Image showing Windland running on a smartwatch

Three.js Boilerplate: Create your own Windland

To make it easier to create projects in Three.js, I’ve created an easy-to-use, well-documented, and free starter project. So, using this boilerplate, you will be able to create a scene in Three.js in just a few lines and import a model. The boilerplate also has instructions on how to export the model and some other information that can help you create your city.

Find the repository on GitHub: https://github.com/ektogamat/threejs-andy-bolierplate

Watch the video on how to use it: https://www.youtube.com/watch?v=qM6Ih_cC6Gc

image17.png

Interesting facts

Some people ask: What is the advantage of making a project using Three.js and not just use a rendered image for a website? Well, a rendered image of this scene at 1920×1080 is approximately 2.8mb in size, with reasonable compression. This whole scene in Three.js, with all its interactivity, animations, interface and everything you see in the animations is only 1.8mb.

Windland was awarded an Honorable Mention at Awwwards on March 31, 2022. It transformed itself from a test project into a Three.js use case to complex scenes that mimic the look and feel of games.

Three.js is increasingly my favorite library. You can find more videos on my YouTube channel or on my official Twitter.

Thanks for your time 🙂

The post Case Study: Windland — An Immersive Three.js Experience appeared first on Codrops.

Challenges When Developing a GUI for FIX

This article explores the challenges in developing a graphical user interface (GUI) for Financial Information eXchange (FIX) data. FIX is both a protocol and a message format, but to create a FIX GUI we will focus just on the message format. A FIX message is a standard message format for transmitting financial and investment banking data.

Below is an example of a FIX message:

A Guide To Undoing Mistakes With Git (Part 2)

In this second part of our series on "Undoing Mistakes with Git", we’ll bravely look danger in the eye again: I’ve prepared four new doomsday scenarios — including, of course, some clever ways to save our necks! But before we dive in: take a look at the check out previous articles on Git for even more self-rescue methods that help you undo your mistakes with Git!

Let’s go!

Recovering a Deleted Branch Using the Reflog

Have you ever deleted a branch and, shortly after, realized that you shouldn’t have? In the unlikely event that you don’t know this feeling, I can tell you that it’s not a good one. A mixture of sadness and anger creeps up on you, while you think of all the hard work that went into that branch’s commits, all the valuable code that you’ve now lost.

Luckily, there’s a way to bring that branch back from the dead — with the help of a Git tool named "Reflog". We had used this tool in the first part of our series, but here’s a little refresher: the Reflog is like a journal where Git notes every movement of the HEAD pointer in your local repository. In other, less nerdy words: any time you checkout, commit, merge, rebase, cherry-pick, and so on, a journal entry is created. This makes the Reflog a perfect safety net when things go wrong!

Let’s take a look at a concrete example:

$ git branch
* feature/login
master

We can see that we currently have our branch feature/login checked out. Let’s say that this is the branch we’re going to delete (inadvertently). Before we can do that, however, we need to switch to a different branch because we cannot delete our current HEAD branch!

$ git checkout master
$ git branch -d feature/login

Our valuable feature branch is now gone — and I’ll give you a minute to (a) understand the gravity of our mistake and (b) to mourn a little. After you’ve wiped away the tears, we need to find a way to bring back this branch! Let’s open the Reflog (simply by typing git reflog) and see what it has in store for us:

Here are some comments to help you make sense of the output:

  • First of all, you need to know that the Reflog sorts its entries chronologically: the newest items are at the top of the list.
  • The topmost (and therefore newest) item is the git checkout command that we performed before deleting the branch. It’s logged here in the Reflog because it’s one of these "HEAD pointer movements" that the Reflog so dutifully records.
  • To undo our grave mistake, we can simply return to the state before that — which is also cleanly and clearly recorded in the Reflog!

So let’s try this, by creating a new branch (with the name of our "lost" branch) that starts at this "before" state SHA-1 hash:

$ git branch feature/login 776f8ca

And voila! You’ll be delighted to see that we’ve now restored our seemingly lost branch! 🎉

If you’re using a Git desktop GUI like "Tower", you can take a nice shortcut: simply hit CMD + Z on your keyboard to undo the last command — even if you’ve just violently deleted a branch!

Luckily, these types of problems can be easily corrected. Let’s roll up our sleeves and get to work.

The first step is to switch to the correct destination branch and then move the commit overusing the cherry-pick command:

$ git checkout feature/login
$ git cherry-pick 776f8caf

You will now have the commit on the desired branch, where it should have been in the first place. Awesome!

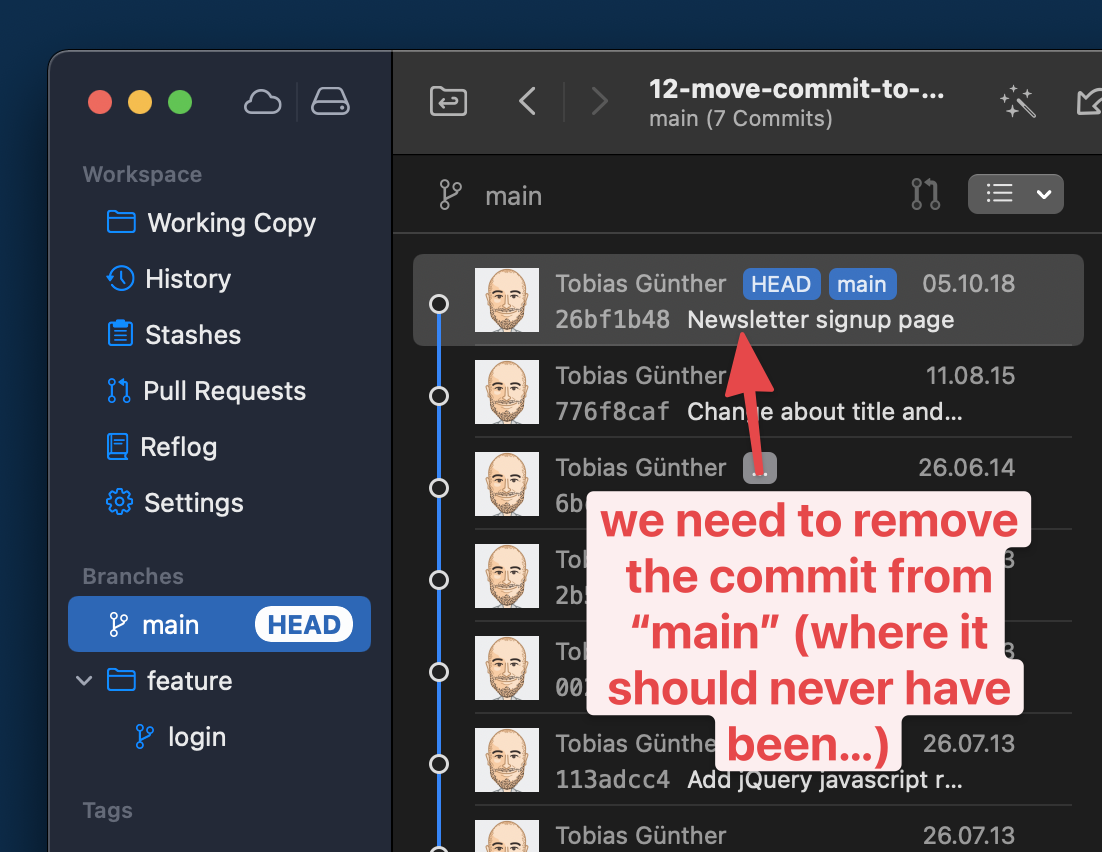
But there’s still one thing left to do: we need to clean up the branch where it accidentally landed at first! The cherry-pick command, so to speak, created a copy of the commit — but the original is still present on our long-running branch:

This means we have to switch back to our long-running branch and use git reset to remove it:

$ git checkout main
$ git reset --hard HEAD~1

As you can see, we’re using the git reset command here to erase the faulty commit. The HEAD~1 parameter tells Git to "go back 1 revision behind HEAD", effectively erasing the topmost (and in our case: unwanted) commit from the history of that branch.

And voila: the commit is now where it should have been in the first place and our long-running branch is clean — as if our mistake had never happened!

Editing the Message of an Old Commit

It’s all too easy to smuggle a typo into a commit message — and only discover it much later. In such a case, the good old --amend option of git commit cannot be used to fix this problem, because it only works for the very last commit. To correct any commit that is older than that, we have to resort to a Git tool called "Interactive Rebase".

First, we have to tell Interactive Rebase which part of the commit history we want to edit. This is done by feeding it a commit hash: the parent commit of the one we want to manipulate.

$ git rebase -i 6bcf266b

An editor window will then open up. It contains a list of all commits after the one we provided as a basis for the Interactive Rebase in the command:

Here, it’s important that you don’t follow your first impulse: in this step, we do not edit the commit message, yet. Instead, we only tell Git what kind of manipulation we want to do with which commit(s). Quite conveniently, there’s a list of action keywords noted in the comments at the bottom of this window. For our case, we mark up line #1 with reword (thereby replacing the standard pick).

All that’s left to do in this step is to save and close the editor window. In return, a new editor window will open up that contains the current message of the commit we marked up. And now is finally the time to make our edits!

Here’s the whole process at a glance for you:

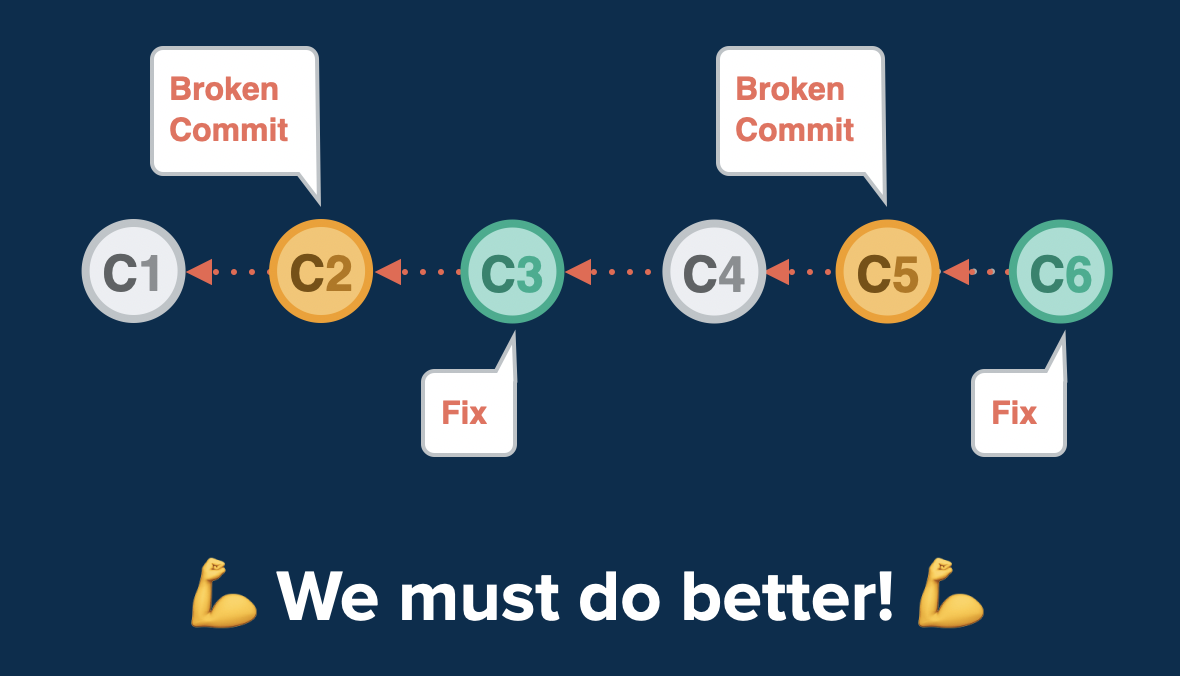
This is where fixup comes in. It allows you to still make this correcting band-aid commit. But here comes the magic: it then applies it to the original, broken commit (repairing it that way) and then discards the ugly band-aid commit completely!

We can go through a practical example together! Let’s say that the selected commit here is broken.

Let’s also say that I have prepared changes in a file named error.html that will solve the problem. Here’s the first step we need to make:

$ git add error.html
$ git commit --fixup 2b504bee

We’re creating a new commit, but we’re telling Git this is a special one: it’s a fix for an old commit with the specified SHA-1 hash (2b504bee in this case).

The second step, now, is to start an Interactive Rebase session — because fixup belongs to the big toolset of Interactive Rebase.

$ git rebase -i --autosquash 0023cddd

Two things are worth explaining about this command. First, why did I provide 0023cddd as the revision hash here? Because we need to start our Interactive Rebase session at the parent commit of our broken fellow.

Second, what is the --autosquash option for? It takes a lot of work off our shoulders! In the editor window that now opens, everything is already prepared for us:

Thanks to the --autosquash option, Git has already done the heavy lifting for us:

  1. It marked our little band-aid commit with the fixup action keyword. That way, Git will combine it with the commit directly above and then discard it.
  2. It also reordered the lines accordingly, moving our band-aid commit directly below the commit we want to fix (again: fixup works by combining the marked-up commit with the one above!).

In short: There’s nothing to do for us but close the window!

Let’s take a final look at the end result.

  • The formerly broken commit is fixed: it now contains the changes we prepared in our band-aid commit.
  • The ugly band-aid commit itself has been discarded: the commit history is clean and easy to read — as if no mistake had occurred at all.

Knowing How to Undo Mistakes is a Superpower

Congratulations! You are now able to save your neck in many difficult situations! We cannot really avoid these situations: no matter how experienced we are as developers, mistakes are simply part of the job. But now that you know how to deal with them, you can face them with a laid-back heart rate. 💚

If you want to learn more about undoing mistakes with Git, I can recommend the free "First Aid Kit for Git", a series of short videos about exactly this topic.

Have fun making mistakes — and, of course, undoing them with ease!

GUI development help with python

Dear friends:

I need to develop a numerical computation software with a GUI interface like the attachment. I have tried tkinter package, but it seems that it can not resolve this mission. 
Could you please give me some suggestions about which package should i use to obtain this goal. 
Regards

2021-03-05_14-49-49.png

Distribution of JVM Desktop Applications

The previous posts of this series focused on different frameworks to develop JVM-based applications.

Distributing applications on a couple of computers inside the same company is not an issue. A lot of products are available for automating the pushing of files onto computers. Issues might start to appear when you need to coordinate the deployment across different physical sites.

Getting The Most Out Of Git

Not a single project today will get away without some sort of version control with Git under the hood. Knowing Git well helps you become a better developer, boost your developer’s workflow and truly improve the quality of your code base. However, that requires going a little bit outside of the comfort zone that we are all familiar with. As it turns out, there is a bit more to Git than just commit, push and pull.

Some developers stay true to the main principles in Git, and often that’s absolutely understandable. In the front-end world of ours, there are just so many sophisticated things to understand and get better at, that frankly Git is often not a high priority. As a side effect, many of the valuable techniques that can boost a developer’s workflow remain unnoticed and rarely discovered.

In this article, we'll explore four advanced Git tools, and hopefully, whet your appetite to learn even more about Git!

Recovering Deleted Commits

You’re convinced that you’ve programmed yourself into a dead end because your last two commits lead nowhere! Understandably, you might want to undo them and start over.

Here’s one way to do this:

$ git reset --hard 2b504be

But let’s also say that, moments later, you notice that you made a mistake: actually, the commits contained important data and you just lost valuable work! 😱

Your heart starts pumping, the sweat starts running — you know the drill. 🤯

Now, the million-dollar question is: How can we get those seemingly deleted commits back? Luckily, there is an answer: the "Reflog"!

Using the Reflog to Recover Lost States

You can think of the Reflog as Git’s "diary": it’s the place where Git protocols every movement of the HEAD pointer. Or, in other words: all of the more interesting actions like when you commit, merge, checkout, rebase, cherry-pick and others. This, of course, makes it a perfect tool for those inevitable situations when things go wrong.

Let’s open the Reflog for our example scenario and see how it can help us:

$ git reflog

The first and most important thing to know about the Reflog is that it’s ordered chronologically. And indeed: the topmost (in other words: newest) item is our mishap when we had hastily used git reset and lost some commits.

The solution to fix our problem is pretty easy: we can simply return to the state before the mistake. And that state is clearly protocoled in the Reflog, right below our fatal reset command. To undo our mistake, we can simply use git reset once more to recover this seemingly lost state:

$ git reset e5b19e4

You can also accomplish the same result a little bit faster. As a group of friendly and passionate developers on "Tower" Git desktop GUI, we’ve been aiming to resolve common pain points around Git heads-on. So in our little tool, you can achieve the same results by simply hitting CMD + Z — as if you wanted to correct a simple typo in your text editor. In fact, the same hotkey is available for a family of different actions, e.g. when you’ve wrongfully deleted a branch, made a mistake with a merge operation, or committed something on the wrong branch.

to correct this mistake, we’ll initiate an Interactive Rebase session, starting at the faulty commit’s parent revision:

git rebase -i 2b504be

An editor window will then open and allow us to manipulate the selected part of our commit history:

In our case, since we want to delete a commit, we simply mark up the respective line in the editor with the drop action keyword. Once we hit "Save" in our editor and close the window, the Interactive Rebase is completed — and the unwanted commit will have disappeared!

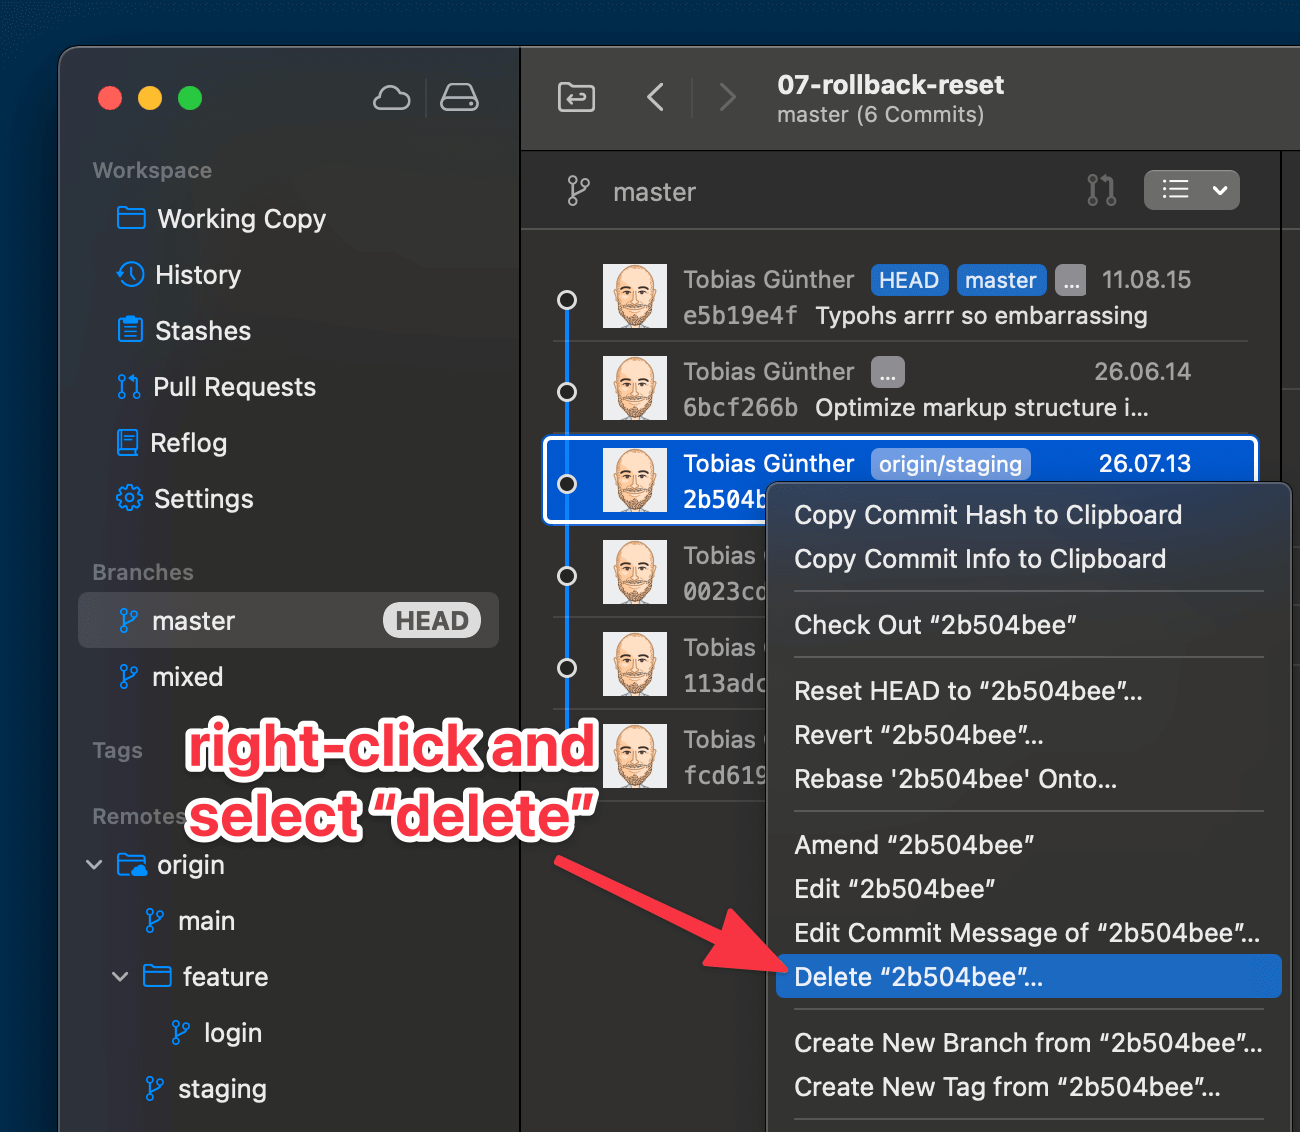
(Just a quick note: again, if you’re using a desktop GUI like Tower, you can take a shortcut: simply right-click the unwanted commit and select the "Delete..." option from the contextual menu.)

As mentioned above, Interactive Rebase has a lot more use cases to offer! If you’d like to learn more about Interactive Rebase and what it can do, take a look at the free “First Aid Kit for Git”: a collection of short, helpful, and free videos, all around undoing mistakes with Git.

Using Submodules To Manage Third-Party Code

In today’s complex software world, there’s hardly a project that doesn't include code from other sources: a module or library from a third party or even from your own team. Managing these modules in an elegant, pragmatic way greatly helps to reduce headaches!

In theory, you could simply copy and paste the necessary code files into your project and then commit them to your code base. But this comes with a couple of downsides. Most importantly, you’ll have a very hard time updating third-party code when new versions become available. You’d have to download the code again and copy-paste it — again and again.

Additionally, it’s considered bad practice if you squeeze multiple projects (your actual project and all the third-party libraries you might need) into a single Git repository. This mixes external code with our own, unique project files.

A much better way to do this is to use Git’s "Submodule" structure: this allows you to include third-party code simply as a Git repository inside your actual project’s Git repository. This means that all code bases remain neatly separated.

Including a third-party module / library is as easy as executing the following Git command:

$ git submodule add https://github.com/djyde/ToProgress

This command will download a clone of the specified Git repository into your project. You’ll be left with a fully-functional, nicely separated Git repository of your third-party code. Tidy, clean and flexible.

Submodules, admittedly, are quite a complex topic when it comes to handling them in practice. If you want to understand them a bit more thoroughly, check out the “Submodules” chapter of the free "Learn Version Control with Git" online book.

Composing Commits With Precision

There’s a golden rule in version control: a commit should only contain changes from a single issue! When you stick to this rule, you will create commits that are easy to understand. When you don’t — when multiple issues and topics get crammed into the same commit — you will inflict chaos on your code base in almost no time.

In practice, this means that you create separate commits for each and every topic. Even if it’s just a small bug fix where you’re changing only a semicolon: it’s a topic of its own, so it gets a commit of its own!

But in the messy real world, we often don’t work at only one topic at a time. Or we think we do, and only later discover that our code from the last three hours actually involves three different topics. This trickles down to individual files: often, the changes in a single file belong to multiple topics.

That’s when adding a complete file to the next commit isn’t the best strategy anymore.

Staging Selected Parts of Your Changed Files

In the example case below, you can see that we currently have two chunks (= parts or areas) of modifications in our file imprint.html:

Let’s say that the first chunk belongs to one topic (maybe we’re in the process of unifying and cleaning up all page titles in our project). And let’s also say that the second chunk belongs to another, completely unrelated topic.

A simple git add imprint.html, i.e. adding the whole file to Staging, would cram all of its changes into the same commit. Our colleagues, then, would have a hard time understanding what this particular commit was really about. Seeing some titles being changed, they might think it was only about the “title clean-up project”, but they might very well overlook the other changes.

Luckily, Git allows us to precisely select the chunks we want to put into the next commit! All we have to do is add the -p flag to our git add command:

$ git add -p imprint.html

Git now takes us by the hand and walks us through each and every chunk of changes in that file. And for each one, it asks us a simple question: “Stage this chunk?”

Let’s type Y (for “Yes”) for the first one and N for the second one. When we then actually make our commit, only the first chunk of changes will be included. The second one remains as an uncommitted local change in our working copy for a later, separate commit.

If you’re using Git in a desktop GUI, you might be able to do this right through the interface:

Becoming More Productive with Git

This short article was just a short glimpse into some of the advanced features in Git. But I sincerely hope it shows that Git has so many powerful features under the hood! From Interactive Rebase to Submodules and from the Reflog to File History, it pays to learn these advanced features because they help you become more productive and make fewer mistakes.

If you want to dive deeper, here are some helpful (and free) resources:

  • Git Cheat Sheet
    If you want to keep the most important commands at hand, the “Git Cheat Sheet" might be for you. Available in English, German, Spanish, Portuguese, Arabic and Chinese.
  • Undoing Mistakes
    Git is a perfect safety net for when things go wrong. Learning about the different “undo” features in Git is time well spent for any developer. The "First Aid Kit for Git", a collection of short videos, provides a great introduction.

Have fun becoming a better developer!

The State of JVM Desktop Frameworks: Jetpack Compose for Desktop

The previous posts of this series were dedicated to frameworks that adopted the same traditional Object-Oriented-Programming approach. Components were modeled as classes. This week's post is dedicated to Jet Compose for Desktop, the new kid on the block that offers a completely different approach.

  1. The state of JVM desktop frameworks: Introduction
  2. The state of JVM desktop frameworks: Swing
  3. The state of JVM desktop frameworks: SWT
  4. The state of JVM desktop frameworks: TornadoFX

Getting Your Feet Wet

Originally, Jetpack Compose was a framework for the Android runtime. Compose for Desktop is its port to the JVM.

The State of JVM Desktop Frameworks: TornadoFX

The two previous posts of this series were respectively dedicated to Swing and SWT. This post is dedicated to Tornado FX, which itself is built on JavaFX.

  1. The State of JVM Desktop Frameworks: Introduction
  2. The State of JVM Desktop Frameworks: Swing
  3. The State of JVM Desktop Frameworks: SWT

JavaFX

JavaFX started as a scripting language named JavaFX script. Sun Microsystems intended to use it to compete with Adobe Flex (now Apache Flex) and Microsoft Silverlight to a lesser extent.

The State of JVM Desktop Frameworks: SWT

This series is dedicated to the state of JVM desktop frameworks. After having had a look at Swing last week, this post focuses on the Standard Widget Toolkit.

  1. The State of JVM Desktop Frameworks: Introduction
  2. The State of JVM Desktop Frameworks: Swing

What Is SWT?

SWT originated with the Eclipse project as an IDE. The developers built a dedicated framework for Eclipse in which to build their graphic components. Swing and SWT have widely different designs. Swing implements the drawing of widgets in Java from scratch. SWT is a thin wrapper API that relies on native graphic objects. This has two main benefits:

The State of JVM Desktop Frameworks: Swing

In the first post of this series, we went through the rise and fall of some of the desktop frameworks, mainly Java ones. This post and the following will each focus on a single JVM framework. To compare between them, a baseline is in order. Thus, we will develop the same application using different frameworks. Will use the Kotlin language because some of the frameworks require Kotlin.

This post focuses on the Swing API.

Knobs for Demos

CodePen is full of prototypes and loaded with full-blown art. Generative art is common, since hey, we’re working with code anyway, might as well make some of the code randomized and adjustable. There is a great project that has been around years and years that is purpose-built for giving users a UI to change values on-the-fly called dat.GUI. I once blogged about it right here on the CodePen Blog because I wanted to showcase how useful it can be for generative art Pens. While dat.GUI is still pretty cool and perfectly usable, there is a new player on the block.

Introducing Knobs by Yair Even Or! Demo first:

To me, the API and configuration is really clear and usable. I like how it is also modernized by using stuff like <input type="range"> for the sliders rather than re-inventing that. And the focus on changing CSS custom properties is very clever. Plus, you can style the controls themselves.

I snagged it and updated my Gray Burst idea from the other day to have a stroke-width knob:

I wish every generative art Pen had knobs!

The post Knobs for Demos appeared first on CodePen Blog.

Bmi calculator GUI

Anyone can help me on my GUI. I'm making a BMI calcu GUI. But I don't know hot to input to my check bmi button. Im a total beginner btw. What code I need to add in a button to perform bmi calculation?

CSS in 3D: Learning to Think in Cubes Instead of Boxes

My path to learning CSS was a little unorthodox. I didn’t start as a front-end developer. I was a Java developer. In fact, my earliest recollections of CSS were picking colors for things in Visual Studio.

It wasn’t until later that I got to tackle and find my love for the front end. And exploring CSS came later. When it did, it was around the time CSS3 was taking off. 3D and animation were the cool kids on the block. They almost shaped my learning of CSS. They drew me in and shaped (pun intended) my understanding of CSS more than other things, like layout, color, etc.

What I’m getting at is I’ve been doing the whole 3D CSS thing a minute. And as with anything you spend a lot of time with, you end up refining your process over the years as you hone that skill. This article is a look at how I’m currently approaching 3D CSS and goes over some tips and tricks that might help you!

Everything’s a cuboid

For most things, we can use a cuboid. We can create more complex shapes, for sure but they usually take a little more consideration. Curves are particularly hard and there are some tricks for handling them (but more on that later).

We aren’t going to walk through how to make a cuboid in CSS. We can reference Ana Tudor’s post for that, or check out this screencast of me making one:

At its core, we use one element to wrap our cuboid and then transform six elements within. Each element acts as a side to our cuboid. It’s important that we apply transform-style: preserve-3d. And it’s not a bad idea to apply it everywhere. It’s likely we’ll deal with nested cuboids when things get more complex. Trying to debug a missing transform-style while hopping between browsers can be painful.

* { transform-style: preserve-3d; }

For your 3D creations that are more than a few faces, try and imagine the whole scene built from cuboids. For a real example, consider this demo of a 3D book. It’s four cuboids. One for each cover, one for the spine, and one for the pages. The use of background-image does the rest for us.

Setting a scene

We’re going to use cuboids like LEGO pieces. But, we can make our lives a little easier by setting a scene and creating a plane. That plane is where our creation will sit and makes it easier for us to rotate and move the whole creation.

For me, when I create a scene, I like to rotate it on the X and Y axis first. Then I lay it flat with rotateX(90deg). That way, when I want to add a new cuboid to the scene, I add it inside the plane element. Another thing I will do here is to set position: absolute on all cuboids.

.plane {
  transform: rotateX(calc(var(--rotate-x, -24) * 1deg)) rotateY(calc(var(--rotate-y, -24) * 1deg)) rotateX(90deg) translate3d(0, 0, 0);
}

Start with a boilerplate

Creating cuboids of various sizes and across a plane makes for a lot of repetition for each creation. For this reason, I use Pug to create my cuboids via a mixin. If you’re not familiar with Pug, I wrote a 5-minute intro.

A typical scene looks like this:

//- Front
//- Back
//- Right
//- Left
//- Top
//- Bottom
mixin cuboid(className)
  .cuboid(class=className)
    - let s = 0
    while s < 6
      .cuboid__side
      - s++
.scene
  //- Plane that all the 3D stuff sits on
  .plane
    +cuboid('first-cuboid')

As for the CSS. My cuboid class is currently looking like this:

.cuboid {
  // Defaults
  --width: 15;
  --height: 10;
  --depth: 4;
  height: calc(var(--depth) * 1vmin);
  width: calc(var(--width) * 1vmin);
  transform-style: preserve-3d;
  position: absolute;
  font-size: 1rem;
  transform: translate3d(0, 0, 5vmin);
}
.cuboid > div:nth-of-type(1) {
  height: calc(var(--height) * 1vmin);
  width: 100%;
  transform-origin: 50% 50%;
  position: absolute;
  top: 50%;
  left: 50%;
  transform: translate(-50%, -50%) rotateX(-90deg) translate3d(0, 0, calc((var(--depth) / 2) * 1vmin));
}
.cuboid > div:nth-of-type(2) {
  height: calc(var(--height) * 1vmin);
  width: 100%;
  transform-origin: 50% 50%;
  transform: translate(-50%, -50%) rotateX(-90deg) rotateY(180deg) translate3d(0, 0, calc((var(--depth) / 2) * 1vmin));
  position: absolute;
  top: 50%;
  left: 50%;
}
.cuboid > div:nth-of-type(3) {
  height: calc(var(--height) * 1vmin);
  width: calc(var(--depth) * 1vmin);
  transform: translate(-50%, -50%) rotateX(-90deg) rotateY(90deg) translate3d(0, 0, calc((var(--width) / 2) * 1vmin));
  position: absolute;
  top: 50%;
  left: 50%;
}
.cuboid > div:nth-of-type(4) {
  height: calc(var(--height) * 1vmin);
  width: calc(var(--depth) * 1vmin);
  transform: translate(-50%, -50%) rotateX(-90deg) rotateY(-90deg) translate3d(0, 0, calc((var(--width) / 2) * 1vmin));
  position: absolute;
  top: 50%;
  left: 50%;
}
.cuboid > div:nth-of-type(5) {
  height: calc(var(--depth) * 1vmin);
  width: calc(var(--width) * 1vmin);
  transform: translate(-50%, -50%) translate3d(0, 0, calc((var(--height) / 2) * 1vmin));
  position: absolute;
  top: 50%;
  left: 50%;
}
.cuboid > div:nth-of-type(6) {
  height: calc(var(--depth) * 1vmin);
  width: calc(var(--width) * 1vmin);
  transform: translate(-50%, -50%) translate3d(0, 0, calc((var(--height) / 2) * -1vmin)) rotateX(180deg);
  position: absolute;
  top: 50%;
  left: 50%;
}

Which, by default, gives me something like this:

Powered by CSS variables

You may have noticed a fair few CSS variables (aka custom properties) in there. This is a big time-saver. I’m powering my cuboids with CSS variables.

  • --width: The width of a cuboid on the plane
  • --height: The height of a cuboid on the plane
  • --depth: The depth of a cuboid on the plane
  • --x: The X position on the plane
  • --y: The Y position on the plane

I use vmin mostly as my sizing unit to keep everything responsive. If I’m creating something to scale, I might create a responsive unit. We mentioned this technique in a previous article. Again, I lay the plane down flat. Now I can refer to my cuboids as having height, width, and depth. This demo shows how we can move a cuboid around the plane changing its dimensions.

Debugging with dat.GUI

You might have noticed that little panel in the top right for some of the demos we’ve covered. That’s dat.GUI. It’s a lightweight controller library for JavaScript that super useful for debugging 3D CSS. With not much code, we can set up a panel that allows us to change CSS variables at runtime. One thing I like to do is use the panel to rotate the plane on the X and Y-axis. That way, it’s possible to see how things are lining up or work on a part that you might not see at first.


const {
  dat: { GUI },
} = window
const CONTROLLER = new GUI()
const CONFIG = {
  'cuboid-height': 10,
  'cuboid-width': 10,
  'cuboid-depth': 10,
  x: 5,
  y: 5,
  z: 5,
  'rotate-cuboid-x': 0,
  'rotate-cuboid-y': 0,
  'rotate-cuboid-z': 0,
}
const UPDATE = () => {
  Object.entries(CONFIG).forEach(([key, value]) => {
    document.documentElement.style.setProperty(`--${key}`, value)
  })
}
const CUBOID_FOLDER = CONTROLLER.addFolder('Cuboid')
CUBOID_FOLDER.add(CONFIG, 'cuboid-height', 1, 20, 0.1)
  .name('Height (vmin)')
  .onChange(UPDATE)
CUBOID_FOLDER.add(CONFIG, 'cuboid-width', 1, 20, 0.1)
  .name('Width (vmin)')
  .onChange(UPDATE)
CUBOID_FOLDER.add(CONFIG, 'cuboid-depth', 1, 20, 0.1)
  .name('Depth (vmin)')
  .onChange(UPDATE)
// You have a choice at this point. Use x||y on the plane
// Or, use standard transform with vmin.
CUBOID_FOLDER.add(CONFIG, 'x', 0, 40, 0.1)
  .name('X (vmin)')
  .onChange(UPDATE)
CUBOID_FOLDER.add(CONFIG, 'y', 0, 40, 0.1)
  .name('Y (vmin)')
  .onChange(UPDATE)
CUBOID_FOLDER.add(CONFIG, 'z', -25, 25, 0.1)
  .name('Z (vmin)')
  .onChange(UPDATE)
CUBOID_FOLDER.add(CONFIG, 'rotate-cuboid-x', 0, 360, 1)
  .name('Rotate X (deg)')
  .onChange(UPDATE)
CUBOID_FOLDER.add(CONFIG, 'rotate-cuboid-y', 0, 360, 1)
  .name('Rotate Y (deg)')
  .onChange(UPDATE)
CUBOID_FOLDER.add(CONFIG, 'rotate-cuboid-z', 0, 360, 1)
  .name('Rotate Z (deg)')
  .onChange(UPDATE)
UPDATE()

If you watch the timelapse video in this tweet. You’ll notice that I rotate the plane a lot as I build up the scene.

That dat.GUI code is a little repetitive. We can create functions that will take a configuration and generate the controller. It takes a little tinkering to cater to your needs. I started playing with dynamically generated controllers in this demo.

Centering

You may have noticed that by default each cuboid is half under and half above the plane. That’s intentional. It’s also something I only recently started to do. Why? Because we want to use the containing element of our cuboids as the center of the cuboid. This makes animation easier. Especially, if we’re considering rotating around the Z-axis. I found this out when creating “CSS is Cake”. After making the cake, I then decided I wanted each slice to be interactive. I then had to go back and change my implementation to fix the rotation center of the flipping slice.

Here I’ve broken that demo down to show the centers and how having an offset center would affect the demo.

Positioning

If we are working with a scene that’s more complex, we may split it up into different sections. This is where the concept of sub-planes comes in handy. Consider this demo where I’ve recreated my personal workspace.

There’s quite a bit going on here and it’s hard to keep track of all the cuboids. For that, we can introduce sub-planes. Let’s break down that demo. The chair has its own sub-plane. This makes it easier to move it around the scene and rotate it — among other things — without affecting anything else. In fact, we can even spin the top without moving the feet!

Aesthetics

Once we’ve got a structure, it’s time to work on the aesthetics. This all depends on what you’re making. But you can get some quick wins from using certain techniques. I tend to start by making things “ugly” then go back and make CSS variables for all the colors and apply them. Three shades for a certain thing allows us to differentiate the sides of a cuboid visually. Consider this toaster example. Three shades cover the sides of the toaster:

https://codepen.io/jh3y/pen/KKVjLrx

Our Pug mixin from earlier allows us to define class names for a cuboid. Applying color to a side usually looks something like this:

/* The front face uses a linear-gradient to apply the shimmer effect */
.toaster__body > div:nth-of-type(1) {
  background: linear-gradient(120deg, transparent 10%, var(--shine) 10% 20%, transparent 20% 25%, var(--shine) 25% 30%, transparent 30%), var(--shade-one);
}
.toaster__body > div:nth-of-type(2) {
  background: var(--shade-one);
}
.toaster__body > div:nth-of-type(3),
.toaster__body > div:nth-of-type(4) {
  background: var(--shade-three);
}
.toaster__body > div:nth-of-type(5),
.toaster__body > div:nth-of-type(6) {
  background: var(--shade-two);
}

It’s a little tricky to include extra elements with our Pug mixin. But let’s not forget, every side to our cuboid offers two pseudo-elements. We can use these for various details. For example, the toaster slot and the slot for the handle on the side are pseudo-elements.

Another trick is to use background-image for adding details. For example, consider the 3D workspace. We can use background layers to create shading. We can use actual images to create textured surfaces. The flooring and the rug are a repeating background-image. In fact, using a pseudo-element for textures is great because then we can transform them if needed, like rotating a tiled image. I’ve also found that I get flickering in some cases working directly with a cuboid side.
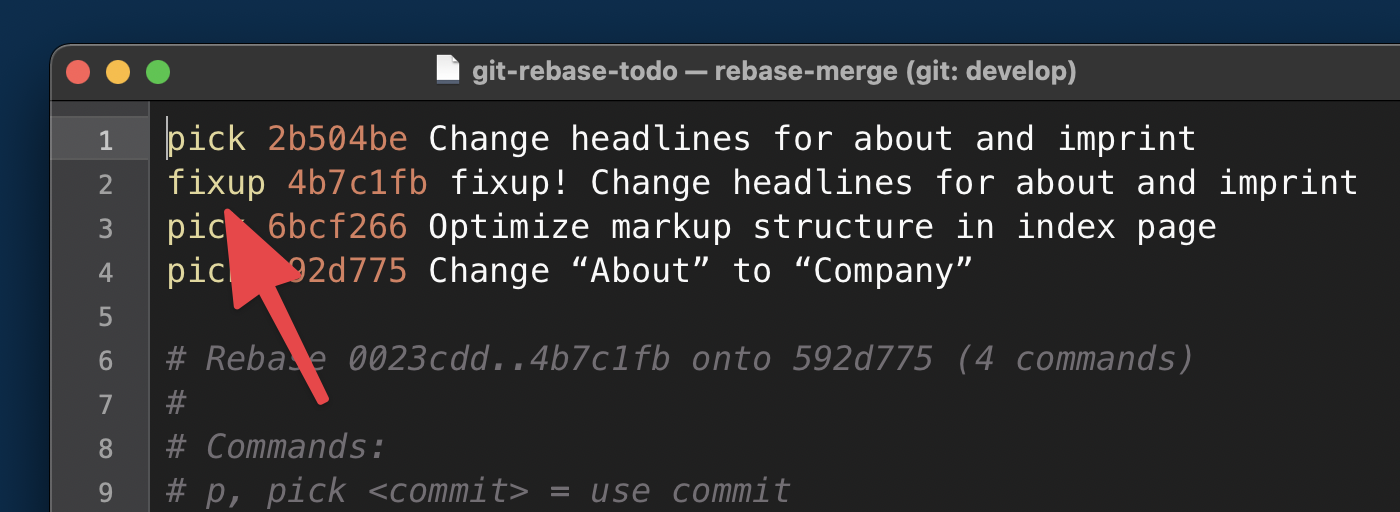
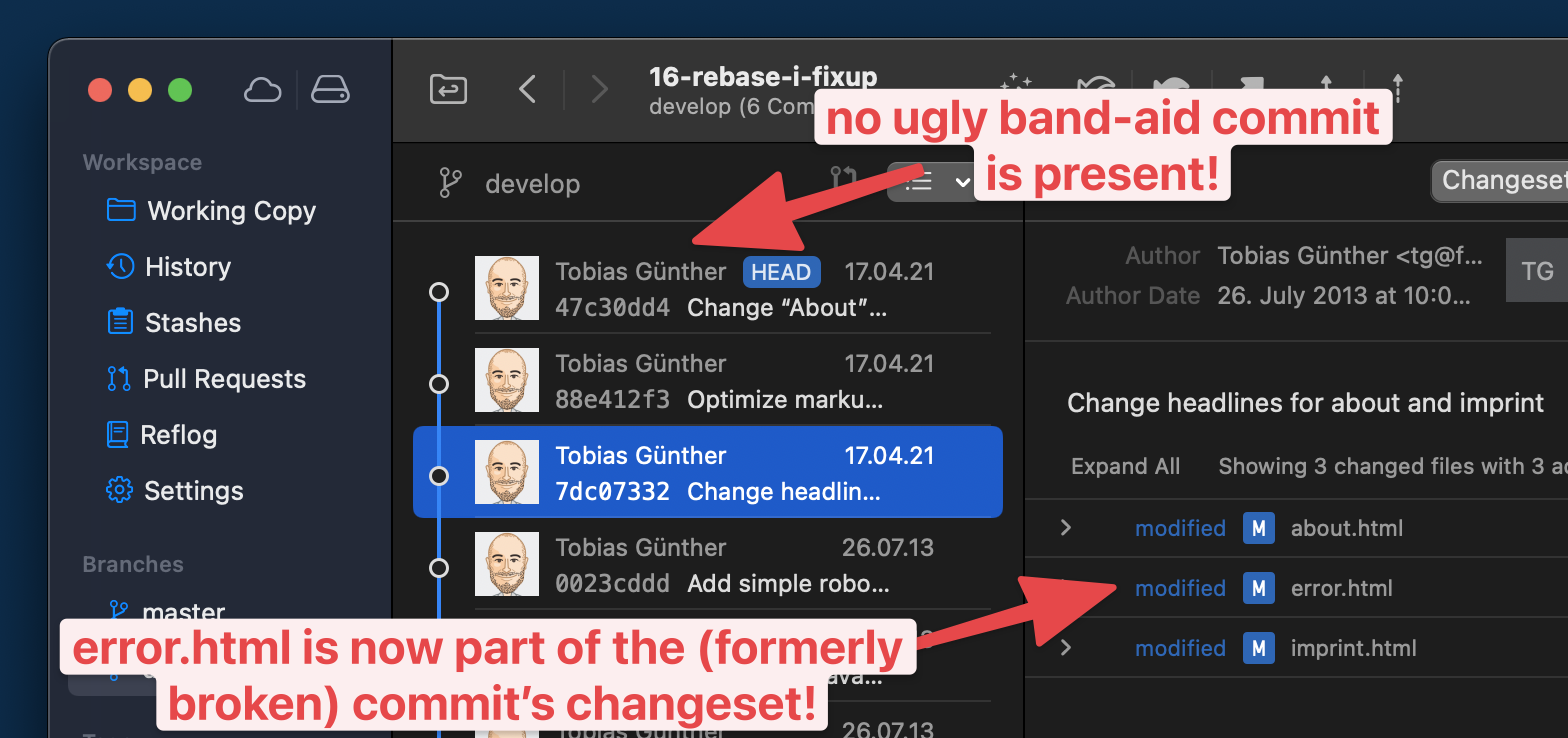
One issue with using an image for texture is how we create different shades. We need shades to differentiate the different sides. That’s where the filter property can help. Applying a brightness``() filter to the different sides of a cuboid can lighten or darken them. Consider this CSS flipping table. All the surfaces are using a texture image. But to differentiate the sides, brightness filters are applied.

Smoke and mirrors perspective

How about shapes — or features we want to create that seem impossible — using a finite set of elements? Sometimes we can trick the eye with a little smoke and mirrors. We can provide a “faux” like sense of 3D. The Zdog library does this well and is a good example of this.

Consider this bundle of balloons. The strings holding them use the correct perspective and each has its own rotation, tilt, etc. But the balloons themselves are flat. If we rotate the plane, the balloons maintain the counter plane rotation. And this gives that “faux” 3D impression. Try out the demo and switch off the countering.

Sometimes it takes a little out-of-the-box thinking. I had a house plant suggested to me as I built the 3D workspace. I have a few in the room. My initial thought was, “No, I can make a square pot, and how would I make all the leaves?” Well actually, we can use some eye tricks on this one too. Grab a stock image of some leaves or a plant. Remove the background with a tool like remove.bg. Then position many images in the same spot but rotate them each a certain amount. Now, when they’re rotated, we get the impression of a 3D plant.

Tackling awkward shapes

Awkward shapes are tough to cover in a generic way. Every creation has its own hurdles. But, there is a couple of examples that could help give you ideas for tackling things. I recently read an article about the UX of LEGO interface panels. In fact, approaching 3D CSS work like it’s a LEGO set isn’t a bad idea. But the LEGO interface panel is a shape we could make with CSS (minus the studs — I only recently learned this is what they are called). It’s a cuboid to start with. Then we can clip the top face, make the end face transparent, and rotate a pseudo-element to join it up. We can use the pseudo-element for adding the details with some background layers. Try turning the wireframe on and off in the demo below. If we want the exact heights and angles for the faces, we can use some math to workout the hypoteneuse etc.

Another awkward thing to cover is curves. Spherical shapes are not in the CSS wheelhouse. We have various options at this point. One option is to embrace that fact and create polygons with a finite number of sides. Another is to create rounded shapes and use the rotation method we mentioned with the plant. Each of these options could work. But again, it’s on a use case basis. Each has pros and cons. With the polygon, we surrender the curves or use so many elements that we get an almost curve. The latter could result in performance issues. With the perspective trick, we may also end up with performance issues depending. We also surrender being able to style the “sides” of the shape as there aren’t any.

Z fighting

Last, but not least, it’s worth mentioning “Z-fighting.” This is where certain elements on a plane may overlap or cause an undesirable flicker. It’s hard to give good examples of this. There’s not a generic solution for it. It’s something to tackle on a case-by-case basis. The main strategy is to order things in the DOM as appropriate. But sometimes that’s not the only issue.

Being accurate can sometimes cause issues. Let’s refer to the 3D workspace again. Consider the canvas on the wall. The shadow is a pseudo-element. If we place the canvas exactly against the wall, we are going to hit issues. If we do that, the shadow and the wall are going to fight for the front position. To combat this, we can translate things by a slight amount. That will solve the issue and declare what should sit in front.

Try resizing this demo with the “Canvas offset” on and off. Notice how the shadow flickers when there is no offset? That’s because the shadow and the wall are fighting for view. The offset sets the --x to a fraction of 1vmin that we’ve named --cm. That’s a responsive unit being used for that creation.

That’s “it”!

Take your CSS to another dimension. Use some of my tips, create your own, share them, and share your 3D creations! Yes, making 3D things in CSS can be tough and is definitely a process that we can refine as we go along. Different approaches work for different people and patience is a required ingredient. I’m interested to see where you take your approach!

The most important thing? Have fun with it!


The post CSS in 3D: Learning to Think in Cubes Instead of Boxes appeared first on CSS-Tricks.

You can support CSS-Tricks by being an MVP Supporter.