What, Why, and Hows of WordPress Security Keys

Do you want to learn more about WordPress security keys and salts?

WordPress uses security keys to protect your website against hacking attempts. You can use them more efficiently to improve WordPress security.

In this article, we will discuss what are WordPress security keys and salts and why you should use them.

WordPress security keys guide for beginners

What are WordPress Security Keys and SALTs?

WordPress security keys are an encryption tool that protects login information by making it harder to decode.

These keys act just like real keys and are used to lock and unlock encrypted information such as passwords, keeping your WordPress site secure.

WordPress security keys diagram

Here is how it works.

Basically, when you log in to a WordPress website, your information is stored on your computer in cookies. This allows you to continue working on your website without the need to log in on each page load.

All information is stored in encrypted form by converting it into a string of alpha-numeric and special characters.

This encrypted data can be translated using WordPress security keys. Without the keys, this data is nearly impossible to crack.

These security keys are automatically generated by your WordPress site and stored in your WordPress configuration file (wp-config.php).

There are a total of four security keys:

  • AUTH_KEY
  • SECURE_AUTH_KEY
  • LOGGED_IN_KEY
  • NONCE_KEY

Apart from WordPress security keys, you’ll also find the following SALTs.

  • AUTH_SALT
  • SECURE_AUTH_SALT
  • LOGGED_IN_SALT
  • NONCE_SALT

Salts add extra information to your encrypted info which provides another layer of security to your encrypted data.

Why Use WordPress Security Keys?

WordPress security keys protect your website against hacking attempts by making your passwords secure.

For instance, a regular password with medium-level difficulty can be easily cracked using brute force attacks.

On the other hand, a password string like ‘7C17bd5b44d6c9c37c01468b20d89c35e576914c289f98685941accddf67bf32b49’ takes years to decrypt without knowing the security keys.

That’s why you should never share WordPress security keys with anyone and protect them as you would normally protect sensitive information online.

That being said, let’s take a look at how to use WordPress security keys to keep your WordPress site protected.

How to Use WordPress Security Keys?

Normally, you don’t need to do anything extra since in most cases WordPress will automatically generate and use security keys + salts on each new WordPress install.

You can view your WordPress security keys and salts by using an FTP client or the File Manager app in your WordPress hosting account control panel.

Simply connect to your website, and open the wp-config.php file. Inside it, you’ll see your WordPress security keys defined.

Security keys WordPress configuration file

However, depending on how you initially installed WordPress, your website may not have security keys defined at all.

If your security keys are empty, then don’t worry. You can easily add them manually by going to the WordPress Security Key Generator page to generate a new set of keys.

WordPress security key generator

Next, copy and paste these keys inside your wp-config.php file, and you are done.

You can use the same method to delete your current WordPress security keys and replace them with new keys.

Note: When you replace the security keys, all users will be forced to re-login which is great for security.

Regenerate WordPress Security Keys using a Plugin

If you suspect that your website is hacked, then you need to regenerate WordPress security keys and change your passwords.

You can manually copy and paste new security keys as mentioned above. However, a much easier approach would be using a plugin. This way you can also set a schedule to automatically regenerate security keys regularly.

1. Update WordPress Security Keys using Sucuri

The easiest way to automatically regenerate WordPress security keys by using Sucuri. It is one of the best WordPress security plugins on the market that protects your WordPress website against common threats.

Simply install and activate the Sucuri Security plugin. For more details, see our step by step guide on how to install a WordPress plugin.

Upon activation, you need to visit the Sucuri Security » Settings page and switch to the Post-Hack tab.

Update security keys using Sucuri

From here, simply click on the Generate New Security Keys button under the ‘Update Secret Keys’ section.

Note: Regenerating new security keys will log you out of the WordPress admin area and you’ll need to login again.

Regenerate security keys

After that, revisit the Sucuri Security » Settings page and switch to the Post-Hack tab again.

Under the security keys section, enable the Automatic Secret Keys Updater by choosing a frequency (daily, weekly, monthly, yearly). Then click on the Submit button.

Automatically update security keys

Sucuri will now automatically reset your WordPress security keys based on the frequency you have chosen.

2. Update WordPress Security Keys using Salt Shaker

This method is for users who are not using Sucuri and need to automate security key regeneration.

First, you need to install and activate the Salt Shaker plugin. For more details, see our step by step guide on how to install a WordPress plugin.

Upon activation, you need to visit Tools » Salt Shaker page to configure plugin settings.

Update security keys with Salt Shaker

From here, you can set a schedule to automatically generate security keys. You can also just click on the ‘Change now’ button to immediately regenerate security keys.

We hope this article helped you understand what are WordPress security keys and how to use them. You may also want to see our guide on how to fix common WordPress errors, or see our expert pick of the must have WordPress plugins for your website.

If you liked this article, then please subscribe to our YouTube Channel for WordPress video tutorials. You can also find us on Twitter and Facebook.

The post What, Why, and Hows of WordPress Security Keys first appeared on WPBeginner.

Where Does WordPress Store Images on Your Site?

Are you wondering where does WordPress store images on your website?

Many WordPress beginners have asked us how does WordPress store images, and what they can to do to organize their media library more efficiently.

In this article, we’ll explain how WordPress stores images on your website. We’ll also share tools and plugins that you can use to organize your images more efficiently.

Where does WordPress store image files (Explained)

How Does WordPress Store Images?

WordPress comes with a built-in system to manage media uploads like images, videos, audio, and documents on your WordPress website.

This system allows you to easily upload images and other media to a specific folder on your WordPress hosting server.

These files are then displayed in your WordPress media library. You can view all your uploads under Media » Library page. From here, you can also edit these files, manipulate them, or even delete them.

WordPress media library

The specific folder where the image files are stored in WordPress is called the uploads folder located inside the /wp-content/ folder.

Uploads folder in WordPress

Inside the uploads folder, your media files are stored by year and month folders. Additionally, you’ll also see folders created by your WordPress plugins to save other uploads.

For instance, all your media files uploaded in June 2022 will be stored in:

/wp-content/uploads/2022/06/

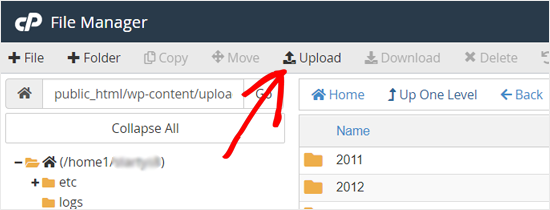
You can view these files and folders by connecting to your WordPress hosting account using an FTP client or via the File Manager app under your hosting account control panel.

Media uploads organized in year and monthly folders

You’ll notice that there are several copies of each image that uploaded on your server. These image sizes are generated automatically by WordPress when you upload an image.

Multiple image sizes

By default, you may see a thumbnail, medium, and large size of the image along with the original upload.

Apart from that, your WordPress theme or plugins may also generate additional image sizes for them to use.

Now you may be wondering how does WordPress display information about these files inside the media library?

To do that, WordPress also stores information about your image uploads in the database as an attachment post type under the posts table.

Apart from that, WordPress also saves information in the posts meta table when you insert images into posts/pages or any other custom post type.

Meta data for images stored in WordPress database

For instance, when you set a featured image, WordPress saves this information as a meta key _thumbnail_id and stores it in the postmeta table of your database.

Image meta data stored in WordPress database

The information inside your database tells WordPress the location of the file on your hosting server. Now if you delete a file from your server using FTP, then WordPress will show those images as broken.

Broken image in WordPress

Similarly, if you delete the reference to an image from your WordPress database, the file will still be intact on your hosting server but not appear in your media library.

Changing How WordPress Stores Images and Media Uploads

By default, WordPress does not allow you to change the uploads location from the WordPress admin area. The only change you can make is to disable the month and year based folders by visiting Settings » Media page.

Media settings in WordPress

From here, you can also adjust the maximum dimensions in pixels for your image uploads.

Advanced WordPress users can follow our tutorial on how to manually change the default WordPress uploads folder.

Organizing Your Images in WordPress

For most users, the default WordPress media library would work just fine.

However, if images play a more significant role in your WordPress blog, then you may need additional tools to organize your uploads.

For instance, if you run a photography website, then you may want to organize your content in Albums or tags.

For that, you will need a plugin like Envira Gallery. It is a WordPress image gallery plugin that allows you to organize your images in albums, tags, and galleries.

Envira Gallery provides albums and tags functionality for images

Allowing Users to Upload Images in WordPress

By default, WordPress allows any users who can write posts on your website to upload images. This includes users with the Administrator, Author, Editor, and Contributor user roles.

But what if you wanted other users to upload images on your website without logging into the admin area?

To do that, you’ll need the WPForms plugin. It is the best WordPress form builder plugin and allows you to easily create any kind of forms for your website.

It also comes with a file upload field that allows users to easily upload images, documents, and other files without creating a user account or accessing the WordPress admin area.

First, you need to install and activate the WPForms plugin. For more details, see our step by step guide on how to install a WordPress plugin.

Upon activation, you need to visit the WPForms » Settings page to enter your license key. You can find this information under your account on WPForms website.

Entering your WPForms license key

Next, you need to visit WPForms » Add New page to create your image upload form.

First, you need to provide a title for your form. After that, you can look for File Upload Form template to get started.

File upload form

WPForms will now load the form builder interface and automatically load form fields from the File Upload Form template.

File upload form editing

The form will include a file upload field by default. You can add or remove fields to your form, change their labels, or move them up or down.

You can click on the File Upload field to change its settings. From here, you can set which file types and how many files a user can upload. You can also set a maximum file size limit.

File upload settings

Once you are finished, you can save your form and exit the form builder.

Next, you need to create a new post or page or edit an existing one. On the post edit screen, go ahead and add WPForms block to your content area.

Add form to your WordPress website

From the WPForms block settings, click on the drop-down menu to select the form you created earlier.

You can now save your changes and preview your post or page to see your file upload form in action.

File upload form

You can view files uploaded by users by visiting WPForms » Entries page and clicking on your File upload form. From here you can view an entry to see the files uploaded.

User entry

For more details, see our complete guide on how to allow users to upload images in WordPress.

Optimizing WordPress Images for Performance

Images are highly engaging thus they make your content more interesting for users. However, they also take more time to load than just plain text.

This means if you have multiple large images on a page, then your webpage will load slower. This slow page speed affects user experience as well as SEO.

Luckily, there are tons of tools to easily optimize your images for the web before uploading them to WordPress.

For instance, you can use a WordPress image compression plugin to automatically optimize each image that you upload to your website.

You can further boost performance by using a CDN (content delivery network). This allows you to load images from a global network of servers instead of your hosting server.

We recommend using Bunny.net which is the best CDN service on the market. It is super easy and comes with its own WordPress plugin for quicker setup.

We hope this article helped you learn where WordPress stores images on your site. You may also want to see our guide on how to find royalty free images for your WordPress blog, or see our beginner guide on how WordPress actually work behind the scenes.

If you liked this article, then please subscribe to our YouTube Channel for WordPress video tutorials. You can also find us on Twitter and Facebook.

The post Where Does WordPress Store Images on Your Site? first appeared on WPBeginner.

How to Fix Error Too Many Redirects Issue in WordPress

Are you trying to fix the ‘Error Too Many Redirects’ issue on your WordPress website?

It is a common WordPress error that may be caused by a plugin or incorrect settings. However, it leaves users locked out of their WordPress websites which makes it particularly troublesome.

In this article, we’ll show you how to easily fix the ‘Error too many redirects’ issue in WordPress. We will also cover how to regain access to your website and troubleshoot the error.

Fixing too many redirects error in WordPress

What Causes The Error Too Many Redirects Issue in WordPress?

The ‘Error too many redirects’ is caused by a misconfigured redirection issue in WordPress.

As you know that WordPress uses an SEO-friendly URL structure feature that uses the redirect function.

Similarly, many popular WordPress plugins use this feature to set up temporary redirects, permanent 301 redirects, and for fixing the 404 errors.

If you are using a plugin to fix the SSL insecure content issue or a WordPress caching plugin, then they may also affect redirects and cause this error.

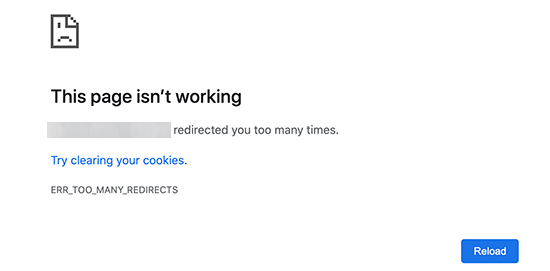
Error Too Many Redirects in Google Chrome

However, this error doesn’t tell you what’s causing the conflict and forcing the redirect loop in WordPress.

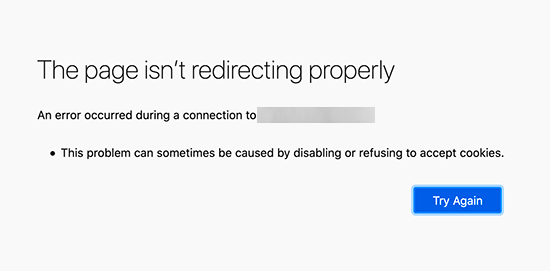
This is how the error looks in Firefox with the message ‘The page isn’t redirecting properly’.

Too many redirects error in Firefox

That being said, let’s take a look at how to fix the error too many redirects issue in WordPress.

We will walk you through step-by-step troubleshooting, getting access to your WordPress site, and fixing the error from reoccurring.

1. Clear Browser Cookies and Cache

A common cause of the error could be your web browser cookies. Try accessing your website using a different web browser like Firefox, Safari, Opera, Microsoft Edge, etc.

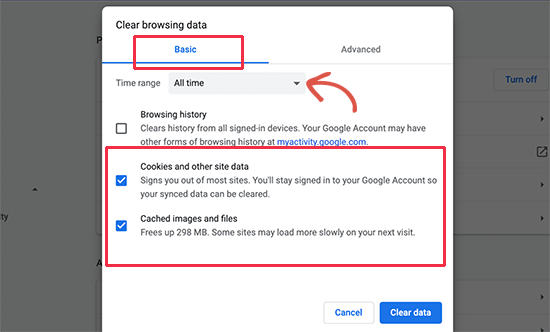
If you are able to access your website normally using a different browser, then you need to clear browser cookies and cache on your regular browser.

Clear cookies and cache in Google chrome

We have a detailed guide on how to clear browser cache in all major browsers that will help you do that.

On the other hand, if changing the browser doesn’t fix the issue then you can move on to the next step.

2. Deactivate All WordPress Plugins

The most common cause of the WordPress redirect loops or ‘Too many redirects’ issue is a plugin conflict. A plugin trying to set up a redirect in a way that conflicts with default WordPress redirects would end up causing this error.

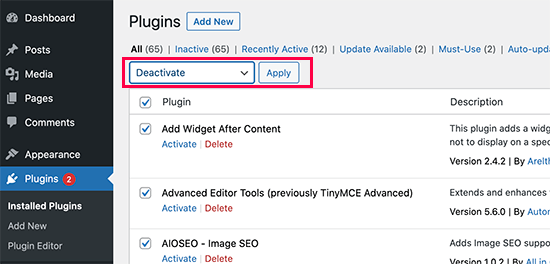
To fix this, you need to deactivate all WordPress plugins on your website. Now, normally you can just go to Plugins » All Plugins page inside the WordPress admin area and deactivate plugins from there.

Deactivate all plugins

However, we are assuming that due to the redirect error you may not be able to access the WordPress admin area.

In that case, you will need to deactivate WordPress plugins using an FTP client, or the File Manager app in your WordPress hosting control panel.

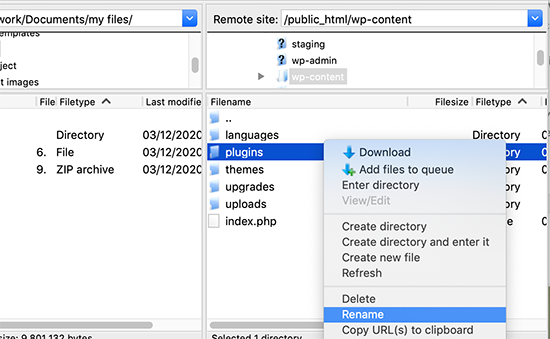
Simply connect to your website using an FTP client and go to the /wp-content/ folder.

Renaming the plugins folder using FTP

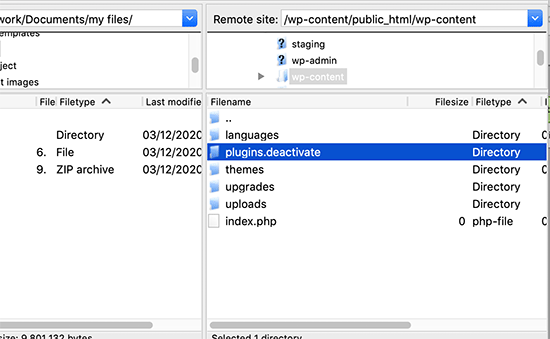
There you’ll find the plugins folder, which you need to rename to ‘plugins.deactivate’ which will deactivate WordPress plugins.

Renamed plugins folder

Basically, WordPress looks for a folder called plugins to load the plugin files. When it does not find the folder, it automatically disables the active plugins in the database.

Now you can try visiting your WordPress website. If you are able to login to your WordPress admin area now, then this means one of the plugins was causing the error.

To figure out which plugin was the culprit, you need to switch back to the FTP client or File Manager app and rename your plugins.deactivate folder back to ‘plugins’.

After that, switch to the WordPress admin area of your website and go to the Plugins » All Plugins page. From here, you can activate your plugins one by one, and then visit your website to see if you can reproduce the error.

Once you find the plugin that is causing the error, you can find an alternative to that plugin or report the issue to the plugin’s support forum.

3. Fix WordPress URLs

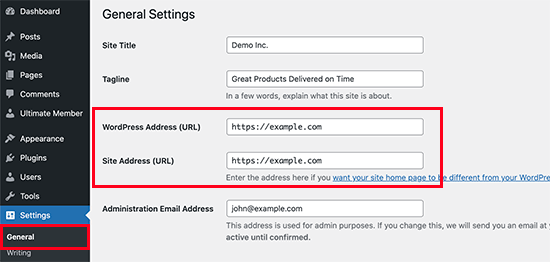
Another major cause of this error is a misconfiguration in WordPress URL settings. Normally, you can view these options under Settings » General page.

WordPress URL settings

For most websites, the URLs in the WordPress Address and Site Address field have to be the same. However, some users may end up using www in one URL and non-www URL in the other.

Since you may not have access to the WordPress admin area, you may need to fix the WordPress URLs using an FTP client or the File Manager app.

Simply connect to your WordPress site using an FTP client and go to /wp-content/themes/your-theme-folder/.

Edit functions.php file

From here you need to locate the functions.php file and edit it using a plain text editor like Notepad or TextEdit.

Next, you need to add the following code at the bottom:

update_option( 'siteurl', 'https://example.com' );
update_option( 'home', 'https://example.com' );

Don’t forget to replace https://example.com with your own site URLs. You can now save your changes and upload the file back to your website.

After that, you can try visiting your website to see if this resolves the error.

For more methods, see our tutorial on how to easily change WordPress URLs.

4. Reset WordPress .htaccess File

The .htaccess file is a special file that is used by website server to manage redirects and other server settings. WordPress also uses this file for SEO friendly URLs and other redirects.

Sometimes WordPress plugins may make changes to your website’s .htaccess file which may trigger this error. It is also possible that dectivating a plugin will not remove those changes form your .htaccess file.

In that case, you’ll need to manually reset your WordPress .htaccess file.

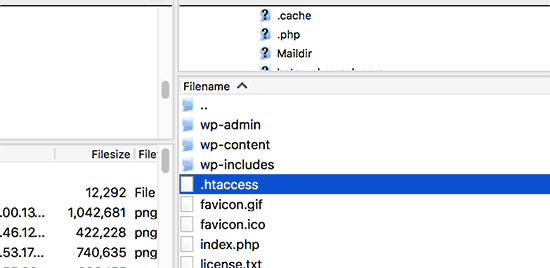
Again, you will need to access your website using an FTP client or the File Manager app in your hosting dashboard. Once connected, you’ll see the .htaccess file in the root folder of your website.

Editing .htaccess file via FTP

Note: If you cannot find your .htaccess file, then see our guide on how to find .htaccess file in WordPress.

First, you need to download a copy of your .htaccess file to your computer as a backup.

After that, you can go ahead and delete the file from your website. You can now try visiting your WordPress blog, and if everything works normal, then this means your .htaccess file was causing the redirect error.

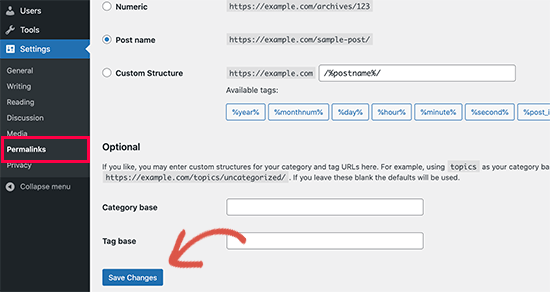
Now, since we deleted the .htaccess file you need to recreate it. Normally, your WordPress website can do it on its own but to make sure you can go to Settings » Permalinks page and click on the ‘Save changes’ button at the bottom.

Refresh permalinks to create .htaccess file

5. Preventing Error Too Many Redirects in WordPress

Hopefully, the above mentioned steps would have fixed the redirect issue on your website. If they did not fix the issue, then you may need to talk to your WordPress hosting company to make sure that it is not due to a server issue.

Once they fix the issue on your site, you should also figure out what caused the issue.

If it was a plugin, then you need to report the issue to plugin’s support forum. See our guide on how to ask for WordPress support. However, if you are unable to get help then you can always find an alternative plugin that does the same thing.

If the error was caused by a WordPress site misconfiguration, then you can make a note of it and ensure that your site settings are properly set up.

For more tips, see our detailed tutorial on how to troubleshoot WordPress issues on your own like a total WordPress pro.

We hope this article helped you resolve the error too many redirects issue on your website. You may also want to bookmark our ultimate handbook of common WordPress errors and how to fix them.

If you liked this article, then please subscribe to our YouTube Channel for WordPress video tutorials. You can also find us on Twitter and Facebook.

The post How to Fix Error Too Many Redirects Issue in WordPress appeared first on WPBeginner.

Web File Management Comes to WPMU DEV Hosting

We ran our 2020 survey. We asked you what you’d like. You told us, among other things, a web based file manager for your managed WordPress hosting. So, here you go.

Basically you were looking for the ability to simply upload and edit files in your hosting account using a file manager interface instead of SFTP. We get that. It’s a pain having to set up a client etc. and so we put this one in the ‘do it now’ queue.

And now it’s ready for you.

How Do I Access File Manager?

To access File Manager, your site(s) must be hosted with WPMU DEV.

After that, it gets all too easy!

First, log into your account, go to The Hub, and click on the main Hosting menu.

The Hub - Hosting
Access your hosting inside The Hub.

Next, select your site and click on either the hosting menu link or hosting panel to access the tools and settings for your domain.

Select your site
Select your site and click on hosting.

Scroll down to the bottom of your screen and click on Manage Files.

Manage Files
Click on Manage Files.

And voila…File Manager!

File Manager
File Manager interface.

Note: File manager is available for both production (live) and staging sites.

The Hub - Staging site - File Manager
You can also manage your files in staging sites.

For more details on how to upload, edit, and delete your files using File Manager, see our documentation.

Manage More Than Just Files…

File Manager is just one of the many time-saving tools and profit-increasing services we make available to WPMU DEV members.

We’ve also recently added other features to our managed WordPress hosting service that our members requested, like email, DNS manager, cloning templates, WAF, and more!

So, stay tuned and watch this space for more exciting announcements coming soon!

7 Best WordPress Download Manager Plugins Compared (2020)

Do you want to manage and control file downloads in WordPress? Perhaps you’d like to keep track of how many times a file is downloaded.

Or maybe you need to protect content so only registered users or customers can access it.

In this article, we’ll compare some of the best WordPress download manager plugins to track and manage your file downloads.

The best download manager plugins for WordPress

What to Look For in a WordPress Download Manager Plugin

There are several different reasons why you might want to use a WordPress download manager plugin. You may need to do some or all of the following:

  • Lock a file so only registered users with a specific role can access it
  • Lock a file so only paying customers can access it
  • Offer a limited number of copies of a digital file
  • Reorganize and tag files in WordPress
  • Prevent bots or spammers from repeatedly downloading your files
  • Track how many times a specific file is downloaded
  • Track how many times a type or group of files is downloaded
  • Provide downloadable files as part of a larger product, like an online course

It’s hard to find a single plugin that can do all the above, but depending on the use case, you may not need all these features.

In our comparison, we’ve picked the best WordPress download manager plugins to cover all the various scenarios and use-cases.

1. MemberPress

The MemberPress website

MemberPress is the best WordPress membership plugin on the market. It lets you easily sell digital downloads. You can also use it to sell subscriptions, lock content on your site so that only members can access it, and much more.

The MemberPress Downloads addon gives you advanced download management capabilities. It lets you upload multiple files, tag or categorize them, and list them using a shortcode.

You can use MemberPress to protect files as well as posts and pages. You can lock files, so that only users with the right level of access can view them.

One great feature is that you can protect files by category and tag, too. You can set up a rule to protect all files that you’ve assigned to a specific category or tag. This makes it easy to restrict files based on user’s subscription level.

You can also list your files by their category and tag, using MemberPress’ shortcodes system. If you’re offering a lot of different downloads, then this makes it really easy to organize them for your users.

MemberPress gives you plenty of flexibility, too. It lets you go way beyond just selling downloads to create a full membership site. It even integrates with email marketing services like Constant Contact, ConvertKit, and AWeber.

For detailed instructions, see our guide on how to easily create a WordPress membership website.

2. LearnDash

LearnDash - Best WordPress LMS Plugin

LearnDash is a very popular LMS (learning management system) plugin for WordPress. It’s easy to use and comes with many powerful features.

LearnDash lets you charge a one-time fee for your product or set up a recurring subscription. You can easily insert video and audio files into your course, making it a great way to sell these types of files.

Aside from using LearnDash to lock the content on your site, you can use it to accept payments, create online courses, make assignments and quizzes, and more. There are also dynamic forums built into LearnDash where your users can interact with one another.

LearnDash works well on its own for taking payments and offering protected content. You can also integrate it with several of the other tools on this list, including MemberPress, WordPress Download Manager, and WooCommerce.

3. MonsterInsights

MonsterInsights

MonsterInsights, the best Google Analytics plugin for WordPress. It’s the best option if you want to track which files on your site are being downloaded the most. This is crucial if you offer a lot of free downloads and need to know which ones are proving popular with your users.

You can choose which types of files to track, such as images, zip files, PDFs, and so on.

You can also label your different files so MonsterInsights can show which categories are being downloaded the most. For instance, you could track “Free Reports” separately from “Printable Worksheets” in MonsterInsights.

You can see the file downloads report in your WordPress dashboard along with MonsterInsight’s other user analytics report.

For detailed instructions, see our tutorial on how to use MonsterInsighs to track file downloads.

MonsterInsights seamlessly integrate with all the plugins mentioned in this list, and we recommend installing it alongside any file download manager plugin that you use. The free version of MonsterInsights also comes with file tracking, but you can upgrade to the Pro version to unlock other powerful features.

Alternatively, you can use MonsterInsights by itself too. Simply upload your files in the WordPress media library, embed the link to the files anywhere in your posts, pages, menus, etc. After that MonsterInsights will start tracking the download stats for you.

4. WooCommerce

WooCommerce

WooCommerce is a popular eCommerce plugin for WordPress. You can use it to sell both physical and digital products.

If you want to sell digital downloads, you can simply designate your download as a product in WooCommerce, so the customer only receives access after paying for it.

You can also use WooCommerce plugins to add more features to your online store. For instance, you can use smart coupons features to run sales and promotions more easily.

WooCommerce offers several different download methods and types of protection for your files. You can choose which suits your situation best. Just like regular WooCommerce products, your downloads can have variations, too.

You can also use WooCommerce to create a product that has both a downloadable and a physical component. For instance, you might provide an online video course that comes with a physical workbook.

For more details, see our complete WooCommerce guide for beginners.

5. Easy Digital Downloads

Easy Digital Downloads

As the name suggests, Easy Digital Downloads makes it easy for you sell digital products on your website. You can also use it to provide and track free downloads.

Your files will be automatically protected by Easy Digital Downloads plugin. You can track the date, time, and IP address of all purchases and free downloads.

You can restrict how many times a customer can download their files. You can also set the download link to expire after a certain period of time. These are both good ways to prevent customers from sharing their files with others.

You can integrate Easy Digital Downloads with lots of other services, including email marketing services like ConvertKit and AWeber. You can even integrate it with AffiliateWP to create a referral program.

Easy Digital Downloads has a built-in shopping cart system that lets customers buy several digital products at once. You can easily create a customer account page where logged-in customers can see a list of everything they’ve purchased.

6. File Manager

File Manager - downloads manager plugin for WordPress

File Manager is a really useful FTP like file manager. You can use it to edit files through your WordPress dashboard, rather than using FTP to move them between locations.

We always recommend using an FTP client or your WordPress hosting file manager where possible. However, there may be times when you want to quickly manage files through your WordPress dashboard.

File Manager lets you put your files into the WordPress media library, too. It creates thumbnails for all types of image files. It also has search functionality, making it easy to find your files.

With the Pro Edition of File Manager, you can also create private folders. You can set these so specific user roles or even specific users have access.

You can also use the Pro Edition to control what types of files can be uploaded and downloaded. You can even set up email notifications so that you get an email whenever a file is downloaded.

7. WordPress Download Manager

WordPress Download Manager plugin

WordPress Download Manager is a great simple option. You can use it to manage free and paid file downloads.

You can set a password per file, or you can specify user roles that can have access to your files.

If you’re looking for a WordPress download manager to stop bots or spammers, then you can set a Captcha Lock or IP Block feature. You can also control downloads by putting a download limit on each user. This can help improve WordPress speed and performance.

You’ll also get download logs, so you can see the date, time, and location of the user that’s downloading your files.

When a user downloads a free file, they won’t need to go through the whole checkout process. With PDF and image files, WordPress Download Manager will give the user the option to open the file in their browser or download it.

You can easily give files a price by using the free “Premium Package – Complete Digital Store Solution” addon.

There are also a number of paid addons for WordPress Download Manager. These include BuddyPress integration, a User Review addon, a Download Limit addon, and more.

Final Thoughts: Best Download Manager Plugin for WordPress

Choosing the right download manager plugin can be tricky. All of the plugins on this list are great options, depending on how you want to manage your downloads.

If you’re going to sell downloads and want to restrict access to members, then MemberPress is best download manager plugin for you. It’s comes with all the powerful features like protecting files by categories and tag, email marketing integrations, payment gateways, etc.

If you simply want to track downloads, then MonsterInsights is the best plugin for you. It’ll provide you with all the stats you need. Simply upload the files in your WordPress file manager, embed it in a post, and MonsterInsights will show you the download stats.

We hope this article helped you learn about the best download manager plugins for WordPress. We also recommend going through our experts’ list of must have plugins for business websites.

If you liked this article, then please subscribe to our YouTube Channel for WordPress video tutorials. You can also find us on Twitter and Facebook.

The post 7 Best WordPress Download Manager Plugins Compared (2020) appeared first on WPBeginner.

How to Uninstall and Delete a WordPress Theme (Step by Step)

Do you want to delete a WordPress theme but are worried that it might be unsafe?

If you have recently switched your WordPress theme, then you may want to delete the old one. You may also have a few other WordPress themes that come pre-installed on your website that you may want to remove.

In this article, we’ll show you why and how to easily delete a WordPress theme without affecting your website.

How to easily delete a WordPress theme

Why Delete a WordPress Theme?

If you are not using a WordPress theme, then it is recommended to delete it from your website. There are a number of reasons for deleting unused WordPress themes.

  • WordPress theme files are written in PHP and can be used to hide malicious code or malware on your website (that is if your website was ever compromised). Sometimes rogue developers can hide backdoors in unused themes as well.
  • Keeping them installed on your server increases your backup sizes and your WordPress security plugin takes longer to finish a scan.
  • You’ll also keep getting updates for those themes, even though you are not using them at all.

Now a lot of users install WordPress themes on their live websites just to test them out. This is not the best way to test drive a WordPress theme.

We recommend using a staging site or a local WordPress install to do all your testing. This way it doesn’t affect your live website and allows you to offer a consistent experience to your users.

What’s the difference between uninstalling vs deleting a WordPress theme?

WordPress allows you to only keep one theme as your active theme. However, you can install as many themes as you want on your website.

These themes will not be active, but they are still installed on your site, and you’ll continue to receive updates for them.

To completely uninstall a WordPress theme, you need to delete it. This will remove all theme files from your website.

Is it safe to delete old WordPress themes?

Yes, it is safe to delete a WordPress theme that you are not using.

Each WordPress site needs at least one theme installed to function properly. This is the theme that WordPress will use to display your website.

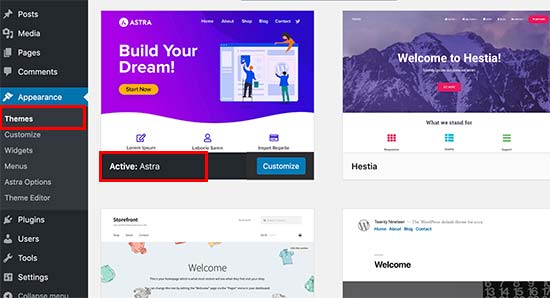
You can view which WordPress theme you are currently using by visiting Appearance » Themes page. Your current theme will appear as ‘Active’ theme.

Active theme

We also recommend keeping one default WordPress theme (e.g. Twenty Twenty or Twenty Nineteen) installed on your website. It acts as the fallback theme in case your current theme is not working.

If your current theme is a child theme, then you will also need to keep the parent theme installed on your website.

Apart from these themes, you can safely delete any other themes installed on your website.

That being said, let us show you how to delete a WordPress theme.

Preparing Before Deleting a WordPress Theme

If you have customized a WordPress theme and want to preserve those customizations before deleting it, then you can create a complete WordPress backup.

You can also just download the theme folder to your computer as a backup.

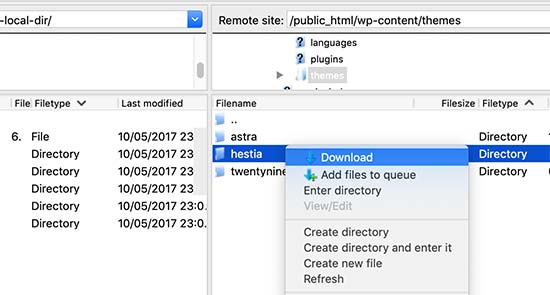
To do that, you can use an FTP client or the File Manager app in your WordPress hosting account dashboard. Once connected, go to /wp-content/themes/ folder and download the inactive theme folder to your computer.

Download WordPress theme folder to your computer as backup

Once you have safely backed-up your old theme, you can proceed to delete it.

Deleting a WordPress Theme

There are multiple ways to delete a WordPress theme. We’ll start with the easiest one first.

1. Deleting a WordPress theme via admin dashboard

This is the easiest and the recommended way to delete a WordPress theme.

First, you need to go to Appearance » Themes page and click on the theme that you want to delete.

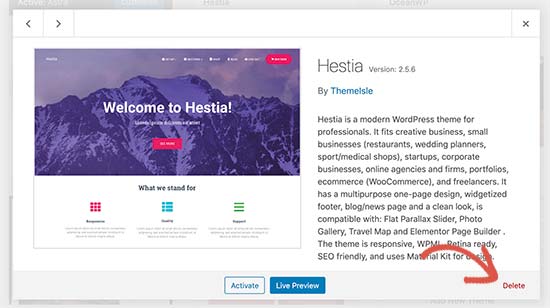
WordPress will now open theme details in a popup window. You need to click on the Delete button at the bottom right corner of the popup screen.

Deleting a WordPress theme via WordPress admin dashboard

Next, you’ll be asked to confirm that you want to delete the theme. Simply click the OK button to continue, and WordPress will delete your selected theme.

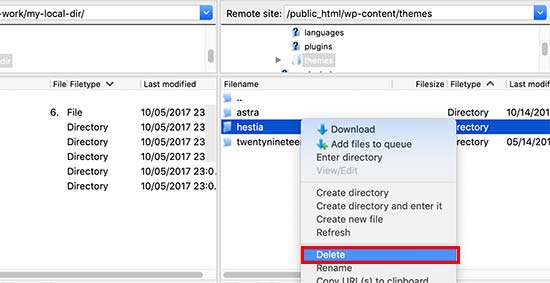
2. Deleting a WordPress theme via FTP

This method is a bit advanced, but it comes in handy if you are unable to access the WordPress admin area.

Simply connect to your WordPress site using an FTP client and then go to /wp-content/themes/ folder.

Deleting a theme via FTP client

From here you need to locate the theme folder that you want to delete. Right-click on the folder name and then select delete.

Your FTP client will now delete your selected theme.

3. Delete a WordPress theme using File Manager

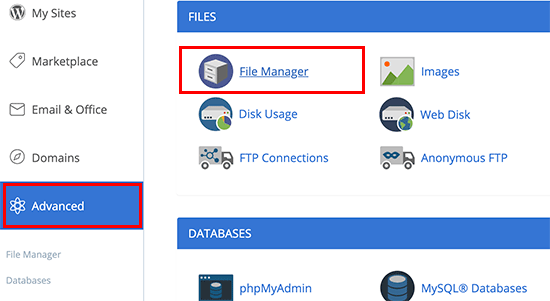
If you are uncomfortable using an FTP client, then you can also use the File Manager app in your web hosting control panel.

For this example, we’ll be showing screenshots from Bluehost’s hosting dashboard. Depending on your hosting provider, your hosting dashboard may look a bit different.

Login to your hosting account dashboard and click on the File Manager icon under the Advanced tab.

File manager app

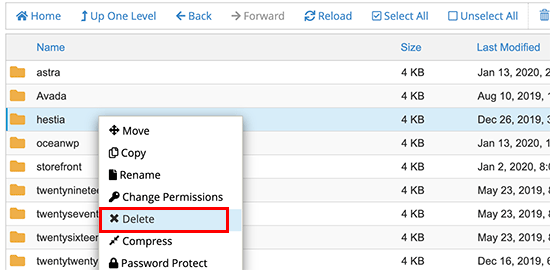
This will launch the file manager where you can browse the contents of your web server like you would using an FTP client. You need to go to the /public_html/wp-content/themes/ folder.

Deleting a WordPress theme using the file manager

Next, you just need to right-click and delete the theme that you want to get rid of, and that’s all.

What to Do If You Accidentally Delete a WordPress Theme?

If you accidentally deleted a WordPress theme, then there are multiple ways to restore it back.

First, you can restore the theme from the backup. This is easier as many WordPress backup plugins allow you to quickly restore your website to an earlier stage.

However, if you didn’t make a backup, then you can restore the theme by downloading and installing a fresh copy of the same theme.

The downside of the second approach is that you would lose any customizations you made to the theme.

We hope this article helped you learn how to easily delete a WordPress theme. You may also want to see our list of the best WordPress plugins and best email marketing services for small business.

If you liked this article, then please subscribe to our YouTube Channel for WordPress video tutorials. You can also find us on Twitter and Facebook.

The post How to Uninstall and Delete a WordPress Theme (Step by Step) appeared first on WPBeginner.
How To Fix “The Link You Followed Has Expired” Error in WordPress

Are you seeing ‘The link you followed has expired’ error in WordPress?

This error does not give much clues about what’s actually wrong, which is why beginners find it a bit difficult to resolve.

In this article, we will show you how to easily fix ‘the link you have followed has expired’ error in WordPress. We will also talk about what causes this error and how to avoid it in the future.

Fixing 'The link you have followed has expired' error

What Causes The Link You Have Followed Has Expired Error?

This error usually occurs when you are trying to upload a WordPress theme or a plugin to your website from the WordPress admin area.

The link you followed has expired error displayed on a WordPress website

WordPress hosting companies have a setting which controls the size of files you can upload from inside the WordPress admin area. They also have a setting which stops scripts from running too long.

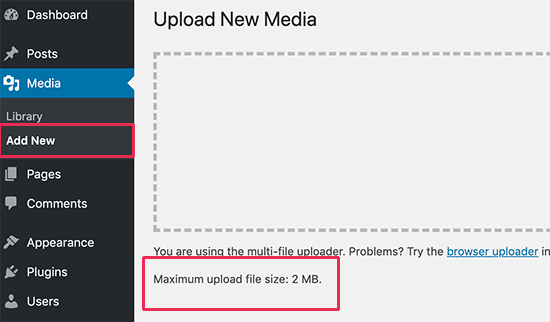
You can see the file size upload limit by visiting Media » Add New page.

WordPress file upload limit

These restrictions make your website safer and improves the overall performance of your WordPress hosting server.

If these settings are too low, or you are trying to upload a larger file, then you would see errors like memory exhausted error or maximum execution time exceeded error.

However, if you are trying to upload a WordPress theme or plugin, then you would see ‘The link you followed has expired’ error.

That being said, let’s take a look at how to easily fix this problem.

Fixing ‘The Link You Have Followed Has Expired’ Error

The quickest way to fix ‘The link you followed has expired’ error is by increasing the file upload size, PHP memory, and execution time limits for your website.

There are multiple ways to do that. We will show you all of them, and you can choose the one that looks easier or the one that works on your hosting environment.

Method 1. Increasing limits in functions.php file

This method is easier, but it has a downside. Your site will return back to the old limits if you change WordPress theme. If you are planning on changing your theme, then try one of the other two methods described below.

Simply add the following code to your WordPress theme’s functions.php file.

@ini_set( 'upload_max_size' , '120M' );
@ini_set( 'post_max_size', '120M');
@ini_set( 'max_execution_time', '300' );

You can increase the values in upload_max_size and post_max_size to be more than the file you are trying to upload.

You will also need to increase the max_execution_time to the time you think it would take for the file to upload. If you are unsure, then you can try doubling this value.

Method 2. Fix by increasing limits in .htaccess file

If you don’t want to add code to your theme’s functions file, then you can try the .htaccess method.

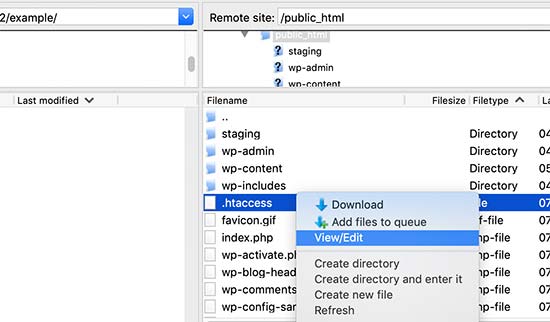
For this method, you will need to edit the .htaccess file by using an FTP client or the File Manager app in cPanel.

Simply connect to your website using FTP and edit the .htaccess file.

Editing the .htaccess file using FTP

Now, you need to add the following code at the bottom of your .htaccess file.

php_value upload_max_filesize 128M
php_value post_max_size 128M
php_value max_execution_time 300
php_value max_input_time 300

Don’t forget to save your changes and upload the file back to your website.

Method 3. Fix by increasing limits in php.ini file

The php.ini file is a configuration file used by PHP and WordPress. You’ need to connect to your WordPress site using an FTP client and look for php.ini file in your site’s root folder.

Most users are on a shared hosting account, so they may not find it in their site’s root folder. In that case, you need to create a blank php.ini file using a plain text editor like Notepad and upload it to your website.

Now edit the php.ini file and add the following code inside it.

upload_max_filesize = 128M
post_max_size = 128M
max_execution_time = 300

Don’t forget to save your changes and upload the file back to your website.

You can now visit your website and try to upload the theme or plugin file. The error would disappear, and you should be able to upload the file.

If it doesn’t, then try to increase file limits to match the file size you are trying to upload.

We hope this article helped you easily fix ‘The link you followed has expired’ error in WordPress. You may also want to bookmark our guide on how to fix the most common WordPress errors. It will help you save a lot of time by quickly finding a fix for WordPress issues.

If you liked this article, then please subscribe to our YouTube Channel for WordPress video tutorials. You can also find us on Twitter and Facebook.

The post How To Fix “The Link You Followed Has Expired” Error in WordPress appeared first on WPBeginner.
How to Disable PHP Execution in Certain WordPress Directories

By default, WordPress makes certain directories writeable so that you and other authorized users on your website can easily upload themes, plugins, images, and videos to your website.

However this capability can be abused if it gets in the wrong hand such as hackers who can use it to upload backdoor access files or malware to your website.

These malicious files are often disguised as core WordPress files. They are mostly written in PHP and can run in the background to gain full access to every aspect of your website.

Sounds scary, right?

Don’t worry there is an easy fix for that. Basically, you’d simply disable PHP execution in certain directories where you don’t need it. Doing so, any PHP files will not run inside those directories.

In this article, we will show you how to disable PHP execution in WordPress using the .htaccess file.

How to Disable PHP Execution in Certain WordPress Directories

Disabling PHP Execution in Certain WordPress Directories Using .htaccess File

Most WordPress sites have a .htaccess file in the root folder. This is a powerful configuration file used to password protect admin area, disable directory browsing, generate SEO friendly URL structure, and more.

By default, the .htaccess file located in your WordPress website’s root folder, but you can also create and use it inside your inner WordPress directories.

To protect your website from backdoor access files, you need to create a .htaccess file and upload it to your site’s /wp-includes/ and /wp-content/uploads/ directories.

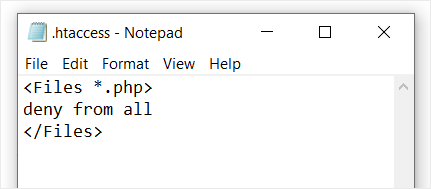
Simply create a blank file on your computer by using a text editor like Notepad (TextEdit on Mac). Save the file as .htaccess and paste the following code inside it.

<Files *.php>
deny from all
</Files>

Create htaccess File with Code to Disable PHP

Now save the file on your computer.

Next, you need to upload this file to /wp-includes/ and /wp-content/uploads/ folders on your WordPress hosting server.

You can upload it by using an FTP client or via File Manager app in your hosting account’s cPanel dashboard.

Upload htaccess file to your WordPress site

Once the .htaccess file with the above code is added, it will stop any PHP file to run in these directories.

Using this .htaccess trick helps you harden your WordPress security, but it is not a FIX for an already hacked WordPress site.

Backdoors are cleverly disguised and can already be hidden in plain sight.

If you want to check for possible backdoors on your website, then you need to activate Sucuri on your website.

Sucuri

Sucuri is the best WordPress security plugin on the market. It scans your website for possible threats, suspicious code, malware, and vulnerabilities.

It also effectively blocks most hacking attempts to even reach your website by adding a firewall between your site and suspicious traffic.

Most importantly, if your WordPress site gets hacked, then they will clean it up for you. To learn more, you can check our Sucuri review because we have been using their service for years.

We hope this article helped you to learn how to disable PHP execution in certain WordPress directories to harden your website security. If you are looking for a complete guide, check out our ultimate WordPress security guide.

If you liked this article, then please subscribe to our YouTube Channel for WordPress video tutorials. You can also find us on Twitter and Facebook.

The post How to Disable PHP Execution in Certain WordPress Directories appeared first on WPBeginner.