How to Add a Chatbot in WordPress (Step by Step)

Are you looking to add a chatbot in WordPress?

A chatbot is software that can start talking with your website visitors. Adding a chatbot to your website can help you provide instant customer support, generate leads, and improve the user experience.

In this article, we will show you how to easily add a chatbot in WordPress, step by step.
add chatbot-in-wordpress-og

What Is a Chatbot?

A chatbot is a computer program that uses a chat interface to talk with your website visitors. It acts just like your customer support team does when they use a live chat plugin.

However, while live chat is a real-time conversation between a customer and your support staff, chatbots are automated.

This means that they can only provide answers that you have programmed them for.

For example, a customer service chatbot can answer questions about products or services, troubleshoot problems, and make recommendations.

Similarly, a healthcare chatbot might answer questions about health conditions, provide reminders for appointments, and connect patients with doctors.

Why Should You Use a Chatbot in WordPress?

Adding a chatbot to your WordPress website will allow you to provide 24/7 customer support to your visitors, even when your support team isn’t available.

This will reduce the number of support tickets on your website and improve user experience.

Chatbots can also be used to automate other customer support tasks like answering frequently asked questions, providing product support, and fixing smaller issues.

This will save a lot of time and let your team focus on more complex issues.

If you have an online store, then you can also use a chatbot to find out about a customer’s interests and ask them about their needs. The chatbot can then answer the customer’s queries and close the deal.

Having said that, let’s see how to easily add a chatbot in WordPress, step by step. We’ll cover three different methods, and you can use the quick links below to jump to the one you want to use:

Add a Chatbot in WordPress Using Heroic KB (Best for Customer Support)

If you want to create a custom chatbot to automate customer support inquiries, then this method is perfect for you.

Heroic KB is the best WordPress knowledge base plugin that adds a searchable knowledge base to your existing site.

It also comes with a powerful Heroic AI Assistant that lets you easily add a chatbot to your knowledge base page. The AI chatbot is trained directly from your knowledge base articles so it can provide accurate responses to visitor questions.

To get started, you need to install and activate the Heroic KB plugin. If you need help, see our tutorial on how to install a WordPress plugin.

Note: You’ll need the Heroic KB Pro plan to access the Heroic AI Assistant.

Once the plugin is activated, you need to create a knowledge base so that you can train your AI chatbot on it. Make sure that your knowledge base includes detailed, high-quality articles that will help your audience learn how to use your products/services.
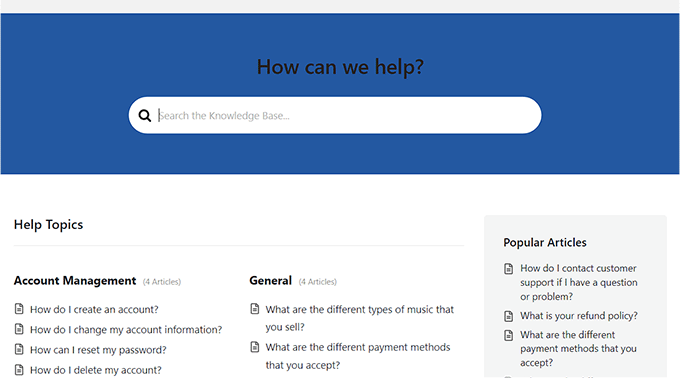
Website documentation preview

For step by step instructions, you can follow our tutorial on how to add knowledge base documentation in WordPress.

After you’ve created your knowledge base, you can set up the Heroic AI Assistant.

To do that, go to Heroic KB » Settings from the WordPress dashboard and click on the ‘Help Assistant’ tab.

From there, you need to place a checkmark next to the Enable Help Assistant, Show Help Assistant on this Site, and AI Help Assistant options.
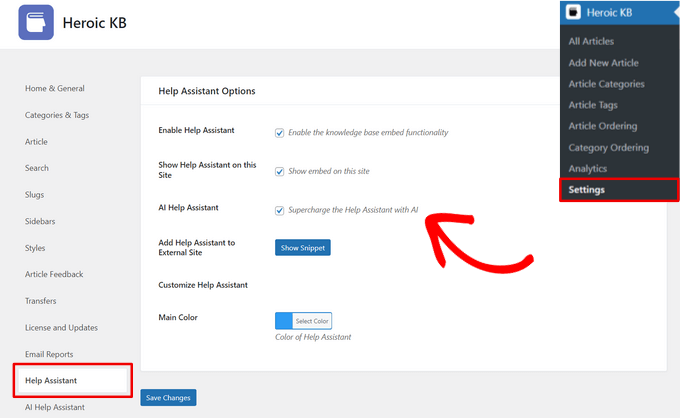
Enable the Heroic AI Help Assistant

You can also select the main color of your Help Assistant chatbot on this page.

When you’re done, click on the ‘Save Changes’ button.

Next, you need to click on the ‘AI Help Assistant’ tab from the Heroic KB Settings page. Here, you need to add API keys for OpenAI and Pinecone.
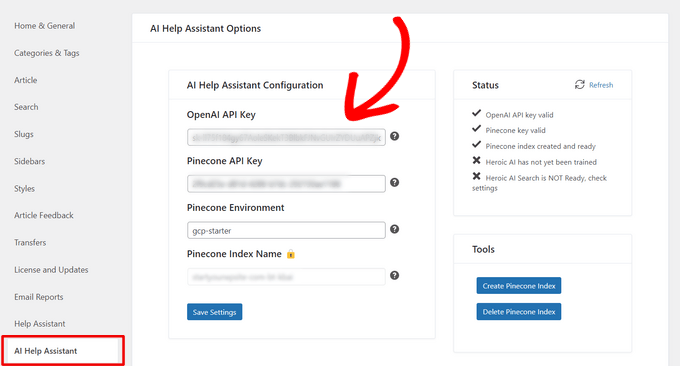
Add OpenAI and Pinecone API keys in Heroic KB

You can generate an OpenAI API key on the OpenAI website by visiting the API Keys page from your paid account.

Simply generate a new secret key and copy and paste it into the Heroic KB AI Help Assistant Configuration settings.
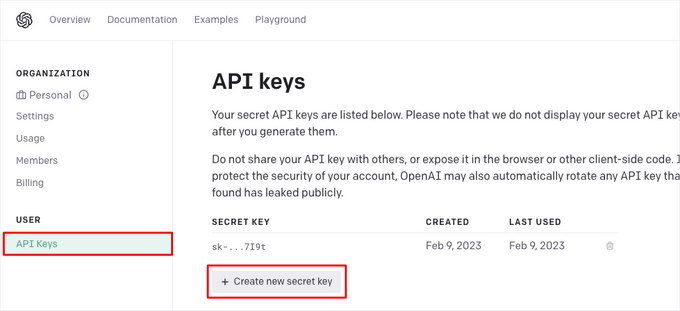
OpenAI API keys

You can generate a Pinecone API key on the Pinecone website with a free or paid account.

Just go to the ‘API Keys’ page and click on the ‘Create API Key’ button. Then, copy and paste it into the Heroic KB settings.
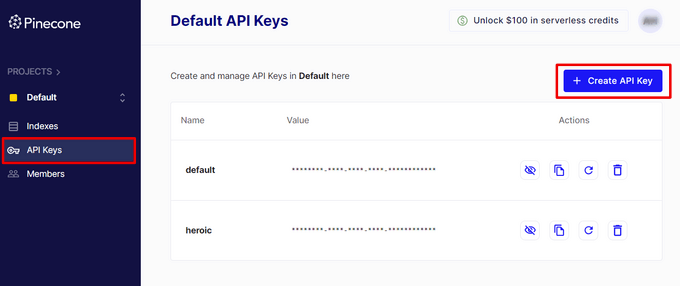
Generate Pinecone API key

After copying and pasting your API keys, you also need to fill out the ‘Pinecone Environment’ field.

For free Pinecone accounts, you can use gcp-starter as the Pinecone Environment. For paid accounts, you can use any GCP Region supported by Pinecone like eu-west4-gcp or us-central1-gcp, for example.
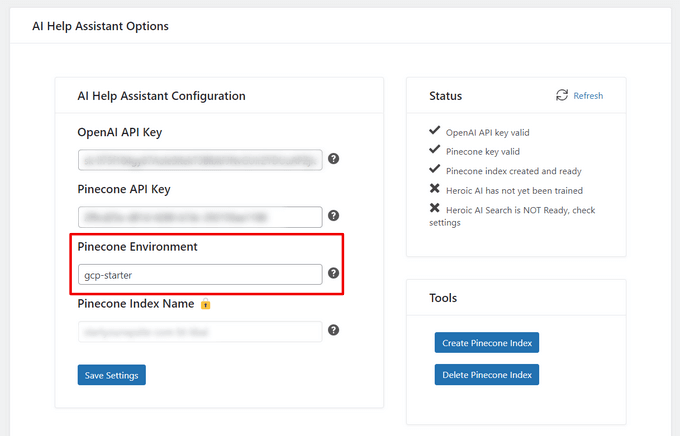
Enter Pinecone environment

Don’t forget to hit the ‘Save Settings’ button.

Next, click on the ‘Create Pinecone Index’ button to automatically create a new Pinecone index.
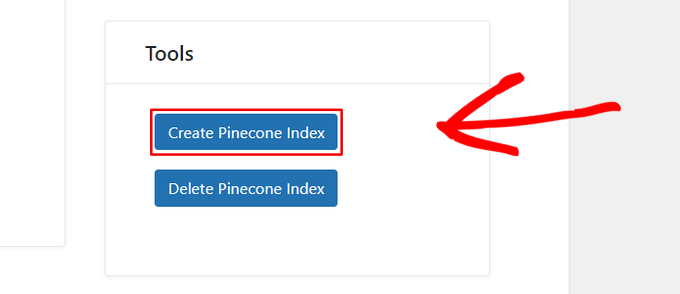
Create Pinecone index

You can check the ‘Status’ box to see if your API keys have been validated and the Pinecone index has been created.
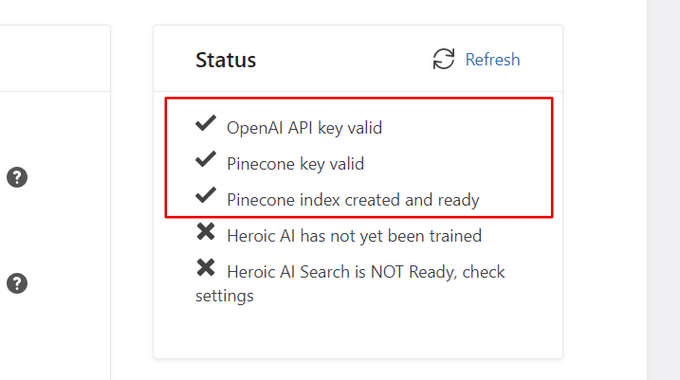
Check status of your Pinecone index

Once those are ready, you can start to train the AI assistant chatbot on your knowledge base.

To do that, simply click on the ‘Train on this site’s Heroic Knowledge Base’ button.

Train Heroic AI assistant on your knowledge base

The AI assistant will then begin training, this may take a few minutes depending on the size of your knowledge base. The progress will be displayed in the Training panel.
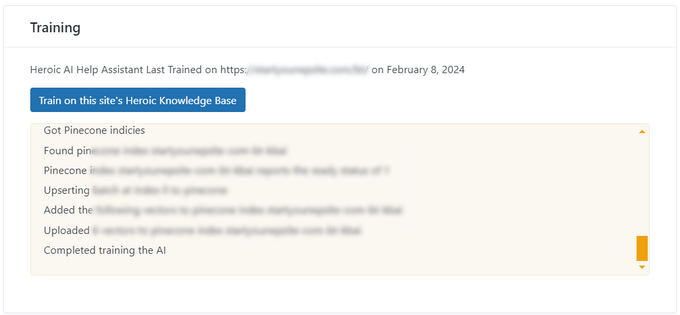
Completed training for Heroic AI assistant

When the training is complete, you can visit your Knowledge Base page to see your Heroic AI Assistant chatbot in action.

Visitors can ask a question and the chatbot will provide an accurate response based on your knowledge base documentation.
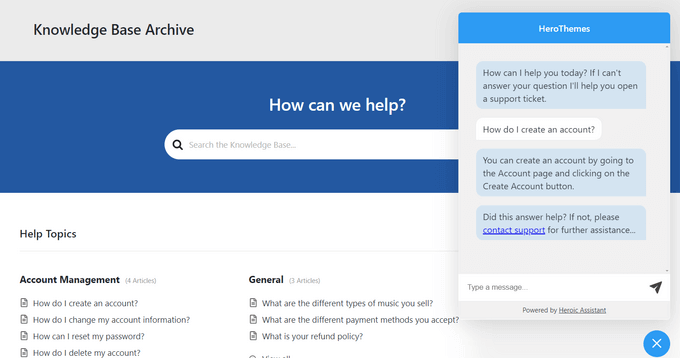
Example of Heroic AI assistant chatbot

Add a Chatbot in WordPress Using ChatBot (Best for Sales & Customer Service)

If you are looking for an all-in-one chatbot for lead generation, sales, customer service, and more, then this method is for you.

You can easily add a chatbot to your WordPress site using ChatBot. It is the best AI chatbot software that allows you to make chatbots using a drag-and-drop builder. It also offers more chatbot customization options and multilingual features.

First, you will need to install and activate the free ChatBot plugin. For detailed instructions, please see our step-by-step guide on how to install a WordPress plugin.

Upon activation, visit the ChatBot menu tab from the WordPress admin sidebar and click the ‘Connect Account’ button.
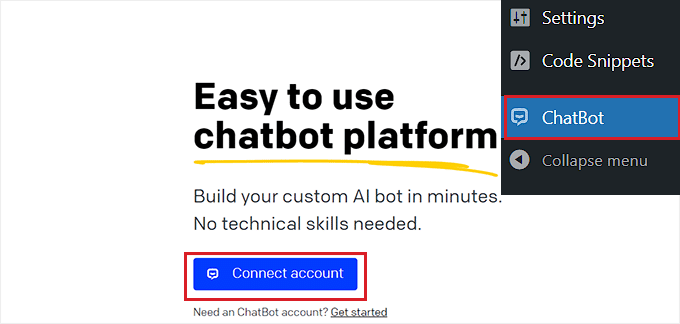
Click Connect to account button

This will open the ChatBot website in a new window, where you have to enter your login credentials and click the ‘Login’ button.

However, if you don’t have an account on ChatBot yet, then just click the ‘Sign up free’ link at the top.
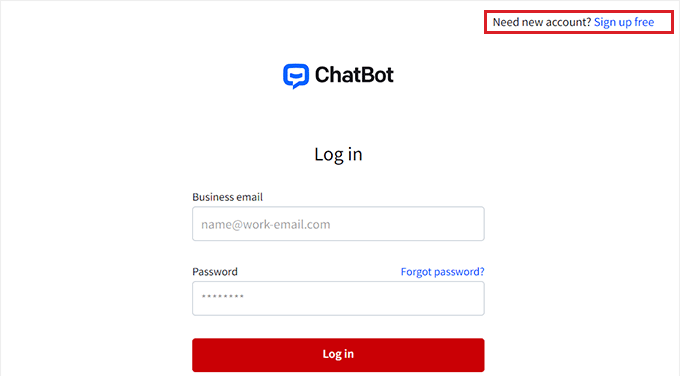
Login to your Chatbot account

This will take you to a new page where you will need to provide your email address and enter an account name and password.

Once you are done, just click the ‘Create account’ button.
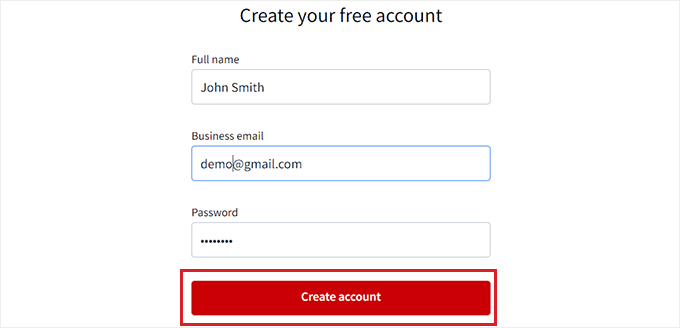
Create Chatbot account

Upon account creation, you will be redirected to your WordPress dashboard. You have now successfully connected your WordPress site with ChatBot.com.

Now, to start creating a chatbot, just click the ‘Go to dashboard’ button.
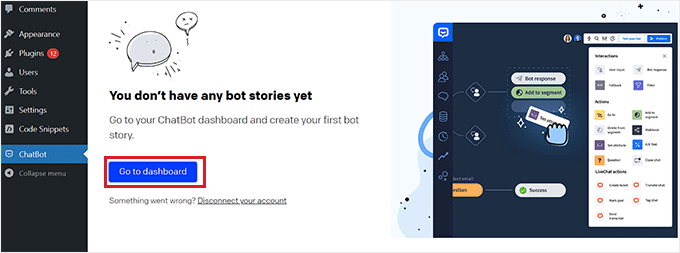
Click the Go to dashboard button

You will then be directed to your ChatBot account dashboard.

From here, click the ‘Create bot’ button at the top to start the process.
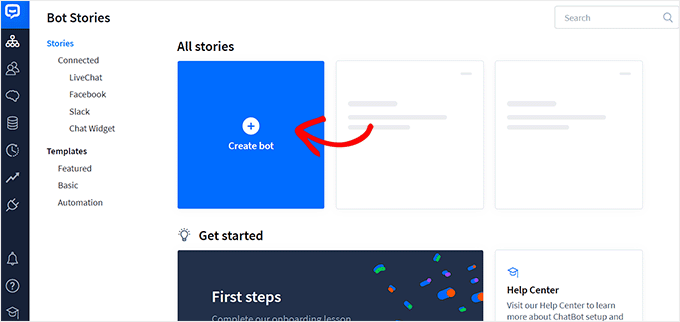
Click Create bot button

This will take you to the ‘Create new story’ page, where you need to choose the type of chatbot that you want to make.

By default, ChatBot allows you to create a customer service bot, job application bot, lead generation bot, FAQ bot, sales bot, and more.

However, you can also pick the ‘Build from Scratch’ option to make a bot yourself. For this tutorial, we will be creating a customer service bot.
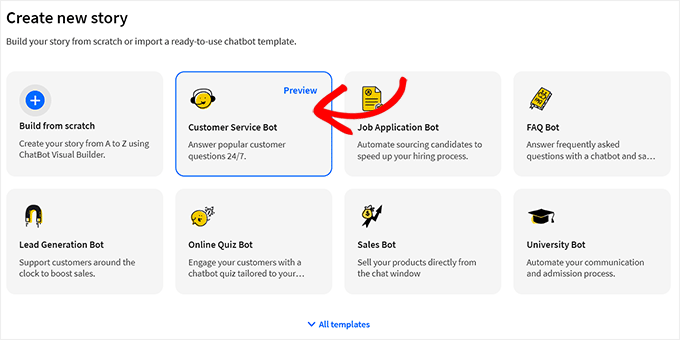
Choose the customer service bot template

This will open the premade customer service bot template on your screen.

From here, you can easily create a conversation flow for your chatbot by clicking on the ‘Bot Response’ tabs in the chatflow.

This will open a prompt on the screen, where you can add chat responses and quick replies like text, images, and buttons by dragging and dropping the blocks into the prompt.

Once you have done that, just add the bot response and click the ‘Save and Close’ button at the top.
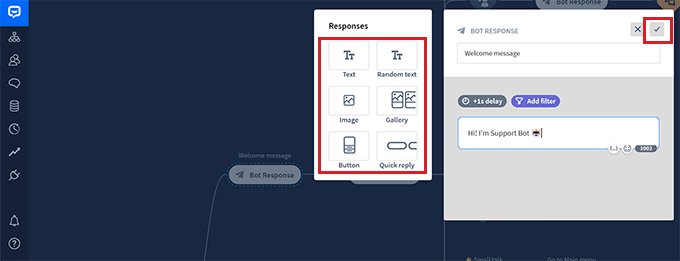
Add a bot response

If you want, you can also add custom filters with the chatbot response by clicking on the ‘Add Filter’ button in the prompt.

This will open a dropdown menu where you can pick a filter that will be added to your chatbot’s response, including:

  • Message: Personalize the conversation by tailoring the responses to the user’s message.
  • Score: Prevent irrelevant conversations by filtering out messages that have a low score.
  • Failures: Improve chatbot accuracy by filtering out messages that are likely to result in failure. This can prevent the chatbot from giving incorrect or misleading information.
  • Email: Rule out invalid email addresses or address users by their emails.
  • Name: Create a personalized experience for the user or block messages that contain certain names.
  • Username: Filter out messages that contain certain usernames.
  • Integration: Create specific messages for users who use a particular tool.
  • Language: Write messages in specific languages for multilingual websites.
  • Timezone: Filter messages according to the relevant time zone.

Additionally, you can create specific messages for users in different regions and countries. This can be helpful if you have a large international audience.
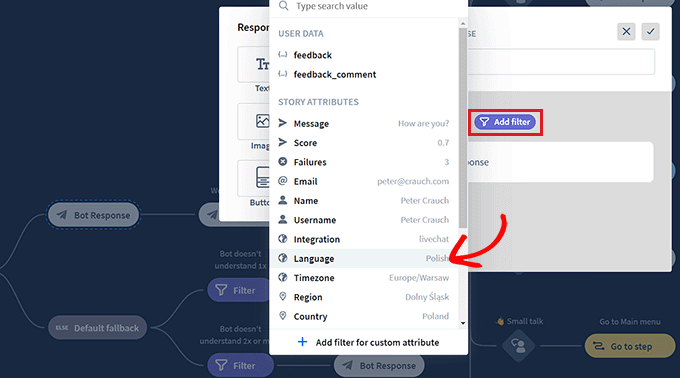
Add filter to response

After that, you can also select conditional logic for the now-filtered response. The response that you are creating will only be used by the chatbot if the customer that it is interacting with fits the filter.

For example, if you have a multilingual website and want to create a chatbot for different languages, then you can use the ‘Language’ filter.

Once you do that, select the ‘= equals’ option as the condition and then type in the language name.

After that, you can add the response in the language that you chose. In our example, when a user types a query in the chatbot in Italian, the chatbot will show them the Italian response that we created with this filter.
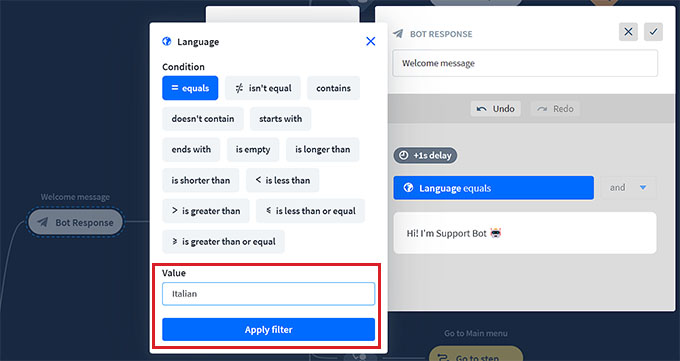
Add filter value

When you have finished adding your filter, just click on ‘Apply filter’.

After that, you can also use the ‘+’ button to add different blocks to your chat flow. This will open a prompt where you can select any block of your choice, including:

  • User Input: Add user messages that will trigger the bot’s response.
  • FAQ: Add frequently asked questions and their answers in this block.
  • Attachment Input: Let users attach files in an ongoing conversation with the chatbot.
  • Bot Response: Add a chatbot’s response to a question.
  • Backtracking: Prevent users from viewing previously matched interactions with the bot.
  • Fallback: Display a general message or trigger an action anytime your chatbot can’t match the user query with any chatbot response.
  • Flow: Visually organize complex chatbot response scenarios.
  • Add to segment: Segment all the users into different groups based on user data.
  • Delete from segment: Delete users from a specific segment.
  • Set attribute: Save information about users.
  • Mark Goal: Mark a conversation as having reached its goal.

You also have the option to send a transcript of a conversation to an email address or tag different chatbot conversations with keywords and phrases.
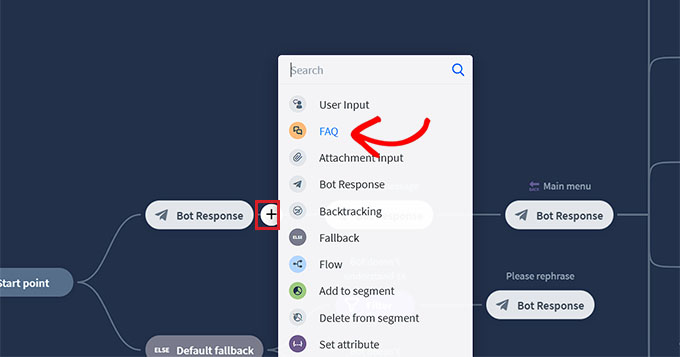
Add FAQs block to the chatflow

For example, if you choose the FAQ block, it will open on your screen, where you can now add common customer support questions and their answers.

Your chatbot will then use these responses to answer customer queries on your website.
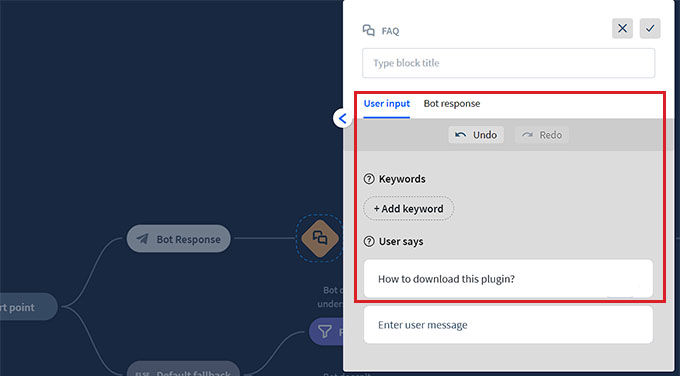
Add FAQs

Next, click on the ‘Main Menu’ bot response tab to open the block prompt. Here, you can add buttons for all the services that your chatbot can offer using the Button block.

After that, click on each Button block to open its settings and configure where you want the button to direct the users.

For example, you can allow users to be directed to the FAQs chatbot response that you created by selecting the button type as ‘Go to block’.

Next, select the ‘FAQ’ block from the ‘Go to’ dropdown menu and click the ‘Save Settings’ button.
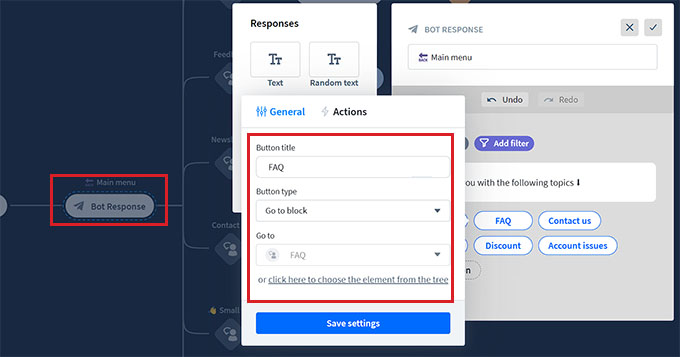
Configure main menu bot response

Other than FAQs, you can also create buttons for directing users to your newsletter signup, contact us page, discount offers, and more.

Once you are done, don’t forget to click the ‘Publish’ button at the top to store your settings.
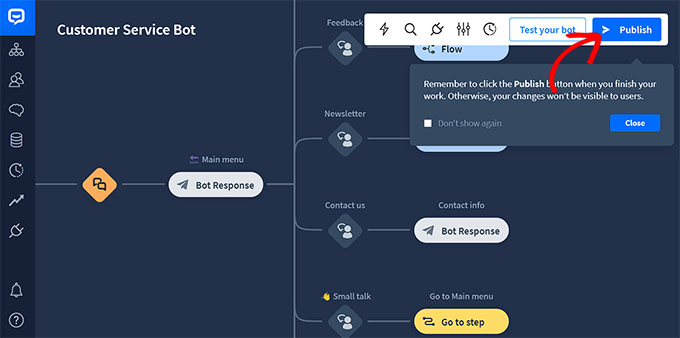
Publish the bot

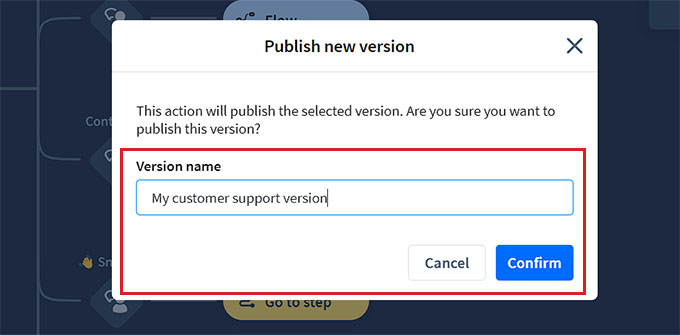
A prompt will now open on your screen, asking you to provide a name for your chatbot.

After entering the details, simply click the ‘Confirm’ button to publish your chatbot.
Save chatbot

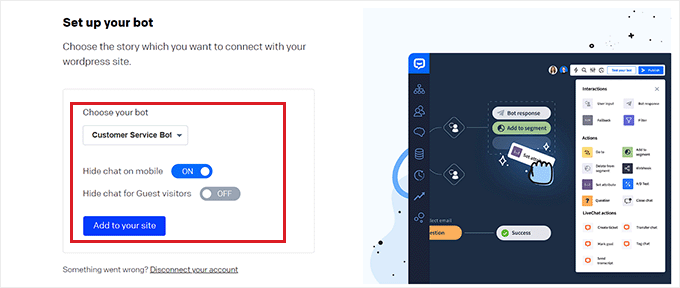
Next, visit your WordPress dashboard and head over to the ChatBot tab, where you will now notice that the ‘Choose your bot’ section will be visible on the screen.

Note: Keep in mind that it might take 3-4 hours between creating your chatbot and it being visible in your WordPress dashboard.

Now, simply choose the bot that you just created from the dropdown menu.

After that, toggle the ‘Hide chat on mobile’ switch to ‘On’ if you don’t want people visiting your website from their phones to be able to see the chatbot.
Add chatbot to your site

You can also toggle the ‘Hide chat for Guest visitors’ to ‘On’ if you want the chatbot to be exclusive for your members only.

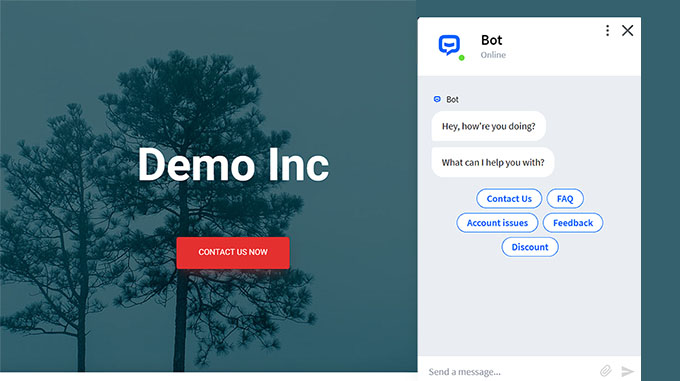
Finally, click the ‘Add to Site’ button. Now, you can visit your website to view the chatbot in action.
Chatbot preview

Add a Chatbot in WordPress Using HubSpot (Free & Easy)

If you are looking for a free and easy way to build a chatbot, then you can use this method.

HubSpot is an amazing customer relationship management (CRM) system that comes with a suite of tools for sales, customer service, marketing, and content management.

It even lets you create automated conversations with your website visitors with its free chatbot builder.

First, you will need to install and activate the HubSpot plugin on your website. For detailed instructions, you may want to see our beginner’s guide on how to install a WordPress plugin.

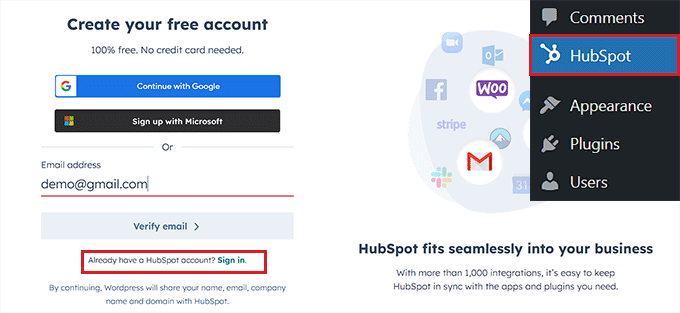
Upon activation, you need to visit the HubSpot menu tab from the WordPress admin sidebar and enter your email address to create a HubSpot account.

If you already have one, then just click the ‘Sign In’ link at the bottom.
Create or sign in to your HubSpot account

Once you’ve provided your details and set a password for your new account, HubSpot will ask you about the industry that you work in.

Simply select an industry of your choice from the dropdown menu and click the ‘Next’ button.
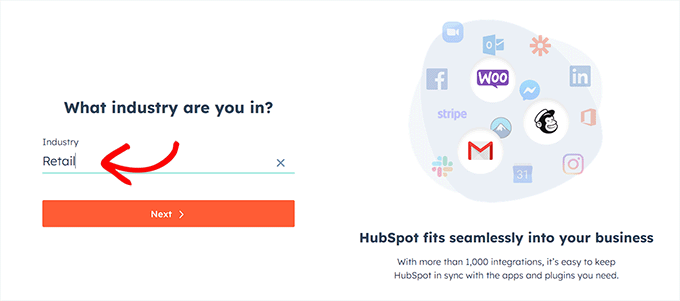
Add your industry and click the 'Next' button

After that, HubSpot will create a new account for you and then ask you to connect it with your WordPress site.

From here, simply click the ‘Connect Website’ button.
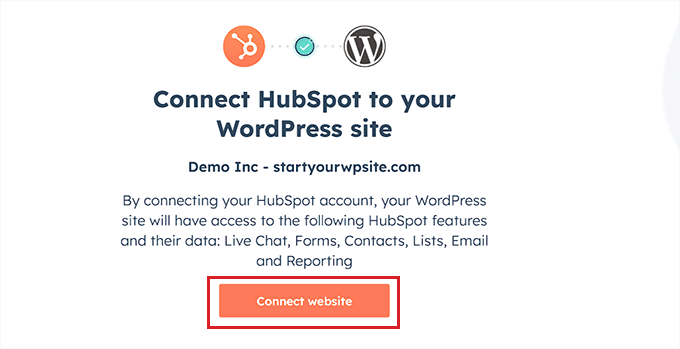
Connect website to HubSpot

Now, it’s time for you to start creating your chatbot.

To do this, visit the HubSpot » Live Chat page from the WordPress dashboard and click the ‘Create chatflow’ button.
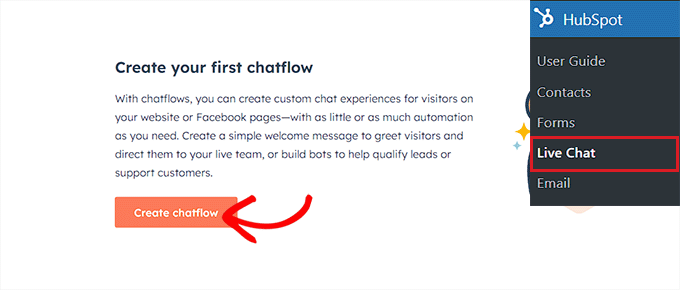
Click the Create Chat flow button

This will take you to the next page, where you can select any of the premade chatbot templates.

By default, HubSpot allows you to create a concierge bot, qualify leads bot, meetings bot, ticket bot, offline bot, or even a chatbot from scratch.

For this tutorial, we will be creating a ‘Tickets bot’.

Just select the chatflow you want to use and then click the ‘Continue in HubSpot’ button to move forward.
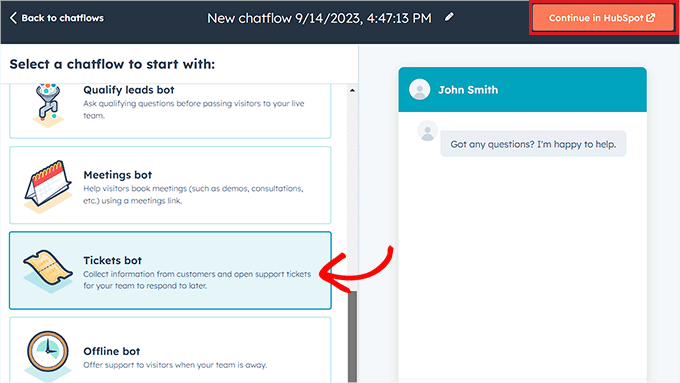
Choose a bot template

You will then be directed to your HubSpot account, where you will be creating the rest of your chatbot.

From here, click the ‘Next’ button to move ahead.
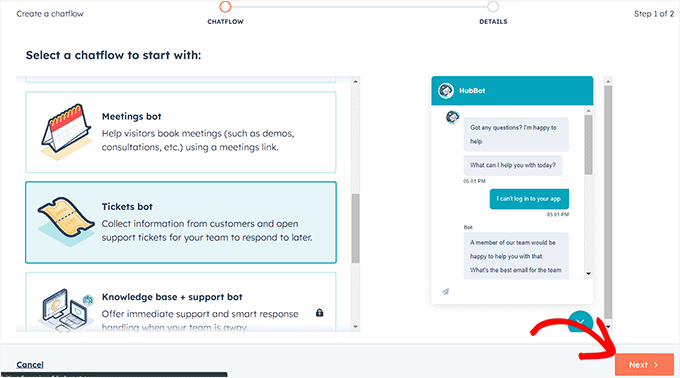
Click Next on the HubSpot website

In the next step, you need to select the language for your chatbot from the dropdown menu.

You can leave the other settings as they are and click the ‘Create’ button.
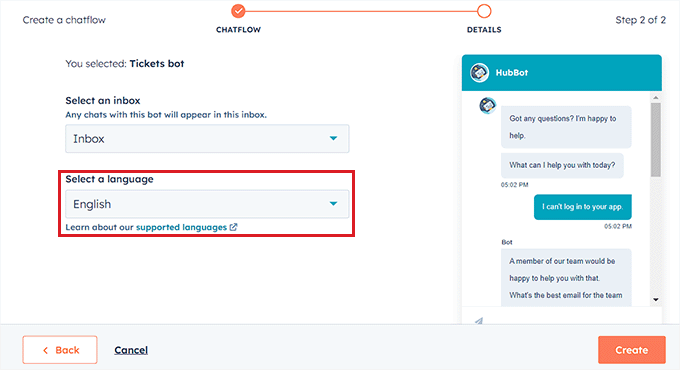
Choose chatbot language

Your template will now open in the chatbot builder, where you can edit the chatflow.

Simply click on the ‘Options’ tab in the bot response and select the ‘Edit’ link.

This will open the action settings in the left column, where you can change the action name and text.

In HubSpot, an action is a step in the chatbot conversation that performs a specific task, like asking questions or sending responses. The first action for your chatbot will be the first question that is sent to the website visitor.
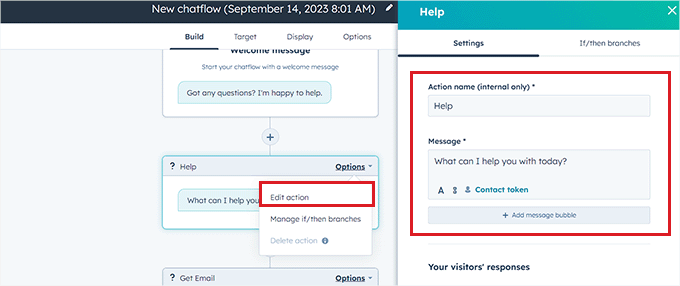
configure chatbot action settings

After that, scroll down to the ‘Your visitors’ responses’ section and type all the quick replies that a visitor may potentially give to this question.

For example, a visitor may ask you how to purchase your product, or they might want to report an error that they are facing on your website.
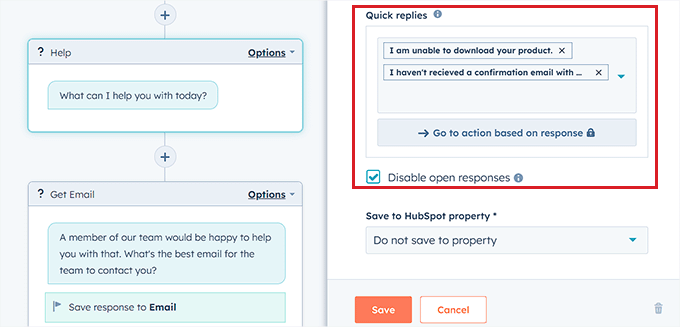
Add customer quick replies

After that, scroll back to the top and switch to the ‘If/then branches’ tab.

From here, you have to select the action the chatbot will take if the customer replies with one of the quick responses that you just added.

For example, if you want the chatbot to open support tickets every time a user is unable to receive a confirmation email with credentials, then select the ‘Create Ticket’ option from the dropdown menu.

After that, just click the ‘Save’ button to store the action settings.
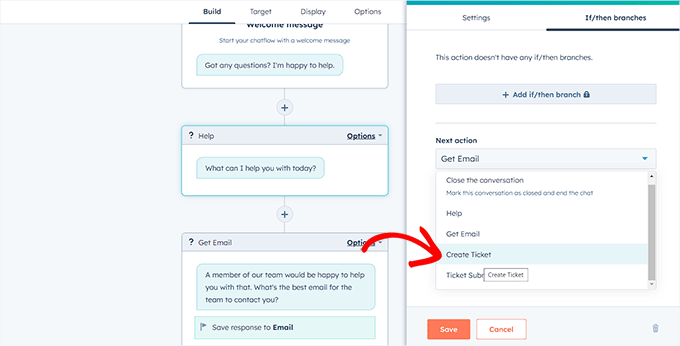
Choose an action for customer response

After that, you can leave the rest of the chatflow settings as they are or keep editing the different actions for your chatbot.

Chatbot will now create a support ticket for all the quick responses that you’ve added to the action prompt.

Next, switch to the ‘Target’ tab from the top. Here, you have to choose where the chatbot widget will appear on your website.

You can leave these settings as they are if you want the chatbot to appear on every page of your website.

However, if you want to hide the chatbot on specific pages, then you will have to click the ‘Add exclusion rule’ link. This will open another rule where you can simply add the URL of the page where you want to hide the chatbot in the field on the right.
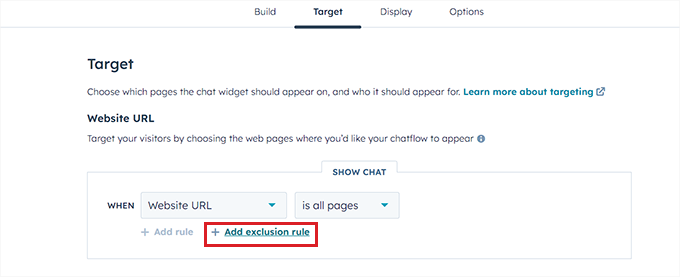
Configure target settings

Once you are done, scroll down to the ‘Visitor information and behavior’ section. Here, you can choose the visitors that you want the chatbot to be shown to.

For example, if you only want visitors who are part of your contact list to be able to see the chatbot, then you can choose the ‘Visitor’ option from the left dropdown menu and the ‘Is a contact’ option in the right field.

After that, click the ‘Save’ button and switch to the ‘Display’ tab.
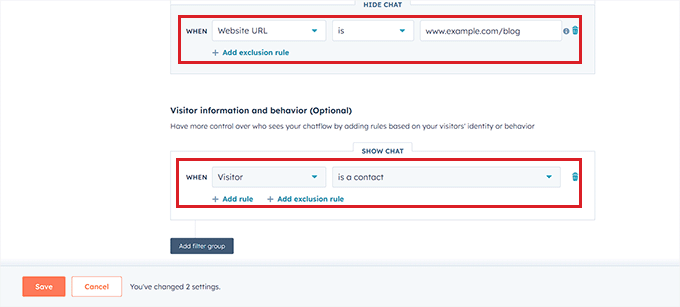
Add exclusion rule and behavior rule

From here, you can upload an avatar image for your chatbot and change its name.

Next, expand the ‘Chat display behavior’ section and choose the chatbot’s default state when the triggers are met.

For example, if you want the bot’s welcome message to appear immediately once someone visits your website, then you can choose the ‘Pop open the welcome message as a prompt’ option.

If you pick ‘Only show the chat launcher’, then visitors will have to click on your chatbot to see its prompts.

However, if you want the chatbot to appear only when a trigger is met, then you can select the third option.
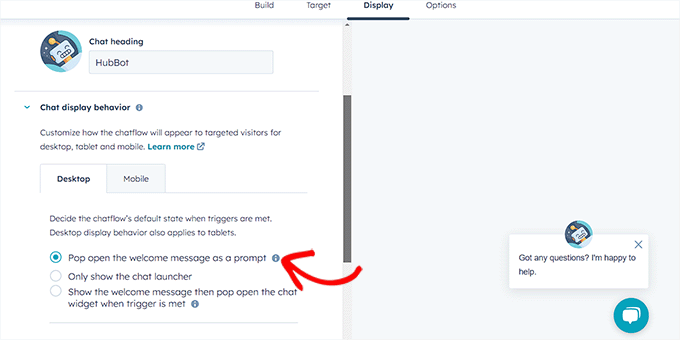
Configure chat display behavior

After that, scroll down and choose the trigger for the chatbot appearance.

For instance, if you want the chatbot to be displayed once the visitor is leaving your site, then select the ‘On exit intent’ option.

However, you can also choose the percentage of pages scrolled or minutes spent on your website as triggers.

Next, you can also switch to the ‘Mobile’ tab to configure chat display settings for mobile phones.

Once you have done that, simply click the ‘Save’ button to store your changes.
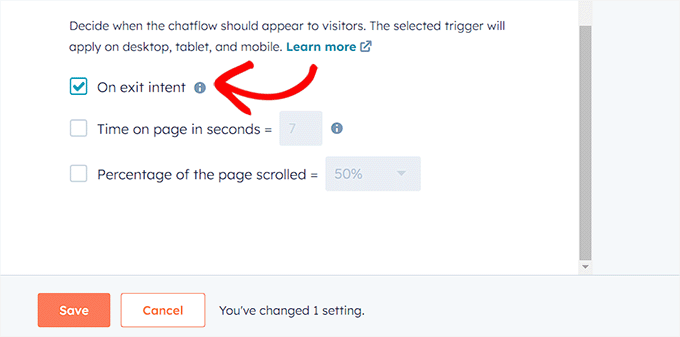
Choose a trigger for chatbot

Now, switch to the ‘Options’ tab from the top to configure general settings like delay message text, session timeout, generic error message, bot language, availability, and more.

After that, click the ‘Save’ button to store your settings. Finally, toggle the switch at the top to activate your chatbot on your website.
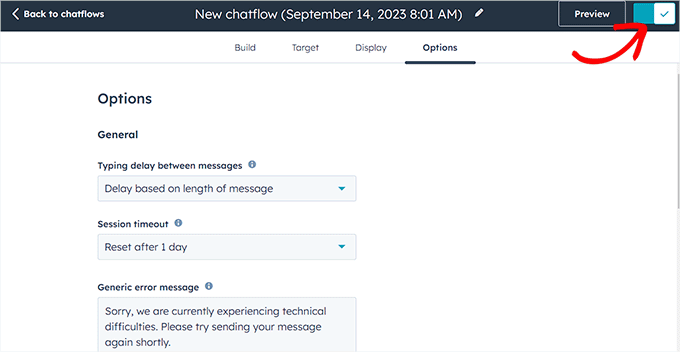
Save HubSpot chatbot

Now, you can visit your WordPress site to see your chatbot in action.

This is what it looked like on our demo website.
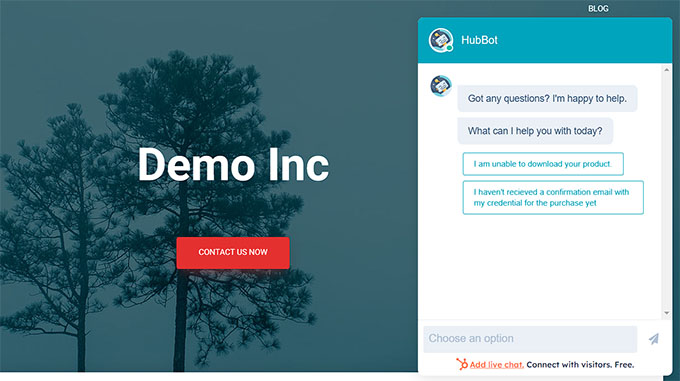
HubSpot chatbot preview

Bonus: Add Live Chat to Your WordPress Site

Live chat is a communication tool that allows visitors to chat with a member of your customer support team through a chat window on your website.

It is a super popular way to connect with customers and has a satisfaction level of 73%, which is much higher than email, phone, and SMS support.

Adding live chat to your WooCommerce store will allow customers to get help quickly and easily without having to wait on hold or send an email. 

This reduces the bounce rate, increases sales, and even gives you a chance to collect feedback from users.

You can easily add this feature to your website using LiveChat, which is the best live chat support software for WordPress.
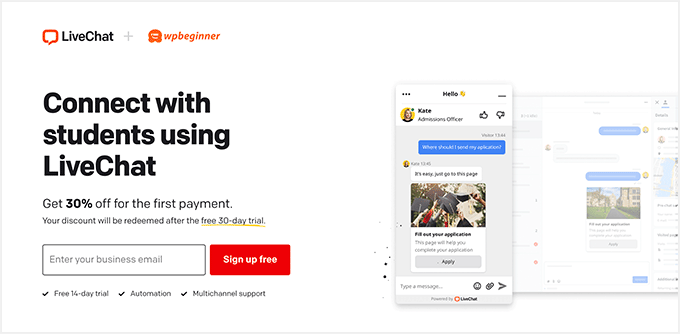
Live Chat Inc Website

It comes with pre-made live chat templates, real-time chat, multiple support channels, canned responses, chat transcripts, chat analytics, and so much more.

Plus, it integrates with tools like WooCommerce, HubSpot, ChatBot, Constant Contact, and Mailchimp.

For detailed instructions, you can see our step-by-step tutorial on how to add free live chat in WordPress.

We hope this article helped you learn how to easily add a chatbot in WordPress. You may also want to see our guide on how to optimize the customer journey in WooCommerce and our top picks of the best video chat software for small businesses.

If you liked this article, then please subscribe to our YouTube Channel for WordPress video tutorials. You can also find us on Twitter and Facebook.

The post How to Add a Chatbot in WordPress (Step by Step) first appeared on WPBeginner.

How to Make Search Your Site’s Greatest Asset

What makes a site truly brilliant? Impressive content? Sophisticated design? User-friendly interface? An effective support system for users, old and new alike? All this and more, my friend. No matter what you choose to build your site around, it can’t exist without a great search solution that helps guide every visitor to what they’re looking for – quickly, efficiently, and with as little effort on the site owner’s part as possible.

In this article, we’ll go through the crème de la crème of the coolest features you can implement on your search with the help of Site Search 360, an easy-to-install and easier-to-maintain app fit for any site builder. Whether you have a HubSpot blog, a knowledge base maintained via Zendesk, a Shopify store, or all three at once, as long as your site’s content is searchable, this app is just what the doctor ordered!

Top 5 search features for your site

Search Result Categorization

It’s highly likely that your site has tons of content that your users might be asked to search through. Depending on the number of pages you have accumulated over the years, that could require herculean patience. So, the first thing needed for your new search are separate tabs to neatly organize all the types of content you offer.

Say you sell a million types of products. You wouldn’t want your users to scroll through all product categories mixed together as they search for their dream pair of shoes. Non-commercial sites can use this nifty technique, too – for instance, to put articles, YouTube videos, and blog posts in their own dedicated tabs. Or, as we call them in the search biz, Result Groups.

Categorization via Result Groups is by no means limited to good old content types. Your search results might constitute pages from more than just a singular site – you could, for instance, have several interconnected domains for your primary content, FAQ knowledge base, news, etc. All of them have unique subsets of pages that you’d need your users to be able to search through, and as long as all these sites are included in your Data Sources, you can not only enable extensive cross-domain search, but also separate pages from these sites into dedicated groups for easier navigation.

And the best part? You can even manually order these tabs to guide your site visitors to the categories you deem most important.

So, how do you set this up? Easy – just enter the URL patterns of the page subsets you’d like to include in the same tab (or XPaths to specific elements found across all of these pages), give your brand-new Result Group a name, and you’re done:

setting up result group for facetted search

Repeat until all categories are in place.

And here’s what your Result Groups can look like once implemented:

result groups in live search

Pro tip: If you ever feel like adding multiple search boxes to your site, you can limit each of them to specific Result Groups. You’ll then have, say, only products in the search results for the commercial part of the site, FAQ entries on the “About Us” page, etc. Configuration options are close to infinite!

Filters and Ranking

Your search is now organized into tabs. But that’s not the only thing you can do to make navigating your site’s content a piece of cake.

Filters are a must-have when you want your users to be able to narrow down their search to instantly find exactly what they had in mind. Say someone’s looking for articles written by a specific author within a specific date range. With just a few clicks, you can create filters for both of these criteria (or anything in the world really – from prices to locations and beyond).

These bad boys are configured differently for projects whose search results were generated either with a sitemap or through website crawling (low-touch integrations where the only thing we need to index your content is your site domain) and for those where a product feed was involved, turning each product into its own search result (best integrated over our API or through our extensions for various e-commerce platforms such as Shopify, Shopware, Adobe Commerce, and so on).

For crawler-based integrations, filters are configured with Data Points, tidbits of information found across numerous pages that the crawler is pointed to via XPaths, URL patterns, linked and meta data, or even regular expressions. Data Points can be added to search result descriptions (across all pages as well as in specific Result Groups), used to automatically boost certain pages in your search results’ hierarchy, and, of course, they can direct the crawler to your future filter values. All of this can be configured right when a Data Point is created with a simple tick in the box of your choice.

Here are the settings you can tinker with for each of your filters:

crawler-based filters

And here’s your data point used simultaneously in the description of the product and as a filter:

crawler-based filter example

For e-com, things get even more exciting. Instead of Data Points, we extract and then use Product Facts, aka the various product characteristics (like color, material, vendor, etc.) available in your feed. The process is fully automated – no need to experiment with XPaths and regexes. It also comes with some ecom-exclusive perks such as HEX-coded circles next to “Color” filter values.

An e-com filter configuration could look like this:

color filter with swatches

Another pro tip for you: e-com and regular filters alike (as well as their values) can be reordered, and there’s even an option to exclude specific values from any filter. But the coolest part is that you get to choose how many pages should bear the values of a specific filter before that filter is triggered to pop up in the search. There really isn’t much of a point in showing the filter if it can only be applied to a singular page, now is there?

In action, these filters are impressive to say the least.

ecommerce filters example

Filters are tightly connected to Ranking Strategies.

Crawler-based integrations come with the option to sort results in ascending or descending order by any numeric Data Point such as “Price”. Sorting Options are configured in a very straightforward manner:

price filter and sorting config

And here’s what your search can look like with the same “Product Price” Data Point used as a basis for the Sorting Order, filter, and part of the search snippet.

price filter and sorting option

You can also prioritize different subsets of pages in the search result hierarchy with boosting rules – in bulk, pointing the crawler to the most important pages by putting more value in their URL patterns, or by specific page element. Pages with query matches in their titles can be consequently ranked higher than those which only have said query matches in other extracted content and vice versa.

E-com integrations get more variety with strategies based on Product Facts attributes, a singular one or several all at once, to automatically put products with specific characteristics at the top of your search results. Let’s say you wanted to bring your users’ attention to products of a specific brand already available for purchase and popular among your customers. In that case, you could base your Ranking Strategy on three factors: “Brand” (for example, “ASOS”), “Availability” (“In stock”) and “Most Sold Items” (“More is better”). You could also prioritize them differently so that “Brand” is the most important characteristic, with “Availability” second, and “Most Sold Items” following suit.

Here’s an example of a Ranking Strategy with multiple attributes:

ranking strategy config

Narrowing down the search and automatically ordering your search results to point your users to the coolest content you offer right away? Sign me up!

Custom results and result sets

This is it, folks. The thing you never knew you needed but always did.

Boosting whole subsets of pages is cool, but what if you need more granular control over your result sets? That’s where Result Mappings come into play.

There are two primary ways in which mappings are used – to create custom result sets and to redirect queries to specific URLs.

This is quite simple too: you enter your query of choice (e.g., a popular search term), our system returns every page that matches said query, and you can reorder these search results as you see fit. You can even blend in other queries among this set so if the mapping is applied for, say, “jeans” , it can also include pages that’d normally be displayed for “pants”, but whenever your users search for “pants”, they’d see default search results. You can also automatically apply filters (with specific values, should you so choose) and ranking strategies to your mapping.

Here’s a possible configuration for a custom result set:

customized result mappings config example

Redirecting queries to your URL of choice is even easier – you just need to type in the address of the page which will pop up automatically once a query is entered into the search box, and you’re done:

redirect to url mapping setup

Both these types of mappings can be applied to queries indefinitely or within a specific timeframe. Added some exciting content to your website and want your users to see it before the older stuff? Just place those results at the top of the page and have the search return to its default state when your new content no longer needs promotion. Simple, but super effective.

And the best part? Your mappings aren’t limited to pages you have indexed from your site. Your custom result set can include entirely new pages – you’ll just need to enter the desired URL, set up the title, description, and thumbnail of your result, and there it’ll be, totally indistinguishable from other search results as if it were in your Index all along:

custom result config
custom result in live search

Your mapping can also be complemented by a custom banner placed above other results – a fancy way of promoting whatever content is most worthy of your users’ attention. This is where things get a little code-heavy. Banners are configured with HTML templates, so be ready to put your developer hat on – it’s totally worth the effort:

custom banner example

Mappings aren’t the only way of customizing which results are shown for any given query. There’re also Dictionary Entries, which allow you to make certain queries synonymous to others.

Intricate control over any page displayed for any query? Don’t mind if we do.

Search design customization

So, you’re done experimenting with your new search features, and the time has come for you to decide how they should look on your site.

Every design-related feature we offer is nested in our “Search Designer” tool, with three distinct blocks for our default design options (fully configurable by clicking a few buttons – no coding necessary), “Additional CSS” (meant for more intricate design customization), and “Templating” (an impressive HTML and Mustache-based tool that allows you to apply your site’s existing search design configuration to your Site Search 360 search results for a seamless integration with any website theme).

Default design options are the way to go if you don’t feel like getting into coding:

design configured with default site search 360 settings

These options are also categorized according to the functionality they offer:

  • “Main search settings”, aka search box styling configuration (its color and loading animation), search bar/search result placement (selector-based), and layout (in a pop-up on the page where the search was initiated on top of the search or fullscreen in a new tab), as well as settings -> layout (embedded, in a pop-up window on top of your site page or in a fullscreen overlay)
  • “Suggestions” are tailored to give you full control over the presentation of your search suggestions – from basic functionally settings, like how many symbols should be entered into the search box for your suggestions to pop up, to fully customizable suggestions formats: user search history and quick links for when your search box is empty
Empty state suggestion
  • …alongside autocomplete queries (preconfigured or pulled from your analytics as most typed in by your user base) as well as best matching results from every Result Group for when a few symbols have already been typed in
Autocomplete suggestions
  • “Search result behavior” is for, to no one’s surprise, results (their number per page, optionable redirection to a new tab when they’re clicked on), Result Groups (whether they’re shown or hidden in bulk and by specific groups), Filters (shown or hidden, where they’re placed on the search results page, whether the number of filters values available for matching search results is displayed) and Highlighting (whether matched content is put in bold and if so, in which color)
  • “Search result layout” is used to configure what (if anything) is displayed in the result thumbnails when a page is associated with several images or no specific image at all, how search results are presented on desktop and mobile (how they’re ordered as well as whether each result should have a URL, image, and description included in the result card) and whether there should be a CTA button (“Add to Cart” or quite literally anything your heart desires)
  • “Advanced settings” gives you the opportunity to add custom CSS to your search’s design as well as your result/suggestion templates, and this is where things get really exciting

Both “Additional CSS” and “Templating” are essentially pop-up windows on the right side of the screen where you can enter your custom CSS/HTML.

additional css

Keep in mind that Templating necessitates filling numerous properties (result title, its images, URL, description, and applicable Data Points) with syntax similar to the Mustache templating engine:

templating

You can also use Callbacks to personalize your templates even further:

templating callback

Just compare our default search design:

default search design

To the design templated on a user’s site:

search design with additional css and templating

Total creative freedom with just a tiny bit of coding.

Everything in between

Alright, you caught us. The list of awesome search features you could implement on your site actually goes way beyond our top 5 contenders! To finish off, a lightning round of other functionality settings that will grant you full control over the look and feel of your search.

So you get to analyze how successful the search is. Awesome! Now you just need to see which exact pages constitute your search results. First off, you’ll need to see which pages constitute your search results. Your Index Log (or Product List) is there to help you out with that! Not only will you have a list of pages our crawler has access to, each of them will also be equipped with a status indicating whether it has been added to your search results successfully:

index log

Your search also needs variety when it comes to the sources your results are pulled from. Depending on the integration, your primary indexing method could be either the list of pages available on your site or your product feed. Some site builders, like Duda, Lightspeed, or Shopify, allow us to access this content automatically – no action needs to be taken by the user. You can also use multiple indexing methods, peppering FAQ entries, pages from non-indexable domains, and even YouTube videos in your search. Keep in mind that your search results’ formats may go way past simple HTML pages – you also have the option to index PDF, Word, Excel, PowerPoint, and even Open Office documents, so the search can be as diverse as you wish (and with PDF Indexing specifically, you’re also in control of indexing strategies for your PDFs’ titles, content, and images).

Another nifty feature to experiment with? Search Fuzziness, aka how closely search results and search suggestions need to match the entered query – a range from “extremely strict” (the match needs to be perfect) to “get more results” (the most lenient of options requiring just a few symbols of the query to be found in the search result/search suggestion titles and content):

Fuzziness settings

You can also pick and choose the content to be included in the search. Our Content Extraction rules allow you to point our crawler to the exact element (or elements) where your search results’ titles and images are located. The same goes for the content of the page – you can force the crawler to automatically skip specific parts of your site’s pages when configuring your search results.

Search snippets are a bit different, though. By default, snippets are dynamic, their text changing depending on the part of the page’s content where a query match is found (and highlighted). But you can choose to configure static snippets based on your metadata or Open Graph tags if your page descriptions are carefully curated and kept up to date. In that case, the same few paragraphs would showing regardless of whether a match is there or not. We usually recommend to stick to dynamic snippets so that your users can instantly see why a certain result popped up in their search.

search snippet settings
dynamic search snippet

Next up – security settings which will allow you to block specific IPs from using the search (or that keep them from being logged in your analytics), thus protecting yourself from bot searches and ensuring that internal activity doesn’t pollute your search data.

Last but definitely not least, you’ll need a way to determine how successfully your search is performing. There are three types of data that might prove useful in this regard:

  • Dashboard Analytics present information about how your search is being used, aka how many searches have been performed in a specific timeframe, what are the most common queries, etc. Here you’ll also see queries that returned zero matches (for instance, due to misspellings or lack of relevant site content) and get the opportunity to instantly correct your search result sets by setting up new Result Mappings or Dictionary Entries.
dashboard analytics
  • Search Success Tracking is a score calculated based on the number of users who engage with the search; the frequency at which they click on the search results they’re presented with, abandon their search, and use filters; and the percentage of zero result searches:
search success tracking
  • Search Map shows where in the world your search is being used as well as which queries are most common in any given region:
search map

A lot, right? Well, there’s never be too much of a good thing.

Most likely, you’re already on the edge of your seat, desperate to try out all these features yourself. So what are you waiting for?

Start with a free Site Search 360 account today!

If your site’s on the smaller side when it comes to the number of pages to index and the frequency at which the search will be used, you can enjoy all these features (and more) for free. And if you exceed the Free plan limits, Site Search 360 offers a wide variety of custom plans that can accommodate your every need.

If any questions come up, head over to to our How-To docs for step-by-step instructions on setting up every search feature mentioned in this article, or reach out to 360’s support.

Happy searching!

8 Best Wedding Website Builder and Templates of 2022 (Compared)

Are you looking for the best wedding site builder and templates to create the perfect wedding website?

The good news is that there are plenty of ways to create a beautiful website that has everything you need for your special day.

In this guide, we’re going to compare the best wedding website builders that you can use to build a wedding website without writing any code.

9 best wedding builder and templates (compared)

How to Find the Best Wedding Website Builder for You?

Creating a wedding website helps your guests find all the information they need to prepare for your big day.

For instance, you can inform them about the travel information, accommodation details, gift registry, seating chart, and other wedding details. Plus, it also helps share your love story, wedding party details, engagement photos and videos, and send guests digital Save the Date option.

When considering which wedding website builder you should use, you’ll want to look for features that make the following tasks easy.

RSVP management: You’ll need a way for wedding guests to register for your wedding and manage these easily. 

Calendar for events: If you have an eventful wedding planned, then you’ll need a way for guests to keep up with the timeline for your wedding. 

Design and templates: You’ll want to pick a site builder with a wide range of wedding templates and design options. You’ll also want the builder to be easy to use and customize so that you can create a wedding site just as beautiful as your wedding. 

Content management features: Beyond building a website, you’ll need an easy way to add pages like an FAQ page, your story, venue directions, and more. 

Gift registry: It’s not a requirement, but many website builders and platforms let you embed your gift registry or easily add links.

With that said, let’s take a look at some of the pros and cons of the most popular wedding website builders, so you can choose the right software for your needs. 

1. WordPress.org

WordPress Website Builder

WordPress.org is the most popular platform for creating websites. It powers over 43% of all the websites on the internet, and it is 100% free to use. WordPress.org is open source software, and you can easily use it to create a wedding website.

There are multiple WordPress plugins, themes, and website builders that give you complete freedom and flexibility when it comes to creating a website. To start, all you need is a web hosting service and a domain name.

Wedding themes in WordPress

Normally the domain name costs $15 per year, and web hosting can cost you upwards of $7.99 per month.

Luckily, the folks at Bluehost have agreed to offer our readers a 60% discount + free domain name which means you start your wedding website for $2.75 per month.

Bluehost is an official WordPress recommended hosting partner.

After getting a website hosting, you can then use a website builder like SeedProd. It is the best drag and drop WordPress page builder and custom theme builder in the market that’s used by over 1 million sites.

It lets you create completely custom WordPress themes without writing a single line of code. This means you can build the wedding website of your dreams with all the features you need. You can use the pre-built collection of themes and customize every element.

SeedProd Example

You can add multiple pages to your WordPress wedding website, like a custom RSVP page, rehearsal dinner page, bridal shower page, and a section for engagement photos and videos.

Pros

  • It’s open-source software that is 100% free and super easy to use.
  • You get complete control over your website design, functionality, and data.
  • There are numerous free and paid WordPress plugins and themes for customizing your WordPress wedding website.
  • You can create an eCommerce store section, sell digital products, accept online payments, and make money from your website.
  • WordPress.org websites easily integrate with Google Analytics and help you track their performance and see which strategies are working.

Cons

  • To run a WordPress.org website, you’ll need website hosting. The initial cost isn’t expensive and could cost you around $3 to $10 per month. However, as your website grows, the cost of hosting will also increase since you’ll need more space to store website files and deliver fast performance.
  • With WordPress.org, you’ll have to make sure of website backups. Luckily there are many WordPress backup plugins you can use.
  • Similarly, you’ll also have to ensure that your site, plugins, and themes are up to date.

Pricing

WordPress is free, but you’ll need to pay for a domain name and web hosting. A domain name costs typically around $15 per year, and web hosting costs $7.99 per month.

Luckily, Bluehost, one of the largest hosting providers, has agreed to offer WPBeginner readers a 60% discount on hosting, plus a free domain name and SSL certificate.

You can get started for as low as $2.75 per month.

If you need help setting up your website, then see our ultimate guide on how to make a website.

2. Web.com

Web.com Website Builder

Web.com is another popular website builder for small businesses that offers a user-friendly tool. You can easily create a wedding website of your choice in no time using their website builder.

It comes with a DIY builder which lets you drag and drop different elements for your website. Plus, there are over 150 different templates, including wedding themes that you can use to get started.

Wedding templates for web.com

With Web.com, you can also create a WordPress website. It offers its own web hosting service and automatically installs WordPress. You also get 1-year domain registration, unmetered bandwidth, automatic WordPress updates, and more.

Pros

  • Web.com offers an easy-to-use drag and drop website builder that makes it effortless to create any type of website.
  • There are over 150 different website templates to choose from, so you can get started quickly and customize the web design according to your needs.
  • The builder also offers powerful features like photo galleries, testimonial sliders, social media buttons, and more.
  • You easily create an online store using the website builder, accept credit card payments online, manage your products and inventory, and more.
  • With Web.com, you get different customer support options, including detailed documentation, phone call support, email support, and live chat.

Cons

  • Web.com is a great solution for small businesses, but as your site grows, it lacks some powerful features that you might need to grow your business.
  • The online store builder is relatively new and doesn’t offer as many features as you would get in WooCommerce.
  • If you’re looking to start a blog using Web.com, then you will get limited features.

Pricing

Web.com prices start from $4.95 per month with the Website Essentials plan, and you get free SSL, free domain, secure web hosting, and more. If you want different marketing tools and basic analytics, then you can choose the Business Essentials plan, which will cost you $7.95 per month.

Besides that, Web.com also offers an eCommerce Essentials plan for $13.95 per month and an eCommerce Premium plan for $19.95 per month.

3. Wix

Wix

Wix is a drag-and-drop website builder that makes it easy to create a website without writing code. The best part is that you can create a free wedding website in no time.

The template library includes hundreds of beautiful wedding templates you can use as a starting point for your website. 

Wix wedding templates

These templates also include standard wedding website features like an online RSVP system, a location map, links to your gift registry, and a calendar for your wedding events. 

Beyond the selection of wedding themes, there’s an included Wix logo maker to create a wedding couple logo and a wedding playlist creator. 

Pros

  • The drag and drop builder makes it very easy to customize your beautiful wedding template.
  • It supports all kinds of integrations if you need to add more features to your website.

Cons

  • The Free and Connect plans will show branded ads on your site.
  • It’s a difficult process if you ever want to move your website away from Wix.
  • Once you choose a template for your website, you won’t be able to change it.

Pricing

You can get the basic Wix website builder for free. However, with the free account, your wedding website will be on a subdomain, have ads, and a Wix logo.

If you want access to a free custom domain and remove the Wix ads, then paid plans start at $14 per month.

4. WordPress.com

WordPress.com

WordPress.com is an all-in-one website hosting platform with the same underlying code as WordPress.org.

It’s easy to get confused about the difference between WordPress.com and WordPress.org. To learn more, see our comparison of WordPress.com and WordPress.org and which is best.

It does offer a free plan, but it’s quite limited, and there are restrictions on what you can do with your website compared to WordPress.org. 

However, you will find a few wedding-specific free themes that give you features like a guestbook template, large featured images, and guest RSVP to create a free wedding website.

WordPress.com wedding theme

If you’re looking to quickly build a simple wedding website with limited features, then it might be the right choice. 

Pros

Cons

  • You won’t have the same level of customization as you would with other website builders. 
  • You’re limited in storage size, so you won’t be able to add many high-resolution photos.

Pricing

You can use the free plan with a subdomain (such as yourname.wordpress.com), but it’s very limited in features and storage space, and they will show ads on your website.

Paid plans start at $15 per month when billed annually and include a custom domain name. 

5. Joy

Joy

Joy is a free wedding website builder app. Instead of simply being a website builder, it includes additional features to help you manage and even organize your wedding. 

For example, you’ll find features for managing your guest registry, creating a guest list, sending out save the dates, storing photos, and more. There’s also a unique feature that creates your own wedding app for you and your guests. 

You can choose between hundreds of different wedding website templates. They aren’t highly customizable, but you can control the fonts, colors, and more. 

Joy wedding templates

You can create a guest FAQ section for common questions, provide travel and flight information, create wedding bios for your guests, and more. 

Pros

  • There’s an easy-to-use dashboard for managing all of your website and wedding planning features, so you only need to keep track of one tool.
  • It’s almost impossible to find all of the features this platform offers at such an affordable price.

Cons

  • The themes are beautiful, but they may be too simplistic for some users.
  • You don’t have many options for creating a unique site with custom features. It will look very similar to other websites using the same platform.
  • Once you build your website, you won’t be able to migrate it away from the platform.

Pricing

Joy is completely free. You don’t have to pay a dime to use the service or build a wedding website. 

Instead, they earn a commission on any item that gets sold through the wedding registry. However, if you want a custom URL, then you’ll need a custom domain name and it will cost you $19.99.

6. Squarespace

Squarespace

Squarespace is a popular drag and drop website builder that helps you create a website for your wedding day. The design has always been at the core focus, so you’ll find a template library filled with beautiful modern templates.

There are currently dozens of different wedding templates available you can customize using the drag and drop builder.

Squarespace wedding templates

Plus, when you choose a wedding template, it includes other helpful features like a wedding gift registry, RSVP pages, wedding invitations, and creating and sharing photos with friends and family. 

Pros

  • The platform is easy to use and built for beginners.
  • The theme templates are beautiful and focus on high-quality images, videos, and font choices.

Cons

  • There are limited integrations built into the platform, so you can only add the included tools and features.
  • The price point can be a limiting factor, especially if you want to accept cash donations instead of gifts.

Pricing

Squarespace offers a variety of different pricing plans depending on your needs.

Pricing for the Personal plan starts at $14 per month when paid annually and includes all the features you need to build your wedding website.

However, if you want to accept cash donations as a cash gift registry, then you’ll need at least the Business plan that starts at $23 per month when paid annually. 

7. The Knot

The Knot

The Knot is another free option and a wedding planner platform you can use to create a website quickly. 

The website builder offers hundreds of different wedding templates that can be customized with a simple drag and drop editor. 

The Knot wedding templates

You have control over your site images, color scheme, page layouts, and more. 

If you’re ordering wedding invitations and other paper goods through their service, then it’s really simple to have these match the design of your website. 

Beyond quickly building a wedding website, it offers different wedding planning tools like you can integrate your registries, view an event timeline, manage and track RSVPs, and more. 

Pros

  • It’s truly an all-in-one platform, so you can manage your website, send wedding invitations, buy gifts, use budgeting tools, and even find vendor recommendations during the planning stage.
  • There are unique live chat, and live streaming features integrated into the tool to keep all of your guests updated.

Cons

  • Although the website builder is free, most of the wedding websige designs are quite simple and don’t offer a lot of customization options compared to other tools.
  • The platform might be too complex for users looking to simply build a wedding website.

Pricing

The Knot is entirely free to build a wedding website and access the wedding planning features. However, if you want to use a custom domain name, then you’ll need to purchase a custom domain name for $20. 

8. Appy Couple

Appy Couple

Appy Couple is an all-in-one wedding platform and wedding website builder that includes over 500 different wedding templates you can choose from. 

When you choose a wedding template, it also includes a mobile app with a similar design.

Appy Couple wedding templates

As you customize your site, you can choose from pre-set sections like save the date, RSVP forms, and more. You can also use drag and drop widgets to add image galleries, highlight hotel reservations and travel deals, and more. 

There’s also a helpful guest list manager that lets you manage your guest list from both the website and mobile app. 

Pros

  • You can use the Android and iOS apps to build your site on your mobile device.
  • The platform includes advanced features to take care of everything related to your wedding, even helping your guests get reservations.
  • The template library is smaller, but they offer unique designs from artists you can’t find anywhere else.

Cons

  • Some users may find the back and forth between the website and mobile app confusing.
  • You can’t purchase a custom domain elsewhere, and you’ll have to buy it through the platform for an added fee.

Pricing

Appy Couple is either $49 per year or $12 per month, giving you access to all the platform features. 

You can also add a custom domain name (such as www.mywedding.com) for $20 per year. Otherwise, you’ll get a free subdomain (mywedding.appycouple.com) when you sign up. 

Expert Pick: What is the Best Wedding Website Builder?

WordPress.org is the best solution to build a wedding website. It offers lots of freedom and flexibility in how your website will look and function. Plus, you have complete control over your data as you own the website.

With WordPress.org, you get free and paid WordPress plugins, themes, and page builders to get started and customize every element of your wedding website.

For example, you can use SeedProd to create a website. The builder comes with a theme and template library and can be used to create an entire WordPress site perfect for your wedding without writing any code.

You can even create a simple one-page site with all the details about your wedding.

SeedProd wedding site example

It’s also very affordable since you can use the Bluehost web hosting deal to get a free domain name and discount hosting. 

If you need to add any other wedding-related features like a gift registry, RSVP management system, email notifications for wedding updates, and more, then you can always use a popular WordPress plugin.

We hope this article helped you learn about the best wedding website builders and templates. You may also want to take a look at our guide on how to create a free business email address and how to create an email newsletter for your website.

If you liked this article, then please subscribe to our YouTube Channel for WordPress video tutorials. You can also find us on Twitter and Facebook.

The post 8 Best Wedding Website Builder and Templates of 2022 (Compared) first appeared on WPBeginner.

13 Best WordPress Footer Design Examples (+ Best Practices)

Are you looking for the best footer design examples to help you get inspired?

The footer is the area at the bottom of your website, and it’s often overlooked by website owners. By checking out great website footers, you can get design inspiration and improve your footer.

In this article, we’ll show you some of the best footer design examples and offer best practices and tips to help you take action.

12 best WordPress footer design examples (+ best practices)

Why Is a Good WordPress Footer Design Important?

The footer is the area of your website that appears at the very bottom of the page. It will normally be on every page of your WordPress website.

Here’s an example of our footer on WPBeginner that millions of readers see every month.

WPBeginner footer

Since it’s located at the bottom of the website, most beginners forget to optimize this area.

However, your website footer is a very important area of your website. It lets you show important details and final takeaways in one place.

By customizing your footer, you can improve the overall user experience of your website and even optimize your site for WordPress SEO.

Plus, visitors who scroll to the bottom of the page are very engaged, so you can capture their attention with a call to action, email subscribe box, or send them to the most important pages on your website.

That being said, let’s show you some of the best footer design examples and best practices to optimize your footer.

Best WordPress Footer Design Examples

We’ve rounded up some of the top footer design examples to help you get design inspiration for your own footer area.

1. WPForms

WPForms footer

WPForms has a footer with all kinds of useful links. You’ll find links that go to the most helpful company pages, top features of the plugin, and useful WordPress links.

This ensures that when the reader gets to the bottom of the page and still has questions, they’ll find the exact resources they need. There’s also a floating alert bar at the bottom of the page with a call to action.

2. OptinMonster

OptinMonster footer

OptinMonster has a footer that offers readers links to important company pages, top features, helpful product links, and much more.

It also has simple social media icons, trust icons, and a company logo for branding purposes.

3. Neil Patel

Neil Patel footer

Neil Patel has a compact and straightforward footer that offers readers quick navigation links. The footer menu is the same as the navigation menu at the top of the site.

Plus, readers have the option to follow Neil Patel on social media as well.

4. Michael Hyatt

Michael Hyatt footer

Michael Hyatt has another simple and compact footer. It highlights the copyright date, easy social sharing buttons, and links to pages like terms of service and privacy policy.

Directly above the footer, you’ll see a call to action to download a free guide, which can convert a lot of visitors that make it to the bottom of the page.

5. ReddBar

Reddbar footer

ReddBar is a WooCommerce store with a footer that encourages email sign ups. Directly above the footer links, there’s a massive sign up box for readers.

Some of the helpful links include a link to their FAQ page, contact page, wholesale pricing page, and more.

6. Reader’s Digest

Reader's Digest footer

The Reader’s Digest footer contains a lot of information for visitors. You’ll find links to their category pages, other company brands, social media sharing buttons, and more.

Plus, there’s an eye catching email sign up box to encourage visitors to join their email list.

7. IsItWP

IsItWP footer

IsItWP footer has a quick section on what the website is about and links to other sites and company pages.

It also has a very unique site links drop down that lets readers click to find the exact type of content they’re looking for.

8. Born Fitness

Born Fitness footer

Born Fitness has a very minimalist footer that focuses on helping readers find the information they need. There are links to their premium services, free resources, and company pages.

Plus, there’s a search bar to help visitors find what they’re looking for, along with social sharing buttons.

9. Printing New York

Printing New York footer

Printing New York is an online store that ships worldwide. The footer highlights their address, services, and popular products.

They use the structure of their links to help boost their local SEO and search engine rankings.

10. Nalgene

Nalgene footer

Nalgene has a clean and well organized footer section. Directly above the footer, there’s a simple email sign up box.

After that, there are well organized links to help visitors find the exact products they’re looking for, along with company related links.

11. ProBlogger

ProBlogger footer

The ProBlogger footer has links to their most popular posts, top resources, and new jobs posted on their job board.

There’s also a big email sign up form directly above the footer, and a small footer navigation menu with the same menu options as the header navigation.

12. Custom Seafoods

Custom Seafoods footer

Custom Seafoods is a popular eCommerce brand that has a very different footer. Instead of including navigation or page links, they only feature an email newsletter sign up box.

Although it’s different from most other brands, a minimalist footer like this can convert well, since there are no other distractions or actions the visitor can take.

13. The Next Web

The Next Web footer

The Next Web has a footer that stands out from the rest of the website. It has social media sharing buttons, links to important pages, and more.

You’ll see a social proof section directly above the footer where they feature logos from popular brands and websites they’ve been mentioned or featured.

WordPress Footer Design – Tips and Best Practices

There are a lot of ways you can improve your user experience and create a better footer for your WordPress blog.

Let’s take a quick look at some of the best practices to keep in mind as you edit your website footer.

Include Your Business Contact Information

Having contact information listed on your site is essential. You should have a separate contact form page on your website, so your visitors can get in touch.

However, the footer is also a good place to include your contact information, especially if you have local customers who will be looking for your physical address.

Business contact information example

For local businesses, the more you ways you can feature your contact information, address, and even business hours, the better.

Add Links to Important Website Pages

It’s important to have clear navigation across your entire website. That’s why it’s so common for websites to include links in their footers.

You can add links for your most important product pages, top blog posts, about page, and more.

Footer links example

Think about the most valuable pages on your website and what your visitors will find the most useful.

Adding and optimizing your links can also give you an SEO benefit and boost in your search engine rankings.

Add Social Proof to Improve Conversions

One thing you may have seen certain websites do in their footer is add social proof. This can help to earn your customer’s trust and position you as an expert in your space.

It can be as simple as a customer testimonial or logos of popular websites you’ve been featured on.

Here at WPBeginner, we highlight logos of popular websites where we’ve been featured directly above the website footer.

Footer social proof example

Add a Call to Action

When your visitors get to the bottom of your website, you’ll want to tell them the exact action they should take and how they should do it.

For some websites, this will be a call to action to sign up for their email newsletter. For others, it will be links to explore popular product features, or even a call to action button.

Call to action button footer example

Your footer is the last chance to get your visitors attention and encourage them to become a subscriber, customer, or simply spend more time on your website.

For more optimization tips, see our checklist on ten things to add to your website footer.

We hope this article helped you find some of the best footer examples to help you optimize your website footer. You may also want to see our guide on how to choose the best blogging platform and our picks on the best virtual business phone number apps for small businesses.

If you liked this article, then please subscribe to our YouTube Channel for WordPress video tutorials. You can also find us on Twitter and Facebook.

The post 13 Best WordPress Footer Design Examples (+ Best Practices) first appeared on WPBeginner.

7+ Best WordPress Accordion Plugins (2024)

Are you looking for the best WordPress accordion plugins?

An accordion is a helpful web design element that allows you to display content in a collapsible tab layout. It’s often used to display frequently asked questions or product details without taking up so much of the page’s space.

In this article, we will share the best WordPress accordion plugins that you can use on your website.

Best WordPress Accordion Plugins

What Is an Accordion on a Website?

An accordion is a list of panels that can hide and show information when you click on each panel. It lets users choose which detail they want to learn more about, while the rest of the tabbed content remains closed.

An example of a FAQ section using an accordion

Many website owners use accordions when they want to cover tons of information while saving some space on their web pages.

You may have seen accordions used as FAQs (Frequently Asked Questions) in online documentation. Users can click on the question to see the answer, and if they don’t want to read it, then they can just close it again. FAQ content has also become more common for WordPress SEO since it can show up in the search results.

WooCommerce product pages also often use accordions to organize a lot of information. Customers can click on a detail they want more explanation for.

By default, WordPress doesn’t have a Gutenberg block for accordions. That’s why many users install a plugin for this purpose.

Let’s take a look at some of the best WordPress accordion plugins that you can use on your WordPress website.

Disclaimer: When choosing the plugins for this showcase, we installed each tool on our test site to explore its pros, cons, and features. This allowed us to recommend only the best WordPress accordion plugins.

1. Heroic FAQs

If you want to use an accordion plugin specifically for frequently asked questions, then check out Heroic FAQs. It lets you easily generate collapsible tabbed content and add it anywhere on your WordPress blog or site.

It comes with a drag-and-drop editor so that you can create questions and answers, group FAQs, and reorder items with ease. There are 5 pre-defined accordion styles and many customization options to match your website design perfectly.

For example, you can add rich content to your accordions, including images, blockquotes, videos, lists, and so on.

Heroic FAQs also offers 15 FAQ icon choices, accordion or toggle style options, CSS3 animations, and more to make your FAQs more personalized.

Pros of Heroic FAQs:

  • Easy-to-customize accordions for FAQ content.
  • User-friendly drag-and-drop editor to build your accordions.
  • Offers rich content elements to be inserted into your accordions so you can make them much more engaging.
  • Has built-in FAQ schema support so that your FAQ content can show up on search engines.

Cons of Heroic FAQs:

  • No free plugin is available.
  • Must be purchased with Heroic KB, where the price starts at $149.50 per year. So, this plugin is kind of like an addon.

Why we chose Heroic FAQs: It is perfect if you are looking for an easy-to-use accordion plugin that is specifically designed for FAQ content. We also recommend it if you want to build a knowledge base, as you have to purchase it with Heroic KB.

2. SeedProd

SeedProd Website and Theme Builder

As the best drag-and-drop WordPress page builder in the market, SeedProd offers various blocks to create a user-friendly site. These include an accordion block, which lets you add text sections that expand and collapse on your pages.

All you have to do is drag and drop the accordion block onto your page and start customizing it. You can create as many text sections as you need and even use a unique dropdown icon from Font Awesome for a personal touch.

Creating an accordion in SeedProd

Feel free to customize the block’s typography, colors, animated effects, and more to make the accordion more interactive.

What’s great about SeedProd is that it makes it easy to make a responsive accordion. You can adjust the block’s spacing for desktop and mobile devices, and even opt to hide the accordion if the page is viewed on a certain device.

Making the SeedProd accordion mobile-friendly

Pros of SeedProd:

  • Easy-to-use drag-and-drop editor for users of all levels.
  • The customization options allow full control over the accordion’s design, from the header and dropdown icon to the text section’s shadows.
  • Provides settings to adjust the accordion’s spacing and visibility on mobile, which is great for improving the user experience.
  • Offers various ready-to-use FAQ section layouts to speed up your process.
  • Allows custom CSS to make your accordion design more personalized.

Cons of SeedProd:

Why we chose SeedProd: While the accordion block is only available in the Pro version, we still think SeedProd is worth recommending. Besides a customizable accordion, you will also get access to a user-friendly page builder that makes creating a unique website easy.

For more details, you can see our complete SeedProd review.

3. Accordions

Accordions is a slightly more advanced accordion plugin, but it’s a pretty powerful one, too.

Unlike the previous plugins, it doesn’t come with a WYSIWYG or drag-and-drop editor. The interface is much simpler, with no live preview, but you can see a lot of settings to add and customize unlimited accordions.

The Accordions plugin interface in WordPress

One of the most notable features of this plugin is its lazy load setting. This delays the loading of the accordion until the user’s screen reaches it on the page. This way, you can maintain a fast website performance.

Additionally, if you get the Pro version, you can create nested accordions. This feature will be handy if you have plenty of information to explain and want to make it more organized.

Pros of Accordions:

  • Has a lazy loading feature to optimize the accordions.
  • Offers an import feature for importing accordions from other plugins.
  • Provides two types of accordions to choose from: the traditional accordion or vertical tabs.
  • Offers integration with Font Awesome icons to customize the icons for expanding or collapsing the accordion.
  • The Pro plan includes advanced features like nested accordions and a built-in search function.

Cons of Accordions:

  • The interface is not the most user-friendly.
  • You can only display the accordion using shortcodes (there’s no built-in block for it).

Why we chose Accordions: Despite its slight lack of user-friendliness, Accordions is a powerful plugin for creating beautiful accordions. Its Pro plan also includes features that you may not find in other plugins, like nested accordions.

4. Thrive Architect

Thrive Architect

Thrive Architect is another great page builder with an accordion/toggle block. It has a drag-and-drop editor, so designing a FAQ or product information section with this plugin is easy.

What makes Thrive Architect unique is you can customize the toggle block’s animation style and speed. This offers you more control over how the accordion behaves.

Editing the toggle block in Thrive Architect

Other than that, you can create columns in the toggle block, which can be beneficial if you have a lot of accordion content. Plus, you can customize the toggle block’s background color, typography, shadows, and so on.

If you want to make the toggle expanded by default to catch visitors’ attention, you can do that too. You don’t have to worry about the space becoming limited due to the expansion, as only the first accordion’s content will be shown.

Pros of Thrive Architect:

  • The toggle block comes with all Thrive Architect and Thrive Suite plans.
  • User-friendly drag-and-drop editor.
  • Plenty of ways to customize how the accordion block looks.
  • Advanced settings to configure the accordion block’s animation to control how it behaves when clicked.
  • Settings to make the toggle visible or invisible on desktop, mobile, and tablet to make the website more responsive.

Cons of Thrive Architect:

  • No free version is available.
  • No auto-save feature, so you have to manually save your work.

Why we chose Thrive Architect: If you are on the hunt for a page builder with a toggle function, then try Thrive Architect. The customization settings to create accordions are comprehensive, and you can easily build a unique web design and attractive landing pages with the plugin.

See our Thrive Architect review for more information.

5. Ultimate Blocks

Ultimate Blocks

Ultimate Blocks is a Gutenberg block plugin with an accordion feature. Using it, you can add a content toggle block right in the block editor rather than in a separate interface.

This way, you can create a FAQ section and easily place it wherever you want on your page or post.

The cool thing about Ultimate Blocks is you can select the heading tag for the accordion title. As a result, you can make your accordion content SEO-friendly and align it with the logical structure of your page or post.

If you upgrade to the Pro version, then you can also add a search bar on top of the accordion so that users can search for answers quickly.

Pros of Ultimate Blocks:

  • Offers responsive design controls to make the accordion hidden on desktop, tablet, or mobile devices.
  • SEO-friendly, with FAQ schema support and customizable heading tags.
  • Easy to use as you can add the content toggle block right in the drag-and-drop Gutenberg block editor.
  • Provides other blocks for presenting information while minimizing space, like tabbed and expandable content blocks.

Cons of Ultimate Blocks:

  • Limited accordion icon options compared to the other plugins on the list.

Why we chose Ultimate Blocks: Most WordPress users are already pretty familiar with the block editor, so Ultimate Blocks is great for adding an accordion right in the editor. The content toggle block is also available in the free plugin version.

To learn more, see our detailed Ultimate Blocks review.

6. Easy Accordion

Easy Accordion

If you are looking for an accordion plugin for your WooCommerce product pages, then check out Easy Accordion. The Pro version includes support for creating detailed FAQ sections for product pages.

If you have the same FAQ for multiple product categories, you can easily implement them with this plugin. As a result, you won’t have to create different FAQs for different pages.

Easy Accordion is also translation-ready, as it is compatible with multilingual plugins like WPML and PolyLang. This is great if you run a multilingual business.

Another great feature is the custom shortcode generator. This lets you easily differentiate your accordion shortcodes for when you need to embed them later.

Pros of Easy Accordion Pro:

  • Supports Gutenberg and most major WordPress page builder plugins.
  • You can create accordions from existing pages, posts, custom post types, and even taxonomies to save time on inserting the accordion content.
  • Multiple accordion layouts, from vertical tabs and multicolumn sections to horizontal toggles.
  • Includes SEO features like schema markup and nofollow links.

Cons of Easy Accordion Pro:

  • The plugin comes with a free version, but most of the features that make it great are locked in the Pro version.

Why we chose Easy Accordion: The built-in support for WooCommerce product pages and translation plugins makes Easy Accordion great for online businesses.

7. Accordion FAQ

WPShopSmart's Accordion plugin

If you are looking for a no-frills accordion plugin with a drag-and-drop builder, then look no further than Accordion FAQ. With it, you can easily create multiple collapsible content sections and move them however you likef from the backend.

The free Accordion FAQ plugin only has one template, but it’s quite user-friendly and versatile. For more design choices, you can upgrade to the Pro version and get 18+ templates.

WPShopSmart's Accordion plugin interface in the admin area

The plugin also offers many ways to customize the accordion. Feel free to use its 30+ animation styles, dozens of Font Awesome Icons, and 500+ Google Fonts to make the accordion more unique.

Pros of Accordion FAQ:

  • User-friendly drag-and-drop accordion editor.
  • Many customization options with unlimited color options and tons of animation styles, icons, and Google Fonts.
  • The pricing for the Pro plans is quite affordable, starting from $9 for 6 months.
  • Based on the Bootstrap framework, which creates a responsive design for the accordions.

Cons of Accordion FAQ:

  • The free plugin version displays multiple ads that can make for a poor user experience.

Why we chose Accordion FAQ: If you are looking for a simple accordion plugin with a drag-and-drop functionality, then Accordion FAQ is a great option, so long as you don’t mind the ads on the plugin page.

Bonus: Shortcodes Ultimate

The Shortcodes Ultimate plugin

Shortcodes Ultimate is a WordPress plugin that comes with a set of shortcodes to add various content elements, including accordions.

Since it uses shortcodes, you can add the accordion shortcode to any part of your WordPress site, from pages and posts to widget-ready areas. You also won’t have to worry about theme compatibility, as it functions smoothly with most modern themes.

The downside is the shortcode and HTML for the accordion are pretty long, and you have to be careful when inserting your content. That’s why we didn’t put this option in the same list as above.

For more details, see our complete Shortcodes Ultimate review.

What Is the Best WordPress Accordion Plugin?

The best WordPress accordion plugin depends on your needs.

If you are looking for an accordion plugin for FAQ content, then the best option is Heroic FAQs. The drag-and-drop editor is easy to use and includes various customization features for creating accordions out of the box.

If you are looking for a page builder with an accordion block, then SeedProd is your best option. SeedProd offers various controls and settings for how the accordion looks and behaves. Plus, your accordion design will look great with other elements on your page.

Finally, for people looking for a free WordPress accordion plugin, consider Accordions. This plugin includes everything needed to create simple accordions or vertical tabbed content. Its lazy loading will also ensure the accordion won’t slow down your site.

FAQs About Accordions in WordPress

Let’s go over some frequently asked questions about adding accordions in WordPress.

How do I add an accordion to WordPress?

The easiest way to add an accordion in WordPress is with a plugin like Heroic FAQs, SeedProd, or Accordions. With these tools, you can insert a ready-to-use accordion into your pages and posts and customize it to your liking.

Which WordPress accordion plugin offers the best customization options?

Heroic FAQs offers the best customization options for creating accordions. It comes with a drag-and-drop editor, pre-defined accordion styles, 15 FAQ icon choices, CSS3 animations, toggle style options, and more.

SeedProd also offers comprehensive customization options to modify how an accordion looks and behaves. Besides changing the color and typography, you can adjust the accordion’s size specifically for mobile devices.

Which WordPress accordion plugin is best for creating FAQ sections?

Heroic FAQs is an excellent WordPress accordion plugin for creating FAQ sections. With this plugin, you can create accordions using various styles and insert different rich content to make your information easier to understand.

Best Guides for Using Accordions in WordPress

We hope this article helped you find the best WordPress accordion plugins. You may also want to see our picks of the best email marketing services, and our expert list of the must-have WordPress plugins for business websites.

If you liked this article, then please subscribe to our YouTube Channel for WordPress video tutorials. You can also find us on Twitter and Facebook.

The post 7+ Best WordPress Accordion Plugins (2024) first appeared on WPBeginner.

How to Add FAQ Schema in WordPress (2 Methods)

Do you want to add FAQ schema in WordPress?

Adding FAQ schema can help boost your SEO rankings and organic click-through rate by making your frequently asked questions appear directly in Google’s search results.

In this article, we will show you how to add FAQ schema in WordPress and improve your rankings, step by step.

How to Add FAQ Schema in WordPress (2 Methods)

What Is FAQ Schema?

FAQ schema is a smart markup code, also known as structured data, that you can add to your website pages to help Google identify an FAQ section.

If you add FAQ schema, then Google may choose to reward you with an enhanced search result listing that also shows FAQs directly below the name of your WordPress website.

Here’s an example of an FAQ result. Google shows the questions, and you can click the down arrows to see the answers.

Example of FAQ rich result

This increased visibility on Google means more traffic to your website. It also makes your blog look like an authority on the subject.

Plus, FAQ schema makes your content more helpful to users who prefer the question-and-answer approach.

With FAQ schema, you have control over the questions and answers. You can customize the content however you like. You can even add emojis to boost your organic click-through rate (CTR).

Your FAQs can also appear in Google’s ‘People also ask’ boxes, which is another potential visibility boost.

These boxes appear for many search queries and offer a list of additional questions, each linked to a website for more information.

FAQ schema can appear in the People Also Ask box

It’s important to note, though, that adding FAQ schema in WordPress will not guarantee that your FAQs appear on Google. However, it will improve your chances of being seen.

FAQ Schema Guidelines

Before adding FAQ schema to your pages and posts, it’s important to understand Google’s content guidelines.

FAQ schema content guidelines

You should only use FAQ schema if your page has a list of questions with answers. If your page only asks one question, then you should use the QA schema instead.

You should not use FAQ schema for advertising purposes or for questions and answers that contain violent, obscene, hateful, dangerous, or illegal language.

If the same question and answer appear multiple times on your page, then it’s important to only add FAQ schema in one instance.

The questions and answers in your FAQs must also appear in the content on your page.

Finally, make sure each question includes the entire text of the question and each answer includes the entire text of the answer.

How to Add FAQ Schema in WordPress

The easiest way to add FAQ schema in WordPress is to install a plugin that handles it for you, but you can also do it without a plugin.

We will cover both options and you can use the quick links below to jump to the method you want to use:

Method 1: Adding FAQ Schema in WordPress With All in One SEO

The best way to add FAQ schema in WordPress is with the All in One SEO Pro plugin. It’s the best SEO plugin for WordPress, used by over 3 million sites.

The first thing you need to do is install and activate the plugin. For more details, see our guide on how to install a plugin in WordPress.

Note: There is a free version of All in One SEO available, but you need the premium version to add FAQ schema in WordPress.

Upon activation, the plugin will run a setup wizard. You can follow the on-screen instructions to set it up. If you need more help, then please take a look at our guide on how to properly set up All in One SEO for WordPress.

All in One SEO setup

Once you are done with the setup, you will return to the WordPress dashboard.

You can see a new ‘All in One SEO’ menu item in the admin sidebar.

All in One SEO menu item

If you had the free version of All in One SEO installed, then all of your settings will automatically transfer to the Pro version. The free version will be automatically deactivated.

Now that All in One SEO is installed and activated, you need to navigate to the page or post where you would like to add FAQ schema.

Simply scroll down to the bottom of the content editor, where you will see the AIOSEO Settings.

When you click on the ‘Schema’ tab, you can see that the schema settings are automatically enabled by default. Then, you can click on the ‘Generate Schema’ button to customize it.

All in One SEO Schema Settings

This will bring up the Schema Catalog, where you can select the type of schema you want to implement.

Next, you need to find the FAQ option and click the ‘Add Schema’ button next to it.

Choose FAQ from the Schema Catalog in AIOSEO

Now, you can start entering your FAQ information.

Start by adding a name and description for your page or post. You can even use AIOSEO’s easy emoji picker to add emojis to these fields.

Add name and description for FAQ

After that, you should scroll down to start adding the Question and Answer fields for your first FAQ question.

You can also click the ‘Add Another Question’ link to add more questions.

Add FAQs to All in One SEO

Once you are done, don’t forget to click the ‘Add Schema’ button.

If you want to test whether your FAQ schema markup is correctly added, then scroll down to our section on how to test your WordPress FAQ schema.

Method 2: Adding FAQ Schema in WordPress Without a Plugin

If you want to add FAQ schema in WordPress without a plugin, then you can do it by using our manual code method.

First, you will need to generate the FAQ schema code. You can do this by using the FAQPage JSON-LD Schema Generator.

FAQ schema generator

Start by adding your questions and answers on the left side of the tool. You can click ‘Add Another FAQ’ to add as many questions as needed.

As you type, the schema markup will update on the right.

Add questions to schema generator

Your next step is to paste the code you just created into WordPress. Simply click ‘Copy FAQ Schema’ to copy the code.

After that, navigate to the page or post where you want to add the FAQ schema.

If you are using the block editor, then you need to add a Custom HTML block and paste the FAQ schema markup inside that.

Add FAQ schema in the block editor

If you are still using the old classic editor, then you need to toggle to the text editor.

After that, you can paste the schema markup at the bottom of your post.

Add FAQ schema in the classic editor

When you are finished, just click the ‘Update’ or ‘Publish’ button to save your changes.

Testing Your WordPress FAQ Schema

Since your FAQ schema code is specifically for Google, you can’t tell whether it’s working just by looking at your page.

To test whether your FAQ schema markup is correct, you can use Google’s Rich Results Test page. Simply enter the URL of the page with FAQ schema and click ‘Test URL’.

Google's Rich Results Test

Google will analyze your page for all kinds of schema markup, not just FAQ schema. You may see multiple results if your page uses other kinds of schema.

Once the text is complete, expand the results under the “FAQ” heading.

Rich results FAQ schema section

You should see the actual question-and-answer pairs that you added to your FAQ section. If these are correct, then you are all set.

If they aren’t correct, then you will need to go back and double-check that you set up your FAQ schema properly.

FAQ schema test results

If the correct items still aren’t showing, then we recommend clearing your WordPress cache because caching plugins may show an outdated version of your content to Google.

We hope this article helped you learn how to easily add FAQ schema in WordPress. You may also want to see our ultimate WordPress SEO guide to boost your rankings and our expert picks for the best social media plugins for WordPress.

The post How to Add FAQ Schema in WordPress (2 Methods) first appeared on WPBeginner.

Crowdfunding Web Platform Features With Open Prioritization

Crowdfunding Web Platform Features With Open Prioritization

Crowdfunding Web Platform Features With Open Prioritization

Rachel Andrew

In my last post, I described some interesting CSS features — some of which are only available in one browser. Most web developers have some feature they wish was more widely available, or that was available at all. I encourage developers to use, talk about, and raise implementation bugs with browsers to try to get features implemented, however, what if there was a more direct way to do so? What if web developers could get together and fund the development of these features?

This is the model that open-source consultancy Igalia is launching with their Open Prioritization experiment. The basic idea is a crowdfunding model for web platform features. If we want a feature implemented, we can put in a small amount of money to help fund that work. If the goal is reached, the feature can be implemented. This article is based on an interview with Brian Kardell, Developer Advocate at Igalia.

What Is Open Prioritization?

The idea of open prioritization is that the community gets to choose and help fund feature development. Igalia have selected a list of target features, all of which are implemented or currently being implemented in at least one engine. Therefore, funding a feature will help it become available cross-browser, and more usable for us as developers. The initial list is:

  • CSS lab( ) colors in Firefox
  • :focus-visible in WebKit/Safari
  • HTML inert in WebKit/Safari
  • Selector list arguments for :not( ) in Chrome
  • CSS Containment support in WebKit/Safari
  • CSS d (SVG path) support in Firefox

The website gives more explanation of each feature and all of the details of how the funding will work. Igalia are working with Open Collective to manage the pledges.

Who Are Igalia?

You may never have heard of Igalia, but you will have benefited from their work. Igalia works on browser engines, and have specialist knowledge of all of the engines. They had the second-highest number of commits to the Chrome and WebKit source in 2019. If you love CSS Grid Layout, then you have Igalia to thank for the implementation in Chrome and WebKit. The work to add the feature to those browsers was done by a team at Igalia, rather than engineers working internally at the browser company.

This is what makes this idea so compelling. It isn’t a case of raising some money and then trying to persuade someone to do the work. Igalia have a track record of doing the work. Developers need to be paid, so by crowdsourcing the money we are able to choose what is worked on next. Igalia also already have the relationships with the engines to make any suggested feature likely to be a success.

Will Browsers Accept These Features If We Fund Them?

The fact that Igalia already have relationships within browser engine teams, and have already discussed the selected features with them means that if funded, we should see the features in browsers. And, there are already precedents for major features being funded by third parties and developed by Igalia. The Grid Layout implementation in Chrome and WebKit was funded by Bloomberg Tech. They were frustrated by the lack of Grid Layout implementation, and it was Bloomberg Tech who provided the money to develop that feature over several years.

Chrome and WebKit were happy to accept the implementation; there was no controversy over adding the feature. Rather, it was a matter of prioritization. The browsers had other work that was deemed a higher priority, and financial commitment and developer time was therefore directed elsewhere. The features that have been selected for this initial crowdfunding attempt are also non -controversial in terms of their implementation. If the work can be done then the engines are likely to accept it. Interoperability — things working in the same way across browsers — is something all browser vendors care about. There is no benefit to an engine to lag behind. We essentially just get to bypass the internal prioritization process for the feature.

Why Don’t Browsers Just Do This Stuff?

I asked Brian why the browser companies don’t fund these things themselves. He explained,

“People might think, for example, ‘Apple has all of the money in the world’ but this ignores complex realities. Apple’s business is not their Web browser. In fact, the web browser itself isn’t a money-making endeavor for anyone. Browsers and standards are voluntary, they are a commons. Cost-wise, however, browsers are considerable. They are massively more complex than most of us realize. Only 3 organizations today have invested the many years and millions of dollars annually that it takes to evolve and maintain a rendering engine project. Any one of them is already making a massive and unparalleled investment in the commons.”

Brian went on to point out the considerable investment of Firefox into Servo, and Google into LayoutNG, projects which will improve the browser experience and also make it possible to implement new features of the platform. There is a lot that any browser could be implementing in their engine, but the way those features are internally prioritized may not always map to our needs as developers.

It occurred to me that by funding browser implementation, we are doing the same thing that we do for other products that we use. Many of us will have developed a plugin for a needed feature in a CMS or paid a third party to provide it. The CMS developers spend their time working on the core product, ensuring that it is robust, secure, and up to date. Without the core product, adding plugins would be impossible. Third parties however can contribute parts to that platform, and in a sense that is what we can do via open prioritization. Show that a feature is worthwhile enough for us to pledge some cash to get it over the line.

How Does This Fit With Projects Such As Web We Want?

SmashingConf has supported the Web We Want project, where developers pitched web platform ideas to be discussed and voted for onstage at conferences. I was involved in several of these events as a host and on the panel. I wondered how open prioritization fits with these existing efforts. Brian explained that these are quite different things saying,

“... if you asked me what could make my house better I could name a million things. Some of those aren’t even remotely practical, they would just be really neat. But if you said make a list of things you could do with a budget for what each one costs — my list will be considerably more practical and bound by realities I know exist.

At the end of the month if you say "there is your list, and here is $100, what will you do with it?" that’s a very direct question that helps me accomplish something practical. Maybe I will paint. Maybe I will buy some new lighting. Or, maybe I will save it for some months toward something more costly.”

The Web We Want project asks an open question, it asks what we want of the platform. Many of the wants aren’t things that already exist as a specification. To actually start to implement any of these things would mean starting right at the beginning, with an idea that needs taking right from the specification stage. There are few certainties, and they would be very hard to put a price on.

The features selected for this first open prioritization experiment are deliberately limited in scope. They already have some implementation; they have a specification, and Igalia have already spoken to browser maintainers to check that the features are ready to work on but don’t feature in immediate priorities.

Supporting this project means supporting a concrete chunk of development, that can happen within a reasonably short timeframe. Posting an idea to Web We Want, writing up an idea on your blog, or adding an issue describing a totally new feature on the CSSWG GitHub repo potentially gets a new idea out into the discussion. However, those ideas may have a long slow path to becoming reality. And, given the nature of standards discussions, probably won’t happen in exactly the way that you imagined. It is valuable to propose these things, but very hard to estimate time and costs to a final implementation.

The same problem is true for the much-wanted feature of container queries, Igalia have gone so far as to mention container queries in their FAQ. Container queries are something that many people involved in the standards process and at browser vendors are looking into, however, those discussions are at an early stage. It isn’t something it would be possible to put a monetary value on at this point.

Get Involved!

There is more information at the Open Prioritization site, along with a detailed FAQ answering other questions that you might have. I’m excited about this because I’m always keen to help find ways for designers and developers to get involved in the web platform. It is our platform. We can wait for things to be granted to use by browser vendors, or we can actively contribute via ideas, bug reports, and with Open Prioritization a bit of cash, to help to make it better.

Smashing Editorial (il)

What is the Difference Between Posts vs. Pages in WordPress

Often WordPress beginners get confused between posts and pages. By default, WordPress comes with two content types: posts and pages.

As a beginner, you are probably wondering what’s the difference between posts vs pages? They seem to look similar in the WordPress dashboard as well as on the website.

Readers often ask us: Why do I need both? When should I use posts? When should I use pages?

In this article, we will explain the difference between posts vs. pages in WordPress.

WordPress Posts vs. Pages - What's the difference

What are Posts in WordPress?

Posts are blog content listed in a reverse chronological order (newest content on top). You will see posts listed on your blog page.

If you are using WordPress as a blog, then you will end up using posts for the majority of your website’s content.

You can add and edit your WordPress posts from the ‘Posts’ menu in your dashboard. Here is how Add New Post screen looks.

New WordPress Post Screen

Due to their reverse chronological order, your posts are meant to be timely. Older posts are archived based on month and year.

As the posts gets older, the user has to dig deeper to find them. You have the option to organize your posts based on categories and tags.

WordPress Post Categories Tags

Because WordPress posts are published with time and date in mind, they are syndicated through the RSS feeds. This allows your readers to be notified of the most recent post update via RSS feeds.

Bloggers can use the RSS feeds to deliver email broadcasts through services like Constant Contact, Aweber or MailChimp. You can create a daily and weekly newsletter for your audience to subscribe to.

The very timely nature of posts make it extremely social. You can use one of the many social sharing plugins to allow your users to share your posts in social media networks like Facebook, Twitter, LinkedIn, Pinterest etc.

Posts encourage conversation. They have a built-in comment feature that allows users to comment on a particular topic. By default, comments, pingbacks, and trackbacks are enabled.

WordPress Post Comments Enabled

You can go to your Settings » Discussion to turn off comments on older posts if you like.

WordPress posts usually have the name of the author and published/updated date.

The best example of a WordPress post may be this article which you are reading now. Go to the top, and you can see the post category ‘Beginner’s Guide’ above the article title. Below the title, there is the last updated date, author’s name, and social share buttons.

WordPress Post Example WPBeginner Blog

After the main article content, there is the comments section. You cannot usually find these on a page.

Now that you know what are posts, let’s take a look at pages and how they are different.

What are Pages in WordPress?

Pages are static “one-off” type content such as your about page, privacy policy, contact page, etc. While the WordPress database stores the published date of the page, pages are timeless entities.

For example, your about page is not suppose to expire. Sure you can go back and make updates to it, but chances are you will not have about page 2012, about page 2013 etc. Because there is no time and date tied to pages, they are not included in your RSS feeds by default.

You can add and edit pages in WordPress from ‘Pages’ menu in your dashboard. Here is how Add New Page screen looks like:

Add New Page WordPress Screen

Pages are not meant to be social in most cases thus do not include social sharing buttons. For example, you probably don’t want others to tweet your privacy policy page in most cases.

Similarly, pages also don’t include comments. You don’t want users to comment on your contact page or your legal disclaimers page. There is an option to enable comments, however, it is disabled by default for your WordPress pages.

Comment Options in WordPress Pages

Unlike posts, pages are hierarchical by nature. For example, you can have subpages or child pages within a page. You can easily turn a page into subpage by choosing a parent page from Page Attributes when editing a page.

Page Attributes WordPress

A key example of this in action would be our Blueprint page. This feature allows you to organize your pages together, and even assign a custom template to them.

WordPress by default comes with a feature that allows you create custom page templates using your theme. This allows developers to customize the look of each page when necessary.

In most themes, post and pages look the same. But when you are using your page to create a landing page or a gallery page, then the custom page templates feature comes in very handy.

Pages also have this archaic feature called ‘Order’ which lets you customize the order of pages by assigning a number value to it. However, this feature is extended by plugins like Simple Page Ordering that allows you to drag & drop the order of pages.

WordPress Pages vs. Posts (Key Differences)

To summarize, following are the key differences between posts vs pages in WordPress.

  • Posts are timely vs. Pages are timeless.
  • Posts are social vs. Pages are NOT.
  • Posts are organized using categories and tags vs. Pages are hierarchical and can be organized as child and parent pages.
  • Posts are included in RSS feed vs. Pages are not.
  • Posts have author and published date vs Pages do not.

The differences we listed above may have exceptions. You can use plugins to extend the functionality of both content types.

Despite these differences, there are some similarities between pages and posts in WordPress.

First, they are both used for publishing content. You can add text, images, forms, etc. to both posts and pages. There is featured image meta-field in both pages and posts.

You can build a website without ever using posts or blogging features of WordPress. You can also make a business website with pages and a separate blog section for your news, announcements, and other articles.

Frequently Asked Questions

Following are some of the most frequently asked questions we have heard from our users about posts vs. pages, and how to properly use them in WordPress.

1. How Many Posts and/or Pages Can I Have?

You can have as many posts and/or pages that you want. There is no limit on the number of posts or pages that can be created.

2. Are there any SEO advantages to one or the other?

Search engines like content to be organized. Timeless content is considered to be more important; however, there is a lot of priority given to the latest timely content.

In short, there may be a difference, but as a beginner, you do not need to worry about it. Focus on making your site organized for the user. To learn more, see our complete WordPress SEO guide for beginners.

3. Which pages I should create on my website or blog?

It really depends on what kind of blog or website you are making. However, you may want to see our list of important pages for all websites.

4. Can I switch posts to pages and vice versa?

Many beginners accidentally add content to posts when they actually wanted to create pages. Similarly, some new bloggers may end up saving blog posts as pages.

If you have just started out, then you can easily fix that by using the post type switcher plugin. For more details see our article on how to switch post types in WordPress.

5. Are there other content types in WordPress besides posts and pages?

Yes, there are. However, these other default content types include attachments, revisions, and navigation menus which are normally not used the same way as posts and pages.

WordPress also allows developers to create their own custom post types. This feature is used by plugins to create additional content types in WordPress. For example, if you are running a WooCommerce store, then you will see a ‘Products’ post type in your WordPress admin area.

We hope this article helped you learn the difference between pages and posts in WordPress and how to use them. You may also want to see our list of important things to do after installing WordPress.

If you liked this article, then please subscribe to our YouTube Channel for WordPress video tutorials. You can also find us on Twitter and Facebook.

The post What is the Difference Between Posts vs. Pages in WordPress appeared first on WPBeginner.

4 WordPress Alternatives: the What, Where, and Why

This guest post is by Matt Setter of MaltBlue.com.

As bloggers, we’re all familiar with WordPress, whether as a self-hosted setup, or via WordPress.com. I think that, if you’re a blogger and you’ve not used it, then you’re likely in an odd minority.

If you do a Google search for “blogging software,” WordPress will likely be among the first results you’ll see. But is it necessarily the best choice?

Yes, “everybody’s doing it,” but does that make it the right choice? Just like in the 90’s when Microsoft seemed like the only choice, but then we found alternatives like Mac or Linux, there are alternatives to WordPress too.

Now maybe you’re quite happy with your WordPress installation, it meets your needs, and your site’s humming along nicely. Well, that’s perfectly fine. But what if you’re not? What if you want to change, or have the opportunity to change?

What if you’re:

  • just starting out
  • about to rebuild or redesign your blog
  • moving hosts
  • concerned WordPress is not meeting your needs
  • contrarian in your thinking?

Well if you’re any one of these, you’ll love this post. Today I present to you four alternatives you may never have heard of, showing you the pros and cons of each, how much they cost, and where you can get them from. Ready? Great! Let’s begin.

Habari

habariHabari is a secure blogging platform designed from the ground up with the current and future needs of the blogging community firmly in mind. It’s also designed to be open and transparent, using modern software development techniques in its design.

Some examples of blogs run on this platform include:

  • http://barefootrunner.co.uk/
  • http://futurespark.com.au/

The Habari project screencast linked below gives a great introduction to the CMS.

Features

  • Support for a wide variety of plugins and extensions, including:
    • contact forms
    • Last.FM
    • spam management
    • Amazon
    • Google Maps, AdSense, and Analytics
    • star ratings
    • members-only access
    • LinkedIn
    • Twitter
  • modern theme support
  • support for multiple users and multiple sites in one installation
  • support for tagging
  • support for a wide variety of media, including Viddler and Flickr
  • custom RSS feeds and statistics
  • Feedburner integration
  • modern spam filtering techniques
  • automatic Twitter updates
  • Disqus integration for commenting.

Cost and availability

Habari is available as a free download from the project home page. You can even try out a demo version without needing to install it.

Support options

Habari support is available via:

  • FAQ
  • users group
  • IRC (internet chat, similar to ICQ, MSN, Google Chat etc).

Is it for you?

If you’re keen to roll up your sleeves and manage things yourself, or you have great tech support, try out Habari. However, if your host doesn’t support it or you’re not able to do it yourself, then this may not be the best option for you.

CushyCMS

cushycmsCushyCMS is, as the home page says, “A Truly Simple CMS.” It was designed to be implemented with as little effort as possible; to be “Super Easy To Use!”

Where Habari is more like WordPress in that you can download, install, and configure it yourself, CushyCMS is a fully hosted solution.

Minimal manual effort is required on your part, other than the work required to implement modest customisations. Have a look at the introductory video below to see just how easy it is.

Blogs that use CushyCMS include:

  • http://thewebtherapist.com/
  • http://www.the-nomads.co.uk/

Features

Depending on the package that you choose, different features will be available to you. In the free package, you get:

  • five sites
  • unlimited site editors
  • availability in 20 languages.

If you take the pro package, you can:

  • brand your installation
  • customise the interface via a wysiwig editor
  • remove all ads from the site
  • use your own domain name and logo
  • configure access rights for each user
  • customise the CSS classes.

Cost and availability

CushyCMS is available from Stateless Systems and comes in two forms:

  • free
  • pro, for US$28 per month.

Support options

This depends on the package that you’ve chosen. If you’ve chosen the free package, you get:

  • videos
  • documentation
  • package FAQ
  • access to the Google user group.

If you upgrade to the pro package, you get all that, plus direct email support from Stateless Systems.

Is it for you?

Depending on your needs and requirements, CushyCMS could be just what you’re looking for. You can sign up and get started in minutes. There’s no need to worry about what your current provider does or doesn’t support, as this system is fully hosted. You can get started with the free version, but you’ll have limited branding and domain control privileges.

You can upgrade to the pro version, but unless you’re making regular money with your blog, you might not want to pay the monthly fee for it. However, you do get a company backing the product with 24/7 support, should you have any questions or queries.

concrete5

concrete5Just like WordPress and Habari, concrete5 is available to be downloaded, configured, and installed at your web host and is a blogging platform built from the ground up to satisfy the needs of website editors, designers, and developers alike on a foundation of proven open source technologies.

The underlying philosophy of concrete5 is to make running a website easy. As you can see from the demo video below, in just about all aspects of site administration, you can simply click on a region of the page and edit it to your heart’s content.

A couple of blogs that run on concrete5 are:

  • http://www.gigstadpainting.com/
  • http://www.sustainableharvest.com/

Features

Concrete5:

  • is easy to theme yourself, or you can choose from a wide variety of pre-made themes
  • supports a wide variety of plugins and extensions including:
    • digital download support
    • discussion forums
    • ecommerce
    • ad servers
    • configurable menu navigation
    • star reviews
    • scrolling ticker
    • image gallery
    • traffic and statistics management
    • Google Maps
    • user chat
    • country-based redirect
    • Vimeo and YouTube support.
  • easy to configure, whether by hand or via the wysiwig editor
  • easy to update, right from your browser
  • open source and completely free to use
  • easy to install and configure.

Cost and availability

Concrete5 is available from the concrete5 website and is open source, so it’s free.

Support options

Similar to Habari, concrete5 doesn’t have a paid support option, however it does have:

  • an active community
  • clear documentation
  • a thorough FAQ.

If you are a developer, or have access to development support, training and integration packages are also available.

Is it for you?

Concrete5 is a good mixture of the best parts of the two previous packages. You can install it yourself, but training and custom build support are also available. So, depending on your needs and your available budget, concrete5 may be the right option for you. Why not give a trial version a go today to see?

TomatoCMS

tomatocmsLast, but by no means least, is TomatoCMS. Like Habari and Concrete5, TomatoCMS is an open source, modern blogging and CMS platform designed from the ground up to meet today’s needs and demands.

Examples of blogs that run on this platform include:

  • http://www.thethao68.com/
  • http://home.phono.co.jp/

Two key aspects set TomatoCMS apart: Widgets and the Layout Editor. Let’s look at its feature list.

Features

Among a vast array of compelling features are:

  • a variety of built-in modules (extension) including:
    • banner advertising support
    • category management
    • comment management
    • simple menu management
    • multimedia management
    • in-built news system
    • tag support
    • poll support
  • built on the Zend Framework, jQuery, and 960grid, making it fast, light and flexible.

In addition to this it’s also:

  • SEO friendly
  • secure
  • highly themable
  • packaged with a simple visual editor allowing you to drag, drop, and resize almost any interface element.

Cost and availability

As with Habari and Concrete5, TomatoCMS is also a free download available to be installed and configured on your host as your needs demand.

Support options

Also like Habari and Concrete5, TomatoCMS doesn’t offer a commercial support package. However it does have a solid project wiki and a thriving forum. If you have troubles with it, then you’re likely to find the solution there without too much hassle.

Is it for you?

If you’re keen to control most, if not all, of the aspects of the system on your own host, then this is the option for you. However, if you need support then this option may not be the best choice.

Choices, choices

So there you have it. If you want to change from WordPress, have an opportunity to change, or are just starting out, now you have four additional options to WordPress to choose from.

Take a closer look and evaluate them. When you find the one that ticks all your boxes, give it a try and let me know how it goes for you.

Do you run your blog on an alternative to WordPress? Why is it your platform of choice? What makes it the best one for your blog and your business? Let us know in the comments.

Matthew Setter is a freelance writer, technical editor and proofreader. His mission is to help businesses present their online message in an engaging and compelling way so they’re noticed and remembered.

The post 4 WordPress Alternatives: the What, Where, and Why appeared first on ProBlogger.

4 WordPress Alternatives: the What, Where, and Why
https://problogger.com/4-wordpress-alternatives-the-what-where-and-why/
http://www.problogger.net/archives/category/blog-networks/feed/
Blog Networks – ProBlogger
Blog Tips to Help You Make Money Blogging – ProBlogger
https://problogger.com/wp-content/uploads/powerpress/problogger_podcast-891.jpg

Powered by WPeMatico