How to Send a Welcome Email to Google Form Respondents

“Tech and AI” - that’s the theme of an upcoming event we are organizing in New York. We have created a Google Form to collect registrations and would like to send a welcome email automatically to each person as they fill the form.

The email should be personalized and include the name of the attendee. We would like also attach a PDF file, with the speaker bios and other details about the event, to the email.

Google Form for Event Registration

Here’s a sample Google Form that we are using to collect registrations for the event. The form requires attendees to fill in their name, email address and their preferred date to attend the event.

Event Registrations - Google Form

Personalized Welcome Email

Since we would like to send a personalized email to each attendee, we’ll use markers in the email template that will be replaced with the actual values from the Google Form. For instance, if we use the marker {{ Attendee Name }} in the email template, it will be replaced with the actual name of the attendee that is filled in the Google Form.

Here’s how the email template looks like:

Hi {{ Attendee Name }},

Thank you for registering for the Tech and AI event. We are excited to have you join us on {{ Preferred Date }}.

We've attached a PDF file with speaker bios and other details about the event.

Your registration ID is {{ Response ID }}. If you would like to make any changes to your registration, please visit {{ Response URL}}

We look forward to seeing you there!

Sincerely,
Digital Inspiration

The Response ID is a unique identifier for each Google Form response and the Response URL is the link to the Google Form response that the attendee can use to edit their response anytime later.

PDF File with Event Details

Upload the PDF file that you would like to attach to the email to Google Drive. Share the file with anyone who has the link and copy the link of the PDF file to the clipboard.

PDF file in Google Drive

Send Automated Emails from Google Forms

Now that we have the Google Form and templates ready, we’ll be using the Email Notifications for Google Forms add-on to send the welcome emails automatically to each attendee.

Launch the add-on inside Google Forms, and click the Create Email Notification button to create a new rule for sending emails.

Give your rule a name, say Welcome Email, and paste the Google Drive File URL in the Attach Files input box. Next, click the Visual Editor button to open the email editor.

Enter the subject line and the email body containing the markers. You can also add inline images (like your brand’s logo) to the email body.

Google Form Notifications Rule

Send Email to the Form Respondent

The last step is to specify the email address of the person who filled the Google Form. This is the email address that will receive the welcome email.

There are two ways to specify the email address of the form respondent:

  1. You can either check the Notify Form Submitter option and select the Email Address question from the drop-down. This will send the welcome email to the email address that the respondent has entered in the Google Form.

  2. Alternatively, you may put the question title of the email address field in the Email Addresses to Notify input box. This is useful when you want to send the welcome email to a different email address that is not entered in the Google Form.

Barcode and QR Code in the Email

Tip: If you are using the add-on to generate event passes, you can include the barcode or QR code of the registration ID in the email body. The barcode can be scanned at the event venue to verify the attendee’s identity. Learn more.

Test the Email Notification Rule

That’s it. Click the Save button to enable the rule and it will send the welcome email to the form respondent as soon as they submit the Google Form.

Here’s a sample email that we received after filling the Google Form.

Welcome Email for Google Forms

Also see: Getting Started with Google Form Notifications

Say Goodbye to Multiple Registrars: Transfer Your Domains to The Hub

Have a domain purchased from somewhere else besides WPMU DEV? It’s now easier than ever to transfer them to our platform in The Hub with our domain transfer-in feature.

As you’ll see, it only takes three steps to quickly establish a domain into a new home at WPMU DEV – so you can manage everything under one roof!

Plus, you’re in control regarding nameservers, autorenewal, associating a domain with a client, and more.

In this article, we’ll look at:

After reading this, you’ll immediately be able to implement transferring domains into one easy-to-manage system – cheaply and effectively.

But first…

Before we get into the steps to transfer a domain, here are some general guidelines to get you in good shape:

transfer tips
These tips will set you on the right course to domain transfer!

Now, if you’re ready — let’s begin!

Triggering Domain Transfers

There are several ways to transfer a domain over. Whether it’s an established domain with us or you have a third-party domain service, it’s a breeze.

There are just a few differences…

New User

If you’re a new user with no registered or connected domains, you’ll get started in The Hub by clicking the Domains tab and Transfer a Domain.

New user view for domains.
No domains in our system? This area will get you started.

Already have domains registered or connected? Under Registered Domains, you’ll start by clicking Transfer Domain.

Transfer domain tab
This gets you started right away.

Another route is if you have connected any domain(s), click on the ellipsis icon on any domain’s row to show the available management options for that domain. From that, click on the Transfer Domain to Us button.

Use us for domain
You have other options under the ellipsis as well, such as managing and rechecking DNS.

Additionally, you can click on any connected domain’s row, which will open up Nameserver details for that specific domain. Clicking the Transfer Domain to Us button is another way to get the process going.

transfer domain to us.
As you can see, the price per year is also mentioned here.

Whatever option you choose will lead to an area where you can start the 3-step process.

Step 1: Domain Eligibility Check

In this first step, we check whether the domain is transferable.

To start, you’ll specifically enter the domain you want to transfer. Enter it completely with its TLD (e.g. .com).

Transfer existing domain
Once entered, hit ‘Transfer’ to continue.

If a domain is ineligible, you’ll get an error message. The messages will vary, depending on the issue.

error message.
In this example, it’s an invalid TLD.

Almost any domain TLD is okay to transfer. We have over 260 TLDs that are available for use and transfers. For any questions or issues about this, please contact support or see our documentation for rules and reasons a domain doesn’t transfer.

That being said, if all is good and the domain is eligible, once you hit Transfer, it will take you to the nameserver step.

Step 2: Nameserver Settings

This step is where you can choose to use our nameservers and DNS records, or keep current nameservers. If existing DNS records are available, they will be shown here. If not, it will be blank and state that there are no records to display.

Nameservers options.
Choose where you’d like to manage your DNS in one click.

If you choose to Keep Current Nameservers, it will keep the current nameserver records for the domain.

Current nameservers.
The type of nameserver and TTL is listed.

Once you decide on what’s best for you, you can continue on…

And for help pointing a domain to our nameservers, check out our complete guide on how to do so.

Step 3: Transfer Registration

Registering a domain is all done in one area.

You can start by viewing the Registration Terms. You’ll notice the transfer price, renewal price, auto-renew option, and whether domain privacy is active or not.

Want auto-renew? It’s a click away.

Next, the domain will need an Authorization Code from your current registrar. This is a normal process that is universal amongst domains. You’ll get this from the losing domain register you’re transferring from.

Authorization code area.
You’ll need this code from the domain provider you’re transferring from.

Additionally, you’ll also add the Registrant Information. You can associate the domain with a client or add personal details.

Registrant information area.
You can always go back and edit this information at any time.

Then, checkout in the Summary. This has the Domain Name, Registration Period, and Price. Plus, it shows whether Auto-Renew is activated or not.

The price summary for the domain.
Read the Terms of Service and Privacy Policy for more information.

After hitting Pay Now, you’re all set!

By default, the Registration Period of all the transfer-in domains is set to One year. Pay the transfer fee on our pricing page to transfer a domain to WPMU DEV. Upon successful transfer, the domain’s expiration date will be extended by one year.

It’s also important to note that if the Authorization code is invalid, the domain transfer will fail, and the transfer amount will be refunded to your account.

The Domain Transfer Process

Once the new domain transfer-in payment is complete, the Domain Registration process begins. You’ll be able to see the status under Domain Overview.

The transferring status.
The transferring part is always highlighted in orange.

The system will verify three registrant contact data pieces: First Name, Last Name, and Email Address. For more information about registrant verification, please read our documentation.

When complete, you’ll see that it’s Active OR Verifying. Also, additional information will be displayed (e.g. Registration Date, Expiration date, Costs, etc).


Sign indicating that a domain is active.
All other information is displayed, too.

Be aware that the domain transfer can take up to five days – and that’s out of our control. It depends on how quickly the verification can take place from the losing register (e.g. GoDaddy).

Once completed, your domain will then be available in the Domains area in The Hub – along with any others you have.

Bulk Domain Transfer

Last but not least, if you need to do a Bulk Domain Transfer, contact our 24/7/365 support to help assist with this. It’s the easiest and quickest way to get any bulk domains transferred over to our system.

The Main Way to Manage Your Domain

As you can see, bringing in domains from third-party providers is quick and easy, with only three steps. And once done, you can manage all your domains in one place with The Hub!

Adding domains to a client’s site, setting up auto-renewal, connecting nameservers – the process couldn’t be more streamlined. So, try bringing a new domain in today. Good luck, and enjoy!

Oh, and if you’re not on our Agency Plan yet, give it a go. Not only do you get domain management like bringing in third-party domains, you’ll also have access to unlimited site licences, 500GB CDN, $144 hosting credits, and more.

Do More With Your Forms: New Forminator Reports and Webhooks Integration

Track and optimize the performance of forms, polls, and quizzes with new Forminator reports, plus, integrate with even more automation tools that support webhooks. We break down version 1.18 of the plugin in this article.

Want to monitor and improve the performance of your (or your clients) forms? Forminator’s new reports dashboard allows you to easily track views, submissions, conversions, and more.

Forminator 1.18 also introduced a new Webhook Integration, allowing you to send submission data to any automation tool that supports webhooks.

In this article, we’ll demonstrate how these features work and how easy it is to implement them.

Skip ahead to any section you’d like to learn more about:

Let’s begin!

Performance Reports for Forms, Polls, and Quizzes

Forminator’s reports are here to make your forms better than ever, giving you instant and detailed information regarding views, submissions, conversion rates, and more.

This helps you test your forms, manage your income and analytics, and ensure any form is up to par.

There are a number of different report modules, each gives insights into different form metrics. Let’s cover them now, starting with the main reports dashboard…

Reports Dashboard

It all begins at the Reports dashboard. You pick whether you want to view a report from a Form, Quiz, or Poll in the dropdown.

Contact forms in the reports area.
In this example, we’re looking at a report for a created form named ‘Contact Form.’

Then simply select the Date Range you want to see reports for. Or, add your custom timeline by clicking on the calendar dates.

Date range for forms.
Change the timeline to anything you’d like.

Overview

The Overview shows Views, Submissions, and Conversion Rate. It also displays the date and time of the last submission and reporting dates.

With the overview, you can keep track of your form’s performance in a simple, easy-to-read area.

Forminator - Reports overview screen.
508 views, 113 submissions, and a 22.2% conversion rate…this form’s performing great!

Views

The Views section displays the number of views and how it compares to the previous period. Once your form is implemented for a while, you’ll also start receiving Monthly Average reporting.

The views area.
The percentage of views is up 27%.

Submissions

One of the most important form metrics. View the total number of submissions, how the submissions compare to the previous period, and your monthly average.

Submissions area.
Want more information? Go to ‘View Submissions.’

You can also view individual submissions. View ID, Date Submitted, First Name, and Email Address.

Forminator - Form submission area
The submissions are shown for this particular form.

Need to look even further into individual submissions? You can open up more details – including email addresses, phone numbers, names – depending on the fields implemented on your form.

Very detailed submission.
This is Bob’s submission, with a message that was included.

Additionally, you can also make it easier to sort through all the submissions by including various filters — such as date range, keywords, IDs, sort order, and more.

Forminator filters screen.
Add any filters to sort more easily and efficiently.

Conversion Rate

Keep tabs on performance with the Conversion Rate report. This shows how many submissions opted-in instead of leaving the form’s page.

Conversion rate
This particular form’s performance sits at 22.2%.

You also get a glimpse of the monthly average conversion rate.

Payments

Forminator also provides Payments (forms only for one-time payments – not subscriptions) information. This feature helps you to keep track of sales and how much income is in each account.

You’ll see what you made in a given period compared to a previous one. Plus, it shows you where it came from Stripe or PayPal.

A view of the payments report inside of Forminator
No payment area will be included if you don’t have any data.

Apps

Forminator is amazing for 3rd-party apps, allowing you to integrate with thousands of applications for collecting data, emails, analytics, and more.

In the Apps area, monitor the data sent to 3rd-party apps and how they compare to previous periods. It will show you the difference in numbers and percentages of all the active apps you have.

The integrations area.
In this form, we have HubSpot and Mailchimp integrated.

For more information, read our article on integrating 3rd party apps and after-submission behavior.

Leads

The Leads feature is just for Forminator quizzes. It shows the number of leads you’ve collected over a period. You’ll also see the monthly average of new leads.

A look at the leads report inside of Forminator
In this case, the monthly average is 26 new leads.

The notifications are essential to know if your quiz is performing well.

Automation Webhooks to Send Data Automatically to 3rd Party Apps

Forminator’s new Webhooks integration allows you to send submission data to automation tools, including Zapier, Integrately, Tray.io, Make, Workato, and other automation tools where webhooks function.

Setting up Webhooks is all done from the Integrations tab. If not installed already, you’ll see it as an Available App.

Just click on the Plus (+) sign and click Activate.

Where you activate webhoooks.
One click gets you started.

Once activated, you’re ready to start using Webhook with forms, quizzes, polls, and your 3rd party applications.

We’ll run through a quick example of how to integrate webhooks with a 3rd party app.

In this example, I’ll be using MailChimp.

Webhooks will now be there from individual forms in the Integrations area. Then, click the Plus (+) sign next to Webhook to get started.

applications
All of the applications that are activated are located here.

The next popup is where you’ll Name the Webhook and enter the Webhook URL.

webhook information area.
Give a name that relates to what it’s used for.

So, how do you get a Webhook URL?

Obviously, it varies on each 3rd-party app. They’re all different. In the case of MailChimp, for example, here’s the process:

  1. Log into Mailchimp and navigate to Audience
  2. Select the audience you want to work with in the Current Audience dropdown
  3. Click on the Manage Audience dropdown button and then Settings
  4. On the Settings page, click Webhooks
  5. Tap the Create New Webhook button
  6. In the Callback URL field, add the URL of the integration or application where you want to send webhook requests—this URL will receive data about your Mailchimp audience.

Once you have your URL established, add it to the Webhook URL area, and that’s it!

You can edit the Conditions anytime and do further editing in MailChimp.

The conditions area.
Any changes with Conditions can be made from here.

For more information on setting this up with MailChimp, please read their article about setting up webhooks. And for another example of using Zapier, check out our documentation.

WordPress Forms Have Never Been Better With Detailed Reports and Webhook Integration

Be sure to take advantage of reports so that you can ensure your forms, polls, and quizzes are at peak performance.

And get automated by activating Webhooks to your favorite 3rd party applications!

By the way, if you’re not using our five-star rated Forminator – it’s free and available on WordPress.org for download. It’s also freely included in our free WPMU DEV plan, along with a whole suite of WordPress plugins and site management tools.

How to Require an Email Address to Download a File in WordPress

Do you want to have users enter an email address before downloading a file from your WordPress site?

Many businesses use free file downloads like eBooks, white papers, etc to collect email addresses and potential leads. These lead magnets convert really well because it offers users an incentive that motivates them to sign up.

In this article, we’ll show how to easily require an email address to download a file in WordPress.
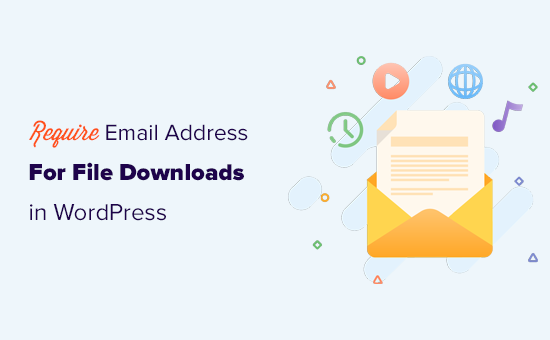
Requiring email address for file downloads on your WordPress website

Why Require an Email Address to Download a File in WordPress?

Email is still the best way to communicate with customers online. Many businesses collect email addresses as potential leads that they can follow up with to make a sale.

For instance, an online store may capture email leads based on user interests. Those users may not make a purchase right away, but it gives you an option to convert them later.

Similarly, if you are selling an online course, you can offer users a free lesson download in exchange for their email addresses. This way, you can send targeted emails to those users and convince them to buy your premium course.

It doesn’t always have to be a free file download. You can sell e-books, music, software, and other digital downloads.

What You Need to Collect Email Addresses

The easiest way to collect and build email lists is by using an email marketing service. This allows you to not only collect the email addresses but also be able to send beautiful emails, create customer segments, track open rates, and more.

We recommend using Constant Contact as the best email marketing service for small businesses. It allows you to easily collect email addresses, send targeted emails, segment your audiences, and grow your business.

Most importantly, it works really well with WordPress, WooCommerce, and all other essential WordPress plugins.

If you need alternatives, then do check out Sendinblue or Drip.

Note: You can still collect email addresses even if you don’t want to use an email marketing service right away. All the methods described below would still work for manual outreach.

That being said, let’s take a look at how to require an email address to download a file in WordPress. We’ll show multiple methods, and you can choose one that works best for you.

1. Collect Email Address for File Downloads in WordPress with OptinMonster

This method is the most flexible, incredibly powerful, and recommended for all users.

For this method, we’ll be using OptinMonster. It is the best lead generation software on the market and allows you to easily collect email addresses with powerful popups, sign up forms, banners, and more.

First, you need to sign up for an OptinMonster account.
OptinMonster

After that, you need to install and activate the OptinMonster plugin on your WordPress website. For more details, see our step by step guide on how to install a WordPress plugin.

This free plugin is a mere connector between your WordPress website and your OptinMonster account.

Upon activation, you need to visit OptinMonster » Settings page and click on the ‘Connect existing account’ button.
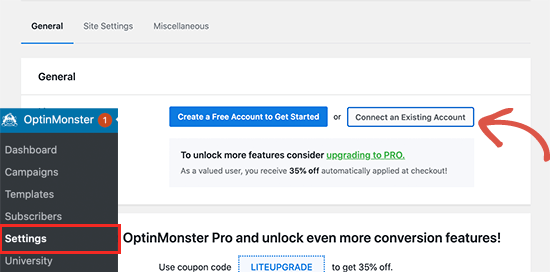
Connect OptinMonster account to WordPress

This will bring up a popup where you can log in and connect your WordPress site to your OptinMonster account.
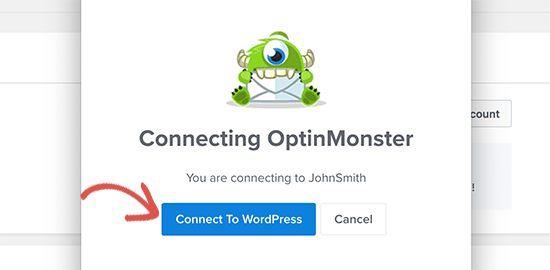
Connect WordPress

Now that your WordPress site is connected, you are ready to create your first campaign. Head over to OptinMonster » Campaigns page and click on the ‘Add New’ or ‘Create your first campaign’ button.
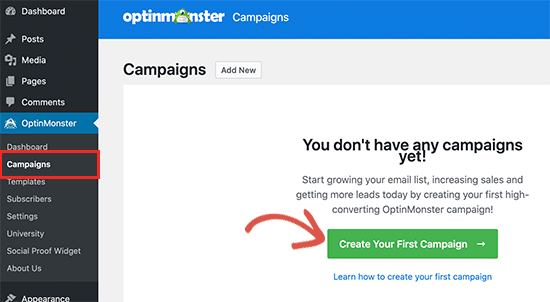
Create campaign

Next, you’ll be asked to select a campaign type. OptinMonster supports lightbox popups, floating bars, inline optins, fullscreen, slide-in, and gamified campaigns.

For the sake of this tutorial, we’ll create a lightbox popup campaign. Below that, you can choose a campaign template by clicking on it.
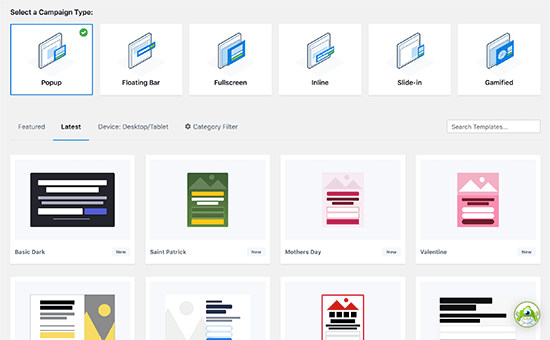
Choose campaign type and template

You’ll then be asked to provide a name for your campaign. You can enter any name here to identify it easily, and then click on the Start building button.
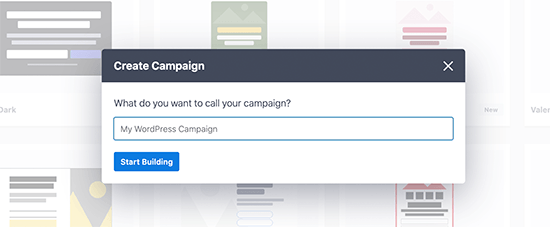
Choose campaign name

This will launch OptinMonster’s campaign builder interface with a live preview of your campaign in the right panel. You can click on any item in your campaign to edit it.
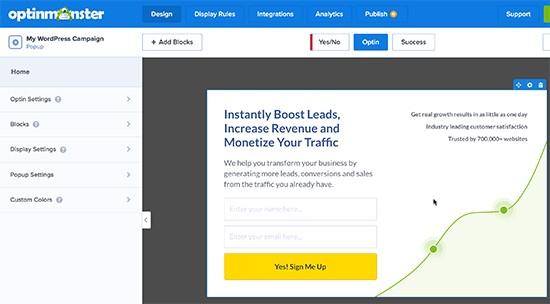
Campaign builder

You can also add new items to your campaign by clicking on the Add Blocks button.

Once you are satisfied with the design, you can switch to the success view. This is the view your users will see when they have submitted their email addresses.
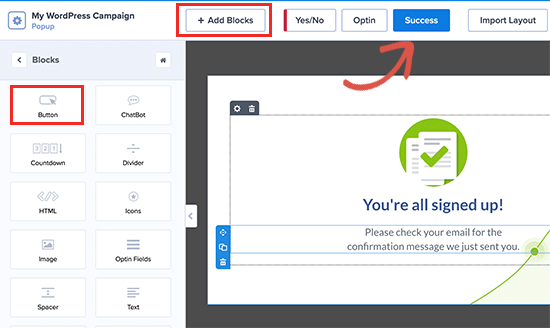
Edit the success view

There are multiple ways to allow users to download the file on the success view. You can edit the text and add a link to the download file.

Alternately, you can click on the Add Blocks button and then add a ‘Button’ block. After that, click to select the button block and switch to the ‘Action’ panel.
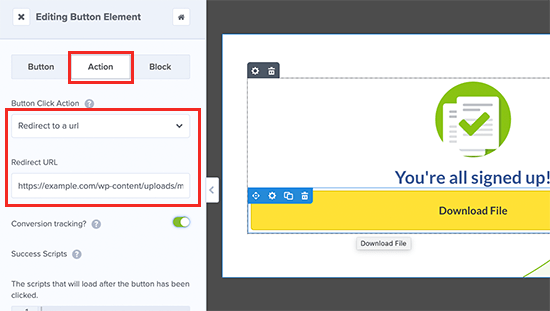
Adding file download button

From here, select ‘Go to a URL’ under the ‘Button click action’ setting and then enter the file download URL.

Once finished, don’t forget to click on the Save button to store your campaign settings.

Next, you need to click on the Integrations tab on the top to connect your email service provider.
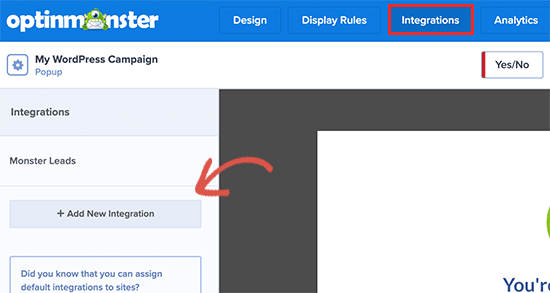
Add new integration

Simply click on the Add New Integration button and then select your email provider from the list. Follow the on-screen instructions to set it up.

Note: If you just want to capture email leads for your CRM software or manual outreach, then OptinMonster can automatically use their MonsterLeads feature to store them for you.

Now that everything is set up, you can switch to the Publish tab to make your campaign go to live. Simply switch to the ‘Publish Status’ from Draft to Publish by clicking on it.
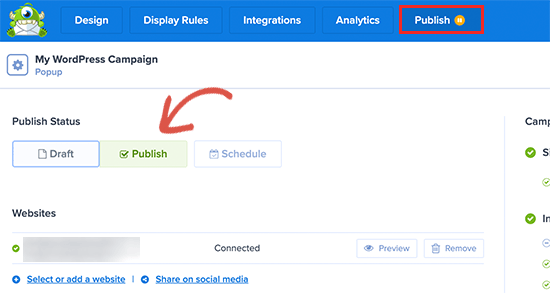
Publish campaign

Don’t forget to click on the Save changes button to save your campaign settings and then click on the close button to exit the builder.

After that, you’ll be redirected back to your WordPress site, where you can configure where and when you want to display the campaign.

For example, you can show it on specific pages or posts, existing customers, target WooCommerce customers, and more. For details, see our guide on how to show personalized content to different users in WordPress.
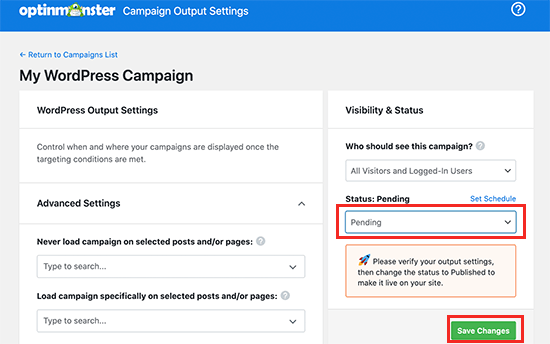
Output settings for your campaign

For this tutorial, we will be showing it to all visitors. After that, simply set the status from pending to published and click on the ‘Save Changes’ button to launch your campaign.

You can now visit your website in a new incognito tab to see your campaign in action.
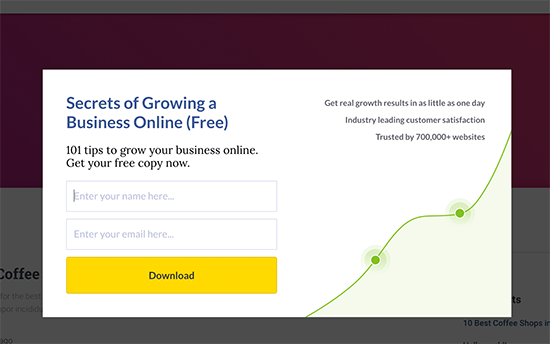
Campaign preview

Your users will be able to provide their email address, and after that, they will see the success view of your campaign with a file download link.
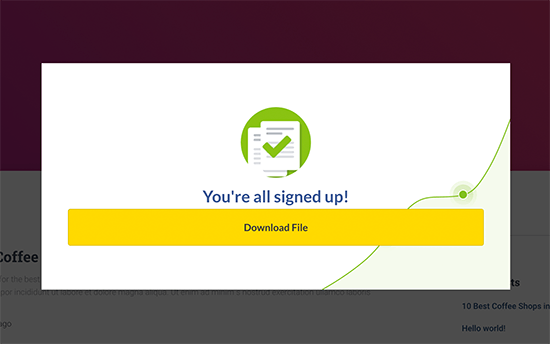
Download file after submitting the email address

2. Collect Email Address for File Downloads in WordPress with WPForms

This method is handy if you want to create custom lead generation forms and add them to your WordPress landing pages.

For this method, we’ll be using WPForms. It is the best WordPress form builder plugin that allows you to easily create custom lead capture forms that you can add anywhere on your website.

It also allows you to redirect users to a file download upon form submission.
wpforms

First, you need to install and activate the WPForms plugin. For more details, see our step by step guide on how to install a WordPress plugin.

Upon activation, you need to visit WPForms » Settings page to enter your license key. You can find this information under your account on the WPForms website.
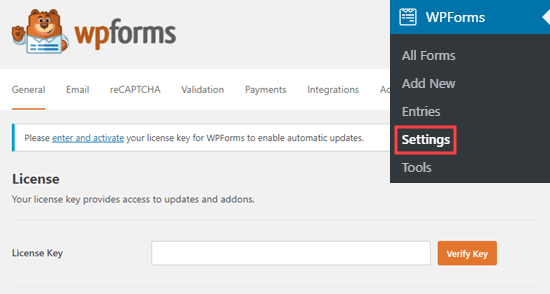
Entering your WPForms license key on your site

After that, you can go to WPForms » Add New page to create your email capture form. First, provide a name for your form and then select a template.
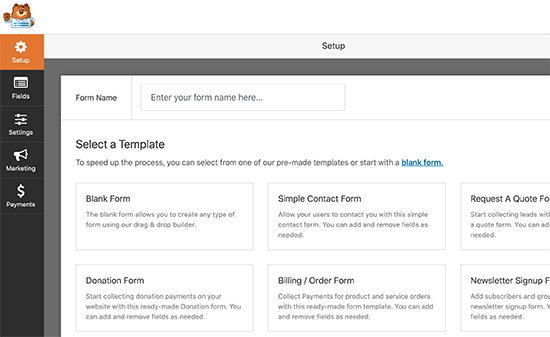
Adding a new form

Templates are a starting point, and WPForms comes with several commonly used templates. For instance, you can choose a newsletter sign-up form or a contact form template.

After choosing the template, WPForms will launch the form builder interface with a preview of your live form on the right.
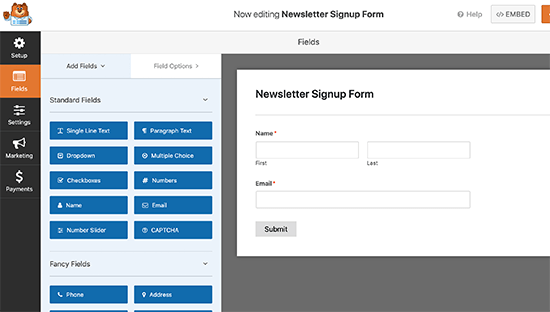
WPForms builder interface

From here, you can click on any form field to add. edit, move it up or down, or delete it. You can also click on the ‘Submit’ button to change the text to ‘Download’.
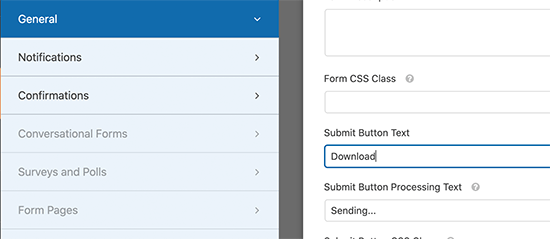
Change submit button text

Once you are done editing your form, you need to switch to the marketing tab to connect it to your email service provider. You can skip this step if you are manually managing form leads.
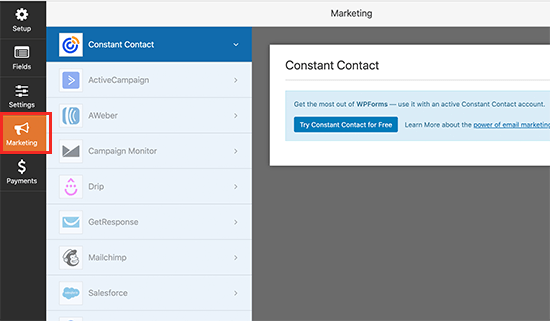
Connect your email marketing service to WPForms

WPForms supports all the top email marketing platforms. Simply click on your email service provider and follow the on-screen instructions to connect it.

Once finished, you need to switch to the Settings tab and then click on Confirmation. From here, you can configure what to do when a user submits the form.
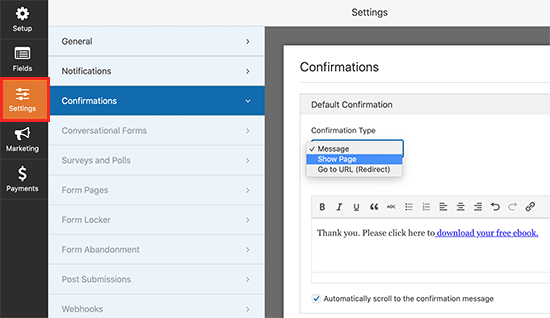
Form confirmation

You can choose to show a message with a link to the file download. You can also show users a page on your website to download the file or redirect them to the file download URL.

Once finished, don’t forget to click on the Save button at the top to store your settings.

Adding The Form to Your Website

WPForms makes it super easy to add your forms anywhere on your website.

Simply, edit the post or page where you want to display the form. On the post edit screen, click on the (+) add new block button and select WPForms block.
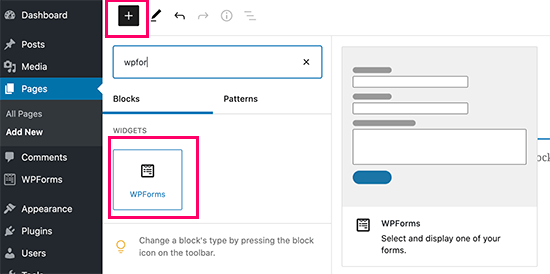
WPForms block

This will add the WPForms block to your post or page content. You need to select the form your created earlier from the drop-down menu.
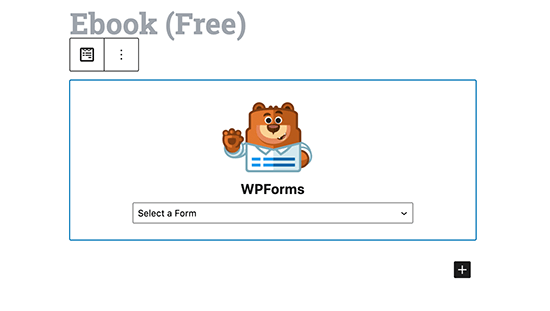
Select your form

You’ll see a live preview of your form in the content editor. You can now save or publish your post / page and visit your website to see your form in action.
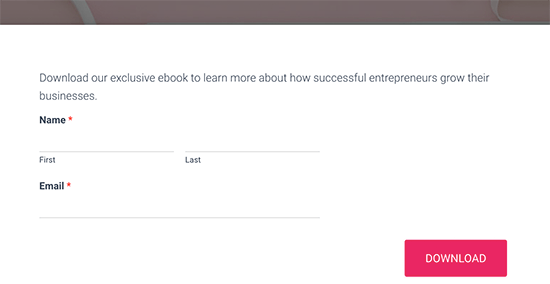
Form preview

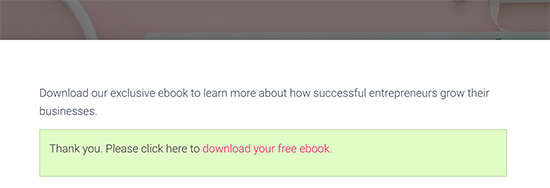
Based on your settings, when users submit the form they will get the confirmation message with the file download link or redirected.
Confirmation message

3. Collect Email Address for File Downloads in WordPress with MemberPress

This method is recommended if you want to make the file download available to existing users, members, or paid users.

For this method, we will be using MemberPress. It is the best WordPress membership plugin and allows you to easily control access to premium content, file downloads, members-only content, and more.
MemberPress

First, you need to install and activate the MemberPress plugin. For more details, see our step by step guide on how to install a WordPress plugin.

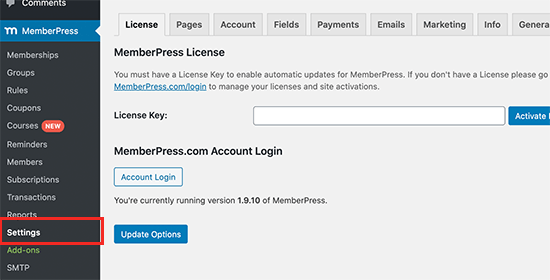
Upon activation, you need to visit MemberPress » Settings page to enter your license key. You can find this information under your account on the MemberPress website.
MemberPress license key

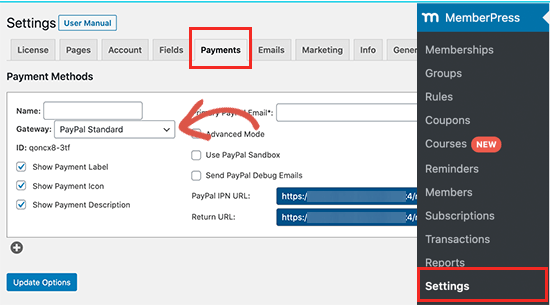
Next, you need to switch to the ‘Payments’ tab and select a payment method to accept payments for membership subscriptions. You can also create free subscription plans if you want.
Add a payment method in MemberPress

MemberPress supports PayPal and Stripe. You can also use Authorize.net with their Plus and Pro plans.

After selecting your payment method, you’ll be asked to provide your account details. You can also choose to add multiple methods.

Once finished, click on the ‘Update Options’ button to save your changes.

Now you are ready to create a membership plan.

Simply go to the MemberPress » Memberships page and click on the Add New button.
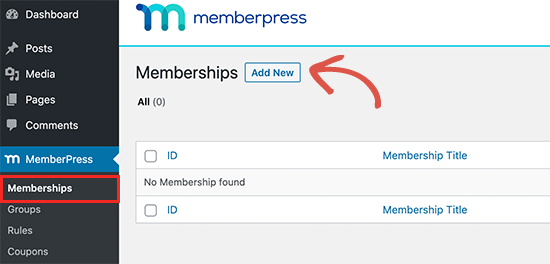
Add new membership plan

On the next screen, you can give your membership plan a name and set a pricing option. Depending on how you want to organize your memberships, you can choose lifetime, expiring, or fixed expiring plans.
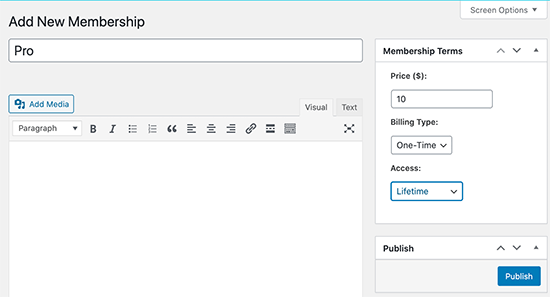
Creating a membership plan in MemberPress

After that, click on the Publish button to make your membership plan available.

Next, you need to create an access rule. This allows you to control which parts of your website you want to be protected and available to members-only.
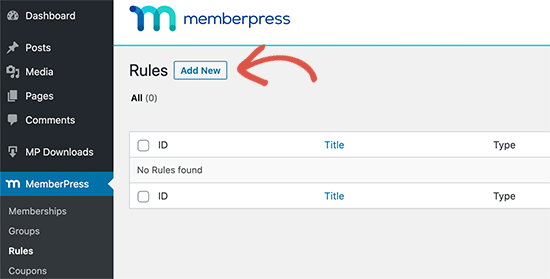
Add new rule

On the next screen, first you need to choose which content you want to be restrict under ‘Protected Content’.

MemberPress offers a whole range of options. You can select posts that match certain tags, categories, pages that are under the same parent page, single posts, or any URL.
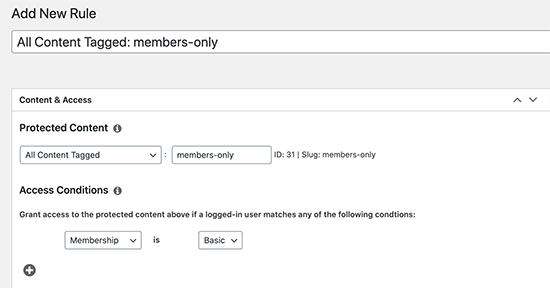
Rule settings

For instance, we have chosen to protect all content tagged members-only.

Below that, you need to select who will have access to the protected content. We have chosen anyone who has Basic membership.

Once you have set up the rule, don’t forget to click on the Save Rule button to save your changes.

Next, you need to create content that you want to be protected. For this tutorial, we want users to be able to download a file.

You can create a new post in WordPress, based on our rules settings we will simply add the tag members-only to protect this page.
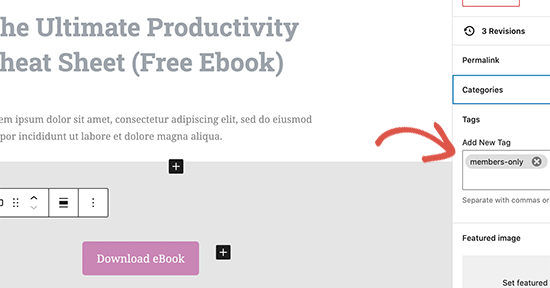
Creating members only content

After that, you can simply add your file download as a link or a download button in the post content.

Next, scroll down to the ‘Membership Unauthorized Access’ box and set the ‘Unauthorized Message:’ to custom. After that, you can add a custom message you want to show to users who have not signed up yet.
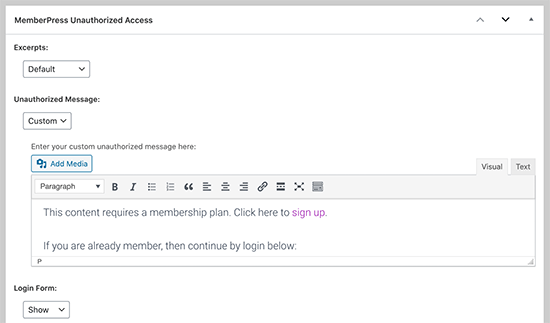
Unauthorized access message

You can now save or publish your content and preview it in a new browser window using incognito mode. You’ll see your custom unauthorized access message with the login form.
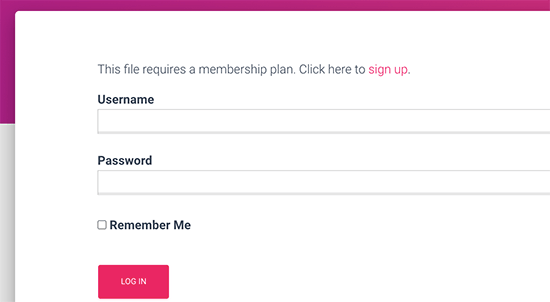
Restricted file download page

Connecting MemberPress to Your Email Service

MemberPress works with all top email marketing providers and you can automatically add all new members to your website into your email list.

Simply go to the MemberPress » Addons page and install the addon for your email provider. For the sake of this tutorial, we’ll show you Constant Contact but settings are pretty much the same for most email providers.
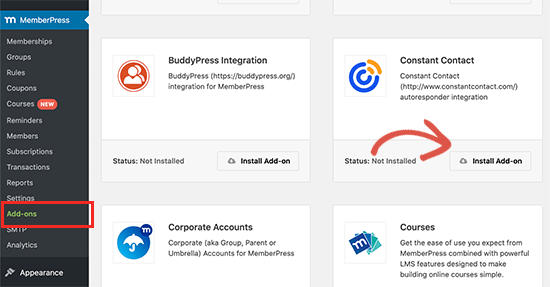
Install email marketing addon

Next, go to MemberPress » Settings page and switch to the Marketing tab. From here, you can connect your email service by providing your account API keys.
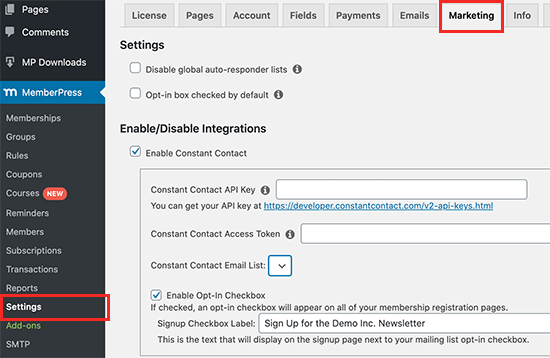
Enable email marketing service

For details, you’ll need to see MemberPress documentation for your email service provider.

After entering the required information, click on the Update Options button to save your settings.

Next, you need to visit MemberPress » Memberships page and edit the membership plan you created earlier. Scroll down to the ‘Membership Options’ box and switch to the Advanced tab.
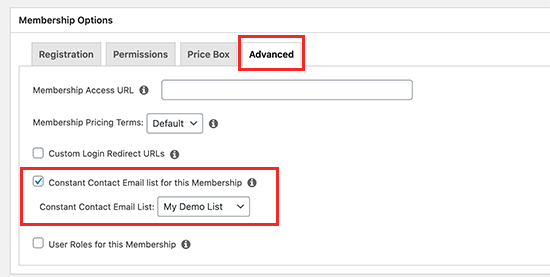
Turn on email optin for a membership plan

From here you can check the option to enable email sign up checkbox for that membership plan.

After that, don’t forget to click on the ‘Update’ button to save changes.

Now when users visit the sign up page, they will see an option to subscribe to your email list.
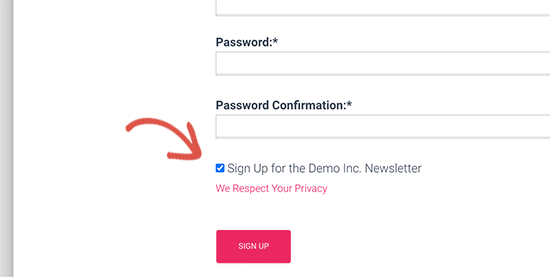
Sign up option to join your email list

Tracking Your File Downloads in WordPress

Now that you have enabled email requirement to download a file in WordPress, you may want to see how users are finding it and how many users download it.

You can do that by using the MonsterInsights. It is the best Google Analytics plugin on the market and allows you to easily track file downloads in WordPress.

monsterInsights

For more details, see our complete guide on how to easily track file downloads in WordPress.

We hope this article helped you learn how to easily require an email address to download a file in WordPress. You may also want to see our guide on how to get more traffic to your website and our expert pick of the best business phone services, so you can ask for phone numbers in exchange for file downloads using the methods above.

If you liked this article, then please subscribe to our YouTube Channel for WordPress video tutorials. You can also find us on Twitter and Facebook.

The post How to Require an Email Address to Download a File in WordPress appeared first on WPBeginner.

Useful Regular Expressions for Validating Input in Google Forms

Your organization has a few vacant positions and you are planning to use Google Forms to prepare a pre-interview questionnaire for job applicants. You have created a form and it has all the standard fields where candidates can enter their name, email address, website URL, phone number, zip code and other essential details.

The form is ready for publishing online but before you make it live, how would you ensure that candidates have entered data in the correct format? And even if the format is proper, is the data itself valid? Can you add a CAPTCHA to Google forms to prevent spam bots? Can you include a profanity filter to block people from submitting entries that include obscene words?

When you are expecting dozens, or even hundreds, of responses in your Google Forms, it is always a good idea to have some rules in place and respondents data should be matched against these rules even before they submit the form. For instance, if your form is asking for a person’s year of birth, they should only be allowed to enter a number between 1900 and 2014.

Advanced data validation in Google Forms using RegEx (regular expressions) Advanced data validation in Google Forms using RegEx (regular expressions)

Regular Expressions in Google Forms

Google Forms makes it relatively easy to add such advanced date validation rules to individual fields through Regular Expressions (or regex or regexp). Think of them as search patterns and every character entered in a form field is matched against that pattern - the form can only be submitted if the patter and the user-input matches.

Let’s understand this with a real-world example.

Say your Google form expects the user to enter their year of birth. At the time of designing the form, expand the “Data Validation” section below the form field (see screenshot above) and choose Regular Expression from the drop-down. Next select “Matches” in the other drop-down and enter ^(19\d{2}|20[0-1]\d)$ in the input field. The field will now accept input value like 1920, 2010 but would reject other values that fall outside the range.

Regular Expressions for Common Form Fields

A regular expression may appear gibberish but they aren’t so difficult to read and understand if you can know the basic rules of the language. What you see here is a compilation of some useful regular expressions that can be used to validate common form fields like URLs, phone numbers, zip codes, dates, etc.

1. Postal Address - allow only alphanumeric characters, spaces and few other characters like comma, period and hash symbol in the form input field.

[a-zA-Z\d\s\-\,\#\.\+]+

2. ZIP Code - the regex allows ZIP codes in standard formats and it matches both US and Indian zip codes.

^\d{5,6}(?:[-\s]\d{4})?$

3. Date - accept date input in the mm/dd/yyyy or mm-dd-yyyy formats.

((0[1-9])|(1[0-2]))[\/-]((0[1-9])|(1[0-9])|(2[0-9])|(3[0-1]))[\/-](\d{4})

Also see: Get Google Form Data by Email

4. Email Address - the regex below should match most common email address formats, including Gmail aliases that accept the ”+” sign but there’s no perfect solution.

[a-zA-Z0-9_\.\+-]+@[a-zA-Z0-9-]+\.[a-zA-Z0-9-\.]+

5. URL (Web domain) - this is useful for fields that require the user to enter their website address and it even matches the upcoming TLDs like .directory or .restaurant. The other regex matches YouTube URL including those using the youtu.be domains.

https?\:\/\/[a-zA-Z0-9\-\.]+\.[a-zA-Z]{2,}
https?\:\/\/(www\.)?youtu(\.)?be(\.com)?\/.*(\?v=|\/v\/)?[a-zA-Z0-9_\-]+

6. Character Limit - the default text box in a Google form allows users to input any number of characters but you can impose a limit with the help of regular expression. Here we limit the input to 140 characters much like Twitter.

[\w]{1,140}

7. Phone Numbers - these are often a series of numbers preceded by an optional ”+” sign and the area code may be inside brackets.

\+?\(?\d{2,4}\)?[\d\s-]{3,}

8. Price (with decimal) - if a form field requires users to enter a price of an item in their own currency, this regex will help. Replace the $ sign with your own currency symbol.

\$?\d{1,3}(,?\d{3})*(\.\d{1,2})?

9. Complex Password - only accept a string that has 1 uppercase alphabet, 1 lowercase alphabet, 2 digits and 1 special character. Also the minimum allowed length is 8 characters.

(?=.*[A-Z])(?=.*[a-z])(?=.*[0-9].*[0-9])(?=.*[^a-zA-Z0-9]).{8,}

10. CAPTCHA - Google forms do not offer CAPTCHAs but you can create one using regex. Here’s a simple captcha that requires users to answer a simple question - what is 2+2?

^(4|[Ff][Oo][Uu][Rr])$

Also see: Regular Expressions for Gmail Search

11. Word Limit - If you would like to limit the number of words that a user can type in the input field of a Google Form, there’s a regex for that as well. In this case, we only allow any input that has between 10 to 15 words:

^[-\w]+(?:\W+[-\w]+){9,14}\W*$

How to Build Order Forms with Payments for Free in WordPress

You lose 100% of the sales you don’t ask for, and the same holds true for having a clunky checkout experience. Order forms help you to collect order information and process payments efficiently, thereby increasing your conversion rates significantly.

Forminator makes it easier than ever to build an order form and accept payments on WordPress. Oh ya…and the best part is, it’s completely free! And that includes PayPal and Stripe payment gateways!

Whether you’re planning to sell merchandise, collect donations or get rooms booked, Forminator does them all without skipping a beat. His simple drag-and-drop interface means that you don’t need to know any coding whatsoever. It’s truly the one form maker plugin to rule them all!

**Long live Forminator!**

In this post, I’ll show you step-by-step how to use Forminator to build an order form from scratch and have set it up to collect payments effortlessly with Stripe and/or PayPal.

Introducing the Fantastic Forminator

Forminator is a powerhouse of a form plugin. He supports conditional logic, stores all the form entries in an easily accessible database, sends emails to both the user and the admin, and does it all without reloading the page.

To supercharge your forms, Forminator integrates with popular third-party tools such as Mailchimp, AWeber, ActiveCampaign, Google Sheets, Zapier, and Slack. Here’s an integration guide to automate your form workflow with Zapier.

He’s also GDPR compliant and works seamlessly with WordPress’ new Gutenberg block editor. If you can think of a form, Forminator can almost certainly get it done.

Let’s Build an Order Form

For this demo, we’ll build a simple order form, like the one below, to sell a custom notebook. We’ll make it so that the users can enter their personal information (such as name, address, email and phone number), and then at the very end, place an order by completing the payment.

Screenshot of the order form we'll be building

Follow the steps below and/or enjoy the video we’ve put together to accompany this post:


Step 1: Install Forminator

To install Forminator, just go to your WordPress Dashboard, and under Plugins, choose Add New and search for Forminator. Click the Install Now button and Activate the plugin after installation.

If you’re a WPMU DEV Member, you can also install and activate Forminator Pro directly from the WPMU DEV Dashboard. If you’re not a member yet, what are you waiting for? Try it free for 30 days!

Using the free WordPress.org version of Forminator is totally cool too. This tutorial works perfectly fine with either version.

Step 2: Access the Forminator Dashboard

Go to Forminator’s Dashboard. This will give you a quick overview of all your forms, quizzes, and polls.

Forminator’s minimalist yet easy-to-use Dashboard.

You won’t see any data here now, but as you start creating forms and collecting user entries, the dashboard will start populating with views, submissions, conversion rates, and other interesting data.

Step 3: Let’s Create a Form

Go to Forminator > Forms and click either of the blue Create buttons to begin making your new form. You can also do the same directly from Forminator’s dashboard.

A popup will appear where you need to enter your new form’s name. Keep the form name unique and memorable so that you can recall it easily. Click the blue Create button after entering your form name.

By default, every form in Forminator comes with the following predefined fields: First Name, Email Address, Phone Number, and Message.

The default form fields can be edited or deleted, and with the option of adding many other fields, you have unlimited customization possibilities.

Note: The fields marked with a red asterisk (*) at the end are Required fields. The form won’t submit until the user fills them up.

Step 4: Adding the Order Form Fields

We’ll keep the First Name, Email Address and Phone Number fields, and delete the Message field which we don’t need for this form.

In the First Name field, click on the gear icon and select Duplicate. This is a faster way to insert multiple fields of the same type without accessing the Insert Fields menu repeatedly.

Rename the duplicated field as Last Name.

Drag the Last Name field to the same row as the First Name, to its right, so that they appear side by side in the form.

And just like that, you have a two-column row in your form.

All Forminator fields can be dragged and dropped into rows and columns, so you have maximum flexibility in designing your forms just the way you want them.

Next, click on the purple Insert Fields button. It should open a popup with all the field options you can add to the form. There’s also another Insert Fields link at the bottom of the form.

Select the Address option from the popup window, and click the Insert Fields button.

Once inserted, click on the Address row to open its field settings. In the Labels tab, you can activate or deactivate the different address subfields (they’re all enabled by default).

Underneath the Settings tab, mark all the address subfields as required since they’re essential to ship the product.

Finally, click on the gear icon of Message field and hit Delete.

You can retain the Message field if you want to give users an option to add a comment or preference.

Step 5: Adding the Stripe Payment Button and Integration

Click on the purple Insert Fields button and select the Stripe option.

Stripe enables you to supercharge your online sales with its hassle-free and secure payment gateway.

Note: You need an activated Stripe account to configure the Stripe field. Otherwise, it won’t let you edit it. If you need help to set it up, use Forminator’s documentation as a cheatsheet.

You can configure Stripe by going to Settings > Payments > Stripe under Forminator.

Once Stripe is configured, under the Stripe field settings, we need to set the payment amount. Since this is a single product with an all-inclusive price and no variations, we’ll select the Fixed payment option.

When user inputs affect the price (ex. different sized t-shirts or customization options), or if there is a calculation such as tax or shipping that will be added to the original price, the Variable option should be used instead.

Select Fixed in the Stripe field settings and enter the amount.

Also, note the Test and Live mode options mentioned on the top here. We’ll be using the Test mode for now.

Don’t forget to set your brand logo, company name and product description under the Checkout tab. It’s great to have a self-branded payment gateway popup.

The below image shows how the self-branded popup will look like. Cool, isn’t it?

Next, change the Submit button label from Send Message to Order Now.

Preview the form and ensure it’s working as you intend. You can edit the default placeholders in the form if they’re not to your liking.

The order form is good to go!

Step 6: Let’s Jazz It Up

Forminator lets you make basic style changes to the form easily. The Appearance section helps you set your form’s Design Style, Colors, Fonts, Padding, Borders, Spacing, etc.

Click on the Appearance button to move on to its settings.

You can choose your preferred style here. I like the look of the Flat style more than the Default one, however this choice is up to you. It also offers you a way to add Custom CSS for your form.

As for the Colors and Fonts, I prefer the theme defaults and will leave them as is. Save your form draft after making your changes.

Step 7: Form Submitted. Next What?

Forminator is like a cool and casual professor. He’s fun and intelligent, but he also makes sure that the forms behave properly.

In the Behavior settings, you can define how the form will behave after the user successfully submits the form, or in this case, places an order.

By default, the form will show an inline message that will close automatically within 5 seconds. Change the message here to better reflect an order form.

You also have the option of redirecting the user to a new page or hiding the form altogether.

If you’re collecting payments, it’s highly recommended that you have the “Require SSL certificate to submit this form” option checked. It’ll enable your form to collect payments securely.

The rest of the Behavior settings can be left as is.

Step 8: Email Me Please, and to the User Too

After finishing up with setting the Behavior, move to the Email Notifications settings.

By default, every form will send you (the admin) an email with details of all the form fields entered.

You can change it and/or add multiple recipients too. You also have the option of adding Cc and Bcc fields to the email.

It’s good practice to send an automatic order confirmation email to the user. This option can be enabled in the Email Notifications settings.

Make sure that the recipient here is set to Email Address, which is the label for the email address entered by a user in the form. For example, if a user enters username@gmail.com as their email address in the form, the order confirmation email will be sent to that address automatically.

Forminator also lets you set Integrations with various third-party apps, and change the overall form settings. For this order form, we won’t be adding any Integrations, and will stick to the default settings.

Step 9: Hit the Publish Button

Preview the form one last time before pressing the Publish button.

Hey, give yourself a pat on the back. You just created your first order form!

After hitting the Publish button, a popup will present you with the form’s shortcode. Copy and place this shortcode anywhere in your site to display it to users.

You can also copy the shortcode later from Forminator’s Dashboard.

Step 10: Add the Order Form to Your Sales Page

Create a sales page if you don’t have one yet. It should contain all the important product details such as name, image, description, price, etc.

If you’re using the Classic Editor plugin, you can copy and paste the shortcode to add the form to your post/page. For sites that are using the default Block Editor, adding a form is much simpler.

To place the order form at the bottom of your sales page, in your WordPress post/page editor, click the Plus icon and add a Form block.

Next, select your order form from here to add it to the page.

Publish or Update your sales page after you’ve added the order form to it.

Visitors to your website can now use this form to place an order. It’s that simple!

Important Note: The Stripe field in your order form is still set to Test mode. This is to help you make test payments and make sure that everything is working fine. Before accepting actual orders, you need to change it from Test to Live.

Once an order has been placed, you’ll be notified of it via mail. Forminator also stores all the form submissions in a database so that it’s easier for you to sort through them later.

To view all of a form’s submissions, visit Forminator > Forms in your dashboard. Click on the gear icon and select View Submissions.

You can click on any individual submission row to get its complete details. You can also push the Export button to download all the submissions as a .csv file.

Reach > Engage > Convert

Running an online business comes with a lot of challenges. Anything that helps you engage with your potential customers and get paid easier is a welcome addition, and that’s exactly what Forminator does.

What we’ve built here is the simplest of order forms that you can make with Forminator. With its support for conditional logic, it can do much more! You can set taxes, shipping rates, product variations, and then have the form calculate the final order amount automatically.

You can check out a few of the order form and payment demos here and see how versatile Forminator really is.

Start creating!

Using Cypress to Write Tests for a React Application

End-to-end tests are written to assert the flow of an application from start to finish. Instead of handling the tests yourself — you know, manually clicking all over the application — you can write a test that runs as you build the application. That’s what we call continuous integration and it’s a beautiful thing. Write some code, save it, and let tooling do the dirty work of making sure it doesn’t break anything.

>Cypress is just one end-to-end testing framework that does all that clicking work for us and that’s what we’re going to look at in this post. It’s really for any modern JavaScript library, but we’re going to integrate it with React in the examples.

Let’s set up an app to test

In this tutorial, we will write tests to cover a todo application I’ve built. You can clone the repository to follow along as we plug it into Cypress.

git clone git@github.com:kinsomicrote/cypress-react-tutorial.git

Navigate into the application, and install the dependencies:

cd cypress-react-tutorial
yarn install

Cypress isn’t part of the dependencies, but you can install it by running this:

yarn add cypress --dev

Now, run this command to open Cypress:

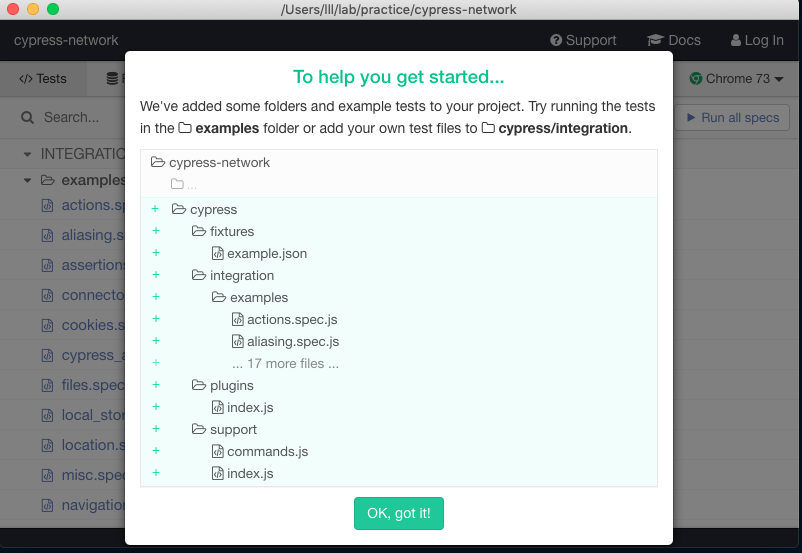
node_modules/.bin/cypress open

Typing that command to the terminal over and over can get exhausting, but you can add this script to the package.json file in the project root:

"cypress": "cypress open"

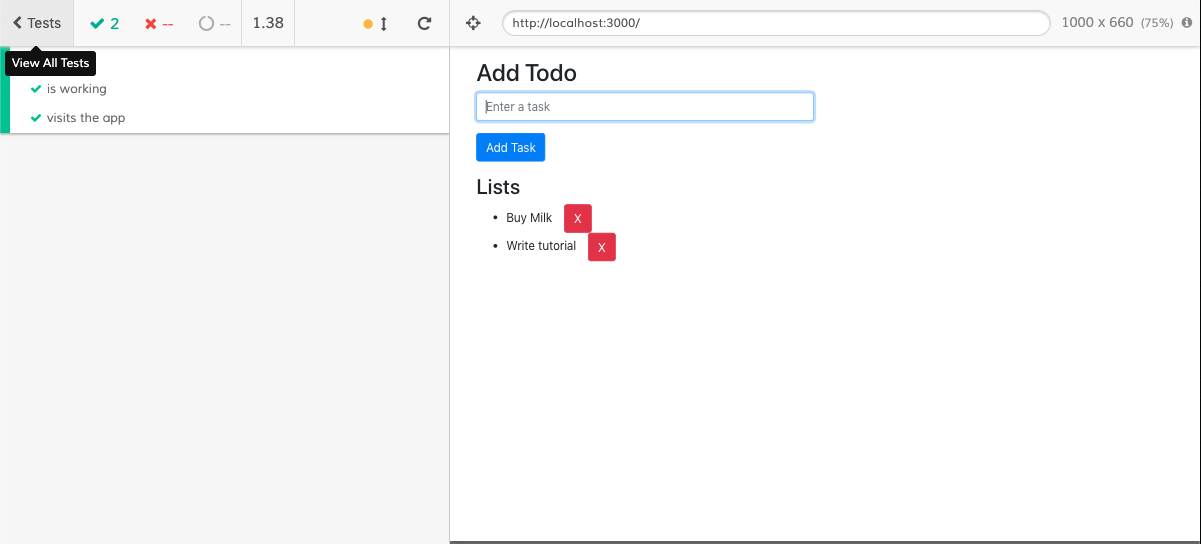
Now, all you have to do is do npm run cypress once and Cypress will be standing by at all times. To have a feel of what the application we’ll be testing looks like, you can start the React application by running yarn start.

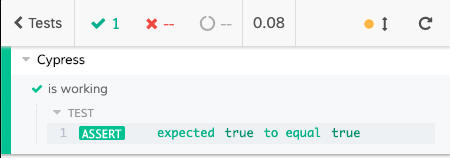
We will start by writing a test to confirm that Cypress works. In the cypress/integration folder, create a new file called init.spec.js. The test asserts that true is equal to true. We only need it to confirm that’s working to ensure that Cypress is up and running for the entire application.

describe('Cypress', () => {
  it('is working', () => {
    expect(true).to.equal(true)
  })
})

You should have a list of tests open. Go there and select init.spec.js.

That should cause the test to run and pop up a screen that shows the test passing.

While we’re still in init.spec.js, let’s add a test to assert that we can visit the app by hitting http://localhost:3000 in the browser. This’ll make sure the app itself is running.

it('visits the app', () => {
  cy.visit('http://localhost:3000')
})

We call the method visit() and we pass it the URL of the app. We have access to a global object called cy for calling the methods available to us on Cypress.

To avoid having to write the URL time and again, we can set a base URL that can be used throughout the tests we write. Open the cypress.json file in the home directory of the application and add define the URL there:

{
  "baseUrl": "http://localhost:3000"
}

You can change the test block to look like this:

it('visits the app', () => {
  cy.visit('/')
})

...and the test should continue to pass. 🤞

Testing form controls and inputs

The test we’ll be writing will cover how users interact with the todo application. For example, we want to ensure the input is in focus when the app loads so users can start entering tasks immediately. We also want to ensure that there’s a default task in there so the list is not empty by default. When there are no tasks, we want to show text that tells the user as much.

To get started, go ahead and create a new file in the integration folder called form.spec.js. The name of the file isn’t all that important. We’re prepending "form" because what we’re testing is ultimately a form input. You may want to call it something different depending on how you plan on organizing tests.

We’re going to add a describe block to the file:

describe('Form', () => {
  beforeEach(() => {
    cy.visit('/')
  })

  it('it focuses the input', () => {
    cy.focused().should('have.class', 'form-control')
  })
})

The beforeEach block is used to avoid unnecessary repetition. For each block of test, we need to visit the application. It would be redundant to repeat that line each time beforeEach ensures Cypress visits the application in each case.

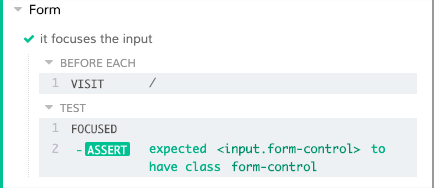
For the test, let’s check that the DOM element in focus when application first loads has a class of form-control. If you check the source file, you will see that the input element has a class called form-control set to it, and we have autoFocus as one of the element attributes:

<input
  type="text"
  autoFocus
  value={this.state.item}
  onChange={this.handleInputChange}
  placeholder="Enter a task"
  className="form-control"
/>

When you save that, go back to the test screen and select form.spec.js to run the test.

The next thing we’ll do is test whether a user can successfully enter a value into the input field.

it('accepts input', () => {
  const input = "Learn about Cypress"
  cy.get('.form-control')
    .type(input)
    .should('have.value', input)
})

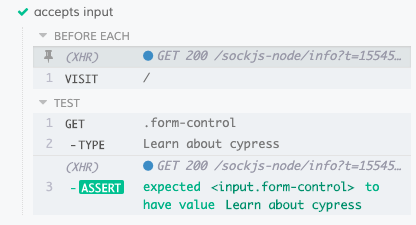
We’ve added some text ("Learn about Cypress") to the input. Then we make use of cy.get to obtain the DOM element with the form-control class name. We could also do something like cy.get('input') and get the same result. After getting the element, cy.type() is used to enter the value we assigned to the input, then we assert that the DOM element with class form-control has a value that matches the value of input.

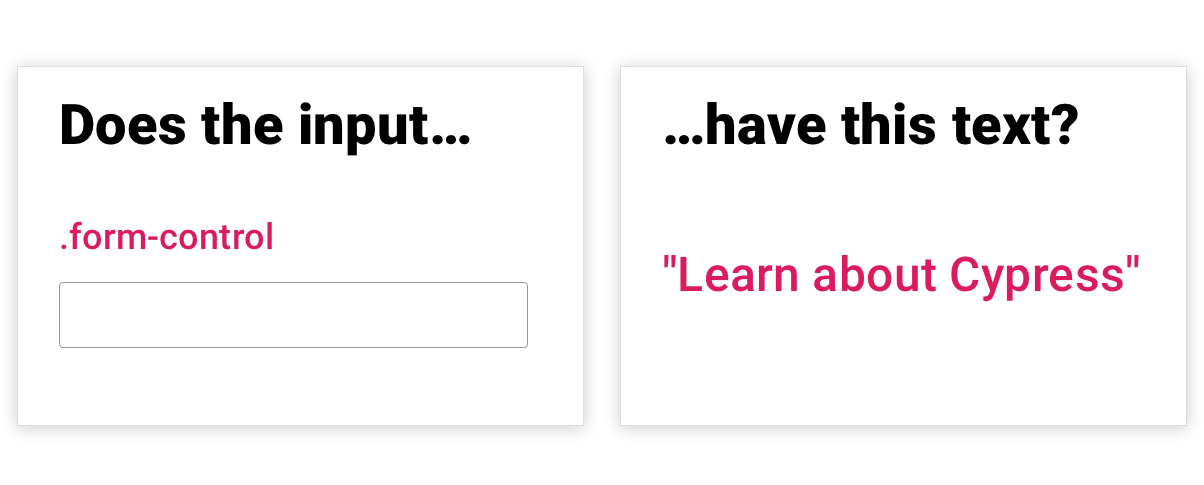
In other words:

Does the input have a class of form-control and does it contain Learn About Cypress in it?

Our application should also have two todos that have been created by default when the app runs. It’s important we have a test that checks that they are indeed listed.

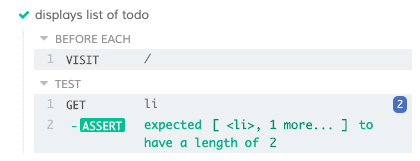
What do we want? In our code, we are making use of the list item (<li>) element to display tasks as items in a list. Since we have two items listed by default, it means that the list should have a length of two at start. So, the test will look something like this:

it('displays list of todo', () => {
  cy.get('li')
    .should('have.length', 2)
})

Oh! And what would this app be if a user was unable to add a new task to the list? We’d better test that as well.

it('adds a new todo', () => {
  const input = "Learn about cypress"
  cy.get('.form-control')
    .type(input)
    .type('{enter}')
    .get('li')
    .should('have.length', 3)
})

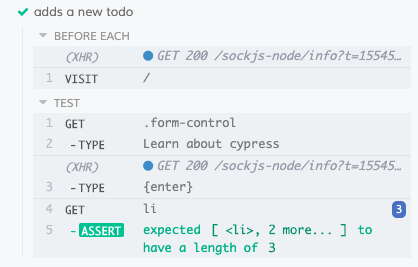
This looks similar to what we wrote in the last two tests. We obtain the input and simulate typing a value into it. Then, we simulate submitting a task that should update the state of the application, thereby increasing the length from 2 to 3. So, really, we can build off of what we already have!

Changing the value from three to two will cause the test to fail — that’s what we’d expect because the list should have two tasks by default and submitting once should produce a total of three.

You might be wondering what would happen if the user deletes either (or both) of the default tasks before attempting to submit a new task. Well, we could write a test for that as well, but we’re not making that assumption in this example since we only want to confirm that tasks can be submitted. This is an easy way for us to test the basic submitting functionality as we develop and we can account for advanced/edge cases later.

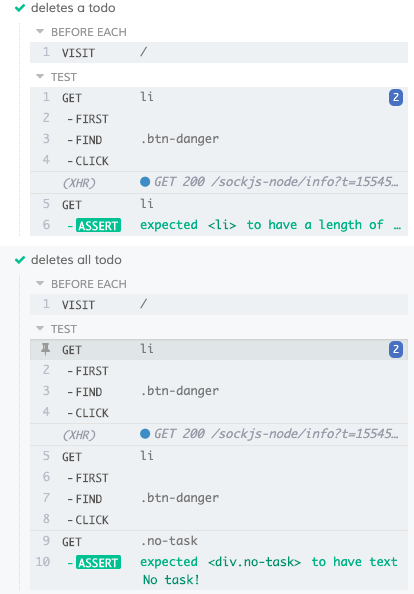
The last feature we need to test is the deleting tasks. First, we want to delete one of the default task items and then see if there is one remaining once the deletion happens. It’s the same sort of deal as before, but we should expect one item left in the list instead of the three we expected when adding a new task to the list.

it('deletes a todo', () => {
  cy.get('li')
    .first()
    .find('.btn-danger')
    .click()
    .get('li')
    .should('have.length', 1)
})

OK, so what happens if we delete both of the default tasks in the list and the list is completely empty? Let’s say we want to display this text when no more items are in the list: "All of your tasks are complete. Nicely done!"

This isn’t too different from what we have done before. You can try it out first then come back to see the code for it.

it.only('deletes all todo', () => {
  cy.get('li')
    .first()
    .find('.btn-danger')
    .click()
    .get('li')
    .first()
    .find('.btn-danger')
    .click()
    .get('.no-task')
    .should('have.text', 'All of your tasks are complete. Nicely done!')
})

Both tests look similar: we get the list item element, target the first one, and make use of cy.find() to look for the DOM element with a btn-danger class name (which, again, is a totally arbitrary class name for the delete button in this example app). We simulate a click event on the element to delete the task item.

I’m checking for "No task!" in this particular test.

Testing network requests

Network requests are kind of a big deal because that’s often the source of data used in an application. Say we have a component in our app that makes a request to the server to obtain data which will be displayed to user. Let’s say the component markup looks like this:

class App extends React.Component {
  state = {
    isLoading: true,
    users: [],
    error: null
  };
  fetchUsers() {
    fetch(`https://jsonplaceholder.typicode.com/users`)
      .then(response => response.json())
      .then(data =>
        this.setState({
          users: data,
          isLoading: false,
        })
      )
      .catch(error => this.setState({ error, isLoading: false }));
  }
  componentDidMount() {
    this.fetchUsers();
  }
  render() {
    const { isLoading, users, error } = this.state;
    return (
      <React.Fragment>
        <h1>Random User</h1>
        {error ? <p>{error.message}</p> : null}
        {!isLoading ? (
          users.map(user => {
            const { username, name, email } = user;
            return (
              <div key={username}>
                <p>Name: {name}</p>
                <p>Email Address: {email}</p>
                <hr />
              </div>
            );
          })
        ) : (
          <h3>Loading...</h3>
        )}
      </React.Fragment>
    );
  }
}

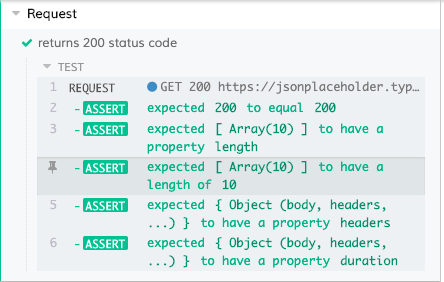
Here, we are making use of the JSON Placeholder API as an example. We can have a test like this to test the response we get from the server:

describe('Request', () => {
  it('displays random users from API', () => {
    cy.request('https://jsonplaceholder.typicode.com/users')
      .should((response) => {
        expect(response.status).to.eq(200)
        expect(response.body).to.have.length(10)
        expect(response).to.have.property('headers')
        expect(response).to.have.property('duration')
      })
  })
})

The benefit of testing the server (as opposed to stubbing it) is that we are certain the response we get is the same as that which a user will get. To learn more about network requests and how you can stub network requests, see this page in the Cypress documentation.

Running tests from the command line

Cypress tests can run from the terminal without the provided UI:

./node_modules/.bin/cypress run

...or

npx cypress run

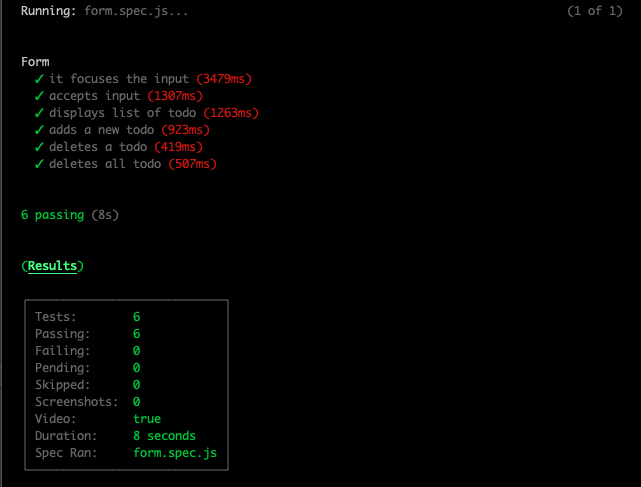
Let’s run the form tests we wrote:

npx cypress run --record --spec "cypress/integration/form.spec.js"

Terminal should output the results right there with a summary of what was tested.

There’s a lot more about using Cypress with the command line in the documentation.

That’s a wrap!

Tests are something that either gets people excited or scared, depending on who you talk to. Hopefully what we’ve looked at in this post gets everyone excited about implementing tests in an application and shows how relatively straightforward it can be. Cypress is an excellent tool and one I’ve found myself reaching for in my own work, but there are others as well. Regardless of what tool you use (and how you feel about tests), hopefully you see the benefits of testing and are more compelled to give them a try.

Related resources

The post Using Cypress to Write Tests for a React Application appeared first on CSS-Tricks.

How to Email Google Form Responses to Multiple People

With Google Forms Email Notifications, you can send an automatic email to one or more people when a new form response is received.

To get started, open the Google Form, go to Add-ons > Email Notifications for Forms > Create Email Notification. Here, inside the Email Addresses to Notify box, you can enter one or more email addresses separated by a comma.

email-users-notify.png

You can also put {{form questions}} that ask for the user’s email address and they’ll be dynamically substituted with the actual email address entered by the user.

For instance, if your Google Form has a question titled “Your Email Address”, you can put {{Your email address}} in the Email Address to Notify field and the notification will be sent to the actual email address entered by the user of Google Forms.

email-notify-multiple-users.png