Have you ever seen websites that show file icons next to the download links?
Recently, one of our readers asked if it was possible to display attachment file icons in WordPress. You can easily show different icons so that users know which type of file they are downloading.
In this article, we will show you how to add attachment file icons in WordPress.
When You Need Attachment File Icons in WordPress
By default, WordPress allows you to upload images, audio, video, and other documents. You can also enable additional file types to be uploaded in WordPress.
When you upload a file through the media uploader and add it to a post or page, WordPress will try to embed the file as if it is an image, audio, video, or in a supported file format.
For all other files, it will just add a file name as plain text and link it to the download or attachment page.
In the above screenshot, we have added a PDF and a Docx file. However, it is difficult for a user to guess which type of file they would be downloading.
If you regularly upload different file types, then you may want to display an icon next to the link. This way, your users can easily find the file type they are looking for.
Having said that, let’s see how to add attachment file icons in WordPress for different file types.
Method 1: Add Attachment File Icons in WordPress Using Plugin
The easiest way of adding file type icons is by using a WordPress plugin like MimeTypes Link Icons. It is a free plugin that is very easy to use and lets you add icons for different file types.
Upon activation, you need to visit the Settings » MimeType Icons page to configure the plugin settings.
The plugin allows you to choose the icon size, as well as between PNG and GIF icons. Next, you need to choose the icon alignment and which file types will display the icon.
After that, you can scroll down and select icons to display on your website. For instance, there are icons for file types like PDF, PPT, CSV, AVI, RPM, TXT, and more.
Next, you can scroll down to the Advanced Settings section.
Here, you will find the option to show file size next to the download link. It is turned off by default, as it could be resource-intensive.
Once you are done, don’t forget to click on the ‘Save Changes’ button to store your settings.
You can now edit a post or page and add a file download link using the media uploader. Simply preview your post, and you will see the file icon next to the download link.
Method 2: Using Icon Fonts for Attachment Files in WordPress
In this method, we will be using an icon font to display an icon next to the attachment file link.
Upon activation, you can head to the Settings » Font Awesome page from your WordPress dashboard. Here, you can edit the general settings for the plugin, like choosing whether it should use pro or free icons.
Next, you can edit a post or page where you want to add an attachment link.
Once you are in the content editor, you must enter the HTML code for the icon you want to display.
To find that HTML code, you can visit the Font Awesome icon library website. Simply search for an icon in the search bar and then click on the image.
Next, you will see different variations of the icon and its HTML code.
Go ahead and click on the code to copy it.
After that, you can return to your website’s WordPress content editor and click the ‘+’ sign to add a Custom HTML block.
From here, simply paste the code for your icon into the block.
Once you are done, go ahead and publish or update your page.
You can now visit your website to see the newly added icon for the attachment file type.
Bonus: Sell Digital Files to Make Money Online
Now that you know how to add attachment file type icons, you can go a step further and sell different files as digital downloads. This allows you to make money online or encourage users to sign up for your newsletter in exchange for a free resource.
Are you looking for a way to sell fonts online using WordPress?
Fonts play a crucial role in graphic designing, branding, website building, and other creative tasks. Selling fonts is a great way to make money online, as you can create your own website and target different niches.
In this article, we will show you how to sell fonts online with WordPress.
Why Sell Fonts Online with WordPress?
There is a growing need for fonts, as graphic designers, bloggers, marketers, and business owners of all sizes need a font for their websites. This presents a huge potential opportunity for font designers, as you can easily sell typefaces online to make money.
While it can be a competitive industry, you can find gaps and target a specific niche. For example, you can sell fonts to designers who create logos or target creative artists who create digital art.
Selling online fonts also requires little investment compared to other businesses. To get started, you need only a web hosting platform, a domain name, and an eCommerce platform. For more details, please see how much it costs to build a website.
Plus, you don’t have to worry about storage or restocking with digital products like fonts compared to physical goods.
Now, there are many third-party websites where you can sell your fonts. However, you don’t get complete control over your digital products, and you’d have to share a percentage of your sales with the particular platform.
That’s why it’s better to create your own website to sell digital products, including fonts. You get complete control over your products and the flexibility to sell them however you want. Plus, you don’t have to split the money with anyone.
Which Platforms Should You Use to Sell Fonts Online?
When it comes to selling fonts, you’ll need an eCommerce platform. It will allow you to set up an online shop with a shopping cart, easily upload different fonts, add multiple payment options, and create different pages for your store.
Now, it’s important to select the right platform because moving to another platform in the future can be complicated and take a lot of time and effort.
Some platforms are better suited for physical products, while others are great for selling digital products.
WordPress is the best website builder in the market, and it powers over 43% of websites on the internet. On the other hand, Easy Digital Downloads is the best eCommerce plugin for WordPress for selling digital products like fonts.
Do note that there are 2 types of WordPress software. First, there is WordPress.com, which is a blog hosting platform. Then there is WordPress.org, which is also known as self-hosted WordPress.
To sell fonts online, you will need the WordPress.org platform because it gives you full control over your site.
That said, let’s see how you can easily sell fonts online with WordPress.
Step 1: Setting Up a WordPress Website
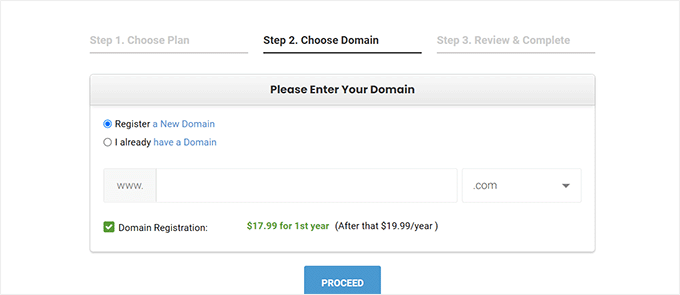
To start selling fonts online, you’ll first need a domain name, web hosting, and an SSL certificate.
A domain name is the website address that people will enter on the internet to visit your site. You can think of it as an address to your house but for the internet, like wpbeginner.com.
Web hosting is a place where your website lives online. It’s where all your website files, fonts, and other information are stored. To help you out, we’ve selected the best WordPress hosting services that you can purchase.
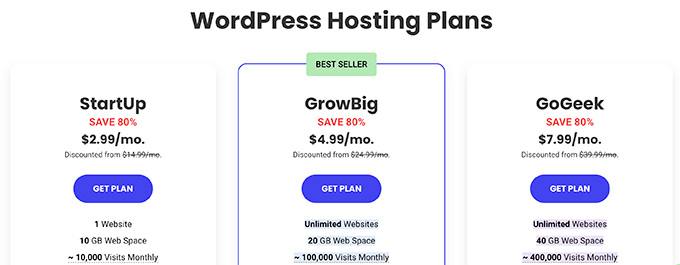
One of our top recommended hosting providers is SiteGround. It offers managed WordPress hosting for Easy Digital Downloads (EDD). It comes with a free SSL certificate, EDD pre-installed, all the optimization features, and you get a huge 80% off.
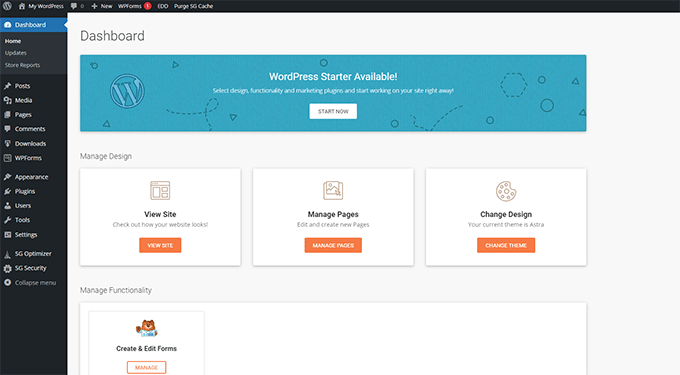
If you opted for SiteGround’s EDD hosting, then Easy Digital Downloads will come preinstalled.
However, if you’re using another WordPress hosting service, then you’ll need to install and activate the Easy Digital Downloads plugin. For more details, please see our guide on how to install a WordPress plugin.
Do note that for this tutorial, we will use the Easy Digital Downloads Pro version because it offers more features, payment gateways, and extensions. However, you can use the Easy Digital Downloads Lite version to get started for free.
Upon activation, you can go to the Downloads » Settings page from your WordPress admin panel. From here, you’ll need to enter the license key under the General tab. You will find the license key in the Easy Digital Downloads account area.
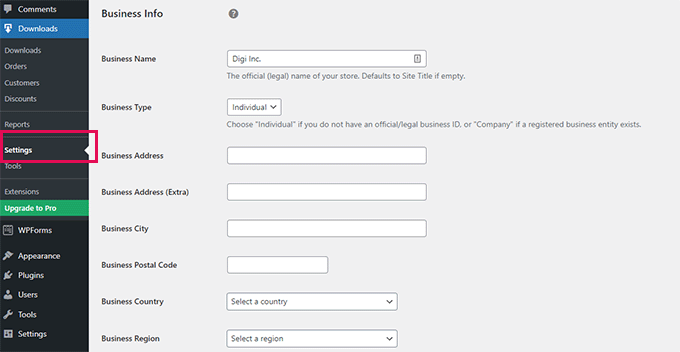
Next, you’ll need to scroll down and enter your business information. For instance, you can choose a business name, business type, address, and more.
You can also select the business country and region from the dropdown menu. This will help determine where your business is located and allow EDD to fill different fields automatically.
Once you’re done, click the ‘Save Changes’ button.
Step 3: Adding a Payment Method to Sell Fonts
Next, you’ll need to set up payment methods to accept payments from customers who buy fonts.
By default, Easy Digital Downloads include Stripe, PayPal, and credit cards as payment options.
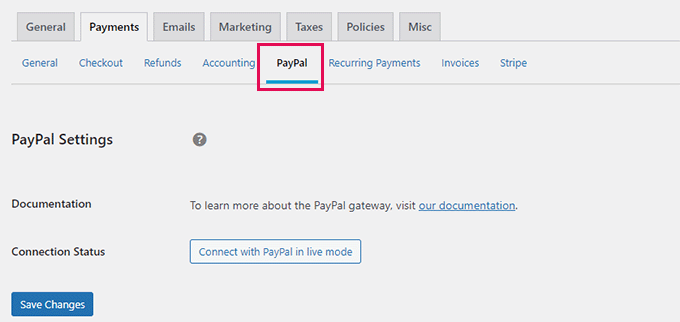
Simply switch to the ‘Payments’ tab and then the ‘General’ tab in the Downloads settings.
After that, you can check the box next to each payment gateway you want to use on your website.
If you select multiple payment options, then you’ll have to set the default gateway. Simply click the ‘Default Gateway’ dropdown menu and choose the method that will appear default.
We recommend using Stripe, as it lets you accept credit card payments, Apple Pay, and Google Pay. This makes it a versatile payment option for users.
Next, you’ll need to configure each payment option you selected for selling fonts online. Do note that the process may vary for each service.
For example, we will select Stripe for this tutorial.
Simply click the ‘Stripe’ tab under the Payments settings. From here, click the ‘Connect with Stripe’ button.
After that, you can follow the onscreen instructions in the setup wizard to connect your Stripe account with Easy Digital Downloads.
Now, you’ll need to repeat these steps for other payment gateways you added to your digital store.
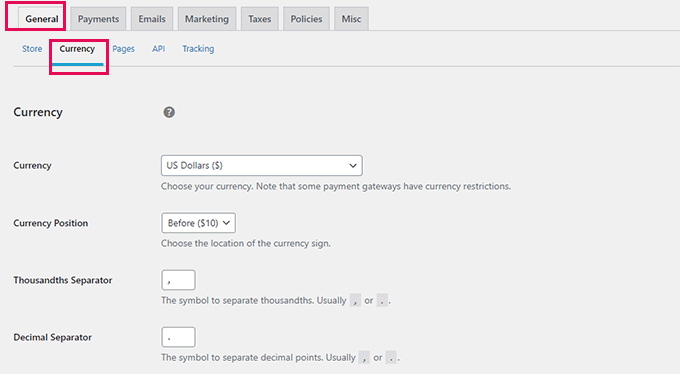
Lastly, you can switch to the ‘General’ tab and then select ‘Currency.’ Here, Easy Digital Downloads lets you select the default currency for your store.
Once you’re done, simply click the ‘Save Changes’ button.
Step 4: Adding Fonts as Digital Products
Now that you’ve set up a WordPress site and configured Easy Digital Downloads, the next step is to add your custom fonts to the store.
To create a digital product, you can head to Downloads from your WordPress dashboard and then click the ‘Add New’ button.
Next, you’ll need to enter the name of your font. This will appear at the top of the product page, so you’d typically want to use the font name.
Under that, you can also add a brief description of the custom font. Here, you can list out the details of your font, like specification, size, style, weights, variations, and more.
After that, you can scroll down to the ‘Download Details’ section.
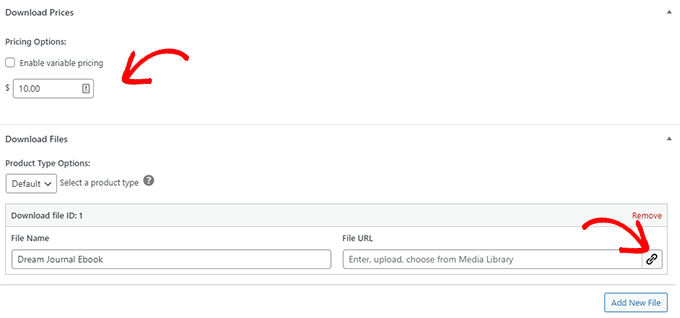
Here, you’ll see options to set the price for a single product, bundle, or service. Then, under ‘Pricing Options,’ simply enter the price for your custom font.
If you’d like to price different variations of fonts differently, then you can also enable the ‘Enable variable pricing’ option.
Next, you can head to the ‘Download Files’ section. From here, you’ll need to enter a name for your file and then upload the font zip file.
If you have multiple files, then simply click the ‘Add New File’ button and upload different variations of the font.
The final step is adding a product image for your website. You can click the ‘Set Download Image’ option from the settings panel on the right and upload an image.
We recommend using a picture of the font as the download image. This way, a user will know what the font will look like before purchasing.
When you’re happy with all the settings, you can click the ‘Publish’ button at the top.
You can now repeat this step to add more fonts to your WordPress website and sell them online.
Step 5: Customize Your Font Download Emails
Easy Digital Downloads sends default emails to customers who purchase your fonts online.
However, the default email is plain and lacks branding or a logo.
You can customize these emails in Easy Digital Downloads by adding your own brand name or logo. This helps make your emails stand out and shows a professional touch.
To customize emails, you’ll need to go to Downloads » Settings from the WordPress dashboard and then click on the ‘Emails’ tab.
Here, you can upload a logo by clicking the ‘Attach File’ button.
There are also options to edit the ‘from’ name and email address.
If you scroll down, then Easy Digital Downloads also gives an option to enable WP Mail SMTP.
It is the best SMTP plugin for WordPress that helps email deliverability and prevents your emails from landing in the spam folder or not reaching the customer’s inbox.
When you are done, simply click the ‘Save Changes’ button.
Next, you can switch to the ‘Purchase Receipts’ tab.
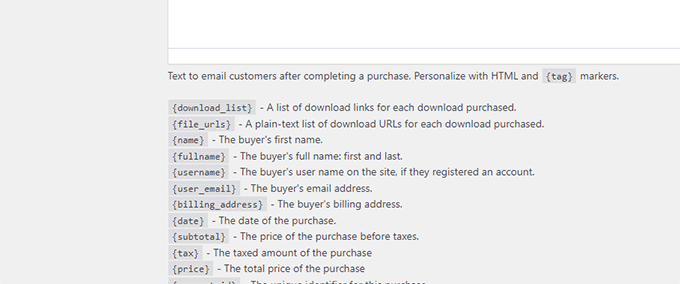
Here, you can edit the purchase email subject, heading, and the text of the email.
Don’t forget to save your changes when you are done.
You can also send a test email to see your changes and ensure everything is working correctly. Simply click the ‘Send Test Email’ button, and EDD will send a message to your admin email address.
Step 6: Promote Your Online Font Store
Now that your digital store is ready to sell fonts, you’ll need to promote it to drive traffic and sales.
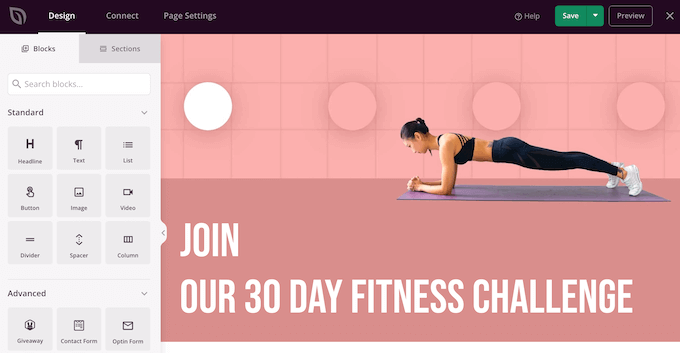
There are different ways you can start promoting your store. This can include creating a sales page where you list different fonts and adding the page to your website navigation menu. You can also display different fonts on the homepage to improve their visibility and get conversions.
Other than that, creating a WordPress blog can help drive to your website. You can write about different fonts and cover extensive topics, like when to use them or share your own experience.
Easy Digital Downloads also lets you create a purchase button, which you can add anywhere on your site. It is similar to a buy now button, where users can purchase fonts with a click of a button.
Simply head to Downloads from your WordPress dashboard and edit one of the fonts.
Next, you’ll need to scroll down to the Purchase Shortcode section.
You can now add the purchase shortcode to any page or post and allow users to buy the font.
Bonus: Use Plugins and Tools to Promote Your Digital Downloads Store
Besides that, there are lots of WordPress plugins you can use to help promote your online font store. Here are some of the top picks to help you sell digital products:
OptinMonster – It is the best conversion optimization software in the market. You can create multiple campaigns to grow your email list, convert visitors into customers, and reduce cart abandonment.
MonsterInsights – You can use this plugin to set up Google Analytics in WordPress without editing code. It helps track user behavior on your site, shows where visitors are coming from, how your site is performing, and more. You can uncover amazing insights to grow your business and make data-driven decisions.
PushEngage – It is the best push notification software for WordPress. You can use it to send personalized web push notifications and let users know about new fonts, sales, discount coupons, and more.
RafflePress – You can use RafflePress to run viral giveaways. This helps build social followers, grow your email list, build brand recognition, and promote your fonts.
Educational material like homework guides, worksheets, and more.
You can also use the PDF download to create content upgrades for your posts to grow your email list. Additionally, you can even hide the option behind a subscription fee to make money from your website.
Having said that, let’s see how you can add a PDF download for WordPress posts.
Do you want to use PDF downloads to grow your email list? PDF downloads make an excellent content upgrade offer.
When we say content upgrade, this is a marketing term that means the extra content perks you can offer your users in return for their email addresses.
This approach works well because the bonus content adds value to the user experience, and you also get leads in return. Think of it as a content bribe.
Instead of giving PDF downloads right away, you can download and upload PDF files to your website.
Next, you will need OptinMonster. It is the best conversion optimization software that helps you create beautiful marketing campaigns that convert visitors into customers and subscribers.
After signing up with OptinMonster, you will reach your account dashboard.
From here, you need to create a new campaign.
It comes with several campaign types, but for the sake of this tutorial, you need to select an inline campaign.
Choose a template. There are dozens of them. Don’t worry, you can customize them later.
After that, use the campaign builder to design your campaign.
It is an intuitive design tool where you can simply point and click to edit an item or drag and drop blocks from the left column.
You can add a default view, a yes/no view, a signup form or optin view, and a Success view to your campaign using the options at the bottom of the campaign builder.
In the Success view, click on the button within the campaign and then make sure to add the PDF download link in the ‘New Window URL’ field.
Make sure that you have published your campaign.
Next, switch to your WordPress website and install and activate the OptinMonster plugin.
You’ll be asked to connect your WordPress site to OptinMonster.
After that, go to the OptinMonster » Campaigns page and publish the inline campaign you created earlier.
This makes the campaign available on your website.
Next, edit the post or page where you want to add the content upgrade offer.
You need to add the OptinMonster block where you want to display the offer and choose your campaign from the dropdown menu.
Finally, you can now visit your post and page to see the campaign in action.
Don’t forget to fill in the email form and test the download link.
OptinMonster works with all popular email marketing services. It also comes with power display rules that allow you to show personalized messages to users.
There are many ways to monetize PDF content in WordPress. Depending on your business, you can choose one that fits your goals.
1. Create a Subscription Platform
A subscription platform allows you to sell membership plans on your website. Users on a subscription platform can get access to pay-per-view content, bonus downloads, and PDF files.
The easiest way to create a subscription-based community is by using MemberPress. It is the best membership plugin for WordPress that allows you to easily restrict content to paid members.
MemberPress lets you create multiple subscription levels and then restrict access to file downloads and other content based on a user’s subscription plan.
You can accept payments online using Stripe or PayPal. More importantly, you can set up recurring payments to automatically charge users for their subscriptions.
The most direct way to monetize PDF content is by selling it as a digital download.
Easy Digital Downloads is the most straightforward way to sell digital downloads. It is a WordPress eCommerce plugin for selling digital goods like file downloads, eBooks, software, music, and more.
Easy Digital Downloads allows you to add your PDF files as products, which you can then add to your posts or pages.
Plus, each of your digital downloads can have its own product page. Then, users can easily add the downloads to their carts and check out.
Easy Digital Downloads allows you to accept payments using Stripe, PayPal, Authorize.net, and more. For details, see our article on selling digital downloads in WordPress.
We hope this article helped you learn how to add a PDF download for posts in WordPress. You may also want to see our pick of the best PDF plugins for WordPress or learn how to grow your business online without spending a fortune.
If you liked this article, then please subscribe to our YouTube Channel for WordPress video tutorials. You can also find us on Twitter and Facebook.
Are you looking for ways to encourage customers to spend more money in your online store? You should immediately start tracking the average order value (AOV) metric.
Focusing on AOV is an effective way to grow a business, especially if you are running an eCommerce store. While working closely with numerous online stores over the last decade, I have tested a ton of strategies to see what increases AOV and what doesn’t.
From this experience, I can show you 14 ways that are sure to increase average order value with WordPress to improve your bottom line.
Note: This is a guest post by Chris Klosowski, the president of Easy Digital Downloads, the best digital eCommerce plugin for WordPress. This is an expert column that we publish every other Thursday, where we invite a WordPress expert to share their experiences with our readers.
What Is Average Order Value (AOV)?
Running an online store is all about meeting the needs of your customers while covering your costs and making a profit. Luckily, there are quite a few ways you can increase your bottom line.
For example, you can try to increase the amount of traffic coming to your website or encourage more of your visitors to make a purchase. This will increase the number of conversions or transactions in your store, leading to more revenue.
A different approach is to try to increase the amount of money you make from each individual transaction. This is known as ‘average order value’ or AOV and is the topic of this article.
AOV is all about how much your customers are spending per order. You can calculate it by dividing your total revenue by the number of orders you received.
Here’s the formula for calculating AOV:
AOV = Total Revenue / Number of Orders
For example, let’s say your online store generated a total revenue of $10,000 from 200 orders in a month. Your AOV would be:
AOV = $10,000 / 200 orders = $50 per order
Understanding and analyzing your AOV can help you gain valuable insights into your eCommerce business. You can then use these insights to make data-driven decisions that improve your profitability and overall success.
Overall, if you sell multiple digital products, then focusing on increasing your average order value can be an easy way to grow your business.
With that being said, to increase your store’s average order value, you simply need to give your customers a reason to spend more.
Let’s take a look at 14 ways you can increase average order value with WordPress.
1. Track the Average Order Value (AOV) Metric on Your Online Store
Your first step is to start tracking AOV on your WordPress website. You can use this data to learn which strategies are working and which aren’t.
My team makes this simple in Easy Digital Downloads by offering built-in reporting so that you don’t have to set up separate tracking software and analytics solutions. All you have to do is go to Downloads » Reports in your WordPress dashboard.
WooCommerce also lets you easily find AOV within their dashboard.
For eCommerce tracking, I highly recommend setting up eCommerce tracking using Google Analytics on your WordPress site.
2. Get Your Pricing Structure Right
Finding the right pricing structure for your products is crucial. It needs to cover your costs and let you make a profit while also offering fair prices that encourage customers to make a purchase.
Optimizing your pricing structure may involve some experimentation. Sometimes, you might find that lowering your price raises your AOV because it makes it easier for your customers to purchase more products.
But you won’t know what is working if you don’t measure it. Tracking your store’s AOV metric is a great way to discover what is working and what isn’t.
3. Offer Product Bundles
When considering the pricing structure of your store, don’t limit your thinking to individual products. Bundling different combinations of products can help your customers feel they are getting extra value.
In my last expert column, I mentioned that product bundling makes it easier for customers to make a purchasing decision. Better still, it can encourage them to purchase more, increasing your average order value.
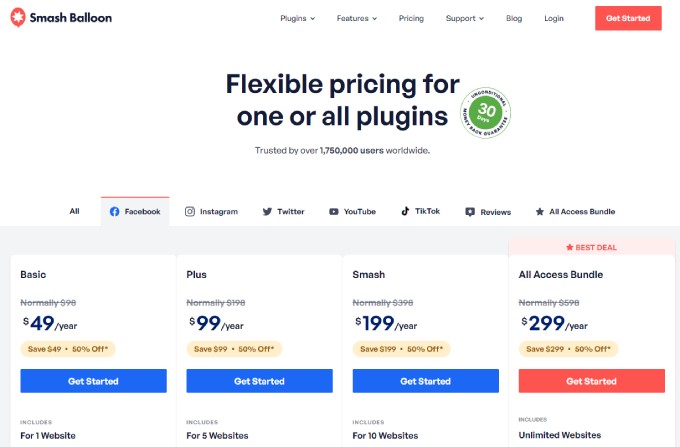
For example, one of our customers, SmashBalloon successfully uses bundling to encourage their customers to try their products in a bundle for a heavily discounted price.
Bundles offer your customers a bulk discount that typically costs 60-80% of the total value of those products. The right combinations of products will cater to the user’s tastes, needs, and budget.
For instance, you could bundle products that are often purchased together. A gaming store might bundle a console together with a game and controller, or you could bundle an eBook with its audiobook version.
Bundles can also encourage customers to purchase more products than they were planning. Someone who just wants to purchase a few stock photos of home offices may be tempted by an affordable ‘Home Office Bundle’.
4. Offer Payment Plans
Sometimes, your customers can only make a small purchase simply because they don’t have enough money to buy more right now.
’Buy Now Pay Later’ payment plans allow users to make the purchase now and pay for it over time. At the same time, your store will receive the full amount right away.
Currently, 35% of consumers use pay-later plans for most of their purchases.
Because they make it easier for your customers to make a purchase, these plans help improve conversions and your store’s AOV.
If you’re selling digital downloads, you can use payment options like Klarna and Afterpay to set up Buy Now Pay Later with Easy Digital Downloads. Alternatively, you could use the WP Simple Pay plugin to offer a pay-later payment option with other eCommerce solutions.
5. Make It Easy to Check Out
A lengthy or confusing checkout process can overwhelm customers, meaning they spend less time and effort on their purchases or even quit before completing the payment. An easy checkout process encourages customers to spend more.
Simplifying the process reduces the cognitive load on customers by reducing the amount of brainpower needed. It lets buyers focus on completing the purchase without feeling overwhelmed, which may lead to them adding more items to their cart.
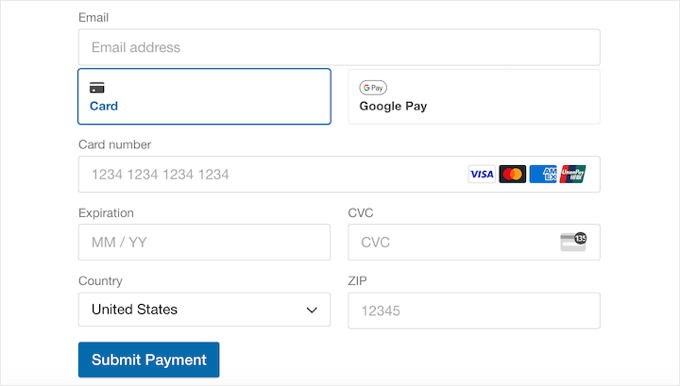
You can reduce friction by offering multiple payment options in various currencies, allowing your customers to check out as guests without needing to create an account, and including clear instructions.
EDD includes these options on its fast-loading checkout page. You can choose an extension to add the payment methods you wish to use, including Stripe, PayPal, and many others.
You can also customize the checkout page in WooCommerce and other eCommerce plugins to optimize it for conversions and increased AOV.
6. Offer Upsells and Cross-Sells
In my experience, one of the most effective ways to encourage customers to spend more money when making a purchase is using order bumps. This is when you offer the buyer extra products or deals during checkout.
Industry reports estimate that order bumps contribute to 35% of Amazon’s total revenue. They do it well, and it pays off.
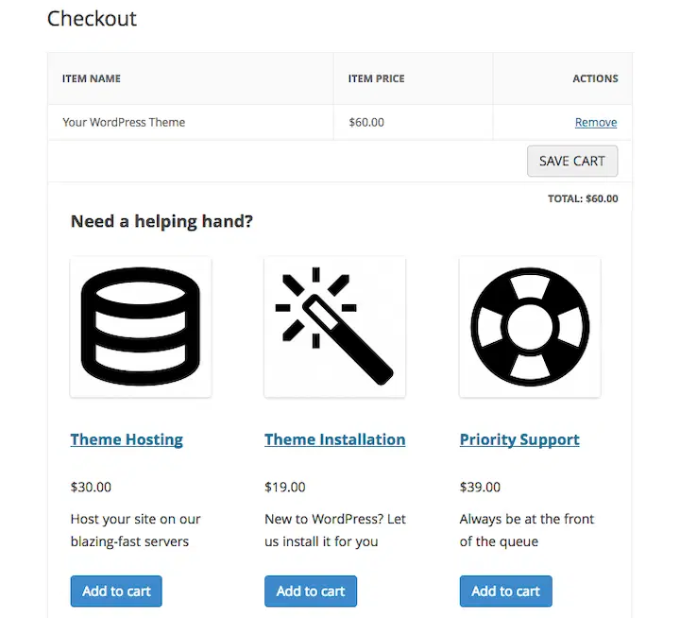
Take a look at a screenshot of how a WordPress theme company can upsell a related product.
The main types of order bumps are upsells and cross-sells. Here are some examples to help you see the difference:
In a paint shop, an upsell would be to encourage a customer to buy UV-resistant paint instead of normal paint. It costs more initially, but lasts much longer, offering better value and saving money in the long term.
A cross-sell would be to offer the customer other products they will need while painting their house. These might include paint brushes, rollers, drop sheets, paint trays, and more.
This is simply good customer service. You are making sure the customer purchases the product they actually need, and they have everything they require to do the job. They appreciate it.
It also helps you increase the visibility of products that aren’t purchased frequently. And because the customer spends more money on the order, it increases your AOV.
It’s easy to add order bumps to your online store using the Easy Digital Downloads cross-sell and upsell extension, which is available for paid members.
It lets you add other digital products to your product pages and checkout page. This can generate some impulse purchases, allowing you to boost the average order value.
While you are recommending products to your customers, it helps to showcase and promote items with higher profit margins.
Compared to your other products, high-margin products will generate more profit per unit sold.
By promoting them strategically, you can increase your overall profit even if the sales volume remains the same or even decreases slightly. This can lead to a higher AOV without requiring an increase in the number of orders.
If you have a digital product store, then you can use the EDD Recommended Products extension to prominently display your high-margin products on your downloads and checkout pages.
Amazon does something like this on its product pages by displaying ‘People who viewed this also viewed’ and ‘People who bought this also bought’ recommendations. These can encourage customers to purchase additional products they are interested in.
Another approach is to bundle high-margin products with related lower-margin ones. This can incentivize customers to purchase the bundle and potentially increase their overall spending.
8. Offer Smart Coupons
Smart coupons are a great way to get more sales, keep your customers happy, and encourage brand loyalty. They can motivate your customers to add more items to their cart so that they qualify for a discount.
For example, you could encourage customers to spend more by offering a free gift or free shipping when their cart total reaches a certain amount.
Or you can create ‘buy one get one’ (BOGO) coupons to convince shoppers to add more items to their cart. Or when they buy a certain item, you can offer them a second item at a discounted price instead of free.
The EDD Discounts Pro extension lets you create advanced discounts that are automatically applied to the checkout screen based on specific conditions.
Alternatively, if you have a WooCommerce store, then you can create smart coupons with the Advanced Coupons plugin. It lets you create all kinds of coupons, rewards, and discounts to get more sales and grow your business.
9. Optimize the User Journey
I have already touched on improving the checkout experience in your online store, but there are plenty of other ways you can optimize the user journey to improve customer experience.
A smooth and positive customer journey fosters a sense of trust and satisfaction. This can encourage customers to spend more and return for future purchases.
FunnelKit, formerly WooFunnels, is a WordPress sales funnel builder that lets you optimize the path users take on your website to become customers. It lets you improve your checkout, offer one-click upsells, use beautiful page layouts, and much more.
Customers have a positive experience on a website that’s easy to navigate and find the products they need. This helps them feel more confident about their purchases and complete larger orders.
10. Use of the Fear of Missing Out (FOMO) to Create Urgency
Creating a sense of urgency and excitement can encourage customers to purchase immediately to avoid missing out on a valuable opportunity. This is known as FOMO, or the fear of missing out, and is a well-known sales tactic.
When using FOMO strategies, you need to be genuine and transparent. If your customers sense that you are trying to manipulate them by creating a false sense of urgency, then you may lose their trust.
Urgency is typically created by running a limited-time holiday sale, such as on Black Friday. The customer needs to make a purchase before the sale is over to get the discount.
When running a limited-time discount, I recommend displaying a countdown timer to make sure customers act before the offer expires.
Scarcity is another way to create a sense of urgency. For example, you can inform customers when stock is low or offer exclusive limited edition products.
11. Use Social Proof to Earn Trust
New customers may be reluctant to spend much money in your online store. They simply don’t have a reason to trust you yet.
In fact, 92% of consumers are hesitant to make a purchase when there are no customer reviews available.
This is the power of social proof, where potential customers can be strongly influenced by the experiences of people who already made a purchase and had a good experience with your store.
This means that you can earn the trust of new customers by displaying product reviews and testimonials on your website from genuine customers. Once you gain the trust of new visitors, they will be much more confident about adding items to their carts.
EDD users can do this using the Reviews extension. This lets you enable customer reviews with star ratings on the products you choose.
Many of my customers successfully use loyalty programs to encourage shoppers to spend more. When you award extra points for orders over a certain amount, you can increase the average order value just as effectively as cross-selling and upselling.
Think of a Starbucks Rewards card. Every time you buy a drink, you are closer to a free coffee.
EDD offers several extensions that can help you create a loyalty program, such as the Purchase Rewards extension.
This lets you reward customers with a discount code after making a purchase. You can set a minimum purchase amount that will encourage them to add more to their cart.
Most online stores have huge numbers of users leaving their sites from the checkout page. On average, a massive 69% of shoppers are abandoning their carts. Why not try to get some of them back and recover those lost sales?
These customers showed genuine interest in your products, which makes them valuable leads. Remind them of their abandoned cart and offer some incentives to complete the purchase. You might successfully convert them into paying customers, and this can contribute to your AOV.
You may be able to catch them just before they leave your site. OptinMonster’s exit-intent technology studies mouse movements to know when someone is about to leave your site, and shows a popup at that exact moment.
If an abandoning visitor has already left your site, then you can send them a push notification using PushEngage. Or you can send an automated email using EDD’s Recapture extension to regain their attention.
You can offer the customers an incentive to complete the purchase and present them with relevant upsell or cross-sell options, such as adding complementary products to their cart or offering a bundle discount. This is particularly effective if you use a personalized approach.
These targeted suggestions can encourage them to spend more, potentially increasing the overall order value.
Now that you’ve seen my list of ways to increase your store’s AOV, you can get to work and start testing multiple strategies.
But don’t try them all at once.
It’s better to make one change at a time and measure the effect it has on the value of your orders. This will let you see which approaches work and which don’t so that you can make data-driven decisions for your business.
Remember, increasing AOV is an ongoing process. By using a combination of these strategies and continuously monitoring and analyzing the results, you can effectively raise your average order value and boost the overall revenue in your online store.
Recently, one of our readers asked us how they can pass payment processing fees to customers in WordPress.
Most payment processors charge additional fees to facilitate a secure transaction process for the buyer and seller. Asking customers to pay the payment processing fees helps you increase your earning by around 3%.
In this article, we will show you how to easily pass payment processing fees to customers in WordPress, step by step.
Why Pass Payment Processing Fees to Customers in WordPress?
If you have an online store, then you may have noticed that most payment processors charge you additional per-transaction fees, percentage-based fees, and gateway fees.
For instance, if a user buys a chair from your furniture store for $50 and uses Stripe as a payment method, then you will only get $48.55 in your account. This is because Stripe collects 2.9% + $0.30 per transaction.
Passing this processing fee to customers allows you to receive the entire amount ($50) for your product/service without having to worry about absorbing this fee as a business expense.
Plus, it gives you more control over your product pricing strategy.
It also helps build transparency with customers by adding a separate line for the fees on the checkout page, which can act as a competitive advantage. It will allow you to set lower base prices for your products and attract more customers who are looking for the lowest total cost.
Having said that, let’s see how to easily pass the payment processing fees to customers in WordPress. In this tutorial, we will cover three methods, and you can use the links below to jump to the one of your choice:
Method 1: Pass Payment Processing Fees to Customers With WP Simple Pay
WP Simple Pay is the best WordPress Stripe plugin on the market that allows you to accept payments from customers without adding a shopping cart. It comes with premade templates, has a form builder, and lets you add payment processing fees directly to the customer’s bill.
Plus, WP Simple Pay is a great choice if you have a membership site, sell courses online, or sell a single product in your online store.
Now, you can start by visiting the WP Simple Pay » Add New page from the WordPress admin sidebar. This will direct you to the ‘Select a Template’ page where you can choose any template you like.
For this tutorial, we will be creating a simple payment form.
The form builder will now open up on your screen. Here, you have to provide a name and description for the form that you are about to create.
Then, select ‘On-site payment form’ as the form type and switch to the ‘Payment’ tab.
Once you are there, scroll down to the ‘Price Options’ section and simply add an amount for your product or service. You can also pick if you want it to be a one-time or recurring payment.
If you want to add multiple prices, then you can click the ‘Add Price’ button at the top.
After that, scroll down to the ‘Payment Method’ section and check the boxes next to the gateways that you want to add to your payment form.
With WP Simple Pay, you can add KIarna, Affirm, AliPay, debit card, credit card, SEPA Debit, and many more methods.
Once you do that, click the ‘Configure’ link next to the payment option of your choice.
This will open a prompt on the screen, where you have to check the ‘Add an additional fee to payments made with this payment method’ option. Once you do that, you can set a transaction fee percentage for the product that you are selling.
If you don’t configure this setting, then Stripe will automatically add 2.9% of the product price as the fee. Then, click the ‘Update’ button to store your settings.
Now, the payment processing fee will automatically be added to the customer’s bill on the checkout page.
However, if you think that adding a recovery fee without customer consent can damage your reputation, then you can also provide a choice to your customer.
To do this, switch to the ‘Form Fields’ tab. Here, you can add, rearrange, or delete fields in the form according to your liking. For more information, you can see our tutorial on how to accept payments with Stripe in WordPress.
Once you do that, open the ‘Form Fields’ dropdown menu and select the ‘Fee Recovery Toggle’ option. Then, click the ‘Add’ button.
Now, users on your site will have to toggle this switch if they want to pay the payment processing fee themselves.
Next, switch to the ‘Payment Page’ tab and check the ‘Enable a dedicated payment page’ option.
After that, you can now customize your payment form page by adding a permalink, color scheme, image, and footer text.
Once you are done, don’t forget to click the ‘Publish’ button at the top.
Now, simply visit your payment form page to view the fee recovery feature in action.
Method 2: Pass Payment Processing Fees to Customers With Easy Digital Downloads
If you sell digital products like eBooks, PDFs, music, or spreadsheets, then this method is for you.
Easy Digital Downloads is the best WordPress plugin for selling digital products that makes it super easy to pass processing fees to customers using an addon.
First, you will need to install and activate the Easy Digital Downloads plugin. For detailed instructions, see our beginner’s guide on how to install a WordPress plugin.
Note: EDD has a free plan. However, you need the pro version to unlock the ‘Gateway Fees’ extension.
Upon activation, head over to the Downloads » Settings page from the WordPress dashboard to enter your license key.
You can get this information from your account on the Easy Digital Downloads website.
After that, you must set up your store to start selling products. For detailed instructions, you can check out our beginner’s guide on how to sell digital downloads in WordPress.
Once you have done that, visit the Downloads » Extensions page from the WordPress admin sidebar and locate the ‘Gateway Fees’ extension.
Then, click the ‘Install’ button under it.
Upon addon activation, visit the Downloads » Settings » Payments page and switch to the ‘Gateway Fees’ tab.
Here, you can add the payment processing fee that you want to charge your customers next to the ‘Percent fee for Stripe’ or ‘Flat fee for Stripe’ options.
Once you do that, you can add a label that will be displayed on the checkout page to explain the additional fee being charged to the user.
You can configure the gateway for all the payment methods that you have added to your site from this page.
After that, don’t forget to click the ‘Save Changes’ button to store your settings.
You can now visit your WordPress site to view the additional payment processing fee on the checkout page.
Method 3: Pass Payment Processing Fees to Customers With WP Charitable
If you accept donations or do crowdfunding through your website, then this method is for you.
WP Charitable is a popular WordPress donation plugin that lets you create unlimited fundraising campaigns and comes with a Fee Relief extension to allow users to cover payment processing fees.
For this tutorial, you will need the WP Charitable Plus license to unlock this extension.
Next, visit the Charitable » Settings page from the WordPress dashboard to enter your pro plan’s license key and click the ‘Verify Key’ button.
You can find this information in your account on the WP Charitable website.
After that, head over to the Charitable » Addons page from the WordPress admin sidebar and find the ‘Charitable Fee Relief’ extension.
Then, click the ‘Install Addon’ button.
Upon addon activation, you need to go to the Charitable » Settings page and switch to the ‘Extensions’ tab.
Here, you can check the ‘Opt-in checkbox, checked by default’ option as a fee relief mode. This will add a checked box to the donation form for fee recovery. If the user does not want to pay the processing fee, then they will have to uncheck this box.
However, if you don’t want to provide users with an option and automatically add the recovery fee along with the donation amount, then you can check the ‘Automatic opt-in’ option.
After that, you must click the ‘Enable Fee Relief’ button next to the payment gateways to activate fee recovery for payment processing.
Once you do that, you can set a payment processing fee as a combination of a percentage and a fixed amount per donation.
For instance, if PayPal charges 2.9% and $0.30 per transaction, then these are the amounts that you will have to add in the fields.
Once you are done, don’t forget to click the ‘Save Changes’ button to store your settings.
Here, you will have to enter a campaign name, after which you will be taken to the ‘Select a Template’ page.
From here, click the ‘Create Campaign’ button under a template of your choice.
This will open the drag-and-drop builder, where you can drag, rearrange, and delete form fields according to your liking.
For example, you can add the ‘Donation Amount’ field and then add some custom amounts that users can choose from in the left column.
Once you do that, you can also add a progress bar, social links, a campaign title, and more from the left sidebar. You can also configure payment gateways by switching to the ‘Payment’ tab.
Once you are done, simply change the form status to ‘Publish’ from the dropdown menu in the top right corner of the screen. Then, click the ‘Save’ button at the top to store your settings.
Now, just visit your WordPress site to view the donation form with the fee recovery option.
Bonus: Accept ACH Payments in WordPress
If you do not want to pass payment processing fees to customers in WordPress, then you should consider accepting ACH payments on your website.
ACH is an electronic bank-to-bank payment made through the Automated Clearing House (ACH) network in the United States. Keep in mind that this method will only work if your business is based in the USA.
Accepting ACH payments can lower your transaction fees a lot as Stripe’s fee for ACH is just 0.8% per transaction compared to its usual 2.9%.
For example, if you have a WooCommerce store and a customer buys some products for $100, then the transaction fee with ACH payments will be only $0.80. On the other hand, payment processing fees using other methods will be $3.20.
You can easily start accepting ACH payments on your website using WP Simple Pay.
Simply install and activate the plugin and then visit the WP Simple Pay » Add New page from your WordPress dashboard. Here, you must choose the ‘ACH Direct Debit Form’ template and create a payment form in the builder.
Once you add the form to your website, you will have to pay a lower transaction fee for users choosing this option as a payment gateway.
Are you looking for the best WooCommerce alternatives?
While WooCommerce is the most popular eCommerce plugin for WordPress sites, it may not be the perfect option for everyone. Depending on your needs, there are better alternatives to WooCommerce that can get the job done faster and easier.
In this article, we will share the best WooCommerce alternatives you can use to sell online.
Why Might You Need WooCommerce Alternatives?
WooCommerce is the most popular eCommerce platform because it allows anyone to launch an online store. And it’s an open-source solution, so you can download and use it for free.
Due to its ease of use and powerful customization options, it is hugely popular among online store owners. And WooCommerce powers over 23% of all eCommerce stores.
WooCommerce comes with hundreds of free and premium extensions to add powerful eCommerce features to your online store. It includes inventory management, point of sale (POS), and so on.
Now you may wonder, is there a better option than WooCommerce?
Well, there are some scenarios where WooCommerce may not be the right tool for the job.
It might not have the specific key features you need for your eCommerce business or require a learning curve. And this is where WooCommerce alternatives come in.
These user-friendly eCommerce platforms offer better solutions for specific needs and may be more suitable for your business plans.
Now, without delay, let’s look at the best WooCommerce alternatives and see when they are a better solution for your online business.
MemberPress is the best WordPress membership plugin on the market. It allows you to sell paid memberships with multi-level subscriptions, drip-content support, and eCommerce features.
It comes with support for multiple payment gateways, easy pricing tables, and other tools to help you sell and grow your membership community.
When Is MemberPress a Better Solution Than WooCommerce?
If you want to create a membership site that offers access to premium content with subscriptions, then MemberPress is made specifically for that purpose. It offers a better experience for you as well as your users.
You can do the same thing with WooCommerce, but it would soon become overly complicated. You will have to use several add-ons to get the same functionality that you get built-in with MemberPress.
More importantly, MemberPress works well with WooCommerce, and you can combine them to sell subscription-based products and physical products on the same website.
Cons Compared to WooCommerce
MemberPress does not have any of the traditional shopping cart or advanced checkout features. To sell physical products, you will need to use them alongside WooCommerce.
We recommend MemberPress as a WooCommerce alternative because it’s the best membership plugin for WordPress, and it’s PCI compliant by default, making it easy and secure to accept online recurring payments.
When it comes to top features, MemberPress lets you create multiple membership levels so you can show different content to different members on your WordPress site.
While WooCommerce is an ultimate eCommerce solution, it has fewer membership options and is not PCI compliant. You can use third-party payment plugins to ensure your online store’s compliance with payment cards and processors.
Plus, MemberPress offers advanced community building, timed content release with Drip, a powerful LMS platform, a subscription plugin, integrations with third-party tools, and more.
Easy Digital Downloads is the best WordPress digital downloads plugin made specifically for selling virtual goods. These include software, music, eBooks, movies, and more.
You can manage software licenses, accept payments, install addons to extend the platform further, and more.
When Is Easy Digital Downloads a Better Choice Than WooCommerce?
If you only want to sell digital downloads, then Easy Digital Downloads can replace WooCommerce easily. It simplifies the process and allows you to manage licenses, accept payments, manage users, and manage file downloads.
You can sell digital products with WooCommerce as well. However, it includes many key features to sell physical goods, cluttering the interface.
You’ll also need to use several addons to manage licenses, file permissions, and other virtual product features.
On the other hand, there’s a free version of the Easy Digital Downloads plugin. However, you need to use their professional business plan to get access to several features like shipping digital products.
Just like you can sell digital goods with WooCommerce, you can also sell physical goods with Easy Digital Downloads using addons.
However, if you plan on selling digital and physical goods, then WooCommerce will be a much better solution to manage your file downloads.
Why Do We Recommend Easy Digital Downloads?
We recommend Easy Digital Downloads because it is the best WordPress plugin to sell virtual products, digital goods, and software. We use it on several of our websites, including WPForms and MonsterInsights, and it works like a charm.
While WooCommerce lets you sell physical products and anything else you might want, it comes with a lot of features and options. This makes it confusing for business owners to set up their sites and sell digitally.
On the other hand, Easy Digital Downloads has a simple setup process. It comes with secure payment options, subscription plans for customers, hundreds of integrations, and more.
Easy Digital Downloads also offers addons to sell physical products. So, if you are using this plugin, then you can sell anything and everything with a few extra steps.
Unlike other WooCommerce alternatives on this list, Shopify is a fully hosted eCommerce platform that does not require using WordPress. You don’t have to manage software, install updates, or manage backups.
It allows anyone to start an online store and sell without technical skills easily.
When Is Shopify a Better Solution Than WooCommerce?
Normally, you need to manage your shopping cart software using a platform like WooCommerce.
You will need to register a domain name and buy a WooCommerce web hosting account to install software, manage updates, backups, and so on.
Shopify takes care of all that and offers you a fully hosted platform. You can use their drag-and-drop tools to build your online store within minutes.
Shopify offers a better user-friendly solution if you are looking for a completely hands-off platform. It also provides a mobile app to manage your products, process orders, and design campaigns using built-in marketing tools.
Cons Compared to WooCommerce
Shopify is a hosted platform, meaning you get less control over your website than with a hosted WooCommerce store. It also charges you transaction fees, which means your costs will increase as you start selling more.
For a side-by-side comparison, you can see our article on Shopify vs. WooCommerce with the pros and cons of both platforms.
Why Do We Recommend Shopify?
We recommend Shopify because it’s a popular hosted eCommerce solution. When we say hosted, this means that you don’t need to worry about a lot of things, including web hosting, security, and more.
Unlike WooCommerce, Shopify is a ready-made eCommerce platform for business owners to get started quickly. There’s no need to install or manage software, and you can use their drag-and-drop builder to set up your online store.
While WooCommerce gives you full control over customization and installing third-party tools to make a powerful eCommerce store, Shopify has limited options. You have to work around their provided tools and addons.
WPForms is the best WordPress form builder plugin in the market. Although it’s not a full-featured eCommerce plugin, it comes with payment options for Stripe, PayPal, Square, and Authorize.net, so you can easily create online payment forms in WordPress.
It also has a free plan, but you’ll need the WPForms Pro version to access payment options and other eCommerce functionality.
When Is WPForms a Better Solution Than WooCommerce?
If you are looking to create an order form to accept credit card payments on your WordPress website, then WPForms is the simplest option on the list.
You can use it for one-time or recurring services like consulting, lawn mowing, and more. It also offers hundreds of ready-made form templates for your ease.
WPForms is also a better solution for NGOs to create an online donation or fundraising form and automatically send email notifications to donors.
Moreover, WPForms has an excellent customer support team that can help with setting up your credit card and other payment options easily.
This is not an apples-to-apples comparison. WPForms is not an eCommerce plugin. So, you will need to install addons to handle advanced features like taxes, shipping, and more.
It’s a simple payment solution for people who want to sell online without setting up a complete online store.
WooCommerce, on the other hand, is a powerful, full-featured eCommerce plugin.
Why Do We Recommend WPForms?
We recommend WPForms because it’s the best WordPress form builder and a simple and secure payment solution. For people who don’t want to set up a complete eCommerce store and still sell from their site, WPForms is the ideal choice.
It supports all major payment options, including Stripe, PayPal, Google Pay, and more. WPForms is the most beginner-friendly WordPress plugin that lets you add a payment form with just a few clicks.
While WooCommerce is a complete WordPress eCommerce plugin to start an online store, sometimes it’s too much for small businesses with a few products. WPForms provides a way out and lets you install specific addons that get the work done without cluttering your WordPress website.
With WPForms, you can give choice to users to select one or multiple products within the online form and use their favorite payment method. Additionally, WPForms has conditional logic to accept one-time and recurring payments.
Bonus WooCommerce Alternatives
If you didn’t find the perfect WooCommerce alternative in the list above, then here are some other alternatives that may be more suited to your needs.
Magento, also known as Adobe Commerce, is a popular open-source platform that lets you easily build and manage an online store.
It allows you to accept payments from different gateways, is completely customizable, and has customer management tools, helping you create an online store of any shape and size.
When Is Magento (Adobe Commerce) a Better Solution Than WooCommerce?
If you are creating an online store on an enterprise level with a high traffic volume and a huge product range, then Magento is the ideal choice.
It comes with features for B2B businesses, including quote management, custom pricing, and credit terms, and has amazing marketing tools for targeted promotions, personalized product recommendations, and customer segmentation.
While Magento itself is open source, it does have two premium editions that add significant licensing fees.
Additionally, the platform is difficult to set up, and you may need to hire a team of developers to create an online store, which can add to your costs.
It also has a smaller community compared to WooCommerce and has a less user-friendly interface. For more details, you can see our comparison of Magento vs. WooCommerce: Which is better?
Why Do We Recommend Magento (Adobe Commerce)?
Magento is the perfect platform if you want to create a large product catalog and handle a huge traffic volume.
For example, if you have a B2B online store that sells products to other smaller stores, then Magento will be a great option with its product management, marketing tools, and extensive store customization settings.
The tool also offers 3,783+ extensions for further scalability and can easily integrate with payment gateways like Stripe, 2Checkout, Braintree, WePay, Google Checkout, Skrill, Venmo, and more.
BigCommerce is a fully hosted e-commerce platform that comes with a variety of features, including design, payment gateways, SEO, email marketing, and more to build an online store.
Plus, the platform also has a BigCommerce plugin that you can use on your WordPress site if you don’t want to move your entire store to the platform itself.
When Is BigCommerce a Better Solution Than WooCommerce?
BigCommerce can be a great solution if you are a beginner and looking for an all-in-one solution that manages everything for you, from site security to backups.
BigCommerce is super easy to set up and offers a very intuitive interface with its drag-and-drop builder, making it easier to create an online store.
Plus, the tool is also fully self-hosted, offers 24/7 customer support and unlimited bandwidth, and has fixed monthly pricing, which can make budgeting easier.
The solution is completely hassle-free, can handle large product catalogs, and has built-in SEO and marketing features, which WooCommerce does not offer.
Cons Compared to WooCommerce
As BigCommerce is a self-hosted solution, it gives you limited control and flexibility over your site design. It also offers fixed pricing plans, limited themes, and integration apps, which can stunt your store’s growth.
On the other hand, WooCommerce is completely free and offers full control over your website. However, you will have to face scalability challenges as your site grows.
We recommend BigCommerce if you are a beginner and want to easily start your online store on a self-hosted platform that manages all the security, scalability, and backups for your site.
BigCommerce has a drag-and-drop builder, reporting and analytics, social media integration, customer management, and premade templates that can help you launch an online store of any size in just a few minutes.
It lets you create an online payment form, has premade templates, comes with a discount coupon codes field, and lets you collect payments from gateways like Klarna, AliPay, Affirm, and more.
When Is WP Simple Pay a Better Solution Than WooCommerce?
If you want to add a simple payment form to your site and accept Stripe payments, then WP Simple Pay is your go-to solution.
The plugin can be used to accept consultation fees, organize fundraisers and donations, or for small businesses like cleaning service subscriptions, dance lessons, landscaping, martial arts lessons, laundry service payments, and more.
It can also work if you have a very small online store with a limited product catalog.
Additionally, WP Simple Pay can integrate with other tools like WooCommerce Shipping, FunnelKit Automations, EDD, or WPCode to create an automated workflow.
You can also schedule your payment forms, customize the payment page, and send email notifications as a payment receipt to customers.
Cons Compared to WooCommerce
WP Simple Pay is not a complete eCommerce plugin. It is a simple solution that accepts Stripe payments and is only recommended if you want to sell services instead of multiple products on your online store.
On the other hand, WooCommerce is a fleshed-out eCommerce platform that lets you manage your product inventory, add different payment gateways, and create a scalable online store.
We recommend WP Simple Pay because it is completely secure and makes it easy to sell online.
If you sell services, want to accept donations, or take registration fees from users, then WP Simple Pay is the best solution because it comes with premade templates, different payment methods, and recurring payments.
However, if you want to build an online store that sells physical products, then you should opt for WooCommerce or another alternative.
What Are the Best WooCommerce Alternatives?
Finding a better eCommerce solution than WooCommerce is not difficult if you know exactly what you need as an online business owner.
We recommend MemberPress for creating a fully functional membership site. It’s user-friendly and works with WordPress out of the box.
And if you want to sell digital products with better features and flexibility, then Easy Digital Downloads is the right provider.
There are many other WooCommerce alternatives that we didn’t mention in this list to avoid confusion. For example, you could use BigCommerce, Magento, Ecwid, Opencart, or Square.
These can be good eCommerce solutions, but we wanted to share only the best WooCommerce alternatives for beginners and small business owners.
We hope this article helped you learn about the best WooCommerce alternatives and when they can be a better solution. You may also want to see our other guides about WooCommerce, online businesses, and eCommerce sites.
Frequently Asked Questions
Here is a list of some questions frequently asked by our users about WooCommerce alternatives.
What is the cheapest way to sell on WordPress?
If you want to start an online store to sell physical products but have a shoestring budget, then you can use WooCommerce because it is completely free and easy to use.
Similarly, you can also accept payments for your services with WPForms Lite, which is free.
Can WooCommerce handle high traffic?
WooCommerce itself can handle a high amount of traffic on your website. However, several other factors can influence the store’s ability, including your hosting service, site optimization, themes or plugins, and custom code.
If you are still doubtful about WooCommerce’s ability to handle traffic, then you can opt for a self-hosted platform like Shopify or BigCommerce. These platforms will manage the hosting, site speed, and backups all by themselves, and you won’t have to worry about a thing.
Is there a better option than WooCommerce?
WooCommerce is the most popular eCommerce platform for WordPress because it is free, easy to use, and completely customizable.
However, considering the type of products or services that you want to sell, WooCommerce may not be the best option for you.
For example, if you want to sell ebooks, then Easy Digital Downloads is a better option than WooCommerce because it is specifically designed for selling digital downloads.
Similarly, if you want to start a wholesale store that sells products to other online stores, then Magento would be better to help you manage your large inventory and high traffic volume.
On the other hand, if you want to accept donations, host fundraisers, or accept fees for your services, then adding a simple payment form with WPForms or WP Simple Pay is the better choice.
Recently, one of our readers asked us how they can prevent overselling out of stock items in their online store.
When a customer purchases an item that isn’t available, it can lead to disappointment, loss of trust, and a negative user experience. However, you can reduce refunds and improve customer satisfaction by not allowing out of stock items to be sold.
In this article, we will show you how to easily prevent overselling out of stock items in WordPress, step by step.
Why Prevent Customers From Buying Out of Stock Items in WordPress?
If you have an online store, then overselling out of stock items can lead to customer disappointment and complicate order fulfillment.
For example, if you sell clothes and a customer places an order for a shirt that isn’t available, then you may have to manually adjust orders, track down a replacement, or contact the customer about product substitutions.
This can damage your brand reputation heavily and users may even leave negative customer reviews on your WordPress site.
By improving your inventory management, you can ensure that you always have the items customers want and can inform them if they go out of stock. Doing this will boost your sales, reduce complaints, and enhance your store’s credibility.
Having said that, let’s see how to easily prevent overselling out of stock items in WordPress with WooCommerce, Easy Digital Downloads, and WP Simple Pay.
You can use the links below to jump to the method of your choice:
You can easily prevent overselling products by visiting the WooCoomerce » Settings page from the WordPress dashboard and switching to the ‘Products’ tab.
Once you do that, click on the ‘Inventory’ link. This will open some new settings on your page where you must check the ‘Enable stock management’ option.
After that, scroll down to the ‘Notifications’ section and check the ‘Enable low stock notifications’ and ‘Enable out of stock notifications’ options.
You will now receive an email notification when a product has low stock or goes out of stock.
Now, you can add the email address where you want to receive these notifications next to the ‘Notification recipient(s)’ option. You can also add multiple email addresses by separating them with a comma.
Next, you can add the low stock threshold according to your liking. You will be sent an email when the product stock reaches this amount.
For instance, if you are selling a customized jewelry piece and have set the low stock threshold to 2, then you will get an email when your store has only 2 of the jewelry pieces left.
Next, you will see the ‘Out of stock threshold’ option, which you can leave as is. This setting will change a product’s status to ‘Out of Stock’ automatically once the stock reaches zero.
Additionally, you can check the ‘Hide out of stock items from the catalog’ option. This means that out of stock items won’t be displayed in your shop’s product catalog when users browse through your store.
Then, you can also configure the ‘Stock display format’ option from the dropdown menu.
For instance, if you want to show the stock quantity of each product to your users, then you can select that option.
You can choose the ‘Only show quantity remaining in stock when low’ option if you want the users to know when only 2 items for that product are left in the inventory. This option can create a sense of urgency among visitors and may encourage them to buy your products.
However, if you don’t want to display stock quantity at all, then you can pick the ‘Never show quantity remaining in stock’ option.
Finally, click the ‘Save changes’ button to store your settings.
Now you must visit the Products » All Products page from the WordPress dashboard to configure the stock quantity of individual items.
To do this, click the ‘Edit’ link under any product.
This will open a new screen, where you must scroll down to the ‘Product Data’ section and switch to the ‘Inventory’ tab.
Next, check the box next to the ‘Stock management’ option.
This will open some new settings and you can start by adding the quantity for the product you are editing. For instance, if you are selling a blue colored hoodie and have 10 items of it in stock, then you can add that value next to the ‘Quantity’ option.
Once you do that, you must select the ‘Do not allow’ option for the ‘Allow backorders?’ setting.
Backorders are like pre-orders for out of stock items. Now, customers won’t be able to place orders for unavailable items and there will be less chance of user dissatisfaction.
After that, you can add a low stock threshold for the product. If you don’t configure this setting, then the storewide low stock threshold that you configured earlier will be applied for the individual product.
Finally, click the ‘Update’ button at the top to store your settings. You have now successfully prevented overselling out of stock products in WooCommerce.
Prevent Overselling Out of Stock Items in Easy Digital Downloads
Easy Digital Downloads is the best WordPress plugin for selling digital products like music, eBooks, spreadsheets, software, and more.
Usually, vendors do not need to create a purchase limit for digital files. However, if you are selling items on your such as tickets to an event with a specific limit or an expiration date, then you will have to prevent overselling sold-out tickets.
You can easily do this using the plugin’s Purchase Limit extension.
Once you have done that, visit the Downloads » Extensions page from the WordPress dashboard.
Here, you must locate the ‘Purchase Limit’ extension and click the ‘Install’ button under it.
After that, go to the Downloads menu tab from the admin dashboard. Here, you will see a list of all the digital downloads you created for your site.
Simply click the ‘Edit’ link under the product where you want to set a purchase limit.
This will open the block editor, where you must scroll down to the ‘Download Details’ section.
Here, you can type the number of tickets or copies of the digital product that you are selling under the ‘Purchase Limit’ option.
For instance, if you have ten tickets to sell for an event, then you can add 10 as the value in the field. When your store sells these 10 tickets, your purchase button text will change to ‘Sold Out’ automatically.
This way, you won’t be able to oversell out-of-stock products to customers.
If you have added multiple price options for your digital product, then you can also set different purchase limits for various packages.
For example, if you have 10 normal tickets and 5 VIP ones to sell for an event, then you can set different purchase limits for them.
You can also check the ‘Disable product when any item sells out’ option. This feature is only available if you have multiple pricing plans for a product.
This means that your product will be removed from the catalog once it sells out.
Finally, go back to the top of the page and click the ‘Update’ or Publish’ button to store your settings.
You have now successfully prevented overselling your out of stock digital product.
If you want to set a default purchase limit for all the digital products on your website, then you can do that by visiting the Downloads » Settings page and switching to the ‘Misc’ tab.
Next, click on ‘File Downloads’ to open more settings on the page.
From here, set a default limit for all your products by typing a value next to the ‘File Download Limit’ option.
This will be the maximum number of times each file can be purchased and downloaded from your site. Once that limit is reached, the product status will then automatically change to ‘Sold Out’.
Once you are done, don’t forget to click the ‘Save Changes’ button to store your settings.
Prevent Overselling Out of Stock Items in WP Simple Pay
If you use WP Simple Pay on your website, then this method is for you.
WP Simple Pay is the best WordPress Stripe plugin on the market that makes it super easy to add a payment form to your website.
It is an ideal choice if you have a membership site that accepts subscription payments or if you host workshops like cooking lessons, dance classes, coding, and more.
You may have a limited number of subscriptions to offer or a limited number of openings for your class and do not want to oversell your services or subscriptions. In that case, you can easily avoid overselling using WP Simple Pay’s purchase restrictions feature.
Note: WP Simple Pay has a free plan but you will need the pro plan of the plugin to unlock the purchase restrictions feature.
Upon activation, a setup wizard will be launched on the screen where you must click the ‘Let’s Get Started’ button.
You will be guided to the first step, where you must add your license key and click the ‘Activate and Continue’ button.
You can find this information in your account on the WP Simple Pay website.
Next, you have to connect your Stripe account with the plugin.
To do this, click the ‘Connect with Stripe’ button.
After that, you must log in to your Stripe account to connect it with WP Simple Pay. Once you do that, you must configure the other setup wizard steps.
Next, visit the WP Simple Pay » Add New page from the WordPress admin sidebar. This will take you to the ‘Select a template’ page where you can click the ‘Use Template’ under any template.
For this tutorial, we will be creating a simple payment form.
This will launch the form builder, where you can start by adding a title and description for your form.
After that, you can select ‘On-site payment form’ as the type and then switch to the ‘Payment’ tab.
Here, you can scroll down to the ‘Price Options’ section and add an amount for your product or service.
You can also add multiple price options by clicking on the ‘Add Price’ button.
Then, you can scroll down to the ‘Payment Methods’ section and check the box next to the payment method you want to add to your site.
You can add AliPay, Klarna, AfterPay, and any other methods that you like.
Once you have done that, you can switch to the ‘Form Fields’ tab to add, rearrange, or delete fields in the form according to your liking.
Next, switch to the ‘Purchase Restrictions’ tab and check the ‘Hide the payment form after a set number of payments’ option.
Once you do that, type the number of subscriptions that you want to sell with your form.
For example, if you run a dance class and have room for 15 students only, then you can type the number 15 into the ‘All payments count towards a single limit’ field. This means that once 15 users fill out your form and pay the fees, the form will be hidden from other users, preventing overselling.
However, if you have multiple pricing plans in your form, then you can select the ‘Each price option has its own limit’ option and add the availability number for individual pricing packages.
Next, you can switch to the ‘Payment Page’ tab and check the ‘Enable a dedicated payment page’ option.
You can now create a custom page for your payment form by adding a permalink, color scheme, image, and footer text. Once you are done, don’t forget to click the ‘Publish’ button to store your settings.
You have now successfully prevented overselling your membership subscriptions or classes with WP Simple Pay.
Bonus! Inventory Management Tips for Your Online Store
Apart from preventing overselling out of stock products, here are some other inventory management tips that can help boost traffic to your online store and lead to more conversions.
For instance, you should regularly count your physical inventory to avoid any discrepancies between your online store record and actual products. You can also categorize your products based on popularity, value, and lead time for better management.
You must also analyze the past sales trends in your store to predict future demand and adjust your inventory levels accordingly. You can easily do this using MonsterInsights, which is the best analytics solution on the market.
The plugin can show you an overview report for metrics like total sales, revenue, average order value, and conversion rate. You can adjust the reports to analyze older data by setting a custom date range easily.
Some other tips for better inventory management include adding discount offers for less popular items and organizing your inventory according to product type.
Using all these tips will help you get ahead of your competitors and ultimately get more sales.
We hope this article helped you learn how to prevent overselling out of stock items in WordPress. You may also want to see our beginner’s guide on how to increase WooCommerce sales and our top picks for the best WooCommerce themes for your store.
If you liked this article, then please subscribe to our YouTube Channel for WordPress video tutorials. You can also find us on Twitter and Facebook.
Digital eCommerce is my passion, and it has changed my way of life.
I started offering digital downloads on my own almost over a decade ago.
As the President of Easy Digital Downloads, I also help thousands of successful individuals and businesses achieve their dreams by selling digital downloads, like ebooks, software, documents, and more from their websites.
From my experience of selling digital downloads and helping people do so, here are 5 important lessons I believe every newbie seller needs to know.
Note: This is a guest post by Chris Klosowski, the president of Easy Digital Downloads, the best digital eCommerce plugin for WordPress. This is an expert column that we publish every other Thursday, where we invite a WordPress expert to share their experiences with our readers.
Why Sell Digital Downloads for Passive Income?
While there are several different ways to make a passive income online, creating and selling digital downloads is possibly the best way to make a decent income with minimal effort.
You Don’t Need a Lot of Traffic to Succeed
You could make money by displaying advertising, but there are compromises. With ads, you’ll need a lot of traffic to make a decent income. Driving a lot of traffic can be time-consuming and tedious. With affiliate marketing, on the other hand, you don’t have control over the product’s quality.
By selling digital products, you get full control over what you sell. To succeed, you don’t necessarily need a lot of traffic. You just need to attract the right audience who is interested in your offering.
For instance, one of our customers, Sam Parrett from SetSailStudios.com, monetizes his website by creating and selling niche-specific products — downloadable fonts, which perfectly aligns with his passion as a graphic designer.
Unlike people who monetize their websites with ads, he doesn’t have to worry about choosing a broader niche that he’s not familiar with and publishing content in that niche to attract a higher traffic volume.
In his case, it’s easier for him to produce and sell digital downloads in a niche he’s familiar with than monetizing his site with ads in a broader niche.
Create Once and Sell Forever
Selling digital products also has an advantage over physical products.
You will never run out of stock because you can repeatedly sell a digital product forever. That means you don’t need to worry about keeping inventory and ordering or creating more stock.
You also won’t need to pay for storage or spend time packing and shipping products to customers. Anyone from around the world can easily purchase and download a digital product. That means you can sell from the comfort of your home and with little to no investment.
1. Choose a Digital Product Based on Your Expertise
Selling digital downloads is all about the product, and your first job is to decide on which products you will sell. There are plenty of popular digital products to choose from.
eBooks are the most popular digital product people choose to monetize. However, you could choose to sell music, videos, eBooks, or audiobooks based on your expertise.
If you need inspiration, here are examples from our customers who sell different types of digital products:
EscapeRoomGeeks.com: They create and sell printable Escape Room Kits for various age groups. Customers purchase a kit (or bundle of kits), download the printable assets, assemble the challenges and then a group of kids can try and solve them.
BrushGalaxy.com: Brush Galaxy is a marketplace where you can buy and sell custom brushes for Procreate (the leading digital illustration app for iPads)
MrsMactivity.co.uk: They sell membership access to thousands of creative, curriculum-aligned primary education resources.
When deciding on a product, make sure to choose the one based on your expertise and the product format you’re comfortable with.
2. Make Sure Your Product Solves a Problem
You’ll need to create a product that solves a real problem. At the end of the day, potential customers will only visit your website if it solves their problem.
Ask yourself the following questions: Why would someone buy your product? What problem are you looking to solve?
The statement should describe the specific problem (or problems) you are trying to solve.
You can write these as benefits on your website.
This will give you a built-in customer base and make sure you meet your customer’s expectations during the post-purchase process.
3. Understand Who Your Customers Are
The next question to answer is, ‘Who are you selling to?’ I recommend spending some time thinking clearly about this and writing actual answers down on paper.
You should create a detailed description of your typical customer. Have a clear picture of what they look like in your mind.
Thinking about this customer at each stage will help you stay on track. Do this when considering new features, writing your website copy, and fixing bugs.
Here’s an example from one of our customers, Mrs Mactivity Resources, where they make money from selling online resources for Early Years educators. The ‘who’ is stated clearly on the website so that teachers can easily see whether the resources will meet their needs.
You can either sell the products on a third-party marketplace or create your own online store. Switching to a different platform in the future can be hectic, so perform due diligence before picking a platform.
Sell on a Third-Party Marketplace
Third-party marketplaces do make sign-up easy and have a low initial cost. However, you’ll end up paying high transaction fees of up to 30% for every product you sell.
You also don’t own your own data; you just rent it. Your product listings, customer information, and purchase data are all stored on someone else’s server. Migrating to a different platform later can be extremely difficult, if not impossible.
You Could Create Your Own Online Store
Your other option is to create your own digital download store using WordPress, the most popular platform for building websites and online stores.
With a digital eCommerce platform like Easy Digital Downloads, you will pay absolutely nothing for transaction fees, monthly fees, or listing fees.
Besides that, you will own your own data. The license keys are all in your WordPress database. The purchase data and customer information are in your database. So, if you want to shift to a new website, then you can just migrate your own data over.
5. Choose an Optimal Price to Maximize Your Revenue
When it comes to pricing your products, there are three helpful principles to keep in mind.
Make It Easier for Your Customer to Make a Decision
The first key to your product offering is making it easy for the customer to make a decision. This comes in handy, especially if you’re selling a lot of products. In that case, it can become difficult for the potential customer to understand which product they need to solve their problem.
A lot of our client’s stores solve this with bundling. They group some products together that are similar or help achieve a specific goal. This means customers don’t need to pick and choose which product they want. Instead, they just pay one flat fee and get all of them.
Bundles are probably the easiest way to reduce choice paralysis. They also help you create a good pricing page because you can just list your bundles instead of having to cover all of your individual products.
They can also help reduce your refund rates. Without a bundle, a customer might choose Product A when they really need Product B. This usually results in a request for a refund. With a bundle, they get both solutions and can choose the one that works for them.
Don’t Race to the Bottom With Pricing
Racing to the bottom on price can hurt your growth.
You may have a competitor who sells thousands of PDF documents and printables for $1.25. You might be tempted to see that as the price point you should be at.
Unfortunately, such a strategy will undercut your growth, too.
In fact, businesses often cover all their costs in their pricing, including the costs for web hosting, a domain name, a software license, an email marketing service, and more.
But it’s also important to know that there are other additional costs, also known as soft costs, for running a business, such as customer support. If you are not charging enough for your product, then the first customer support ticket may eat up any profits you made on the initial purchase.
So you need to pay attention to your soft costs and understand that those are profit eaters. Make sure you build these into your pricing.
Experiment With Pricing
It’s OK to experiment with pricing. You can try raising or lowering prices a little bit to find the point where you are optimizing conversions.
If your product is solving a problem, then conversions won’t be hard to come by. But you need to find the price point where you are actually profitable, and experimenting may help.
Do you want to add free trial subscriptions in WordPress?
Subscriptions are a great way to get consistent, recurring revenue for your business. However, it can be difficult to convince people to sign up for long-term subscriptions.
In this guide, we’ll show you how to get more signups by adding free trial subscriptions to your WordPress website.
Why Add Free Trial Subscriptions in WordPress?
By adding subscriptions to your website, you’ll have a more consistent cash flow, fewer payment errors, and fewer payment delays. However, customers often want to try before they buy, especially if you’re selling longer-term or more expensive subscriptions.
With that being said, it’s a good idea to offer free trials for all your subscriptions. For example, you might give customers a free month’s trial of your subscription box service or create a free one-week pass for your online yoga classes.
If customers enjoy the free trial, then they might pay for a premium subscription. Even if shoppers don’t sign up straight away, you can still use their contact information to do lead generation. For example, you might send them exclusive coupon codes or target them with web push notifications.
With that being said, let’s see how you can add free trial subscriptions in WordPress. Simply use the quick link below to jump straight to the method you want to use.
Method 1: Easy Digital Downloads (Free Trial For Software and Digital Products)
Do you want to offer a free trial subscription for digital products? Maybe you’re planning to sell subscriptions for online courses, a stock photography website, a digital music store, or something else.
The easiest way to offer free trial subscriptions for digital products is by using Easy Digital Downloads. This plugin lets you easily sell ebooks, PDF files, audio files, videos, and any other type of digital product.
Even better, if you’re a SiteGround customer then the Easy Digital Downloads plugin comes pre-installed, so you can start selling subscriptions and digital products straight away.
In this guide, we’ll show you how to create a free trial for an all-access pass. This pass will look just like any other digital product on your online store.
After signing up for the free trial, customers will be able to view, access, and download different products on your online store.
Customers can simply click on a link inside their account, to see all the products that are included in their free pass.
To stop customers from abusing their trial, you can set daily download limits, limit the free pass to specific product categories, and more.
With all that in mind, we’ll be using three extensions to create a user-friendly ‘all access’ free trial. You’ll need to buy the Extended or higher license for Easy Digital Downloads in order to download these three extensions.
After setting up Easy Digital Downloads, it’s time to install the extensions by going to Downloads » Extensions.
On this screen, find the All Access, Free Downloads, and Recurring Payments extensions.
For each extension, click on the ‘Install’ button.
Create a Free Trial Subscription in WordPress
With that done, you’re ready to create a free all access trial. To get started, head over to Downloads » Downloads in the WordPress dashboard.
On this screen, click ‘Add New.’
You can now type in a name for the subscription.
This will be visible to customers, so it’s a good idea to use something descriptive.
After that, scroll to the ‘Download Options’ section. Under ‘Pricing Options,’ type in 0.
Next, check the box next to the following option: ‘Enable free trial for subscriptions.’
Now, it’s time to turn this subscription into a free all-access pass that customers can use across your entire online store.
To do this, simply scroll to the ‘All Access’ section and check the following option: Convert this product into an “All Access” pass.
Limit the Trial to Specific Product Categories (Optional)
By default, the free trial gives customers access to all your products. However, you can restrict the free trial to specific product categories. For example, if you create and sell ebooks then you might include some books in the free trial, and keep others for paid subscribers.
To restrict the free trial to specific categories, simply click on the ‘x’ next to ‘All Products.’
After that, you can click on the ‘Type to search categories’ dropdown and start typing in the category you want to include in the free trial.
When the right category appears, click to select it.
Set a Time Limit
With that done, you can choose whether to make the free trial permanent or to set a time limit.
If you’ve restricted the free trial to specific product categories, then it may make sense to choose ‘Never Expires.’ For example, if you sell digital art and graphics then you might allow customers to download as many watermarked images as they want, forever. However, they’ll need to buy a subscription in order to remove the watermark.
Just be aware that Easy Digital Downloads also allows you to set a download limit. This means you can use ‘Never Expires’ while also limiting how many items the customer can download.
To create a never-ending free trial, open the ‘All Access Duration’ dropdown menu and choose ‘Never Expires.’
Another option is to set a time limit. This works particularly well for digital products that take a while to get through or for products the customer will want to access over and over again.
For example, if you create and sell online courses then you could offer a two-day free trial, so customers will need to buy a subscription to finish their training.
To set a time limit, open the ‘All Access Duration’ dropdown and choose from years, months, weeks, or days. You can then type a number into the field that appears.
Add a Daily, Weekly, Monthly, or Yearly Download Limit
You can also type in a Download Limit. This can protect your site from customers who might try to abuse the free trial. For example, if you sell Excel or Google Spreadsheets in WordPress, then you might set a download limit so customers can’t download your entire product catalog while on a free trial.
By default, Easy Digital Downloads has a download limit of 0, which means the customer can download as many products as they want. To change this, type a number into the ‘Download Limit’ field.
You can then make this limit per day, week, month, or per year using the dropdown that appears.
Adding Variable Pricing to Your Free Trial (Optional)
Are you using variable pricing on your online marketplace? Then you may want to include specific price variations in the free trial.
For example, if you’ve created Standard and Deluxe price variations, then you may want to include Standard in the free trial, while keeping the Deluxe version for paying users only.
If you’ve enabled variable pricing, then Easy Digital Downloads includes all variations in its free trial by default.
To change this, find ‘Total Price Variations’ and type in how many variations you want to include in the free trial. Depending on the number you use, you’ll see a list of the different variations on your online store.
Simply check the box next to each variation you want to include in the free trial.
Customizing the Purchase Confirmation Page and Email
When a customer downloads a product using their free trial pass, Easy Digital Downloads will show them a Purchase Confirmation page.
It will also send a confirmation message to their email address.
By default, both the Purchase Confirmation page and email contain the following link: Click here to use your All Access Pass. This takes the customer to a page where they can download their free products.
To change the link text, type into the ‘Receipts: All Access Link Message’ box.
You can also change the page where Easy Digital Downloads will send customers when they want to download their free products.
To do this, simply create a new page in WordPress and then add the following shortcode:
This will show all the products the customer can download while on a free trial. You can then add other content, such as text, images, a contact form, or anything else you want to include.
After publishing the page, simply add its URL to the ‘Receipts: Link URL’ field.
When you’re happy with how the free trial is set up, click on the ‘Publish’ button.
Create a Premium Subscription
With that done, you may want to create a premium ‘all access’ subscription. When their free trial expires, customers can upgrade to this subscription and continue enjoying your content.
To create a premium subscription go to Downloads » Add New.
You can then type in a name for the subscription and set the price, by typing into the ‘Pricing Options’ field.
You can also make this a recurring subscription, add an optional sign-up fee, and more using the settings under ‘Download Prices.’
With that done, scroll to the ‘All Access’ section. At this point, you can turn the subscription into an all-access pass, add a download limit, and more by following the same process described above.
When you’re happy with how the premium all-access subscription is set up, don’t forget to click on ‘Publish’ to make it live.
Remove the Checkout for Free Trial Users
After creating the free trial subscription, you’ll want to get as many signups as possible. With that being said, it’s a good idea to allow customers to start the free trial without going through the checkout screen.
Easy Digital Downloads can hide the checkout screen when a customer is claiming a free product, including your free trial subscription.
To do this, simply go to Downloads » Settings, and then select the ‘Marketing’ tab. Next, click on ‘Free Downloads’ to hide the checkout.
After that, you can use ‘Button Label’ to specify the text you’ll show when products are available for free download.
By default, this is ‘Download Now.’
You can replace this with your own custom messaging.
Simply go ahead and type into the ‘Button Label’ field.
There are more settings that can help you do lead generation like a pro. For example, you can collect the person’s name and email address, even when they’re signing up for a free trial or downloading a free product. However, we recommend keeping things simple, as this will often get you the most signups.
When you’re happy with the changes you’ve made, click on ‘Save Changes.’ Now, if you visit the free trial product page, you’ll see the new button text in action.
Create Expiration Reminder Emails
Free trials can generate leads, but the goal is to convert those people into paying customers.
With that in mind, you may want to email people when their free trial is about to expire. This will encourage them to buy a premium subscription, so they can continue accessing your digital content.
Easy Digital Downloads integrates with all the best email marketing services. However, you can also create reminder emails using the Recurring Payments extension you installed earlier.
To use this extension, go to Download » Settings. Then, select the ‘Emails’ tab followed by the ‘Recurring Payments’ link.
On this screen, check the box next to ‘Send Expiration Reminders.’
After that, select ‘Add Expiration Reminder.’
This takes you to a screen where you can type in an email subject and a message.
To make the email more personal, it’s a good idea to use template tags. Easy Digital Downloads will replace these tags with real values such as the customer’s name, the expiration date, and the name of their subscription.
You can see all the available template tags underneath the small text editor.
Just be aware that Easy Digital Downloads will send the message to all customers, and not just the people on your free trial.
When you’re happy with the information you’ve typed in, click on Add Reminder Notice.
Now, Easy Digital Downloads should notify customers when their subscription is about to expire. However, sometimes your WordPress hosting server may not be properly configured or email providers such as Gmail might use filters that wrongly flag your emails as spam.
To get more conversions, your emails need to arrive in the customer’s inbox and not in the spam folder. For that reason, we recommend using a WordPress SMTP plugin and provider to improve your email deliverability
WP Mail SMTP is the best WordPress SMTP plugin on the market. It allows you to connect your WordPress site with a mailer service. This means your expiration reminder and other messages will always arrive safely in the customer’s inbox.
Method 2. MemberPress (Free Trial For Memberships or Courses)
A membership website allows users to pay for premium content, online courses, features, and access to a community. However, these members-only features are usually hidden behind a paywall in WordPress, so visitors can’t see what the membership includes.
With that in mind, you may want to offer visitors a free trial so they can try before they buy. The easiest way to do this is by using MemberPress.
MemberPress is an all-in-one membership plugin that allows you to accept payments, add unlimited membership levels, create gated content, restrict access based on different membership levels, and much more. It also lets you create as many free trials as you want, including different trials for different membership levels.
First, you’ll need to install and activate the plugin. If you need help, then please see our guide on how to install a WordPress plugin.
With that done, you can set the price by typing into the ‘Price’ box.
This is how much members will pay once the free trial expires.
You can only create a free trial for recurring memberships. However, if you want to charge members a one-time fee then there’s a workaround, which we’ll be covering shortly.
With that being said, open the ‘Billing Type’ dropdown and choose ‘Recurring.’
Next, you need to set the billing interval for the recurring payment. This is how often your members will be charged once the free trial expires.
Simply open the ‘Interval’ dropdown and choose an option from the list, such as monthly or yearly billing.
Want to use a different interval? Then select ‘Custom’ instead.
You’ll now see some new controls where you can set a custom interval.
Create a Free Trial Membership Subscription
With that done, check the box next to ‘Free Trial.’
You can now specify how many days the free trial will last, by typing into the ‘Trial Duration’ field. For example, if you want to offer a one-month trial then you would type in ‘30.’
After that, you’ll need to type in the ‘Trial Amount,’ which is the total cost of the subscription trial period before tax. You’ll typically want to type ‘0’ into this box.
Finally, you can choose whether to limit customers to one free trial by checking or unchecking the ‘Allow Only One Free Trial’ box. If you check this box, then customers who cancel their subscription and then re-subscribe won’t get another free trial.
You’ll typically want to leave the box checked, so customers can’t abuse the free trial. However, if you only offer a very short trial then you may want to allow customers to have multiple free trials.
Just be aware that coupons will override this setting, so it’s still possible to offer multiple free trials to the same customer.
Create a Lifetime Membership (Optional)
As already mentioned, you can only offer a free trial for recurring memberships. However, it is possible to create a trial for lifetime memberships, by changing a few MemberPress settings.
To do this, check the ‘Limit Payment Cycles’ box and set the ‘Max # of Payments’ to 1.
After that, open the ‘Access After Last Cycle’ dropdown and select ‘Lifetime Access.’
Now, once the trial expires customers will need to pay a one-time fee for lifetime membership.
Publish the Free Trial Membership Subscription
With that done, you can make any other changes to the membership level.
When you’re happy with how the membership is set up, it’s time to make it live by clicking on the ‘Publish’ button.
To see how the membership looks to potential customers, go to MemberPress » Memberships. On this screen, you’ll see the membership level you just created.
Here, just hover your mouse over the membership level and click on the ‘View’ link.
WordPress will now show the membership signup form in a new tab.
Do you want to add a free trial to more membership levels? Then simply follow the same process described above.
Once you’ve added a free trial to your membership site, you’ll want to encourage visitors to sign up for the free trial. This might mean mentioning the free trial in your email newsletter, creating popups using a WordPress popup plugin, promoting it on social media, and more.
Method 3. WooCommerce Subscriptions (Free Trial For Physical Products)
If you want to sell digital products online, then we recommend using Easy Digital Downloads. However, if you want to sell physical products, then WooCommerce is the world’s most popular eCommerce platform.
By default, WooCommerce doesn’t allow you to offer free trial subscriptions. However, it’s easy to add this missing feature using WooCommerce Subscriptions.
This plugin adds a new ‘simple subscription’ product type to your WooCommerce store. You can add this product type to any existing item, or create new subscription products. For example, you might let shoppers try a product before they buy it, or maybe you will send them a sample subscription box from your online boutique shop.
When a customer visits a subscription product, they’ll see a ‘Sign up now’ button instead of the standard ‘Add to cart’ call to action button.
Customers can manage all their subscriptions by logging into their WooCommerce account, and then visiting the new ‘My Subscriptions’ section.
Here, they can see when the subscription started, how much it costs, the subscription status, and more. The customer can also cancel, reactivate, and renew their subscriptions directly from this page, without having to contact you directly.
In this way, a customer who is enjoying a free trial can quickly and easily upgrade to a premium subscription.
In this guide, we’re going to assume you’ve already set up a WooCommerce store. If you haven’t, then you may want to check out our complete guide to WooCommerce made simple.
As soon as the plugin is active, you’re ready to add free trial subscriptions to WooCommerce. Simply go to Products » Add New.
You can now create this product in exactly the same way you create any WooCommerce product. For example, you can type in the product’s title, add a description, or create a WooCommerce product gallery.
After entering all this information, scroll to the ‘Product Data’ box.
Here, open the dropdown menu and choose ‘Simple subscription.’
This adds some new settings that you can use to create a subscription and add a free trial.
To start, type in the ‘Subscription price.’
Then, use the dropdown menus to choose how long the subscription will last. In the following image, the subscription will cost $20 per month once the free trial expires.
You can now choose whether the subscription will last forever, or expire after a set amount of time. Just be aware that the expiration length doesn’t include the free trial. This means that if the subscription expires in 1 month and you offer a one-month free trial, then the subscription will last for 2 months.
Another option is to give the customer lifetime access. To do this, open the ‘Expire After’ dropdown and choose ‘Never expire.’
Next, you may want to add a sign-up fee.
Just be aware that WooCommerce will charge this fee no matter whether the customer is buying a subscription or signing up for a free trial. With that in mind, we don’t recommend adding a sign-up fee to products that have a free trial subscription.
With that done, you can specify how long the free trial will last by opening the dropdown that shows ‘days’ by default, and then choosing an option from the list.
After that, just type in how many days, weeks, months, or years the free trial should last. Note that the free trial can’t last longer than 90 days, 52 weeks, 24 months, or 5 years.
You can now make any other changes to the product. When you’re happy with how the product and subscription are set up, either click on ‘Update’ or ‘Publish’ to make the trial live.
You can now create free trial subscriptions for other products, by following the same process described above.
Once you’ve added one or more subscriptions to your WooCommerce website, you’ll want to get as many signups as possible. With that in mind, you should allow visitors to use their preferred payment method.
By adding the free Stripe Payment Gateway for WooCommerce plugin to your website, you can collect payments through Visa, MasterCard, Google Pay, Apple Pay, and more.
Simply install the plugin and the onboarding wizard will guide you through the process of adding more payment methods and enabling express checkout.
Method 4. WP Simple Pay (Free Trial For Custom Services)
Many freelancers, consultants, trainers, and other business owners sell their services as a subscription. For example, if you run a yoga studio then you might offer a one month free trial of your personalized training program.
The best way to offer a free trial for custom services is by using WP Simple Pay. It’s the best Stripe payment plugin for WordPress and lets you accept payments, manage invoices, and offer free trials without having to set up a shopping cart, or add products to an online store.
Note: There is a free version of WP Simple Pay that allows you to accept credit cards, Apple Pay, iDEAL, and other payment methods. However, in this guide we’ll be using the premium plugin as it allows you to offer free trials.
Set Up the WP Simple Pay Plugin
First, you’ll need to install and activate the WP Simple Pay plugin. If you need help, then please see our guide on how to install a WordPress plugin.
Upon activation, the plugin will automatically launch the setup wizard. Go ahead and click the ‘Let’s Get Started’ button.
With that done, click the ‘Activate and Continue’ button.
Connect WordPress to Your Stripe Account
In the next step, you’ll need to connect your Stripe account to WP Simple Pay. Stripe is a popular payment gateway, and it’s the easiest way to accept credit card payments in WordPress, so it’s a great way to sell custom services online.
To get started, simply click the ‘Connect with Stripe’ button. You can then either log into your Stripe account, or create a new account if you haven’t already registered with Stripe.
After connecting WP Simple Pay with Stripe, the setup wizard will ask you to configure its emails. You can choose whether to receive emails for payment receipts, upcoming invoices, and payment notifications.
You’ll also need to enter the email address where WP Simple Pay will send the messages.
Simply click the ‘Save and Continue’ button when you’re done.
Create a Subscription Form With a Free Trial
Now, you’re ready to create a subscription form that offers a free trial. Go ahead and click on the ‘Create a Payment Form’ button.
To offer a free trial, hover over the ‘Recurring Services with Trial Period Form’ template. When it appears, click on the ‘Use Template’ button.
This will take you to the payment form editor.
To start, you can rename the form and type in an optional description. By default, the description is ‘Try our service free for 30 days,’ but you can change this to anything you want.
By default, WP Simple Pay will create an on-site payment form. However, you may want to show a payment button instead. When the visitor clicks the button, they’ll see the payment form in a popup.
To create a popup, check the box next to ‘Open in an overlay modal’ box.
Another option is to host the payment form on Stripe’s site, by opening the ‘Type’ dropdown.
Here, select ‘Off-site Stripe Checkout form.’
When a customer buys a subscription, WP Simple Pay will redirect them to its built-in Payment Success Page. If you want to send visitors to a different page, then select either ‘Specific Page’ or ‘Redirect URL.’
You can then either type in the URL or select the page you want to use instead. For example, you might send subscribers to a custom thank you page, or a page where they can manage their free trial.
Add a Price to Your Subscription Form
When you’re ready, select the Payment tab.
Here you can set the payment mode to either live or testing. Testing mode allows you to complete the purchasing process without getting charged, so it’s perfect for testing new subscriptions on your website.
If you do select ‘Test Mode,’ then remember to come back to this page and change the mode to ‘Live’ when you’re finished testing.
Next, you can set the price of your subscription and the currency using the ‘Amount’ settings.
With that done, you can choose how often WP Simple Pay should charge subscribers.
Simply open the ‘Billing Period’ dropdown and choose day, week, month, or year. Then, type a number into the field next to the dropdown menu.
By default, WP Simple Pay offers customers a 30 day free trial.
If you want to make the free trial longer or shorter, then simply type a number into the ‘Free Trial’ field.
Sometimes, you may want to charge subscribers a set up fee. For example, if you’re a life coach then this extra fee may cover the time and effort required to add new clients to your admin system.
To charge an additional fee, simply type an amount into the ‘Setup Fee’ field.
With that done, scroll to the ‘Payment Methods’ section.
Here, you can check the box next to any additional payment methods you want to offer, such as Klarna payments or ACH payments.
By offering visitors a choice of payment methods, you may be able to get more subscribers. However, try not to offer too many options, as this can become confusing.
Depending on the payment methods you select, you may see a ‘Configure’ link. In this case, click on ‘Configure’ and then follow the onscreen instructions to set up the payment gateway or method.
Customize the WP Simple Pay Subscription Form
With that done, you’re ready to build the subscription form.
Simply click on ‘Form Fields’ to open WP Simple Pay’s form builder.
The template already collects some basic information about the customer, such as their email address and credit card information.
The following image shows how the default form will look on WordPress.
To customize any of the default fields, simply click select it.
The section will expand to show all the settings you can customize, such as changing the field’s label or adding some placeholder text.
You can also remove fields from the subscription form.
Simply click to expand the field, and then select ‘Remove.’
Do you need to collect more information from your new subscribers? For example, you might need their tax ID or phone number.
Just click on the ‘Form Fields’ dropdown and then choose a field from the list. After that, click on ‘Add Field.’
Finally, you can change the order the fields appear in your form using drag and drop.
As you’re customizing the form, you can click on ‘Preview’ to see how it will look on your blog or website.
When you’re happy with the form, click ‘Publish’ to store your settings.
Add the Subscription Form to Your WordPress Website
Now, you’re ready to add the form to your WordPress blog using either a block or shortcode.
The easiest method is to use a block, so open the page or post where you want to show the subscription form.
Then, click on the plus (+) sign and type in ‘WP Simple Pay.’
When the right block appears, click to add it to the page or post.
With that done, open the dropdown menu in the WP Simple Pay block, and choose the form you want to display.
When you’re finished, click on either ‘Update’ or ‘Publish.’
Now, if you visit your website you’ll see the subscription form live.
Another option is to add the subscription form using shortcode. To get the shortcode, head over to WP Simple Pay » Payment Forms in the WordPress dashboard.
Here, just find the subscription form and click on its ‘Copy Shortcode’ button.
Now you just need to paste the shortcode into any page, post, or widget-ready area. For step-by-step instructions on how to place the shortcode, please see our guide on how to add a shortcode in WordPress.
Gumroad is an online marketplace where users can sell digital goods. From games to music to courses and videos, Gumroad used to be a good eCommerce platform for creators. However, many users are looking to switch from Gumroad to WordPress because they have raised their fees to 10% for each transaction.
In this article, we’ll show you how to easily switch from Gumroad to WordPress, so you can grow your online business without the Gumroad tax.
Why Do You Need to Switch From Gumroad to WordPress?
However, they now charge a 10% flat fee on each sale. This 10% does not include credit card processing or PayPal fees.
Plus, an additional 10% fee is charged if a product is sold through the ‘Gumroad Discover’ feature, or their ‘Global Affiliates’ program. That’s a lot of fees.
On the other hand, WordPress is free and doesn’t charge you any fee for the items you sell.
Unlike Gumroad, WordPress gives you the freedom to sell anything online, including physical versions of your digital goods. Plus, you can use any payment gateway you want and promote your website freely.
Important: When we say WordPress, we are talking about WordPress.org aka self-hosted WordPress, and not WordPress.com which is a hosting platform. For more details, please see our article on the difference between WordPress.com vs. WordPress.org.
That being said, here is a quick overview of the things we’ll cover to switch from Gumroad to WordPress.
If for some reason, you don’t want to use SiteGround, then you can also install WordPress on other hosting companies like Bluehost, Hostinger, and WP Engine following a fairly similar process.
Let’s go ahead and walk through how to purchase your domain, web hosting, and SSL certificate.
First, you need to visit the SiteGround website and choose a plan by clicking on the Get Plan button.
After that, SiteGround will ask you to enter a domain name for your website.
You can look up a domain name or if you already have one then you can add that as well.
Lastly, you will need to add your account information. You will also be able to purchase some optional extras.
You can always add these extras at a later date if you decide that you need them. If you’re unsure then we recommend skipping this step.
You can now finish the setup by making the payment.
After that, you will get an email from SiteGround with a link to log in to your hosting account control panel.
From here, switch to the websites tab and click on the WordPress Admin button next to your website.
This will take you to the WordPress admin area of your website where you’ll notice Easy Digital Downloads pre-installed on your website.
Step 2. Setting up Your WordPress Website
By default, WordPress does not come with eCommerce shopping cart functionality.
If you followed our advice and signed up with SiteGround, then your WordPress site will now have Easy Digital Downloads installed which provides all the Gumroad features you’ll need to sell digital goods.
On the other hand, if you are using some other WordPress hosting provider, then you’ll need to install Easy Digital Downloads first.
Note: For the sake of this tutorial, we are using the free version of Easy Digital Downloads. There is also a premium version that comes with additional features and priority support.
Upon activation, you need to visit Downloads » Settings page in your WordPress admin area to set up your store.
First, you need to provide a business name and type.
After that, enter your business address and country. This information is used for calculating taxes.
Finally, click on the ‘Save changes’ button to store your settings.
Next, you need to switch to the ‘Currency’ tab and select the default currency you want to use on your store.
Don’t forget to Save your changes to store your settings.
Step 3. Setting up Payment Gateway
In order to accept payments online, you’ll need to set up a payment gateway provider.
Easy Digital Downloads supports PayPal, Stripe, and Amazon payment gateways by default. You can also add support for additional payment gateways using add-ons.
To set up payments, simply switch to the Payments tab under the plugin settings.
From here, you need to select the payment services you want to use. You can choose more than one payment service if you want.
We recommend using Stripe since it lets you accept credit cards from anywhere in the world.
After that, select a default payment gateway and check the payment method icons you want to display on checkout.
Finally, click on the Save changes button to store your changes.
After that, you need to click on the individual payment gateway tabs to configure them.
For instance, clicking on Paypal will show you a button to connect your PayPal account.
Similarly, you can switch to the Stripe tab and click on the ‘Connect with Stripe’ button to set it up.
Step 4. Importing Gumroad Products in WordPress
The next step is to import the products from Gumroad to Easy Digital Downloads in WordPress.
Unfortunately, Gumroad does not provide an easy way to export your product data in a WordPress-compatible format.
You’ll need to manually move your products from your Gumroad account to Easy Digital Downloads.
To create your first digital product, go to the Downloads page and click on the ‘Add New’ button at the top.
You can now type a name for your product into the ‘Enter download name here’ field. Below that you can provide details of your item.
Feel free to use images, videos, emojis, and text to write a compelling description. You can also just copy and paste the description from your Gumroad product.
You can also organize your downloads into categories and tags. This helps users browse and discover product downloads that interest them.
You also need to provide a download image, this will be the main featured image for your download and will be displayed in different locations on your website.
Feel free to use the image you used for your Gumroad product.
Below the editor, you will find the Download options. First, you can set the download price.
After that, you can choose the download type. EDD supports both single downloads and bundles as download types.
Below that, you can provide the download file name and then click on the Link button in the File URL field to upload your download file.
If you need to add more files to a bundled product then click on the ‘Add New File’ button to add them.
Finally, you can provide any optional download instructions or notes. These will be displayed on the purchase receipt and some plugins and themes may also use these instructions.
Once you are finished, simply click on the ‘Publish’ button at the top right corner of the screen to publish your download.
This will make your download publicly available for purchase.
Once published, you can click on the ‘View Download’ button to see your download product in action.
Here is how it looks on our test site.
Repeat the process to move all your products from Gumroad to your WordPress website.
Step 5. Moving Subscription Products From Gumroad to WordPress
Some users sold subscription-based downloads on Gumroad. Basically, customers purchased a membership plan to access downloads.
EDD offers recurring digital subscriptions as part of their Pro plugin which you can purchase from their website.
Alternatively, if you’re selling memberships or online courses, then the easiest way to sell these products is by using MemberPress. It is the best WordPress membership plugin on the market.
For more details, follow our guide on how to make a membership website with step-by-step instructions.
Step 6. Choose and Customize Your WordPress Theme
Themes are the design templates for your WordPress website. They control how your website looks to the users.
There are thousands of free and paid WordPress themes that you can use on your website. However, this abundance can be a bit overwhelming for beginners.
Once you’ve chosen a theme, you can see our beginner’s guide on how to install a WordPress theme to get it live on your website.
Each WordPress theme comes with a bunch of options that allow you to customize it to your own needs. You can change colors and layout, as well as add your own images and logo.
SeedProd is the best WordPress page builder on the market.
It also allows you to easily create any type of landing page, product page, and custom login page using a drag-and-drop interface.
Step 7. Customize Easy Digital Download Emails
Just like Gumroad, Easy Digital Downloads also relies on emails to send users to purchase receipts, account information, and download instructions.
However, since you are now selling on your own platform, you may want to use your own branding with those emails.
Simply go to the Downloads » Settings page and switch to the ‘Emails’ tab.
From here, you can provide a logo to be used in your emails.
Below that, you can add a name that will be used as the sender’s name. You can also provide an email address to send the email from.
We recommend using a business email address because it looks more professional. Your hosting provider can also offer a free business email address that you can use.
Lastly, you will need WP Mail SMTP plugin to configure your emails. It ensures that all your emails reach users’ inboxes and not end up in spam.
PushEngage – is the best push notification software, which allows you to send personalized notifications to users. You can announce new downloads, sale events, or special offers.
AffiliateWP – Run your own affiliate program and partner with marketers to help you sell more downloads with affiliate marketing.
We hope this article helped you learn how to easily switch from Gumroad to WordPress. You may also want to see our article on growing your business on a shoestring budget or take a look at our ultimate WordPress SEO guide.
If you liked this article, then please subscribe to our YouTube Channel for WordPress video tutorials. You can also find us on Twitter and Facebook.
In a personal farewell to the WordPress community, Sandhills Development founder Pippin Williamson confesses he lost his passion for WordPress and the web:
In the last few years I discovered a truth about myself: I had lost my passion for the web and building software products. I used to absolutely adore WordPress and building plugins to extend it and power businesses. That passion helped create amazing platforms that have helped tens of thousands of businesses grow, succeed, and thrive on the web, and I am so immensely proud of that. But when the passion is gone, the drive and motivation to build great things leaks away as well. It has been several years since I last felt truly inspired and motivated to build something with WordPress.
Sandhills Development has created an iconic and beloved suite of products with more than 100,000 users. Its Payouts Service paid out over a million dollars to affiliates in May and is on track to pass $2M this year. The service has more than 6,500 individuals and businesses registered and able to receive deposits and more than 1,350 businesses setup to pay their affiliates.
The financial details of the deal were not disclosed but Williamson has always been transparent about Sandhills’ financials. In last year’s summary he disclosed that the company brought in $4,331,814.12 in revenue from plugin sales, affiliate agreements, services, real estate, and payout processing, with a net profit of $232,201 after heavily investing in new projects and payroll increases.
Many of Awesome Motive’s products use EDD, so the company has a vested interest in the product’s future, alongside others in the WordPress ecosystem who depend on it. Williamson explained in his announcement why he selected Awesome Motive as the new home for his products:
Awesome Motive has been an innovator in WordPress for more than a decade and during that time they have built infrastructures, processes, and a level of polish rarely seen in the WordPress industry. The learnings and strategies that have made Awesome Motive so successful will be applied to the whole suite of Sandhills products, making the products better than ever before and at a pace previously unseen by our customers.
Despite Williamson’s professed confidence in Awesome Motive, multiple sources inside Sandhills Development expressed reservations about the deal. The company was called to an all-hands meeting where employees were given the option to jump ship or continue on with Awesome Motive.
“Well the thing that made this the most frustrating was that there was little room for discussion, or choice,” one source said. “We were given a very short heads-up (2 weeks), and no opportunity to discuss employment terms. Basically it was ‘in two weeks, you’re working for Awesome Motive, or you are out of a job.'”
Awesome Motive currently employees more than 200 people across 36 countries. For years, the company has been known for its aggressive sales tactics and upsells in the WordPress admin. These concerns, along with the change in culture from Sandhills, gave some employees reason to pause when considering the change.
“Given AM’s questionable business practices, such as using screen recorders on many employees’ laptops, trigger happy firing tendencies, and incredibly aggressive non-competes, it felt like we were being coerced to work for a company that was so, so far from the fundamental values that brought us to Sandhills in the first place,” one source within the company said. Despite this criticism, the same source said they believe “every product acquired will become considerably better,” with Awesome Motive’s investment.
“Going into the meeting with Syed, I’d describe the prevailing sentiment as cautiously optimistic,” Sandhills’ former Director of Operations Kyle Maurer said. “Obviously none of us were involved in this decision; that was Pippin only. We didn’t ask for this and didn’t know what to expect. But our many questions have been answered and at this point everyone is wholly on board. Syed’s excitement and enthusiasm are infectious and, along with his team, he’s done a tremendous job welcoming and accommodating us. It feels like new energy has been injected into the organization and I’m personally very optimistic about the future.”
Awesome Motive Founder and CEO Syed Balkhi confirmed that in the past the company has used time tracking software on its employees but “shifted away from doing so as the vast majority of our employees are on full-time salary now.”
“Many people may think of AM as one large company, but I always see us as a collection of over a dozen small companies,” Balkhi said. “Each product team operates independently and will continue to do so.”
Balkhi confirmed that no pricing changes are planned for the products. He said Awesome Motive also plans to share several internal tools the company has built for EDD to help scale the business.
Acquisitions are ramping up in the WordPress space, with major players like Automattic and hosting companies scooping up smaller businesses and plugins to create a suite of products tailored to their users. Some question whether this is a healthy part of a maturing ecosystem or a trend that may stifle the unique range of diverse, smaller products that have always been available to WordPress users.
“I know that our goal is to help small businesses grow and compete with the big guys, and our growth is a result of us living true to our mission,” Balkhi said. “We never set out to become investors.
“As you can see the products that join AM — the founders have been around for a long time and they know of us already. Founders choose to join us because we are an independent bootstrapped business not some big PE /venture-backed corporation.”
Matt Medeiros, director at Castos and creator of the Matt Report business podcast, commented on how the deal reveals the current lifecycle of WordPress companies.
“It’s quite obvious that we’re in the buying season for WordPress product companies,” Medeiros said. “If you’re a company that has built a substantial business, with a solid product, strike while the ‘buying iron’ is hot! WP products reach a certain plateau point where they have to expand wider, creating a platform of their own. When you look up at Jetpack, Elementor, AwesomeMotive, Liquid Web you have to do some serious soul searching if that’s who you want to compete against. It doesn’t take 2x the effort, it takes 50x.”
In the end, it’s the users who unwittingly drive the success of these products through their responses to the engineering, support, and marketing. Awesome Motive is retaining much of the same team behind the Sandhills products but has its own packaging, vision, and leadership that will inevitably bring changes for users down the road.
“I think users can expect to remain supported and still have a great product, but should certainly expect to be part of a bigger platform or suite of services,” Medeiros said. “Ultimately, it probably means price changes, but in reality, WP solutions have been too cheap for a while. Folks like Syed at AwesomeMotive will be able to offer end-to-end solutions for WordPress site owners, particularly small businesses. While hosting companies like Liquid Web will give you a turnkey solutions _per site_ for non-profits, e-commerce, and now online educators. Ultimately, I think we will hear less about ‘WordPress the software’ and more about the complete solution + experience companies are delivering with WordPress at its core.”
Choosing the right eCommerce platform for selling WordPress plugins and themes can be a difficult decision. There are quite a few platforms available for WordPress businesses to sell their products, and each one has different features that can have a big impact on conversion rates and your bottom line. Making the right decision requires a fair amount of research and comparison of the different platforms available.
On December 14, 2016, my team and I pushed a significant change to our Easy Digital Downloads products: we increased the price on all extensions by 50-250%. Yes, you read that right: up to a 250% price increase on certain plugins. This change was done for a number of reasons, which I will get into shortly, and has resulted in a very interesting last three months. Since I have always been very open with my company’s financials, I would like to now share some reflections on the change that we made and to also share some of the aftermath of the change.
The backstory
Since the beginning of Easy Digital Downloads, and I imagine many products, customer support has always been our biggest challenge. Taking care of customers is hands down the most difficult job in the company. It is ripe with challenging problems to solve, long hours, relentless flows of new tickets, on-going conversations that spread not only over days but even weeks and months. Providing good and, when possible, great customer support is, to put it simply, exhausting.
There have been many times over the last 5-7 years where I thought to myself I’m sick of this; I just can’t keep taking care of these people, maybe I should quit. I have had those thoughts and every member of my team has had those thoughts. On one particular evening back in November, I was sitting on my couch doing my best to work through a not-abnormally sized support queue, and it hit me: this has to stop. This wasn’t the first time I (and many other members of the team) had spent insane hours working through support queues, nor was it the 50th time. Working late to help finish support requests is an every single day occurrence. It literally never stops. This time, however, I had had enough (fifty times too many) and decided it was finally time to take drastic measures to reduce support. I hopped into our Slack channel and told my team this and within a few minutes we’d made a decision: it was time to increase prices. It was past time, actually, but late is always better than never.
When a company is faced with an over burdensome support load, there are a number of ways that most companies look to address it:
Fix the bugs that cause problems to happen that then result in support tickets
Improve UX so customers better understand how to achieve certain results
Write more and better documentation
Hire more support team members
Move team members from non-support roles to support roles
Outsource support
Release fewer updates
Release more updates
Remove problematic features / products
All of these methods are 100% viable and our team has implemented all of them. There is, however, another method that people tend to gloss over or ignore, and it is perhaps one of the most effective of them all.
To lower your support load, all you need to do is have fewer customers.
It may seem like the opposite of what most companies want, after all customers are the people that make it possible for companies to pay their bills and their team members. Without customers, companies cease to exist.
The real answer to lowering support burdens is to have fewer but more valuable customers.
On that evening in November, my team and I decided it was time to try and drastically reduce our support burdens by dramatically raising prices, thus reducing the number of customers while simultaneously increasing the average value of customers. Theoretically this would allow us to keep our revenue about the same (which was just barely covering our monthly expenses) or, if all goes well, raise our revenue and lower the total number of support tickets we received each month.
That was the hope anyway.
The change
We threw a lot of numbers back and forth while discussing the possible changes we’d make to pricing. In the end we had several goals:
Raise the average customer value
Lower the number of customers, thus lowering the number of support requests
Keep overall revenue steady or raise it
Due to the sheer number of plugins sold through easydigitaldownloads.com, there were a lot of different price points. We sold plugins as low as $6 and as high as $149. Our primary plugins were priced at $29, $49, and $82, and just one was priced at $149.
As a general rule, we came up with the following guidelines on picking new plugin prices:
Plugins that power fundamental aspects of a store, such as licensing, multi-vendor marketplaces, subscriptions, etc, would be priced at the top tier of $199. These were previously priced between $82 and $149.
Plugins that are priced at $49 (mostly payment gateways) would be increased to $89.
Plugins priced at $29 (email marketing plugins and some other miscellaneous plugins) would be increased to $49.
Plugins priced between $12 and $19 would be increased to $29. This was determined to be the lowest price point we’d offer.
In some cases, this resulted in plugins having $10 added to their price tag, and in others the increase was as much as $117.
The results
There are a number of statistics we can look at to help gauge the effectiveness of our price increase and we’ll go over those shortly, but there’s a non-scientific metric I want to look at first.
Team happiness and morale.
I do not need a psychology degree to tell you that the price increase has significantly affected the happiness and day-to-day mood of the team. For more than 12 months, our team has been faced with the problem that is Easy Digital Downloads. Yes, I mean that: the problem that is Easy Digital Downloads. You see, EDD is seen around the WordPress community as this great plugin that is wildly successful and a model to look up to in the commercial plugin ecosystem. While this is a reputation that we take great pride in, the honest truth of the matter is our team has struggled with EDD for months because in many ways it has felt like a sinking ship. We’ve seen stagnated revenue growth (even declines), higher-than-ever maintenance costs, relentless support queues, and a whole series of other challenges that our other two primary projects (RCP and AffWP) simply do not have. In comparison to EDD, those projects are cake walks.
The price increase has been enormously successful in making the team feel good, and the importance of that should never be ignored.
Support tickets
One of the primary results we needed to see in order for this change to be successful was a significant decrease in support tickets. It has now been three months since the price increase, so how’ve we done?
New tickets submitted: down 0.2%
Total tickets handled: down 43%
Total customers interacted with: down 35%
Conversations per day: down 42%
The total number of tickets submitted barely changed, but the other three statistics are incredibly significant. A 42% decrease in the number of tickets handled each day. That means EDD handled 10-15 fewer tickets every day, which translates to a considerable less amount of time spent working on tickets for our team. We have an average handling time of 5 min and 49 seconds per ticket, meaning we have removed one to one-and-a-half hours of support work per day by increasing prices.
Assume, for a moment, that we pay $25 per hour for support technicians. Removing 1.5 hours per day equates to approximately $37.50 in savings each day, or, when extrapolated out, approximately $13,687 per year in reduced support costs (if assuming zero volume change).
Revenue and sales
Along with a decrease in support burdens, we hoped the price increase would also provide a much needed boost to our monthly revenue. As mentioned in my 2016 in review post, Easy Digital Downloads operated at a loss for much of 2016, so increasing our revenue was an important measure on the success of the price increase. If we managed to decrease support and increase revenue, we’d consider it a home run.
To gauge the effect the price increase had on revenue, I decided to compare three different time periods:
January to February, 2016
August to September, 2016
January to February, 2017
These time periods are good representatives of our average revenue as they do not include any special promotional sale periods and they allow us to compare similar periods from before and after the price adjustments.
The summaries below provide a good overview of the revenue statistics for each of the time periods used for this comparison.
January to February, 2016:
Sales (including free): 3,861
Refunds processed: 106 – $8,765.40
NET revenue: $100,530.39
Average order value: $28.31
New paying customers: 664
Average value for new paying customers: $131.30
August to September, 2016:
Sales (including free): 3,930
Refunds processed: 74 – $4,454.95
NET revenue: $100,262.55
Average order value: $26.65
New paying customers: 565
Average value for new paying customers: $116.57
January to February, 2017:
Sales (including free): 3,009
Refunds processed: 65 – $7,530
NET revenue: $114,376.70
Average order value: $40.57
New paying customers: 373
Average value for new paying customers: $154.95
There are a few primary changes I’d like to highlight here. First, notice that the NET revenue increased by ~$14,000 in 2017 compared to the two 2016 time periods. With that NET increase, however, the total sale count decreased significantly, by more than 800 in fact. This also resulted in our average order value increasing from $28.31-26.65 to $40.57.
The total amounts refunded also possibly suggest that higher value customers are less likely to request a refund, perhaps because they do more ample research before committing than lower value customers.
This change also caused our average customer value (for brand new customers) to jump up to $154.95 from $131.30 and $116.57.
We are only part of the way through March, but the numbers are already looking even better than January and February. This is partly due to the promotional sale we ran for the end of winter, 2017. We shall see if the remainder of March and April hold up with the trend so far.
The price change has also had an interesting effect on commissions amounts that we pay to 3rd party vendors. In 2016, we paid an average of $16,000 per month to 3rd party extension authors. For February and January, this average has dropped to a little over $12,000 per month. While this is not an overly positive change for most extension vendors, it is a change that we see as an overall positive change for our company. This change primarily happened because of a decrease in the total sales, though it is also due in part to us reducing the number of 3rd party products we sell through the site. We have repeatedly learned just how difficult running a multi-vendor marketplace is and, as a company, we’ve determined that is not something included in our long term goals so we have continually worked to reduce the number of 3rd party vendors we directly work with. I hope to share more on various changes we’ve made over the years that have affected vendor commissions soon.
When combining the increase in revenue with the decrease in support burdens, this price change has so far appeared to be incredibly positive for us. It is a single move that might just be one of the most important changes we have ever made.
Customer response
Gauging the success of a price change based on customer reactions provides some really interesting insights. Using customer satisfaction as a metric, however, is something you must be careful with. In much the same way that star ratings tend to highlight the most unhappy and, oftentimes, unreasonable customers, the customer reactions to price changes typically show those customers that are the most unhappy. It’s unfortunately rare to hear from the happy customers or those that support your price change.
Within hours of pushing the price change live, we received our first reaction from a customer that who been considering a purchase during the time we were updating the prices:
Can you please confirm what is going on? How price jumped to the sky in a matter of seconds, I’m client of you and want to include multi-vendor option, it is even an effort to invest those 91 USD.
That reaction is fully reasonable, especially if he’d already added the items to the cart (our system could not account for already-in-cart items).
The second reaction we received:
Did the price of the Recurring Payments plugin really increase from $83.00 to $199.00 since January?? This was an unpleasant surprise. :/
Technically this was true, though with a brief explanation from Sean, her reaction completely turned around:
Awesome. Thanks for the explanation. I’ll look forward to exploring the features.
This customer did end up completing her purchase and has not contacted us since.
So within a few hours, we’d had two negative reactions but one of them turned into a positive experience for both parties. Over the next few weeks, we continued to receive emails from customers reacting to the price change. Many customers, interestingly, asked if the price increase was some kind of error.
Is there an error on your website or did your price in the last week just over double in cost? I was looking at making a purchase when I just did a refresh and saw the huge price increase.
We knew we’d get a decent amount of flack for our price increase, especially as we chose not to alert customers (new or old) of the price increase before it happened. Whether this was the right choice or not, it was one we made intentionally. We felt there was a good chance that publicly mentioning our price increase before it happened would simply provide a place for people to pile negativity on us, and it would create a permanent record of that negativity for others to stumble upon. Doing it silently was like ripping the bandaid off in one fell swoop. It’s done, it hurts, but then it’s forgotten a short time later.
I still don’t know if doing it silently was the right choice, but there were numerous customers that were irate because of that particular decision. One person’s response was perhaps the most difficult to stomach. They started out perfectly reasonably:
I am in the process of renewing my plugin licenses again, everything looks good but I noticed that you’re now charging $199.00 (139.30 discounted) for Software Licensing? What is up with that?
I paid like $42 last year and certainly can’t afford to shell out $140 or more every year for a plugin. Not to mention the additional $40 every year for the other EDD plugins I’m using…
Please, tell me that a 200% price increase is some kind of mistake..
To that I gave a calm, collected, though perhaps too generic response, which really did not go over well, as can be seen by his reply:
Wow, so calm and collected.
Well, regardless of what YOU think about it:
1) It’s a 350% price increase (!!!)
2) It’s called gouging the customer
3) It’s called betraying all those people who got on board for 350% less, thinking that, even if the price increases, it will remain an affordable deal despite the annual renewals
4) You should grandfather existing customers at the original price instead of screwing them over
5) I expected much more from you, Pippin.
6) Maybe it’s time to create a similar competing plugin, sounds like it’s a very lucrative market, and would be much less expensive than getting screwed for a 350% price jack.
7) You won’t get away with it
8) It was a horrible decision
9) Even if I do renew this year, I’ll be looking for a complete replacement of the very overpriced EDD plugin suite that I have to keep paying for, over and over and over and over again.
10) Raising prices by 5%, 10%, or even 25% is reasonable. 350% is just greedy.
11) Do your current customers get 350% more value? Nope. They get the same old thing, only YOU benefit.
12) This list will be the outline of my next blog post
13) A textbook example of a bad move, how not to raise prices, and how to screw over your customers.
Seriously unbelievable move. I was all on board with you guys. Not anymore.
350% price jack = unbelievable gouging of your “valued” customers.
I could go on and on, but I’ll save it for the post.
I have had a fair share of people throw derogatory remarks my way, but this one was a bit different. This felt incredibly personal because it came from a person I’ve respected and looked up to for a long time. In fact, this response came from one of the very first people I looked up to in the WordPress community. Having them express their extreme displeasure at my decision to raise prices and method with which we chose to implement the change was painful.
It should be noted that we did grand father in all customers that had an active subscription (one that automatically renews). The only affected customers were those with manual renewals and new customers.
When you get these kind of reactions, it’s important to keep a fact in mind: companies do not need to justify their prices.
Perhaps the most telling thing from all of the reactions we received was just how horribly undervalued Easy Digital Downloads (and similar platforms) are in many customers’ minds. Here we had a customer that was seriously unhappy about paying $140 per year for plugins that provided the functionality they needed to operate their own store. Previously this customer had paid just $42 per year to run their store with EDD.
I’ve had friends, colleagues, and advisors tell me our prices have been too low for years, and I couldn’t agree more. It is absolutely crazy that we’re more accustomed as a society to pay $5 for a latte from Starbucks, which we will consume in a matter of minutes, than we are to pay $12-$20 per month for platforms that allow us to operate our businesses. We are accustomed to paying $80-$100 per year for subscriptions to Netflix and Hulu but we react with revulsion and disgust when a company asks for $150 per year to provide software that businesses literally rely on to bring in their own revenue. In the United States (where the customer above lives), we’re used to paying $50-$100 per month for cable TV subscriptions, but we expect software to be provided for so much less.
As a world, we are better at paying for things that rot (figuratively and literally) our insides than we are paying for things that help us provide for the health and wellbeing of our families and employees.
This disparity in pricing expectations is asinine. Unfortunately, huge companies like Apple and Google have perhaps single handedly helped to create this through the rock-bottom prices of their respective app stores. Between the 1980s and early 2000s, it was common for video games, which take hundreds of hours to create, to cost $40-$50. This price was normal and expected. Once the app stores rolled around, however, expected prices dropped so low that companies now get practically eviscerated if they try and charge just $10 for a full length game in the Android or iOS app stores.
With a £7.99 price tag, Super Mario Run certainly isn’t cheap, but it’s easily one of the best smartphone games around.
Isn’t cheap? Seriously? It’s roughly the cost of just two lattes or one-three pints from many pubs, both of which are gone within a matter of minutes.
It’s high past time software providers charge appropriately based on the value they provide. If we cannot even ask for a decent price, how can we possibly continue to build platforms that power the web and the world around us?
My final reply to the angry customer was lengthy and has served as a good sounding board as I worked through this reflection post. I ended with:
Perhaps our definition of “appropriate” is different, but the last time I checked, EDD provides me (with the ability to run my stores) far more value than any monthly TV subscription or coffee service. Would I pay $500-$1500 per year to operate the stores that provide for my family and employees?
Absolutely.
Perhaps it was my explanation of why we chose to increase prices so severely or perhaps it was the price disparities provided that convinced this customer, but they did end up sticking with us.
Thanks Pippin.
This makes sense, I understand where you are coming from.
I went ahead and upgraded. The renewal discount always is appreciated.
Thanks for the great response. Enjoyed it.
Going forward
At this point, we are very happy with how the price change has worked out for us and Easy Digital Downloads. We were happy enough, in fact, that we decided to implement a similar price increase on Restrict Content Pro and AffiliateWP, which went live on March 1, 2017, just a few weeks ago. We did end up making some adjustments to how we rolled out those price changes and so far the changes appear to have worked well. It is too early to tell just how effective they will be, but we are confident that it will prove to have been the right choice in 3-6 months.
Do you have thoughts or reactions? I’d love to engage with you in the comments.