Restoring the MS SQL Server Database in Easy Steps

Restoring an MS SQL Server database involves using tools like SQL Server Management Studio (SSMS) or Transact-SQL (T-SQL) commands. This process is crucial for various reasons, such as disaster recovery, testing, migration, and maintaining data integrity. It typically includes steps like connecting to the server, selecting the source backup file, specifying the destination database, setting options, and monitoring the restoration process. Careful execution and regular backups are essential for successful database restoration, ensuring data reliability and system stability.

Why Restore Microsoft SQL Server Database?

Restoring a SQL Server database can be necessary for various reasons:

How to Secure Your Website in 10 Easy Steps

A website for your business is essential for reaching a wider audience and establishing a solid online presence. However, security should be a top priority when creating a website to protect your business and customers from cyber threats. 

Securing a website is crucial in today's digital landscape, as it protects the website and its users from various threats such as hacking, data theft, and malware infections. This article will outline easy steps for creating and securing your website.

The Basics of Coffee Branding & Design – Coffee Design Ideas Brewed to Perfection

Be honest, have you ever, ever created an amazing design or came up with a great idea and coffee was not involved?

Because, I’ve got to admit… I’ve never had a good idea on a day I didn’t have coffee.

And I might have a little bit of a problem. Recently, I’ve been drinking about 4 cups of coffee a day, and that’s not helping my sleeping habits for sure.

But that’s what gave me this idea.

Today I want to talk to you about coffee branding basics and how to design for your next coffee shop clients or company.

[source]

We’re also going to go over the best examples of coffee branding and graphic design.

So grab your coffee and let’s get into it.

The Basics of Coffee Branding

Coffee is pretty much an essential part of life at this point.

[source]

Almost every single person I know starts their morning off with coffee, then has an afternoon pick-me-up coffee.

And it’s not just my friends who drink that much coffee. It turns out that 75% of all Americans intake their caffeine by drinking coffee.

Besides the fact that it’s just a wonderful beverage with a million and one benefits, from clearer thinking and better ideas, and also helping you stay awake on the days you stayed up absolutely too late, it’s also a drink that brings people together.

[source]

People love to bond and spend time together in coffee shops, people go there to relax, work, have meetings, etc.

On average, a typical American adult will spend about 2 grand a year on buying coffee, and 173 million bags of coffee are consumed worldwide each year.

So this means that now, more than ever, your coffee branding needs to stand out.

When people walk into the grocery store to pick out a bag of coffee beans, their eyes need to be drawn to your design.

But how?

Ask the Right Questions: Assess The Brand’s Values, Strategy, and Style

Before you can hop on any graphic design software and start designing away, you have to stop and think about what your brand’s values are or what your client is expecting from you.

[source]

Here are some questions to ask yourself before designing.

  1. What’s the style or vibe you’re going for?
  2. Is it a more earthy vibe? Will the colors be neutral or do they want them to be crazy eccentric?
  3. What are the values of this coffee company? Are they ethical? How can I express that through my design?
  4. Who is my target audience and what would they look for in a coffee brand?

Once you answer some of these basic questions, you can start designing accordingly.

4 Easy Steps to Creating the Perfect Coffee Brand and Logo

1. Come Up With The Right Branding Strategy

As I said, it all comes down asking the right questions, and when you get your answers, you can start coming up with a strategy.

Pinpointing your audience is key in the first steps of designing. Who are you designing for? An elegant brand that requires minimal color and a fancy typeface, or for a younger, more fun generation, where you have the freedom to do whatever you want? No matter the audience, make sure you design with them in mind and what would make the choose your brand.

The brand name is going to decide a lot for you. The creativity wheels will start spinning when you look at the name. Do a play on words, coincide your design to make sense with the name. You can also get a sense of tone-of-voice from the name of the brand and design accordingly.

Your logo should be something that everyone can recognize and something that sparks joy for your clients and customers. But we’ll talk more about this a little later.

2. Use An Irresistible Color Palette

After doing some research and drawing some conclusions from my own experience in designing for coffee brands, most people love earthy tones when it comes to coffee branding.

So whether you go from a toned-down green, or an earthy brown pallette, make sure everything works together perfectly.

Just because most people choose earthy tones, that doesn’t mean that you have to! You can still go for brighter, more vibrant color palettes, but my recommendation is that you use the more muted versions of the colors you choose. So if you want to use orange and green, for example, just use a more muted version of the colors.

Here are a few of my favorite color combinations when it comes to coffee branding.

3. Check Out Your Competitors

One sure fire way to know if you’re doing well is by checking out your competitors.

Check out the ones who are doing better than you, but also the ones in the same boat.

You want to look at their work and not just be a copy-cat of what their doing, but be inspired by them and ask yourself what you have to offer that is different from them and how you can do better.

4. Keep it Simple

When it comes to your logo, the best thing to do is to keep it simple.

Especially nowadays, when the trend is flat-design and minimalist.

You want people to look at your design, and say, “oh yeah! That’s my favorite coffee brand.”

It shouldn’t be so complex that your customers don’t understand what the heck is going on, but it can also have a bit of a back story that needs to be explained.

A perfect combination of the two is the goal here, but keep it simple!

Our Favorite Coffee Branding Examples

I want to close out this article by inspiring you and showing you some examples of my favorite coffee brand designs.

My favorite places to get inspiration from are Pinterest, Dribbble, Behance, and the places around me.

So if you’re lacking inspiration, I hope this helps!

I hope this article helped you out in one way or another and inspired you to get to designing.

So go ahead, grab your coffee and go make something amazing.

And until next time,

Stay creative, folks!

Read More at The Basics of Coffee Branding & Design – Coffee Design Ideas Brewed to Perfection

How to Host a Website in 5 Easy Steps

Every website needs to be hosted. So if you’re building a new website for the first time, learning how to host it is the only way your site will be published on the web.

The concept of web hosting is pretty straightforward.

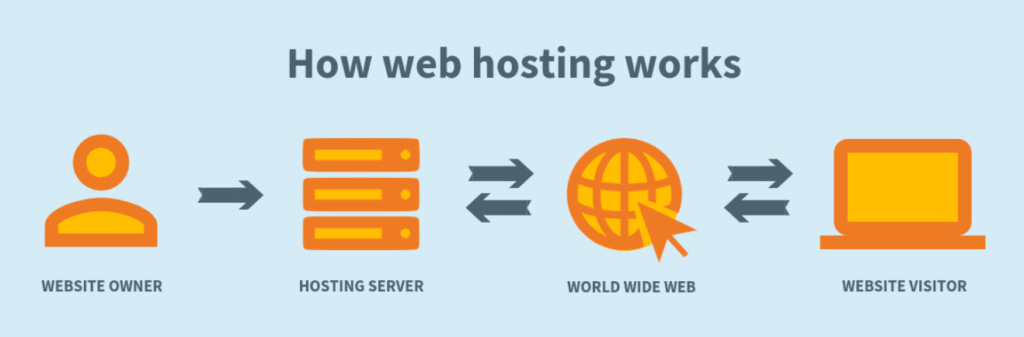
Your website lives on a server. A web hosting provider maintains the server and technology needed to connect your site to the Internet.

When an Internet user wants to visit your website, they simply type your domain or web address into their browser. Their device connects with the server and your pages are delivered to the user.

How Web Hosting Works

Hosting a website isn’t complicated. But you want to make sure you get it right the first time. Otherwise, it can cause you big headaches and problems down the road.

So how do you host a website?

There’s an overwhelming amount of information on the Internet about web hosting. The answer depends on multiple factors, such as your technical experience, type of website, and size of your website.

That was my inspiration for creating this guide. I’ve simplified the web hosting process into just five easy steps.

No matter what type of website you’re creating, you’ll be able to host it with ease if you follow the steps below.

Step #1: Research Web Hosting Providers

Web hosting is just like any other consumer product or service. If you wanted to buy a new car, you wouldn’t just walk up to a dealer and purchase the first one on the lot. You’d research different types of cars, makes, models, and dealerships to help you make an informed decision.

The same concept can be applied to web hosting.

All web hosting providers are not the same. Some are undoubtedly better than others.

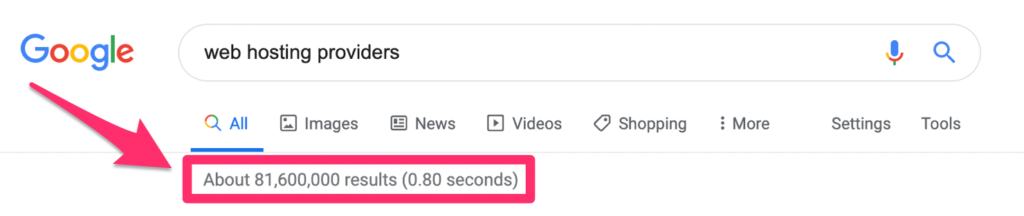
Here’s the thing. There are dozens, if not hundreds of different web hosting providers on the market today. Your research process can help narrow your search. You’ll be able to eliminate certain hosts right away.

There are web hosting providers out there that specialize in speed, while others prioritize customer service. Some providers are best for small business websites and others are best for agencies or enterprises.

So where should you start your research?

Don’t just blindly start clicking through different web hosts on Google. That’s way too time-consuming and it won’t be very productive. Plus, you won’t know what to look for to see if the company is legit or not.

Web Hosting Providers

Nobody is going to search through all of those results. Instead, I’d recommend finding a third-party guide of reviews.

As an expert in web hosting, I’ve written one of these guides myself. After personally checking the features and performance of nearly every web host in existence, I was able to narrow down the top options. So check out my list of the best web hosting providers.

You don’t need to pick a provider just yet. But the research process will guide you in the right direction as you continue through each step in this guide.

Step #2: Determine Your Budget

This step can be tricky because it involves more than picking a price point. Your budget will also depend on the features you need and the type of hosting that you want (which we’ll get to in the next step).

How much does web hosting cost?

You can find hosting providers that offer plans for less than $1 per month, and other providers offering plans for $2,000 per month.

Having a rough idea of what you’re willing and able to spend will at least help you narrow down your options.

For example, if you’re starting a small personal blog and not expecting tons of traffic, you can get away with paying less than $5 or $10 per month for a cheap web hosting provider. Small business owners and ecommerce sites would likely want to look towards a higher pricing tier.

Web hosting is like any other type of product or service. In most instances, you get what you pay for. So don’t expect to pay $2 per month for the best web hosting experience on the planet.

While price doesn’t automatically equate to quality, it’s usually a good indication of how many additional features and benefits you’ll get with the plan.

If you want dedicated resources, lightning-fast loading speeds, cPanel, freebies, and 24/7 customer support, you can expect to pay a bit more for those hosting services.

Step #3: Choose a Hosting Type

Now that you’ve had a chance to research some providers and get an idea of how much you want to spend, it’s time to determine the type of hosting that’s best for your website.

You have four main options to choose from:

  • Shared hosting
  • VPS hosting
  • Dedicated hosting
  • Cloud hosting

I’ll give you a brief overview of each so you can figure out which one to use.
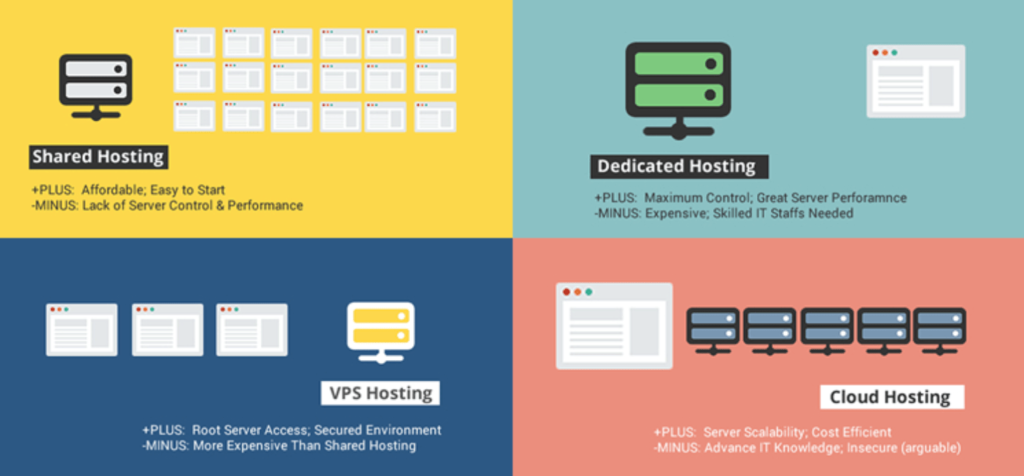
Compare Types of Hosting

Shared Hosting

Shared web hosting is a popular choice for new or entry-level websites. It’s the most affordable type of web hosting and doesn’t require a ton of technical knowledge.

A shared plan is ideal for websites that won’t be getting high volumes of traffic.

As the name implies, your website will be sharing server resources with other sites as well. This can impact the performance of your website. If another site on the same server has a traffic spike, it can cause the server to crash and bring down your website with it.

Take a look at my guide and reviews of the best shared hosting plans if you’re interested in this type of hosting option.

VPS Hosting

VPS stands for virtual private servers. With this type of hosting, you’ll be using a single server that’s been separated into multiple virtual machines.

VPS hosting is a step above shared hosting. Since you won’t be sharing your resources with other websites, it will improve the performance of your site. Expect to have more disk space, bandwidth, higher uptimes, and faster loading speeds with a VPS plan.

This is a great option for websites that will be expecting higher volumes of traffic and need enough resources to accommodate those users. VPS plans give you more control over your server settings as well.

If you’re interested in a virtual private server, check out my reviews of the best VPS providers in the web hosting industry.

Dedicated Hosting

The majority of new websites do not need a dedicated server. This hosting type is reserved for large websites that need enterprise-level hosting capabilities.

With that said, for those of you who are more tech-savvy and want complete control over your server settings and hosting environment, a dedicated server plan is the best way to get that.

A dedicated server gives you the most resources and therefore delivers the highest performance.

The biggest downside of a dedicated server is the price. This is the most expensive type of web hosting, which is another reason why it’s not ideal for new or small websites.

Cloud Hosting

Cloud web hosting is new compared to the other three options. But it’s definitely becoming a popular choice for website owners.

A cloud plan is ideal for websites that are growing and need to scale server resources as their site gets bigger. If your site is going to surpass 50,000 monthly visitors, it’s time for you to consider cloud hosting.

Cloud hosting is a step above shared hosting, yet it’s usually cheaper than a VPS plan.

If you choose this option, your site will be run on multiple cloud servers, which decreases your chances of having unexpected downtimes due to traffic surges or server issues.

I’d recommend a cloud hosting plan to new website owners who plan on growing their site as fast as possible in the coming years. By going with a cloud plan from the beginning, you won’t have to change your hosting type down the road as you outgrow a shared plan. Check out my list of the best cloud hosting companies to help you find the best plan for your needs.

Step #4: Select Your Hosting Plan

Using the information you’ve gathered in the first three steps, it’s time for you to choose a hosting plan.

Find a provider that offers the type of web hosting option you need at a price point that’s within your budget. You’ll likely have at least a couple of choices that fit this description. So here are some other factors that you should keep in mind when you’re evaluating a hosting plan.

Uptime

Uptime is the most important feature in web hosting. If your hosting provider isn’t offering a minimum of 99.9% uptime, then look elsewhere. Most web hosts will offer an uptime guarantee in their plans, and compensate you if they fail to meet that promise.

Resources

You need to make sure that your plan has enough resources to accommodate your website content and traffic.

The first thing to look at is RAM, which is your storage. 4 GB of RAM is enough for an average website. That’s the minimum I would recommend for you.

Next, you’ll have to consider the bandwidth offered in the plan. 120 GB of bandwidth is enough for 2,000 daily page loads of a 4 GB website. So if you are expecting more traffic or plan to have a larger website, you need to get more bandwidth.
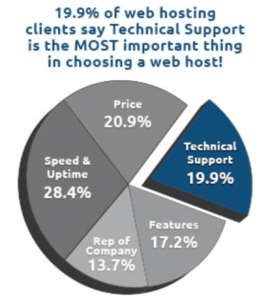
Customer Support

You may not think so right now, but aside from the performance of your hosting plan, customer service should be your next priority. Roughly 20% of web hosting customers agree with this.

Web Hosting Support

In a perfect world, nothing will ever go wrong with your website or servers. But realistically, something is bound to go wrong at some point. That’s just the nature of the web hosting world. It happens to everyone, and your site probably won’t be immune from it.

During a time of trouble, you want to be able to get in contact with your web host immediately. So look for a plan that offers 24/7 support via phone and live chat.

Aside from that, you should also look for providers that have a knowledge base and resource center that will teach you how to do certain tasks on their platform. This type of customer support can really help you get the most out of your web hosting plan.

Renewal Rates

You need to look beyond the introductory rate of your web hosting plan to make sure that it will continue to fit within your budget in the coming years.

It’s common practice in the web hosting industry for providers to heavily discount new contracts, and then increase the fees when it’s time to renew. Normally, you can lock in the best possible rate by committing to the longest term length, which is usually up to 36 months.

But make sure you know how much your plan will cost you at the end of that period.

Freebies, Add-ons, and Additional Features

You should also be looking for plans that give you the best value for your money. Most hosting providers will include some extras in their plans as an incentive for you to sign up.

Here are some common features to look for:

  • Free domain (usually for the first year)
  • Free SSL certificate
  • Free cPanel license
  • Google Ads credit
  • Free site builder
  • Free site migration
  • Unlimited email accounts
  • Automatic backups

Most plans come with a money-back guarantee as well. 30 days seems to be the industry standard for this, but I’ve seen plans offer up to 97 days for you to change your mind.

Step #5: Register Your Domain Name

The domain name is your digital address. Ours is www.quicksprout.com.

I included this step last because you can potentially register your domain name from your hosting provider when you sign up for a hosting plan. Sometimes this will even come free depending on the plan and provider you go with.

But with that said, you can register your domain name elsewhere before you settle on a plan.

Personally, I like to keep my domain registration services and web hosting services separate. So I’d recommend using a domain registrar for this step. If you’re lost and don’t know where to do this, take a look at my guide on the best domain registrars.

Getting your domain from a web host isn’t necessarily wrong. So it’s fine if that’s what you prefer.

Regardless of where you get it from, this step needs to be completed in order for your website to be live on the web.

Alternative Option: Self Hosting (Not Recommend)

It’s possible to host your website without using a web hosting provider, although I would not recommend this option.

Self-hosting can be accomplished by using your computer or a Linux machine as a server. It requires lots of technical experience and a full understanding of how websites and servers work.

In many cases, self-hosting is slow, unstable, and unreliable. Plus, you’ll be responsible for all of the server maintenance, backups, software updates, and security on your own.

Overall, self-hosting is a bad idea, especially for beginners. So I don’t want to spend too much time talking about it. But I wouldn’t be doing my job properly if I didn’t at least mention it as an option.

Conclusion

Hosting a website isn’t as complicated as you might think. In fact, the whole process can be accomplished in just five simple steps.

  1. Research web hosting providers.
  2. Determine your budget.
  3. Choose a hosting type.
  4. Select your hosting plan.
  5. Register your domain name.

If you follow the steps in this exact order, it will give you enough information to make an informed decision. This is the most ideal way to host any website.

Get started by reading our expert reviews of the top web hosting providers to find the best host for your website.

How to Build a WordPress AJAX Form (in 4 Easy Steps)

Do you want to build an AJAX contact form in WordPress?

AJAX contact forms allow users to submit the form without reloading a page. This enables you to increase user engagement while offering a better form submission experience to your users.

This comes in handy when you run an eCommerce website and want to collect user feedback without diverting user attention.

You can also use the same AJAX functionality for other custom forms on your website. For example, a custom user login form will allow users to login without an additional page load.

In this article, we will show you how to easily build a WordPress AJAX contact form with step by step instructions.

Creating an Ajax contact form in WordPress

What is Ajax and Why Use it For Your Forms?

Ajax, short for Asynchronous Javascript and XML, is a JavaScript programming technique which allows developers to transfer data without reloading a page.

It is most commonly used in web forms allowing users to submit form data without reloading a page. This makes form submission easy and fast, which improves the overall user experience.

Web applications like Gmail and Facebook extensively use this technique to keep users engaged while making everything work seamlessly in the background.

You can also use Ajax for your WordPress forms. It will save users from unnecessary page reload and keeps them engaged on the page they are currently viewing.

That being said, let’s take a look at how to easily make a WordPress Ajax contact form in 4 simple steps.

1. Install WPForms Plugin

First thing you need to do is install and activate the WPForms plugin. For more details, see our step by step guide on how to install a WordPress plugin.

WPForms is the best WordPress form builder plugin on the market. It allows you to easily create Ajax powered forms aswell.

Upon activation, you need to visit WPForms » Settings page to enter your license key.

WPForms license key

After entering the license key, you’ll be able to receive automatic updates and install add-ons.

You are now all set up to make beautiful ajax forms in WordPress.

2. Create Your First Form

Let’s go ahead and create your first form.

Simply visit WPForms » Add New page in WordPress admin area. You’ll be asked to provide a title for your form and select a template as a starting point.

Choose form template

For the sake of this tutorial, we will be creating a contact form. However you can create any other type of form you need.

WPForms will now load your form with basic fields already added to it. You can simply point and click on any form field to edit it.

Editing form fields in WPForms

You can also add any new form field from the left column by simply clicking on it. The new field will appear at the bottom of your form just above the submit button.

Click to add a new form field

You can easily drag and drop form fields to move them up and down in the form.

Once you are finished editing the form, you can move on to the next step.

3. Turn On Ajax Form Submission Feature

WPForms does not enable Ajax form submission by default. You will need to manually enable it for your form.

Simply switch to the Settings tab in the form builder and check the box next to ‘Enable AJAX form submission’ option.

Turn on Ajax form functionality

Checking the box will turn on the Ajax functionality for this form.

Now let’s set up what happens after the form submission.

First, switch to the ‘Confirmation’ tab under settings. This is where you inform your users that you have received their form submission.

Confirmation settings

WPForms allows you to do that in different ways. For example, you can redirect users to a URL, show them a specific page, or simply display a message on screen.

Since we have enabled Ajax functionality for the form, redirecting users to another page will defeat the purpose of creating an Ajax form.

You need to select the message option and edit the confirmation message. Feel free to use the formatting toolbar on the editor or add a link or two to tell users where to go next.

After that, you can set up how you would like to be notified about a form submission.

Switch to the Notifications tab in the form settings and configure notification email settings.

Form notification email settings

Once you are done, you can save your form and exit the form builder.

4. Add Your Ajax Enabled Form in WordPress

WPForms makes it super easy to add forms into your WordPress posts, pages, and sidebar widgets.

Simply edit the post or page where you want to add the form and insert the WPForms block to your content area.

Add WPForms block to WordPress post or page

After that, you need to select the form you just created from the block’s settings. WPForms will immediately load a live preview of the form in the content editor.

Select your form

You can now save or publish your content and then visit your website to test the form’s ajax functionality.

Ajax contact form preview

You can also add your form to a sidebar widget in WordPress. To do that, go to Appearance » Widgets page and add the WPForms widget to a sidebar.

Add your ajax powered form to a sidebar widget

Select the form you created earlier and click on the Save button to store widget settings. You can now visit your website to see your Ajax powered form in action.

We hope this article helped you learn how to create a WordPress Ajax contact form for your website. You may also want to see our guide on how to create a contact form popup in WordPress.

If you liked this article, then please subscribe to our YouTube Channel for WordPress video tutorials. You can also find us on Twitter and Facebook.

The post How to Build a WordPress AJAX Form (in 4 Easy Steps) appeared first on WPBeginner.

Create a Website

Creating a website is overwhelming. Don’t worry, that’s completely natural when building your first website.

When we built our first sites, it was so complicated. And so many articles and YouTube videos on how to create a website made it seem a lot easier than it ended up being.

We’ve outlined all the specific steps below on how to create your own website. We included everything that we learned over the years from building hundreds of sites.

We’re here to help.

This page is a collection of 70+ guides.You won’t need to read them all in order to build your website. Browse through and read what’s relevant to your situation. This will save you countless hours of frustration.

Our General Take on Building A Website

Don’t get confused by all of the different options for creating a website.

WordPress is King

In most cases, we highly recommend to build your website with WordPress. It’s an open source platform that allows you to run your website with very little technical expertise.

Some of the biggest websites on the Internet are built on WordPress. TechCrunch, The New Yorker, Variety and MTV News, just to name a few.

It’s also the most popular blogging platform, so there are hundreds of thousands of smaller websites that use WordPress.

WordPress is used by 33.4% of all the websites, and has a content management system market share of 60.3%.

Much of our content is centered around WordPress because we use it for all of our websites outside of Ecommerce.

Here’s the guide on how to create your website on WordPress.

Shopify for Ecommerce

For Ecommerce, we like Shopify — which is an Ecommerce website builder that allows you to get an online store up and running quickly.

The reality is that creating and running an online store can be a huge pain. Shopify takes that pain away. That’s probably why they are growing so quickly, and so many great online stores are popping up on the platform.

Here’s the guide on how to create your website on Shopify.

The Dozens of Other Options

If you’re reading this right now, then you most definitely fall into the category of someone that should be using WordPress or Shopify.

In rare cases, it might make sense to create a website using Wix or a similar website builder.

In other (very) rare cases, it might make sense to have a custom built website.

How to Create a Website

Start with our guide on how to create a website in 120 minutes. Along with that, there are a number of useful guides to consider as you start working on your website.

How to Plan Out Your New Website

How to Buy The RIGHT Domain Name – A Detailed Guide

How to Develop Your First Brand Identity on a Budget

The 5 Best Website Builders

The 5 Best Domain Registrars

10 Trending 2019 Website Color Schemes

9 Places To Get Website Images (Paid and Free)

The Best Website Fonts That Go Together in 2019

13 Website Design Best Practices

7 Reasons Why You Do NOT Need to Hire a Website Designer

The 22 Key Elements of a High Quality Website

How Much Copy Should You Write on Your Homepage?

10 Contact Page Techniques That Make People Contact You

How To Create an About Page That Matters

How to Make a Wix Website in 6 Easy Steps

Some useful guides for optimization as your site gets up and running:

Website Speed

Website Usability

Website Security

Website Mobile Friendliness

5 Easy Steps to Creating a Sitemap For a Website

Should You Switch Your Site to HTTPS? Pros and Cons

The Top 10 Principles That Boost Your Website Loading Time

Web Hosting

You need a web hosting provider in order to have a website.

We recommend SiteGround for most people. For advanced WordPress users, with high traffic websites, it could make sense to move to WP Engine at some point.

More about The Best Web Hosting Companies here.

Here are some additional guides to help you learn more about web hosting:

Everything You Need To Know About Web Hosting

The Best Web Hosting for Small Business

The Best Web Hosting for WordPress

The Best Free Web Hosting

The Best Cheap Web Hosting

The Hidden Costs of Website Hosting

Analytics and Reporting

An analytics tool is important if you want to know what’s happening on your website. It tells you how much traffic you’re getting, where it’s coming from, and what people do on your site. Google Analytics is the standard. That’s what we use for Quick Sprout.

Read more about why Google Analytics is the best.

Installing Google Analytics is easy. Consuming the reports is a bit more complicated.

Here are some guides to help:

The 2 Website Analytics Tools Pros Actually Use in 2019

Setup Google Analytics in 3 Steps – The Beginner’s Guide

10 Vital Customizations to Make in Google Analytics

A Guide to Google Analytics Add-on for Google Sheets

How to Track Your Leads with UTM Parameters

Building and Optimizing With WordPress

A WordPress website is basically made from what’s called a WordPress Theme and WordPress Plugins. All of the features of your website will come either from the theme or the plugins you install.

To help you get started, we reviewed all of the best WordPress Plugins across the most popular categories.

Here’s an in-depth review for each category:

Best SEO Plugins for WordPress

Best WordPress Gallery Plugin

Best WordPress Backup Plugin

Best Form Plugin WordPress

Best WordPress Cache Plugin

Best WordPress Security Plugin

Best WordPress Calendar Plugin

Best Google Analytics Plugins for WordPress

Best WordPress Popup Plugin

Best WordPress Directory Plugin

Best WordPress Booking Plugin

Best Membership Plugins for WordPress

Best Social Media WordPress Plugin

Ecommerce Websites

If the primary purpose of your website is to sell products, you’ll need an ecommerce website. We recommend keeping it simple and going with Shopify.

Read our full review on Shopify to see why.

Check out our review of the Best Ecommerce Platforms, to get a comparison to the other options out there.

Get the step-by-step on how to start an online store.

Our guide on how to create an Ecommerce website.

More useful guides on building an Ecommerce website:

WordPress Ecommerce

How to Transfer Your Website to Shopify

Best Ecommerce WordPress Themes

Best Ecommerce Website Builder

Checkout Process Design

Ecommerce Color Schemes

How to Create a Trust Seal On Checkout Page

Starting a Blog

When you really break it down — most websites are blogs, and blogs are websites. They have become one and the same. The most popular blogging platform is WordPress, and that is also the same platform we use for any other website, blog or otherwise.

If you’re thinking about starting a blog specifically, and that is why you’re trying to figure out how to create a website…we have over 40 guides on blogging.

Here are the blogging guides specific to getting started, and building your blog:

How to Start a Blog

Best Blogging Platforms / Blog Sites

Best WordPress Themes for Blogs

Blog Design

11 Things I Wish I Knew Before I Started My First Blog

The Top 12 Tips for Running a Successful Video Blog

10 Lessons Seth Godin Can Teach You About Blogging

100 Lessons Learned from 10 Years of Blogging

Creating Your Own Website: In Summary

Creating your website might seem overwhelming at first. It really comes down to starting with these simple steps:

  1. Is your primary purpose to sell things on your website? If yes, then focus on Shopify, if no, then focus on WordPress.
  2. Use the guides on Quick Sprout to help you through the process. It’s a learning curve for sure. Taking the time to set up everything correctly will help you grow your business and your traffic much faster later on.
  3. Don’t hesitate to reach out to us directly via email with questions. We’ll help however we can.