Humble Planning: Maarten Dalmijn at the 57th Hands-On Agile Meetup

TL; DR: Humble Planning With Maarten Dalmijn

In this fascinating talk, Maarten introduced the concept of humble planning and why it’s crucial for succeeding with an Agile way of working and building products of exceptional value. During his talk, he covered concepts like friction, the three gaps model of Bungay, intent, intent-based leadership, humble planning, sprint goals, the fog of beforehand, and the fog of speculation. It is a must-see for all Agile practitioners!

Abstract

When faced with uncertainty, risk, and complexity, our natural response is to focus on what we know and to spend more time talking, analyzing, planning, and predicting. As a result, our plans become filled with speculation and rooted in our imagination. Our plans as an anchor stifle the ability to respond to changes. We become locked into plans that prevent collaboration, learning, and discovery.

When Is It Time to Stop Using Scrum?

TL; DR: When Should a Team Stop Using Scrum?

When is the time to look beyond Scrum? After all, many things—ideas, practices, mantras, etc.—outlive their utility sooner or later; why would Scrum be an exception? Moreover, we are not getting paid to practice Scrum but solve our customers’ problems within the given constraints while contributing to the sustainability of our organization. Scrum is a tool, a helpful practice but neither a religion nor a philosophy. Which brings us back to the original question: Is there a moment when a Scrum team should stop using Scrum?

Setting the Context of Using Scrum To Your Benefit

When I ask whether there is a moment when a Scrum team should stop using Scrum, I am not referring to a situation in which using Scrum is useless, to begin with. For example, if you look at the Stacey Matrix below, you will notice areas colored in red—Simple and Chaotic:

Sprint Goal Principles

TL; DR: Nine Sprint Goal Principles

In Scrum, the Sprint Goal serves as the spotlight that provides transparency to the Sprint Backlog, as the flag that allows the team to rally, and as the one thing that provides focus and cohesion. No Scrum team has ever been able to reap the benefits of the framework to the fullest extent without making the Sprint Goal a cornerstone of its efforts. The following nine Sprint Goal principles point at critical issues any Scrum team needs to consider on its path to excellence.

The Purpose of the Sprint Goal According to the Scrum Guide

The Scrum Guide characterizes the Sprint Goal as follows:

Adapt How You Lead for Agile Success

TL; DR: Adapt How You Lead for Agile Success With Johanna Rothman — ACB21

Learn from Johann Rothman how to adapt your leadership style for agile success as a manager in an agile organization in this 54-minute long video from the Agile Camp Berlin 2021.

Modern Management: Adapt How You Lead for Agile Success

Too many people say, “With agile, we don’t need no stinkin’ managers.”

Linking Strategy to Everyday Work

TL; DR: Linking Strategy to Everyday Work w/John Cutler — ACB21

In this highly engaging speaker session from the Agile Camp Berlin 2021, John Cutler delves into the advantages of linking strategy to everyday work: Motivation, inspiration, seeing the big picture despite working on a small iteration.

Linking Strategy to Everyday Work (With Value Creation Models, and Time-Based Goals Like OKRs)

When teams can link their day-to-day work to a meaningful/concrete representation of “strategy”, they feel more inspired, and confidently work small while thinking big. Too often teams feel like they are iterating to nowhere, or locked into huge, prescriptive batches. Time-based goals like OKRs (alone) don’t help. In this talk we will discuss the difference between point-in-time goals and persistent value-creation models. My goal: inspire teams to adopt some form of persistent value-creation model and link their daily work to that framework.

When the Management Ignores Self-Management

TL; DR: Ignoring Self-Management — Undermining Scrum From the Start

There are plenty of failure possibilities with Scrum. Given that Scrum is a framework with a reasonable yet short “manual,” this effect should not surprise anyone. One of Scrum’s first principles is self-management. It is based on the idea that the people closest to a problem are best suited to find a solution. Therefore, the task of the management is not to tell people what to do when and how. Instead, its job is to provide the guardrails, the constraints within which a Scrum team identifies the best possible solution. Join me and explore the consequences of management ignoring self-management and what you can do about it.

Self-Management According to the Scrum Guide

There are several references to self-management in the Scrum Guide 2020:

Scrum Commitments: Tying Up Loose Ends and Shoehorning the Definition of Done

TL; DR: Scrum Commitments

While the new Scrum Guide is less prescriptive and more inclusive, it also ties up loose ends by including elements better, namely the previously free-floating Sprint Goal and the Definition of Done with the creation of Scrum commitments. This inclusion works remarkably well in the former’s case; regarding the latter, we need a shoehorn, though.

The Scrum Guide 2020

Foremost, the new Scrum Guide is less prescriptive, eliminating many suggestions such as the Daily Scrum questions, the need for at least one mandatory action item from the Retrospective becoming a part of the Sprint Backlog, or the advice on why Sprint cancelations are rare events.

How To Use MDX Stored In Sanity In A Next.js Website

Recently, my team took on a project to build an online, video-based learning platform. The project, called Jamstack Explorers, is a Jamstack app powered by Sanity and Next.js. We knew that the success of this project relied on making the editing experience easy for collaborators from different companies and roles, as well as retaining the flexibility to add custom components as needed.

To accomplish this, we decided to author content using MDX, which is Markdown with the option to include custom components. For our audience, Markdown is a standard approach to writing content: it’s how we format GitHub comments, Notion docs, Slack messages (kinda), and many other tools. The custom MDX components are optional and their usage is similar to shortcodes in WordPress and templating languages.

To make it possible to collaborate with contributors from anywhere, we decided to use Sanity as our content management system (CMS).

But how could we write MDX in Sanity? In this tutorial, we’ll break down how we set up MDX support in Sanity, and how to load and render that MDX in Next.js — powered website using a reduced example.

TL;DR

If you want to jump straight to the results, here are some helpful links:

How To Write Content Using MDX In Sanity

Our first step is to get our content management workflow set up. In this section, we’ll walk through setting up a new Sanity instance, adding support for writing MDX, and creating a public, read-only API that we can use to load our content into a website for display.

Create A New Sanity Instance

If you don’t already have a Sanity instance set up, let’s start with that. If you do already have a Sanity instance, skip ahead to the next section.

Our first step is to install the Sanity CLI globally, which allows us to install, configure, and run Sanity locally.

# install the Sanity CLI
npm i -g @sanity/cli

In your project folder, create a new directory called sanity, move into it, and run Sanity’s init command to create a new project.

# create a new directory to contain Sanity files
mkdir sanity
cd sanity/
sanity init

The init command will ask a series of questions. You can choose whatever makes sense for your project, but in this example we’ll use the following options:

  • Choose a project name: Sanity Next MDX Example.
  • Choose the default dataset configuration ("production").
  • Use the default project output path (the current directory).
  • Choose "clean project" from the template options.

Install The Markdown Plugin For Sanity

By default, Sanity doesn’t have Markdown support. Fortunately, there’s a ready-made Sanity plugin for Markdown support that we can install and configure with a single command:

# add the Markdown plugin
sanity install markdown

This command will install the plugin and add the appropriate configuration to your Sanity instance to make it available for use.

Define A Custom Schema With A Markdown Input

In Sanity, we control every content type and input using schemas. This is one of my favorite features about Sanity, because it means that I have fine-grained control over what each content type stores, how that content is processed, and even how the content preview is built.

For this example, we’re going to create a simple page structure with a title, a slug to be used in the page URL, and a content area that expects Markdown.

Create this schema by adding a new file at sanity/schemas/page.js and adding the following code:

export default {
  name: 'page',
  title: 'Page',
  type: 'document',
  fields: [
    {
      name: 'title',
      title: 'Page Title',
      type: 'string',
      validation: (Rule) => Rule.required(),
    },
    {
      name: 'slug',
      title: 'Slug',
      type: 'slug',
      validation: (Rule) => Rule.required(),
      options: {
        source: 'title',
        maxLength: 96,
      },
    },
    {
      name: 'content',
      title: 'Content',
      type: 'markdown',
    },
  ],
};

We start by giving the whole content type a name and title. The type of document tells Sanity that this should be displayed at the top level of the Sanity Studio as a content type someone can create.

Each field also needs a name, title, and type. We can optionally provide validation rules and other options, such as giving the slug a max length and allowing it to be generated from the title value.

Add A Custom Schema To Sanity’s Configuration

After our schema is defined, we need to tell Sanity to use it. We do this by importing the schema into sanity/schemas/schema.js, then adding it to the types array passed to createSchema.


  // First, we must import the schema creator
  import createSchema from 'part:@sanity/base/schema-creator';

  // Then import schema types from any plugins that might expose them
  import schemaTypes from 'all:part:@sanity/base/schema-type';

+ // Import custom schema types here
+ import page from './page';

  // Then we give our schema to the builder and provide the result to Sanity
  export default createSchema({
    // We name our schema
    name: 'default',
    // Then proceed to concatenate our document type
    // to the ones provided by any plugins that are installed
    types: schemaTypes.concat([
-     / Your types here! /
+     page,
    ]),
  });

This puts our page schema into Sanity’s startup configuration, which means we’ll be able to create pages once we start Sanity up!

Run Sanity Studio Locally

Now that we have a schema defined and configured, we can start Sanity locally.

sanity start

Once it’s running, we can open Sanity Studio at http://localhost:3333 on our local machine.

When we visit that URL, we’ll need to log in the first time. Use your preferred account (e.g. GitHub) to authenticate. Once you get logged in, you’ll see the Studio dashboard, which looks pretty barebones.
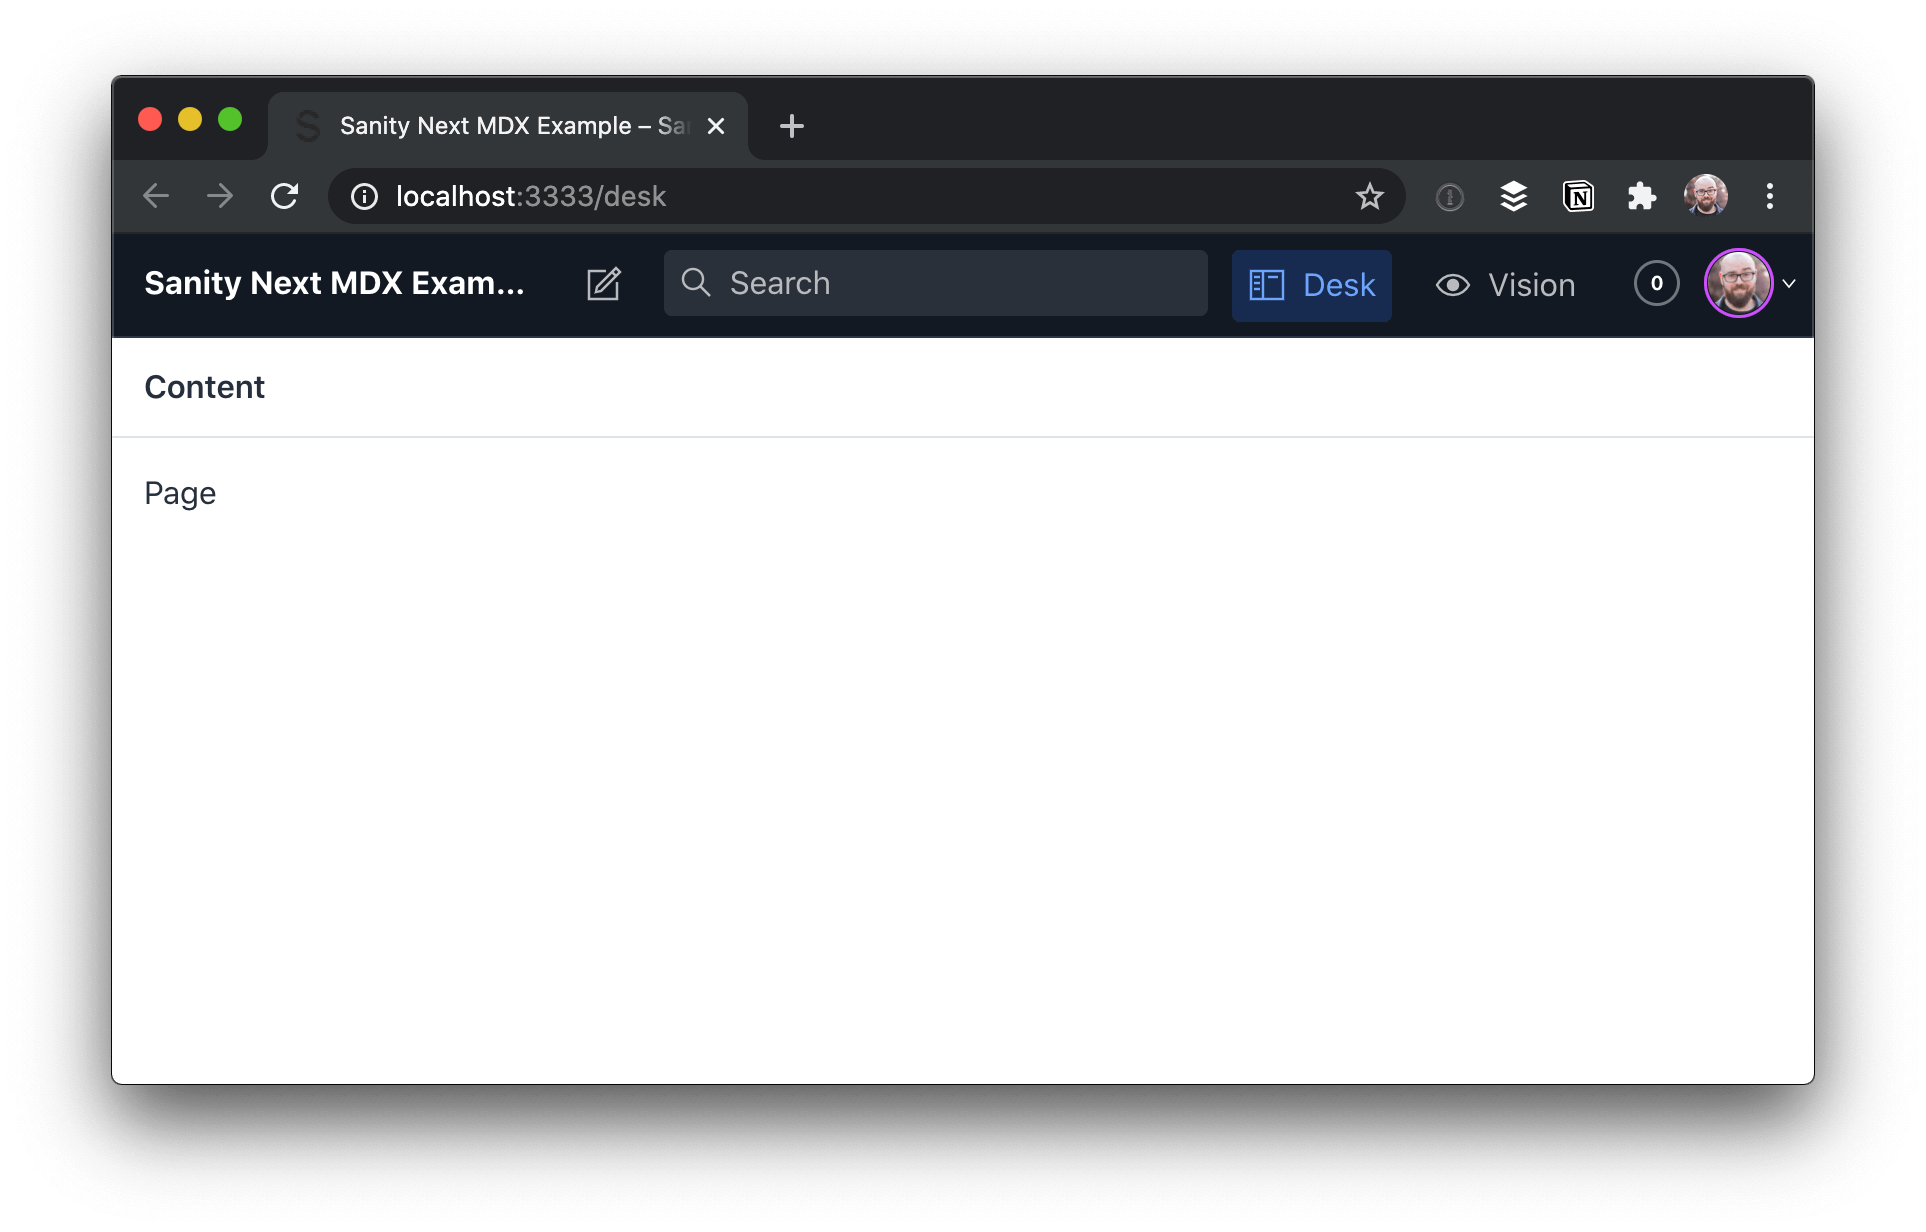
To add a new page, click "Page", then the pencil icon at the top-left.

Add a title and slug, then write some Markdown with MDX in the content area:

This is written in Markdown.

But what’s this?

<Callout>

Oh dang! Is this a React component in the middle of our content? 😱

</Callout>

Holy buckets! That’s amazing!

Heads up! The empty line between the MDX component and the Markdown it contains is required. Otherwise the Markdown won’t be parsed. This will be fixed in MDX v2.

Once you have the content in place, click "Publish" to make it available.

Deploy The Sanity Studio To A Production URL

In order to make edits to the site’s data without having to run the code locally, we need to deploy the Sanity Studio. The Sanity CLI makes this possible with a single command:

sanity deploy

Choose a hostname for the site, which will be used in the URL. After that, it will be deployed and reachable at your own custom link.
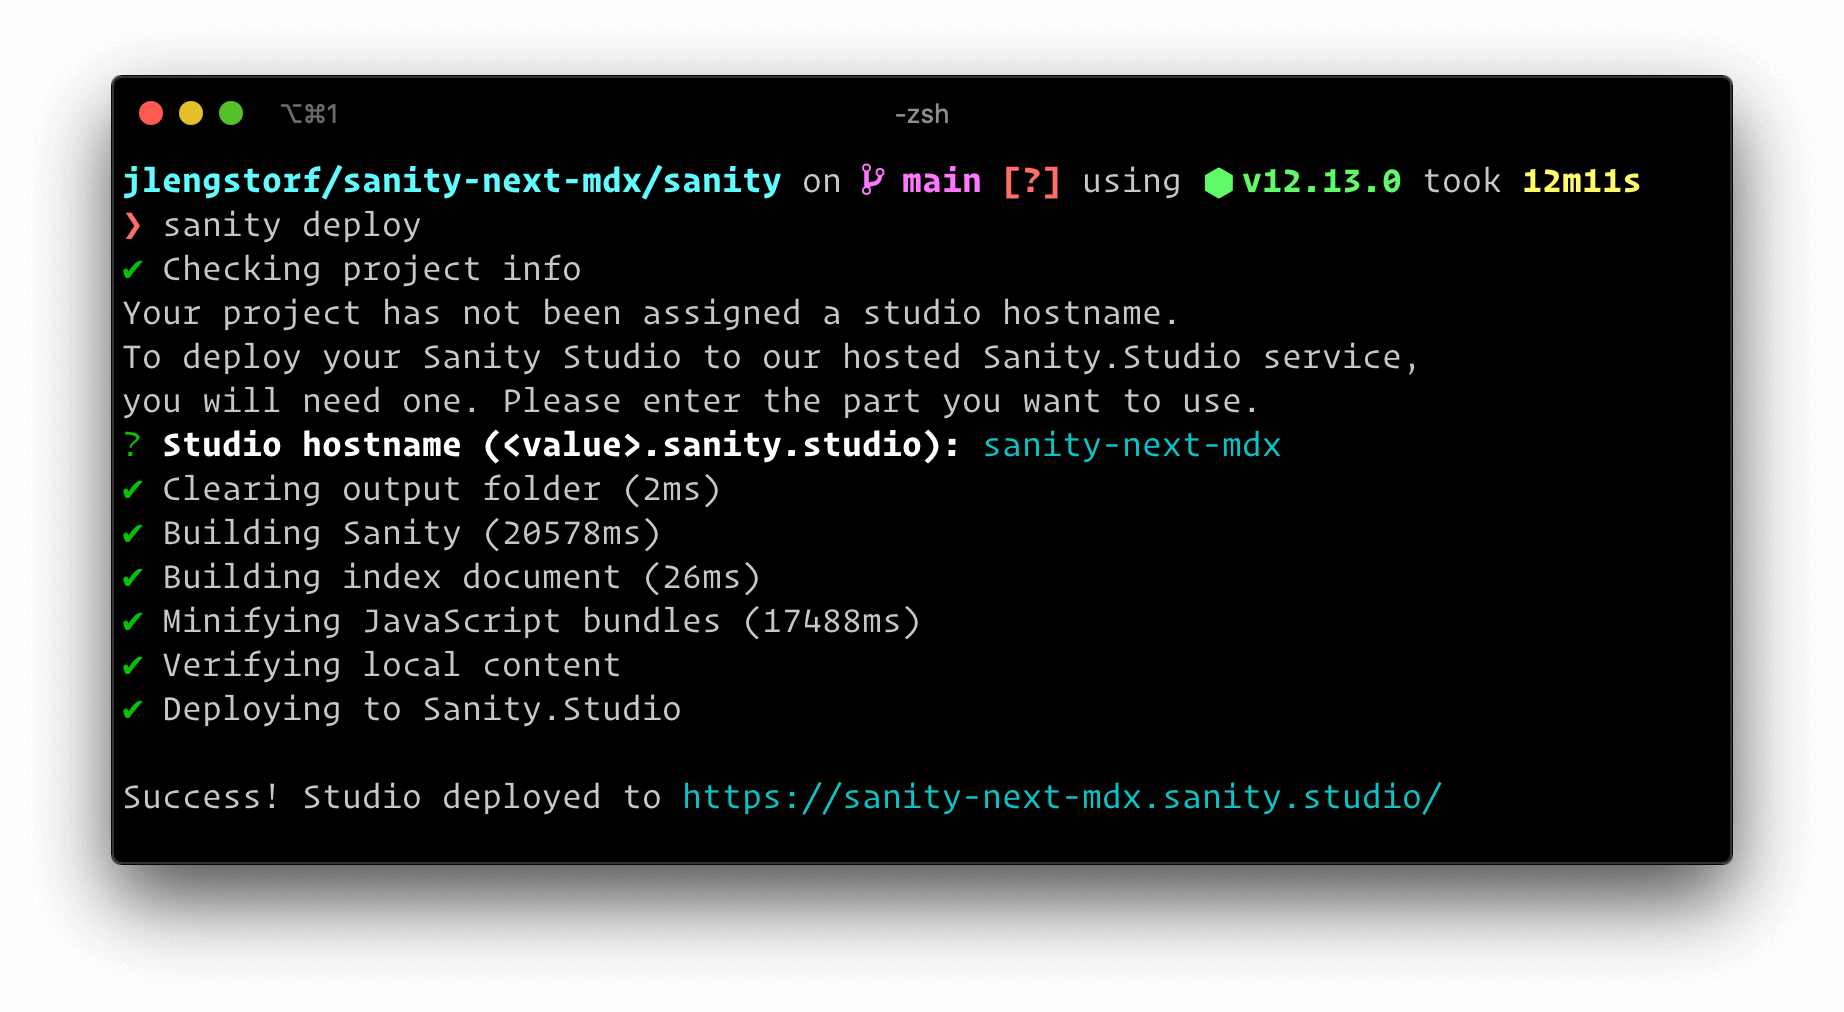
This provides a production URL for content editors to log in and make changes to the site content.

Make Sanity Content Available Via GraphQL

Sanity ships with support for GraphQL, which we’ll use to load our page data into our site’s front-end. To enable this, we need to deploy a GraphQL API, which is another one-liner:

sanity graphql deploy

We can choose to enable a GraphQL Playground, which gives us a browser-based data explorer. This is extremely handy for testing queries.

Store the GraphQL URL — you’ll need it to load the data into Next.js!

https://sqqecrvt.api.sanity.io/v1/graphql/production/default

The GraphQL API is read-only for published content by default, so we don’t need to worry about keeping this secret — everything that this API returns is published, which means it’s what we want people to see.

Test Sanity GraphQL Queries In The Browser

By opening the URL of our GraphQL API, we’re able to test out GraphQL queries to make sure we’re getting the data we expect. These queries are copy-pasteable into our code.

To load our page data, we can build the following query using the "schema" tab at the right-hand side as a reference.

query AllPages {
  allPage {
    title
    slug {
      current
    }
    content
  }
}

This query loads all the pages published in Sanity, returning the title, current slug, and content for each. If we run this in the playground by pressing the play button, we can see our page returned.

Now that we’ve got page data with MDX in it coming back from Sanity, we’re ready to build a site using it!

In the next section, we’ll create an Next.js site that loads data from Sanity and renders our MDX content properly.

Display MDX In Next.js From Sanity

In an empty directory, start by initializing a new package.json, then install Next, React, and a package called next-mdx-remote.

# create a new package.json with the default options
npm init -y

# install the packages we need for this project
npm i next react react-dom next-mdx-remote

Inside package.json, add a script to run next dev:

  {
    "name": "sanity-next-mdx",
    "version": "1.0.0",
    "scripts": {
+     "dev": "next dev"
    },
    "author": "Jason Lengstorf <jason@lengstorf.com>",
    "license": "ISC",
    "dependencies": {
      "next": "^10.0.2",
      "next-mdx-remote": "^1.0.0",
      "react": "^17.0.1",
      "react-dom": "^17.0.1"
    }

Create React Components To Use In MDX Content

In our page content, we used the <Callout> component to wrap some of our Markdown. MDX works by combining React components with Markdown, which means our first step is to define the React component our MDX expects.

Create a Callout component at src/components/callout.js:

export default function Callout({ children }) {
  return (
    <div
      style={{
        padding: '0 1rem',
        background: 'lightblue',
        border: '1px solid blue',
        borderRadius: '0.5rem',
      }}
    >
      {children}
    </div>
  );
}

This component adds a blue box around content that we want to call out for extra attention.

Send GraphQL Queries Using The Fetch API

It may not be obvious, but you don’t need a special library to send GraphQL queries! It’s possible to send a query to a GraphQL API using the browser’s built-in Fetch API.

Since we’ll be sending a few GraphQL queries in our site, let’s add a utility function that handles this so we don’t have to duplicate this code in a bunch of places.

Add a utility function to fetch Sanity data using the Fetch API at src/utils/sanity.js:

export async function getSanityContent({ query, variables = {} }) {
  const { data } = await fetch(
    'https://sqqecrvt.api.sanity.io/v1/graphql/production/default',
    {
      method: 'POST',
      headers: {
        'Content-Type': 'application/json',
      },
      body: JSON.stringify({
        query,
        variables,
      }),
    },
  ).then((response) => response.json());

  return data;
}

The first argument is the Sanity GraphQL URL that Sanity returned when we deployed the GraphQL API.

GraphQL queries are always sent using the POST method and the application/json content type header.

The body of a GraphQL request is a stringified JSON object with two properties: query, which contains the query we want to execute as a string; and variables, which is an object containing any query variables we want to pass into the GraphQL query.

The response will be JSON, so we need to handle that in the .then for the query result, and then we can destructure the result to get to the data inside. In a production app, we’d want to check for errors in the result as well and display those errors in a helpful way, but this is a post about MDX, not GraphQL, so #yolo.

Heads up! The Fetch API is great for simple use cases, but as your app becomes more complex you’ll probably want to look into the benefits of using a GraphQL-specific tool like Apollo or urql.

Create A Listing Of All Pages From Sanity In Next.js

To start, let’s make a list of all the pages published in Sanity, as well as a link to their slug (which won’t work just yet).

Create a new file at src/pages/index.js and put the following code inside:

import Link from 'next/link';
import { getSanityContent } from '../utils/sanity';

export default function Index({ pages }) {
  return (
    <div>
      <h1>This Site Loads MDX From Sanity.io</h1>
      <p>View any of these pages to see it in action:</p>
      <ul>
        {pages.map(({ title, slug }) => (
          <li key={slug}>
            <Link href={`/${slug}`}>
              <a>{title}</a>
            </Link>
          </li>
        ))}
      </ul>
    </div>
  );
}

export async function getStaticProps() {
  const data = await getSanityContent({
    query: `
      query AllPages {
        allPage {
          title
          slug {
            current
          }
        }
      }
    `,
  });

  const pages = data.allPage.map((page) => ({
    title: page.title,
    slug: page.slug.current,
  }));

  return {
    props: { pages },
  };
}

In getStaticProps we call the getSanityContent utility with a query that loads the title and slug of all pages in Sanity. We then map over the page data to create a simplified object with a title and slug property for each page and return that array as a pages prop.

The Index component to display this page receives that page’s prop, so we map over that to output an unordered list of links to the pages.

Start the site with npm run dev and open http://localhost:3000 to see the work in progress.

If we click a page link right now, we’ll get a 404 error. In the next section we’ll fix that!

Generate Pages Programatically In Next.js From CMS Data

Next.js supports dynamic routes, so let’s set up a new file to catch all pages except our home page at src/pages/[page].js.

In this file, we need to tell Next what the slugs are that it needs to generate using the getStaticPaths function.

To load the static content for these pages, we need to use getStaticProps, which will receive the current page slug in params.page.

To help visualize what’s happening, we’ll pass the slug through to our page and log the props out on screen for now.

import { getSanityContent } from '../utils/sanity';

export default function Page(props) {
  return <pre>{JSON.stringify(props, null, 2)}</pre>;
}

export async function getStaticProps({ params }) {
  return {
    props: {
      slug: params.page,
    },
  };
}

export async function getStaticPaths() {
  const data = await getSanityContent({
    query: `
      query AllPages {
        allPage {
          slug {
            current
          }
        }
      }
    `,
  });

  const pages = data.allPage;

  return {
    paths: pages.map((p) => `/${p.slug.current}`),
    fallback: false,
  };
}

If the server is already running this will reload automatically. If not, run npm run dev and click one of the page links on http://localhost:3000 to see the dynamic route in action.

Load Page Data From Sanity For The Current Page Slug In Next.js

Now that we have the page slug, we can send a request to Sanity to load the content for that page.

Using the getSanityContent utility function, send a query that loads the current page using its slug, then pull out just the page’s data and return that in the props.

  export async function getStaticProps({ params }) {
+   const data = await getSanityContent({
+     query: +       query PageBySlug($slug: String!) {
+         allPage(where: { slug: { current: { eq: $slug } } }) {
+           title
+           content
+         }
+       }
+,
+     variables: {
+       slug: params.page,
+     },
+   });
+
+   const [pageData] = data.allPage;

    return {
      props: {
-       slug: params.page,
+       pageData,
      },
    };
  }

After reloading the page, we can see that the MDX content is loaded, but it hasn’t been processed yet.

Render MDX From A CMS In Next.js With Next-mdx-remote

To render the MDX, we need to perform two steps:

  1. For the build-time processing of MDX, we need to render the MDX to a string. This will turn the Markdown into HTML and ensure that the React components are executable. This is done by passing the content as a string into renderToString along with an object containing the React components we want to be available in MDX content.

  2. For the client-side rendering of MDX, we hydrate the MDX by passing in the rendered string and the React components. This makes the components available to the browser and unlocks interactivity and React features.

While this might feel like doing the work twice, these are two distinct processes that allow us to both create fully rendered HTML markup that works without JavaScript enabled and the dynamic, client-side functionality that JavaScript provides.

Make the following changes to src/pages/[page].js to render and hydrate MDX:

+ import hydrate from 'next-mdx-remote/hydrate';
+ import renderToString from 'next-mdx-remote/render-to-string';
  import { getSanityContent } from '../utils/sanity';
+ import Callout from '../components/callout';

- export default function Page(props) {
-   return <pre>{JSON.stringify(props, null, 2)}</pre>;
+ export default function Page({ title, content }) {
+   const renderedContent = hydrate(content, {
+     components: {
+       Callout,
+     },
+   });
+
+   return (
+     <div>
+       <h1>{title}</h1>
+       {renderedContent}
+     </div>
+   );
  }

  export async function getStaticProps({ params }) {
    const data = await getSanityContent({
      query: `
          query PageBySlug($slug: String!) {
            allPage(where: { slug: { current: { eq: $slug } } }) {
              title
              content
            }
          }
        `,
      variables: {
        slug: params.page,
      },
    });

    const [pageData] = data.allPage;

+   const content = await renderToString(pageData.content, {
+     components: { Callout },
+   });

    return {
      props: {
-       pageData,
+       title: pageData.title,
+       content,
      },
    };
  }

  export async function getStaticPaths() {
    const data = await getSanityContent({
      query: `
          query AllPages {
            allPage {
              slug {
                current
              }
            }
          }
        `,
    });

    const pages = data.allPage;

    return {
      paths: pages.map((p) => `/${p.slug.current}`),
      fallback: false,
    };
  }

After saving these changes, reload the browser and we can see the page content being rendered properly, custom React components and all!

Use MDX With Sanity And Next.js For Flexible Content Workflows

Now that this code is set up, content editors can quickly write content using MDX to enable the speed of Markdown with the flexibility of custom React components, all from Sanity! The site is set up to generate all the pages published in Sanity, so unless we want to add new custom components we don’t need to touch the Next.js code at all to publish new pages.

What I love about this workflow is that it lets me keep my favorite parts of several tools: I really like writing content in Markdown, but my content also needs more flexibility than the standard Markdown syntax provides; I like building websites with React, but I don’t like managing content in Git.

Beyond this, I also have access to the huge amount of customization made available in both the Sanity and React ecosystems, which feels like having my cake and eating it, too.

If you’re looking for a new content management workflow, I hope you enjoy this one as much as I do!

What’s Next?

Now that you’ve got a Next site using MDX from Sanity, you may want to go further with these tutorials and resources:

What will you build with this workflow? Let me know on Twitter!

***Remote Agile (Part 5): Retrospectives with Distributed Teams

TL; DR: A Remote Retrospective with a Distributed Team

We started this series on remote agile with looking into practices and tools, followed by exploring virtual Liberating Structures, how to master Zoom as well as common remote agile anti-patterns. This fifth article now dives into organizing a remote Retrospective with a distributed team: practices, tools, and lessons learned.

The Scrum Guide on the Sprint Retrospective

According to the Scrum Guide, the Sprint Retrospective serves the following purpose:

Ensuring SQL Server High Availability in the Cloud

Theoretically, the cloud seems tailor-made for ensuring high availability (HA) and disaster recovery (DR) solutions in mission critical SQL Server deployments. Azure, AWS, and Google have distributed, state-of-the-art data centers throughout the world. They offer a variety of SLAs that can guarantee virtual machine (VM) availability levels of 99.95% and higher.

But deploying SQL Server for HA or DR has always posed a challenge that goes beyond geographic dispersion of data centers and deep levels of hardware redundancy. Configuring your SQL Server for HA or DR involves building a Windows Server Failover Cluster (WSFC) that ensures not only the availability of different machines running SQL Server itself but also — and most importantly — the availability of storage holding the data in which SQL Server is interacting.

Configuring SQL Server for High Availability in the Cloud

Cloud service providers offer SLAs guaranteeing availability of 99.95% and higher. That number might prompt one to think the cloud ideally suited for a SQL Server deployment that requires high availability (HA). Given the geographic distribution of Azure and AWS data centers, one might even think the cloud perfect for a SQL Server deployment configured with disaster recovery (DR) in mind.

But let’s rethink this.

Slim SEO Keeps Options Simple and Handles the Legwork of SEO

I have been running a blog of some kind since the Spring of 2003. In a few short months, it will be my 17th blog-aversary. The most important lesson I have learned over the years is to not do more work than is necessary to publish a blog post.

There was a time when I fiddled with custom field boxes to fine-tune every aspect of a blog post, such as meta keywords, descriptions, titles, and much more. However, worrying over every bit of metadata about a post became more work than actually writing the blog post itself. It was killing my creative process.

I have tried numerous SEO plugins and even built such a plugin myself once. Eventually, I would always come back to simply automating most of the process for whatever project I was working on.

Some SEO purists may balk at the idea. They might argue that everything must be fine-tuned for the best results in search engines. I could not say. Worrying about ranking seems to be a never-ending, uphill battle. In my experience, no particular plugin has ever given me an edge in comparison to another. Results were always similar regardless of whether I fixated on every detail that options-filled SEO plugins offered or let an automated system generate the bits and pieces I needed.

I decided to give the Slim SEO plugin a try. It promised to handle the dirty work and ticked most of the boxes in terms of what I was looking for in an SEO plugin.

Slim SEO is a plugin built by eLightUp, the company behind the Meta Box framework and GretaThemes. Given their history of building quality extensions for WordPress, their SEO plugin made sense for a test run.

The plugin beautifully handles the basics that you would expect from an SEO plugin. It automatically handles meta tags, including Open Graph Tags for social media. It generates a sitemap of your public posts and pages. It outputs structured data via JSON-LD with no work on the user’s part.

TL;DR: For users who are looking for a simple SEO solution with little legwork, Slim SEO is a solid option. For users who want to tinker with every aspect of their SEO, look elsewhere.

A Slim User Interface

As a user, the things I tire of quickly the most are complex options screens. Just give me the basics. That is exactly what Slim SEO does. It has a single options screen titled “SEO” under the default “Settings” menu in the admin. Currently, the only options are for inputting header and footer scripts from various services, such as Google Tag Manager or Google Analytics.

On the post-editing screen, the plugin provides a simple meta box for customizing the meta title and description. Users can also opt to hide the post from search engines and change the Facebook and Twitter images for the post. And, that’s it.

Screenshot of the meta box for handling per-post SEO options with the Slim SEO plugin.
Per-post SEO options meta box.

Each of these options can be skipped if you prefer to let the plugin handle them automatically.

Suffice it to say, I am a fan of the slimmed-down interface. The plugin has no SEO scores, keyword rankings, or 20 different options to worry about. It does not show a preview of what the post might look like in a search engine. The options available are items that I may want to configure from time to time, so it’s nice to have the ability to do so when needed.

The Downsides of the Plugin

Slimmed-down does not always equate to being better. You make sacrifices by allowing the plugin to make decisions that may not always be the best for your site. Keep these in mind when deciding whether to use the plugin.

Automatic Redirects

One of the biggest downsides of automated systems is that I sometimes want things to be handled differently by the plugin. The plugin’s automatic redirect feature is a good example of that issue. Out of the box, the plugin will redirect all attachment page views to the media file. It also redirects visitors to author archive pages to the home page if the author has not written any posts or on single-author sites.

These auto-redirects may be desirable for some end-users, but they are not something I want. The problem is there is no clear way to disable this feature, even via code.

Header Cleanup

The plugin also has a “cleanup” feature that automatically removes the RSD link, Windows Live Writer manifest link, WordPress version number, and post shortlink from the <head> area on the front end. It may be desirable to remove those items, but their removal would be more appropriate in a cleanup WordPress type of plugin rather than a plugin focused on SEO.

Automatic Image Alt Attributes

Slim SEO automatically adds the alt attribute to post thumbnails and when inserting images into the editor. The problem is that it uses the attachment title. This could make accessibility worse than simply leaving the alt attribute empty. If your attachment title is something like DS_IMG9453.jpg, it does not accurately describe an image.

Breadcrumbs

The plugin has a shortcode for outputting breadcrumbs. It must either be manually added to a shortcode-aware area or within a theme template.

The breadcrumbs functionality provides a baseline experience. It doesn’t handle every scenario or even close to every scenario. The feature will not get you far with highly-complex setups. However, it would work OK for the average install.

That’s par for the course with SEO plugins — mediocre breadcrumbs at best. Frankly, SEO plugins should drop breadcrumbs from the feature list and let fully-fledged breadcrumb plugins do their thing. Users should use opt for a plugin that specifically focuses on being a breadcrumb plugin. Authors who build those tend to have more experience handling edge cases.

How Does the Code Stack Up?

From a programming perspective, the code is clean and clear. It is 90% to the point where it should be. The missing 10% is that there are no references to many of the objects the plugin creates. This is not an issue limited to this plugin and is more common than it should be.

This issue makes it next to impossible to remove actions and filters from hooks. For end-users, this does not matter. For developers, it is not a frustration-free exercise to manipulate how the plugin works. This could easily be solved in numerous ways, such as using a container, service locator, static single instance, singleton, or even a global. Whether some of those methods should be deployed is beyond the scope of this review. Nevertheless, some reference to the plugin’s objects would help.

Addressing this issue would come in handy disabling those auto-redirects.

The Final Verdict

Aside from a handful of admittedly trivial gripes, I would use this plugin in lieu of SEO plugins with more options. Years of running multiple sites has taught me to grab for the simplest solutions so that I can get back to doing the things I enjoy doing.

If you prefer to micro-manage every aspect of your SEO, there are plenty of existing options out there. Slim SEO will not fit your needs.

Using React Portals to Render Children Outside the DOM Hierarchy

Say we need to render a child element into a React application. Easy right? That child is mounted to the nearest DOM element and rendered inside of it as a result.

render() {
  return (
    <div>
      // Child to render inside of the div
    </div>
  );
}

But! What if we want to render that child outside of the div somewhere else? That could be tricky because it breaks the convention that a component needs to render as a new element and follow a parent-child hierarchy. The parent wants to go where its child goes.

That’s where React Portals come in. They provide a way to render elements outside the DOM hierarchy so that elements are a little more portable. It may not be a perfect analogy, but Portals are sort of like the pipes in Mario Bros. that transport you from the normal flow of the game and into a different region.

The cool thing about Portals? Even though they trigger their own events that are independent of the child’s parent element, the parent is still listening to those events, which can be useful for passing events across an app.

We’re going to create a Portal together in this post then make it into a re-usable component. Let’s go!

The example we’re building

Here’s a relatively simple example of a Portal in action:

See the Pen React Portal by Kingsley Silas Chijioke (@kinsomicrote) on CodePen.

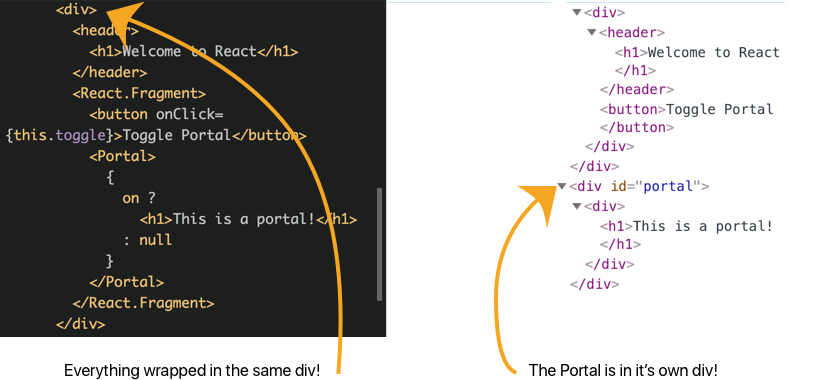
Toggling an element’s visibility is nothing new. But, if you look at the code carefully, you’ll notice that the outputted element is controlled by the button even though it is not a direct descendent of it. In fact, if you compare the source code to the rendered output in DevTools, you’ll see the relationship:

So the outputted element’s parent actually listens for the button click event and allows the child to be inserted even though it and the button are separate siblings in the DOM. Let’s break down the steps for creating this toggled Portal element to see how it all works.

Step 1: Create the Portal element

The first line of a React application will tell you that an App element is rendered on the document root using ReactDOM. Like this;

ReactDOM.render(<App />, document.getElementById("root"));

We need to place the App element in an HTML file to execute it:

<div id="App"></div>

Same sort of thing with Portals. First thing to creating a Portal is to create a new div element in the HTML file.

<div id="portal"></div>

This div will serve as our target. We’re using #portal as the ID, but it doesn’t have to be that. Any component that gets rendered inside this target div will maintain React’s context. We need to store the div as the value of a variable so we can make use of the Portal component that we’ll create:

const portalRoot = document.getElementById("portal");

Looks a lot like the method to execute the App element, right?

Step 2: Create a Portal component

Next, let’s set up the Portal as a component:

class Portal extends React.Component {
  constructor() {
    super();
    // 1: Create a new div that wraps the component
    this.el = document.createElement("div");
  }
  // 2: Append the element to the DOM when it mounts
  componentDidMount = () => {
    portalRoot.appendChild(this.el);
  };
  // 3: Remove the element when it unmounts
  componentWillUnmount = () => {
    portalRoot.removeChild(this.el);
  };
  render() {
    // 4: Render the element's children in a Portal
    const { children } = this.props;
    return ReactDOM.createPortal(children, this.el);
  }
}

Let’s step back and take a look at what is happening here.

We create a new div element in the constructor and set it as a value to this.el. When the Portal component mounts, this.el is appended as a child to that div in the HTML file where we added it. That’s the <div id="portal"></div> line in our case.

The DOM tree will look like this.

<div> // Portal, which is also portalRoot
  <div> // this.el
  </div>
</div>

If you’re new to React and are confused by the concept of mounting and unmounting an element, Jake Trent has a good explanation. TL;DR: Mounting is the moment the element is inserted into the DOM.

When the component unmounts we want to remove the child to avoid any memory leakage. We will import this Portal component into another component where it gets used, which is the the div that contains the header and button in our example. In doing so, we’ll pass the children elements of the Portal component along with it. This is why we have this.props.children.

Step 3: Using the Portal

To render the Portal component’s children, we make use of ReactDOM.createPortal(). This is a special ReactDOM method that accepts the children and the element we created. To see how the Portal works, let’s make use of it in our App component.

But, before we do that, let’s cover the basics of how we want the App to function. When the App loads, we want to display a text and a button — we can then toggle the button to either show or hide the Portal component.

class App extends React.Component {
  // The initial toggle state is false so the Portal element is out of view
  state = {
    on: false
  };

  toggle = () => {
    // Create a new "on" state to mount the Portal component via the button
    this.setState({
      on: !this.state.on
    });
  };
  // Now, let's render the components
  render() {
    const { on } = this.state;
    return (
      // The div where that uses the Portal component child
      <div>
        <header>
          <h1>Welcome to React</h1>
        </header>
        <React.Fragment>
          // The button that toggles the Portal component state
          // The Portal parent is listening for the event
          <button onClick={this.toggle}>Toggle Portal</button>
          // Mount or unmount the Portal on button click
          <Portal>
            {
              on ?
                <h1>This is a portal!</h1>
              : null
            }
          </Portal>
        </React.Fragment>
      </div>
    );
  }
}

Since we want to toggle the Portal on and off, we need to make use of component state to manage the toggling. That’s basically a method to set a state of on to either true or false on the click event. The portal gets rendered when on is true; else we render nothing.

This is how the DOM looks like when the on state is set to true.

When on is false, the Portal component is not being rendered in the root, so the DOM looks like this.

More use cases

Modals are a perfect candidate for Portals. In fact, the React docs use it as the primary example for how Portals work:

See the Pen Example: Portals by Dan Abramov (@gaearon) on CodePen.

It’s the same concept, where a Portal component is created and a state is used to append the its child elements to the Modal component.

We can even insert data from an outside source into a modal. In this example, the App component lists users fetched from an API using axios.

See the Pen React Portal 3 by Kingsley Silas Chijioke (@kinsomicrote) on CodePen.

How about tooltips? David Gilberston has a nice demo:

See the Pen React Portal Tooptip by David Gilbertson (@davidgilbertson) on CodePen.

J Scott Smith shows how Portals can be used to escape positioning:

He has another slick example that demonstrates inserting elements and managing state:

Summary

That’s a wrap! Hopefully this gives you a solid base understanding of Portals as far as what they are, what they do, and how to use them in a React application. The concept may seem trivial, but having the ability to move elements outside of the DOM hierarchy is a handy way to make components a little more extensible and re-usable… all of which points to the core benefits of using React in the first place.

More information

The post Using React Portals to Render Children Outside the DOM Hierarchy appeared first on CSS-Tricks.

Web Standards: The What, The Why, And The How

Web Standards: The What, The Why, And The How

Web Standards: The What, The Why, And The How

Amy Dickens

The World Wide Web is an interesting place.

As the Internet has grown and become more common place, it has become a gigantic instrument of change in terms of the way in which we interact with the world and each other.

Like many people, my intro to web development at school was kind of bleak. Our school ICT (Information Computing Technology) lessons taught us very little, using Dreamweaver (back when it was a Macromedia product) as a platform to visually edit a personal website with the biggest lesson being “what is a hyperlink”. We didn’t even view the HTML source of our own websites!

So my education around HTML and CSS came largely from messing around with the “view source” option in websites. I learned through copy-pasting bits and pieces together to create my own websites and downloading templates for bootstrap, before I knew what bootstrap actually was.

Why Am I Telling You This?

Having recently surveyed my Twitter followers (it’s an exact science 😜), I discovered that a large chunk of people (43% of the people who voted), knew little to nothing about Web Standards and only 5% of those who voted were active contributors.

When you look at the ways in which people learn to do web development, it is totally understandable that this might be the case. The volume of online tutorials, boot-camps and online resources for learning how to build websites has lead to an increasing amount of self-taught web developers (like me) building stuff for the web.

This is one of the great successes of the Internet; anyone can learn almost anything  —  and there being more and more resources for learning outside of academia is really positive in terms of lowering barriers to access web development as a career.

Even with free resources online there are still a number of barriers in learning how to be a web developer. I’m not saying these don’t exist — they really do — and we should be doing more as a community to tackle these.

But with the diversification of learning processes comes several challenges, including information overwhelm and knowledge gaps.

When learning how to build web-flavored things, it is very easy to get wrapped up in “how do I build the thing?” This can result in not equally considering the “why should I build it this way?” or “what are all the options for building the thing?

Consequently, it is equally as easy to become overwhelmed with the many number of ways to solve your web related problem. This can result in picking the first solution from the results of an internet search, without considering whether it is the better (in terms of most robust, accessible and secure) of the options available. 

Web Standards and the documentation to support Web Standards, provide a lot of insight about ‘the why’ and ‘the what’ of the world wide web. They are a fantastic resource for any web developer and help you to build things for the web that are functional, accessible and cross-compatible.

This post is designed to help anyone with an interest in the web who wants to get to know more about web standards. We will cover:

  • An introduction to web standards (what are they, why do they exist and who makes them);
  • How to navigate and make use of standards in your work;
  • Ways you can get involved in contributing to new and existing standards.

Let’s begin our introduction to web standards by asking, “Why do we need standards for the web?

The World Wide Web Before Standards

We can think of the world wide web as an information ecosystem. People create content that is fed into the web. This content is then passed through a browser to allow people to access that information. 

An illustration the world wide web as an information ecosystem
(Large preview)

Before Web Standards, there weren’t many fixed rules for any part of this system; no formal rules as to how the content should be created, nor any requirements in terms of how a browser should serve up that information to the people that are requesting it.

So, in a way, the web operated a bit like that children’s toy where you have to sort the different shaped blocks into the correct holes. In this analogy, the different types of browsers are the different shaped holes and the content or websites, are the brightly colored blocks.

The sorting shape toy and its differently shaped coloured blocks
The sorting shape toy and its colorful blocks (Large preview)

In the past, as a content creator you would make a website to fit the browser it would be intended for. For example, you would create an IE-shaped block to be able to pass this through the Internet Explorer hole.

This meant that this website block you had created would only fit through that one hole and you would need to rebuild your content into other shapes for it to be viewed using any of the other browsers.

Fitting an internet explorer sized block into an internet explorer sized hole
Fitting an IE-sized block into an IE-sized hole (Large preview)

Developers in the 90s would often have to make three or four versions of every website they built, so that it would be compatible with each of the browsers available at the time. And what is more, browser makers in attempts to better their competition would introduce “features” that diversified their approach from their competitors.

In the beginning, it was probably fairer to say our Internet browser to content-matching toy looked more like this:

A sorting toy with three round holes and one square hole
A sorting toy with three round holes and one square hole (Large preview)

This was because browsers were built to handle pretty much the same stuff, which was largely text-based content. So, for the most part, a website block would fit through the majority of the holes, with the exception of maybe one where it might fit — but not perfectly. 

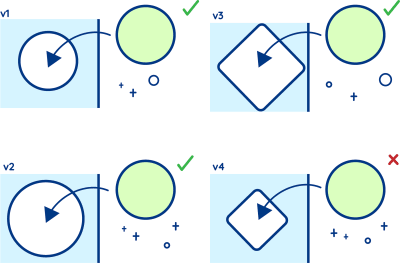
As the browsers developed, they begin to add features (e.g. by changing their shape) and it became more and more difficult to make a block that would pass through each of the browser holes. This even meant that a block that could once fit through one particular hole, didn’t fit through that hole any longer; adding these features into the browser would often result in poor reverse compatibility.

Four versions of a hole that starts out circular but changes with each version to become more diamond like in shape.
A hole that changes over time means all blocks will not always fit through. (Large preview)

This was really damaging for some developers. It created a system in which compatibility was limited to the content creators that could afford to continuously update and refactor their websites for each of the available browsers. For everyone else, every time a new feature or version was released, there was a chance your website would no longer work with that browser.

Web standards were introduced to protect the web ecosystem, to keep it open, free and accessible to all. Putting the web in a protective bubble and disbanding with the idea of having to build websites to suit specific browsers.

Putting the web in a protective bubble and disbanding with the idea of having to build websites to suit specific browsers.
(Large preview)

When standards were introduced, browser makers were encouraged to adhere to a standardized way of doing things — resulting in cross-compatibility becoming easier for content makers and there no longer being the need to build multiple versions of the same website.

Note: There are still a number of nuances about cross-compatibility amongst browsers. Even today, over 20 years since standards were introduced, we aren’t quite at “one-size fits all” just yet.

Here’s a quick look at some of the key moments in the history of web browser development:

Year Key moments
1990 Sir Tim Berners Lee releases the WorldWideWeb, the first way in which to browse the web.
1992 MidasWWW was developed as another WWW browser, which included a source code viewer.
1992 Also in 1992 Lynx was released, which was a text-based web browser, it could not display images or any other graphic content.
1993 NCSA Mosaic was released, this is the browser that is credit for being the first to popularize web browsing as it allowed the display of image embedded within text.
1995 Microsoft released Internet Explorer, previously Cello or Mosaic browsers were used on Windows products.
1996 Opera was released publicly, it was previously a research project for a Norwegian telecoms company Telnor.
2003 Safari was released by Apple, previously Macintosh computers shipped with Netscape Navigator or Cyberdog.
2004 In the wake of Netscape Navigator’s demise, Firefox was launched as a free, open-source browser.
2008 Chrome was launched by Google and within six years grew to encompass the majority of the browser market.
2015 Microsoft released Edge, the new browser for Microsoft, replacing Internet Explorer from Windows 10 onwards.

Source: “Web Browsers: A Brief History” by Rhiannon Williams

Why We Need Standards

Knowing a bit about the history of standards and why they were introduced, we can start to see the benefits of having standards for the World Wide Web. But why is it important that we continue to contribute to Web Standards? Here are just a few reasons: 

Keeping The Web Free And Accessible To All

Without the Web Standards community, browser makers would be the ones making decisions on what should and shouldn’t be features of the world wide web. This could lead to the web becoming a monopolized commodity, where only the largest players would have a say in what the future holds.

Helping Make Source Code Simpler; Reducing Development And Maintenance Time

As more browsers appeared and browser makers began to diversify in their approach, it became more and more difficult to create content that would be served in the same way across multiple browsers. This increased the amount of work required to make a fully compatible website, including bloating the source code for a web page. As developers today we still have to do the odd include [X script] so this works on [X web browser], but without Web Standards, this would be much worse.

Making The Web A More Accessible Place

Web standards help to standardize the way in which a website can interact with assistive technologies. Meaning that browser makers and web developers can incorporate instructions into their pages which can be interpreted by assistive technologies to maintain a common (or sometimes better) end-user experience.

Allowing For Backward Compatibility And Validation

Web standards have created a foundation which allows for new websites, that comply with standards, to work with older browser versions. This idea of backward compatibility is super important for keeping the web accessible. It doesn’t guarantee older browsers will show your content exactly as you expect, but it will ensure that the structure of the web document is understood and displayed accordingly. 

Helping Maintain Better SEO (Search Engine Optimization)

Another of the major hidden benefits (at the time that Web Standards was first introduced) was that a Web Standards compliant website was more discover-able by search engines. This became more evident when the Google search became the major player in the search engine world in the early 2000s.

Creating A Pool Of Common Knowledge

A world with web standards creates a place in which a set of rules exists, rules that every developer can follow, understand and become familiar with. In theory, this means that one developer could build a website that complies with standards and another developer could pick up where the former left off without much trouble. In reality, standards provide the foundation for this; but the idea relies heavily on developers writing well-documented code. 

Who Decides On What Becomes A Web Standard?

Standards are created by people. In the web and Internet space, there is a strong culture of consensus — which means a lot of talking and a lot of discussions.

The groups through which standards are developed are sometimes referred to as “Standards Development Organisations” or SDOs. Key SDOs in the web space include the Internet Engineering Task Force (IETF), the World Wide Web Consortium (W3C), the WHATWG, and ECMA TC39. Historically there were also groups like the Web Standards Project (WaSP), that advocated for Web Standards to be adopted by organizations.

The groups that work on the Internet and Web Standards generally operate under a royalty-free regime. That means when you make use of a web standard you don’t have to pay anyone — like someone who might hold a relevant patent. Whilst the idea that you might have to pay royalties to someone to build a web browser or website might seem absurd right now, it wasn’t too long ago that organizations like BT were trying to assert ownership of the concept of the hyperlink. Standards organizations like the ones listed below help keep the web free (or free from licensing fees at least).

What Is IETF?

The IETF is the grandparent of Internet standards organizations. It’s where underlying Internet technologies like TCP/IP (Transmission Control Protocol/Internet Protocol) and DNS (Domain Name System) are standardized. Another key technology developed in IETF is something called Hyper-Text Transport Protocol (HTTP) which you may have heard of.

If you’ve been paying attention to the rise of HTTP2 and the subsequent development of (UDP-based) HTTP3, this is where that work happens. Most of the work in IETF is focused on the lower levels of the Open Systems Interconnection model.

What Is W3C?

The World Wide Web Consortium (W3C) is an international community where member organizations, a full-time staff, invited experts and the public work together to develop Web Standards. Led by Web inventor and Director Tim Berners-Lee and CEO Jeffrey Jaffe, W3C’s mission is to lead the Web to its full potential.

The community was founded in 1994 at MIT (Massachusetts Institute of Technology) in collaboration with CERN. At the time of this post, W3C has 475 member companies and organizations and exists as a consortium between 4 academic institutions: MIT (USA), ERCIM (France), KEIO University (Japan) and Beihang University (China).

Work in W3C happens in working groups and community groups. Community groups are where a lot of initial innovation happens around new web technologies. New web standards can be produced by community groups but they are officially seen as “pre-standard.” Community groups are open for anyone to participate, whether or not the organization you work for or are affiliated with is a W3C member.

W3C working groups are where new web standards are officially minted. Working groups usually start with a submission of a standard, often something that is already shipping in some browsers. However, technical work on refining these standards happens within these groups before the standard goes for final approval as a “W3C Recommendation.” By the time something reaches “recommendation” phase in W3C, it’s most often implemented and in wide use across the web. 

Working groups are more difficult for people who are not affiliated with a member organization to become a part of. However, you may become an invited expert to a group. One reason why working groups are a little more difficult to join and operate with more process is that they also act as an intellectual property holder  —  through joining a W3C working group organizations and companies agree to the royalty-free licensing laid out in W3C’s patent policy.

W3C Advisory Board member Natasha Rooney has put together a great document, W3C Process Document for Busy People, that explains a lot of the ins and outs of working in W3C.

What Is The WHATWG?

The WHATWG was originally a splinter group from the W3C. It was formed in 2007 because some browser vendors didn’t agree with the direction in which the W3C was pushing HTML. WHATWG continues to be the place where HTML is developed and evolved. However, the community of participation in the HTML specification still includes many people from the W3C community, and many WHATWG-affiliated people participate in W3C working groups. 

At the time of this post, the relationship between the W3C and the WHATWG remains in flux. From a developer perspective, this doesn’t matter too much because developers can rely on resources like MDN to reflect the “truth” of which web technologies can be used in specific browsers. However, it has led to a lack of clarity, in terms of where to participate in the development of certain standards. WHATWG also has its own royalty-free license agreement  — the WHATWG participation agreement

What Is The “Why CG”?

The Web Incubator Community Group (WICG, pronounced Why-CG) is a special community group, within W3C, where some new and emerging web technologies are discussed and developed.

If you have a great idea for a new standard, a new feature for an existing standard or a new technology you think ought to be incorporated into the web, it’s worth checking here first to see if something like it is already being discussed. If it is, great! Jump into these discussions and lend your support. If not, then suggest it! That’s what this group is for.

What Is The ECMA TC39?

Ecma is a standards organization for information and communication systems, which was founded in 1961 to standardize computer systems in Europe. Its name comes from being previously known as the “European Computer Manufacturers Association” but it is now referred to as “Ecma International  —  European association for standardizing information and communication systems” since the organization went global in 1994.

The ECMA-262 standard outlines the ECMAScript Language Specification, which is the standardized specification of the scripting language known as JavaScript. There are ten editions of ECMA-262 that have been published (the tenth edition was published in June 2018).

TC39 (Technical Committee 39) is the committee that evolves JavaScript. Like the other groups listed here, its members are companies which include most of the major browser makers. The committee has regular meetings which are attended by delegates sent from the member organizations and also by invited experts. The TC39 operates on achieving consensus, as with many of the other groups, and the agreements made often lead to obligations for its members (in terms of future features that member organizations will need to implement). The TC39 process includes accelerating proposals through a set of stages, the progression of a proposal from one stage to the next must be approved by the committee. 

What Was The Web Standards Project?

The Web Standards Project was formed in 1998 as a resistance to the feature face-off happening between browsers in the 90s; with a primary goal of getting browser makers to comply with the standards set forth by the W3C.

As the organization grew and the browser wars ended, the project began to shift focus. The group began working with browser makers on improving their standards support, consulting software makers that created tooling for website creation and educating web designers and developers on the importance of web standards. The last of these points, resulted in the creation of the InterAct web curriculum framework which is now maintained by W3C.

The Web Standards Project ceased to be active in 2013. A final blog post was created on March 1st that gives thanks to the hard work of the members and supporters of the project. In the closing remarks of this post, readers are reminded that the job of the Web Standards Project is not entirely over, and that the responsibility now lies with thousands of developers who continue to care about ensuring the web remains a free, open, inter-operable and accessible resource.

How Does Something Become A Web Standard?

So, how are standards made? The short answer is through LOTS of discussions.

Proposals for new standards usually start as a discussion within a community group (this is especially the case in W3C) or through issues raised on the relevant GitHub repository.

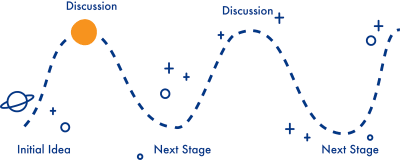
Across the different SDOs, there seems to then be a common theme of ascension; after the discussion has begun, it then moves up within the organization, and at each level, a deciding committee needs to reach a consensus to approve the elevation of that discussion. This is repeated until the discussion becomes a proposal, then that proposal becomes a draft and the draft goes on to become an official standard. 

After an idea has been presented, a discussion begins among a deciding committee that needs to reach a consensus to approve the elevation of that discussion. This is repeated until the discussion becomes a proposal, then a draft, and finally an official standard.
(Large preview)

Now as previously mentioned, when something isn’t an official standard, this does not necessarily mean that it is not in use within some browsers. In fact, by the time something becomes a standard, it is likely to already have widespread use across many of the available browsers. In this instance, the role of the standard is part of the normalizing and adoption process for new features; it sets out the expected use for something and then outlines how browser makers and developers can conform to this expectation. 

What Is TPAC?

Every year, W3C holds one massive event, a week-long multi-group meeting punctuated by a one-day unconference on the Wednesday (the Technical Plenary) combined with a meeting of its Advisory Committee (a group consisting of one person for every organization or company that is a W3C member). Put Technical Plenary and Advisory Committee together, and you get TPAC (often pronounced tee-pac). Although it’s a W3C-run event, you will often find people “from” WHATWG, IETF or TC39 here as well.

This past year, Samsung Internet people came together to participate in TPAC. We also sponsored diversity scholarships which are intended to bring people from under-represented groups to TPAC and to the Web Standards community.

My First TPAC

When I first heard the team talking about TPAC, I had no idea what to expect. After reading up about the event on the TPAC website, I signed myself up and booked my travel. Soon enough, I was on a train from London to Lyon with the team. 

The banner at the front entrance of the TPAC venue
The banner at the front entrance of the TPAC venue (Large preview)

On arrival, I was given my Lanyard and a map of the various rooms where all the action was happening. My goal, for the three days I was attending, was to join in with as much accessibility type things as I could. Having arrived shortly after things had begun on my first day, I stood staring at a closed door for the Accessibility Guidelines working group that I wanted to sit in on. Lots of things went through my mind at that moment; “Perhaps I should wait until the break?” “No, don’t be silly, that’s still an hour away.” “Maybe I should knock?” “But wouldn’t that be more interruptive than just going in?” “Maybe I shouldn’t go in at all…” But after a few minutes, I worked up the courage to walk into the room.   There was a round table set up (which is typical of a lot of these sessions) with folks sitting at the tables with laptops; along with a number of seats arranged around the edge of the room for people to join in a more observational role. Each group also had a chat room on IRC, which anyone from the W3C membership could join (whether attending TPAC in person or not). I sat at the end of one of the tables; though I’m still not sure whether that was the proper thing to do in terms of etiquette. 

The gigantic bear statue outside of the Cité Centre de Congrès de Lyon, which was the venue for TPAC 2018.
The gigantic bear statue outside of the Cité Centre de Congrès de Lyon, which was the venue for TPAC 2018. (Large preview)

Initially, I was worried that my presence stuck out as much as the gigantic bear statue outside the venue; but no-one in the room paid any mind to my arrival and so the discussion continued. The group was about to move onto receiving an update on the work being done by the Silver Task Force; a community group that is trying to make the accessibility standards themselves more accessible. 

It was really interesting to sit at the table for these discussions. Whilst as a first-time attendee, some of the language took some getting used to (terms like ‘conformance’ and ‘normative’); it was super nice to be inside of a room full of people who cared so much about accessibility. Many of the attendees of this working group spoke from a position of lived experience in terms of using the web with an accessibility requirement. Having spent my last three years researching accessibility requirements in digital music technology, I felt quite at home following along with the questions raised by the members of this group.

The work showcased by the Silver Task Force in this first discussion really sparked an interest for me. It felt like quite a refreshing viewpoint of how to make standards, in general, more accessible and frame them in such a way that makes for easier navigation and more tailored advice and guidance. For the following few days, I joined this (much smaller) group and had the chance to input into the conversations  —  which was really positive. Since TPAC, I have joined the community group for the Silver Task Force and have plans to join the weekly meetings in the new year. 

The Samsung group posing for an after-dinner picture around the table
Our Samsung group out to dinner during the week TPAC. (Large preview)

One of the nice things about TPAC (for those not chairing a working group or in some sort of leading role) was the ability to dip in and out of sessions. In amongst the things I attended over the few days I was at TPAC, there was a session from the Web Incubator community group (WICG), a developer meet-up with talks from prominent community members and demonstrations of new web technologies, and a Diversity and Inclusion for W3C meeting. An extra added bonus of going to TPAC with the Samsung Internet team was that we got to meet up with people from our team based in Korea, as well as other Samsung team members from the USA. 

How To Use Web Standards In Your Work

So, now that you know the why and wherefore of Web Standards, how do you go about using web standards in your work?

Mozilla Developer Network Web Docs (MDN Web Docs)

We (the Samsung Internet team) recommend that if you’re interested in learning more about a particular web standard or technology, you start with the MDN (Mozilla Developer Network) Web Docs. Whilst MDN WebDocs started as Mozilla Project, more recently it has become the place web developers go for cross-browser documentation on web platform technologies.

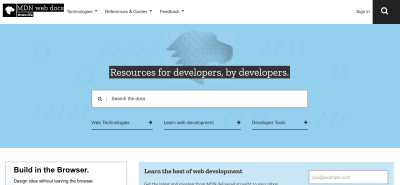
The MDN web docs homepage
The MDN Web Docs homepage (Large preview)

Last year, Samsung joined Bocoup, Google and Microsoft and W3C to form the MDN WebDocs Product Advisory Board to help ensure that MDN maintains this position.

When you search a technology in MDN, you will see a browser compatibility matrix letting you know what the browser support is. You will also find a link to the most relevant and up to date version of the standard. When you follow a link to a standard, you will be directed to the relevant web page outlining that standard and its technical specifications. These pages can be a little overwhelming at first, as they are somewhat ‘academic’ in structure. 

To give you some tips on navigating the documentation, let’s take a look at a standard I’m most familiar with: the W3C Web Content Accessibility Guidelines (2.1).

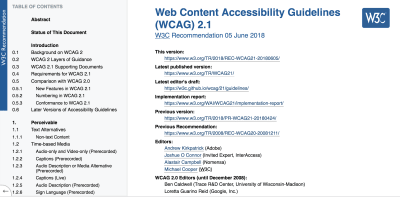
The Web Content Accessibility Guidelines (WCAG 2.1) web standard home page
The WCAG 2.1 web standard home page (Large preview)

This is the format of a W3C web standard. It features a table of contents on the left-hand side of the page while the content is organized into very structured headers — starting with the version, reports and editors details. These headers in standards are often used to quote the relevant parts of a standard “Oh, but WCAG 2.1 1.2.2 says”; but for those without the alphanumeric memory of a hard-disk, do not fear, it is not a requirement that you have to know these things by heart.

My first piece of advice about navigating web standards is to try not to be overwhelmed by these. If you’ve come from the non-academic route into web development like me, the structure of these documents can at first seem quite formal, and the language can feel this way, too. Don’t let this be a reason to navigate away from using this as a source of information  —  as quite frankly it is the best source of information available for finding out how and why web things work in the way that they do.

Here are some quick tips for working with web standards:

  • The TL;DR version
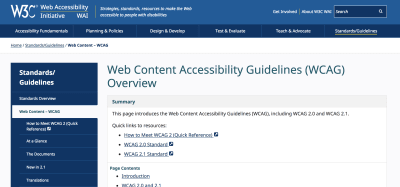
    Firstly, it’s important to understand that there isn’t a TL;DR for web standards. The reason they are these long and comprehensive documents is because they have to be. There can’t be any stone unturned when it comes to exacting the structure and expected us of web development things. However (a pro tip, and a way to avoid information overwhelm), is to start with the abstract of the standard and follow any links to introductory documents. In my example, the WCAG 2.1 standard document leads us to another linked page for the Web Content Accessibility Guidelines Overview. Which provides a range of useful documentation including a quick reference guide on how to meet WCAG 2
The homepage for the Web Content Accessibility Guidelines Overview
The homepage for the WCAG Overview (Large preview)
  • Make use the glossary of terms
    This just helps to understand the exact meaning of words and phrases in the context of the web standard . Let’s face it; there are so many terms out there with multiple meanings. Checking out the glossary also helps navigate some of the more academic terms.
The WCAG 2.1 Glossary section, which provides contextual definitions of words and phrases used within the standard.
The WCAG 2.1 Glossary section, which provides contextual definitions of words and phrases used within the standard. (Large preview)
  • ‘Find in page’ is your friend
    Once you have familiarized yourself with an overview and got an idea about the terms used within a web standard, you can start to search through the documentation for the information you require. The web standards are designed in such a way that you can consume them in a number of ways. If you seek to gain a comprehensive understanding then reading from start to finish is advised; however, you can also drop in and out of the sections as you require them. The good folks creating web standards have made efforts to ensure that referential content is linked to the source and any helpful resources are also included, which helps support the kind of “on demand” usage that is common. Take this example from WCAG 2.1:
WCAG 2.1 Guideline on Text Alternatives, in amongst the text are links to success criterions and other useful guidelines.
WCAG 2.1 Guideline on Text Alternatives, in amongst the text are links to success criterions and other useful guidelines. (Large preview)
  • If you’re not sure — ask!
    This community is put together from a bunch of people who care and have an investment in the future of web technologies. If you want to make sure you are adhering to Web Standards but maybe have got caught up in a language barrier, and you’re struggling to interpret what is meant by a phrase within a web standard, there are many folks out there that can help. You can raise issues through the W3C GitHub repositories for the W3C Web Standards or join the conversations about Web Standards through the suggested resources on the participate section of the W3C website.

How Do I Get Involved?

So, now that you know how to read up on your standards, what about getting involved? 

Well, here are a few places to start: 

  • GitHub repositories for standards
    The WC3, TC39, WhatWG and WICG all have organizations on GitHub that contain repositories for the work they are doing. Be sure to check in on the READme, contribution guidelines and code of conduct (if there is one) before you begin. Use the issues of a repository to look at what is currently being discussed in terms of future developments for the standard it relates to. 
  • The W3C website
    Here you can look at all the working groups, community groups, and forums. It is a great place to start; if you join the organization and become a member of a community group or working group you’ll be invited to the ongoing discussions, meetings, and events for that group.
  • The WhatWG website
    For all things WhatWG. Here there are guides on how to participate, FAQs, links to the GitHub repositories and a blog that is maintained by members of the WhatWG.
  • The WICG website
    Whilst the Web Incubator Community Group can be found from the W3C website, they are worth a separate shout-out here as they have their own web community page and Discourse instance. (For those of you not familiar with Discourse, it allows communities to create and maintain forums for discussion.)
  • The TC39 standard
    This is pretty comprehensive and includes links to the ways in which you can to contribute to the standard. 
  • Speak to Developer Advocates
    Many Web Developer Advocates are members of an SDO or known to be working on standards; teams like ours (the Samsung Internet Developer Advocates) are often involved in the work of Web Standards and happy to talk to developers that are interested in them. After all, standards have a huge impact on the future of the web and in turn the work that we do. So, depending on the web standard that interests you, you’ll be able to find folks like us (who are part of the work for those standards) through social media spaces like Twitter or Mastodon.

Thanks for reading! Remember that web standards impact everyone that builds or consumes websites, so the work of Web Standards is something we should all care about.

If you want to chat more about web standards, accessibility on the web, web audio or open-source adventures  —  you can find me on Twitter and I’m also on Mastodon. ✨

A huge thanks to Daniel Appelquist, who helped bring this article together.

Smashing Editorial (ra, il)