The Safest Way To Hide Your API Keys When Using React

Back in the day, developers had to write all sorts of custom code to get different applications to communicate with each other. But, these days, Application Programming Interfaces (APIs) make it so much easier. APIs provide you with everything you need to interact with different applications smoothly and efficiently, most commonly where one application requests data from the other application.

While APIs offer numerous benefits, they also present a significant risk to your application security. That is why it is essential to learn about their vulnerabilities and how to protect them. In this article, we’ll delve into the wonderful world of API keys, discuss why you should protect your API keys, and look at the best ways to do so when using React.

What Are API Keys?

If you recently signed up for an API, you will get an API key. Think of API keys as secret passwords that prove to the provider that it is you or your app that’s attempting to access the API. While some APIs are free, others charge a cost for access, and because most API keys have zero expiration date, it is frightening not to be concerned about the safety of your keys.

Why Do API Keys Need To Be Protected?

Protecting your API keys is crucial for guaranteeing the security and integrity of your application. Here are some reasons why you ought to guard your API keys:

  • To prevent unauthorized API requests.
    If someone obtains your API key, they can use it to make unauthorized requests, which could have serious ramifications, especially if your API contains sensitive data.
  • Financial insecurity.
    Some APIs come with a financial cost. And if someone gains access to your API key and exceeds your budget requests, you may be stuck with a hefty bill which could cost you a ton and jeopardize your financial stability.
  • Data theft, manipulation, or deletion.
    If a malicious person obtains access to your API key, they may steal, manipulate, delete, or use your data for their purposes.
Best Practices For Hiding API Keys In A React Application

Now that you understand why API keys must be protected, let’s take a look at some methods for hiding API keys and how to integrate them into your React application.

Environment Variables

Environment variables (env) are used to store information about the environment in which a program is running. It enables you to hide sensitive data from your application code, such as API keys, tokens, passwords, and just any other data you’d like to keep hidden from the public.

One of the most popular env packages you can use in your React application to hide sensitive data is the dotenv package. To get started:

  1. Navigate to your react application directory and run the command below.
    npm install dotenv --save
    
  2. Outside of the src folder in your project root directory, create a new file called .env.

  3. In your .env file, add the API key and its corresponding value in the following format:
    // for CRA applications
    REACT_APP_API_KEY = A1234567890B0987654321C ------ correct
    
    // for Vite applications
    VITE_SOME_KEY = 12345GATGAT34562CDRSCEEG3T  ------ correct
    
  4. Save the .env file and avoid sharing it publicly or committing it to version control.
  5. You can now use the env object to access your environment variables in your React application.
    // for CRA applications
    'X-RapidAPI-Key':process.env.REACT_APP_API_KEY
    // for Vite  applications
    'X-RapidAPI-Key':import.meta.env.VITE_SOME_KEY
    
  6. Restart your application for the changes to take effect.

However, running your project on your local computer is only the beginning. At some point, you may need to upload your code to GitHub, which could potentially expose your .env file. So what to do then? You can consider using the .gitignore file to hide it.

The .gitignore File

The .gitignore file is a text file that instructs Git to ignore files that have not yet been added to the repository when it’s pushed to the repo. To do this, add the .env to the .gitignore file before moving forward to staging your commits and pushing your code to GitHub.

// .gitignore
# dependencies
/node_modules
/.pnp
.pnp.js

# api keys
.env

Keep in mind that at any time you decide to host your projects using any hosting platforms, like Vercel or Netlify, you are to provide your environment variables in your project settings and, soon after, redeploy your app to view the changes.

Back-end Proxy Server

While environment variables can be an excellent way to protect your API keys, remember that they can still be compromised. Your keys can still be stolen if an attacker inspects your bundled code in the browser. So, what then can you do? Use a back-end proxy server.

A back-end proxy server acts as an intermediary between your client application and your server application. Instead of directly accessing the API from the front end, the front end sends a request to the back-end proxy server; the proxy server then retrieves the API key and makes the request to the API. Once the response is received, it removes the API key before returning the response to the front end. This way, your API key will never appear in your front-end code, and no one will be able to steal your API key by inspecting your code. Great! Now let’s take a look at how we can go about this:

  1. Install necessary packages.
    To get started, you need to install some packages such as Express, CORS, Axios, and Nodemon. To do this, navigate to the directory containing your React project and execute the following command:
    npm install express cors axios nodemon
    
  2. Create a back-end server file.
    In your project root directory, outside your src folder, create a JavaScript file that will contain all of your requests to the API.

  3. Initialize dependencies and set up an endpoint.
    In your backend server file, initialize the installed dependencies and set up an endpoint that will make a GET request to the third-party API and return the response data on the listened port. Here is an example code snippet:
    // defining the server port
    const port = 5000
    
    // initializing installed dependencies
    const express = require('express')
    require('dotenv').config()
    const axios = require('axios')
    const app = express()
    const cors = require('cors')
    app.use(cors())
    
    // listening for port 5000
    app.listen(5000, ()=> console.log(Server is running on ${port} ))
    
    // API request
    app.get('/', (req,res)=>{
    const options = { method: 'GET', url: 'https://wft-geo-db.p.rapidapi.com/v1/geo/adminDivisions', headers: { 'X-RapidAPI-Key':process.env.REACT_APP_API_KEY, 'X-RapidAPI-Host': 'wft-geo-db.p.rapidapi.com' } }; axios.request(options).then(function (response) { res.json(response.data); }).catch(function (error) { console.error(error); }); }
  4. Add a script tag in your package.json file that will run the back-end proxy server.

  5. Kickstart the back-end server by running the command below and then, in this case, navigate to localhost:5000.
    npm run start:backend
    
  6. Make a request to the backend server (http://localhost:5000/) from the front end instead of directly to the API endpoint. Here’s an illustration:
    import axios from "axios";
    import {useState, useEffect} from "react"
    
    function App() {
    
      const [data, setData] = useState(null)
    
      useEffect(()=>{
        const options = {
          method: 'GET',
          url: "http://localhost:5000",
        }
        axios.request(options)
        .then(function (response) {
            setData(response.data.data)
        })
        .catch(function (error) {
            console.error(error);
        })
    }, []) console.log(data) return ( <main className="App"> <h1>How to Create a Backend Proxy Server for Your API Keys</h1> {data && data.map((result)=>( <section key ={result.id}> <h4>Name:{result.name}</h4> <p>Population:{result.population}</p> <p>Region:{result.region}</p> <p>Latitude:{result.latitude}</p> <p>Longitude:{result.longitude}</p> </section> ))} </main> ) } export default App;

Okay, there you have it! By following these steps, you'll be able to hide your API keys using a back-end proxy server in your React application.

Key Management Service

Even though environment variables and the back-end proxy server allow you to safely hide your API keys online, you are still not completely safe. You may have friends or foes around you who can access your computer and steal your API key. That is why data encryption is essential.

With a key management service provider, you can encrypt, use, and manage your API keys. There are tons of key management services that you can integrate into your React application, but to keep things simple, I will only mention a few:

  • AWS Secrets Manager
    The AWS Secrets Manager is a secret management service provided by Amazon Web Services. It enables you to store and retrieve secrets such as database credentials, API keys, and other sensitive information programmatically via API calls to the AWS Secret Manager service. There are a ton of resources that can get you started in no time.
  • Google Cloud Secret Manager
    The Google Cloud Secret Manager is a key management service provided and fully managed by the Google Cloud Platform. It is capable of storing, managing, and accessing sensitive data such as API keys, passwords, and certificates. The best part is that it seamlessly integrates with Google’s back-end-as-a-service features, making it an excellent choice for any developer looking for an easy solution.
  • Azure Key Vault
    The Azure Key Vault is a cloud-based service provided by Microsoft Azure that allows you to seamlessly store and manage a variety of secrets, including passwords, API keys, database connection strings, and other sensitive data that you don’t want to expose directly in your application code.

There are more key management services available, and you can choose to go with any of the ones mentioned above. But if you want to go with a service that wasn’t mentioned, that’s perfectly fine as well.

Tips For Ensuring Security For Your API Keys

You have everything you need to keep your API keys and data secure. So, if you have existing projects in which you have accidentally exposed your API keys, don’t worry; I've put together some handy tips to help you identify and fix flaws in your React application codebase:

  1. Review your existing codebase and identify any hardcoded API key that needs to be hidden.
  2. Use environment variables with .gitignore to securely store your API keys. This will help to prevent accidental exposure of your keys and enable easier management across different environments.
  3. To add an extra layer of security, consider using a back-end proxy server to protect your API keys, and, for advanced security needs, a key management tool would do the job.
Conclusion

Awesome! You can now protect your API keys in React like a pro and be confident that your application data is safe and secure. Whether you use environment variables, a back-end proxy server, or a key management tool, they will keep your API keys safe from prying eyes.

Further Reading On SmashingMag

How To Build A Group Chat App With Vanilla JS, Twilio And Node.js

Chat is becoming an increasingly popular communication medium in both business and social contexts. Businesses use chat for customer and employee intra-company communication like with Slack, Microsoft Teams, Chanty, HubSpot Live Chat, Help Scout, etc. Most social networks and communication apps also offer chat as an option by default, like on Instagram, Facebook, Reddit, and Twitter. Other apps like Discord, Whatsapp, and Telegram are mostly chat-based, with group chats being one of their main functionalities.

While there exist numerous products to facilitate chat, you may need a custom-tailored solution for your site that fits your particular communication needs. For example, many of these products are stand-alone apps and may not be able to integrate within your own site. Having your users leave your website to chat may not be the greatest option as it can affect user experience and conversion. On the flip side, building a chat app from scratch can be a daunting and sometimes overwhelming task. However, by using APIs like Twilio Conversations you can simplify the process of creating them. These communication APIs handle group creation, adding participants, sending messages, notifications, among other important chat functions. Backend apps that use these APIs only have to handle authentication and make calls to these APIs. Front-end apps then display conversations, groups, and messages from the backend.

In this tutorial, you will learn how to create a group chat app using the Twilio Conversations API. The front end for this app will be built using HTML, CSS, and Vanilla JavaScript. It will allow users to create group chats, send invites, login, as well as send and receive messages. The backend will be a Node.js app. It will provide authentication tokens for chat invitees and manage chat creation.

Prerequisites

Before you can start this tutorial, you need to have the following:

  • Node.js installed. You’ll use it primarily for the backend app and to install dependencies in the front-end app.
    You can get it using a pre-built installer available on the Node.js downloads page.
  • A Twilio account.
    You can create one on the Twilio website at this link.
  • http-server to serve the front-end app.
    You can install it by running npm i -g http-server. You can also run it with npx http-server for one-off runs.
  • MongoDB for session storage in the backend app.
    Its installation page has a detailed guide on how to get it running.
The Backend App

To send chat messages using Twilio API, you need a conversation. Chat messages are sent and received within a conversation. The people sending the messages are called participants. A participant can only send a message within a conversation if they are added to it. Both conversations and participants are created using the Twilio API. The backend app will perform this function.

A participant needs an access token to send a message and get their subscribed conversations. The front-end portion of this project will use this access token. The backend app creates the token and sends it to the frontend. There it will be used to load conversations and messages.

Project Starter

You’ll call the backend app twilio-chat-server. A scaffolded project starter for it is available on Github. To clone the project and get the starter, run:

git clone https://github.com/zaracooper/twilio-chat-server.git
cd twilio-chat-server
git checkout starter

The backend app takes this structure:

.
├── app.js
├── config/
├── controllers/
├── package.json
├── routes/
└── utils/

To run the app, you’ll use the node index.js command.

Dependencies

The backend app needs 8 dependencies. You can install them by running:

npm i 

Here’s a list of each of the dependencies:

  • connect-mongo connects to MongoDB, which you’ll use as a session store;
  • cors handles CORS;
  • dotenv loads environment variables from the .env file that you will create in a later step;
  • express is the web framework you’ll use for the backend;
  • express-session provides middleware to handle session data;
  • http-errors helps create server errors;
  • morgan handles logging;
  • twilio creates the Twilio client, generates tokens, creates conversations, and adds participants.

Configuration

The config folder is responsible for loading configuration from environment variables. The configuration is grouped into three categories: configuration for CORS, Twilio, and the MongoDB session DB. When the environment is development, you will load config from the .env file using dotenv.

Start by creating the .env file on the terminal. This file is already added to the .gitignore file to prevent the sensitive values it contains from being checked into the repository.

touch .env

Here’s what your .env should look like:

# Session DB Config
SESSION_DB_HOST=XXXX
SESSION_DB_USER=XXXX
SESSION_DB_PASS=XXXX
SESSION_DB_PORT=XXXX
SESSION_DB_NAME=XXXX
SESSION_DB_SECRET=XXXX

# Twilio Config
TWILIO_ACCOUNT_SID=XXXX
TWILIO_AUTH_TOKEN=XXXX
TWILIO_API_KEY=XXXX
TWILIO_API_SECRET=XXXX

# CORS Client Config
CORS_CLIENT_DOMAIN=XXXX

You can learn how to create a user for your session DB from this MongoDB manual entry. Once you create a session database and a user who can write to it, you can fill the SESSION_DB_USER, SESSION_DB_PASS, and SESSION_DB_NAME values. If you’re running a local instance of MongoDB, the SESSION_DB_HOST would be localhost, and the SESSION_DB_PORT usually is 27017. The SESSION_DB_SECRET is used by express-session to sign the session ID cookie, and it can be any secret string you set.

In the next step, you will get credentials from the Twilio Console. The credentials should be assigned to the variables with the TWILIO_ prefix. During local development, the front-end client will run on http://localhost:3000. So, you can use this value for the CORS_CLIENT_DOMAIN environment variable.

Add the following code to config/index.js to load environment variables.

import dotenv from 'dotenv';

if (process.env.NODE_ENV == 'development') {
    dotenv.config();
}

const corsClient = {
    domain: process.env.CORS_CLIENT_DOMAIN
};

const sessionDB = {
    host: process.env.SESSION_DB_HOST,
    user: process.env.SESSION_DB_USER,
    pass: process.env.SESSION_DB_PASS,
    port: process.env.SESSION_DB_PORT,
    name: process.env.SESSION_DB_NAME,
    secret: process.env.SESSION_DB_SECRET
};

const twilioConfig = {
    accountSid: process.env.TWILIO_ACCOUNT_SID,
    authToken: process.env.TWILIO_AUTH_TOKEN,
    apiKey: process.env.TWILIO_API_KEY,
    apiSecret: process.env.TWILIO_API_SECRET
};

const port = process.env.PORT || '8000';

export { corsClient, port, sessionDB, twilioConfig };

The environment variables are grouped into categories based on what they do. Each of the configuration categories has its own object variable, and they are all exported for use in other parts of the app.

Getting Twilio Credentials From the Console

To build this project, you’ll need four different Twilio credentials: an Account SID, an Auth Token, an API key, and an API secret. In the console, on the General Settings page, scroll down to the API Credentials section. This is where you will find your Account SID and Auth Token.

To get an API Key and Secret, go to the API Keys page. You can see it in the screenshot below. Click the + button to go to the New API Key page.

On this page, add a key name and leave the KEY TYPE as Standard, then click Create API Key. Copy the API key and secret. You will add all these credentials in a .env file as you shall see in subsequent steps.

Utils

The backend app needs two utility functions. One will create a token, and the other will wrap async controllers and handle errors for them.

In utils/token.js, add the following code to create a function called createToken that will generate Twilio access tokens:

import { twilioConfig } from '../config/index.js';
import twilio from 'twilio';

function createToken(username, serviceSid) {
    const AccessToken = twilio.jwt.AccessToken;
    const ChatGrant = AccessToken.ChatGrant;

    const token = new AccessToken(
        twilioConfig.accountSid,
        twilioConfig.apiKey,
        twilioConfig.apiSecret,
        { identity: username }
    );

    const chatGrant = new ChatGrant({
        serviceSid: serviceSid,
    });

    token.addGrant(chatGrant);

    return token.toJwt();
}

In this function, you generate access tokens using your Account SID, API key, and API secret. You can optionally supply a unique identity which could be a username, email, etc. After creating a token, you have to add a chat grant to it. The chat grant can take a conversation service ID among other optional values. Lastly, you’ll convert the token to a JWT and return it.

The utils/controller.js file contains an asyncWrapper function that wraps async controller functions and catches any errors they throw. Paste the following code into this file:

function asyncWrapper(controller) {
    return (req, res, next) => Promise.resolve(controller(req, res, next)).catch(next);
}

export { asyncWrapper, createToken };

Controllers

The backend app has four controllers: two for authentication and two for handling conversations. The first auth controller creates a token, and the second deletes it. One of the conversations controllers creates new conversations, while the other adds participants to existing conversations.

Conversation Controllers

In the controllers/conversations.js file, add these imports and code for the StartConversation controller:

import { twilioConfig } from '../config/index.js';
import { createToken } from '../utils/token.js';
import twilio from 'twilio';

async function StartConversation(req, res, next) {
    const client = twilio(twilioConfig.accountSid, twilioConfig.authToken);

    const { conversationTitle, username } = req.body;

    try {
        if (conversationTitle && username) {
            const conversation = await client.conversations.conversations
                .create({ friendlyName: conversationTitle });

            req.session.token = createToken(username, conversation.chatServiceSid);
            req.session.username = username;

            const participant = await client.conversations.conversations(conversation.sid)
                .participants.create({ identity: username })

            res.send({ conversation, participant });
        } else {
            next({ message: 'Missing conversation title or username' });
        }
    }
    catch (error) {
        next({ error, message: 'There was a problem creating your conversation' });
    }
}

The StartConversation controller first creates a Twilio client using your twilioConfig.accountSid and twilioConfig.authToken which you get from config/index.js.

Next, it creates a conversation. It needs a conversation title for this, which it gets from the request body. A user has to be added to a conversation before they can participate in it. A participant cannot send a message without an access token. So, it generates an access token using the username provided in the request body and the conversation.chatServiceSid. Then the user identified by the username is added to the conversation. The controller completes by responding with the newly created conversation and participant.

Next, you need to create the AddParticipant controller. To do this, add the following code below what you just added in the controllers/conversations.js file above:

async function AddParticipant(req, res, next) {
    const client = twilio(twilioConfig.accountSid, twilioConfig.authToken);

    const { username } = req.body;
    const conversationSid = req.params.id;

    try {
        const conversation = await client.conversations.conversations
            .get(conversationSid).fetch();

        if (username && conversationSid) {
            req.session.token = createToken(username, conversation.chatServiceSid);
            req.session.username = username;

            const participant = await client.conversations.conversations(conversationSid)
                .participants.create({ identity: username })

            res.send({ conversation, participant });
        } else {
            next({ message: 'Missing username or conversation Sid' });
        }
    } catch (error) {
        next({ error, message: 'There was a problem adding a participant' });
    }
}

export { AddParticipant, StartConversation };

The AddParticipant controller adds new participants to already existing conversations. Using the conversationSid provided as a route parameter, it fetches the conversation. It then creates a token for the user and adds them to the conversation using their username from the request body. Lastly, it sends the conversation and participant as a response.

Auth Controllers

The two controllers in controllers/auth.js are called GetToken and DeleteToken. Add them to the file by copying and pasting this code:

function GetToken(req, res, next) {
    if (req.session.token) {
        res.send({ token: req.session.token, username: req.session.username });
    } else {
        next({ status: 404, message: 'Token not set' });
    }
}

function DeleteToken(req, res, _next) {
    delete req.session.token;
    delete req.session.username;

    res.send({ message: 'Session destroyed' });
}

export { DeleteToken, GetToken };

The GetToken controller retrieves the token and username from the session if they exist and returns them as a response. DeleteToken deletes the session.

Routes

The routes folder has three files: index.js, conversations.js, and auth.js.

Add these auth routes to the routes/auth.js file by adding this code:

import { Router } from 'express';

import { DeleteToken, GetToken } from '../controllers/auth.js';

var router = Router();

router.get('/', GetToken);
router.delete('/', DeleteToken);

export default router;

The GET route at the / path returns a token while the DELETE route deletes a token.

Next, copy and paste the following code to the routes/conversations.js file:

import { Router } from 'express';
import { AddParticipant, StartConversation } from '../controllers/conversations.js';
import { asyncWrapper } from '../utils/controller.js';

var router = Router();

router.post('/', asyncWrapper(StartConversation));
router.post('/:id/participants', asyncWrapper(AddParticipant));

export default router;

In this file, the conversations router is created. A POST route for creating conversations with the path / and another POST route for adding participants with the path /:id/participants are added to the router.

Lastly, add the following code to your new routes/index.js file.

import { Router } from 'express';

import authRouter from './auth.js';
import conversationRouter from './conversations.js';

var router = Router();

router.use('/auth/token', authRouter);
router.use('/api/conversations', conversationRouter);

export default router;

By adding the conversation and auth routers here, you are making them available at /api/conversations and /auth/token to the main router respectively. The router is then exported.

The Backend App

Now it’s time to put the backend pieces together. Open the index.js file in your text editor and paste in the following code:

import cors from 'cors';
import createError from 'http-errors';
import express, { json, urlencoded } from 'express';
import logger from 'morgan';
import session from 'express-session';
import store from 'connect-mongo';

import { corsClient, port, sessionDB } from './config/index.js';

import router from './routes/index.js';

var app = express();

app.use(logger('dev'));
app.use(json());
app.use(urlencoded({ extended: false }));

app.use(cors({
    origin: corsClient.domain,
    credentials: true,
    methods: ['GET', 'POST', 'DELETE'],
    maxAge: 3600 * 1000,
    allowedHeaders: ['Content-Type', 'Range'],
    exposedHeaders: ['Accept-Ranges', 'Content-Encoding', 'Content-Length', 'Content-Range']
}));
app.options('*', cors());

app.use(session({
    store: store.create({
        mongoUrl: mongodb://${sessionDB.user}:${sessionDB.pass}@${sessionDB.host}:${sessionDB.port}/${sessionDB.name},
        mongoOptions: { useUnifiedTopology: true },
        collectionName: 'sessions'
    }),
    secret: sessionDB.secret,
    cookie: {
        maxAge: 3600 * 1000,
        sameSite: 'strict'
    },
    name: 'twilio.sid',
    resave: false,
    saveUninitialized: true
}));

app.use('/', router);

app.use(function (_req, _res, next) {
    next(createError(404, 'Route does not exist.'));
});

app.use(function (err, _req, res, _next) {
    res.status(err.status || 500).send(err);
});

app.listen(port);

This file starts off by creating the express app. It then sets up JSON and URL-encoded payload parsing and adds the logging middleware. Next, it sets up CORS and the session handling. As mentioned earlier, MongoDB is used as the session store.

After all that is set up, it then adds the router created in the earlier step before configuring error handling. Lastly, it makes the app listen to and accept connections at the port specified in the .env file. If you haven’t set the port, the app will listen on port 8000.

Once you’re finished creating the backend app, make sure MongoDB is running and start it by running this command on the terminal:

NODE_ENV=development npm start

You pass the NODE_ENV=development variable, so that configuration is loaded from the local .env file.

The Front-end

The front-end portion of this project serves a couple of functions. It allows users to create conversations, see the list of conversations they are a part of, invite others to conversations they created, and send messages within conversations. These roles are achieved by four pages:

  • a conversations page,
  • a chat page,
  • an error page,
  • a login page.

You’ll call the front-end app twilio-chat-app. A scaffolded starter exists for it on Github. To clone the project and get the starter, run:

git clone https://github.com/zaracooper/twilio-vanilla-js-chat-app.git
cd twilio-vanilla-js-chat-app
git checkout starter

The app takes this structure:

.
├── index.html
├── pages
│   ├── chat.html
│   ├── conversation.html
│   ├── error.html
│   └── login.html
├── scripts
│   ├── chat.js
│   ├── conversation.js
│   └── login.js
└── styles
    ├── chat.css
    ├── main.css
    └── simple-page.css

The styling and HTML markup have already been added for each of the pages in the starter. This section will only cover the scripts you have to add.

Dependencies

The app has two dependencies: axios and @twilio/conversations. You’ll use axios to make requests to the backend app and @twilio/conversations to send and fetch messages and conversations in scripts. You can install them on the terminal by running:

npm i

The Index Page

This page serves as a landing page for the app. You can find the markup for this page (index.html) here. It uses two CSS stylesheets: styles/main.css which all pages use and styles/simple-page.css which smaller, less complicated pages use.

You can find the contents of these stylesheets linked in the earlier paragraph. Here is a screenshot of what this page will look like:

The Error Page

This page is shown when an error occurs. The contents of pages/error.html can be found here. If an error occurs, a user can click the button to go to the home page. There, they can try what they were attempting again.

The Conversations Page

On this page, a user provides the title of a conversation to be created and their username to a form.

The contents of pages/conversation.html can be found here. Add the following code to the scripts/conversation.js file:

window.twilioChat = window.twilioChat || {};

function createConversation() {
    let convoForm = document.getElementById('convoForm');
    let formData = new FormData(convoForm);

    let body = Object.fromEntries(formData.entries()) || {};

    let submitBtn = document.getElementById('submitConvo');
    submitBtn.innerText = "Creating..."
    submitBtn.disabled = true;
    submitBtn.style.cursor = 'wait';

    axios.request({
        url: '/api/conversations',
        baseURL: 'http://localhost:8000',
        method: 'post',
        withCredentials: true,
        data: body
    })
        .then(() => {
            window.twilioChat.username = body.username;
            location.href = '/pages/chat.html';
        })
        .catch(() => {
            location.href = '/pages/error.html';
        });
}

When a user clicks the Submit button, the createConversation function is called. In it, the contents of the form are collected and used in the body of a POST request made to http://localhost:8000/api/conversations/ in the backend.

You will use axios to make the request. If the request is successful, a conversation is created and the user is added to it. The user will then be redirected to the chat page where they can send messages in the conversation.

Below is a screenshot of the conversations page:

The Chat Page

On this page, a user will view a list of conversations they are part of and send messages to them. You can find the markup for pages/chat.html here and the styling for styles/chat.css here.

The scripts/chat.js file starts out by defining a namespace twilioDemo.

window.twilioChat = window.twilioChat || {};

Add the initClient function below. It is responsible for initializing the Twilio client and loading conversations.

async function initClient() {
    try {
        const response = await axios.request({
            url: '/auth/token',
            baseURL: 'http://localhost:8000',
            method: 'GETget',
            withCredentials: true
        });

        window.twilioChat.username = response.data.username;
        window.twilioChat.client = await Twilio.Conversations.Client.create(response.data.token);

        let conversations = await window.twilioChat.client.getSubscribedConversations();

        let conversationCont, conversationName;

        const sideNav = document.getElementById('side-nav');
        sideNav.removeChild(document.getElementById('loading-msg'));

        for (let conv of conversations.items) {
            conversationCont = document.createElement('button');
            conversationCont.classList.add('conversation');
            conversationCont.id = conv.sid;
            conversationCont.value = conv.sid;
            conversationCont.onclick = async () => {
                await setConversation(conv.sid, conv.channelState.friendlyName);
            };

            conversationName = document.createElement('h3');
            conversationName.innerText = 💬 ${conv.channelState.friendlyName};

            conversationCont.appendChild(conversationName);
            sideNav.appendChild(conversationCont);
        }
    }
    catch {
        location.href = '/pages/error.html';
    }
};

When the page loads, initClient fetches the user’s access token from the backend, then uses it to initialise the client. Once the client is initialised, it’s used to fetch all the conversations the user is subscribed to. After that, the conversations are loaded onto the side-nav. In case any error occurs, the user is sent to the error page.

The setConversion function loads a single conversation. Copy and paste the code below in the file to add it:

async function setConversation(sid, name) {
    try {
        window.twilioChat.selectedConvSid = sid;

        document.getElementById('chat-title').innerText = '+ ' + name;

        document.getElementById('loading-chat').style.display = 'flex';
        document.getElementById('messages').style.display = 'none';

        let submitButton = document.getElementById('submitMessage')
        submitButton.disabled = true;

        let inviteButton = document.getElementById('invite-button')
        inviteButton.disabled = true;

        window.twilioChat.selectedConversation = await window.twilioChat.client.getConversationBySid(window.twilioChat.selectedConvSid);

        const messages = await window.twilioChat.selectedConversation.getMessages();

        addMessagesToChatArea(messages.items, true);

        window.twilioChat.selectedConversation.on('messageAdded', msg => addMessagesToChatArea([msg], false));

        submitButton.disabled = false;
        inviteButton.disabled = false;
    } catch {
        showError('loading the conversation you selected');
    }
};

When a user clicks on a particular conversation, setConversation is called. This function receives the conversation SID and name and uses the SID to fetch the conversation and its messages. The messages are then added to the chat area. Lastly, a listener is added to watch for new messages added to the conversation. These new messages are appended to the chat area when they are received. In case any errors occur, an error message is displayed.

This is a screenshot of the chat page:

Next, you’ll add the addMessagedToChatArea function which loads conversation messages.

function addMessagesToChatArea(messages, clearMessages) {
    let cont, msgCont, msgAuthor, timestamp;

    const chatArea = document.getElementById('messages');

    if (clearMessages) {
        document.getElementById('loading-chat').style.display = 'none';
        chatArea.style.display = 'flex';
        chatArea.replaceChildren();
    }

    for (const msg of messages) {
        cont = document.createElement('div');
        if (msg.state.author == window.twilioChat.username) {
            cont.classList.add('right-message');
        } else {
            cont.classList.add('left-message');
        }

        msgCont = document.createElement('div');
        msgCont.classList.add('message');

        msgAuthor = document.createElement('p');
        msgAuthor.classList.add('username');
        msgAuthor.innerText = msg.state.author;

        timestamp = document.createElement('p');
        timestamp.classList.add('timestamp');
        timestamp.innerText = msg.state.timestamp;

        msgCont.appendChild(msgAuthor);
        msgCont.innerText += msg.state.body;

        cont.appendChild(msgCont);
        cont.appendChild(timestamp);

        chatArea.appendChild(cont);
    }

    chatArea.scrollTop = chatArea.scrollHeight;
}

The function addMessagesToChatArea adds messages of the current conversation to the chat area when it is selected from the side nav. It is also called when new messages are added to the current conversation. A loading message is usually displayed as the messages are being fetched. Before the conversation messages are added, this loading message is removed. Messages from the current user are aligned to the right, while all other messages from group participants are aligned to the left.

This is what the loading message looks like:

Add the sendMessage function to send messages:

function sendMessage() {
    let submitBtn = document.getElementById('submitMessage');
    submitBtn.disabled = true;

    let messageForm = document.getElementById('message-input');
    let messageData = new FormData(messageForm);

    const msg = messageData.get('chat-message');

    window.twilioChat.selectedConversation.sendMessage(msg)
        .then(() => {
            document.getElementById('chat-message').value = '';
            submitBtn.disabled = false;
        })
        .catch(() => {
            showError('sending your message');
            submitBtn.disabled = false;
        });
};

When the user sends a message, the sendMessage function is called. It gets the message text from the text area and disables the submit button. Then using the currently selected conversation, the message is sent using its sendMessage method. If successful, the text area is cleared and the submit button is re-enabled. If unsuccessful, an error message is displayed instead.

The showError method displays an error message when it is called; hideError hides it.

function showError(msg) {
    document.getElementById('error-message').style.display = 'flex';
    document.getElementById('error-text').innerText = There was a problem ${msg ? msg : 'fulfilling your request'}.;
}

function hideError() {
    document.getElementById('error-message').style.display = 'none';
}

This is what this error message will look like:

The logout function logouts out the current user. It does this by making a request to the backend which clears their session. The user is then redirected to the conversation page, so they can create a new conversation if they’d like.

function logout(logoutButton) {
    logoutButton.disabled = true;
    logoutButton.style.cursor = 'wait';

    axios.request({
        url: '/auth/token',
        baseURL: 'http://localhost:8000',
        method: 'DELETEdelete',
        withCredentials: true
    })
        .then(() => {
            location.href = '/pages/conversation.html';
        })
        .catch(() => {
            location.href = '/pages/error.html';
        });
}

Add the inviteFriend function to send conversation invites:

async function inviteFriend() {
    try {
        const link = http://localhost:3000/pages/login.html?sid=${window.twilioChat.selectedConvSid};

        await navigator.clipboard.writeText(link);

        alert(The link below has been copied to your clipboard.\n\n${link}\n\nYou can invite a friend to chat by sending it to them.);
    } catch {
        showError('preparing your chat invite');
    }
}

To invite other people to participate in the conversation, the current user can send another person a link. This link is to the login page and contains the current conversation SID as a query parameter. When they click the invite button, the link is added to their clipboard. An alert is then displayed giving invite instructions.

Here is a screenshot of the invite alert:

The Login Page

On this page, a user logs in when they are invited to a conversation. You can find the markup for pages/login.html at this link.

In scripts/login.js, the login function is responsible for logging in conversation invitees. Copy its code below and add it to the aforementioned file:

function login() {
    const convParams = new URLSearchParams(window.location.search);
    const conv = Object.fromEntries(convParams.entries());

    if (conv.sid) {
        let submitBtn = document.getElementById('login-button');
        submitBtn.innerText = 'Logging in...';
        submitBtn.disabled = true;
        submitBtn.style.cursor = 'wait';

        let loginForm = document.getElementById('loginForm');
        let formData = new FormData(loginForm);
        let body = Object.fromEntries(formData.entries());

        axios.request({
            url: /api/conversations/${conv.sid}/participants,
            baseURL: 'http://localhost:8000',
            method: 'POSTpost',
            withCredentials: true,
            data: body
        })
            .then(() => {
                location.href = '/pages/chat.html';
            })
            .catch(() => {
                location.href = '/pages/error.html';
            });
    } else {
        location.href = '/pages/conversation.html';
    }
}

The login function takes the conversation sid query parameter from the URL and the username from the form. It then makes a POST request to api/conversations/{sid}/participants/ on the backend app. The backend app adds the user to the conversation and generates an access token for messaging. If successful, a session is started in the backend for the user.

The user is then redirected to the chat page, but if the request returns an error, they are redirected to the error page. If there is no conversation sid query parameter in the URL, the user is redirected to the conversation page.

Below is a screenshot of the login page:

Running the App

Before you can start the front-end app, make sure that the backend app is running. As mentioned earlier, you can start the backend app using this command on the terminal:

NODE_ENV=development npm start

To serve the front-end app, run this command in a different terminal window:

http-server -p 3000

This serves the app at http://localhost:3000. Once it’s running, head on over to http://localhost:3000/pages/conversation.html; set a name for your conversation and add your username, then create it. When you get to the chat page, click on the conversation, then click the Invite button.

In a separate incognito window, paste the invite link and put a different username. Once you’re on the chat page in the incognito window, you can begin chatting with yourself. You can send messages back and forth between the user in the first window and the second user in the incognito window in the same conversation.

Conclusion

In this tutorial, you learned how to create a chat app using Twilio Conversations and Vanilla JS. You created a Node.js app that generates user access tokens, maintains a session for them, creates conversations, and adds users to them as participants. You also created a front-end app using HTML, CSS, and Vanilla JS. This app should allow users to create conversations, send messages, and invite other people to chat. It should get access tokens from the backend app and use them to perform these functions. I hope this tutorial gave you a better understanding of how Twilio Conversations works and how to use it for chat messaging.

To find out more about Twilio Conversations and what else you could do with it, check out its documentation linked here. You can also find the source code for the backend app on Github here, and the code for the front-end app here.

Don’t Snore on CORS

Whatever, I just needed a title. Everyone’s favorite web security feature has crossed my desk a bunch of times lately and I always feel like that is a sign I should write something because that’s what blogging is.

The main problem with CORS is that developers don’t understand CORS. The basic concept of it is supposed to be easy: don’t run code across origins. Meaning if I, at css-tricks.com, try to fetch some JavaScript from an external URL, like any-other-website.com, the browser will just stop it by default. You’ll see an error in the console. Not allowed.

Unless, that is, the other website sends a header that specifically allows this. My domain can be whitelisted or there could be a wildcard that allows it. There is way more detail here (like preflighting and credentials) and, as ever, the MDN article does a good job on that front.

What have traditionally been hair-pulling moments for me are when CORS seems to behave inconsistently. Two requests will go through and a third will fail, which seems inexplicable, but was reproducible. (Perhaps there was a load balancer involved with half-cached headers? Who knows.) Or I’m trying to use a proxy and the proxy stops working. I can’t even remember all the examples, but I bet I’ve been in meetings trying to debug CORS issues over 100 times in my life.

Anyway, those times where CORS have crossed my desk recently:

  • This video, Learn CORS In 6 Minutes, has 10,000 likes and seems to have struck a chord with folks. A non-ironic npm install cors was the solution here.
  • You have to literally tell servers to have the correct headers. So, similar to the video above, I had to do that in a video about Cloudflare Workers, where I used cross-origin (but you don’t have to, which is actually a very cool feature of Cloudflare Workers).
  • Jake’s article “How to win at CORS” which includes a playground.
  • There are browser extensions (like ones for Firefox and Chrome) that yank in CORS headers for you, which feels like a questionable workaround, but I wouldn’t blame anybody for using in development.

The post Don’t Snore on CORS appeared first on CSS-Tricks. You can support CSS-Tricks by being an MVP Supporter.

Weekly Platform News: Reduced Motion, CORS, WhiteHouse.gov, popups, and 100vw

In this week’s roundup, we highlight a proposal for a new <popup> element, check the use of prefers-reduced-motion on award-winning sites, learn how to opt into cross-origin isolation, see how WhiteHouse.gov approaches accessibility, and warn the dangers of 100vh.

Let’s get into the news!

The new HTML <popup> element is in development

On January 21, Melanie Richards from the Microsoft Edge web platform team posted an explainer for a proposed HTML <popup> element (the name is not final). A few hours later, Mason Freed from Google announced an intent to prototype this element in the Blink browser engine. Work on the implementation is taking place in Chromium issue #1168738.

A popup is a temporary (transient) and “light-dismissable” UI element that is displayed on the the “top layer” of all other elements. The goal for the <popup> element is to be fully stylable and accessible by default. A <popup> can be anchored to an activating element, such as a button, but it can also be a standalone element that is displayed on page load (e.g., a teaching UI).

Two use cases showing a white action menu with four gray menu links below a blue menu button, and another example of a blog button with a large dark blue tooltip beneath it with two paragraphs of text in white.

A <popup> is automatically hidden when the user presses the Esc key or moves focus to a different element (this is called a light dismissal). Unlike the <dialog> element, only one <popup> can be shown at a time, and unlike the deprecated <menu> element, a <popup> can contain arbitrary content, including interactive elements:

We imagine <popup> as being useful for various different types of popover UI. We’ve chosen to use an action menu as a primary example, but folks use popup-esque patterns for many different types of content.

Award-winning websites should honor the “reduce motion” preference

Earlier this week, AWWWARDS announced the winners of their annual awards for the best websites of 2020. The following websites were awarded:

All these websites are highly dynamic and show full-screen motion on load and during scroll. Unfortunately, such animations can cause dizziness and nausea in people with vestibular disorders. Websites are therefore advised to reduce or turn off non-essential animations via the prefers-reduced-motion media query, which evaluates to true for people who have expressed their preference for reduced motion (e.g., the “Reduce motion” option on Apple’s platforms). None of the winning websites do this.

/* (code from animal-crossing.com) */
@media (prefers-reduced-motion: reduce) {
  .main-header__scene {
    animation: none;
  }
}

An example of a website that does this correctly is the official site of last year’s Animal Crossing game. Not only does the website honor the user’s preference via prefers-reduced-motion, but it also provides its own “Reduce motion” toggle button at the very top of the page.

Screenshot of the animal crossing game website that is bright with a solid green header above a gold ribbon that displays menu items. Below is the main banner showing a still of the animated game with a wooden welcome to Animal Crossing sign in the foreground.

(via Eric Bailey)

Websites can now opt into cross-origin isolation

Cross-origin isolation is part of a “long-term security improvement.” Websites can opt into cross-origin isolation by adding the following two HTTP response headers, which are already supported in Chrome and Firefox:

Cross-Origin-Embedder-Policy: require-corp
Cross-Origin-Opener-Policy: same-origin

A cross-origin-isolated page relinquishes its ability to load content from other origins without their explicit opt-in (via CORS headers), and in return, the page gains access to some powerful APIs, such as SharedArrayBuffer.

if (crossOriginIsolated) {
  // post SharedArrayBuffer
} else {
  // do something else
}

The White House recommits to accessibility

The new WhiteHouse.gov website of the Biden administration was built from scratch in just six weeks with accessibility as a top priority (“accessibility was top of mind”). Microsoft’s chief accessibility officer reviewed the site and gave it the thumbs up.

The website’s accessibility statement (linked from the site’s footer) declares a “commitment to accessibility” and directly references the latest version of the Web Content Accessibility Guidelines, WCAG 2.1 (2018). This is notable because federal agencies in the USA are only required to comply with WCAG 2.0 (2008).

The Web Content Accessibility Guidelines are the most widely accepted standards for internet accessibility. … By referencing WCAG 2.1 (the latest version of the guidelines), the Biden administration may be indicating a broader acceptance of the WCAG model.

The CSS 100vw value can cause a useless horizontal scrollbar

On Windows, when a web page has a vertical scrollbar, that scrollbar consumes space and reduces the width of the page’s <html> element; this is called a classic scrollbar. The same is not the case on macOS, which uses overlay scrollbars instead of classic scrollbars; a vertical overlay scrollbar does not affect the width of the <html> element.

macOS users can switch from overlay scrollbars to classic scrollbars by setting “Show scroll bars” to ”Always” in System preferences > General.

The CSS length value 100vw is equal to the width of the <html> element. However, if a classic vertical scrollbar is added to the page, the <html> element becomes narrower (as explained above), but 100vw stays the same. In other words, 100vw is wider than the page when a classic vertical scrollbar is present.

This can be a problem for web developers on macOS who use 100vw but are unaware of its peculiarity. For example, a website might set width: 100vw on its article header to make it full-width, but this will cause a useless horizontal scrollbar on Windows that some of the site’s visitors may find annoying.

Screenshot of an article on a white background with a large black post title, post date and red tag links above a paragraph of black text. A scrollbar is displayed on the right with two large red arrows illustrating the page width, which is larger than the 100 viewport width unit.

Web developers on macOS can switch to classic scrollbars to make sure that overflow bugs caused by 100vw don’t slip under their radar. In the meantime, I have asked the CSS Working Group for comment.


The post Weekly Platform News: Reduced Motion, CORS, WhiteHouse.gov, popups, and 100vw appeared first on CSS-Tricks.

You can support CSS-Tricks by being an MVP Supporter.

Building A Web App With React, Redux And Sanity.io

The fast evolution of digital platforms have placed serious limitations on traditional CMS like Wordpress. These platforms are coupled, inflexible and are focused on the project, rather than the product. Thankfully, several headless CMS have been developed to tackle these challenges and many more.

Unlike traditional CMS, headless CMS, which can be described as Software as a Service (SaaS), can be used to develop websites, mobile apps, digital displays, and many more. They can be used on limitless platforms. If you are looking for a CMS that is platform independent, developer-first, and offers cross platform support, you need not look farther from headless CMS.

A headless CMS is simply a CMS without a head. The head here refers to the frontend or the presentation layer while the body refers to the backend or the content repository. This offers a lot of interesting benefits. For instance, it allows the developer to choose any frontend of his choice and you can also design the presentation layer as you want.

There are lots of headless CMS out there, some of the most popular ones include Strapi, Contentful, Contentstack, Sanity, Butter CMS, Prismic, Storyblok, Directus, etc. These headless CMS are API-based and have their individual strong points. For instance, CMS like Sanity, Strapi, Contentful, and Storyblok are free for small projects.

These headless CMS are based on different tech stacks as well. While Sanity.io is based on React.js, Storyblok is based on Vue.js. As a React developer, this is the major reason why I quickly picked interest in Sanity. However, being a headless CMS, each of these platforms can be plugged on any frontend, whether Angular, Vue or React.

Each of these headless CMS has both free and paid plans which represent significant price jump. Although these paid plans offer more features, you wouldn’t want to pay all that much for a small to mid-sized project. Sanity tries to solve this problem by introducing pay-as-you-go options. With these options, you will be able to pay for what you use and avoid the price jump.

Another reason why I choose Sanity.io is their GROQ language. For me, Sanity stands out from the crowd by offering this tool. Graphical-Relational Object Queries (GROQ) reduces development time, helps you get the content you need in the form you need it, and also helps the developer to create a document with a new content model without code changes.

Moreover, developers are not constrained to the GROQ language. You can also use GraphQL or even the traditional axios and fetch in your React app to query the backend. Like most other headless CMS, Sanity has comprehensive documentation that contains helpful tips to build on the platform.

Note: This article requires a basic understanding of React, Redux and CSS.

Getting Started With Sanity.io

To use Sanity in your machine, you’ll need to install the Sanity CLI tool. While this can be installed locally on your project, it is preferable to install it globally to make it accessible to any future applications.

To do this, enter the following commands in your terminal.

npm install -g @sanity/cli

The -g flag in the above command enables global installation.

Next, we need to initialize Sanity in our application. Although this can be installed as a separate project, it is usually preferable to install it within your frontend app (in this case React).

In her blog, Kapehe explained in detail how to integrate Sanity with React. It will be helpful to go through the article before continuing with this tutorial.

Enter the following commands to initialize Sanity in your React app.

sanity init

The sanity command becomes available to us when we installed the Sanity CLI tool. You can view a list of the available Sanity commands by typing sanity or sanity help in your terminal.

When setting up or initializing your project, you’ll need to follow the prompts to customize it. You’ll also be required to create a dataset and you can even choose their custom dataset populated with data. For this listing app, we will be using Sanity’s custom sci-fi movies dataset. This will save us from entering the data ourselves.

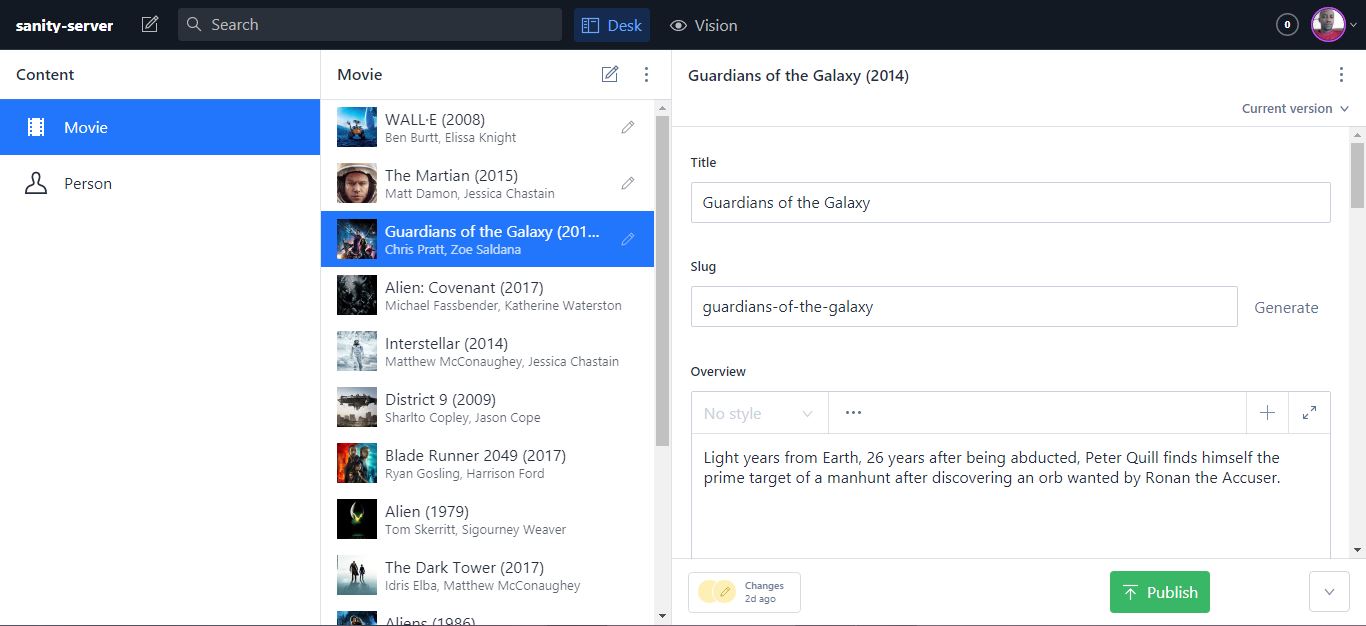
To view and edit your dataset, cd to the Sanity subdirectory in your terminal and enter sanity start. This usually runs on http://localhost:3333/. You may be required to login to access the interface (make sure you login with the same account you used when initializing the project). A screenshot of the environment is shown below.

Sanity-React Two-way Communication

Sanity and React need to communicate with each other for a fully functional application.

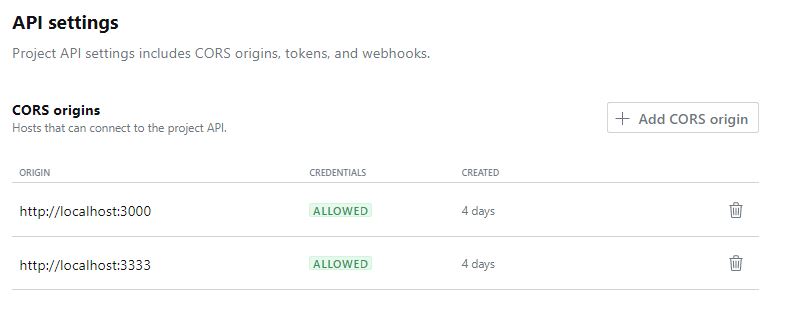
CORS Origins Setting In Sanity Manager

We’ll first connect our React app to Sanity. To do this, login to https://manage.sanity.io/ and locate CORS origins under API Settings in the Settings tab. Here, you’ll need to hook your frontend origin to the Sanity backend. Our React app runs on http://localhost:3000/ by default, so we need to add that to the CORS.

This is shown in the figure below.

Connecting Sanity To React

Sanity associates a project ID to every project you create. This ID is needed when connecting it to your frontend application. You can find the project ID in your Sanity Manager.

The backend communicates with React using a library known as sanity client. You need to install this library in your Sanity project by entering the following commands.

npm install @sanity/client

Create a file sanitySetup.js (the filename does not matter), in your project src folder and enter the following React codes to set up a connection between Sanity and React.

import sanityClient from "@sanity/client"
export default sanityClient({
    projectId: PROJECT_ID,
    dataset: DATASET_NAME,
    useCdn: true
});

We passed our projectId, dataset name and a boolean useCdn to the instance of the sanity client imported from @sanity/client. This works the magic and connects our app to the backend.

Now that we’ve completed the two-way connection, let’s jump right in to build our project.

Setting Up And Connecting Redux To Our App

We’ll need a few dependencies to work with Redux in our React app. Open up your terminal in your React environment and enter the following bash commands.

npm install redux react-redux redux-thunk

Redux is a global state management library that can be used with most frontend frameworks and libraries such as React. However, we need an intermediary tool react-redux to enable communication between our Redux store and our React application. Redux thunk will help us to return a function instead of an action object from Redux.

While we could write the entire Redux workflow in one file, it is often neater and better to separate our concerns. For this, we will divide our workflow into three files namely, actions, reducers, and then the store. However, we also need a separate file to store the action types, also known as constants.

Setting Up The Store

The store is the most important file in Redux. It organizes and packages the states and ships them to our React application.

Here is the initial setup of our Redux store needed to connect our Redux workflow.

import { createStore, applyMiddleware } from "redux";
import thunk from "redux-thunk";
import reducers from "./reducers/";

export default createStore(
  reducers,
  applyMiddleware(thunk)
);

The createStore function in this file takes three parameters: the reducer (required), the initial state and the enhancer (usually a middleware, in this case, thunk supplied through applyMiddleware). Our reducers will be stored in a reducers folder and we’ll combine and export them in an index.js file in the reducers folder. This is the file we imported in the code above. We’ll revisit this file later.

Introduction To Sanity’s GROQ Language

Sanity takes querying on JSON data a step further by introducing GROQ. GROQ stands for Graph-Relational Object Queries. According to Sanity.io, GROQ is a declarative query language designed to query collections of largely schema-less JSON documents.

Sanity even provides the GROQ Playground to help developers become familiar with the language. However, to access the playground, you need to install sanity vision. Run sanity install @sanity/vision on your terminal to install it.

GROQ has a similar syntax to GraphQL but it is more condensed and easier to read. Furthermore, unlike GraphQL, GROQ can be used to query JSON data.

For instance, to retrieve every item in our movie document, we’ll use the following GROQ syntax.

*[_type == "movie"]

However, if we wish to retrieve only the _ids and crewMembers in our movie document. We need to specify those fields as follows.

`*[_type == 'movie']{                                             
    _id,
    crewMembers
}

Here, we used * to tell GROQ that we want every document of _type movie. _type is an attribute under the movie collection. We can also return the type like we did the _id and crewMembers as follows:

*[_type == 'movie']{                                             
    _id,
    _type,
    crewMembers
}

We’ll work more on GROQ by implementing it in our Redux actions but you can check Sanity.io’s documentation for GROQ to learn more about it. The GROQ query cheat sheet provides a lot of examples to help you master the query language.

Setting Up Constants

We need constants to track the action types at every stage of the Redux workflow. Constants help to determine the type of action dispatched at each point in time. For instance, we can track when the API is loading, fully loaded and when an error occurs.

We don’t necessarily need to define constants in a separate file but for simplicity and clarity, this is usually the best practice in Redux.

By convention, constants in Javascript are defined with uppercase. We’ll follow the best practices here to define our constants. Here is an example of a constant for denoting requests for moving movie fetching.

export const MOVIE_FETCH_REQUEST = "MOVIE_FETCH_REQUEST";

Here, we created a constant MOVIE_FETCH_REQUEST that denotes an action type of MOVIE_FETCH_REQUEST. This helps us to easily call this action type without using strings and avoid bugs. We also exported the constant to be available anywhere in our project.

Similarly, we can create other constants for fetching action types denoting when the request succeeds or fails. A complete code for the movieConstants.js is given in the code below.

export const MOVIE_FETCH_REQUEST = "MOVIE_FETCH_REQUEST";
export const MOVIE_FETCH_SUCCESS = "MOVIE_FETCH_SUCCESS";
export const MOVIE_FETCH_FAIL = "MOVIE_FETCH_FAIL";

export const MOVIES_FETCH_REQUEST = "MOVIES_FETCH_REQUEST";
export const MOVIES_FETCH_SUCCESS = "MOVIES_FETCH_SUCCESS";
export const MOVIES_FETCH_FAIL = "MOVIES_FETCH_FAIL";
export const MOVIES_FETCH_RESET = "MOVIES_FETCH_RESET";

export const MOVIES_REF_FETCH_REQUEST = "MOVIES_REF_FETCH_REQUEST";
export const MOVIES_REF_FETCH_SUCCESS = "MOVIES_REF_FETCH_SUCCESS";
export const MOVIES_REF_FETCH_FAIL = "MOVIES_REF_FETCH_FAIL";

export const MOVIES_SORT_REQUEST = "MOVIES_SORT_REQUEST";
export const MOVIES_SORT_SUCCESS = "MOVIES_SORT_SUCCESS";
export const MOVIES_SORT_FAIL = "MOVIES_SORT_FAIL";

export const MOVIES_MOST_POPULAR_REQUEST = "MOVIES_MOST_POPULAR_REQUEST";
export const MOVIES_MOST_POPULAR_SUCCESS = "MOVIES_MOST_POPULAR_SUCCESS";
export const MOVIES_MOST_POPULAR_FAIL = "MOVIES_MOST_POPULAR_FAIL";

Here we have defined several constants for fetching a movie or list of movies, sorting and fetching the most popular movies. Notice that we set constants to determine when the request is loading, successful and failed.

Similarly, our personConstants.js file is given below:

export const PERSONS_FETCH_REQUEST = "PERSONS_FETCH_REQUEST";
export const PERSONS_FETCH_SUCCESS = "PERSONS_FETCH_SUCCESS";
export const PERSONS_FETCH_FAIL = "PERSONS_FETCH_FAIL";

export const PERSON_FETCH_REQUEST = "PERSON_FETCH_REQUEST";
export const PERSON_FETCH_SUCCESS = "PERSON_FETCH_SUCCESS";
export const PERSON_FETCH_FAIL = "PERSON_FETCH_FAIL";

export const PERSONS_COUNT = "PERSONS_COUNT";

Like the movieConstants.js, we set a list of constants for fetching a person or persons. We also set a constant for counting persons. The constants follow the convention described for movieConstants.js and we also exported them to be accessible to other parts of our application.

Finally, we’ll implement light and dark mode in the app and so we have another constants file globalConstants.js. Let’s take a look at it.

export const SET_LIGHT_THEME = "SET_LIGHT_THEME";
export const SET_DARK_THEME = "SET_DARK_THEME";

Here we set constants to determine when light or dark mode is dispatched. SET_LIGHT_THEME determines when the user switches to the light theme and SET_DARK_THEME determines when the dark theme is selected. We also exported our constants as shown.

Setting Up The Actions

By convention, our actions are stored in a separate folder. Actions are grouped according to their types. For instance, our movie actions are stored in movieActions.js while our person actions are stored in personActions.js file.

We also have globalActions.js to take care of toggling the theme from light to dark mode.

Let’s fetch all movies in moviesActions.js.

import sanityAPI from "../../sanitySetup";
import {
  MOVIES_FETCH_FAIL,
  MOVIES_FETCH_REQUEST,
  MOVIES_FETCH_SUCCESS  
} from "../constants/movieConstants";

const fetchAllMovies = () => async (dispatch) => {
  try {
    dispatch({
      type: MOVIES_FETCH_REQUEST
    });
    const data = await sanityAPI.fetch(
      `*[_type == 'movie']{                                            
          _id,
          "poster": poster.asset->url,
      } `
    );
    dispatch({
      type: MOVIES_FETCH_SUCCESS,
      payload: data
    });
  } catch (error) {
    dispatch({
      type: MOVIES_FETCH_FAIL,
      payload: error.message
    });
  }
};

Remember when we created the sanitySetup.js file to connect React to our Sanity backend? Here, we imported the setup to enable us to query our sanity backend using GROQ. We also imported a few constants exported from the movieConstants.js file in the constants folder.

Next, we created the fetchAllMovies action function for fetching every movie in our collection. Most traditional React applications use axios or fetch to fetch data from the backend. But while we could use any of these here, we’re using Sanity’s GROQ. To enter the GROQ mode, we need to call sanityAPI.fetch() function as shown in the code above. Here, sanityAPI is the React-Sanity connection we set up earlier. This returns a Promise and so it has to be called asynchronously. We’ve used the async-await syntax here, but we can also use the .then syntax.

Since we are using thunk in our application, we can return a function instead of an action object. However, we chose to pass the return statement in one line.

const fetchAllMovies = () => async (dispatch) => {
  ...
}

Note that we can also write the function this way:

const fetchAllMovies = () => {
  return async (dispatch)=>{
    ...
  }
}

In general, to fetch all movies, we first dispatched an action type that tracks when the request is still loading. We then used Sanity’s GROQ syntax to asynchronously query the movie document. We retrieved the _id and the poster url of the movie data. We then returned a payload containing the data gotten from the API.

Similarly, we can retrieve movies by their _id, sort movies, and get the most popular movies.

We can also fetch movies that match a particular person’s reference. We did this in the fetchMoviesByRef function.

const fetchMoviesByRef = (ref) => async (dispatch) => {
  try {
    dispatch({
      type: MOVIES_REF_FETCH_REQUEST
    });
    const data = await sanityAPI.fetch(
      `*[_type == 'movie' 
            && (castMembers[person._ref match '${ref}'] || 
                crewMembers[person._ref match '${ref}'])            
            ]{                                             
                _id,                              
                "poster" : poster.asset->url,
                title
            } `
    );
    dispatch({
      type: MOVIES_REF_FETCH_SUCCESS,
      payload: data
    });
  } catch (error) {
    dispatch({
      type: MOVIES_REF_FETCH_FAIL,
      payload: error.message
    });
  }
};

This function takes an argument and checks if person._ref in either the castMembers or crewMembers matches the passed argument. We return the movie _id, poster url, and title alongside. We also dispatch an action of type MOVIES_REF_FETCH_SUCCESS, attaching a payload of the returned data, and if an error occurs, we dispatch an action of type MOVIE_REF_FETCH_FAIL, attaching a payload of the error message, thanks to the try-catch wrapper.

In the fetchMovieById function, we used GROQ to retrieve a movie that matches a particular id passed to the function.

The GROQ syntax for the function is shown below.

const data = await sanityAPI.fetch(
      `*[_type == 'movie' && _id == '${id}']{                                               
                _id,
                "cast" :
                    castMembers[]{
                        "ref": person._ref,
                        characterName, 
                        "name": person->name,
                        "image": person->image.asset->url
                    }
                ,
                "crew" :
                    crewMembers[]{
                        "ref": person._ref,
                        department, 
                        job,
                        "name": person->name,
                        "image": person->image.asset->url
                    }
                ,                
                "overview":   {                    
                    "text": overview[0].children[0].text
                  },
                popularity,
                "poster" : poster.asset->url,
                releaseDate,                                
                title
            }[0]`
    );

Like the fetchAllMovies action, we started by selecting all documents of type movie but we went further to select only those with an id supplied to the function. Since we intend to display a lot of details for the movie, we specified a bunch of attributes to retrieve.

We retrieved the movie id and also a few attributes in the castMembers array namely ref, characterName, the person’s name, and the person’s image. We also changed the alias from castMembers to cast.

Like the castMembers, we selected a few attributes from the crewMembers array, namely ref, department, job, the person’s name and the person’s image. we also changed the alias from crewMembers to crew.

In the same way, we selected the overview text, popularity, movie's poster url, movie's release date and title.

Sanity's GROQ language also allows us to sort a document. To sort an item, we pass order next to a pipe operator.

For instance, if we wish to sort movies by their releaseDate in ascending order, we could do the following.

const data = await sanityAPI.fetch(
      `*[_type == 'movie']{                                            
          ...
      } | order(releaseDate, asc)`
    );

We used this notion in the sortMoviesBy function to sort either by ascending or descending order.

Let’s take a look at this function below.

const sortMoviesBy = (item, type) => async (dispatch) => {
  try {
    dispatch({
      type: MOVIES_SORT_REQUEST
    });
    const data = await sanityAPI.fetch(
      `*[_type == 'movie']{                                
                _id,                                               
                "poster" : poster.asset->url,    
                title
                } | order( ${item} ${type})`
    );
    dispatch({
      type: MOVIES_SORT_SUCCESS,
      payload: data
    });
  } catch (error) {
    dispatch({
      type: MOVIES_SORT_FAIL,
      payload: error.message
    });
  }
};

We began by dispatching an action of type MOVIES_SORT_REQUEST to determine when the request is loading. We then used the GROQ syntax to sort and fetch data from the movie collection. The item to sort by is supplied in the variable item and the mode of sorting (ascending or descending) is supplied in the variable type. Consequently, we returned the id, poster url, and title. Once the data is returned, we dispatched an action of type MOVIES_SORT_SUCCESS and if it fails, we dispatch an action of type MOVIES_SORT_FAIL.

A similar GROQ concept applies to the getMostPopular function. The GROQ syntax is shown below.

const data = await sanityAPI.fetch(
      `
            *[_type == 'movie']{ 
                _id,                              
                "overview":   {                    
                    "text": overview[0].children[0].text
                },                
                "poster" : poster.asset->url,    
                title 
            }| order(popularity desc) [0..2]`
    );

The only difference here is that we sorted the movies by popularity in descending order and then selected only the first three. The items are returned in a zero-based index and so the first three items are items 0, 1 and 2. If we wish to retrieve the first ten items, we could pass [0..9] to the function.

Here’s the complete code for the movie actions in the movieActions.js file.

import sanityAPI from "../../sanitySetup";
import {
  MOVIE_FETCH_FAIL,
  MOVIE_FETCH_REQUEST,
  MOVIE_FETCH_SUCCESS,
  MOVIES_FETCH_FAIL,
  MOVIES_FETCH_REQUEST,
  MOVIES_FETCH_SUCCESS,
  MOVIES_SORT_REQUEST,
  MOVIES_SORT_SUCCESS,
  MOVIES_SORT_FAIL,
  MOVIES_MOST_POPULAR_REQUEST,
  MOVIES_MOST_POPULAR_SUCCESS,
  MOVIES_MOST_POPULAR_FAIL,
  MOVIES_REF_FETCH_SUCCESS,
  MOVIES_REF_FETCH_FAIL,
  MOVIES_REF_FETCH_REQUEST
} from "../constants/movieConstants";

const fetchAllMovies = () => async (dispatch) => {
  try {
    dispatch({
      type: MOVIES_FETCH_REQUEST
    });
    const data = await sanityAPI.fetch(
      `*[_type == 'movie']{                                             
          _id,
          "poster" : poster.asset->url,
      } `
    );
    dispatch({
      type: MOVIES_FETCH_SUCCESS,
      payload: data
    });
  } catch (error) {
    dispatch({
      type: MOVIES_FETCH_FAIL,
      payload: error.message
    });
  }
};

const fetchMoviesByRef = (ref) => async (dispatch) => {
  try {
    dispatch({
      type: MOVIES_REF_FETCH_REQUEST
    });
    const data = await sanityAPI.fetch(
      `*[_type == 'movie' 
            && (castMembers[person._ref match '${ref}'] || 
                crewMembers[person._ref match '${ref}'])            
            ]{                                             
                _id,                              
                "poster" : poster.asset->url,
                title
          }`
    );
    dispatch({
      type: MOVIES_REF_FETCH_SUCCESS,
      payload: data
    });
  } catch (error) {
    dispatch({
      type: MOVIES_REF_FETCH_FAIL,
      payload: error.message
    });
  }
};

const fetchMovieById = (id) => async (dispatch) => {
  try {
    dispatch({
      type: MOVIE_FETCH_REQUEST
    });
    const data = await sanityAPI.fetch(
      `*[_type == 'movie' && _id == '${id}']{      
                _id,
                "cast" :
                    castMembers[]{
                        "ref": person._ref,
                        characterName, 
                        "name": person->name,
                        "image": person->image.asset->url
                    }
                ,
                "crew" :
                    crewMembers[]{
                        "ref": person._ref,
                        department, 
                        job,
                        "name": person->name,
                        "image": person->image.asset->url
                    }
                ,                
                "overview":   {                    
                    "text": overview[0].children[0].text
                  },
                popularity,
                "poster" : poster.asset->url,
                releaseDate,                                
                title
            }[0]`
    );
    dispatch({
      type: MOVIE_FETCH_SUCCESS,
      payload: data
    });
  } catch (error) {
    dispatch({
      type: MOVIE_FETCH_FAIL,
      payload: error.message
    });
  }
};

const sortMoviesBy = (item, type) => async (dispatch) => {
  try {
    dispatch({
      type: MOVIES_MOST_POPULAR_REQUEST
    });
    const data = await sanityAPI.fetch(
      `*[_type == 'movie']{                                
                _id,                                               
                "poster" : poster.asset->url,    
                title
                } | order( ${item} ${type})`
    );
    dispatch({
      type: MOVIES_SORT_SUCCESS,
      payload: data
    });
  } catch (error) {
    dispatch({
      type: MOVIES_SORT_FAIL,
      payload: error.message
    });
  }
};

const getMostPopular = () => async (dispatch) => {
  try {
    dispatch({
      type: MOVIES_SORT_REQUEST
    });
    const data = await sanityAPI.fetch(      `
            *[_type == 'movie']{ 
                _id,                              
                "overview":   {                    
                    "text": overview[0].children[0].text
                },                
                "poster" : poster.asset->url,    
                title 
            }| order(popularity desc) [0..2]`
    );
    dispatch({
      type: MOVIES_MOST_POPULAR_SUCCESS,
      payload: data
    });
  } catch (error) {
    dispatch({
      type: MOVIES_MOST_POPULAR_FAIL,
      payload: error.message
    });
  }
};
export {
  fetchAllMovies,
  fetchMovieById,
  sortMoviesBy,
  getMostPopular,
  fetchMoviesByRef
};

Setting Up The Reducers

Reducers are one of the most important concepts in Redux. They take the previous state and determine the state changes.

Typically, we’ll be using the switch statement to execute a condition for each action type. For instance, we can return loading when the action type denotes loading, and then the payload when it denotes success or error. It is expected to take in the initial state and the action as arguments.

Our movieReducers.js file contains various reducers to match the actions defined in the movieActions.js file. However, each of the reducers has a similar syntax and structure. The only differences are the constants they call and the values they return.

Let’s start by taking a look at the fetchAllMoviesReducer in the movieReducers.js file.

import {
  MOVIES_FETCH_FAIL,
  MOVIES_FETCH_REQUEST,
  MOVIES_FETCH_SUCCESS,  
} from "../constants/movieConstants";

const fetchAllMoviesReducer = (state = {}, action) => {
  switch (action.type) {
    case MOVIES_FETCH_REQUEST:
      return {
        loading: true
      };
    case MOVIES_FETCH_SUCCESS:
      return {
        loading: false,
        movies: action.payload
      };
    case MOVIES_FETCH_FAIL:
      return {
        loading: false,
        error: action.payload
      };
    case MOVIES_FETCH_RESET:
      return {};
    default:
      return state;
  }
};

Like all reducers, the fetchAllMoviesReducer takes the initial state object (state) and the action object as arguments. We used the switch statement to check the action types at each point in time. If it corresponds to MOVIES_FETCH_REQUEST, we return loading as true to enable us to show a loading indicator to the user.

If it corresponds to MOVIES_FETCH_SUCCESS, we turn off the loading indicator and then return the action payload in a variable movies. But if it is MOVIES_FETCH_FAIL, we also turn off the loading and then return the error. We also want the option to reset our movies. This will enable us to clear the states when we need to do so.

We have the same structure for other reducers. The complete movieReducers.js is shown below.

import {
  MOVIE_FETCH_FAIL,
  MOVIE_FETCH_REQUEST,
  MOVIE_FETCH_SUCCESS,
  MOVIES_FETCH_FAIL,
  MOVIES_FETCH_REQUEST,
  MOVIES_FETCH_SUCCESS,
  MOVIES_SORT_REQUEST,
  MOVIES_SORT_SUCCESS,
  MOVIES_SORT_FAIL,
  MOVIES_MOST_POPULAR_REQUEST,
  MOVIES_MOST_POPULAR_SUCCESS,
  MOVIES_MOST_POPULAR_FAIL,
  MOVIES_FETCH_RESET,
  MOVIES_REF_FETCH_REQUEST,
  MOVIES_REF_FETCH_SUCCESS,
  MOVIES_REF_FETCH_FAIL
} from "../constants/movieConstants";

const fetchAllMoviesReducer = (state = {}, action) => {
  switch (action.type) {
    case MOVIES_FETCH_REQUEST:
      return {
        loading: true
      };
    case MOVIES_FETCH_SUCCESS:
      return {
        loading: false,
        movies: action.payload
      };
    case MOVIES_FETCH_FAIL:
      return {
        loading: false,
        error: action.payload
      };
    case MOVIES_FETCH_RESET:
      return {};
    default:
      return state;
  }
};
const fetchMoviesByRefReducer = (state = {}, action) => {
  switch (action.type) {
    case MOVIES_REF_FETCH_REQUEST:
      return {
        loading: true
      };
    case MOVIES_REF_FETCH_SUCCESS:
      return {
        loading: false,
        movies: action.payload
      };
    case MOVIES_REF_FETCH_FAIL:
      return {
        loading: false,
        error: action.payload
      };
    default:
      return state;
  }
};
const fetchMovieByIdReducer = (state = {}, action) => {
  switch (action.type) {
    case MOVIE_FETCH_REQUEST:
      return {
        loading: true
      };
    case MOVIE_FETCH_SUCCESS:
      return {
        loading: false,
        movie: action.payload
      };
    case MOVIE_FETCH_FAIL:
      return {
        loading: false,
        error: action.payload
      };
    default:
      return state;
  }
};
const sortMoviesByReducer = (state = {}, action) => {
  switch (action.type) {
    case MOVIES_SORT_REQUEST:
      return {
        loading: true
      };
    case MOVIES_SORT_SUCCESS:
      return {
        loading: false,
        movies: action.payload
      };
    case MOVIES_SORT_FAIL:
      return {
        loading: false,
        error: action.payload
      };
    default:
      return state;
  }
};
const getMostPopularReducer = (state = {}, action) => {
  switch (action.type) {
    case MOVIES_MOST_POPULAR_REQUEST:
      return {
        loading: true
      };
    case MOVIES_MOST_POPULAR_SUCCESS:
      return {
        loading: false,
        movies: action.payload
      };
    case MOVIES_MOST_POPULAR_FAIL:
      return {
        loading: false,
        error: action.payload
      };
    default:
      return state;
  }
};
export {
  fetchAllMoviesReducer,
  fetchMovieByIdReducer,
  sortMoviesByReducer,
  getMostPopularReducer,
  fetchMoviesByRefReducer
};

We also followed the exact same structure for personReducers.js. For instance, the fetchAllPersonsReducer function defines the states for fetching all persons in the database.

This is given in the code below.

import {
  PERSONS_FETCH_FAIL,
  PERSONS_FETCH_REQUEST,
  PERSONS_FETCH_SUCCESS,
} from "../constants/personConstants";

const fetchAllPersonsReducer = (state = {}, action) => {
  switch (action.type) {
    case PERSONS_FETCH_REQUEST:
      return {
        loading: true
      };
    case PERSONS_FETCH_SUCCESS:
      return {
        loading: false,
        persons: action.payload
      };
    case PERSONS_FETCH_FAIL:
      return {
        loading: false,
        error: action.payload
      };
    default:
      return state;
  }
};

Just like the fetchAllMoviesReducer, we defined fetchAllPersonsReducer with state and action as arguments. These are standard setup for Redux reducers. We then used the switch statement to check the action types and if it’s of type PERSONS_FETCH_REQUEST, we return loading as true. If it’s PERSONS_FETCH_SUCCESS, we switch off loading and return the payload, and if it’s PERSONS_FETCH_FAIL, we return the error.

Combining Reducers

Redux's combineReducers function allows us to combine more than one reducer and pass it to the store. We'll combine our movies and persons reducers in an index.js file within the reducers folder.

Let’s take a look at it.

import { combineReducers } from "redux";
import {
  fetchAllMoviesReducer,
  fetchMovieByIdReducer,
  sortMoviesByReducer,
  getMostPopularReducer,
  fetchMoviesByRefReducer
} from "./movieReducers";

import {
  fetchAllPersonsReducer,
  fetchPersonByIdReducer,
  countPersonsReducer
} from "./personReducers";

import { toggleTheme } from "./globalReducers";

export default combineReducers({
  fetchAllMoviesReducer,
  fetchMovieByIdReducer,
  fetchAllPersonsReducer,
  fetchPersonByIdReducer,
  sortMoviesByReducer,
  getMostPopularReducer,
  countPersonsReducer,
  fetchMoviesByRefReducer,
  toggleTheme
});

Here we imported all the reducers from the movies, persons, and global reducers file and passed them to combineReducers function. The combineReducers function takes an object which allows us to pass all our reducers. We can even add an alias to the arguments in the process.

We’ll work on the globalReducers later.

We can now pass the reducers in the Redux store.js file. This is shown below.

import { createStore, applyMiddleware } from "redux";
import thunk from "redux-thunk";
import reducers from "./reducers/index";

export default createStore(reducers, initialState, applyMiddleware(thunk));

Having set up our Redux workflow, let’s set up our React application.

Setting Up Our React Application

Our react application will list movies and their corresponding cast and crewmembers. We will be using react-router-dom for routing and styled-components for styling the app. We’ll also use Material UI for icons and some UI components.

Enter the following bash command to install the dependencies.

npm install react-router-dom @material-ui/core @material-ui/icons query-string

Here’s what we’ll be building:

Connecting Redux To Our React App

React-redux ships with a Provider function that allows us to connect our application to the Redux store. To do this, we have to pass an instance of the store to the Provider. We can do this either in our index.js or App.js file.

Here’s our index.js file.

import React from "react";
import ReactDOM from "react-dom";
import "./index.css";
import App from "./App";
import { Provider } from "react-redux";
import store from "./redux/store";
ReactDOM.render(
  <Provider store={store}>
    <App />
  </Provider>,
  document.getElementById("root")
);

Here, we imported Provider from react-redux and store from our Redux store. Then we wrapped our entire components tree with the Provider, passing the store to it.

Next, we need react-router-dom for routing in our React application. react-router-dom comes with BrowserRouter, Switch and Route that can be used to define our path and routes.

We do this in our App.js file. This is shown below.

import React from "react";
import Header from "./components/Header";
import Footer from "./components/Footer";
import { BrowserRouter as Router, Switch, Route } from "react-router-dom";
import MoviesList from "./pages/MoviesListPage";
import PersonsList from "./pages/PersonsListPage";

function App() {

  return (
      <Router>
        <main className="contentwrap">
          <Header />
          <Switch>
            <Route path="/persons/">
              <PersonsList />
            </Route>
            <Route path="/" exact>
              <MoviesList />
            </Route>
          </Switch>
        </main>
        <Footer />
      </Router>
  );
}
export default App;

This is a standard setup for routing with react-router-dom. You can check it out in their documentation. We imported our components Header, Footer, PersonsList and MovieList. We then set up the react-router-dom by wrapping everything in Router and Switch.

Since we want our pages to share the same header and footer, we had to pass the <Header /> and <Footer /> component before wrapping the structure with Switch. We also did a similar thing with the main element since we want it to wrap the entire application.

We passed each component to the route using Route from react-router-dom.

Defining Our Pages And Components

Our application is organized in a structured way. Reusable components are stored in the components folder while Pages are stored in the pages folder.

Our pages comprise movieListPage.js, moviePage.js, PersonListPage.js and PersonPage.js. The MovieListPage.js lists all the movies in our Sanity.io backend as well as the most popular movies.

To list all the movies, we simply dispatch the fetchAllMovies action defined in our movieAction.js file. Since we need to fetch the list as soon as the page loads, we have to define it in the useEffect. This is shown below.

import React, { useEffect } from "react";
import { fetchAllMovies } from "../redux/actions/movieActions";
import { useDispatch, useSelector } from "react-redux";

const MoviesListPage = () => {
  const dispatch = useDispatch();
  useEffect(() => {    
      dispatch(fetchAllMovies());
  }, [dispatch]);

  const { loading, error, movies } = useSelector(
    (state) => state.fetchAllMoviesReducer
  );

  return (
    ...
  )
};
export default MoviesListPage;

Thanks to the useDispatch and useSelector Hooks, we can dispatch Redux actions and select the appropriate states from the Redux store. Notice that the states loading, error and movies were defined in our Reducer functions and here selected them using the useSelector Hook from React Redux. These states namely loading, error and movies become available immediately we dispatched the fetchAllMovies() actions.

Once we get the list of movies, we can display it in our application using the map function or however we wish.

Here is the complete code for the moviesListPage.js file.

import React, {useState, useEffect} from 'react'
import {fetchAllMovies, getMostPopular, sortMoviesBy} from "../redux/actions/movieActions"
import {useDispatch, useSelector} from "react-redux"
import Loader from "../components/BackdropLoader"
import {MovieListContainer} from "../styles/MovieStyles.js"
import SortIcon from '@material-ui/icons/Sort';
import SortModal from "../components/Modal"
import {useLocation, Link} from "react-router-dom"
import queryString from "query-string"
import {MOVIES_FETCH_RESET} from "../redux/constants/movieConstants"

const MoviesListPage = () => {
    const location = useLocation()
    const dispatch = useDispatch()
const [openSort, setOpenSort] = useState(false)
useEffect(()=>{ dispatch(getMostPopular()) const {order, type} = queryString.parse(location.search) if(order && type){
dispatch({ type: MOVIES_FETCH_RESET }) dispatch(sortMoviesBy(order, type)) }else{
dispatch(fetchAllMovies())
} }, [dispatch, location.search]) const {loading: popularLoading, error: popularError, movies: popularMovies } = useSelector(state => state.getMostPopularReducer) const { loading: moviesLoading, error: moviesError, movies } = useSelector(state => state.fetchAllMoviesReducer) const { loading: sortLoading, error: sortError, movies: sortMovies } = useSelector(state => state.sortMoviesByReducer) return ( <MovieListContainer> <div className="mostpopular">
{ popularLoading ? <Loader />
: popularError ? popularError :
popularMovies && popularMovies.map(movie => ( <Link to={/movie?id=${movie.&#95;id}} className="popular" key={movie._id} style={{backgroundImage: url(${movie.poster})}}>
<div className="content"> <h2>{movie.title}</h2> <p>{movie.overview.text.substring(0, 50)}…</p> </div>
</Link> )) } </div>
<div className="moviespanel"> <div className="top"> <h2>All Movies</h2> <SortIcon onClick={()=> setOpenSort(true)} /> </div> <div className="movieslist"> { moviesLoading ? <Loader /> : moviesError ? moviesError : movies && movies.map(movie =>( <Link to={/movie?id=${movie.&#95;id}} key={movie._id}> <img className="movie" src={movie.poster} alt={movie.title} /> </Link> )) } { ( sortLoading ? !movies && <Loader /> : sortError ? sortError : sortMovies && sortMovies.map(movie =>( <Link to={/movie?id=${movie.&#95;id}} key={movie._id}> <img className="movie" src={movie.poster} alt={movie.title} /> </Link> )) ) } </div> </div>
<SortModal open={openSort} setOpen={setOpenSort} />
</MovieListContainer> ) } export default MoviesListPage

We started by dispatching the getMostPopular movies action (this action selects the movies with the highest popularity) in the useEffect Hook. This allows us to retrieve the most popular movies as soon as the page loads. Additionally, we allowed users to sort movies by their releaseDate and popularity. This is handled by the sortMoviesBy action dispatched in the code above. Furthermore, we dispatched the fetchAllMovies depending on the query parameters.

Also, we used the useSelector Hook to select the corresponding reducers for each of these actions. We selected the states for loading, error and movies for each of the reducers.

After getting the movies from the reducers, we can now display them to the user. Here, we have used the ES6 map function to do this. We first displayed a loader whenever each of the movie states is loading and if there’s an error, we display the error message. Finally, if we get a movie, we display the movie image to the user using the map function. We wrapped the entire component in a MovieListContainer component.

The <MovieListContainer> … </MovieListContainer> tag is a div defined using styled components. We’ll take a brief look at that soon.

Styling Our App With Styled Components

Styled components allow us to style our pages and components on an individual basis. It also offers some interesting features such as inheritance, Theming, passing of props, etc.

Although we always want to style our pages on an individual basis, sometimes global styling may be desirable. Interestingly, styled-components provide a way to do that, thanks to the createGlobalStyle function.

To use styled-components in our application, we need to install it. Open your terminal in your react project and enter the following bash command.

npm install styled-components

Having installed styled-components, Let’s get started with our global styles.

Let’s create a separate folder in our src directory named styles. This will store all our styles. Let’s also create a globalStyles.js file within the styles folder. To create global style in styled-components, we need to import createGlobalStyle.

import { createGlobalStyle } from "styled-components";

We can then define our styles as follows:

export const GlobalStyle = createGlobalStyle`
  ...
`

Styled components make use of the template literal to define props. Within this literal, we can write our traditional CSS codes.

We also imported deviceWidth defined in a file named definition.js. The deviceWidth holds the definition of breakpoints for setting our media queries.

import { deviceWidth } from "./definition";

We set overflow to hidden to control the flow of our application.

html, body{
        overflow-x: hidden;
}

We also defined the header style using the .header style selector.

.header{
  z-index: 5;
  background-color: ${(props)=>props.theme.midDarkBlue}; 
  display:flex;
  align-items:center;
  padding: 0 20px;
  height:50px;
  justify-content:space-between;
  position:fixed;
  top:0;
  width:100%;
  @media ${deviceWidth.laptop_lg}
  {
    width:97%;
  }
  ...
}

Here, various styles such as the background color, z-index, padding, and lots of other traditional CSS properties are defined.

We’ve used the styled-components props to set the background color. This allows us to set dynamic variables that can be passed from our component. Moreover, we also passed the theme’s variable to enable us to make the most of our theme toggling.

Theming is possible here because we have wrapped our entire application with the ThemeProvider from styled-components. We’ll talk about this in a moment. Furthermore, we used the CSS flexbox to properly style our header and set the position to fixed to make sure it remains fixed with respect to the browser. We also defined the breakpoints to make the headers mobile friendly.

Here is the complete code for our globalStyles.js file.

import { createGlobalStyle } from "styled-components";
import { deviceWidth } from "./definition";

export const GlobalStyle = createGlobalStyle`
    html{
        overflow-x: hidden;
    }
    body{
        background-color: ${(props) => props.theme.lighter};
overflow-x: hidden;
min-height: 100vh;
display: grid; grid-template-rows: auto 1fr auto; } #root{
display: grid; flex-direction: column;
}
h1,h2,h3, label{ font-family: 'Aclonica', sans-serif;
} h1, h2, h3, p, span:not(.MuiIconButton-label), div:not(.PrivateRadioButtonIcon-root-8), div:not(.tryingthis){ color: ${(props) => props.theme.bodyText} } p, span, div, input{ font-family: 'Jost', sans-serif;
} .paginate button{ color: ${(props) => props.theme.bodyText} } .header{ z-index: 5;
background-color: ${(props) => props.theme.midDarkBlue};
display: flex; align-items: center;
padding: 0 20px;
height: 50px; justify-content: space-between; position: fixed; top: 0; width: 100%; @media ${deviceWidth.laptop_lg}{ width: 97%;
}
@media ${deviceWidth.tablet}{ width: 100%; justify-content: space-around; } a{ text-decoration: none; } label{ cursor: pointer; color: ${(props) => props.theme.goldish}; font-size: 1.5rem; }
.hamburger{ cursor: pointer;
color: ${(props) => props.theme.white}; @media ${deviceWidth.desktop}{ display: none; } @media ${deviceWidth.tablet}{ display: block;
} }
}
.mobileHeader{ z-index: 5;
background-color: ${(props) => props.theme.darkBlue};
color: ${(props) => props.theme.white}; display: grid; place-items: center;
width: 100%;
@media ${deviceWidth.tablet}{ width: 100%;
}
height: calc(100% - 50px);
transition: all 0.5s ease-in-out; position: fixed;
right: 0; top: 50px; .menuitems{ display: flex; box-shadow: 0 0 5px ${(props) => props.theme.lightshadowtheme};
flex-direction: column; align-items: center; justify-content: space-around;
height: 60%;
width: 40%; a{ display: flex; flex-direction: column; align-items:center; cursor: pointer; color: ${(props) => props.theme.white}; text-decoration: none;
&:hover{ border-bottom: 2px solid ${(props) => props.theme.goldish}; .MuiSvgIcon-root{ color: ${(props) => props.theme.lightred} } } } } } footer{
min-height: 30px;
margin-top: auto; display: flex; flex-direction: column; align-items: center; justify-content: center;
font-size: 0.875rem;
background-color: ${(props) => props.theme.midDarkBlue};
color: ${(props) => props.theme.white};
}
`;

Notice that we wrote pure CSS code within the literal but there are a few exceptions. Styled-components allows us to pass props. You can learn more about this in the documentation.

Apart from defining global styles, we can define styles for individual pages.

For instance, here is the style for the PersonListPage.js defined in PersonStyle.js in the styles folder.

import styled from "styled-components";
import { deviceWidth, colors } from "./definition";

export const PersonsListContainer = styled.div`
  margin: 50px 80px;
  @media ${deviceWidth.tablet} {
    margin: 50px 10px;
  }
  a {
    text-decoration: none;
  }
  .top {
    display: flex;
    justify-content: flex-end;
    padding: 5px;
    .MuiSvgIcon-root {
      cursor: pointer;
      &:hover {
        color: ${colors.darkred};
      }
    }
  }
  .personslist {
    margin-top: 20px;
    display: grid;
    place-items: center;
    grid-template-columns: repeat(5, 1fr);
    @media ${deviceWidth.laptop} {
      grid-template-columns: repeat(4, 1fr);
    }
    @media ${deviceWidth.tablet} {
      grid-template-columns: repeat(3, 1fr);
    }
    @media ${deviceWidth.tablet_md} {
      grid-template-columns: repeat(2, 1fr);
    }
    @media ${deviceWidth.mobile_lg} {
      grid-template-columns: repeat(1, 1fr);
    }
    grid-gap: 30px;
    .person {
      width: 200px;
      position: relative;
      img {
        width: 100%;
      }
      .content {
        position: absolute;
        bottom: 0;
        left: 8px;
        border-right: 2px solid ${colors.goldish};
        border-left: 2px solid ${colors.goldish};
        border-radius: 10px;
        width: 80%;
        margin: 20px auto;
        padding: 8px 10px;
        background-color: ${colors.transparentWhite};
        color: ${colors.darkBlue};
        h2 {
          font-size: 1.2rem;
        }
      }
    }
  }
`;

We first imported styled from styled-components and deviceWidth from the definition file. We then defined PersonsListContainer as a div to hold our styles. Using media queries and the established breakpoints, we made the page mobile-friendly by setting various breakpoints.

Here, we have used only the standard browser breakpoints for small, large and very large screens. We also made the most of the CSS flexbox and grid to properly style and display our content on the page.

To use this style in our PersonListPage.js file, we simply imported it and added it to our page as follows.

import React from "react";

const PersonsListPage = () => {
  return (
    <PersonsListContainer>
      ...
    </PersonsListContainer>
  );
};
export default PersonsListPage;

The wrapper will output a div because we defined it as a div in our styles.

Adding Themes And Wrapping It Up

It’s always a cool feature to add themes to our application. For this, we need the following:

  • Our custom themes defined in a separate file (in our case definition.js file).
  • The logic defined in our Redux actions and reducers.
  • Calling our theme in our application and passing it through the component tree.

Let’s check this out.

Here is our theme object in the definition.js file.

export const theme = {
  light: {
    dark: "#0B0C10",
    darkBlue: "#253858",
    midDarkBlue: "#42526e",
    lightBlue: "#0065ff",
    normal: "#dcdcdd",
    lighter: "#F4F5F7",
    white: "#FFFFFF",
    darkred: "#E85A4F",
    lightred: "#E98074",
    goldish: "#FFC400",
    bodyText: "#0B0C10",
    lightshadowtheme: "rgba(0, 0, 0, 0.1)"
  },
  dark: {
    dark: "white",
    darkBlue: "#06090F",
    midDarkBlue: "#161B22",
    normal: "#dcdcdd",
    lighter: "#06090F",
    white: "white",
    darkred: "#E85A4F",
    lightred: "#E98074",
    goldish: "#FFC400",
    bodyText: "white",
    lightshadowtheme: "rgba(255, 255, 255, 0.9)"
  }
};

We have added various color properties for the light and dark themes. The colors are carefully chosen to enable visibility both in light and dark mode. You can define your themes as you want. This is not a hard and fast rule.

Next, let's add the functionality to Redux.

We have created globalActions.js in our Redux actions folder and added the following codes.

import { SET_DARK_THEME, SET_LIGHT_THEME } from "../constants/globalConstants";
import { theme } from "../../styles/definition";

export const switchToLightTheme = () => (dispatch) => {
  dispatch({
    type: SET_LIGHT_THEME,
    payload: theme.light
  });
  localStorage.setItem("theme", JSON.stringify(theme.light));
  localStorage.setItem("light", JSON.stringify(true));
};

export const switchToDarkTheme = () => (dispatch) => {
  dispatch({
    type: SET_DARK_THEME,
    payload: theme.dark
  });
  localStorage.setItem("theme", JSON.stringify(theme.dark));
  localStorage.setItem("light", JSON.stringify(false));
};

Here, we simply imported our defined themes. Dispatched the corresponding actions, passing the payload of the themes we needed. The payload results are stored in the local storage using the same keys for both light and dark themes. This enables us to persist the states in the browser.

We also need to define our reducer for the themes.

import { SET_DARK_THEME, SET_LIGHT_THEME } from "../constants/globalConstants";

export const toggleTheme = (state = {}, action) => {
  switch (action.type) {
    case SET_LIGHT_THEME:
      return {
        theme: action.payload,
        light: true
      };
    case SET_DARK_THEME:
      return {
        theme: action.payload,
        light: false
      };
    default:
      return state;
  }
};

This is very similar to what we’ve been doing. We used the switch statement to check the type of action and then returned the appropriate payload. We also returned a state light that determines whether light or dark theme is selected by the user. We’ll use this in our components.

We also need to add it to our root reducer and store. Here is the complete code for our store.js.

import { createStore, applyMiddleware } from "redux";
import thunk from "redux-thunk";
import { theme as initialTheme } from "../styles/definition";
import reducers from "./reducers/index";

const theme = localStorage.getItem("theme")
  ? JSON.parse(localStorage.getItem("theme"))
  : initialTheme.light;

const light = localStorage.getItem("light")
  ? JSON.parse(localStorage.getItem("light"))
  : true;

const initialState = {
  toggleTheme: { light, theme }
};
export default createStore(reducers, initialState, applyMiddleware(thunk));

Since we needed to persist the theme when the user refreshes, we had to get it from the local storage using localStorage.getItem() and pass it to our initial state.

Adding The Functionality To Our React Application

Styled components provide us with ThemeProvider that allows us to pass themes through our application. We can modify our App.js file to add this functionality.

Let's take a look at it.

import React from "react";
import { BrowserRouter as Router, Switch, Route } from "react-router-dom";
import { useSelector } from "react-redux";
import { ThemeProvider } from "styled-components";

function App() {
  const { theme } = useSelector((state) => state.toggleTheme);
  let Theme = theme ? theme : {};
  return (
    <ThemeProvider theme={Theme}>
      <Router>
        ...
      </Router>
    </ThemeProvider>
  );
}
export default App;

By passing themes through the ThemeProvider, we can easily use the theme props in our styles.

For instance, we can set the color to our bodyText custom color as follows.

color: ${(props) => props.theme.bodyText};

We can use the custom themes anywhere we need color in our application.

For example, to define border-bottom, we do the following.

border-bottom: 2px solid ${(props) => props.theme.goldish};

Conclusion

We began by delving into Sanity.io, setting it up and connecting it to our React application. Then we set up Redux and used the GROQ language to query our API. We saw how to connect and use Redux to our React app using react-redux, use styled-components and theming.

However, we only scratched the surface on what is possible with these technologies. I encourage you to go through the code samples in my GitHub repo and try your hands on a completely different project using these technologies to learn and master them.

Resources

#299: Meet CPHub

CPHub is just the name of an internal project (“CodePen Hub”) that we’ve released in the last couple of weeks. You (as a user) won’t notice a thing (except, perhaps, that some of our processors have been upgraded, like RubySass to DartSass). But for us, we notice, because not only does it do everything we hoped it would, it’s had side effects that have all been positive.

This show is Alex and Chris chatting about all the technical in-and-outs of the project. Short story: we have a new internally-facing relative URL, which is responsible for the vast majority of anything that would otherwise go out to a third-party URL. So for example, all our code processing services in the past would have been routed to an AWS Gateway and then to an AWS Lambda orchestrator and then to an individual AWS Lambda and back. Now they go to CPHub, to the individual Lambda, and back. But it’s not just AWS stuff, it’s really any third party HTTP request.

Among other things, CPHub is:

  1. Faster — a handful of Go-powered web servers that are literally faster, never break a sweat, and require less hops
  2. Less expensive — we have to manage those servers, but they are simple and cheap
  3. Are not subject to CORS concerns — because the HTTP requests are to our own domain

The thing I’m most excited about though is the consolidation. Every service we have is consolidated into the CPHub area of our repo and we’ve improved the deployment story for all of it.

Episode Timestamps

  • 01:14 Serverless functions on CodePen
  • 06:43 Advantages of CP Hub
  • 11:22 Sponsor: FeaturePeek
  • 14:17 Benefits of CP Hub continued
  • 19:16 Boom Boom
  • 25:02 Writing a node function
  • 32:15 A good idea all around
  • 34:36 Squashing bugs

Sponsor: FeaturePeek

Turn front-end deployment previews into your hub for continuous product review. FeaturePeek is the easiest way for web development teams to collaborate on frontend work.

  • Take and annotate screenshots
  • Record session video
  • Tag coworkers and leave comments

FeaturePeek works with all frameworks and hosting providers and integrates with Linear, Clubhouse, Trello, and more.

Get started today at featurepeek.com and use code FP2021 for 30% off upgrades to FeaturePeek for business teams.

The post #299: Meet CPHub appeared first on CodePen Blog.

Collective #616


Collective 616 Item Image

this vs that

What is the difference between some key concepts in front-end development? Find out with this great collection. By Nguyen Huu Phuoc.

Check it out


Collective 616 Item Image

svelthree

Svelthree is a components library for declarative construction of reactive and reusable scene graphs utilizing a slightly modified three.js source.

Check it out


Collective 616 Item Image

CS Visualized: CORS

In this part of the “CS Visualized” series, Lydia Hallie explains cross-origin resource sharing in an easy to understand way.

Check it out


Collective 616 Item Image

Luckysheet

Luckysheet is an online spreadsheet like Excel that is powerful, simple to configure, and completely open source.

Check it out


The post Collective #616 appeared first on Codrops.

New, Better Asset URLs

The files you upload to CodePen with our PRO Asset Hosting feature have a public URL you can access them at. You might recognize a URL like this, that we used to give you:

https://s3-us-west-amazonaws.com/s.codepen.io/1/your-file.jpg

Or you might recognize that URL as being a direct URL to an Amazon S3 bucket. While that works, it’s not ideal for a couple of reasons:

  1. S3 isn’t a CDN. It’s the right place for asset storage, but not direct asset delivery. For one thing, notice the “us-west” in the URL. That’s OK for me literally being in the west of the U.S., but worse and worse of a choice the farther you are away. Rachel in Queensland, Australia didn’t exactly have fast assets.
  2. CORS issues. S3 can have a “bucket policy” that sets CORS headers, and we absolutely did that and it worked for the most part, but there was a really tricky little issue that could cache the asset with missing CORS headers and cause people grief.

So, we’re now serving up assets from a new URL, like this:

https://assets.codepen.io/1/your-file.jpg

Here’s what that transition is like:

Now…

  • The files are served from a global CDN, meaning everyone will get them much faster.
  • We can ensure the files are served with the right CORS headers no matter what.
  • This unlocks some additional cool features we’ll be making available soon, so stay tuned.

Do I have to do anything?

No. If you want to take advantage of this, you can update your “old” URLs to this new format, but you don’t have to, the old URLs will work fine forever.

We might ultimately update those URLs for you, just because it’s purely better.

The post New, Better Asset URLs appeared first on CodePen Blog.

Building Your First Serverless Service With AWS Lambda Functions

Many developers are at least marginally familiar with AWS Lambda functions. They’re reasonably straightforward to set up, but the vast AWS landscape can make it hard to see the big picture. With so many different pieces it can be daunting, and frustratingly hard to see how they fit seamlessly into a normal web application.

The Serverless framework is a huge help here. It streamlines the creation, deployment, and most significantly, the integration of Lambda functions into a web app. To be clear, it does much, much more than that, but these are the pieces I’ll be focusing on. Hopefully, this post strikes your interest and encourages you to check out the many other things Serverless supports. If you’re completely new to Lambda you might first want to check out this AWS intro.

There’s no way I can cover the initial installation and setup better than the quick start guide, so start there to get up and running. Assuming you already have an AWS account, you might be up and running in 5–10 minutes; and if you don’t, the guide covers that as well.

Your first Serverless service

Before we get to cool things like file uploads and S3 buckets, let’s create a basic Lambda function, connect it to an HTTP endpoint, and call it from an existing web app. The Lambda won’t do anything useful or interesting, but this will give us a nice opportunity to see how pleasant it is to work with Serverless.

First, let’s create our service. Open any new, or existing web app you might have (create-react-app is a great way to quickly spin up a new one) and find a place to create our services. For me, it’s my lambda folder. Whatever directory you choose, cd into it from terminal and run the following command:

sls create -t aws-nodejs --path hello-world

That creates a new directory called hello-world. Let’s crack it open and see what’s in there.

If you look in handler.js, you should see an async function that returns a message. We could hit sls deploy in our terminal right now, and deploy that Lambda function, which could then be invoked. But before we do that, let’s make it callable over the web.

Working with AWS manually, we’d normally need to go into the AWS API Gateway, create an endpoint, then create a stage, and tell it to proxy to our Lambda. With serverless, all we need is a little bit of config.

Still in the hello-world directory? Open the serverless.yaml file that was created in there.

The config file actually comes with boilerplate for the most common setups. Let’s uncomment the http entries, and add a more sensible path. Something like this:

functions:
  hello:
    handler: handler.hello
#   The following are a few example events you can configure
#   NOTE: Please make sure to change your handler code to work with those events
#   Check the event documentation for details
    events:
      - http:
        path: msg
        method: get

That’s it. Serverless does all the grunt work described above.

CORS configuration 

Ideally, we want to call this from front-end JavaScript code with the Fetch API, but that unfortunately means we need CORS to be configured. This section will walk you through that.

Below the configuration above, add cors: true, like this

functions:
  hello:
    handler: handler.hello
    events:
      - http:
        path: msg
        method: get
        cors: true

That’s the section! CORS is now configured on our API endpoint, allowing cross-origin communication.

CORS Lambda tweak

While our HTTP endpoint is configured for CORS, it’s up to our Lambda to return the right headers. That’s just how CORS works. Let’s automate that by heading back into handler.js, and adding this function:

const CorsResponse = obj => ({
  statusCode: 200,
  headers: {
    "Access-Control-Allow-Origin": "*",
    "Access-Control-Allow-Headers": "*",
    "Access-Control-Allow-Methods": "*"
  },
  body: JSON.stringify(obj)
});

Before returning from the Lambda, we’ll send the return value through that function. Here’s the entirety of handler.js with everything we’ve done up to this point:

'use strict';
const CorsResponse = obj => ({
  statusCode: 200,
  headers: {
    "Access-Control-Allow-Origin": "*",
    "Access-Control-Allow-Headers": "*",
    "Access-Control-Allow-Methods": "*"
  },
  body: JSON.stringify(obj)
});


module.exports.hello = async event => {
  return CorsResponse("HELLO, WORLD!");
};

Let’s run it. Type sls deploy into your terminal from the hello-world folder.

When that runs, we’ll have deployed our Lambda function to an HTTP endpoint that we can call via Fetch. But… where is it? We could crack open our AWS console, find the gateway API that serverless created for us, then find the Invoke URL. It would look something like this.

The AWS console showing the Settings tab which includes Cache Settings. Above that is a blue notice that contains the invoke URL.

Fortunately, there is an easier way, which is to type sls info into our terminal:

Just like that, we can see that our Lambda function is available at the following path:

https://6xpmc3g0ch.execute-api.us-east-1.amazonaws.com/dev/ms

Woot, now let’s call It!

Now let’s open up a web app and try fetching it. Here’s what our Fetch will look like:

fetch("https://6xpmc3g0ch.execute-api.us-east-1.amazonaws.com/dev/msg")
  .then(resp => resp.json())
  .then(resp => {
    console.log(resp);
  });

We should see our message in the dev console.

Console output showing Hello World.

Now that we’ve gotten our feet wet, let’s repeat this process. This time, though, let’s make a more interesting, useful service. Specifically, let’s make the canonical “resize an image” Lambda, but instead of being triggered by a new S3 bucket upload, let’s let the user upload an image directly to our Lambda. That’ll remove the need to bundle any kind of aws-sdk resources in our client-side bundle.

Building a useful Lambda

OK, from the start! This particular Lambda will take an image, resize it, then upload it to an S3 bucket. First, let’s create a new service. I’m calling it cover-art but it could certainly be anything else.

sls create -t aws-nodejs --path cover-art

As before, we’ll add a path to our HTTP endpoint (which in this case will be a POST, instead of GET, since we’re sending the file instead of receiving it) and enable CORS:

// Same as before
  events:
    - http:
      path: upload
      method: post
      cors: true

Next, let’s grant our Lambda access to whatever S3 buckets we’re going to use for the upload. Look in your YAML file — there should be a iamRoleStatements section that contains boilerplate code that’s been commented out. We can leverage some of that by uncommenting it. Here’s the config we’ll use to enable the S3 buckets we want:

iamRoleStatements:
 - Effect: "Allow"
   Action:
     - "s3:*"
   Resource: ["arn:aws:s3:::your-bucket-name/*"]

Note the /* on the end. We don’t list specific bucket names in isolation, but rather paths to resources; in this case, that’s any resources that happen to exist inside your-bucket-name.

Since we want to upload files directly to our Lambda, we need to make one more tweak. Specifically, we need to configure the API endpoint to accept multipart/form-data as a binary media type. Locate the provider section in the YAML file:

provider:
  name: aws
  runtime: nodejs12.x

…and modify if it to:

provider:
  name: aws
  runtime: nodejs12.x
  apiGateway:
    binaryMediaTypes:
      - 'multipart/form-data'

For good measure, let’s give our function an intelligent name. Replace handler: handler.hello with handler: handler.upload, then change module.exports.hello to module.exports.upload in handler.js.

Now we get to write some code

First, let’s grab some helpers.

npm i jimp uuid lambda-multipart-parser

Wait, what’s Jimp? It’s the library I’m using to resize uploaded images. uuid will be for creating new, unique file names of the sized resources, before uploading to S3. Oh, and lambda-multipart-parser? That’s for parsing the file info inside our Lambda.

Next, let’s make a convenience helper for S3 uploading:

const uploadToS3 = (fileName, body) => {
  const s3 = new S3({});
  const  params = { Bucket: "your-bucket-name", Key: `/${fileName}`, Body: body };


  return new Promise(res => {
    s3.upload(params, function(err, data) {
      if (err) {
        return res(CorsResponse({ error: true, message: err }));
      }
      res(CorsResponse({ 
        success: true, 
        url: `https://${params.Bucket}.s3.amazonaws.com/${params.Key}` 
      }));
    });
  });
};

Lastly, we’ll plug in some code that reads the upload files, resizes them with Jimp (if needed) and uploads the result to S3. The final result is below.

'use strict';
const AWS = require("aws-sdk");
const { S3 } = AWS;
const path = require("path");
const Jimp = require("jimp");
const uuid = require("uuid/v4");
const awsMultiPartParser = require("lambda-multipart-parser");


const CorsResponse = obj => ({
  statusCode: 200,
  headers: {
    "Access-Control-Allow-Origin": "*",
    "Access-Control-Allow-Headers": "*",
    "Access-Control-Allow-Methods": "*"
  },
  body: JSON.stringify(obj)
});


const uploadToS3 = (fileName, body) => {
  const s3 = new S3({});
  var params = { Bucket: "your-bucket-name", Key: `/${fileName}`, Body: body };
  return new Promise(res => {
    s3.upload(params, function(err, data) {
      if (err) {
        return res(CorsResponse({ error: true, message: err }));
      }
      res(CorsResponse({ 
        success: true, 
        url: `https://${params.Bucket}.s3.amazonaws.com/${params.Key}` 
      }));
    });
  });
};


module.exports.upload = async event => {
  const formPayload = await awsMultiPartParser.parse(event);
  const MAX_WIDTH = 50;
  return new Promise(res => {
    Jimp.read(formPayload.files[0].content, function(err, image) {
      if (err || !image) {
        return res(CorsResponse({ error: true, message: err }));
      }
      const newName = `${uuid()}${path.extname(formPayload.files[0].filename)}`;
      if (image.bitmap.width > MAX_WIDTH) {
        image.resize(MAX_WIDTH, Jimp.AUTO);
        image.getBuffer(image.getMIME(), (err, body) => {
          if (err) {
            return res(CorsResponse({ error: true, message: err }));
          }
          return res(uploadToS3(newName, body));
        });
      } else {
        image.getBuffer(image.getMIME(), (err, body) => {
          if (err) {
            return res(CorsResponse({ error: true, message: err }));
          }
          return res(uploadToS3(newName, body));
        });
      }
    });
  });
};

I’m sorry to dump so much code on you but — this being a post about Amazon Lambda and serverless — I’d rather not belabor the grunt work within the serverless function. Of course, yours might look completely different if you’re using an image library other than Jimp.

Let’s run it by uploading a file from our client. I’m using the react-dropzone library, so my JSX looks like this:

<Dropzone
  onDrop={files => onDrop(files)}
  multiple={false}
>
  <div>Click or drag to upload a new cover</div>
</Dropzone>

The onDrop function looks like this:

const onDrop = files => {
  let request = new FormData();
  request.append("fileUploaded", files[0]);


  fetch("https://yb1ihnzpy8.execute-api.us-east-1.amazonaws.com/dev/upload", {
    method: "POST",
    mode: "cors",
    body: request
    })
  .then(resp => resp.json())
  .then(res => {
    if (res.error) {
      // handle errors
    } else {
      // success - woo hoo - update state as needed
    }
  });
};

And just like that, we can upload a file and see it appear in our S3 bucket! 

Screenshot of the AWS interface for buckets showing an uploaded file in a bucket that came from the Lambda function.

An optional detour: bundling

There’s one optional enhancement we could make to our setup. Right now, when we deploy our service, Serverless is zipping up the entire services folder and sending all of it to our Lambda. The content currently weighs in at 10MB, since all of our node_modules are getting dragged along for the ride. We can use a bundler to drastically reduce that size. Not only that, but a bundler will cut deploy time, data usage, cold start performance, etc. In other words, it’s a nice thing to have.

Fortunately for us, there’s a plugin that easily integrates webpack into the serverless build process. Let’s install it with:

npm i serverless-webpack --save-dev

…and add it via our YAML config file. We can drop this in at the very end:

// Same as before
plugins:
  - serverless-webpack

Naturally, we need a webpack.config.js file, so let’s add that to the mix:

const path = require("path");
module.exports = {
  entry: "./handler.js",
  output: {
    libraryTarget: 'commonjs2',
    path: path.join(__dirname, '.webpack'),
    filename: 'handler.js',
  },
  target: "node",
  mode: "production",
  externals: ["aws-sdk"],
  resolve: {
    mainFields: ["main"]
  }
};

Notice that we’re setting target: node so Node-specific assets are treated properly. Also note that you may need to set the output filename to  handler.js. I’m also adding aws-sdk to the externals array so webpack doesn’t bundle it at all; instead, it’ll leave the call to const AWS = require("aws-sdk"); alone, allowing it to be handled by our Lamdba, at runtime. This is OK since Lambdas already have the aws-sdk available implicitly, meaning there’s no need for us to send it over the wire. Finally, the mainFields: ["main"] is to tell webpack to ignore any ESM module fields. This is necessary to fix some issues with the Jimp library.

Now let’s re-deploy, and hopefully we’ll see webpack running.

Now our code is bundled nicely into a single file that’s 935K, which zips down further to a mere 337K. That’s a lot of savings!

Odds and ends

If you’re wondering how you’d send other data to the Lambda, you’d add what you want to the request object, of type FormData, from before. For example:

request.append("xyz", "Hi there");

…and then read formPayload.xyz in the Lambda. This can be useful if you need to send a security token, or other file info.

If you’re wondering how you might configure env variables for your Lambda, you might have guessed by now that it’s as simple as adding some fields to your serverless.yaml file. It even supports reading the values from an external file (presumably not committed to git). This blog post by Philipp Müns covers it well.

Wrapping up

Serverless is an incredible framework. I promise, we’ve barely scratched the surface. Hopefully this post has shown you its potential, and motivated you to check it out even further.

If you’re interested in learning more, I’d recommend the learning materials from David Wells, an engineer at Netlify, and former member of the serverless team, as well as the Serverless Handbook by Swizec Teller

The post Building Your First Serverless Service With AWS Lambda Functions appeared first on CSS-Tricks.

How to NGINX Reverse Proxy with Docker Compose

While developing a web application, a common method of calling the application from a local machine is through http://localhost:x ports, which essentially means that we are required to expose several ports to access different modules of the application. In the article below, we will go through the method of using Reverse Proxy to call an application and the benefits of using it.

Why Do We Need Reverse Proxy?

The most obvious reason for using Reverse Proxy is to avoid changing ports every time you try to access different modules of the application through the same URL. Through Reverse Proxy we can reach frontend, backend, or other services without changing port through a single domain. Another important reason for using Reverse Proxy is to mask services behind a proxy and avoid dealing with CORS issues.

Laravel 7 Now Available

Laravel, which calls itself the "PHP framework for web artisans," has released version 7. Laravel 7 includes better routing speed, a new HTTP client, CORS support and other enhancements. New features include Laravel Airlock, custom Eloquent casts, Blade component tags, and fluent string operations.

Web Development Merit Badges

Changed a DNS record and everything worked just fine
Comprehended someone else's RegEx
Built an accordion from scratch
Exited VIM
Accidentally created own CMS
Pulled off a design you didn’t think you could
Told a client/boss "No, we're not doing that."
Wrote an HTAccess redirect that included a capture group
Refactored a large portion of CSS and didn't break anything
Centered an element vertically and horizontally
Migrated a database without character encoding issues
Pushed to production on Friday and didn't roll it back over the weekend
Merged master into a six month old branch
Had a neglected site get hacked and spammed
Used CSS Grid in production
Someone you don't know starred one of your GitHub Repositories
Hand-coded a HTML email
Gave someone useful feedback on a Pull Request
Debugged something for over one hour where the fix was literally one character
Solved a bug by taking a nap
Became extremely confused by a CORS error
Quoted the exact number of hours it took to do the job
Renewed an SSL certificate without any drama
Found an answer to an issue on StackOverflow
Rocked the Checkbox Hack on a project
Your personal website hasn't been updated in at least 5 years

The post Web Development Merit Badges appeared first on CSS-Tricks.

Zoom, CORS, and the Web

It's sorta sad by funny that that big Zoom vulnerability thing was ultimately related to web technology and not really the app itself.

There is this idea of custom protocols or "URL schemes." So, like gittower:// or dropbox:// or whatever. A native app can register them, then URLs that hit them get passed to the native app. iOS has "universal links" which are coming to the web apparently. (Atishay Jain has an excellent write-up on them.) But links like that don't leave much choice — they will open in the app. If your app has both web and native components, you might want to offer the user a choice. So, you use a regular URL instead.

In order for that web page to open up a native app, apparently, the tactic used by many is to have it communicate with a server running on localhost on your own computer which uses a URL scheme to open the native app. Clever, but I've heard sentiment from folks like:

  • I had no idea this software was running a localhost server on my machine
  • It feels weird that websites out on the wild internet can communicate with my localhost server

That's the way it is though. But there are some protections in place. Namely: CORS (Cross-Origin Resource Sharing). Ugh. I feel like I deal with some kind of CORS problem every week of my life. But it's important. It prevents XHR requests from websites that aren't specifically allowed. Imagine if you visit my website, and I have your browser shoot requests over to Facebook, hoping you are logged in so I can do things on your behalf. Bad. CORS doesn't prevent that, the same-origin policy of browsers prevents that. CORS is the mechanism to control that.

If my website tries to communicate with your website, and your website's response doesn't have an Access-Control-Allow-Origin header with my domain or *, it will fail. But not everything is subject to CORS restrictions. Images, for example, are not. We can link up images from any domain and they will return data.

Chris Foster thinks CORS and a lack of understanding of CORS was at the heart of the Zoom bug.

Zoom may have needed to get this feature out and did not understand CORS. They couldn’t make the AJAX requests without the browser disallowing the attempt. Instead, they built this image hack to work around CORS. By doing this, they opened Zoom up to a big vulnerability because n/ot only can the Zoom website trigger operations in the native client and access the response, but every other website on the internet can too.

In the wake of all this, Nicolas Bailly wrote "What you should know about CORS":

This is often a source of confusion for newcomers because it's not immediately apparent what CORS is supposed to achieve. Firstly CORS is not a security measure in itself, it's actually the opposite: CORS is a way to circumvent the "Same Origin Policy" which is the security measure preventing you from making [AJAX] requests to a different domain.

The post Zoom, CORS, and the Web appeared first on CSS-Tricks.