The Benefits of Implementing Blue/Green Deployment in Your CI/CD Pipeline

What Exactly Is Blue-Green Deployment?

Blue-green deployments refer to a Continuous Delivery technique that aims to eliminate deployment downtime and enables almost instant rollbacks. The method involves setting up two production environments, Blue and Green, that are nearly identical.

The Challenge of Automating Deployment

Automating deployment poses a challenge when it comes to transitioning software from the final testing stage to live production. The process must be executed quickly to minimize downtime. The blue-green deployment approach provides a solution by leveraging two identical production environments. 

Spinnaker vs. Argo CD: Best Tools for Continuous Delivery

Intro to CD

Adopting containers has been a common strategy for enterprises to roll out new application changes quickly, deploy efficiently, and run applications securely.

Today, to achieve those goals, many enterprises are now adopting continuous delivery (CD) in order to deploy changes into production quickly, frequently, and safely.

Comparing Lean, Agile, and Continuous Delivery

With DevOps and Continuous Delivery gaining traction, are the principles behind Lean and Agile still relevant? How do they compare to the 5 Continuous Delivery principles, and what do any differences mean for software development teams?

The Beginnings of Lightweight Software Delivery

Throughout the 1990s, a revolution was brewing in the software development industry. The early phased models divided the delivery process into skill-based steps, with designs and documents used to run approval processes to control a project.

Continuous Delivery != DevOps

Continuous Delivery and DevOps are interdependent, not equivalent

Since the publication of Dave Farley and Jez Humble’s seminal book on Continuous Delivery in 2010, its rise within the IT industry has been paralleled by the growth of the DevOps movement. While Continuous Delivery has an explicit goal of optimising for cycle time and an established set of principles and practices, DevOps is a more organic philosophy that is defined as “aligning development and operations roles and processes in the context of shared business objectives“, and gradually codifying into principles and practices. Continuous Delivery and DevOps possess a shared background in agile methods and Lean Thinking, and a shared desire to eliminate Waterscrumfall silos – but what is the nature of their relationship?

Optimizing the Role of QA in Continuous Delivery

Software development space is quickly evolving, bringing in more agility and accessibility. For a long time, software testing posed a significant challenge for engineers. It used to be a tedious affair and used to begin after the completion of development. The testers had to build test cases manually. As a result, it could delay the launch of the application.

Apart from actual production and post-production issues, the usability and tracking of the application stage became difficult. It led to chaos at all stages.

Continuous Integration and Continuous Delivery for Database Changes

Introduction

Over the last two decades, many application development teams have adopted Agile development practices and have immensely benefited from it. Delivering working software frequently, receiving early feedback from customers and having self-organized cross-functional teams led to faster delivery to market and satisfied customers. Another software engineering culture, called DevOps, started evolving towards the middle of this decade and is now popular among many organizations. DevOps aims at unifying software development (Dev) and IT operations (Ops). Both these software engineering practices advocate automation, and two main concepts coming out of them are Continuous Integration (CI) and Continuous Delivery (CD). The purpose of this article is to highlight how Database Change Management, which is an important aspect of the software delivery process, is often the bottleneck in implementing a Continuous Delivery process. The article also recommends some processes that help in overcoming this bottleneck and allow streamlining application code delivery and database changes into a single delivery pipeline.

Continuous Integration

One of the core principles of an Agile development process is Continuous Integration. Continuous Integration emphasizes on making sure that code developed by multiple members of the team are always integrated. It avoids “integration hell” that used to be so common during the days when developers worked in their silos and waited until everyone was done with their pieces of work, before attempting to integrate them. Continuous Integration involves independent build machine, automated builds, and automated tests. It promotes test-driven development and the practice of making frequent atomic commits to the baseline or master branch or trunk of the version control system.

Using Jenkins as Your Go-to CI/CD Tool

Introduction

Everyone loves Agile and the way it is replacing all the older methodologies and development models with a streamlined and sustainable system for faster delivery cycles. However, the ever-prevailing manual testing practice has always kept the QA teams from entirely adopting Continuous Integration and Continuous Delivery, making Agility unreachable. Fortunately, tools like Jenkins help reach the goals of the CI/CD pipeline, i.e., to maintain a continuous flow of software updates in production and shorter release cycles at reduced costs.

Jenkins and Its Relation to DevOps and CI/CD

We know that Continuous Integration and Continuous Delivery are integral parts of the DevOps process and are inevitable in the Agile approach. It has completely changed the way the development and QA team delivers software. Let us briefly review DevOps, CI/CD pipeline, and Jenkins before moving ahead.

Overcome Challenges of Continuous Delivery for Kubernetes With Spinnaker

Kubernetes is the leading container orchestration system, and it has a vast ecosystem of open-source and commercial components built around it. Today, in the wake of the pandemic, even more enterprises are considering Kubernetes a central part of their IT transformation journey. Kubernetes is a great container management tool because it offers:

  • Automated bin packing 
  • Scaling and self-healing containers 
  • Service discovery
  • Load balancing  

However, using Kubernetes alone may not solve the purpose of becoming agile because it was never meant to be a deployment system. This blog will highlight some of the challenges of using Kubernetes and, based on our work with hundreds of organizations, how to avoid the challenges to unlock the full potential of cloud-native. 

Outcome-based Development w/ Bryan Finster

"A developer is a business expert who solves problems with code."       Bryan Finster

Continuous Delivery isn’t about how fast you can deliver, it’s about the outcome your delivery achieves. On our first episode of the new year I talk with Bryan Finster, author of 5-minute DevOps, about outcome-based development and why failing small is better than failing fast.

Creating A Continuous Integration Test Workflow Using GitHub Actions

When contributing to projects on version control platforms like GitHub and Bitbucket, the convention is that there is the main branch containing the functional codebase. Then, there are other branches in which several developers can work on copies of the main to either add a new feature, fix a bug, and so on. It makes a lot of sense because it becomes easier to monitor the kind of effect the incoming changes will have on the existing code. If there is any error, it can easily be traced and fixed before integrating the changes into the main branch. It can be time-consuming to go through every single line of code manually looking for errors or bugs — even for a small project. That is where continuous integration comes in.

What Is Continuous Integration (CI)?

“Continuous integration (CI) is the practice of automating the integration of code changes from multiple contributors into a single software project.”

— Atlassian.com

The general idea behind continuous integration (CI) is to ensure changes made to the project do not “break the build,” that is, ruin the existing code base. Implementing continuous integration in your project, depending on how you set up your workflow, would create a build whenever anyone makes changes to the repository.

So, What Is A Build?

A build — in this context — is the compilation of source code into an executable format. If it is successful, it means the incoming changes will not negatively impact the codebase, and they are good to go. However, if the build fails, the changes will have to be reevaluated. That is why it is advisable to make changes to a project by working on a copy of the project on a different branch before incorporating it into the main codebase. This way, if the build breaks, it would be easier to figure out where the error is coming from, and it also does not affect your main source code.

“The earlier you catch defects, the cheaper they are to fix.”

— David Farley, Continuous Delivery: Reliable Software Releases through Build, Test, and Deployment Automation

There are several tools available to help with creating continuous integration for your project. These include Jenkins, TravisCI, CircleCI, GitLab CI, GitHub Actions, etc. For this tutorial, I will be making use of GitHub Actions.

GitHub Actions For Continuous Integration

CI Actions is a fairly new feature on GitHub and enables the creation of workflows that automatically run your project’s build and tests. A workflow contains one or more jobs that can be activated when an event occurs. This event could be a push to any of the branches on the repo or the creation of a pull request. I will explain these terms in detail as we proceed.

Let’s Get Started!

Prerequisites

This is a tutorial for beginners so I will mostly talk about GitHub Actions CI on a surface level. Readers should already be familiar with creating a Node JS REST API using the PostgreSQL database, Sequelize ORM, and writing tests with Mocha and Chai.

You should also have the following installed on your machine:

  • NodeJS,
  • PostgreSQL,
  • NPM,
  • VSCode (or any editor and terminal of your choice).

I will make use of a REST API I already created called countries-info-api. It’s a simple api with no role-based authorizations (as at the time of writing this tutorial). This means anyone can add, delete, and/or update a country’s details. Each country will have an id (auto-generated UUID), name, capital, and population. To achieve this, I made use of Node js, express js framework, and Postgresql for the database.

I will briefly explain how I set up the server, database before I begin with writing the tests for test coverage and the workflow file for continuous integration.

You can clone the countries-info-api repo to follow through or create your own API.

Technology used: Node Js, NPM (a package manager for Javascript), Postgresql database, sequelize ORM, Babel.

Setting Up The Server

Before setting up the server, I installed some dependencies from npm.

npm install express dotenv cors

npm install --save-dev @babel/core @babel/cli @babel/preset-env nodemon

I am using the express framework and writing in the ES6 format, so I’ll need Babeljs to compile my code. You can read the official documentation to know more about how it works and how to configure it for your project. Nodemon will detect any changes made to the code and automatically restart the server.

Note: Npm packages installed using the --save-dev flag are only required during the development stages and are seen under devDependencies in the package.json file.

I added the following to my index.js file:

import express from "express";
import bodyParser from "body-parser";
import cors from "cors";
import "dotenv/config";

const app = express();
const port = process.env.PORT;

app.use(bodyParser.json());

app.use(bodyParser.urlencoded({ extended: true }));

app.use(cors());

app.get("/", (req, res) => {
    res.send({message: "Welcome to the homepage!"})
})

app.listen(port, () => {
    console.log(`Server is running on ${port}...`)
})

This sets up our api to run on whatever is assigned to the PORT variable in the .env file. This is also where we will be declaring variables that we don’t want others to easily have access to. The dotenv npm package loads our environment variables from .env.

Now when I run npm run start in my terminal, I get this:

As you can see, our server is up and running. Yay!

This link http://127.0.0.1:your_port_number/ in your web browser should return the welcome message. That is, as long as the server is running.

Next up, Database and Models.

I created the country model using Sequelize and I connected to my Postgres database. Sequelize is an ORM for Nodejs. A major advantage is that it saves us the time of writing raw SQL queries.

Since we are using Postgresql, the database can be created via the psql command line using the CREATE DATABASE database_name command. This can also be done on your terminal, but I prefer PSQL Shell.

In the env file, we will set up the connection string of our database, following this format below.

TEST_DATABASE_URL = postgres://<db_username>:<db_password>@127.0.0.1:5432/<database_name>

For my model, I followed this sequelize tutorial. It is easy to follow and explains everything about setting up Sequelize.

Next, I will write tests for the model I just created and set up the coverage on Coverall.

Writing Tests And Reporting Coverage

Why write tests? Personally, I believe that writing tests help you as a developer to better understand how your software is expected to perform in the hands of your user because it is a brainstorming process. It also helps you discover bugs on time.

Tests:

There are different software testing methods, however, For this tutorial, I made use of unit and end-to-end testing.

I wrote my tests using the Mocha test framework and the Chai assertion library. I also installed sequelize-test-helpers to help test the model I created using sequelize.define.

Test coverage:

It is advisable to check your test coverage because the result shows whether our test cases are actually covering the code and also how much code is used when we run our test cases.

I used Istanbul (a test coverage tool), nyc (Instabul’s CLI client), and Coveralls.

According to the docs, Istanbul instruments your ES5 and ES2015+ JavaScript code with line counters, so that you can track how well your unit-tests exercise your codebase.

In my package.json file, the test script runs the tests and generates a report.

{
    "scripts": {
        "test": "nyc --reporter=lcov --reporter=text mocha -r @babel/register ./src/test/index.js"
    }
}

In the process, it will create a .nyc_output folder containing the raw coverage information and a coverage folder containing the coverage report files. Both files are not necessary on my repo so I placed them in the .gitignore file.

Now that we have generated a report, we have to send it to Coveralls. One cool thing about Coveralls (and other coverage tools, I assume) is how it reports your test coverage. The coverage is broken down on a file by file basis and you can see the relevant coverage, covered and missed lines, and what changed in the build coverage.

To get started, install the coveralls npm package. You also need to sign in to coveralls and add the repo to it.

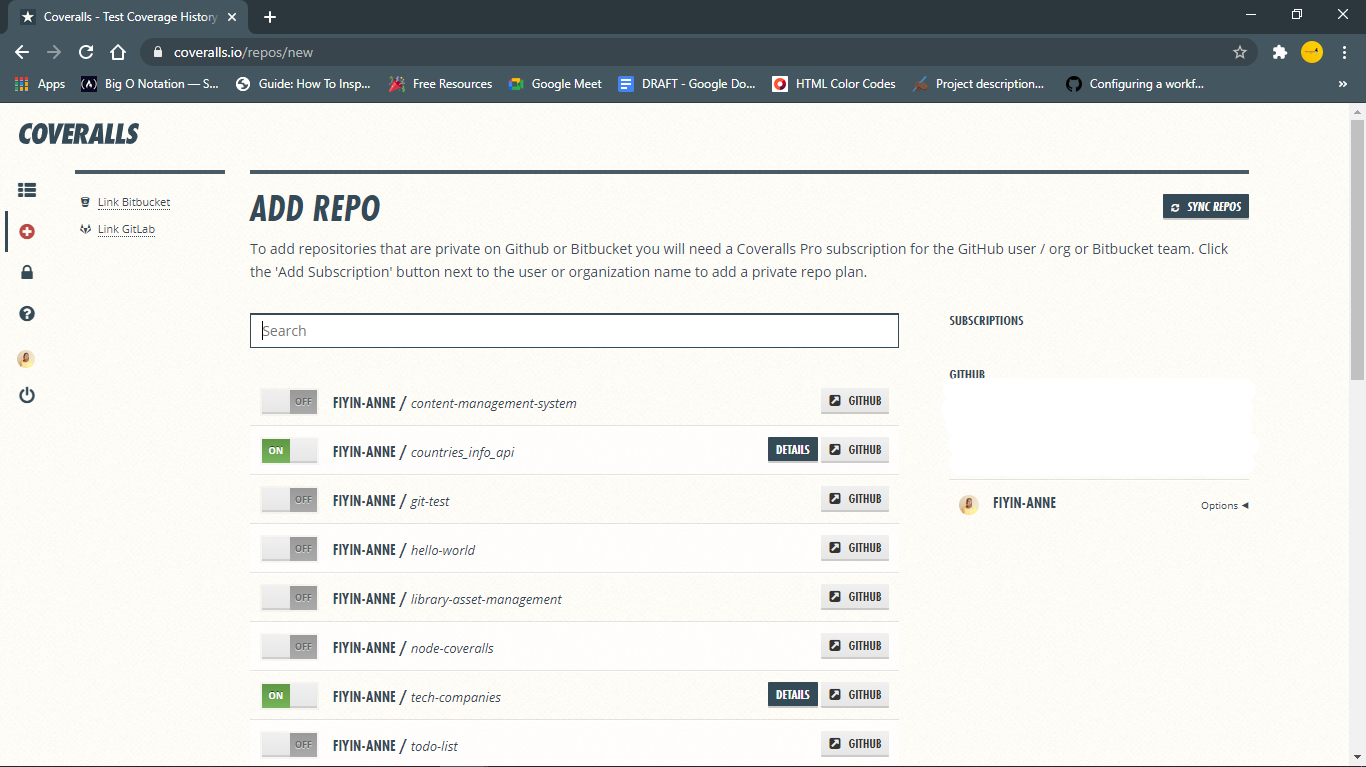
Then set up coveralls for your javascript project by creating a coveralls.yml file in your root directory. This file will hold your repo-token gotten from the settings section for your repo on coveralls.

Another script needed in the package.json file is the coverage scripts. This script will come in handy when we are creating a build via Actions.

{
    "scripts": {
        "coverage": "nyc npm run test && nyc report --reporter=text-lcov --reporter=lcov | node ./node_modules/coveralls/bin/coveralls.js --verbose"
    }
}

Basically, it will run the tests, get the report, and send it to coveralls for analysis.

Now to the main point of this tutorial.

Create Node JS Workflow File

At this point, we have set up the necessary jobs we will be running in our GitHub Action. (Wondering what "jobs" mean? Keep reading.)

GitHub has made it easy to create the workflow file by providing a starter template. As seen on the Actions page, there are several workflow templates serving different purposes. For this tutorial, we will use the Node.js workflow (which GitHub already kindly suggested).

You can edit the file directly on GitHub but I will manually create the file on my local repo. The folder .github/workflows containing the node.js.yml file will be in the root directory.

This file already contains some basic commands and the first comment explains what they do.

# This workflow will do a clean install of node dependencies, build the source code and run tests across different versions of node

I will make some changes to it so that in addition to the above comment, it also runs coverage.

My .node.js.yml file:

name: NodeJS CI
on: ["push"]
jobs:
  build:
    name: Build
    runs-on: windows-latest
    strategy:
      matrix:
        node-version: [12.x, 14.x]

    steps:
    - uses: actions/checkout@v2
    - name: Use Node.js ${{ matrix.node-version }}
      uses: actions/setup-node@v1
      with:
        node-version: ${{ matrix.node-version }}
    - run: npm install
    - run: npm run build --if-present
    - run: npm run coverage

    - name: Coveralls
      uses: coverallsapp/github-action@master
      env:
        COVERALLS_REPO_TOKEN: ${{ secrets.COVERALLS_REPO_TOKEN }}
        COVERALLS_GIT_BRANCH: ${{ github.ref }}
      with:
        github-token: ${{ secrets.GITHUB_TOKEN }}
      

What does this mean?

Let’s break it down.

  • name
    This would be the name of your workflow (NodeJS CI) or job (build) and GitHub will display it on your repository’s actions page.
  • on
    This is the event that triggers the workflow. That line in my file is basically telling GitHub to trigger the workflow whenever a push is made to my repo.
  • jobs
    A workflow can contain at least one or more jobs and each job runs in an environment specified by runs-on. In the file sample above, there is just one job that runs the build and also runs coverage, and it runs in a windows environment. I can also separate it into two different jobs like this:

Updated Node.yml file

name: NodeJS CI
on: [push]
jobs:
  build:
    name: Build
    runs-on: windows-latest
    strategy:
      matrix:
        node-version: [12.x, 14.x]

    steps:
    - uses: actions/checkout@v2
    - name: Use Node.js ${{ matrix.node-version }}
      uses: actions/setup-node@v1
      with:
        node-version: ${{ matrix.node-version }}
    - run: npm install
    - run: npm run build --if-present
    - run: npm run test

  coverage:
    name: Coveralls
    runs-on: windows-latest
    strategy:
      matrix:
        node-version: [12.x, 14.x]

    steps:
    - uses: coverallsapp/github-action@master
      env:
        COVERALLS_REPO_TOKEN: ${{ secrets.COVERALLS_REPO_TOKEN }}
      with:
        github-token: ${{ secrets.GITHUB_TOKEN }}
  • env
    This contains the environment variables that are available to all or specific jobs and steps in the workflow. In the coverage job, you can see that the environment variables have been "hidden". They can be found in your repo’s secrets page under settings.
  • steps
    This basically is a list of the steps to be taken when running that job.
  • The build job does a number of things:
    • It uses a checkout action (v2 signifies the version) that literally checks-out your repository so that it is accessible by your workflow;
    • It uses a setup-node action that sets up the node environment to be used;
    • It runs install, build and test scripts found in our package.json file.
  • coverage
    This uses a coverallsapp action that posts your test suite’s LCOV coverage data to coveralls.io for analysis.

I initially made a push to my feat-add-controllers-and-route branch and forgot to add the repo_token from Coveralls to my .coveralls.yml file, so I got the error you can see on line 132.

Bad response: 422 {"message":"Couldn’t find a repository matching this job.","error":true}

Once I added the repo_token, my build was able to run successfully. Without this token, coveralls would not be able to properly report my test coverage analysis. Good thing our GitHub Actions CI pointed out the error before it got pushed to the main branch.

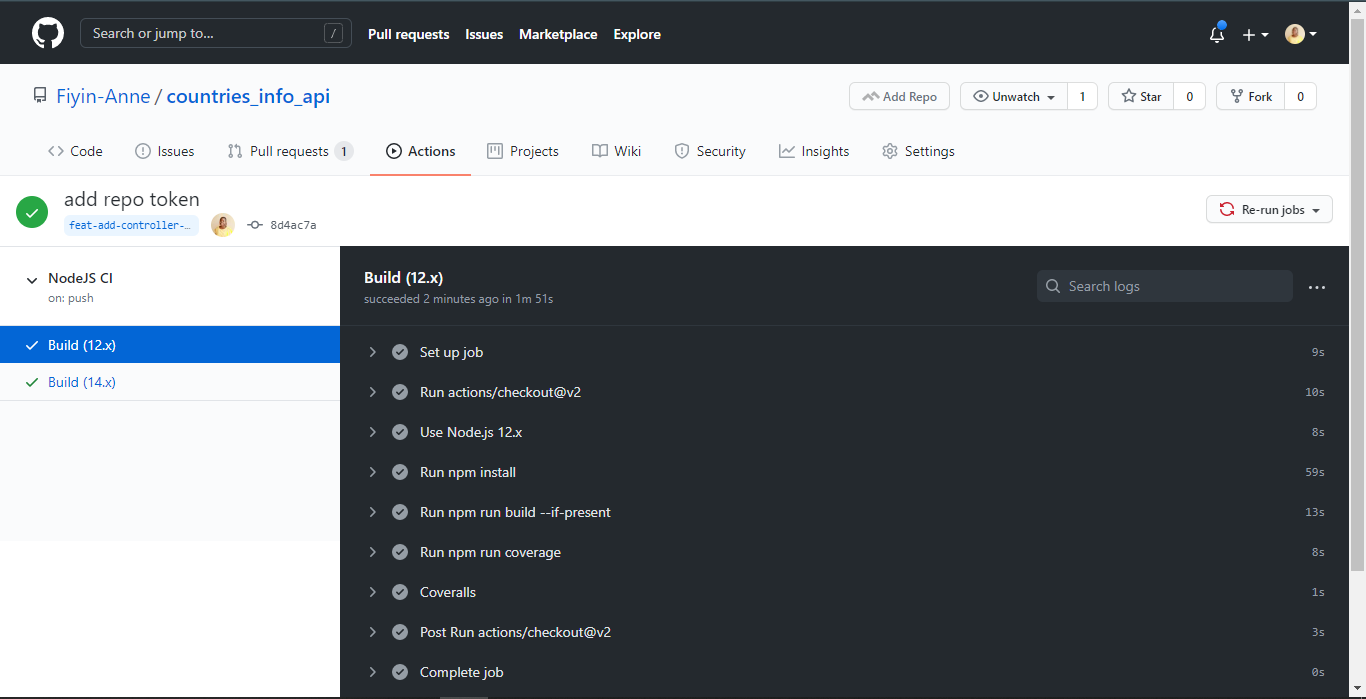
N.B: These were taken before I separated the job into two jobs. Also, I was able to see the coverage summary-and error message-on my terminal because I added the --verbose flag at the end of my coverage script

Conclusion

We can see how to set up continuous integration for our projects and also integrate test coverage using the Actions made available by GitHub. There are so many other ways this can be adjusted to fit the needs of your project. Although the sample repo used in this tutorial is a really minor project, you can see how essential continuous integration is even in a bigger project. Now that my jobs have run successfully, I am confident merging the branch with my main branch. I would still advise that you also read through the results of the steps after every run to see that it is completely successful.

Continuous Delivery Pipeline for Kubernetes Using Spinnaker

Kubernetes is now the de-facto standard for container orchestration. With more and more organizations adopting Kubernetes, it is essential that we get our fundamental ops-infra in place before any migration. This post will focus on pushing out new releases of the application to our Kubernetes cluster i.e. Continuous Delivery.

Pre-Requisites

  1. Running Kubernetes Cluster (GKE is used for the purpose of this blog).
  2. A Spinnaker set-up with Jenkins CI enabled.
  3. Github webhook enabled for Jenkins jobs.

Strategy Overview

  1. Github + Jenkins : CI System to build the docker image and push to registry.
  2. Docker hub: Registry to store docker images.
  3. Spinnaker : CD System to enable automatic deployments to Staging environment and supervised deployment to Production.
Continuous Delivery Pipeline for Kubernetes

Continuous Integration System

Although this post is about the CD system using Spinnaker. I want to briefly go over the CI pipeline so that the bigger picture is clear.

The Complete CI/CD Collection [Tutorials]

Everything you need to set up your complete CI/CD pipeline and implementation.

What is CI/CD?

Getting Started

Time to roll up your sleeves and get started building your CI/CD pipeline.

Getting Started With CI/CD 

Tools

Why DevOps and Security Should Go Hand in Hand?

Organizations across the world are excited to make a cultural change or shift and adapt to DevOps as early as possible. While everybody is just talking about how fast they can practice this approach, they forget about the security aspect involved with this change. DevOps might initially involve that needed change in the culture, but as it embeds across the organization, it requires more scrutiny at each phase and has to be taken seriously. Shifting security to the left can help organizations to be more secure and do well in the future.

The customer is the king, and the market has numerous alternatives these days, more choices and more power to consumers. The ultimate goal of any firm whether product/service based should be to deliver quality and continuously make sure the customer info/data is secure. In the software development field, the Continuous Delivery of software is supported by build and deployment automation commonly called a Continuous Integration/Continuous Deployment (CICD) pipeline.
The CICD pipeline makes it possible to employ rapid changes daily to address customer needs and demands. The CI/CD pipeline can be automated as well, and hence Security has to be a design constraint these days. Thinking security right from the beginning requires security to be built into software instead of being bolted on, Security is no more an add-on.

Automating Website Deployments Through Buddy

Automating Website Deployments Through Buddy

Automating Website Deployments Through Buddy

Leonardo Losoviz

(This is a sponsored article.) Managing the deployment of a website used to be easy: It simply involved uploading files to the server through FTP and you were pretty much done. But those days are gone: Websites have gotten very complex, involving many tools and technologies in their stacks.

Nowadays, a typical web project may require to execute build tools to compress assets and generate the deliverable files for production, upload the assets to a CDN and invalidate stale ones, execute a test suit to make sure the code has no errors (for both client and server-side code), do database migrations (and, to be on the safe side, first execute a backup of the database), instantiate the desired number of servers behind a load balancer and deploy the application to them (through an atomic deployment, so that the website is always available), download and install the dependencies, deploy serverless functions, and finally notify the team that everything is ready through Slack or by email.

All this process sounds like a bit too much, right? Well, it actually is too much. How can we avoid getting overwhelmed by the complexity of the task at hand? The solution boils down to a single word: Automation. By automating all the tasks to execute, we will not dread doing the deployment (and having a trembling sweaty finger when pressing the Enter button), indeed we may not be even aware of it.

Automation improves the quality of our work, since we can avoid having to manually execute mind-numbing tasks again and again, which will enable us to use all our time for coding, and reassures us that the deployment will not fail due to human errors (such as overriding the wrong folder as in the old FTP days).

Introduction To Continuous Integration, Delivery, And Deployment

Managing and automating software deployment involves both tools and processes. In particular, Git as the version control system where to store our source code, and the availability of Git-hosting services (such as GitHub, GitLab and BitBucket) which trigger events when new code is pushed into the repository, enable to benefit from the following processes:

  • Continuous Integration
    The strategy of merging changes in the code into the main branch as often as possible, upon which automated tests against a build of the codebase are run to validate that the new code doesn’t introduce errors;
  • Continuous Delivery
    An extension to Continuous Integration which also automates the release process, enabling to deploy the project into production at any moment;
  • Continuous Deployment
    An extension to Continuous Delivery which automatically deploys the new code whenever it passes all required tests (as small a change it may contain), enabling to easily identify the source of any problem that might arise, and removing pressure off the team as it doesn’t need to deal with a "release day" anymore.

Adhering to these strategies has several benefits. The most immediate one is that our product can ship new features faster, indeed they can go live as soon as the team has finished coding them. The team can also receive feedback immediately (either from team members on a development environment, from the client on a staging environment, and from the users after it goes live) and be able to react straight away, thus creating a positive feedback loop. And because the whole process is fully automated, the team can save time and focus on the code, thus improving the quality of the product.

Continuous delivery enables getting feedback as early as possible
Continuous delivery enables getting feedback as early as possible. (Large preview)

Introducing Buddy, A Tool For Automating Software Deployment

The popularity of Git has given rise to a new generation of tools to manage the complexity of software deployments. Buddy is one of these new tools, born with the goal of making it easy to implement Continuous Integration/Delivery/Deployment, while broadening the number of features our application can provide, improving its quality, and reducing its costs by allowing to incorporate the offerings of the best or cheapest cloud-based service providers (among them AWS, DigitalOcean, Google Cloud Platform, Cloudflare, Rackspace, Azure, and others) into our stacks. This way, for instance, our application can be hosted on GitHub, be protected from DDoS through Cloudflare, have its static files hosted through DigitalOcean, use serverless functions from AWS Lambda, and authenticate users through Firebase, and everything is handled seamlessly.

Buddy operates through the use of pipelines: Sets of actions defined by the developer in a specific order, executed either manually or automatically when executing a Git push, that deliver the application from a Git repository to wherever needed and transforming it as required. Pipelines are extremely flexible, enabling developers to add only the required actions and have them customized for their specific needs.

For instance, the following pipeline performs all required tasks to deploy some Node.js application: execute the build step, upload files to the server through SFTP, upload assets to AWS S3 and purge them from the CDN, restart the server and finally inform the team through Slack (as it can be appreciated in the image below, the pipeline can be self-explanatory):

Buddy pipeline example
An example of a pipeline to deploy a Node.js application. (Large preview)

We can create different pipelines for different environments, and execute special actions when the process fails (such as when a test was not successful when the server to deploy to is down, or others). For instance, the following pipeline (to deploy a Node.js & PHP app that uses DigitalOcean, Fortrabbit & AWS CloudFront for hosting) makes a backup of assets and purges the CDN only when deploying to production, and sends a notification to the team through Slack in case of failure:

Demonstration of Buddy pipeline
Pipeline configured for different environments. (Large preview)

A noteworthy effect of configuring our pipelines with actions from different cloud-service providers is that we can conveniently switch among them whenever the need arises, making it easy to avoid vendor lock-in (this includes also changing the repository provider). Buddy offers slightly over 100 actions out of the box, and also allows developers to create and use their own actions. This image shows all the readily available actions:

Buddy actions
Out of the box actions in Buddy. (Large preview)

Creating A Pipeline

Let’s see how to create a simple pipeline to test and deploy a Node.js application, and send a notification to the team. The first step is to create a new project, during which you will be asked to select the project’s hosting provider (from among GitHub, GitLab, Bitbucket, Buddy Git Hosting, and your private Git server), and then to select the repository:

Tutorial step 1: Selecting the hosting provider
Selecting the hosting provider (Large preview)

Then we can create the pipeline, specifying when it must run (either manually, automatically after new code is pushed to the repository, or automatically every x amount of time) and from which branch:

Tutorial step 2: Creating a new pipeline
Creating a new pipeline (Large preview)

Then we can add actions to the pipeline. For that, we simply click on the “+” button to add a new action, upon which we must configure it as needed. To build and test a Node.js application we add and configure a “Node.js” action:

Tutorial step 3: Adding a Node.js action
Adding a Node.js action (Large preview)

After testing the application, we can deploy it by uploading it to our production server through SFTP. For this, we add an “SFTP” action, and configure it through custom-defined environment variables ${SFTP} and ${SFTP_USER}:

Tutorial step 4: Adding an SFTP action
Adding an SFTP action (Large preview)

Finally, we send an email to the team with the results of the execution. For this, we add and configure the “Email” action:

Tutorial step 5: Adding an Email action
Adding an Email action (Large preview)

That’s it. Our pipeline will look like this:

Tutorial step 6: Pipeline finished
Pipeline finished (Large preview)

From this moment on, if the pipeline was configured to run when new code is pushed to the repository, doing a git push will trigger the execution of the pipeline.

Staying Constantly Up To Date

Web development is in a never-ending state of flux, with new tools and services being launched without a break, some of them often becoming a hot trend immediately and the new normal barely a few months later. Technologies seldom heard of a few years ago progressively gain importance and eventually become a must (voice search, machine learning, WebAssembly), new frameworks and libraries offer new ways of building sites (GraphQL, Gatsby, Next.js, Nuxt.js), and our applications need to be accessed from newly-invented devices (Amazon Echo, In-car systems). To keep our applications relevant, we must continuously evaluate the latest offerings and decide if to add them to our technology stack. Hence, it is extremely important that our platforms for developing the application do not restrict what technologies we can use.

Buddy deals with this issue by continuously collecting feedback from its users about what they need (through user polls, their forum, communication channels, and tweets), and its team strives to deliver the required features. The Buddy blog provides a glimpse of the intense pace of development: For instance, in the last few months they implemented features for building static apps and websites with Gatsby, deploying to UpCloud and to Google Cloud Functions, triggering pipelines with webhooks, integrating with Firebase, building and running Docker containers on AWS ECS, and many others.

Conclusion

Automation has become a must to avoid being overwhelmed by the complexity of modern website deployment. We can make use of Continuous Integration/Delivery/Deployment (readily feasible by hosting our source code through Git) to shorten the time needed for delivering new features into our applications and getting feedback from the users.

Buddy helps in this task, enabling developers to create pipelines to execute actions concerning a wide array of technologies and cloud-service providers, and combining these actions in any possible way to satisfy the most particular needs.

You can check out Buddy for free for 2 weeks and, if you need to host your data, you can also install it on your own premises.

Smashing Editorial (ms, ra, yk, il)

Unified Agile-DevOps Transformation Model, Framework and Executable Roadmap for Large Organizations

Abstract

Agile-DevOps transformation and Continuous Delivery became the leading topic and highest priority for senior leadership, stakeholders, teams and customers alike. Agile-DevOps transformation is a fundamental change to the organization's culture, structure, people, and business/technical paradigms towards the next level of agility. It relies on Lean values and principles, and brings the highest level of collaboration, productivity, quality, flexibility and efficiency, cutting-edge technology, and competitive edge to your organization.

While some organizations succeed in their transformations, others fail. Agile-DevOps transformation can be ambiguous, disrupting, misdirecting, and even harmful if executed without the right guidance or led by the wrong people. Transformations primarily fail for two reasons. The first is the lack of a common vision, strategic approach and unified transformation model, framework, and roadmap that inhibits the agreement between change agents, leading to the inability to arrive at a single voice on how to orchestrate and implement change. The other is the agents’ limited knowledge and expertise or a tendency to follow on a previous success path regardless of the organization's uniqueness.

Continuous Delivery with OpenShift and Jenkins: A/B Testing

One of the reasons you could decide to use OpenShift instead of some other containerized platforms (for example, Kubernetes) is out-of-the-box support for continuous delivery pipelines. Without proper tools, the process of releasing software in your organization may be really time-consuming and painful. The quickness of that process becomes especially important if you deliver software to production frequently. Currently, the most popular use case for it is microservices-based architecture, where you have many small, independent applications.

CI/CD on OpenShift is built around Jenkins. OpenShift provides a verified Jenkins container for building continuous delivery pipelines and also scales the pipeline execution through on-demand provisioning of Jenkins replicas in containers. Jenkins is still the leading automation server that provides many plugins that support building and deploying. One of that plugins is OpenShift Jenkins Pipeline (DSL) Plugin, which is by default enabled on a predefined Jenkins template available inside Openshift services catalog. There is not only one plugin enabled on Openshift Jenkins image. In fact, Openshift comes with a default set of installed plugins on Jenkins, which are required for building application from source code and interaction with the cluster. That's a very useful feature.

Why AI and Machine Learning Will Redefine Software Testing in 2019

We’ve reached a tipping point that’s prompted CIOs to start actively exploring how AI can help them achieve their digital transformation goals. With the advent of DevOps and Continuous Delivery, businesses are now looking for real-time risk assessment throughout the various stages of the software delivery cycle.

Although Artificial Intelligence (AI) is not really new as a concept, applying AI techniques to software testing has started to become a reality just the past couple of years. Down the line, AI is bound to become part of our day-to-day quality engineering process, however, prior to that, let us take a look at how AI can help us achieve our quality objectives.