The Evolution Of Jamstack

It’s been five years since I first presented the idea of the Jamstack architecture at SmashingConf in San Francisco 2016, a talk inspired by many conversations with colleagues and friends in the industry. At that point, the idea of fundamentally decoupling the front-end web layer from the back-end business logic layer was only an early trend, and not yet a named architectural approach.

<!--

Static site generators were emerging as a real option for building larger content-driven sites, but the whole ecosystem around them was nascent, and the main generators were pure open-source tools with no commercial presence. Single Page Applications were the basis of some large-scale web apps, like Gmail, but the typical approach to building them was still backend-centric.

Fast forward to 2020, Jamstack hit the mainstream, and we saw millions of developers and major brands like Unilever, Nike, and PayPal embrace the architecture. Vital initiatives like the Covid Tracking Project were able to scale from 0 to 2 million API requests on the Jamstack. Frameworks like Nuxt became commercial businesses, and we celebrated large public companies like Microsoft and Cloudflare as they launched early Jamstack offerings.

As the commercial space has heated up and the developer community has grown, there’s also been more noise, and we’re even starting to test the boundaries of Jamstack’s best practices. It feels like the right time to both revisit the original vision some of us had five years ago, and look ahead at what the changes in the technological landscape will mean for the future of the Jamstack architecture and the web.

Let’s start out by quickly revisiting the core principles that have made the architecture prove popular.

Compiling The UI

In the Jamstack architecture, the UI is compiled. The goal is to do the right work at the right times — with a preference for doing as much work as possible ahead of time. Many times, the entire site can be prerendered, perhaps not even requiring a backend once deployed.

Decoupled Frontends

Decoupling the frontend from back-end services and platforms enforces a clear contract for how your UI communicates with the rest of the system. This defaults to simplicity: your frontend has a limited contact surface with anything outside itself, making it less complicated to understand how external changes will affect its operation.

Pulling Data As Needed

Of course, not everything can be prerendered, and the Jamstack architecture is capable of delivering dynamic, personalized web apps as well as more globally consistent content. Requesting data from the frontend can power some rich and dynamic applications.

A good example is the frontend of our own Netlify UI, which is itself a Jamstack application built and run on Netlify. We pre-compile an app shell, then use asynchronous requests to hit our API to load data about our users and their sites. Whether you’re using REST, GraphQL, or WebSockets, if you’re precompiling as much of the UI as possible and loading data to give your users a dynamic, customized experience, then you’re shipping the Jamstack architecture.

Jamstack In 2021 And Beyond

There’s more innovation happening across the Jamstack ecosystem than ever before. You can see a rapid evolution of the back-end services, developer tooling, and client-side technologies that are combining to enable development teams to build experiences for the web that would have seemed out of reach only a couple of years ago.

I want to point to three trends I see shaping up for Jamstack developers in the near future:

1. Distributed Persistent Rendering (DPR)

More than anything, Jamstack’s inherent simplicity has made the process of building and deploying web applications much easier to reason about. Code and content updates can be pre-rendered as clean, atomic deployments and pushed right to the edge, creating strong guarantees around reliability and performance without the need to manage complex infrastructure.

But pre-rendering a larger website may also mean waiting several minutes each time there’s a new deployment. That’s why I think we are seeing so much innovation happening to make builds smarter and faster — especially for larger sites and web apps. Take for example the raw speed of esbuild, the new “extremely fast JavaScript compiler.” A production bundle that may take Parcel or Webpack over a minute to compile can be completed by esbuild in under a second. And build tools like Vite and Snowpack lean on native ES modules to make local development feel nearly instantaneous.

In the React ecosystem, some newer frameworks like Remix or Blitz are starting to lean more on the “run everything on a server” approach we’ve all known in the past. There’s a risk of bringing back much of the complexity we’ve worked to escape. Layers of caching can help make server-side apps more performant, but developers lose the guarantees of atomic deployments that make Jamstack apps easy to reason about.

Blitz seems to be moving the monolith into the frontend. This can make full-stack apps runnable on typical Jamstack platforms, but without any clear decoupling between the web experience layer and the back-end business logic layer. I think decoupling the frontend from the backend is fundamental to the Jamstack approach and responsible for unlocking so many of its benefits.

What I see gaining real momentum are the “hybrid” frameworks like Next.js, Nuxt.js, and SvelteKit that allow developers to seamlessly mix pages pre-rendered at build time with other routes that are rendered via serverless functions. The challenge is that serverless functions (while certainly scalable) have their own set of performance implications.

Ultimately, I see the community moving towards an extremely powerful trio that provides Jamstack developers request-level control over the performance profile of any site or application:

  1. Delivering pages entirely pre-rendered at build time,
  2. Delivering pages dynamically via serverless functions, or
  3. Building pages on-demand that then persist as static CDN assets.

Next.js has done quite a bit of work on a concept they call Incremental Static Regeneration. The idea is to ensure high-performance pages by paring serverless functions with different caching strategies like Stale While Revalidate. While the idea of distributing some of the builds to an on-demand approach that still includes strong caching guarantees is a powerful technique, there’s a risk to breaking atomic deploys in this particular implementation, and the benefits are locked into a singular framework, and in some cases, a provider.

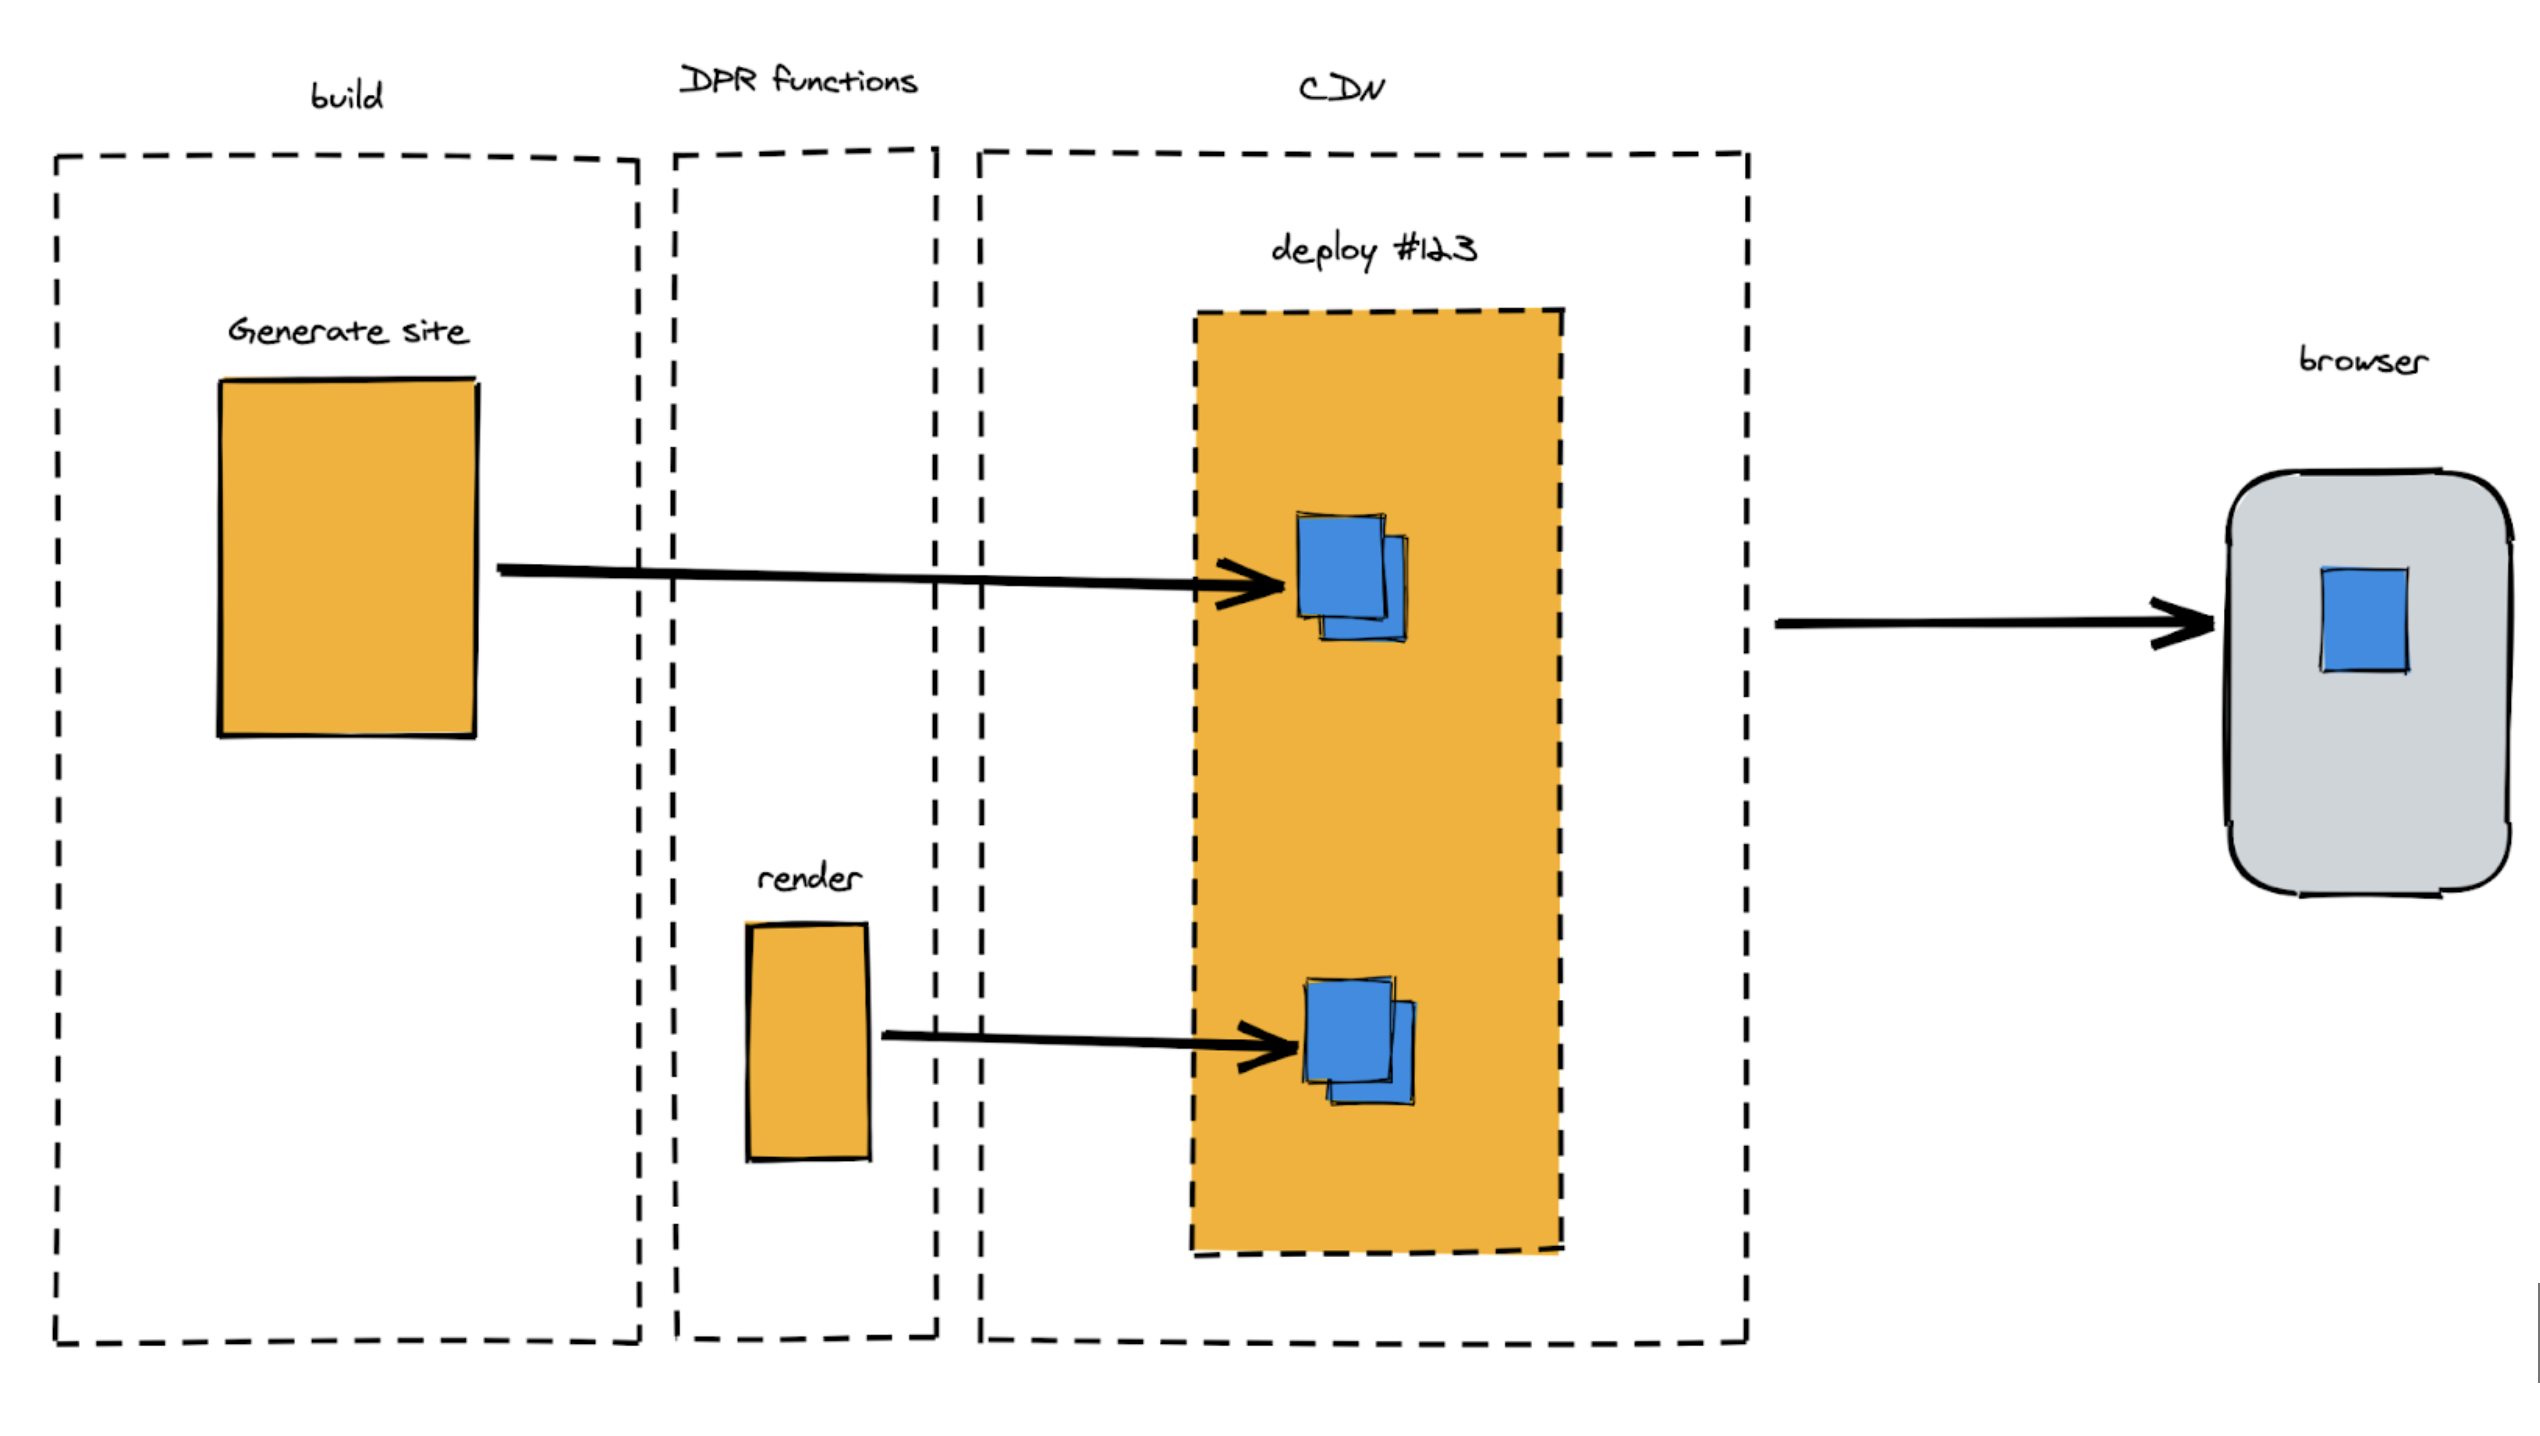
At Netlify, we see a lot of promise in the idea of allowing developers to render critical pages at build time, while deferring other pages (like older blog posts, for example) to be built only when and if they are requested. We’re calling the approach Distributed Persistent Rendering or DPR. It’s an architecture for incremental builds that can be compatible across almost every framework and Jamstack site generator, from 11ty to Nuxt to Next.js.

DPR will dramatically reduce upfront build times for larger sites, solving a core criticism of static site generation. On Jamstack.org, we’ve opened a Request For Comments to involve the entire community in our efforts to give developers more options for how pages are rendered while adhering closely to the principles that have made Jamstack so popular. By giving this architecture a name and refining it with community input, we can help Jamstack developers build patterns around it — regardless of the framework.

2. Streaming Updates From The Data Layer

If you develop web applications, you’ve likely followed the evolution of state management libraries as developers have built more and more complex web interfaces using tools like React, Vue, and Svelte. But state management has largely been an in-browser and in-memory concern. Each browser tab essentially has its own state, but can be quite complex to connect that local browser state of your application back to the data services that power it.

Luckily, this is improving as more and more services now support real-time data subscriptions. Hasura, OneGraph, and Supabase all offer this capability and I only expect to see wider adoption across all providers as the underlying data stores are cached and distributed to the edge for fast global performance. Take Twillio’s expanding APIs: they now not only offer streaming video but also streaming “data tracks,” which can be used to create complex collaboration apps that stay continually synchronized across participants.

Finally, new providers are emerging that aggregate data across back-end services. Whether or not you use GraphQL as a query language, it’s really compelling to imagine the power of connecting your UI to a single, standard stream of updates from multiple underlying APIs.

3. Developer Collaboration Goes Mainstream

The Jamstack is built on a Git workflow — an approach that scales really well to larger development teams. But going forward, we’ll start to see how these traditionally developer-focused tools will expand to involve everyone across the company: developers, sure, but also writers, editors, designers, and SEO experts.

When you think of collaboration, you tend to think of synchronous edits—the multiple cursors that fly around a Google Doc, for example. We are seeing that style of live collaboration come to CMS tools like Sanity and design tools like Figma. But so much work often happens asynchronously, and non-developers traditionally haven’t enjoyed the powerful tools that developers use to seamlessly branch, stage, and merge changes with collaborative discussion attached to each pull request.

Early on in the Jamstack, some clever git-based CMS tools emerged to help non-developers manage content like code — perhaps without even knowing that each change they made was being git-committed just like a developer working from the terminal. We’re now starting to see new tools tackle visual page edits in a way that remains compatible with popular Jamstack site generators like Gatsby and Next.js. All of this lowers the bar to collaboration for non-developers and we’ll only see that trend accelerate.

And it’s not just non-developers joining in on the collaboration: deep integrations between tools are bringing more automated contributions into our dev, build, and deploy workflows. Just browse the comment history on a GitHub pull request to see how many tools are now integrated to run automated tests and catch errors before they are deployed.

Updates to Netlify’s docs, for example, aren’t just linted against our code standards, they are also linted against our content standards, ensuring we stay consistent with our style guide for vocabulary, language, and phrasing. Teams can also now easily tie performance budgets and SEO standards to each deployment, again with alerts and logs tied directly to GitHub issues.

I would expect to see those sorts of integrations explode in the coming year, allowing a git-based workflow to underpin not just code changes, but also content, data, design assets — you name it. Friendly interfaces into these Git workflows will allow more contributors to comment, commit, and collaborate and bring developer productivity tooling further into the mainstream.

Enabling Scale And Dynamic Use Cases

While Jamstack stays true to the core concepts of decoupling the frontend from the backend and maintaining immutable and atomic deploys, new build strategies and compute primitives have the potential to unlock extremely large-scale sites and dynamic, real-time web applications.

Jamstack developers — and now entire web teams, marketers, and product managers — have much to look forward to in this space.

Further Reading And References

Don’t Lose Your Head: Evaluating Headless

With many options comes many decisions, and it is easy to drown in all the many and various stated benefits of the different systems. So how do you approach evaluating these options? Two weeks ago, Aaron Hans shed light on the use cases of going headless and what it is good for here on Smashing Magazine. Today, I’ll give you a little bit of a primer on the CMS landscape, as well as some questions to ask to aid you in making a decision.

Headless? What?

Headless content management is the practice of decoupling your content management system (CMS) from your front-end. Unlike with traditional (or “monolith”) systems, the CMS is not directly responsible for powering the web front-end. Instead, content is served to the front end from a remote system by way of an API, and the front-end consumes this data to render its pages. This can occur either at run-time (when a user lands on your website), or at build-time (content gets pre-rendered and generated in advance), but the important concept here is the separation between content and presentation layers.

If you’re planning to create a site using the Jamstack, you’re going to end up heading in this direction by default, but the approach is just as valid for other kinds of projects, using server-side languages such as PHP, .Net, or Ruby.

But Why Is This Even A Thing?

Headless came about originally as a way to manage content for the Jamstack (before Jamstack got its snazzy name), but the approach has garnered fans for a lot of reasons. Headless content management allows us to deploy content to different platforms, so you can use content from your website in a native mobile app, for example.

Headless also allows us to patch up shortcomings in other systems. For example, Shopify. Whilst great at what it does, it isn’t the most flexible system when it comes to managing content for your online store. Using a headless CMS, we can remotely manage additional content for a Shopify site and bring more power and flexibility than we would have by default.

I recently worked on a project doing exactly this — extending the content that Shopify provides with additional, richer content from a headless CMS (we happened to use Contentful for this particular project, but any headless CMS could do this job). Using a headless content management solution allowed us to create custom data structures that we could tailor to our needs. For instance, the client wanted to highlight the ingredients they used in the making of their products, and Shopify doesn’t really provide a good way to manage this. We created a new content type in Shopify and allowed that to be added to a custom product page full of other types of content we created.

Shopify content was pulled through and synced to Contentful, and this became the primary data driver for the site, with the Shopify APIs only really getting involved for stock level checks and basket creation. Being able to add this kind of rich data to a SaaS-based eCommerce site was incredibly powerful.

We happened to achieve this result using Nuxt to build the site, but we could equally have chosen to integrate data from the CMS directly within the Shopify templates. Jamstack was chosen as the better approach here, but headless is flexible enough that it can be used almost anywhere. So long as you have access to some kind of scripting through JavaScript or a more traditional back-end language such as PHP or .Net, you can integrate headless into your workflow.

Decoupling your content from your presentation layer can be really powerful. Allowing your content to plug in to different platforms and presentation layers helps keep your content consistent across your touchpoints, and it helps make sure that your content doesn’t get fragmented across a bunch of different systems managed by different teams.

Imagine you have a product that you want to talk about on your website, in a mobile app and also in programatic ads. With headless, you could have one central content repository and deploy the same content (or aspects of it) to all of these platforms and more. With more traditional content management, you would need to manage the content for different platforms separately.

This Sounds Great! So Is Headless Right For Me?

There are a bunch of things to consider when choosing your approach. There are benefits to going headless, but there are costs as well. Here are some questions to ask yourself when considering headless as an approach:

Are You Comfortable With The Knowledge Requirements Of Making The Split?

A lot of people think that moving to headless can “get rid” of the need for back-end developers, but the truth is that the mindset to structure data effectively and build content models that work and scale well is still very different from the mindset needed to be a great front-end developer much of the time. There is still a knowledge gap and that will still need to be filled.

If you’re dealing with a project of significant scale, you’re still probably going to want some developers to focus on the “back end” areas, and some to focus on the “front end”. The divisions are finer and more malleable in headless land, but don’t labor under the false assumption that you can halve your development workforce just by going headless.

Do You Know The Total Cost Of Ownership?

Whilst headless can often prove cheaper than a monolith, the SaaS nature of most of these systems can mean that for large, rapidly changing datasets, or very large teams, the costs may not add up. Always check how the costs scale, and what that scaling is based on. Some vendors scale based on data volume, some on number of API requests, and some on number of collaborators editing your content. The combination of these can have a dramatic effect on how your costs grow with scale.

You will also likely need to look at multiple different platforms to formulate an idea of your total cost of ownership. If you aren’t getting search “out of the box”, you’ll need to consider how much it will cost you to add that feature. You can usually predict how these costs will scale, and you can often start out small, but it’s worth being aware of what these things might cost you in the long run.

Also keep a close eye on your build minutes if you do choose to go headless: these can mount up quickly, especially in the development and content population phases. Be aware that, if you choose to staticly generate your site, then you will require a build after each publish action from the CMS. With large sites, these builds can take a while, so its worth keeping in mind that these will need to be kept in check. Many of the popular static hosting services (such as Netlify and Vercel) support build asset caching and, in combination with modern frameworks enabling incremental builds, this can help mitigate this increasing cost, but you still need to keep an eye on it and do your research to ensure you don’t get caught out.

Have You Explained It Well Enough For Your Client?

You might love the developer experience of working with the Jamstack and headless, but when making these evaluations, you must keep in mind that the clients are the ones who have to use and live with the solutions you put together, so you’ll want to try to make their lives as easy as possible.

In a previous role, I was involved in a pitch to an automotive manufacturer who said they wanted industry-leading performance as a top priority, but they ultimately went with another agency offering a more traditional solution. This can happen for a number of reasons. (We most probably didn’t do a good enough job of selling the benefits of our approach, but going headless can also seem pretty scary to content editors, especially when put up against some of the traditional “enterprise” systems who have a talent for making it look like everything “just works”.)

When you go headless, you will be bringing together individual tools that are each designed to be very good at one particular thing, rather than having one large system that can do all of these things in one place. That can be pretty intimidating to deal with unless you can make it easy as possible for your client to deal with.

Are You Taking The Additional Development Time Into Account?

All of the potential power and flexibility of headless doesn’t come for free. One of the downsides to everything being custom is that this means that everything needs to be developed from scratch. With many of the options in this space, there is no real “default” document schema — indeed, they are set up very deliberately to not have any defaults like that. This is great on the one hand because it means that you get tightly-tailored document models that precisely match your needs.

On the other hand, though, it means that someone needs to define these document models, and then someone needs to create them for the system you are using. Then, because the frontend and backend are decoupled, somebody will usually need to create an engine to allow previewing of draft content; many modern frameworks include a system to allow previewing of draught content, but they universally require additional configuration to get working, and some will require a level of custom code. Of course, the front-end isn’t tied to the content, so any mapping of data to front-end components needs to be done as well. You will usually have to do at least some of this even with a tightly-coupled CMS, but the fact that you will likely have to allocate time to all of these things can be costly.

Are You/Your Client Comfortable With Data Not Living On Your Own Infrastructure?

Whilst many who work with headless CMS systems and other SaaS vendors frequently consider this a positive, there are situations where your data being outside of your own infrastructure could be less than desirable, for instance where sensitive product or non-public production data is involved. Security for these companies is usually pretty good, but there are always risks.

Make sure you weigh up the relative benefits of having your content housed on an anonymous AWS server somewhere. We have seen before that even the mighty AWS can have outages and, for business-critical systems, these can be extremely costly. The difference here between SaaS on AWS or using your own infrastructure is that if you have an outage or security breach on your own infrastructure, that is likely to be down to your own product or code, but in a SaaS/AWS environment, outages are more likely to be caused by factors unrelated to your business. These instances are rare, but they do happen and it is important that this is taken into account when making these decisions.

Ok, Great. So What Are My Options?

The number of headless and headless-capable content management solutions available in 2021 is staggering and growing constantly. Rather than trying to cover all of the options here, I want to give just a very brief introduction to a few of the better-known options. If you’re looking for a more comprehensive list, then you might want to check out Headless CMS or CMS Comparison.

Contentful

Contentful is one of the most established of the headless CMS options, having been founded in 2016 and having enjoyed several successful seed investment rounds, and describe themselves as “an API-first content platform to deliver digital experiences”.

Contentful have made great strides in recent years to better support translated and trans-created content, and they have good support for multiple content “environments”, allowing changes to be made away from your production data and migrated later.

Contentful have a suite of integrations with other SaaS apps, so it’s easy to integrate with the likes of Shopify or CommerceLayer for e-commerce, or Cloudinary for asset hosting and processing.

Best For:

Those who are looking for the most well-established solution in the headless space.

Storyblok

Storyblok is the only one of the headless-first options here to actually describe themselves as a CMS, and features a really nice visual content editor which allows you to create and edit your content seemingly in-situ with a marvelous WYSIWYG interface. This is one of the traditional weaknesses of separating the CMS from the website, so seeing this kind of editing environment being created by Storyblok is a big step forward and the team should be proud to be driving the market forward in this regard.

Storyblok also has the ability to use their API to generate content schemas that allow these things to live as and with your code, which is great for maintainability. Role-based permissions and translation/transcreation capabilities make distributed teams working on multilingual sites happily. Overall, Storyblok feels like an extremely polished and well-thought-out offering, and one that content teams, in particular, are likely to be a fan of.

Best For:

Those looking for a best-in-class WYSIWYG content editing solution from a headless CMS.

Sanity

Sanity are one of the newer kids on the block in this space, but have been garnering attention fast. They describe themselves as “the ultimate content platform that helps teams dream big and deliver quickly”.

Sanity does things a little differently from the other options here in that all your configuration and content models are done as code which, for developers, is a comfortable place to keep things. By allowing an almost limitless amount of creativity with document models and custom field types, Sanity allows developers to create deep, rich content structures for all manner of things — not just web content.

The editing suite in Sanity is clean and simple, customizable, open-source, and is based on React. You can deploy the editing studio to any host you like, or choose to use a Sanity subdomain to host on their infrastructure.

Best For:

Those who need absolute control over nearly every aspect of implementation, from custom data structures to input components.

Prismic

Prismic really is the old character in the room in the headless space, being around way back in 2013, but that hasn’t stopped them innovating in the space. Just last year, they introduced SliceMachine, which aims to bridge the gap between front-end developers creating components and content authors by creating a 1:1 relation between content blocks (or “slices”) and front-end components, which makes building new pages and content sections a breeze for editors.

Prismic’s editing suite is lovely and it seems that they have patched up some holes that used to exist in their field selection, so it offers a well-rounded experience.

Best For:

Those looking to minimize friction for content editors.

What If I Want Something A Little More Traditional?

Wordpress

Wordpress is still huge in 2021. For all the hype around other platforms, WordPress still powers some 40% of the internet, and it isn’t going to go anywhere. The developers are helping to make sure of this by improving its headless capabilities and focussing more heavily on its API support. New editing tools also make the experience of writing within WordPress more enjoyable, and some of the inherent tradeoffs of working with WordPress have been massively improved in recent years.

Working with a WordPress-as-a-service company such as Nestify takes much of the anxiety and headaches of security out of your hands as a developer, but be aware that, as the largest platform on the internet, WordPress still presents a very tempting target for those with malicious intentions.

Best For:

Those looking to stick to a comfortable, familiar content platform, whilst bringing the tech up to date.

Sitecore

As one of the giants of enterprise content management, Sitecore is perhaps one of the names you would least expect to see on this list, but they have made huge strides in supporting headless, releasing Sitecore JSS to enable Jamstack projects to interface with Sitecore data.

The big difficulty in working with Sitecore or other enterprise CMS systems in a headless manner has always been getting personalization up and running, but that issue has been solved by the folks at Uniform, who actually got started working with Sitecore to enable this kind of functionality.

Sitecore is a big beast, and it’s not going to be right for a lot of projects — the cost alone puts it out of range of all but enterprise-level customers — but it is worth listing here, along with AEM, because there are still a lot of people who think that headless content management is only for small websites.

Best For:

Those looking at an enterprise project with a client that doesn’t necessarily want to go “all in” on new tech.

Adobe Experience Manager

Adobe Experience Manager (or AEM) is another one of the major players at the enterprise end of things. It’s huge, and hugely expensive, just like most of its competition, but Adobe is another vendor that has made massive efforts to make their offering more friendly to those who want to separate their content from the presentation of their website.

AEM now supports a couple of different methods of requesting data out of their platform and Adobe now markets AEM as a “hybrid CMS”, which means it combines headless and more traditional, channel-specific, operation under one hood. This can be a big advantage to marketing teams who need to work across diverse platforms and need fine-grained control of content between these platforms, but those wanting in on Adobe’s “one platform to rule them all” will need deep pockets to get started.

Best For:

Those looking at the very top end of an enterprise, with deep pockets! AEM does a lot (more than we could ever hope to mention here), but it is expensive.

Now I Have An Idea Of My Options, But How Can I Ever Hope To Choose Between Them?

There are so many options in the headless space now, you can easily end up in option paralysis. There are, however, a few questions you can use to help form an initial opinion or at least slim down the field:

How Long Will It Take You To Get Up To Speed?

Different systems have different learning curves and different ways of supporting developers. Every system listed here has a community of developers built around it, but not all communities are created equal. Does the vendor provide detailed documentation? Starter projects? All of these can have a big impact on spin-up time.

What Kind Of Support Model Will You Need?

Support models are usually most important to clients, and you often find that to access the more direct lines of support, you need to pay for the “enterprise” packages, which could make your investment higher than you might expect looking at your usage.

How Well Established Is The Vendor?

How well established is the vendor? How are they financed? Again, these are usually client considerations rather than developer ones, but it pays to be able to tell the client early on that the vendor you are recommending is stable, has been around for X number of years, and that they have sufficient financial backing to be sure they aren’t going to be going anywhere any time soon. The last thing any client wants to have to deal with is a forced re-platforming because their existing vendor is sunsetting their product whilst the client is mid-way through their engagement!

What Is The Editing Experience Like?

The editing experience is likely to be wildly important to a number of people at the client-side of any project. These are the people who will be working with whatever CMS you choose day in and day out. If the CMS is a nightmare to use, they will say so — a lot. Trust me, I’ve been in many pitches and follow-up meetings where a significant amount of time has been spent with the client listing the many frustrations they have with their existing system!

“Can the system(s) you are looking at provide in-context editing or live draft previews?”

“How much effort is it to set these up?”

“How fast or slow does the editor itself run?”

“Is the user bombarded with options and unfamiliar buttons or are things well organised?”

All of these questions feed into the overall ease of use of the system. Some solutions, such as Storyblok, have gone to great lengths to make content editing a rich and seamless experience, but it is not generally considered a strength in the headless landscape as a whole, so it is definitely worth putting a small-scale demo in front of your content editors and seeing how they feel about the solution(s) you have your eye on.

How Easy Is It To Get Your Data Off The Platform?

I’ve lost count of the number of pitch meetings that I have sat in and been told that we will probably have to start from scratch or write a custom scraper for content because the client’s content is completely tied up in a proprietary content management system, and they can’t easily export their data.

No matter how cool your CMS of choice seems, make absolutely certain that there is an easy way to get all of your content off of the system at some point. Sadly, no system is forever, and the client is eventually going to want to change their site, and their infrastructure with it. Anything you can do to make life easier for them at that point will be a huge positive.

This is generally easier with headless CMS solutions because they are API-able at their core, but it still bears closer scrutiny to make sure that you aren’t going to be causing a huge headache a few years down the line.

Summing Up

Choosing an approach to, and platform for, content management is a big choice in any digital project. Headless content management is powerful and flexible but does come with some costs, and it isn’t ideal for every situation.

Be mindful that the price you see up-front from the vendor is rarely the final, total cost of the solution, and be sure that you don’t fall into the trap of thinking you can cut down on development costs by removing traditional “back-end” developers.

Make sure that everyone is comfortable with the realities of working with a headless CMS as opposed to a more traditional setup, and be sure to bring content editors along for the journey because they are the people who will be working with the system you set up most frequently.

Hopefully, this guide has at least helped to give some context to the hype and can help you to make a decision that you and your client can be comfortable with. You can build pretty much anything you want with headless at its center now — but always ask yourself whether you are reaching for a solution because it is familiar or hyped, or if it really is the best solution for your circumstances.

Reconciling Editor Experience and Developer Experience in the CMS

Components are great, aren’t they? They are these reusable sources of truth that you can use to build rock-solid front-ends without duplicating code.

You know what else is super cool? Headless content management! Headless content management system (CMS) products offer a content editing experience while freeing that content in the form of data that can be ported, well, to any API-consuming front-end UI. You can structure your content however you’d like (depending on the product), and pull that content into your front-end applications.

Using these two things together — a distributed CMS solution with component-based front-end applications — is a core tenet of the Jamstack.

But, while components and headless CMSs are great on their own, it can be difficult to get them to play nicely together. I‘m not saying it‘s difficult to hook one up to the other. In a lot of cases, it’s actually quite painless. But, to craft a system of components that is reusable and consistent, and to have that system maintain parity with a well-designed CMS experience is a difficult thing to achieve. It’s that win-win combo of being able to freely write content and then have that content structured into predictable components that makes headless content management so appealing.

Achieving parity between a CMS and front-end components

My favorite demonstrating this complexity is a simple component: a button. Let‘s say we’re working with React to build components and our button looks like this:

<Button to="/">Go Home</Button>

In the lovely land of React, that means the <Button> component has two props (i.e. properties, attributes, arguments, etc.) — to and children. children is a React thing that holds all the content within the opening and closing tags, which is “Go Home” in this case.)

If we’re going to enable users in the content editor to add buttons to the site, we want a system for them that makes it easy to understand how their actions in the CMS affect what appears on screen in the front-end app. But we also want our developer(s) to work productively with component properties that make sense to them and within the framework they’re working (i.e. React in our example).

How do we do that?

We could…

…use fields in the CMS that match the components’ properties, though I’ve had little success with this approach. to and children don‘t make much sense to content editors trying to build a button. Believe me, I‘ve tried. I‘ve tried with beginners and experienced editors alike. I‘ve tried helper text. It doesn’t matter. It’s confusing.

What makes more sense is using words editors are more likely to understand, like label or text for children and url for to.

Showing a mockup of CMS text input fields for a button component, one for a to field with https as a placeholder, and another for children with Buy Now as a placeholder.
😕
Showing a mockup of CMS text input  fields for a button component, one for a URL field with https as a placeholder, and another for Button Label with Buy Now as a placeholder.
🤓

But then we’d be out of sync with our code.

Or what if we…

masked attributes in the CMS. Most headless CMS solutions enable you to have a different value for the label of the field than the name that is used when delivering content via an API.

We could label our fields Label and URL, but use children and to as the names. We could. But we probably shouldn’t. Remember what Ian Malcolm said?

On the surface, masking attributes makes sense. It’s a separation of concerns. The editors see something that makes them happy and productive, and the developers work with the names that make sense to them. I like it, but only in theory. In practice, it confuses developers. Debugging a content editor issue often requires digging through extra layers (i.e. time) to find the relationship between labels and field names.

Or why not …

…change the properties. Wouldn’t it be easier for developers to be flexible? They’re the ones designing the system, after all.

Yes, that’s true. But if you follow that rule exclusively, it’s inevitable that you’re going to run into some issue along the way. You’ll likely end up fighting against the framework, or props will just feel goofy.

In our example, using label and url as props for a button works totally fine for data that originates from the CMS. But that also means that any time our developers want to use a button within the code, it looks like this:

<Button label="Go Home" url="/" />

That may seem okay on the surface, but it significantly limits the power of the button. Let’s say I want to support some other feature, like adding an icon within the label. I’m going to need some additional logic or another property for it. If I would have used React’s children approach instead, it would have just worked (likely after some custom styling support).

Okay, so… what do we do?

Introducing transformers

The best approach I’ve found is to separately optimize the editor and developer experiences. Craft a CMS experience that is catered to the editors. Build a codebase that is easy for developers to navigate, understand, and enhance.

The result is that the two experiences will not be in parity with one another. We need some set of utilities to transform the data from the CMS structure into something that can be used by the front-end, regardless of the framework and tooling you’re using.

I call these utilities transformers. (Aren’t I so good at naming things!?) Transformers are responsible for consuming data from your CMS and transforming it into a shape that can be easily consumed by your components.

Illustration showing a rounded square that says Data Source pointing to a yellow box that says transformer, pointing to another rounded square that says component. There is a small code snippet on both sides of the yellow square showing how it transforms the Label and URL fields to Children and To, respectively.

While I‘ve found that transforming data is the smoothest means to get great experiences in both the CMS and the codebase, I don‘t have an obvious solution for how (or perhaps where) those transformations should happen. I‘ve used three different approaches, all of which have their pros and cons. Let’s take a look at them.

1. Alongside components

One approach is to put transformers right alongside the components they are serving. This is the approach I typically take in organizing component-based projects — to keep related files close to one another.

The same illustrated diagram, but the yellow box is now the button index.js file that points to a transformer.js file that then points to a button component.js file.

That means that I often have a directory for every component with a predictable set of files. The index.js acts as the controller for the component. It is responsible for importing and exporting all other relevant files. That makes it trivial to wrap the component with some logic-based behavior. In other words, it could transform properties of the component before rendering it. Here’s what that might look like for our button example:

import React from "react"

import Component from "./component"
import transform from "./transformer"

const Button = props => <Component {...transform(props)} />

export default Button

The transform.js file might look like this:

export default input =&gt; {
  return {
    ...input,
    children: input.children || input.label,
    to: input.to || input.url
  }
}

In this example, if to and children were properties sent to the component, it works just fine! But if label and url were used instead, they are transformed to children and to. That means the <Button> component (component.js) only has to worry about using children and to.

const Button = ({ children, to }) => <a href={to}>{children}</a>

I personally love this approach. It keeps the logic tightly coupled with the component. The biggest downside I‘ve found thus far is that it’s a large number of files and transforms, when the entire dataset for any given page could be transformed earlier in the stack, which would be…

2. At the top of the funnel

The data has to be pulled into the application via some mechanism. Developers use this mechanism to retrieve as much data for the current page or view as possible. Often, the fewer number of queries/requests a page is required to make, the better its performance.

In other words, that mechanism often exists near the top of the funnel (or stack), as opposed to each component pulling its own data in dynamically. (When that’s necessary, I use adapters.)

Another illustration, this time where the yellow box is labeled import mechanism, and it has three arrows, each pointing to a white square, labeled, component 1, component 2, and component 3, respectively.

The mechanism that retrieves the page data could also be responsible for transforming all the data for the given page before it renders any of its components.

In theory, this is a better approach than the first one. It decreases the amount of work the browser has to do, which should improve the front-end performance. That means the server has to do more work, but that’s often a better choice.

In practice, though, this is a lot of work. Data structures can be big, complex, and interwoven. It can take a heck of a lot of work to transform everything into the right format at the top of the funnel, and then pass the transformed data down to components. It’s also more difficult to test because of the potential complexity and variation of the giant data blob retrieved at the top of the stack. With the first approach, testing the transformer logic for the button is trivial. With this approach, you’d want to account for transforming button data anywhere that it might appear in the retrieved data object.

But, if you can pull it off, this is generally the better approach.

3. The middleman engine

The third and final (and magical) approach is to do all this work somewhere else. In this case, we could build an engine (i.e. a small application) that would do the transformations for us, and then make the content available for the application to consume.

Another illustration, this time where the yellow box is the abstracted data source, which points to a white box labeled import mechanism, which then points to the same three white squares representing components that are outlined in the previous illustration.

This is likely even more work than the second approach. And it has added cost and maintenance in running an additional application, which takes more effort to ensure it is rock solid.

The major upside to this approach is that we could build this as an abstracted engine. In other words, any time we bring in data to any front-end application, it goes through this middleman engine. That means if we have two projects that use the same CMS or data source, our work is cut down significantly for the second project.


If you aren‘t doing any of this today and want to start, my advice is to treat these approaches like stepping stones. They grow in complexity and maintenance and power as the application grows. Start with the first approach and see how far that gets you. Then, if you feel like you could benefit from a jump to the second, do it! And if you’re feeling like living dangerously, go for the third!

In the end, what matters most is crafting an experience that both your editors and your developers understand and enjoy. If you can do that, you win!


The post Reconciling Editor Experience and Developer Experience in the CMS appeared first on CSS-Tricks.

You can support CSS-Tricks by being an MVP Supporter.

Beginner’s Guide: How to Publish a Website in 2021 (Step by Step)

Do you want to publish a website but are worried about technical stuff?

It is a misconception that you need to be a web designer or developer to code a website. There are many tools that make it super easy to put your website online without writing any code.

In this article, we’ll show you how to easily publish a website with step by step instructions.

A beginners guide on publishing a website online

Using a Website Builder to Publish a Website

Most beginners feel that they need to learn programming and web design skills to publish their websites.

It was true in the early days of the internet. At that time, businesses hired web developers or they had to learn coding skills to publish a website on their own.

However, things have changed over the years and technical skills are no longer a hurdle in publishing your content on the web.

These days, beginners, businesses, and even developers use website builders like WordPress to easily publish websites.

More than 69% of all websites on the internet are built using a website builder or CMS platform. This means, even developers don’t need to write code from scratch to publish a website.

These platforms allow anyone in the world to easily publish a website and put it on the internet. We’ll show you the easiest and most popular way to publish your website (no coding required).

1. Publish a Website with WordPress

WordPress is the most popular website builder on the market with the slogan ‘Democratize Publishing’. It is a free (as in freedom) and open-source software that anyone can use to build any type of website.

WordPress mission is to democratize publishing

Over 39% of all websites on the internet are powered by WordPress.

To get started with WordPress, you’ll need a domain name (e.g. wpbeginner.com) and web hosting (this is where your website files are stored).

We recommend using Bluehost. They’re offering WPBeginner users a free domain name and a generous 60% discount on hosting ($2.75/month).

If you want to try an alternative, then we recommend SiteGround or any of these top WordPress hosting providers.

Next, you’ll need to install WordPress. We have a step by step WordPress installation tutorial that’ll walk you through the installation process.

Once you have installed WordPress, you’ll see the WordPress dashboard which looks like this.

WordPress dashboard

Next, you need to install and activate the SeedProd plugin. For more details, see our step by step guide on how to install a WordPress plugin.

SeedProd is the best WordPress page builder plugin. It allows you to quickly publish professionally designed web pages for your website using a simple drag and drop user interface.

SeedProd user interface

It is super easy to use and allows you to quickly publish your website with professional designs that are already optimized for sales, conversions, and SEO.

Alternatives to SeedProd

There are several popular page builder tools for WordPress. You can use any of the following to publish your website without any coding or design skills.

  • Beaver Builder – A drag and drop WordPress website builder with advanced theme customizations
  • Divi Builder – Another beginner friendly WordPress theme builder with tons of ready made templates
  • Elementor – A powerful page builder tool for WordPress suitable for both beginners and developers

We believe WordPress is the most beginner-friendly platform to publish your website.

It is widely used and trusted by millions of beginners as well as big name brands like Microsoft, Facebook, and even US government uses WordPress to power the The White House website.

The best part about WordPress is that there are over 58,000 WordPress plugins that let you add just about any functionality to your website such as online store, contact form, SEO features, and more.

You can think of plugins like addons or apps for your iPhone. They make it easy for even first time users to configure and publish a website that search engines love and is easy to use for your customers.

2. Publish a Website with Contact Contact Website Builder

Constant Contact Website builder is an AI-powered website publishing tool suitable for beginners and small businesses.

Constant Contact Website Builder

If you don’t want to go through the trouble of purchasing hosting, domain name, and installing a web application software, then Constant Contact Website Builder would be the right tool for you.

It is an AI-powered website publishing tool that allows you to simply follow a step by step wizard. You’ll answer some questions and it will generate ideal layouts for you complete with the dummy content.

You can customize it in any way you want using a simple drag and drop interface. Once you’re done, simply click the Publish button.

Constant Contact customizer

The best part about using Constant Contact Website Builder is that you don’t need to worry about hosting or updates. You also get reliable support via chat, phone, and email.

If you simply want to publish a small business website or a quick online store, then it gets the job done with very little effort.

Alternatives to Constant Contact Website Builder

There are plenty of other fully-hosted, drag and drop website publishing platforms similar to Constant Contact. Following are a few hosted website builders picked by our expert team.

  • Wix – a fast growing website builder platform that has all the features you’d need to build a website.
  • Gator by HostGator – Fully hosted website builder by the folks behind HostGator. It comes with an intuitive drag and drop publisher with beautiful templates.
  • Domain.com Website Builder – A fully hosted website builder with beautiful templates to quickly publish a website.
  • GoDaddy – a large domain name registrar that also offer website builder tools.

All of these platforms are easy to use and allow you to publish your website without writing code.

3. Manually Publish Your Website

For those of you are who are eager to learn and willing to dive into basic HTML, CSS, and JavaScript, then this is the route you can take.

Note: If you don’t have any previous experience with these programming languages, then it may take you a while to get enough basic grip to code a reasonably presentable website and publish it online.

There are several online course platforms for students offering courses on web development for beginners. We recommend checking out the one offered by the CodeAcademy.

You can make a website on your computer, but you will still need a domain name (web address for your site) and website hosting service to publish it online.

All websites on the internet need hosting. It provides you storage on an online web server where you can upload and store your website files.

You can sign up with Bluehost which is one of the biggest hosting companies in the world. They are offering WPBeginner users a generous discount + free domain name + free SSL certificate.

Once you have signed up for a hosting account, you can upload the website files from your computer to your website by using an FTP client.

Alternatively, if your web hosting provider has cPanel, then you can use their built-in file manager for uploading your website in the public_html folder. This saves you from learning how to use the FTP server.

We hope this article helped you learn how to easily publish a website. You may also want to see our guide on how to create a professional business email address, and how to get a virtual business phone number for your small business.

If you liked this article, then please subscribe to our YouTube Channel for WordPress video tutorials. You can also find us on Twitter and Facebook.

The post Beginner’s Guide: How to Publish a Website in 2021 (Step by Step) appeared first on WPBeginner.

APIs in Less Than 5 Minutes With Strapi

This blog is originally published on InfraCloud blog. 

The evolution of CDN (Content Delivery Networks) and business need to scale multi-channel ways of interacting with the customer have made the traditional CMS obsolete. Organizations are using JAMstack to build responsive websites & CDN to deliver them where the customer is. With the evolution of the 5G and data-intensive applications such as AR, VR, drones, etc. new technologies will emerge that will deliver services closest to where the customer resides.

CMS Deprecated. Next Steps?

The popular Concurrent Mark Sweep (CMS) GC algorithm is deprecated in JDK 9. According to JEP-291, this decision has been made to reduce the maintenance burden of the GC code base and accelerate new development.

Thus, from Java 9 onwards, if you launch the application with -XX:+UseConcMarkSweepGC (an argument which will activate the CMS GC algorithm), you are going to see below WARNING message:

Simplify Your Stack With A Custom-Made Static Site Generator

With the advent of the Jamstack movement, statically-served sites have become all the rage again. Most developers serving static HTML aren’t authoring native HTML. To have a solid developer experience, we often turn to tools called Static Site Generators (SSG).

These tools come with many features that make authoring large-scale static sites pleasant. Whether they provide simple hooks into third-party APIs like Gatsby’s data sources or provide in-depth configuration like 11ty's huge collection of template engines, there’s something for everyone in static site generation.

Because these tools are built for diverse use cases, they have to have a lot of features. Those features make them powerful. They also make them quite complex and opaque for new developers. In this article, we’ll take the SSG down to its basic components and create our very own.

What Is A Static Site Generator?

At its core, a static site generator is a program that performs a series of transformations on a group of files to convert them into static assets, such as HTML. What sort of files it can accept, how it transforms them, and what types of files come out differentiate SSGs.

Jekyll, an early and still popular SSG, uses Ruby to process Liquid templates and Markdown content files into HTML.

Gatsby uses React and JSX to transform components and content into HTML. It then goes a step further and creates a single-page application that can be served statically.

11ty renders HTML from templating engines such as Liquid, Handlebars, Nunjucks, or JavaScript template literals.

Each of these platforms has additional features to make our lives easier. They provide theming, build pipelines, plugin architecture, and more. With each additional feature comes more complexity, more magic, and more dependencies. They’re important features, to be sure, but not every project needs them.

Between these three different SSGs, we can see another common theme: data + templates = final site. This seems to be the core functionality of generator static sites. This is the functionality we’ll base our SSG around.

At its core, a static site generator is a program that performs a series of transformations on a group of files to convert them into static assets, such as HTML.

Our New Static Site Generator’s Technology Stack: Handlebars, Sanity.io And Netlify

To build our SSG, we’ll need a template engine, a data source, and a host that can run our SSG and build our site. Many generators use Markdown as a data source, but what if we took it a step further and natively connected our SSG to a CMS?

  • Data Source: Sanity.io
  • Data fetching and templating: Node and Handlebars
  • Host and Deployment: Netlify.

Prerequisites

  • NodeJS installed
  • Sanity.io account
  • Knowledge of Git
  • Basic knowledge of command line
  • Basic knowledge of deployment to services like Netlify.

Note: To follow along, you can find the code in this repository on GitHub.

Setting Up Our Document Structure In HTML

To start our document structure, we’re going to write plain HTML. No need to complicate matters yet.

In our project structure, we need to create a place for our source files to live. In this case, we’ll create a src directory and put our index.html inside.

In index.html, we’ll outline the content we want. This will be a relatively simple about page.

<!DOCTYPE html><html lang="en">
<head>
    <meta charset="UTF-8">
    <meta name="viewport" content="width=device-width, initial-scale=1.0">
    <title>Title of the page!</title>
</head>
<body>
    <h1>The personal homepage of Bryan Robinson</h1>

    <p>Some pagraph and rich text content next</p>

    <h2>Bryan is on the internet</h2>
    <ul>
        <li><a href="linkURL">List of links</a></li>
    </ul>
</body>
</html>

Let’s keep this simple. We’ll start with an h1 for our page. We’ll follow that with a few paragraphs of biographical information, and we’ll anchor the page with a list of links to see more.

Convert Our HTML Into A Template That Accepts Data

After we have our basic structure, we need to set up a process to combine this with some amount of data. To do this, we’ll use the Handlebars template engine.

At its core, Handlebars takes an HTML-like string, inserts data via rules defined in the document, and then outputs a compiled HTML string.

To use Handlebars, we’ll need to initialize a package.json and install the package.

Run npm init -y to create the structure of a package.json file with some default content. Once we have this, we can install Handlebars.

npm install handlebars

Our build script will be a Node script. This is the script we’ll use locally to build, but also what our deployment vendor and host will use to build our HTML for the live site.

To start our script, we’ll create an index.js file and require two packages at the top. The first is Handlebars and the second is a default module in Node for accessing the current file system.

const fs = require('fs');
const Handlebars = require('handlebars');

We’ll use the fs module to access our source file, as well as to write to a distribution file. To start our build, we'll create a main function for our file to run when called and a buildHTML function to combine our data and markup.

function buildHTML(filename, data) {
  const source = fs.readFileSync(filename,'utf8').toString();
  const template = Handlebars.compile(source);
  const output = template(data);

  return output
}

async function main(src, dist) {
  const html = buildHTML(src, { "variableData": "This is variable data"});

  fs.writeFile(destination, html, function (err) {
    if (err) return console.log(err);
      console.log('index.html created');
  });
}

main('./src/index.html', './dist/index.html');

The main() function accepts two arguments: the path to our HTML template and the path we want our built file to live. In our main function, we run buildHTML on the template source path with some amount of data.

The build function converts the source document into a string and passes that string to Handlebars. Handlebars compiles a template using that string. We then pass our data into the compiled template, and Handlebars renders a new HTML string replacing any variables or template logic with the data output.

We return that string into our main function and use the writeFile method provided by Node’s file-system module to write the new file in our specified location if the directory exists.

To prevent an error, add a dist directory into your project with a .gitkeep file in it. We don’t want to commit our built files (our build process will do this), but we’ll want to make sure to have this directory for our script.

Before we create a CMS to manage this page, let’s confirm it’s working. To test, we’ll modify our HTML document to use the data we just passed into it. We’ll use the Handlebars variable syntax to include the variableData content.

<h1>{{ variableData }}</h1>

Now that our HTML has a variable, we’re ready to run our node script.

node index.js

Once the script finishes, we should have a file at /dist/index.html. If we read open this in a browser, we’ll see our markup rendered, but also our “This is variable data” string, as well.

Connecting To A CMS

We have a way of putting data together with a template, now we need a source for our data. This method will work with any data source that has an API. For this demo, we’ll use Sanity.io.

Sanity is an API-first data source that treats content as structured data. They have an open-source content management system to make managing and adding data more convenient for both editors and developers. The CMS is what’s often referred to as a “Headless” CMS. Instead of a traditional management system where your data is tightly coupled to your presentation, a headless CMS creates a data layer that can be consumed by any frontend or service (and possibly many at the same time).

Sanity is a paid service, but they have a “Standard” plan that is free and has all the features we need for a site like this.

Setting Up Sanity

The quickest way to get up and running with a new Sanity project is to use the Sanity CLI. We’ll start by installing that globally.

npm install -g @sanity/cli

The CLI gives us access to a group of helpers for managing, deploying, and creating. To get things started, we’ll run sanity init. This will run us through a questionnaire to help bootstrap our Studio (what Sanity calls their open-source CMS).

Select a Project to Use:
   Create new project
   HTML CMS

Use the default dataset configuration?   
   Y // this creates a "Production" dataset

Project output path:
   studio // or whatever directory you'd like this to live in

Select project template
   Clean project with no predefined schemas

This step will create a new project and dataset in your Sanity account, create a local version of Studio, and tie the data and CMS together for you. By default, the studio directory will be created in the root of our project. In larger-scale projects, you may want to set this up as a separate repository. For this project, it’s fine to keep this tied together.

To run our Studio locally, we’ll change the directory into the studio directory and run sanity start. This will run Studio at localhost:3333. When you log in, you’ll be presented with a screen to let you know you have “Empty schema.” With that, it’s time to add our schema, which is how our data will be structured and edited.

Creating Sanity Schema

The way you create documents and fields within Sanity Studio is to create schemas within the schemas/schema.js file.

For our site, we’ll create a schema type called "About Details." Our schema will flow from our HTML. In general, we could make most of our webpage a single rich-text field, but it’s a best practice to structure our content in a de-coupled way. This provides greater flexibility in how we might want to use this data in the future.

For our webpage, we want a set of data that includes the following:

  • Title
  • Full Name
  • Biography (with rich text editing)
  • A list of websites with a name and URL.

To define this in our schema, we create an object for our document and define out its fields. An annotated list of our content with its field type:

  • Title — string
  • Full Name — string
  • Biography — array of "blocks"
  • Website list — array of objects with name and URL string fields.
types: schemaTypes.concat([
    / Your types here! /

    {
        title: "About Details",
        name: "about",
        type: "document",
        fields: [
            {
                name: 'title',
                type: 'string'
            },
            {
                name: 'fullName',
                title: 'Full Name',
                type: 'string'
            },
            {
                name: 'bio',
                title: 'Biography',
                name: 'content',
                type: 'array',
                of: [
                    {
                        type: 'block'
                    }
                ]
            },
            {
                name: 'externalLinks',
                title: 'Social media and external links',
                type: 'array',
                of: [
                    {
                        type: 'object',
                        fields: [
                            { name: 'text', title: 'Link text', type: 'string' },
                            { name: 'href', title: 'Link url', type: 'string' }
                        ]
                    }
                ]
            }
        ]
    }
])

Add this to your schema types, save and your Studio will recompile and present you with your first documents. From here, we’ll add our content into the CMS by creating a new document and filling out the information.

Structuring Your Content In A Reusable Way

At this point, you may be wondering why we have a "full name" and a "title." This is because we want our content to have the potential to be multipurpose. By including a name field instead of including the name just in the title, we give that data more use. We can then use information in this CMS to also power a resumé page or PDF. The biography field could be programmatically used in other systems or websites. This allows us to have a single source of truth for much of this content instead of being dictated by the direct use case of this particular site.

Pulling Our Data Into Our Project

Now that we’ve made our data available via an API, let's pull it into our project.

Install and configure the Sanity JavaScript client

First thing, we need access to the data in Node. We can use the Sanity JavaScript client to forge that connection.

npm install @sanity/client

This will fetch and install the JavaScript SDK. From here, we need to configure it to fetch data from the project we set up earlier. To do that, we’ll set up a utility script in /utils/SanityClient.js. We provide the SDK with our project ID and dataset name, and we’re ready to use it in our main script.

const sanityClient = require('@sanity/client');
const client = sanityClient({
    projectId: '4fs6x5jg',
    dataset: 'production',
    useCdn: true 
  })

module.exports = client;

Fetching Our Data With GROQ

Back in our index.js file, we’ll create a new function to fetch our data. To do this, we’ll use Sanity’s native query language, the open-source GROQ.

We’ll build the query in a variable and then use the client that we configured to fetch the data based on the query. In this case, we build an object with a property called about. In this object, we want to return the data for our specific document. To do that, we query based on the document _id which is generated automatically when we create our document.

To find the document’s _id, we navigate to the document in Studio and either copy it from the URL or move into “Inspect” mode to view all the data on the document. To enter Inspect, either click the “kabob” menu at the top-right or use the shortcut Ctrl + Alt + I. This view will list out all the data on this document, including our _id. Sanity will return an array of document objects, so for simplicity’s sake, we’ll return the 0th entry.

We then pass the query to the fetch method of our Sanity client and it will return a JSON object of all the data in our document. In this demo, returning all the data isn’t a big deal. For bigger implementations, GROQ allows for an optional "projection" to only return the explicit fields you want.

const client = require('./utils/SanityClient') // at the top of the file

// ...

async function getSanityData() {
    const query = {
        "about": *[_id == 'YOUR-ID-HERE'][0]
    }
    let data = await client.fetch(query);
}

Converting The Rich Text Field To HTML

Before we can return the data, we need to do a transformation on our rich text field. While many CMSs use rich text editors that return HTML directly, Sanity uses an open-source specification called Portable Text. Portable Text returns an array of objects (think of rich text as a list of paragraphs and other media blocks) with all the data about the rich text styling and properties like links, footnotes, and other annotations. This allows for your text to be moved and used in systems that don’t support HTML, like voice assistants and native apps.

For our use case, it means we need to transform the object into HTML. There are NPM modules that can be used to convert portable text into various uses. In our case we’ll use a package called block-content-to-html.

npm install @sanity/block-content-to-html

This package will render all the default markup from the rich text editor. Each type of style can be overridden to conform to whatever markup you need for your use case. In this case, we’ll let the package do the work for us.

const blocksToHtml = require('@sanity/block-content-to-html'); // Added to the top

async function getSanityData() {
    const query = {
        "about": *[_type == 'about'][0]
    }
    let data = await client.fetch(query);
    data.about.content = blocksToHtml({
        blocks: data.about.content
    })
    return await data
}

Using The Content From Sanity.io In Handlebars

Now that the data is in a shape we can use it, we’ll pass this to our buildHTML function as the data argument.

async function main(src, dist) {
    const data = await getSanityData();
    const html = buildHTML(src, data)

    fs.writeFile(dist, html, function (err) {
        if (err) return console.log(err);
        console.log('index.html created');
    });
}

Now, we can change our HTML to use the new data. We’ll use more variable calls in our template to pull most of our data.

To render our rich text content variable, we’ll need to add an extra layer of braces to our variable. This will tell Handlebars to render the HTML instead of displaying the HTML as a string.

For our externalLinks array, we’ll need to use Handlebars’ built-in looping functionality to display all the links we added to our Studio.

<!DOCTYPE html>
<html lang="en">
<head>
    <meta charset="UTF-8">
    <meta name="viewport" content="width=device-width, initial-scale=1.0">
    <title>{{ about.title }}</title>
</head>
<body>
    <h1>The personal homepage of {{ about.fullName }}</h1>

    {{{ about.content }}}

    <h2>Bryan is on the internet</h2>
    <ul>
        {{#each about.externalLinks }}
            <li><a href="{{ this.href }}">{{ this.text }}</a></li>
        {{/each}}
    </ul>
</body>
</html>

Setting Up Deployment

Let’s get this live. We need two components to make this work. First, we want a static host that will build our files for us. Next, we need to trigger a new build of our site when content is changed in our CMS.

Deploying To Netlify

For hosting, we’ll use Netlify. Netlify is a static site host. It serves static assets, but has additional features that will make our site work smoothly. They have a built-in deployment infrastructure that can run our node script, webhooks to trigger builds, and a globally distributed CDN to make sure our HTML page is served quickly.

Netlify can watch our repository on GitHub and create a build based on a command that we can add in their dashboard.

First, we’ll need to push this code to GitHub. Then, in Netlify’s Dashboard, we need to connect the new repository to a new site in Netlify.

Once that’s hooked up, we need to tell Netlify how to build our project. In the dashboard, we’ll head to Settings > Build & Deploy > Build Settings. In this area, we need to change our “Build command” to “node index.js” and our “Publish directory” to “./dist”.

When Netlify builds our site, it will run our command and then check the folder we list for content and publish the content inside.

Setting Up A Webhook

We also need to tell Netlify to publish a new version when someone updates content. To do that, we’ll set up a Webhook to notify Netlify that we need the site to rebuild. A Webhook is a URL that can be programmatically accessed by a different service (such as Sanity) to create an action in the origin service (in this case Netlify).

We can set up a specific “Build hook” in our Netlify dashboard at Settings > Build & Deploy > Build hooks. Add a hook, give it a name and save. This will provide a URL that can be used to remotely trigger a build in Netlify.

Next, we need to tell Sanity to make a request to this URL when you publish changes.

We can use the Sanity CLI to accomplish this. Inside of our /studio directory, we can run sanity hook create to connect. The command will ask for a name, a dataset, and a URL. The name can be whatever you’d like, the dataset should be production for our product, and the URL should be the URL that Netlify provided.

Now, whenever we publish content in Studio, our website will automatically be updated. No framework necessary.

Next Steps

This is a very small example of what you can do when you create your own tooling. While more full-featured SSGs may be what you need for most projects, creating your own mini-SSG can help you understand more about what’s happening in your generator of choice.

  • This site publishes only one page, but with a little extra in our build script, we could have it publish more pages. It could even publish a blog post.
  • The “Developer experience” is a little lacking in the repository. We could run our Node script on any file saves by implementing a package like Nodemon or add “hot reloading” with something like BrowserSync.
  • The data that lives in Sanity can power multiple sites and services. You could create a resumé site that uses this and publishes a PDF instead of a webpage.
  • You could add CSS and make this look like a real site.

Weaved Webs

There is a bit of an irony with Jamstack.

The concept is simple: you put pre-rendered, static files on web hosting (a CDN) designed to do that well. That’s it. If you need to do more, anything you do from there is done with client-side JavaScript, which is likely talking to serverless functions because that’s the spiritual partner to Jamstack on the back end. I heard Guillermo Rauch say at Smashing Conf the other day that it isn’t exactly a “stack” in that it’s almost entirely non-prescriptive in what you do. While I like the word Jamstack, that also feels fair.

The irony is that while the concept is simple, that simplicity can be the cause of complexity.

Netlify, the company largely behind Jamstack, knows this. They know that without a back-end server with back-end languages, something like a basic contact form gets complicated. Instead of being in no-brainer solved-problem territory, we have to figure out another way to process that form. So, they solve that problem for you (among others, like auth and serverless functions). But there are tons of other companies that want to be that cog in your machine.

That’s just one potential complication. What do you use for a CMS or other data storage? What is your build process like? How do you see previews of content changes? How do you do auth? What if you need some fancy calendar widget? What if you want to sell something? Anything a website can do, Jamstack has an answer for — it’s just that combining all those answers can feel disjointed and potentially confusing.

Dave recently played with Eleventy + Tailwind + Netlify CMS (which is Jamstack-y) and said it felt like cattle herding:

So my little mashup, which was supposed to be just 3 technologies ended up exposing me to ~20 different technologies and had me digging into nth-level dependency source code after midnight. If there’s an allegory for what I don’t like about modern-day web development, this is it. You want to use three tools, but you have to know how to use twenty tools instead. If modules and components are like LEGO, then this is dumping out the entire bin on the floor just to find one tiny piece you need.

“The tangled webs we weave,” indeed.

In a conversation between Richard MacManus and Matt Mullenweg¹, Richard quotes Matt:

You can patch together a dozen services, each with its own account and billing, for hundreds of dollars a month, to get a similar result you’d have for a few dollars a month using WordPress on shared hosting,” he said. “And it would be more fragile, because the chain is only as strong as its weakest link. You are chaining together different toolsets, logins, billing, hosting… any part of it going down can break the entire flow.

If I was considering Jamstack for a particular project, and the grand total really was twelve services, I probably would reconsider, particularly if I could reach for a tool like WordPress and bring it down to one. There are plenty of other fair criticisms of Jamstack, particularly since it is early-days. The story of “CMS with Preview” isn’t particularly great, for example, which is a feature you don’t even think about with WordPress because, duh, obviously it has that.

And Jamstack can do some things that are very ahead of the game that I cherish. Git-based deployment? All websites should have that. Previews of my pull requests? Hot damn. Sub -100-millisecond first requests? Yes please. Not having to diddle with cache? Sweet. Catch up, other stacks.

I’m saying there are baby bear choices to be made here. You get there by doing what you’re probably already doing anyway: putting your adult pants on, thinking about what your project needs, and choosing the best option.

I have production WordPress sites. Like this one! It’s great!

I have production Jamstack sites. Like this one! It’s not a complicated web of services. It’s a static site generator with content in the GitHub repo deployed with Netlify. While CSS-Tricks can do about 100 things that this site can’t, it has a few tricks up its sleeve that CSS-Tricks can’t do, like accept pull requests on content.

I feel like I’ve chosen pretty well in all my cases.

  1. While Matt is clearly incentivized to defend the WordPress approach, it feels to me the opinions here are genuine; in part because Automattic invests in alternative stack approaches, and that WordPress and Jamstack are not mutually exclusive. I enjoyed responses to this, like Ohad Eder-Pressman’s open letter, which is also full of incentivized-but-genuine thoughts.


The post Weaved Webs appeared first on CSS-Tricks.

You can support CSS-Tricks by being an MVP Supporter.

Put the Smackdown on Spammers: 12 Top-Rated WordPress Antispam Plugins

If you have a WordPress site, there’s a good chance you welcome giving your users the option to comment on a blog, register for information, send you an email, or something else. It’s great to have folks communicate with you, but this also opens the door to (gulp!) spam.

Unfortunately, spam comes with the territory, as the WordPress CMS is so popular, it naturally attracts an increased number of troublemakers looking to hack or wreak havoc on your site.

If not dealt with, it can become like swatting mosquitoes away from your WordPress site — annoying and challenging to control.

Dev Man swatting away spam.
Dev Man’s swatting powers demonstrated while on a website without spam protection.

Luckily, there are plugins out there that can come to your rescue and defend your site against spammers, ensuring that only real users you want to connect with get through.

We’ll be looking at one dozen top-rated plugins that can help you fight against spam—keeping real engagement flowing and kicking any spammer attempts to the curb.

Continue reading, or jump ahead using these links:

Each plugin has specific features, and they’re all different. Take your pick. You might want to use just one or combine them as part of a full-proof spam protection strategy.

We’ll also look at ways to combat spam from your WordPress dashboard without a plugin.

12 Top-Rated Anti-Spam Plugins

1. Akismet

The akismet plugin.

Akismet filters through the comments on your blog and marks any suspicious-looking one as spam. When they’re spotted, the comments will be sent to the spam section of the WordPress admin’s comments page.

To use Akismet, you need to get an Akismet.com API key. Keys are free for personal blogs, and there are paid subscriptions available for businesses and commercial WordPress sites. So, depending on what kind of operation you have set up, you can choose accordingly.

With over 5 million active installations, it’s the most popular combat against spam.

2. Defender

Defender banner.

Our free Defender plugin is our answer to security and can quickly put the smackdown on spammers. With his powerful firewall, you can block hackers or bots before reaching your site with his defense.

He has IP banning, IP lockouts, 404 detections, the capability of automatically identifying bad acting IPs, and much more. Therefore, you can eliminate spam and anyone up to no good before they have a chance even to reach your website.

With a solid 5-star review and popular with over 30K active users, you’ll want to have Defender in your corner to stop spammers in their tracks.

For more information, check out our article on how to get the most out of Defender security.

3. WordPress Zero Spam

zero spam plugin

Instead of relying on visitors to prove they’re genuine users with CAPTCHA, the WordPress Zero Spam plugin makes spam bots jump through hoops so your users can enjoy a better user experience. After all, let’s face it, CAPTCHA can be complicated.

It uses AI in combination with effective spam detection techniques and a database of known malicious IPs from across the globe to detect and block spammers.

It can also integrate with popular 3rd party apps, such as Contact Form 7, BuddyPress, WPForms, and more.

Plus, it’s completely free to use.

4. NoSpamNX

NoSpamNX plugin

NoSpamNX blocks comment spam by creating a field that only bots can see. Then, once bots fill it out, the comment is not published and can either be blocked or completely moved into the spam queue.

Instead of relying on CAPTCHA or calculations to defend you against automated bots, NoSpamNX automatically adds additional form fields to your comment form that are invisible to human users.

When a spambot blindly fills these fields out, the comment doesn’t get saved. Then, you can decide whether to block the spambots or mark them as spam.

5. Hivemind (formerly: Stop Spammers)

hivemind plugin

A useful plugin that blocks many forms of spam so you can use fewer plugins is Hivemind. This plugin helps block comment and registration spam, spam email, and spambots while also monitoring your login attempts.

It also features over 50 + configuration options for maximum personalization.

Stop Spammers works right away once installed without much to adjust. However, if you’d like more options, there is a Stop Spammers Premium option.

6. CleanTalk Spam Protection

CleanTalk is a universal antispam plugin. It blocks all bots from the forms on your site. That includes comment and registration spam, along with spam that comes through other forms on your site (e.g. bookings, shopping carts, widgets, etc.).

The one thing it won’t do is block manual spam; however, you’ll see a nice reduction in spam, considering most spam is created with bots. Plus, this plugin scans your site for preexisting spam.

It also includes a firewall, which helps prevent your site from DDoS and XML-RPC attacks.

7. Antispam Bee

Antispam Bee

Antispam Bee puts the sting on spam by blocking spam comments and trackbacks effectively, without CAPTCHA, and without distributing personal information to 3rd party services.

This free plugin will also schedule spam to be deleted and view stats on the blocked and deleted spam.

It’s one of the more popular options for combatting spam, with over 500K active users and a solid 5-star rating.

8. Titan Anti-Spam & Security

titan plugin

The Titan Anti-Spam & Security plugin has quite a few awesome features to prevent spam; it includes a firewall, antispam, malware scanner, site accessibility checking, and security & threats audits.

It doesn’t use CAPTCHA and includes an algorithm that ensures reliability and accuracy against spambots. It’s very well updated, and it always meets new versions of CMS.

9. Spam Destroyer

Spam Destroyer

Spam Destroyer stops automated spam from bots that are sent to your default WordPress comment form. They make it as effortless as possible to use, because once you install it, it’s ready to go. It’s intended as a drop-in solution with no settings or configuration required.

For a free, simple, and easy to use plugin, Spam Destroyer is a great option.

10. Analytics Spam Blocker

analytics plugin

The Analytics Spam Blocker works a bit differently than our previous plugins that have been mentioned, where it stops spam bots from reaching your site, so the traffic isn’t accounted for in your Google Analytics data. That means that you should only see genuine traffic reflected in your analytics.

A nice feature is you can also easily report referral spam domains with the Analytics Spam Blocker reporting tool.

11. Cerber Security

Cerber Security

The Cerber Security, Antispam & Malware Scan defends your site against spam, hacker attacks, trojans, and malware.

It has features such as limiting the login attempts when logging in by IP address or subnet, custom login URLs, Cerber anti-spam engine, etc.

All the features that this plugin provides is worth checking out. With a 5-star rating and over 100K downloads, it’s a popular choice.

12. Anti Spam

As the name suggests, the Anti Spam plugin helps fight spam by automatically detecting comment spam. It does all of this without using annoying questions, quizzes, or CAPTCHA.

All that you need to do to get it working is to install it. This plugin features a free trial, and then there is an option to upgrade to the Pro version, which has features such as protecting your contact forms, the ability to stop fake user registration, run reports, and more.

3 Quick Tricks to Stopping Spam in the WordPress Dashboard

As you can see, to stop spam in your comment section, you have a wide range of plugins at your disposal.

There’s also a way to combat spam directly from the WordPress dashboard.

So, here’s a look at three ways to combat manual spam when a plugin might not be enough or when you want some added protection.

1. Make Users Register

One thing that may help is to make users register. Many drive-by spammers will not want to go to the trouble of registering to leave a quick spam comment. After all, they’re pretty lazy.

Go to Settings > Discussion > Other comment settings and check the box to make users register.

The user must register checkbox.
You’ll check the little box and be all set.

Some bots can attempt to register at your site, and while some may be successful, others will not. So even if some use automated software for registrations, it still puts up a wall that will work at least some of the time.

And if you notice a specific IP address causing trouble, you can block it with, for example, our Defender plugin.

The other thing to consider, of course, is your non-spamming visitors. If forced to register, users may go away. You’ll need to make a judgment call if registration is right for you.

2. Close Comments on Older Posts

Another way to combat spam is to shut the comment section down after a certain amount of time. Shutting down the comments can make sense if you have a highly publicized blog when published, and traffic dies down after a certain amount of time.

Go to Settings > Discussion > Other comment settings and check the box to close older articles’ comments.

Where you'll check to close comments.
From here, you can choose how many days old a post needs to be before shutting down comments.

Not all, but lots of spammers like to leave links on pages at least somewhat related to whatever it is they’re trying to promote. You may have posts that fit that bill, but when you close comments down after a certain amount of days, then the possibility of having comments open on such a post shrinks dramatically.

If you close comments after 14 days and a spammer finds a post from two months ago via search, the comments on that post will be closed by the time they arrive.

Just keep in mind that doing this may hurt non-spamming visitors. Some may want to leave comments on older posts.

That said, most older posts tend not to get many comments. Folks see that the post has some age, and the flow of initial comments has either slowed considerably or stopped altogether.

If you like this method but worry about closing down comments to genuine visitors, you could extend the time allowed for comments.

3. Hold Comments with Links

This setting lets you hold comments with a certain amount of links in the body of the comment.

Go to Settings > Discussion > Comment Moderation and set the number of links you’d like to allow.

Where you'll click to hold comments for moderation.
Want to hold a comment if it has two or more links? No problem!

You can decide how many links should trigger a hold here. Two is the default, but you could change that to one (or anything else).

Keep in mind, changing it to zero will hold all comments. That could get very time consuming to shuffle through them all in that setting.

Like That, Your Spam is Stopped

With all 15 anti-spam plugins mentioned in this post and ways to tweak your WordPress dashboard manually, you should easily combat spam on your site. Your WordPress site will be spam-free before you know it!

Spammers will be moving on to more vulnerable locations, leaving you more time to focus on actual users on your site and less annoyed.

If you’d like some more spam-tastic information, check out our Ultimate Guide to WordPress Spam.

On that note, go out there and put the smackdown on spammers.

5 Best ERP Software for Businesses of All Sizes

Software abbreviations are typically easy to understand. CRM (customer relationship management), CMS (content management system), VPN (virtual private network), and the many other software available are fairly simple to dissect from their names. But what about best ERP software?

What is WordPress? A Beginner’s Guide (FAQs + Pros and Cons)

WordPress is the world’s most popular website builder. It allows you to easily create websites, blogs, eCommerce stores and more.

If you have been wondering what is WordPress, how does it work, and what you can use it for, then you are in the right place.

In this beginner’s guide, we will explain what is WordPress, how you can use it, and answer some of the most frequently asked questions about WordPress.

WordPress explained for beginners

What is WordPress?

WordPress is a website builder and content management system. It is an open source software that anyone can use to make any kind of website imaginable.

It started out as a blogging platform in 2003 but soon transformed into a CMS and later a full-fledged website building platform. Today it powers more than 38% of all websites on the internet.

To learn more about its evolution, see our complete guide on the history of WordPress and how it changed over time.

To summarize, WordPress is a software that you can use to build blogs, websites, and stores to sell products online.

How is it Different from WordPress.com?

In this article, when we say WordPress we are talking about WordPress.org.

WordPress.com is a separate website that offers website and blog hosting service. It was launched by the WordPress co-founder, Matt Mullenweg.

Most beginners often confuse the two due to their similar names.

WordPress.org is the open-source software used by millions of websites (including WPBeginner). On the other hand, WordPress.com is a website and blog hosting platform.

For more details, see our guide on the difference between WordPress.org vs WordPress.com.

What do You Need to Use WordPress?

You need a web hosting account and a domain name to start using WordPress.

All websites need web hosting. It is the place where all your website files are stored, so that others on the internet can access your website.

A domain name is your website’s address on the internet (example, wpbeginner.com).

If your website was a house then web hosting will be the building you live in and domain name would be your street address. For more on this topic, see our beginner’s guide on the difference between web hosting and domain name.

To get a web hosting account, you’ll need to sign up with a WordPress hosting provider. These are third-party companies that sell hosting solutions.

We recommend using Bluehost. They are one of the largest hosting companies in the world and an officially recommended WordPress hosting provider.

Normally, a domain name costs $14.99 per year and web hosting starts from $7.99 per month.

Bluehost is offering WPBeginner users a discount on hosting with a free domain name. Basically, you can get started for just $2.75 per month.

→ Click Here to Claim This Exclusive Bluehost Offer ←

For step by step instruction, see our complete guide on how to make a website it will walk you through complete WordPress set up.

What Kind of Websites You Can Make Using WordPress?

You can make any kind of website imaginable using WordPress.

Users from all over the world use WordPress to make money online. It is flexible enough to run eCommerce operations and simple enough to quickly make small websites.

The following are just some types of websites you can make using WordPress.

How WordPress Works?

Once you have installed WordPress, you’ll see an easy to use dashboard with links to different areas in the left column. From here, you can create pages for your website or write blog posts.

You can also choose a website design template (Theme) for your website. There are thousands of free WordPress themes that you can choose from. You can also choose premium WordPress theme that comes with more advanced features.

WordPress themes

All these WordPress themes allow you to set up your website using a simple theme customizer interface. From here you can edit and customize your site design.

Theme customizer

But the real power of WordPress comes from the plugins.

WordPress plugins are like apps for your website. Similar to the apps you install on your phone, WordPress plugins allow you to add new features to your website.

For instance, you can add a contact form to your site, or display a lightbox popup to announce a sale.

You can convert your site into an online store using plugins like WooCommerce, or use a membership plugin to make a subscription-based website.

There are 56000+ free WordPress plugins in the WordPress plugin directory alone. There are also premium WordPress plugins that offer full support and guaranteed updates.

You can see some of the best WordPress plugins hand-picked by our expert team to help you grow your WordPress site.

Note: If you want to see how WordPress works behind the scenes from a technical point of view, then please check out our infographic on how WordPress works.

Who Else is Using WordPress?

WordPress is not just for beginners. It is used by many of the fortune 500 companies, universities, non-profits, governments around the world, and more.

The following are some of the top brands and organizations that are using WordPress.

1. The White House

The White House

The official website of the White House is built using WordPress. It features a large header on the top followed by the latest updates, news, and resources.

2. Facebook

Facebook

Facebook uses WordPress for their corporate website. It is a typical business website with a homepage showcasing key characteristics of the brand along with its flagship products. It also has a blog section called the Newsroom.

3. The New York Times

The New York Times

New York Times uses WordPress on its corporate website showcasing the company behind the iconic newspaper.

4. Microsoft

Microsoft

Microsoft uses WordPress to run their blogs website. It features company news, information, and product highlights.

5. Sony Music

Sony Music

Sony Music is one of the biggest music producers in the world representing top artists and labels. They use WordPress to power their corporate website.

To see a full list, check out our complete list on the most popular brands using WordPress.

Why Use WordPress to Make a Website?

Now, if you are thinking about starting a blog or a small business website, then you may be wondering why you should use WordPress as your website platform?

There are dozens of website builders and potential WordPress alternatives on the market that you can use to make your website. However, we believe that WordPress is the best platform for beginners and small businesses.

This is why over 38% of all websites use WordPress.

But here are just some of the reasons to choose WordPress for your website.

1. WordPress gives you the freedom

WordPress is free (as in freedom) and open-source software. Anyone can use it to create and launch a website. It is not owned by a single company, and it is protected by the WordPress Foundation, a non-profit organization.

This means you have complete freedom to use it in any way you see fit. You will have full control and complete ownership of your website and all of its content.

2. WordPress is easy

One of the reasons that make WordPress the #1 website builder is that it is incredibly easy to use.

There is a slight learning curve when you familiarize yourself with the software, but most beginners pass it quickly and easily manage their own websites.

Pro Tip: See our guide on how to learn WordPress for free in a week.

There is also a ton of free WordPress help and support available. You can ask questions on any tech community website and you’ll find answers from other users who started out just like you.

You can also join our WPBeginner Facebook Group to ask all your WordPress related questions and get free help from our experts and other WPBeginner users.

3. WordPress is super-flexible

WordPress allows you to use third-party themes and plugins. This means you can choose from thousands of professionally designed templates for your website.

Using plugins, you can add any feature to your WordPress website. Most of them are available for free, but you can also purchase premium plugins to get priority support from developers.

There are drag & drop WordPress page builder plugins that lets you completely customize your design and make custom templates without writing any code.

4. WordPress is multilingual

WordPress is fully translated into more than 65 languages. You can easily choose your website language during the installation or change it from the settings page.

Choose site language

You can keep the WordPress admin area in one language and create a website in another language. You can also use a WordPress multilingual plugin to create a website in multiple languages.

WordPress themes and plugins can also be translated and many of the top WordPress plugins are already translated into many languages.

5. WordPress is cost effective

With proprietary website builders and hosted platforms, you have to pay a monthly fee for a fixed set of features.

With WordPress, you pay a monthly fee for hosting and add any feature to your website using plugins. Most of them are free or have free alternatives, which gives you the freedom to control the cost of your WordPress website.

Once your website starts growing and making money, then you can spend on upgrading your hosting service or buying premium WordPress themes and plugins.

For more reasons, see our article on why you should use WordPress.

FAQs about WordPress

We made WPBeginner to help WordPress beginners. Since 2009, we have helped millions of beginners get started with WordPress and have been answering WordPress related questions every day.

Here are some of the most frequently asked WordPress questions that we hear from beginners.

1. Why is WordPress available for free?

WordPress is an open-source software available for anyone to use. It is free (as in freedom), but there are other costs involved. For instance, you’ll need WordPress hosting and domain name to make your website.

For a more detailed explanation, see our article Why is WordPress free which explains the philosophy behind free software and WordPress.

2. What are the disadvantages of using WordPress?

Like everything else in the world, there are pros and cons to using WordPress. We have mentioned the advantages in detail, and they are enough to outweigh any disadvantages. However, here are some of the cons of using WordPress.

  • You will need to spend a little time learning the basics. This does not mean coding or programming, but learning where things are located and how to use them.
  • You’ll need to spend time on setting up backups, security, and updates. Most of these tasks can be easily automated and most beginners manage them without any special skills
  • If you are not careful, then you may end up spending more on third-party tools and plugins that you may not need. Spend your money wisely and rely on free alternates whenever possible.

3. How can I learn WordPress?

WordPress is easy to learn, and there are a lot of learning material out there. You can learn WordPress right here on WPBeginner.

We are the largest WordPress resource site for beginners in the world. All of WPBeginner resources are available for free.

For beginners, we recommend starting out with our WordPress video tutorials. It is a series of videos that walks you through WordPress basics and how to manage your website like a total pro.

Our WordPress glossary section explains all the technical WordPress terminology in plain English for beginners.

You can also find answers to your WordPress questions by clicking on the search icon at the top.

WPBeginner search

Need a little more help from real users? Join our WPBeginner Facebook group to get answers from other WordPress users and our experts. It’s free to join, and there are over 50,000 members.

You can also subscribe to our YouTube Channel for regular WordPress video tutorials and guides (over 500 free video tutorials).

4. Which WordPress hosting company to choose?

You’ll need WordPress hosting to start your website, and there are thousands of them out there. Due to fierce competition in the hosting industry, it becomes quite confusing for beginners to make up their minds.

Don’t worry, we did the research for you. You can read about it in our complete WordPress hosting guide for beginners.

For beginners, we recommend starting with Bluehost. They are offering a generous discount and a free domain name.

More importantly, they are one of the biggest names in the business and an officially recommended WordPress hosting provider.

If you have a slightly larger budget to afford premium hosting, then we recommend SiteGround or WP Engine.

5. How do I start a WordPress website?

Getting started with WordPress is easy. You can simply follow our step by step tutorial on how to make a WordPress website for detailed instructions.

It will walk you through the whole process, and you’ll be up and running with a brand new WordPress website in no time.

If you need assistance, you can take advantage of our free WordPress blog setup service, where our expert team will setup your WordPress blog for free, without any costs.

We hope this article explained what is WordPress, and how you can use it. You may also want to see our guide on things to do after installing WordPress, or head over to check out these practical online business ideas that you can start with WordPress right away.

If you liked this article, then please subscribe to our YouTube Channel for WordPress video tutorials. You can also find us on Twitter and Facebook.

The post What is WordPress? A Beginner’s Guide (FAQs + Pros and Cons) appeared first on WPBeginner.

Using Trello as a Super Simple CMS

Sometimes our sites need a little sprinkling of content management. Not always. Not a lot. But a bit. The CMS market is thriving with affordable, approachable products, so we’re not short of options. Thankfully, it is a very different world to the one that used to force companies to splash out a ga-jillionty-one dollars (not an exact cost: I rounded to the nearest bazillion) for an all-singing, all-dancing, all-integrating, all-personalizing, big-enterprise-certified™ CMS platform.

Sometimes, though, it’s nice to use a really simple tool that anyone updating content on the site is already familiar with, rather than getting to grips with a new CMS. 

I like Trello a lot for managing ideas and tasks. And it has an API. Why not use it as a content source for a web site? I mean, hey, if we can do it with Google Sheets, then what’s to stop us from trying other things?

Hello, Trello

Here’s a simple site to explore. It gets its content from this Trello board and that content is displayed in sections. Each section is populated by the title and description fields of a card in our Trello board.

Two webpages side-by-side. The left is a Trello board with a bright pink background. The right is a screenshot of the build website using Trello data.

Trello uses Markdown, which comes in handy here. Anyone editing content in a Trello card is able to apply basic text formatting and have the same Markdown flow into the site and transformed into HTML by a build process.

Building blocks

I’m a big fan of this model of running a build which pulls content from various feeds and sources, and then mashes them together with a template to generate the HTML of a website. It decouples the presentation from the management of the content (which is where the term “decoupled” comes from in popular modern CMS products). And it means that we are free to craft the website just the way we want with all of the wizzy tricks and techniques we’ve learned here on CSS-Tricks.

Diagram showing the flow of data, going from Trello as JSON to Build where the data and the template are coupled, then finally, to the front end.

Since we pull in the content at build time, we don’t need to worry about the usage quotas or the performance of our data sources if our sites get popular and bring in loads of traffic. And why wouldn’t they? Look how pretty we made them!

I wanna play!

Fine. You can grab a copy of this site’s code and tinker around to your heart’s content. This version includes information on how to create your own Trello board and use it as the source for content for the build.

If you want to walk through how this works first rather than diving right into it yourself, read on.

Discovering the API

Trello has a well-documented API and set of developer resources. There is also a handy Node module to simplify the task of authenticating and interacting with the API. But you can also explore the API by tinkering with the URLs when you are exploring your Trello boards. 

For example, the URL for the Trello board above is:

https://trello.com/b/Zzc0USwZ/hellotrello

If we add .json to that URL, Trello shows us the content represented as JSON. Take a look.

We can use this technique to inspect the underlying data throughout Trello. Here is the URL for one card in particular:

https://trello.com/c/YVxlSEzy/4-sections-from-cards

If we use this little trick and add .json to the URL we’ll see the data which describes that card

We’ll find interesting things — unique IDs for the board, the list, and the card. We can see the card’s content, and lots of metadata.

I love doing this! Look at all the lovely data! How shall we use it?

Deciding how to use a board

For this example, let’s assume that we have a site with just one page of manageable content. A list or column in our board would be ideal for controlling the sections on that page. An editor could give them titles and content, and drag them around into the order they want.

We’ll need the ID of the list so that we can access it via the API. Luckily, we’ve already seen how to discover that — take a look at the data for any of the cards in the list in question. Each one has an idBoard property. Bingo!

Generating the site

The plan is to fetch the data from Trello and apply it to some templates to populate our site. Most static site generators (SSG) would do the job. That’s what they are good at. I’ll use Eleventy because I think it has the simplest concepts to understand. Plus, it is very efficient at getting data and generating clean HTML with Nunjucks (a popular templating language).

We’ll want to be able to use an expression lin our template that outputs a section element for each item found in a JavaScript object called trello:

<!-- index.njk -->
{% for card in trello %}
<section>
  <h2>{{ card.name }}</h2>
  <div>
    {% markdown %}
      {{- card.desc | safe }}
    {% endmarkdown %}
  </div>
</section>
{% endfor %}

Fetching the data for the build

A popular technique with Jamstack sites like this is to run a build with Gulp, Grunt or [insert latest new build script hotness here] which goes and fetches data from various APIs and feeds, stashes the data in a suitable format for the SSG, and then runs the SSG to generate the HTML. This works rather nicely.

Eleventy simplifies things here by supporting the execution of JavaScript in its data files. In other words, rather than only leveraging data stored as JSON or YAML, it can use whatever gets returned by JavaScript, opening the door to making requests directly to APIs when the Eleventy build runs. We won’t need a separate build step to go off to fetch data first. Eleventy will do it for us.

Let’s use that to get the data for our trello object in the templates.

We could use the Trello Node client to query the API, but as it turns out all the data we want is right there in the JSON for the board. Everything! In one request! We can just fetch it in one go!

// trello.js
module.exports = () => {
  const TRELLO_JSON_URL='https://trello.com/b/Zzc0USwZ/hellotrello.json';

  // Use node-fetch to get the JSON data about this board
  const fetch = require('node-fetch');
  return fetch(TRELLO_JSON_URL)
    .then(res => res.json())
    .then(json => console.log(json));
};

However, we don’t want to show all the data from that board. It includes cards on other lists, cards which have been closed and deleted, and so on. But we can filter the cards to only include the ones of interest thanks to JavaScript’s filter method.

// trello.js
module.exports = () => {
   const TRELLO_JSON_URL='https://trello.com/b/Zzc0USwZ/hellotrello.json'
   const TRELLO_LIST_ID='5e98325d6d6bd120f2b7395f',
 
   // Use node-fetch to get the JSON data about this board
   const fetch = require('node-fetch');
   return fetch(TRELLO_JSON_URL)
   .then(res => res.json())
   .then(json => {
 
     // Just focus on the cards which are in the list we want
     // and do not have a closed status
     let contentCards = json.cards.filter(card => {
       return card.idList == TRELLO_LIST_ID && !card.closed;
     });
 
     return contentCards;
 });
};

That’ll do it! With this saved in a file called trello.js in Eleventy’s data directory, we’ll have this data ready to use in our templates in an object called trello

Done-zo! 🎉

But we can do better. Let’s also handle attached images, and also add a way to have content staged for review before it goes live.

Image attachments

It’s possible to attach files to cards in Trello. When you attach an image, it shows up right there in the card with the source URL of the asset described in the data. We can make use of that!

If a card has an image attachment, we’ll want to get its source URL, and add it as an image tag to what our template inserts into the page at build time. That means adding the Markdown for an image to the Markdown in the description property of our JSON (card.desc). 

Then we can let Eleventy turn that into HTML for us along with everything else. This code looks for cards in our JSON and massages the data into the shape that we’ll need.

// trello.js

// If a card has an attachment, add it as an image 
// in the description markdown
contentCards.forEach(card => {
  if(card.attachments.length) {
    card.desc = card.desc + `\n![${card.name}](${card.attachments[0].url} '${card.name}')`;
  }
});

Now we can move images around in our content too. Handy!

Staging content

Let’s add one more flourish to how we can use Trello to manage our site’s content.

There are a few ways that we might want to preview content before launching it to the world. Our Trello board could have one list for staging and one list for production content. But that would make it hard to visualize how new content lives alongside that which is already published.

A better idea would be to use Trello’s labels to signify which cards are published live, and which should only be included on a staged version of the site. This will give us a nice workflow. We can add more content by adding a new card in the right place. Label it with “stage” and filter it out from the cards appearing on our production branch. 

Screenshot of the Trello board with a bright pink background. It has cards in a column called Published.
Label hints in Trello showing what content is staged and what is live

A little more filtering of our JavaScript object is called for:

// trello.js

// only include cards labelled with "live" or with
// the name of the branch we are in
contentCards = contentCards.filter(card => {
  return card.labels.filter(label => (
    label.name.toLowerCase() == 'live' ||
    label.name.toLowerCase() == BRANCH
   )).length;
 });

We want the content labelled ‘live’ to show up on every version of the build, staging or not. In addition we’ll look to include cards which have a label matching a variable called “BRANCH”. 

How come? What’s that?

This is where we get crafty! I’ve chosen to host this site on Netlify (disclaimer: I work there). This means that I can run the build from Netlify’s CI/CD environment. This redeploys the site whenever I push changes to its git repository, and also gives access to a couple of other things which are really handy for this site. 

One is Branch deploys. If you want a new environment for a site, you can create one by making a new branch in the Git repository. The build will run in that context, and your site will be published on a subdomain which includes the branch name. Like this.

Take a look and you’ll see all the cards from our list, including the one which has the orange “stage” label. We included it in this build because its label matched the branch name for the build context. BRANCH was an environment variable which contained whichever branch the build ran in.

label.name.toLowerCase() == BRANCH

In theory, we could make as many branches and labels as we like, and have all sorts of staging and testing environments. Ready to promote something from “stage” to “live”? Swap the labels and you’re good to go!

But how does it update though?

The second perk we get from running the site build in a CI/CD such as Netlify’s is that we can trigger a build to run whenever we like. Netlify lets us create build hooks. These are webhooks which initiate a new deployment when you send an HTTP POST to them.

If Trello supports webhooks too, then we could stitch these services together and refresh the site automatically whenever the Trello board changes. And guess what… they do! Hoorah!

To create a Netlify build hook, you’ll need to visit your site’s admin panel. (You can bootstrap this demo site into a new Netlify site in a couple of clicks if you want to try it out.)

Screenshot of the netlify build hooks screen with options to add a build hook and generate a public deploy key.
Creating a Netlify Build hook

Now, armed with a new build hook URL, we’ll need to register a new Trello webhook which calls it when content changes. The method for creating webhooks in Trello is via Trello’s API

The repo for this site includes a little utility to call the Trello API and create the webhook for you. But you’ll need to have a Trello developer token and key. Thankfully, it is easy to create those for free by visiting the Trello Developer portal and following the instructions under “Authorizing a client.”

Got ‘em? Great! If you save them in a .env file in your project, you can run this command to set up the Trello webhook:

npm run hook --url https://api.netlify.com/build_hooks/XXXXX

And with that, we’ve created a nice little flow for managing content on a simple site. We can craft our frontend just the way we want it, and have updates to the content happen on a Trello board which automatically updates the site whenever changes are made.

Could I really use this though?

This is a simplistic example. That’s by design. I really wanted to demonstrate the concepts of decoupling, and of using the API of an external service to drive the content for a site.

This won’t replace a full-featured decoupled CMS for more involved projects. But the principles are totally applicable to more complex sites.

This model, however, could be a great match for the types of websites we see for businesses such as independent shops, bars and restaurants. Imagine a Trello board that has one list for managing a restaurant’s home page, and one for managing their menu items. Very approachable for the restaurant staff to manage, and far nicer than uploading a new PDF of the menu whenever it changes.

Ready to explore an example and experiment with your own board and content? Try this:


The post Using Trello as a Super Simple CMS appeared first on CSS-Tricks.

You can support CSS-Tricks by being an MVP Supporter.

Should You Hire A Developer Or Use The API For Your Website’s CMS?

It doesn’t matter how powerful or well-rounded your chosen CMS happens to be: there can still come a point at which you decide that its natural state isn’t enough and something more is needed. It could be a new function, a fresh perspective, or improved performance, and you’re unwilling to settle for less. What should you do?

5 Myths About Jamstack

Jamstack isn’t necessarily new. The term was officially coined in 2016, but the technologies and architecture it describes have been around well before that. Jamstack has received a massive dose of attention recently, with articles about it appearing in major sites and publications and new Jamstack-focused events, newsletters, podcasts, and more. As someone who follows it closely, I’ve even seen what seems like a significant uptick in discussion about it on Twitter, often from people who are being newly introduced to the concept.

The buzz has also seemed to bring out the criticism. Some of the criticism is fair, and I’ll get to some of that in a bit, but others appear to be based on common myths about the Jamstack that persist, which is what I want to address first. So let’s look at five common myths about Jamstack I’ve encountered and debunk them. As with many myths, they are often based on a kernel of truth but lead to invalid conclusions.

Myth 1: They are just rebranded static sites

Yes, as I covered previously, the term “Jamstack” was arguably a rebranding of what we previously called “static sites.” This was not a rebranding meant to mislead or sell you something that wasn’t fully formed — quite the opposite. The term “static site” had long since lost its ability to describe what people were building. The sites being built using static site generators (SSG) were frequently filled with all sorts of dynamic content and capabilities.

Static sites were seen as largely about blogs and documentation where the UI was primarily fixed. The extent of interaction was perhaps embedded comments and a contact form. Jamstack sites, on the other hand, have things like user authentication, dynamic content, ecommerce, user generated content.

A listing of sites built using Jamstack on Jamstack.org

Want proof? Some well-known companies and sites built using the Jamstack include Smashing Magazine, Sphero, Postman, Prima, Impossible Foods and TriNet, just to name a few.

Myth 2: Jamstack sites are fragile

Jay Freestone, on The issues with JAMStack: You might need a backend

Reading the dependency list for Smashing Magazine reads like the service equivalent of node_modules, including AlgoliaGoCommerceGoTrueGoTell and a variety of Netlify services to name a few. There is a huge amount of value in knowing what to outsource (and when), but it is amusing to note the complexity that has been introduced in an apparent attempt to ‘get back to basics’. This is to say nothing of the potential fragility in relying on so many disparate third-party services.

Yes, to achieve the dynamic capabilities that differentiate the Jamstack from static sites, Jamstack projects generally rely on a variety of services, both first- or third-party. Some have argued that this makes Jamstack sites particularly vulnerable for two reasons. The first, they say, is that if any one piece fails, the whole site functionality collapses. The second is that your infrastructure becomes too dependent on tools and services that you do not own.

Let’s tackle that first argument. The majority of a Jamstack site should be pre-rendered. This means that when a user visits the site, the page and most of its content is delivered as static assets from the CDN. This is what gives Jamstack much of its speed and security. Dynamic functionality — like shopping carts, authentication, user generated content and perhaps search — rely upon a combination of serverless functions and APIs to work.

Broadly speaking, the app will call a serverless function that serves as the back end to connect to the APIs. If, for example, our e-commerce functionality relies on Stripe’s APIs to work and Stripe is down, then, yes, our e-commerce functionality will not work. However, it’s important to note that the site won’t go down. It can handle the issue gracefully by informing the user of the issue. A server-rendered page that relies on the Stripe API for e-commerce would face the identical issue. Assuming the server-rendered page still calls the back end code for payment asynchronously, it would be no more or less fragile than the Jamstack version. On the other hand, if the server-rendering is actually dependent upon the API call, the user may be stuck waiting on a response or receive an error (a situation anyone who uses the web is very familiar with).

As for the second argument, it’s really hard to gauge the degree of dependence on third-parties for a Jamstack web app versus a server-rendered app. Many of today’s server-rendered applications still rely on APIs for a significant amount of functionality because it allows for faster development, takes advantage of the specific area of expertise of the provider, can offload responsibility for legal and other compliance issues, and more. In these cases, once again, the server-rendered version would be no more or less dependent than the Jamstack version. Admittedly, if your app relies mostly on internal or homegrown solutions, then this may be different.

Myth 3: Editing content is difficult

Kev Quirk, on Why I Don’t Use A Static Site Generator:

Having to SSH into a Linux box, then editing a post on Vim just seems like a ridiculously high barrier for entry when it comes to writing on the go. The world is mobile first these days, like it or not, so writing on the go should be easy.

This issue feels like a relic of static sites past. To be clear, you do not need to SSH into a Linux box to edit your site content. There are a wide range of headless CMS options, from completely free and open source to commercial offerings that power content for large enterprises. They offer an array of editing capabilities that rival any traditional CMS (something I’ve talked about before). The point is, there is no reason to be manually editing Markdown, YAML or JSON files, even on your blog side project. Aren’t sure how to hook all these pieces up? We’ve got a solution for that too!

One legitimate criticism has been that the headless CMS and build process can cause a disconnect between the content being edited and the change on the site. It can be difficult to preview exactly what the impact of a change is on the live site until it is published or without some complex build previewing process. This is something that is being addressed by the ecosystem. Companies like Stackbit (who I work for) are building tools that make this process seamless.

Animated screenshot. A content editor is shown on a webpage with a realtime preview of changes.
Editing a site using Stackbit

We’re not the only ones working on solving this problem. Other solutions include TinaCMS and Gatsby Preview. I think we are close to it becoming commonplace to have the simplicity of WYSIWYG editing on a tool like Wix running on top of the Jamstack.

Myth 4: SEO is Hard on the Jamstack

Kym Ellis, on What the JAMstack means for marketing:

Ditching the concept of the plugin and opting for a JAMstack site which is “just HTML” doesn’t actually mean you have to give up functionality, or suddenly need to know how to code like a front-end developer to manage a site and its content.

I haven’t seen this one pop up as often in recent years and I think it is mostly legacy criticism of the static site days, where managing SEO-related metadata involved manually editing YAML-based frontmatter. The concern was that doing SEO properly became cumbersome and hard to maintain, particularly if you wanted to inject different metadata for each unique page that was generated or to create structured data like JSON-LD, which can be critical for enhancing your search listing.

The advances in content management for the Jamstack have generally addressed the complexity of maintaining SEO metadata. In addition, because pages are pre-rendered, adding sitemaps and JSON-LD is relatively simple, provided the metadata required exists. While pre-rendering makes it easy to create the resources search engines (read: Google) need to index a site, they also, combined with CDNs, making it easier to achieve the performance benchmarks necessary to improve a site’s ranking.

Basically, Jamstack excels at “technical SEO” while also providing the tools necessary for content editors to supply the keyword and other metadata they require. For a more comprehensive look at Jamstack and SEO, I highly recommend checking out the Jamstack SEO Guide from Bejamas.

Myth 5: Jamstack requires heavy JavaScript frameworks

If you’re trying to sell plain ol’ websites to management who are obsessed with flavour-of-the-month frameworks, a slick website promoting the benefits of “JAMstack” is a really useful thing.

– jdietrich, Hacker News

Lately, it feels as if Jamstack has become synonymous with front-end JavaScript frameworks. It’s true that a lot of the most well-known solutions do depend on a front-end framework, including Gatsby (React), Next.js (React), Nuxt (Vue), VuePress (Vue), Gridsome (Vue) and Scully (Angular). This seems to be compounded by confusion around the “J” in Jamstack. While it stands for JavaScript, this does not mean that Jamstack solutions are all JavaScript-based, nor do they all require npm or JavaScript frameworks.

In fact, many of the most widely used tools are not built in JavaScript, notably Hugo (Go), Jekyll (Ruby), Pelican (Python) and the recently released Bridgetown (Ruby). Meanwhile, tools like Eleventy are built using JavaScript but do not depend on a JavaScript framework. None of these tools prevent the use of a JavaScript framework, but they do not require it.

The point here isn’t to dump on JavaScript frameworks or the tools that use them. These are great tools, used successfully by many developers. JavaScript frameworks can be very powerful tools capable of simplifying some very complex tasks. The point here is simply that the idea that a JavaScript framework is required to use the Jamstack is false — Jamstack comes in 460 flavors!

Where we can improve

So that’s it, right? Jamstack is an ideal world of web development where everything isn’t just perfect, but perfectly easy. Unfortunately, no. There are plenty of legitimate criticisms of Jamstack.

Simplicity

Sebastian De Deyne, with Thoughts (and doubts) after messing around with the JAMstack:

In my experience, the JAMstack (JavaScript, APIs, and Markup) is great until is isn’t. When the day comes that I need to add something dynamic–and that day always comes–I start scratching my head.

Let’s be honest: Getting started with the Jamstack isn’t easy. Sure, diving into building a blog or a simple site using a static site generator may not be terribly difficult. But try building a real site with anything dynamic and things start to get complicated fast.

You are generally presented with a myriad of options for completing the task, making it tough to weigh the pros and cons. One of the best things about Jamstack is that it is not prescriptive, but that can make it seem unapproachable, leaving people with the impression that perhaps it isn’t suited for complex tasks.

Tying services together

When you actually get to the point of building those dynamic features, your site can wind up being dependent on an array of services and APIs. You may be calling a headless CMS for content, a serverless function that calls an API for payment transactions, a service like Algolia for search, and so on. Bringing all those pieces together can be a very complex task. Add to that the fact that each often comes with its own dashboard and API/SDK updates, things get even more complex.

This is why I think services like Stackbit and tools like RedwoodJS are important, as they bring together disparate pieces of the infrastructure behind a Jamstack site and make those easier to build and manage.

Overusing frameworks

In my opinion, our dependence on JavaScript frameworks for modern front-end development has been getting a much needed skeptical look lately. There are tradeoffs, as this post by Tim Kadlec recently laid out. As I said earlier, you don’t need a JavaScript framework to work in the Jamstack.

However, the impression was created both because so many Jamstack tools rely on JavaScript frameworks and also because much of the way we teach Jamstack has been centered on using frameworks. I understand the reasoning for this — many Jamstack developers are comfortable in JavaScript frameworks and there’s no way to teach every tool, so you pick the one you like. Still, I personally believe the success of Jamstack in the long run depends on its flexibility, which (despite what I said about the simplicity above) means we need to present the diversity of solutions it offers — both with and without JavaScript frameworks.

Where to go from here

Sheesh, you made it! I know I had a lot to say, perhaps more than I even realized when I started writing, so I won’t bore you with a long conclusion other than to say that, obviously, I have presented these myths from the perspective of someone who believes very deeply in the value of the Jamstack, despite it’s flaws!

If you are looking for a good post about when to and when not to choose Jamstack over server-side rendering, check out Chris Coyier’s recent post Static or Not?.

The post 5 Myths About Jamstack appeared first on CSS-Tricks.

Strapi Community Edition Now Generally Available

Strapi, an open-source headless CMS, has announced the general availability of the Strapi Community Edition. The project has been five years in the making, and the company is excited to see continued growth in the Strapi community now that it's generally available. In a blog post announcement, the Strapi team recapped the journey thus far, which includes over 1 million downloads, over 400 contributors, and almost 5,000 Strapi community projects on GitHub.