How to Edit a WordPress Website (Ultimate Guide)

Are you a new WordPress.org user who wants to learn how to edit your WordPress site?

Here at WPBeginner, we have helped millions of beginners build their websites using WordPress, which is the most popular website builder on the market. If you need help with editing your website, then you have come to the right place.

In this article, we will show you the basics of editing a WordPress website.

How to Edit a WordPress Website (Ultimate Guide)

An Overview of Ways to Edit a WordPress Site

As an open-source content management system, WordPress has a lot of features to build and edit your website.

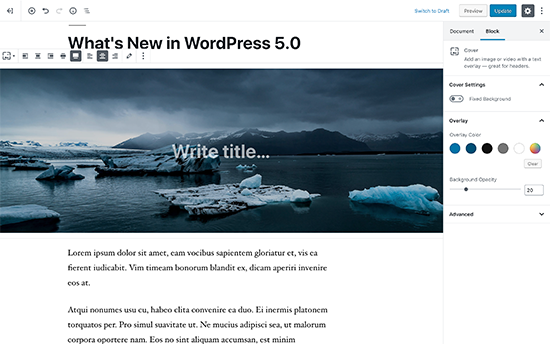
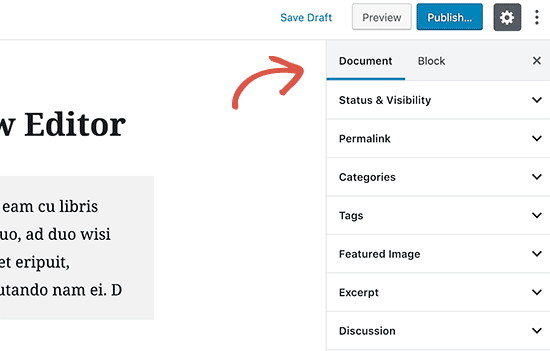
If you installed WordPress recently, then you may have come across Gutenberg, which is WordPress’s drag-and-drop block editor that allows you to customize a page or post. This feature is pretty easy and beginner-friendly.

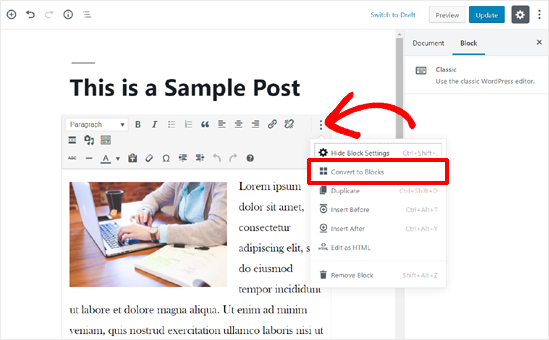
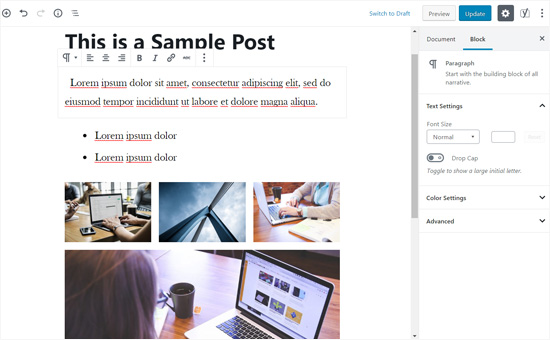
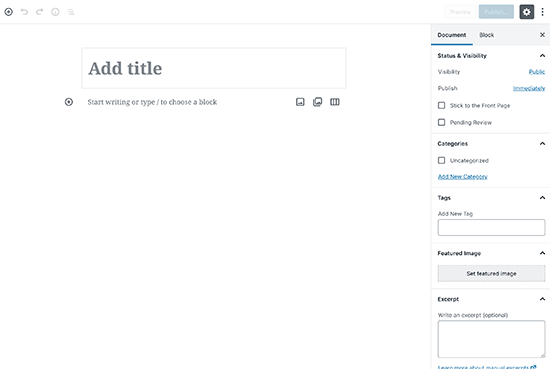
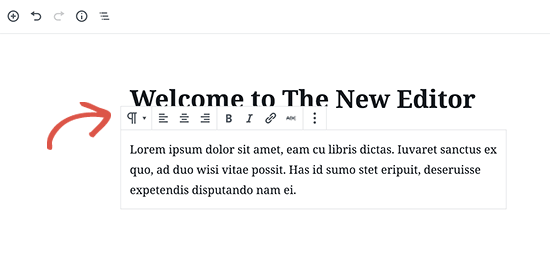
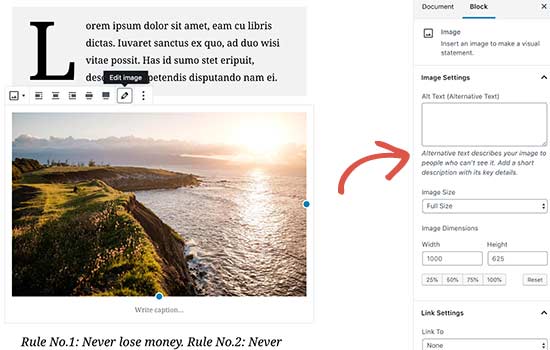
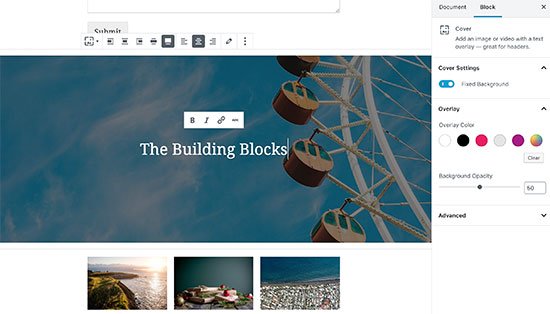
The Gutenberg block editor interface

You may have also seen the Full Site Editor.

This is an extension of Gutenberg that lets you use the block editor to customize block-based WordPress themes.

The WordPress Full Site Editor

That said, if you use a classic, non-block WordPress theme, then the FSE won’t be available to you. Instead, you will have to use the WordPress Theme Customizer.

This feature doesn’t come with a drag-and-drop function, so it’s not as user-friendly. You have to edit your theme using some menu settings in the left-hand panel.

Using the WordPress Theme Customizer to edit a transportation and logistics website

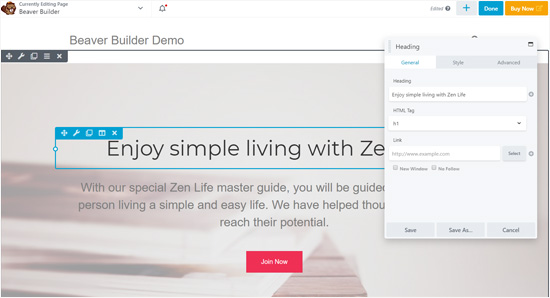
If you need more customization options that aren’t available in WordPress’s built-in features, then you can install a page builder plugin like SeedProd.

This is what we usually recommend to WordPress beginners. Like Gutenberg, SeedProd has a drag-and-drop feature. However, it offers more ways to get creative, like animation effects and more content block options to build your pages.

Editing the online coaching business theme in SeedProd

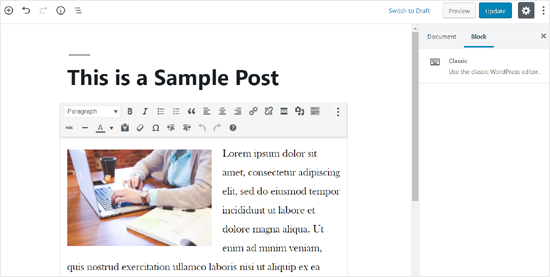
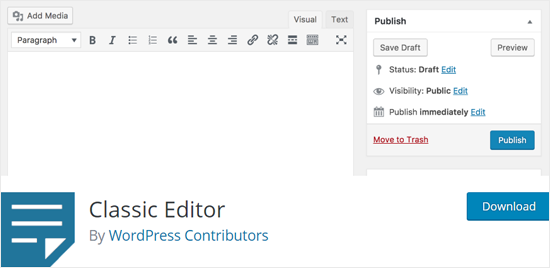
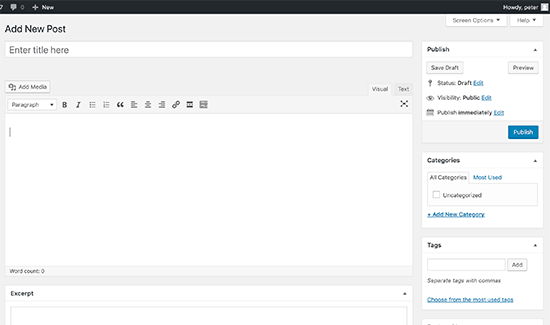
Some WordPress users also use the Classic Editor. It’s WordPress’s legacy page and post editor that looks a bit like a document editor.

This feature is no longer enabled by default in the latest WordPress versions. However, some people still use it because they are more familiar with it and want to keep their current website designs.

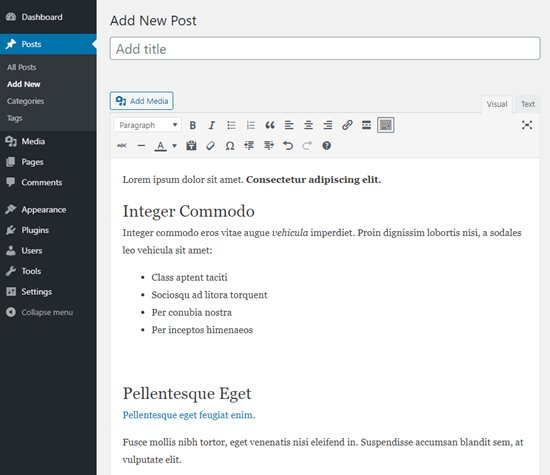
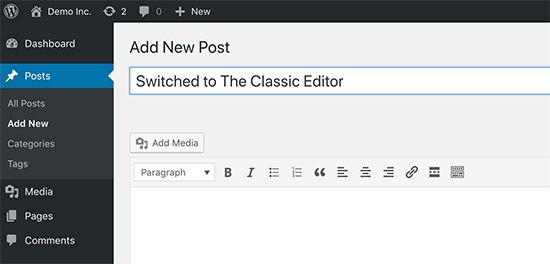
The Classic Editor Interface

In this article, we will show you how to edit different parts of your WordPress website using the editors we’ve mentioned.

We will also assume that you have WordPress installed and set up already. Otherwise, you will need a WordPress hosting plan, domain name, and WordPress installation.

Want to skip to a specific section in this tutorial? Feel free to use these quick links below:

How to Edit a WordPress Theme

One of the first things you should do after installing WordPress is to choose and customize your theme. We will show you 3 ways to do that.

Customizing a Block Theme With the Full Site Editor

Full Site Editing was introduced in WordPress 5.9. It’s designed to make it easy to edit WordPress block themes using the block editor.

One tell-tale sign that you are using a block WordPress theme is you will see Appearance » Editor in your WordPress admin area. If you see Appearance » Customize instead, then you can skip to using the Theme Customizer.

Clicking Appearance Editor in the WordPress admin

To use the Full Site Editor, you will need to have a block theme installed. You can find plenty of them in our list of the best block WordPress themes for Full Site Editing.

If you want to find some free options, go to Appearance » Themes. Then, click ‘Add New Theme.’

Adding a new WordPress theme in the admin area

After that, just switch to the ‘Block Themes’ tab.

You will then see dozens of block themes on your screen. For installation instructions, check out our step-by-step guide on how to install a WordPress theme.

Finding WordPress block themes in the admin area

Once you have the theme installed, you must go to Appearance » Editor.

Now, you will see the main Full Site Editing dashboard. You can then edit your theme’s navigation menu, styles, pages, templates, and patterns.

We will discuss these topics in the rest of the tutorial, but we will show you briefly how to change the style of your theme.

To do this, click the ‘Styles’ menu.

Clicking Styles in the Full Site Editing interface

Now, you will see a list of the color scheme and typography pairings provided by the theme.

Every time you click on a style, the interface will preview it for you.

Choosing a theme style in the Full Site Editor

Once you are satisfied with your choice, just click ‘Save.’ Alternatively, you can create a custom style.

You can learn more about this and other ways to use the Full Site Editor in our beginner’s guide to WordPress Full Site Editing.

Customizing a Classic Theme With the Theme Customizer

If you use a classic WordPress theme, then you will work with the Theme Customizer to edit it. Simply head to Appearance » Customize from the WordPress admin area to access it.

Opening the WordPress theme customizer

Now, what you can customize here varies by the theme you are using.

For instance, if you have the Astra theme, then you can customize the style of your entire website, header, footer, sidebar, page, logo, and so on.

For this reason, we recommend reading your theme’s documentation for more instructions.

What the Theme Customizer looks like for Astra theme

Our guide on the Theme Customizer can give you more detailed pointers.

Once you’ve made your changes, you can preview the website in different screen resolutions. Then, you can hit the ‘Publish’ button at the top to make your edits live.

Publishing a classic WordPress theme in the Theme Customizer

One downside of the Theme Customizer is its user experience isn’t as flexible or easy as the block editor. If you feel this way, then we recommend using the next method instead.

Customizing a WordPress Theme With a Page Builder Plugin

Many WordPress users who aren’t satisfied with the platform’s built-in design features use a page builder to edit their site. This is a WordPress plugin that can replace the default editor for designing different parts of your website.

Most page builders come with a drag-and-drop functionality, so they are just as easy to use as the block editor. What’s more, they come with more page blocks and templates to personalize your website.

Out of all the page builders we’ve tried, we find SeedProd to be the best. It comes with 300+ templates for various industry categories, from eCommerce and accommodation to services.

SeedProd Website and Theme Builder

Note: While SeedProd comes in a free version, we recommend upgrading to the Pro plan to access the Theme Builder. This is what we will use in this tutorial.

To use SeedProd, you will need to install the WordPress plugin first. After that, go to SeedProd » Settings to activate your Pro plan license. Simply insert your license key and click ‘Verify Key’ to complete this step.

Verifying SeedProd Pro's license key

Next, switch to SeedProd » Theme Builder.

Just click ‘Theme Template Kits‘ to view your theme options.

Accessing SeedProd's Theme Template Kits

As you can see, there are many theme template kits available, from online stores to service sites. Feel free to use the filtering and sorting settings to find the right one for your needs.

Once you’ve made your choice, just hover over the theme template and click the orange checkmark button to use it.

Choosing a theme template kit in SeedProd

Now, just go back to the Theme Builder page and select a theme template you’d like to edit.

For demonstration purposes, we will show you how to edit the style of your SeedProd theme template. To do this, locate the ‘Global CSS’ theme template, hover over it, and click ‘Edit Design.’

Editing a theme template kit's Global CSS in SeedProd

You are now inside the SeedProd page builder and can customize your theme template’s style. Here, you can change your website’s colors, fonts, backgrounds, buttons, forms, and layout.

Let’s see how to change the theme’s default font. To do this, open the ‘Fonts’ menu. Then, just choose one of SeedProd’s many font and color options for the heading and body text.

All the changes you make will show up automatically in the right-side preview.

Changing a SeedProd theme template kit font in the Global CSS theme template

Once you are happy with the style, just click ‘Save’ to make these changes official.

Then, you can go back to SeedProd » Theme Builder and turn on the ‘Enable SeedProd Theme’ toggle in the top right corner.

Enabling the SeedProd theme template kit in WordPress

For more information about editing WordPress themes with SeedProd, you can see our guide on how to easily create a custom WordPress theme.

How to Edit a WordPress Page or Post

If you have updated WordPress to the latest version, then most likely, you will use the Gutenberg block editor to edit a page or post.

You can create a new page by going to Pages » Add New Page. This will automatically make an entirely blank page and direct you to the block editor.

On the other hand, if you want to edit an existing page, like the homepage or blog page, then you can go to Pages » All Pages. Hover your cursor over the page you want to edit, and then click ‘Edit.’

Clicking the Edit button to edit an existing WordPress page

Alternatively, there is also the Quick Edit feature.

This allows you to modify the page’s title, URL slug, and last modified date.

Clicking the Quick Edit button in the WordPress Pages page

You can do various things with the Quick Edit feature.

Examples include setting a password for the page, making it private, assigning it as a parent page, changing the page template, allowing/disallowing comments, and changing the page status.

The Quick Edit feature for WordPress pages

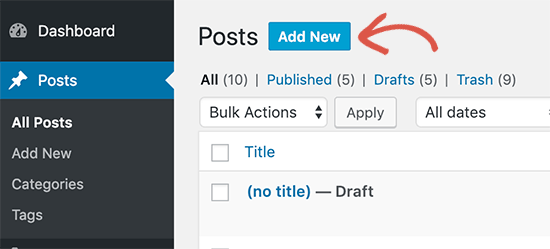
To create a new post, simply head to Posts » Add New Post to make a new blank post and edit it using the block editor.

Like before, you can edit an existing WordPress blog post by hovering your cursor over the selected post and clicking ‘Edit.’

The WordPress Posts interface in the WordPress admin area

The Quick Edit feature for posts is similar but with some minor differences.

Here, you can also add tags, allow/disallow pings, and make the post sticky (featured on your website).

The Quick Edit feature for WordPress blog posts

Once you have opened up a WordPress page or post, there are many things you can do in the block editor.

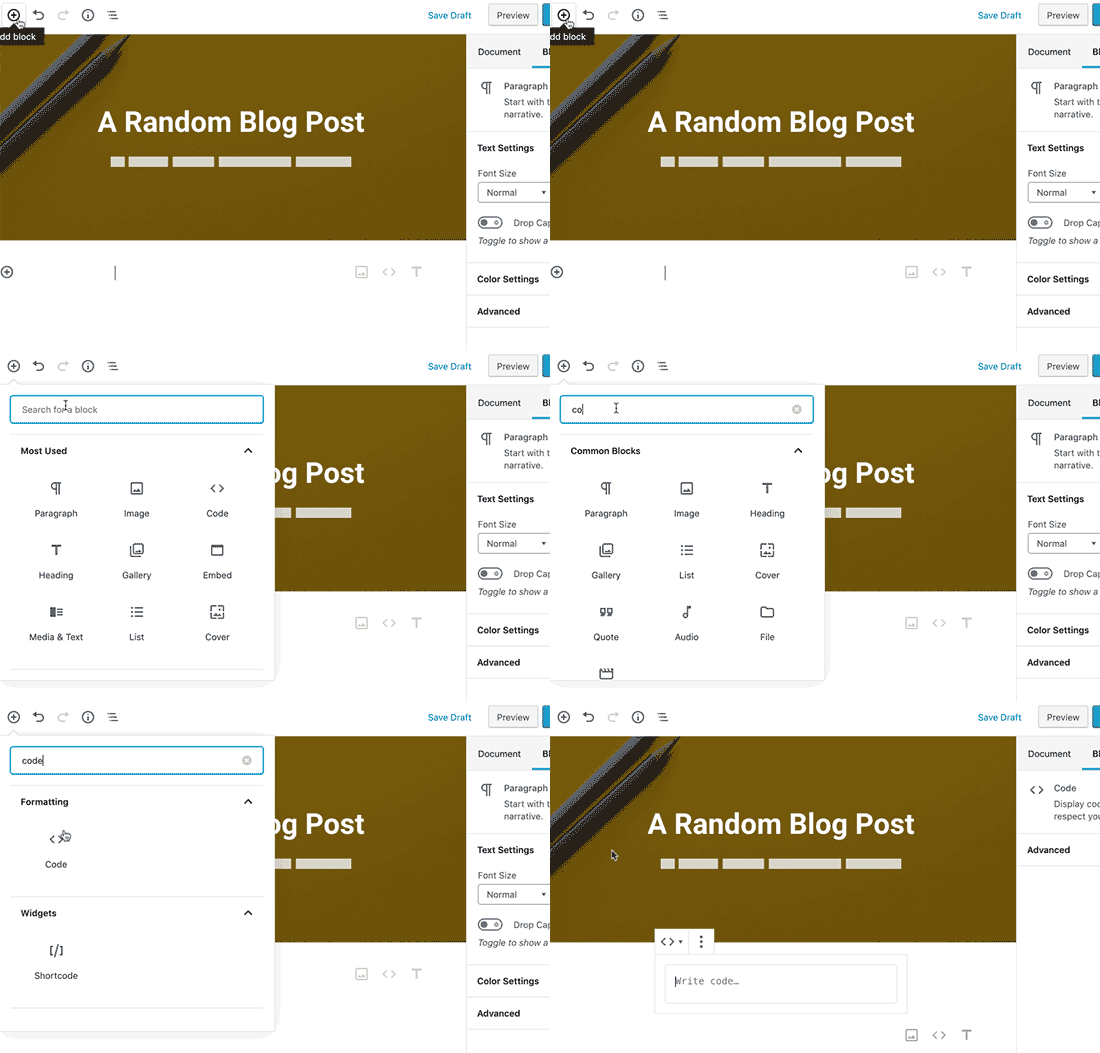
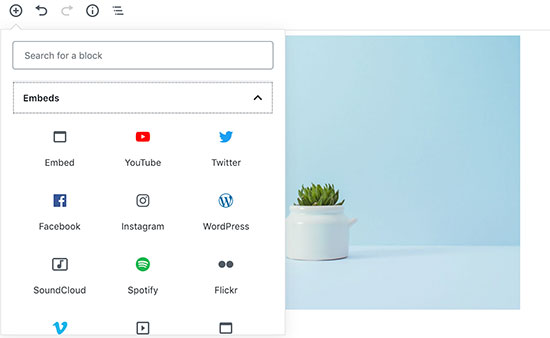
Typically, you will start by clicking the ‘+’ add block button in the top left corner.

This is where you will find all the available blocks from WordPress and the plugins you use.

Opening the block inserter library in WordPress

You can then drag and drop a block to the main editing area.

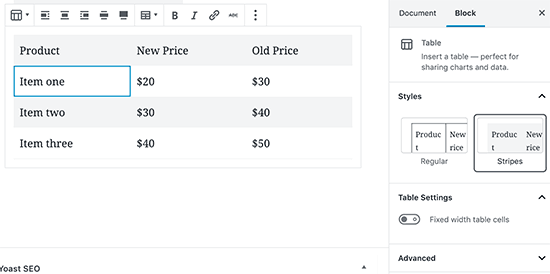
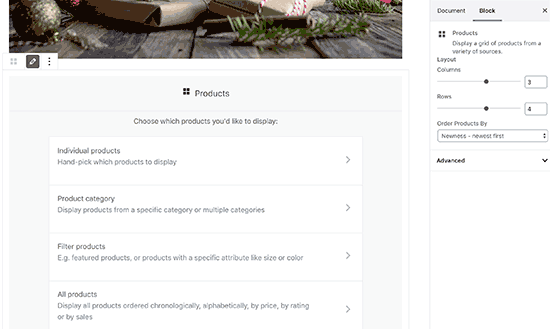
After that, you can use the block’s toolbar and settings sidebar to configure the block’s style, dimensions, spacing, and more.

The block settings sidebar in WordPress

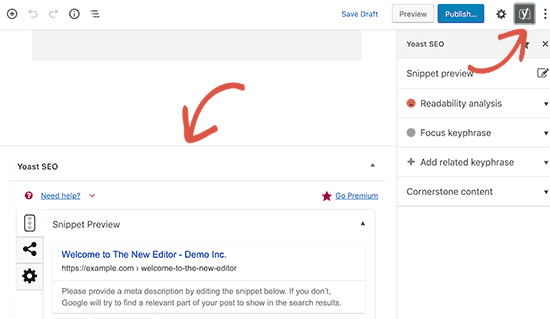
If you have installed a WordPress plugin, then you may also see some settings below the editing interface.

For instance, the All in One SEO plugin will show you a section where you can optimize the page or post’s meta title and description for search engines.

The AIOSEO settings in the WordPress block editor

We have plenty of guides for you to learn more about editing posts and pages, so be sure to check them out:

How to Edit a WordPress Page or Post With Classic Editor

If you want to use the Classic Editor, then you will need to enable it. You can read our article on how to disable Gutenberg and activate the Classic Editor to do this.

After that, just create a new post or page by going to Posts » Add New Post or Pages » Add New Page, and the Classic Editor will show up on your screen.

The WordPress classic editor

Unlike the block editor, you won’t add blocks to insert content into your page or post. Instead, you can only type text, format it using the controls at the top of the editing panel, and add media files to your content by clicking on the ‘Add Media’ button.

At the bottom and the sides of the editing interface, there are settings to publish the page/post, set the page or post’s categories/tags, upload a featured image, and so on.

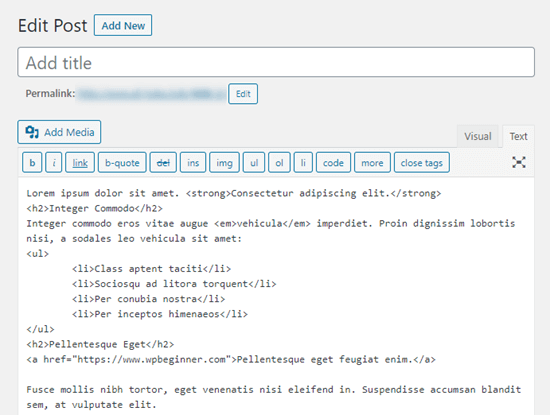
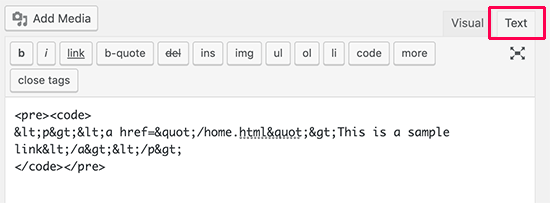
You can also switch between the visual and text editing modes. With the second editor, you can modify the post or page’s HTML code.

The text editing mode in the WordPress classic editor

How to Edit a WordPress Page With a Page Builder

If you already use a page builder like SeedProd to edit your theme, then you can use it to edit a page as well. This way, you can maintain your design’s consistency throughout all of your pages.

You will need to create a new page and open the block editor. If SeedProd is active, then you will see a button at the top that says, ‘Edit with SeedProd.’ Go ahead and click on it.

You can also do this with an existing page. However, do note that the content will not be transferred over, and you will have to create the page from scratch.

Clicking the Edit with SeedProd button in the WordPress block editor

In the page builder, you will see that the SeedProd theme’s header and footer have been added. All you need to do is start building the page.

First, choose one of the 8 layouts to use on the page.

Choosing a layout for the section in a SeedProd theme template

On the left-hand side, you will find all the blocks and sections that you can drag and drop onto the right-hand side, which is the template preview.

You can use these to insert content into the page.

SeedProd's block library

Whenever you click a block or a section, the left-hand side will show the available settings to customize the element.

In the screenshot below, you can see that clicking on the Text block will make the block settings appear. You can customize the text, insert dynamic content, edit the HTML, change the alignment, and so on.

Customizing SeedProd's text block settings

Once you are done editing the page, don’t forget to click ‘Save’ to make the changes live.

For more details, just see our guide on how to create a custom page in WordPress.

If you want to create a custom landing page from scratch, then you can also do that with SeedProd. All you need to do is go to SeedProd » Landing Pages. Then, click the ‘+ Add New Landing Page’ button.

Create a new landing page in SeedProd

For more information, check out our tutorial on how to create a custom landing page.

Alternative: Thrive Architect is another great page builder option for designing attractive and conversion-focused landing pages.

You may also want to edit the WordPress header, footer, sidebar, and other parts of your theme template.

These are sections on your site that are not part of the main page or post content. However, they are essential for giving additional information or helpful navigation.

How you can edit these sections depends on what theme you are using, so let’s go through each option.

How to Edit a Block Theme’s Header, Footer, and Other Template Parts

If you have a block theme, then you can use the Full Site Editor to edit your theme’s header and footer.

In the Full Site Editor, a header and footer are considered template parts. These are also known as WordPress patterns (a set of reusable blocks) that appear throughout your website.

Other examples of a template part include the comment section and the post meta.

For the sake of example, we will show you how to edit your WordPress header, but you can repeat these steps with other template parts.

First, go to Appearance » Editor. Once you are in the Full Site Editor, just click ‘Patterns.’

Clicking the Patterns menu in the Full Site Editor

You will now see a list of patterns provided by your WordPress theme.

Go ahead and scroll down to the Template Parts section. Then, select ‘Header’ and click on the Header template part.

Opening the header template part in the WordPress Full Site Editor

Now, you need to click the pencil button next to the Header text.

This will open the block editor.

Clicking the pencil button to edit the header using the Full Site Editor

The block editor works the same way with template parts as it does with pages and posts. You can add various blocks to the header, configure the block, and update the changes when you are done.

Headers usually include a Site Logo (or the favicon), so feel free to add that here, too.

Adding the Site Logo block to the header in the Full Site Editor

If you want to completely change how the header looks but don’t know where to start, click the ‘+’ add block button in the top left corner.

Then, navigate to the ‘Patterns’ tab and click ‘Headers.’ You will find many ready-to-use header layouts there.

Finding WordPress header patterns in the Full Site Editor

For more information, see our guide on how to customize your WordPress header.

Once you are done changing the header, click ‘Save.’ Since the header is a synced template part, all the changes you make here will apply across all pages that use the header.

Now, if you want to create a new header or any other template parts rather than editing the existing ones, you can go back to the ‘Patterns’ page. After that, click the ‘+ Create pattern’ button and select ‘Create template part.’

Creating a new template part in the Full Site Editor

In the popup, give the template part a name and select the type of template part.

Then, click ‘Create.’ You will then be directed to the block editor and you can edit the template part like usual.

The Create template part popup in the WordPress Full Site Editor

For more details, you can see our complete guide to WordPress full site editing.

How to Edit a WordPress Header, Footer, and Other Widget-Ready Areas in a Classic Theme

In a classic theme, a WordPress widget is basically a block that you can add to widget-ready areas, like headers, footers, sidebars, and so on.

Every classic WordPress theme has different widget-ready areas. Some may include a sidebar, and some may not. So be sure to check your theme’s documentation for more information.

To use widgets, you have to go to Appearance » Widgets. Here, you can add, configure, and remove blocks in the available widget-ready areas.

Adding the FlipBox widget to a sidebar or similar section

You can read more information about widgets in our how to add and use widgets in WordPress article.

Also, check out our guide on the difference between widgets and blocks to understand more about this feature.

How to Edit a WordPress Header, Footer, and Other Template Parts With a Page Builder

One of the benefits of using a page builder is you will have more options to customize headers, footers, sidebars, and other parts of your theme.

If you use SeedProd, you can go to SeedProd » Theme Builder. We will assume that you have installed a theme template kit from earlier.

The kit usually includes various theme templates. This may be a built-in page template, like a 404 or single post, or a part of a page, like a header, footer, pricing tables, and so on.

Go ahead and hover over a theme template. Then, click ‘Edit Design.’

Editing the header theme template in SeedProd

Now, you can edit the header the same way as you would with a page.

Let’s say you want to add your social media links here. What you can do is hover over the header until the blue border appears and click the ‘+ Add Row’ button. Then, go ahead and select a row layout.

In our example, we want to add one more column so that the header can fit the image, menu, and social media links. That means we will need three columns in one row.

Choosing a row layout in SeedProd

You can then drag and drop the blocks from the top row to the new row.

After that, just delete the top row so that your new row becomes the new header.

Deleting a previous row in a SeedProd section

Now, just look for the Social Profiles block in the left-side panel.

Drag it into the right column, and you are done.

Adding the Social Profiles block in the header in SeedProd

For more information about editing template parts, you can read these WordPress tutorials:

How to Edit a Navigation Menu in WordPress

A navigation menu makes it easy for visitors to explore all your content without getting lost on your website. That’s why it’s important to design a menu that shows your essential pages and links to other relevant information.

If you use a block WordPress theme, then you can select the ‘Navigation’ menu from the Full Site Editor page.

Selecting Navigation in WordPress Full Site Editing

Our article on adding custom navigation menus in WordPress can walk you through the rest of the steps.

If you use a classic WordPress theme, then you can go to Appearance » Menus. This is a dedicated page for you to add, arrange, and remove pages/posts and links to your menus.

How to add a WordPress navigation menu to your site or blog

For step-by-step instructions, you can check out our beginner’s guide on how to add a navigation menu in WordPress.

If you use a page builder like SeedProd, then your navigation menu (Nav Menu block) may have been embedded in your header theme template.

The Nav Menu block will already include all of your pages, though you can add new items, too.

First, go to SeedProd » Theme Builder from your WordPress dashboard. Then, find the ‘Header’ theme template and click ‘Edit Design.’

Editing the header theme template in SeedProd

Now, hover over the block that looks like a menu. That should be the ‘Nav Menu’ block.

After that, scroll down on the left panel and click ‘+ Add New Item.’

You can then customize the anchor text, enter the URL, have it open in a new window, and set it as nofollow.

Adding new menu items in SeedProd

Toward the bottom, you can change the links’ font size, spacing, divider, and alignment.

Don’t forget to click ‘Save’ to make the changes live.

Configuring the Nav Menu block in SeedProd

How to Edit a WordPress Site With Code

If you are comfortable with code, then you can also use custom code snippets to edit your WordPress website. That said, we only recommend this method if you have the right technical know-how to avoid breaking your website.

One way you can edit a WordPress site with code is by adding CSS, which is a stylesheet that can change how HTML looks on the front end.

Classic theme users can go to Appearance » Customize and find the ‘Additional CSS’ field in the Theme Customizer.

Here, you can insert CSS code to style different HTML elements like colors and fonts.

This may be handy if your theme’s built-in options aren’t enough for your needs.

Adding custom CSS in WordPress

As for block theme users, you cannot add custom CSS within the Full Site Editor.

Instead, you have to go to the URL below to open the Theme Customizer and find the Additional CSS field. Make sure to replace the domain name with your own.

https://example.com/wp-admin/customize.php

For more details, see our guide on how to fix missing Theme Customizer in WordPress.

Another way to add CSS is with CSS Hero. This plugin makes adding custom CSS to WordPress themes easy, even for beginners. If you are interested in using it, then just check out our CSS Hero review.

How to Edit WordPress Theme Files

At times, some tutorials may require you to edit your WordPress theme files to make changes beyond what your built-in theme features allow. In this case, we recommend:

  • Creating a child theme first. This is like a copy of your WordPress theme that you can safely customize with some coding.
  • Backing up your website. It’s a good measure to do so that you can restore your website to a previous version in case of errors.

Editing a WordPress theme file requires going to your WordPress file directory from the backend. To do this, you will need to open your hosting provider’s file manager or connect to your website with an FTP client.

If you use Bluehost, then you can go to your dashboard and open the ‘Websites’ tab. After that, click ‘Settings’ on the website for which you want to open the theme files.

Opening Bluehost's website settings

Now, simply scroll down to the ‘Quick Links’ section.

Then, click ‘File Manager.’ If you’re not sure where your root folder is, you can check the ‘Document Root’ function to see its path.

Opening Bluehost's file manager

Once inside the file manager, you can go to your website’s root folder (usually named public_html).

Then, head to /wp-content/themes and find your current theme folder.

An example of what the WordPress theme files look like in the Bluehost file manager

After that, you will find all of your WordPress theme files, which you can edit using a text editor.

Here are some things you can do by editing WordPress theme files:

How to Safely Insert Custom Code into WordPress

If you want to add new custom code rather than editing the code that is already within your theme files, then we recommend using WPCode. It’s the best WordPress code snippets plugin for easily inserting and managing custom code snippets.

WPCode - Best WordPress Code Snippets Plugin

With this plugin, you won’t have to worry about accidentally breaking your website. WPCode will let you know if there are errors in the code and deactivate it. Plus, you can create PHP shortcodes for inserting custom content into your website.

To see WPCode in action, you can check out our full WPCode review in the WPBeginner Solution Center.

What Is the Best Way to Edit a WordPress Site for Beginners?

For beginners, we always recommend installing a page builder plugin like SeedProd to edit WordPress websites. The reason is that it’s just as easy to use as the block editor yet gives you much more control over your website design.

If you don’t want to use a plugin, then the next best thing is a block theme with the Full Site Editor. This feature is not entirely developed yet because WordPress is constantly working on the Gutenberg project. But as of now, it’s pretty user-friendly.

The Theme Customizer is not as flexible as the Full Site Editor because it lacks drag-and-drop functionality. That’s why we suggest classic theme users install SeedProd to improve their user experience.

As for coding, we only recommend it if you have created a child theme and backups of your site to avoid errors. But with the WPCode plugin, adding custom code to edit your WordPress site is much safer and won’t cause any errors or break your website.

We hope this article helped you learn how to edit a WordPress website. You may also want to check out our in-depth WooCommerce tutorial to create an online store and the ultimate guide to WordPress SEO.

If you liked this article, then please subscribe to our YouTube Channel for WordPress video tutorials. You can also find us on Twitter and Facebook.

The post How to Edit a WordPress Website (Ultimate Guide) first appeared on WPBeginner.

WordPress Classic Editor Support Extended for at Least Another Year

Last week, I reached out to several members of the core WordPress committers to see if we could get an official word on whether Classic Editor support would continue beyond the mere months it seemingly had left to live. I received a semi-official answer but was asked to hold off on publishing for a more detailed and nuanced response.

Earlier today, WordPress executive director Josepha Haden Chomposy announced the official decision. It was just as expected. The WordPress project would continue supporting the Classic Editor plugin for a while longer.

“At the time, we promised to support the plugin through 2021 and adjust if needed as the deadline got closer,” she wrote. “After discussing this with Matt [Mullenweg], it’s clear that continuing to support the plugin through 2022 is the right call for the project as well as the community.”

As of now, classic users have a one-year extension.

However, the plugin will not suddenly stop working on December 31, 2022. That is merely the current deadline for the “full support” phase. It should continue working well beyond whatever date is set for that support window to close.

Designer Mark Root-Wiley reached out to WP Tavern via Twitter last week, but others had been asking the same question for a while. For some, they needed to know if they could continue supporting specific client needs. For others, it was a bludgeon to use in conversations for all editor-related things. Whatever the reason, before today, the last word had been from a Make Core post in November 2018.

“The Classic Editor plugin will be officially supported until December 31, 2021,” wrote core contributor Gary Pendergast in that three-year-old announcement. It was a shock for many at the time, uncertain whether the new block system would meet their needs.

While three years may have seemed like plenty of time to ditch the classic in favor of the modern WordPress editor, the current stats show that the project still has a few miles yet to go.

Currently, there are over 5 million active installations of the Classic Editor plugin. I am still waiting for a more specific tally, but no one has provided an answer yet. At best, we think the counter turns over at 10+ million, so we can speculate on the floor and ceiling for possible usage.

Active installs are not the entire picture either. For example, we have the plugin installed here at the Tavern for legacy reasons but do not use it in our day-to-day work. We can likely disable it altogether. WordPress has no telemetry system for tracking the usage of such features. While the install total will not always make the picture clear, the current number supports the push for continued maintenance.

“I think it’s important to note that the plugin is not going anywhere,” said core committer Jonathan Desrosiers. “It will continue to be listed on the .ORG repository for the foreseeable future.”

He pointed out that understanding the next phase of the Classic Editor plugin meant looking into the level of effort required to support it since 2018. The overwhelming majority of the changes in that nearly three-year timeframe have come down to keeping up with:

  • Text changes.
  • Adjustments to prevent warnings/errors and promote consistency across supported PHP versions.
  • Changes to deprecated action/filter hook calls.

“It’s been almost three whole years, and the plugin has largely required very little maintenance to continue functioning, and the bulk of maintenance has been to limit warnings and notices in debug logs,” he said.

The goal of the Classic Editor plugin was to help ease the transition to the block editor. Thus far, there have been eight major WordPress releases since the switch in version 5.0.

“There’s a theory called the diffusion of innovations that looks to explain how, why, and at what rate new technology spreads,” said Desrosiers. “It separates adopters into several groups based on when they are willing to take the jump: innovators, early adopters, early majority, late majority, and laggards. I truly think that we have seen a good portion of the late majority beginning to move towards using the block editor. This can also be confirmed by the plugin’s install growth, which has been slowing and plateauing this year.”

He had expected the previous deadline to mark the next stage of the Classic Editor plugin, called the “sunset” phase. It would be a time when the WordPress project moved from full support to encouraging late adopters to transition to the current editor to get the plugin’s numbers down.

“The context I gave previously shows that, until now, that the level of effort needed to keep the plugin working on newer versions of WP has been pretty minimal,” said Desrosiers of the potential sunset phase. “I expect that pattern to continue thanks to backward compatibility. If any security issues or major problems are encountered, they’ll, of course, be fixed. Any incompatibilities with the plugin and newer versions of WP will be considered on a case by case basis, but little to no time will be put towards bug fixes.”

However, this sunset phase will have to wait. We will not see it until at least the current support window closes on December 31, 2022. WordPress project leaders will need to reevaluate the plugin’s lifespan at that point.

The other looming question would be whether core WordPress would move specific pieces of its system to the Classic Editor plugin, such as allowing custom post types to support the old editor or the meta box API.

“There are no plans at this time to move any of the underlying ‘classic’ parts from core to the plugin,” said Desrosiers. “I’m sure that removing these parts will be evaluated at some point in the future, but when that will be is not clear.”

Even when official Classic Editor support reaches a hard deadline, it does not mean such a traditional editing experience will cease to exist. Plugins like Disable Gutenberg have promised longer lifespans than the initial support window, and other editor projects will undoubtedly arise if there is wide enough demand.

“The block editor has come a long way, and I encourage everyone that has not yet given it a second chance (late adopters) to do so,” said Desrosiers. “You may be pleasantly surprised.”

How to Edit HTML in WordPress Code Editor (Beginner’s Guide)

Are you looking for an easy way to edit HTML on your WordPress website?

HyperText Markup Language or HTML is a code that tells a web browser how to display the content on your web pages. Editing HTML comes in handy for advanced customization and troubleshooting issues.

In this article, we’ll show you how to edit HTML in the WordPress code editor using different methods.

How to Edit HTML in WordPress code editor

Why Should You Edit HTML in WordPress?

WordPress offers thousands of themes and plugins to change the appearance of your website and customize different elements without touching a single line of code.

However, plugins and themes have their limitations and might not offer the exact features you’re looking for. As a result, you might be unable to style your website the way you want it to look.

This is where editing HTML is really useful. You can easily perform advanced customization using HTML code. It provides a lot of flexibility and control over how your site will look and function.

In addition, learning how to edit HTML can also help you identify and fix errors on your WordPress website when you don’t have access to the dashboard.

Note: If you don’t want to edit HTML, but still want full customization options, then we recommend using a drag and drop WordPress page builder like SeedProd.

That being said, let’s look at different ways to edit HTML in a WordPress website.

We’ll cover how to edit HTML using the block editor and classic editor, and we’ll also show you an easy way to add code to your site. You can click the links below to jump ahead to your preferred section.

How to Edit HTML in WordPress Block Editor

In the WordPress block editor, there are multiple ways to edit the HTML of your post or page.

First, you can use a Custom HTML block in your content to add HTML code.

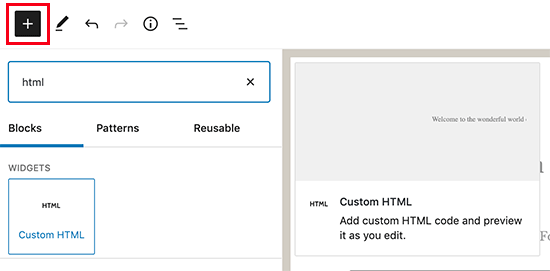
To start, head over to your WordPress dashboard and then add a new post/page or edit an existing article. After that, click the plus (+) sign at the top left corner and add a ‘Custom HTML’ block.

Adding custom HTML block in WordPress

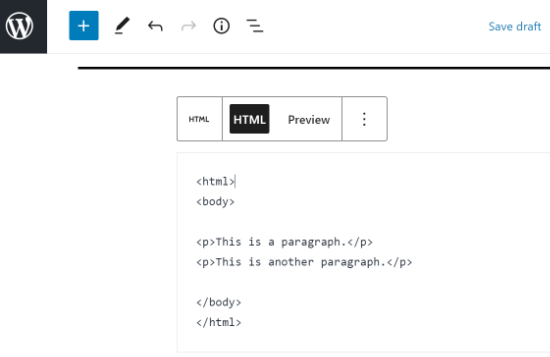
Next, go ahead and enter your custom HTML code in the block. You can also click on the ‘Preview’ option to check if the HTML code is working properly and how your content will look on your live website.

Custom HTML code in WordPress Editor

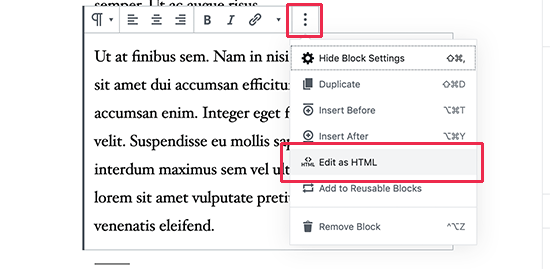
Another way to add or change HTML code in the WordPress block editor is by editing the HTML of a particular block.

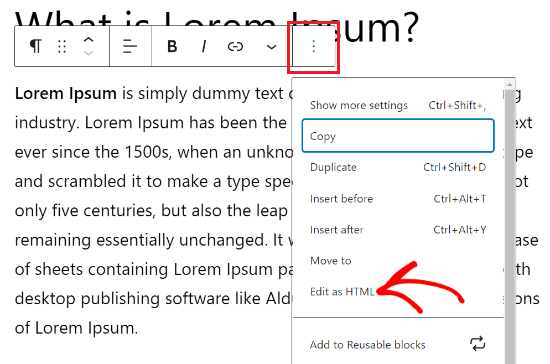
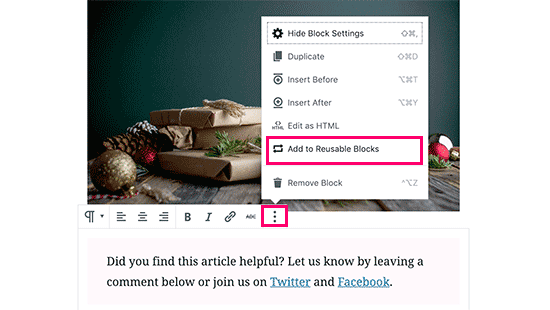
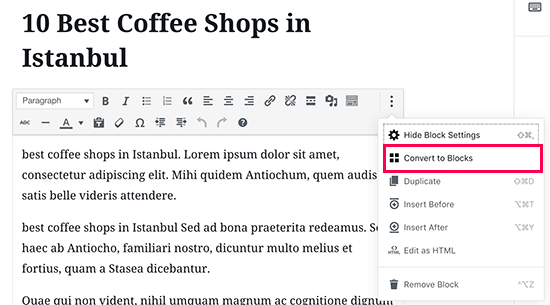
To do that, simply select an existing block in your content and then click the three-dot menu. Next, go ahead and click the ‘Edit as HTML’ option.

Click the three dots and select edit as HTML

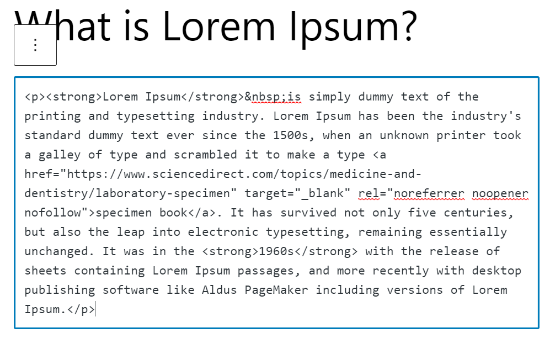
You’ll now see the HTML of an individual block. Go ahead and edit the HTML of your content. For example, you can add a nofollow link, change the style of your text, or add other code.

Edit the HTML of an individual block

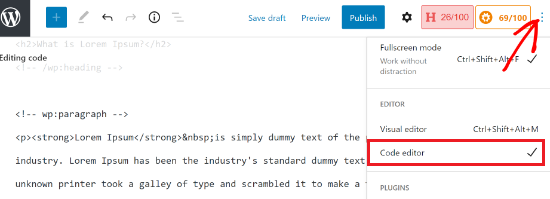
If you want to edit the HTML of your entire post, then you can use the ‘Code Editor’ in the WordPress block editor.

You can access the code editor by clicking the three-dots option in the top right corner. Then select ‘Code Editor’ from the drop-down options.

Access the Code Editor

How to Edit HTML in WordPress Classic Editor

If you’re using the WordPress classic editor, then you can easily edit the HTML in the Text view.

To access the Text view, simply edit a blog post or add a new one. When you’re in the classic editor, click the ‘Text’ tab to see the HTML of your article.

Click on Text in the Classic Editor to edit HTML

After that, you can edit the HTML of your content. For example, you can bold different words to make them prominent, use the italic style in the text, create lists, add a table of contents, and more.

How to Edit HTML in WordPress Widgets

Did you know that you can add and edit HTML code in your site’s widget area?

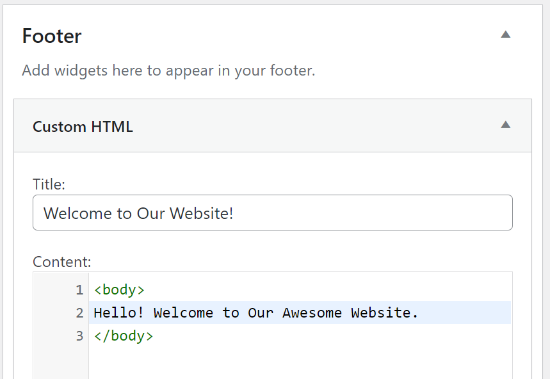
In WordPress, using a Custom HTML widget can help you customize your sidebar, footer, and other widget areas. For instance, you can embed contact forms, Google Maps, call to action (CTA) buttons, and other content.

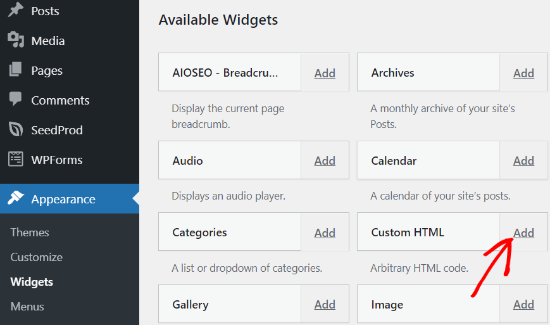
You can start by heading over to your WordPress admin panel and then go to Appearance » Widgets. After that, go ahead and add a Custom HTML widget by clicking the ‘Add’ button.

Add a Custom HTML Widget

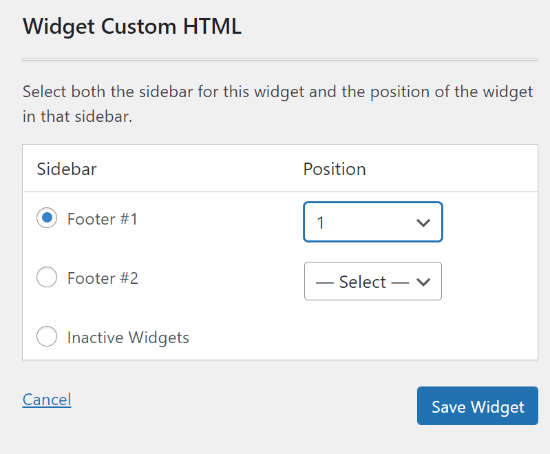
Next, you’ll need to select where you’d like to add the Custom HTML widget and choose a position. The widget area will depend on the WordPress theme you’re using. For example, you may be able to add it to your footer, header, or other areas.

Select the area and position for your Custom HTML widget

Once you’ve selected the widget area and position, go ahead and click the ‘Save Widget’ button.

After that, you can click on your Custom HTML widget, enter the HTML code, and then click the ‘Save’ button.

Enter Custom HTML

You can now visit your website to see the Custom HTML widget in action.

Custom HTML Preview

How to Edit HTML in WordPress Theme Editor

Another way to edit the HTML of your website is through the WordPress Theme Editor (Code Editor).

However, we don’t recommend that you directly edit the code in the Theme Editor. The slightest mistake when entering code can break your website and block you from accessing the WordPress dashboard.

Also, if you update your theme, then all your changes would be lost.

That said, if you are considering editing HTML using the Theme editor, then it’s a good idea to backup your website before making any changes.

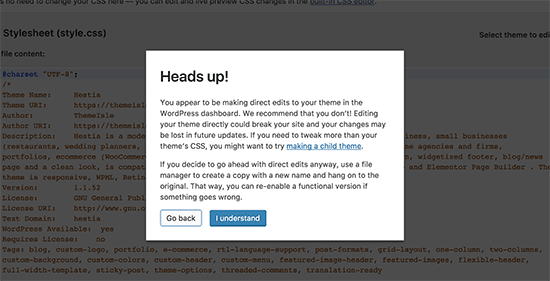
Next, head over to Appearance » Theme Editor from your WordPress dashboard. You’ll now see a warning message about directly editing theme files.

Theme editor warning in WordPress

Once you click the ‘I Understand’ button, you’ll see your theme files and code. From here, you can choose which file you’d like to edit and make your changes.

WordPress Theme Editor

How to Edit HTML in WordPress Using FTP

Another alternative method to editing HTML in the WordPress theme files is by using FTP also known as file transfer protocol service.

This is a standard feature that comes with all WordPress hosting accounts.

The benefit of using FTP instead of the code editor is that you can easily fix issues using the FTP client. This way, you won’t be locked out of your WordPress dashboard if something breaks when editing HTML.

To start, you’ll first need to select an FTP software. We’ll be using FileZilla in this tutorial, as it’s a free and user-friendly FTP client for Windows, Mac, and Linux.

After selecting your FTP client, you’ll now need to log in to your site’s FTP server. You can find the login details in your hosting provider’s control panel dashboard.

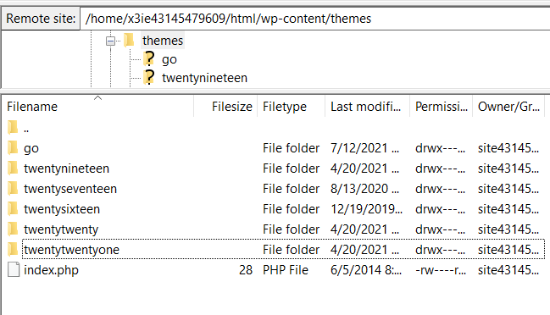
Once you’re logged in, you will see different folders and files of your website under the ‘Remote site’ column. Go ahead and navigate to your theme files by going to wp-content » theme.

You’ll now see different themes on your website. Go ahead and select the theme that you want to edit.

Navigate to your theme files in FTP client

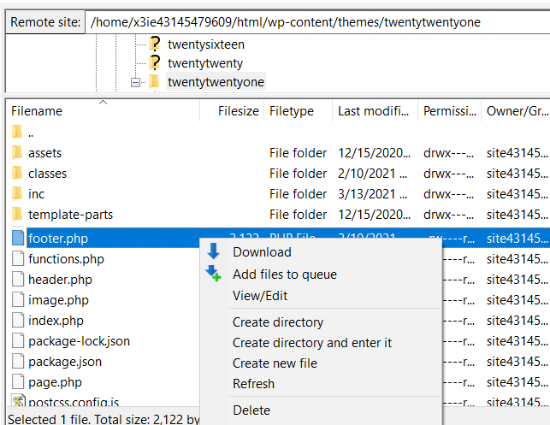
Next, you can right-click on a theme file to edit the HTML. For example, if you want to make changes in the footer, then right-click the footer.php file.

Many FTP clients allow you to view and edit the file and automatically upload them once you’ve made the changes. In FileZilla, you can do this by clicking the ‘View/Edit’ option.

Download and edit your theme file

However, we suggest that you download the file that you want to edit to your desktop before making any changes.

After editing the HTML, you can replace the original file. For more details, we recommend following our guide on how to use FTP to upload files in WordPress.

Easy Way to Add Code in WordPress

The easiest way to add code to your WordPress is by using the Insert Headers and Footers WordPress plugin.

The team at WPBeginner designed this plugin, so you can easily add code to your site in minutes, and we’ve made it 100% free to use.

It also helps organize your code, as it’s stored in one place. Plus, it prevents errors that can be caused when manually editing code.

Another benefit is that you don’t have to worry about your code being erased if you decide to update or change your theme.

The first thing you’ll need to do is install and activate the Insert Headers and Footers plugin on your website. For more details, you can follow our detailed tutorial on how to install a WordPress plugin.

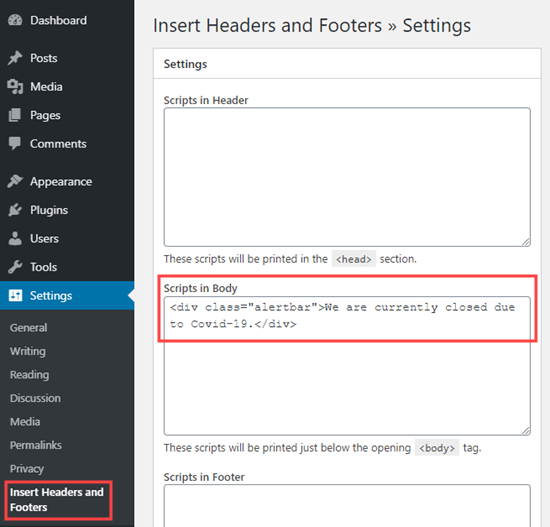
Once the plugin is active, you can head over to Setting » Insert Headers and Footers from your admin panel.

Next, you can add the HTML code to your website in the header, body, and footer boxes.

For example, let’s say you want to display an alert bar on your website. You can simply enter the HTML code in the ‘Scripts in Body’ box and click the Save button.

Adding the HTML code using the Insert Headers and Footers plugin

Besides that, you can add a Google Analytics tracking code and Facebook pixel in the header or add a Pinterest button in the footer of your website using the plugin.

For more details, you can see our guide on how to add header and footer code in WordPress.

We hope that this article helped you learn how to edit HTML in the WordPress code editor. You may also want to look at our guide on how much it really costs to build a WordPress website, or see the most important reasons you should use WordPress for your website.

If you liked this article, then please subscribe to our YouTube Channel for WordPress video tutorials. You can also find us on Twitter and Facebook.

The post How to Edit HTML in WordPress Code Editor (Beginner’s Guide) appeared first on WPBeginner.

How to Fix The Invalid JSON Error in WordPress (Beginner’s Guide)

Are you trying to fix the invalid JSON error in WordPress?

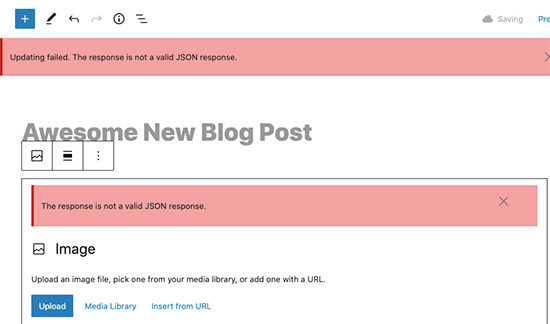
This error appears when editing WordPress posts or pages on your website. You’ll see a message saying ‘The response is not a valid JSON response’ and updating that page would fail.

In this article, we’ll show you how to easily fix the invalid JSON error in WordPress. We’ll also talk about why this error occurs and how to avoid it in the future.

JSON response is not valid error in WordPress

What causes ‘Not a Valid JSON Response’ Error in WordPress?

Failure to receive an expected response from the server causes the ‘Not a valid JSON response’ error in WordPress.

Basically, WordPress needs to communicate with the server while you are editing a blog post. It relies on getting responses from the web hosting server in the background. This response is usually in JSON format which is used to quickly transport data using JavaScript.

If for some reason, WordPress fails to get the response, or the response is not in JSON format, then you’ll see the ‘Not a valid JSON response’ error.

Not valid JSON response error displayed in WordPress

This error could appear for a number of reasons. However, the most likely cause of it to occur is incorrect URL settings in WordPress or broken permalinks.

That being said, let’s take a look at how to easily fix the invalid JSON error in WordPress.

Important: Please make a complete WordPress backup before making any big changes to your website. This allows you to easily restore your website to the previous state.

1. Check WordPress URLs in Settings

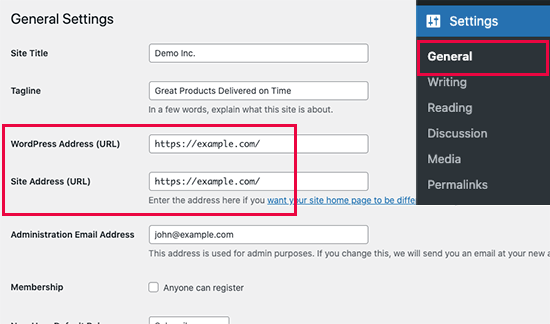
First, you need to make sure that your WordPress Address and Site Address settings are correct.

Simply, go to Settings » General page. From here, you need to review the WordPress Address (URL) and Site Address (URL) fields.

WordPress URL settings

For most websites, this setting needs to have the same URL in both fields.

However, rarely, some users may have given WordPress its own directory and serve the website on a different address. In that case, they can have different URLs here.

However, if your Site Address is incorrect then that would trigger the invalid JSON error in WordPress.

If you made any changes to the settings, then don’t forget to click on the Save Changes button to store your settings. You can now edit a blog post and see if adding any new blocks or saving that post triggers the ‘Not valid JSON response’ error.

If you are still seeing the error, then continue reading.

2. Fix WordPress Permalink Structure

WordPress comes with SEO friendly URL structure that allows you to use human-readable URLs for your posts and pages.

However, sometimes a user may mess up the permalinks settings. This would make it impossible for the WordPress editor to get a valid JSON response and cause the error to show up.

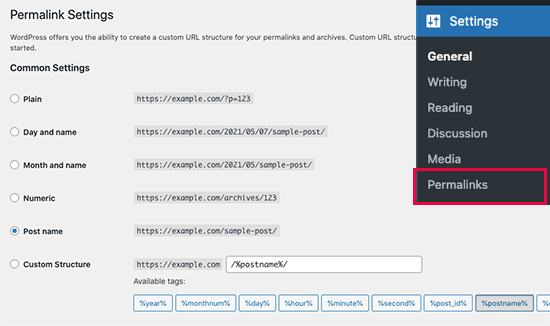
To fix this, you need to simply visit Settings » Permalinks page. From here, you need to carefully review the permalink options.

Fix permalinks in WordPress

If you are unsure whether you are using the right settings, then simply select one of the default formats available.

After that, go ahead and click on the Save Changes button to store your settings.

You can now try editing a blog post or page to see if the error has disappeared. If it hasn’t, then you can try this next step.

3. Regenerate WordPress .htaccess File

The .htaccess file in WordPress is used as a configuration file to manage SEO-friendly URLs (permalinks).

Normally, WordPress can automatically regenerate and update it. You can also trigger that update by simply clicking on the Save Changes button at the bottom of Settings » Permalinks page.

However, sometimes it may not get updated or has incorrect settings. This would affect your WordPress permalinks and may also cause an invalid JSON response error.

To fix this, you need to connect to your website using an FTP client or the file manager app in your WordPress hosting account dashboard.

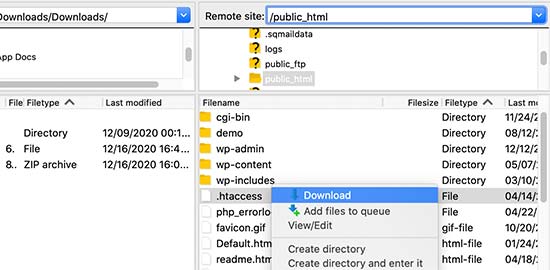
Once connected, you need to locate the .htaccess file in the root folder of your website and download it as a backup to your computer.

Download .htaccess file as a backup

Tip: Can’t locate .htaccess file? See this quick article on how to find .htaccess file.

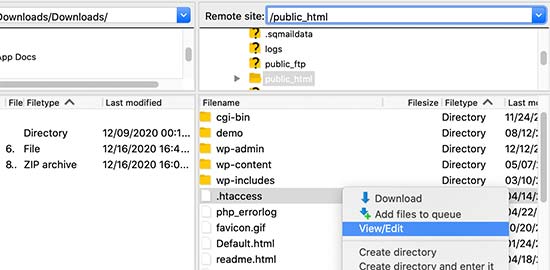
After that, you need to edit the .htaccess file using FTP client or the file manager app.

Edit .htaccess file

Once the file opens, you need to delete all the code inside it and replace it with the following code:

# BEGIN WordPress

RewriteEngine On
RewriteRule .* - [E=HTTP_AUTHORIZATION:%{HTTP:Authorization}]
RewriteBase /
RewriteRule ^index\.php$ - [L]
RewriteCond %{REQUEST_FILENAME} !-f
RewriteCond %{REQUEST_FILENAME} !-d
RewriteRule . /index.php [L]

# END WordPress

Don’t forget to save your changes and upload the file back to your website.

You can now visit your website and edit and post or page to see if you can reproduce the invalid JSON response error.

If you are still seeing the error, then there are a few more steps you can take.

4. View The Rest API Debug Log

The invalid JSON response error would also mean that WordPress REST API on your website encountered an error.

The REST API is the set of techniques WordPress uses to communicate with the server as you work on your website.

You can see details of this error in the WordPress Site Health tool. Visit the Tools » Site Health page.

REST API issue in WordPress

From here, you may see an issue labeled ‘The REST API encountered an unexpected result’.

Clicking on it will show you more details which may give you some clues about which plugin or third-party service may be causing the issue.

If this doesn’t provide any clue, then you can move on to the next step.

5. Deactivate All WordPress Plugins

Occasionally, WordPress plugins may conflict with each other or the WordPress core. This could result in unexpected behavior and could be a potential reason for the invalid JSON error.

Simply go to the Plugins » Installed Plugins page. From here, select all your WordPress plugins and then choose ‘Deactivate’ under the Bulk Actions drop down menu. Now, click the Apply button to continue.

Deactivate all plugins

WordPress will now deactivate all your installed plugins.

You can now try again to reproduce the error. If the error disappears, then this means one of the plugins installed on your website was causing it.

To figure out which plugin, you need to activate them one by one and then try to reproduce the error. Repeat this until you find the culprit.

After that, you can reach out to the plugin author for support or find an alternative plugin.

6. Temporarily Switch to the Classic Editor

If all the above steps fail, then you can temporarily switch to the Classic Editor for WordPress.

This older version of WordPress editor uses a simpler text editor and doesn’t rely heavily on REST API to get JSON response.

To use it, you need to install and activate the Classic Editor plugin. For more details, see our step by step guide on how to install a WordPress plugin.

The plugin works out of the box, and it will disable the Gutenberg editor upon activation.

You can now continue working on your website and get back to the troubleshooting later.

7. Further Troubleshooting

A number of things can block WordPress REST API or make it return an invalid JSON response. We have addressed the most likely culprits above, but if that didn’t fix it for you then here are some more steps that you can try.

Switching to a Default WordPress Theme

Sometimes a conflict between your WordPress theme and a plugin or the WordPress core may result in unexpected behavior.

You can test this, by simply switching to a default WordPress theme like TwentyTwentyOne or Twenty-Twenty.

Temporarily Turn off Website Application Firewall

If you are using a WordPress firewall like Sucuri, Cloudflare, or a plugin, then it is possible that they may sometimes block legitimate requests too.

The easiest way to figure this out is by temporarily disabling your WordPress firewall plugin or service.

Some application-level WordPress firewalls can be disabled by simply deactivating the plugin. For DNS level firewalls like Sucuri and Cloudflare, you can disable them from your account dashboard.

Turn on Debugging in WordPress

WordPress comes with a built-in feature that allows you to keep a log of errors. However, it is not enabled by default.

To turn it on, you need to add the following code to your wp-config.php file:

define( 'WP_DEBUG', true );
define( 'WP_DEBUG_LOG', true );

After that, WordPress will keep a log of all errors in a debug.log file located inside /wp-content/ folder. You can access this file by using an FTP client.

The error log may provide you a clue about what may be causing the invalid JSON error on your website. For more details, see our guide on setting up WordPress error logs and using them for debugging errors.

Seek Expert Help

Finally, if all else fails, then this could be due to a misconfiguration on your WordPress hosting server. Most reliable WordPress hosting companies are able to help users with common WordPress issues like that.

Simply reach out to them via live chat or support ticket and they may be able to help you fix it.

We hope this article helped you learn how to fix the invalid JSON error in WordPress. Let us know which solution worked for you in the comments below.

You may also want to see our complete handbook of the most common WordPress errors and how to fix them.

If you liked this article, then please subscribe to our YouTube Channel for WordPress video tutorials. You can also find us on Twitter and Facebook.

The post How to Fix The Invalid JSON Error in WordPress (Beginner’s Guide) appeared first on WPBeginner.

How to Easily Embed iFrame Code in WordPress (3 Methods)

Do you want to embed an iFrame code in a WordPress post or page?

IFrames provide an easy way to embed video or other content to your site without uploading it. Many third-party platforms like YouTube allow users to use iframe to embed content from their website.

In this article, we’ll show you how to easily embed iFrame code in WordPress using multiple methods.

Easily embedding iFrame code in WordPress

What is iFrame?

An iFrame lets you embed videos or other content on your site. This means you can display a video on your site without actually hosting that video.

The iframe is like opening a window on your site to display external content. The actual content is still loaded from the source that you are embedding from.

To add an iframe, you need to add a special HTML code. Don’t worry if that sounds quite technical.

We’re going to show you the easiest way to embed an iFrame in your WordPress blog.

Why Use iFrames?

A key reason to use iFrames is to avoid having to host videos or other resources on your site, which will use up your bandwidth and storage space.

Also, iFrames let you avoid infringing on other people’s copyrighted content. Instead of downloading their video or other content then uploading it to your site, you simply add it to your page using an iFrame.

Another advantage is that if the original content is changed, it will automatically be updated in the iFrame too.

An image of cartoon people adding content to a website

There are also some drawbacks to using iFrames. Not all websites let you put their content into an iFrame. Also, the iFrame may end up too big or small for your page, and you will need to manually adjust it.

Another issue is that HTTPS sites can only use iFrames for content from other HTTPS sites. Similarly, HTTP sites can only use iFrames for content from other HTTP sites.

This is why many platforms like WordPress prefers oEmbed. You can use oEmbed to embed videos as well as some other types of content by simply pasting a URL into your WordPress post. The content will automatically be resized to fit, and it will be the right size even on mobile devices.

Important: WordPress doesn’t support oEmbed for Facebook and Instagram posts. For more on this, check out our full guide on the Facebook / Instagram oEmbed issue and how to fix it.

Another great alternative to iFrames is to use a social feeds plugin. We recommend using Smash Balloon‘s plugins. These let you display content from Facebook, Instagram, Twitter, and YouTube.

Having said that, let’s take a look at three different ways to add iFrames to your site.

1. Use the Source’s Embed Code to Add iFrame in WordPress

Many large sites have an Embed option for their content. This gives you the special iFrame code that you need to add to your site.

On YouTube, you can get this code by going to the video on YouTube, then clicking the Share button below it.

Clicking the Share button for your chosen YouTube video

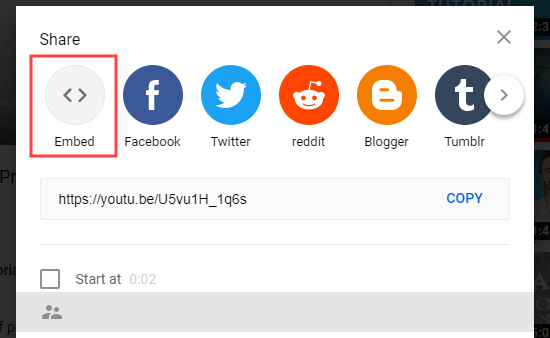
Next, you will see a popup with several share options. Simply click on the Embed button.

Clicking the Embed button to get the YouTube embed code

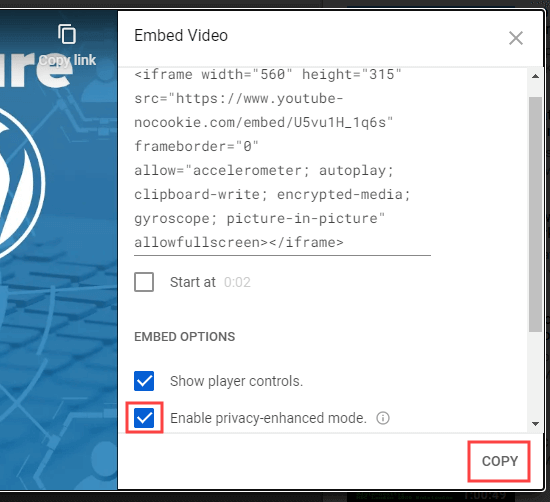
Now, YouTube will show you the iFrame code. By default, YouTube will include the player controls. We also recommend that you enable the privacy-enhanced mode.

After that, go ahead and click the Copy button to copy the code.

Copying the embed code for the YouTube video

Now, you can paste that code into any post or page on your site. We’re going to add it to a new page in the block editor.

To create a new page, go to Pages » Add New in your WordPress dashboard.

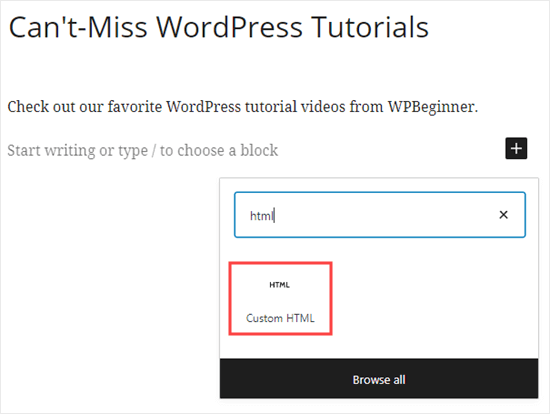
Then, add an HTML block to your page.

Adding a custom HTML block to WordPress

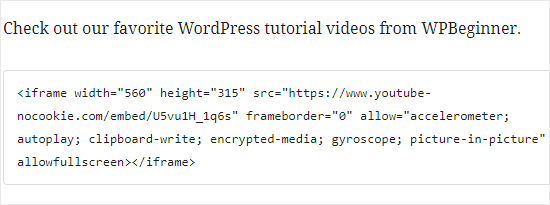
Now, you need to paste the YouTube iFrame code into this block.

Pasting the YouTube HTML code into the iFrame block

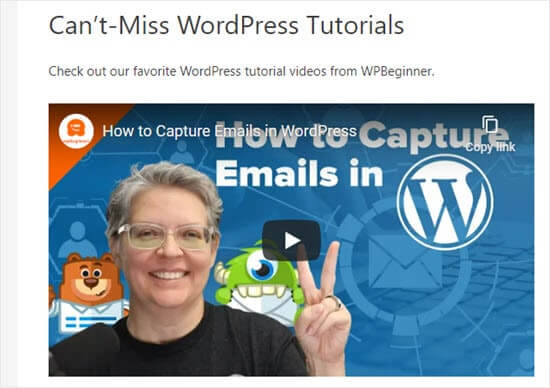
You can then preview or publish your page to see the YouTube video embedded there.

Viewing the embedded video live on your website

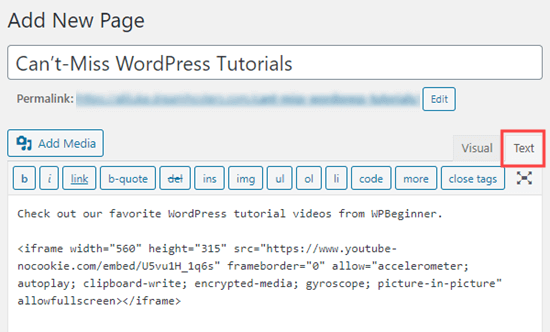
Tip: If you’re using the old classic editor, you can still add iFrame code. You need to do so in the Text view.

Adding the YouTube iFrame code in the classic editor

Switching between the visual and text view on the Classic Editor can cause issues with the iFrame code.

2. Using the iFrame WordPress Plugin to Embed an iFrame

This method is useful as it allows you to create an iframe to embed content from any source, even if that source doesn’t provide an embed code.

First, you need to install and activate the iFrame plugin. For more details, see our step by step guide on how to install a WordPress plugin.

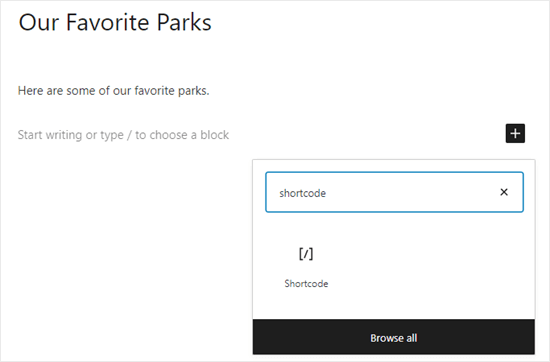
Upon activation, the plugin will start working straight away with no setup needed. Go ahead and edit or create a post or page. Then, add a shortcode block.

Adding a shortcode block in the block editor

After that, you can use this shortcode to enter your iFrame code.

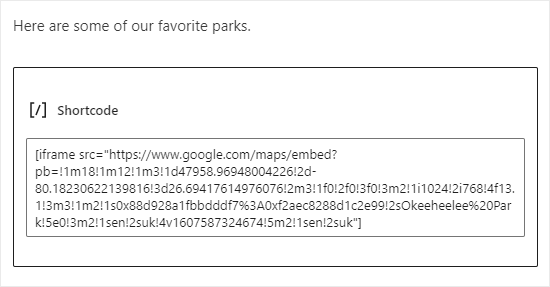
[iframe src="URL goes here"]

Simply replace URL goes here with the URL of the content you want to embed on your site. We are embedding a Google map.

Tip: You may need to use the Embed option to get the direct URL of the content. You need to use just the URL, not the rest of the embed code.

The shortcode to embed a Google map

Next, preview or publish your post. You should see the Google map embedded on your site.

The Google map embedded on the website

You can optionally add parameters to the iFrame shortcode to change how the embedded content displays. For instance, you could set the width and height, and add or remove a scrollbar or border. You can find details on the iFrame plugin’s page.

Tip: If you’re using the Classic editor, you can simply paste the shortcode into your post or page. You don’t need to switch to the Text view.

Adding the shortcode in the classic editor

3. Manually Creating the iFrame Code and Embedding in WordPress

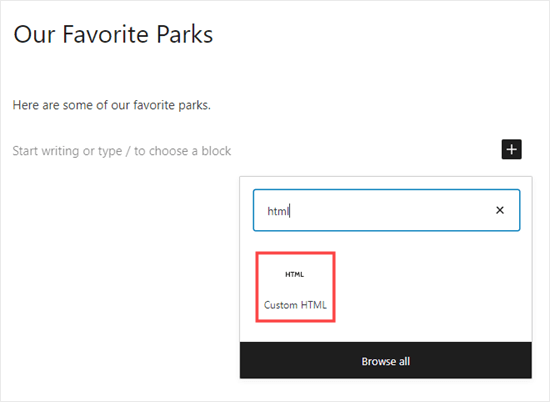
If you prefer not to use an iFrame plugin, then you can create the iFrame code manually. To do this, you need to add an HTML block in the WordPress content editor.

Adding a custom HTML block

First, you need to paste this code into your HTML block.

<iframe src="URL goes here"></iframe>

Simply replace “URL goes here” with the direct URL for the content that you want to embed. You only need the URL itself.

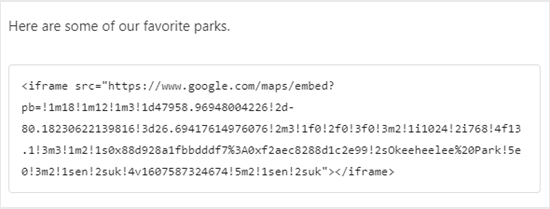
Here, we’re embedding a map from Google.

Entering the iFrame code for the Google map

You can add extra parameters to the HTML tag. For instance, you could set the width and height of your iFrame. The code below means your embedded content will display 600 pixels wide and 300 pixels high.

<iframe src="URL goes here" width="600" height="300"></iframe>

This is useful if you need to restrict the embedded content to a smaller space.

The Google map on the site with a set height and width

We hope this article helped you learn how to easily embed iFrame code in WordPress. You may also want to check out our ultimate guide on how to speed up your WordPress site, and our comparison of the best keyword research tools for improving your SEO rankings.

If you liked this article, then please subscribe to our YouTube Channel for WordPress video tutorials. You can also find us on Twitter and Facebook.

The post How to Easily Embed iFrame Code in WordPress (3 Methods) appeared first on WPBeginner.

How to Copy and Paste in WordPress without Formatting Issues

Recently, a reader asked us how to copy and paste items into WordPress without causing formatting issues?

Often when you are copying and pasting content from a desktop app or a web page, you end up pasting unwanted formatting too. This does not match your WordPress theme’s fonts and colors which simply looks odd.

In this article, we’ll share how to easily copy and paste into WordPress without any unwanted formatting and styles.

Copying and pasting text into WordPress

Understanding Copying and Pasting in WordPress

Copying and pasting means copying text from one place to another without needing to type it all out again.

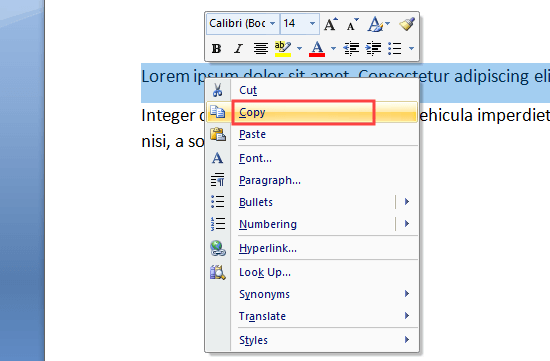
To copy text from a document or webpage, you need to highlight it using your mouse. Then, simply right-click and select ‘Copy’ from the menu. Or, you can use the keyboard shortcut Ctrl+C (Command+C on a Mac) to copy the highlighted text.

Copying text from your Word document by highlighting it and right-clicking

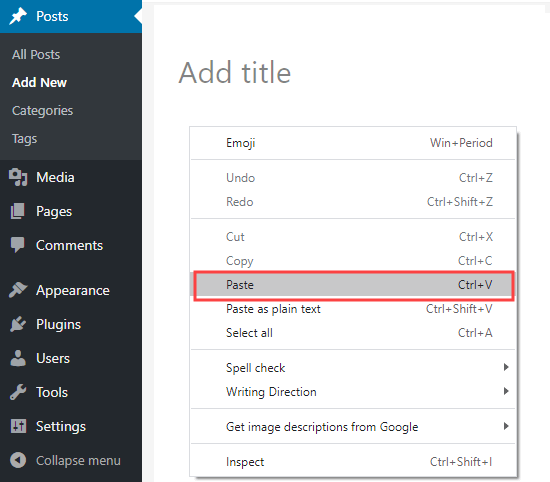
To paste text into WordPress, you can right-click and select ‘Paste’ from the menu. Or, use the keyboard shortcut Ctrl+V (Command+V on a Mac) to paste the copied text:

Pasting your copied text into WordPress

When you copy text, the formatting of the text is copied with it. The problem is that sometimes you will end up with formatting that you don’t want.

This unwanted formatting can affect how your text displays on other devices.

Some WordPress users choose to avoid copying and pasting altogether. Instead, they draft their posts straight into their WordPress site.

However, you may prefer to draft using a separate tool, such as Microsoft Word or Google Docs. This lets you work offline and can make it easier to share your work for comments and revisions before publication.

It’s also important to avoid adding unnecessary formatting because it impacts your page size which means slower site speed.

That’s why we have created this ultimate guide on how to properly copy & paste text in WordPress. You can use the links to jump straight to the sections you need:

How to Copy and Paste from Word to WordPress (Block Editor)

Copying text from Microsoft WordPress is quite straight forward.

For years, WordPress has allowed you to copy rich (formatted) text from Word documents straight into the editor. This is a big advantage if you like to write and format your posts in Microsoft Word.

Copying your post from Word into WordPress lets you keep elements like headings, bold and italic text, links, and lists. It will discard any styling options like colors, spacing, etc.

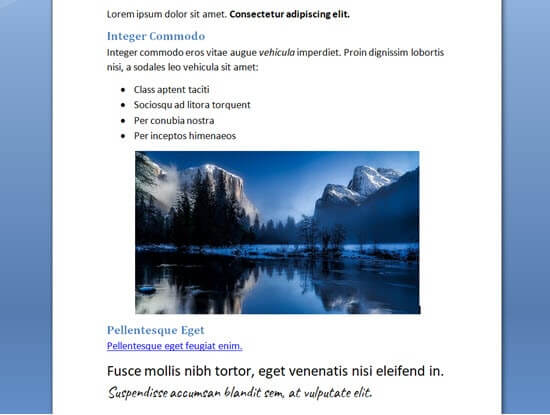
Here is a document that we’re going to copy from Word into WordPress:

The Word document that we will be copying into WordPress

This document is formatted with two Heading 2 subheadings for subsections of the post. There is bold and italic text, a bulleted list, and a link.

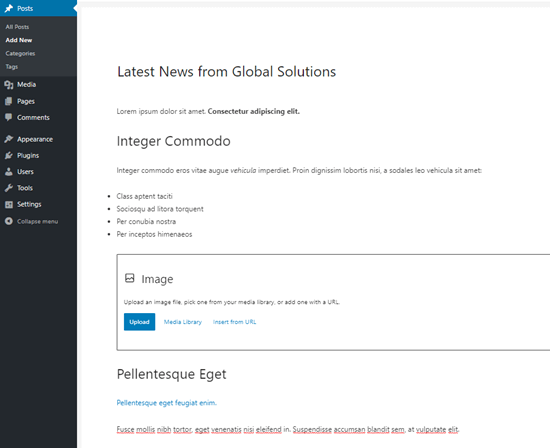
We will simply copy all the content from Word document and paste it inside the WordPress block editor.

The text from Word has now been copied into our WordPress post

Note that some formatting has not been copied over. The image has been left out, but WordPress has created an image block in the correct place.

Tip: Always use the ‘Heading styles’ in Word to create your subheadings. Don’t highlight the text and increase the font size manually.

Want to confirm that your text has copied over correctly? Just follow our instructions later in this article on checking for and fixing formatting errors.

How to Copy and Paste from Google Docs to WordPress (Block Editor)

Google Docs is a very popular word processing tool. Just like with Word, it’s easy to copy and paste from Google Docs into the WordPress block editor.

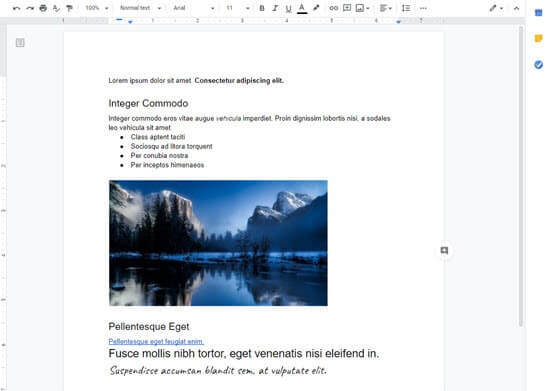
Here is our piece of text in Google Docs. It’s identical to the piece we used in Word, above.

The Google Doc with the text we're going to copy

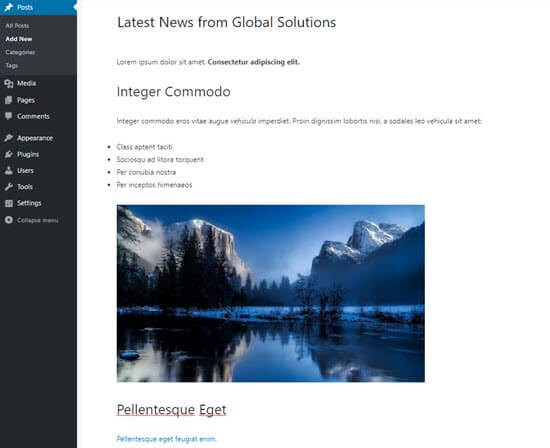
When we copy and paste the text from Google Docs to WordPress, again, WordPress has formatted the text correctly.

This time, the image has also been uploaded to WordPress too.

The Google Docs text in the WordPress block editor

Copying and Pasting Using the Classic Editor

Are you having trouble with formatting errors after copying and pasting text into WordPress? Then you are likely using the old classic editor.

The classic editor handles Word documents well and shouldn’t add any unnecessary code. However, it doesn’t do such a good job with the text copied from Google Docs.

Here’s how our text from Google Docs looks when pasting it into the classic editor:

The Google Docs text copied into the classic editor

The headings, link, bold, and italic text all look correct.

However, some unnecessary extra formatting has been added that isn’t visible.

How to Check and Fix Copy and Paste Formatting Errors

Let’s take a look at how to check for and fix formatting errors now.

All the text in your WordPress posts is formatted using HTML (hypertext markup language). HTML tags go around the words that are formatted in a particular way.

For instance, bold text in WordPress posts looks like this in HTML code:

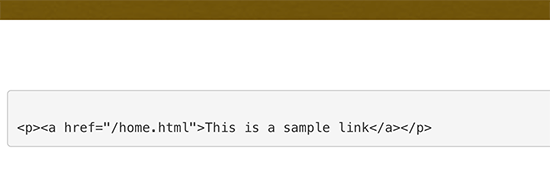
There is <strong>bold text</strong> in this sentence.

The words ‘bold text’ will appear in bold.

To check for and fix formatting errors after copying and pasting, you need to check the HTML code for your post.

Checking the HTML Code in the Block Editor

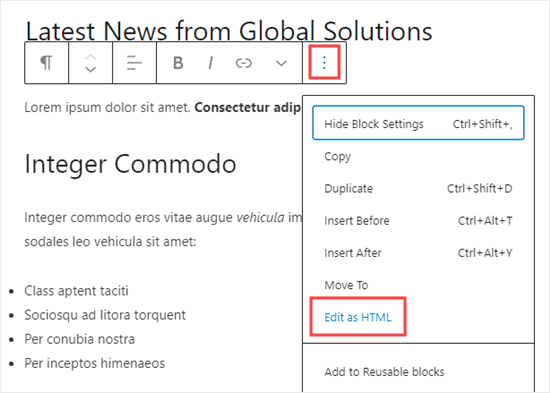
In the block editor, it’s easy to view the HTML code of any block. First, click on the block. Then, click the three vertical dots to the right of the block’s menu.

You will see a dropdown menu. Here, you just need to click the ‘Edit as HTML’ option:

Switching to the HTML view of a block in WordPress

You will now see the HTML code for the block. With the block editor, you should normally find that no unwanted formatting has been added.

Here, the paragraph correctly begins with the opening <p> tag and ends with the closing </p> tag.

The sentence in bold is also correct. It begins at the <strong> tag and ends with the closing </strong> tag.

Viewing the HTML code for your block in the block editor

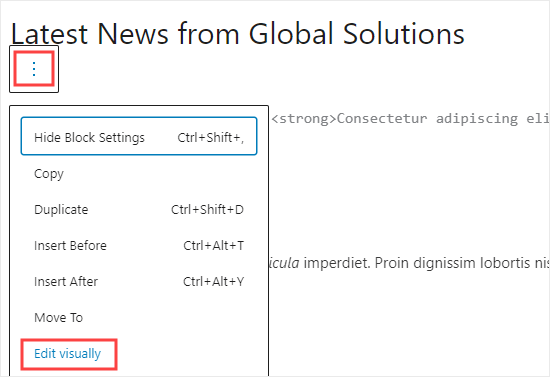
To switch back to the normal view of your block, simply click the three vertical dots again. Then, go ahead and select the ‘Edit visually’ option.

Switching back to the visual view of your block

Checking the HTML Code in the Classic Editor

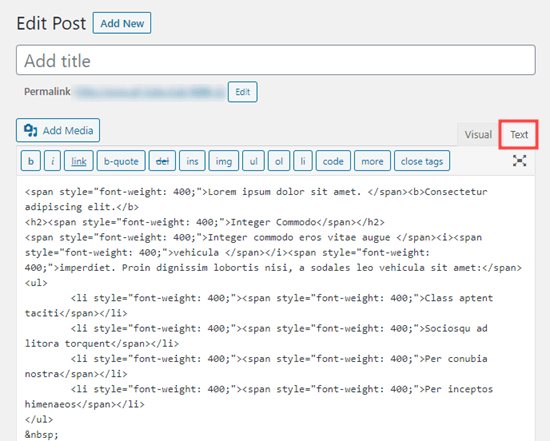
In the classic editor, it’s easy to view the HTML code of a post by clicking on the ‘Text’ tab at the top of the box containing the text of the post. This is the HTML code for our post copied from Google Docs:

Viewing the HTML code of your post in the classic editor

The span tags here are extra, unnecessary code.

Also, the bold text and italic text are formatted using the <b> tag instead of <strong> and the <i> tag instead of <em>. It is generally considered best to use the <strong> and <em> tags as these give your words semantic meaning, not just visual styling.

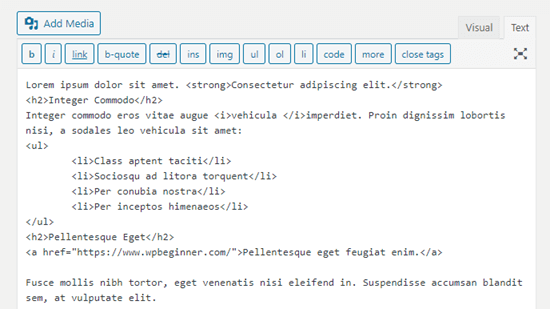
By comparison, here is the code produced when copying from Word instead of Google Docs in the classic editor. There are no unnecessary formatting tags and the bold and italics have been correctly rendered.

The HTML code produced when copying a document from Word into the classic editor

If you’ve copied your post from Google docs, you will need to go through the HTML code and manually correct the formatting. In this case, that means:

  • Removing all the <span style="font-weight: 400;"> and </span> tags.
  • Changing all the <li style="font-weight: 400;"> to just <li>.
  • Changing <b> and </b> to <strong> and </strong>.
  • Changing <i> and </i> to <em> and </em>.

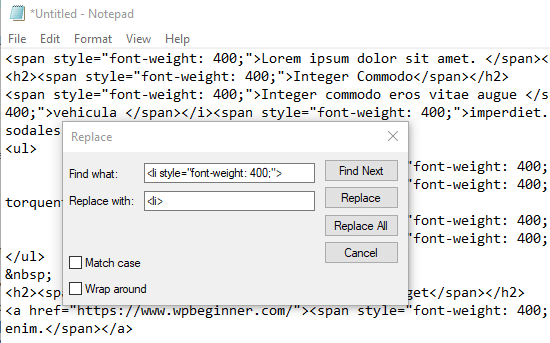
To speed up the process, you first need to copy and paste the HTML code into a text editor.

Then, simply use Find and Replace to change incorrect formatting. Here’s an example using notepad. We are finding all instances of <li style="font-weight: 400;"> and replacing them with <li>:

Using Notepad to quickly and easily correct the unwanted HTML code

Once you’ve replaced all the incorrect formatting, simply copy and paste the text back into the Text view of the classic editor.

The corrected formatting code in the classic editor

Copying and Pasting Plain Text

Plain text is text without any formatting. To avoid any possibility of incorrect formatting, you may prefer to copy and paste plain text.

This is also a very useful option if you’re copying a section of text from another website. For instance, you might include a quote from someone else in your content.

Copying and Pasting Plain Text in the Block Editor

The WordPress block editor doesn’t have a button or option to paste plain text. However, it’s easy to do this yourself.

The quickest method is to use the keyboard shortcut Ctrl+Shift+V (PC) or Command+Shift+V (Mac) to paste your text. This will automatically paste in plain text format.

Plain text pasted into the block editor using the Ctrl+Shift+V command

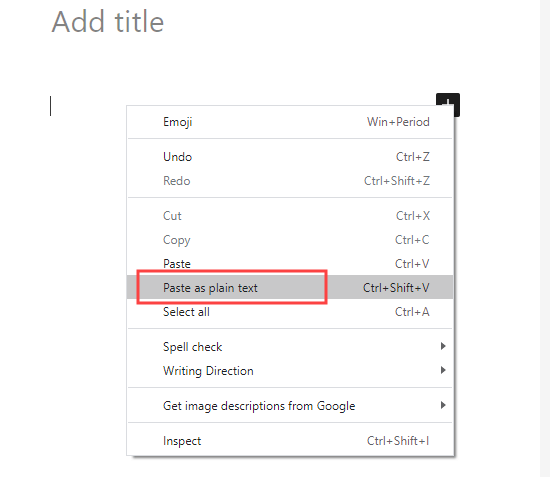
Alternatively, some browsers offer the option to paste as plain text. If you’re using Google Chrome, simply right click and select the ‘Paste as plain text’ option:

Right click and use the "Paste as plain text" optin in your browser

Both of these methods will work to paste plain text in a single paragraph block.

Copying and Pasting Plain Text in the Classic Editor

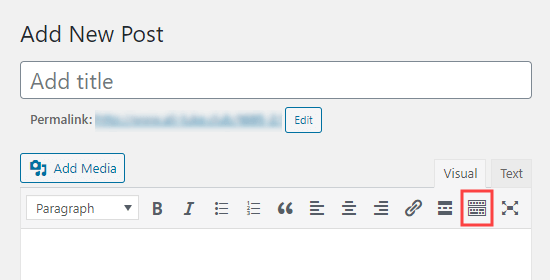
To paste plain text into the classic editor, first click the Toolbar Toggle button:

The toolbar toggle button in the WordPress classic editor

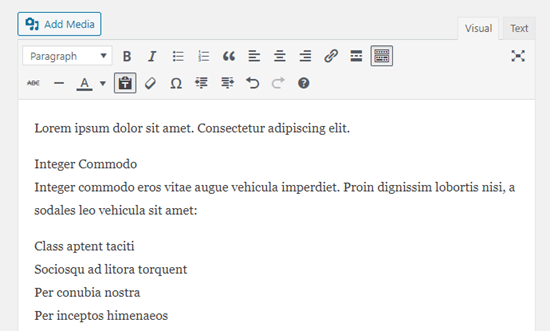
Now, you just need to click the ‘Paste as text’ icon. It looks like a clipboard with the letter T on it:

Use the 'Paste as text' WordPress button to toggle plain text mode on

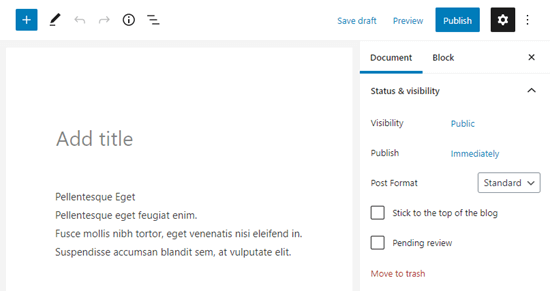
Any text that you paste will now be pasted in plain text mode, with the formatting removed. Here’s how that looks when we paste the text from our Google doc. The headings, bold, italics, bullet points, and link have all been removed:

The Google docs text pasted as plain text in the WordPress classic editor

Pro Tip: Copy, Paste, and Clone Entire WordPress Sites

While the above beginner’s guide show you the basic of copy and pasting, WordPress also offers many advanced copy, paste, and cloning features.

For example, you can easily clone an entire WordPress site in 7 easy steps.

There’s also a way to create a duplicate WordPress page or post with a single click.

If you’re using the block editor, then you can also create re-usable blocks that you can use across multiple posts.

We hope this article helped you learn how to copy and paste into WordPress. You might also like our tips on mastering the WordPress content editor, and our expert pick of the must have WordPress plugins for all websites.

If you liked this article, then please subscribe to our YouTube Channel for WordPress video tutorials. You can also find us on Twitter and Facebook.

The post How to Copy and Paste in WordPress without Formatting Issues appeared first on WPBeginner.

The Future of WordPress: The Block Editor Is Here to Stay

It is inevitable that when we publish a story on the Tavern that is remotely related to the block editor or the Gutenberg project, we receive negative comments. Despite sprinting along in its second year as part of core WordPress, there are still those who liken posts on the editor to Soviet-style mind manipulation and propaganda for certain unnamed companies.

It is not all negative. Far more comments are from people who are ecstatic about the current editor and the upcoming features that will expand the block system to other areas of WordPress.

However, I felt the need to address a recent request that we stop covering the block editor. While I cannot speak for our entire staff, there are two simple truths about why I write about blocks.

Truth #1: Blocks are Here to Stay

The block system is not going anywhere. WordPress has moved beyond the point where we should consider the block editor as a separate entity. It is an integral part of WordPress and will eventually touch more and more areas outside of the editing screen.

Frankly, it would be poor journalism to not cover stories related to blocks.

Some of the most exciting things happening in the WordPress ecosystem is around what developers are doing with blocks. Whether it is a fun T-rex game, a block-ready theme, or a team of block developers being hired by a major company, there is always something interesting happening in the world of blocks.

Every day, more users are embracing the block editor. Even the percentage of holdouts still running WordPress 4.9, which was the last version without the block editor, is decreasing. Currently, only 12.8% of WordPress installs are on 4.9. Nearly 73% are running WordPress 5.0 or newer. Some of those users are running plugins like Classic Editor, which has maintained a steady growth rate in the neighborhood of 0.5% – 1.0% in recent months. Currently, the plugin has over 5 millions installs, which is a drop in the ocean in comparison to total WordPress sites.

At the moment, WordPress.com and self-hosted Jetpack users are creating content via blocks on 44.5 million WordPress sites. Yesterday, those users wrote 302,000 posts in the block editor.

Blocks are the future of the platform. What we need to do as a community is avoid putting our heads in the sand or railing against the powers-that-be. Instead, we should ask ourselves what we could do to continue improving the system. How can we move forward? How can we present our ideas, even dislikes, in a constructive manner? How can we create better software?

Criticism of the editor is fair. Make it constructive so we can dissect and address that criticism. That is an essential part of building great software.

Truth #2: Love of Blocks

Believe it or not, I actually love blocks. While I may criticize some decisions about the editor, summoning an internal facepalm emoji at times, this is the most excited I have been about WordPress in years. But, it is not about me. I have enough familiarity with dozens of editors that I can live with even the most mediocre of experiences. And, if I am not satisfied, I can build my own.

What it is about is seeing the face of an inexperienced WordPress user light up for the first time because they get it.

For years, I helped an older family member run an outdoors site. I had no interest in hunting, fishing, or most other topics covered on the blog. However, he was passionate about what he was doing. I wanted to help fuel that passion in any way I could. The problem? He simply never learned how WordPress worked. He never had that lightbulb moment. His face never glowed when he finally figured out how to lay out his content in the editor.

He had big ideas and no way to accomplish them.

At the time, most page builders were little more than shortcode soup, which I knew would eventually mean I would be the one to clean up the mess. There were few options other than the classic editor. My older cousin stuck it out for longer than most. After a few years, he finally let the site go.

Even some of what I would consider the most basic of things were too frustrating for him. It was also frustrating for me because I could not understand why he could never learn what I was teaching.

However, the block editor changed things. He was thinking of starting a new site but was asking about non-WordPress platforms. I spun up a demo install and a basic block-ready theme for him not long ago. Suddenly, this guy who routinely broke links and accidentally made all of his blog post content bold — twice — was piecing together media-filled content with few issues. That initial passion that he had all those years ago seemed to come back. Maybe, just maybe, WordPress might now be the CMS for him.

I am fully aware that this is not everyone’s experience. However, what I have found working with new and less-than-tech-savvy users is that the block editor is a stepping stone toward them being able to create the sites they want more easily. Right now, those users have far more control over their content than ever before. In the future, they will have that control over their entire site.

When I share a story about blocks, it is because I am excited about them. More so, I want to share that excitement with others who are on this journey. Whether they want something on the wacky and weird side of things or want to build custom patterns for reuse in their posts, I want them to find those tools.

If I am a bit optimistic about the future at times, I will not apologize for that. I look forward to the next block-related story that we have the opportunity to cover here at the Tavern.

How to Restrict Your WordPress Forms to Logged-in Users Only

Are you looking for an easy way to restrict your WordPress form submissions to logged-in users only?

If you have a membership site, online store, or another type of website that has registered users, then you may want to restrict certain forms access to only logged in users.

In this article, we will show you how to restrict your WordPress forms access so only logged in users can fill out and submit them.

Restrict Form Access in WordPress

When and Why You Need to Restrict Access for WordPress Forms?

There could be a number of scenarios when you would need to restrict access to certain WordPress forms to logged-in users only.

For example:

  • You may be hosting a private members event, and you only want registered users on your site to RSVP.
  • You may restrict access to support for members only, and by restricting it to logged-in users only, you can dynamically populate certain information from their profile.
  • You might want to run an employee survey or poll, and you want to restrict access to your internal team only.
  • You are running a customer NPS survey that you only want to be submitted by logged-in users only.
  • You might have a special prize claim form that you want to be accessed by only certain logged-in users.

These are just some examples, but there could be literally hundreds of other use cases where you want to restrict form access to registered users only.

With that said, let’s take a look how to restrict your WordPress form access to logged-in users only.

Method 1: Restrict Form Access with WPForms Form Locker Addon

This method is easiest and most powerful, so we recommend it for all beginner users. We will use the WPForms plugin and their Form Locker addon to completely lock down WordPress form access.

WPForms is the best WordPress form plugin used by over 2 million websites. It was created by WPBeginner’s founder, Syed Balkhi, to have all the features we needed for running our business.

The first thing you need to do is install and activate the WPForms plugin. For more details, see this step by step guide on how to install a plugin in WordPress.

Upon activation, you need to enter your license key and then add over to the WPForms » Addons page to install the Form Locker Addon.

WPForms Form Locker Addon

Now you’re ready to create a new form that has restricted access for logged-in users.

To do this, go ahead and create a new form by going to WPForms » Add New. This will open the WPForms form builder where you will be presented with the option to either choose a form template or start with a blank one.

WPForms drag & drop form builder is extremely easy to use, so you can add or remove fields and customize the form to your liking.

WPForms Form Builder

Once you have added all the necessary fields, you need to go to the Settings Tab and click on Form Locker.

WPForms Form Locker Settings

On this tab, you will see the option to enable password protection for your WordPress forms, set total entry limits, enable form scheduling, and enable restricting entries to logged-in users only.

Form Locker Logged in User Only

Once you check the box, you will see a new Message field where you will need to draft a message that will appear to all users who are not logged in to your site.

WPForms Form Locker Restrict Access Message

Once done, you can tweak other form settings that you might need and then click the Save button.

Now you can embed this form on any WordPress post or page on your site by using the WPForms shortcode in the Classic Editor or by using the WPForms block in the Gutenberg editor.

Simply go to Post or Pages, and then click on the Plus icon to select a block. Next, type WPForms in the block search.

Add WPForms block to WordPress post or page

Once the WPForms block is added, select your form to embed and you’re done. Congratulations, you have successfully created a WordPress form that’s restricted to logged-in users only.

Method 2: Restrict Form Access with Password Protected or Private Pages

Another way to restrict form access in WordPress is by using the default WordPress visibility settings. You can use this method with the free version of WPForms or any other contact form plugin.

Simply create a Page or Post where you want to embed the form. After that click on the Visibility settings on the right panel.

WordPress Page Visibility Settings

You have the option to either make the whole page private or make the whole page password protected.

Private pages can only be seen by the Administrators and Editor level users on your website.

If you set a password for the page, then you will have to share that password with everyone who you want to give access to.

While this method works, there are several downsides to it.

First, the entire page is hidden not just the forms area. You lack the finer controls, and there’s no way for you to see which logged-in user submitted the form (if you’re using the password protected setting).

Method 3: Use Advanced Membership Plugins to Restrict Form Access

If you’re using an advanced WordPress membership plugin like MemberPress, then it comes with a lot of access control features built-in.

You can simply go to MemberPress » Rules to create a new permissions rule.

Add new rules in MemberPress

The rule edit page allows you to select different conditions and associate them to a membership plan.

For example, you can select all content that matches a particular tag or category to be available only to members with the silver subscription plan.

Add a rules set to MemberPress

You can also create more specific rules. For example, a single post or page, child pages, or a specific URL.

Once you have set the rules, you can use it in combination with any WordPress contact form plugin to restrict form access to logged-in users only.

For more details, see our step by step guide on how to restrict content access in WordPress.

We hope this article helped you learn how to restrict your WordPress forms to logged-in users only. You may also want to see our list of best WordPress plugins for business websites.

If you liked this article, then please subscribe to our YouTube Channel for WordPress video tutorials. You can also find us on Twitter and Facebook.

The post How to Restrict Your WordPress Forms to Logged-in Users Only appeared first on WPBeginner.

How to “Easily” Add Anchor Links in WordPress (Step by Step)

We occasionally use anchor links in our longer WordPress posts to help users quickly jump to the section they want to read.

Anchor links are often used in the table of content sections because they help users move up and down a lengthier article without reloading the page. It can also help with SEO as Google may show them below your search listings for easy navigation (more on this later).

In this step by step guide, we will explain what are anchor links and show you how to easily add anchor links in WordPress.

Adding anchor links in WordPress

Ready? Let’s start with a live example of anchor links.

Below is a list of all the topics we will cover in this guide. Go ahead and click on any of these links, and you’ll be taken to that specific section.

An anchor link is a type of link on the page that brings you to a specific place on that same page. It allows users to jump to the section they’re most interested in.

Take a look at the animated screenshot below:

Anchor link preview

As you can see, clicking on the anchor link takes the user to the specific section on the same page.

Anchor links are commonly used in lengthier articles as the table of content which allows users to quickly jump to the sections they want to read.

Why and when you should use anchor links?

An average user spends less than a few seconds before deciding if they want to stay or leave your website. You have just those few seconds to convince users to stay.

The best way to do that is to help them quickly see the information they’re looking for.

Anchor links make this easier by allowing users to skip the rest of the content and jump directly to the part that interests them. This improves user experience and helps you win new customers / readers.

Anchor links are also great for WordPress SEO. Google can display an anchor link in the search results as a “jump to link”.

Jump to link in search results

Sometimes Google can also display several links from that page as jump to links, and this is proven to increase the click-through rate in search results. In other words, you get more traffic to your website.

Multiple jump to links below a search result

Having said that, let’s take a look at how to easily add anchor links in WordPress.

If you just want to add a few anchor links in your article, then you can easily do so manually.

Basically you need to add two things for an anchor text to work as intended.

  1. Create an anchor link with a # sign before the anchor text.
  2. Add the id attribute to the text where you want the user to be taken.

Let’s start with the anchor link part.

Step 1. Creating an anchor link

First you need to select the text that you want to link and then click on the insert link button in the WordPress Gutenberg editor.

Add a link in WordPress

This will bring up the insert link popup where you usually add the URL or look for a post or page to link.

However, for an anchor link, you’ll simply use # as prefix and enter the keywords for the section you want the user to jump to.

Creating anchor link

After that click on the enter button to create the link.

Some helpful tips on choosing what text to use as your anchor # link:

  • Use the keywords related to the section you are linking to.
  • Don’t make your anchor link unnecessarily long or complex.
  • Use hyphens to separate words and make them more readable.
  • You can use capitalization in anchor text to make it more readable. For example: #Best-Coffee-Shops-Manhattan.

Once you add the link, you will be able to see the link you have created in the editor. However, clicking on the link doesn’t do anything.

That’s because the browsers cannot find the anchor link as an ID.

Let’s fix that by pointing browsers to the area, section, or text that you want to show when users click on the anchor link.

Step 2. Add the ID attribute to the linked section

In the content editor, scroll down to the section that you want the user to navigate to when they click on the anchor link. Usually, it is a heading for a new section.

Next, click to select the block and then in the block settings click on the Advanced tab to expand it. You can simply click on the ‘Advanced’ tab under the heading block settings.

HTML Anchor

After that, you need to add the same text that you added as the anchor link under the ‘HTML Anchor’ field. Make sure that you add the text without the # prefix.

You can now save your post and see your anchor link in action by clicking on the preview tab.

What if the section you want to show is not a heading but just a regular paragraph or any other block?

In that case, you need to click on the three-dot menu on the block settings and select ‘Edit as HTML’.

Edit as HTML

This will allow you to edit the HTML code for that particular block. You need to select find the HTML tag for the element you want to point to. For example, <p> if it is a pagraph, or <table> if it is a table block, and so on.

Now, you need to add your anchor as the ID attribute to that tag, like the following code:

<p id="best-coffee-shops-manhattan">

You will now see a notice that this block contains unexpected or invalid content. You need to click on the convert to HTML to preserve the changes you made.

Convert to HTML

How to Manually Add Anchor Link in Classic Editor

If you are still using the older classic editor for WordPress, then here is how you can add the anchor link.

Step 1. Create the anchor link

First, select the text that you want to change into the anchor link and then click on the ‘Insert Link’ button.

Adding an anchor link in Classic Editor

After that, you need to add your anchor link with a # sign prefix followed by the slug you want to use for the link.

Step 2. Add the ID attribute to the linked section

The next step is to point the browsers to the section you want to show when users click on your anchor link.

For that, you’ll need to switch to the ‘Text’ mode in the classic editor. After that scroll down to the section that you want to show.

Adding anchor ID in Classic Editor

Now locate the HTML tag you want to target. For example, <h2>, <h3>, <p>, and so on.

You need to add the ID attribute to it with your anchor link’s slug without the # prefix, like this:

<h2 id="best-coffee-shops-manhattan">

You can now save your changes and click on the preview button to see your anchor link in action.

How to Manually Add Anchor Links in HTML

If you are used to writing in the Text mode of the old Classic Editor in WordPress, then here is how you would manually create an anchor link in HTML.

First, you need to create the anchor link with a # prefix using the usual <a href=""> tag, like this:

<a href="#best-coffee-shops-manhattan">Best Coffee Shops in Manhattan</a>

Next, you need to scroll down to the section that you want to show when users click on the link.

Usually, this section is a heading (h2, h3, h4, etc.), but it could be any other HTML element or even a simple paragraph <p> tag.

You need to add the ID attribute to the HTML tag, and then add the anchor link slug without the # prefix.

<h2 id="best-coffee-shops-manhattan">Best Coffee Shops in Manhattan</h4>

You can now save your changes and preview your website to test the anchor link.

This method is suitable for users who regularly publish long-form articles and need to create table of contents with anchor links.

The first thing you need to do is install and activate the Easy Table of Contents plugin. For more details, see our step by step guide on how to install a WordPress plugin.

This plugin allows you to automatically generate a table of contents with anchor links. It uses headings to guess the content sections, and you can customize it fully to meet your needs.

Upon activation, simply go to Settings » Table of Contents page to configure plugin settings.

Easy Table of Contents plugin settings

First, you need to enable it for the post types where you want to add table of contents. By default, the plugin is enabled for pages, but you can also enable it for your posts as well.

You can also enable the auto-insert option. This allows the plugin to automatically generate the table of contents for all articles, including the older articles that match the criteria.

If you only want to automatically generate table of contents for specific articles, then you can leave this option unchecked.

Next, scroll down a little to select where you want to display the table of contents and when you want it to be triggered.

Select where and when to display table of contents

You can review other advanced settings on the page and change them as needed.

Don’t forget to click on the ‘Save Changes’ button to store your settings.

If you enabled the auto-insert option, then you can now view an existing article with the specified number of headings.

You’ll notice that the plugin will automatically display a table of contents before the first heading in the article.

If you wanted to manually generate table of contents for specific articles, then you need to edit the article where you want to display a table of contents with anchor links.

On the post edit screen, scroll down to the ‘Table of Contents’ tab below the editor.

Manually add table of contents with anchor links

From here, you can check the ‘Insert table of contents’ option and select the headings you want to include as anchor links.

You can now save your changes and preview your article. The plugin will automatically display a list of anchor links as your table of contents.

Table of contents preview

For more detailed instructions, see our article on how to add table of contents in WordPress.

We hope this article helped you learn how to easily add anchor links in WordPress. You may also want to see our tips on how to properly optimize your blog posts for SEO and our pick of the best WordPress page builder plugins.

If you liked this article, then please subscribe to our YouTube Channel for WordPress video tutorials. You can also find us on Twitter and Facebook.

The post How to “Easily” Add Anchor Links in WordPress (Step by Step) appeared first on WPBeginner.

WordPress Post Revisions Made Simple: A Step by Step Guide (2019)

Did you know that WordPress comes with a built-in feature that allows you to undo changes and go back to a previous version of a post?

This feature is called Post Revisions or simply Revisions.

Most of us make mistakes when writing. Sometimes you might wish that you hadn’t deleted what you wrote earlier. Revisions allow you to fix that by going back in time and undoing the changes.

In this article, we will show you how to easily undo changes in WordPress with post revisions. We will also show you how to easily manage post revisions in WordPress.

Managing the WordPress post revisions

Here is an overview of the topics we’ll cover in this guide:

What is Post Revisions?

Post revisions is a WordPress feature that allows you to undo changes and go back to an earlier version of your posts and pages.

For each draft you are working on, WordPress automatically saves a temporary revision. This type of revision is called auto-save.

WordPress stores an auto-save every 60 seconds. It also automatically replaces the older version with the new auto-save.

Autosave revisions in WordPress

The autosave feature helps you restore the content if something goes wrong before you can save it. For example, if your browser crashed or your computer hanged while writing, then you can restore your latest draft from the autosave.

WordPress also saves post revisions each time a user clicks on the save, update, or publish button. Unlike auto-saves, these revisions are permanently stored in the WordPress database.

You can locate, browse, and revert back to any of these revisions from the post edit screen.

Why You Should Use Post Revisions

Almost every WordPress user can benefit from post revisions. Writing great content requires a lot of tweaking and edits. Post revisions allow you to see your process and take a bird’s eye view of how your post has evolved.

You can then switch between different states of your draft, make changes, and make your article perfect for publishing.

For multi-author WordPress sites, post revisions allow editors to easily manage the work of multiple authors. You can see who made changes to an article, what changes they made, and so on.

That being said, let’s take a look at how to use post revisions to improve your WordPress posts and pages.

How to use Post Revisions to Undo Changes in WordPress

WordPress displays the number of revisions under the ‘Document’ panel on the post/page edit screen.

You can find that on the right-hand side of your post editor screen. Clicking on the ‘Revisions’ will take you to post revisions screen.

Post revisions in WordPress

The post revision screen will show you the latest revision of the post with a scrollbar on top. Sliding the button on the scroll bar will take you to earlier revisions of the post.

Switching between post revisions

Changes made in each revision will be highlighted in green and pink colors. On the top, you can see the user who made these changes, time, and other information.

WordPress will also let you know if a revision is an autosave or a draft.

Restore autosaves aswell as revisions

You can use the next and previous buttons to move around revisions.

Plus, you can check the box on top that says ‘Compare any two revisions’. Doing so will split the scrollbar button into two, and you can take each button to a different revision and compare the difference between two distant revisions.

Compare any two revisions

To restore a revision, you can simply click on Restore This Revision or Restore This Autosave button.

WordPress will restore the selected revision as your current post revision, and you can then save it as a draft.

Restore revision point

Keep in my mind that restoring to an earlier revision will not delete the latest version of your post. Instead, WordPress will store it in the database as another revision.

Using post revisions with Classic WordPress editor

In case you haven’t upgraded your WordPress to Gutenberg and still using the Classic Editor, then you’ll find the post revisions in the publish meta box on the right panel of the post/page edit screen.

Browsing post revisions in classic editor

To view the post revisions, you can simply click the ‘Browse’ link next to the number of revisions. Apart from this, the post revisions work similarly in both the Classic Editor and Gutenberg.

Limiting Post Revisions in WordPress

All post revisions are stored in your WordPress database. Due to this, many users worry that too many revisions can slow down their websites.

It is not true.

WordPress skips post revisions when making database calls on the front end. It only looks for revisions on the post edit screen, or when you are actually browsing revisions.

You can still control and limit post revisions in WordPress. We’ll show you two different methods to do that you can choose one that best suits you.

1. Limit post revisions in WordPress using plugin

The easiest way to manage WordPress post revisions is by using a plugin. This allows you to control revisions from the WordPress admin area.

First thing you need to do is install and activate the WP Revisions Control plugin. For more details, see our step by step guide on how to install a WordPress plugin.

Upon activation, you need to visit Settings » Writing page and scroll down to WP Revisions Control section.

WP Revisions Control settings

From here you need to enter the number of revisions you want to store for each post type and then click on the ‘Save Changes’ button to store your settings.

WP Revisions Control will now limit the post revisions stored in your WordPress database.

The plugin also allows you to delete revisions for an individual post. Simply edit the post where you want to delete revisions and scroll down below the editor.

Purge revisions

You can limit the revisions for this post only or delete them by clicking on the ‘Purge these revisions’ button.

2. Limit WordPress post revisions manually

WordPress allows you to control how many revisions you want to keep for an article. To limit post revisions, simply add this code to your WordPress site’s wp-config.php file.

define( 'WP_POST_REVISIONS', 10 );

Don’t forget to replace 10 with the number of revisions you want to keep for each post.

How to Delete Old Post Revisions in WordPress

Old post revisions are perfectly harmless, and you don’t need to delete them in most cases. However, if you have a very large website with thousands of articles, then deleting old post revisions can help you reduce backup sizes.

First, you’ll need to install and activate the WP-Optimize plugin. For more details, see our step by step guide on how to install a WordPress plugin.

Upon activation, go to WP-Optimize » Database page and check the box next to ‘Clean all post revisions’ option.

Clean post revisions

Now click on the ‘Run optimization’ button to delete all post revisions. You can uninstall the plugin after you have deleted the revisions.

Once you have cleaned up revisions, feel free to uninstall and delete the plugin.

Deleting WordPress post revisions via phpMyAdmin

Advanced users can also delete WordPress posts revisions via phpMyAdmin.

First, make sure that you have created a complete WordPress database backup.

After that, simply login to your WordPress hosting control panel and click on the phpMyAdmin icon.

Next, you need to select your WordPress database from the left column. PhpMyAdmin will now display tables in your WordPress database.

PhpMyAdmin

After that, you need to click on the SQL tab from the top menu.

This will load phpMyAdmin’s SQL interface. From here you can manually run commands on your WordPress database.

You need to enter the following code.

DELETE FROM wp_posts WHERE post_type = "revision";

Don’t forget to replace wp_ with your own WordPress database prefix. After that, click on the Go button to run the command.

Deleting revision via MySQL

PhpMyAdmin will now delete all revisions from your WordPress database.

Note: Deleting revisions will not stop WordPress from saving revisions for your future posts.

How to Completely Disable WordPress Post Revisions

We don’t recommend disabling WordPress post revisions. However, some users may want to disable revisions to reduce their WordPress database size.

The easiest way to do this is by installing Disable Post Revision plugin. For more details, see our step by step guide on how to install a WordPress plugin.

Upon activation, go to Settings » Writing page and select the post types where you want to disable revisions feature.

Disable revision plugin

Don’t forget to click on the save changes button to store your settings.

If you don’t want to use the plugin, then you can also do the same thing manually by adding this code to your wp-config.php file.

define('WP_POST_REVISIONS', false );

This code disables WordPress post revisions feature on your website. It will still allow WordPress to save one autosave and one revision in your browser storage.

We hope this article helped you learn how to use WordPress post revisions to undo changes and how to manage post revisions for larger sites. You may also want to see our beginners guide on managing your editorial workflow in WordPress.

If you liked this article, then please subscribe to our YouTube Channel for WordPress video tutorials. You can also find us on Twitter and Facebook.

The post WordPress Post Revisions Made Simple: A Step by Step Guide (2019) appeared first on WPBeginner.

How to Easily Display Code on Your WordPress Site

Do you want to display code in your WordPress blog posts? If you tried to add code like regular text, then WordPress will not display it correctly.

WordPress runs your content through several cleanup filters each time you save a post. These filters are there to make sure someone does not inject code via post editor to hack your website.

In this article, we will show you the proper ways to easily display code on your WordPress site. We will show you different methods, and you can choose the one that best fits your needs.

How to easily display code in WordPress posts

Method 1. Display Code Using The Default Editor in WordPress

This method is recommended for beginners and users who don’t need to display code very often.

Simply edit the blog post or page where you want to display the code. On the post edit screen, add a new code block to your post.

Add code block to your WordPress posts

You can now enter the code snippet in the text area of the block.

Add code to your blog post

After that, you can save your blog post and preview it to see the code block in action.

PHP code displayed in WordPress

Depending on your WordPress theme, the code block may look different on your website.

Method 2. Display Code in WordPress Using a Plugin

For this method, we will be using a WordPress plugin to display code in your blog posts. This method is recommended for users who often display code in their articles.

It gives you the following advantages over the default code block:

  • It allows you to easily display any code in any programming language
  • It displays the code with syntax highlighting and line numbers
  • Your users can easily study the code and copy it

First, you need to install and activate the SyntaxHighlighter Evolved plugin. For more details, see our step by step guide on how to install a WordPress plugin.

Upon activation, you can go ahead and edit the blog post where you want to display the code. On the post edit screen, add the ‘SyntaxHighlighter Code’ block to your post.

SyntaxHighlighter code block

You will now see a new code block in the post editor where you can enter your code. After adding the code, you need to select the block settings from the right column.

SyntaxHighlighter code block settings

First, you need to select the language for your code. After that, you can turn off line numbers, provide first line number, highlight any line you want, and turn off the feature to make links clickable.

Once you are done, save your post and click on the preview button to see it in action.

Code displayed with syntax highlighting

The plugin comes with a number of color schemes and themes. To change the color theme, you need to visit Settings » SyntaxHighlighter page.

SyntaxHighlighter settings

From the settings page, you can select a color theme and change SyntaxHighlighter settings. You can save your settings to see a preview of the code block at the bottom of the page.

Code block preview

Using SyntaxHighlighter with Classic Editor

If you are still using the old classic WordPress editor, then here is how you would use SyntaxHighlighter plugin to add code to your WordPress blog posts.

Simply wrap your code around square brackets with the language name. For example, if you are going to add PHP code, then you will add it like this:

[php]
<?php
private function get_time_tags() {
$time = get_the_time('d M, Y');
return $time;
}
?>
[/php]

Similarly, if you wanted to add an HTML code, then you will wrap it around the HTML shortcode like this:

[html]
<a href="example.com">A sample link</a>
[/html]

Method 3. Display Code in WordPress Manually (No Plugin or Block)

This method is for advanced users because it requires more work and does not always work as intended.

It is suitable for users who are still using the old classic editor and want to display code without using a plugin.

First, you need to pass your code through an online HTML entities encoder tool. It will change your code markup to HTML entities, which will allow you to add the code and bypass the WordPress cleanup filters.

Now copy and paste your code in the text editor and wrap it around <pre> and <code> tags.

Adding code manually in classic editor

Your code would look like this:

<pre><code>
&lt;p&gt;&lt;a href=&quot;/home.html&quot;&gt;This is a sample link&lt;/a&gt;&lt;/p&gt;
</pre></code>

You can now save your post and preview the code in action. Your browser will convert the HTML entities and users will be able to see and copy the correct code.

Manually displaying code in WordPress

We hope this article helped you learn how to easily display code on your WordPress site. You may also want to see our ultimate list of the most wanted WordPress tips, tricks, and hacks.

If you liked this article, then please subscribe to our YouTube Channel for WordPress video tutorials. You can also find us on Twitter and Facebook.

The post How to Easily Display Code on Your WordPress Site appeared first on WPBeginner.

How to Add Multi-Column Content in WordPress Posts (No HTML Required)

Do you want to add multi-column content to your WordPress posts?

Columns can be used to create engaging layouts for your posts and pages. They make it easier for you to organize your content. They can also improve readability as your website visitors quickly scan the text.

In this article, we will show you how to easily add multi-column content to your WordPress posts without writing any HTML code.

How to add multi column content in WordPress posts

Why Add Multi-Column Content in WordPress?

Traditional print media, like newspapers and magazines, have been using multi-column layouts since the very early days of printing.

Their goal was to make it easier for users to read the smaller text while utilizing the available space economically.

Single-column layouts are more commonly used on the web. However, multi-column grids are still useful for highlighting content and making it easier to scan and read.

For example, if you run a magazine website, then you can use a multi-column layout to organize your content. It will give it the same feel as you would find in a physical magazine.

Organizing your content in multiple columns is also helpful if you are publishing comparisons, research papers, and other interactive content on your WordPress website. It helps improve readability and boost engagement.

That said, let’s see how you can add multi-column content in the block and classic editor. You can simply click the links below to jump ahead to the method you want to use:

Adding Multi-Column Content in WordPress Block Editor – The Easy Way

Creating multi-column content, also known as grid column content in WordPress, is now easy because it is a default feature. The WordPress Block Editor includes a Columns block.

To add a multi-column layout, you need to create a new post or edit an existing one. Once you are in the content editor, click on the ‘+’ icon at the top to add a block.

Next, you need to select the Columns block in the ‘Design’ tab.

Add a column block

Next, you will need to select the number of columns and layouts you would like to use for your blog post.

WordPress will show you different options to choose from. For example, you can pick a 50/50 column layout, use a 33/66 layout, and more.

Choose number of columns to add

After choosing a layout, you can add blocks to your columns. The Columns block allows you to add blocks inside each column.

For example, you can select the Paragraph block and add content to it.

Add blocks to columns

You will also be able to see the block settings in the right column of the post-edit screen in the settings panel. Here, you can edit the width of the columns.

In addition to the text, you can also add images and embed videos in WordPress columns.

Simply take the mouse to one of the columns, and click the ‘+’ button to add a block. You can also add a block by typing ‘/’ and then the block name.

For example, we added an image in one column and some text in the other column.

Add media content to columns

Adding Multiple Columns in Old WordPress Classic Editor

If you haven’t upgraded your WordPress to Gutenberg and are still using the Classic Editor, then you will need to install a separate plugin for creating a grid column layout.

First, install and activate the Column Shortcodes plugin. For detailed instructions, follow our step-by-step guide on how to install a plugin in WordPress.

Upon activation, you can create a new post or edit an old one. Once you are in the classic editor, simply click on the ‘[ ]’ button in the toolbar.

Click the shortcode buttons

The plugin will now show you a list of column shortcodes for your blog post.

You can choose any layout you would like to add to your WordPress blog. There are also options to edit the column padding.

Select shortcode for columns

Once you have selected a shortcode, it will automatically appear in the classic editor. For instance, we picked the ‘one half’ shortcode for this tutorial.

You can then enter your content between the shortcodes.

Enter your text between column shortcodes

Next, you can click the shortcode icon ‘[ ]’ again to add another column shortcode.

Let’s add the ‘one half (last)’ shortcode to show two columns next to each other. From here, you just need to add your content to the other column.

Enter text for second column and publish post

After that, you can preview your post and publish it.

Here’s how it looked on our test site.

Multi column content in classic editor

We hope this article helped you learn how to add multi-column content in WordPress posts and pages. You may also want to see our simple guide to WordPress SEO and our expert picks for the must-have WordPress plugins for business sites.

If you liked this article, then please subscribe to our YouTube Channel for WordPress video tutorials. You can also find us on Twitter and Facebook.

The post How to Add Multi-Column Content in WordPress Posts (No HTML Required) first appeared on WPBeginner.
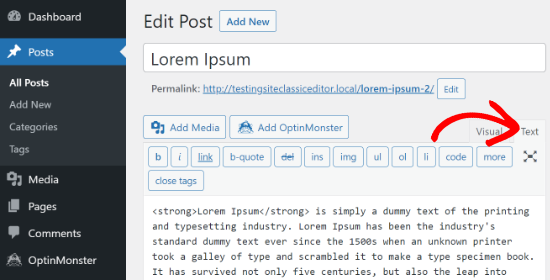
How to Undo Changes in WordPress with Post Revisions

Did you know that WordPress comes with a built-in feature that allows you to undo changes and go back to a previous version of a post. This feature is called Post Revisions or simply Revisions.

Most of us make mistakes when writing. Sometimes you might wish that you hadn’t deleted what you wrote earlier. Revisions allow you to fix that by going back in time and undoing the changes.

In this article, we will show you how to easily undo changes in WordPress with post revisions.

Easily undo changes in WordPress with post revisions

What is Post Revisions?

WordPress comes with a powerful system to store revision history for each post or page you are writing.

For each draft you are working on, WordPress automatically saves a temporary revision. This type of revision is called auto-save.

WordPress stores an auto-save every 60 seconds. It also automatically replaces the older version with the new auto-save.

Autosave Posts in WordPress

The autosave feature helps you restore content if something goes wrong before you can save it. For example, if your browser crashed or your computer hanged while writing, then you can restore your latest draft from the autosave.

WordPress also saves post revisions each time a user clicks on the save, update, or publish button. Unlike auto-saves, these revisions are permanently stored in the WordPress database.

You can locate, browse, and revert back to any of these revisions from the post edit screen.

That being said, let’s take a look at how to use post revisions feature to undo changes in WordPress posts and pages.

Why You Should Use Post Revisions

Almost every WordPress user can benefit from post revisions. Writing great content requires a lot of tweaking and edits. Post revisions allow you to see your process and take a bird’s eye view of how your post has evolved.

You can then switch between different states of your draft, make changes, and make your article perfect for publishing.

For multi-author WordPress sites, post revisions allow editors to easily manage the work of multiple authors. You can see who made changes to an article, what changes they made, and so on.

That being said, let’s take a look at how to use post revisions to improve your WordPress posts and pages.

How to use Post Revisions to Undo Changes in WordPress

WordPress displays the number of revisions under the ‘Document’ panel on the post/page edit screen.

You can find that on the right-hand side of your post editor screen. Clicking on the ‘Revisions’ will take you to post revisions screen.

Gutenberg WordPress Post Revisions

The post revision screen will show you the latest revision of the post with a scrollbar on top. Sliding the button on the scroll bar will take you to earlier revisions of the post.

WordPress Post revision screen

Changes made in each revision will be highlighted in green and pink colors. On the top, you can see the user who made these changes, time, and other information.

WordPress will also let you know if a revision is an autosave or a draft.

Autosaved Post WordPress

You can use the next and previous buttons to move around revisions.

Plus, you can check the box on top that says ‘Compare any two revisions’. Doing so will split the scrollbar button into two, and you can take each button to a different revision and compare the difference between two distant revisions.

Compare Two revisions WordPress posts

To restore a revision, you can simply click on Restore This Revision or Restore This Autosave button.

WordPress will restore the selected revision as your current post revision, and you can then save it as a draft.

Restore a Revision in WordPress

Keep in my mind that restoring to an earlier revision will not delete the latest version of your post. Instead, WordPress will store it in the database as another revision.

Using Post Revisions with Old WordPress Editor

In case you haven’t upgraded your WordPress to Gutenberg and still using the old Classic Editor, you’ll find the post revisions in the publish meta box on the right panel of the post/page edit screen.

Browse Post Revisions in WordPress Classic Editor

To view the post revisions, you can simply click the ‘Browse’ link next to the number of revisions. Apart from this, the post revisions work similarly in both the Classic Editor and Gutenberg.

Limiting or Deleting Post Revisions in WordPress

All post revisions are stored in your WordPress database. Due to this, many users worry that too many revisions can slow down their websites.

It is not true.

WordPress skips post revisions when making database calls on the front end. It only looks for revisions on the post edit screen, or when you are actually browsing revisions.

WordPress allows you to control how many revisions you want to keep for an article. To limit post revisions, simply add this code to your WordPress site’s wp-config.php file.

define( 'WP_POST_REVISIONS', 10 );

Don’t forget to replace 10 with the number of revisions you want to keep for each post.

You can also delete old post revisions. If you are sure that you’ll never need those revisions, then here is how you can delete them.

First, make a new WordPress backup of your site. This will allow you to restore your website if something goes wrong.

Next, you need to install and activate the WP-Optimize plugin. For more details, see our step by step guide on how to install a WordPress plugin.

Upon activation, go to WP-Optimize » Database page and check the box next to ‘Clean all post revisions’ option.

Clean post revisions

Now click on the ‘Run optimization’ button to delete all post revisions. You can uninstall the plugin after you have deleted the revisions.

Note: Deleting revisions will not stop WordPress from saving revisions for your future posts.

We hope that this article helped you understand how to use post revisions to undo changes in WordPress. You may also want to see our tips on creating a killer editorial calendar in WordPress.

If you liked this article, then please subscribe to our YouTube Channel for WordPress video tutorials. You can also find us on Twitter and Facebook.

The post How to Undo Changes in WordPress with Post Revisions appeared first on WPBeginner.
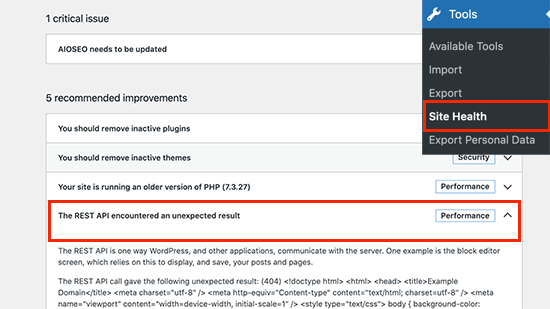
Common Gutenberg Questions Answered (WordPress 5.0+ FAQ)

WPBeginner has been helping users learn WordPress for nearly a decade. Over these years, we’ve published thousands of tutorials to help you successfully create a WordPress site and grow your business.

Over a month ago, WordPress 5.0 was released with a new content editor called Gutenberg. Since then, we’ve been receiving a lot of questions regarding the update. In this article, we’ll answer some of the most frequently asked Gutenberg questions.

Common Gutenberg Questions Answered

1. Why did WordPress introduce Gutenberg?

For a long time, WordPress used a TinyMCE based editor to create posts and pages. The Classic WordPress editor was a simple text window with few buttons on top for basic formatting options.

While it worked well, users had to learn different approaches to add images, create galleries, embed videos, add tables and other content elements. This learning curve combined with modern web standards made WordPress seem like it’s harder to use when compared to other popular website builders.

The new WordPress block editor introduces a modern streamlined writing experience where each content element is wrapped in a block. You can move these blocks around the editor, change their settings, and create engaging content layouts without writing code.

New WordPress editor called Gutenberg block editor

The Gutenberg editor also provides a powerful framework for theme and plugin developers to build advanced solutions for WordPress.

2. How can I check if the theme and plugins I’m using are Gutenberg compatible?

The easiest way to check if your theme and plugins are Gutenberg compatible is to find if they’re supporting WordPress version 5.0+.

Gutenberg Editor was launched as the default content editor in WordPress 5.0, so a theme or plugin that has a “tested with version 5.0” label means that they are compatible with Gutenberg.

You can find the “Tested with” label in the WordPress.org plugins directory by searching your plugin’s name.

Search WPForms plugin in WordPress.org

In the results, you’ll see the WordPress version your plugin is tested with. For instance, you can see WPForms is tested with WordPress 5.0.3 at the moment.

WPForms plugin tested with WordPress 5.0 plus

This means that WPForms is a Gutenberg compatible plugin.

For a WordPress theme, it’s best to visit your theme’s official website and check if they’ve made any official announcement about Gutenberg support.

If you don’t see any information on their marketing page, then you can visit their blog or knowledgebase and search the ‘Gutenberg’ keyword.

For example, if you’re using Divi theme, you can search their documentation.

Search 'Gutenberg' keyword in theme site's documentation

This will help you find articles including their official announcement on Gutenberg support.

If you don’t see any article from your theme or plugin authors about Gutenberg upgrade, then you’ll need to contact them.

Once you’ve confirmation about all your theme and plugins’ Gutenberg compatibility, you can confidently update your site to WordPress 5.0.

To prevent errors and conflicts, we have created a complete guide on how to test your WordPress site for upgrading to Gutenberg

3. How to manage my old posts in the Gutenberg block editor?

After you update your site to WordPress 5.0, your old post content will be wrapped inside the Classic block inside the Gutenberg editor.

Classic Block in Gutenberg Editor

You can edit everything just like before inside the Classic block.

You can also convert your old post content into Gutenberg blocks. Simply click the Convert to Blocks option from your Classic block’s dropdown menu, and then it’ll automatically convert your post content into appropriate blocks.

Convert Old Post Content to Blocks in WordPress Block Editor

For detailed instructions, you can read our step by step guide on updating your old WordPress posts with Gutenberg.

4. How can I disable Gutenberg and bring back the Classic Editor?

A lot of users are not ready to make the switch to the Gutenberg editor due to one reason or another.

In that case, you do have the option to disable Gutenberg and bring back the Classic Editor.

All you need to do is install and activate the Classic Editor plugin.

Classic Editor WordPress plugin

Using this plugin, you can easily disable Gutenberg and use the classic editor on your site.

Classic Editor plugin will be available until at least 2022 or as long as necessary.

This should provide plenty of time for users to test their websites with Gutenberg and upgrade when they feel comfortable.

5. Is Gutenberg a WordPress Page Builder?

Gutenberg is a block-based editor which uses content elements called blocks to build posts and pages. Similarly, WordPress page builders also use blocks, also known as widgets, modules, or elements for creating pages in WordPress.

This has caused confusion amongst users, and we have been asked the question if Gutenberg is a WordPress page builder alternative.

The answer is ‘No, not at least in its current form’.

WordPress page builder plugins provide a lot more advanced functionalities for creating landing pages in WordPress.

Most of the page builders are frontend editors whereas Gutenberg is a backend editor. Here’s how you can edit content in Gutenberg Content Editor.

Gutenberg Post Edit Screen

And, below is how one of the best page builders, Beaver Builder, looks like when you’re editing a page:

Creating a page with Beaver Builder best page builder plugin

Page builder blocks are truly drag and drop elements which support free-form dragging and dropping. Whereas, Gutenberg blocks support drag and drop only for reordering the blocks.

In simple terms, Gutenberg is a basic editing interface whereas page builders are advanced page editors. You can use both of them for cutting-edge landing pages in WordPress.

For a more detailed answer, please see our detailed explanation of Gutenberg vs WordPress Page Builders.

6. How can I update page builder content with Gutenberg?

Updating your content created with page builders should not be a problem. The method you use to update your content may vary from one page builder to another.

Therefore, you’ll need to contact your plugin provider for an updating tutorial.

Also, you can check their official website to find their announcements on Gutenberg support.

7. Does Gutenberg support shortcodes?

Yes, Gutenberg supports shortcodes. There’s a separate Shortcode block in Gutenberg to add content with shortcodes.

Shortcode Block in Gutenberg Editor

WordPress blocks are defined as an evolution of the [shortcode], so using regular Gutenberg blocks is recommended instead of shortcodes.

For example, you can add your WPForms to your posts or pages using a shortcode.

WPForms all forms with shortcodes

All you have to do is copy the shortcode from the Forms Overview screen, and then paste it in the Shortcode block on the post edit screen.

Add shortcode to Gutenberg Editor

However, the better option is to use the WPForms Gutenberg block directly instead of pasting the form shortcode in the Shortcode block.

WPForms Widget for Gutenberg

8. Who can I contact if something is broken after upgrading to Gutenberg?

Gutenberg should not ideally break anything on your site however conflict with your theme and plugins can cause some errors.

It’s always recommended to test your site on a staging area before upgrading to Gutenberg.

However, you may sometimes find unexpected errors. If this happens, you should first disable Gutenberg and activate the Classic editor on your site.

Then, contact your theme and plugin companies to request support.

9. How can I learn more about Gutenberg?

You can learn more about Gutenberg right here on WPBeginner. We are the best free WordPress resource website on the internet.
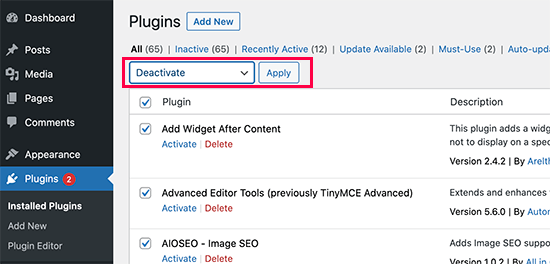
We’ve already published a number of articles on the new WordPress Block Editor aka Gutenberg. We’ll be publishing more tutorials in the future to help you master the new block editor.

We hope this article helped you find answers to the common Gutenberg questions on your mind. If you have further questions, please reach out to us by leaving a comment or by using the contact form on our website.

You may also want to see our list of the must have WordPress plugins and tools for every successful website.

If you liked this article, then please subscribe to our YouTube Channel for WordPress video tutorials. You can also find us on Twitter and Facebook.

The post Common Gutenberg Questions Answered (WordPress 5.0+ FAQ) appeared first on WPBeginner.
How to Test Your Site for Updating to Gutenberg (WordPress 5.0)

Are you excited to use the new WordPress Gutenberg editor? Officially launched with WordPress 5.0, Gutenberg is the new default content editor for WordPress that allows you create visually stunning content using blocks.

The challenge is that some themes and plugins may not properly support Gutenberg, so updating your website can cause unexpected issues.

In this article, we’ll show you how to test your WordPress site for updating to Gutenberg and WordPress 5.0.

Testing your site for update to Gutenberg and WordPress 5.0

Why Test Your WordPress Site Before Updating to Gutenberg?

WordPress 5.0 brings a totally new way of creating content with a brand new editor called The Block Editor or Gutenberg. It uses blocks which are content elements that you can move around the editor.

New WordPress Block Editor also known as Gutenberg

WordPress 5.0 with Gutenberg editor is indeed a revolutionary improvement to the WordPress platform.

However due to this massive change, some users are reluctant to update their sites right away, fearing that something would not work, or it may break their website.

Gutenberg was developed over a long period with enough time for theme and plugin developers to make their products Gutenberg compatible. All top WordPress plugins are already fully compatible with Gutenberg and most themes would work without a hiccup.

However, to avoid any conflicts you may want to test your site with Gutenberg and WordPress 5.0. This would allow you to find if any of your plugins or theme are incompatible. You can also catch unexpected errors and fix them before updating your live site.

That being said, now let’s go ahead and check how to test your website for updating to Gutenberg or WordPress 5.0 step-by-step.

Step 1: Create a Complete Backup of Your Website

You must always create a complete back of your WordPress website before any major update. Backups protect you against any unfortunate damage that can happen during the update process.

Keeping regular website backups is important even if you aren’t updating your site because they can save you in catastrophic situations like malware attack, hacking, etc.

There are plenty of WordPress backup plugins that you can choose from. We recommend using UpdraftPlus because it allows you to setup automatic backups and store them on a remote location.

Step 2: Test Your Site on Local Server or Staging Site

After you’ve created a complete backup of your website, you are now ready to test your website with WordPress 5.0 and the new Gutenberg editor.

There are two common methods to test new updates without actually affecting your live site.

  1. Test your website on a local server installed on your computer
  2. Test your website on a staging server

Both options allow you to test WordPress 5.0 with the new Gutenberg editor with your existing content, plugin, and themes.

1. Test Your Website on Local Server

Using a local server simply means installing your WordPress site on your personal computer with a software like WAMP or MAMP (for Mac).

In this method, you’ll first move a copy of your live WordPress site to local server using a migration plugin like Duplicator.

Duplicator WordPress plugin

Then on the local site, you can update to WordPress 5.0 and test out all your plugins / themes for compatibility with the new editor.

You can also make changes on the local site and upload it to your live site when you are done.

If you didn’t need to make any changes to the local site, and everything seemed ok, then you can go ahead and update your live site to WordPress 5.0.

2. Test Your Website on Staging Environment

A staging site is a separate development version of your website where you can try out new features.

It’s usually a sub-domain of your site that’s restricted from public access. It’s where you can test new updates, themes, plugins, or use it for all your development. Once you’ve tested everything necessary, you can then upload it to your live site.

Most top WordPress hosting companies offer 1-click staging site installation from your hosting account.

If your site is hosted with Bluehost, then you’ll find an option to create a staging site under the Bluehost menu in your WordPress admin dashboard.

Creating a staging site in Bluehost

You can also create 1-click staging sites on WPEngine and SiteGround. If you are not using any of these hosting companies, then you should ask your host because they may offer this feature.

If your hosting service doesn’t have staging site installation feature, then you can still do it manually on your own. Here’s our step by step tutorial on how to create a staging environment in WordPress.

Step 3: Install the Classic Editor Plugin

The most significant change in WordPress 5.0 is the new Gutenberg editor.

This means that if you were to run into any issues, then it’ll likely be caused by a plugin or theme’s incompatibility with the new editor.

It is also possible that you may not like the new editor.

Luckily, you can update to WordPress 5.0 and still keep the classic WordPress editor.

You can simply disable Gutenberg by installing the Classic Editor plugin on your WordPress site. Doing this will allow you to safely update to WordPress 5.0, while still keeping the classic editor that you’re familiar with.

Switching to the classic editor

Classic Editor is an official WordPress plugin from WordPress core contributors to allow you to switch back to the classic editor. With this plugin, you can hide the Gutenberg editor and create content the same way as before.

If you had to install Classic Editor because a theme or plugin wasn’t working after updating to WordPress 5.0, then you still have work to do.

You need to reach out to the theme or plugin developer and request them to make it compatible with the latest WordPress release.

If you don’t get a positive response, then you need to find an alternative theme or plugin to replace incompatible ones.

Step 4. Things to Do After Updating to Gutenberg in WordPress 5.0+

If you are just starting your first WordPress blog, then you are in luck. You’ll quickly get used to the awesome new block editor which is faster, modern, and incredibly powerful.

On the other hand, if you have been using WordPress for a while, then the new editor is an exciting new experience for you.

Most of us are used to working with the old editor and have setup our workflows around it.

Good news is that you can still do all the things you did in the old editor with Gutenberg, and then some more.

To help you learn new features, we have created a complete Gutenberg tutorial it shows how to use new block editor and create visually stunning content for your site.

We hope this article helped you to learn how to test your WordPress site for updating to Gutenberg or WordPress 5.0. For troubleshooting common errors you may encounter, check out our guide on most common WordPress errors and how to fix them.

If you liked this article, then please subscribe to our YouTube Channel for WordPress video tutorials. You can also find us on Twitter and Facebook.

The post How to Test Your Site for Updating to Gutenberg (WordPress 5.0) appeared first on WPBeginner.

How to Use the New WordPress Block Editor (Gutenberg Tutorial)

In WordPress 5.0, the classic content editor was replaced with a brand new block editor, known as Gutenberg. Since then, several of our readers have asked us to create a comprehensive tutorial on how to use the Gutenberg block editor in WordPress.

WordPress block editor is a totally new and different way of creating content in WordPress. In this tutorial, we will show you how to use the new WordPress block editor and master it to create visually stunning blog posts and pages.

Using the new WordPress block editor aka Gutenberg

What’s The Difference Between Block Editor (Gutenberg) and Classic Editor?

Before we dive into the new editor, let’s first compare and understand the differences between Gutenberg Block Editor and the Classic Editor.

Here is what the classic editor in WordPress looked like:

Old WordPress editor

If you upgrade to WordPress 5.0, then this is what the new block editor looks like:

New WordPress Block Editor also known as Gutenberg

As you can see, they are two completely different editors for creating content in WordPress.

The old classic editor was a text editor with formatting buttons very similar to Microsoft Word.

The new editor uses a totally different approach, called ‘Blocks’ (hence, the name Block Editor).

Blocks are content elements that you add to the edit screen to create content layouts. Each item you add to your post or page is a block.

You can add blocks for each paragraph, images, videos, galleries, audio, lists, and more. There are blocks for all common content elements and more can be added by WordPress plugins.

How is the new WordPress block editor better than the classic editor?

The new WordPress block editor offers a simple way to add different types of content to your posts and pages.

For example, previously if you wanted to add a table in your content, then you needed a separate table plugin.

With the new editor, you can simply add a table block, select your columns and rows, and start adding content.

Table block

You can move content elements up and down, edit them as individual blocks, and easily create media-rich content.

Most importantly, the new WordPress block editor is easy to use and learn.

This gives an immense advantage to all WordPress beginners who are just starting their first blog or building a DIY business website.

That being said, let’s take a look at how to use the new WordPress block editor like a pro to create great content.

Here is what we will cover in this Gutenberg tutorial:

  1. Using Gutenberg – The new WordPress block editor
  2. Creating a new blog post or page
  3. How to add a block in Gutenberg
  4. Working with blocks in the new editor
  5. Saving and reusing blocks in Gutenberg
  6. Publishing and post settings in Gutenberg
  7. Plugin settings in new editor
  8. Adding some common blocks in Gutenberg
  9. Exploring some new content blocks in Gutenberg
  10. Bonus tips on using Gutenberg like a pro
  11. Adding more blocks to Gutenberg Block Editor
  12. FAQs about Gutenberg

Ready? Let’s dive in.

Using Gutenberg – The New WordPress Block Editor

The block editor is designed to be intuitive and flexible. While it looks different than the old WordPress editor, it still does all the things that you were able to do in the classic editor.

Let’s start with covering the basic things that you did in the classic editor, and how they are done in the block editor.

Creating a New Blog Post or Page Using The Block Editor

You will start creating a new blog post or page like you normally would. Simply click on Posts » Add New menu in your WordPress admin. If you are creating a page, then go to Pages » Add New menu.

Adding a new post

This will launch the new block editor.

How to Add a Block in Gutenberg

The first block of every post or page is the title.

After that, you can use the mouse to move below the title or press the tab key on your keyboard to move down and start writing.

Adding a post title in Gutenberg

By default, the next block is a paragraph block. This allows users to start writing right away.

However, if you want to add something different, then you can click on the add new block button on the top left corner of the editor, below an existing block, or on the left side of a block.

Add new block button

Clicking on the button will show the add block menu with a search bar on top and commonly used blocks below.

You can click on tabs to browse block categories or type in the keyword to quickly search for a block.

Finding and adding blocks in Gutenberg

If you don’t want to use a mouse to click on the button, then you can use a keyboard shortcut by typing / to search and add a block.

Working with Blocks in The New Editor

Each block comes with its own toolbar which appears on top of the block. The buttons in the toolbar would change depending on the block you are editing.

For example, in this screenshot, we are working in a paragraph block which shows basic formatting buttons like: text alignment, bold, italic, insert-link, and strikethrough buttons.

Each block comes with its own toolbar

Apart from the toolbar, each block can also have its own block settings which would appear in the right column of your edit screen.

Block settings

You can move blocks up and down by simple drag and drop or by clicking the up and down buttons next to each block.

Moving a block up and down

Saving and Reusing Blocks in Gutenberg

One of the best things about blocks is that they can be saved and reused individually. This is particularly helpful for bloggers who frequently need to add specific content snippets to their articles.

Simply click on the menu button located at the right corner of each block’s toolbar. From the menu, select ‘Add to reusable blocks’ option.

Saving a block to reuse later

You will be asked to provide a name for this reusable block. Enter a name for your block and then click on the save button.

Giving a name to reusable block

The block editor will now save the block as a reusable block.

Now that you have saved a block, let’s see how to add the reusable block into other WordPress posts and pages on your site.

Simply edit the post or page where you want to add the reusable block. From the post edit screen, click on the add block button.

You will find your saved block under the ‘Reusable’ tab. You can also find it by typing its name in the search bar.

Insert a reusable block

You can take your mouse over it to see a quick preview of the block. Simply click on the block to insert it into your post or page.

All reusable blocks are stored in your WordPress database, and you can manage them by clicking on the ‘manage all reusable blocks’ link.

Manage your reusable blocks

This will bring you to the block manager page. From here, you can edit or delete any of your reusable blocks. You can also export reusable blocks and use them on any other WordPress website.

Import export reusable blocks in WordPress

Publishing and Managing Options in Gutenberg Block Editor

Each WordPress post contains a lot of metadata. This includes information like publish date, categories and tags, featured images, and more.

All these options are neatly placed in the right column on the editor screen.

Document settings in Gutenberg the new WordPress editor

Plugin Options in Gutenberg

WordPress plugins are able to take advantage of the block editor’s API to integrate their own settings within the edit screen.

Some popular plugins are already available as blocks. For example, WPForms, the best WordPress form builder plugin allows you to add forms into your content using a widget block.

WPForms block in new Gutenberg editor

Here is how Yoast SEO allows you to edit your SEO settings in the new editor:

Yoast SEO settings in new Gutenberg editor

WooCommerce also comes with widget blocks that you can easily add to any of your WordPress posts and pages.

WooCommerce products block

Adding Some Common Blocks in New Editor

Basically, the new editor can do everything the classic editor did. However, you will be doing things way quicker and elegantly than before.

1. Adding an image in new WordPress editor

There is a ready to use image block in the new WordPress editor. Simply add the block and then upload an image file or select from the media library.

Image block in new WordPress editor

You can also drag and drop images from your computer, and the editor will automatically create an image block for it.

Once you have added an image, you will be able to see the block settings where you can add metadata for the image like alt text, size, and add a link to the image.

Image block settings

2. Adding a link in new block Editor

The block editor comes with several blocks where you can add text. Most commonly used one is the paragraph block which comes with an insert link button in the toolbar.

All other commonly used text blocks also include a link button in the toolbar.

Link button in the list block

You can also insert a link using the keyboard shortcut, which is Command + K for Mac and CTRL + K on Windows computers.

3. Adding an image gallery in Gutenberg

The gallery block works like the image block. You add it and then upload or select image files.

Adding image gallery in new WordPress editor

4. Adding shortcodes in WordPress posts using Gutenberg

All your shortcodes will work just like they did in the classic editor. You can simply add them to a paragraph block, or you can use the shortcode block.

Adding a shortcode block

Exploring Some New Content Blocks in Gutenberg

The Gutenberg editor promises to solve some long-standing usability issues in WordPress by introducing some new blocks.

Following are some of the favorites that we believe users will find immensely helpful.

1. Adding an image next to some text in WordPress

Using the old editor, many of our users were unable to place an image next to the text. You can do this now with the Media & Text block.

Media and Text block

This simple block comes with two blocks placed side-by-side allowing you to easily add an image and add some text next to it.

2. Adding a button in WordPress posts and pages

Adding a button to your blog posts or pages was another annoyance in the classic editor. You either had to use a plugin that created a shortcode for the button, or you had to switch to HTML mode and write code.

Gutenberg comes with a button block that allows you to quickly add a button to any post or page.

Adding a button block in Gutenberg

You can add a link for your button, change colors, and choose from three button styles.

3. Adding beautiful cover images in blog posts and landing pages

Another cool feature that you may want to try is the ‘Cover’ block, which allows you to add cover images to your posts and pages.

A cover image is a wider image often used as a cover for a new section in a page or the beginning of a story. They look beautiful and allow you to create engaging content layouts.

Simply add a cover block and then upload the image you want to use. You can choose an overlay color for the cover or make it a fixed background image to create parallax effect when users scroll down the page.

The cover image block in Gutenberg editor

4. Creating tables inside articles

The classic editor didn’t have a button to add tables into your WordPress posts. You had to use a plugin or create a table writing custom CSS and HTML.

New Gutenberg editor comes with a default Table block, which makes it super easy to add tables into your posts and pages. Simply add the block and then select the number of columns and rows you want to insert.

Table block

You can now go ahead and start adding data to table rows. You can always add more rows and columns if needed. There are also two basic style options available.

5. Creating multi-column content

Creating multi-column content was another issue that the classic editor didn’t handle at all. The block editor allows you to add Columns block, which basically adds two columns of paragraph blocks.

Multi-column content

This columns block is quite flexible. You can add up to 6 columns in a row and even use other blocks inside each column.

Bonus Tips to Use Gutenberg like a Pro

Looking at the new block editor, you may be wondering whether you will be spending more time adding and adjusting blocks than creating actual content?

Well, the new editor is incredibly fast and even very basic usage for a few minutes will allow you to instantly add blocks without even thinking.

Pretty soon you will realize how much faster your workflow will become with this new approach.

For power users, here are some bonus tips to help you work even faster with the new WordPress editor.

1. Move the block toolbar to the top.

As you may have noticed in the screenshots that there is a toolbar that appears on top of every block. You can move this toolbar to the top of the editor.

Simply click on the three-dot button at the top right corner of the screen and then select the Top Toolbar option.

Move the block toolbar to the top of the editor

2. Use keyboard shortcuts

Gutenberg comes with several handy shortcuts that will make your workflow even better. The first one you should start using right away is the /.

Simply enter / and then start typing, and it will show you matching blocks that you can instantly add.

For more shortcuts, click on the three-dot menu on the top-right corner of your screen and then select ‘Keyboard Shortcuts’.

Launch keyboard shortcuts

This will bring up a popup with the list of all the keyboard shortcuts that you can use. The list will have different shortcuts for Windows and Mac users.

3. Drag and drop media to automatically create media blocks

Gutenberg allows you to just drag and drop files anywhere on the screen and it will automatically create a block for you.

You can drop a single image or video file, and it will create the block for you. You can also drop multiple image files to create a gallery block.

Drag and drop gallery block in new WordPress editor

4. Adding YouTube, Twitter, Facebook, Vimeo, and other embeds

Gutenberg introduces new embed blocks to the block editor. There is a block for all supported embed types including YouTube, Twitter, Facebook, and more.

Embed blocks

However, you can just copy and paste the embed URL at any point, and it will automatically create a block for you.

For example, if you added a YouTube video URL, it will automatically create a YouTube embed block and display the video.

YouTube embed

Adding More Blocks to Gutenberg Block Editor in WordPress

The new block editor in WordPress allows developers to create their own blocks. There are some awesome WordPress plugins offering block bundles for the new editor.

Here are a few of them:

1. Advanced Gutenberg

Advanced Gutenberg

Advanced Gutenberg comes with several blocks for popular content elements like WooCommerce product slider, testimonials, maps, counter, tabs, accordions, and more.

It also gives you advanced control on which users can access blocks based on their user roles. You can create user profiles and select which blocks they can add.

2. Stackable – Gutenberg Blocks

Stackable - Gutenberg Blocks

Stackable – Gutenberg Blocks is a collection of beautifully designed Gutenberg blocks that you can use on your website. It includes blocks for the container, posts, feature grid, accordion, image box, icon list, call to action, and more.

3. Editor Blocks

Editor blocks for Gutenberg

Editor Blocks is another neat collection of Gutenberg blocks that you can use. It comes with useful blocks like author profile, hero image, pricing table, brands, features, and more.

FAQs about Gutenberg – The New Block Editor in WordPress

Since Gutenberg became the new WordPress editor, we have been getting a lot of questions. Here are the answers to some of the most frequently asked questions about Gutenberg.

1. What happens to my older posts and pages? Can I still edit them?

Your old posts and pages are completely safe and unaffected by the Gutenberg. You can still edit them, and Gutenberg will automatically open them in a block containing the classic editor.

Editing older articles in new WordPress editor

You can edit them inside the old editor, or you can convert older articles into blocks and use the new block editor.

2. Can I still keep using the old editor?

Yes, you can still keep using the old editor. Simply install and activate the Classic Editor plugin.

Upon activation, it will disable the block editor, and you will be able to continue using the classic editor.

Please note that Classic Editor will be supported until 2022.

3. What to do if the new editor doesn’t work with a plugin or theme I am using?

Project Gutenberg was under development for a long time. This gave plugin and theme authors plenty of time to test their code for compatibility.

However, there is still a chance that some plugins and themes may not work well with the new editor. In that case, you can install the classic editor plugin, request the developer to add Gutenberg support, or simply find an alternative plugin or theme.

4. How to learn more Gutenberg tips and tricks?

WPBeginner is the best place to learn about the new block editor in WordPress. We are the largest WordPress resource site on the internet.

We will be publishing new articles and updating our old resources to help you master the new block editor.

Meanwhile, if you have any questions, feel free to reach out to us by leaving a comment or by using the contact form on our website.

We hope this Gutenberg tutorial helped you learn how to use the new WordPress block editor. You may also want to see our complete WordPress performance guide for improving your website speed.

If you liked this article, then please subscribe to our YouTube Channel for WordPress video tutorials. You can also find us on Twitter and Facebook.

The post How to Use the New WordPress Block Editor (Gutenberg Tutorial) appeared first on WPBeginner.
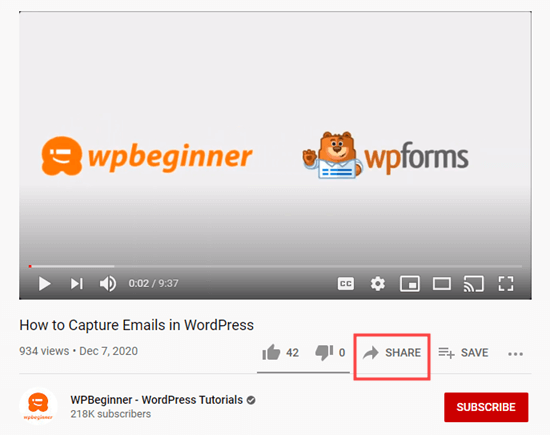
Official Resources for the Gutenberg Block Editor

Just a quick post to share some recommended useful resources for anyone working with the new Gutenberg Block Editor. Our book Digging Into WordPress now links to this post, so readers can learn more and dive deep into Gutenberg. Or just bookmark for future reference. What does that mean? It means that this page will be updated with any new useful and official resources. And by "official" just means the information is sourced/hosted at WordPress.org.

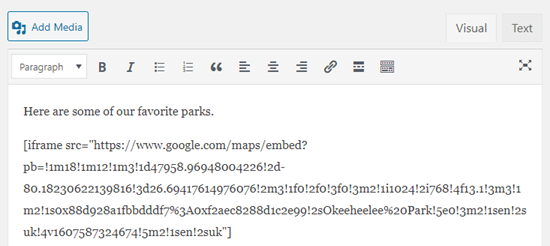
Learn more about Gutenberg

There are many official posts that are useful in specific contexts. This list focuses on just the main resources for learning more about Gutenberg Block Editor. Starting points for digging in and branching out.
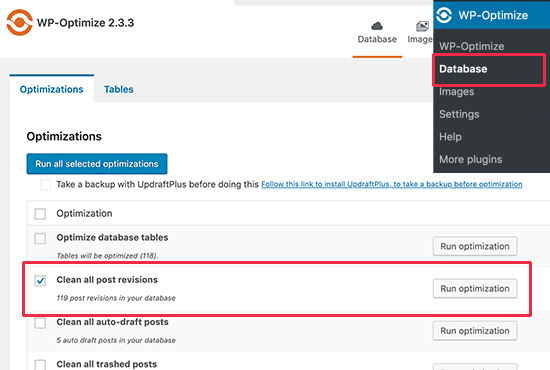
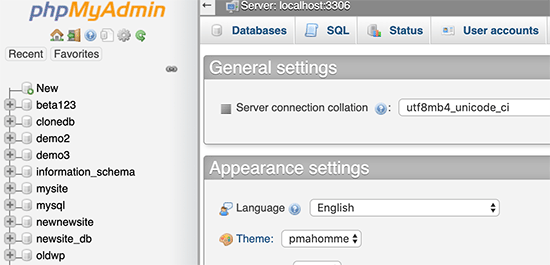
Any one of these resources will open many doors for further learning and exploration of the Gutenberg Block Editor and related WordPress features.

Gutenberg Alternatives

The Gutenberg Block Editor has come a long way since it first began as a plugin. But not everyone is ready for the changes. Some folks like myself prefer the original "classic" editor. So for anyone looking for alternatives to Gutenberg, here are some resources that may be useful.

  • Classic Editor — official plugin by the WP team to restore the Classic Editor, already over 1 million active installations.
  • Disable Gutenberg — free WP plugin that completely disables all traces of Gutenberg and restores the Classic Editor. Includes robust options for custom configuration and selective enabling of the Block Editor.
  • ClassicPress — the new "Gutenberg-free" version of WordPress (forked at WP 4.9) that's focused on providing a reliable, consistent CMS.

Or if you are a developer and would like to know how to disable Gutenberg or selectively enable the Block Editor, check out these DigWP tutorials:

Plus there are lots of other plugins now available to help you configure, customize, and disable Gutenberg. Also lots of plugins to help you customize and extend the Block Editor, visit the WordPress.org Plugin Directory to explore the possibilities.

Bonus tip

Also useful if you want to look at the "Welcome" screen for WordPress 5.0 (or whichever version you are using), just enter the following URL while logged into your WordPress site:

https://example.com/wp-admin/about.php?updated

Or if you have WordPress installed in a subdirectory, say, /wordpress/, you would enter this URL instead:

https://example.com/wordpress/wp-admin/about.php?updated

Then you would replace "example.com" with your actual domain. That should get you to the "Welcome" screen for your current version of WordPress. So for awhile you can get a broad look at Gutenberg, how it works, features, etc.

WordPress 5.0 Welcome Screen

Send any suggestions for useful/official Gutenberg resources that should be added to this post, please comment or contact direct, thank you! :)