How to Show Random Quotes in Your WordPress Sidebar

Do you want to show random quotes in the WordPress sidebar?

Displaying quotes from happy customers can convince more visitors to buy your products. Or you might simply want to brighten your audience’s day by showing them a random inspirational quote. 

In this article, we will show you how to easily show random quotes in the WordPress sidebar by using a free plugin.

How to Show Random Quotes in WordPress Sidebar

How to Show Random Quotes in Your WordPress Sidebar

You can show random quotes in the WordPress sidebar using the Quotes and Tips plugin. It lets you add an unlimited number of quotes to your site.

It also lets you display quotes on any page, post, or widget area, including your WordPress sidebar.

First, you’ll need to install and activate the plugin. If you need help, then please see our guide on how to install a WordPress plugin

After activating the plugin, you can start adding quotes. To add your first quote, go to Quotes » Add New.

How to add a new random quote

First you’ll need to type a title for your quote into the ‘Add Title’ field. In a later step, we’ll show you how to choose whether or not to display the quote’s title to your visitors, or use it for internal reference only.

Next, type your quote into the text editor. In our example, we’re using a quote from a case study.

A quote from an OptinMonster customer

You may want to organize your quotes into categories. This becomes important when it’s time to display your quotes.

Basically, you have two options.

The Quotes and Tips plugin can select a random quote from all of the quotes you’ve added. Or, it can select a random quote from a specific quote category.

For example, if you have an online store, you might want to display quotes about a specific product on that product page only.

If you already have some categories in mind, then it makes sense to organize your quotes into these categories now. But you can always add, remove, and edit your categories later. We’ll be covering that at the end of the post.

If you do want to create a quote category now, then you can find the Quotes Categories box on the right side of the page.

To add your category, first click on the ‘Add New Quotes Category’ link.

Adding a new quote category

A field will display where you can type your category name. The category won’t appear to your visitors, so it’s just for your reference.

After you type it in, click on the ‘Add New Quotes Category’ button. 

This category will now appear in the Quotes Category tab. To add the current quote to this category, simply select the category’s checkbox. 

Selecting a quote category in the WordPress dashboard

You can keep repeating these steps to create more quote categories. 

Next, you’ll typically want to show where a quote comes from. This might be a valued customer, a famous brand, or even a celebrity.

To assign your quote to a person or company, scroll down to the ‘Name and Official Position’ section.

You can now type the person or company’s name into the Name field. 

The Name and Official Position settings

You might also want to add this person’s job title, or some information that explains why they’re qualified to make this statement. You can type this information into the Official Position field.

When you’re happy with your quote, click on the Publish button. 

You can now repeat these steps to create all of the quotes that you want to show in your WordPress sidebar.  

Configuring Your Quotes and Tips Settings 

After creating your quotes, it’s time to take a look at the Quotes and Tips settings. This contains some important settings that control how and when your site displays a random quote. 

To take a look at these settings, go to Tips » Settings

The Quotes and Tips settings page

By default, Quotes and Tips will display a new quote every time the page reloads. This means visitors will see a new quote every time they visit a new page or press the Refresh button in their web browser. 

If you prefer, you can display a new quote automatically every few seconds or minutes. The visitor doesn’t even have to refresh their web browser.

To do this, select ‘AJAX (no page reload).’ You can then find the Change Frequency field. Here, simply type how frequently WordPress should display a new quote in seconds.

Changing the quote frequency

Next, it’s time to choose the title that will appear above your quote. 

The default setting is ‘Set Title From Post’. This will display the title you entered when adding the quote to WordPress.

Another option is creating a title that WordPress will use for all of your quotes. This might be something such as ‘Words of Wisdom’ or ‘Don’t take our word for it! Here’s what our customers think’ for testimonials.

To use the same title for all your quotes, click on ‘Set Custom Titles.’ You can now type your title into the Quote Title field. 

Setting your quote title in the WordPress dashboard

When you’re finished, don’t forget to click on the Save Changes button. 

How to Display a Random Quote 

Now it’s time to display your quotes.

Let’s start by showing a random quote from your entire quote collection. If you’ve created multiple categories, then this method will ignore all of these categories. 

You can add your quote to any page, post, or widget using the Quotes and Tips shortcode. To get this shortcode, go to Quotes » Settings

Now, copy the shortcode in the ‘Quotes and Tips’ section.

The WordPress quotes shortcode

Another option is to simply copy the following: [quotes_and_tips]

Since we want to show random quotes in the WordPress sidebar, you’ll need to go to Appearance » Widgets. This shows all the areas of your site that support widgets. 

The WordPress 'Widgets' settings

This screen may look slightly different depending on your WordPress theme. However, most modern WordPress themes have a sidebar. 

Find the Main Sidebar or similar section, and give it a click. This section will now expand.

The WordPress Main Sidebar settings

You need to add a Shortcode block to this widget, so click on the + button. In the search field, type Shortcode. 

You can now select the Shortcode block when it appears. Next, either paste or type the shortcode into this block. 

Finally, click on the blue Update button at the top of the screen. Now, if you visit your website you should see a random quote in your WordPress sidebar. 

How to Display Random Quotes From a Specific Category 

Another option is to display a quote from a specific quote category.

To display a random quote from a particular category, you’ll need to use a different shortcode.

To get this code, head over to Quotes » Quote Category

Here, you’ll find a list of all the categories you’ve created. Each category has its own shortcode. 

A list of WordPress quote categories

Simply find the category that you want to use, and copy its shortcode. You can then paste this shortcode into any page, post, or widget, following the same process above.

How to Style and Brand Your Random Quotes

By default, Quotes and Tips adds a blue background to the quote area. It also uses a background image of silhouettes.

You can change this default styling to better match the rest of your website’s design. You can even remove the styling completely. 

A random quote in the WordPress sidebar

To change the background color, text color, or background image, go to Quotes » Settings.

In the left menu, click on the Appearance tab.

How to style the random quote in your WordPress sidebar

You can now change the background color and text color, by clicking on the Select Color button.

This adds an area where you can choose your perfect color.

Changing the background color

If you change your mind, you can restore the plugin’s default colors at any point. Simply click on the Default button.

You can also change the background image. To remove the default background image, scroll to Background Image, and then click on the None button.

Customizing the quote's background image

You can also add your own background image.

Using your company or product logo as a background image can be a great way to brand your quotes.

Displaying a random branded quote in WordPress sidebar

To upload a new background image, click on the Custom button. This adds a Choose File button. 

Give this button a click. This will open a window where you can select the file that you want to use as your background image.

Uploading a new image to your random quote

After making your choice, you can customize how this image looks on your site.

This includes changing the background image alignment and the opacity, which is how transparent the background image is.

Why not experiment, to see what different effects you can create?

How to Add, Edit and Delete Quote Categories 

Sometimes, you may want Quotes and Tips to display a completely random quote.

Other times, you may need more control over the kind of quotes that it displays. 

You can do this using quote categories. We’ve already seen how to create a category when adding a new quote. However, Quotes and Tips has an entire menu where you can make changes to these categories, and create new ones.

To see these settings, go to Quotes » Quotes Categories

Editing your quote categories

Here, you can quickly and easily create quote categories. To add a new category, type a name for your category into the Name field.

By default this plugin creates each quote category as a parent category. 

Another option is to create a subcategory. For example, you might have an OptinMonster parent category, and then create subcategories for your different promotions, such as ‘OptinMonster summer sale’ and ‘OptinMonster holiday promotion.’ 

To create a quote subcategory, you’ll need to select a Parent Category.

Choosing the quote parent category

When you’re happy with your quote category, click on the blue Add New Quotes Category button. 

You can also edit any of the categories you created earlier. 

To edit a category, hover over it. Then, click on the Edit link when it appears.

Editing a quote category in the WordPress dashboard

This launches a new page where you can make changes to this category. This includes editing the category’s name, and choosing a new parent.

We hope this article helped you learn how to show random quotes in the WordPress sidebar. Next, you can see our guide on how to increase your blog traffic, or see our expert pick of the best social proof plugins for WordPress 

If you liked this article, then please subscribe to our YouTube Channel for WordPress video tutorials. You can also find us on Twitter and Facebook.

The post How to Show Random Quotes in Your WordPress Sidebar first appeared on WPBeginner.

Choose File and Display : ScrollPane Issue

Hello,

I have a program below where I am selecting a file and displaying the content using a JTextArea. It works fine, but when I add a JScroller, it does not display the area with the scroller. What am I doing wrong?

import javax.swing.*;
import java.awt.*;
import java.awt.event.*;
import java.io.*;

public class ChooseFileAndDisplay extends JPanel implements ActionListener{
    private JButton button;
    private JPanel panel;
    private static JFrame f;
    private JTextArea area = new JTextArea();
    private JScrollPane scroller;
    public ChooseFileAndDisplay(){
        button = new JButton ("Click me");
        button.setPreferredSize(new Dimension(100, 50));
        scroller = new JScrollPane(area);
        button.addActionListener(this);
        JScrollPane scrollPane = new JScrollPane(area);
        scrollPane.setVerticalScrollBarPolicy(ScrollPaneConstants.VERTICAL_SCROLLBAR_ALWAYS);
        add (button);
        add(scrollPane);
    }

    public void actionPerformed (ActionEvent e){
        JFileChooser choose = new JFileChooser();
        choose.showOpenDialog(f);
        File f = choose.getSelectedFile();
        String filepath =f.getAbsolutePath();
        try{
            FileReader reader = new FileReader(filepath);
            BufferedReader br = new BufferedReader(reader);
            area.read(br, null);
            br.close();
        }
        catch (Exception E){
            JOptionPane.showMessageDialog (null, E);
        }
    }

    public static void main (String args[]) {
        ChooseFileAndDisplay P = new ChooseFileAndDisplay();
        f = new JFrame ("Picture Grid");
        f.add(P);
        f.setSize(800, 800);
        f.setVisible (true);
        f.setResizable(false);
    }
}

How to Install a WordPress Plugin – Step by Step for Beginners

After installing WordPress, the first thing every beginner needs to learn is how to install a WordPress plugin.

In simple words, WordPress plugins are like apps for your WordPress website. They allow you to add new features to WordPress like a contact form, slideshow, shopping cart, and more.

There are thousands of free and paid plugins available for WordPress. In this step by step guide, we will show you how to install a WordPress plugin.

Installing a WordPress plugin - A beginner's guide

Before You Start

If you are using WordPress.com, then you cannot install plugins.

We often get complaints from users saying that they can’t see the plugins menu in their WordPress dashboard. It is because you are using WordPress.com, which has its limitations.

You cannot install plugins on WordPress.com unless you upgrade to their business plan. On the other hand, you can install any plugin you want on your self hosted WordPress.org website right out of the box (See the differences between self hosted WordPress.org vs WordPress.com).

If you want to switch from WordPress.com to WordPress.org, then read our tutorial on how to properly move from WordPress.com to WordPress.org.

That being said, now let’s take a look at how to install a WordPress plugin on your website.

How to Install a WordPress Plugin

To make it easy, we have created a video tutorial on how to install a WordPress plugin that you can watch below.

However, if you just want to follow text-instructions, then you can follow our step by step tutorial on how to install a WordPress plugin.

We have covered all three methods: installing a WordPress plugin using search, uploading a WordPress plugin, and manually installing a WordPress plugin using FTP.

Ready? Let’s get started.

Install a Plugin using WordPress Plugin Search

The easiest way of installing a WordPress plugin is to use the plugin search. The only downside of this option is that a plugin must be in the WordPress plugin directory which is limited to only free plugins.

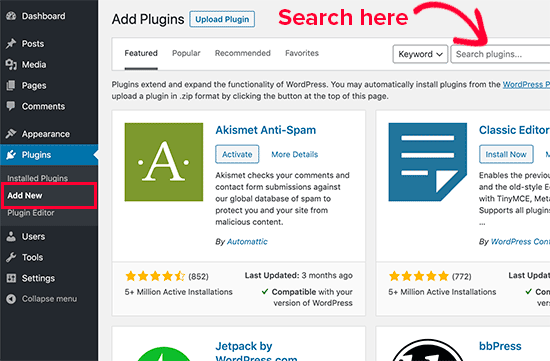
First thing you need to visit the Plugins » Add New page inside your WordPress admin area.

Searching for plugins to install in WordPress admin area

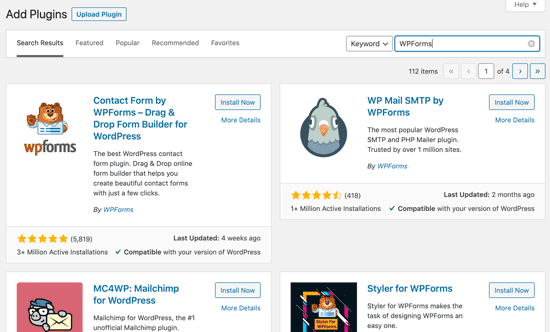
You will see a screen like the one in the screenshot above. Find the plugin by typing the plugin name or the functionality you are looking for. After that, you will see a bunch of listings like the example below:

Plugin search results

You can pick the plugin that is best for you. Since in our search, we were looking for WPForms which is the best WordPress contact form plugin, we’ll click the ‘Install Now’ button next to it.

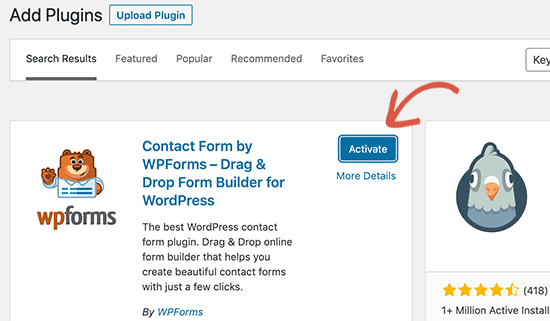
WordPress will now download and install the plugin for you. After this, you’ll notice the ‘Install Now’ button will change into the ‘Activate’ button.

Activating a WordPress plugin

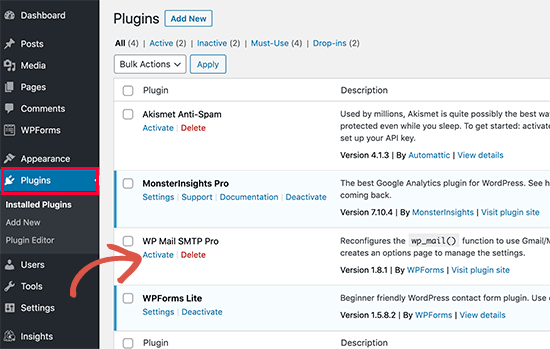
A WordPress plugin can be installed on your site, but it will not work unless you activate it. So go ahead and click on the activate button to start using that plugin on your WordPress site.

That’s all, you have successfully installed your first WordPress plugin.

The next step is to configure the plugin settings. These settings will vary for each plugin therefore we will not be covering that in this post.

Install a Plugin using the WordPress Admin Plugin Upload

Paid WordPress plugins are not listed in the WordPress plugin directory. These plugins cannot be installed using the first method.

That’s why WordPress comes with the upload method to install such plugins. We will show you how to install WordPress plugins using the upload option in the admin area.

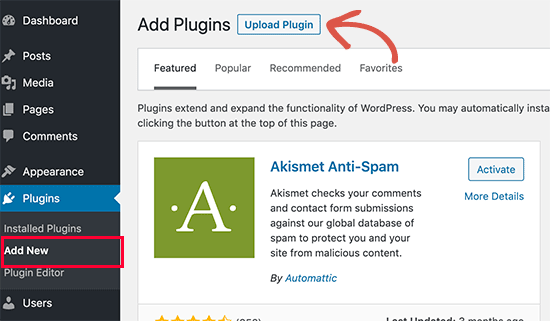
First, you need to download the plugin from the source (which will be a zip file). Next, you need to go to WordPress admin area and visit Plugins » Add New page.

After that, click on the ‘Upload Plugin’ button on top of the page.

Upload plugin button

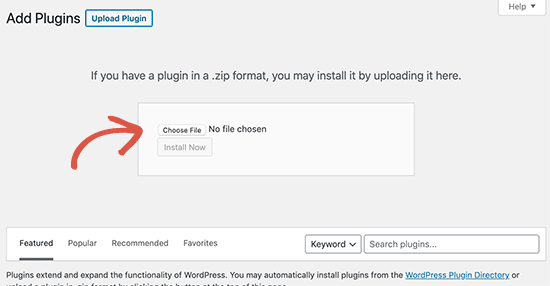
This will reveal the plugin upload form. Here you need to click on the ‘Choose File’ button and select the plugin file you downloaded earlier to your computer.

Select plugin zip file to upload and install in WordPress

After you have selected the file, you need to click on the ‘Install Now’ button.

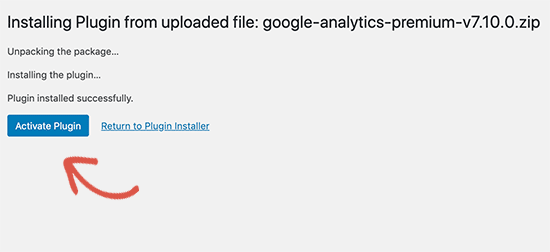
WordPress will now upload the plugin file from your computer and install it for you. You will see a success message like this after the installation is finished.

Activate plugin

Once installed, you need to click on the Activate Plugin link to start using the plugin.

You would have to configure the settings to fit your needs. These settings will vary for each plugin therefore we will not be covering that in this post.

Manually Install a WordPress Plugin using FTP

In some rare cases, your WordPress hosting provider may have file restrictions that could limit your ability to install a plugin from the admin area.

In this situation, your best bet is to install the plugin manually using FTP.

The FTP manager method is the least friendly for beginners.

First you will need to download the plugin’s source file (it will be a zip file). Next, you need to extract the zip file on your computer.

Extracting the plugin zip file will create a new folder with the same name. This is the folder that you need to manually upload to your website using a FTP client.

You would need to access your host through the FTP manager. If you do not have your FTP username and password, then contact your WordPress hosting provider and ask them.

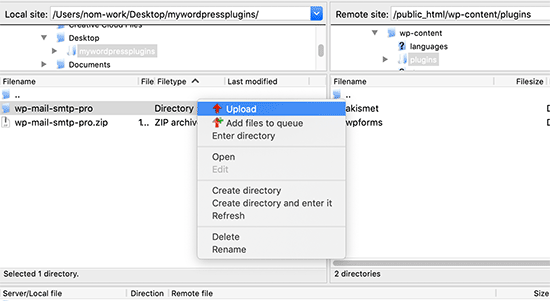
Open the FTP client on your computer and connect to your website using the login credentials provided by your web host. Once connected, you need to go to the /wp-content/plugins/ folder on your website.

Next, upload the folder you extracted from the zip file to the /wp-content/plugins/ folder on your web server.

Uploading a plugin via FTP

After uploading the files, you need to visit the WordPress admin area and click on the Plugins link in the admin menu. You’ll see your plugin successfully installed on the plugins page.

Activate installed plugin

You need to click on the Activate link below the plugin to start using it.

Upon activating, you may need to configure the plugin settings. WordPress plugins come with their own settings which differ from one plugin to another so we will not describe them here.

FAQs About Installing WordPress Plugins

As a beginners you may have few questions about installing WordPress plugins. As the largest WordPress resource site, we have heard all of them.

Here are some of the most frequently asked questions about installing WordPress plugins.

1. How do I find the best WordPress plugins to install on my website?

There are more than 55,000 WordPress plugins on the free WordPress plugin directory alone. Many more are available as premium plugins. This makes it a bit difficult for beginners to find the best plugin for the feature they need.

We have compiled a list of all the essential WordPress plugins that most WordPress websites need.

We also have a detailed tutorial on choosing the best WordPress plugin where we show you what to look for when looking for a plugin.

2. What is the difference between installed and active plugins?

WordPress allows you to install a plugin and not use it at all. In order to use a plugin on your site, you need to ‘Activate’ it.

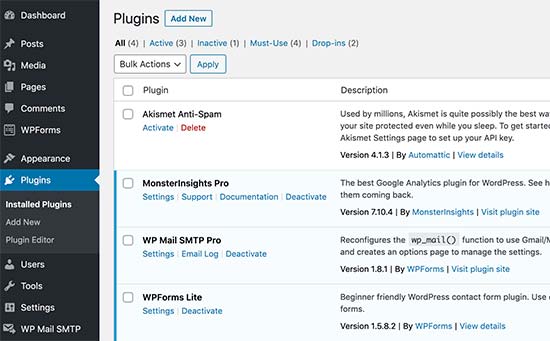
You can see active plugins by visiting the ‘Plugins’ page in the WordPress admin area. They will be highlighted with a blue background.

Installed and active plugins

Plugins with the white background are installed on your website but not active.

3. Should I delete inactive plugins?

If you are not using a plugin, then it is recommended to delete it from your website. For more on this topic, see our article on why should you delete inactive plugins in WordPress.

4. How many plugins I can install in WordPress?

You can install as many WordPress plugins as you need. It is not the number of plugins that affect your website speed, but the quality of those plugins. For more information, see our article on how many WordPress plugins you should install.

5. How do I uninstall a WordPress plugin

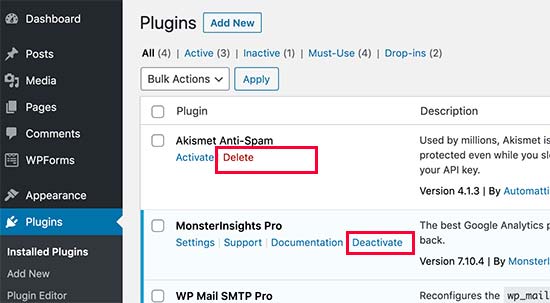
You can uninstall a WordPress plugin by visiting the Plugins page in the WordPress admin area. If the plugin you want to remove is currently active, then first you’ll need to deactivate it. After that, you can simply click on the delete link to remove it from your website.

Uninstall a WordPress plugin

For more detailed instructions, see our guide on how to properly uninstall a WordPress plugin.

We hope this helped you learn how to install WordPress plugins.

You may also want to see our plugins category where we write about the best WordPress plugins that you can use to accomplish whatever you’re looking to do. Each of those articles comes with step-by-step instructions on how to set up individual plugins.

If you liked this article, then please subscribe to our YouTube Channel for WordPress video tutorials. You can also find us on Twitter and Facebook.

The post How to Install a WordPress Plugin – Step by Step for Beginners appeared first on WPBeginner.

How to Import / Export Your WordPress Gutenberg Blocks (2 Steps)

Did you know that the new WordPress block editor aka Gutenberg allows you to save your custom content blocks and export them to use on your other WordPress sites.

This little-known feature is extremely useful and can you save you a lot of time specially if you’re building websites for clients.

In this article, we’ll show you how to easily export your WordPress Gutenberg blocks and import them to use on other sites.

How to export your Gutenberg blocks

Reusable Gutenberg Blocks 101

Gutenberg is a fully block-based WordPress editor where every piece of content you add is a block.

You can customize each individual block styles and re-use it to quickly create content in the future.

These re-usable blocks are extremely helpful for adding call-to-action buttons, feedback forms, banner ads, etc.

We created a step by step guide on how to create a reusable block in WordPress.

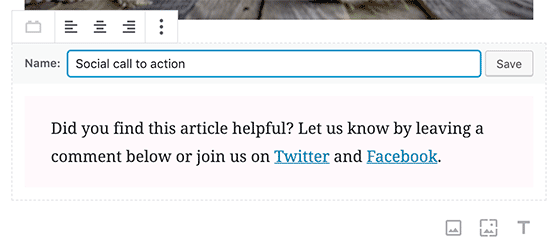
Giving a name to reusable block

What a lot of users don’t know is that you can actually export these re-usable blocks to use on your other sites, client websites, and technically you can even sell them if you want to.

Let’s take a look at how to export Gutenberg blocks to use on other sites.

Exporting Your WordPress Gutenberg Blocks to Use on Other Sites

WordPress’ reusable blocks are not just restricted for the website they’re created on. You can easily export them to use on any other WordPress site.

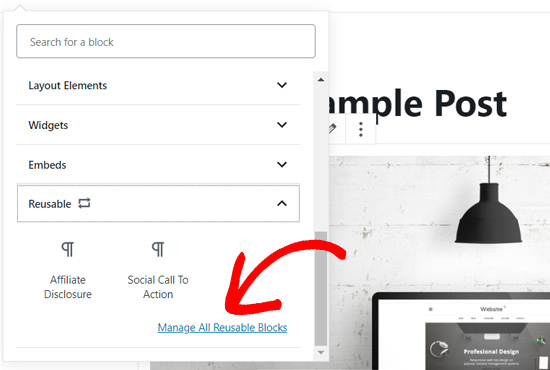
First, you’ll need to open the block management page. You can navigate to that page by clicking the Manage All Reusable Blocks link inside the Reusable tab in your content editor.

Manage all reusable blocks in Gutenberg

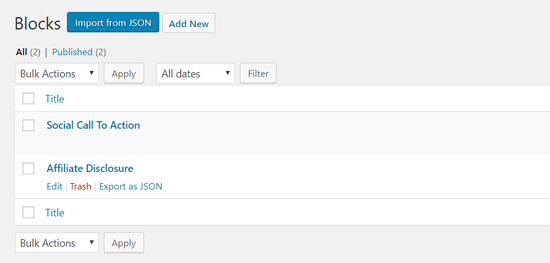
Once you’re on the block management page, you can edit, delete, export, and import your WordPress Gutenberg blocks.

Gutenberg reusable blocks management page

Step 1. Export Your Gutenberg Block

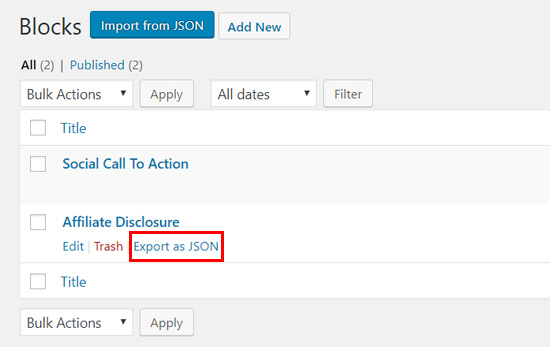
To export your Gutenberg block, you simply need to click the Export as JSON option below the block.

Export your WordPress block as JSON file

Next, your block will be downloaded to your computer as a JSON file. Now, you can upload this JSON to any other WordPress site and use the block.

Gutenberg block downloaded

Step 2. Import Your Gutenberg Block

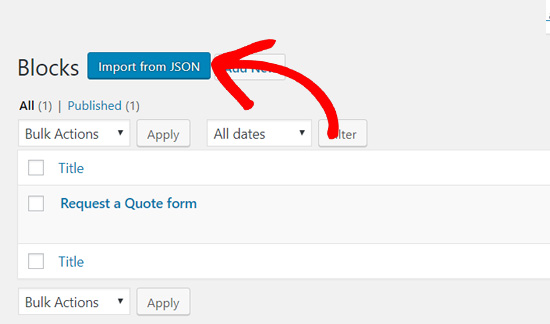
You need to log into the other WordPress site and go to its block management screen. You’ll see an Import from JSON button at the top.

Click Import from JSON in Gutenberg

Go ahead and click on that button to import.

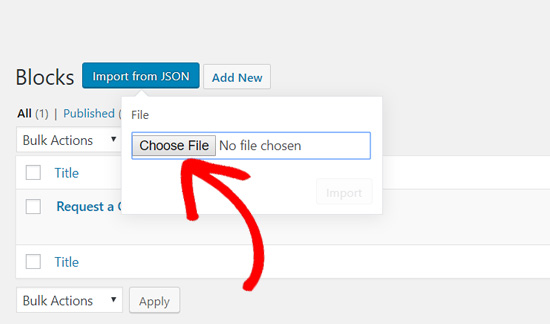
Next, you’ll see a file upload box. You need to click on the Choose File button and select the block JSON file you downloaded earlier.

Choose file to import block in Gutenberg

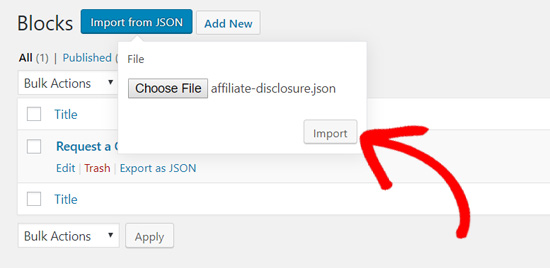
After it’s uploaded, you’ll see an Import option. Simply click on that to proceed.

Import WordPress Gutenberg block

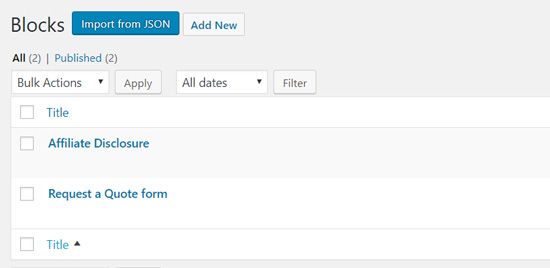
WordPress will now import your new reusable block and save it in the database. Once done, you can use it on your new WordPress site like you would any other block.

Gutenberg block imported

We hope this article helped you learn how to export your WordPress Gutenberg blocks to use on other sites. You may also want to see our list of the must have WordPress plugins for all websites.

If you liked this article, then please subscribe to our YouTube Channel for WordPress video tutorials. You can also find us on Twitter and Facebook.

The post How to Import / Export Your WordPress Gutenberg Blocks (2 Steps) appeared first on WPBeginner.