How to Show Random Quotes in Your WordPress Sidebar

Do you want to show random quotes in the WordPress sidebar?

Displaying quotes from happy customers can convince more visitors to buy your products. Or you might simply want to brighten your audience’s day by showing them a random inspirational quote. 

In this article, we will show you how to easily show random quotes in the WordPress sidebar by using a free plugin.

How to Show Random Quotes in WordPress Sidebar

How to Show Random Quotes in Your WordPress Sidebar

You can show random quotes in the WordPress sidebar using the Quotes and Tips plugin. It lets you add an unlimited number of quotes to your site.

It also lets you display quotes on any page, post, or widget area, including your WordPress sidebar.

First, you’ll need to install and activate the plugin. If you need help, then please see our guide on how to install a WordPress plugin

After activating the plugin, you can start adding quotes. To add your first quote, go to Quotes » Add New.

How to add a new random quote

First you’ll need to type a title for your quote into the ‘Add Title’ field. In a later step, we’ll show you how to choose whether or not to display the quote’s title to your visitors, or use it for internal reference only.

Next, type your quote into the text editor. In our example, we’re using a quote from a case study.

A quote from an OptinMonster customer

You may want to organize your quotes into categories. This becomes important when it’s time to display your quotes.

Basically, you have two options.

The Quotes and Tips plugin can select a random quote from all of the quotes you’ve added. Or, it can select a random quote from a specific quote category.

For example, if you have an online store, you might want to display quotes about a specific product on that product page only.

If you already have some categories in mind, then it makes sense to organize your quotes into these categories now. But you can always add, remove, and edit your categories later. We’ll be covering that at the end of the post.

If you do want to create a quote category now, then you can find the Quotes Categories box on the right side of the page.

To add your category, first click on the ‘Add New Quotes Category’ link.

Adding a new quote category

A field will display where you can type your category name. The category won’t appear to your visitors, so it’s just for your reference.

After you type it in, click on the ‘Add New Quotes Category’ button. 

This category will now appear in the Quotes Category tab. To add the current quote to this category, simply select the category’s checkbox. 

Selecting a quote category in the WordPress dashboard

You can keep repeating these steps to create more quote categories. 

Next, you’ll typically want to show where a quote comes from. This might be a valued customer, a famous brand, or even a celebrity.

To assign your quote to a person or company, scroll down to the ‘Name and Official Position’ section.

You can now type the person or company’s name into the Name field. 

The Name and Official Position settings

You might also want to add this person’s job title, or some information that explains why they’re qualified to make this statement. You can type this information into the Official Position field.

When you’re happy with your quote, click on the Publish button. 

You can now repeat these steps to create all of the quotes that you want to show in your WordPress sidebar.  

Configuring Your Quotes and Tips Settings 

After creating your quotes, it’s time to take a look at the Quotes and Tips settings. This contains some important settings that control how and when your site displays a random quote. 

To take a look at these settings, go to Tips » Settings

The Quotes and Tips settings page

By default, Quotes and Tips will display a new quote every time the page reloads. This means visitors will see a new quote every time they visit a new page or press the Refresh button in their web browser. 

If you prefer, you can display a new quote automatically every few seconds or minutes. The visitor doesn’t even have to refresh their web browser.

To do this, select ‘AJAX (no page reload).’ You can then find the Change Frequency field. Here, simply type how frequently WordPress should display a new quote in seconds.

Changing the quote frequency

Next, it’s time to choose the title that will appear above your quote. 

The default setting is ‘Set Title From Post’. This will display the title you entered when adding the quote to WordPress.

Another option is creating a title that WordPress will use for all of your quotes. This might be something such as ‘Words of Wisdom’ or ‘Don’t take our word for it! Here’s what our customers think’ for testimonials.

To use the same title for all your quotes, click on ‘Set Custom Titles.’ You can now type your title into the Quote Title field. 

Setting your quote title in the WordPress dashboard

When you’re finished, don’t forget to click on the Save Changes button. 

How to Display a Random Quote 

Now it’s time to display your quotes.

Let’s start by showing a random quote from your entire quote collection. If you’ve created multiple categories, then this method will ignore all of these categories. 

You can add your quote to any page, post, or widget using the Quotes and Tips shortcode. To get this shortcode, go to Quotes » Settings

Now, copy the shortcode in the ‘Quotes and Tips’ section.

The WordPress quotes shortcode

Another option is to simply copy the following: [quotes_and_tips]

Since we want to show random quotes in the WordPress sidebar, you’ll need to go to Appearance » Widgets. This shows all the areas of your site that support widgets. 

The WordPress 'Widgets' settings

This screen may look slightly different depending on your WordPress theme. However, most modern WordPress themes have a sidebar. 

Find the Main Sidebar or similar section, and give it a click. This section will now expand.

The WordPress Main Sidebar settings

You need to add a Shortcode block to this widget, so click on the + button. In the search field, type Shortcode. 

You can now select the Shortcode block when it appears. Next, either paste or type the shortcode into this block. 

Finally, click on the blue Update button at the top of the screen. Now, if you visit your website you should see a random quote in your WordPress sidebar. 

How to Display Random Quotes From a Specific Category 

Another option is to display a quote from a specific quote category.

To display a random quote from a particular category, you’ll need to use a different shortcode.

To get this code, head over to Quotes » Quote Category

Here, you’ll find a list of all the categories you’ve created. Each category has its own shortcode. 

A list of WordPress quote categories

Simply find the category that you want to use, and copy its shortcode. You can then paste this shortcode into any page, post, or widget, following the same process above.

How to Style and Brand Your Random Quotes

By default, Quotes and Tips adds a blue background to the quote area. It also uses a background image of silhouettes.

You can change this default styling to better match the rest of your website’s design. You can even remove the styling completely. 

A random quote in the WordPress sidebar

To change the background color, text color, or background image, go to Quotes » Settings.

In the left menu, click on the Appearance tab.

How to style the random quote in your WordPress sidebar

You can now change the background color and text color, by clicking on the Select Color button.

This adds an area where you can choose your perfect color.

Changing the background color

If you change your mind, you can restore the plugin’s default colors at any point. Simply click on the Default button.

You can also change the background image. To remove the default background image, scroll to Background Image, and then click on the None button.

Customizing the quote's background image

You can also add your own background image.

Using your company or product logo as a background image can be a great way to brand your quotes.

Displaying a random branded quote in WordPress sidebar

To upload a new background image, click on the Custom button. This adds a Choose File button. 

Give this button a click. This will open a window where you can select the file that you want to use as your background image.

Uploading a new image to your random quote

After making your choice, you can customize how this image looks on your site.

This includes changing the background image alignment and the opacity, which is how transparent the background image is.

Why not experiment, to see what different effects you can create?

How to Add, Edit and Delete Quote Categories 

Sometimes, you may want Quotes and Tips to display a completely random quote.

Other times, you may need more control over the kind of quotes that it displays. 

You can do this using quote categories. We’ve already seen how to create a category when adding a new quote. However, Quotes and Tips has an entire menu where you can make changes to these categories, and create new ones.

To see these settings, go to Quotes » Quotes Categories

Editing your quote categories

Here, you can quickly and easily create quote categories. To add a new category, type a name for your category into the Name field.

By default this plugin creates each quote category as a parent category. 

Another option is to create a subcategory. For example, you might have an OptinMonster parent category, and then create subcategories for your different promotions, such as ‘OptinMonster summer sale’ and ‘OptinMonster holiday promotion.’ 

To create a quote subcategory, you’ll need to select a Parent Category.

Choosing the quote parent category

When you’re happy with your quote category, click on the blue Add New Quotes Category button. 

You can also edit any of the categories you created earlier. 

To edit a category, hover over it. Then, click on the Edit link when it appears.

Editing a quote category in the WordPress dashboard

This launches a new page where you can make changes to this category. This includes editing the category’s name, and choosing a new parent.

We hope this article helped you learn how to show random quotes in the WordPress sidebar. Next, you can see our guide on how to increase your blog traffic, or see our expert pick of the best social proof plugins for WordPress 

If you liked this article, then please subscribe to our YouTube Channel for WordPress video tutorials. You can also find us on Twitter and Facebook.

The post How to Show Random Quotes in Your WordPress Sidebar first appeared on WPBeginner.

Nailing the Perfect Contrast Between Light Text and a Background Image

Have you ever come across a site where light text is sitting on a light background image? If you have, you’ll know how difficult that is to read. A popular way to avoid that is to use a transparent overlay. But this leads to an important question: Just how transparent should that overlay be? It’s not like we’re always dealing with the same font sizes, weights, and colors, and, of course, different images will result in different contrasts.

Trying to stamp out poor text contrast on background images is a lot like playing Whac-a-Mole. Instead of guessing, we can solve this problem with HTML <canvas> and a little bit of math.

Like this:

We could say “Problem solved!” and simply end this article here. But where’s the fun in that? What I want to show you is how this tool works so you have a new way to handle this all-too-common problem.

Here’s the plan

First, let’s get specific about our goals. We’ve said we want readable text on top of a background image, but what does “readable” even mean? For our purposes, we’ll use the WCAG definition of AA-level readability, which says text and background colors need enough contrast between them such that that one color is 4.5 times lighter than the other.

Let’s pick a text color, a background image, and an overlay color as a starting point. Given those inputs, we want to find the overlay opacity level that makes the text readable without hiding the image so much that it, too, is difficult to see. To complicate things a bit, we’ll use an image with both dark and light space and make sure the overlay takes that into account.

Our final result will be a value we can apply to the CSS opacity property of the overlay that gives us the right amount of transparency that makes the text 4.5 times lighter than the background.

Optimal overlay opacity: 0.521

To find the optimal overlay opacity we’ll go through four steps:

  1. We’ll put the image in an HTML <canvas>, which will let us read the colors of each pixel in the image.
  2. We’ll find the pixel in the image that has the least contrast with the text.
  3. Next, we’ll prepare a color-mixing formula we can use to test different opacity levels on top of that pixel’s color.
  4. Finally, we’ll adjust the opacity of our overlay until the text contrast hits the readability goal. And these won’t just be random guesses — we’ll use binary search techniques to make this process quick.

Let’s get started!

Step 1: Read image colors from the canvas

Canvas lets us “read” the colors contained in an image. To do that, we need to “draw” the image onto a <canvas> element and then use the canvas context (ctx) getImageData() method to produce a list of the image’s colors.

function getImagePixelColorsUsingCanvas(image, canvas) {
  // The canvas's context (often abbreviated as ctx) is an object
  // that contains a bunch of functions to control your canvas
  const ctx = canvas.getContext('2d');


  // The width can be anything, so I picked 500 because it's large
  // enough to catch details but small enough to keep the
  // calculations quick.
  canvas.width = 500;


  // Make sure the canvas matches proportions of our image
  canvas.height = (image.height / image.width) * canvas.width;


  // Grab the image and canvas measurements so we can use them in the next step
  const sourceImageCoordinates = [0, 0, image.width, image.height];
  const destinationCanvasCoordinates = [0, 0, canvas.width, canvas.height];


  // Canvas's drawImage() works by mapping our image's measurements onto
  // the canvas where we want to draw it
  ctx.drawImage(
    image,
    ...sourceImageCoordinates,
    ...destinationCanvasCoordinates
  );


  // Remember that getImageData only works for same-origin or 
  // cross-origin-enabled images.
  // https://developer.mozilla.org/en-US/docs/Web/HTML/CORS_enabled_image
  const imagePixelColors = ctx.getImageData(...destinationCanvasCoordinates);
  return imagePixelColors;
}

The getImageData() method gives us a list of numbers representing the colors in each pixel. Each pixel is represented by four numbers: red, green, blue, and opacity (also called “alpha”). Knowing this, we can loop through the list of pixels and find whatever info we need. This will be useful in the next step.

Image of a blue and purple rose on a light pink background. A section of the rose is magnified to reveal the RGBA values of a specific pixel.

Step 2: Find the pixel with the least contrast

Before we do this, we need to know how to calculate contrast. We’ll write a function called getContrast() that takes in two colors and spits out a number representing the level of contrast between the two. The higher the number, the better the contrast for legibility.

When I started researching colors for this project, I was expecting to find a simple formula. It turned out there were multiple steps.

To calculate the contrast between two colors, we need to know their luminance levels, which is essentially the brightness (Stacie Arellano does a deep dive on luminance that’s worth checking out.)

Thanks to the W3C, we know the formula for calculating contrast using luminance:

const contrast = (lighterColorLuminance + 0.05) / (darkerColorLuminance + 0.05);

Getting the luminance of a color means we have to convert the color from the regular 8-bit RGB value used on the web (where each color is 0-255) to what’s called linear RGB. The reason we need to do this is that brightness doesn’t increase evenly as colors change. We need to convert our colors into a format where the brightness does vary evenly with color changes. That allows us to properly calculate luminance. Again, the W3C is a help here:

const luminance = (0.2126 * getLinearRGB(r) + 0.7152 * getLinearRGB(g) + 0.0722 * getLinearRGB(b));

But wait, there’s more! In order to convert 8-bit RGB (0 to 255) to linear RGB, we need to go through what’s called standard RGB (also called sRGB), which is on a scale from 0 to 1.

So the process goes: 

8-bit RGB → standard RGB  → linear RGB → luminance

And once we have the luminance of both colors we want to compare, we can plug in the luminance values to get the contrast between their respective colors.

// getContrast is the only function we need to interact with directly.
// The rest of the functions are intermediate helper steps.
function getContrast(color1, color2) {
  const color1_luminance = getLuminance(color1);
  const color2_luminance = getLuminance(color2);
  const lighterColorLuminance = Math.max(color1_luminance, color2_luminance);
  const darkerColorLuminance = Math.min(color1_luminance, color2_luminance);
  const contrast = (lighterColorLuminance + 0.05) / (darkerColorLuminance + 0.05);
  return contrast;
}


function getLuminance({r,g,b}) {
  return (0.2126 * getLinearRGB(r) + 0.7152 * getLinearRGB(g) + 0.0722 * getLinearRGB(b));
}
function getLinearRGB(primaryColor_8bit) {
  // First convert from 8-bit rbg (0-255) to standard RGB (0-1)
  const primaryColor_sRGB = convert_8bit_RGB_to_standard_RGB(primaryColor_8bit);


  // Then convert from sRGB to linear RGB so we can use it to calculate luminance
  const primaryColor_RGB_linear = convert_standard_RGB_to_linear_RGB(primaryColor_sRGB);
  return primaryColor_RGB_linear;
}
function convert_8bit_RGB_to_standard_RGB(primaryColor_8bit) {
  return primaryColor_8bit / 255;
}
function convert_standard_RGB_to_linear_RGB(primaryColor_sRGB) {
  const primaryColor_linear = primaryColor_sRGB < 0.03928 ?
    primaryColor_sRGB/12.92 :
    Math.pow((primaryColor_sRGB + 0.055) / 1.055, 2.4);
  return primaryColor_linear;
}

Now that we can calculate contrast, we’ll need to look at our image from the previous step and loop through each pixel, comparing the contrast between that pixel’s color and the foreground text color. As we loop through the image’s pixels, we’ll keep track of the worst (lowest) contrast so far, and when we reach the end of the loop, we’ll know the worst-contrast color in the image.

function getWorstContrastColorInImage(textColor, imagePixelColors) {
  let worstContrastColorInImage;
  let worstContrast = Infinity; // This guarantees we won't start too low
  for (let i = 0; i < imagePixelColors.data.length; i += 4) {
    let pixelColor = {
      r: imagePixelColors.data[i],
      g: imagePixelColors.data[i + 1],
      b: imagePixelColors.data[i + 2],
    };
    let contrast = getContrast(textColor, pixelColor);
    if(contrast < worstContrast) {
      worstContrast = contrast;
      worstContrastColorInImage = pixelColor;
    }
  }
  return worstContrastColorInImage;
}

Step 3: Prepare a color-mixing formula to test overlay opacity levels

Now that we know the worst-contrast color in our image, the next step is to establish how transparent the overlay should be and see how that changes the contrast with the text.

When I first implemented this, I used a separate canvas to mix colors and read the results. However, thanks to Ana Tudor’s article about transparency, I now know there’s a convenient formula to calculate the resulting color from mixing a base color with a transparent overlay.

For each color channel (red, green, and blue), we’d apply this formula to get the mixed color:

mixedColor = baseColor + (overlayColor - baseColor) * overlayOpacity

So, in code, that would look like this:

function mixColors(baseColor, overlayColor, overlayOpacity) {
  const mixedColor = {
    r: baseColor.r + (overlayColor.r - baseColor.r) * overlayOpacity,
    g: baseColor.g + (overlayColor.g - baseColor.g) * overlayOpacity,
    b: baseColor.b + (overlayColor.b - baseColor.b) * overlayOpacity,
  }
  return mixedColor;
}

Now that we’re able to mix colors, we can test the contrast when the overlay opacity value is applied.

function getTextContrastWithImagePlusOverlay({textColor, overlayColor, imagePixelColor, overlayOpacity}) {
  const colorOfImagePixelPlusOverlay = mixColors(imagePixelColor, overlayColor, overlayOpacity);
  const contrast = getContrast(this.state.textColor, colorOfImagePixelPlusOverlay);
  return contrast;
}

With that, we have all the tools we need to find the optimal overlay opacity!

Step 4: Find the overlay opacity that hits our contrast goal

We can test an overlay’s opacity and see how that affects the contrast between the text and image. We’re going to try a bunch of different opacity levels until we find the contrast that hits our mark where the text is 4.5 times lighter than the background. That may sound crazy, but don’t worry; we’re not going to guess randomly. We’ll use a binary search, which is a process that lets us quickly narrow down the possible set of answers until we get a precise result.

Here’s how a binary search works:

  • Guess in the middle.
  • If the guess is too high, we eliminate the top half of the answers. Too low? We eliminate the bottom half instead.
  • Guess in the middle of that new range.
  • Repeat this process until we get a value.

I just so happen to have a tool to show how this works:

In this case, we’re trying to guess an opacity value that’s between 0 and 1. So, we’ll guess in the middle, test whether the resulting contrast is too high or too low, eliminate half the options, and guess again. If we limit the binary search to eight guesses, we’ll get a precise answer in a snap.

Before we start searching, we’ll need a way to check if an overlay is even necessary in the first place. There’s no point optimizing an overlay we don’t even need!

function isOverlayNecessary(textColor, worstContrastColorInImage, desiredContrast) {
  const contrastWithoutOverlay = getContrast(textColor, worstContrastColorInImage);
  return contrastWithoutOverlay < desiredContrast;
}

Now we can use our binary search to look for the optimal overlay opacity:

function findOptimalOverlayOpacity(textColor, overlayColor, worstContrastColorInImage, desiredContrast) {
  // If the contrast is already fine, we don't need the overlay,
  // so we can skip the rest.
  const isOverlayNecessary = isOverlayNecessary(textColor, worstContrastColorInImage, desiredContrast);
  if (!isOverlayNecessary) {
    return 0;
  }


  const opacityGuessRange = {
    lowerBound: 0,
    midpoint: 0.5,
    upperBound: 1,
  };
  let numberOfGuesses = 0;
  const maxGuesses = 8;


  // If there's no solution, the opacity guesses will approach 1,
  // so we can hold onto this as an upper limit to check for the no-solution case.
  const opacityLimit = 0.99;


  // This loop repeatedly narrows down our guesses until we get a result
  while (numberOfGuesses < maxGuesses) {
    numberOfGuesses++;


    const currentGuess = opacityGuessRange.midpoint;
    const contrastOfGuess = getTextContrastWithImagePlusOverlay({
      textColor,
      overlayColor,
      imagePixelColor: worstContrastColorInImage,
      overlayOpacity: currentGuess,
    });


    const isGuessTooLow = contrastOfGuess < desiredContrast;
    const isGuessTooHigh = contrastOfGuess > desiredContrast;
    if (isGuessTooLow) {
      opacityGuessRange.lowerBound = currentGuess;
    }
    else if (isGuessTooHigh) {
      opacityGuessRange.upperBound = currentGuess;
    }


    const newMidpoint = ((opacityGuessRange.upperBound - opacityGuessRange.lowerBound) / 2) + opacityGuessRange.lowerBound;
    opacityGuessRange.midpoint = newMidpoint;
  }


  const optimalOpacity = opacityGuessRange.midpoint;
  const hasNoSolution = optimalOpacity > opacityLimit;


  if (hasNoSolution) {
    console.log('No solution'); // Handle the no-solution case however you'd like
    return opacityLimit;
  }
  return optimalOpacity;
}

With our experiment complete, we now know exactly how transparent our overlay needs to be to keep our text readable without hiding the background image too much.

We did it!

Improvements and limitations

The methods we’ve covered only work if the text color and the overlay color have enough contrast to begin with. For example, if you were to choose a text color that’s the same as your overlay, there won’t be an optimal solution unless the image doesn’t need an overlay at all.

In addition, even if the contrast is mathematically acceptable, that doesn’t always guarantee it’ll look great. This is especially true for dark text with a light overlay and a busy background image. Various parts of the image may distract from the text, making it difficult to read even when the contrast is numerically fine. That’s why the popular recommendation is to use light text on a dark background.

We also haven’t taken where the pixels are located into account or how many there are of each color. One drawback of that is that a pixel in the corner could possibly exert too much influence on the result. The benefit, however, is that we don’t have to worry about how the image’s colors are distributed or where the text is because, as long as we’ve handled where the least amount of contrast is, we’re safe everywhere else.

I learned a few things along the way

There are some things I walked away with after this experiment, and I’d like to share them with you:

  • Getting specific about a goal really helps! We started with a vague goal of wanting readable text on an image, and we ended up with a specific contrast level we could strive for.
  • It’s so important to be clear about the terms. For example, standard RGB wasn’t what I expected. I learned that what I thought of as “regular” RGB (0 to 255) is formally called 8-bit RGB. Also, I thought the “L” in the equations I researched meant “lightness,” but it actually means “luminance,” which is not to be confused with “luminosity.” Clearing up terms helps how we code as well as how we discuss the end result.
  • Complex doesn’t mean unsolvable. Problems that sound hard can be broken into smaller, more manageable pieces.
  • When you walk the path, you spot the shortcuts. For the common case of white text on a black transparent overlay, you’ll never need an opacity over 0.54 to achieve WCAG AA-level readability.

In summary…

You now have a way to make your text readable on a background image without sacrificing too much of the image. If you’ve gotten this far, I hope I’ve been able to give you a general idea of how it all works.

I originally started this project because I saw (and made) too many website banners where the text was tough to read against a background image or the background image was overly obscured by the overlay. I wanted to do something about it, and I wanted to give others a way to do the same. I wrote this article in hopes that you’d come away with a better understanding of readability on the web. I hope you’ve learned some neat canvas tricks too.

If you’ve done something interesting with readability or canvas, I’d love to hear about it in the comments!


The post Nailing the Perfect Contrast Between Light Text and a Background Image appeared first on CSS-Tricks.

You can support CSS-Tricks by being an MVP Supporter.

How to Add a Background Image in WordPress (6 Easy Ways)

Do you want to add a background image to your WordPress site?

Background images can make your website look more engaging and vibrant.

In this article, we will show you how to easily add a background image to your WordPress site.

How to add a background image in WordPress

Why Add a WordPress Background Image?

Adding an image to your WordPress website can make it more attractive to visitors. You can quickly grab users’ attention and engage them with your content.

It also allows you to personalize your website design according to your brand. For example, you can upload subtle photos of your products or brand mascot in the background.

Additionally, you can also add a YouTube video as full background or an image slideshow that will bring your content to life.

However, we do suggest selecting background images that are not distracting or make it hard to read the content on your WordPress blog. A background should enhance the user experience and help deliver your message to visitors.

It’s also important to choose a background image that’s mobile friendly and won’t impact your website speed. Otherwise, it will hurt your WordPress SEO.

That said, let’s look at different ways you can add a WordPress background image. We’ll cover multiple methods including the use of the WordPress theme customizer, full site editor, a plugin, theme builder, and more.

Simply click a link below to jump ahead to your preferred section:

Method 1. Add a Background Image Using Your WordPress Theme Customizer

Most popular WordPress themes come with custom background support. This feature allows you to easily set a background image, and we recommend this method if your theme supports it.

However, if your customizer menu option is missing, then your theme may have full site editing enabled. In the next section, we’ll cover how to use the full site editor to change your background image.

To use the Customizer, you need to visit the Appearance » Customize page in your WordPress admin. This will launch the WordPress theme customizer where you can change different theme settings while viewing a live preview of your website.

The WordPress theme customizer

An important thing to remember is that the options you see will vary based on the WordPress theme you’re using. For this tutorial, we are using the Astra theme.

If you’re using a different theme, then you may need to look up that theme’s documentation or contact the theme developer to find out how to add a background image if you can’t find it in the customizer.

In the Astra theme’s customizer options, you need to click on ‘Global’ in the panel to the left.

Go to global settings in Astra

After that, you’ll see different Global options to customize your Astra theme.

Go ahead and click into the ‘Colors’ section.

Click on colors options

Here, you can change the theme colors, including the background color. You can also customize your links, body text, headings, borders, and more.

To add a background image, scroll down to the ‘Surface Color’ section. Then you can click on the ‘Site Background’ option and switch to the ‘Image’ tab.

Select a background image

After that, simply click the ‘Select Background Image’ button.

This will bring up the WordPress media library, where you can upload an image from your computer or select one you have previously uploaded.

Upload media to WordPress

After you have chosen the image for your background, you need to click on the ‘Select’ button.

This will close the media popup, and you will see a preview of your selected background image in the theme customizer.

Save your background image

Don’t forget to click on the ‘Publish’ button at the top to store your settings.

That’s all. You have successfully added a background image to your WordPress site. Go ahead and visit your website to see it in action.

Method 2. Add a Custom Background Image Using Full Site Editor

If you’re using a block-based WordPress theme, then you can add a custom background image using the full site editor (FSE).

The full site editor allows you to edit your website design using blocks. It is just like editing a blog post or page using the WordPress block editor.

For this tutorial, we’ll use the default Twenty Twenty-Two theme. To launch the full site editor, simply go to Appearance » Editor from your WordPress dashboard.

Go to full site editor

Once you’re in the full site editor, you’ll need to add a Cover block to your template to upload a background image.

Simply click the ‘+’ sign at the top and add a Cover block.

Add a cover block to theme template

Go ahead and click ‘Upload’ or ‘Media Library’ button in the Cover block to add a background image to the block.

This will open the WordPress media uploader popup.

Upload your image to cover block

You can choose an image that you’d like to use as the website background.

When you have chosen the image, simply click on the ‘Select’ button.

Upload media to WordPress

Once the image is added to the Cover block, the next step is to set it as the background of the page.

To do so, click on the List View icon at the top (icon with 3 dashes) to open an outline view of theme elements, such as the site header and footer.

Open list view in FSE

After that, simply drag and drop all the template elements under the Cover block in the list view.

When they are all under there, the Cover block’s image will show up as the site’s background.

Add theme parts to cover block

After that, you can adjust the background image by clicking into the Cover block and selecting the gear icon in the top right corner of the screen. This opens the Block settings panel.

You will find options to make the image a fixed background, repeated background, adjust its overlay, edit the color, and more.

Edit background image settings

When you’re done, don’t forget to click the ‘Save’ button.

That’s it! You’ve successfully added a background image using the full site editor.

Method 3. Add Background Image Using WordPress Theme Builder

Another way you can add custom background images to your website is by using a WordPress theme builder like SeedProd.

It is the best WordPress landing page plugin and website builder. You get drag and drop functionality to easily customize your website design without touching a single line of code.

For this tutorial, we’ll use the SeedProd Pro version because it includes the theme builder. There is also a SeedProd Lite version that you can try for free.

First, you’ll need to install and activate the SeedProd plugin. If you need help, then please see our guide on how to install a WordPress plugin.

Once the plugin is active, you’ll see the SeedProd welcome screen in your WordPress dashboard. Next, simply enter your license key and click the ‘Verify Key’ button. You can find the license key in your SeedProd account area.

SeedProd license key

Next, you’ll need to head to SeedProd » Theme Builder in your WordPress admin panel.

Go ahead and click the ‘Themes’ button at the top.

Create your custom theme

SeedProd will now offer multiple theme templates to choose from.

You can hover over any template that you’d like to use and click on it. Let’s use the ‘Starter’ theme template for this tutorial.

Choose a starter theme

From here, SeedProd will generate different templates such as the homepage, single post, single page, sidebar, header, and more.

To add a background image that appears on the entire website and on all the theme templates, go ahead and click the ‘Edit Design’ option under Global CSS.

Edit global CSS

On the next screen, you’ll see global CSS settings you can change.

Simply click on the ‘Background’ option.

Open background settings in SeedProd

After that, you’ll see the Background Image options.

Go ahead and click the ‘Use Your Own Image’ button to upload your picture or click the ‘Use a Stock Image’ button to search for a stock image to use as your website background.

Add a background image in SeedProd

Once you’ve added a background image, the SeedProd builder will display a live preview.

The plugin also offers options to change the Background Position. You can choose whether you’d like to use the full screen cover, put it on repeat, and more.

Plus, you can edit how dark the background image should be by moving the ‘Dim Background’ slider. The higher the score, the darker the image will be.

Change image position and dim settings

When you’re done editing the background image, simply click the ‘Save’ button at the top and close the Global CSS Settings.

If you want to add a custom background image for different parts of your website, then you can edit those individual theme templates in SeedProd.

For more details, please see our guide on how to easily create a custom WordPress theme.

Method 4. Add a Custom Background Image in WordPress Using a Plugin

Using a WordPress plugin to add a background image is a lot more flexible than built-in WordPress options.

To begin, you need to install and activate the Full Screen Background Pro plugin. For more details, see our step-by-step guide on how to install a WordPress plugin.

This plugin will let you set a different background for any post, page, category, and more. Plus, they will automatically be full-screen and adjust themselves for mobile devices.

Upon activation, you need to visit Appearance » Fullscreen BG Image to configure the plugin settings.

Enter full screen background license

You will be asked to add your license key. You can get this information from the email you received after buying the plugin or from your account on the plugin’s website.

Next, you need to click on the ‘Save Options’ button to activate your key. You are now ready to start adding background images to your WordPress site.

Go ahead and click on the ‘Add New Image’ button on the plugin’s settings page.

Add a new image

You should now see the background image upload screen.

Click on the ‘Choose Image’ button to upload or select an image. As soon as you select the image, you will be able to see a live preview of the image on your screen.

Add background image

Next, you need to provide a name for this image. This name is just for you, so you can type anything here. Finally, you need to select where you want to use this as the background page.

Once you have chosen whether it will be the background for the whole site, for posts, categories, archives, or elsewhere, don’t forget to save your changes.

You can add as many images as you want to different areas of your site by visiting the Appearance » Fullscreen BG Image page and repeating this process.

If you set more than one image to be used globally or for posts, pages, and categories, then the plugin will automatically start displaying background images as a slideshow.

You can adjust the time it takes for an image to fade out and the time after which a new background image starts to fade in the plugin Settings.

Set fadein effect time

The time you enter here is in milliseconds. 1 second is 1000 milliseconds. If you want a background image to fade out after 20 seconds, then you will need to enter 20000.

Don’t forget to click on the ‘Save Options’ button to store your changes.

Background Images for Posts, Pages, and Categories

Full Screen Background Pro also allows you to set background images for single posts, pages, categories, tags, and more.

Just edit the post/page where you want to display a different background image. On the post edit screen, you will notice the new ‘Full Screen Background Image’ box below the post editor.

Full screen background image metabox

To use a background image for categories, posts, and pages, you need to visit the Appearance » Fullscreen BG Image page and then click on the ‘Add New Image’ button.

After uploading your image, you can select a category, posts, pages, archives, and other options from the ‘Choose the context on which to display this image’ dropdown menu.

Let’s say you want to show a background image for category pages. For this, simply select ‘Category’ from the dropdown menu.

Add background image to categories

The plugin also offers an option to restrict the background image to specific categories, posts, and pages.

For example, if you want to add a custom background image for specific categories, then simply enter the category names under the ‘Select the Categories to restrict images to’ field.

Don’t forget to save your image to store your settings.

You’ve now successfully added a background image for specific posts, pages, and categories.

Method 5. Add Background Images Using CSS Hero

CSS Hero is a WordPress plugin that allows you to make any changes to your theme without touching a single line of code.

You can add background images quickly in a few simple steps. First, you need to install and activate CSS Hero. For more details, please see our guide on how to install a WordPress plugin.

Once you’ve done that, it’s time to start customizing your website. Now open up your homepage in your browser. You’ll see the ‘Customize with CSS Hero’ link in your admin bar.

Customize with CSS hero

After you click that link, you’ll see the CSS Hero options open up. Hover your mouse over the area you want to add an image to.

When you click the selected area, you can see the ‘Background’ option in the left sidebar.

Click the background option in CSS hero

Go ahead and click ‘Background’ to see the settings for adding an image.

From there, you can click on ‘Image.’ Now, you can choose an image from Unsplash or upload your own to create your background.

Apply image and save

When you click on the image you want, you’ll see the ‘Apply Image’ button. Then you can choose what size you want your image to be. You can choose the large version so it will stretch across the page.

Hit ‘Save and Publish’ at the bottom to save the background image for your site.

Method 6. Add Custom Background Images Anywhere in WordPress Using CSS Code

By default, WordPress adds several CSS classes to different HTML elements throughout your WordPress site. You can easily add custom background images to individual posts, categories, authors, and other pages using these WordPress generated CSS classes.

For example, If you have a category on your website called TV, then WordPress will automatically add these CSS classes to the body tag when someone views the TV category page.

<body class="archive category category-tv category-4">

You can use the inspect tool to see exactly which CSS classes are added by WordPress to the body tag.

Inspect body classes

You can use either category-tv or category-4 CSS class to style just this category page differently.

Let’s add a custom background image to a category archive page. You will need to add this custom CSS to your theme.

body.category-tv {
background-image: url("https://example.com/wp-content/uploads/2017/03/your-background-image.jpg");
background-position: center center;
background-size: cover;
background-repeat: no-repeat;
background-attachment: fixed;
}

Don’t forget to replace the background image URL and the category class with ones from your own site.

You can also add custom backgrounds to individual posts and pages. WordPress adds a CSS class with the post or page ID in the body tag. You can use the same CSS code, just replace .category-tv with the post-specific CSS class.

Inspect element to see post ID

We hope this article helped you learn how to add a background image in WordPress. You may also want to see our guide on how to start an online store and the best website design software.

If you liked this article, then please subscribe to our YouTube Channel for WordPress video tutorials. You can also find us on Twitter and Facebook.

The post How to Add a Background Image in WordPress (6 Easy Ways) first appeared on WPBeginner.

How to Fix Common Image Issues in WordPress

WordPress comes with some pretty neat tools to manage and edit images. You can easily upload images, align them, and even edit them inside WordPress.

Most beginners are not aware of these WordPress image editing features. It takes users a while to discover out some of them while other features go completely unnoticed.

If you ever had a question about WordPress images, then you’re in luck. In this article, we will cover the most common image issues in WordPress and how to fix them.

Fixing common image issues in WordPress

Since this is a detailed article, here is the list of image related issues that we will cover this article.

  1. How to Upload Images in WordPress?
  2. How to Align Image to the Left or Right in WordPress?
  3. How to Add Caption below Images?
  4. How to Display Photos in Columns and Rows?
  5. Create Beautiful Responsive Image Galleries in WordPress
  6. How to Fix Missing Post Thumbnails / Featured Image?
  7. How to Add Cover Images in WordPress Posts and Pages
  8. How to Fix Featured Image Appearing Twice Issue?
  9. Image too Big? How to Crop Images in WordPress?
  10. How to Add a Header Image in WordPress?
  11. How to Add a Background Image in WordPress?
  12. How to Find Free Images for Your WordPress Blog Posts?
  13. How to Tag Images in WordPress?
  14. How to Import External Images in WordPress?
  15. How to Require Featured Image for Posts in WordPress?
  16. How to Set a Default Featured Image in WordPress?
  17. How to Remove the Default Image Link in WordPress?

Let’s start with the most obvious one.

1. How to Upload images in WordPress?

WordPress makes it super easy to upload images to your posts, pages, and non-content areas like sidebars.

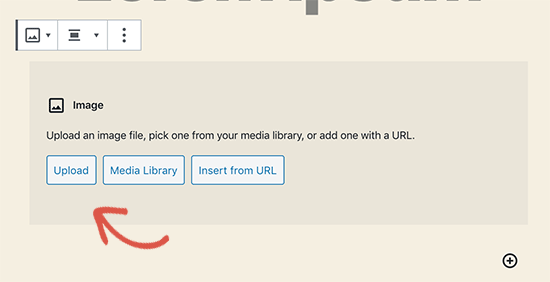
To upload images in WordPress posts and pages, you simply need to add the image block to the content editor.

Adding an image block to a WordPress post or page

You can also add the image block by simply typing /image in a paragraph block. The editor will start showing blocks you can insert as soon as you start typing.

Adding image block

WordPress will now add the image block to the editor. You need to click on the ‘Upload’ button to select and upload the image from your computer.

Select and upload image

You can also select a previously uploaded image from your media library.

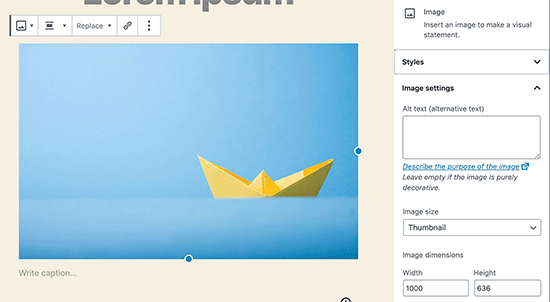
After uploading the image, you’ll see a live preview of the image in the content editor.
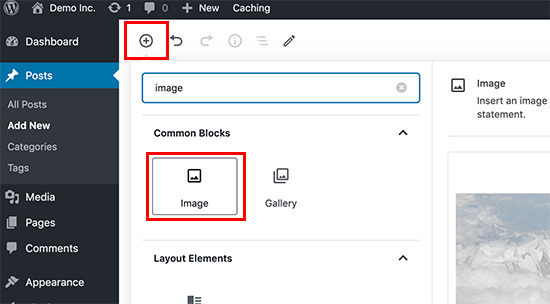
Image preview

You’ll see a bunch of image settings on the right panel. From there you can provide image alt text, select image size, and image style.

2. How to Align Image to the Left or Right in WordPress?

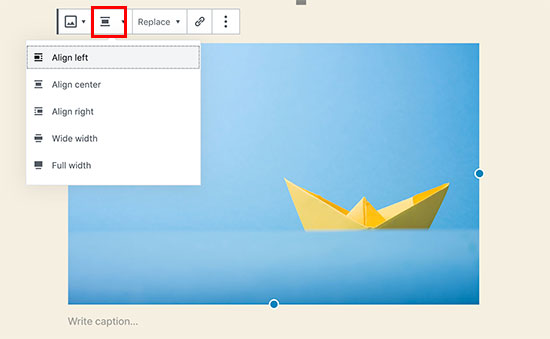
WordPress makes it easier to align images to the left, right, or center. Simply select the image by clicking on it, and then click on alignment button from the block toolbar.

Image alignment options

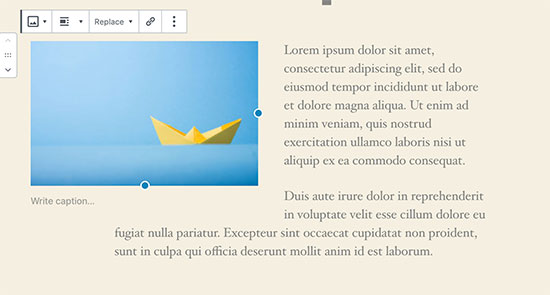
You may have noticed how some popular blogs use images with text wrapped around them. This is done by using the align feature.

Image aligned left with text on the right

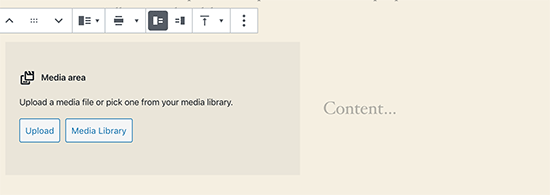
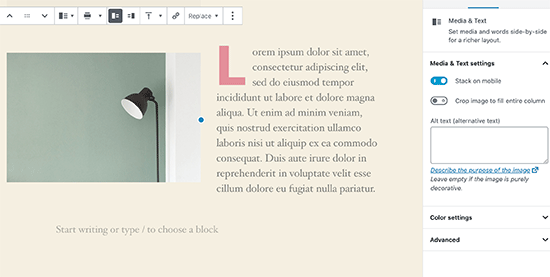
Alternatively, you can also use the ‘Media & Text’ block instead of the image block. This block is made specifically for adding images next to the text.

Media and text block

You can then upload an image and text side by side. You can also use the block toolbar to change the image or text side.

Image next to the text in WordPress

3. How to Add Caption below Images?

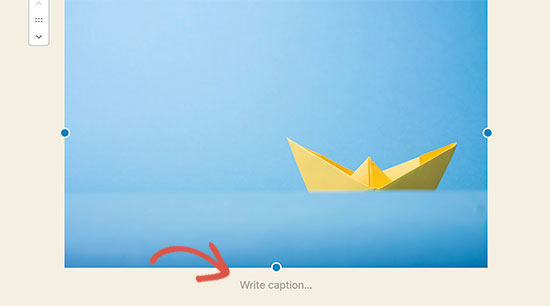
WordPress allows you to easily add caption for images. After you upload an image, you’ll see the option to add caption right below the image preview.

Write caption for an image in WordPress

Similarly, you can also add captions to image galleries in WordPress. For more details, see our guide on how to add captions to images in WordPress.

4. How to Display Photos in Columns and Rows?

Often users ask us how to neatly display photos in columns and rows.

Let’s say you want to share photos of a birthday party or vacation photos. You can add them one by one into a post, but this will look like a lengthy list of images.

The better way to group your photos is by creating image galleries.

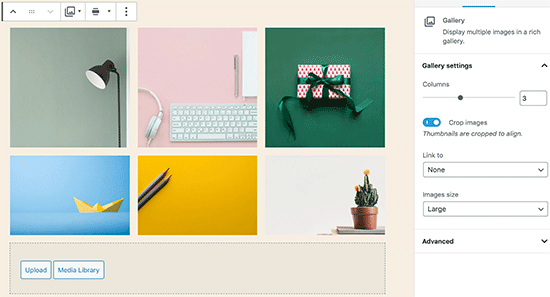
WordPress comes with a built-in gallery block that allows you to easily add images in rows and columns with thumbnail previews.

Simply add the gallery block to the post editor and select the images you want to upload.

Adding a gallery in WordPress

For more detailed instructions see our guide on how to create an image gallery in WordPress.

5. Create Beautiful Responsive Image Galleries in WordPress

Envira Gallery

You will notice that the default WordPress image galleries lack several features. For instance, they are also not very easy to browse.

If you often upload images and photographs to your WordPress site, then you will need a proper WordPress photo gallery plugin.

We recommend using Envira Gallery. It allows you to easily create beautiful and fully mobile-friendly image galleries on your WordPress site.

The best part is that it adds additional functionality like albums, gallery templates, social sharing, slideshows, watermarking, pagination, password protection, tagging, fullscreen view, and much more.

6. How to Fix Missing Post Thumbnails / Featured Image?

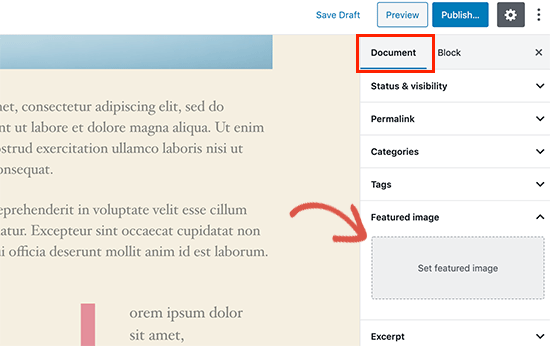
Most WordPress themes allow you to prominently display a featured image with your articles. Here is how to set a featured image in WordPress to avoid missing thumbnails.

Setting a featured image for a WordPress post

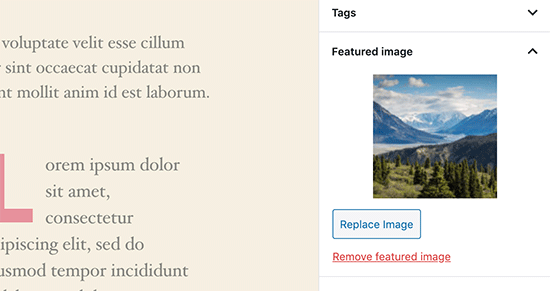
Now, you can click on ‘Set Featured Image’ to upload your post thumbnail. After uploading the image, you’ll be able to see your post thumbnail in the featured image meta box like this:

Featured image preview in post editor

For more details, see our guide on how to add featured image or post thumbnail in WordPress.

7. How to Add Cover Images in WordPress Posts and Pages

Cover images are the wide or full-width images that can be used as a separator between different sections of an article or a lengthy sales page.

They are highly engaging and help users easily scan a page without feeling overwhelmed by too much text.

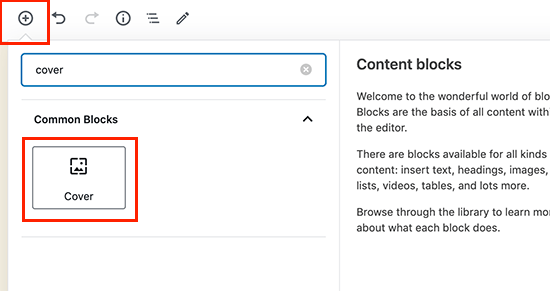
To add a cover image, you simply need to add the ‘Cover’ block to the content editor.

Adding cover block to WordPress post editor

Next, you need to upload the image you want to use from your computer or select one from the media library. If you don’t want to use an image, then you can also select a color background as the cover.

Tip: It is best to use a large image for a better result.

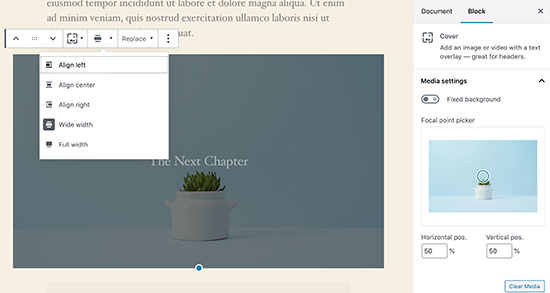
You’ll now see a liver preview of your cover image in the editor. You can change the cover image display options from the block toolbar or using the settings on the right.

Cover image preview

To learn more see our guide on the difference between cover image vs featured image in WordPress and how to use them effectively.

8. How to Fix Featured Image Appearing Twice Issue?

Inserting the featured image inside content is a common mistake made by beginners.

Once you set a featured image, you don’t need to insert it into the post editor along with your post content.

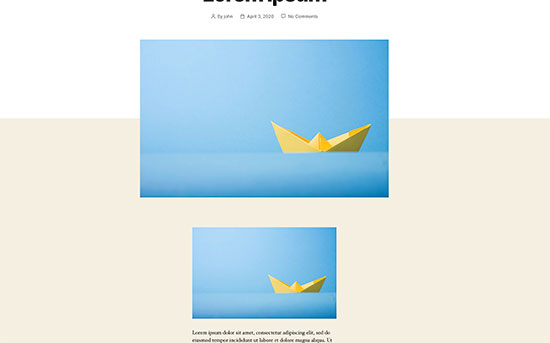
Doing so, will make your featured image appear twice. Once as the featured image, and once as an image inside the post.

Featured image appearing twice

You can add other images in your post, but your featured image goes in the featured image box.

For more details, see our guide on how to fix featured image appearing twice in WordPress posts.

9. Image too Big? How to Crop Images in WordPress?

When you are uploading images from your phone or camera they are usually too big.

WordPress automatically creates small, medium, and large image sizes for your original upload. But sometimes you may need to crop the image in a different size.

WordPress is no Photoshop, but it comes with some basic image editing features like scale, crop, flip and rotate images.

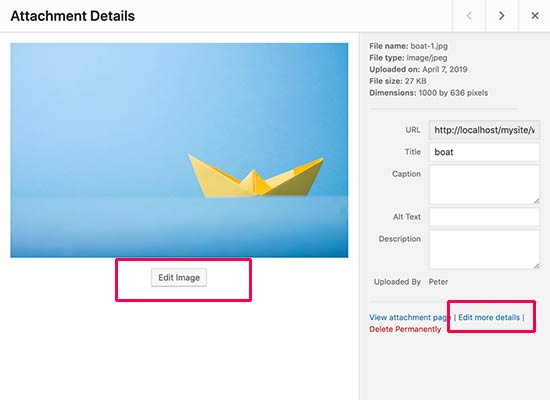
Go to Media » Add New and upload your image. After uploading the image, you will see an Edit link next to the uploaded image.

Clicking on it will open the Edit Media screen where you will see an Edit Image button right below the image. This will open the WordPress image editor.

Editing image in WordPress

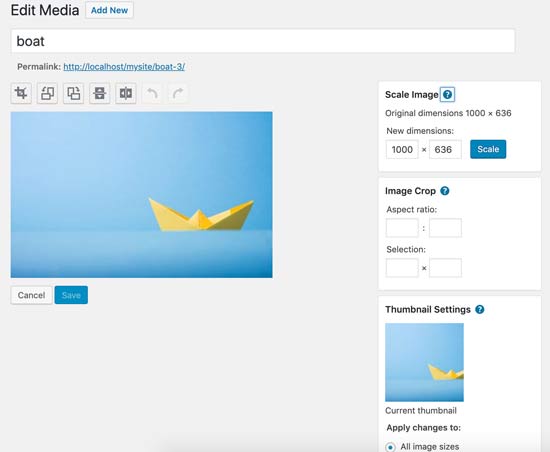
From here you can click on the ‘Edit Image’ button below the image preview. This will open the image editing screen.

On the image editor screen, you will see buttons to perform some basic image editing tasks such as cropping, rotating, resizing, etc.

WordPress image editing features

For more detailed instructions see our guide on how to crop, rotate, scale, and flip images in WordPress.

10. How to Add a Header Image in WordPress?

A header image in WordPress is a theme feature. Many WordPress free and premium themes comes with support for header image.

You can upload your own custom header image from the Appearance » Customize page.

Header options

Since it is a theme feature, many WordPress themes come with their own header options. Some allow you to set a site-wide header image, while others allow you to only set a header image for the homepage.

11. How to Add a Background Image in WordPress?

Just like the custom header image, custom background image is also a WordPress theme feature. Many WordPress themes come with support for custom background images.

Visit Appearance » Customize to launch the theme customizer. If you can see the Background Image option, then your theme has support for custom backgrounds.

Custom background

It is a theme feature which is why it varies from one theme to another. Depending on your theme you’ll see different options for styling your background image.

If your theme does not support background image, then you can still use a plugin to add full-screen background images to your website.

12. How to Find Free Images for Your WordPress Blog Posts?

Finding images for blog posts

Images can make your articles stand out. However, you must respect copyrights of other people and try to find images that you are legally allowed to use.

We are often asked by our readers about how to find best royalty free images to use in their posts?

There are many websites where you can find free images to use. However, you will soon notice that images on those sites look overused and generic.

See our list of the best sources for free public domain and CC0-licensed images on the internet.

13. How to Tag Images in WordPress?

If you run a photography blog, then you will notice that WordPress does not allow you to sort photos and images.

Wouldn’t it be great if you could add tags to your images, so that you and your users can easily browse them?

Luckily, there are some great plugins that allow you to do just that.

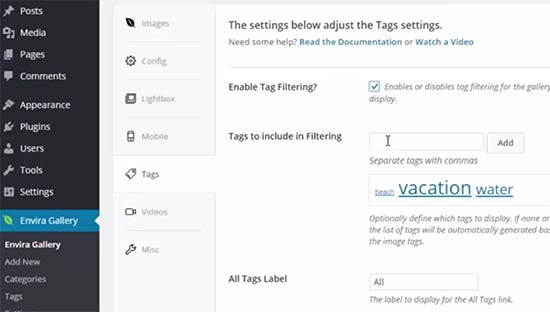
For a photography related blog, the best option is to use Envira Gallery which comes with an add-on to add tags.

Envira Gallery allows you to create beautiful, mobile-ready, photo galleries in WordPress. Using tags, your users can easily filter and sort photos without even reloading a page.

Envira Gallery tags feature

For more details, see our article on how to add categories and tags to WordPress media library.

14. How to Import External Images in WordPress?

This question often comes up when you are migrating your site to WordPress. Some images on your website may still be pointing to older location.

Specially users importing blogs from Blogger, Squarespace, or WordPress.com may face this problem.

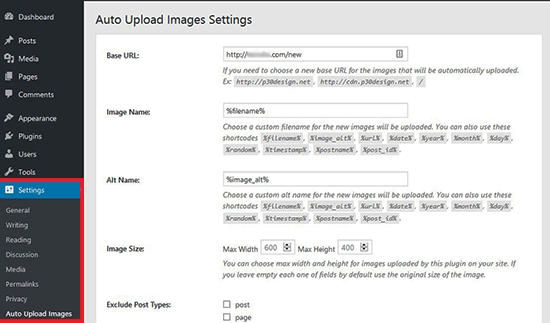
While the images on your site may appear correctly, they are still loading from external source. To solve this issue, all you need to do is install and activate Auto Upload Images plugin.

Auto upload image settings

The plugin will check for external images once you update or save any post or page. You can manually do that for each post or page or you can bulk edit all posts and simply click the update button.

For detailed instructions, see our guide on how to import external images in WordPress.

15. How to Require Featured Image for Posts in WordPress?

When running a multi-author site in WordPress, some of your authors may not be familiar with the featured image functionality.

In this case, you may want to remind yourself or your users to upload a featured image whenever they are submitting a post in WordPress.

You can do this by installing and activating the Require Featured Image plugin.

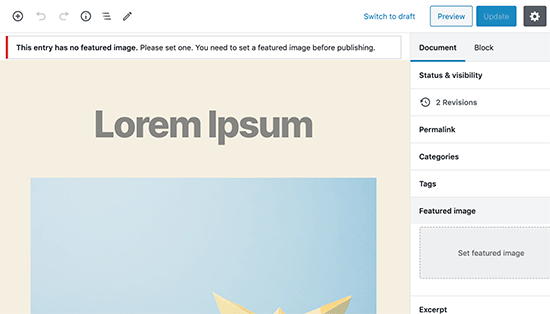
Once activated, the plugin will display a notification box in the post edit area, informing users that this post requires a featured image.

Require featured image

You and your users will be able to save posts as drafts, but you cannot publish the post until you add a featured image.

See our article on how to require featured images for posts in WordPress for more instructions.

16. How to Set a Default Featured Image in WordPress?

Finding the perfect featured image for every post or article is a tough task. Sometimes you may not want to add a featured image to a post, but your theme may look awkward without a featured image.

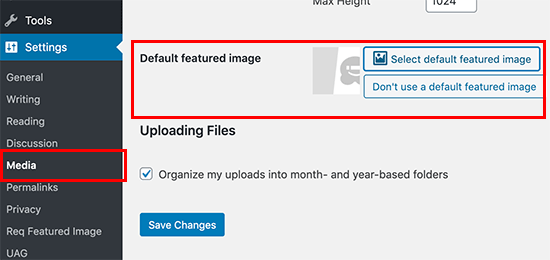
This is where a default featured image can come in handy. A default featured image is used when an article does not have a featured image of its own.

You can set a default featured image by using the default featured image plugin.

Default featured image

We hope this article helped you fix some of the most common image issues in WordPress. You may also want to see our list of the most common WordPress errors and how to fix them.

If you liked this article, then please subscribe to our YouTube Channel for WordPress video tutorials. You can also find us on Twitter and Facebook.

The post How to Fix Common Image Issues in WordPress appeared first on WPBeginner.