Static code analysis is the practice of examining application’s source, bytecode, or binary code without ever executing the program code itself. Instead, the code under review is analyzed to identify any defects, flaws, or vulnerabilities which may compromise the integrity or security of the application itself. In this Refcard, we explore the necessary components and steps for getting started with static code analysis, including CI/CD integrations, OWASP Benchmark, and more.
CommonMark is a rationalized version of Markdown syntax with a spec whose goal is to remove the ambiguities and inconsistency surrounding the original Markdown specification. It offers a standardized specification that defines the common syntax of the language along with a suite of comprehensive tests to validate Markdown implementations against this specification.
GitHub uses Markdown as the markup language for its user content.
“CommonMark is an ambitious project to formally specify the Markdown syntax used by many websites on the internet in a way that reflects its real-world usage [...] It allows people to continue using Markdown the same way they always have while offering developers a comprehensive specification and reference implementations to interoperate and display Markdown in a consistent way between platforms.”
In 2012, GitHub proceeded to create its own flavor of Markdown — GitHub Flavored Markdown (GFM) — to combat the lack of Markdown standardization, and extend the syntax to its needs. GFM was built on top of Sundown, a parser specifically built by GitHub to solve some of the shortcomings of the existing Markdown parsers at the time. Five years after, in 2017, it announced the deprecation of Sundown in favor of CommonMark parsing and rendering library, cmark in A formal spec for GitHub Flavored Markdown.
In the Common Questions section of Markdown and Visual Studio Code, it is documented that Markdown in VSCode targets the CommonMark Markdown specification using the markdown-it library, which in itself follows the CommonMark specification.
CommonMark has been widely adopted and implemented (see the List of CommonMark Implementations) for use in different languages like C (e.g cmark), C# (e.g CommonMark.NET), JavaScript (e.g markdown-it) etc. This is good news as developers and authors are gradually moving to a new frontier of been able to use Markdown with a consistent syntax, and a standardized specification.
A Short Note On Markdown Parsers
Markdown parsers are at the heart of converting Markdown text into HTML, directly or indirectly.
Parsers like cmark and commonmark.js do not convert Markdown to HTML directly, instead, they convert it to an Abstract Syntax Tree (AST), and then render the AST as HTML, making the process more granular and subject to manipulation. In between parsing — to AST — and rendering — to HTML — for example, the Markdown text could be extended.
CommonMark’s Markdown Syntax Support
Projects or platforms that already implement the CommonMark specification as the baseline of their specific flavor are often superset of the strict subset of the CommonMark Markdown specification. For the most part of it, CommonMark has mitigated a lot of ambiguities by building a spec that is built to be built on. GFM is a prime example, while it supports every CommonMark syntax, it also extends it to suits its usage.
CommonMark's syntax support can be limited at first, for example, it has no support for this table syntax, but it is important to know that this is by design as this comment in this thread of conversation reveals: that the supported syntax is strict and said to be the core syntax of the language itself — the same specified by its creator, John Gruber in Markdown: Syntax.
At the time of writing, here are a number of supported syntax:
Paragraphs and Line Breaks,
Headers,
Emphasis and Strong Emphasis,
Horizontal Rules,
Lists,
Links,
Images,
Blockquotes,
Code,
Code Blocks.
To follow along with the examples, it is advised that you use the commonmark.js dingus editor to try out the syntax and get the rendered Preview, generated HTML, and AST.
Paragraphs And Line Breaks
In Markdown, paragraphs are continuous lines of text separated by at least a blank line.
A Horizontal rule, <hr/> is created with three or more asterisks (*), hyphens (-), or underscores (_), on a new line. The symbols are separated by any number of spaces, or not at all.
Syntax
Rendered HTML
**
<hr />
<hr />
---
<hr />
- - -
<hr />
___
<hr />
_ _ _
<hr />
Dingus permalink to check out the full example with the Preview and AST.
The inline format has the syntax: [value](URL "optional-title") with no space between the brackets.
The reference format has the syntax: [value][id] for the reference, and [id]: href "optional-title" for the hyperlink label, separated with at least a line.
The id is the Definition Identifier and may consist of letters, numbers, spaces, and punctuation.
Definition Identifiers are not case sensitive.
There is also support for Automatic Links, where the URL is bounded by the less than (<) and greater than (>) symbol, and displayed literally.
Dingus permalink%0A%0A---%0A%0A%5BGoogle%5D(https%3A%2F%2Fgoogle.com)%0A%0A---%0A%0A%5BComparing%20Styling%20Methods%20In%20Next.js%5D(%2F2020%2F09%2Fcomparing-styling-methods-next-js)%0A%0A---%0A%0A%5BGoogle%5D%5Bid%5D%0A%0A%5Bid%5D%3A%20https%3A%2F%2Fgoogle.com%20%22Google%22%0A%0A---%0A%0A%3Chttps%3A%2F%2Fgoogle.com%3E) to check out the full example with the Preview and AST.
The inline format has the syntax: .
The reference format has the syntax: ![alt text][id] for the reference, and [id]: image-url "optional-title" for the image label. Both should be separated by at least a blank line.
The image title is optional, and the image-url can be relative.
<!--Markdown-->

<!--Rendered HTML-->
<img src="image-url" alt="alt text" title="optional-title" />
<!--Markdown-->
![alt text][id]
<!--At least a line must be in-between-->
<!--Markdown-->
[id]: image-url "optional-title"
<!--Rendered HTML-->
<img src="image-url" alt="alt text" title="optional-title" />
Dingus permalink%0A%0A---%0A%0A!%5Balt%20text%5D%5Bid%5D%0A%0A%5Bid%5D%3A%20image-url%20%22optional-title%22) to check out the full example with the Preview and AST.
<!--Markdown-->
> This is a blockquote element
> You can start every new line
> with the greater than symbol.
> That gives you greater control
> over what will be rendered.

<!--Rendered HTML-->
<blockquote>
<p>This is a blockquote element
You can start every new line
with the greater than symbol.
That gives you greater control
over what will be rendered.</p>
</blockquote>
Blockquotes can be nested:
<!--Markdown-->
> Blockquote with a paragraph
>> And another paragraph
>>> And another

<!--Rendered HTML-->
<blockquote>
<p>Blockquote with a paragraph</p>
<blockquote>
<p>And another paragraph</p>
<blockquote>
<p>And another</p>
</blockquote>
</blockquote>
</blockquote>
They can also contain other Markdown elements, like headers, code, list items, and so on.
<!--Markdown-->
> Blockquote with a paragraph
> # Heading 1
> Heading 2
> -
> 1. One
> 2. Two

<!--Rendered HTML-->
<blockquote>
<p>Blockquote with a paragraph</p>
<h1>Heading 1</h1>
<h2>Heading 2</h2>
<ol>
<li>One</li>
<li>Two</li>
</ol>
</blockquote>
The HTML Inline Code element, <code>, is also supported. To create one, delimit the text with back-ticks (`), or double back-ticks if there needs to be a literal back-tick in the enclosing text.
The HTML Preformatted Text element, <pre>, is also supported. This can be done with at least three and an equal number of bounding back-ticks (`), or tildes (~) — normally referred to as a code-fence, or a new line starting indentation of at least 4 spaces.
Dingus permalink%20%3D%3E%20%5B...new%20Set(array)%5D%3B%0A%60%60%60%0A%0A---%0A%0A%20%20%20%20const%20dedupe%20%3D%20(array)%20%3D%3E%20%5B...new%20Set(array)%5D%3B) to check out the full example with the Preview and AST.
According to John Grubers original spec note on inline HTML, any markup that is not covered by Markdown’s syntax, you simply use HTML itself, with The only restrictions are that block-level HTML elements — e.g. <div>, <table>, <pre>, <p>, etc. — must be separated from surrounding content by blank lines, and the start and end tags of the block should not be indented with tabs or spaces.
However, unless you are probably one of the people behind CommonMark itself, or thereabout, you most likely will be writing Markdown with a flavor that is already extended to handle a large number of syntax not currently supported by CommonMark.
Going Forward
CommonMark is a constant work in progress with its spec last updated on April 6, 2019. There are a number of popular applications supporting it in the pool of Markdown tools. With the awareness of CommonMark’s effort towards standardization, I think it is sufficient to conclude that in Markdown’s simplicity, is a lot of work going on behind the scenes and that it is a good thing for the CommonMark effort that the formal specification of GitHub Flavored Markdown is based on the specification.
The move towards the CommonMark standardization effort does not prevent the creation of flavors to extend its supported syntax, and as CommonMark gears up for release 1.0 with issues that must be resolved, there are some interesting resources about the continuous effort that you can use for your perusal.
JavaScript parser — Acorn and AST are useful things. They help us automatically and efficiently edit source code. This post shows you how to build and edit the AST of JavaScript code.
To quote from the github repository, Acorn is a tiny, fast JavaScript parser, written completely in JavaScript, released under a MIT license. Acorn can generate abstract syntax trees for JavaScript codes. It has 3 modules: the main JavaScript parser named “acorn”, the error-tolerant parser named “acorn-loose”, the syntax tree walker named “acorn-walk”. This post focuses on the main parser. In this section, we introduce its installation.
One of the more powerful concepts I've stumbled across recently is the idea of abstract syntax trees, or ASTs. If you've ever studied alchemy, you may recall that the whole motivation for alchemists was to discover some way to transform not-gold into gold through scientific or arcane methods.
ASTs are kind of like that. Using ASTs, we can transform Markdown into HTML, JSX into JavaScript, and so much more.
Why are ASTs useful?
Early in my career, I tried to change files using a find-and-replace method. This ended up being fairly complicated, so I tried using regular expressions. I ended up abandoning the idea because it was so brittle; the app broke all the time because someone would enter text in a way I hadn’t anticipated and it would break my regular expressions causing the whole app to fall down.
The reason this was so hard is that HTML is flexible. That makes it extremely hard to parse using regular expressions. String-based replacement like this is prone to breaking because it might miss a match, match too much, or do something weird that results in invalid markup that leaves the page looking janky.
ASTs, on the other hand, turn HTML into something far more structured, which makes it much simpler to dive into a text node and do replacements on only that text, or to mess with elements without needing to deal with the text at all.
This makes AST transformation safer and less error-prone than a purely string-based solution.
What are ASTs used for?
To start, let's take a look at a minimal document using a couple lines of Markdown. This will be saved as a file called home.md, which we'll save in the content folder of our website.
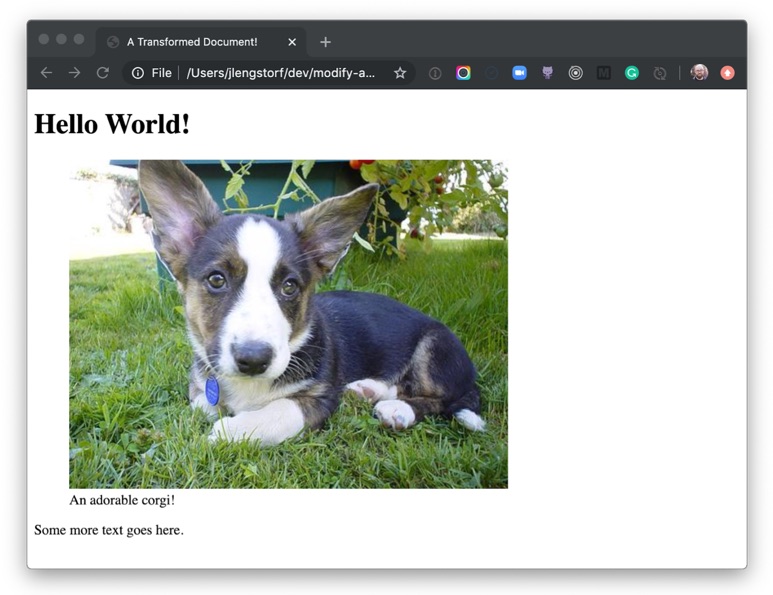
# Hello World!
 An adorable corgi!
Some more text goes here.
Assuming we know Markdown, we can infer that when this Markdown is parsed, it'll end up being an <h1> that says, "Hello World!" and a <p> that says, "This is some Markdown."
But how does it get transformed from Markdown to HTML?
First, we need to install the dependencies required to parse the Markdown into an AST and convert it to HTML. To do that, we need to make sure we've initialized the folder as a package. Run the following command in your terminal:
# make sure you’re in your root folder (where `content` is)
# initialize this folder as an npm package
npm init

# install the dependencies
npm install unified remark-parse remark-html
If we assume our Markdown is stored in home.md, we can get the AST with the following code:
This code takes advantage of Node’s built-in fs module, which allows us to access and manipulate the filesystem. For more information on how this works, check out the official docs.
If we save this as src/index.js and use Node to execute this script from the command line, we’ll see the following in our terminal:
$ node src/index.js
<h1>Hello World!</h1>
<p><img src="<https://images.dog.ceo/breeds/corgi-cardigan/n02113186_1030.jpg>" alt="cardigan corgi"> An adorable corgi!</p>
<p>Some more text goes here.</p>
We tell unified to use remark-parse to turn the Markdown file into an AST, then to use remark-html to turn the Markdown AST into a HTML — or, more specifically, it turns it into something called a VFile. Using the toString() method turns that AST into an actual string of HTML we can display in the browser!
Thanks to the hard work of the open-source community, remark does all the hard work of turning Markdown into HTML for us. (See the diff)
Next, let's look at how this actually works.
What does an AST look like?
To see the actual AST, let’s write a tiny plugin to log it:
Note that the position values have been truncated to save space. They contain information about where the node is in the document. For the purposes of this tutorial, we won’t be using this information. (See the diff)
This is a little overwhelming to look at, but if we zoom in we can see that each part of the Markdown becomes a type of node with a text node inside it.
The type tells us what kind of node we're dealing with.
Each node type has additional properties that describe the node. The depth property on the heading tells us what level heading it is — a depth of 1 means it’s an <h1> tag, 2 means <h2>, and so on.
The children array tells us what's inside this node. In both the heading and the paragraph, there’s only text, but we could also see inline elements here, like <strong>.
This is the power of ASTs: We've now described the Markdown document as an object that a computer can understand. If we want to print this back to Markdown, a Markdown compiler would know that a "heading" node with a depth of 1 starts with #, and a child text node with the value "Hello" means the final line should be # Hello.
How AST transformations work
Transforming an AST is usually done using the visitor pattern. It‘s not important to know the ins and outs of how this works to be productive, but if you’re curious, JavaScript Design Patterns for Humans by Soham Kamani has a great example to help explain how it works. The important thing to know is that the majority of resources on AST work will talk about "visiting nodes," which roughly translates to "find part of the AST so we can do stuff with it." The way this works practice is that we write a function that will be applied to AST nodes matching our criteria.
A few important notes about how it works:
ASTs can be huge, so for performance reasons we will mutate nodes directly. This runs counter to how I would usually approach things — as a general rule I don't like to mutate global state — but it makes sense in this context.
Visitors work recursively. That means that if we process a node and create a new node of the same type, the visitor will run on the newly created node as well unless we explicitly tell the visitor not to.
We're not going to go too deep in this tutorial, but these two ideas will help us understand what's going on as we start to mess with the code.
How do I modify the HTML output of the AST?
What if we want to change the output of our Markdown, though? Let's say our goal is to wrap image tags with a figure element and supply a caption, like this:
To accomplish this, we'll need transform the HTML AST — not the Markdown AST — because Markdown doesn't have a way of creating figure or figcaption elements. Fortunately, because unified is interoperable with multiple parsers, we can do that without writing a bunch of custom code.
Convert a Markdown AST to an HTML AST
To convert the Markdown AST to an HTML AST, add remark-rehype and switch to rehype-stringify for turning the AST back to HTML.
npm install remark-rehype rehype-stringify
Make the following changes in src/index.js to switch over to rehype:
This is the AST for the HTML representation of the image, so we can start changing it over to use the figure element. (See the diff)
Write a plugin for unified
To wrap our img element with a figure element, we need to write a plugin. In unified, plugins are added with the use() method, which accepts the plugin as a first argument and any options as a second argument:
.use(plugin, options)
The plugin code is a function (called an “attacher” in unified jargon) that receives option. These options are used to create a new function (called a “transformer”) that receives the AST and does work to, er, transform it. For more details on plugins, check out the plugin overview in the unified docs.
The function it returns will receive the entire AST as its argument, and it doesn't return anything. (Remember, ASTs are mutated globally.) Create a new file called img-to-figure.js in the same folder as index.js, then put the following inside:
module.exports = options => tree => {
  console.log(tree);
};
Next, we need to add a visitor. This will let us actually get at the code. Unified takes advantage of a number of utility packages, all prefixed with unist-util-*, that allow us to do common things with our AST without writing custom code.
We can use unist-util-visit to modify nodes. This gives us a visit helper that takes three arguments:
The entire AST we're working with
A predicate function to identify which nodes we want to visit
A function to make any changes to the AST we want to make
To install, run the following in your command line:
npm install unist-util-visit
Let's implement a visitor in our plugin by adding the following code:
const visit = require('unist-util-visit');

  module.exports = options => tree => {
    visit(
      tree,
      // only visit p tags that contain an img element
      node =>
        node.tagName === 'p' && node.children.some(n => n.tagName === 'img'),
      node => {
        console.log(node);
      }
    );
};
When we run this, we can see there's only one paragraph node logged:
Now that we have the image attributes, we can start to change the AST. Remember, because ASTs can be really large, we mutate them in place to avoid creating lots of copies and potentially slowing our script down.
We start by changing the node’s tagName to be a figure instead of a paragraph. The rest of the details can stay the same for now.
Make the following changes in src/img-to-figure.js:
const visit = require('unist-util-visit');

module.exports = options => tree => {
  visit(
    tree,
    // only visit p tags that contain an img element
    node =>
    node.tagName === 'p' && node.children.some(n => n.tagName === 'img'),
    node => {
      node.tagName = 'figure';
    }
  );
};
If we run our script again and look at the output, we can see that we’re getting closer!
<h1>Hello World!</h1>
<figure><img src="<https://images.dog.ceo/breeds/corgi-cardigan/n02113186_1030.jpg>" alt="cardigan corgi">An adorable corgi!</figure>
<p>Some more text goes here.</p>
To avoid needing to write custom syntax, we're going to use any text passed inline with an image as the image caption.
We can make an assumption that usually images don't have inline text in Markdown, but it’s worth noting that this could 100% cause unintended captions to appear for people writing Markdown. We're going to take that risk in this tutorial. If you're planning to put this into production, make sure to weigh the trade-offs and choose what's best for your situation.
To use the text, we're going to look for a text node inside our parent node. If we find one, we want to grab its value as our caption. If no caption is found, we don’t want to transform this node at all, so we can return early.
Make the following changes to src/img-to-figure.js to grab the caption:
const visit = require('unist-util-visit');

module.exports = options => tree => {
  visit(
    tree,
    // only visit p tags that contain an img element
    node =>
    node.tagName === 'p' && node.children.some(n => n.tagName === 'img'),
    node => {
      // find the text node
      const textNode = node.children.find(n => n.type === 'text');

      // if there’s no caption, we don’t need to transform the node
      if (!textNode) return;

      const caption = textNode.value.trim();

      console.log({ caption });
      node.tagName = 'figure';
    }
  );
};
Now that we have our caption text, we can add a figcaption to display it. We could do this by creating a new node and deleting the old text node, but since we’re mutating in place it’s a little less complicated to just change the text node into an element.
Elements don’t have text, though, so we need to add a new text node as a child of the figcaption element to display the caption text.
Make the following changes to src/img-to-figure.js to add the caption to the markup:
const visit = require('unist-util-visit');

module.exports = options => tree => {
  visit(
    tree,
    // only visit p tags that contain an img element
    node =>
      node.tagName === 'p' && node.children.some(n => n.tagName === 'img'),
    node => {
      // find the text node
      const textNode = node.children.find(n => n.type === 'text');

      // if there’s no caption, we don’t need to transform the node
      if (!textNode) return;

      const caption = textNode.value.trim();
      // change the text node to a figcaption element containing a text node
      textNode.type = 'element';
      textNode.tagName = 'figcaption';
      textNode.children = [
        {
          type: 'text',
          value: caption
        }
      ];

      node.tagName = 'figure';
    }
  );
};
If we run the script again with node src/index.js, we see the transformed image wrapped in a figure element and described with a figcaption!
<h1>Hello World!</h1>
<figure><img src="<https://images.dog.ceo/breeds/corgi-cardigan/n02113186_1030.jpg>" alt="cardigan corgi"><figcaption>An adorable corgi!</figcaption></figure>

<p>Some more text goes here.</p>
Now that we've made a bunch of transformations, we want to save those adjustments to an actual file so we can share them.
Since the Markdown doesn't include a full HTML document, we’re going to add one more rehype plugin called rehype-document to add the full document structure and a title tag.
Run the script again and we'll be able to see a new folder in root called public, and inside that we’ll see home.html. Inside, our transformed document is saved!
If we open public/home.html in a browser, we can see our transformed Markdown rendered as a figure with a caption.
Holy buckets! Look at that adorable corgi! And we know it’s adorable because the caption tells us so.
What to do next
Transforming files using ASTs is extremely powerful — with it, we’re able to create pretty much anything we can imagine in a safe way. No regexes or string parsing required!
From here, you can dig deeper into the ecosystem of plugins for remark and rehype to see more of what’s possible and get more ideas for what you can do with AST transformation, from building your own Markdown-powered static site generator; to automating performance improvements by modifying code in-place; to whatever you can imagine!