How to Accept ACH Payments in WordPress

Do you want to accept ACH payments on your WordPress website?

ACH (Automated Clearing House) payments are a bank-to-bank payment method in the United States. ACH payments help save transaction fees for business owners since they are a lot lower than a credit card or digital wallet transaction fees.

In this article, we’ll show you how to accept ACH payments in WordPress.

How to accept ACH payments in WordPress

Why Accept ACH Payments in WordPress?

If your business is located in the United States, then you can lower your transaction fees by a lot when you accept ACH payments on your WordPress site. It’s a perfect payment method if you regularly accept large amounts of money from customers.

For example, the Stripe fee for accepting ACH payments is just 0.8% per transaction, with a maximum cap of $5.

On the other hand, a typical credit card or digital wallet payment fee is 2.9% + USD 0.30 per transaction. Even newer methods like Apple Pay charge a 1.5% fee, nearly double ACH.

Keeping these fees in mind, let’s say a customer pays $100. Through ACH payments, the transaction fee would be roughly $0.80. At the same time, the transaction fee for the same amount through a credit card or digital wallet would be $3.20.

Similarly, on an $800 payment amount, the transaction fee through ACH would be $6.40, and through cards or digital wallets would be $23.50. What this means is that the higher the transaction amount, the more you’ll save in transaction costs.

Another advantage of using ACH payments is getting higher customer retention and reducing the churn rate. Credit and debit cards expire after a certain period, which means that customers will stop doing business until their cards are renewed. With ACH payments, you can overcome this issue and reduce involuntary churn.

That said, let’s look at how you can accept ACH payments in WordPress.

Accepting ACH Payments in WordPress

The best way to allow ACH payments in WordPress is by using the WP Simple Pay plugin. It’s the best Stripe plugin for WordPress and will let you set up one-time payments or recurring payments without setting up a shopping cart.

We’ll use the WP Simple Pay Pro version for this tutorial because it includes ACH payments, on-site payment forms, and other features. There is also a free version of the plugin, but it doesn’t have an ACH payment option.

First, you’ll need to install and activate the WP Simple Pay plugin. If you need help, then please see our detailed guide on how to install a WordPress plugin.

Once the plugin is active, it will automatically launch the setup wizard. Go ahead and click the ‘Let’s Get Started’ button.

The WP Simple Pay Setup Wizard Will Start Automatically

On the next screen, you’ll need to enter the license key. You can easily find the license key in your WP Simple Pay account area.

After entering the key, you can click the ‘Activate and Continue’ button.

You’ll Be Asked to Enter Your WP Simple Pay License Key

Next, you’ll need to connect WP Simple Pay with Stripe.

Stripe is a popular payment gateway that allows you to collect ACH payments on your WordPress site.

Go ahead and click the ‘Connect with Stripe’ button.

Connecting WP Simple Pay to Stripe

After that, you can log in to your Stripe account and connect it with WP Simple Pay.

Just a note that Stripe requires websites to have HTTPS encryption. If you don’t already have an SSL certificate for your website, then please see our step-by-step guide on how to get a free SSL certificate for WordPress.

Once your Stripe account is connected, WP Simple Pay will show different email options to configure. You can enable emails for payment receipts, upcoming invoices, and payment notifications.

Configure Your WP Simple Pay Emails

Next, enter your business email address where you’d like to receive these emails, and then click the ‘Save and Continue’ button.

After that, you’ll arrive at the last step in the setup wizard, where you’ll need to create a payment form. Simply click on the ‘Create a Payment Form’ button.

WP Simple Pay Setup Is Complete

Setting Up a WP Simple Pay Payment Form

You can also create a payment form in WP Simple Pay by going to WP Simple Pay » Add New from your WordPress dashboard.

You will see a number of payment form templates. You need to hover over the ‘ACH Direct Debit Form’ template and then click the ‘Use Template’ button that appears.

Select the ACH Direct Debit Form Template

You’ll find yourself on the ‘General’ tab of the payment form editor. If you like, you can rename the form and give it a description.

We’ll leave the other settings with their default values.

If You Like, Rename Your Form and Give It a Description

Next, go to the ‘Payment’ tab in the payment form and enter the price amount and label.

You should also set up whether it is a one-time payment or a recurring subscription.

Enter payment details

After that, head down to the ‘Form Field’ tab.

Under the Payment Method section, you’ll notice that the ‘ACH Direct Debit’ and ‘Card’ payment options have already been selected for you. If you like, you can also select any other payment methods that you’d like to use.

ACH and Credit Card Payment Options Have Already Been Set Up for You

Next, you can preview your ACH payment form and then publish it.

To do that, simply click the ‘Publish’ button in WP Simple Pay.

Publish your ACH form

You can now add your ACH payment form anywhere on your WordPress website.

To start, go ahead and add a new page or edit an existing one. Once you’re in the content editor, simply add a WP Simple Pay block. After that, you should select your ACH form from the dropdown menu.

Add WP Simple Pay Block

Once that’s done, you can preview your page and publish it.

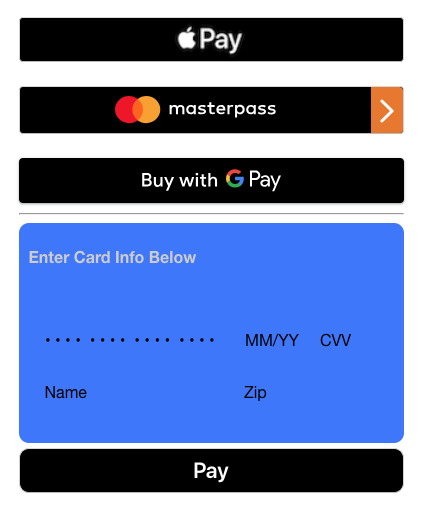
Now you can visit your website to see the ACH payment form in action. Here’s a preview of what it looks like on our demo site.

ACH Payment Form Preview

Final Thoughts on Adding ACH Payments in WordPress

The above method is the simplest way to accept ACH payment in WordPress without using a shopping cart.

However, if you’re using WordPress for your online store or to sell digital downloads, then most of those eCommerce plugins also support ACH payments.

For example, you can use Easy Digital Downloads to sell digital downloads like eBooks, software, music, etc, and it lets you accept ACH payments.

Alternatively, WooCommerce will allow you to sell physical goods and accept ACH payments.

We hope that this article helped you learn how to accept ACH payments in WordPress. You can also see our guide on how much it costs to build a website and the best WordPress plugins.

If you liked this article, then please subscribe to our YouTube Channel for WordPress video tutorials. You can also find us on Twitter and Facebook.

The post How to Accept ACH Payments in WordPress first appeared on WPBeginner.

How to Accept Apple Pay in WordPress (The EASY Way)

Would you like to accept Apple Pay on your WordPress site?

Over the last several years Apple Pay has significantly grown in popularity, and now there are several easy ways to offer Apple Pay as a payment option on your website.

In this article, we’ll show you how to accept Apple Pay in WordPress.

How to Accept Apple Pay in WordPress

Why Accept Apple Pay in WordPress?

If you’re selling products or services on your WordPress website, then it’s important to let your visitors to pay with their preferred method.

Often that means using a credit card, but newer methods like Apple Pay and Google Pay are becoming more popular. Apple Pay now has over 40% of the mobile payment market in the US, and it makes online payments simple.

However, online Apple Pay payments can only be made from the Safari browser running on a Mac or iOS device.

That being said, let’s take a look at how to accept Apple Pay in your online store.

Note: We’ll cover how to add an Apple Pay option in WordPress without adding a full eCommerce cart, but we will leave other helpful resources at the end of this article for those looking for full eCommerce solutions.

How to Accept Apple Pay in WordPress

The first thing you need to do is install and activate the WP Simple Pay plugin. For more details, see our step by step guide on how to install a WordPress plugin.

WP Simple Pay is one of the top WordPress invoicing and payments plugins among small business owners because it’s both simple and powerful. The best part is that WP Simple Pay does not charge you any additional transaction fees, and you can set it up without the complexity of a cart system.

While there is a free version of the plugin, you need the Pro plugin to accept Apple Pay, create on-site payment forms, and more.

Upon activation, the WP Simple Pay setup wizard will start automatically. You simply need to click the ‘Let’s Get Started’ button to continue.

The WP Simple Pay Setup Wizard Will Start Automatically

First, you’ll be asked to enter your license key. You can find this information from your account on the WP Simple Pay website.

After that, you need to click the ‘Activate and Continue’ button to move to the next step.

You’ll Be Asked to Enter Your WP Simple Pay License Key

Now you’ll need to connect WP Simple Pay to Stripe. Stripe is a popular payment gateway, and it’s the easiest way to add Apple Pay to your WordPress site. It also supports all top credit and debit cards, Google Pay, and more.

Simply click the ‘Connect with Stripe’ button, and from there you can log in to your Stripe account or create a new one. Anyone with a legitimate business can create a Stripe account and accept payments online.

You Need to Connect WP Simple Pay to Stripe

Note: Stripe requires your site to be using SSL/HTTPS encryption. If you don’t already have an SSL certificate for your website, then please see our step by step guide on how to add SSL in WordPress.

Once you’ve connected to Stripe, you’ll be asked to configure your WP Simple Pay emails.

Configure Your WP Simple Pay Emails

The options for payment and invoice emails to your customers have already been enabled for you. So is the option for sending payment notification emails.

You just need to enter the email address where the notifications should be sent.

Once you’ve done that, you need to click the ‘Save and Continue’ button. This completes your setup of WP Simple Pay.

WP Simple Pay Setup Is Complete

Creating a Payment Form in WordPress

Next, you need to create a payment form.

You can get started by clicking the ‘Create a Payment Form’ button on the last page of the setup wizard. This will automatically take you to the WP Simple Pay » Add New page.

Give Your New Payment Form a Name and Description

You should start by giving the payment form a name and description. After that, you can select any form type (Embedded, Overlay or Stripe Checkout). For this example, let’s select the ‘Stripe Checkout’ option under Form Type.

Next, you need to click on the Payment tab. Here you can set the payment mode to either live or testing. Testing mode will let you make payments that are not actually charged to Apple Pay so you can make sure your form is working properly and emails are being sent.

Don’t forget to change this to ‘Live’ when you’ve finished testing and are ready to start receiving payments from your customers.

Set the Payment Mode to Either Live or Testing

You can also add the products or services that you offer, along with their prices and whether they are a one-time payment or a subscription.

Simply click the ‘Add Price’ button until you have added as many prices as you need. Then for each one, you will need to add a label and price. You can also select other options, such as if the price is a subscription, or the user can determine the price, as in a donation.

Add Your Products and Services to the Payment Form

You can show or hide a price by clicking the small arrow on the right.

Next, we’ll move on to the ‘Form Fields’ tab. The essential fields have already been added to the form, and you can add more if necessary.

Using the ‘Form Fields’ drop down, you can choose additional fields and add them by clicking the ‘Add Field’ button. Options include name, phone number, address, and much more.

You Can Add Fields to Your Payment Form

The default text on the button is ‘Pay with Card’. If you like, you can change the text to something more generic, such as simply ‘Pay Now’. Then your customers won’t assume that credit cards are the only payment option.

Finally, the ‘Stripe Checkout’ tab allows you to select additional payment methods and tweak the checkout form that is displayed after the user clicks the ‘Pay’ button.

For this tutorial, we’ll leave those settings as they are.

Select any Additional Payment Methods and Tweak the Checkout Form

When you are happy with your payment form, click on the ‘Publish’ button to store your settings and push the form live.

Now we can add the form to a post or page on your website.

Adding the Payment Form to Your Website

WP Simple Pay makes it super easy to add forms anywhere on your website.

Simply create a new post or page, or edit an existing one. Then, click on the plus (+) sign at the top and add a WP Simple Pay block in the WordPress block editor.

Add the WP Simple Pay Block to a Post or Page

After that, select your order form from the dropdown menu in the WPForms block.

Once you’re finished, you can update or publish the post or page, and then click on the preview button to see your form in action.

Visit Your Website to See the Payment Form in Action

When your users click the Pay button, the Stripe checkout form will be displayed.

If they are using the Safari browser on a Mac or an iOS device like iPhone, then the Apple Pay option will be displayed at the top of the form. Otherwise, the Apple Pay option will be hidden, and your customers can pay using a credit card.

Apple Pay Will Be Offered When Checking Out on Safari on a Mac or iOS Device

If you’re looking for other ways to add Apple Pay in WordPress, then you can use full eCommerce solutions like Easy Digital Downloads or WooCommerce. Both of them have support for Apple Pay and Google Pay options.

We hope this tutorial helped you learn how to accept Apple Pay in WordPress. You may also want to learn how to create a contact form in WordPress, or check out our list of the best live chat software for small business.

If you liked this article, then please subscribe to our YouTube Channel for WordPress video tutorials. You can also find us on Twitter and Facebook.

The post How to Accept Apple Pay in WordPress (The EASY Way) first appeared on WPBeginner.

#296: 2020 Year in Review

Show Description

Marie and Chris take a look back at the features, fixes, and infrastructure work Team CodePen worked on throughout 2020.

Time Jumps

Sponsor: WooCommerce

WooCommerce is a WordPress plugin that brings eCommerce to your WordPress sites. It’s unique in its customizability and flexibility. You can use it to sell physical products, digital downloads, memberships, services, and tickets, plus offer customers lots of different ways to pay, including things like Apple Pay and Bitcoin powered by Stripe.

Show Links

CodePen Links

The post #296: 2020 Year in Review appeared first on CodePen Blog.

#295: Projects and Serverless Functions

Show Description

Dee, Marie, and Chris talk about behind the scenes updates to dramatically improve CodePen Projects.

Time Jumps

  • 03:52 Fixing tragic bugs
  • 07:33 How did we upgrade Projects
  • 16:57 Sponsor: WooCommerce
  • 19:36 Bye Gulp

Sponsor: WooCommerce

WooCommerce is a WordPress plugin that brings eCommerce to your WordPress sites. It’s unique in its customizability and flexibility. You can use it to sell physical products, digital downloads, memberships, services, and tickets, plus offer customers lots of different ways to pay, including things like Apple Pay and Bitcoin powered by Stripe.

Show Links

CodePen Links

The post #295: Projects and Serverless Functions appeared first on CodePen Blog.

Online Payments With React and Square

Create a Custom Payment Form Using React and Square

There are a lot of ways to accept payments online. Wouldn’t it be nice to implement a single form that could accept as many payment methods as we want? Let’s take a look at implementing a custom payment form using Square and React. This form will enable us to take credit cards online, and give us support for Apple Pay, Google Pay, and Masterpass in a single payment form.

Requirements

Our Final (Payment) Form:

Final payment form