Gutenberg 8.9 Brings Block-Based Widgets Out of the Experimental Stage

On Wednesday, September 2, Gutenberg 8.9 launched with a set of new features, enhancements, and several bug fixes. The development team took the block-based widgets system out of its experimental stage, making it the default experience for all plugin users.

Block-based widgets have taken months upon months of work. The team has surpassed some of my expectations by essentially sticking a square peg into a square hole, granting the power of blocks to the sidebars/widgets system. On the whole, the system works. However, the team still has a lot of work to mold this feature into the shape it needs to be in for the upcoming WordPress 5.6 release in December. It is important that the community at large test, provide feedback, and contribute where possible.

Gutenberg plugin users who have not yet enabled block-based widgets via the experiments screen in past versions will be in for a surprise. The new system will have some of the familiarity of the block editor. However, it is a much different experience than traditional widgets.

The big questions we must answer is whether the feature is currently usable and whether it can be ready for WordPress 5.6.

New Widgets Screen

New block-based widgets screen in Gutenberg 8.9.
Block-based widgets screen.

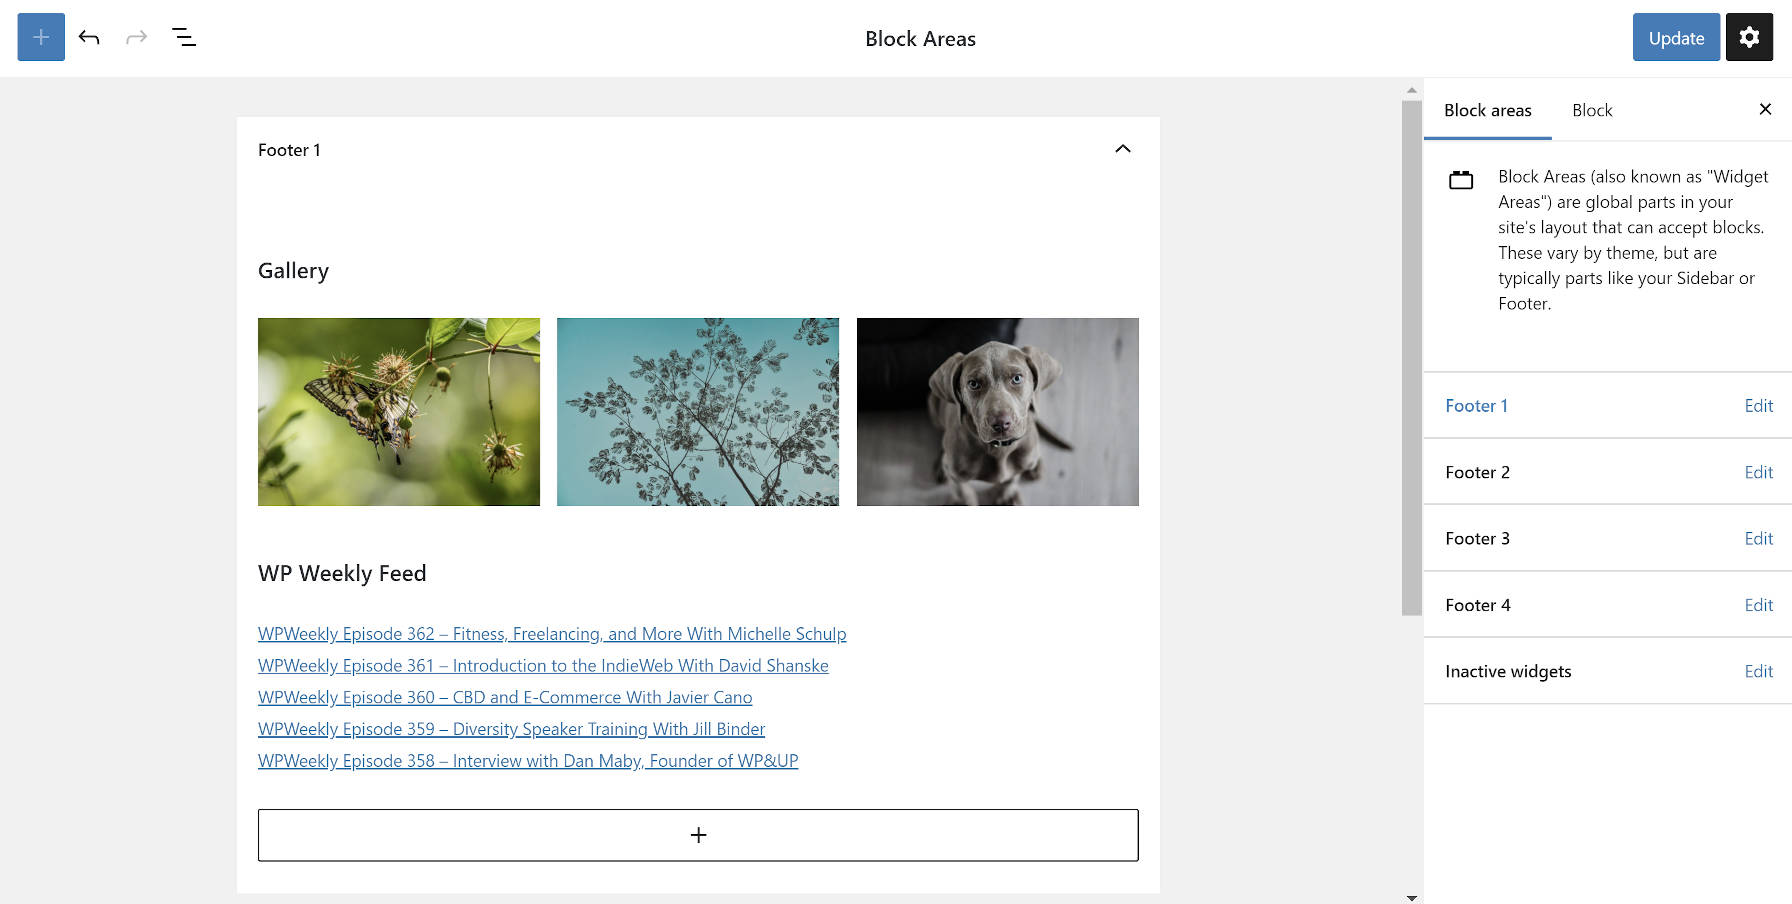
Gutenberg completely replaces the old Appearance > Widgets screen in the WordPress admin. The plugin no longer has an option for end-users to disable it, which was expected. The goal is to begin getting users accustomed to building their sidebars with blocks rather than traditional widgets.

For the most part, the new widgets screen handles block-based widgets without issue from a usability perspective. Adding blocks is little different from working with the post-editing screen. It should feel relatively natural for users who are accustomed to the block editor. If anything, the experience seems scaled down in comparison.

Unlike widgets in the past, blocks cannot be collapsed (the sidebars themselves can be). As a long-time WordPress user, this feels uncomfortable. However, it is the sort of uncomfortableness that will simply take some adjustment time.

Core legacy widgets worked well. However, I could not get legacy widgets to work from several third-party plugins. Sometimes, they disappeared from the editor. Then, they would later appear, seemingly at random. Eventually, during testing, I completely broke the page to the point where it did not display anything. Fortunately, I was able to fix it by clearing out a few widget-related rows from the database.

As a developer, I want to simply wipe the slate clean and leave the old widgets system in the dust of history. However, doing so may very well alienate many end-users. For this feature to be successful, we need to carry them along and allow them to easily transition from their current tools to the new system.

Widget Blocks in the Customizer

Widget blocks section in the WordPress customizer.
Widget blocks section in the customizer.

While the primary widget blocks screen was generally solid, that was not the case with widget blocks in the customizer. At best, it was sub-par.

We may finally be at that point where I agree with all those earlier complaints of the customizer control panel being too narrow. The most obvious issue was that the block toolbar was too wide for the control panel, hiding pieces of it off-screen. For some blocks, there are buttons that users cannot access.

That is not the end of the issues. Block options are unavailable, so users cannot even add something as basic as an image alt attribute. The core legacy widget blocks are not editable. The “more options” button popup has a transparent background, making the text unreadable and, for all intents and purposes, not worth attempting a use.

I understand that WordPress is still far from launching widget blocks in the customizer, but the feature was practically unusable. It is still very much in an experimental state and probably should have remained optional for another plugin update or two or three. I cannot recommend using this within any sort of production environment. Stick with the widgets screen in the admin.

Widgets/Blocks Styling Issues for Theme Authors

HTML code view of block-based widgets.
No structured grouping of “widget” HTML.

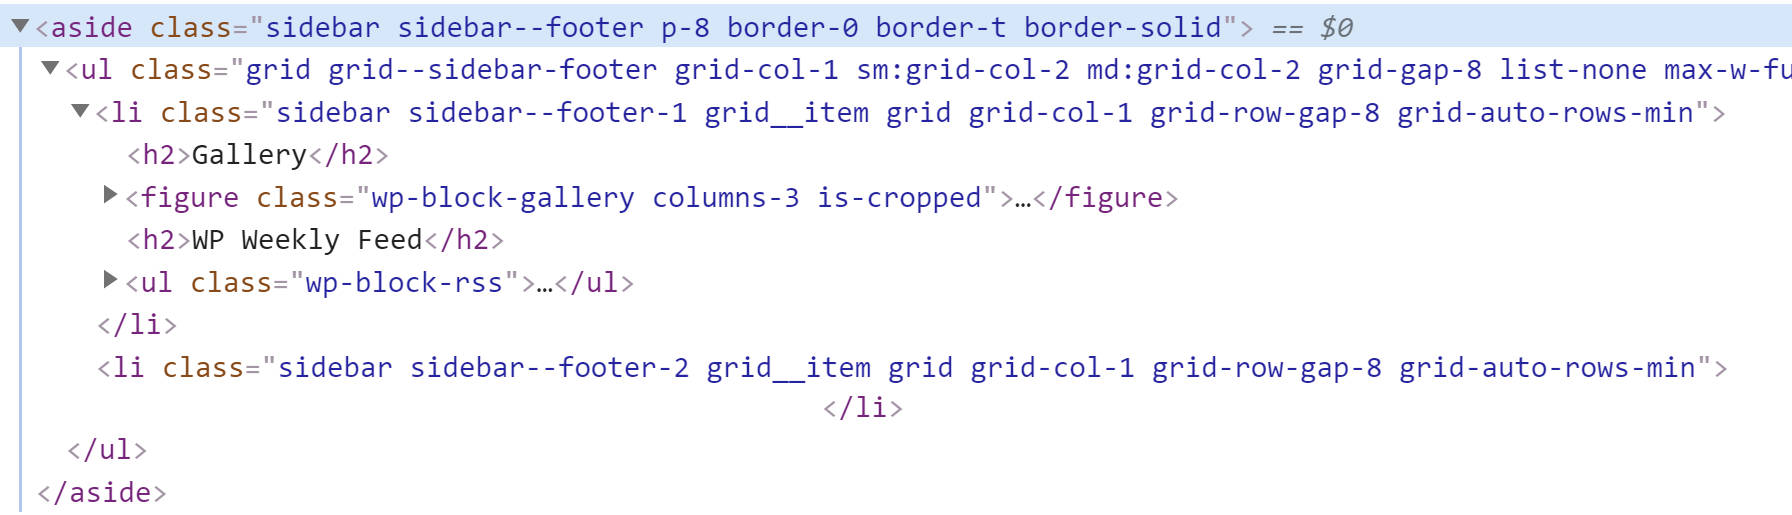
One of the largest changes that theme authors need to be aware of is that blocks in sidebars do not have the typical widget HTML wrappers. This could present some issues with styling widgets in the traditional fashion. For example, themes usually register a widget wrapper element and a wrapper for the widget title. This allows theme authors to build consistent styles for each widget. With blocks, this becomes much tougher because the theme author loses that control — this control is passed to the end-user.

The great part of this system is that users can do some really interesting things and have the flexibility to style their sidebars in any way they want. The bad part is that if a theme author has any sort of intricate styles, such as a boxed widget design, there is no easy way for the end-user to simply drop widgets into place and have them all use that boxed design. There is no standard class name for the theme author to target with CSS, which is what is required for consistently-styled widgets.

This is not necessarily a good or bad thing in and of itself. It is simply different.

With that said, I would have much preferred the Gutenberg development team created a new and separate system from the old sidebars/widgets system. Leave that in place, then build and promote “block areas” as a new system for theme authors to take advantage of. In the long run, it would allow theme authors to make the transition and even potentially support both systems in their themes. Theme authors are down in the trenches, working with their users on a day-to-day basis. They are in a much better position to handle the transition from old to new.

Theme authors who are not prepared to go all in with block-based widgets in WordPress 5.6 can add the following line of PHP to their theme’s setup code to disable the widgets block editor:

remove_theme_support( 'widgets-block-editor' );

Over time, theme authors will want to fully transition to the new system. However, this will provide additional time for them to make any adjustments that may be needed with how widgets are handled.

How to Add Featured Posts in WordPress Sidebar

Do you want to add a featured posts section in the sidebar of your WordPress website?

Displaying your top content as featured posts in the sidebar can help you drive more traffic to your pillar articles.

In this article, we’ll show you how to easily display featured posts in WordPress sidebar using multiple methods.

Easily feature posts in WordPress sidebar

Why Add Featured Posts in WordPress Sidebar?

Sidebars are the non-content area of your website. Most users utilize this space by adding a email newsletter form, social media buttons, and / or displaying banner ads.

Another way you can utilize the sidebar is by displaying your top articles as featured posts. This helps you get more traffic to those articles, and you users are able to discover your best content without looking for it.

Here is how we feature our top articles on WPBeginner. This sidebar widget appears on all pages of our website.

Featured posts WPBeginner

That being said, let’s take a look at how to add featured posts in WordPress sidebar to boost your pageviews and user engagement.

Method 1. Featuring Posts in WordPress Sidebar

This method is pretty straight forward and does not require you to install any plugin on your website.

Simply go to Appearance » Widgets page and add a Text widget to your WordPress sidebar.

Featuring posts in WordPress sidebar using a text widget

This widget comes with a visual editor equipped with a few formatting buttons at the top. You can simply add titles of the posts you want to feature as a bulleted list or plain text.

After that, select the post title and then click on the link button to add link to the blog post.

Once you are done, don’t forget to click on the ‘Save’ button to store your changes.

You can now visit your website to see your featured posts in action. This is how it looked on our demo site.

Featured posts in WordPress sidebar text widget

Method 2. Feature Posts in WordPress Sidebar using Menus

This method is a little indirect but gives you the ability to manage your featured posts more effectively.

Instead of adding the featured post list in a Text widget, we will create a navigation menu and then display it in the sidebar.

The advantage of this method is that you can easily add new posts without editing the widget, and you can reorganize the list with a drag & drop interface.

First, you need to visit the Appearance » Menus page and click on the ‘create a new menu’ link.

Create a new custom menu in WordPress

Next, you need to enter a name for your menu that helps you easily identify it whenever you need to add it somewhere. After that click on the ‘Create Menu’ button to continue.

Enter your new menu name

WordPress will now create a new blank menu for you.

Now, you need to click on the ‘Posts’ tab from the left column to expand it. From here you need to select the posts you want to feature. You can find them under Recent, All, or use the search option to locate and select them.

Select posts you want to feature

After selecting the posts you want to add, click on the ‘Add to Menu’ button. Your posts will now appear in the right column and you can edit each one of their titles by clicking on it. You can also rearrange them by simply dragging them up or down.

Save your menu

Once you are satisfied, click on the ‘Save Menu’ button to store your changes.

Your menu is now ready to be used.

Adding Featured Posts Menu in Sidebar

Simply go to the Appearance » Widgets page and add the ‘Navigation Menu’ widget to your sidebar.

Add Navigation Menu widget to your sidebar

Next, you need to provide a title for your sidebar menu widget and then select the featured posts menu you created earlier from the dropdown menu.

Don’t forget to click on the Save button to store your widget settings. You can now visit your website to see your featured posts list in action.

Featured posts displayed using navigation menu widget

Method 3. Adding Featured Posts in WordPress Using Gutenberg

A lot of users may want to display their feature posts inside a WordPress post or page. They may be using the page editor to create layouts for their homepage or their theme may not have a sidebar.

This method allows you to feature posts in your WordPress posts and pages.

Simply edit a WordPress post or page where you want to showcase your featured posts. On the post edit screen, click on the add new block button (+) at the top and then add the ‘List’ block to your content area.

Add list block

Simply add the title of each blog post you want to feature as an item on the list. Then select the text and click on the link button in the toolbar to create a link to the article.

Once you are done, you can save your changes and update or publish the post. This is how it looked on our demo website.

Reuse The Feature Posts Block

One great feature of the block editor is that you can save block as ‘Reusable block’ and then add the same block in any posts or pages you want.

To make your feature posts block reusable, simply click on the three-dot menu icon in the block toolbar and select ‘Add to reusable blocks’.

Create reusable block

Next, you’ll be asked to provide a name for your reusable block. Give it a name that helps you easily identify it later.

Name your reusable block

Click on the Save button to save your reusable block.

Now, whenever you are editing a post or page where you want to display the feature posts again. Simply click on the add new block button and look for your reusable block by typing its name.

Adding reusable block

You can also edit reusable blocks and it will automatically get updated everywhere. For more details, see our article on how to add reusable blocks in WordPress.

Method 4. Display Featured Posts in WordPress with Thumbnails

A simple plain list of links may often go by unnoticed by your users. Displaying thumbnails with your featured posts would help users notice them more easily.

To do that, we’ll be using a plugin to fetch and display a list of our featured posts along with thumbnails.

First, you need to install and activate the Display Posts plugin. For more details, see our step by step guide on how to install a WordPress plugin.

This plugin allows you to select and display any WordPress posts you want anywhere on your website. It uses shortcodes and allows you to build a custom query using a variety of parameters.

For instance, we’ll be using it to fetch and display the list of your featured posts along with thumbnail and excerpt.

Head over to Appearance » Widgets page and add a ‘Text’ widget to your sidebar. In the text area of the widget, simply add the following shortcode.

[display-posts id="1,1178,1177,1176,1174,1173,1016,1011," image_size="thumbnail" include_excerpt="true" excerpt_length="10"]

Don’t forget to replace the id values to match the IDs of posts that you want to feature.

Tip: See our article on how to locate the post IDs in WordPress.

Now click on the ‘Save’ button to store your widget settings.

You can now visit your website to see it in action. It may not look good out of the box so let’s add some CSS magic to clean it up a little.

Go to the Appearance » Customize page to launch theme customizer. From here click on the Additional CSS tab and you will see a box where you can add your custom CSS.

Custom CSS box

You can now copy and paste the following CSS to the custom CSS box on your website.

ul.display-posts-listing img { 
max-height:50px;
max-width:50px; 
float:left;
padding-right:4px;
}
ul.display-posts-listing li { 
margin-bottom:20px;
font-size:11px;
display:inline-block; 
}

You’ll see live preview of your changes applied on your WordPress blog. Feel free to modify the CSS to meet your requirements.

Once you are done, don’t forget to click on the Publish button at the top to store your custom CSS.

You can now visit your website to see your featured posts with thumbnail and excerpt.

Featured posts with thumbnail and excerpt

We hope this article helped you learn how to easily feature posts in WordPress sidebar. You may also want to see our guide on the best email marketing services and best WordPress SEO plugins to grow your website traffic.

If you liked this article, then please subscribe to our YouTube Channel for WordPress video tutorials. You can also find us on Twitter and Facebook.

The post How to Add Featured Posts in WordPress Sidebar appeared first on WPBeginner.

How to Display Recent Posts in WordPress

Do you want to show your recent posts in WordPress? Displaying recent posts help users easily discover your new content and spend more time on your site.

You can add a list of your latest posts in your sidebar, after the end of your post content, inside your post content with a shortcode, in your footer widget area, or anywhere else you like.

In this article, we will show you how to display recent posts in WordPress using a variety of different methods

Displaying recent posts in WordPress

Why Add Recent Posts in WordPress?

If you have been running a WordPress blog or website for a long time, then you may have some older articles getting regular traffic from search engines and other sources.

Many of these users will check out the information they were looking for and leave. More than 75% of those visitors will never see your website again.

To keep users coming back to your website, you need to ensure that they spend more time on your website.

One way to do this is by showing them other recent posts that they should see. This helps users uncover more content on your website which leads to them spending more time on your website.

As users view more pages, this gives you time to convince them into signing up for your email newsletter or making a purchase.

That being said, let’s take a look at how to easily display recent posts in WordPress using multiple methods. Click on the quick links to jump straight to that method:

Method 1. Use WordPress’s Latest Posts Gutenberg Block

The WordPress block (Gutenberg) editor has a built-in block for displaying your latest posts. You can easily add this to any of the posts or pages on your site.

To use this block, simply edit the post where you to display recent posts. On the post edit screen, you need to add the ‘Latest Posts’ block to the content area.

Adding the Latest Posts block to a page

There are lots of different ways you can configure this block. By default, it just shows the post titles, but you can easily customize it.

For example, you can toggle the post content on and off in the right-hand pane. This lets you choose to add post content or excerpt next to the title.

You can also customize excerpt length which defaults to 55 words, but you can pick any value between 10 and 100 words.

Configuring how the post excerpt should display

If you want, you can display the post date. This will appear just below the title.

Displaying the dates of your latest posts

You can also choose exactly how your posts will display. You can order them differently from the default ‘Newest to Oldest’, and you can show only the latest posts from a specific category.

From the settings panel, you can also choose how many posts will display. By default, the block shows 5 posts, but you can display anywhere between 1 and 100 posts.

Sorting and filtering the list of latest posts

You also have the option to display your recent posts in a column grid rather than a list.

Setting the latest posts to display in a grid format

You can customize the grid to featured images for your posts, resize the image, and align them accordingly:

Adding the featured images to your recent posts block

Here’s how the finished block looks live on the website:

Latest posts block displaying live

Method 2. Use the WordPress Recent Posts Widget

What if you want to show a list of your latest posts in your sidebar instead of on a page? WordPress comes with a built-in default widget to display recent posts in your site’s sidebar or any widget ready area.

In your WordPress dashboard, go to Appearance » Widgets and add the ‘Recent Posts’ widget to your sidebar.

Recent posts widget

The built-in Recent Posts widget doesn’t offer many options. You can give the widget a title, choose whether or not to show the dates of posts, and add the number of posts you want to display.

Once you’re done, click on the ‘Save’ button to store your widget settings.

Here’s the widget live on the blog, with the title ‘New Posts’ and dates enabled:

The recent posts displaying in the sidebar on the blog

Method 3. Use the Recent Posts Widget With Thumbnails Plugin

The built-in widget we mentioned above is quite limited.

What if you want to display thumbnails and excerpts with your recent posts? What if you’d like to only show posts from a specific category in your sidebar?

Well, that’s when the Recent Posts Widget With Thumbnails plugin comes in handy. It does a lot more than just thumbnails, and it’s free.

First, you’ll need to install and activate the WordPress Recent Posts Widget With Thumbnails plugin.

Next, go to Appearance » Widgets page where you should see the ‘Recent Posts With Thumbnails’ widget.

The Recent Posts With Thumbnails widget in the list of available widgets

You need to add it to your sidebar or another widget-enabled area.

The Recent Posts With Thumbnails widget in the sidebar

The Recent Posts With Thumbnails widget comes with a lot of options. It gives you full control on how you want to display recent posts on your WordPress site.

You can also show excerpts, show posts from specific categories, ignore sticky posts, display random posts, and more.

Once you are done, don’t forget to click on the save button to store your settings. You can now visit your website to see your recent posts with thumbnails.

Display Recent Posts in Sidebar

Method 4. Display Recent Posts Using a Shortcode

Using the ‘Latest Posts’ block is definitely the easiest way to display recent posts in WordPress posts and pages. However, if you chose to disable Gutenberg and keep the Classic editor, you can use shortcodes instead.

First, install and activate the Display Posts plugin. It works out of the box, and there are no settings for you to configure.

Simply edit a post or page where you want to display your recent posts. Next, use the shortcode [display-posts]. The plugin offers a whole range of parameters that you can use with the shortcode.

Here are some examples of what you can do using this plugin.

Display 3 recent posts with thumbnails and excerpt:

[display-posts posts_per_page="3" image_size="thumbnail" include_excerpt="true"]

Display recent pages instead of posts:

[display-posts posts_per_page="3" post_type="page"]

Change the order to title instead of date:

[display-posts posts_per_page="3" orderby="title"]

Display recent pages under a specific parent page:

[display-posts posts_per_page="3" post_type="page" post_parent="5"]

You can also include additional styling. For instance, you may want to align your featured images to the left. You can do that using the instructions on the plugin’s website here.

Here’s how our list of recent posts looked, using those instructions:

Displaying recent posts using the shortcode widget

For a full list of parameters visit the plugin’s documentation.

You can also use these shortcodes inside a text widget. First, you will need to enable shortcodes in your text widgets by adding this code to your theme’s functions.php file or a site specific plugin.

add_filter('widget_text', 'do_shortcode');

Method 5. Display Recent Posts Manually in WordPress

More advanced WordPress users may want to add recent posts directly in their WordPress theme files. Of course, you should use a child theme for this so that when you update your theme, you don’t lose your changes.

It’s always a good idea to create a backup before you edit your theme files. If anything does go wrong, you might want to take a look at our list of the most common WordPress errors and how to fix them.

The easiest way to manually display recent posts to use the built-in WP_Query class. Simply add this code where you want to display the recent posts.

<ul>
// Define our WP Query Parameters
<?php $the_query = new WP_Query( 'posts_per_page=5' ); ?>

// Start our WP Query
<?php while ($the_query -> have_posts()) : $the_query -> the_post(); ?>

// Display the Post Title with Hyperlink
<li><a href="<?php the_permalink() ?>"><?php the_title(); ?></a></li>

// Display the Post Excerpt
<li><?php the_excerpt(__('(more…)')); ?></li>

// Repeat the process and reset once it hits the limit
<?php 
endwhile;
wp_reset_postdata();
?>
</ul>

This code displays the five most recent posts with their title and excerpt. The WP_Query class has tons of parameters that allow you to customize it any way that you like. For more information please refer to the WordPress developer documentation.

We hope that this article helped you learn how to display recent posts in WordPress. You might also be interested in our article on how to create a separate page for blog posts in WordPress, and our comparison of the best drag and drop WordPress page builder plugins.

If you liked this article, then please subscribe to our YouTube Channel for WordPress video tutorials. You can also find us on Twitter and Facebook.

The post How to Display Recent Posts in WordPress appeared first on WPBeginner.

How to Add a Shortcode in WordPress? (Beginner’s Guide)

Shortcodes are an easy way to add dynamic content into your WordPress posts, pages, and sidebars.

Many WordPress plugins and themes use shortcodes to add specialized content like contact forms, image galleries, sliders, and more.

In this article, we will show you how to easily add a shortcode in WordPress. We will also show you how to create your own custom shortcodes in WordPress.

Adding a shortcode in WordPress

What are Shortcodes?

Shortcodes in WordPress are code shortcuts that help you add dynamic content in WordPress posts, pages, and sidebar widgets. They are displayed inside square brackets like this:

[myshortcode]

To better understand shortcodes, lets take a look at the background of why they were added in the first place.

WordPress filters all content to make sure that no one uses posts and page content to insert malicious code in the database. This means that you can write basic HTML in your posts, but you cannot write PHP code.

But what if you wanted to run some custom code inside your posts to display related posts, banner ads, contact forms, galleries, etc?

This is where Shortcode API comes in.

Basically, it allows developers to add their code inside a function and then register that function with WordPress as a shortcode, so users can easily use it without having any coding knowledge.

When WordPress finds the shortcode it will automatically run the code associated with it.

Let’s see how to easily add shortcodes in your WordPress posts and pages.

Adding a Shortcode in WordPress Posts and Pages

First, you need to edit the post and page where you want to add the shortcode. After that, you need to click on the add block button to insert a shortcode block.

Adding shortcode block in WordPress

After adding the shortcode block, you can simply enter your shortcode in the block settings. The shortcode will be provided by various WordPress plugins that you might be using such as WPForms for contact forms, OptinMonster for email marketing forms, WP Call button for inserting a click to call button, etc.

Insert shortcode in the block editor

To learn more about using blocks, see our Gutenberg tutorial for more details.

You can now save your post or page and preview your changes to see the shortcode in action.

Adding a Shortcode in WordPress Sidebar Widgets

You can also use shortcodes in WordPress sidebar widgets. Simply visit the Appearance » Widgets page and add the ‘Text’ widget to a sidebar.

Now you can paste your shortcode inside the text area of the widget.

Adding shortcode in sidebar widget

Don’t forget to click on the ‘Save’ button to store your widget settings.

After that, you can visit your WordPress website to see the live preview of the shortcode in the sidebar widget.

Adding a Shortcode in Old WordPress Classic Editor

If you are still using the old classic editor in WordPress, then here is how you can add shortcodes to your WordPress posts and pages.

Simply edit the post and page where you want to add the shortcode. You can paste the shortcode anywhere inside the content editor where you want it to be displayed. Just make sure the shortcode is in its own line.

Shortcode classic editor

Don’t forget to save your changes. After that you can preview your post and page to see the shortcode in action.

How to Add a Shortcode in WordPress Theme Files

Shortcodes are meant to be used inside WordPress posts, pages, and widgets. However, sometimes you may want to use a shortcode inside a WordPress theme file.

WordPress makes it easy to do that, but you will need to edit your WordPress theme files. If you haven’t done this before, then see our guide on how to copy and paste code in WordPress.

Basically, you can add a shortcode to any WordPress theme template by simply adding the following code.

<?php echo do_shortcode("[your_shortcode]"); ?>

WordPress will now look for the shortcode and display its output in your theme template.

How to Create Your Own Custom Shortcode in WordPress

Shortcodes can be really useful when you want to add dynamic content or custom code inside the WordPress post and pages. However, if you want to create a custom shortcode, then it requires some coding experience.

If you are comfortable with writing PHP code, then here is a sample code that you can use as a template.

// function that runs when shortcode is called
function wpb_demo_shortcode() { 

// Things that you want to do. 
$message = 'Hello world!'; 

// Output needs to be return
return $message;
} 
// register shortcode
add_shortcode('greeting', 'wpb_demo_shortcode'); 

In this code, we first created a function that runs some code and returns the output. After that, we created a new shortcode called ‘greeting’ and told WordPress to run the function we created.

You can now use add this shortcode to your posts, pages, and widgets using the following code:

[greeting]

It will run the function you created and show the desired output.

Now let’s take a look at a more practical usage of a shortcode. In this example, we will display a Google AdSense banner inside a shortcode.


// The shortcode function
function wpb_demo_shortcode_2() { 

// Advertisement code pasted inside a variable
$string .= '<script async src="//pagead2.googlesyndication.com/pagead/js/adsbygoogle.js"></script>
<ins class="adsbygoogle"
     style="display:block; text-align:center;"
     data-ad-format="fluid"
     data-ad-layout="in-article"
     data-ad-client="ca-pub-0123456789101112"
     data-ad-slot="9876543210"></ins>
<script>
     (adsbygoogle = window.adsbygoogle || []).push({});
</script>';

// Ad code returned
return $string; 

}
// Register shortcode
add_shortcode('my_ad_code', 'wpb_demo_shortcode_2'); 

Don’t forget to replace the ad code with your own advertisement code.

You can now use the [my_ad_code] shortcode inside your WordPress posts, pages, and sidebar widgets. WordPress will automatically run the function associated with the shortcode and display the advertisement code.

Shortcodes vs Gutenberg Blocks

We’re often asked by users about the differences between shortcode vs the new Gutenberg blocks.

Basically if you find shortcodes useful, then you’ll love WordPress editor blocks. Blocks allow you to do the same thing but in a more user-friendly way.

Instead of requiring users to add a shortcode for displaying dynamic content, blocks allow users to add dynamic content inside posts / pages with a more intuitive user interface. A lot of popular WordPress plugins are switching to using Gutenberg blocks instead of shortcodes because they’re more beginner friendly.

We have put together a list of the most useful Gutenberg block plugins for WordPress that you may want to try.

If you want to create your own custom Gutenberg blocks, you can follow our step by step tutorial on how to create custom Gutenberg blocks in WordPress.

We hope this article helped you learn how to add a shortcode in WordPress. You may also want to see our guide on the best drag & drop WordPress page builder plugins, and how to create a custom WordPress theme without writing any code.

If you liked this article, then please subscribe to our YouTube Channel for WordPress video tutorials. You can also find us on Twitter and Facebook.

The post How to Add a Shortcode in WordPress? (Beginner’s Guide) appeared first on WPBeginner.

How to Display the Total Number of Comments in WordPress

Do you want to display the total number of comments on your WordPress site?

Comments allow users to participate and engage with the content on your website. By showing off the total comment count, you can encourage more users to join the conversation.

In this article, we will show you how to easily display the total number of comments in WordPress, with or without a plugin.

How to display total number of comments in WordPress

Display WordPress Comment Count using a Plugin

This method is easier and it is recommended for all users. Instead of writing code, you’ll be using a plugin to display comment count in WordPress.

First, you need to install and activate the Simple Blog Stats plugin. You may read our step by step guide on how to install a WordPress plugin for detailed instructions.

Upon activation, go to Settings » Simple Blog Stats page to configure plugin settings.

Simple Blog Stats Plugin settings page

On this page, you’ll see all the shortcodes that you can use to show different stats like the total number of comments, registered users, number of posts, categories, page count, and more.

You need to copy the shortcode [sbs_approved] to display the total number of approved comments on your WordPress site.

If you want to display it in a post or page, then simply create a new post or edit an existing one.

On the post edit screen, you need to add the shortcode block in the WordPress content editor.

Add Shortcode Block to a WordPress Page

You can do this by clicking on the Add block (+) icon and then search for the shortcode block. Once you find it, you need to click on it to add the shortcode block to the editor.

Next, you need to paste the shortcode [sbs_approved] inside the block settings.

Paste Shortcode to the Shortcode Block

You can add any text you want to display before or after the shortcode.

Alternatively, you can also use the shortcode inside a paragraph block. Simply copy and paste the shortcode where you want to display the comment count.

Paragraph block with comment count shortcode inside it

Using the paragraph block will also allow you to use the text styling option available in the WordPress block editor.

Once you are done, click on the publish or update button to save your changes. You can now visit your website to see your changes in action.

Comment count displayed in a WordPress post

Displaying total comment count in a sidebar widget

You can also use the same shortcode inside a WordPress widget and display it in your blog’s sidebar.

Simply head over to the Appearance » Widgets page and add a ‘Text’ widget to the sidebar.

Text widget with comment count shortcode inside it

Next, go ahead and paste your shortcode inside the ‘Text’ widget.

Don’t forget to click on the ‘Save’ button to store your widget settings.

You can now visit your website to see the widget in action.

Sidebar comment count in WordPress

Display WordPress Comment Count (without a plugin)

If you don’t want to use a plugin, then you can use display the total comment count manually.

This method requires you to add a code snippet to your website. If you haven’t done this before, then please check out our guide on how to copy and paste code snippets in WordPress.

Before you do anything, you should make a full backup of your website. This will help you to restore your site in case you break anything while editing the theme files.

Now you need to add the following code to your theme’s functions.php file or a site-specific plugin:


function wpb_comment_count() { 
$comments_count = wp_count_comments();
$message =  'There are <strong>'.  $comments_count->approved . '</strong> comments posted by our users.';

return $message; 
} 

add_shortcode('wpb_total_comments','wpb_comment_count'); 

This code creates a function that outputs the total number of approved WordPress comments on your site. It also creates a shortcode to display it.

You can now use the shortcode [wpb_total_comments] in your posts, pages, or a text widget to display the total number of comments on your website.

This is how it looked on our demo site:

Preview of comment numbers

We hope this article helped you display the total number of comments on your WordPress site. You may also want to check out our guide on how to prevent comment spam in WordPress and the best WordPress plugins for every website.

If you liked this article, then please subscribe to our YouTube Channel for WordPress video tutorials. You can also find us on Twitter and Facebook.

The post How to Display the Total Number of Comments in WordPress appeared first on WPBeginner.