How to Prevent Text Selection and Copy/Paste in WordPress (Easy)

Recently, one of our readers asked us how they can prevent text selection and copy/paste in WordPress?

Many publishers who want to stop people from stealing their content may want to apply this. This basically just makes it a bit harder for people to copy text from your website.

In this article, we’ll show you how to easily prevent text selection and copy/paste in WordPress.
Preventing text selection and copying & pasting in WordPress

Why Prevent Text Selection and Copy/Paste on Your WordPress Site?

Many bloggers find that their content gets stolen and used without permission.

This can happen through automated content scraping. It can also happen if someone manually copies part or all of your content.

One way to make this more difficult is to prevent people from copying and pasting your text. You can do this by making it harder for them to select the text on your website.

Remember, tech savvy users can still view the source code or use the Inspect tool to copy anything they want. These techniques will also not stop people who are using auto-blogging tools to fetch the content using RSS.

Keeping this in mind, let’s take a look at a few ways to prevent text selection and copying in WordPress.

Method #1: Preventing Text Selection Using CSS

This method is simpler, and you’ll just need to add some custom CSS code to your WordPress theme. If you haven’t done this before, then take a look at our guide on adding custom CSS to your site before you begin.

First, you need to visit the Appearance » Customize page in WordPress admin area to launch the theme customizer.
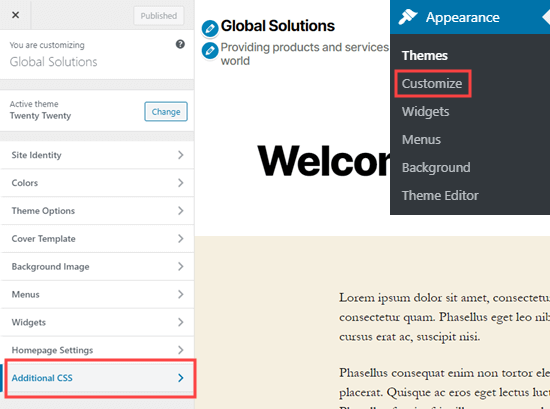
Opening the theme customizer to add custom CSS

In theme customizer, you need to click on the Custom CSS tab from the left column.

Now, you will see a box to add custom CSS to your WordPress theme. Simply copy and paste the following CSS code into that box.

* {
  -webkit-touch-callout: none; /* iOS Safari */
  -webkit-user-select: none; /* Safari */
  -khtml-user-select: none; /* Konqueror HTML */
  -moz-user-select: none; /* Old versions of Firefox */
  -ms-user-select: none; /* Internet Explorer/Edge */
   user-select: none; /* Non-prefixed version, currently supported by Chrome, Opera and Firefox */
}

(Code source)

This is how the code will look when added.
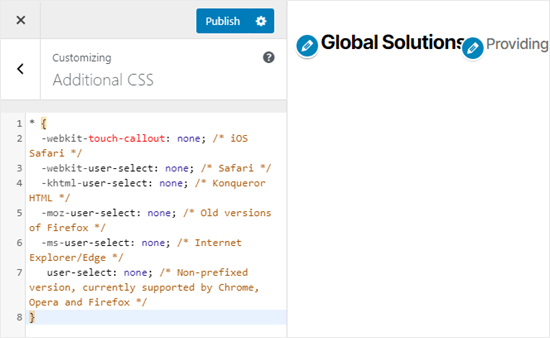
Adding the CSS code to prevent text selection and copy/paste

Now, go ahead and try to select some of the text on your page in the live customizer. You will find that you cannot select it.

Don’t forget to click the ‘Publish’ button at the top of the screen to put your changes live for everyone.

Method #2: Preventing Text Selection Using a Plugin

For this method, we will be using a WordPress plugin that disables text selection and right-click. This would also protect images from being downloaded and reused.

First, you need to install and activate the WP Content Copy Protection plugin. For more details, see our step by step guide on how to install a WordPress plugin.

Upon activation, the plugin will work straight out of the box. Users will no longer be able to copy and paste text from your site. They also will not be able to right click or print your content.

If you want to change the plugin’s settings, it’s easy to do so. Simply go to the Copy Protection page in your WordPress admin. Here, you can choose to enable or disable protection for specific types of content.
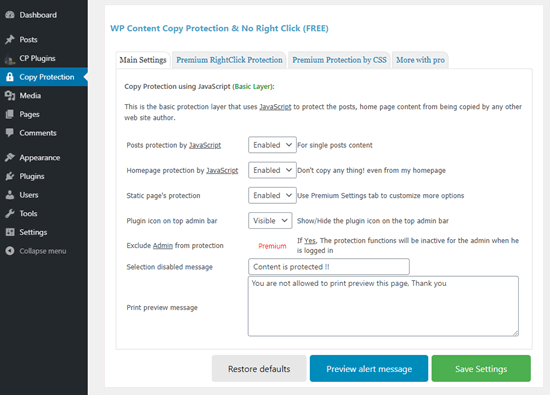
The settings for the WP Content Copy Protection & No Right Click plugin

Make sure you click the Save Settings button after making any changes.

You can also change the message that will appear if someone tries to print your content. The message will display like this in the print preview and on the printout itself.
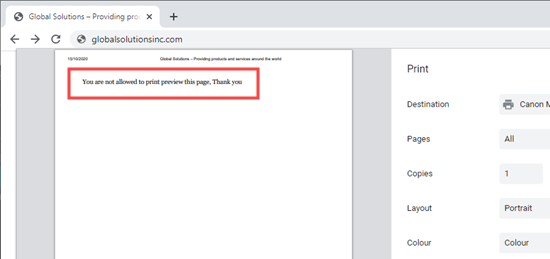
The default message that users will see if they try to print a protected page/post

Is it a Good Idea to Prevent Text Selection in WordPress?

While many new website owners want to stop people from copy/pasting content from their site, these techniques do not really prevent content theft.

Any slightly tech savvy user can easily open your website code source to copy any content that they want.

Also not everyone copying your text will be a content thief. For instance, some people may want to copy the title to share your post on social media.

This is why it’s not best practice to prevent text selection. We recommend you only use this method if you feel it’s truly needed for your site.

In most cases, it’s better to look for an alternative way to prevent content theft. If a site is re-publishing your content without permission, then you could find out who is hosting the website and send a DMCA takedown notice.

We hope this article helped you learn how to prevent text selection and copy/paste in WordPress. You might also want to see our guide on how to create a membership site with protected content, and our comparison of the best email marketing services for subscriber only content.

If you liked this article, then please subscribe to our YouTube Channel for WordPress video tutorials. You can also find us on Twitter and Facebook.

The post How to Prevent Text Selection and Copy/Paste in WordPress (Easy) appeared first on WPBeginner.

How to Easily Change the Font Size in WordPress

Do you want to change the font size in your WordPress posts or pages?

Sometimes, you may want to make a line or a paragraph larger, or you might want to increase the font size of your entire page content.

In this article, we’ll show you how to easily change the font size in WordPress. You’ll learn not only how to change font size in your WordPress posts, but also how to do it across your website.

Change font size in WordPress

Method 1: Using Paragraph Headings

It takes your visitors just a couple of seconds to decide whether they want to stay or leave your website. This gives you very little time to convince them to stay on your website.

Using Headings in your content is a great way to grab user attention.

They allow you to break your posts and pages into sections using different headings (often called “subheadings”).

Headings are great for SEO as well. Search engines give proper headings more weight than normal paragraph text.

How to add a heading in the default WordPress block editor

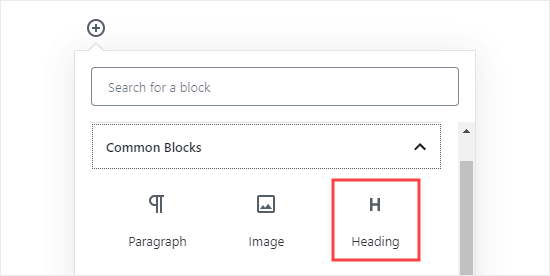
You can add a heading to your posts or pages by simply adding the ‘Heading’ block. You can search for it or find it in the ‘Common Blocks’ section in the WordPress block editor.

Adding a heading block in Gutenberg

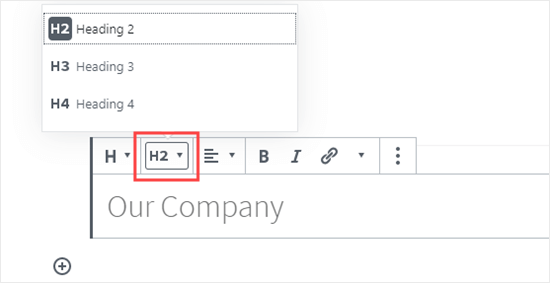
The block will default to Heading 2. Normally, it makes sense to stick with Heading 2 for your subheadings. If you want to change this, then you can simply click on the ‘H2’ drop-down to select a different size.

Selecting your Heading size in the block editor

Alternatively, you can change this in the block settings on the right-hand side of the screen. You can also change the heading’s color there as well.

How to add a heading in the older Classic Editor

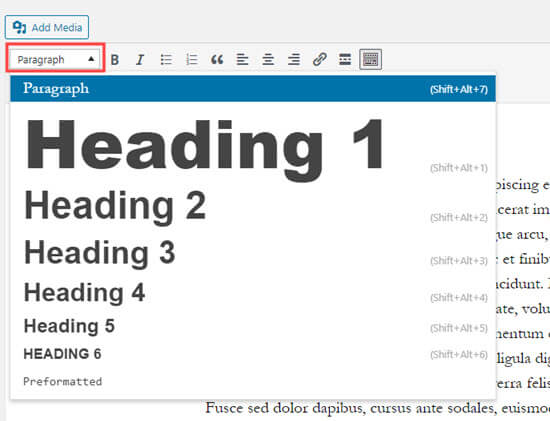
If you are still using the older classic editor in WordPress, then you can add headings using the ‘Paragraph’ drop-down.

Just highlight the text that you want to turn into a heading, click the ‘Paragraph’ drop-down, and select your heading size.

Creating a heading by clicking on the Paragraph drop-down in the classic editor

The sizes and colors of the different Heading styles are controlled by your theme’s stylesheet (style.css).

If you’re using a premium WordPress theme, then you may have the option to change these settings under Appearance » Customize.

Using subheadings in your articles makes it easier for readers to follow what you’re telling them. At the same time, it also makes your WordPress posts SEO friendly.

Method 2: Changing the Size of the Text in the Block Editor

What if you want to have a paragraph or even your whole post in a larger font? You can do this really easily using the default WordPress block editor.

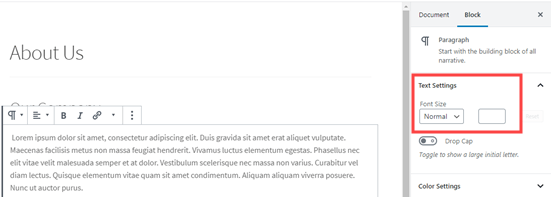
Just click on any paragraph block, then select the font size under ‘Text Settings’ on the right-hand side.

Changing the text size of a paragraph block

You can select from the drop-down, which covers Small, Normal, Medium, Large, and Huge. If you change your mind, then just click the ‘Reset’ button to set your paragraph back to the default text.

There’s also a ‘Custom’ option where you can simply type in the pixel size that you’d like. If you want, you can also set a large Drop Cap to appear at the start of your paragraph.

These options aren’t available in the older classic editor for WordPress. If you want to use them, then think about making the switch. Our tutorial on how to use the new WordPress block editor will help you.

If you are determined to stick with the classic editor, then this next option is for you.

Method 3: Change Font Size Using The TinyMCE Advanced Plugin

TinyMCE Advanced is a WordPress plugin that gives you more control over font sizes and text formatting, as well as a range of other features.

This is particularly useful with the older classic editor, but it also works with the block editor. It adds a new block called “Classic Paragraph” that has all the TinyMCE controls.

To use it, you’ll first need to install and activate the TinyMCE Advanced plugin. If you’re not sure how to do that, check out our step by step guide on how to install a WordPress plugin.

Next, go to Settings » TinyMCE Advanced to configure the editor settings. This is where you can set up the buttons you want to use in the TinyMCE Advanced toolbar.

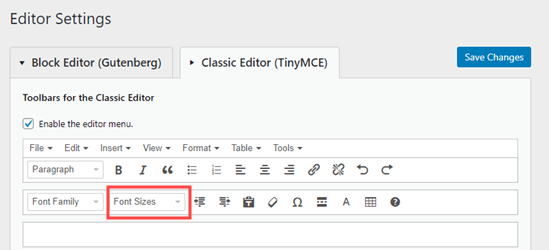
If you’re using it with the Classic editor, then you should see that TinyMCE has the ‘Font Size’ drop-down enabled by default in the second row of icons.

You can move it to the first row by dragging it upwards if you want.

The font sizes drop-down button on the TinyMCE Advanced menu for the classic editor

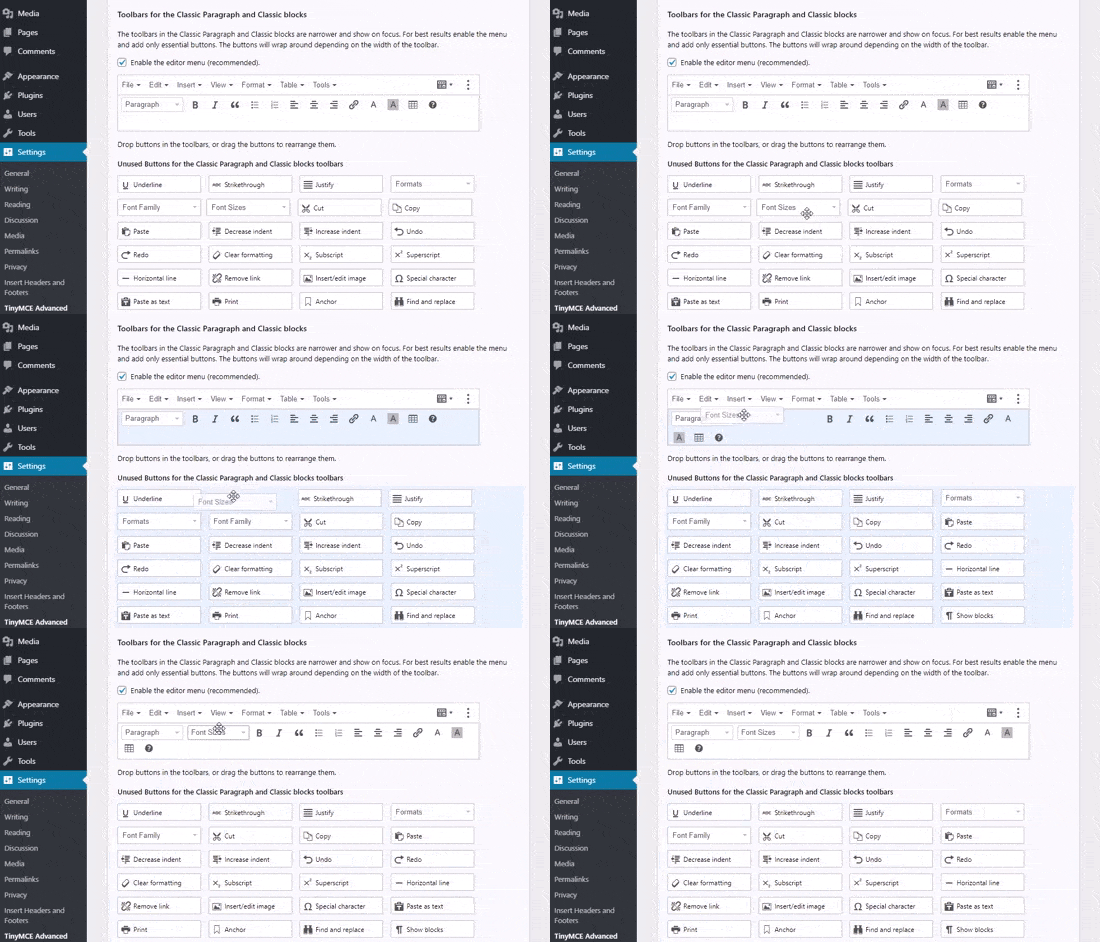
If you’re using the block editor, then you’ll need to scroll down the screen and add the Font Sizes drop-down to the toolbar by dragging and dropping it:

Adding the font sizes button to the TinyMCE Advanced block toolbar

Make sure you click ‘Save Changes’ at the bottom of the screen.

To see the button in action, create a new post or edit an existing one.

In the block editor, you’ll now have the option to add a ‘Classic Paragraph’ block. It will have the TinyMCE Advanced controls, like this:

The Classic Paragraph block in the block editor, added by the TinyMCE Advanced plugin

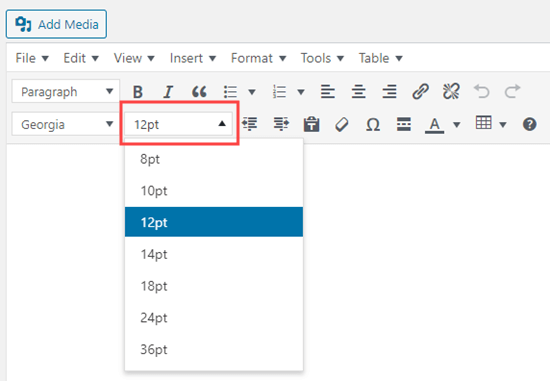
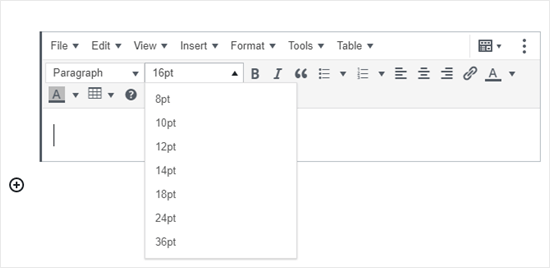
In the classic editor, you’ll see the TinyMCE Advanced toolbars with a font size drop-down:

Changing the font size using the TinyMCE Advanced editor

You can select any font size from the drop-down.

Note: this doesn’t give you as many options as the WordPress block editor, and you can’t type in your own font size.

Method 4: Change Site-Wide Font Size Using CSS

If you are changing font sizes every time you edit a post, then you may want to make it easier by changing it permanently in your theme.

The good news is that you can change the default paragraph size across your whole site. The best way to do this is by using the Theme Customizer under Appearance » Customize.

Some WordPress themes may come with an option for you to change the font size. If you can find this option, then you can use it without writing CSS code.

However, if your theme does not have that feature, then you can add custom CSS to add your own font size rules.

Simply click on the ‘Additional CSS’ option in the theme customizer. This is where you can store all your custom CSS code.

Using the Customizer to add CSS code to your site

Now under the additional CSS text box, simply add your CSS code. In this example, we are changing the font size to ’16px’, you can choose a different font size.

p { 
font-size:16px; 
} 

You’ll immediately see the changes on the preview on the right-hand side of the screen. If you’re happy with the font size, click the ‘Publish’ button at the top of your screen to make it live.

Note: Your custom CSS will only be applied to the theme you’re using. If you later choose to switch to a different WordPress theme, you’ll need to copy and paste it into the Customizer again.

The above code only applies to paragraph text. What if you wanted to change the font size of all h2 sub-headings?

Simply modify the above code to target the h2 element in your theme like this:

h2 { 
font-size:32px; 
} 

You can do the same thing with other headings as well by simply changing h2 to h3, h4, or h5.

We hope this article helped you learn how to easily change the font size in WordPress. You may also want to see our guide on how to use custom fonts in WordPress or our list of the best drag & drop WordPress page builder plugins.

If you liked this article, then please subscribe to our YouTube Channel for WordPress video tutorials. You can also find us on Twitter and Facebook.

The post How to Easily Change the Font Size in WordPress appeared first on WPBeginner.
How to Disable Theme and Plugin Editors from WordPress Admin Panel

Did you know that WordPress comes with a built-in theme and plugin editor? This plain code editor allows you to edit your theme and plugin files directly from the WordPress dashboard.

Now, this may sound really helpful, but it can also lead to issues such as breaking your site and potential security issues when combined with other vulnerabilities.

In this article, we will explain why and how to disable theme and plugin editors from the WordPress admin area.

Disable theme and plugin editors in WordPress admin area

Why Disable Theme and Plugin Editors in WordPress?

WordPress comes with a built-in code editor which allows you to edit WordPress theme and plugin files directly from the admin area.

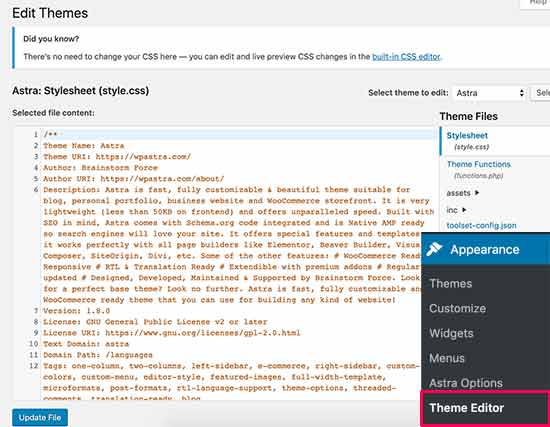
The theme editor is located at Appearance » Theme Editor page. By default, it will show your currently active theme’s files.

Theme editor in WordPress

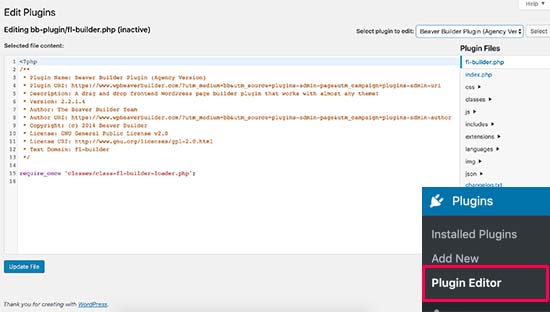
Similarly, the plugin editor can be seen at Plugins » Plugin Editor page. By default, it will show you one of the installed plugins from your site that comes up first in the alphabatical order.

Plugin editor in WordPress

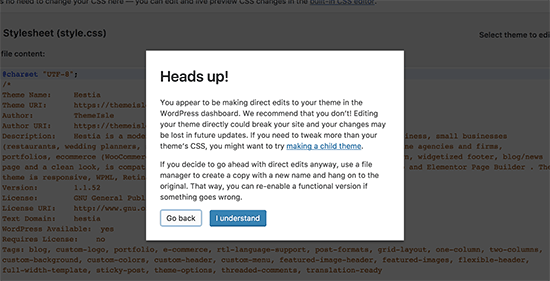
If you visit the theme or plugin editor page for the first time, WordPress will warn you that using the editor can break your website.

Theme editor warning in WordPress

In WordPress 4.9, theme and plugin editors were upgraded to protect users from accidentally breaking their website. In most cases, the editor will catch a fatal error and will revert back the changes.

However, this is not guaranteed and some code may still slip through and you would end up losing access to the WordPress admin area.

The biggest problem with the built-in file editor is that it gives full access to add any kind of code to your website.

If a hacker broke into your WordPress admin area, then they can use the built-in editor to gain access to all your WordPress data.

Hackers can also use it to distribute malware or launch DDOS attacks from your WordPress website.

To improve WordPress security, we recommend removing the built-in file editors completely.

That being said, let’s see how to easily disable theme and plugin editors in WordPress.

How to Disable Theme and Plugin Editors in WordPress

Disabling theme and plugin editors in WordPress is quite easy.

Simply edit your wp-config.php file and paste the following code just before the line that says ‘That’s all, stop editing! Happy publishing’ :

define( 'DISALLOW_FILE_EDIT', true );

You can now save your changes and upload the file back to your website.

That’s all, plugin and theme editors will now disappear from themes and plugins menus in the WordPress admin area.

You can also add this line of code to your theme’s functions.php file, a site-specific plugin, or by using the code snippets plugin.

If you don’t want to edit the files directly, then you can install the Sucuri WordPress plugin which offers 1-click hardening feature.

Proper Way to Edit WordPress Theme and Plugin Files

Many users actually use WordPress theme and plugin editors to look up the code, add custom CSS, or editing code in their child themes.

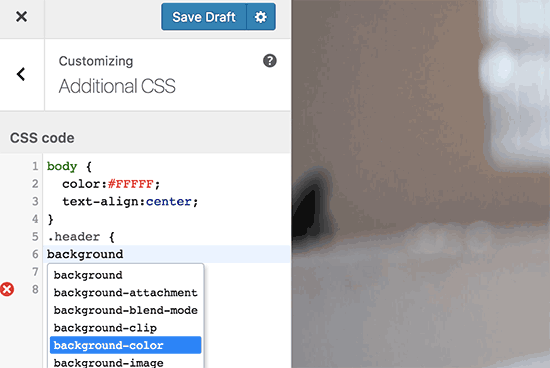
If you only want to add custom CSS to your theme, then you can do so by using the theme customizer located under Appearance » Customize.

Adding custom CSS via theme customizer

For more details, see our guide on how to add custom CSS in WordPress without breaking your site.

If you want to look up the code in a plugin, then you can do so by using an FTP client.

For better file management and syntax highlighting, you can use one of these code editors for editing WordPress files on your computer.

Last but not least, you can also create a custom WordPress theme without writing any code.

We hope this article helped you learn how to easily disable theme and plugin editors from WordPress admin panel. You may also want to see our ultimate guide to improving WordPress performance and speed.

If you liked this article, then please subscribe to our YouTube Channel for WordPress video tutorials. You can also find us on Twitter and Facebook.

The post How to Disable Theme and Plugin Editors from WordPress Admin Panel appeared first on WPBeginner.