Google has announced that applications that utilize API versions more than two years removed from the current offering will soon be delisted from the Google Play ecosystem. This change is made in an effort to improve security and consistency across the platform.
The iOS App store started with just 500 apps back in 2008 and today they have more than 1.85 million different apps for users to download and use. The android apps on the other hand have even more apps to download and use with over 2.56 million apps that are available through the Google Play Store. While there are tons of apps to choose from, not many make the cut to stay on the phone for several quality issues or bugs within the app. And of course, there is the issue of multiple apps for the same purpose. However, there is a new breed of apps that is making its way into the world of apps that fulfills many purposes using a single app — the Super Apps.
Today, we use multiple apps to perform various functions in our household. We use WhatsApp to send messages, we use Facebook, Instagram, Snapchat, etc for social media, we use different apps to order our groceries and also use various ride-sharing or cab-hailing apps to get from one place to another, and the list goes on. The point I’m making here is that we use a lot of apps on a daily basis to go through the day. But imagine if you could simply use a single app to meet all your needs, be it booking a cab, ordering groceries, paying your bills, etc. That is precisely what a Super App aims to do. Let us delve into Super Apps a bit more to understand how they work.
QR codes are a useful technology that simplify and enrich the customer journey. The technology is currently used almost everywhere: e-menus in restaurants, virtual business cards, customer feedback collection after food delivery, boarding passes at the airport. However, as with everything else, a business owner should consider several things when using this technology if they want to create a positive customer experience.
In this article, I’ve assembled a checklist of items to keep in mind as you try to leverage QR codes for your business, broken down by the steps of the customer journey. So, in this mini-journey, our customer:
Sees the QR code for the first time,
Examines the code,
Scans it,
Follows the link from the code.
Let’s take a closer look at what to consider in each stage.
Note: This list can and will be updated as it continues to grow, so if you have any ideas on what could be included, please do let me know. Let’s make this content even more valuable for everyone!
1. First Contact With The QR Code
Usage
A basic point: When appropriate, QR codes are worth using. The pandemic and the emergence of built-in code-scanning on our smartphones have set the stage: The public is ready for this technology. It’s a good time to use QR codes and to relieve your customers from having to memorize a long URL or type it in manually.
Gruzovichkof (a shipping company), for instance, states on its cars that its app is available in the App Store and Google Play, but it does not provide customers with any link to it:
Technopark (a retailer) performs this task more intelligently, allowing you to download the app by scanning the QR code placed on the surface of its delivery cars:
Code Visibility
Try to position the QR code in such a way that it is clearly visible from various points of the path that your customers are following. For example, if the QR code is not at eye level, then you run the risk of customers not noticing it at all.
IKEA is good at this, although initially I thought of mentioning it as a bad example. By placing QR codes under the feedback collection terminal, which seems illogical, it simplifies the process of providing feedback for visitors on wheelchairs:
Free Space
If possible, place the QR code in a way that it doesn’t “stick” to the other design elements on the surface. And minimize the visual noise around it, so that the client’s attention doesn’t dissipate and the code is easier to notice.
2. Examining The Code
Call To Action
Don’t show a QR code without an explanation. Let customers know explicitly what they are being asked. To increase the likelihood that customers will scan your QR code, place an explicit call to action (CTA) next to it:
Explanation Of Value
In addition to the CTA, explain to customers why scanning the QR code would be valuable to them. By managing their expectations, you further increase the likelihood that they will take action.
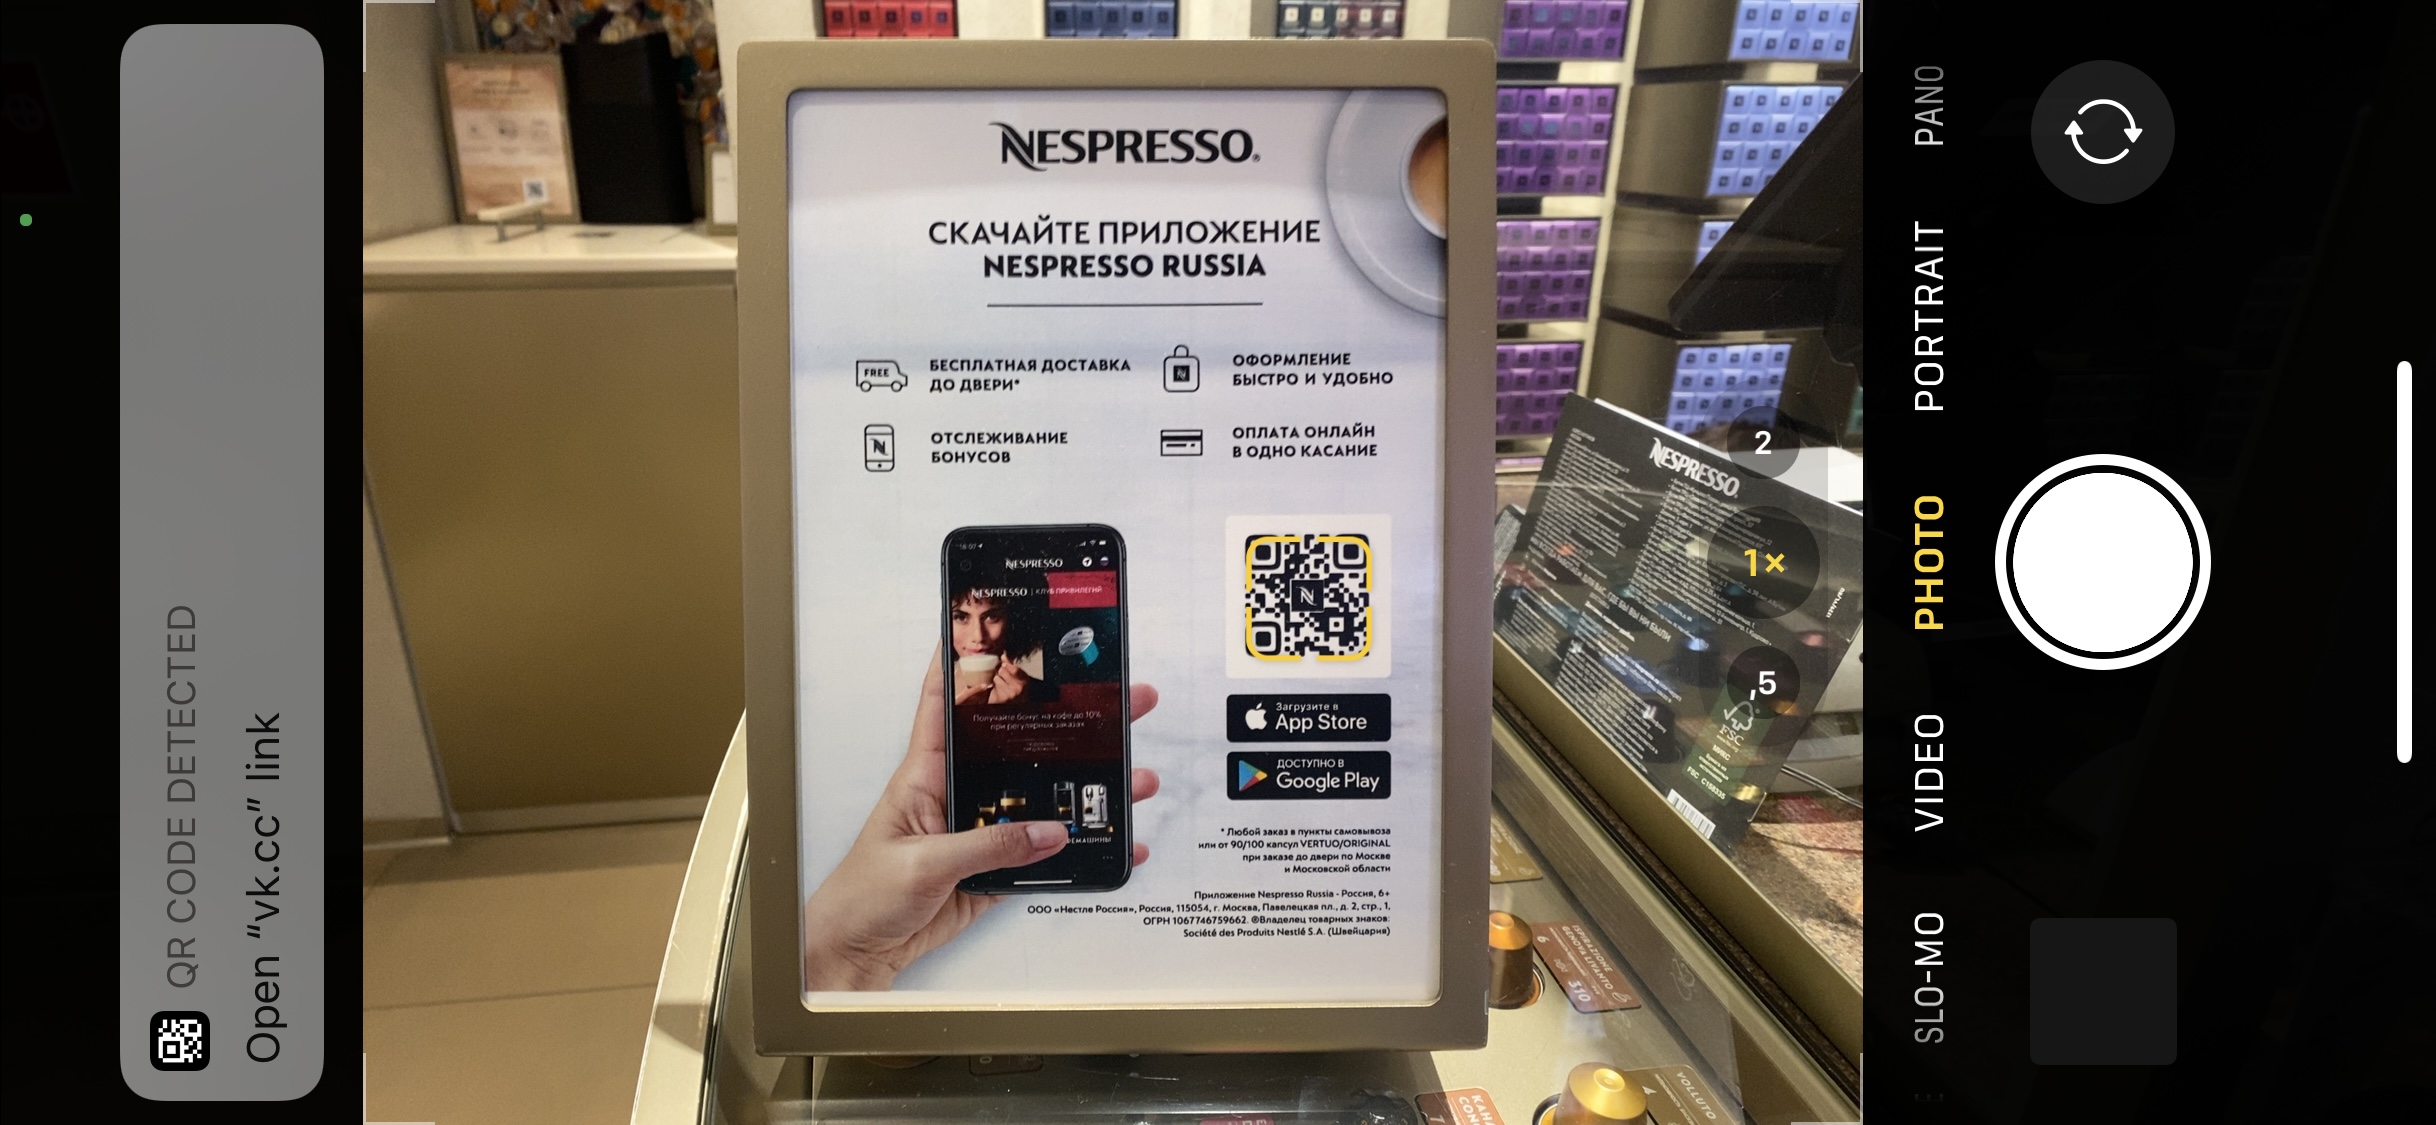
For example, the call to download the app in Nespresso’s boutique is accompanied by an infographic with key benefits:
Contact Details
Some businesses also place contact details next to their QR codes. It’s important not to overwhelm, but in some cases these details would be appropriate, such as for a hotline:
Company Logo
Most QR code generators allow you to brand the code by placing your company logo at its centre. This will make your code look more professional and increase the chance of drawing your customers’ attention.
Brand Colors
QR code generators also allow you to select a color for your code. This is a great opportunity to use your brand’s colors and make the code more visually appealing.
3. Scanning A QR Code
Size
Make sure that any QR code you place in offline media is not too small. Also account for the distance from which the code will be scanned. If it’s too small, customers will have trouble scanning it, and the code will be useless.
Non-Contact Surface
Minimize direct physical contact with your QR code. Otherwise, the surface will erode over time, and the code will become more difficult to scan. For example, for a storefront, stick the code inside the window, rather than outside.
In one of Street Beat’s stores (a sports apparel retailer), QR codes are placed on the checkout counter. The idea is quite good, but because it’s a contact surface, the sticker will come off gradually, and then it will look untidy and eventually have to be replaced.
Comfort Of Scanning
Place your QR code in a location where it’s comfortable to scan, without rushing. For example, a highway billboard will not only be inconvenient for customers, but will also increase the risk of accidents.
Mobile Network Availability
Many QR codes are links to websites. If yours is, make sure it’s somewhere where a mobile network or Wi-Fi is readily available. Otherwise, the value of the code will be close to zero.
Proper Surface
You’ll see some QR codes placed on transparent surfaces, which makes them difficult to scan or not scannable at all.
In Nespresso’s boutique, this issue is apparent: The code is almost unscannable. Store personnel found a solution: Every time a customer tries to scan the code, they hold up a sheet of paper as a background (which is still not the best customer experience at the end of the day):
X5 Retail Group (a food retailer) uses billboards along the streets to show its QR codes for downloading its app. Due to the format of the billboards, the codes are not as easy to read as they would be on a solid surface.
Environmental Factors
If you place a QR code outside, consider environmental factors such as lighting and weather. If the poster will be poorly highlighted at night, the code will be much harder to scan. If you’re using vehicles (such as delivery cars or cabs), ensure that they are cleaned regularly, especially in bad weather — the usefulness of a code covered with dirt is close to zero.
Explaining The Scanning Process
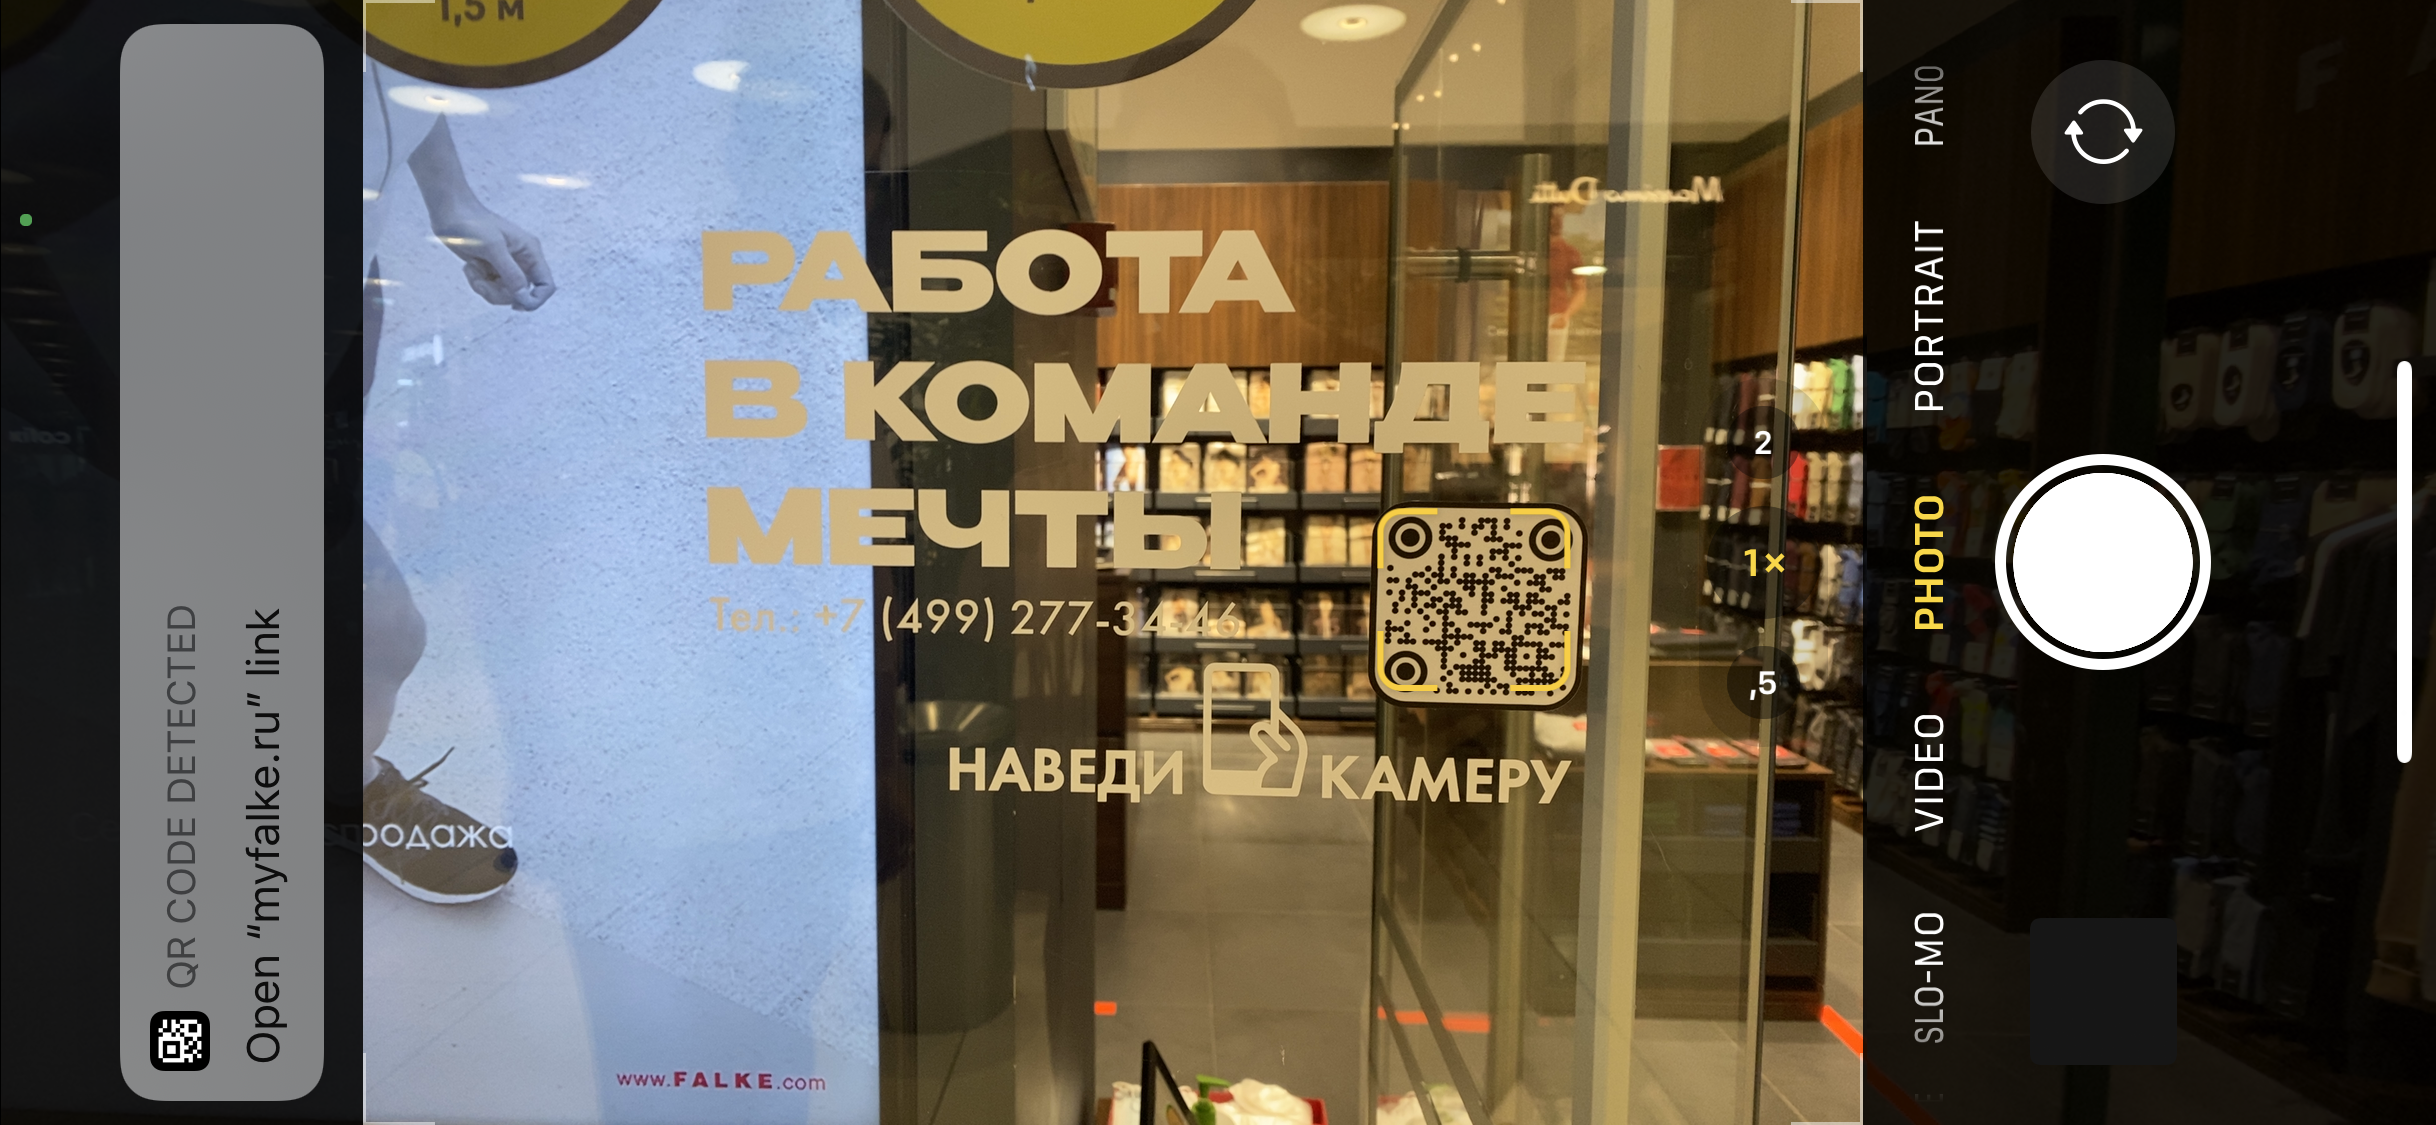
Despite the prevalence of QR codes, not everyone is aware of what to do with them. That’s why it’s a good practice to clearly explain this next to the code. For example, you could write, “Point your smartphone camera at the QR code to scan it”, along with an icon of a camera.
Scanning With Native Camera App
Set customers’ expectations correctly about how to scan the QR code, and if possible, do not implement a solution that requires people to install a specialized camera app.
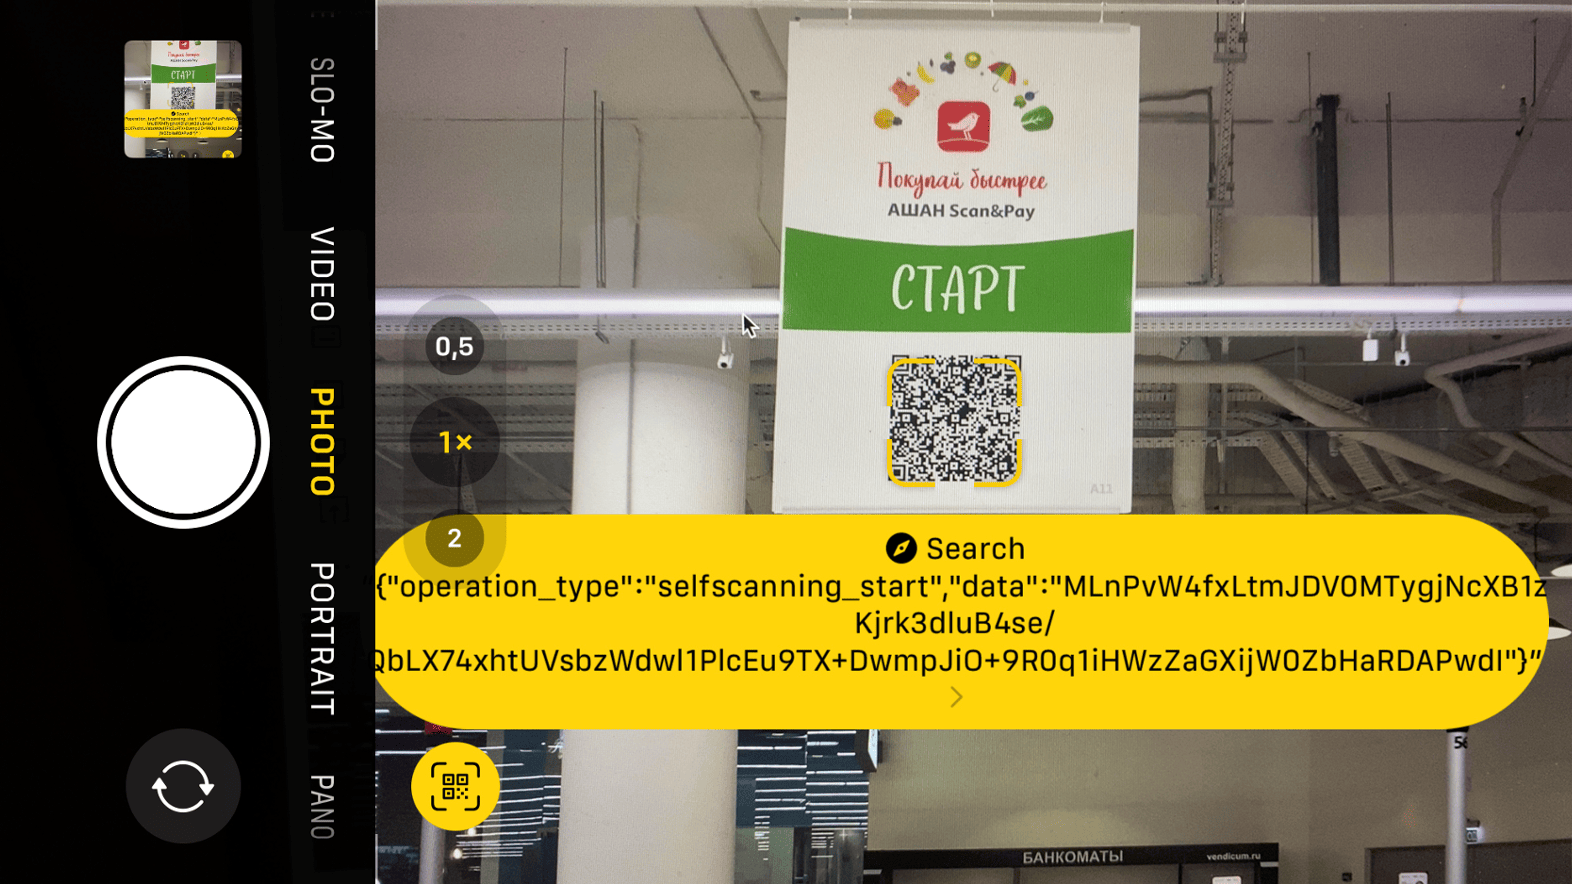
When Auchan launched its innovative “Scan & Pay” system, corresponding QR codes were placed all over the store. Hundreds of visitors tried to scan the codes with a standard camera and encountered an error. They were not taken to the landing page but came across a system code. (The QR codes had to be scanned with the camera in Auchan’s app.)
Scanning From Different Devices
A QR code may be easily scannable on some devices and not scannable at all on others. Check the scannability of your code on different smartphone models before sending it for printing.
Color Contrast
Standard QR codes are black and white. If you use your brand’s color, make sure that it contrasts with the background enough to be scanned without any issue.
Dark On Light
Always use a color contrast of dark on light — that is, a dark QR code on a light background. Not all devices can scan the opposite correctly.
Resolution
Before submitting the code for printing, make sure the code is at a resolution high enough not to blur or pixelate. Otherwise, your effort and money will be wasted.
Website Code: Desktop
QR codes can also be used in a digital environment. For example, if I’m visiting a website on a desktop computer, the usefulness of an HTML button to download an app is questionable. However, a QR code can be scanned from the page with a smartphone, resulting in a smoother download process:
Website Code: Mobile
Unlike on a desktop website, where a transition to a mobile environment can be justified, think twice about whether to put a QR code on your mobile website. If a user encounters a code on their smartphone screen, they will not be able to read it with their camera. In this case, using a button makes more sense.
A while ago, I noticed that both the desktop and mobile versions of Auchan’s e-commerce website contained QR codes. While the former was justified, the usefulness of the latter was questionable:
An exception is when users can share a code with others. A particular and quite widespread case nowadays is the verification of a person’s COVID-19 vaccination status using the QR code from the mobile version of a public-service website.
4. Opening A Link From A QR Code
Active Link
This is a basic point, but I decided to include it nonetheless. Mistakes sometimes happen at the execution level of a business. Before sending a QR code for printing, check that the link in the code does not contain any errors and is active. Also, check regularly that all existing QR codes are active and working.
Content Relevance
Don’t forget to regularly check the relevance of content both on the page that is accessible via the link and in the area surrounding the QR code, especially if you’re using the code for a limited-time offer, an event invitation, or the like. Otherwise, it could result in unmet expectations and a negative customer experience.
Landing Page vs. Several Codes
If you want your customer to take several actions, don’t create a QR code for each action. A better solution would be to present one QR code, and then outline the CTAs on the page that is accessible via the link in the QR code. This way, the presentation of the code will look neater, and the customer won’t be distracted when scanning it.
Below is an example of a case when this point was not thought through (by Persona Sport, a gym and wellness club). Links to Google My Business, Yandex.Maps, and 2GIS could have been placed on the landing page that is accessible via the QR code:
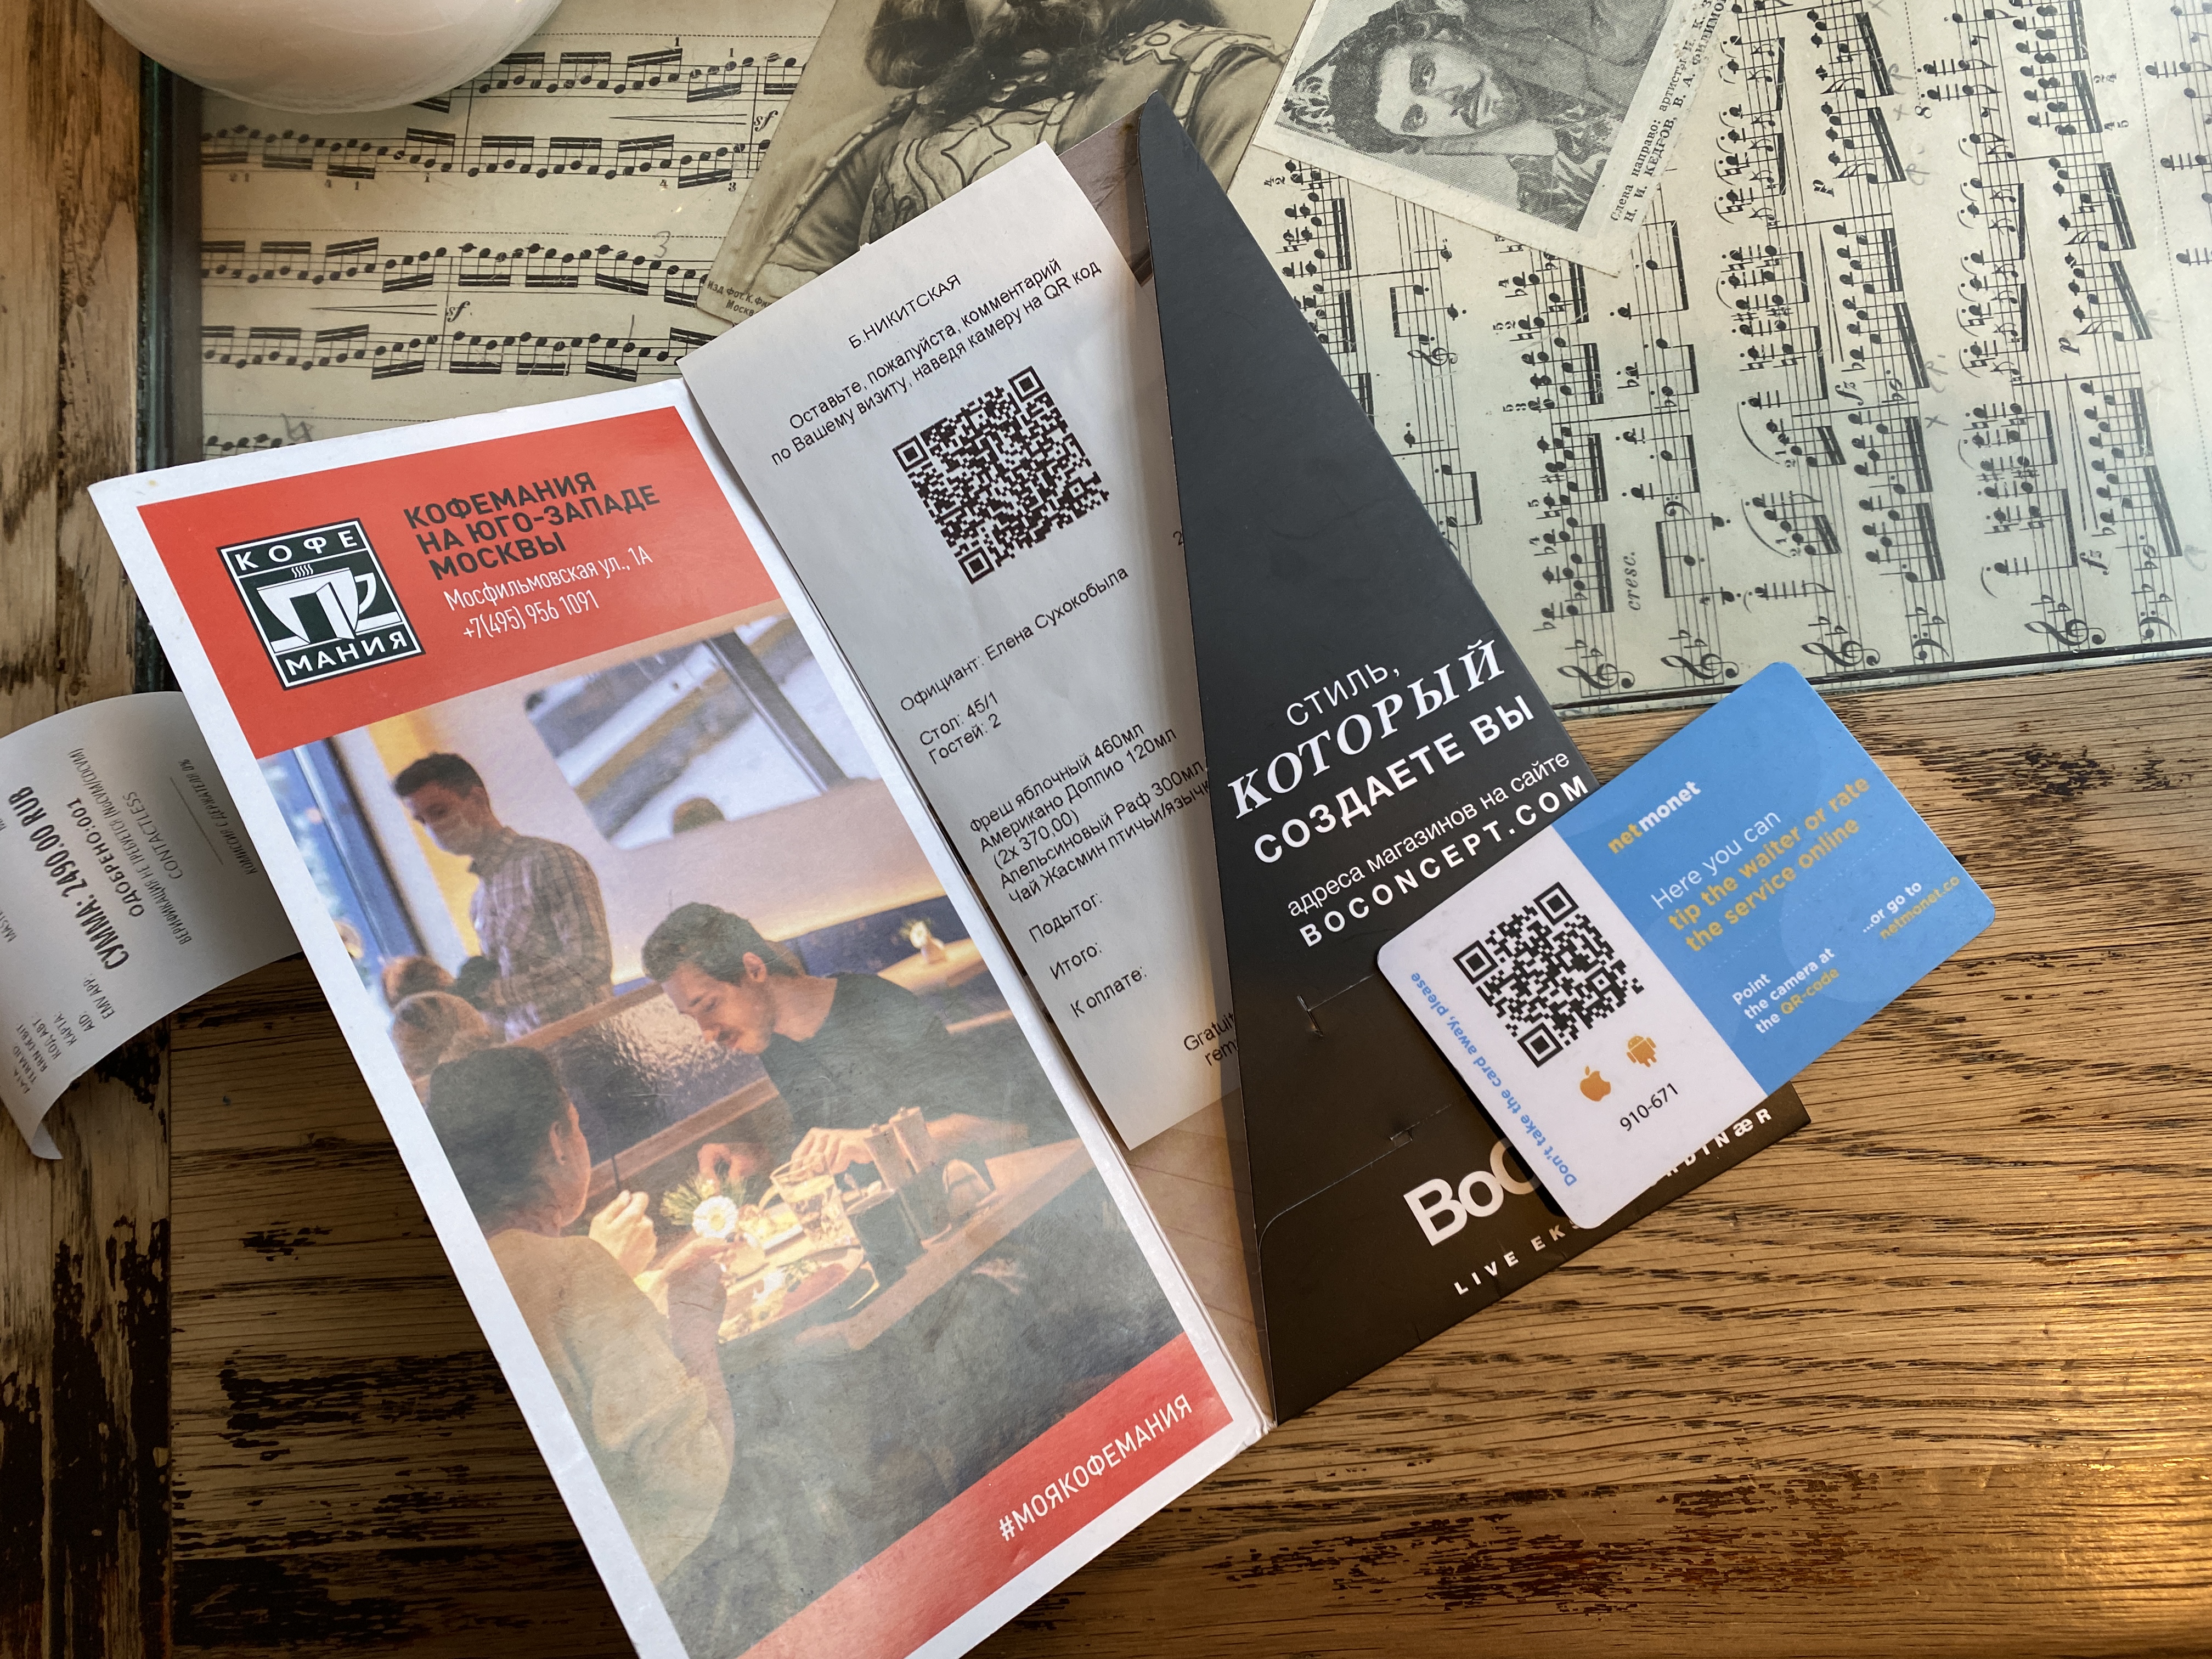
A while ago, Coffeemania (a restaurant) used one QR code for patrons to submit reviews, and another one for patrons to send tips to servers (whereas these actions could have been combined in a single code):
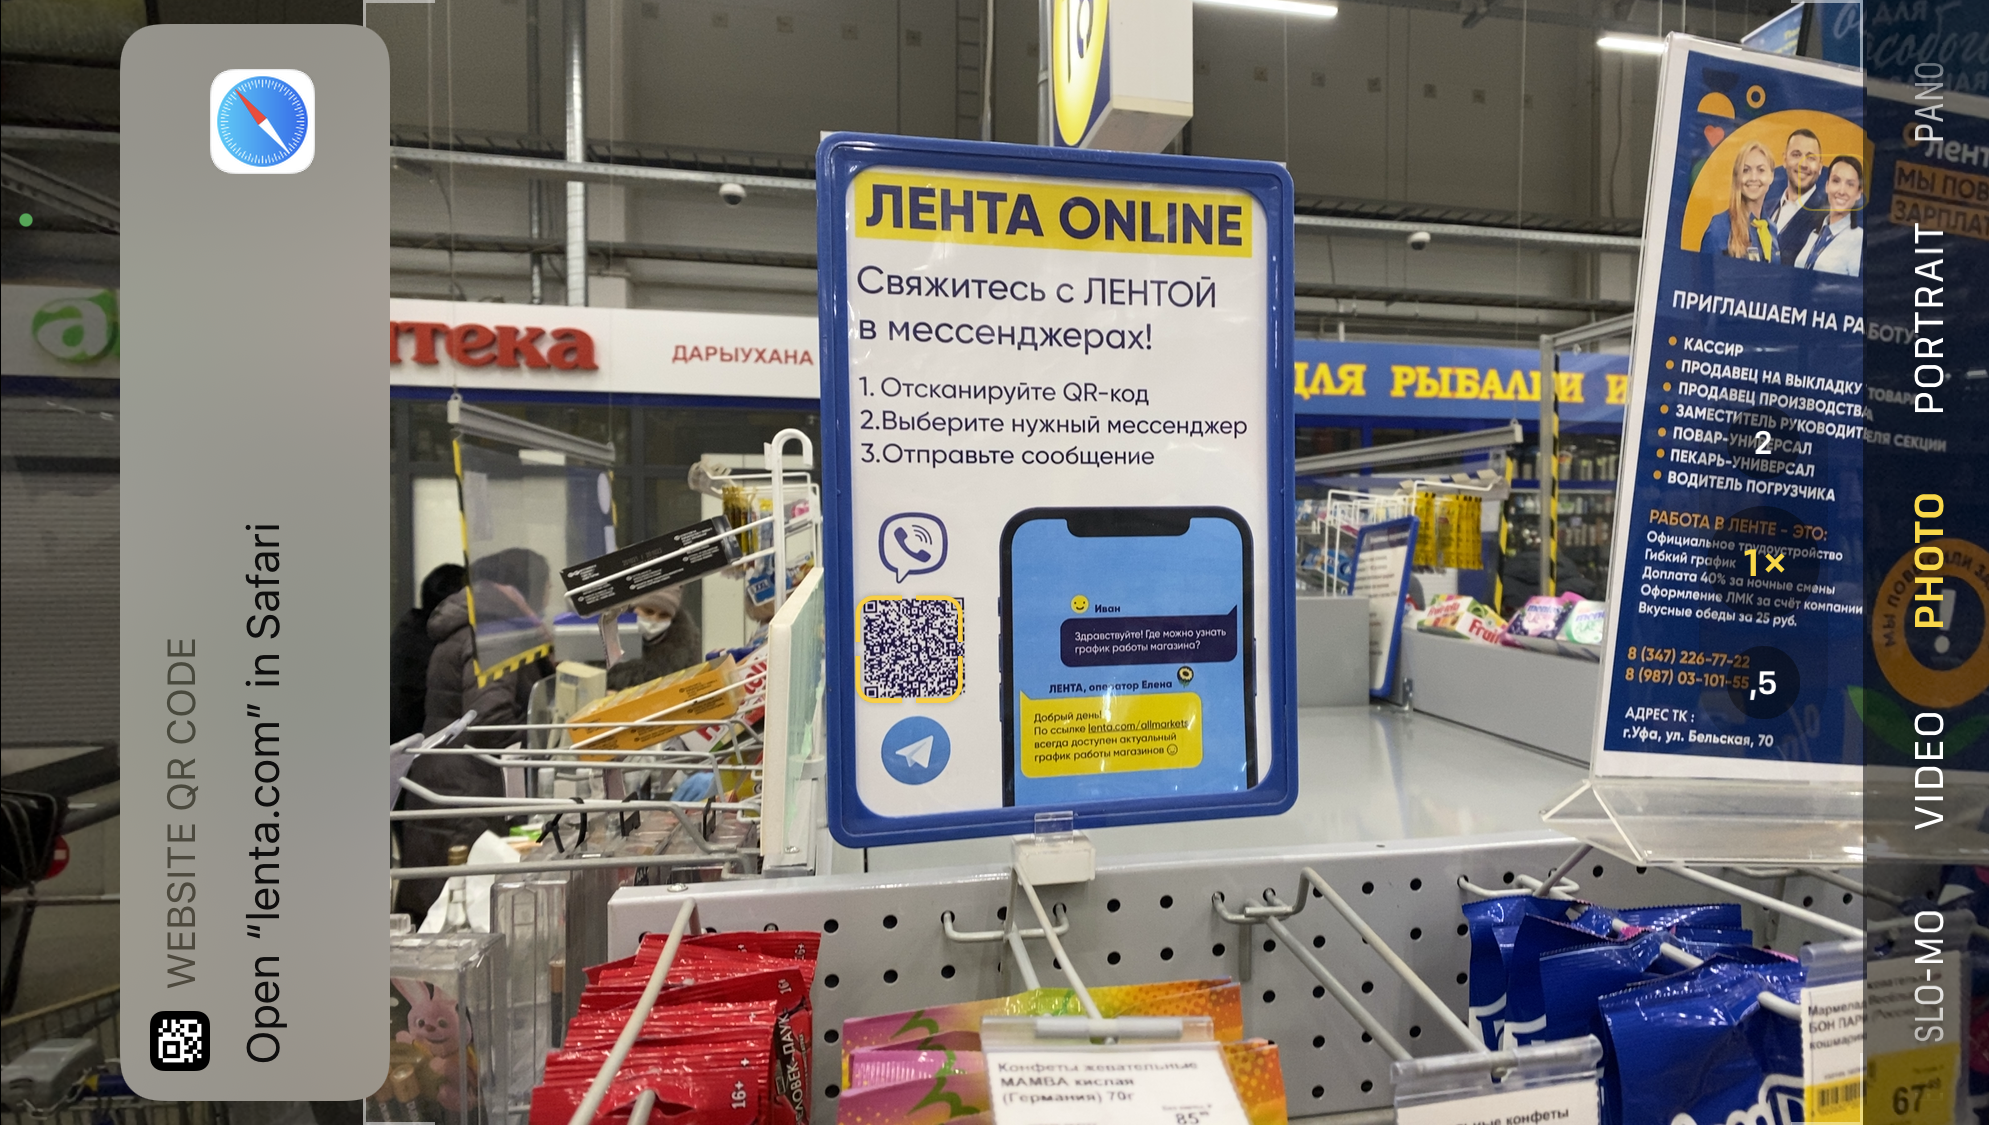
Lenta (a retailer) does this more efficiently, allowing customers to choose the medium by which to communicate with support at the level of the web page, rather than from printed media:
Managing Expectations
The content accessed via the link should match the CTA next to the QR code. If an invitation to subscribe to a social media account is the CTA, and the customer is prompted to take several unrelated actions upon scanning the code, then their attention might get diverted, and they might not take any action at all.
The drawback of the last example is that the QR code, which allows the customer to choose the medium by which to communicate with customer support, leads not to a dedicated landing page, but simply to the main e-commerce page, blurring the customer’s focus:
Mobile Optimization
It’s important to understand that scanning a QR code is just one part of the journey that a customer takes. That’s why thinking through all of the steps is important. Specifically, if the customer scans a QR code with their phone and ends up on a page that isn’t optimized for mobile devices, it won’t do them (or you) any good.
App Downloads
You can use deep linking to reduce your number of QR codes and to simplify the customer journey. This strategy allows you, among other things, to identify the type of device that the customer is using when scanning your QR code. It is useful when you’re providing a link to download an app. iPhone users who have scanned the QR code will go to the App Store, while Android users, having scanned the same code, will go to Google Play. The customer’s focus is not distracted by multiple QR codes, and there is no need to choose, while the value is the same.
Coffeemania’s loyalty program offers several QR codes, depending on the way the client wants to register. This could be overwhelming:
Uniqlo, on the other hand, doesn’t ask what kind of smartphone I have. The relevant app store will open automatically when I follow the link from the QR code:
Personalization
You can personalize the customer’s experience by leveraging UTM parameters in the link from the QR code. For example, to allow customers to evaluate a restaurant server’s work, you can add the server’s ID as a link parameter and personalize the feedback page with their name.
Analytics
Besides personalization, UTM parameters can also be used for analytics. For example, when placing QR codes on different banners around the city, you can add corresponding parameters with the ID of each banner to see which banners get more traffic and which ones should be relocated in the future.
To Be Continued
QR codes can simplify the customer journey and make it more convenient. As with everything else, however, the effectiveness of this touch point depends on the details, and poorly implemented details can turn your bright prospects into a bad customer experience.
If you use QR codes in your business, be aware of the pitfalls along the way, and leverage all of the technology available, and don’t rely on having to learn from your own mistakes. I hope this article was valuable, and if you have something to add, drop me a message — we’ll continue to refine the best practices.
I fell in love with coding the moment I created my first CSS :hover effect. Years later, that initial bite into interactivity on the web led me to a new goal: making a game.
Those early moments playing with :hover were nothing special, or even useful. I remember making a responsive grid of blue squares (made with float, if that gives you an idea of the timeline), each of which turned orange when the cursor moved over them. I spent what felt like hours mousing over the boxes, resizing the window to watch them change size and alignment, then doing it all over again. It felt like pure magic.
What I built on the web naturally became more complex than that grid of <div> elements over the years, but the thrill of bringing something truly interactive to life always stuck with me. And as I learned more and more about JavaScript, I especially loved making games.
Sometimes it was just a CodePen demo; sometimes it was a small side project deployed on Vercel or Netlify. I loved the challenge of recreating games like color flood, hangman, or Connect Four in a browser.
After a while, though, the goal got bigger: what if I made anactualgame? Not just a web app; a real live, honest-to-goodness, download-from-an-app-store game. Last August, I started working on my most ambitious project to date, and four months later, I released it to the world (read: got tired of fiddling with it): a word game app that I call Quina.
What’s the game (and what’s that name)?
The easiest way to explain Quina is: it’s Mastermind, but with five-letter words. In fact, Mastermind is actually a version of a classic pen-and-paper game; Quina is simply another variation on that same original game.
The object of Quina is to guess a secret five-letter word. After each guess, you get a clue that tells you how close your guess is to the code word. You use that clue to refine your next guess, and so on, but you only get ten total guesses; run out and you lose.
Example Quina gameplay
The name “Quina” came about because it means “five at a time” in Latin (or so Google told me, anyway). The traditional game is usually played with four-letter words, or sometimes four digits (or in the case of Mastermind, four colors); Quina uses five-letter words with no repeated letters, so it felt fitting that the game should have a name that plays by its own rules. (I have no idea how the original Latin word was pronounced, but I say it “QUINN-ah,” which is probably wrong, but hey, it’s my game, right?)
I spent my evenings and weekends over the course of about four months building the app. I’d like to spend this article talking about the tech behind the game, the decisions involved, and lessons learned in case this is a road you’re interested in traveling down yourself.
Choosing Nuxt
I’m a huge fan of Vue, and wanted to use this project as a way to expand my knowledge of its ecosystem. I considered using another framework (I’ve also built projects in Svelte and React), but I felt Nuxt hit the sweet spot of familiarity, ease of use, and maturity. (By the way, if you didn’t know or hadn’t guessed: Nuxt could be fairly described as the Vue equivalent of Next.js.)
I hadn’t gone too deep with Nuxt previously; just a couple of very small apps. But I knew Nuxt can compile to a static app, which is just what I wanted — no (Node) servers to worry about. I also knew Nuxt could handle routing as easily as dropping Vue components into a /pages folder, which was very appealing.
Plus, though Vuex (the official state management in Vue) isn’t terribly complex on its own, I appreciated the way that Nuxt adds just a little bit of sugar to make it even simpler. (Nuxt makes things easy in a variety of ways, by the way, such as not requiring you to explicitly import your components before you can use them; you can just put them in the markup and Nuxt will figure it out and auto-import as needed.)
Finally, I knew ahead of time I was building a Progressive Web App (PWA), so the fact that there’s already a Nuxt PWA module to help build out all the features involved (such as a service worker for offline capability) already packaged up and ready to go was a big draw. In fact, there’s an impressive array of Nuxt modules available for any unseen hurdles. That made Nuxt the easiest, most obvious choice, and one I never regretted.
I ended up using more of the modules as I went, including the stellar Nuxt Content module, which allows you to write page content in Markdown, or even a mixture of Markdown and Vue components. I used that feature for the “FAQs” page and the “How to Play” page as well (since writing in Markdown is so much nicer than hard-coding HTML pages).
Achieving native app feel with the web
Quina would eventually find a home on the Google Play Store, but regardless of how or where it was played, I wanted it to feel like a full-fledged app from the get-go.
To start, that meant an optional dark mode, and a setting to reduce motion for optimal usability, like many native apps have (and in the case of reduced motion, like anything with animations should have).
Under the hood, both of the settings are ultimately booleans in the app’s Vuex data store. When true, the setting renders a specific class in the app’s default layout. Nuxt layouts are Vue templates that “wrap” all of your content, and render on all (or many) pages of your app (commonly used for things like shared headers and footers, but also useful for global settings):
Speaking of settings: though the web app is split into several different pages — menu, settings, about, play, etc. — the shared global Vuex data store helps to keep things in sync and feeling seamless between areas of the app (since the user will adjust their settings on one page, and see them apply to the game on another).
Every setting in the app is also synced to both localStorage and the Vuex store, which allows saving and loading values between sessions, on top of keeping track of settings as the user navigates between pages.
And speaking of navigation: moving between pages is another area where I felt there was a lot of opportunity to make Quina feel like a native app, by adding full-page transitions.
Nuxt page transitions in action
Vue transitions are fairly straightforward in general—you just write specifically-named CSS classes for your “to” and “from” transition states—but Nuxt goes a step further and allows you to set full page transitions with only a single line in a page’s Vue file:
<!-- A page component, e.g., pages/Options.vue -->
<script>
export default {
  transition: 'page-slide'
  // ... The rest of the component properties
}
</script>
That transition property is powerful; it lets Nuxt know we want the page-slide transition applied to this page whenever we navigate to or away from it. From there, all we need to do is define the classes that handle the animation, as you would with any Vue transition. Here’s my page-slide SCSS:
Notice the .reduce-motion class; that’s what we talked about in the layout file just above. It prevents visual movement when the user has indicated they prefer reduced motion (either via media query or manual setting), by disabling any transform properties (which seemed to warrant usage of the divisive !important flag). The opacity is still allowed to fade in and out, however, since this isn’t really movement.
Comparing default motion (left) with reduced motion (right)
Side note on transitions and handling 404s: The transitions and routing are, of course, handled by JavaScript under the hood (Vue Router, to be exact), but I ran into a frustrating issue where scripts would stop running on idle pages (for example, if the user left the app or tab open in the background for a while). When coming back to those idle pages and clicking a link, Vue Router would have stopped running, and so the link would be treated as relative and 404.
Example: the /faq page goes idle; the user comes back to it and clicks the link to visit the /options page. The app would attempt to go to /faq/options, which of course doesn’t exist.
My solution to this was a custom error.vue page (this is a Nuxt page that automatically handles all errors), where I’d run validation on the incoming path and redirect to the end of the path.
This worked for my use case because a) I don’t have any nested routes; and b) at the end of it, if the path isn’t valid, it still hits a 404.
Vibration and sound
Transitions are nice, but I also knew Quina wouldn’t feel like a native app — especially on a smartphone — without both vibration and sound.
Vibration is relatively easy to achieve in browsers these days, thanks to the Navigator API. Most modern browsers simply allow you to call window.navigator.vibrate() to give the user a little buzz or series of buzzes — or, using a very short duration, a tiny bit of tactile feedback, like when you tap a key on a smartphone keyboard.
Obviously, you want to use vibration sparingly, for a few reasons. First, because too much can easily become a bad user experience; and second, because not all devices/browsers support it, so you need to be very careful about how and where you attempt to call the vibrate() function, lest you cause an error that shuts down the currently running script.
Personally, my solution was to set a Vuex getter to verify that the user is allowing vibration (it can be disabled from the settings page); that the current context is the client, not the server; and finally, that the function exists in the current browser. (ES2020 optional chaining would have worked here as well for that last part.)
Side note: Checking for process.client is important in Nuxt — and many other frameworks with code that may run on Node — since window won’t always exist. This is true even if you’re using Nuxt in static mode, since the components are validated in Node during build time. process.client (and its opposite, process.server ) are Nuxt niceties that just validate the code’s current environment at runtime, so they’re perfect for isolating browser-only code.
Sound is another key part of the app’s user experience. Rather than make my own effects (which would’ve undoubtedly added dozens more hours to the project), I mixed samples from a few artists who know better what they’re doing in that realm, and who offered some free game sounds online. (See the app’s FAQs for full info.)
Users can set the volume they prefer, or shut the sound off entirely. This, and the vibration, are also set in localStorage on the user’s browser as well as synced to the Vuex store. This approach allows us to set a “permanent” setting saved in the browser, but without the need to retrieve it from the browser every time it’s referenced. (Sounds, for example, check the current volume level each time one is played, and the latency of waiting on a localStorage call every time that happens could be enough to kill the experience.)
An aside on sound
It turns out that for whatever reason, Safari is extremely laggy when it comes to sound. All the clicks, boops and dings would take a noticeable amount of time after the event that triggered them to actually play in Safari, especially on iOS. That was a deal-breaker, and a rabbit hole I spent a good amount of hours despairingly tunneling down.
Fortunately, I found a library called Howler.js that solves cross-platform sound issues quite easily (and that also has a fun little logo). Simply installing Howler as a dependency and running all of the app’s sounds through it — basically one or two lines of code — was enough to solve the issue.
If you’re building a JavaScript app with synchronous sound, I’d highly recommend using Howler, as I have no idea what Safari’s issue was or how Howler solves it. Nothing I tried worked, so I’m happy just having the issue resolved easily with very little overhead or code modification.
Gameplay, history, and awards
Quina can be a difficult game, especially at first, so there are a couple of ways to adjust the difficulty of the game to suit your personal preference:
You can choose what kind of words you want to get as code words: Basic (common English words), Tricky (words that are either more obscure or harder to spell), or Random (a weighted mix of the two).
You can choose whether to receive a hint at the start of each game, and if so, how much that hint reveals.
Quina offers several different ways to play, to accommodate players of all skill levels
These settings allow players of various skill, age, and/or English proficiency to play the game on their own level. (A Basic word set with strong hints would be the easiest; Tricky or Random with no hints would be the hardest.)
“Soft hints” reveal one letter in the code word (but not its position)
While simply playing a series of one-off games with adjustable difficulty might be enjoyable enough, that would feel more like a standard web app or demo than a real, full-fledged game. So, in keeping with the pursuit of that native app feel, Quina tracks your game history, shows your play statistics in a number of different ways, and offers several “awards” for various achievements.
Quina tracks the results of all games played, your longest win streaks, and many other stats
Under the hood, each game is saved as an object that looks something like this:
The app catalogues your games played (again, via Vuex state synced to localStorage) in the form of a gameHistory array of game objects, which the app then uses to display your stats — such as your win/loss ratio, how many games you’ve played, and your average guesses — as well as to show your progress towards the game’s “awards.”
This is all done easily enough with various Vuex getters, each of which utilizes JavaScript array methods, like .filter() and .reduce(), on the gameHistory array. For example, this is the getter that shows how many games the user has won while playing on the “tricky” setting:
There are many other getters of varying complexity. (The one to determine the user’s longest win streak was particularly gnarly.)
Adding awards was a matter of creating an array of award objects, each tied to a specific Vuex getter, and each with a requirement.threshold property indicating when that award was unlocked (i.e., when the value returned by the getter was high enough). Here’s a sample:
// assets/js/awards.js
export default [
  {
    title: 'Onset',
    requirement: {
      getter: 'totalGamesPlayed',
      threshold: 1,
      text: 'Play your first game of Quina',
    }
  },
  {
    title: 'Sharp',
    requirement: {
      getter: 'trickyGamesWon',
      threshold: 10,
      text: 'Win ten total games on Tricky',
    },
  },
]
From there, it’s a pretty straightforward matter of looping over the achievements in a Vue template file to get the final output, using its requirement.text property (though there’s a good deal of math and animation added to fill the gauges to show the user’s progress towards achieving the award):
There are 25 awards in all (that’s 5 × 5, in keeping with the theme) for various achievements like winning a certain number of games, trying out all the game modes, or even winning a game within your first three guesses. (That one is called “Lucky” — as an added little Easter egg, the name of each award is also a potential code word, i.e., five letters with no repeats.)
Unlocking awards doesn’t do anything except give you bragging rights, but some of them are pretty difficult to achieve. (It took me a few weeks after releasing to get them all!)
Pros and cons of this approach
There’s a lot to love about the “build once, deploy everywhere” strategy, but it also comes with some drawbacks:
Pros
You only need to deploy your store app once. After that, all updates can just be website deploys. (This is much quicker than waiting for an app store release.)
Build once. This is sorta true, but turned out to be not quite as straightforward as I thought due to Google’s payments policy (more on that later).
Everything is a browser. Your app is always running in the environment you’re used to, whether the user realizes it or not.
Cons
Event handlers can get really tricky. Since your code is running on all platforms simultaneously, you have to anticipate any and all types of user input at once. Some elements in the app can be tapped, clicked, long-pressed, and also respond differently to various keyboard keys; it can be tricky to handle all of those at once without any of the handlers stepping on each other’s toes.
You may have to split experiences. This will depend on what your app is doing, but there were some things I needed to show only for users on the Android app and others that were only for web. (I go into a little more detail on how I solved this in another section below.)
Everything is a browser. You’re not worried about what version of Android your users are on, but you are worried about what their default browser is (because the app will use their default browser behind the scenes). Typically on Android this will mean Chrome, but you do have to account for every possibility.
Logistics: turning a web app into a native app
There’s a lot of technology out there that makes the “build for the web, release everywhere” promise — React Native, Cordova, Ionic, Meteor, and NativeScript, just to name a few.
Generally, these boil down to two categories:
You write your code the way a framework wants you to (not exactly the way you normally would), and the framework transforms it into a legitimate native app;
You write your code the usual way, and the tech just wraps a native “shell” around your web tech and essentially disguises it as a native app.
The first approach may seem like the more desirable of the two (since at the end of it all you theoretically end up with a “real” native app), but I also found it comes with the biggest hurdles. Every platform or product requires you to learn its way of doing things, and that way is bound to be a whole ecosystem and framework unto itself. The promise of “just write what you know” is a pretty strong overstatement in my experience. I’d guess in a year or two a lot of those problems will be solved, but right now, you still feel a sizable gap between writing web code and shipping a native app.
On the other hand, the second approach is viable because of a thing called “TWA,” which is what makes it possible to make a website into an app in the first place.
What is a TWA app?
TWA stands for Trusted Web Activity — and since that answer is not likely to be helpful at all, let’s break that down a bit more, shall we?
A TWA app basically turns a website (or web app, if you want to split hairs) into a native app, with the help of a little UI trickery.
You could think of a TWA app as a browser in disguise. It’s an Android app without any internals, except for a web browser. The TWA app is pointed to a specific web URL, and whenever the app is booted, rather than doing normal native app stuff, it just loads that website instead — full-screen, with no browser controls, effectively making the website look and behave as though it were a full-fledged native app.
TWA requirements
It’s easy to see the appeal of wrapping up a website in a native app. However, not just any old site or URL qualifies; in order to launch your web site/app as a TWA native app, you’ll need to check the following boxes:
Your site/app must be a PWA. Google offers a validation check as part of Lighthouse, or you can check with Bubblewrap (more on that in a bit).
You must generate the app bundle/APK yourself; it’s not quite as easy as just submitting the URL of your progressive web app and having all the work done for you. (Don’t worry; we’ll cover a way to do this even if you know nothing about native app development.)
You must have a matching secure key, both in the Android app and uploaded to your web app at a specific URL.
That last point is where the “trusted” part comes in; a TWA app will check its own key, then verify that the key on your web app matches it, to ensure it’s loading the right site (presumably, to prevent malicious hijacking of app URLs). If the key doesn’t match or isn’t found, the app will still work, but the TWA functionality will be gone; it will just load the web site in a plain browser, chrome and all. So the key is extremely important to the experience of the app. (You could say it’s a key part. Sorry not sorry.)
Advantages and drawbacks of building a TWA app
The main advantage of a TWA app is that it doesn’t require you to change your code at all — no framework or platform to learn; you’re just building a website/web app like normal, and once you’ve got that done, you’ve basically got the app code done, too.
The main drawback, however, is that (despite helping to usher in the modern age of the web and JavaScript), Apple is not in favor of TWA apps; you can’t list them in the Apple App store. Only Google Play.
This may sound like a deal-breaker, but bear a few things in mind:
Remember, to list your app in the first place, it needs to be a PWA — which means it’s installable by default. Users on any platform can still add it to their device’s home screen from the browser. It doesn’t need to be in the Apple App Store to be installed on Apple devices (though it certainly misses out on the discoverability). So you could still build a marketing landing page into your app and prompt users to install it from there.
There’s also nothing to prevent you from developing a native iOS app using a completely different strategy. Even if you wanted both iOS and Android apps, as long as a web app is also part of the plan, having a TWA effectively cuts out half of that work.
Finally, while iOS has about a 50% market share in predominantly English-speaking countries and Japan, Android has well over 90% of the rest of the world. So, depending on your audience, missing out on the App Store may not be as impactful as you might think.
How to generate the Android App APK
At this point you might be saying, this TWA business sounds all well and good, but how do I actually take my site/app and shove it into an Android app?
The answer comes in the form of a lovely little CLI tool called Bubblewrap.
You can think of Bubblewrap as a tool that takes some input and options from you, and generates an Android app (specifically, an APK, one of the file formats allowed by the Google Play Store) out of the input.
Installing Bubblewrap is a little tricky, and while using it is not quite plug-and-play, it’s definitely far more within reach for an average front-end dev than any other comparable options that I found. The README file on Bubblewrap’s NPM page goes into the details, but as a brief overview:
Install Bubblewrap by running npm i -g @bubblewrap/cli (I’m assuming here you’re familiar with NPM and installing packages from it via the command line). That will allow you to use Bubblewrap anywhere.
Note: the manifest.json file is required of all PWAs, and Bubblewrap needs the URL to that file, not just your app. Also be warned: depending on how your manifest file is generated, its name may be unique to each build. (Nuxt’s PWA module appends a unique UUID to the file name, for example.)
Also note that by default, Bubblewrap will validate that your web app is a valid PWA as part of this process. For some reason, when I was going through this process, the check kept coming back negative, despite Lighthouse confirming that it was in fact a fully functional progressive web app. Fortunately, Bubblewrap allows you to skip this check with the --skipPwaValidation flag.
If this is your first time using Bubblewrap, it will then ask if you want it to install the Java Development Kit (JDK) and Android Software Development Kit (SDK) for you. These two are the behind-the-scenes utilities required to generate an Android app. If you’re not sure, hit “Y” for yes.
Note: Bubblewrap expects these two development kits to exist in very specific locations, and won’t work properly if they’re not there. You can run bubblewrap doctor to verify, or see the full Bubblewrap CLI README.
After everything’s installed — assuming it finds your manifest.json file at the provided URL — Bubblewrap will ask some questions about your app.
Many of the questions are either preference (like your app’s main color) or just confirming basic details (like the domain and entry point for the app), and most will be pre-filled from your site’s manifest file.
Other questions that may already be pre-filled by your manifest include where to find your app’s various icons (to use as the home screen icon, status bar icon, etc.), what color the splash screen should be while the app is opening, and the app’s screen orientation, in case you want to force portrait or landscape. Bubblewrap will also ask if you want to request permission for your user’s geolocation, and whether you’re opting into Play Billing.
However, there are a few important questions that may be a little confusing, so let’s cover those here:
Application ID: This appears to be a Java convention, but each app needs a unique ID string that’s generally 2–3 dot-separated sections (e.g., collinsworth.quina.app). It doesn’t actually matter what this is; it’s not functional, it’s just convention. The only important thing is that you remember it, and that it’s unique. But do note that this will become part of your app’s unique Google Play Store URL. (For this reason, you cannot upload a new bundle with a previously used App ID, so make sure you’re happy with your ID.)
Starting version: This doesn’t matter at the moment, but the Play Store will require you to increment the version as you upload new bundles, and you cannot upload the same version twice. So I’d recommend starting at 0 or 1.
Display mode: There are actually a few ways that TWA apps can display your site. Here, you most likely want to choose either standalone (full-screen, but with the native status bar at the top), or fullscreen (no status bar). I personally chose the default standalone option, as I didn’t see any reason to hide the user’s status bar in-app, but you might choose differently depending on what your app does.
The signing key
The final piece of the puzzle is the signing key. This is the most important part. This key is what connects your progressive web app to this Android app. If the key the app is expecting doesn’t match what’s found in your PWA, again: your app will still work, but it will not look like a native app when the user opens it; it’ll just be a normal browser window.
There are two approaches here that are a little too complex to go into in detail, but I’ll try to give some pointers:
Generate your own keystore. You can have Bubblewrap do this, or use a CLI tool called keytool (appropriately enough), but either way: be very careful. You need to explicitly track the exact name and passwords for your keystores, and since you’re creating both on the command line, you need to be extremely careful of special characters that could mess up the whole process. (Special characters may be interpreted differently on the command line, even when input as part of a password prompt.)
Allow Google to handle your keys. This honestly isn’t dramatically simpler in my experience, but it saves some of the trouble of wrangling your own signing keys by allowing you to go into the Google Play Developer console, and download a pre-generated key for your app.
Whichever option you choose, there’s in-depth documentation on app signing here (written for Android apps, but most of it is still relevant).
The part where you get the key onto your personal site is covered in this guide to verifying Android app links. To crudely summarize: Google will look for a /.well-known/assetlinks.json file at that exact path on your site. The file needs to contain your unique key hash as well as a few other details:
Before you get started, there are also some hurdles to be aware of on the app store side of things:
First and foremost, you need to sign up before you can publish to the Google Play Store. This eligibility costs a one-time $25 USD fee.
Once approved, know that listing an app is neither quick nor easy. It’s more tedious than difficult or technical, but Google reviews every single app and update on the store, and requires you to fill out a lot of forms and info about both yourself and your app before you can even start the review process — which itself can take many days, even if your app isn’t even public yet. (Friendly heads-up: there’s been a “we’re experiencing longer than usual review times” warning banner in the Play console dashboard for at least six months now.)
Among the more tedious parts: you must upload several images of your app in action before your review can even begin. These will eventually become the images shown in the store listing — and bear in mind that changing them will also kick off a new review, so come to the table prepared if you want to minimize turnaround time.
You also need to provide links to your app’s terms of service and privacy policy (which is the only reason my app even has them, since they’re all but pointless).
There are lots of things you can’t undo. For example, you can never change a free app to paid, even if it hasn’t publicly launched yet and/or has zero downloads. You also have to be strict on versioning and naming with what you upload, because Google doesn’t let you overwrite or delete your apps or uploaded bundles, and doesn’t always let you revert other settings in the dashboard, either. If you have a “just jump in and work out the kinks later” approach (like me), you may find yourself starting over from scratch at least once or twice.
With a few exceptions, Google has extremely restrictive policies about collecting payments in an app. When I was building, it was charging a 30% fee on all transactions (they’ve since conditionally lowered that to 15% — better, but still five times more than most other payment providers would charge). Google also forces developers (with a few exceptions) to use its own native payment platform; no opting for Square, Stripe, PayPal, etc. in-app.
Fun fact: this policy had been announced but wasn’t in effect yet while I was trying to release Quina, and it still got flagged by the reviewer for being in violation. So they definitely take this policy very seriously.
Monetization, unlockables, and getting around Google
While my goal with Quina was mostly personal — challenge myself, prove I could, and learn more about the Vue ecosystem in a complex real-world app — I had also hoped as a secondary goal that my work might be able to make a little money on the side for me and my family.
Not a lot. I never had illusions of building the next Candy Crush (nor the ethical void required to engineer an addiction-fueled micro-transaction machine). But since I had poured hundreds of hours of my time and energy into the game, I had hoped that maybe I could make something in return, even if it was just a little beer money.
Initially, I didn’t love the idea of trying to sell the app or lock its content, so I decided to add a simple “would you care to support Quina if you like it?” prompt after every so many games, and make some of the content unlockable specifically for supporters. (Word sets are limited in size by default, and some game settings are initially locked as well.) The prompt to support Quina can be permanently dismissed (I’m not a monster), and any donation unlocks everything; no tiered access or benefits.
This was all fairly straightforward to implement thanks to Stripe, even without a server; it’s all completely client-side. I just import a bit of JavaScript on the /support page, using Nuxt’s handy head function (which adds items to the <head> element specifically on the given page):
With that bit in place (along with a sprinkle of templating and logic), users can choose their donation amount — set up as products on the Stripe side — and be redirected to Stripe to complete payment, then returned when finished. For each tier, the return redirect URL is slightly different via query parameters. Vue Router parses the URL to adjust the user’s stored donation history, and unlock features accordingly.
You might wonder why I’m revealing all of this, since it exposes the system as fairly easy to reverse-engineer. The answer is: I don’t care. In fact, I added a free tier myself, so you don’t even have to go to the trouble. I decided that if somebody really wanted the unlockables but couldn’t or wouldn’t pay for whatever reason, that’s fine. Maybe they live in a situation where $3 is a lot of money. Maybe they gave on one device already. Maybe they’ll do something else nice instead. But honestly, even if their intentions aren’t good: so what?
I appreciate support, but this isn’t my living, and I’m not trying to build a dopamine tollbooth. Besides, I’m not personally comfortable with the ethical implications of using a stack of totally open-source and/or free software (not to mention the accompanying mountain of documentation, blog posts, and Stack Overflow answers written about all of it) to build a closed garden for personal profit.
So, if you like Quina and can support it: sincerely, thank you. That means a ton to me. I love to see my work being enjoyed. But if not: that’s cool. If you want the “free” option, it’s there for you.
Anyway, this whole plan hit a snag when I learned about Google Play’s new monetization policy, effective this year. You can read it yourself, but to summarize: if you make money through a Google Play app and you’re not a nonprofit, you gotta go through Google Pay and pay a hefty fee — you are not allowed to use any other payment provider.
This meant I couldn’t even list the app; it would be blocked just for having a “support” page with payments that don’t go through Google. (I suppose I probably could have gotten around this by registering a nonprofit, but that seemed like the wrong way to go about it, on a number of levels.)
My eventual solution was to charge for the app itself on Google Play, by listing it for $2.99 (rather than my previously planned price of “free”), and simply altering the app experience for Android users accordingly.
Customizing the app experience for Google Play
Fortunately enough, Android apps send a custom header with the app’s unique ID when requesting a website. Using this header, it was easy enough to differentiate the app’s experience on the web and in the actual Android app.
For each request, the app checks for the Android ID; if present, the app sets a Vuex state boolean called isAndroid to true. This state cascades throughout the app, working to trigger various conditionals to do things like hide and show various FAQ questions, and (most importantly) to hide the support page in the nav menu. It also unlocks all content by default (since the user’s already “donated” on Android, by purchasing). I even went so far as to make simple <WebOnly> and <AndroidOnly> Vue wrapper components to wrap content only meant for one of the two. (Obviously, users on Android who can’t visit the support page shouldn’t see FAQs on the topic, as an example.)
For a time while building Quina, I had Firebase set up for logins and storing user data. I really liked the idea of allowing users to play on all their devices and track their stats everywhere, rather than have a separate history on each device/browser.
In the end, however, I scrapped that idea, for a few reasons. One was complexity; it’s not easy maintaining a secure accounts system and database, even with a nice system like Firebase, and that kind of overhead isn’t something I took lightly. But mainly: the decision boiled down to security and simplicity.
At the end of the day, I didn’t want to be responsible for users’ data. Their privacy and security is guaranteed by using localStorage, at the small cost of portability. I hope players don’t mind the possibility of losing their stats from time to time if it means they have no login or data to worry about. (And hey, it also gives them a chance to earn those awards all over again.)
Plus, it just feels nice. I get to honestly say there’s no way my app can possibly compromise your security or data because it knows literally nothing about you. And also, I don’t need to worry about compliance or cookie warnings or anything like that, either.
Wrapping up
Building Quina was my most ambitious project to date, and I had as much fun designing and engineering it as I have seeing players enjoy it.
I hope this journey has been helpful for you! While getting a web app listed in the Google Play Store has a lot of steps and potential pitfalls, it’s definitely within reach for a front-end developer. I hope you take this story as inspiration, and if you do, I’m excited to see what you build with your newfound knowledge.
This week, Ireland introduced a COVID-19 Tracker app. The app uses the Exposure Notification API built by Apple and Google. The app is intended to help contact trace and slow the spread of coronavirus. The app is now available from the App Store and Google Play.
Apple recently updated its App Store review guidelines and made some eye-opening changes. For example, developers can now use push notifications for advertising or marketing purposes. Though user authorization is required, this is sure to develop into a thorny issue over time. Let's go over the rest of the changes.
Hello i ve tried to upload my first app on the App Store but i got this mesage from Apple. Any ideas how to proceed?
*Your app provides a limited user experience as it is not sufficiently different from a mobile browsing experience. As such, the experience it provides is similar to the general experience of using Safari. Including iOS features such as push notifications, Core Location, and sharing do not provide a robust enough experience to be appropriate for the App Store.
Next Steps
To resolve this issue, please revise your app to provide a more robust user experience by including additional native iOS functionality.*
The New York Times recently published an article attacking Apple's recent moves that some have perceived harm both app developers and iPhone users. In Apple Cracks Down on Apps That Fight iPhone Addiction, the article reports that "Apple has removed or restricted 11 of the most 17 most downloaded screen-time and parental-control apps" from its App Store over the past year.
PWA (Progressive Web Apps) have been with us for some time now. Yet, each time I try explaining it to clients, the same question pops up: "Will my users be able to install the app using app stores?" The answer has traditionally been no, but this changed with Chrome 72 which shipped a new feature called TWA (Trusted Web Activities).
Trusted Web Activities are a new way to integrate your web-app content such as your PWA with yourAndroid app using a protocol based on Custom Tabs.
In this article, I will use Netguru’s existing PWA (Wordguru) and explain step-by-step what needs to be done to make the application available and ready to be installed straight from the Google Play app store.
Some of the things we cover here may sound silly to any Android Developers out there, but this article is written from the perspective of a front-end developer, particularly one who has never used Android Studio or created an Android Application. Also, please do note that a lot of what we're covering here is still extremely experimental since it's limited to Chrome 72.
Step 1: Set up a Trusted Web Activity
Setting up a TWA doesn’t require you to write any Java code, but you will need to have Android Studio. If you’ve developed iOS or Mac software before, this is a lot like Xcode in that it provides a nice development environment designed to streamline Android development. So, grab that and meet me back here.
Create a new TWA project in Android Studio
Did you get Android Studio? Well, I can’t actually hear or see you, so I’ll assume you did. Go ahead and crack it open, then click on "Start a new Android Studio project." From there, let’s choose the "Add No Activity" option, which allows us to configure the project.
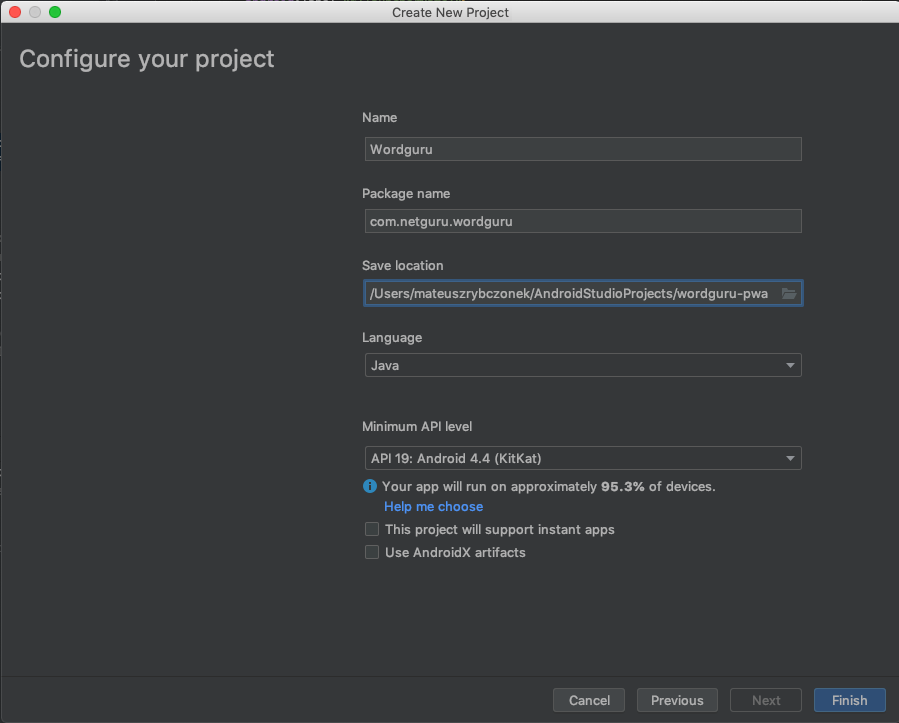
The configuration is fairly straightforward, but it’s always good to know what is what:
Name The name of the application (but I bet you knew that).
Package name: An identifier for Android applications on the Play Store. It must be unique, so I suggest using the URL of the PWA in reverse order (e.g. com.netguru.wordguru).
Save location: Where the project will exist locally.
Language: This allows us to select a specific code language, but there’s no need for that since our app is already, you know, written. We can leave this at Java, which is the default selection.
Minimum API level: This is the version of the Android API we’re working with and is required by the support library (which we’ll cover next). Let’s use API 19.
There are few checkboxes below these options. Those are irrelevant for us here, so leave them all unchecked, then move on to Finish.
Add TWA Support Library
A support library is required for TWAs. The good news is that we only need to modify two files to fill that requirement and the both live in the same project directory: Gradle Scripts. Both are named build.gradle, but we can distinguish which is which by looking at the description in the parenthesis.
There’s a Git package manager called JitPack that’s made specifically for Android apps. It’s pretty robust, but the bottom line is that it makes publishing our web app a breeze. It is a paid service, but I’d say it’s worth the cost if this is your first time getting something into the Google Play store.
Editor Note: This isn’t a sponsored plug for JitPack. It’s worth calling out because this post is assuming little-to-no familiarity with Android Apps or submitting apps to Google Play and it has less friction for managing an Android App repo that connects directly to the store. That said, it’s totally not a requirement.
Once you’re in JitPack, let’s connect our project to it. Open up that build.gradle (Project: Wordguru) file we just looked at and tell it to look at JitPack for the app repository:
There are also variables called manifestPlaceholders that we’ll cover in the next section. For now, let’s add the following to define where the app is hosted, the default URL and the app name:
Every Android app has an Android App Manifest (AndroidManifest.xml) which provides essential details about the app, like the operating system it’s tied to, package information, device compatibility, and many other things that help Google Play display the app’s requirements.
The thing we’re really concerned with here is Activity (<activity>). This is what implements the user interface and is required for the "Activities" in "Trusted Web Activities."
Funny enough, we selected the "Add No Activity" option when setting up our project in Android Studio and that’s because our manifest is empty and contains only the application tag.
Let’s start by opening up the manfifest file. We’ll replace the existing package name with our own application ID and the label with the value from the manifestPlaceholders variables we defined in the previous section.
Then, we’re going to actually add the TWA activity by adding an <activity> tag inside the <application> tag.
And that, my friends, is Step 1. Let’s move on to Step 2.
Step 2: Verify the relationship between the website and the app
TWAs require a connection between the Android application and the PWA. To do that, we use Digital Asset Links.
The connection must be set on both ends, where TWA is the application and PWA is the website.
To establish that connection we need to modify our manifestPlaceholders again. This time, we need to add an extra element called assetStatements that keeps the information about our PWA.
Now, we need to add a new meta-data tag to our application tag. This will inform the Android application that we want to establish the connection with the application specified in the manifestPlaceholders.
That’s it! we just established the application to website relationship. Now let’s jump into the conversion of website to application.
To establish the connection in the opposite direction, we need to create a .json file that will be available in the app’s /.well-known/assetlinks.json path. The file can be created using a generator that’s built into Android Studio. See, I told you Android Studio helps streamline Android development!
We need three values to generate the file:
Hosting site domain: This is our PWA URL (e.g. https://wordguru.netguru.com/).
App package name: This is our TWA package name (e.g. com.netguru.wordguru).
App package fingerprint (SHA256): This is a unique cryptographic hash that is generated based on Google Play Store keystore.
We already have first and second value. We can get the last one using Android Studio.
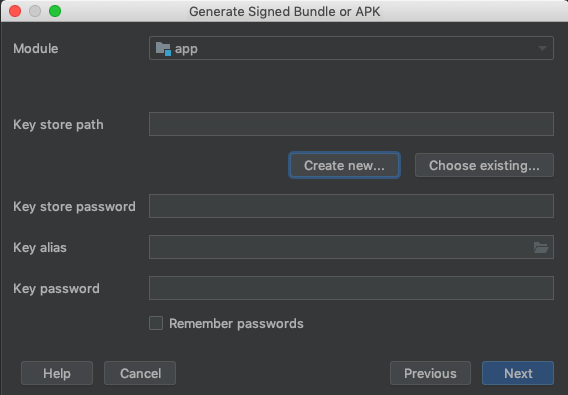
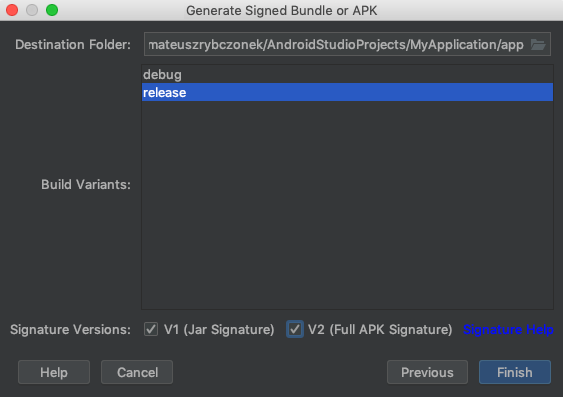
First we need to generate signed APK. In the Android Studio go to: Build → Generate Signed Bundle or APK → APK.
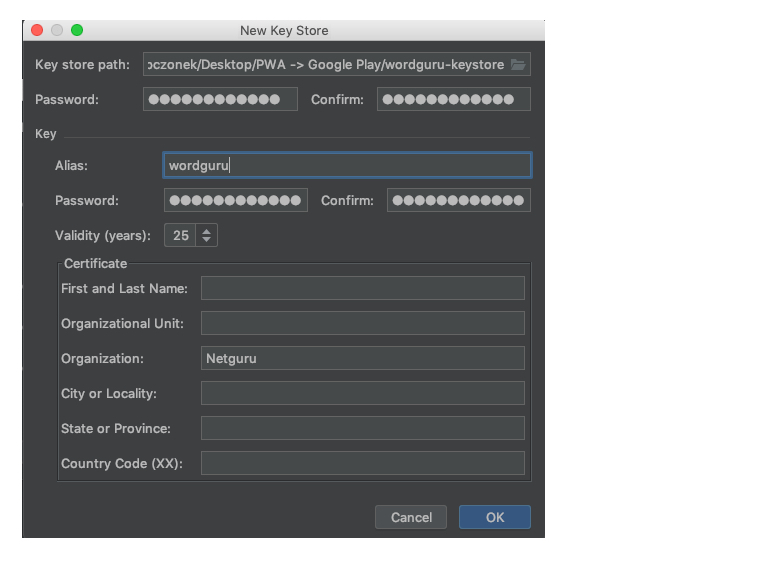
Next, use the existing keystore, if you already have one. If you need one, go to "Create new…" first.
Then let’s fill out the form. Be sure to remember the credentials as those are what the application will be signed with and they confirm your ownership of the application.
This will create a keystore file that is required to generate the app package fingerprint (SHA256). This file is extremely important as it is works as a proof that you are the owner of the application. If this file is lost, you will not be able to do any further updates to your application in the store.
Next up, let’s select type of bundle. In this case, we’re choosing "release" because it gives us a production bundle. We also need to check the signature versions.
This will generate our APK that will be used later to create a release in Google Play store. After creating our keystore, we can use it to generate required app package fingerprint (the SHA256).
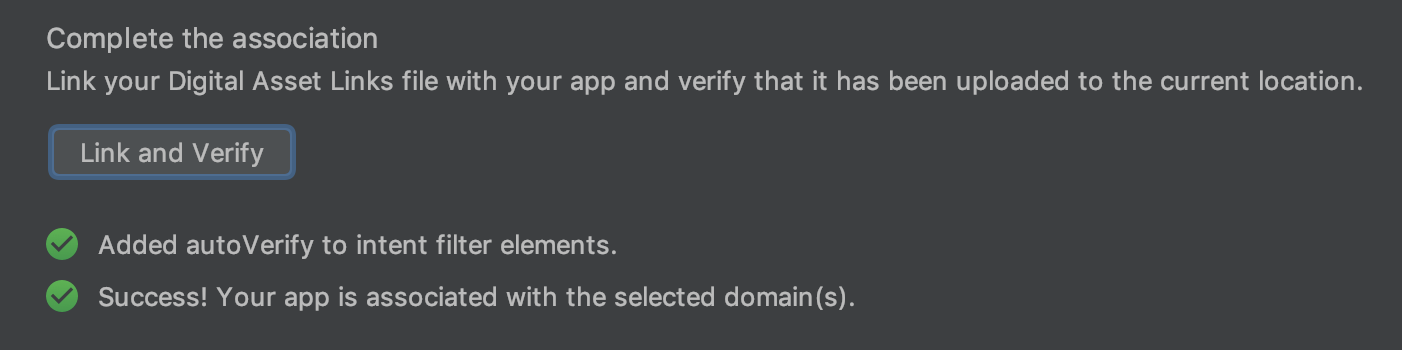
Let’s head back to Android Studio, and go to Tools → App Links Assistant. This will open a sidebar that shows the steps that are required to create a relationship between the application and website. We want to go to Step 3, "Declare Website Association" and fill in required data: Site domain and Application ID. Then, select the keystore file generated in the previous step.
After filling the form press "Generate Digital Asset Links file" which will generate our assetlinks.json file. If we open that up, it should look something like this:
This is the file we need to make available in our app’s /.well-known/assetlinks.json path. I will not describe how to make it available on that path as it is too project-specific and outside the scope of this article.
We can test the relationship by clicking on the "Link and Verify" button. If all goes well, we get a confirmation with "Success!"
Yay! We’ve established a two-way relationship between our Android application and our PWA. It’s all downhill from here, so let’s drive it home.
Step 3: Get required assets
Google Play requires a few assets to make sure the app is presented nicely in the store. Specifically, here’s what we need:
App Icons: We need a variety of sizes, including 48x48, 72x72, 96x96, 144x144, 192x192… or we can use an adaptive icon.
High-res Icon: This is a 512x512 PNG image that is used throughout the store.
Feature Graphic: This is a 1024x500 JPG or 24-bit PNG (no alpha) banner that Google Play uses on the app details view.
Screenshots: Google Play will use these to show off different views of the app that users can check out prior to downloading it.
Let’s go to the last step and finally push our app to the store.
Using the APK that we generated earlier (which is located in the AndroidStudioProjects directory), we need to go to the Google Play console to publish our application. I will not describe the process of publishing an application in the store as the wizard makes it pretty straightforward and we are provided step-by-step guidance throughout the process.
It may take few hours for the application to be reviewed and approved, but when it is, it will finally appear in the store.
If you can’t find the APK, you can create a new one by going to Build → Generate signed bundle / APK → Build APK, passing our existing keystore file and filling the alias and password that we used when we generated the keystore. After the APK is generated, a notice should appear and you can get to the file by clicking on the "Locate" link.
Congrats, your app is in Google Play!
That’s it! We just pushed our PWA to the Google Play store. The process is not as intuitive as we would like it to be, but still, with a bit of effort it is definitely doable, and believe me, it gives that great filling at the end when you see your app displayed in the wild.
It is worth pointing out that this feature is still very much early phase and I would consider it experimental for some time. I would not recommend going with a production release of your application for now because this only works with Chrome 72 and above — any version before that will be able to install the app, but the app itself will crash instantly which is not the best user experience.
Also, the official release of custom-tabs-client does not support TWA yet. If you were wondering why we used raw GitHub link instead of the official library release, well, that’s why.
Apple has warned developers that they should not be recording user interactions with the iPhone without disclosing the behavior. The move is only the most recent case in which Apple was forced to step in to safeguard user privacy. Apple isn't fooling around on this one; Offending apps face ejection from the App Store.
Every day, the ProgrammableWeb team is busy, updating its three primary directories for APIs, clients (language-specific libraries or SDKs for consuming or providing APIs), and source code samples.