In my previous article from this series, we started diving into the details that determine how your integration becomes the key to transforming your customer experience.
It started with laying out the process of how I've approached the use case by researching successful customer portfolio solutions as the basis for a generic architectural blueprint. Now it's time to cover various blueprint details.
Ah, integration! A subject that is close to my heart! A central subject in the IT of companies and in their good conduct. Unfortunately, while it is a central and clearly contemporary subject with API Management among others, integration is often considered as "has been." Like the new mainframe, for which no new development would be made (which is a bit of an urban legend by the way...).
The truth is quite different. API Management, microservices, iPaaS, message buses, data streaming, all this is integration! Let us, therefore, look together at the good reasons for considering integration to the point of having a center of excellence for integration.
This week there were a lot of reports of vulnerable APIs: from flight reservations systems to trading sites and even hot tubs. We also look into best practices for handling special characters in JSON and protecting APIs for mobile applications.
Kong, the API platform formerly known as Mashape, recently announced two new features that aim to simplify API development with the assistance of artificial intelligence and machine learning. The new tools, Kong Brain and Kong Immunity, have been added to the company’s Kong Enterprise API platform and serve to automate processes that include documentation, configuration, and traffic analysis.
NOTE: This is a cross-post from my newsletter. I publish each email two weeks after it’s sent. Subscribe to get more content like this earlier right in your inbox!
Earlier this year, the React team introduced the first official context API. I blogged about that new API and people got sufficiently and reasonably hyped.
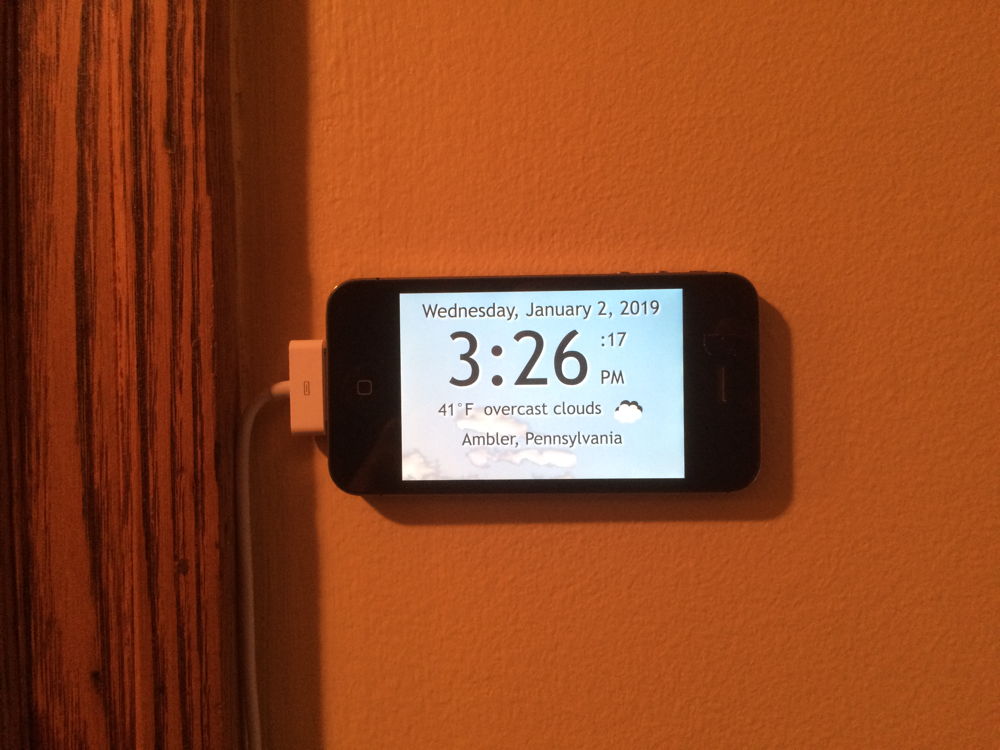
My first smartphone was an iPhone 4s. I remember the excitement of exploring its capabilities at a time when it was the coolest thing around. Eventually, of course, I replaced it with a newer model and the old iPhone, still in mint condition, gathered dust for two years. What a waste!
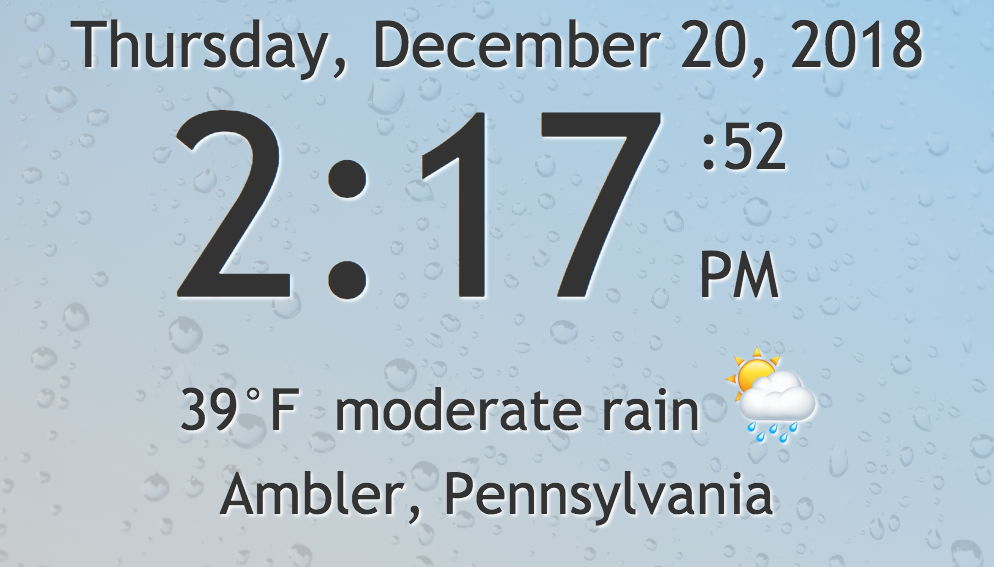
But was it? It occurred to me that I could repurpose the old iPhone to create a useful weather clock for our hallway.
Who needs Nest anyway?
In the process, I discovered that reusing an old device is not only fun and economical, it can also deepen your understanding of web standards. In this tutorial, I will show how I created a small web page to display the date, time, and current weather conditions based on the current GPS location. Together, we’ll retrieve weather data from a public API and hide an API key in a PHP file for security. Finally, we’ll look at adding a manifest file and meta tags so that users can save the page to a device’s home screen and then launch it as a standalone app, including a custom icon for it.
The HTML for the clock has some placeholder text that we will eventually replace. All we really need at this moment is a centered <main> container element and a couple of semantic <time> elements for the date and time. The <span> tag within the second <time> element will be styled specially to display the running seconds and the meridian. The datetime attribute within the <time> elements will be updated dynamically with JavaScript.
A little responsive design is key here. We want this to fit nicely on an iPhone 4s screen or any other small-ish smartphone in both portrait and landscape modes. We also want it to work well on a desktop web browser, of course. We can’t use any bleeding-edge CSS or JavaScript, however, because older devices like my iPhone 4s won’t understand it.
I wound up taking things up a notch by creating styles specific for the time of day and we’ll definitely get to that as well. We could even leverage a media query to darken the daytime style for Mac users who have dark mode turned on in the latest MacOS.
The <span> tag with the running seconds and meridian will wrap nicely based on a width of 2em which is just large enough to accommodate two capital letters (i.e. AM and PM). The final CSS that’s needed is a media query to bump up font sizes when the clock is in landscape mode, or really any device with a viewport wider than 480px.
Here are the base styles we’re looking at, with the more decorative styles in the final app removed for brevity:
For the JavaScript, I chose ES5 because many features of ES6 don’t work on the mobile Safari browser in iOS 9.35, which is the final iOS that runs on the iPhone 4s. Fortunately, ES5 is more than up to the task and the app runs properly on newer devices as well.
We need variables for the current date and time (now), the element that will display the date (dd), the element that will display the time (td) and the names of the months and days. Once the page is loaded, an init function is called to update the time every second (1000 milliseconds). The getClockStrings() function updates the value in the now Date object and returns an object containing HTML strings for the date and time. Then the updateTime() function updates the HTML to show the time. One lesser-used feature here is the inclusion of the toISOString() method of the Date object which adds a machine-readable date string to the datetime attribute of the two <time> elements.
Here’s what that boils dow to, using the JavaScript from the demo:
// NOTE: ES5 chosen instead of ES6 for compatibility with older mobile devices
var now, dd, td;
var months = ["January","February","March","April","May","June","July","August","September","October","November","December"];
var days = ["Sunday","Monday","Tuesday","Wednesday","Thursday","Friday","Saturday"];

document.addEventListener("DOMContentLoaded", init, false);
function init() {
  dd = document.getElementById("date");
  td = document.getElementById("time");
  updateTime();
  setInterval(updateTime,1000);
}

function updateTime() {
  var clockdata = getClockStrings();
  dd.innerHTML = clockdata.datehtml;
  td.innerHTML = clockdata.timehtml;
  dd.dateTime = now.toISOString();
  td.dateTime = now.toISOString();
}

function getClockStrings() {
  now = new Date();
  var year = now.getFullYear();
  var month = months[now.getMonth()];
  var date = now.getDate();
  var day = days[now.getDay()];
  var hour = now.getHours();
  var minutes = now.getMinutes();
  var seconds = now.getSeconds();
  var meridian = hour < 12 ? "AM" : "PM";
  var clockhour = hour > 12 ? hour - 12 : hour;
  if (hour === 0) {clockhour = 12;}
  var clockminutes = minutes < 10 ? "0" + minutes : minutes;
  var clockseconds = seconds < 10 ? "0" + seconds : seconds;
  var datehtml = day + ", " + month + " " + date + ", " + year;
  var timehtml = clockhour + ":" + clockminutes + "<span>:" + clockseconds + " " + meridian + "</span>";
  return {"datehtml":datehtml,"timehtml":timehtml};
}
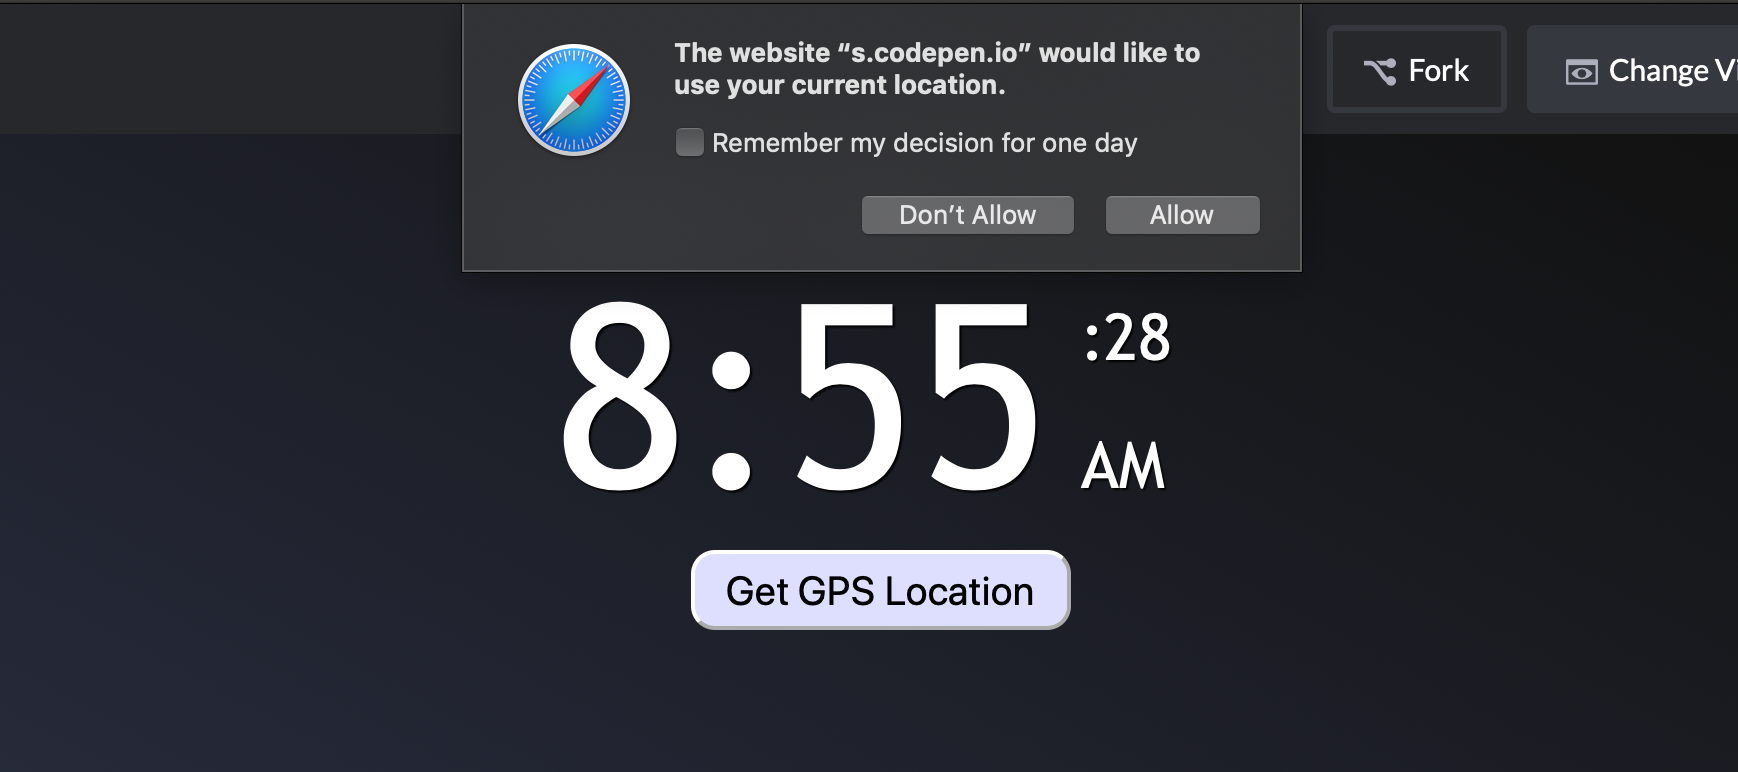
The Geolocation API is an easy way to get the user’s accurate location. We can do that when the page loads, but good manners and Chrome’s best practices audit dictate that we ask the user to initiate the location feature. So, we must add a button and a <div> to the HTML to display the GPS information we receive.
These new items require their own styles — mine can be seen in the embedded Pen above. The important thing is to add the class selector rule for the infotext class as well as the two ID selector rules for the gpsbutton.
Finally, we’ll need to add the modified infotext class selector rule within the media query.
Again, the basic styles minus decorative styling for brevity:
/* The geolocation coordinates upon clicking GPS button */
.infotext {
  font-size: 1.3rem;
  line-height: 1.4;
  padding: 0 5px 0 5px;
  width: auto;
}

/* The button itself */
#gpsbutton {
  -webkit-appearance: none;
  -moz-appearance: none;
  display: block;
  margin: 0 auto;
  width: auto;
  cursor: pointer;
}

#gpsbutton:hover {
  /* Styles for the hover state */
}

@media (min-width: 480px){
  /* Add the rule below to the end of the media query */
  .infotext {font-size: 1.8rem;}
}
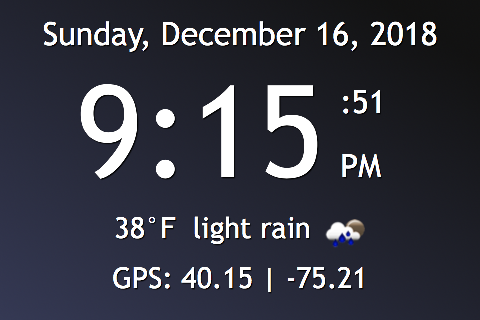
The JavaScript requires a few new variables for the latitude, longitude, GPS <div>, and GPS <button>. When clicked, the GPS button calls the getLocation() function which tests for the availability of geolocation support in the browser. If it finds such support, it calls the getCurrentPosition method of the navigator.geolocation object and passes a reference to a success callback function named showPosition and an error callback function named geoError.
At this point, the browser will ask the user for permission to obtain their GPS location. If the visitor refuses, an appropriate message is displayed. If the user approves, the showPosition() function then displays the latitude and longitude and hides the GPS button.
Here’s the Javascript we get based on what we’ve covered in this section:
// ...
var lat, lon, gd, gpsbutton;
// ...
function init(){
  // ...
  gd = document.getElementById("gps");
  gpsbutton = document.getElementById("gpsbutton");
  gpsbutton.addEventListener("click",getLocation,false);
  // ...
}

function updateTime(){
  // ...
  var sec = now.getSeconds();
  var minutes = now.getMinutes();
  if (sec === 0){
    if (minutes % 5 === 0){
      getLocation(); // Get location every 5 minutes while the app is running
    }
  }
}

function getClockStrings(){
  // ...
}

function getLocation() {
  if (navigator.geolocation) {
    navigator.geolocation.getCurrentPosition(showPosition,geoError);
  }else{
    gd.innerHTML = "location unknown";
  }
}

function geoError(){
  gd.innerHTML = "location detection disabled";
}

function showPosition(position) {
  gpsbutton.style.display = "none";
  lat = position.coords.latitude;
  lon = position.coords.longitude;
  gd.innerHTML = "GPS: " + lat.toFixed(2) + " | " + lon.toFixed(2);
}
Step 3: How’s the weather?
Adding current weather conditions to this clock is a useful feature. Fortunately, the good folks at OpenWeatherMap.org allow access to basic weather information for free. Sign up for a free account there and you will be given an API key you can use in your web development. The free account provides current conditions and 5-day forecasts for any valid GPS location you throw at it. Just be sure to call the API no more than 60 times per minute or you will be prodded to upgrade to a paid account. Once you have an API key, substitute it for the words YOUR_API_KEY_HERE in this code sample and then paste the code into the browser’s location bar. You will receive a JSON object containing the weather for my location here in Pennsylvania. Experiment with different latitudes and longitudes. You can find coordinates for any major city at LatLong.net where the coordinates are given in the decimal format you need.
The CSS needs styles for the new weather <div> and the icon image. Note that the icon is set to 0 opacity initially. That will be changed in the JavaScript code once valid weather information is retrieved.
#weather {
  display: block;
  width: auto;
}

#icon {
  display: inline-block;
  opacity: 0;
  vertical-align: top;
  width: 50px;
  height: 50px;
}

@media (min-width: 480px){
  /* Add the rule below to the end of the media query */
  #weather {display: inline-block;}
}
Add the JavaScript
We need to add variables to reference the weather URL, the weather <div> (wd), and the weather icon. We also need to decide on Fahrenheit or Celsius. The Boolean value for usephp should be set to false for now. We will discuss hiding your API key in a PHP document a little later. The locationRequested Boolean value will help us avoid calling the weather and geolocation APIs before the user has requested them. The sunset and sunrise time variables will allow us to change the appearance of the clock based on the time of day. The iconurl value provides the stem of the URL we need to retrieve weather icons. We also need a random number between 0 and 14 to use in our updateTime function so that all our users don’t request weather at the same minute each quarter hour. If you have your own set of icons, you can change the URL value for iconurl . The file names for the PNG icons are available at OpenWeatherMap.org.
// ...
var weatherurl, wd, icon, weatherminute;
var temperaturescale = "F"; // Set to F or C (fahrenheit or celsius)
var usephp = false; // Set to true to use a PHP document to hide your api key
var locationRequested = false;
var sunsettime = 0;
var sunrisetime = 0;
var iconurl = "https://openweathermap.org/img/w/";

// ...
function init(){
  //... Add these lines before the updateTime call at the end of the function
  wd = document.getElementById("weather");
  icon = document.getElementById("icon");
  weatherminute = randRange(0,14);
  // ...
}

// Random number utility function
function randRange(min, max) {
  return Math.floor(Math.random()*(max-min+1))+min;
}
Next we will modify the final if block of the updateTime() function. We wish to avoid unnecessary calls to the weather and geolocation APIs so it is important to test for sec === 0 to be sure we don't call either API 60 times in a given minute. We also wish to call the APIs only if the user has approved the browser’s geolocation request.
function updateTime(){
  //...
  if (locationRequested && sec === 0){
    checkForSunset(); // Checks for sunset once each minute
    if (minutes % 15 === weatherminute){
        getWeather(); // Get weather every 15 minutes while the app is running
        // weatherminute is a random number between 0 and 14 to ensure
        // that users don't all hit the API at the same minute
    }
    if (minutes % 5 === 0){
      getLocation(); // Get location every 5 minutes while the app is running
    }
  }
}
In the showPosition() function, the URL to request the weather data will be either a relative path to the PHP file or a full HTTPS URL pointing to the OpenWeatherMap.org service. In both cases, we will be passing the latitude and longitude in the query string of the URL. For the APPID, please substitute your own API Key for the words YOUR_API_KEY_HERE unless you are using the PHP solution discussed in Step 4 below.
function showPosition(position) {
  //...
  if (usephp){
    weatherurl = "clock.php?lat=" + lat + "&lon=" + lon;
  }else{
    weatherurl = "https://api.openweathermap.org/data/2.5/weather?";
    weatherurl += "lat=" + lat + "&lon=" + lon + "&APPID=";
    weatherurl += "YOUR_API_KEY_HERE";
  }
  if (!locationRequested){
    getWeather();
    locationRequested = true;
  }
}
The showPosition() function then calls getWeather() which updates the weather <div> to let the user know something is happening while the weather data is being retrieved. I opted to use the older XMLHttpRequest standard because fetch is not supported on old devices like the iPhone 4s. If the weather data request is being channeled through a PHP document, the response type will be "document" rather than plain text so we have to test for that. If that is the case, the JSON object we need will be in the textContent property of the body of the response. Otherwise, we only need the plain text found in the responseText property. The data is then parsed as a JSON object and sent to the processWeather() function.
function getWeather() {
  wd.innerHTML = "getting weather";
  var xhttp = new XMLHttpRequest();
  xhttp.responseType = usephp ? "document" : "text";
  // The PHP file returns a document rather than plain text
  xhttp.onreadystatechange = function() {
    if (this.readyState === 4 && this.status === 200) {
      // When using PHP as a data source we need the `textContent`
      // of the body of the returned document
      var data = usephp ? xhttp.response.body.textContent : xhttp.responseText;
      processWeather(JSON.parse(data));
    }
  };
  xhttp.open("GET", weatherurl, true);
  xhttp.send();
}
The JSON object sent to processWeather() will look something like this:
From this JSON data, we need to grab the weather property that contains the description of the current conditions and the filename for the weather icon. The <img> tag in the html that has the ID of "icon" is then updated with a new src property value to load the icon image. The temperature is part of the main property but it has to be converted to Fahrenheit or Celsius (most humans don’t think in Kelvin). When that is done, the current conditions can be assigned to the innerHTML property of the weather <div>. The times for sunrise and sunset are found in the sys property of the data. Once we have those, we can call the checkForSunset() function and modify the style to match the time of day.
function processWeather(data){
  var weather = data["weather"][0];
  icon.src = iconurl + weather.icon + ".png";
  icon.style.opacity = 1;
  var localtemperature = convertTemperature(data["main"].temp).toFixed(0);
  var weatherstring = localtemperature + "°" + temperaturescale + "  " + weather.description;
  wd.innerHTML = weatherstring;
  sunsettime = Number(data["sys"].sunset);
  sunrisetime = Number(data["sys"].sunrise);
  checkForSunset();
}

function checkForSunset(){
  var nowtime = now.getTime()/1000;
  // Changes the presentation style if the time of day is after sunset
  // or before the next day's sunrise
  var isDark = nowtime > sunsettime || nowtime < sunrisetime;
  document.getElementById("container").className = isDark ? "nightmode":"daymode";
}

function convertTemperature(kelvin){
  // Converts temps in kelvin to celsius or fahrenheit
  var celsius = (kelvin - 273.15);
  return temperaturescale === "F" ? celsius * 1.8 + 32 : celsius;
}
Step 4: Do I really have to show you my API key?
I used a disposable API key to create a working demo. Generally, however, putting an API key in plain text within the code of a front-end web application seems like a bad idea. Others might copy it and use up your API access quota. If you have access to a typical web server (CodePen doesn’t do PHP), you can hide the API key in a PHP file. Here is some sample code. Substitute the API key and upload the file as clock.php into the same directory as the main HTML file. The PHP file serves as a sort of proxy to the OpenWeatherMap API that we’re using to fetch data in the demo. If it has any problem retrieving weather data, it simply returns an appropriately structured object with "Weather Unavailable" as a description and a temperature that converts to 0° Fahrenheit. The API key is never transferred from the server to the browser so there is nothing for prying eyes to see.
I would be interested to hear from readers if you know of a secure, serverless solution to hiding an API key (Netlify or Docker perhaps?) because it’d be nice not to have to spin up our own server to store and hit the data. Chime in if you have some thoughts.
If anyone else tries to use this PHP file from another domain, the browser should throw an error like the one in the following example. I loaded a copy of the weather clock on my makepages.com domain and tried to access the PHP file on my shearspiremedia.com domain. These days, the same-origin policy is in place by default on typical commercial web server installations. You might need to confirm that is the case on the server you are using.
[Error] Origin https://makepages.com is not allowed by Access-Control-Allow-Origin.
[Error] XMLHttpRequest cannot load https://shearspiremedia.com/demos/clock/clock.php?lat=40.14616446413611&lon=-75.20946717104738 due to access control checks.
Next, update the usephp variable in the JavaScript file and test:
var usephp = true; // Set to true to use a PHP document to hide your api key
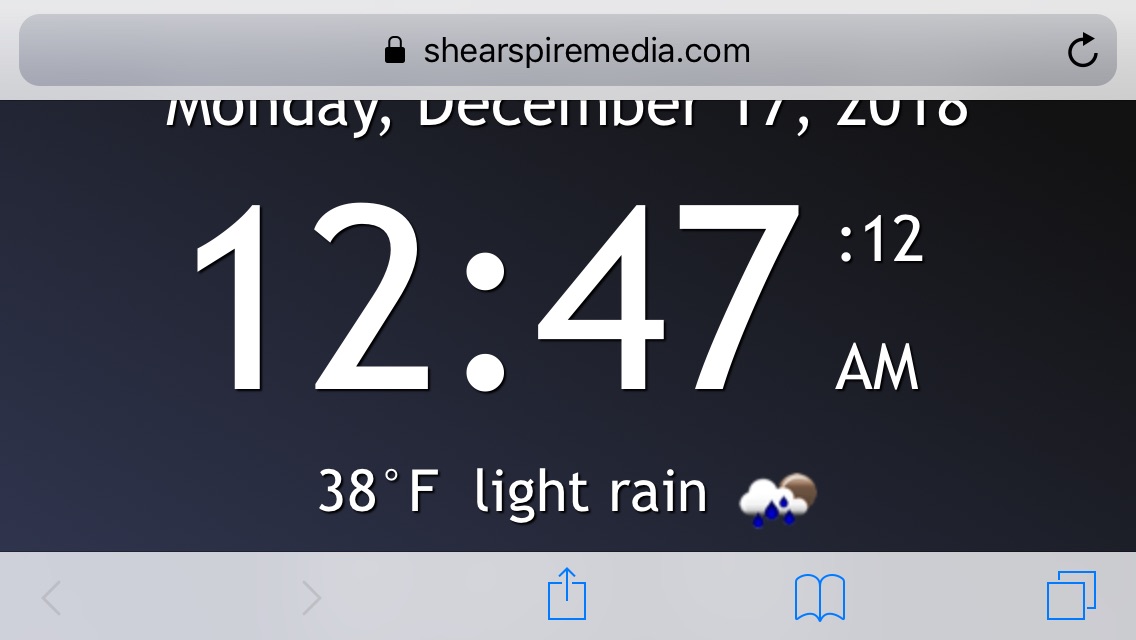
Step 5: Can I please go full screen?
Once the app is up and working, it can load on any smartphone browser. The iPhone, however, is forced to endure the presence of the location bar and footer. Yuck!
It would be lovely to be able to view it full screen instead. To do that, we need a manifest file to tell the device that we wish to view the clock as a standalone app and to tell Android devices where the app icons are located. Here is my manifest file which I saved as manifest.json in the same directory as the HTML file. You can create your own manifest file using the Web App Manifest Generator. Be sure to adjust the icon file names in your own manifest file and in the link tags in the HTML as we see here:
We also need a set of square PNG images at 192px, 152px, 128px, 96px, and 48px for the home screen icon. Save these into an icons folder within the same folder as your HTML file. Use the file names found in the manifest. The Web App Manifest Generator will create icons in all the required sizes other than 48px by uploading a single 512 x 512 pixel image. Here is the simple icon I made:
Home screen icon for my Weather Clock.
Finally, we need to add a bunch of meta and link tags in the head of the HTML file to make this all work. Here is the completed index.html file code including all the head tags you can’t see on CodePen.
The visitor can now tap the share button on the iPhone and choose “Add to Home Screen.” An icon will appear that will launch the clock as a full-screen standalone app. Enjoy!
If the user’s exact location isn’t a requirement, we could avoid the Geolocation API entirely and get the approximate location using any of several IP address services. In the demo above, a JSON object is received from extreme-ip-lookup.com to get the approximate GPS location of the user. That displays the city and region values found in the JSON instead of the GPS coordinates. It should be clear to the user in this case that the weather location is a neighboring town.
Since IP information is part of the normal request for a web page, an argument could be made that there is no ethical problem with displaying IP location information without user permission. That eliminates the need for the GPS button altogether. I actually switched the final app to use the IP address location feature with geolocation only as a fallback in the event the IP location service is down. I also added more weather information, custom background images, and custom weather icons to correspond to current weather conditions. The custom icons are available at this Pen. The final app is available here on my ShearSpireMedia.com site. I also created a Pen that generates a starry sky for night mode that can be used to make a night background.
That’s a wrap!
We covered a lot of ground in this article, but hopefully it gives you an idea that:
We can teach an old device new tricks.
The Geolocation API isn’t all that scary.
Fetching and using data from an external API is useful.
Using a small PHP file is one easy way to hide your API key from prying eyes.
Working with user permissions is a good (and often required) practice.
Like I mentioned earlier, a serverless solution for storing data would be ideal here, so if you have any thoughts on that — or really any ideas or questions at all — please let me know in the comments!
Anyone creating or maintaining APIs is surely aware that sometimes APIs become outdated. While we do our best to create APIs that last, there’s a natural evolution. In some cases, we need to close down APIs, or transition to a new approach. The earlier you accept the natural lifecycle, the easier you’ll make things on yourself in the future.
Below we’ll cover five stages of the API lifecycle:
1. Conception
2. Design
3. Development
4. Maintenance
5. Deprecation
We recently re-designed our API Client UI from scratch. In this post, I want to share best practices on handling Access Secrets, and how these influenced our new design.
Each Service Has Its Own API Client
Every microservice, every front-end, every developer, and whoever else directly accesses your API should get its own API Client. This allows request correlation and the ability to revoke an API Client quickly when you find out it has been leaked. But most importantly, it is the basis for the principle of least privilege.
With Kubernetes’ popularity skyrocketing and the adoption of Apache Cassandra growing as a NoSQL database well-suited to matching the high availability and scalability needs of cloud-based applications, it should be no surprise that more developers are looking to run Cassandra databases on Kubernetes. However, many devs are finding that doing so is relatively simple to get going with, but considerably more challenging to execute at a high level.
On the positive side, Kubernetes helpfully offers StatefulSets — workload API objects that can be used to manage stateful applications. StatefulSets provide the requisite components to establish stable and unique network identifiers, stable persistent storage, smooth and ordering deployment and scaling (as well as deletion and termination), and automated rolling updates.
This week Microsoft announced a few updates to their Azure Blockchain Workbench, a platform for building blockchain applications. The release of v 1.6.0 brings with it new features including application versions, an egress messaging API, and streamlined smart contract development.
Instagram has updated the Content Publishing API, a subset of the Instagram Graph API endpoints, to allow members with business accounts to schedule the publication of video content. Until recently, only direct photo publishing was available through the API.
RigoBlock, blockchain-based asset management solution provider, has announced an API that allows developers to build on top of its decentralized asset management blockchain protocol. The protocol allows anyone to set up and run a decentralized pool of tokens. RigoBlock built its own platform on top of the protocol, and is now offering that option to outside developers.
A REST API is a service on the web that works on representational state transfer technology. It is basically a communication’s approach that has usually been employed in the development of web services.
An API based on REST uses HTTP to make requests for functioning with data. REST uses very little bandwidth and is, therefore, more preferable for internet usage. API is the aptest code through which two different software programs can communicate with each other.
Another OAuth hack, and another reason why using OAuth for authentication can be dangerous. Researches by SafetyDetective found that Microsoft had 400 million users exposed. Outlook, Store, and other services allowed wildcard *.office.com as a valid wreply URL for tokens from login.live.com. Attackers noticed that and managed to grab the success.office.com domain in Azure. Now, the attackers could construct login URLs that, whenever users clicked the URLs, provided the attackers valid tokens they could intercept and use to access Microsoft Outlook and Microsoft Store as those users.
In addition, yet another intranet/open ports hack, similar to the printer hack last month. This time, attackers are using the Shodan search engine to locate Chromecast devices exposed to the Internet by local routers. Once located, attackers can take over the Chromecast devices and stream the videos that they want onto users’ TVs. Again, the reason is that Chromecast APIs were designed with home Wi-Fi network in mind, so it is assumed that whoever gets access to the API must be the device owner. To protect yourself, if you have a Chromecast device at home, make sure you disable UPnP on your home router.
We talk a lot about how webhooks are the 101 of event-driven infrastructure. Webhooks are where API providers begin when it comes to developing an awareness of the most important events that are occurring across their platforms. It is how they begin putting event-driven infrastructure to work to help reduce polling on their API infrastructure. As part of our regular work to map out the event-driven landscape, we've organized a handful of the most common webhook building blocks we've come across.
This article describes how to build a face features detecting app using the face detection API (Firebase ML Kit) and Android Things. The idea of this article comes from the Google project called “Android Things expression flower." This project idea is detecting face characteristics (or face classification) using machine vision based on Firebase ML Kit. Moreover, this project displays the face characteristics using an LCD display and some emoticons.
Spotware, trading platform provider, recently announced the release of its cTrader Open API v2.0. cTrader Open API is Spotware's open option for creating apps for traders and broker's. Unlike the private API, cTrader Open allows anyone to build applications and products that can help traders. The API previously included two segments (Accounts API and Trading API) which have been consolidated into a single technology in v2.0.
If you’re looking to launch a small, static, and speedy website, micro-site, or landing page, you may be considering a static-site generator like Gatsby.
This article will walk you through the process of using Gatsby alongside dotCMS, a Java-based open-source headless CMS, to build a static website that uses API calls to pull content that’s created, stored, and managed in dotCMS, and presented by Gatsby.