Are you looking to add a text to speech feature in WordPress?
Text to speech feature allows you to add an audio version of your articles using artificial intelligence. This is particularly useful for long reads and helps users who prefer audio content while exercising or traveling.
In this article, we’ll show you how to easily add text to speech in WordPress.
What is Text to Speech in WordPress?
Text to speech is a technology that uses artificial intelligence to convert any text into natural-sounding speech. It is provided as a cloud-based service by several companies including Google Cloud and Amazon AWS.
Adding text to speech to your WordPress website allows users to listen to your articles while going through their daily activities like exercising, cooking, and traveling.
Text to speech can also help grow your audience by making content more accessible for the visually impaired and for people with reading difficulties.
This is where BeyondWords comes in. It is a popular AI-based audio publishing platform that allows you to easily add a text to speech feature to your website using a WordPress plugin.
It is a freemium service that comes with different pricing plans. There is also a free plan, which allows you to convert up to 30,000 characters into audio every month.
That being said, let’s see how you can add text to speech in WordPress using BeyondWords.
Upon activation, go to the Settings » BeyondWords page from the admin dashboard.
To fully integrate your account with WordPress, you’d need to give your BeyondWords API key and project ID.
For that, head over to your BeyondWords project dashboard and go to Settings » General from the sidebar.
Now, scroll down to the ‘Credentials’ section and simply copy the API key and project ID.
After that, you need to head over to the WordPress dashboard and then paste your credential details.
Now, scroll down to the ‘Content Settings’ section.
If you want to include excerpts in the audio version of your content, simply check the ‘Process excerpts’ option.
After that, scroll down to the ‘Generate Audio Settings’ section and check the boxes for ‘Posts’ and ‘Pages’ if you want to generate audio for both of them.
You can also uncheck either of the boxes if you don’t want to generate audio for posts or pages.
Don’t forget to click the ‘Save Changes’ button to store your settings.
Step 3. Adding Text to Speech in a Post
First, you need to edit the post or page where you want to display the text to speech audio player.
In the block editor, simply click the BeyondWords tab under the Post Settings panel.
Now, you need to check the ‘Generate Audio’ box and then click the ‘Update’ or ‘Publish’ button to save your changes.
You can now visit that post or page to view the text to speech audio player in action.
We hope this article helped you learn how to easily add text to speech to your WordPress site. You may also want to see our guide how to create an email newsletter to grow your traffic, and our expert pick of the best WordPress plugins.
If you liked this article, then please subscribe to our YouTube Channel for WordPress video tutorials. You can also find us on Twitter and Facebook.
This is the second half of a series on transforming content between text and speech on AWS. In part one, we used Amazon Polly to narrate blog posts and embedded the content in a website using an audio tag. In this article, we will use speech-to-text to draft transcripts of podcasts and interviews for publication. Finally, we will evaluate the overall accuracy of these format-transformation technologies by running a few samples through round-trip transcriptions.
Speech-To-Text Project
In 2012, Patrick McKenzie (a.k.a. patio11, of Kalzumeus and Stripe) and Ramit Sethi (of I Will Teach You To Be Rich) sat down and recorded two hour-long podcasts. As I am a fan of both of their work, I probably would have listened to the podcasts, but I definitely wouldn’t have listened to them several times each. The transcripts, on the other hand, I can reread and reference at my leisure. I also freely recommend the series when talking to people about freelancing, knowing that I am giving them a resource that takes a quarter the time to read that it takes to listen to. Even though the content of the podcasts and transcripts are exactly the same, the combination is 10× as useful as the podcast alone.
In the first transcript, McKenzie says that he paid 75 dollars and waited a couple of days to have the podcast transcribed by a professional service. His other option was to transcribe it himself. When I worked for my college’s newspaper, I frequently transcribed interviews. Over time, I got more practiced at the skill and improved from taking four minutes of transcribing per minute of audio to three minutes per minute. While I imagine that a professional with specialized equipment and a faster typing speed could drop below two minutes per minute, as an amateur transcriber McKenzie likely saved himself five or six hours of work by paying for the service.
Seven years later, it seems like he should have another option: an automated transcription with Amazon Web Services. As we’ll see, the transcription would require significantly more editing before it would be publication-ready, but automated transcription has two killer features compared to hiring a professional: he would have gotten the transcription back in real time for about a dollar. In this article, I’ll explain how you can use Speech-to-Text on AWS to easily make your content multi-format and ideas for using Amazon Transcribe in more complex applications.
Amazon provides a console to experiment with Transcribe. To access the console, log on to your AWS account and search “Transcribe” in the services search field. The console exposes the full power of Transcribe, and if you’re only planning on transcribing a few pieces of content per week then using the console is a solid long-term option. The transcription console gives you two options: streaming audio and uploading a file.
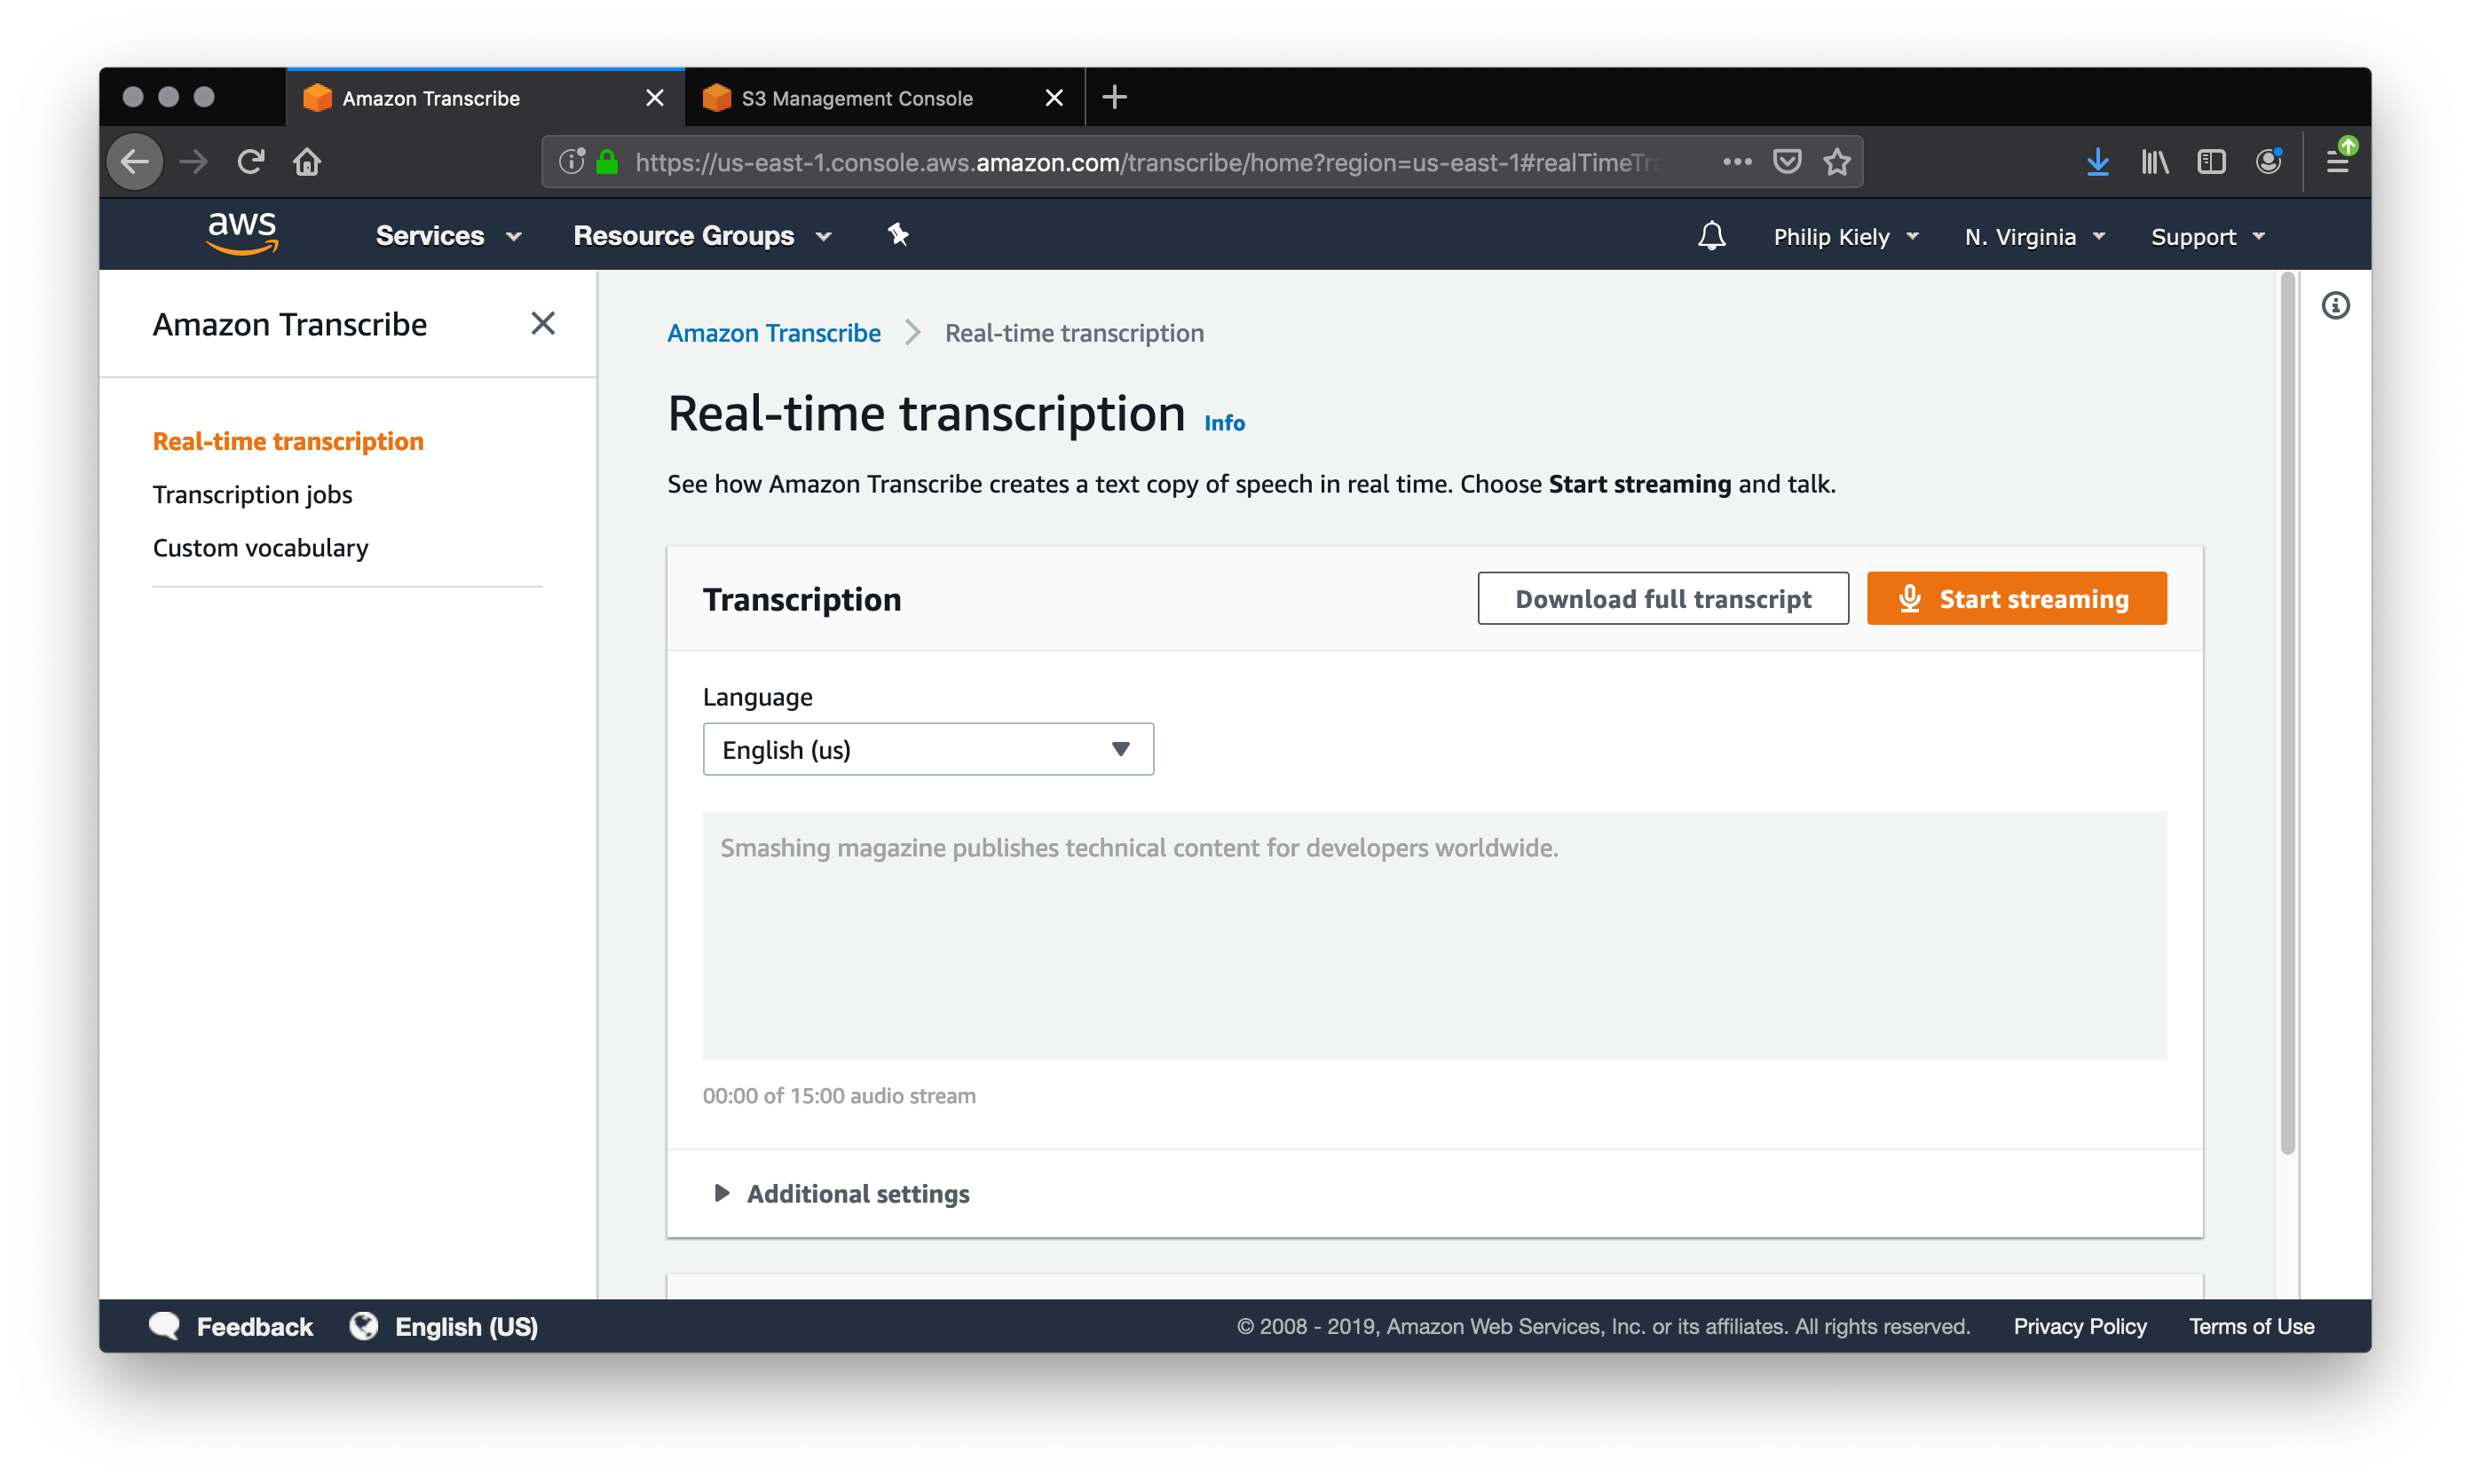
You can launch live transcriptions in the real-time transcription tab. (Large preview)
The “real-time transcription” tab offers the ability to speak into the microphone and have a transcription generated in real time. Speaking deliberately, and with my computer’s onboard microphone, I was able to transcribe the sentence “Smashing Magazine publishes technical content for developers worldwide” on the first try. However, when I tried to transcribe the previous paragraph at a more conversational speed and articulation, there were numerous errors.
“Amazon provides a consul to experiment with transcribe access. The console log onto a ws account and search transcribed in the services search field, The consul exposes the full power of transcribed. And if you only planning on transcribing a few pieces of content a week than using the consul is a solid long term option. The transcription Council gives you two options streaming audio and uploaded a file.”
In addition to simply missing some words, Transcribe has issues with homophones and punctuation. In the first sentence, it transcribed “console” as “consul.” This homophone error can only be corrected by evaluating each transcribed word in the context of the sentence and adjusting according to the algorithm’s best guess. The first sentence also runs into the second, which throws off the grammatical structure and meaning of the entire rest of the paragraph. Beyond contextual clues, Amazon Transcribe seems to use pauses to determine punctuation. That said, I am using a built-in microphone, transcribing in real time, and to be honest I don’t have the clearest speaking voice. Let’s see if we can find improvements by mitigating each of these factors.
I used a Blue Yeti, a midrange all-purpose recording microphone, to stream audio into the console. As you can see in the image below, improved audio quality did not significantly improve transcription quality. I hypothesize that while a poor quality audio input would further degrade the text’s accuracy, improvement past the threshold of a built-in microphone or cheap webcam does not provide the quality transcription that we are looking for.
Improving microphone quality does not materially improve transcription quality. (Large preview)
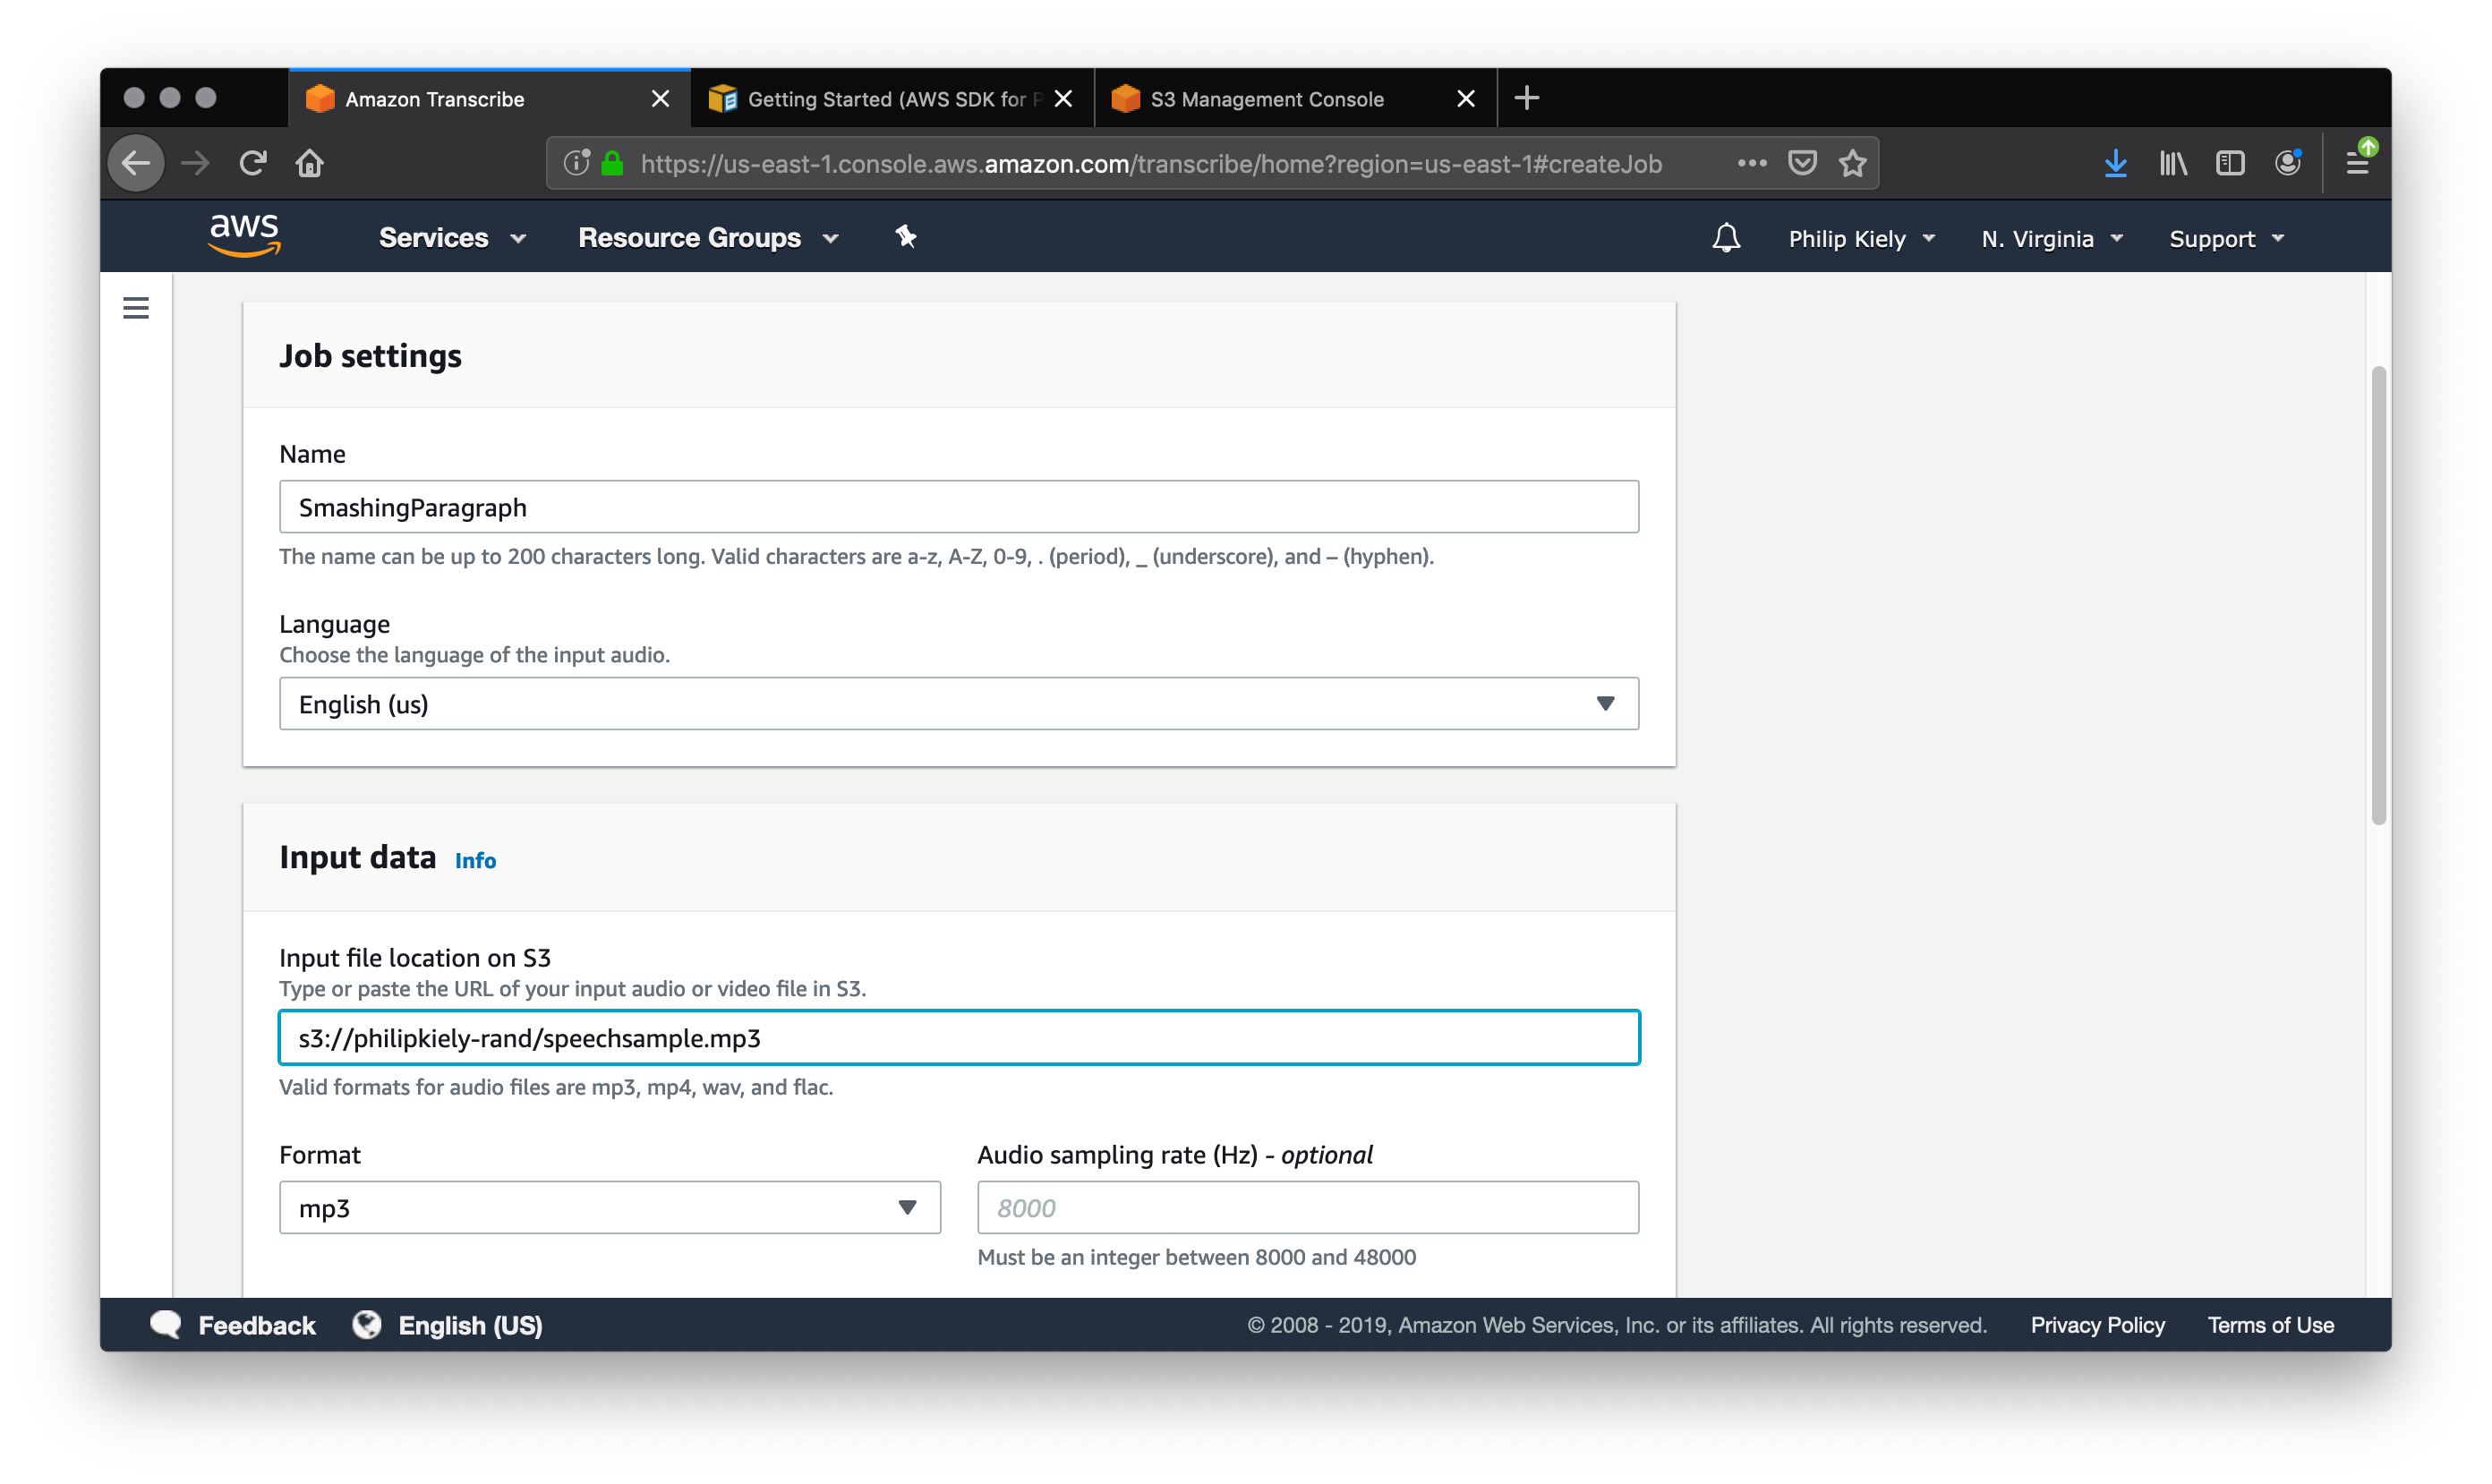
Using the same microphone, I recorded the same paragraph as an .mp3 file and uploaded it for transcription. To do the same, navigate to the “Transcription Jobs” panel and click the orange button with the text “Create Job.” This will bring you to a form where you can configure the transcription job.
A transcription job requires a title, language, input source, and file format. (Large preview)
The job name is arbitrary, just choose something that will be meaningful to you when you review the completed jobs. You can select from about a dozen languages, with English and Spanish available in regional variants. The transcription service draws its input from S3, so you’ll need to upload your audio file to the storage service before you can run the job. You can upload the file in one of four supported formats: .mp3, .mp4, .wav, and .flac.
A transcription job offers data location and audio identification options. (Large preview)
If you want to keep the output data in a permanent location, change “Data location” to “Customer specified” and enter the name of an S3 bucket that you can write to. Finally, you can choose between two identification options. Channel identification tags input with the channel that it came from in the audio file, while “Speaker identification” attempts to recognize distinct voices in the audio. If you are transcribing a multi-person podcast or interview, Speaker identification is a useful feature, but it is not applicable to this simple test.
Inspecting the output, unfortunately, reveals that the transcription is no more accurate than the real-time console transcription. However, running a transcription job does provide more data. In addition to the transcription text, the job outputs JSON with each word, its confidence score, and alternate words considered, if any. If you want to write your own natural language processing code to try to improve the readability of the output, this data will give you what you need to get started.
Finally, I had a friend who hosts a local radio show narrate the same paragraph for live transcription. Despite his steady pace and clear enunciation, the resulting text was no more accurate than any of my live transcription attempts. While a professional narrator may be able to achieve even more specific pronunciation, the technology is really only useful if it is widely usable.
Unfortunately, it seems that the transcription quality is too low to fully automate our proposed use case. Depending on your typing speed, running audio through Amazon Transcribe and then editing by hand may be faster than simple manual transcription, but it is not a turnkey solution for speech-to-text that compares to what exists for text-to-speech. For specific domains, you can define Custom Vocabularies to improve transcription accuracy, but out of the box, the service is insufficiently advanced.
As with most of its services, AWS offers an API for using Transcribe. Unless you have a large number of files to transcribe or you need to transcribe audio in response to events, I would recommend using the console and save yourself the time of setting up programmatic access.
To use Transcribe from the AWS CLI, you’ll need a JSON file and a terminal command.
At YOUR_FILE_PATH.json, you’ll need a .json file with four pieces of information. As above, you can set any meaningful string as the TranscriptionJobName and any supported language as the LanguageCode. The CLI supports the same four media file formats and still reads the media file from S3.
This kind of access is also available through a Python SDK. Amazon recommends Transcribe for voice analytics, search and compliance, advertising, and closed-captioning media. In each of these cases, the transcribed text is an input to another system like Amazon Comprehend rather than the final output. Thus, as a developer, it is important to design your system and limit its use cases to tolerate the range of errors that Transcribe will feed into your application.
Note: For more on using Amazon Transcribe and other services programmatically, check out Amazon’s getting started guide.
Round Trip Accuracy
While the live performance of Amazon Transcribe was somewhat disappointing, we can investigate the theoretical maximum accuracy of the system by transcribing something that was read by Amazon Polly. The two services should be using compatible pronunciation libraries and speech cadences, so text input into Amazon Polly should survive the round trip more or less intact. Of course, we will stick with the same test paragraph.
Lo and behold, this is the only strategy that has made the transcription noticeably better:
“Amazon provides a console to experiment with transcribe. To access the console, log onto your AWS account and search transcribing the service’s search field. The console exposes the full power of transcribe, and if you’re only planning on transcribing a few pieces of content per week than using the console is a solid long term option. The Transcription council gives you two options. Streaming audio and uploading a file.”
Stubborn errors persist (“council” versus “console” comes in at 70% confidence) but overall the text is a few edits away from useable. However, most of us don’t speak like synthesized robots, so this quality is unavailable to us at the time of writing.
Conclusion
While the quality of output speech and text are noticeably lesser than that of a person, these services cost so little that they are a strong alternative for many applications. Text-to-speech, at 4 dollars per million characters (16 dollars per million for the superior neural voices), can narrate articles in seconds for pennies. Speech-to-text, at .04 cents per second, can transcribe podcasts in minutes for about a dollar. Of course, prices may change over time, but historically as technologies like these improve, they tend to become less expensive and more effective.
Because of the low cost, you can experiment with these technologies for things like improving your personal productivity. When biking or driving to work, it is impossible to type notes or an outline a project, however, speaking and automatically transcribing a stream-of-consciousness narration would get a lot of planning done. Journalists frequently transcribe long interviews, a process which AWS can automate by tagging the voices of people speaking in a recording. On the other side of the writing process, having a steady, robotic voice read your work back to you can help you identify errors and awkward phrasing.
These technologies already have a number of use cases, but that will only expand over time as the technologies improve. While text-to-speech is reaching near-perfect accuracy in pronunciation, especially when assisted by pronunciation alphabets and tags, the synthesized voice still doesn’t sound fully natural. Speech-to-text systems are pretty good at transcribing clear speech but still struggle with punctuation, homophones, and even moderately quick speech. Once the technologies overcome these challenges, I anticipate that most applications will have a use for at least one of them.
Every day, the ProgrammableWeb team is busy, updating its three primary directories for APIs, clients (language-specific libraries or SDKs for consuming or providing APIs), and source code samples.
This two-part series presents three projects that teach you how to use AWS (Amazon Web Services) to transform text between its written and spoken states. The first project will use text to speech to turn a blog post or other written content into a spoken .mp3 file to give more options to blind and dyslexic users of your site.
In the next article, we will embark on the return journey, from speech to text, and consider the accuracy of these transcriptions by sending various samples through a round-trip translation. To follow these tutorials, you will need an AWS account with billing enabled, though the tutorials will stay well within the constraints of free-tier resources. Examples will focus on using the AWS console, but I will also demonstrate the AWS CLI (Command Line Interface), which requires basic command line knowledge.
Introduction And Motivation
Most of the internet is text-based. Text is lightweight (1 byte per letter), widely supported, easy to interpret, and has a precedent as old as the internet as the default medium of online communication. Sending written text predates the internet: telegraphs carried text over wires hundreds of years ago and physical mail has transmitted writing for centuries. Voice transmission over radio and telephone also predates the internet, but did not translate to the same foundational medium that text did online. This is in almost all cases a good thing, again, text is lightweight and easy to interpret compared to audio. However, transforming between voice and text can add powerful functionality to and improve the accessibility of a wide variety of applications.
It has always been possible to transform between audio and text, you can read a written speech or transcribe an oral sermon. Indeed, if we think back to the telegram, trained operators transcoded Morse Code messages to words. In each example, it has always been very labor intensive to move from speech to writing or back, even with specialized training and equipment. With a variety of cloud services, we can automate these processes to allow transitioning between mediums in seconds without any human effort, which expands the possible use cases.
The most obvious benefit of implementing appropriate text to speech and speech to text options is accessibility. A visually impaired or dyslexic user would benefit from a narrated version of an article, while a deaf person could become a member of your podcasting audience by reading a transcript of the show.
Text to Speech Project
Say you wanted to add narrated versions of every post to your blog. You could purchase a microphone and invest hours into recording and editing spoken renditions of each post. This would result in a superior listener experience, but if you want most of the benefit for only a couple of minutes and a few pennies per post, consider using AWS instead. If you are the sort of person who regularly updates and revises older or evergreen content, this method also helps you keep the spoken version up to date with minimal effort.
We will begin with text to speech using Amazon Polly. For simple exploration, AWS provides a graphical user interface through its online console. After logging in to your AWS account, use the “Services” menu to find “Amazon Polly” or go to https://us-east-1.console.aws.amazon.com/polly/home/SynthesizeSpeech.
Using the Polly Console
Amazon Polly provides a console to perform text-to-speech operations. (Large preview)
You can use the Amazon Polly console to read 3,000 characters (about 500 words) and get an audio stream or immediate download. If you need up to 100,000 characters (about 16,600 words) read, your only option is to have AWS store the result in S3 after it has finished processing, which can take a couple of minutes. At the time of writing, Amazon Polly does not support inputs of over 100,000 billable characters, if you want to convert a longer text like a book you will most likely have to do so in chunks and concatenate the audio files yourself.
A “billable character” is one that the service actually pronounces. Specifically, that means that SSML tags are not billable characters, which we will cover later. For your first year of using Amazon Polly, you get 5 million billable characters per month for free, which is more than enough to run the examples from this article and do your own experimentation. Beyond that, Amazon Polly costs four dollars per million billable characters at the time of writing, meaning that converting a standard-length novel would cost about two dollars.
The console also allows you to change the language, region, and voice of the reader. Though this article only covers English, at the time of writing AWS supports 21 languages and 29 distinct language-region pairs. While most regions only have one or two voices, popular ones like United States English have several options to chose between.
I often prefer to use the UK English voice “Brian.” To my American ears, the British accent covers some of the inflections in robotic speech and makes for a smoother listening experience. To be clear, Amazon Polly narrated text is very obviously read by a robot, but the resulting audio is quite listenable.
It is significantly better than the built-in reader that the MacOS say terminal command uses, and is comparable to the speech quality of voice assistants like Siri and Alexa.
Writing SSML
If you want full control over the resultant speech, you can take the time to tag your input with SSML. SSML (Speech Synthesis Markup Language) is a standardized language for representing verbal cues in text. Like HTML, XML, and other markup languages, it uses opening and closing tags. Amazon Polly supports SSML input, and tags do not count as “billable characters.” Alexa skills also use SSML for pre-programmed responses, so it is a worthwhile language to know.
The foundational tag, <speak>, wraps everything that you want read. Like HTML, use <p> to divide paragraphs, which results in a significant pause in the narration. Smaller pauses come from punctuation, and you always have the option to insert pauses of up to ten seconds with <break>.
SSML provides <say-as>, a very flexible tag that supports everything from pronouncing phone numbers to censoring expletives using the interpret-as argument. Consider the options from this tag with the following sample.
<speak>
Call 5551230987 by 11'00" PM to get tips on writing clean JavaScript.<break time="1s"/>
Call <say-as interpret-as="telephone">5551230987</say-as> by 11'00" PM to get tips on writing clean <say-as interpret-as="expletive">JavaScript</say-as>
</speak>
Further flexibility comes from the <prosody> tag, which provides you with control over the rate, pitch, and volume of speech. Unfortunately, at the time of writing Polly does not support the <voice> tag, which Alexa skills can use to speak in multiple standard voices, but does support the <lang> tag that allows voices in one language to correctly pronounce words from other languages. In this example, <lang> corrects the pronunciation of “tag” from American to German.
<speak>
    Guten tag, where is the airport?<break time="1s"/>
    <lang xml:lang="de-DE">Guten tag</lang>, where is the airport>
</speak>
Finally, if you want to customize pronunciation within a language, Amazon Polly supports the <phoneme> tag.
<speak>
    Philip Kiely<break time="1s"/>
    Philip <phoneme alphabet="x-sampa" ph="ˈkaI.li">Kiely</phoneme>
</speak>
This is not an exhaustive list of the customization options available with SSML. For a complete reference, visit the documentation.
Writing Lexicons
If you want to specify a consistent custom pronunciation or expand an abbreviation without tagging each instance with a phoneme tag, or you are using plain text instead of SSML, Amazon Polly supports lexicons of custom pronunciations. You can apply up to five lexicons of up to 4,000 characters each per language to a narration, though larger lexicons increase the processing time.
As with before, I want to make sure that Amazon Polly says my name correctly, but this time I want to do so without using SSML. I wrote the following lexicon:
The <?xml?> header and <lexicon> tag will stay mostly constant between lexicons, though the <lexicon> tag supports two important arguments. The first, alphabet, lets you choose between x-sampa and ipa, two standard pronunciation alphabets. I prefer x-sampa because it uses standard ASCII characters, so I am unlikely to encounter encoding issues. The xml:lang argument lets you specify language and region. A lexicon is only usable by a voice from that language and region.
The lexicon itself is a sequence of <lexeme> tags. Each one contains a <grapheme> tag, which contains the original text, and the <alias> tag, which describes what you want said instead. Aliases go beyond pronunciation, you can use them for expanding abbreviations (“Jr” becomes “Junior”) or replacing words (“Bruce Wayne” becomes “Batman”). A lexicon can have as many lexeme tags as it can fit in the 4,000 character limit.
The included lexicon will modify the pronunciation of the input text. (Large preview)
The screenshot shows the plain text that would be mispronounced and the applied lexicon. Use the “Customize Pronunciation” menu to select up to five uploaded lexicons, uploaded from the left navbar tab “Lexicons.” Listening to the speech verifies that my name is said correctly.
Now that we have full control over the resultant speech, let’s consider how to save the output for use in our application.
Saving and loading from S3
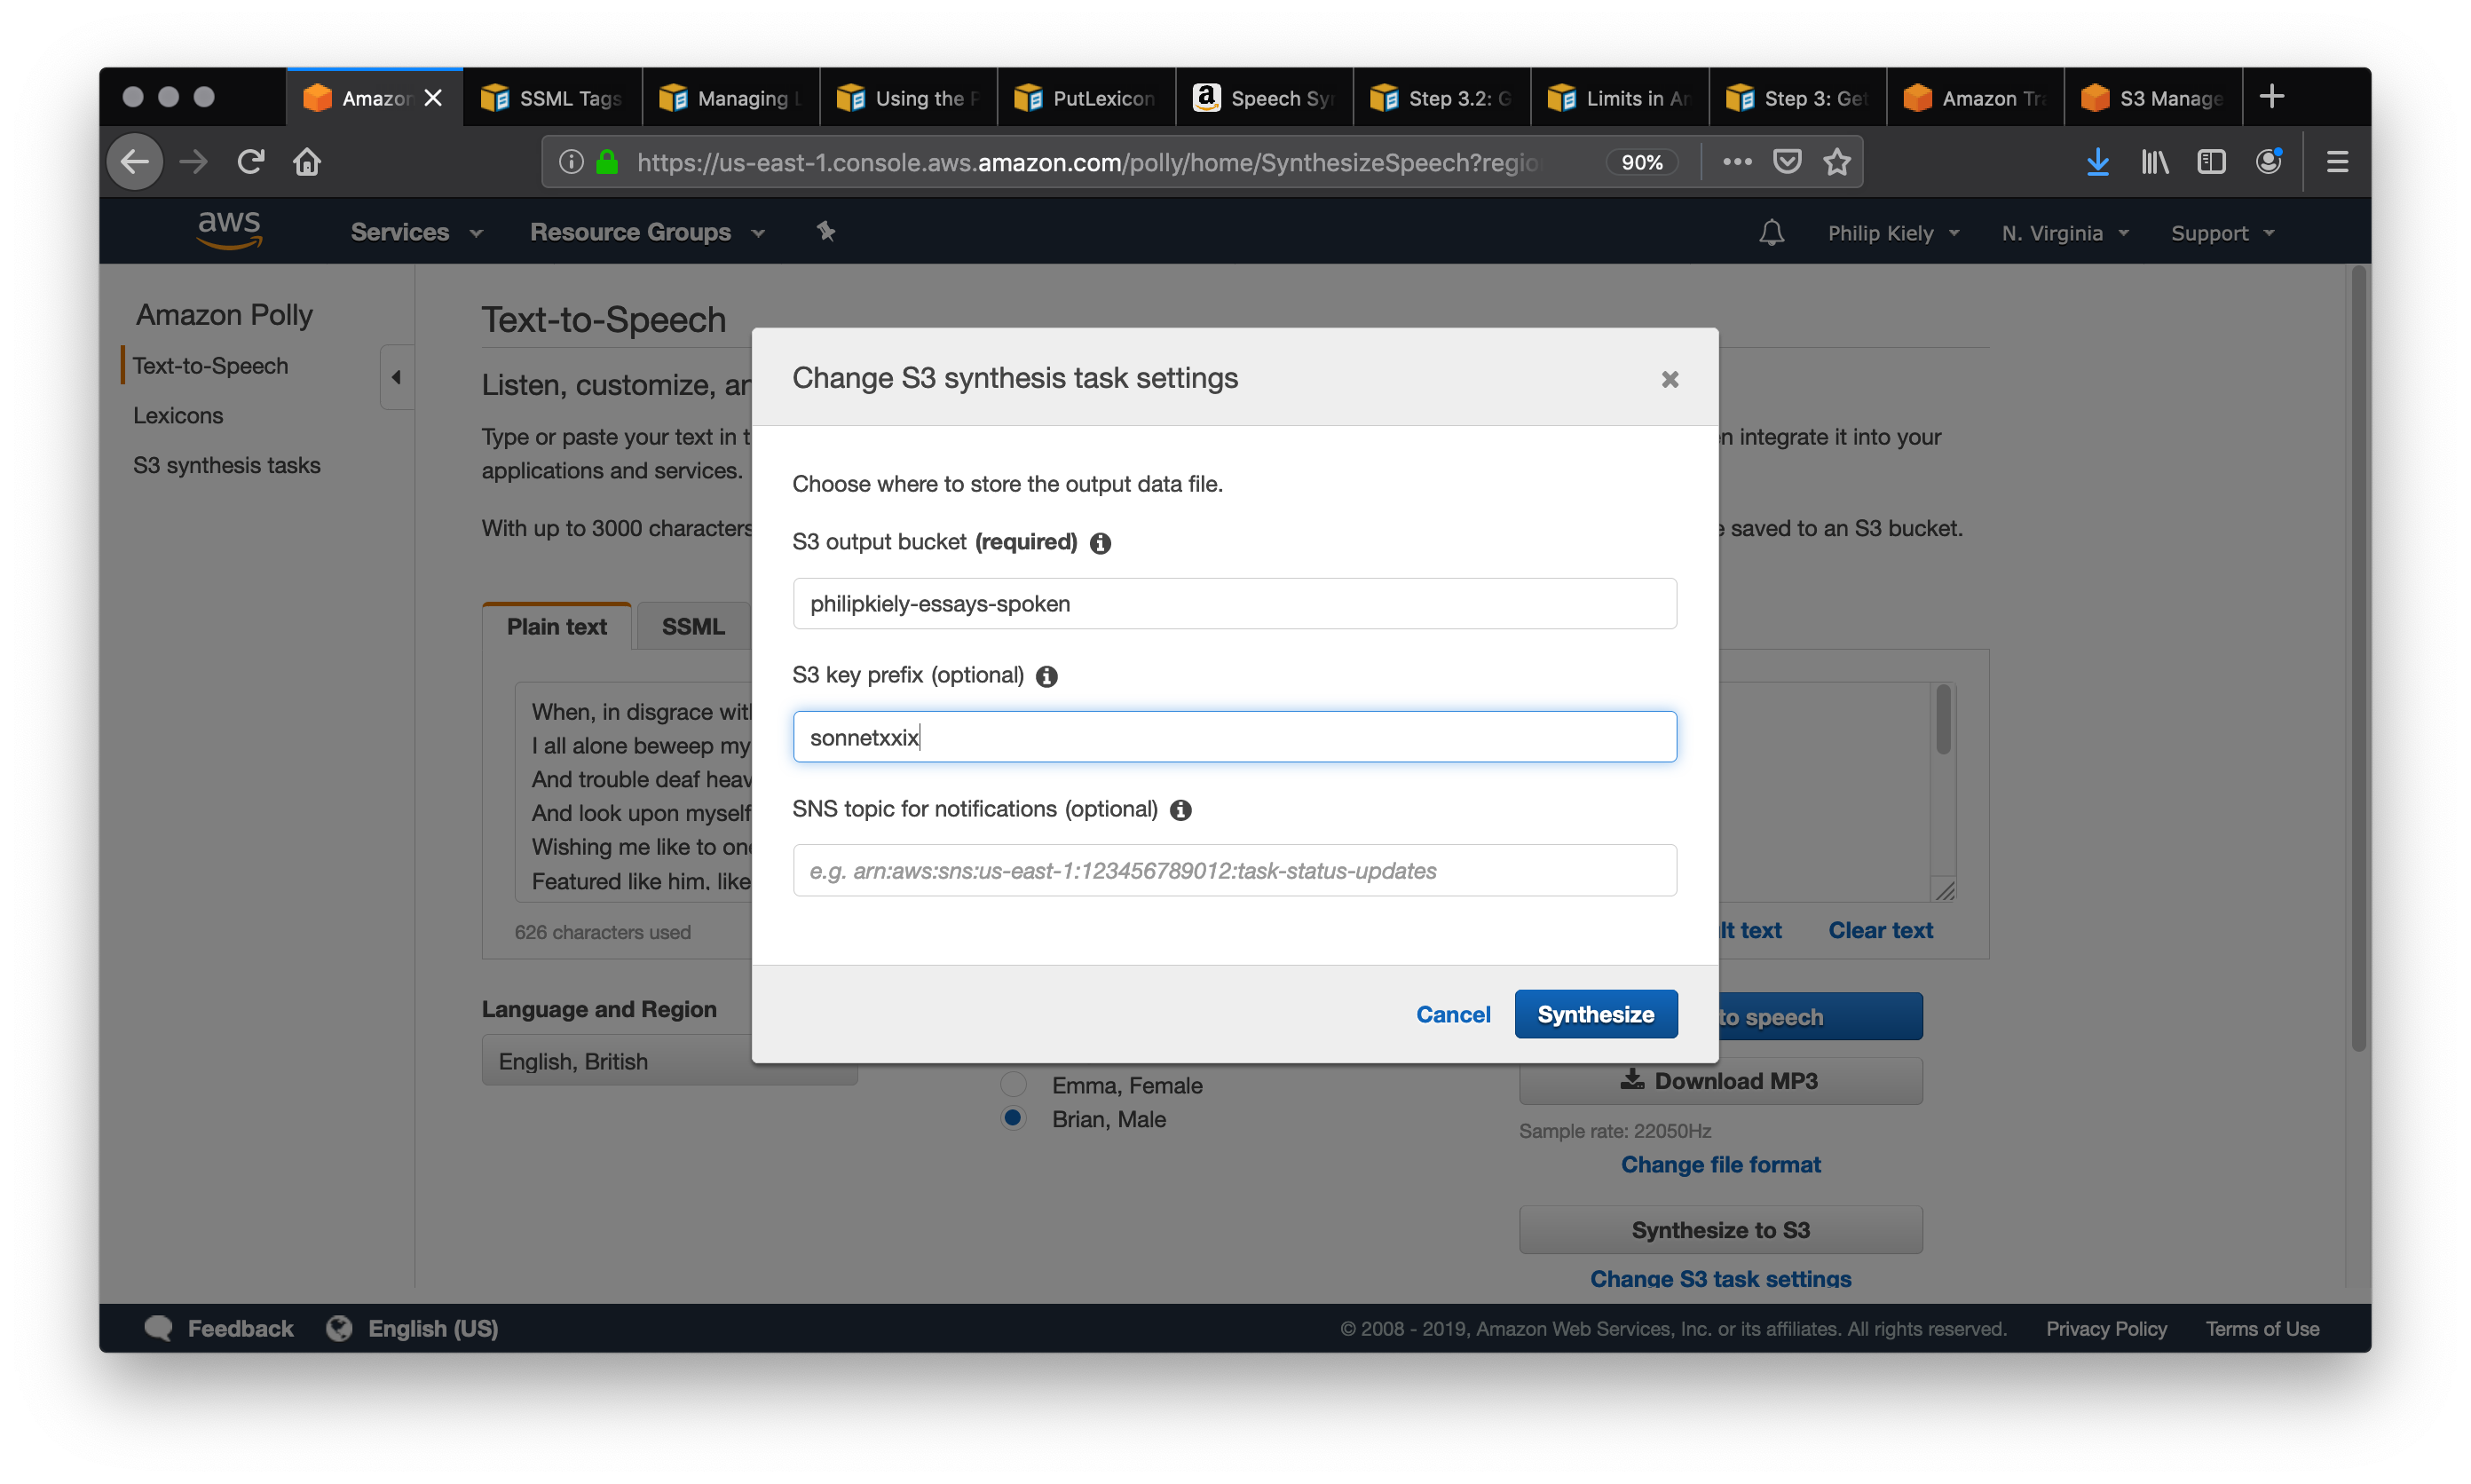
If you want to re-use spoken text in your application, you’ll want to choose the “Synthesize to S3” option in the Amazon Polly console. In this example, I am using the voice “Brian” to perform a surprisingly capable reading of Shakespeare’s sonnet XXIX. We begin by copying in the poem as plain text and selecting “Synthesize to S3,” which launches the following modal.
The 'Synthesize to S3' button gives you options for where to save the resultant file. (Large preview)
S3 buckets have globally unique names, and you can enter any S3 bucket that you own or have the appropriate permissions to. Make sure the bucket allows for making its contents public, as that will be required in a future step. You should also set a “S3 key prefix,” which is a string that will help you identify the output in the bucket. After clicking Synthesize and giving it a moment to process, we navigate to the S3 bucket that we synthesized the speech into.
A S3 bucket stores your project's files. (Large preview)
The arrow points to the entry in the bucket that we just created. Selecting that item will bring us to the following page.
For each file, you can make it public using this button. (Large preview)
Follow the arrow to select the “Make Public” option, which will make the file accessible to anyone with a link. Scroll down and copy the link and use it in your application. For example, you can download the poem here. For many applications, you may wish to pass the url to an html <audio> tag to allow for web playback.
We have covered every necessary component for transforming text to speech on AWS. Next, we turn our attention to a more advanced interface that can provide automation potential and save time.
Using the AWS CLI
Back to our hypothetical blog post. The simplest workflow would be to take the final written version of each article, copy it into the console, click the “Synthesize to S3 button,” and embed a download link to the resultant .mp3 file in the blog. Honestly, this is a pretty decent workflow; it is exactly what I do for my personal website. However, AWS offers another option: the AWS CLI.
Make sure that you have installed and configured the AWS CLI appropriately. Begin by entering aws polly help to make sure that Polly is available and to read a list of supported commands. For troubleshooting, see the documentation.
To perform a conversion from the command line, I first copied the poem from earlier into a .txt file. I then ran the following command in terminal (MacOS/Linux):
In a few seconds, the resulting .mp3 file was downloaded to my machine, ready for inclusion in my CMS or other application. Note the special characters around the --text argument, this passes the contents of the file rather than just the file name.
Finally, for more advanced applications, Amazon Polly has an SDK for 9 languages/platforms. The SDK would be overkill for these examples, but is exactly what you want for automating Amazon Polly calls, especially in response to user actions.
Conclusion
Text to speech can help you create more versatile, accessible content. Beginning in the Amazon Polly console, we can transform up to 100,000 billable characters in plain text or SSML, make the resulting .mp3 file public, and use that file in an application. We can use the AWS CLI for automation and more convenient access.
Stay tuned for the second installment of the series, we will convert media in the other direction, from speech to text, and consider the benefits and challenges of doing so. Part two will build on the technologies that we have used so far and introduce Amazon Transcribe.