How to Add Google Calendar Events From Your WordPress Contact Form

Do you want to send events from your WordPress contact form straight to Google Calendar?

Perhaps you use Google Calendar to take bookings, or maybe you have a contact form that lets clients book a call with you. You can automatically add those events to your Google Calendar.

In this article, we’ll show you how to easily add Google Calendar events from your WordPress contact form.rr

Adding Google Calendar events from a WordPress contact form

Why Add Google Calendar Events From a WordPress Form?

Normally, you can add a contact form to your WordPress website and get notifications via email or in your WordPress dashboard.

You can use a contact form for allowing customers to book appointments, request a callback, get a quote, and more. However, managing contact form leads manually is not very efficient, and you may lose customers because of that.

This is where Google Calendar can help. It works on any device, and you can get instant notifications / reminders for each calendar event.

Automatically sending your form entries to Google Calendar ensures that you don’t miss any bookings, appointments, orders, and calls.

That being said, let’s look at how to easily create a Google Calendar event from your WordPress form entries.

Connecting Your Contact Form and Google Calendar

For this tutorial, we’ll be using WPForms, which is the best form builder for WordPress. It comes with an intuitive drag and drop interface that lets you easily create any type of form.

We’ll then use Zapier to connect your contact form to Google Calendar. Zapier works as a bridge, connecting 2 different apps with no need for any code.

Let’s get started.

Creating Your Contact Form in WPForms

First, you need to install and activate the WPForms plugin. For more details, see our step by step guide on how to install a WordPress plugin.

Note: You need the Pro version or higher to use the Zapier addon for WPForms.

Upon activation, go to the WPForms » Settings page and enter your license key. You will find your license key in your account area on the WPForms website.
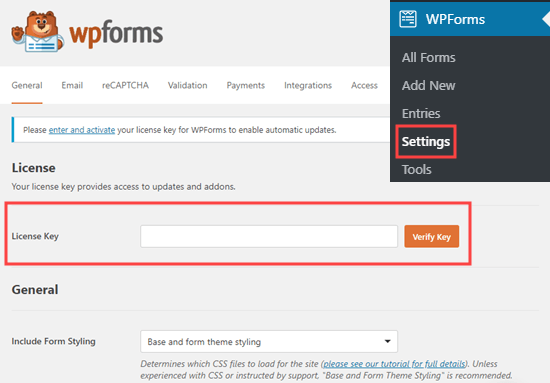
Entering your license key for WPForms

Now, it’s time to create your contact form. If you already have a contact form set up, simply edit it by going to the WPForms » All Forms page and clicking on its name.

Otherwise, visit the WPForms » Add New page in your WordPress admin to launch the WPForms builder and create a new form.

We’re going to use a simple contact form template with added date/time fields for the start and end time of the call. If you need help creating your form and adding fields, check out our step by step guide to creating a contact form.
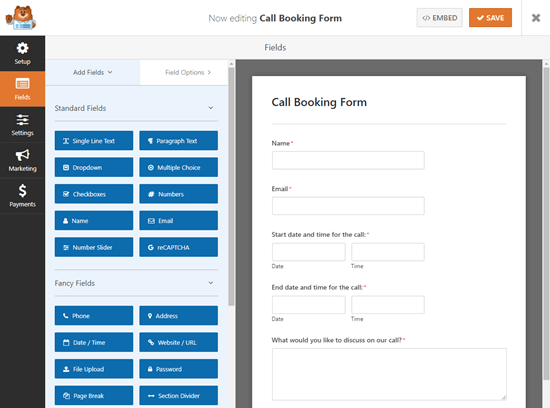
Creating a call booking form in WPForms

Tip: Want to use a specialized event form template instead? Simply install the Form Templates addon under WPForms » Addons for access to the Event Planner Form and dozens of other templates.

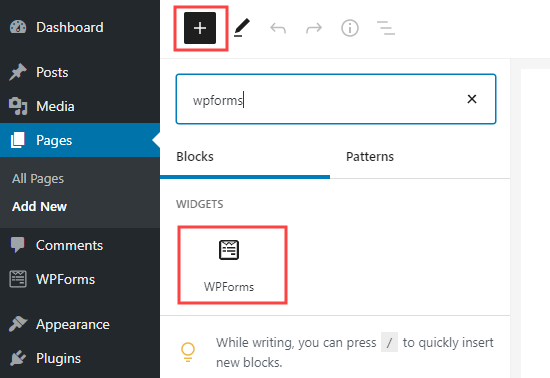
Once you’ve set up your form, you need to add it to your WordPress site. Simply edit the page (or post) where you want to include it, or add a new one by going to Pages » Add New.

First, you need to click the + icon to add a new block. Then, search for the WPForms block and add it to your content area:
For more detailed instructions, check out our step by step guide on creating a contact form.

Once you’ve added your form to your website, go ahead and publish or preview the page.

Make sure that you submit a test entry using your form. This test entry is necessary to set up and check the connection between WPForms and Google Calendar.

Here’s our test entry, with name, email, date, start and end time, plus a message:
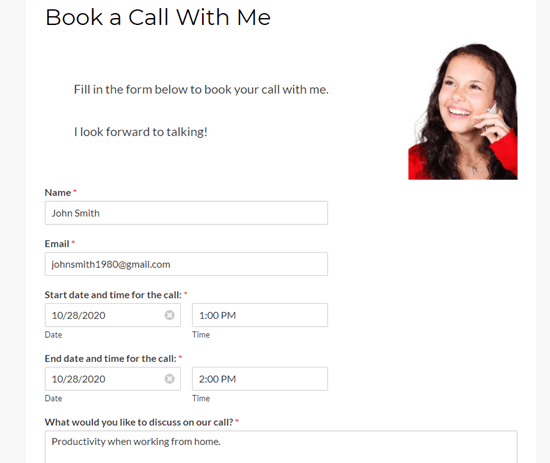
Creating a test entry for your contact form or booking form

Preparing to Connect WPForms and Zapier

We are going to use Zapier to link WPForms and Google Calendar. This means you need to install and activate the WPForms Zapier addon.

Simply go to the WPForms » Addons page in your WordPress admin. Search for the Zapier addon and then click the ‘Install Addon’ button to install and activate it.

Installing the Zapier addon for WPForms

Now, you need to visit the WPForms » Settings » Integrations page. From here, you simply need to click on the Zapier logo to get an API key.

You may want to copy your API key somewhere safe or keep your tab open. You’ll need this later to connect Zapier to your WPForms account.

Creating Your Zap to Send Data From Your Contact Form to Google Calendar

Now, it’s time to go to the Zapier website. If you don’t already have an account, then go ahead and create a free account here.

Once you are logged in to the Zapier dashboard, click on the ‘Make a Zap’ button. This is on the top left of the screen.

Click on the button to start making your Zap

Note: In Zapier, a ‘Zap’ is a process that has both a trigger and an action. In this case, our trigger will be someone filling in the contact form, and our action will be to create a new event in Google Calendar.

Now, you need to give your Zap a name at the top of the screen. After that, it’s time to set up the trigger.

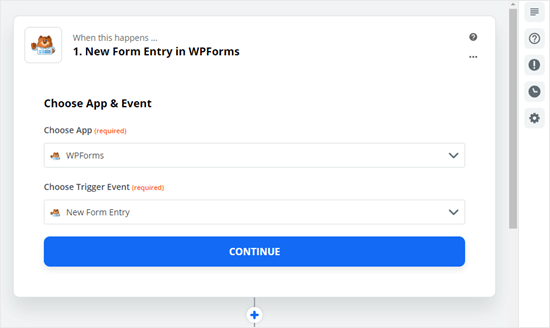
First, type ‘WPForms’ into the search bar for the ‘Choose App & Event’ box. Then, simply click on the WPForms icon that appears:
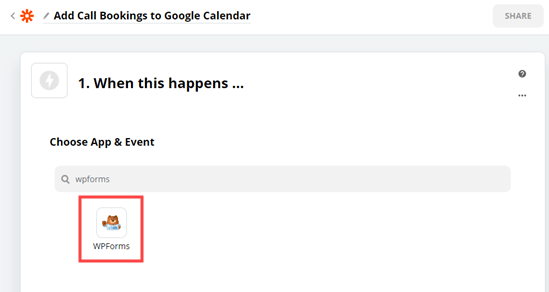
Select WPForms as your trigger app in Zapier

Zapier will automatically fill in the trigger event of ‘New Form Entry’ so you just need to click the Continue button.
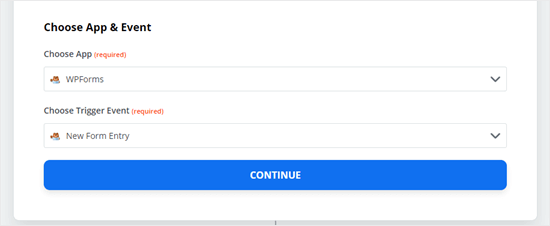
Choosing a trigger event in Zapier

Next, Zapier will prompt you to sign in to your WPForms account. Just click the ‘Sign in to WPForms’ button to do so:

Click the button to sign in to WPForms

You should now see a popup window, where you need to enter your API key. This is the API key that you found earlier on the WPForms » Settings » Integrations page in your WordPress admin.

You also need to add the URL (domain name) of your website.
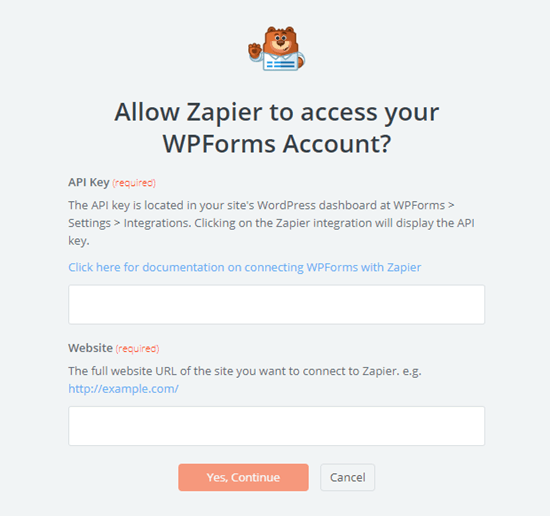
Enter your API key from WPForms and the URL of your website

After doing that, simply click the ‘Yes, Continue’ button to move to the next step.

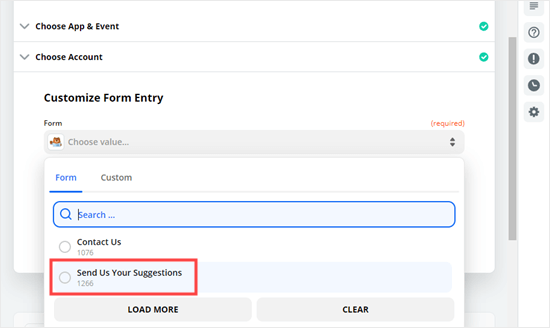
Zapier will now ask you to select your contact form from the dropdown list. If you have several different forms on your site, then make sure you select the right one:
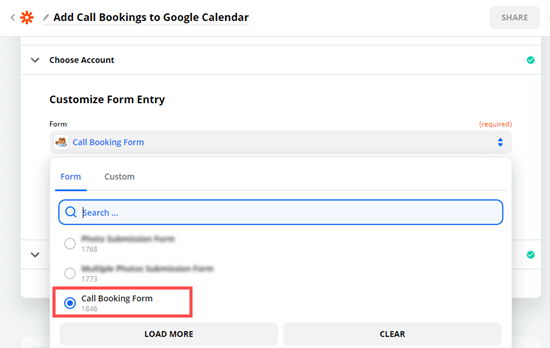
Selecting the correct contact form in Zapier

Next, go ahead and click the test trigger button:
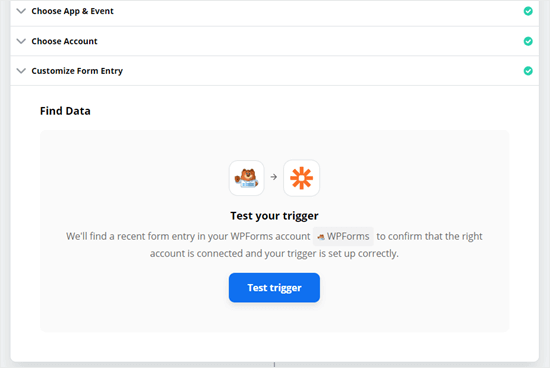
Testing your trigger in Zapier

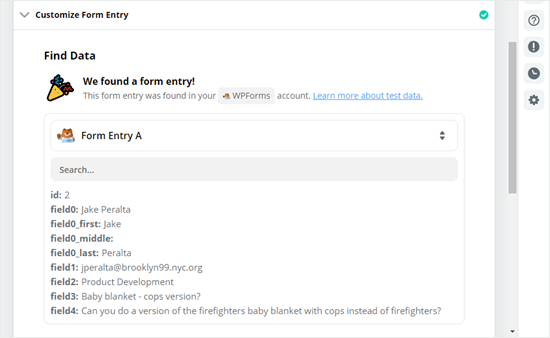
Zapier would now find the test entry you created earlier and show the data on screen:
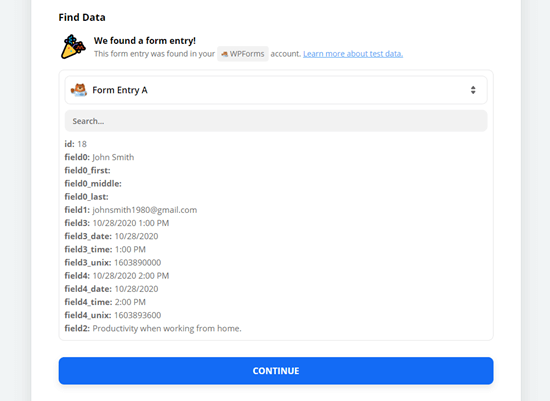
The data from the test contact form entry that Zapier has found

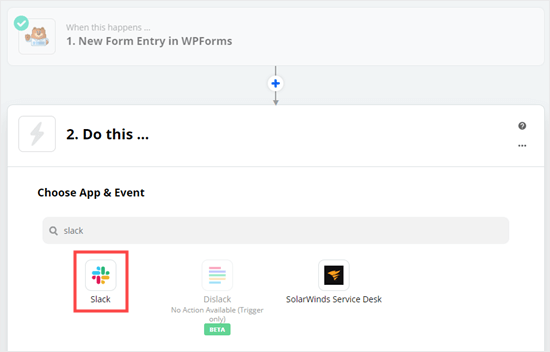
Click the ‘Continue’ button and you’ll move on to the Action part of the Zap. This is where you need to choose your second app, Google Calendar.
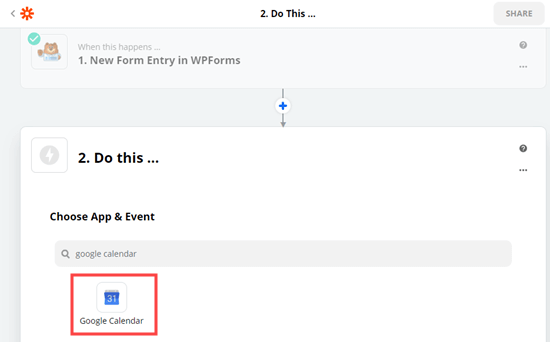
Selecting Google Calendar as your action app

Next, click on the ‘Choose Action Event’ dropdown and select the ‘Create Detailed Event’ option:
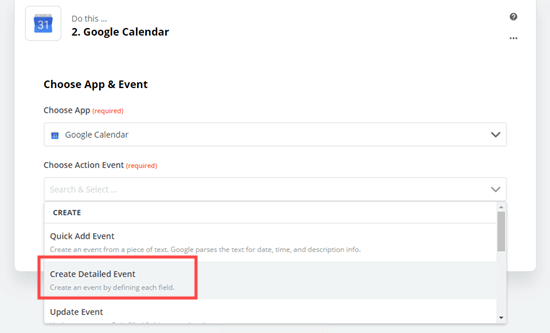
Select 'Create detailed event' as the action event for Google Calendar

Zapier will now prompt you to sign in to your Google Calendar account:
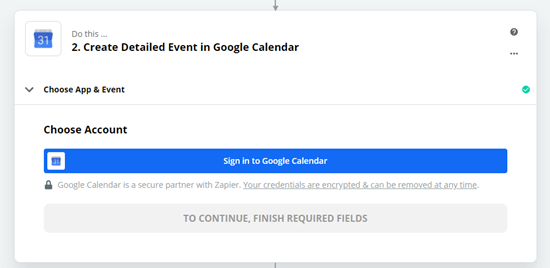
Sign in to your Google Calendar account when prompted by Zapier

You need to give Zapier permission to access your Google Calendar, or it will not be able to create events:
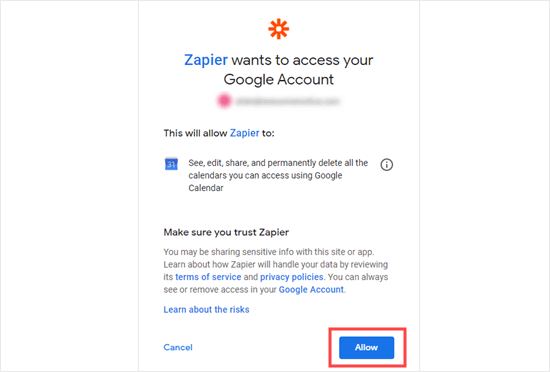
Give Zapier permission to access your Google Calendar

Once you’ve signed into Google Calendar, click the Continue button to carry on.

Next, you will see the Customize Detailed Event section. Here, you need to select the correct calendar from the first dropdown:
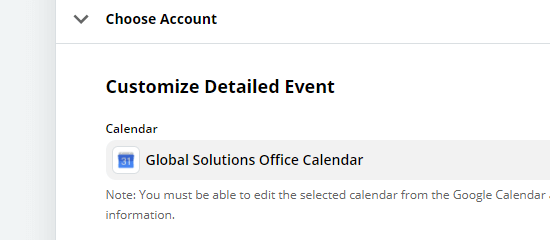
Choose which calendar you want to use with the Zap

Once you’ve done that, type in an event summary for the event. We’re going to use Client Call for ours. You could also choose a form field here, if you have an appropriate field on your form for this.
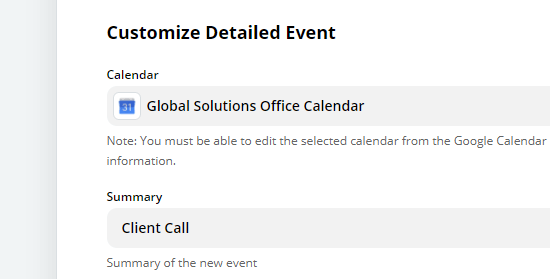
Type in an summary for your Google Calendar event, e.g. "Client Call"

For the event description, we’re going to use the message from the form. Just click on the description box, then click on the field from your form that you want to use. Your test data will be shown alongside the field name:
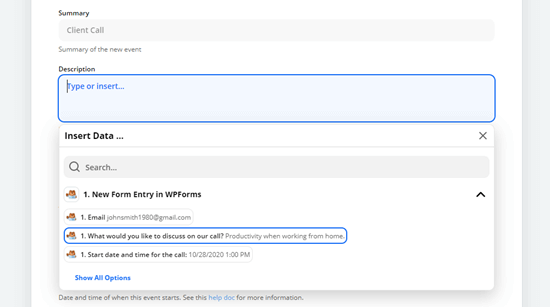
Select the form field that you want to use for the Google Calendar event's description

You can include other fields in here, such as the person’s name and/or email address.

You also need to make sure you add the Start Date & Time and the End Date & Time. Again, click on the box and select the appropriate field from your form:
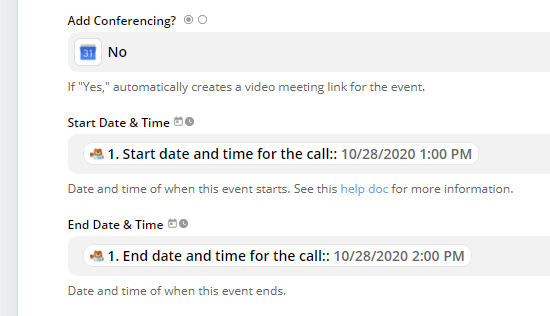
Select the correct fields from your form for the start and end times of the event

You may also want to include the email address of the person who booked the call or event. This means they’ll be sent an invite, so they can easily add the event to their own calendar:
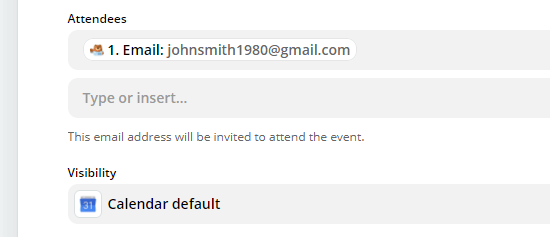
Enter the field for the attendee's email address, if you want to send them a Google Calendar invite

You can change other settings here, as well. Once you’re happy with your settings, click the Continue button.

Now, Zapier gives you the opportunity to test out your Zap. First, you will see the details of what’s going to be sent to Google Calendar:
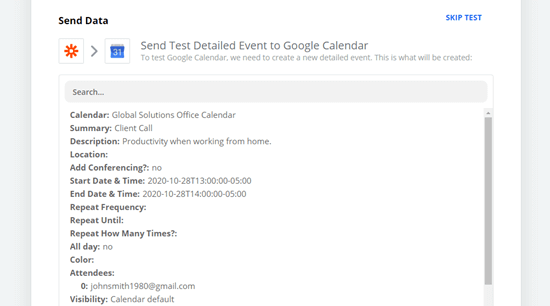
The details of the test event that will be sent to Google Calendar

Below this, simply click the ‘Test & Continue’ button to test out your Zap:

Click the 'Test and Continue' button to send the test entry's details to Google Calendar

Next, go ahead and view your Google Calendar to check that the test event has been successfully added:
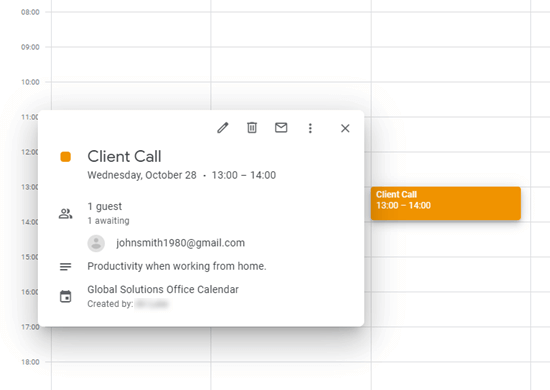
Viewing the details of the event that's been added to Google Calendar

Now, it’s time to switch on your Zap by clicking the blue button:

Turn on your Zap once you're ready

Tip: If your event has been added at the wrong time of day, check the timezone settings in your Zapier profile. If these are incorrect, set them to the correct timezone and test your Zap again.

That’s it. Your contact form entries will now be automatically sent to your Google Calendar.

We hope this article helped you learn how to add Google Calendar events from your WordPress contact form. You may also want to see our comparison of the best business phone services, and our step by step guide on how to get a free business email address.

If you liked this article, then please subscribe to our YouTube Channel for WordPress video tutorials. You can also find us on Twitter and Facebook.

The post How to Add Google Calendar Events From Your WordPress Contact Form appeared first on WPBeginner.

How to Get SMS Text Messages From Your WordPress Forms

Do you want to get SMS text messages from your WordPress forms?

Receiving text messages on your phone makes it easy to stay on top of new form submissions, leads, product orders, registrations, and more. This can improve your response rate and increase customer satisfaction.

In this article, we will show you how to easily get SMS text messages from your WordPress forms, step by step.

Get SMS text messages from your WordPress forms

Why Get SMS Text Messages From Your WordPress Forms?

Getting SMS text messages from your WordPress forms lets you receive instant alerts on your phone. This can be very useful for small business websites with smaller teams.

For instance, if you run a restaurant website, then you may want to get an instant alert for food order forms.

Similarly, if you have an appointment or booking form on your website, then an instant text message can notify you of a new booking.

This can help improve customer satisfaction by helping you respond to your customers as quickly as possible.

Having said that, let’s see how to easily get SMS messages from your WordPress forms.

How to Get SMS Text Messages From Your WordPress Forms

You can easily get text messages from your WordPress forms by connecting WPForms with Twilio.

WPForms is the best contact form plugin on the market, used by over 6 million websites. Similarly, Twilio is a leading text messaging service for sending SMS texts.

Since our goal is always to show no-code solutions for beginners, we will be using Zapier to act as a bridge between the two apps. This will let you set up everything without having any coding knowledge.

Ready? Let’s get started.

Setting Up Your WordPress Form Using WPForms

First, you need to install and activate the WPForms plugin. For more details, see our step-by-step guide on how to install a WordPress plugin.

Note: WPForms has a free version. However, you will need at least the Pro plan of the plugin to unlock the Zapier addon.

Upon activation, visit the WPForms » Settings page from the WordPress admin sidebar to enter the plugin license key.

You will find this information in your account area on the WPForms website.

Entering the WPForms license key

Once you have done that, it’s time to create your first form. To do this, head over to the WPForms » Add New page from the WordPress dashboard.

This will take you to the ‘Select a Template’ page, where you can start by typing a name for the form that you are creating.

After that, you can select any of the premade templates offered by WPForms by clicking the ‘Use Template’ button.

For this tutorial, we will be creating a simple contact form.

Choose the contact form template

The template of your choice will now be launched in the WPForms form builder, where you will notice a form preview on the right with its settings in the left column.

From here, you can drag and drop any form field from the left column into the form.

For detailed instructions, you can see our tutorial on how to create a contact form in WordPress.

Configure form entry

Once you are satisfied, just click the ‘Save’ button at the top to store your settings.

Now, to add your WordPress form to your website, open a page/post from the WordPress dashboard. Then, you need to click the add block ‘+’ button in the top left corner of the screen to open the block menu.

Find and add the WPForms block to the page, and then choose the form that you created from the dropdown menu in the block itself.

Add the WPForms block

Finally, click the ‘Publish’ or ‘Update’ button at the top to save your changes.

Once you have done that, you will need to submit a test entry in order to set up Zapier. Here’s our test entry in our custom form:

Add a form entry

Preparing to Connect WPForms and Zapier

We are now going to use Zapier to connect WPForms and Twilio. To do this, you will first need to install and activate the WPForms Zapier addon.

For this, visit the WPForms » Addons page from the WordPress dashboard and find the Zapier addon.

Once you have done that, click the ‘Install Addon’ button.

Add Zapier addon

The Zapier addon will now be installed and activated for you.

Now, you need to visit the WPForms » Settings page from the admin sidebar and switch to the ‘Integrations’ tab.

Here, just click on the Zapier logo to see your Zapier API key.

You will need this key in a later step to connect Zapier to WPForms. Go ahead and copy it somewhere safe, or just leave the tab open.

Copy the Zapier API key

Preparing to Connect Twilio and Zapier

Now, it’s time for you to create a Twilio account. Twilio is a leading SMS service, and they offer a limited free account that you can use.

First, you need to visit the Twilio website and click the ‘Start for free’ button.

Sign up for your Twilio account

You will now be directed to a new screen where you have to create a free Twilio account by providing login details.

Once you have set up an account, you will be sent a verification email that you will need to click on to activate your account.

View Twilio email to verify your account

Once you have verified your account and filled in some additional details, your Twilio dashboard will open up on the screen.

From here, you will have to choose a phone number that will send you text messages every time someone fills out a form on your WordPress website.

To do this, click the ‘Get phone number’ button on the dashboard.

Click the Get Phone Number button

Then, the phone number will be automatically displayed instead of the button by Twilio.

Next, you have to scroll down to the ‘Account Info’ section, where you will see your Twilio Account SID and Auth Token. You will need these when you set up Zapier. You could copy them to a safe place or leave your tab open.

Copy Twilio account information

Creating a Zap to Send an SMS When Your Form is Submitted

Zapier is an automation tool that can be used to connect different apps and services so that they can automate repetitive tasks.

In this tutorial, we will be connecting WPForms and Twilio using Zapier.

To do this, you need to sign in on the Zapier website. If you don’t have an account, then simply create a free one.

Once you have set up an account, click the ‘+ Create Zap’ button in your dashboard.

Click Create Zap button

Note: Zapier uses the word ‘Zap’ for a process that includes a trigger and an action. Our trigger will be someone submitting the form. Our action will be sending an SMS message.

You will now be taken to a new screen where you can start by typing a name for your Zap.

Then, you need to click on the ‘Trigger’ tab to set up WPForms as the trigger.

Click the Trigger option

This will open a prompt on the screen where you have to type ‘WPForms’ into the search bar.

Now, once the WPForms icon comes on the screen, simply click on it.

Choose the WPForms as the trigger integration

Upon choosing WPForms as the trigger integration, you must select the event that will actually trigger the action.

To do this, select the ‘New Form Entry’ option from the ‘Event’ dropdown menu in the right column. After that, click the ‘Continue’ button.

Choose form entry as the trigger event

Zapier will now prompt you to connect to WPForms.

Go ahead and click the ‘Sign in’ button to continue.

Click Sign in button next to the WPForms option

This will launch a new window on your screen where you have to provide your WPForms API key and your website URL (domain name).

Once you have done that, just click the ‘Yes, Continue to WPForms’ button.

Add the WPForms API key

Now that you have connected your WPForms account with Zapier, you must choose a WordPress form from the ‘Form’ dropdown menu in the right column.

After that, click the ‘Continue’ button. Now, every time someone fills out this WordPress form, you will receive an SMS alert.

Choose a trigger form froom the dropdown menu

Next, Zapier will ask you to test your trigger. This will use the test data that you submitted through your form.

Go ahead and click the ‘Test trigger’ button.

Click the Test Trigger button

You will now see the data from the demo form entry that you submitted earlier on your website.

From here, click the ‘Continue with selected record’ button to move forward.

Click Continue with selected record button

This will open the ‘Change Action’ prompt on the screen, where you need to type Twilio into the search bar.

Upon finding this tool, simply click on the Twilio icon.

Choose Twilio as action integration

Next, select the action that Twilio will take every time a WordPress form is submitted.

From here, select the ‘Send SMS’ option from the ‘Event’ dropdown menu in the right column and click the ‘Continue’ button.

Select the Send SMS option as the action event

In the next step, you will have to connect your Twilio account with Zapier.

To do this, click the ‘Sign in’ button next to the ‘Connect Twilio’ option.

Click the Sign in button next to the Twilio

This will open a new window on the screen where you have to provide your Twilio account SID and Auth token that you copied earlier.

On providing the details, click the ‘Yes, Continue to Twilio’ button to move ahead.

Add Twilio Account SID and Auth token

You now need to customize your SMS message settings from the right column.

First, click on the ‘From Number’ dropdown menu, where you should see the free phone number from your Twilio account. Simply select this.

After that, type your own phone number into the ‘To Number’ field. This will be the number where you will receive SMS notifications.

For the message, you can type in any text you like. You can also select from your WPForms input fields.

For example, you can add the Name, Email address, or Comment fields to the message. This means that the SMS message you get will show these details from the form submission.

After that, click the ‘Continue’ button at the bottom to move ahead.

Customize SMS message

Zapier will now show you the data that will be sent through your Zap.

From here, click the ‘Test step’ button to test the Zap that you have created.

Click the Test Step button

You should now see a message on the screen saying that the SMS was successfully sent.

You should also check your mobile phone to see if you received the SMS message.

SMS message

Once you are happy, simply click the ‘Publish’ button and then toggle the switch at the top to ‘Active’.

Your Zap has now been activated, and you will now get SMS text messages from your WordPress forms.

Publish your Zap

Bonus Tip: Send SMS Messages to Users to Increase Engagement

SMS is a powerful marketing tool that can help you communicate with your customers and increase sales. Apart from receiving form submission messages, you can also send SMS to users to increase engagement on your WordPress site.

For example, if you have an online store, then you can send SMS notifications to your customers for order confirmations, cart abandonment, and more.

You can even offer them coupon codes or alert your customers that their favorite products are back in stock.

This can help open a two-way channel of communication with users. It can even increase conversions because SMS messages have open rates of over 98% and click-through rates of over 36%. This is significantly higher than other marketing channels, including email marketing.

For more detailed instructions, please see our tutorial on how to send SMS messages to WordPress users.

We hope this article helped you learn how to get SMS text messages from your WordPress forms. You may also want to see our comparison of the best business phone services and our guide on how to create a free business email address.

If you liked this article, then please subscribe to our YouTube Channel for WordPress video tutorials. You can also find us on Twitter and Facebook.

The post How to Get SMS Text Messages From Your WordPress Forms first appeared on WPBeginner.

How to Get Slack Notifications From Your WordPress Site

Do you want to get Slack notifications based on certain activity on your WordPress site?

Slack has become a central communication platform for many online businesses. Having activity notifications like new sales, new leads, new blog posts, etc. inside Slack can be helpful in streamlining your business workflows.

In this article, we’re going to show you how to easily get Slack notifications from your WordPress site.

Getting Slack notifications from your WordPress site

Why Get Slack Notifications From Your WordPress Site?

Getting Slack notifications for key events on your WordPress site lets you keep everyone informed and even respond to certain things quickly.

For instance, you might want to get a Slack notification when your site’s contact form is completed. Or you may want a notification if a product in your online store is low on stock.

We’re going to take you through several different ways to set up Slack notifications from your WordPress site.

You can simply use the navigation links to jump straight to the section you want.

Get a Slack Notification When a New Post is Published

If you run many WordPress blogs like we do, then you may want to keep your team informed on all the new article updates that are going live.

Alternatively, you may want to keep your team briefed on all the new things happening in your industry (competitor updates, thought leaders, etc).

This is where Slack notifications can help. You can simply create a new channel that gets RSS feed updates from your favorite sites.

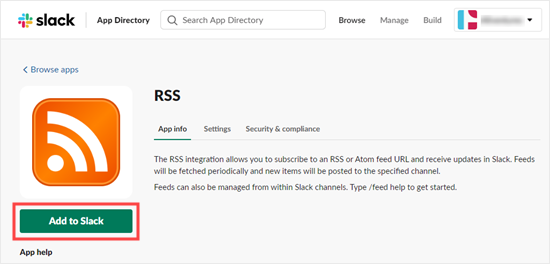
First, go to the RSS app page in Slack’s App Directory then click the ‘Add to Slack’ button.

Adding the RSS app to your Slack workspace

Next, click the ‘Add RSS integration’ button.

Click the button to continue setting up the RSS integration

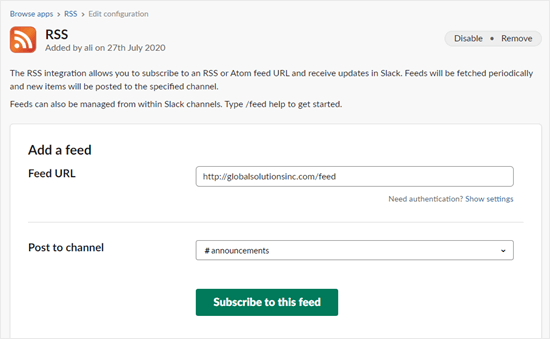
Now, you need to enter the URL of the feed you want to add and choose which Slack channel you want to post notifications to. Once you’ve entered these details, click the ‘Subscribe to this feed’ button.

Adding your RSS feed's URL to the Slack RSS app

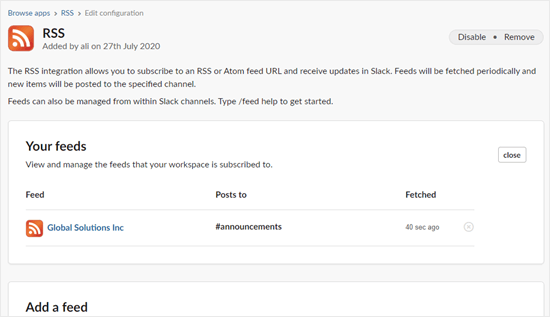
The app will then fetch and display your RSS feed title on screen.
The RSS feed has now been added to your list of feeds

If you run multiple WordPress sites, then you can add more feeds as needed.

Tip: You don’t have to own the RSS feed. You could use the RSS app to keep an eye on your competitors’ sites or stay on top of news from other blogs in your industry.

You will now automatically get a notification in your chosen Slack channel when a new post is published. The app checks for new items every few minutes, which means these notifications may not appear instantly.

A new blog post notification shown in Slack

Setting Up the Slack Notifications WordPress Plugin

If you want Slack to notify you about new posts, comments, WooCommerce orders, and other activity on your site, then you need to use the Slack Notifications plugin.

First, you need to do install and activate the Slack Notifications plugin. For more details, see our step by step guide on how to install a WordPress plugin.

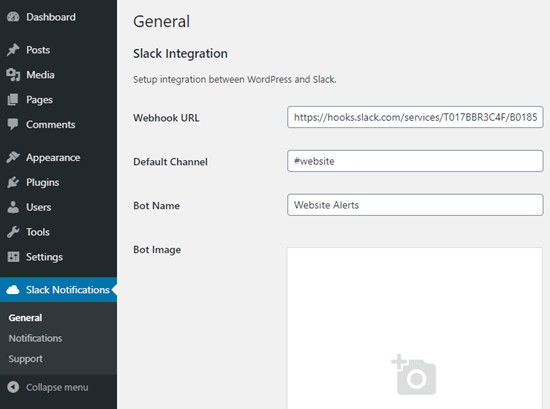
Upon activation, click the Slack Notifications link at the bottom of your WordPress admin sidebar. You will see the Slack Integration page.

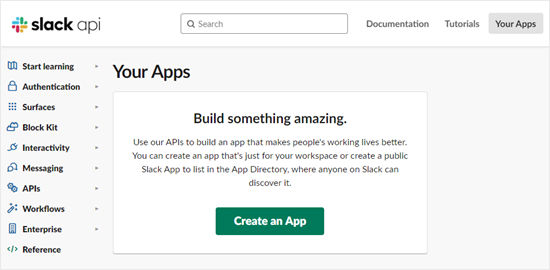
Setting up the Slack Notification plugin's integration with Slackapps page on Slack and click the ‘Create an App’ button:

Creating a new app in Slack

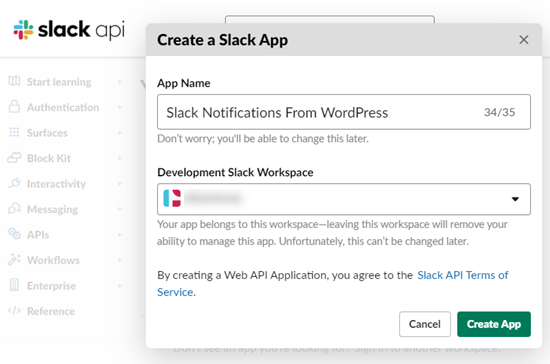
Next, enter a name for your app and choose your workspace from the drop-down list. Then, go ahead and click the ‘Create App’ button:

Name your app and select a workspace

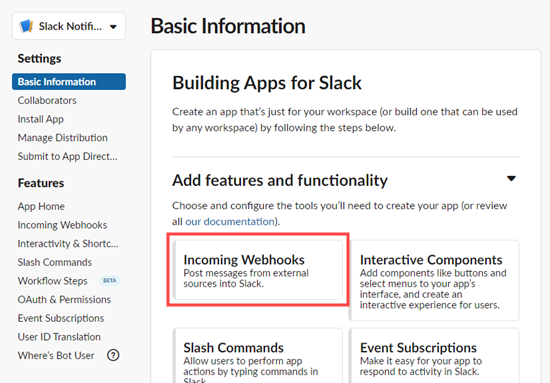
You’ll now see a page titled Basic Information. Here, you need to click on the ‘Incoming Webhooks’ section.

Click on the 'Incoming Webhooks' feature

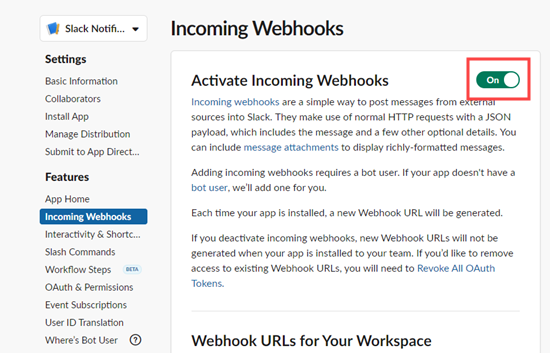
On the next screen, switch the ‘Activate Incoming Webhooks’ slider to the ‘On’ position:

Switch the toggle on to activate incoming webhooks

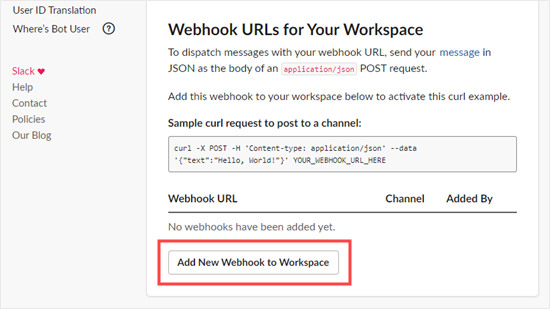
After that, you need to scroll down the page and click on the ‘Add New Webhook to Workspace’ button:

Click the button to add a new webhook to your workspace

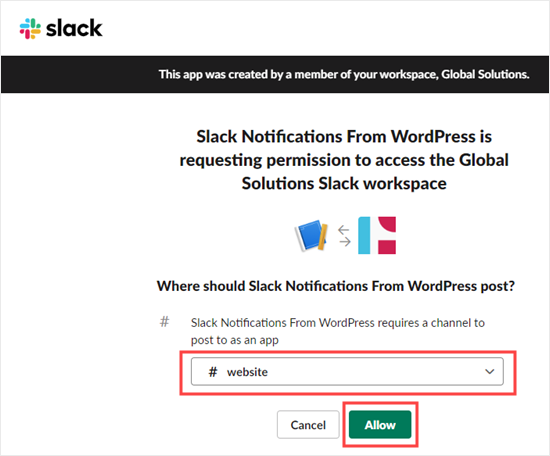
Slack will now prompt you to select the channel from a drop-down list. You need to click the ‘Allow’ button to give the app permission to post to it:

Select a channel and give your webhook permission to post to it

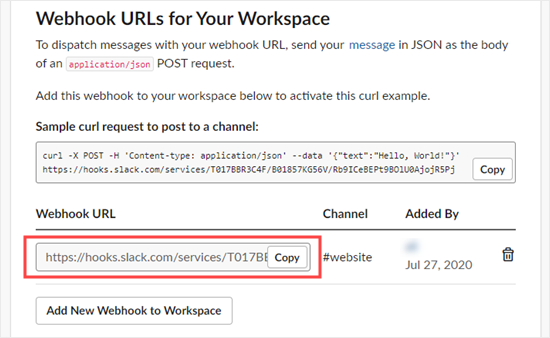
You will now see the previous page again, with your webhook in place. Simply copy this or leave the tab open, as we will need it in a moment.

Getting the URL for your webhook

Now you need to switch back to your WordPress site’s Slack Notifications settings page. On this page, go ahead and copy / paste the webhook URL you created earlier, enter the default channel, and the bot name that you want to use.

Setting up the Slack Notification plugin's integration with Slack

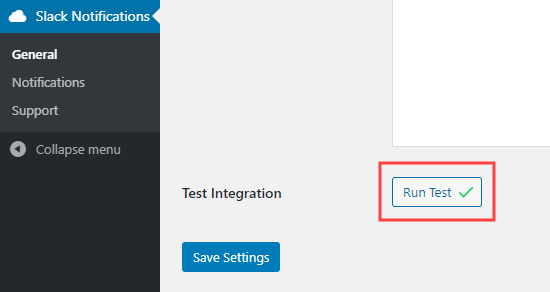
After that, you need to scroll down the page and click on the ‘Run Test’ button at the bottom.

Run a test of the Slack Notifications plugin to make sure the integration is working

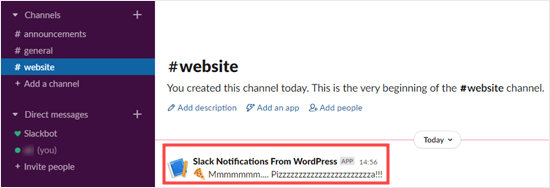
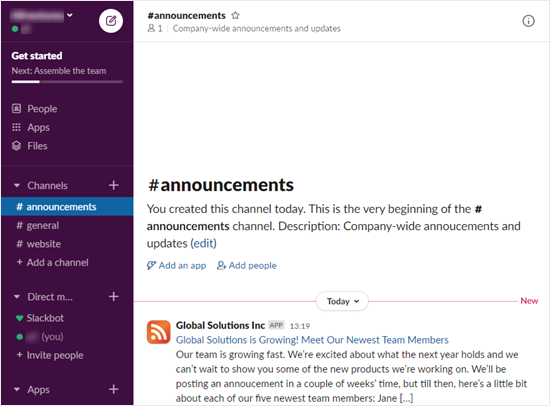
You should get a notification into your Slack channel like this. The app will have the name you gave it when setting it up in Slack.

The test message, successfully received in Slack

Don’t forget to click the ‘Save Settings’ button at the bottom of the page, too.

The Slack Notifications plugin is correctly connected. The next step is to set up notifications from your WordPress site.

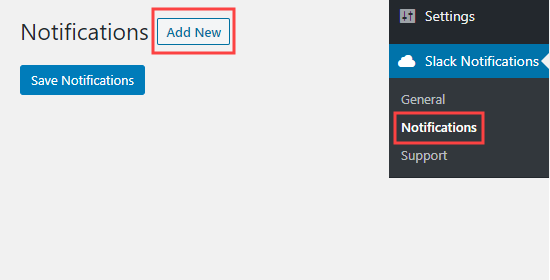
To set up any notification, you need to go to Slack Notifications » Notifications in your WordPress admin. Click the ‘Add New’ button at the top of the screen:

Adding a new notification using the Slack Notifications WordPress plugin

We will go through several different useful options that you may want to use.

Get a WooCommerce Sales Notification in Slack

Are you running an online store with WooCommerce? Typically you can setup new sale notifications via email, but did you know that you can setup WooCommerce sales notification in Slack too?

With the Slack Notifications plugin, you can get a message to your chosen channel whenever a new WooCommerce order comes in.

First, make sure you’ve followed the instructions above to set up Slack Notifications correctly.

Then, simply set up WooCommerce notifications by going to Slack Notifications » Notifications and clicking on the ‘Add New’.

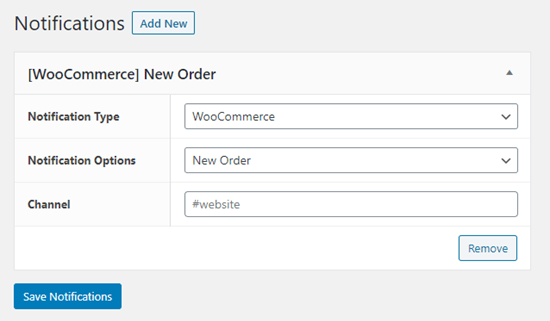
You’ll see several drop-downs. Go ahead and set ‘Notification Type’ to ‘WooCommerce’ and leave ‘Notification Options’ set to ‘New Order’. After that, click the ‘Save Notifications’ button.

Setting up a new WooCommerce order notification for Slack

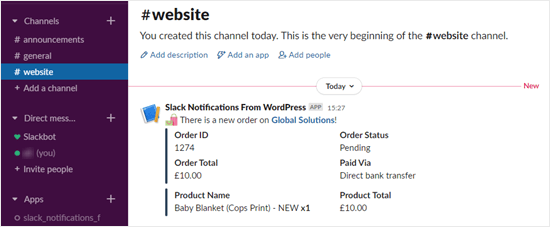
You should now get a notification in Slack whenever a new order comes in. This will include the order ID, status, total, and payment method. It will also include the item(s) purchased.

Note: The notification will not include any personal details such as the customer’s name or address.

The Slack notification for a new order in WooCommerce

Get a Slack Notification for Plugin Updates

Outdated plugins can be a serious risk to the security of your WordPress site. As a business owner, sometimes you might get busy and forget to update plugins, especially if you run multiple websites.

The Slack Notifications plugin lets you get a notification whenever a plugin needs updating.

First, you need to install, activate, and set up the plugin, as shown above. Then, go to Slack Notifications » Notifications in your WordPress admin and click the ‘Add New’ button.

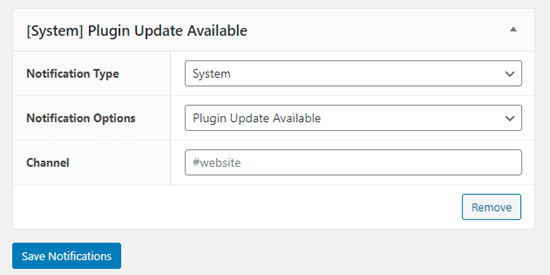
For the ‘Notification Type’ select ‘System’ and for the ‘Notification Options’ select ‘Plugin Update Available’. After that click, Save Notifications button.

Setting up a Slack notification for when a plugin update is available

You’ll receive a notification in Slack whenever a plugin needs updating:

A plugin update notification in Slack

Note: You can also set up an alert for theme updates and core WordPress updates in the same way.

Get New Comment Notifications in Slack

The Slack Notification plugin also lets you easily get notified of new comments on your WordPress site.

Simply install, activate, and set up the plugin, as shown above. Then, go to Slack Notifications » Notifications in your WordPress admin and click the ‘Add New’ button.

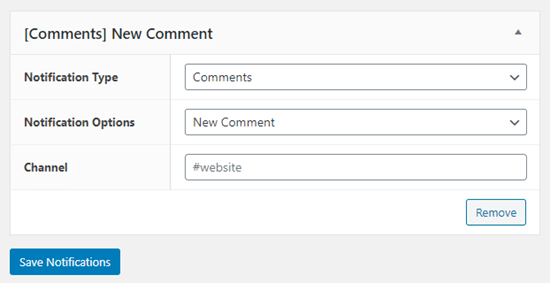
Next, you need to set the Notification Type to ‘Comments’. The Notification Options drop-down should default to ‘New Comment’. After that, simply click the ‘Save Notifications’ button at the bottom.

Setting up new comment notifications into Slack from WordPress

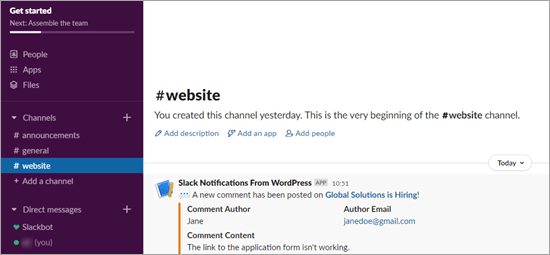
You’ll now receive a notification in Slack for each new comment on your site. This will include a link to the post being commented on, the commenter’s name and email address, and the text of their comment:

The new comment notification in Slack

There are lots of other ways you could use the Slack Notification plugin to stay aware of what’s happening on your WordPress site.

For instance, you could get a notification every time a page is updated, every time a new post is scheduled, and so much more.

Get a Slack Notification When a WordPress Contact Form / Lead Form is Submitted

Often business owners want to immediately respond to new sales / lead form inquiries. You can connect just about every WordPress contact form to Slack using a tool called Zapier.

Zapier is like a bridge that lets you connect two apps, such as WPForms and Slack. It works with over 2,000 different apps. For the sake of this example, we’ll use WPForms which is the #1 rated WordPress form plugin.

First, you’ll need to install and activate the WPForms plugin. For more details, see our step by step guide on how to install a WordPress plugin.

Note: you’ll need at least the Pro version of WPForms to use the Zapier addon.

Upon activation, go to the WPForms » Settings page to enter your license key. You will find the license key in your account section on the WPForms website.

Entering your license key for WPForms

Next, go to the WPForms » Addon page. Find the Zapier addon, then go ahead and install and activate it.

Installing the Zapier addon for WPForms

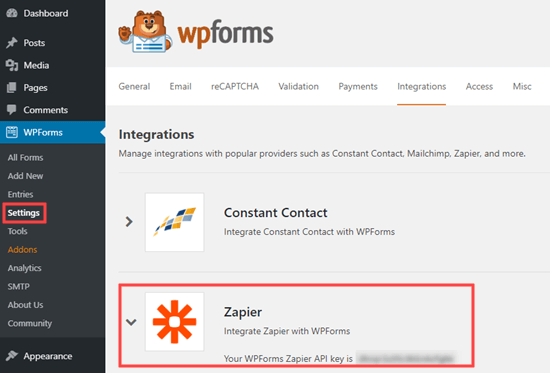
Once you’ve installed that addon, go to the WPForms » Settings » Integrations page. Simply click on the Zapier logo here, and you’ll see your Zapier API key.

Get your API key from WPForms to use with Zapier

You need this to connect Zapier and WPForms, so copy it somewhere safe or keep this tab open in your browser.

You then need to set up a form and submit a test entry. We’re going to use the ‘Suggestion Form’ template as the basis of our form.

You can follow our instructions on creating a form in WPForms for help getting your form set up.

You will also need an account with both Zapier and Slack. In your Slack workspace, you need to add the Zapier app.

Then, you can create your Zap. Login to Zapier and click the ‘Make a Zap’ button on the top-left to start the configuration wizard.

Click on the button to start making your Zap

In Zapier, a ‘zap’ is a process with a trigger and an action. Our trigger will be someone completing the form, and our action will be to send a Slack message.

At the top of the screen, go ahead and give your zap a name. After that, we need to set up the trigger.

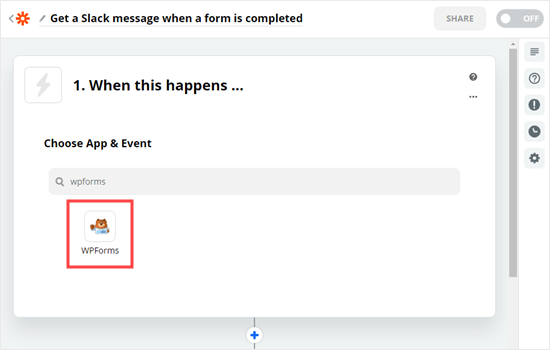
In the ‘Choose App & Event’ box, simply type ‘WPForms’ into the search bar and click on the WPForms icon that appears.

Choose the WPForms app to start off your Zap

Zapier should automatically fill in the trigger event ‘New Form Entry’, so you just need to click the ‘Continue’ button.

Triggering the zap when the form is submitted

You’ll then be asked to log in to your WPForms account. Simply click on the ‘Sign in to WPForms’ button:

Click the button to sign into WPForms

Next, you’ll see a popup window. Here, you need to copy the API key from WPForms that you found earlier. You also need to enter the URL (domain name) of your website. Once you’ve entered these, click the ‘Yes, Continue’ button.

Enter your API key from WPForms and the URL of your website

On the next step, Zapier will ask you to choose your form from a drop-down list. Just click on the form that you want to use, then click the ‘Continue’ button.

Select the form that you want to receive Zap notifications from

You will now be prompted to test your trigger. Click the ‘Test trigger’ button so that Zapier can look for your test entry.

Test your trigger to make sure Zapier has found your test WPForms entry

Once Zapier has found your test data, go ahead and click the ‘Continue’ button.

For the ‘Do this’ action part of the Zap, you need to choose Slack as your app. Simply type ‘Slack’ into the search bar and then click on the Slack app:

Select Slack as the app for the "Do This" part of the zap

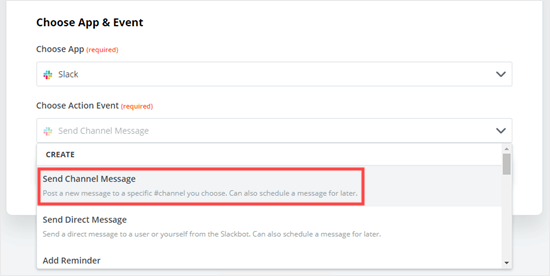
Next, you need to choose your Action Event. We’re going to choose ‘Send Channel Message’ here.

Select "Send Channel Message" from the drop-down list to get the notification to a channel in Slack

Tip: There are several other actions you could choose instead. For instance, you could trigger a direct message or a reminder.

Now, click the ‘Continue’ button. You will then be prompted to sign in to Slack. Simply follow the on-screen prompts to sign in and give Zapier permission to access your Slack workspace.

Once you’ve connected your Slack account, click the Continue button again to move on.

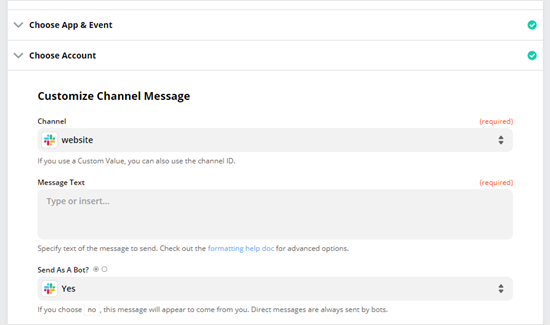
You’ll then be prompted to pick a channel from the drop-down list. We’ve chosen ‘website’ for ours.

Choose the Slack channel that you want to receive form notifications to

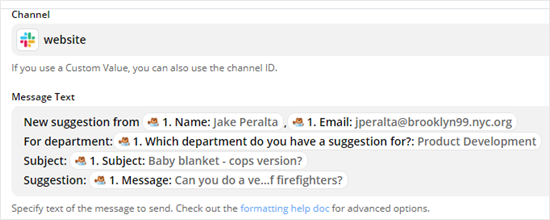
Next, you’ll need to enter the text for the notification.

You can include the details of the form submission, as we’ve done here. When you click on the box, you’ll see your form fields in a drop-down below. Go ahead and add whichever fields you want to the message.

Tip: The name of the fields will not be included in the Slack notification. We have added some text before each field to help make the message clear.

Setting up the message for your Slack notification

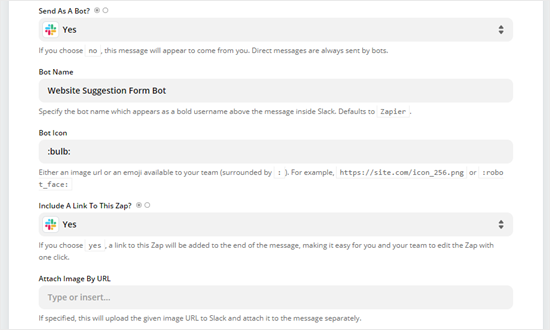
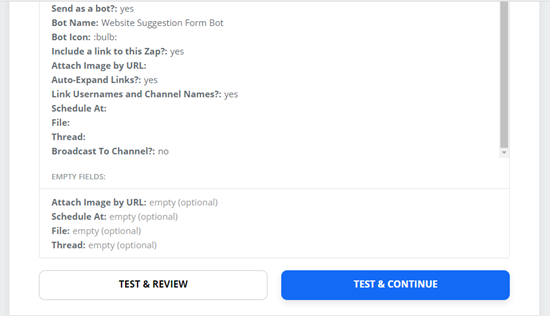
Now, you need to give your bot a name. You may also want to choose an emoji. You can leave the other options as their defaults.

The different options you can choose from in Zapier for your Slack notification

Once you are ready, click the ‘Continue’ button to move on.

It’s time to try out your app. Go ahead and click the ‘Test & Review’ button.

Reviewing the details of your zap and testing it out

Zapier will send your test data to Slack. Go ahead and check Slack to see if your message came through as expected. If there is anything you want to change, you can go back and do so.

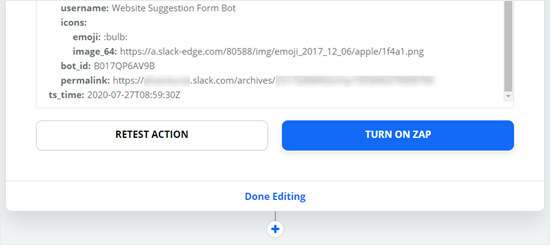
Once you’re happy with the Zap, simply click the ‘Turn on Zap’ button.

Turn on your Zap once you've tested it to make sure it's working

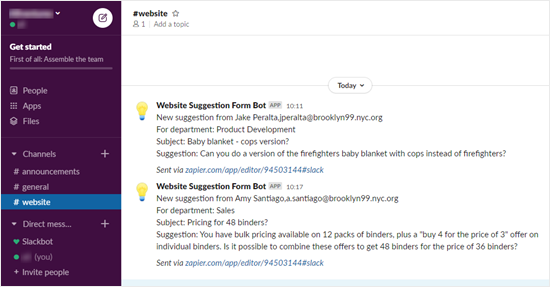
You may also want to send a new test entry through your form to ensure it appears correctly in Slack. Here is our Slack channel with our first test message plus a second one submitted after the Zap was turned on:

Examples of Slack notifications that have come through the WPForms suggestion form on the WordPress site

You can use Zapier to connect just about every email marketing service, marketing automation tool, and other business tools with each other as well as Slack.

The process is roughly similar to what we have demonstrated above with WPForms.

When used properly, Slack Notifications can significantly streamline your workflow by centralizing all the important things inside the central communication platform for your business.

We hope this article helped you learn how to get Slack notifications from your WordPress site. You might also be interested in our articles on the best business phone services for small business, and the best live chat software to get more sales / improve support.

If you liked this article, then please subscribe to our YouTube Channel for WordPress video tutorials. You can also find us on Twitter and Facebook.

The post How to Get Slack Notifications From Your WordPress Site appeared first on WPBeginner.

How to Create a Custom Airtable Form in WordPress (Easy Way)

Do you want to make a custom Airtable form for your WordPress site?

Airtable is a data management tool that lets you create your own custom data-driven apps. Basically, you can collect data with a form on your website and use it to make spreadsheets, contact lists, booking calendars, and more.

In this article, we will show you how to create a custom Airtable form in WordPress.

how-to-create-a-custom-airtable-form-in-wordpress-og

Why Create a Custom Airtable Form in WordPress?

Airtable is a data management tool that allows you to create custom data-driven apps. That way, you can better visualize the data collected on your website using WordPress forms.

For instance, you can use your WordPress contact form data in Airtable as a CRM (Customer Relationship Management) tool to manage leads and contacts captured by your WordPress forms.

You can also store data from user surveys on Airtable.

Here are a few other use cases for using Airtable in WordPress:

  • Organize tasks by project, assign responsibilities, and use Kanban views to visualize project progress.
  • Create a content calendar for content pieces, track publication dates, and assign writers and edits to increase your blog traffic.
  • Maintain a database of inventory items to track quantities for your online store.

Basically, you can use data collected from your WordPress contact forms in Airtable to create custom apps, workflows, and tools for your business.

That being said, let’s take a look at how to easily create a custom Airtable form in WordPress.

How to Create a Custom Airtable Form in WordPress

To create our custom Airtable form in WordPress, we will first make a contact form using WPForms.

It is the best WordPress form builder plugin on the market and allows you to create any kind of form easily using a simple drag-and-drop interface.

After that, we will connect our form to Airtable by using a service called Zapier.

Zapier works as a bridge to connect two different apps without any code. You can use it with dozens of online apps, including WPForms and Airtable.

Ready? Let’s get started.

Create Your Form in WPForms

First, you need to install and activate the WPForms plugin. For more details, see our step-by-step guide on how to install a WordPress plugin.

Note: You will need the Pro version or higher to access the Zapier addon for WPForms.

Upon activation, you need to go to the WPForms » Settings page.

Under the ‘General’ tab, enter the license key from your account on the WPForms website and hit ‘Verify Key.’

verify key in WPForms

Next, you need to visit the WPForms » Add New page in your WordPress dashboard. This will launch the WPForms builder interface, where you can choose from over 1200 pre-built templates.

Make sure to give your form a name so you can easily refer back to it.

name your WPForms

For the sake of this tutorial, we will be using the ‘Simple Contact Form.’

Go ahead and click on ‘Use Template.’

Use template for simple contact form

From here, you’ll be taken to the drag-and-drop editor, where you can easily customize the form.

Let’s say we are creating a contact form to collect leads from B2B prospects. In this case, we will want to add ‘Company’ and ‘Phone Number’ to our contact form.

To add the Company, you need to add a ‘Single Line Text’ item, then click on the element and rename the field to ‘Company.’

Add company field to WPForms

If you want prospects to provide their phone number, just drag the field option ‘Phone’ onto the editor.

Feel free to add any other fields that fit your needs. For more details, you can see our guide on how to create a contact form in WordPress.

Phone field

Once you’ve set up your form, you need to add it to your WordPress website.

Simply hit the ‘Embed’ button up top.

embed button

You can choose to embed the contact form on an existing page or a new page.

In this case, we will pick ‘Select Existing Page.’

Select existing page

Choose any page you’d like and select the ‘Let’s Go!’ button.

This will take you to the WordPress editor of that page.

Embed in a page

All you have to do is hit the ‘+’ button in the top left corner.

Then, find and select the WForms widget to add it to your page.

WPforms block

From here, you can choose the contact form you’ve just created.

That will automatically embed the form into your page.

choose contact form

Next up, make sure to hit the ‘Update’ button up top.

Now, your form should be added to your WordPress page.

update button

After you have added your form to your website, go ahead and create a test entry. This will be used to set up and check the connection between WPForms and Airtable.

Here’s our test entry, with name, email, phone, company name, and a message:

Contact form entry

Activate the Zapier Addon for WPForms

We will be using Zapier to build a bridge between WPForms and Airtable. To do that, you need to install and activate the WPForms Zapier Addon.

In your WordPress dashboard, go to the WPForms » Addons page and find the Zapier addon. Then, go ahead and install and activate it.

Zapier addon

Now, you need to go to the WPForms » Settings.

On the ‘Integrations’ page, simply click on the Zapier logo here, and you will get your Zapier API key. You need this to connect Zapier to your WPForms account.

Copy the API key somewhere safe or keep this tab open, as you will need it in the later step.

Zapier api

Set Up a Base and Table in Airtable

Next, we need to create a base in Airtable to store all of the information that we collect from our contact form.

If you are new to Airtable, then there’s a chance that you may not know how to set up a base and table.

First off, the base is the top-level database used to organize and store information. A table in Airtable is similar to a sheet in a spreadsheet.

Once you’ve created an account on Airtable, go ahead and click the ‘Start from scratch’ option in your home dashboard.

If you have an existing spreadsheet that you want to migrate over to Airtable, then just click the ‘Quickly upload’ option.

Start from scratch

Go ahead and name your base and table.

We’ve decided to name our base ‘Sales CRM’ and the table ‘Contacts.’

Rename base and table in Airtable

Then, change the top column labels to match the form fields you’ve just created in WPForms.

In this case, we added a label for Name, Company, Email, and Phone.

Change labels

Keep this tab open, as we will refer back to it later to check whether our WordPress automation works.

Create a Personal Access Token

Now, you need to prepare Airtable to connect with WPForms via Zapier. To do that, you need a personal access token to connect Airtable with Zapier.

Simply navigate to Airtable and click the ‘Account’ button under your profile logo.

Airtable account

A personal access token lets you create multiple tokens that provide access to the information held in your Airtable databases.

In the ‘Overview’ tab, go ahead and click the ‘Go to developer hub’ button.

Go to developer hub

You’ll be taken to the developer hub, where you can create tokens to connect with your Airtable data.

Under the ‘Personal access tokens’ tab, click the ‘Create token’ button.

Create token

From here, you will be required to fill in important information. First, you need to name the token so that you can easily refer to it later if you want to edit the permissions.

Under ‘Scopes,’ you must select what users can do when given access to this token. In this case, we will select the option that says, ‘data.records:write,’ so that users can create, edit, and delete records.

Once that is done, just click on the ‘Create token’ button.

Create token from airtable

A popup will appear telling you that your token has been created. Just copy it and keep it somewhere safe.

We will be adding this token to Zapier so that we can connect our Airtable database to WordPress.

copy token

Make Your Zap to Send Data From Your Website Form to Airtable

Next, go to the Zapier website. Here, you need to create a free account or sign in to your existing account.

In your Zapier dashboard, click the ‘Create a Zap’ button on the top-left to start the configuration wizard.

Create a zap

Note: In Zapier, a ‘zap’ is a process with a trigger and an action. Our trigger will be someone filling in the form, and our action will be to create a record in Airtable.

At the top of the screen, you need to give your zap a name, and then you can set up the trigger.

Set up name for trigger in Zapier

Scroll down and click on the ‘Trigger’ box.

Next, you will want to find and select the WPForms app to start the trigger.

WPForms zapier trigger

In the ‘Choose App & Event’ box, type ‘WPForms’ into the search bar.

After that, simply click on the WPForms icon that comes up.

Choose WPForms as your trigger app

A sidebar window will appear on the right of your screen. Under Event, choose ‘New Form Entry’ as the trigger to initiate the action.

Then, simply hit the ‘Continue’ button.

New form entry event trigger

Next, you will need to click the ‘Sign In’ button to log in to your WPForms account.

This allows Zapier to grab all of the new form entry data and insert it into your Airtable.

Sign in to WPForms

A pop-up window will appear.

You will need to enter the API key that you generated earlier, plus the URL (domain name) of your website.

allow zapier access to WPForms

Once you’ve done that, click on the ‘Continue’ button to move on.

Next, you will be asked to select the form you created earlier from the dropdown list.

Continue button

Once you’ve selected the contact form, go ahead and select ‘Continue.’

The ‘Refresh fields’ button lets you reload the data to reflect the most recent form entries.

Add trigger to Zapier

Next, click on the ‘Test trigger’ button.

Zapier will find your most recent entry, which will confirm whether the trigger is set up correctly.

Test trigger

You should then see a message telling you that Zapier found a test entry.

The data from your form entry will be shown on the screen:

Continue with selected record

Click the ‘Continue with selected record’ button to carry on. You are now in the Action part of the Zap, where you need to choose your second app.

Simply type ‘Airtable’ into the dropdown to find the app. Then click on the Airtable widget.

Connect airtable to zapier

Once Airtable is connected to your zap, you will see the dropdown for choosing an action event.

The action event is simply what you want to happen when someone completes the form on your site. You need to select ‘Create Record’ here.

Then, hit the ‘Continue’ button.

Create record

Now, Zapier will prompt you to sign in to Airtable.

Simply click the ‘Sign In’ button and then log in.

Sign in to connect airtable

A new window will appear telling you that Zapier is requesting Airtable access. Essentially, this allows Zapier to automatically send your form entry data into the created fields in your Airtable.

All you need to do is click the ‘+ Add a base’ link. Then, choose which workspaces you want to give Zapier access to. If you don’t have a preference, then just click the option that says, ‘All current and future bases in all current and future workspaces.’

Then, once selected, go ahead and click on the ‘Grant access’ button.

Grant access

Now, you will see a ‘Continue’ button.

Just click this to carry on making your zap.

Continue with making zap

Under the Action tab, you’ll need to first add your ‘Base’ and ‘Table’ from the given dropdown menus.

We are going to use our Sales CRM as the base and add our new contacts to the Contacts table.

Add base and table to zap

Also, you need to tell Zapier which fields from your WPForms form should correspond to the columns in your Airtable table.

For all the applicable fields, simply select the correct field using your test data. It should look something like this:

table fields to add to zap

Then, click the ‘Continue’ button to keep going.

Zapier will now prompt you to send a test record to Airtable using your test data.

You will see a preview of the data. Simply click on ‘Test step.’

Test step

This will send the test data to your chosen table in Airtable, creating a new record.

Go ahead and review the preview record to check the information is correct.

Test record

You may want to double-check that the record has been correctly added to Airtable.

It’s a good idea to check that the data went through to your Airtable base and that the information was entered correctly into the proper fields.

Airtable data

Now, head back over to Zapier.

You simply need to click the ‘Publish’ button to finish creating your zap.

Publish zap

Give it a few seconds for the Zap to publish.

At the top of your screen, you should see an ‘On’ button, indicating the Zap is live.

Zap is on

Also, if you ever need to edit the Zap, such as changing which table or fields to send your form entry to, you can always find your Zap on the home dashboard of Zapier.

Just click on the title of the Zap to edit it.

Edit zap

Your zap is now running. All form entries through your connected form will be added to the Airtable table that you selected.

Bonus: How to Send SMS Messages to Your Leads

If you found this integration helpful, then you may want to also send SMS notifications to people who have completed your contact form.

This is a great way of keeping them up to date with the status of their request.

For example, let’s say you have prospects who visit your landing page and then complete your form, indicating interest in your services. While the form data is entered into an Airtable, you will want another connection that automatically sends SMS messages to your leads so they know what to expect from you.

The best option is to use Brevo, which is an email marketing service that also lets you send SMS messages to your leads.

Brevo website

With this software, you will be able to import your contacts and then send text message campaigns. For more information, just follow our tutorial on how to send SMS messages to your WordPress users.

We hope this article helped you learn how to create a custom Airtable form in WordPress. You may also want to check out our guides to the best business phone services and how to get SMS text messages from your WordPress forms.

If you liked this article, then please subscribe to our YouTube Channel for WordPress video tutorials. You can also find us on Twitter and Facebook.

The post How to Create a Custom Airtable Form in WordPress (Easy Way) first appeared on WPBeginner.

Creating an Editable Site with Google Sheets and Eleventy

Remember Tabletop.js? We just covered it a little bit ago in this same exact context: building editable websites. It’s a tool that turns a Google Sheet into an API, that you as a developer can hit for data when building a website. In that last article, we used that API on the client side, meaning JavaScript needed to run on every single page view, hit that URL for the data, and build the page. That might be OK in some circumstances, but let’s do it one better. Let’s hit the API during the build step so that the content is built into the HTML directly. This will be far faster and more resilient.
The situation

As a developer, you might have had to work with clients who keep bugging you with unending revisions on content, sometimes, even after months of building the site. That can be frustrating as it keeps pulling you back, preventing you from doing more productive work.

We’re going to give them the keys to updating content themselves using a tool they are probably already familiar with: Google Sheets.

A new tool

In the last article, we introduced the concept of using Google Sheets with Tabletop.js. Now let’s introduce a new tool to this party: Eleventy

We’ll be using Eleventy (a static site generator) because we want the site to be rendered as a pure static site without having to ship all of the under workings of the site in the client side JavaScript. We’ll be pulling the content from the API at build time and having Eleventy create a minified index.html that we’ll push to the server for the production website. By being static, this allows the page to load faster and is better for security reasons.

The spreadsheet

We’ll be using a demo I built, with its repo and Google Sheet to demonstrate how to replicate something similar in your own projects. First, we’ll need a Google Sheet which will be our data store.

Open a new spreadsheet and enter your own values in the columns just like mine. The first cell of each column is the reference that’ll be used later in our JavaScript, and the second cell is the actual content that gets displayed.

In the first column, “header” is the reference name and “Please edit me!” is the actual content in the first column.

Next up, we’ll publish the data to the web by clicking on File → Publish to the web in the menu bar.
A link will be provided, but it’s technically useless to us, so we can ignore it. The important thing is that the spreadsheet(and its data) is now publicly accessible so we can fetch it for our app.

Take note that we’ll need the unique ID of the sheet from its URL  as we go on.

Node is required to continue, so be sure that’s installed. If you want to cut through the process of installing all of thedependencies for this work, you can fork or download my repo and run:

npm install

Run this command next — I’ll explain why it’s important in a bit:

npm run seed

Then to run it locally:

npm run dev

Alright, let’s go into src/site/_data/prod/sheet.js. This is where we’re going to pull in data from the GoogleSheet, then turn it into an object we can easily use, and finally convert the JavaScript object back to JSON format. The JSON is stored locally for development so we don’t need to hit the API every time.

Here’s the code we want in there. Again, be sure to change the variable sheetID to the unique ID of your own sheet.


module.exports = () => {
  return new Promise((resolve, reject) => {
    console.log(`Requesting content from ${googleSheetUrl}`);
    axios.get(googleSheetUrl)
      .then(response => {
        // massage the data from the Google Sheets API into
        // a shape that will more convenient for us in our SSG.
        var data = {
          "content": []
        };
        response.data.feed.entry.forEach(item => {
          data.content.push({
            "header": item.gsx$header.$t,
            "header2": item.gsx$header2.$t,
            "body": item.gsx$body.$t,
            "body2": item.gsx$body2.$t,
            "body3":  item.gsx$body3.$t,
            "body4": item.gsx$body4.$t,
            "body5": item.gsx$body5.$t,
            "body6":  item.gsx$body6.$t,
            "body7": item.gsx$body7.$t,
            "body8": item.gsx$body8.$t,
            "body9":  item.gsx$body9.$t,
            "body10": item.gsx$body10.$t,
            "body11": item.gsx$body11.$t,
            "body12":  item.gsx$body12.$t,
            "body13": item.gsx$body13.$t,
            "body14": item.gsx$body14.$t,
            "body15":  item.gsx$body15.$t,
            "body16": item.gsx$body16.$t,
            "body17": item.gsx$body17.$t,
            
          })
        });
        // stash the data locally for developing without
        // needing to hit the API each time.
        seed(JSON.stringify(data), `${__dirname}/../dev/sheet.json`);
        // resolve the promise and return the data
        resolve(data);
      })
      // uh-oh. Handle any errrors we might encounter
      .catch(error => {
        console.log('Error :', error);
        reject(error);
      });
  })
}

In module.exports, there’s a promise that’ll resolve our data or throw errors when necessary. You’ll notice that I’m using a axios to fetch the data from the spreadsheet. I like that it handles status error codes by rejecting the promise automatically, unlike something like Fetch that requires monitoring error codes manually.

I created a data object in there with a content array in it. Feel free to change the structure of the object, depending on what the spreadsheet looks like.

We’re using the forEach() method to loop through each spreadsheet column while equating it with the corresponding name we want to allocate to it, while pushing all of these into the data object as content. 

Remember that seed command from earlier? We’re using seed to transform what’s in the data object to JSON by way of JSON.stringify, which is then sent to src/site/_data/dev/sheet.json

Yes! Now have data in a format we can use with any templating engine, like Nunjucks, to manipulate it. But, we’re focusing on content in this project, so we’ll be using the index.md template format to communicate the data stored in the project.

For example, here’s how it looks to pull item.header through a for loop statement:

<div class="listing">
{%- for item in sheet.content -%}
  <h1>{{ item.header }} </h1>
{%- endfor -%}
</div>

If you’re using Nunjucks, or any other templating engine, you’ll have to pull the data accordingly.

Finally, let’s build this out:

npm run build

Note that you’ll want a dist folder in the project where the build process can send the compiled assets.

But that’s not all! If we were to edit the Google Sheet, we won’t see anything update on our site. That’s where Zapier comes in. We can “zap” Google sheet and Netlify so that an update to the Google Sheet triggers a deployment from Netlify.

Assuming you have a Zapier account up and running, we can create the zap by granting permissions for Google and Netlify to talk to one another, then adding triggers.

The recipe we’re looking for? We’re connecting Google Sheets to Netlify so that when a “new or updated sheet row” takes place, Netlify starts a deploy. It’s truly a set-it-and-forget-it sort of deal.

Yay, there we go! We have a performant static site that takes its data from Google Sheets and deploys automatically when updates are made to the sheet.

The post Creating an Editable Site with Google Sheets and Eleventy appeared first on CSS-Tricks.

Ultimate Guide to Integrating Zapier with WordPress Form Plugins

You’ve just designed the perfect form that’s going to hook your leads like fish at the end of a line, and you’re ready to reel them in.

But what happens when the responses come flooding in? Who’s going to end up with the task of copying and pasting all those leads from your forms to your Salesforce, e-mail list, or even Trello?

With Zapier and a quality WordPress form plugin you can automagically categorize the data captured by your site and share it with over 1200 other applications.

Zapier web app integrations
Zapier makes it easy to integrate your WordPress forms with over a thousand web apps.

Sounds difficult and super technical, right? Zapier provides this level of integration to users with almost no skill. And in this post we’ll look at what Zapier is, how to setup and test your first zap, and how to integrate your WordPress form with Salesforce or any of the +1200 web apps built to work with Zapier. So let’s dive in!

What is Zapier?

Zapier is basically a web application that helps you automate the process of moving information from one app to another, by creating a bridge so that both apps can “talk” to each other. For example, you can send information collected from Forminator or Hustle directly to your Salesforce account.

Zapier’s strength lies in its ability to not just send unordered information from your WordPress form plugin, it is also able to automatically categorize the information it receives, and send it exactly where you decide.

Using Zapier, you can send data from both Forminator and Hustle to:

  • Your Salesforce account and Google calendar
  • One Google sheet or several
  • A Trello board
  • Your Dropbox account
  • Acuity Scheduling
  • Manychat
  • …and hundreds more

Some forms are able to seamlessly integrate with a  number of popular web services without the help of Zapier. For example, Forminator allows you to seamlessly share your WordPress-acquired data with Mailchimp, Google Sheets, Trello, Active Campaign, Campaign Monitor, Aweber, and Slack. For other applications,  Zapier is available as the most networked guest at the party, to help you connect your WordPress plugin form to around 1200+ more services.

What can you do with your WordPress form?

If you’re wondering about what sort of Zapier integrations you can achieve with that WordPress form that’s on fire, here are some automations your list can handle using Zapier:

  • Create a new customer in Stripe
  • Create a new lead in Salesforce
  • Add a lead to a campaign in Salesforce
  • Send an email from your Outlook account
  • Create a new task or project in Asana
  • Update a row in a Google spreadsheet
  • Find a contact profile by exact match email in ClickFunnels. Optionally add a new one if no exact match is found.
  • Add a reminder for yourself or a teammate in Slack
  • … and lots more.

So as you can see, the possibilities of what you can do with your WordPress form are endless. Now let’s check out the setup process.

In this example, we’ll explore how to create a new lead in your Salesforce account with the information submitted via your WordPress form using Zapier.

For the purpose of this tutorial, we’ll be using Forminator, our free form plugin, to collect your leads. However, this tutorial is beneficial for any Zapier-integrated WordPress form plugin… so keep reading! You can get Forminator free on WordPress.org or become a WPMU DEV member to get Forminator and our entire suite of marketing, performance, security, hosting, backup, and services free for the next 30-days.

How to connect your WordPress form to your Salesforce account using Zapier

#Step 1. Activate the Zapier webhook to connect your form

This section will guide you through the steps required to correctly link your WordPress form to your Zapier account. Once you have set up your WordPress form correctly, you should end up on a page asking you to enter your webhook URL.

Set up your form in Forminator

  • Go to your Forminator form on WordPress, and click on Edit > Integrations.
  • On the Integration page, scroll down and click on the “+” sign on the right to integrate Zapier.
  • You will get a pop-up asking you to “Setup Webhook”. Keep this open and go to the “Set up your Zapier webhook” section.

#Step 2. Set up a Zapier webhook

    Now let’s look at how to set up your Zapier webhook.

  • In a separate window, log into your Zapier account. In the top right corner of your account dashboard, click on “Make a Zap”
How to create a Zap
  • You will be directed to a page asking you to Choose a Trigger App. Type in “webhooks by Zapier” and click on the application. Webhooks are basically pathways through which automated messages are sent from one application to another.
WordPress Zapier integration webhook
  • Select Catch Hook > Save and Continue.
Zapier WordPress integration – select trigger
  • You should now have a webhook URL. Copy this,  go back to your WordPress form page and paste it in the webhook URL box.
Zapier integration pick a sample to set up your zap
  • Click on “Okay, I did this”.

#Step 3: Create an action in Zapier

Now, it’s time to set up the action that you want the Trigger to lead to.

  • In the bottom left column of the Zapier page, click on Action/Search
  • Search for Salesforce using the Search field.
  • You should see a dropdown list offering a variety of options regarding what to do with your data. You can Create a new lead, Add a lead to an existing campaign, Create a custom object, Add a contact to a Campaign, or Create a new contact. You also have the option to search for existing accounts using a field and any value you choose.
  • Select the action you desire. For the purpose of this example, we want to create a new lead in Salesforce using the information provided in the forms, so we select Create Lead > Save & Continue
  • In the next step, you will need to add your Salesforce account by logging into it, then clicking “Continue”
  • You will now have the option to match the fields in the Salesforce form with the fields in your Forminator form by selecting corresponding fields using the “+” sign. Add as many fields as are available on your form, and when finished, click “Continue”.
Zapier integration with Salesforce

#Step 4. Test your Zap

  • On the action tab (bottom left), click on “Test this step”. Ensure you have filled out all the information that is required on this page. For this step, you will need to actually type the information required in the fields as you may not be able to “pull” information from your lists at this point.
  • Scroll to the bottom and click “Continue”.
    You should get confirmation that the test was successful. If this step is not successful, look through your list again and ensure that you have valid information inside the fields – for example, you have an actual e-mail address inside the e-mail fields, etc.
  • If all works well, don’t forget to turn the Zap on to start sending leads automatically to your Salesforce account (top right corner of the same page)

This guide shows you how to easily integrate one form with the Salesforce app, using a free, basic Zapier account. The possibilities of what can be done with Zapier are endless, especially with a premium account.  You can maximize your productivity by automating multiple integrations with one trigger. For example, once a form is filled on your website, you can add a lead to your Salesforce account, send the same lead to your email list, and send your team a Slack notification. All you need to do is click the “+” button between the steps in your  Zap.

Your powers have been granted!

So easy! If you’ve read this far and still haven’t downloaded Forminator or Hustle, what are you waiting for? Get started for free with Hustle and Forminator on WordPress.org or start your WPMU DEV membership.

Congratulations on your newly-acquired super-zap-powers. I hope you have found this tutorial helpful for learning how to use Zapier to integrate your WordPress forms with your favorite web applications.