Virtual Event Registrations with Wufoo Forms

(This is a sponsored post.)

We’ve seen many events shift from in-person to online this year. That may have required a huge change to how you collect attendee registrations in the past, but with a paid Wufoo account and Zoom — along with a sprinkle of Zapier — it’s easier than ever to go virtual.

First, set up a Zoom call

It doesn’t have to start right now but can be scheduled in advance so we have something to connect to. In Zoom, that’s just a click of the giants “Schedule” button on the welcome screen once the app has been launched.

“New Meeting” will launch something right away, whereas “Schedule” will set a call up in advance to start at a fitter date and time.

Next, we need a registration form

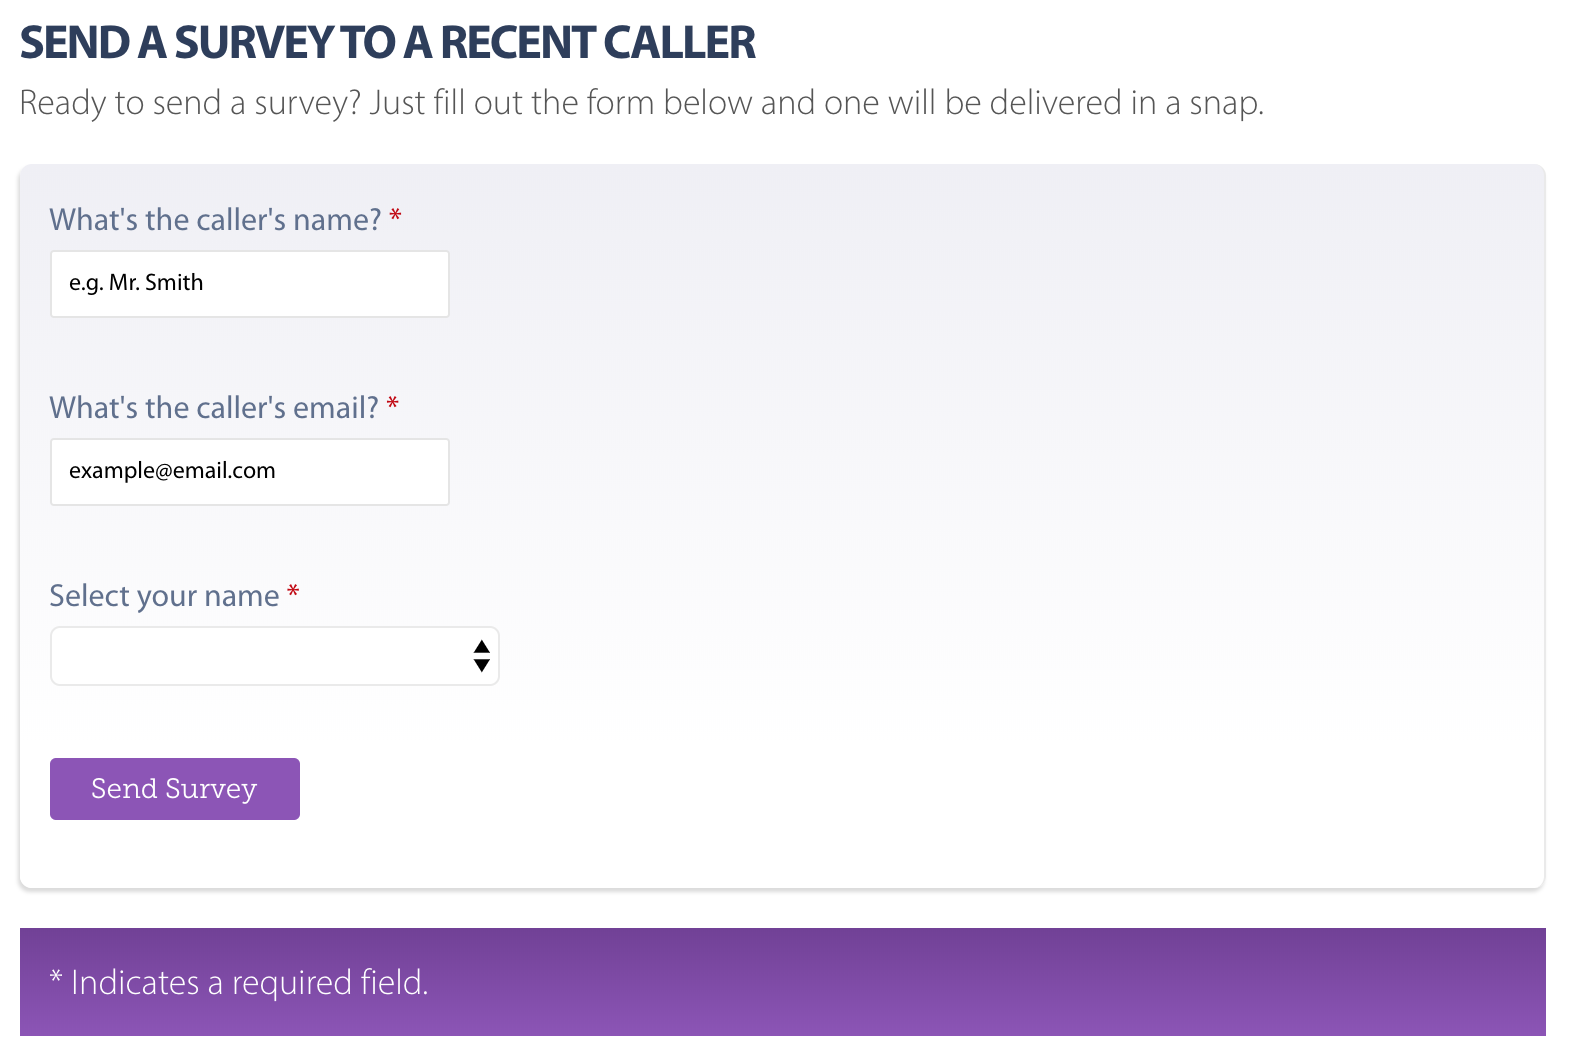
We’re talking about Wufoo’s bread and butter: making online forms! We can create one from scratch, of course, but Wufoo makes it even easier with a set of pre-made options that are specifically designed for registration.

Any of these can be used as-is, or as a starting point to make your own.

Whether you start with a clean slate or a template, the key things you’re going to want to collect are:

  • Name
  • Email address

Seriously, that’s it. Anything else is icing on the cake that can be used to collect additional information about attendees, like their age, gender, shirt size, allergies, or whatever else you think will be helpful to make a better event.

Is this a paid event?

Many events are! If you want to charge a fee for the event, Wufoo integrates with Stripe, Square, PayPal and a slew of other payment gateways that make collecting payments rather trivial. Plus, transactions are protected by 256-bit SSL encryption that’s super secure and PCI-compliant.

Purchasing a single ticket is pretty straightforward, but let’s say you want to allow folks to purchase multiple tickets at a time or have multiple tiers of ticket pricing. Not a problem at all in Wufoo! For example, it’s possible to set prices by the answer provided in a field.

Now, when someone selects an option in the “Number of Tickets” field, a price will calculated.

Is there a maximum number of “seats” available?

You may be cool with an unlimited number of attendees. But if you need to limit the head count, check out Wufoo’s Max Quantity feature, which is like creating a pool of tickets that each registration subtracts from. This is especially useful to create a more “intimate” presentation for, say, workshops or group activities.

The “Max Quantities” feature can restrict the number of people who can register for a specific workshop.

Connect to Zoom

We’re using Zoom in this example, but Wufoo is capable of connecting to other video services, including join.me, GoToMeeting, and Cisco Webex.

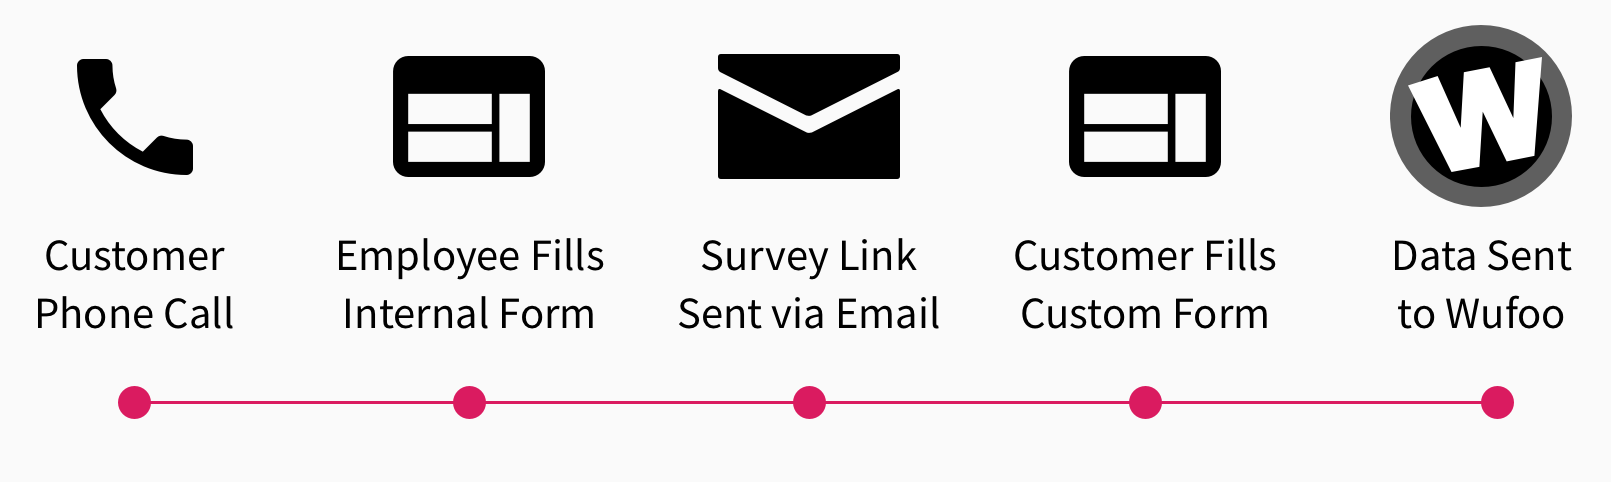
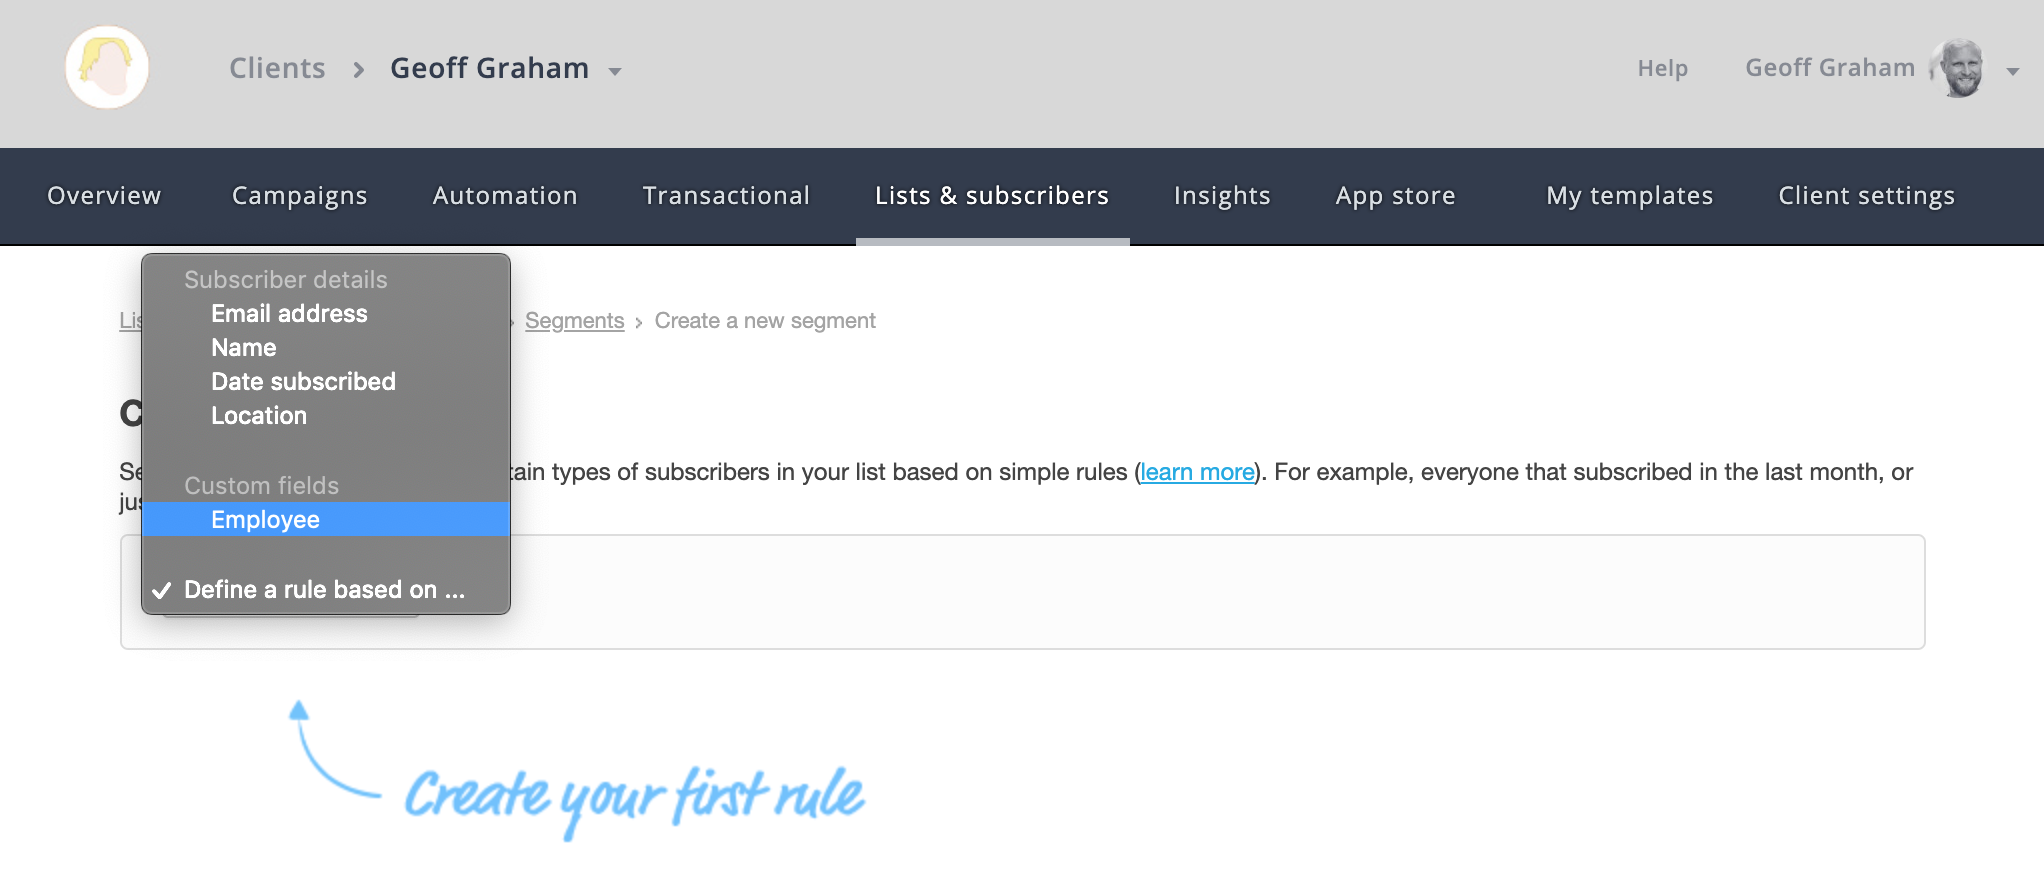
Wufoo’s integrations come by way of Zapier. If you’re new to it, Zapier is this thing that basically connects apps together, establishing communication between their APIs so that they interact with each other when something happens. In this case, when someone signs up for the virtual event, we want to add them as a guest on the Zoom call.

So, go into your Zapier account (or set one up for free). From there, we’ll create a new “zap” which Zapier’s slang for a new app connection. That means we select Wufoo as the first app we want to use and Zoom as the app we want to connect to.

Once the apps have been chosen, Zapier provides options for what to “watch for” in Wufoo (a form submission, or “New Entry” in this case) and actions we want to take place in Zoom when that trigger happens (“Create Webinar Registrant” in this case).

Click the “Use Zap” button and Zapier will walk through the rest of the steps, including what form to use in this integration and which scheduled Zoom webinar to create registrants.

Watch the registrations roll in!

Well, yes. We are technically done at this point, but we’ll want to do some housecleaning before we can actually start collecting registrations:

  • Finish designing the form. Wufoo has a lot of nice design options, and even takes custom CSS to fine-tune the way things look.
  • Embed the form. The form needs to go somewhere if we want folks to use it. A Wufoo form can be embedded just about anywhere (hey, we use on on our own Contact page). Or, simply link it up and use the public URL Wufoo generates for the form.
  • Customize the receipt email. Once a transaction is made, the user will get a receipt emailed to their inbox. It’s a good idea to give it a little love so it’s personalized.
  • Create a reminder email. Sending a reminder a few days before the event is a nice way to give folks a heads up that the event is coming up. Wufoo also integrates with both Mailchimp and Campaign Monitor, both of which can be used in a zap that adds attendees to an email list and sends triggered and automated messages.

There you go, a registration flow for a virtual event that is powerful and doesn’t require any code! If you don’t have a Wufoo account already, get one now — it’s free and worth exploring all the interesting things it can do.

Direct Link to ArticlePermalink


The post Virtual Event Registrations with Wufoo Forms appeared first on CSS-Tricks.

You can support CSS-Tricks by being an MVP Supporter.

Wufoo + Zapier

Wufoo has always been great with integrations. They have integrations with specific apps, like Campaign Monitor, Mailchimp, and Typekit, but they also integrate with Zapier, which is sort of like an integration inside an integration.

That's kinda meta, but the idea is actually pretty straightforward: Wufoo integrates with Zapier, which integrates with a gazillion (yes, I did the math) other apps. That opens up a whole world of possibilities for what you can do with a Wufoo form.

Some interesting ones:

  • Trigger an email to send to someone from Campaign Monitor or Mailchimp when they've submitted the form.
  • Collect submissions in a Google Sheet to build you own database of entries.
  • Automatically create a card in Trello once the form has been submitted.
  • Add the person who is submitting the form to a contact list in Salesforce.
  • Push notifications to Slack once someone completes the form.

Wufoo shared their own list of ideas. Let's sum them up here:

  • Wufoo + your customer relationship management (CRM) tool
  • Wufoo + your email tool
  • Wufoo + your file storage tool
  • Wufoo + your website-building tool
  • Wufoo + your project management tool
  • Wufoo + your calendar tool
  • Wufoo + your spreadsheet tool

That one about website-building tools is pretty sweet. This lets Wufoo hook up to something, say WordPress, so that you can do something like publish a new page for every submission. Think about that. You have one integration to send an email to the user when they submit the form and perhaps it contains a link to a personalized page. Voltron powers, unite!

The post Wufoo + Zapier appeared first on CSS-Tricks.

Customer Satisfaction Surveys with Wufoo

I was once tasked to create a makeshift customer service survey that would allow an employee to receive a customer call and send a survey to the custom once the call ended. The goal was to track customer satisfaction, which is a totally legit thing to want.

There are some solutions out there that do this out of the box. The problem was that my client neither had the desire or budget to use them. They did, however already use Campaign Monitor for sending emails and Wufoo for embedded forms. I figured, hey, if MacGyver can create complex gadgets out of bubble gum and paper clips, then I can cobble something together with these two robust tools. Right?

Right!

Knowing the data

The biggest challenge for a phone call is that it's sometimes difficult to track down an email address during the call. Without that, there's nowhere to send the survey, so that's a big bummer. That means the employee needs to capture the address, whether it's getting a custom ID at the start of the call or straight up asking for it.

I decided I would spin up Wufoo to create an internal form that employees can use to capture the data. Nothing fancy, only the following fields:

  • Employee Name: Used to associate the employee with the call
  • Customer Name: Used to personalize the email sent containing the survey link
  • Customer Email: Used to send the survey link

Wufoo makes this trivial, of course. Create a new form, add a few text fields, copy and paste the snippet onto a page. Voilà! We have a form! We could make it a little simpler (and dummy-proof) by creating a select field containing all employee names so the data remains consistent. We can also make the fields required and use Wufoo's built-in validation to ensure the email address is properly formatted.

There's also a lot of flexibility with the styling to boot, meaning the form can look like a native part of the site.

The employee can now fill that out during the call and submit it once the call is done. Plus, the form is embedded on a private page that can't accidentally get out to others.

Sending the survey

Did you know Wufoo can auto-send emails anywhere once a form is completed? Well, now you do!

This is super handy for most cases and I really wanted to use it for this task, but decided to go with Campaign Monitor because there's one little snag which is...

Each employee needs a unique survey form

Yep, that's a thing. Otherwise, we'd have to ask the customer to identify the employee's name in the survey, which we can't expect them to know. Sure, we could use another select field, but that requires the customer to recall the name as well, and not having the employee name makes it difficult to associate customer satisfaction results with specific employees for tracking.

So, the email needs to contain a unique link that goes to a form that's associated with a specific employee. Again, there are solutions for this stuff, but we're MacGyver'ing this thing.

I'm so glad Wufoo makes building forms so simple. All I needed to do was create one form, duplicate it for each employee, and change the employee value in each one.

On that note, we don't necessarily need to display the employee's name in the survey form. Wufoo accepts custom CSS which means we can hide any field! Plus, it allows us to pre-populate a field, so that gives us hidden fields that already contains the values we need to associate the survey data with a specific employee and create a webpage containing the form for that employee. 💥

Hidden fields are, well...hidden!

Now that there's a survey for each employee, all I needed to do was create webpages where I could embed each employee form and use those as the survey links.

Here's the flow:

Auto-sending the survey link

Let's go back to the first form for a moment. Remember, that's the one an employee fills out and submits once the call has ended. This should send an email to the customer containing a link to the webpage that has the survey form for that employee.

Campaign Monitor can segment lists by custom variables. In other words, we can create one list that contains all of the customers who have called in and create sub-lists that are divided by employee since we have that as a value in the internal employee form. And, since Campaign Monitor and Wufoo play nice together, all of the data we capture is contained in both places.

The other thing Campaign Monitor can do is trigger emails to send based on conditions. So, if the employee submits the internal form, Campaign Monitor can be configured to send a specific email template/campaign to a new subscriber that is added to the list. If we set up a trigger to send an email to any new customer who is added to the list, we can personalize the email to contain the link for the employee who took the call.

Watch the data roll in!

Great! We have a form employees can use to send a survey, surveys set up on webpages for each employee, and an auto-triggered email that's sent to a customer containing the survey link for the employee who submitted the internal survey.

All that's left is to monitor the data and — wouldn't you know it — Wufoo has reporting built right into it where all of that can be accessed and monitored 24/7. Heck, it even permits us to create custom reporting dashboards on a per-survey basis.

Wrapping up

Was this the best way to hack things together? Probably not. Is it bulletproof from incorrect data or misuse? Not entirely. But the fact that Wufoo could intervene at all and is flexible enough to power this sort of thing is awesome. It's more than awesome; it's amazing. It sure wasn't intended to be used that way, but it did the trick anyway.

Thanks, Wufoo!

The post Customer Satisfaction Surveys with Wufoo appeared first on CSS-Tricks.

A Couple of New Wufoo Tips

(This is a sponsored post.)

High fives to Wufoo, our long-time sponsor here on CSS-Tricks. It's powered the vast majority of forms I've built over the past decade. If you've never used it or heard of it: it's a form builder. It makes the arduous task of implementing forms trivially easy. Building a form on Wufoo means you'll get a form that does everything right UX-wise, gives you full design control, integrates with anything, and that you can put anywhere.

The feature list is too long to cover in the confines of a single post, so I always like to cover little bits that I've used recently and liked.

  1. They just released a much quicker way to rename a form both in the Form Manager and inside the form itself.
  2. Don't forget they have a robust API. I used the API to submit form entries on a form just the other day. I wanted to do some special things on a form, like be able to react to the DOM event of submitting the form. That's not really possible when the form is in an <iframe>, but just fine when you host the form yourself and submit via API. Worked great.

Direct Link to ArticlePermalink

The post A Couple of New Wufoo Tips appeared first on CSS-Tricks.