Major email service providers now require all email senders to comply with new email sending rules to ensure email deliverability. Here’s how WPMU DEV’s email services make it easier to comply and get your emails safely delivered…
Refer to our comprehensive guide covering the new email sending requirements if you are not familiar with these new rules, what SPF, DKIM, and DMARC email protocols are, and what this all means for your business.
In this article, we’ll show you how your business can easily comply with the new rules if you use WPMU DEV’s Webmail or Email Hosting services.
As shown in this article, if you run a check of the domain wpmudev.com using email verification tools, you will see that WPMU DEV meets all email service providers’ compliance requirements for email deliverability.
WPMU DEV meets all email sending requirements for email deliverability!
This is great news for your business!
Why?
Well, let’s start with …
Client Reports and Notifications
WPMU DEV’s SPF, DKIM, and DMARC policies are fully compliant with the stringent requirements set by all major email service providers.
This means that all your Hub-generated client reports and notifications sent from WPMU DEV’s email servers, including Uptime monitor reports, should have no problem reaching their intended recipients’ inboxes.
Rest assured that your clients will receive all reports and notifications sent by WPMU DEV’s email servers.
Webmail and Email Hosting
Not only will all reports and email notifications we send on your behalf reach your clients, but if you use or resell our Webmail or Email Hosting services, so will the emails that you send out to your clients, and the emails that your clients send out.
Best of all, all required email compliance is automatically built into our Webmail and email hosting services, so there’s nothing to configure for general emailing.
Let’s take a closer look…
We’ll use Webmail for this example and assume that you are hosting your domain on WPMU DEV’s servers or at least managing your DNS records with us.
When you set up Webmail and configure your email domain, you’ll see that our system automatically creates and adds SPF and DKIM records to your domain’s DNS records.
SPF and DKIM records are automatically created and added to your WPMU DEV hosted domain’s DNS records.
Let’s test this out by sending an email from our Webmail account to a Gmail account.
First, log into Webmail…
Log into Webmail.
Next, compose an email and send it to a Gmail account.
Compose an email using Webmail.
When the email reaches your inbox, go to your Gmail account .
Hurray! Our Gmail recipient has received our email!
As shown earlier, you can view the Internet header for the email by opening the email, clicking on the vertical ellipsis icon, and selecting the Show original option from the menu.
Select the Show Original option to view your email’s Internet header
As you can see, the email sent from the Webmail account meets SPF and DKIM requirements.
This domain has valid SPF and DKIM headers … Gmail likes!
If you or your clients are using Webmail or our hosted email services for regular business emailing purposes, you don’t need to worry about setting up DMARC for your domain.
Bulk Emailing
As per Google’s and Yahoo’s requirements, if you plan to send 5,000 emails or more, you will need to publish a valid DMARC policy.
Add DNS Records For 3rd-Party Email Services
If you currently host an email domain with WPMU DEV that you plan to use for bulk sending purposes (emailing 5,000+ users a day), then check with your bulk sending provider for instructions on how to add the records you will need to comply with their services.
For example, let’s say you send email newsletters using a domain’s DNS managed with WPMU DEV and an email marketing service like Mailchimp, GetResponse, Sender, HubSpot, etc.
In this example, we’ll use Aweber for a domain’s DNS managed with WPMU DEV that needs authentication.
To authenticate the domain, find their setup instructions. In Aweber’s case, a notice displays in the user’s account dashboard with a link to their Domain Authentication screen.
This domain needs DKIM set up and a DMARC policy to be authenticated by the provider.
To authenticate DKIM, Aweber requires adding various new CNAME records to the domain’s DNS records.
So, the first step is to copy the Name (Host) record to the clipboard…
Copy the records provided by your service provider to your clipboard.
Next, go into The Hub > Domains and locate your domain…
Find your domain in The Hub – Domains section.
Click on the vertical ellipsis next to the domain and select Manage DNS.
Select the Manage DNS option for your domain.
In the DNS Records screen, click on Add Record.
Click on Add Record to add a new DNS record.
Select CNAME from the Record type dropdown menu and paste the Hostname record from your clipboard.
Go back to your email service provider’s screen, copy the Value key to your clipboard, and paste it into the Alias field, then click the Add button.
Create a new CNAME Record and paste the records supplied by your provider into the Hostname and Alias fields.
Repeat this process until all of your service provider’s required records have been added in your domain’s DNS management area.
All CNAME records have now been added.
If a DMARC policy is required, follow the same copy and paste process as described for adding DKIM records above.
Note that in Aweber’s case, they require a new TXT record to be created for adding a DMARC policy, not a CNAME record.
Copy the DMARC record to your clipboard.
Create a new TXT record in The Hub’s DNS management area and paste the content provided into the Hostname and Value fields. Click the Add button when done.
Paste the copied TXT record values into the Add New DNS Record fields and click Add.
You will see the new record has been added to the Records section.
The new DMARC TXT record has been added.
Go back to your service provider’s dashboard and refresh their settings to validate your domain’s records.
Your email domain is now fully authenticated and compliant!
If you need help creating or adding DNS records to WPMU DEV’s DNS manager, see our documentation.
Boost Credibility: Sending emails from a free email address undermines your professionalism.
Enhanced Deliverability: Professional addresses are less likely to end up in spam folders, improving email engagement.
Brand Trust: A branded email domain fosters trust and credibility, leading to higher open and click-through rates.
Branding Opportunities: Consistent display of your brand in emails reinforces brand identity and recognition.
Control and Security: Professional email addresses offer more control over infrastructure and security settings, enhancing data protection.
Securing a professional business email address helps to enhance deliverability and improves email engagement, which are important and relevant to this discussion.
WPMU DEV Email Services Get Your Emails Delivered
If you are a WPMU DEV domain reseller, you can help your clients improve their email deliverability and lower potential complaint rates by advising them to secure a professional email address that matches their website domain and setting these up on our Webmail or Pop3 email services.
Sending emails from a professional email address using our Webmail or POP3 email services is the best and easiest way to automatically cover (almost all) your bases.
With our fully compliant hosted services powering your and your clients’ emails, all that’s left for you to do is make sure you have that unsubscribe link in your emails, compose your message, and hit the send button.
If you have any questions about our email services, check our Webmail or email hosting documentation, or contact our expert 24/7 support team.
Webmail is a robust IMAP-based email service and the latest exciting addition to WPMU DEV’s all-in-one WordPress management platform product suite.
In this comprehensive guide, we show you how to get started with Webmail, how to use its features, and how to resell professional business email to clients. We also provide information on the benefits of offering IMAP-based email services for WPMU DEV platform users and resellers.
Read the full article to learn all about Webmail or click on one of the links below to jump to any section:
In addition to our current email hosting offerings, Webmail is a standalone service for Agency plan members that allows for greater flexibility in email account creation.
WPMU DEV’s Webmail:
Is affordably priced
Offers a superior email service with high standards of quality and reliability.
Does not require a third-party app to work.
Lets you set up email accounts on any domain you own or manage, whether it’s a root domain like mydomain.com or a subdomain such as store.mydomain.com.
Lets you provide clients with professional business email no matter where their domain is hosted (or whether the domain is associated with a site in your Hub or not)
Can be accessed from any device, even directly from your web browser.
Can be white labeled and resold under your own brand with Reseller.
Let’s show you now how to set your clients up with email accounts and a fully-functional mailbox in just a few clicks, using any domain, and no matter where their domain is hosted.
Now, all you need to do is get acquainted with the latest powerful tool in your complete WordPress site management toolbox…
Webmail Manager
The Hub lets you create, manage, and access IMAP email accounts for any domain you own from one central location, even domains that are not directly associated with a site in your Hub.
Click on Webmail on the main menu at the top of the screen…
Click Webmail to set up and manage your emails.
This will bring you to the Webmail Overview screen.
If you haven’t set up an email account yet, you’ll see the screen below. Click on the “Create New Email” button to get started.
Click the button to create a new email account in Webmail.
As mentioned earlier, Webmail gives you the choice of creating an email account from a domain you manage in The Hub, or a domain managed elsewhere.
For this tutorial, we’ll select a domain being managed in The Hub.
Select the domain you want to associate your email account with from the dropdown menu and click the arrow to continue.
Select a domain managed in The Hub or elsewhere.
Next, create your email address, choose a strong password, and click on the blue arrow button to continue.
Add your username and password to create your email address.
You will see a payment screen displaying the cost of your new email address and billing start date. Click the button to make the payment and create your new email account.
Make the payment to complete setting up your email account.
Your new email account will be automatically created after payment has been successfully processed.
Our new email has been created successfully…we’re in business!
The last step to make your email work correctly is to add the correct DNS records.
Fortunately, if your site or domain are hosted with WPMU DEV, Webmail Manager can easily and automatically do this for you too!
Note: If your domain is managed elsewhere, you will need to copy and manually add the DNS records at your registrar or DNS manager (e.g. Cloudflare).
Click on the View DNS Records button to continue.
This will bring up the DNS Records screen.
As our example site is hosted with WPMU DEV, all you need to do is click on the ADD DNS Records button and your records will be automatically created and added to your email account.
If your domain is hosted with WPMU DEV click the button to automatically add the correct DNS records to make your email work.
After completing this step, wait for the DNS records to propagate successfully before verifying the DNS.
You can use an online tool like https://dnschecker.org to check the DNS propagation status.
Note: DNS changes can take 24-48 hours to propagate across the internet, so allow some time for DNS propagation to occur, especially if the domain is hosted elsewhere.
Click the Verify DNS button to check if the DNS records have propagated.
Click the Verify DNS button to check if your DNS records have propagated.
If your DNS records have propagated successfully, you will see green ticks for all records under the DNS Status column.
Your emails won’t be seen until all those ticks are green.
Your email account is now fully set up and ready to use.
Repeat the above process to create and add more emails.
Click on the + Create New Email button to add more emails.
Now that you know how to create a new email account, let’s look at how to manage your emails effectively.
Managing Your Emails
If you have set up one or more email accounts, navigate to the Webmail Manager screen any time to view a list of all connected domains, their status, number of email accounts associated with each domain, and additional options.
Manage all of your email accounts in the Webmail overview screen.
To manage your email accounts, click on a domain name or select Manage Domain Email from the Options dropdown menu (the vertical ellipsis icon).
Click on the vertical ellipsis and select Manage Domain Email to manage your email accounts.
This opens up the email management section for the selected domain.
The Email Accounts tab lists all the existing email accounts for that domain, status and creation date information, plus additional email management options that we’ll explore in a moment.
Email Accounts lists all the email accounts you have created for your domain.
Email accounts can have the following statuses: active, suspended, or disabled.
Active accounts can send and receive emails, provided DNS records have been set up and propagated correctly.
Suspended accounts occur if email activity is in violation of our webmail provider’s email sending policy.
A disabled account (see further below) only disables the sending and receiving of emails and webmail access for that email account. It does not affect billing.
Note: Unless you delete the account, you will still be charged for a disabled email account.
Email accounts can display an active, suspended, or disabled status.
Before we discuss managing individual email accounts, let’s look at other main features of Webmail Manager.
Email Forwarding
Email forwarding automatically redirects emails sent to one email address to another designated email address. It allows users to receive emails sent to a specific address without having to check multiple accounts. For example, emails sent to info@yourcompany.tld can be automatically forwarded to john@yourcompany.tld.
Every email account includes 10 email forwarders. This allows you to automatically forward emails to multiple addresses simultaneously (e.g. john@yourcompany.tld, accounts@yourcompany.tld, etc.).
To activate email forwarding hover over the arrow icon and turn its status to On and then click on Manage Email Forwarding to set up email forwarders.
Turn Email Forwarding on and click on Manage Email Forwarding to set up forwarders for an email account.
This will bring up the Email Forwarding tab. Here, you can easily add, delete, and edit email forwarders.
If no email forwarders exist for your email account, click the Create Email Forwarder button to create the first one.
Let’s create an email forwarder for this email account.
In the Add Email Forwarder screen, enter the forwarding email address where you would like incoming email messages to redirect to and click Save.
You can create up to 10 email forwarders per email account.
As stated, you can add multiple forwarding email addresses to each email account (up to 10).
Webmail’s Email Forwarding lets you easily add, delete, and edit email forwarders.
Webmail Login
With Webmail, all emails are stored on our servers, so in addition to being able to access and view emails on any device, every webmail account includes a mailbox that can be accessed online directly via Webmail’s web browser interface.
There are several ways to log in and view emails.
Access Webmail From The Hub
To log into webmail directly via The Hub, you can go to the Email Account Management > Email Accounts screen of your domain, click the envelope icon next to the email account, and click on the Webmail Login link…
Click on the envelope icon in Email Accounts to access Webmail login.
Or, if you are working inside an individual email account, just click on the Webmail Login link displayed in all of the account’s management screens…
Click on the Webmail Login link of any email account management screen to access emails for that account.
This will log you directly into the webmail interface for that email account.
Webmail’s intuitive and easy-to-use interface.
The Webmail interface should look familiar and feel intuitive to most users. If help using any of Webmail’s features is required, click the Help icon on the menu sidebar to access detailed help documentation.
Let’s look at other ways to access Webmail.
Access Webmail From The Hub Client
If you have set up your own branded client portal using The Hub Client plugin, your team members and clients can access and manage emails via Webmail with team user roles configured to give them access permissions and SSO (Single Sign-On) options enabled.
This allows users to seamlessly log into an email account from your client portal without having to enter login credentials.
Team members and clients can access Webmail directly from your own branded client portal.
Direct Access URL
Another way to log into Webmail is via Direct Access URL.
To access webmail directly from your web browser for any email account, enter the following URL into your browser exactly as shown here: https://webmail.yourwpsite.email/, then enter the email address and password, and click “Login.”
Log into webmail directly from your web browser.
Note: The above example uses our white labeled URL address webmail.yourwpsite.email to log into Webmail via a web browser. However, you can also brand your webmail accounts with your own domain so users can access their email from a URL like webmail.your-own-domain.tld.
For more details on how to set up your own branded domain URL, see our Webmail documentation.
Email Aliases
An email alias is a virtual email address that redirects emails to a primary email account. It serves as an alternative name for a single mailbox, enabling users to create multiple email addresses that all direct messages to the same inbox.
For instance, the following could all be aliases for the primary email address john@mysite.tld:
sales@mysite.tld
support@mysite.tld
info@mysite.tld
Webmail lets you create up to 10 email aliases per email account.
To create an alias for an email account, click on the vertical ellipsis icon and select Add Alias.
Let’s add an alias to our email account.
Enter the alias username(s) you would like to create in the Add Alias modal and click Save.
You can create up to 10 aliases for each email account.
Emails sent to any of these aliases will be delivered to your current email account.
Additional Email Management Features
In addition to the features and options found in the Email Accounts tab that we have just discussed, Webmail lets you manage various options and settings for each individual email account.
Let’s take a brief look at some of these options and settings.
Email Information
To manage an individual email account:
Click on The Hub > Webmail to access the Email Accounts tab
Click on the domain you have set up to use Webmail
Click on the specific email account (i.e. the email address) you wish to manage.
Click on the Webmail management screens to access and manage individual email accounts.
The Email Information tab lets you edit your current email account and password and displays important information, such as status, creation date (this is the date your billing starts for this email account), storage used, and current email send limit.
Edit and view information about an individual email account in the Email Information tab.
In addition to the Email Information tab, you can click on the Email Forwarding tab to manage your email forwarders and the Email Aliases tab to manage your email aliases for your email account.
Note: Newly created accounts have send limits set up to prevent potential spamming and account suspension. These limits gradually increase over a two-week period, allowing email accounts to send up to 500 emails every 24 hours.
Each email account’s send limits increase over two weeks and can send up to 500 emails per 24 hours.
Coming soon, you will also be able to add more storage to your email accounts if additional space is required.
Upgrade your email account storage space (coming soon!)
Now that we have drilled down and looked at all the management tabs for an individual email account, let’s explore some additional features of the Webmail Manager.
Go back to The Hub > Webmail and click on one of the email accounts you have set up.
DNS Records
Click on the DNS Records tab to view the DNS Records of your email domain.
Set up and verify your email DNS records in the DNS Records tab.
Note: The DNS Records tab is available to team members and client custom roles, so team members and clients can access these if you give them permission.
Configurations
Click on the Configurations tab to view and download configuration settings that allow you to set up email accounts in applications other than Webmail.
Download and use the configurations shown in this section to set up email accounts in other applications.
The Configurations tab is also available for both team member and client custom roles.
Client Association
If you want to allow clients to manage their own email accounts, you will need to set up your client account first, assign permissions to allow the client to view Webmail, then link the client account with the email domain in the Client Association tab.
After setting up your client in The Hub, navigate to the Client Association tab (The Hub > Webmail > Email Domain) and click on Add Client.
You can let clients manage their own email accounts by linking the email domain with their client account.
Select the client from the dropdown menu and click Add.
Linking the email domain with a client allows them to manage their email accounts.
Notes:
When you associate a client with an email domain, SSO for the email domain is disabled in The Hub. However, your client will be able to access Webmail login via The Hub Client plugin.
The Client Association tab is only made available for team member custom roles.
Reseller Integration
We’re currently working on bringing full auto-provisioning of emails to our Reseller platform. Until this feature is released, you can manually resell emails to clients and bill them using the Clients & Billing tool.
Once Webmail has been fully integrated with our Reseller platform, you will be able to rebrand Webmail as your own and resell everything under one roof: hosting, domains, templates, plugins, expert support…and now business emails!
Resell professional business emails under your own brand!
Congratulations! Now you know how to set up, manage, and resell Webmail in your business as part of your digital services.
Email Protocols – Quick Primer
WPMU DEV offers the convenience of using both IMAP and POP3 email.
Not sure what IMAP is, how it works, or how IMAP differs from POP3? Then read below for a quick primer on these email protocols.
What is IMAP?
IMAP (Internet Message Access Protocol) is a standard protocol used to retrieve emails from a mail server. It allows users to access their emails from multiple devices like a phone, laptop, or tablet, because it stores emails on the server, rather than downloading them to a single device.
Since emails are managed and stored on the server, this reduces the need for extensive local storage and allows for easy backup and recovery.
Additional points about IMAP:
Users can organize emails into folders, flag them for priority, and save drafts on the server.
It supports multiple email clients syncing with the server, ensuring consistent message status across devices.
IMAP operates as an intermediary between the email server and client, enabling remote access from any device.
When users read emails via IMAP, they’re viewing them directly from the server without downloading them locally.
IMAP downloads messages only upon user request, enhancing efficiency compared to other protocols like POP3.
Messages persist on the server unless deleted by the user.
IMAP uses port 143, while IMAP over SSL/TLS uses port 993 for secure communication.
The advantages of using IMAP include the following:
Multi-Device Access: IMAP supports multiple logins, allowing users to connect to the email server from various devices simultaneously.
Flexibility: Unlike POP3, IMAP enables users to access their emails from different devices, making it ideal for users who travel frequently or need access from multiple locations.
Shared Mailbox: A single IMAP mailbox can be shared by multiple users, facilitating collaboration and communication within teams.
Organizational Tools: Users can organize emails on the server by creating folders and subfolders, enhancing their efficiency in managing email correspondence.
Email Functions Support: IMAP supports advanced email functions such as search and sort, improving user experience and productivity.
Offline Access: IMAP can be used offline, allowing users to access previously downloaded emails even without an internet connection.
There are some challenges to setting up and running your own IMAP service, which is why using a solution like WPMU DEV’s Webmail is highly recommended:
Hosting an IMAP service can be resource-intensive, requiring more server storage and bandwidth to manage multiple connections and the storage of emails.
IMAP requires implementing SSL encryption to ensure secure email communication.
Smaller businesses might find it challenging to allocate the necessary IT resources for managing an IMAP server efficiently.
IMAP vs POP3: What’s The Difference?
IMAP and POP3 are both client-server email retrieval protocols, but they are two different methods for accessing email messages from a server.
IMAP is designed for modern email users. It allows users to access your email from multiple devices because it keeps their emails on the server. When users read, delete, or organize their emails, these changes are synchronized across all devices.
For example, if you read an email on your phone, it will show as being read on your laptop as well.
POP3, on the other hand, is simpler and downloads emails from the server to a single device, then usually deletes them from the server. This means if users access their emails from a different device, they won’t see the emails that were downloaded to the first device.
For instance, if you download an email via POP3 on your computer, that email may not be accessible on your phone later.
Here are some of the key differences between IMAP and POP3:
Storage Approach
IMAP: Users can store emails on the server and access them from any device. It functions more like a remote file server.
POP3: Emails are saved in a single mailbox on the server and downloaded to the user’s device when accessed.
Access Flexibility
IMAP: Allows access from multiple devices, enabling users to view and manage emails consistently across various platforms.
POP3: Emails are typically downloaded to one device and removed from the server.
Handling of Emails
IMAP: Maintains emails on the server, allowing users to organize, flag, and manage them remotely.
POP3: Operates as a “store-and-forward” service, where emails are retrieved and then removed from the server.
In practice, IMAP is more suited for users who want to manage their emails from multiple devices or locations, offering greater flexibility and synchronization. POP could be considered for situations where email access is primarily from a single device, or there is a need to keep local copies of emails while removing them from the server to save space.
Essentially, IMAP prioritizes remote access and centralized email management on the server, while POP3 focuses on downloading and storing emails locally.
Professional Business Email For Your Clients
Integrating email hosting, particularly IMAP, with web hosting to create a seamless platform for managing client websites and emails under one roof is challenging, costly, and complex.
With WPMU DEV’s Webmail, you can enhance your email management capabilities and provide clients with affordable and professional business email no matter where their domain is hosted that is easy-to-use and does not require a third-party app.
Note: If you don’t require the full features of IMAP email for a site hosted with WPMU DEV, we also offer the option to create POP3 email accounts with our hosted email. These accounts can be linked to any email client of your choice, ensuring flexibility and convenience.
If you’re yet to set up a WPMU DEV account, we encourage you to become an Agency member. It’s 100% risk-free and includes everything you need to manage your clients and resell services like hosting, domains, emails, and more, all under your own brand.
If you’re already an Agency member, then head over to your Hub and click on Webmail to get started. If you need any help, our support team is available 24×7 (or ask our AI assistant) and you can also check out our extensive webmail documentation.
We’re thrilled to unveil one of our most highly-requested features: Webmail, a professional business email service tailored for agencies and resellers that seamlessly integrates with WPMU DEV’s all-in-one WordPress management platform.
“IMAP is crucial to how we work”
Matthew, WPMU DEV Member
More and more members have been telling us that they need:
A solution that doesn’t solely depend on third-party email clients such as Gmail.
The ability to synchronize, administer, and access email across various devices using IMAP.
User-friendly business email for their clients with a quick and easy setup.
An alternative to managing their own email server and dealing with all the intricacies and expenses involved.
When our members speak, we listen!
We’re happy to announce that we have met these requirements and we’re excited to finally deliver Webmail, the IMAP-based email hosting solution our members have asked for … all easily managed from your Hub!
Now you can finally give your clients professional business email without relying on limited POP3 email, third-party platforms, or other complex and costly workarounds.
Standalone Email That Truly Stands Out
Being IMAP-based means our Webmail provides greater flexibility in email account creation.
Each email account boasts an impressive array of features:
5GB of storage for every inbox.
Complimentary 10 email forwarding and 10 email aliases.
Robust spam and virus protection (including smart filtering, single sign-on, password protection, and 2FA).
Use of your own domain.
Modern & user-friendly email client with intuitive and feature-rich mailbox.
Fast and easy IMAP configuration with all popular mail clients and WordPress SMTP plugins.
Mobile-friendly, secure, ad-free webmail.
One-click webmail login.
Vacation autoresponder, professional signature, calendar integration, contact management, and more.
Support for maximum file attachment size of 27MB.
Unlimited mobile devices and IMAP connections.
Auto-sync across all devices.
And that’s just for starters!
Create & Manage Client Email Accounts From The Hub
With The Hub, you can easily set up and manage everything for multiple clients from once central location: their sites, hosting, domains, plugins…and email accounts!
Creating email accounts with Webmail is as easy as 1-2-3…
Click on Webmail in the Hub…
Manage all email accounts from one central location with The Hub.
Click the “+ Create New Email” button to create an email account from a domain managed in The Hub or hosted elsewhere…
Click the button to create a new email account.
Just follow the prompts and your email account will be all set up and ready to go in no time.
Your new email account is good to go!
Here you can also manage your webmail email forwarders…
Easily add and delete email forwarders with Webmail.
And email aliases…
Create up to 10 email aliases per email account.
For a more detailed tutorial on creating and managing email accounts with Webmail, see our guide on how to use webmail.
Connect to Popular 3rd-Party Apps
Webmail can easily connect to 3rd-party apps (e.g. Apple Mail, Gmail, MS Outlook, Zoho, and many others) via IMAP configuration. Even if your clients aren’t tech-savvy, they should have no problem using their favorite email apps.
Easily connect your email accounts to third-party apps.
However, Webmail does not require any third-party app to work, and our own integrated email client includes all of the essential mailbox features your clients need to effortlessly and conveniently manage their email.
Give Clients More Control
With Webmail, everything your clients need to access and manage their emails is included right out of the box, and you can create professional business emails for them no matter where their domain is hosted.
Webmail lets you set up email accounts on any domain you own or manage, whether it’s a root domain like mydomain.com or a subdomain such as store.mydomain.com.
It also doesn’t matter if the domain is directly associated with a site in your Hub or not.
Webmail lets you create email accounts from a domain managed in the Hub, or from a domain managed elsewhere.
Give Clients More Freedom
Unlike POP email, which doesn’t sync across devices, our IMAP Webmail lets your clients access their latest email activity no matter where they check it or which device they prefer to use…phones, laptops, tablets, even their smartwatch!
Additionally, Webmail includes a powerful user-friendly mailbox that clients can log into from anywhere, on any device, to read and send emails.
Every Webmail account comes with a comprehensive and user-friendly inbox that can be accessed from any device…even directly from their web browser!
Webmail is Affordably-Priced
Each business email account (e.g. hey@yourcompany.tld), is considered an individual account and is available at an affordable price of just $1/month.
Each IMAP email account you create will be billed as a separate paid add-on, including 5GB of email storage.
Resell Webmail Under Your Own Brand
Team members and clients access white label Webmail in your own branded client portal.
Webmail is already white labeled for reselling to your clients. Automated reseller for Webmail is coming next!
We’re currently working on bringing full auto-provisioning of emails to our Reseller platform. Until this feature is released, members can manually resell emails to clients and bill them using our Clients & Billing tool.
Full Reseller integration with Webmail means you will soon have access to all of Reseller’s features under one roof.
This includes:
White label hosting, domains, client billing, and more.
Auto-connect emails to client domains for easy reselling (coming soon!)
DNS management with quick and simple DNS verification for emails and domains.
24/7 Expert support
Anytime priority email support for you and your clients.
Get Started With Webmail Today!
Interested in using Webmail for your web dev clients? It’s fully exclusive to our Agency plan.
If you’re already an Agency member, then head over to The Hub and check it out!
If you haven’t set up a WPMU DEV account yet, we encourage you to become an Agency member. It’s 100% risk-free and includes everything you need to manage your clients and resell services like hosting, domains, emails, and more, all under your own brand.
With over 500,000 downloads, Forminator has quickly evolved into a powerful plugin, beloved for its user-friendly design, extensive features, and robust integrations.
Forminator’s journey from zero to form hero … 500K+ downloads and counting!
How do you grow a plugin from zero to hero and make it shine in a market saturated with plugins? Read on to find out…
Since its inception, Forminator has been consistently evolving, introducing new features and integrations that have significantly enhanced its functionality and user base.
In this article, we take a look at how Forminator became the go-to custom form solution more web developers are choosing to add interactive contact forms, payment forms, polls, quizzes, and more to WordPress sites.
Forminator started out as a nerdy superhero before becoming a fully white labeled plugin!
October 2018: Surpassed 4,000 active installations.
January 2019: Reached 10k active installations.
June 2019: Achieved 20k active installations.
July 2020: Crossed 60k active installations.
August 2021: Exceeded 200k active installations.
February 2023: Surpassed 400k installations.
January 2024: Reached a landmark of 500k installations.
The above timeline not only highlights the continuous improvements and enhancements made to Forminator but also showcases the growing trust and reliance of the WordPress community on this versatile plugin.
According to our users, here’s what many like best about Forminator:
1. Comprehensive Free Features
Forminator offers a vast array of functionalities without the need for a Pro upgrade. Users can create custom forms, polls, quizzes, and payment forms at no cost that support integrations with PayPal and Stripe for financial transactions, making the plugin an all-encompassing solution for gathering information, engaging users, and facilitating payments.
2. User-Friendly Design
Forminator boasts a drag-and-drop visual builder that simplifies the process of form creation and customization. The plugin’s accessibility features and intuitive interface cater to both beginners and advanced users, ensuring that adding forms to a WordPress site is simple, easy, and very straightforward.
3. Responsive Support Team
WordPress users rave about our award-winning customer support, which is highly responsive and helpful, and extends not only to all of our products and services, including Forminator, but also anything WordPress-related.
Also, as a Stripe Verified Partner, Forminator benefits from a direct line to additional resources and support. This partnership highlights our plugin’s commitment to provide a reliable service and ensure that users can maximize the functionality of their Stripe integration.
4. Wide-Ranging Integration
Forminator offers seamless compatibility with a plethora of third-party services, including email marketing tools, CRM systems, and project management platforms.
Integration with over a dozen services like HubSpot, Mailchimp, Google Sheets, Slack, Trello, and newer additions like Mailjet (plus over 1000 apps when using Forminator’s Webhooks integration) ensures seamless workflows and enhanced productivity.
Additionally, Forminator’s full-featured API enables connections with a wide range of services and automation tools, enhancing its utility and flexibility.
5. Deep Customization
Beyond basic form creation, Forminator allows for deep customization through a variety of drag-and-drop blocks and field types. Users can tailor forms to their specific needs, whether for GDPR compliance, social media quizzes, or customer feedback.
6. Advanced Functionalities
For users requiring more sophisticated capabilities, Forminator offers advanced features such as e-signature collection, subscription and recurring payments on Stripe, custom login/registration forms, multi-step forms, file uploads, and integrations with many applications and platforms.
These functionalities, available with Forminator Pro, extend the plugin’s utility to virtually any scenario.
Forminator’s Challenges
Forminator’s popularity continues to grow despite having faced challenges and hurdles since launching, such as:
Standing Out in a Crowded Market
The WordPress plugin ecosystem is highly competitive. With almost 60,000 free WordPress plugins listed in the WordPress.org plugin directory and thousands more premium and custom plugins available to extend and enhance the functionality of WordPress sites, it’s tough for any plugin to stand out.
Forminator has continually addressed this challenge by developing unique features and making these freely available where most would charge for them, consistently delivering exceptional, award-winning support to users, and always being willing to actively engage with its user community.
User Feedback and Feature Requests
They say that you can’t please everybody, but we try our darndest to do this.
Handling the diverse needs of our users has required the implementation of multiple feedback systems to prioritize plugin improvements.
We encourage user feedback and feature requests not only for Forminator, but for all areas of our platform, and we do this by actively engaging our user community through our support channels, member’s forums, holding Discussions of The Week (DOTW), running user surveys, and more.
User Interface Usability
Trying to achieve a balance of providing advanced features while remaining easy to use has led to extensive and continuous UX/UI testing and refinements of Forminator’s interface and feature usability by our development team.
For example, to view just how much work has gone into improving the Free version of Forminator alone, check out the plugin’s extensive and fully documented development log on WordPress.org.
While we’re really pleased with Forminator’s growth to date, achieving success amidst a saturated WordPress plugin market has been no small feat.
Developing Forminator from an idea into one of the “Top 5” form plugins for WordPress is an ongoing effort requiring not only the daily cooperation between all members of our team and feedback from our valued users, but also a comprehensive approach that involves:
Performing diligent market analysis to understand the current landscape and identify gaps, trends, and opportunities,
Conducting in-depth research of our existing user base to understand their needs, preferences, and pain points,
Implementing robust and meticulous tracking of user behavior to understand user interactions with the plugin and which features are being most utilized or neglected.
Gathering insights from our analysis, support, and product development teams to prioritize and develop new features and innovative functionalities that will exceed our users’ expectations and deliver greater value than our competitors,
Continuously iterating and enhancing the plugin, leveraging user feedback and data-driven decisions.
As Forminator’s popularity and usage increases, our plugin development team remains hard at work and committed to achieve the following aims:
Introduce New Free Features
Innovation and user feedback drive the addition of new functionalities. To keep track of new developments and view Forminator’s upcoming features, visit our Roadmap.
Pursue Community-Driven Development
As our entire platform is geared toward helping WordPress web developers and digital agencies grow their business, we value our users’ insights and their experiences, and this significantly influences our development roadmap.
Enhance Integrations
As new technologies and applications emerge, we will continue to expand Forminator’s integrations with key services and platforms to offer more versatility to our users.
Focus on Performance and Reliability
Our plugin development team regularly reviews and optimizes all aspects of Forminator to ensure that as new features and functionalities get added, the plugin will continue to remain fast, reliable, and efficient, whether users choose to download and use the free or Pro version.
Have You Discovered the Power of Forminator Yet?
Forminator’s journey from its initial release to surpassing 500,000 downloads is a testament to WPMU DEV’s commitment to innovation, user satisfaction, and adaptability.
With a focus on user-friendly design and versatility, comprehensive features, and robust integrations, Forminator’s broad feature set and ease of use make it a standout choice for all WordPress users looking to enhance their site’s interactivity, collect payments, and more, all while maintaining a user-friendly and accessible interface.
The future looks promising for Forminator, with plans for new features catering to a wide range of needs, enhanced integrations, and a dedication to performance and reliability.
If you are a current Forminator user, we thank you for helping us reach the 500k download milestone. We truly value your feedback and input into helping us to continually improve the plugin’s features and ease of use.
If you haven’t experienced the power and simplicity of Forminator yet, we invite you to make it a staple in your web development or digital agency’s toolkit. Download Forminator for free or become a WPMU DEV member today and experience Forminator Pro risk-free for 30 days.
We look forward to celebrating 1 million downloads of Forminator with you in the very near future.
WPMU DEV’s Reseller lets you offer domain registrations on your website and white label client portal. Learn how to easily add Domain Reseller to attract and retain more clients, offer additional web services, and boost your business revenue!
Add a new source of revenue to your business with Domain Reseller.
Reselling domains is a great way to get new business through the door, offer a low-cost web service, and retain clients for the long-term.
Note: Reseller is only available to Agency plan members.
In this step-by-step guide, we’ll show how to set up and integrate full domain reseller automation with your business, covering the following sections:
Great! Then let’s show you how easy and straightforward setting up Domain Reseller is …
Add Domains and Set Pricing
Go to The Hub > Reseller > Domain Reseller and click on the +Add TLDs button …
Click on the button to set up Domain Reseller.
This will bring up the Add TLDs screen, where you can select which top-level domains (TLDs) you want to resell and set retail pricing for your domains.
Add your TLDs and set up your domain pricing.
There are currently 250+ TLDs you can resell under your own brand (and more coming soon).
After selecting TLDs, the next step is to add a markup (i.e. your profit) to your wholesale domain pricing across all domains.
There are two ways to set the markup price:
Specify a percentage: For example, setting a value of “10” will increase the price of all domains by 10%, so a domain that costs you US$20 to buy will retail to your clients at US$22.
Set a fixed price markup (in USD): With this option selected, setting a value of “10” will increase the price of all domains by USD$10, so a domain that costs you US$20 to buy will retail to your clients at US$30.
Note: After setting a global markup price, you can edit the markup for individual TLDs, as we’ll show you later.
After selecting your TLDs and setting your global markup price, click on the Add TLDs button to save your settings.
Resell 250+ TLDs with Domain Reseller (more coming soon!)
Your selected TLDs will be automatically configured and display in The Hub’s Domain Reseller tab.
View your domain cost and retail prices in The Hub’s Domain Reseller tab.
Edit Domain Details
Reseller applies a global markup to domains during the initial set up. However, you can also set individual and bulk markups to domains.
To edit an individual domain’s markup value, click on the ellipsis icon next to the domain and select Update TLD.
You can edit the markup value of a single domain.
Specify the % or USD value of the markup for the selected domain and click on the Update TLD button. This adjustment will not affect other domains in your account.
In this example, we are increasing the price of our selected domain by USD$5.
To bulk edit the markup for multiple domains, tick the checkboxes of the domains you wish to edit and click on Update TLDs. (Note: Click on the checkbox next to Update TLDs to toggle and select/deselect all domains).
Save time and easily bulk update TLDs.
Select multiple domains to edit by clicking on their checkboxes. Specify the % or USD value of the markup for all selected domains and click on the Update TLDs button to adjust their pricing.
In this example, we’ll increase the price of the three selected domains by 25%.
You can also remove TLDs from your account individually or in bulk, by either clicking on the ellipsis icon of a single domain, or selecting multiple domains and clicking on Delete TLDs.
Click on Delete TLDs to remove the above selected domains from your Reseller account.
A notification message will appear asking you to confirm your deletion.
Please note the following:
Clicking Delete will remove the selected domains from your account. This will prevent new clients from buying the deleted TLDs. Any existing domains that have already been purchased with the deleted TLDs will remain intact, but your clients won’t be able to renew them.
Click Cancel to abort the deletion request and retain all selected domains in your account.
Make sure you really want to remove domains from your account, as clients won’t be able to renew deleted TLDs.
Additional editing features of Domain Reseller include a search filter that you can use to quickly locate domain extensions.
Use the search feature to quickly find domain extensions.
You can also add TLDs to your account by clicking the + Add TLDs button.
Click the + Add TLDs button to include additional TLDs.
This feature is useful if new TLDs are introduced later to Reseller, or if you have not selected all available domains during your initial Domain Reseller setup.
Note: If the + Add TLDs button is grayed out, it means that all available TLDs have already been added to your Domain Reseller account.
A grayed out button indicates that all available TLDs have already been added to your account.
Now that you have a better understanding of how to add and edit domains, let’s look at how to configure Domain Reseller settings.
Configure Domain Reseller Settings
After adding domains and specifying their markup, head over to the Reseller > Settings tab to configure your Domain Reseller settings.
Configure Domain Reseller features in the Settings tab.
Here’s a brief overview of each setting:
Default Client Role
This section lets you specify the default client role that will be assigned to new clients who purchase domains.
Specify the default role for new domain clients.
Note: Go to The Hub > Clients & Billings > Roles to set up and configure roles for your clients. For more information see our documentation: Client Roles.
Round Off Prices
Select the number of decimal places to round off and display TLD pricing for domains.
Round off TLD prices when domains are displayed.
Taxes
The tax rates you select here will be automatically added to the total price of the domain purchase during checkout.
Add taxes to domain purchases.
To select taxes, create one or more tax rates in the Taxes section of The Hub > Clients & Billing area.
Set up taxes to be added to domain purchases in The Hub’s Clients & Billing section.
After adding TLDs to Domain Reseller and configuring your domain pricing and settings, it’s time to make these available for purchase.
Make Domains Available For Purchase
With Reseller, clients can easily purchase domains directly from your website, all under your own brand.
Your clients will not be directed away to a third-party payment processor to complete their purchase. Everything is handled on your site from start to finish using our white label client portal plugin, The Hub Client.
After installing and configuring The Hub Client on your main website, navigate to The Hub Client > Reseller section in your dashboard menu…
Resell domains from your white label client portal using The Hub Client.
Next, click on the Domain Reseller tab.
The Domain Reseller screen will display a list of all the domains and pricing markups that you have set up in The Hub, as well as links to support, documentation, and a configurable widget that allows you to embed domains for resale on your website.
The Hub Client Domain Reseller screen.
To configure the domains widget, scroll down the Domain Reseller page and click on the Customize domain widget button.
Add an easy search & buy widget to your site.
The customizable widget allows you to change the background, label and button colors of the domains table on your site.
Customize your domain reseller widget to match your brand.
The Hub Client generates a shortcode and a Domain Reseller Gutenberg block that lets you easily embed the widget anywhere on your site.
Embed the domain widget on your site using a shortcode or block … easy!
In the screenshot below, you can see how we have added the widget to a page using the Domain Reseller block and the block’s available settings.
Add the widget anywhere on your site using the Domain Reseller block.
When done, simply publish and visit your page to view and test your live widget.
Can you see the widget on your site? Great! Then you are ready to start selling domains.
Type in a domain name into the search field and click on the Search Domain button to view the results your clients will see when visiting your site.
Your domain results page, showing matching TLDs and additional suggestions.
Here is a nifty little feature of the Domain Reseller widget:
If a client types in a domain with the TLD extension included (e.g. exampledomain.com), the results page will display (Exact Match) next to the domain if it’s available.
Go on, click the button … you know you want to buy it!
After searching for available domain names and clicking on the Buy Now button, your client will be asked to create an account on your client portal site or log into an existing account.
Clients can create an account or log into their existing one.
The client will then be stepped through the domain registration process … all inside your client portal!
First, they will be asked to enter their Registrant Information details.
The domain registration screen where clients are asked to enter their details.
Next, they will be taken to the checkout screen and asked to complete their purchase.
Reseller provides you with effortless and automated client self-checkout.
Manage Client Domains
The automation doesn’t stop after clients successfully register and purchase domains from your site.
You’ll be automatically notified via email of every domain purchase.
You’ll be automatically notified via email when a client purchases a domain.
Purchased domains are accessed and managed inside your white label client portal, where clients can also pay for renewals and add new domains.
Note: If domains are not set to auto renew, your clients will automatically receive domain expiry reminders 90, 60, and 30 days before the expiry date.
You can access all of your clients’ purchase details from The Hub’s Clients & Billing section.
Manage clients and view sales activity from The Hub’s Clients & Billing section.
With domain reseller set up, your clients can now search for and buy domains directly from your site or client portal, under your own brand, at the price you set … all automated from start to finish!
Also, check out our Reseller tutorials for practical tips and additional information.
Additional Features (Coming Soon)
In addition to reselling domains, hosting, and templates directly on your website through your white-label client portal, we are working on a host of other great features that Resellers will soon have access to.
For example, domain and hosting purchases currently require separate checkouts. Very soon, when your clients buy hosting they’ll be prompted to add a domain (or vice versa), and everything will be automatically connected and propagated for them, including DNS setup … making the entire process seamless and hands-free for you!
Additional features of the Reseller platform that we are working on include:
Country-specific TLDs
Domain Transfers
Webmail
A fully integrated ticketing system for the client portal that will streamline the way you communicate with your reseller clients and assist them.
Agency comes with a full risk-free money-back guarantee. So, if within the first 30 days you’re not satisfied with the platform, just cancel and we’ll refund you in full, no questions asked.
In fact, we’re so excited about the future of our Reseller platform and its tremendous potential to transform and grow your business, that we are giving away $1 million in hosting credits to Agency members.
All new Safe Repair feature makes repairing and quarantining malicious files with Defender Pro smoother and safer than ever before for WordPress users!
View quarantined files using Defender’s Safe Repair feature from The Hub.
Defender, WPMU DEV’s powerful WordPress security plugin, recently launched its all new version 4.1, which ensures maximum compatibility with the latest version of WordPress, and — more importantly for Pro users — is designed to streamline the process of repairing and quarantining modified files, suspicious files, and offer users a safer alternative to deleting files.
In this post, we’ll focus on this new feature and cover the following areas:
As a user-driven company, we listen to what our members and users want. Especially when it comes to addressing issues, as outlined in the comments below from our Defender plugin users:
“I was running a malware scan with Defender Pro, and I think I accidentally deleted a file which I shouldn’t have. Now the website is down with a critical error.”
“Our website is currently down after removing two attached files that Defender Pro recommended removing.”
“It would be wonderful if Defender Pro allowed us to quarantine a file in addition to the options of deleting a file or ignoring it. That way if the suspicious file breaks the site, it can be restored easily instead of having to restore the entire site from a backup.”
Using the above feedback, our developers decided to improve our security plugin and add the following options to avoid serious issues and errors on users’ WordPress sites:
Repair and Quarantine/backup suspicious files so these can be restored if necessary.
Repair and Quarantine/backup modified files so these can be restored if necessary.
Defender Malware Scanning scans your entire site for suspicious code or modified files and published vulnerabilities in plugins, themes, and WordPress core.
The new Safe Repair feature applies to reported suspicious and modified files, allowing these to be quarantined, deleted, or replaced with the latest file copies from their official plugin repository.
Defender detects and warns users of plugin, theme, and core vulnerabilities. Note: the plugin shown in the above screenshot was modified for illustrative purposes.
How Does Safe Repair Work?
As explained earlier, Defender Pro’s Safe Repair feature within the Malware scanning section is designed to streamline the process of quarantining files before repairing or deleting them, offering a safer alternative to outright suspicious or modified file deletion.
Here’s how Defender Pro handles these requests from version 4.1 onward:
Suspicious Files
Defender flags PHP functions, code, and files when they vary from what is expected or when they match known issues.
Defender detects and flags files with suspicious code.
Once a flagged function or suspicious code has been verified as suspicious, Defender presents you with three actions: Ignore, Delete, or Safe Repair (note: you may need to deactivate the plugin for the ‘Delete’ option to become active).
Prior to v4.0, deleting suspicious files would occasionally cause a plugin, theme, or even the entire website to break. Often, this is caused by code from the plugin or theme itself being flagged by Defender as being suspicious.
The problem, however, appears when it’s a false positive, meaning that the flagged file isn’t malicious per se, but part of the plugin’s (or theme’s) core files and contains risky code added by the theme or plugin developer. Hence, deleting this file could cause errors on the site, break functionality, or even break the entire site.
From Defender Pro v4.1 onward, users can now opt to repair and quarantine/back up suspicious files for 30 days or more, instead of deleting the file right away. Files are stored under the new quarantine tab, allowing you to restore these if needed, including restoring files manually. This provides a fail-safe method to handle suspicious files and offers a restoration option if things go wrong or return false-positives.
Note: The Safe Repair option becomes available only if the suspicious code found differs from the plugin’s original code. Also, Safe Repair only works with WordPress.org plugins currently.
Modified Files
If code in a plugin, theme, or WordPress core file doesn’t match what is found in the official WordPress repository. Defender will flag the file as a Modified file. Restoring the original file fixes this issue.
Earlier versions of Defender (and Defender Free plugin) feature a “Restore” button in the plugin’s Malware Scanning section, which fetches a fresh file from the WordPress repository and replaces the existing file in the server directory.
Earlier versions of Defender offer only the option to restore modified files with a fresh version of the file.
However, when a file has been modified by an admin or site developer (e.g. by adding a custom code for a certain functionality), deleting or replacing the file with its original can result in the loss of custom code or functionality, and in some cases, lead to sites breaking.
In Defender Pro, Restore is now Safe Repair. This new feature not only replaces the modified file with the original file from the WordPress repository, it also adds an option to quarantine the modified file before replacing it, allowing users to restore the file if required.
The new Safe Repair feature of Defender Pro allows users to restore replaced files.
Repairing Files
Repair is a handy feature to have when a file in the server directory gets modified for any reason. It smartly fetches a fresh file from the WordPress repository and swaps it with the current file in the server directory. (See below for more details on how to use this feature.)
Quarantined Files
Modified and/or suspicious files on your server are quarantined and moved to a remote directory (/wp-content/.defender-security-quarantine), allowing you to restore the files if needed (explained in more detail further below).
Also, make sure that you have enabled the plugin’s settings as shown below for the Safe Repair feature to work.
The above settings must be enabled for Safe Repair to work.
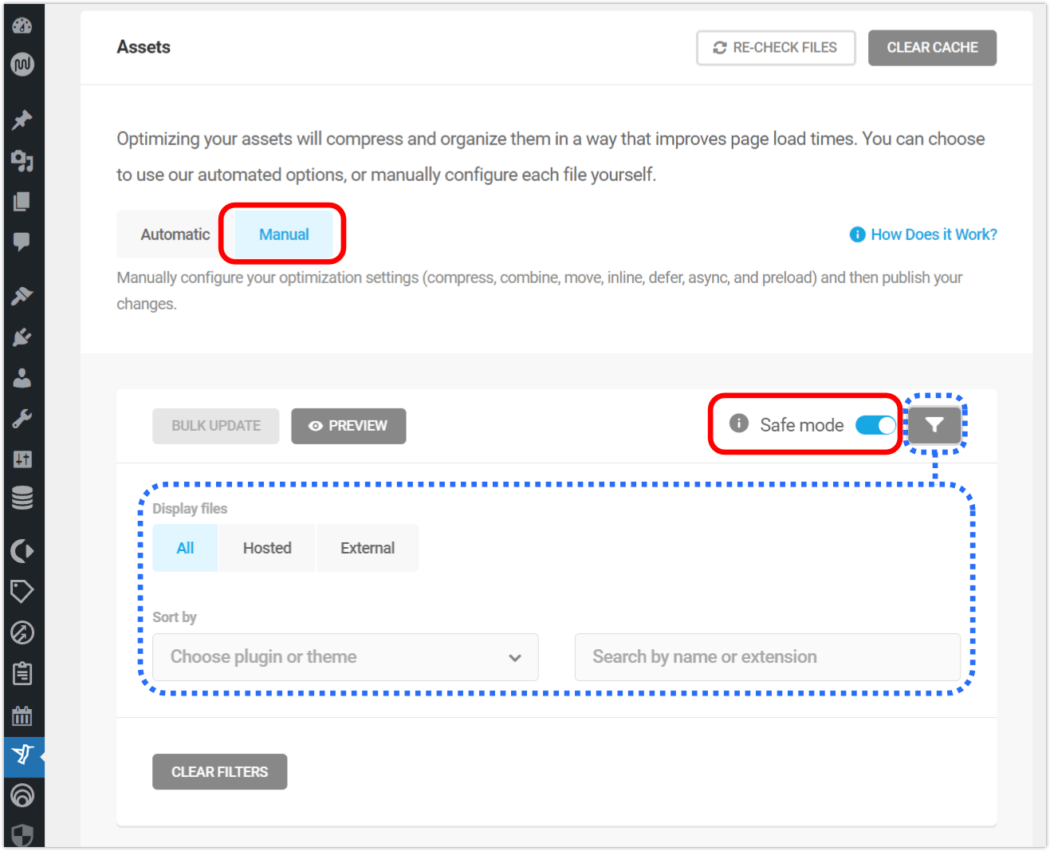
With Defender Pro v4.1 (minimum) installed and the above settings configured, run a fresh Malware Scan by going to Defender > Malware Scanning > New Scan…
Run a malware scan in Defender.
Once the scan is completed, check for modified or suspicious files.
A malware scan showing modified files and suspicious code detected.
Next, click on the Malware Scanning > Issues tab.
Select a file and click on the Safe Repair button.
You will be given the option to repair and/or quarantine the selected file.
We recommend quarantining files before repairing them.
Note that by default, quarantined files will remain isolated for 30 days before being automatically deleted. You can configure quarantine duration in the Malware scanning settings if you want to change this default period.
You can change the quarantine period in the Malware Scanning settings section.
Restoring Quarantined Files
You can restore quarantined files in one of two ways:
Via WordPress Admin: Go to Defender > Malware scanning > Quarantined section.
Via The Hub: Use the Quarantined Hub widget under the Security tab.
Restoring Quarantined Files Via The WordPress Admin
Quarantined files are listed under the new quarantine tab.
Defender stores all of your quarantined files in the Quarantined section.
To restore quarantined files from your WordPress admin, log into your WordPress site, and go to Defender Pro > Malware Scanning > Quarantined.
View all of your quarantined files in the Malware Scanning section.
This section lets you go through your quarantined files and choose to either restore or permanently delete these.
Restore or delete your quarantined files.
Files can also be restored manually by downloading them from /wp-content/.defender-security-quarantine.
Restoring Quarantined Files Via The Hub
The Hub’s Security tab lists your most recent quarantined files (up to a maximum of 5 files) and provides the following options, depending on whether the website is running or not.
If the website is up – files can be restored from the Hub.
If the website is down – instructions will display on how to restore the quarantined file(s) manually using FTP/SSH
Monitor quarantined files in The Hub’s Security section.
Repair Files Safely Using Defender
Defender 4.1 now lets you apply a powerful combination of quarantining and repairing modified or suspicious file threats and isolating files instead of deleting these entirely, lessening the risk of breaking your site, as quarantined files can be restored if required.
For full details on using the new Safe Repair feature and all of its options, see the Defender plugin documentation section.
Our formtastic team’s done it again! Forminator’s new Geolocation Add-on with Google Maps API integration lets you effortlessly gather geolocation data from your form submissions and provide address auto-completion for a smoother user experience.
See where form users are located with Forminator’s new geolocation feature.
After releasing the highly anticipated PDF Generator Add-on, we’re proud to announce another powerful addition to our form-building plugin…Geolocation add-on!
If your business needs to collect location information from users, Forminator Pro with Geolocation Add-on is the only form-building plugin you’ll need.
Key Benefits of Using Forminator’s Geolocation Add-on
With Forminator’s Geolocation Add-on enabled, you can enhance forms on your site in the following ways:
Accurate Location Detection
Forminator can precisely pinpoint the user’s location by harnessing the device’s GPS or IP address.
This information is seamlessly integrated into your forms, giving you real-time access to where your users are located.
Moreover, the Geolocation feature includes a convenient address lookup function, allowing users to search for and select their location using postal addresses, city names, or zip codes.
See the user’s location in your form submissions.
Interactive Map View
One of the standout aspects of the Geolocation feature is its map view. Not only can users see their location on a map but also interact with it.
Users have the option to manually input their location or select it directly from a map marker. This dynamic map view enhances user engagement and makes it easy for users to provide accurate location details.
Customization Options
Forminator’s Geolocation offers a range of customization options to suit your needs. You can configure the display of Google Maps next to your address field, choose whether to position the map above or below the address field, and even adjust the map’s size, ensuring a responsive or custom fit for various devices.
Additionally, you have the flexibility to set a default map location based on specific latitude and longitude coordinates.
You can easily customize your map’s geolocation options.
Seamless Integration
To utilize the Geolocation feature, simply enter your Google Maps API key in the Geolocation settings, ensuring a seamless and reliable experience for your users.
Global Settings
For ease of use across all your forms, you can enable Geolocation as a default setting on all address fields throughout your site. This simplifies the process of collecting location information from your users.
Enable Geolocation as a default setting on all new forms.
User-Friendly Configuration
If you require users to provide location access before submitting a form, the “Require access to users’ location” option can be enabled. Additionally, you can customize the error message displayed if users choose not to provide location access.
How To Use Forminator’s Geolocation Add-on
To install and use the Geolocation Add-on, you’ll need to have Forminator Pro installed and activated on your site.
Forminator Pro is included in all paid memberships, so if you’re not a WPMU DEV member yet, consider becoming one by choosing one of our risk-free membership plans.
With Forminator Pro installed, go to the Add-Ons section of the plugin’s menu and click Install.
Install Geolocation in the plugin’s Add-Ons screen.
Once the plugin has been installed, click Configure.
You’ll need to configure the Add-On before you can use it.
You’ll need to add a valid Google Maps API key to enable and set up geolocation on your forms. Refer to our Forminator Docs for instructions on obtaining this key if you need help with this step.
Enter your key into the Google Maps API field, switch the toggle on to enable geolocation as the default option for all your new forms (optional), and click the Save button to continue.
Enter your Google Maps API key.
Once the API key has been validated and the configuration has been successfully saved, a confirmation message will display briefly on your screen letting you know that you’re all good to go.
Note: You can access additional Geolocation configuration settings for individual forms (e.g. disabling geolocation or making it mandatory for users to provide their location details in order to submit a form) in the Forms > Edit Form > Settings section.
Configure additional Geolocation settings in the Form Settings section.
With the addon configured, let’s go through an example of adding Geolocation field to a form.
Adding Geolocation Fields To Forms
In the Forms section, select a form or create a new form and select Edit > Fields.
Click on the Insert fields button to add Geolocation to a form.
Select the Address field and click the Insert Fields button.
Add an address field to your form.
The Address field is highly customizable and includes a Geolocation tab with advanced options for configuring maps, such as:
Autocomplete: Provides real-time suggestions as users enter an address into the field.
Display address in Map: Displays a map next to the address fields
Map Position: Choose whether to display the map above or below (default) the address field.
Map Size: Set a responsive or custom size for your map.
Default Map Location: Set a default of custom location for your map.
Forminator Address field settings include advanced Geolocation options.
Configure the above settings to suit your needs and to facilitate user interaction with your form maps and a great user experience.
For example, enable autocomplete to display matching locations as users start typing and to fill in the address fields automatically when an address is selected from the options displayed.
Enable autocomplete for a smoother and more interactive user experience with form maps.
Once the browser loads the form page, it will prompt users to give access to their location. Allowing this access will then show the user’s current location on the map and auto complete the address fields.
Enabling autocomplete also prefills all address details on the form.
By simply clicking on different points on the map, users can also change their location and update address fields.
Clicking on different points on the map changes the address on the form fields.
All form information including the user’s geolocation details and a map will also display on Forminator’s submission page.
An example of a Forminator form submission showing a map with the user’s location and coordinates.
It’s All About Geolocation, Geolocation, Geolocation
Forminator’s new Geolocation feature empowers you to collect and leverage location information from your form users, gain valuable insights into your audience, whether they are customers, employees, or suppliers, and make more informed business decisions.
Check out this feature in Forminator Pro and if you need any help, see our documentation or contact our expert 24/7 support team.
Meet Forminator’s powerful PDF Generator Addon…the simplest, easiest and most automated way to create, edit, and send out form-submitted PDFs without leaving your WordPress dashboard!
Forminator plugin users spoke to us about the challenges they face creating and sending out form-generated PDFs on the fly that seamlessly integrate with their business processes.
For example:
“I would like to send a PDF of our forms with email notifications using Forminator. But I don’t want to use the E2PDF method because it’s too limited for us.”
“We need to create a form for our user, and generate a PDF after they write on it, and give them the possibility to pay.”
“Does anyone know how I can generate a PDF from a form submission like Gravity PDF?”
Forminator users, we heard you!
Forminator Pro gives you the ability to integrate, create, generate, and automate PDFs using our nifty PDF generator addon!
Install with just one click and say goodbye to limited free 3rd-party plugins, costly upgrades, and unnecessary integrations!
Built to make it easy for any user to create and customize a PDF file from form submission regardless of their technical level, here are some of the key features of Forminator’s PDF Generator Addon:
Easier PDF Generation
“I am working on a free course for artists who want to start their own websites. They fill out a form and then get a PDF download of their answers. This will serve as a ‘Scope of Work’ for their project.”
Forminator’s PDF Builder uses the same intuitively easy-to-use drag and drop visual interface as the Form builder, providing a seamless user experience with no additional learning curve required.
In fact, the PDF creation option is part of the Form Builder, so it only takes a couple of clicks to create a PDF file.
Customizable PDFs
Forminator gives users high flexibility by not only making it easy to customize the PDF form structure and layout using its form builder, but also customize PDF content using the Rich Text field, add additional form fields, and insert field tags (see “How to Use” section below).
Autogenerated PDFs
PDFs can be autogenerated from your existing form structure and form fields, so you don’t need to create your PDF from scratch.
However, Forminator is flexible enough so that if you want to design your PDF fom scratch, you can.
Attach PDFs to Emails
“It would be great if PDFs could be created of the form submissions and could be attached and sent over emails.”
You can send customized email notifications to admins and visitors with PDF attachments automatically. (see “How to Use” section below.)
Downloadable PDFs
Download the PDFs of the form submissions on the Submissions page.
Unlimited PDFs
No limits on usage of fields, number of pages, or number of PDFs.
PDFs and More PDFs
Create multiple PDFs on the same form.
PDF Templates (Coming Soon)
Generate PDF files for payment receipts, invoices, and quotations in seconds with easy-to-use pre-designed templates.
We also have loads more features coming soon (e.g. payment and quotation fields, more settings to customize PDF form appearance with colors and fonts, allowing form submitters to download PDFs after submission, etc.), so watch this space!
How to Use Forminator’s PDF Generator Addon
As mentioned earlier, one of the key features of Forminator’s PDF Generation Addon is that it works just like the plugin’s Form builder, so once you’ve installed it, configuring your PDF forms is so easy.
Note: This is a Pro feature, so make sure you have Forminator Pro installed, or consider becoming a WPMU DEV member if you are currently using our free Forminator plugin.
Creating PDFs
To create PDFs, first make sure to install the addon. You can do this from your WPMU DEV Dashboard plugin, or by going to Forminator Pro > Add-ons.
Install the PDF Generator from Forminator Pro’s Add-Ons section.
Note: to use the PDF Generator Addon, make sure that you have created at least one form on your site. Remember too, that you can generate multiple PDF files for the same form.
Once the add-on has been installed and activated, edit the form you want to attach a PDF to, and in the Edit Form > PDF section, click on Create New PDF.
Create a new PDF in Forminator’s Edit Form > PDF section.
Give your new PDF a filename and click the + Create button.
Give your PDF a name for internal identification purposes.
Next, choose a template for your PDF. Note: As we develop this feature further, we’ll be adding all kinds of new templates to this section for generating PDF receipts, quotations, etc.
After selecting your template, click the Continue button.
Forminator Pro users can choose from a range of professionally designed PDF templates.
The Preload PDF Content modal gives you the choice of preloading form fields into your new PDF file, or creating your PDF from scratch.
Choose an option and click the Continue button to proceed.
Forminator gives you the choice of preloading form fields or starting with a blank file.
Once your PDF file is created, you can edit it or continue the setup process.
Once your PDF file is created, you can edit it or continue building your form.
If you selected the Preload Form Fields in PDF File option, the fields in your form will load in your PDF file.
Editing PDFs
While the Page Header and Page Footer elements are static and cannot be moved, you can edit the settings and style for all fields by clicking on the gear icon to the right of the fields.
You can also rearrange non-static fields using drag and drop to fully customize the layout of your PDF.
Insert, edit, and preview your form fields.
As well as preloading form fields, you can insert additional fields to add custom text and labels, add page breaks to create multipage PDFs, insert payment and quotation fields, and more.
There are many PDF form field options to choose from.
Note: To add custom text in your forms, use the Rich Text field. Use either a label for the field, or hide the label and add your own text with formatting options like bold, italics, bullet points, and hyperlinks.
You can also insert form fields into the text area to create a customized PDF template that will autopopulate your form details when generated.
Use the Rich Text field to format and style your form field content.
Additionally, you can adjust the appearance of your PDFs using appearance options, which allow you to control how your PDFs will look and their layout.
The Page settings section lets you set the page size from a dropdown menu, with the recommended default being A4. The default page margin is 30 pixels, and you can change this under the Custom tab.
You can also enable the RTL (Right-to-Left) option to output your PDF in languages like Arabic, Hebrew, Farsi, Urdu, etc., and if you’re familiar with CSS, you can use the Custom CSS option to further customize your PDF. Many selectors are included to help you, and if you need further assistance, make sure to contact our 24/7 Live Support team.
After creating or editing your PDF, you can save it as a Draft to continue working on it at a later time. You can also preview, edit, or delete it, and publish or unpublish it.
A Forminator Form with a Forminator generated PDF.
Emailing PDFs
With Forminator’s PDF Generator Addon, attaching PDFs to emails is really simple and easy.
After creating your PDF form, go to Forminator > Edit Form > Email Notifications and select the PDF file(s) to attach to the email notification you have set up.
Select one or more PDFs to attach to the email.
Note: You can also set up conditional email rules to automatically send specific PDFs to specific users.
Use the power of conditional emails to send PDFs to specific users.
Downloading PDFs
You can download PDFs on form submissions from the Submissions page for forms with PDF templates. There are no restrictions on the number of PDFs you can download.
If you have more than one PDF template available for a single form, you can download the form submission PDF for each template separately or the PDFs of all the templates as a zip file.
Download PDFs for all submission forms.
For full details on using the PDF generator addon and all of its features refer to our Forminator documentation.
With Forminator Pro, You Can’t Go PDF’ing Wrong!
Forminator Pro’s new PDF generator allows you to generate an unlimited number of PDFs with your forms and form submissions, customize, edit, and style PDF templates, and a whole lot more.
If you are a WPMU DEV member, there is nothing else you need to purchase to start generating professional PDFs. Simply install the addon in Forminator, tweak the appearance and settings in your forms, and you’re all good to go.
If you’re not a member yet, consider choosing one of our risk-free membership options (Pro or Agency). You’ll not only get all of our Pro plugins, you’ll also get access to everything else you need to use PDFs effectively, including site management, client report, and client billing tools, white label and reseller options, 24/7 expert support on all areas related to WordPress, CSS, hosting, etc, and so much more!
Start using Forminator’s PDF Generator Addon today…it’s PDF’ing great!
[Editor’s note: This post was originally published in August 2023 and updated in April 2024 for accuracy.]
WPMU DEV’s award-winning image optimization plugin’s new Ultra Smush unlocks unprecedented image compression levels up to 5x greater than Super Smush, while retaining impressive image quality!
Is your WordPress site filled with images? Do you want those images to load on your pages faster than a lamborghini speeding on the Autobahn and compress them tighter than a full stack developer’s schedule? And do all this with almost no discernible loss of image quality?
Before we get into how to activate and use the new Ultra Smush image compression level and why it can deliver even more impressive results than our already impressive Super Smush feature, let’s share some of the results of using Ultra Smush.
First, here are the results of performing a bulk smush on a test site with 1,000+ large-ish images with only Super Smush activated (CDN, Local WebP, and Lazy Load are inactive)…
Before Ultra Smush: Image compression savings using Super Smush only.
After activating Ultra Smush, we then ran the test again to see if we could squeeze anything more out of an already image-optimized site.
And it did! Ultra Smush squeezed out more than 5x times savings…
After Ultra Smush: More than 5x times savings on an already optimized site!
Early testers reported getting similar results.
Results: Super Smush (Before) vs Ultra Smush (After)
And here are just some of the comments we received from early testers about Ultra Smush’s impact on image quality:
“Ultra is awesome. It was hard to find the difference between qualities. Quality loss is negligible. I am impressed!”
“It looks pretty good, only if I look really close I can see that some of the colors are not as vibrant, and that some edges are not as sharp as on the original.”
“On a medium size image with lots of details, you gotta look very close to see slight color saturation differences. On a big image with a solid but gradient background, transitions between gradients are more visible and the main object seems lees sharp. You really need to look very close and expect it. Though it’s not for a photo site that requires superb quality. All in all: pretty impressive.”
Our plugin development team also did extensive testing, comparing Ultra Smush’s results with Ewww image optimizer and TinyPNG by running DSSIM tests (a quality comparison metric that shows variation from the original image – the lower the score, the better).
Ultra Smush outperformed the competition in most tests and came out the overall winner for both compression savings…
File Size Reduction testing shows that Ultra Smush is the clear winner!
DSSIM testing shows Ultra Smush delivers superior image savings and better quality over the competition.
To be clear, using Ultra Smush will result in Lossy compression, so while you should not expect the original quality, the results will still be ultra-impressive.
How To Enable Smush’s Ultra Mode
Ultra Smush is not just a new feature, it’s an entirely new compression level for Bulk Smushing images.
Ultra mode is a feature of Smush Pro that replaces the Super Smush toggle on the free version of the plugin with additional “Smush Mode” options.
Switching to Ultra mode is ultra easy. If you have Smush Pro installed on your site, simply navigate to the Bulk Smush Settings screen and select Ultra (Higher Compression)by clicking on the button, then save your settings.
Choose the level of compression for bulk smushing images that best suits your needs.
Smush Mode offers three compression levels for Bulk Smush settings:
Basic – Choose this option for minimal file size reduction (low savings), pixel-perfect lossless compression of original image quality, and negligible impact on speed.
Super – For faster page loads, select this setting for substantial file size reduction with excellent image clarity. Super Smush provides up to 2x compression savings for your images (lossy compression).
Ultra – Select this compression option for professional-grade performance compression. Ultra Smush provides compression levels up to 5x greater than Super, while preserving impressive image quality.
After enabling Ultra Smush in your plugin settings, you can monitor results from The Hub’s Performance tab.
View Ultra Smush optimization results inside The Hub.
Notes:
If you would rather continue optimizing images using the Basic (lossless) or Super Smush settings, just select those Compression Level options instead.
If you enable Ultra Smush on a site where Smush is already running, remember to re-check all images and perform a new Bulk Smush to benefit from further optimization savings.
After enabling Ultra Smush, rerun Bulk Smush to optimize your site even further.
How Does Ultra Smush Compare To Super Smush?
While Super Smush provides up to 2x faster image optimization with virtually no visible loss in quality, Ultra Smush’s new compression engine offers up to 5 times file size reduction to achieve exceptional compression results.
Note: Currently, Ultra Smush improves JPEG images only. Features to improve PNG images will be added in future versions of the plugin.
If you are just getting started with WordPress optimization, then it’s important to know that using image compression on websites offers several significant benefits that enhance overall user experience and site performance, such as:
Faster Loading Speeds
Compressed images are smaller in size, which means they take less time to load when someone visits your WordPress website. Faster loading speeds improve user satisfaction and reduce bounce rates. Additionally, page loading speed is a crucial factor for SEO, as search engines tend to prioritize faster-loading websites in their search results.
Improved User Experience
When images load quickly, users are more likely to stay engaged with your content. High-quality, compressed images ensure that visitors can access the visual elements of your website without waiting for prolonged load times. This positive experience can lead to increased user retention and higher conversion rates.
Bandwidth Savings
Compressed images consume less bandwidth, making your website more efficient, especially for users with limited data plans or slower internet connections. This can be particularly important for mobile users, as they often have restricted data allowances.
Reduced Server Load
Smaller image sizes translate to reduced server load, as the server needs to process and transmit less data for each image request. This can help prevent performance issues during peak traffic times and reduce hosting costs.
Higher SEO Rankings
Google and other search engines consider page loading speed as one of the ranking factors. Faster loading times, achieved through image compression, can positively impact your website’s SEO and potentially lead to higher search engine rankings.
Ease of Backup and Restoration
Smaller image files are quicker to backup and restore, making it easier to manage your website’s backups efficiently.
Accessibility Considerations
Faster loading times benefit all users, including those with disabilities who may rely on screen readers or have limited bandwidth access.
The easiest way to implement image compression on WordPress websites is to use a plugin like Smush, which can be easily installed and configured to handle image compression and optimization automatically as you upload media to your WordPress site (both internally to the Media Library and external media directories) without compromising visual quality.
Choose Ultra Smush For Superior Image Optimization
As mentioned earlier, Ultra Smush is a Smush Pro feature. If you’re currently using the free Smush plugin, consider becoming a WPMU DEV member and start enjoying the benefit of extra savings and performance improvements, plus access to the most robust “all-in-one” WordPress management platform available anywhere.
So, if your aim is to significantly reduce image file sizes and automate the entire process, the solution is ultra simple…enable Ultra Smush on all your WordPress sites and experience an optimization boost of up to 5x in image compression savings and impressive image quality.
We’ve got some exciting news… now you can ask our new AI-powered support chat bot anything related to WPMU DEV and get answers…fast!
Our 24/7 support is now even more stellar with the launch of our newest AI star!
Before you even ask, the answer is “Yes” …
Will I still have access to 24/7 expert support from living, breathing, humans?
Yes, you will. We have no intention of replacing our excellent support team with robots. Our AI assistant is designed to enhance and complement our support offering.
Will this help me get answers faster so I can get back to my business sooner?
Yes, it will. That’s a great question and thanks for asking! Keep reading to learn how our AI assistant will help to speed up your business.
Will the AI assistant automatically grow a successful business for me?
Yes, it will not. Our CEO’s name is James Farmer, not James Cameron (you can check out our James’ Avatar here) and he likes to keep it real. So, don’t hold your breath until your face turns blue waiting for some other-worldly futuristic flight of fancy, cause we’re all about delivering real support with real people (we’re just not opposed to using the latest AI technologies and tools if it helps us serve you better).
While we are very much a “team human” company (no ifs or bots about it), our membership is growing. We offer 24/7 support to all WPMU DEV members (and your team members too as an add-on).
As we are committed to providing all members (and your clients) with the highest level of quality support, we are always looking for tools and ways to help us better help and support you and your business.
Using an AI-powered chat bot is just another tool that can help us to provide a better service.
So, the aim of introducing the AI assistant is not to replace our human support team, but to help speed up the quality and effectiveness of our support service to you.
We understand that customer support is essential to the success of any product or service. We want to assure you that our goal is to continue delivering on our commitment to deliver the best customer support available in the WordPress universe while enhancing your experience and providing faster and more efficient assistance through the addition of our AI-powered chat bot.
The AI-powered chat bot is designed to work alongside our human support team, not replace them. Our human support team is still available 24/7 to provide a personalized touch to the support experience and handle any complex issues that may arise.
How to Access AI-Powered Support 24/7
WPMU DEV’s assistant is available to WPMU DEV members via The Hub.
You can access it from any screen in The Hub by simply clicking on the Help button…
Access the AI Assistant anywhere on The Hub with just a click of the Help button.
Or select it from the Support tab…
Access the AI Assistant in The Hub’s Support tab.
Launch the AI Assistant, enter your question, and hit the Submit button. That’s all there is to using it!
Type your question into the chat field and hit Submit …it’s that simple!
You’ll get an answer in seconds…
Get answers in the blink on an AI!
And it even provides the sources of its response, so you can
Click on the Source links to view the documentation or tutorials used to generate the reply and get more information.
Now that you know how to use the tool (honestly, it’s that simple!), let’s look at why we think you should use it.
Benefits of Using WPMU DEV’s AI Assistant
With our AI assistant, you can expect immediate access to support 24/7 and a faster resolution to your issues and inquiries.
The addition of an AI-powered chat bot to our support team is aimed at allowing us to provide you with a faster and more comprehensive and efficient support experience for common questions and issues that we already have documented answers for.
This saves you time searching our documentation and frees up our human support resources to handle more complex problems and provide more personalized solutions and expert assistance when required.
Using the bot to handle questions that we have documented answers for allows our human support team to handle your more complex issues.
We are confident that this improvement will enhance your experience and enable you to not only get the most out of our products and services but more importantly, help you get back to your own business sooner whenever you need to interact with us.
The benefits of using our AI-powered help bot include:
Immediate assistance: Get immediate responses to commonly asked questions 24/7 without the need to wait or be placed in a queue.
24/7 availability: Our AI assistant is always available, as is our human support team for round the clock support any time of day or night.
Faster issue resolution: Experience less frustration as our AI assistant can quickly identify and help you resolve common issues.
Consistent responses: We are continually improving our bot to provide consistent and accurate responses to inquiries, ensuring that you receive the same high-level of support that we aim to provide to all of ourv members.
Increased efficiency: With the AI assistant handling common inquiries and issues, our human support team can focus on providing you with more complex and personalized support when needed, increasing the overall efficiency of our services and providing you with a higher quality level of support.
Self-service option: Find the tutorials and help articles you need faster and with greater ease.
Multilingual support: Our AI assistant supports multiple languages, providing you with assistance in your preferred language.
Need multilingual support? No problema!
What Can WPMU DEV’s AI Assistant Help You With?
We’ve used OpenAI’s GPT technology to train WPMU DEV’s AI assistant on all of our documentation, blogs, and tutorials.
I wanted to know what kind of questions we can ask our friendly AI help bot, so instead of bugging our busy support team for answers, I thought why not put the tool to the test and ask it directly…
Hey AI Assistant…I’ll have the bot with the lot and a side order of crisply replies!
Here’s the reply I got…
Thanks a lot, AI bot!
I then repeated this a few times and compiled the following list of areas you can expect the bot to provide reasonable answers:
WPMU DEV plugins and services
WordPress user management
WordPress updates and upgrades
WordPress troubleshooting
WordPress themes and templates
WordPress SEO
WordPress security
WordPress performance optimization
WordPress multisite
WordPress hosting
WordPress eCommerce
WordPress development
WordPress design and theming
WordPress customization
WordPress community and events
WordPress best practices
WordPress backups and restores
That’s quite a list.
Questions You Can Ask WPMU DEV’s AI Assistant
But…what about asking it “real” questions? How does the AI assistant handle these?
Well, fortunately one of our human team members (thanks, Marcel!) carefully analyzed and reviewed over 1,200 questions from real users and compiled a report listing all the correct, almost correct, and even wrong answers given by the AI assistant.
Here is just a sample of some of the actual questions the AI assistant provided quality responses for (as judged by our team of human experts). Feel free to ask the bot the above questions and check out the replies for yourself:
Is there a limit to how many images Smush Pro can compress?
Does Defender work with the hosted site WAF?
Is it possible to move non-hosted domains in and can all domains have unlimited email forwarding?
Can I use WooCommerce on a silver/bronze plan?
Can Forminator forward the form data that the customer entered to the email notification feature?
A new site showed up in My Sites that ends with .local, where did this come from?
I’m getting a Error 504 – Gateway timeout on [domain]
Can I import Gravity forms into Forminator
If I associate a client with a domain, will that client automatically be billed for it?
Can I set my own pricing for domains?
Where i can find code epp
How to change the admin email address?
How can I submit a feature request
Will I be charged to add a connected domain to Domains
I want to do specific changes to my forms I integrated via forminator.
Can I schedule cron jobs?
If I cancel my subscription, will I still have access to the pro features until the next renewal?
Enabling CDN breaks the images when we enable it for the first time. Can I push the images to CDN manually before enabling the CDN on the site to prevent image issues on the live site?
How to fix image resize report
Can I have a mix of free and paid sites?
Can I recover a deleted site?
Why is my images blurry with Smush?
What does suspend site do?
Can I connect a multi-site WordPress site network and install all the plugins on all of the site even If I only have the Basic Plan?
Does WPMU hosting have GD PHP Library installed?
Avoid Asking These Questions
You can ask the AI Assistant anything you like, but unless it’s about WPMU DEV products and services or WordPress-related, don’t expect to get a helpful reply.
The bot will spit out replies like this if fed questions it’s not trained to answer.
More importantly, the bot does not have access to your personal details or account information, so it can’t answer questions like:
“My website is down”
“Why is my site not loading XYZ?”
“What are the best templates to use for my website?”
“Why didn’t I get hero points for commenting on last week’s DOTW?”
For assistance with anything like the above, please contact the support team.
It’s The Best Bot We’ve Got (And We’ll Improve It A Lot!)
WPMU DEV’s AI Assistant still has some ways to go and some challenges to overcome but we believe you will find this tool will become increasingly useful when you need fast answers to many commonly-asked questions.
As the tool is still new and still being trained, it doesn’t always give you the answer you expect, but you can help us train it just by using it, so it will get better at serving you and all of our members.
Simply ask a question, and if you like the answer, click on the “thumbs up” (Helpful) icon below the response.
Clicking on the thumbs up icon helps us train the assistant to become more helpful.
Our AI assistant is continuously improving through machine learning algorithms. Your feedback will be taken into account in the bot’s learning process to provide more accurate and relevant responses over time and help deliver you a better experience.
If you find that the bot’s reply doesn’t answer your question or help to resolve your issue, don’t fret, don’t sweat, our helpful humans are still the best help you’ll ever get…and they’re only a click away!
If the answer you get from the bot is not helpful, click on the “thumbs down” (Not helpful) icon below the response and then click on the Contact support now link and you will be immediately put through to our support channel.
If the answer is not helpful, click the thumbs down button and the link to go straight through to our support team.
In some cases, the assistant will even recommend that you contact the support team for help.
Our thoughtful bot even encourages you to contact our support team when it thinks you may need additional help or assistance.
And of course, you can always just click right through to our support team directly…it’s always your choice!
Get Faster Answers With WPMU Dev’s 24/7 AI Bot and Live Team Support
We aim to make our support even more outstanding with our new AI assistant.
As mentioned earlier, the aim of bringing you WPMU DEV’s AI-powered assistant is not to replace our human support team, but to help speed up the quality and effectiveness of our support services. Our team is always available 24/7 to provide personal support and handle any questions or issues you experience in your WordPress business.
WPMU DEV’s AI assistant and access to our 24/7 expert support team is available to all WPMU DEV members. If you’re not a member yet, we invite you to try us today for free.
Fine tuning your website through manual optimization can be tricky, but our new Safe Mode feature in Hummingbird puts that problem in the rearview.
Now, you can now test optimization in a temporary area that allows for non-permanent changes, so you can work out any kinks, then push them to your live site. For free!
Introducing Safe Mode for Manual Asset Optimization – allowing you to optimize in a private space while your users still enjoy a fully functioning site.
In this article, we’re going to look at how Safe Mode in Hummingbird works, while touching on a few related features and settings in the plugin. Plus, we’ll take a look at an additional (surprise!) feature also included in this release.
Continue reading, or jump ahead using these links:
Hummingbird makes your website faster by optimizing site performance with fine-tuned controls. Setting enhancements make things easy and efficient, giving you new ways to boost PageSpeed Insights.
First, it identifies files that can be optimized (HTML, Javascript, and CSS), then offers a variety of means (compress, combine, or move) to make that happen.
The result gives you marked improvement in your website’s performance.
There are two different modes for asset optimization in Hummingbird:
Automatic – use our preset options to optimize your assets and improve page load times.
Manual – configure each file yourself to achieve the setup best suited to your specific site needs.
Drilling down even further, there are two options within Automatic Optimization mode:
Speedy – compresses & auto-combines smaller files together, and optimizes your fonts for faster delivery.
Basic – compresses all your files to deliver a faster version of each.
Automatic mode allows for a quick setup, providing positive gains without the time commitment that manual adjustment requires.
Both of the Automatic options can be configured for Files (CSS, JavaScript), and/or Fonts.
Hummingbird lets you optimize CSS, JS, and font files.
Manual mode allows you to tinker with any and every file individually, so you can optimize your site on a very granular level.
It’s a good idea to test files one at a time to measure results; that way if something doesn’t work it’s easy to identify what caused it and revert back without issue.
We’ve mapped out specific steps for what to do in each mode, so that you can easily follow along in Hummingbird and produce optimal results.
You can see these anytime by navigating to Hummingbird > Asset Optimization > Assets, then click on the How Does it Work? text at right.
There is a page for Automatic and one for Manual; just click on the corresponding header button that you’d like to read about.
Get one-click access to summarized details on both modes of asset optimization.
If you’re just starting out with Hummingbird, we recommend selecting Automatic optimization in Speedy mode to start. As you use and test your site and the plugin further, you can switch to auto basic or manual mode to check for possible improvements.
And of course, you can always view our detailed documentation, or reach out to our customer support gurus, available 24/7/365.
Testing Changes in Safe Mode
We’re going to zero in today on optimization done in Manual, as that’s where the new Safe Mode lives.
Hummingbird’s Safe Mode allows you to test different asset optimization settings in a safe environment, without affecting your website visitors’ experience.
You’ll be able to preview your site from the frontend and check for any errors in your browser’s console, then publish your changes to go live once you’ve got everything just right.
To enable this feature, go to Asset Optimization > Manual Asset Optimization, and click on the toggle button next to Safe Mode.
From here, you can also click on the filter icon, which will open a panel for finding files faster. You can free type or select from the dropdown menu.
You can filter to search for files while in Safe Mode.
When you’re in Safe Mode, clicking on any icon box will change its state.
You will see a solid outline around it, indicating it’s been selected, and a circular info icon will also appear on the far left of the row.
These visuals are to remind you’re in preview mode, and will remain until you click Publish, committing the changes you’ve made.
Visual cues will alert you to unsaved changes.
With Safe Mode enabled, you can start tweaking your files for peak optimization.
Each asset will have a status icon indicating its current state, and these vary based on the asset they’re attached to.
As an example, the Compress option can have the following states:
Gray icon – files that are already compressed
White icon – indicates which files can be compressed
Blue icon – New assets selected for compression
Can’t be compressed – marks files that can’t be compressed
Hover your mouse over any icon for a popup description of what action this change would make.
Need info on a particular icon? Just hover over it for a status popup.
To see the effect any change makes, click the Preview button.
The Preview button shows up once you turn Safe Mode on, taking the place of the Publish Changes button.
Hitting Preview will load the frontend of your site, where you can check on the asset optimization you configured, making sure it doesn’t generate errors or break anything on your site.
What our Preview page looks like in Hummingbird’s Safe Mode.
As you can see, the preview page has three clickable buttons at the top: Go Back, Copy Test Link, and Publish.
Click on Copy Test Link if you want to gauge asset optimization you’ve made using a third-party performance test. Just paste the copied text into your preferred tool.
Click on the Publish button if you’re content with the change(s) you made, and are ready to save.
Click on the Go Back button if you’ve gotten an error message, a site break, or had no observable performance improvements, so you can continue to tweak your assets further.
Once you’ve completed this exercise, turn Safe Mode OFF, as leaving it on can cause page load delays on your live site.
And there you go! Maximum optimization achieved, which is completely changeable at any time.
What’s The Other New Feature in Hummingbird 3.4?
There’s another new feature in the latest release that I wanted to mention, as it’s sure to make your search experience in Hummingbird better.
In the past, if you were working with a particular encrypted file from your performance test reports, locating it on the Manual Asset optimization tab by filename was a bit messy.
That was because Hummingbird generates special filenames for optimized files, and there was no direct way to find them there. Until now!
Copy filenames, then use Ctrl/Cmd+F to quickly find them in the browser search.
With this release, you can copy filenames from the performance reports, then look them up directly in the browser search in the Manual Asset Optimization tab.
This makes finding optimized files easier and faster.
Get Your Site Humming with Optimal Performance
Hummingbird is the ultimate performance suite for all users – whether you’re looking for simple, one-click solutions, or want to fine-tune your site performance down to the last CSS file.
You’ll get faster loading pages and higher search rankings and PageSpeed scores with Hummingbird’s speed optimization.
Now with Safe Mode for asset optimization, you can manually configure and test any files without worrying about a site break or interrupting the visitor experience on your site.
Hummingbird is only one of our highly rated and multi-functional Pro plugins. You can try them all – along with WPMU DEVs membership or hosting – for free! Everything comes with our money-back guarantee, fully supported by our always on-call, 5-star support.
We’ll help you keep your sites humming and your clients happy.
Imagine a room full of accountants, bookkeepers, and invoicing agents billing your clients, collecting, processing, and instantly depositing their payments into your bank account. That’s what WPMU DEV’s Client Billing does.
Client Billing is an integrated solution that is easy to set up, easy to use…and completely free!
In this article, we’ll explore the full gamut of top-notch features and show you how to set up and automate your client billing by integrating your services, pricing, and clients, with your payment processor account.
“Just now I input all of my websites and hooked it up to client billing, to see my MRR right there motivates me so much I think I will upgrade to the agency plan and push hard with business.” – Web Host Wizards (WPMU DEV Member)
We weren’t kidding when we set out to make an elevated experience out of the customer billing and payment process.
Look at all the features included in Client Billing:
Bill Clients Fast – Create profitable subscription plans, and track your recurring revenue.
Invoice with a Click – Professionally branded invoices, automated and ready to send in minutes.
Clever Client Management – Includes everything you need to monitor clients, invoices, and subscriptions.
Profitable Plans & Subscriptions – Create tiered plans unique to your business, and maximize revenue.
Personalized Client Portal – Branded, user-friendly access for clients to remit payments securely.
Streamlined Payments – One-time or recurring payments, the latter of which auto-charge clients after the first invoice is authorized.
Per-Client Site Billing – Link subscriptions and invoices to site-specific products or services.
The above features are all part of The Hub, our all-in-one WordPress site management tool.
If you’re a member, you’ve already got access to this power performer. And if you’re not, sign up – it’s free – and The Hub & Client Billing are included.
Configuring The Components in Clients & Billing
Because there’s so much you can do in the Client Billing module, I wanted to lay out how we’ll go through the touchpoints.
Connect your Stripe account.
Initial setup of clients and products.
Branding and your business profile.
Create and customize invoices.
There’s a lot of great material to unpack, so let’s have at it. :)
Connecting To Your Stripe Account
Client payments in The Hub are currently made through the Stripe payment platform. Additional payment options (such as PayPal) are on the table for future inclusion, so stay tuned.
To start accepting payments in Clients & Billing, you’ll need to connect your Stripe account, so that’s our first order of business. And don’t worry; if you don’t yet have a Stripe account, you can easily create one through the Hub’s integration wizard.
Login to your WPMU DEV account, then navigate to The Hub > Clients & Billing.
From the Getting Started wizard, click the Connect with Stripe button.
Enter the Email and Password fields, using those you want associated with your Stripe account, then click the Log in button.
If you happen to have more than one Stripe account associated with the email address you’ve entered, they’ll be presented here.
Account selection in Stripe setup.
Select the account you want from the listed options, then click the Connect button.
Continue with any additional steps in the setup wizard. (If you need to start over at any point, just click Return to WPMU DEV on the left side of the screen.)
Upon completing the wizard, you’ll be directed back to the Getting Started screen in your Hub, and prompted to select the currency you want to use in your Client Billing portal.
Click on the box denoting awareness of currency not being changeable later, then you’ll be able to hit Finish Setup.
Your connected Stripe account will automatically import after you select currency.The purple dot is for a Client Billing popup tour, which you can choose to skip.
If you don’t don’t already have an account with Stripe, the Getting Started wizard will prompt you to create one. It’s a quick and simple process, which puts you right back in The Hub upon completion.
Creating a Stripe account through The Hub integration.
If you prefer you can go directly to Stripe’s site, set up your account there, then return to the wizard in the Hub and complete the connection there.
Creating an account directly on Stripe’s website.
Note that you can only connect one platform to any Stripe account at any one time. (This is due to Stripe’s policies.)
Initial Setup of Clients & Products
All of the tools you need to manage the Stripe account connected to your Clients & Billing, such as your business profile, your custom branding, the importing of products and clients, and more, are housed here.
Let’s look at them now.
Managing Your Billing Account
From the Hub’s Clients & Billing page, under Configuration > Billing Account, you’ll see the info associated with your Stripe account (name, email, and connection date).
Stripe account settings in The Hub’s Clients & Billing.
The Payment Preferences section beneath shows the currency you selected, as well as the business name that will appear on your clients’ bank or credit card statements.
If you want to change the statement descriptor, just click on the name or arrow to the right of this row, and edit as desired.
Stripe payment preferences and additional tools.
Finally you’ll see Additional Tools at the bottom, which is where you can import customers or products & services from your connected Stripe account, if there are any associated with it.
To import clients or products & services, click on Import or the arrow to the right of the row.
From the resultant popup, select any clients you’d like to import, by checking the box preceding their email address. (Or, click the checkbox to the left of the email address header to select them all.) Then click the Import button at the bottom, which will reflect the total number of clients you’ve selected.
Client importing in Stripe.
The clients you imported will be listed under the Clients tab, where you can manage all activity relevant to your Hub business. You can also Add New Clients from the Clients tab. (See Adding Clients Manually for details.)
Lather, rinse, repeat for Importing products.
Product importing in Stripe.
Pricing plans associated with an imported product will be imported automatically.
You can also create new pricing plans from the Products & Services tab. (See Adding Products Manually for details.)
Understanding Client Roles & Access Permissions
There’s another element we should take a look as it pertains to our clients: assigning roles.
It’s important to define and understand what the purpose of a client’s site access will be.
For some clients, you’ll want to allow access to billing only. For others, you may want to give access to a couple of different sections, but not full run of the house.
And others still, you may want to allow them to view and edit everything.
Assigning roles gives you complete control over what views and actions clients will have in your branded Hub. This has the following benefits:
Omits unnecessary distractions and clutter; clients see only what you need them to see.
Protects against unintentional actions with potentially dire consequences. (They can’t break what they can’t touch.) This gives you and your client great peace-of-mind.
Allows clients to feel connected to their account information, and see the value of what they’re getting through you.
For illustrative purposes, we’ll target three arbitrary types:
Regular Client = needs access to billing only (to view & pay online)
Hosting Client = needs access to billing and hosting
SEO Customer = needs access to billing and SEO for their website
Example #1 – Regular Client
Regular clients are the ones you’ll be doing all of the WordPress development for. You’ll provide reports, do site edits, and run the entire show. The only thing these clients will need is access to billing information.
Therefore, you just want them to be able to pay their invoices.
Clients & Billing in the Hub comes with three pre-established system roles, which are:
View All & Access Billing: client can access and manage their billing and view site data.
Edit All & Access Billing: client can view, edit, and take action regarding anything on their site and manage their own billing.
Access Billing Only: client can view and manage their own billing.
These preset roles can’t be edited or altered; that’s where custom roles come into play (which we’ll get into later).
Navigate to The Hub > Clients & Billing > Clients > Roles, and select Access Billing Only.
Access Billing Only is one of three predefined roles.
Based on the premise that our Regular Client type will need to Access Billing Only, we’re going to select that as our default by clicking the Make default text in its row.
Now when you add new clients, it’s already established that this is their role. Of course this is editable should we need to change it at any time.
Example #2 – Hosting Client
This client plans on focusing some of their business on hosting in addition to billing. For this case, the client would need access to the following 4 areas:
Sites — to view the list of sites
Hosting — to view the hosting options
Site Billing – to view billing at site level
Access Billing – to view the Billing tab and pay invoices from either the site billing or the global billing tab
Start by clicking on + Create New Role.
It’s just a few clicks away from creating a new role.
Give it a Name (in this example, we’ll call it ‘Hosting’) and select what access the client will have. We’ll enable the 4 areas as listed above.
An example of a Hosting Client, and the roles you would enable for them.
Customize even further when clicking on each category dropdown. You can select View & Edit,View Only, or Custom.
If you select Custom, here’s a look at all the options you could select for the client to have access to in custom role creation, pertaining to Hosting.
Select any hosting options you want.
Customize further by clicking the dropdown in each specific category (Staging, Analytics, Logs, Emails, etc), and selecting any/all of the options.
Here’s what Staging looks like:
There are plenty of options for Staging.
Once you have everything customized, click Save – and that’s it! You now have a new, customized role you can assign to any client.
As you can see, Hosting is now a client role.
Example #3 – SEO Customer
This client wants to view SEO details, in addition to billing. We can take the same approach we just took with our hosting clients: create a new role, name it, and select SEO as an option available to the client.
Specifically for this case, access to the following 4 areas would need to be enabled:
Sites — to view the list of sites
SEO — to view the SEO options
Site Billing – to view billing at site level
Access Billing – to view the Billing tab and pay invoices from either the site billing or the global billing tab
In our SEO client example, we would select the SEO option (instead of Hosting), along with the other 3 options mentioned above.
If you choose to customize your SEO options for your client, they’ll be able to view SEO information, run new SEO Crawl, Apply config – basically anything you select here in permissions.
Choose any options you’d like.
Hit Save, and the new role is now available.
Of course, this was just a demo of three random client types. You can set up ANY client type and customize it to fit your business needs.
Prior to inviting our clients to the portal, let’s customize the emails we’ll be sending.
If you’d like, you can configure an SMTP plugin that allows you to enable your own domain address as the sender email. That would result in a from address like this: admin@yoursitename.com
While your own domain as the from address is the most professional, it isn’t required. Without any changes, your from addresses will be something like these:
Sent from a site without our hosting: wordpress@yoursitename.com
Send from a site with our hosting: noreply@yourwpsite.email
There are a number of different emails that are sent from The Hub Client to you and to your clients, depending on various triggers.
Emails that come to you will be branded with WPMU DEV, while emails that go to your clients will be branded with the logo & colors set up in your Business Profile.
Branding and footer settings for your Hub emails.
Two additional informational pieces can be included or excluded from your email notifications:
Business Branding – toggle for your logo & brand color (from Business Profile).
Emails Footer Note – add a custom message at the bottom of all emails.
Here is an example of an email your clients could get:
A sample email clients could get for a payment processing issue.
Of course any of the placeholder text in double brackets would be auto populated by the associated data in your hub before it is sent to you or your client.
Alright, roles have been considered and created accordingly, emails have been formatted… let’s put the finishing touches on our business profile.
Branding and Your Business Profile
Break out the logos and color codes! We’re going to make these billing materials our own.
From the Configure screen, click on the Business Profile tab.
In the Branding section, you’ll decide on the branding that will appear in your business invoices, emails, and billing receipts. It takes only a few seconds and minimal clicks.
Click on the right side of the Brand Logo row to upload your visual identity; likewise on Brand Color, to select your shade match via color selector box or hex code.
Branding your business documents.
The logo you select will also appear in the top right corner of your clients’ profile menu when they log into your Hub via WPMU DEV.
Now we’ll add our business coordinates in the Business Info section – which will appear in any client documents you produce.
Simply click on Add or the arrow to the right of any row, and you’ll be able to enter every available field. (This info will have been imported if it was set up in your Stripe account, but is always fully editable.)
Adding your business information for inclusion on client docs.
If you created custom fields for your Business Profile, they will appear beneath the main Business Info, under Additional Info.
Custom fields allow for additional information you deem pertinent.
To add or edit custom fields, click on the Custom Fields tab, and enter as many additional items as you’d like in Business, and/or Client Profiles.
Adding Custom Fields is as simple as click, type/select, save.
Creating and Customizing Invoices
Now that we’ve got our documentation branding in place, let’s create an invoice that uses it.
This is what you’ll send to your actual clients, and there’s a lot you can personalize.
Under Configurations, click on Customize Invoices. Click on any of the arrows or toggle buttons from the right-side menu column.
You’ll be able to select your numbering format, add a footer note, choose default language, add a logo, brand color, business name, and client information, as well as any custom fields you have added.
When you’ve got the content the way you want it, click on the Preview Sample button for a quick look-see, and it will open in PDF format.
A sample customer invoice easily produced in Clients & Billing.
With an Invoice template created, let’s make one for a specific client.
Click on the + Bill Client button at the top of the page.
Billing a client in The Hub’s Clients & Billing section.
From the modal popup, take the following actions:
Select the Client from the dropdown.
Select the Website from the dropdown (optional).
Select a Product/Plan from the dropdown, and change the quantity if desired.
Creating an invoice, steps 1-3.
Add another Product/Plan if desired; repeat this step as needed.
Add a Tax if desired, and repeat this step as needed.
Click the blue Continue button.
Creating an invoice, steps 4-6.
This will open the invoice that you’ve created thus far. You can check and see if the content is as you’d like it to be, and add a note if desired.
At this point, you can Preview the invoice, Save as Draft, or Send Invoice.
Confirming an invoice prior to sending.
Click Send Invoice, and we’ll send a white-labeled email to the client you selected. From the Invoices tab, you’ll be able to see it listed now, with status Payment Due.
The list summary of clients billed in Invoices.
Here is the email your client will see:
Client email for a billed invoice.
The client can simply click on the Pay Invoice link in the email, and it will take them to your branded hub, where they can quickly & easily remit payment to you.
That’s a wrap on the initial set up and configurations in Clients & Billing. Now we’ll move on to…
Upkeep and Management of Clients and Billing in The Hub
We’ve completed all of the preliminary steps in Clients & Billing! Now you can quickly and easily bill clients, collect payments, and manage your customers, all from one convenient area.
Of course you’ll want to continually manage this content – from client contact info changes, to invoicing and payment status changes, and your own business details as well.
We’ll look at what’s involved in the continued management of these features, so we can keep all of our information current.
Overview Summary
The Overview section in Clients & Billing allows you to see a collective summary of key data and settings in your portal.
One of the coolest things about Client Billing in the Hub, in my opinion, is the ability to get to everything you want almost instantly.
The Overview section gives you an at-a-glance, sectioned view of the most important details, as well as a path to access these elements on the spot. Revenue, products & services, clients, account configs, billing activities – it’s all here.
This is a clever convenience that makes it a stand-out.
The Clients & Billing Overview screen is a detailed dynamo.
Let’s take a closer look at the displayed sections in the Overview.
Revenue
Monthly Recurring Revenue (MRR) – the combined total monthly revenue from all active subscriptions, regardless of billing periods
Active Subscriptions – the total number of active subscriptions from all clients
Net Billing – the combined total amount billed for all subscriptions and other products (excluding refunds)
Clients
This module displays three items:
Total Clients – the total of all active, inactive, & pending clients
Average Billing per Client – Net Billing divided by total number of clients
Clients with Active Subscriptions– the total number of clients with active subs
All of the summary totals above do not include any taxes.
To see the full list of Clients in your billing portal, click View All.
Products & Services
This module displays three items:
Total Products/Services – the total number of products & services combined, including those with no pricing plans attached
One Time Plans – the total number of active one-time pricing plans
Recurring Plans – the total number of active recurring pricing plans
To see the Products & Services section in your billing portal, click View All.
Configurations
This module displays the name of the Stripe account you’ve connected to your Clients & Billing portal, and its status. A green check mark verifies that the account is active.
Click any of the configuration line items to see/edit the associated information.
Managing Stripe Configurations from the Clients & Billing Overview.
Managing Clients
As discussed prior, clients must confirm your invitation to be able to access their billing portal in your Hub.
There are three different ways you can send clients an invitation: 1) when you’re initially adding them; 2) from the dropdown menu in the main client screen; or 3) in their individual client overview screen. In all cases, just click Invite/Invite Client.
One of three ways to invite a client to your branded portal – from the client summary list.
This will generate a white-labeled invitation email to that client, which will look like this:
A branded client invite to join your portal, sent in a formal but friendly email.
The Clients tab will populate with summary info about each client, once you have added one or more to The Hub.
Here is the information you will see in the Client overview section in The Hub:
Client Info – the client’s name, email, and Gravatar (if available)
Account Status – status of client email invite acceptance (Active/Pending), or if invite email has not been sent (Inactive)
Sites – the total number of sites managed by this client
MRR (Monthly Recurring Revenue) – this client’s average monthly revenue for all subscriptions (excluding taxes)
Net Billing – the total amount this client has been billed to date, including taxes
A summary list of your clients, with billing details associated to each.
You can access client management options by clicking on the ellipsis icon to the right of any client row.
If you select Manage Client from this dropdown menu, you’ll go to the Overview screen for that client. From here you can view and manage all aspects of the client’s account and subscriptions.
Individual client overview.
Managing Products & Services
Now we’ll look more closely at the Products & Services section.
This is where you’ll manage all the products & services that you offer to your clients within the Hub.
If you hadn’t yet imported products in the Configure module, you’d be prompted to add your first one – either manually, or as an import from Stripe.
We already did that, but I’ll show you how to manually add a product here.
Click the + New Product/Service button, and enter the form fields info in the popup.
Under Pricing Plans, you’ll want to create at least one plan to associate with the product.
Creating a product or service, primary modal.
There are two billing types: Recurring and One Time.
Bill Every and No. of Billing Cycles only appear if you’ve selected Recurring as the type.
Bill Every is the period of time that repeated billing will occur; options are: Day, Week, Month, and Year.
No of Billing Cycles is how many times a client would be billed for a recurring plan before their subscription expires. (Leave this field blank if you want the plan to auto-renew until it’s canceled).
One time billing services are used for creating a single instance of a service rendered, such as a set up fee, or a site creation.
After you’ve added your first plan, click + Add Another Plan for each additional one you’d like to create. You can make as many as you want.
You can add as many pricing plans as you’d like under each service.
Once at least one product has been created, you’ll see it on the Products & Services screen, along with its status and the number of pricing plans associated with it.
In the below example, we created a single product – Support Only – with 2 recurring pricing plans – Yearly and Monthly.
Click Show Plans to view or edit Services nested under Products in the summary list view.Accessing menus is a click away in the Product summary.
To manage options for any product, click the ellipsis icon and select any option from the dropdown menu: View/Edit, Add a Pricing Plan, Duplicate plan, or Archive Product.
Editing a Product or Service couldn’t be easier.
As before, you can manage options for any pricing plan by clicking the ellipsis icon and selecting the desired action from the dropdown menu.
The Plans summary offers slightly different menu options.
The Archive option will deactivate a product or plan, making it unavailable for selection when billing a client. It won’t affect any existing client subscriptions.
When editing a product or plan, only the name & image of a product/plan can be changed. (This is a limitation of the Stripe API, so we are unable to modify it.)
There is an easy workaround though. If you want to make a change to non-editable settings in an existing plan, just make a duplicate, then edit the desired fields of the duplicate before saving it. Afterward, you can archive the original.
A note about deletions: You cannot delete a pricing plan from the Hub. That action must be done directly through your Stripe account, with the caveat that the plan hasn’t been used in a transaction. If it has, then archiving is your sole option.
Subscriptions
Because of the fluid manner of subscriptions, keeping track of them is a necessity. Luckily, managing subscriptions is a piece of cake in Clients & Billing.
Subscriptions are viewable by client. To see them, click on any client, then from the top menu sections – Overview, Products & Services, Invoices – click on Products & Services.
This page will display three Subscription Types, broken out into tabbed subsections, as follows:
Current Subscriptions
One Time
Inactive Subscriptions
Subscription summary in Products & Services.
Current Subscriptions
This is where you’ll see any current subscriptions for this client. The status column will show as Active or Pending.
One Time
Sometimes the need to bill a client for a one time service will come up again. Say, for example, you do another site set up, and need to invoice them for it again.
When this happens, you don’t need to recreate the entire product or service. Just click Bill Again from the ellipsis dropdown menu on the desired line item. This will automatically bill the client again for the same one-time product.
Inactive Subscriptions are any subscriptions that were at one time active, but are no more. The status column will show as Canceled or Expired.
Hover your mouse over the row number beneath the Products column for a popup listing of all products contained in that subscription.
You can easily reactivate any subscription for a client.
Reactive subscriptions in a snap.
Click the ellipsis at the end of the desired row, and select Reactivate Subscription from the dropdown menu. When you reactivate a subscription, it will send a new invoice to the client and create a new subscription, which becomes active upon the client paying that invoice.
Managing Invoices
The more your business grows, the more invoices you will be sending out, and the more they will accumulate for record keeping.
While this could create a cluttered mess of paperwork and file folders, it’s carefully and neatly organized in The Hub’s Client Billing.
Everything is found in the Invoices tab of each client, and the content included is straight forward.
For a quick assessment, a red notifier icon on the Invoices tab header indicates the number of currently unpaid invoices for that client.
On the main Invoices page, you’ll see a summary list of all of the invoices for this client.
Click anywhere on a row to view the actual invoice, or, click on the ellipsis icon at rows’ end to show the dropdown menu for other actions. Depending on the status of a given invoice, the options available will vary.
Client Billing by WPMU DEV is the custom labeled, payment making, subscription managing, email automating, keeper of all things in the accounting realm of your business.
Ok, it won’t file your taxes, but it does allow for including them on a client invoice.
From branding, to invoicing, to automated emails, and in-app, trusted payment methods, the features you can offer your clients (and yourself) in Clients & Billing are hard to match.
Offering both in-depth and at-a-glance views, you get to present visually customized elements to your clients, and maintain them through your professional services (while we handle everything behind-the-scenes).
All that and more is built into the Hub’s Clients & Billing experience. And it’s included at no extra cost in your WPMU DEV membership, along with our 5-star, expert support.
Include our fast-growing, highly-rated hosting, or go for the membership only – either way, you’d be hard pressed to find a better value. (Plus, full refunds are given if you’re not thrilled.)
Set your sites on the most enjoyable billing experience you’ve likely ever had!
Offering custom design services as part of your overall web development service can help increase your appeal, your revenue, and allow you to add more value for clients. Learn, step-by-step, how it’s done in this article.
Looking to expand your services beyond general web development work? Or maybe you’re learning new web design skills and looking for a profitable way to put them to use?
In this article we’re showing you how to offer specialized web design services to your clients, even if you have ZERO design skills or experience.
FYI, we surveyed our 50,000+ members and researched dozens of professional websites to come to the recommendations and suggestions mentioned in this article.
“The money I’ve made from this side business has paid for vacations and new toys I wouldn’t have been able to afford otherwise.” – Phil (WPMU DEV Member)
By the time you’re done reading you’ll have ideas for…
The best types of web design services to offer to your clients.
What Are Design Services and Which Services Should You Offer?
As mentioned above, our definition of design services are services that go above and beyond your normal theme, template, or page-builder approach.
Branding, rebranding, logo design, landing page design. These are the kind of things a lot of web developers might pass on doing, and that’s fine.
But if you’re up for earning extra income, providing more value for your clients, and making your overall web development service standout from the rest, we’re showing you how to do it.
Also don’t worry if you’re not a designer, or don’t think you have the necessary skills or experience to offer these services.
We’ll provide you with various outsourcing options that still allow you to apply a markup and make a profit.
As we touch on each service you’ll also see we give you a number of tools and resources to use if you want to do the job yourself.
The Top 4 Web Design Services You Can Offer (As Voted By Our Members)
Once you’ve decided on offering these additional web design services, the next question is what type of services you’re actually going to offer.
Rather than taking a stab in the dark, or copying what the top Google result said, we thought we’d ask a group of people who know better than anyone, because they actually do this for a living…
Our 50,000+ web developer members!
Here are the design services that came out on top when we asked them in a recent members discussion:
Branding
Visual Identity
Landing Pages and Lead Generation
Redesign
And the survey says…
Now let’s look at each of these design services in detail. You’ll learn what’s involved with each service, resources, tools, and outsourcing options for each, as well as what you can possibly charge your clients.
Web Design Service 1: Branding
Branding is how a business differentiates itself from other entities, and what customers will identify and associate it with.
You don’t have to go beyond the basics to get a brand up and running, especially if it’s not a massive corporation.
Additional branding components can also be supplemented, if or as they become relevant.
“Start with only what’s required and add more if necessary.” – Databoy (WPMU DEV Member)
–
What’s Involved With Branding Services?
The branding we’re focusing on – based on member community input – is simply creating a brand by incorporating a color palette, selecting fonts, and strategically placing a logo or wordmark (we’ll talk about logo creation separately; see Visual Identity below).
There are some great online tools you use if you need help putting shades together for your clients.
Here are just a few we like, all of which are free.
Color palette tools:
Coolors
With Coolors, you can quickly generate palettes randomly, or more precisely using their color inspector (RGB bars), or by uploading an image – for both solids and gradients.
If you prefer ready-made options, they have a huge library.
Ahoy, mateys! Shipper is positively pink.
This tool is available via iOS and Android apps, a Figma plugin, and a Chrome extension.
They also offer a Contrast Checker, and an Artwork Recolor tool (see my test case in the image above).
Adobe Color
Adobe Color provides their professional color wheel tool, with three modes available: RGB, HSB, & LAB.
Adobe is an industry icon, along with their advanced color wheel.
You can extract a theme from an image to save as a color palette or gradient.
Accessibility tools are another plus; use their Contrast Checker and Color Blind Safe modes to see either, respectively.
Eggradients
Eggradients lets you select from a number of ready-made gradients. These are simple, two color blends, but can be helpful or spark creativity if you’re looking for basic palette approaches.
Ombré omelets, anyone?
Their color palette generator lets you choose from a list of varying shade gradients.
They also have a “50 Shades of Color” section, which will pull random tones in that color family, each with corresponding hex codes.
Choosing Website Fonts
Typography and strong font choice play a crucial role in the success of a new design.
There are several decent tools for comparing and testing fonts, as well as sites that offer access to a robust assortment of the fonts themselves.
Again, these are all free options.
Web Font Tools
Fontpair
Fontpair has a collection of pre-paired fonts on their site gathered from around the web.
They have a suggestions/submissions page, with new pairings added weekly.
Font Pair
Pair & Compare
Pair & Compare makes experimenting with font pairings easy.
You can use Google or local fonts (shared from your device), and have up to three comparatives simultaneously on the screen.
Pair & Compare
There are lots of editing options: size, weight, color, line height, and more.
You can also change any of the sample text, and bookmark fonts for testing later.
Google Fonts
Google Fonts is an excellent resource for finding and using fonts, with nearly 1500 families – including variable fonts and material symbols.
These are all free to use, even commercially or within a product that is sold commercially (example: a logo or wordmark).
Google Fonts
Downloads are available for families, or individual styles, and can be shared with others via links.
To get an idea of how to price your branding services, a useful exercise is to check out what the competition is offering and charging for creation of the same or similar content.
We did this ourselves and here are some relevant examples to draw pricing inspiration from:
There is variance in these prices too, but they’re still helpful to get an idea of what the typical range is for design services.
Knowing this can help prevent you from massively over or under charging, taking your skill and knowledge level (and the scope of a given project) into account.
Of course you can and should price higher the more you’re including in your branding packages.
Average price range for branding services: $1,000-$30,000+
Web Design Service 2: Visual Identity
A visual identity could be a graphic only (logo), artistic text only (wordmark), a combination of both, or the full complement of all.
It could be as basic as a circle with an initial in it, or the business name in a specific font, weight, and color.
Case in point >> WPMU DEV!:
WPMU DEVs fleet of visual identities.
What’s Involved With Providing a Visual Identity Service
Deciding on a logo for a client has varying degrees of difficulty.
It boils down to how particular they are, and what their budget is.
The more complicated or specific a client-envisioned design is, the more likely their needs will be met by going with a custom one.
The other distinct advantage to a custom design is it will be unique. The prefab stuff is available to anyone, so multiple companies could purchase and use the same design.
Just as we checked out some sites that can help with the core elements of branding, we next set out to find resources that offer nice choices for visual identities (logos, wordmarks, etc).
Tools and Outsourcing Options For Creating Custom Logos
These are very basic, premade cookie cutter offerings, but there are a lot of them.
They also allow great variation in color (there’s a Hex field) if you need a very specific shade.
Playing with free logo customization on Logo.com.
Considering these are completely free, it’s a decent option if you don’t need anything intricate or unique.
Creative Market
Creative Market has 150,000+ logo templates for use in corporate branding, e-commerce, and entrepreneurship.
The logo template sets include badges, icons, and other elements for creating unique and modern logos.
Creative Market
These are all pre-made designs, so keep in mind that any number of people can purchase/use the artwork in addition to you. If your client wants a unique logo, this option won’t work.
Fiverr
Fiverr is a highly popular seller marketplace, where you hire an individual artist for any number of design elements offered as Gigs.
Fiverr for logos.
Because this is fully dependent on what designer you happen to pick, your mileage may vary. But in general, reviewers seem pleased on the whole, and feel they got a good deal for what they paid.
The prices range from $5 to $995, depending on the skill level of the artist and the components included.
Logoglo
Logoglo is a premium logo site. Anything you get here would be a unique, one-off design, professionally made from scratch, based on your brief.
Packages include more content as you go up in tiers – such as number of initial concepts, turnaround time, & revision allowances.
Logoglo
This is a great option if you have a client who has a slightly bigger budget, and wants artwork that people won’t come across elsewhere.
99designs
99designs is a subsidiary of VistaPrint, the highly successful online print house.
Offerings include the level of designers, and whether you get a dedicated manager and prioritized support.
The number of presented design concepts starts at 30, and goes up to 90. All designs come with a money-back guarantee, and full copyright ownership.
99designs Design Contest process.
How Much Can You Charge For Visual Identity Services?
Jacob Cass is a brand designer, strategist, and the founder of JUST Creative, an award-winning branding & design consultancy.
JC.com has an article on design cost, with a helpful chart on logo design pricing. Additionally, they provided a list that breaks out the costs in greater detail.
Logo Design cost estimates. Source: JustCreative.com
Logo Design cost estimates. Source: JustCreative.com
Full Branding for global identities is priced extremely high, tapping out at over a million dollars.
This of course is the elite upper echelon, well above average.
For the level we are focused on, you can see the variance goes from $0 for DIY/free logo makers, to upwards of $5K for an experienced designer.
Average price range for visual identity services: $500-$5,000
Web Design Service 3: Landing Pages and Lead Generation
The primary goal of most websites (aside from education and entertainment) is to turn incoming traffic into leads.
Offering landing page or similar conversion-based services to your clients is well worth it.
After all, they’re not likely to turn down the potential of gaining more customers and leads.
“Each page has one purpose, to convert. Make sure you have a clear path on how the client wants to convert, what is the goal that the client wants out of every visitor. Keep your design focused on getting that convert click.” – Chris (WPMU DEV Member)
What’s Involved and The Tools to Help You Provide Landing Page and Lead Generation Services
Landing Pages
You may already have a template you use for client landing pages – either self-created, purchased, or acquired for free.
If you are looking for something fresh, or don’t already have a go-to, here are some options for Landing Page websites.
Tools and Outsourcing Options
Nicepage
Nicepage offers 10,000+ pre-designed Landing pages, or you can make your own.
You can edit any of the pre-made templates, using their own website builder – which allows for drag-and-drop, no coding customizations like content editing, layout changing (blocks), modifying colors and fonts, and making adjustments for different responsive modes.
Nicepage
Nicepage is available for Windows or Mac OS as a WordPress Plugin.
Fiverr
Fiverr’s experienced landing page designers can create the right layout and branding identity for your page.
Expect premium quality images, responsive design suitable for mobile devices and desktop, content upload (of content provided by you) and more.
Fiverr for landing pages.
The prices vary greatly, depending on what you want, how fast you want it, and the self-ascribed skills & experience of the artist you choose. For reference, we found prices ranged from $5 to $1500.
Landingfolio
Landingfolio features a beautiful and diverse collection of landing pages, curated from around the web.
Their offerings include:
Tailwind CSS Site Templates – Figma included on all designs
Logos – a collection by designer Jord Riekwel, donated to the community (they’re free)
Mockup Generator – quickly create device mockups for your app or web design; enter your website URL, and they’ll generate the mockups for you
Landingfolio
Tailwind is a CSS framework like Bootstrap, that speeds up your development time. It uses classes to style elements, so you don’t have to write any CSS.
Popular Page Builders Like Elementor and Divi
Of course, you can always turn to page builders and themes if needed, most of which will help you create quality custom landing pages for clients.
Divi only offers a paid version of their builder, which provides a nice looking end-product when it comes to landing pages and conversion elements. Elementor also has the capability to create landing pages in both their free and Pro versions.
Create Lead Generations Modules With Hustle
Every good landing page needs effective lead generation elements.
You can put together some great lead generating modules with our free Hustle plugin.
Opt-ins, pop-ups, slide-ins, social shares, and embeds – Hustle helps you create them all, designed to drive results and convert visitors.
Just a few of Hustle’s many premade templates.
It’s easy to build great looking modules in minutes with Hustle’s professionally designed templates (18 and counting).
All of which are mobile responsive, and come with a choice of email opt-in forms and informational designs (i.e., users click a button and are sent to another page).
Hustle comes in both free and pro versions. Both give you all of the same great settings and options.
The only difference is the Pro version comes with unlimited Opt-ins, Custom Content, and Social Sharing.
Want more Hustle? Check out these info-packed articles on the blog:
How Much Can You Charge For Landing Page and Lead Generation Services?
F5 Studio, a successful web development outfit that has been in business since 2013, has a great article breaking down the elements of design, and what goes into its landing page pricing.
They say digital agencies charge from about $600 to $3,000 to create a static landing page, and from $2,000 to $5,000 for a dynamic landing page.
Brimar, an award-winning, full-service marketing agency, shared these insights on landing page cost, claiming an agency can charge anywhere from $300 to $3,000 per landing page, depending on the project’s complexity and the clients business goals.
Overall, the cost of creating a landing page varies depending on the complete scope of the job, and how much work will be involved.
Average price range for landing page and conversion services: $300-$5,000
Web Design Service 4: Redesign/Rebrand projects
There are several reasons why a client might benefit from or want a website redesign. The most common are:
The overall look and feel is outdated or unappealing.
The business identity isn’t well-reflected in the design, or soon won’t be due to a planned rebranding.
The usability is poor, making navigation difficult and limiting conversions.
“It is especially important for a complete overhaul (the UI might require a complete rethink) if trying to appeal to a completely different audience—e.g. if a website changes from b2c to b2b.” – Marianna (WPMU DEV Member)
What’s Involved and The Tools to Help You Provide a Redesign Service
Understanding the user experience is key. If a site’s interaction/conversion rates are a lot less than their site traffic, it would behoove you to look into behavior analytics.
Hotjar and Crazy Egg for UX insights
Tools like Hotjar and Crazy Egg can provide great insight on a site’s UX design/usability.
By observing recorded screen behavior, you can pinpoint any weak areas, and make upgrades based on real-use data.
Hotjar offers their service for free, up to a thousand dollars (per month) based on what features you need, and for how many sessions (“Observe”) or responses (“Ask”).
Crazy Egg pricing includes 5 different packages, from less than thirty dollars a month, to priced by quote. Each tier allows greater quantities of services (like tracked page views, snapshots, & recordings).
Learning where customers move their mouses and where they click, what they focus on vs what they ignore, removes any doubt and guesswork, allowing you to focus on the areas specifically highlighted as ripe for improvement.
How Much Can You Charge For Redesign Services?
Redesigns are very similar to new designs in terms of the overall effort required. They involve many of the same elements, tools, and time requirements.
The only price differential with a redesign would be the additional cost of UX insight tools, as explained above.
Average cost to design a website (with basic features): $3,200
Average time to design a website (with basic features): 2 months
The foremost reason people hire a professional web designer (rather than using site building software): the ability to completely customize.
Web Design survey results for overall web design costs. Image creditWeb Design survey results for factors influencing cost. Image credit
Regardless of the reason behind a redesign, it’s important to establishing what the expectations are for scope and cost in advance.
We’re seeing an average of $3+K and a timeframe of about two months for full web designs/redesigns. Factor that into what your average build time is and what services you will include to help set your prices.
Average price range for website redesigns: $2,000-$4,000
Putting All of Your Web Design Components Together
Having gathered information and given it due consideration, you can now construct a menu uniquely tailored to your web design services, providing easy access (and value proposition) to interested clients.
An Example of a Complete Design Services Menu:
Here’s an example we came up with, which includes variations on elemental prices, depending on the components included and expected work involved.
Our full service web development menus, as seen on our sample site.
Get Started Offering Web Design Services To Your Clients
We hope you took away some valuable insights from this detailed look at offering web design services.
If you need any more advice or clarification about anything discussed in the article, feel free to ask us in the comments below.
There are a lot of balls to keep in the air as a Web Developer. At WPMU DEV, our goal is to assist in making that process as easy as possible.
If you’re interested in giving our platform a try, our free plan is the best place to start. It includes unlimited site management, built-in billing, plugins, and more.
Allow users to save a partially filled WordPress form as a draft so they can complete it later before submitting it with our Forminator plugin.
Sometimes, form-filling takes time – especially multipage or lengthy forms. With Forminator’s Save and Continue option, users can save a form as a draft and complete a form at a later time via a custom link.
Saving long forms as a draft is now an option for your users!
This highly requested feature is available and easy as ever to implement. You’ll be able to customize your form’s settings to allow draft retention periods, allow drafts of forms sent to an email address, edit messages, and more!
This brief article takes you through all the features and how to implement them.
Pick a previously created form or start a new one from scratch.
If you’d like to add this to a previously created form, simply click the Gear Icon and then Edit.
The Edit button will get you started!
And for a new form, the process will be the same. Once you get your form started, you’ll click Behavior to begin. When you scroll down a bit, you’ll see Save and Continue.
Ready for launch? Click Enable Save and Continue to activate.
One click is all it takes to get started.
When enabled, a dropdown menu will appear with customizable options. There is a Configuration and Permissions area.
Once enabled, you’ll have two options.
We’ll start with all of the options in the Configuration tab.
Draft Retention Period
Choose the days a form’s draft will be stored on your server. Then, once the time expires, they’ll be automatically deleted.
By default, it’s set at 30-days.
Set any amount of days you’d like.
Set whatever time frame suits your needs.
Save Form Link Text
You can also customize the text when it comes to saving the form. This is what users will see.
Whatever you want to include in your messaging, do so here.
Additionally, when a form is successfully submitted, the user will get a message. Customize the message to anything you’d like.
It even shows what form fields will not be saved.
Your message can include links, form data, and more – to make them as clear, personalized, and precise as possible.
Enabling Draft to Email
When a user wants to save and continue at a later date, there’s no better way to remind them than by having an email sent to their account. By activating this feature, a link to the draft will be sent directly to them with the option to resume.
It’s as easy as ever to let users’ send the incomplete form to their email.
As soon as you have your Save and Continue features set up – click Update on the form.
The Permission Area
Decide whether every user can save their format as a draft – or just registered users. That’s all done from the Permission tab.
There are two options to choose from.
Just choose your option – and it’s all set.
User Experience
So, now that you know how to set up the Save and Continue feature, what does it look like from the users’ perspective?
Of course, every form is different. Unlimited style options, fields, etc., can be used (which we cover in numerous articles, like this one). For this article, we’ll keep it simple and have a look at what happens when a user saves the form we just created.
First, they’ll see the Save as Draft Option on every page (if you have multiple pages) of the form as they complete it.
Here, it’s on page three.
When clicked, it will bring up the custom (or default) message to let them know their form was saved. Plus, the user will get a link that they can copy and paste so that they can get back to the form at any time.
As you can see, the text that we created in the admin is clearly visible.
Since we incorporated the Send Draft Link, this option is available. All the user has to do is enter their email address and hit – in this case – the ‘Send Draft Link’ button (which, as we talked about, can be edited to say something else).
Instantly, an email will go to the user’s email address. It contains the name of the form, website, link, and expiration date of the link.
A short and sweet reminder for the user to complete the form.
All a user has to do is click the link to return to the form and complete it!
Good Save
With Forminator’s new Save and Continue feature, forms will be saved and not forgotten by users who, for whatever reason, can’t complete a form in one session. As you can see, it’s simple to set up in just a few clicks and highly customizable. Plus, this feature is entirely free to use.
This feature is a welcome addition to Forminator, as it was a top request from our users. And so, we’re happy to now include it.
Defender had already implemented Two-Factor Authentication (2FA) in WordPress for hardened security… now we’ve added Biometrics, too!
It has become increasingly apparent that relying strictly on usernames and passwords for logins no longer offers the highest levels of security.
WPMU DEV’s solution to addressing this is through the use of the WebAuthn standard, which bypasses vulnerabilities by providing a protocol of public key cryptography as a login authentication method.
Our newest Defender release—both Free and Pro versions—marks the start of our odyssey into the world of biometric authentication; providing the ability to verify the authenticity of a user login by way of a device fingerprint reader or facial recognition software.
The use of this new biometric authentication is similar to the existing 2FA methods already present in Defender, and can be used together with the existing TOTP (Time-based One-Time Password), backup codes, and fallback email authentication methods.
In this article, we’re going to look at how to implement the Biometric Authentication feature, as part of our 2FA WordPress plugin features in Defender.
Continue reading, or jump ahead using these links:
Let’s explore all that Defender has to offer in the form of login protection with the cool new 2FA Biometric feature.
The All-Encompassing Defender
Defender gives you the best in WordPress plugin security, stopping SQL injections, cross-site scripting XSS, brute force login attacks—and other vulnerabilities—with a list of one-click hardening techniques that will instantly add layers of protection to your site.
It also makes safety easier on and for you, taking advantage of the latest in biometric security measures.
By way of a quick overview, here’s how this works in Defender… the user will input their username & password to log in, and if biometric authentication has been configured for that device, said user can verify their identity through their fingerprint scanner or facial recognition software.
Because we’re using the WebAuthn protocol, Defender does not at any point receive any biometric data, only a confirmation or rejection from the user’s device.
I want to interject here with a quick point of interest, shared by one of our techs, Marcel Oudejans (and paraphrased by me)…
The convention of naming a dog “Fido” was popularized by Abraham Lincoln, though its use as a canine pet name dates back to the ancient Romans.
“Fido” means “faithful”. FIDO stands for “Fast IDentity Online”. The new Biometric authentication feature uses WebAuthn protocol from FIDO.
So in a lovely, roundabout way, by using the FIDO protocol to implement this feature, one could say we are infusing ‘faithfulness’ into Defender.
Ok, now let’s take an in depth look at this awesome new Biometric feature.
Full Walkthrough on Biometric Authentication
First, make sure you have the Defender plugin installed and activated, and update it to the latest version (at the time of this writing, that’s 3.0.1). Defender versions 3.0 and higher are fully compatible with the recently released WordPress 6.0.
Two important things to note up front:
Configuration of authorized devices is required on a per-user basis, since authentication is linked to individual user accounts.
PHP 7.2 or above is required, as it improves performance and security, while also supporting the new biometric feature.
Enable Biometric
Navigate to the WordPress Dashboard > Defender. If you’ve just now updated, you’ll get the popup modal. Give it a quick read, then click the Got It button.
Two F’s = Fingerprint and Facial (recognition).
You’ll be on Defender’s main page now. From the left sidebar, click on the 2FA menu header.
Another popup will appear; click on the Activate button.
One-click activation in Defender.
Now you’ll see all the section information for Two-Factor Authentication, and all the options we have available here.
From the same Defender 2FA page, under User Roles > Administrator, toggle the button On. Make sure to scroll to the bottom and click on Save Changes.
Permission to enable 2FA is given through User Roles.
From the Dashboard’s side menu, go to the Users section, and click on your Admin User profile.
Scroll down to the Security section, and toggle ON the button next to Biometric.
The toggle for enabling the Biometric feature is in the Users > Security section.
Once the Biometric feature is toggled on, you’ll see a suggestion to choose an additional authentication method from these options: TOTP, Backup Codes, and Fallback Email.
In the example below, you’ll see I’ve selected Fallback Email, but you can choose whatever method(s) you prefer. Remember to click the Update Profile button at bottom.
The selection of additional authentication methods available in Defender.
Biometric authentication does not replace your traditional WordPress login (i.e., username & password), instead adds an additional secure layer, like the other authentication options above.
While many browsers and operating systems are compatible with the WebAuthn protocol used to manage the authentication process, some are currently not. Check here to see WebAuthn’s browser and OS compatibility list.
Register Device
With biometric authentication enabled, the Registered Device table will appear, with options to Register Device or Authenticate Device.
Defender keeps a list of Registered Device identifiers.
Clicking the Register Device button will start the prompt from your browser to configure the form of biometrics you wish to use, depending on which are available on your device.
Enter any name in the Authenticator Identifier field, then click the Start Registration button.
Name your identifiers for easy recognition later.
Note that depending on the device you are using the registration process will differ.
Example 1:
Registering a Windows desktop or laptop will prompt you to enter your Windows Hello PIN, or whatever other authentication method may be enabled on your device.
The Windows Hello sign in PIN entry.
Example 2:
Registering a mobile device will prompt you to touch the fingerprint sensor, or whatever other authentication method may be enabled on your device.
A sample fingerprint sensor authenticator window.
Back on your Users Profile page, if you scroll to the bottom under Security > Registered Device, you’ll see your device listed here, along with a message beneath it confirming it has indeed been registered.
Confirmation of registering a new authenticator.
The next step is to authenticate the device you just registered.
Authenticate Device
Once the device has been registered, click the Authenticate Device button.
The same authentication method used to register the device will prompt you to confirm the action.
Success! Confirmation of an authenticated device.
Once done, you’ll see a success message appear. Now you’ll be able to use the registered biometric option as a fast, secure way to login to your site.
Rename or Delete Device
If desired, you can rename or delete any authenticated device.
Navigate to the WordPress Dashboard > Users, and click on your username.
To Rename:
From Profile > Security > Registered device, click on the Rename text in the Action column. Type the new name, and click Save.
Action options for registered devices.
To Delete:
Same process as above, but click on the Delete text in the Action column, then click OK from the next popup.
Confirming the delete of an authentication.
Be advised that the Delete action doesn’t save settings, so if you decide you want to use the Biometric feature from that device again, you will need to go through the full setup process.
Likewise, if you deactivate any biometric functionality on your device, the login will no longer work, and you would need to repeat the process on your device to restore the feature’s functionality.
GDPR Compliance
FIDO Alliance standards were created from the outset with a “privacy by design” approach and are a strong fit for GDPR compliance.
Because FIDO delivers authentication with no third-party involvement or tracking between accounts and services, biometric authentication with FIDO2 compatible devices is fully GDPR compliant.
With FIDO, no personally-identifying information ever leaves your device.
If you enable more than one additional authentication method in your profile, each will display as alternate options beneath the method you have set as your default. In the example below, TOTP Authentication is my preferred method.
You can click on any available option in the list, and it will display the selected alternate authentication method.
Using a TOTP to authenticate, with alternate methods (per your selection) listed below.
A final note… Biometric authentication requires that the following PHP extensions be enabled on your server: mbstring, GMP, and Sodium. These extensions are enabled by default on all sites hosted by WPMU DEV.
If you are hosting elsewhere and any of them are not enabled on your server, you’ll see an alert like the one below. Reach out to your hosting provider to have them enable the extensions for you so that you can use this feature.
If you see this message, don’t panic–you’ll just need some PHP extensions enabled.
As protective measures go in WordPress, it’s hard to beat Defender.
Defender has powerful security protocols, including malware scanning, antivirus scans, IP blocking, firewall, activity log, security log, and two-factor authentication (2FA), including the newly added Biometric Authentication.
The latest version of Defender also came with an additional, useful enhancement to Defender’s WP-CLI “scan” command. By using this WP-CLI command and option, if any issues are found, Defender will create a table with results.
Previously, you could only see the results of a malware scan from the back-end of the site (at WP Admin > Defender Pro > Malware scanning), but now you’ll be able to see the completed scan results right in the console.
Coming soon for Defender… we’ll expand on our use of WebAuthn, with our devs currently working on the ability to use hardware authentication devices. Plans are also underway to implement ‘password free’ logins in the best way possible, using the WebAuthn protocol.
You can read about upcoming features for any of our tools and services anytime in our product Roadmap.
If 2FA is the question, Defender is the answer. Handling security in your WordPress sites can be as simple—yet complete—as activating Defender.
Defender had already implemented Two-Factor Authentication (2FA) in WordPress for hardened security… now we’ve added fingerprint/facial recognition, and external hardware security keys, too!
It has become increasingly apparent that relying strictly on usernames and passwords for logins no longer offers the highest levels of security.
WPMU DEV’s solution to addressing this is through the use of the WebAuthn standard, which bypasses vulnerabilities by providing a protocol of public key cryptography as a login authentication method.
Our newest Defender release—both Free and Pro versions—marks the start of our odyssey into the world of Web Authentication; providing the ability to verify the authenticity of a user login by way of biometrics (facial or fingerprint recognition), or a USB security key (e.g., YubiKey).
Usage of these new web authentication methods is similar to the 2FA methods already present in Defender, alongside the existing TOTP (Time-based One-Time Password), backup codes, and fallback email authentication methods.
In this article, we’re going to look at how to implement these new Web Authentication methods, as part of our 2FA WordPress plugin features in Defender.
Continue reading, or jump ahead using these links:
Let’s explore all that Defender has to offer in the form of login protection with the cool new 2FA WebAuth features.
The All-Encompassing Defender
Defender gives you the best in WordPress plugin security, stopping SQL injections, cross-site scripting XSS, brute force login attacks—and other vulnerabilities—with a list of one-click hardening techniques that will instantly add layers of protection to your site.
It also makes safety easier on and for you, taking advantage of the latest in WebAuth security measures.
By way of a quick overview, here’s how this works in Defender… the user will input their username & password to log in, and if Platform authentication has been configured for that device, said user can verify their identity through their fingerprint scanner or facial recognition software. Likewise, if the Roaming authentication has been configured for that device, the user can verify their identity through their USB security key.
Because we’re using the WebAuthn protocol, Defender does not at any point receive any biometric or security key data, only a confirmation or rejection from the user’s device.
I want to interject here with a quick point of interest, shared by one of our techs, Marcel Oudejans (and paraphrased by me)…
The convention of naming a dog “Fido” was popularized by Abraham Lincoln, though its use as a canine pet name dates back to the ancient Romans.
“Fido” means “faithful”. FIDO stands for “Fast IDentity Online”. The new Biometric authentication feature uses WebAuthn protocol from FIDO.
So in a lovely, roundabout way, by using the FIDO protocol to implement this feature, one could say we are infusing ‘faithfulness’ into Defender.
Ok, now let’s take an in depth look at these awesome new Web Authentication features.
Full Walkthrough on Web Authentication
First, make sure you have the Defender plugin installed and activated, and update it to the latest version (at the time of this writing, that’s 3.1.1). Defender versions 3.0 and higher are fully compatible with the recently released WordPress 6.0.
Two important things to note up front:
Configuration of authorized devices is required on a per-user basis, since authentication is linked to individual user accounts.
PHP 7.2 or above is required, as it improves performance and security, while also supporting the new biometric feature.
Enable Biometric or USB Security Key
Navigate to the WordPress Dashboard > Defender. If you’ve just now updated, you’ll get the popup modal. Give it a quick read, then click the Got It button.
WPMU DEV’s WebAuth features have expanded again!
You’ll be on Defender’s main page now. From the left sidebar, click on the 2FA menu header.
Another popup will appear; click on the Activate button.
One-click activation in Defender.
Now you’ll see all the section information for Two-Factor Authentication, and all the options we have available here.
From the same Defender 2FA page, under User Roles > Administrator, toggle the button On. Make sure to scroll to the bottom and click on Save Changes.
Permission to enable 2FA is given through User Roles.
From the Dashboard’s side menu, go to the Users section, and click on your Admin User profile.
Scroll down to the Security section, and next to Web Authentication, toggle the button ON.
Selecting the WebAuth feature in Defender.
You’ll see a recommendation to choose an additional authentication method from these options: TOTP, Backup Codes, and Fallback Email.
In the example below, you’ll see I’ve selected Fallback Email, but you can choose whatever method(s) you prefer. Remember to click the Update Profile button at bottom.
The selection of additional authentication methods available in Defender.
Web Authentication does not replace your traditional WordPress login (i.e., username & password), instead adds an additional secure layer, like the other authentication options above.
While many browsers and operating systems are compatible with the WebAuthn protocol used to manage the authentication process, some are currently not. Check here to see WebAuthn’s browser and OS compatibility list.
Register Device
With WebAuth authentication enabled, the Registered Device table will appear, with options to Register Device or Authenticate Device.
Defender keeps a list of Registered Device identifiers.
Clicking the Register Device button will start the prompt from your browser to configure the form of Web Authentication you wish to use, depending on what’s available on your device.
Select an Authenticator Type, enter any name in the Authenticator Identifier field, then click the Start Registration button.
Inputting info to authenticate a device; in this case, a USB Security Key.
Depending on the authenticator type and device you are using, the registration process will differ.
Example 1:
Registering a Windows desktop or laptop will prompt you to enter your Windows Hello PIN, or whatever other authentication method may be enabled on your device.
The Windows Hello sign in PIN entry.
Example 2:
Registering a mobile device will prompt you to touch the fingerprint sensor, or whatever other authentication method may be enabled on your device.
A sample fingerprint sensor authenticator window.
Example 3:
Registering a USB Security key will prompt you to go through a brief series of steps.
Back on your Users Profile page, if you scroll to the bottom under Security > Registered Device, you’ll see your device listed here, along with a message beneath it confirming it has indeed been registered.
Congrats! You’re registered. Next up… authentication.
The next step is to authenticate the device you just registered.
Authenticate Device
Once the device has been registered, click the Authenticate Device button.
The same authentication method used to register the device will prompt you to confirm the action.
WebAuth device authentication confirmations for a Desktop PC, and a YubiKey.
Once done, you’ll see a success message appear. Now you’ll be able to use the registered WebAuth options as additional, secure ways to login to your site.
Rename or Delete Device
If desired, you can rename or delete any authenticated device.
Navigate to the WordPress Dashboard > Users, and click on your username.
To Rename:
From Profile > Security > Registered device, click on the Rename text in the Action column. Type the new name, and click Save.
Action options for registered devices.
To Delete:
Same process as above, but click on the Delete text in the Action column, then click OK from the next popup.
Confirming the delete of an authentication.
Be advised that the Delete action doesn’t save settings, so if you decide you want to use the Biometric feature from that device again, you will need to go through the full setup process.
Likewise, if you deactivate any WebAuth functionality on your device, the login will no longer work, and you would need to repeat the process on your device to restore the feature’s functionality.
GDPR Compliance
FIDO Alliance standards were created from the outset with a “privacy by design” approach and are a strong fit for GDPR compliance.
Because FIDO delivers authentication with no third-party involvement or tracking between accounts and services, biometric authentication with FIDO2 compatible devices is fully GDPR compliant.
With FIDO, no personally-identifying information ever leaves your device.
If you enable more than one additional authentication method in your profile, each will display as alternate options beneath the method you have set as your default. In the example below, TOTP Authentication is my preferred method.
You can click on any available option in the list, and it will display the selected alternate authentication method.
Using a TOTP to authenticate, with alternate methods (per your selection) listed below.
A final note… Web Authentication requires that the following PHP extensions be enabled on your server: mbstring, GMP, and Sodium. These extensions are enabled by default on all sites hosted by WPMU DEV.
If you are hosting elsewhere and any of them are not enabled on your server, you’ll see an alert like the one below. Reach out to your hosting provider to have them enable the extensions for you so that you can use this feature.
If you see this message, don’t panic–you’ll just need some PHP extensions enabled.
As protective measures go in WordPress, it’s hard to beat Defender.
Defender has powerful security protocols, including malware scanning, antivirus scans, IP blocking, firewall, activity log, security log, and two-factor authentication (2FA), including the two newly added Web Authentication methods–Biometric, and USB Safety Key.
The latest version of Defender also came with an additional, useful enhancement to Defender’s WP-CLI “scan” command. By using this WP-CLI command and option, if any issues are found, Defender will create a table with results.
Previously, you could only see the results of a malware scan from the back-end of the site (at WP Admin > Defender Pro > Malware scanning), but now you’ll be able to see the completed scan results right in the console.
Coming soon for Defender… we’ll expand on our use of WebAuthn, with our devs currently working on the ability to use hardware authentication devices. Plans are also underway to implement ‘password free’ logins in the best way possible, using the WebAuthn protocol.
You can read about upcoming features for any of our tools and services anytime in our product Roadmap.
If 2FA is the question, Defender is the answer. Handling security in your WordPress sites can be as simple—yet complete—as activating Defender.
Ridding your site of Spam comments and registrations is an on-going battle. But if you arm yourself with the best defenses, you’ll be much better poised to win the war.
Forminator is a free, easy-to-use WordPress form builder plugin that protects your forms from bogus comments and registrations at all times, using a combination of industry-leading anti-spam tools.
Preventing form and comment spam in WordPress starts by zeroing in on how it gets through. With spammers and bots growing by the day, tools that recognize (and stop) them with a high degree of accuracy is vital.
When creating a form in Forminator, like a new user registration, you can enable a combination of the most successful methods for eliminating spam.
In this article, we’re going to look at what the top tools of the trade are when it comes to the prevention of form and comment spam. Then we’ll see how to put each one into action in Forminator’s settings.
It won’t be long until you see that Forminator’s spam protections are fastidious and formidable.
Continue reading, or jump ahead using these links:
Let’s look at the tools in Forminator that help to keep spam at bay.
Triple Threat (Protection)
As the cunning moves spammers & bots use continue to rise, so do (thankfully) the tools to outsmart them.
Forminator takes full advantage of the most solid contenders available. The top three–while not foolproof—are highly popular and effective in their own right.
Captcha
Forminator has two different CAPTCHA options available for you to implement: reCAPTCHA and hCaptcha.
ReCAPTCHA Banner
Google’s reCAPTCHAhas been at the forefront of bot mitigation for over a decade. Applying continuous machine learning to overcome the binary logic of traditional challenge-based detection technologies, it actively protects the data of five million sites.
Using an advanced risk analysis engine and adaptive challenges, reCAPTCHA keeps malicious software from engaging in abusive activities on your website. Meanwhile, legitimate users will be able to login, view pages, create accounts, and complete transactions with little to no fuss–especially with reCAPTCHA v3.
reCAPTCHA is free, even for Enterprise accounts–for up to 1 million Assessments per month.
hCaptcha Banner
hCaptcha is a privacy focused company, providing reliable bot detection while being simple for humans to solve. They present CAPTCHA challenges that are difficult for bots but easy for people by collecting difficult-to-label data from machine learning problems, and using it to distinguish whether a website or app visitor is human.
Both reCAPTCHA and hCaptcha come with visible or invisible options in Forminator. Sign-up is required for both, but is easy and free. You can use either one throughout your site on different forms, but only one per each form. And, each form requires its own set of API keys.
Akismet
Akismet Banner
The brainchild of Automattic CEO and WordPress co-founder Matt Mullenweg, Akismet is one of the most popular WordPress plugins on the WP.org repository, and has been leading the crusade against spam since 2005.
Automatically checking site comments and contact form submissions against their global database of spam, Akismet allows you to review the filtered comment spam it catches for any false positives you’d want to let through.
API keys are also needed to activate this tool, and are free for personal use. There are paid subscriptions available for Plus, Enterprise, and Enterprise Plus, with different features and price points for each.
Akismet is integrated into many of the most used plugins, making for a smooth user experience.
Honeypot
Whereas the two options we just discussed are specific products, Honeypot is a method. In computer terminology, a honeypot is a computer security mechanism set to detect, deflect, or, in some manner, counteract attempts at unauthorized use of information systems.
Honeypot uses a decoy operation to ward off spam, set up purely to attract and detect potential attackers. By monitoring the decoy, the owner of the system can detect if they are being targeted by cyber threats.
The process involves placing a hidden field using JavaScript, CSS (or similar). Spambots automatically search and fill every form, so if this form gets filled in, chances are very good that it was a spam submission.
By employing this simple coding strategy, bots landing on your website will reveal themselves; a simple and effective way to ensure that you only send messages to genuine subscribers/customers, protecting their privacy and your company’s reputation.
Forminator Banner
Set Up Spam Protections in Forminator
Now that we know the tools at our disposal in the Forminator plugin, let’s look at how we can implement each one.
You’ll need to create a form first, so we’ll have something to attach spam protections to.
This is an easy task that takes only seconds. First, make sure to install & activate Forminator, if you haven’t already.
Create a Form
Navigate to the WordPress Dashboard > Forminator > Forms, then click on the blue + Create button.
Select Registration (it will turn blue and add a checkmark in the corner), then click the Continue button.
Type in a name, then click the + Create button.
Form created! That simple. The default template added a few fields for you, which you can add to, or remove from.
Creating a Registration Form with a template… done with a few clicks!
There are a stunning array of options and personalizations in Forminator, so making it your own is a lot of fun. For now, we’ll turn our focus back to the anti spam tools.
Enable a Captcha
From the Edit Form page, click the Edit button next to your form.
Click the purple + Insert Fields button.
Select Captcha (it will turn blue and add a checkmark in the corner), then click the Insert Fields button.
Next, you’ll select which Captcha type/version n you want to use, a threshold tolerance, and more. Of importance here, we need to input the API keys for it.
API keys need to be entered to use reCAPTCHA in forms.
Note: Each different Captcha type will require its own keys in your global settings. If you haven’t yet created APIs for your site, head over to your Google reCAPTCHA or hCaptcha and set them up (takes less than a minute), then return to Forminator to finish the configurations.
Enter both of your API keys, then click the blue Save Settings button.
Setup complete. You can now check out a preview of what your form reCAPTCHA looks like.
Looks nice! We chose the v3 reCAPTCHA.
Enable Honeypot and Akismet
In order to use Akismet’s features in Forminator, you will need to install & activate the plugin, so make sure to do that first.
Navigate to Forminator’s Dashboard, then open the form you created.
From the Edit Form page, click Behavior from the left sidebar menu, then scroll down to Security.
Honeypot & Akismet one-click settings in Forminator.
Toggle the Enable Honeypot protection button ON (it will go from gray to blue).
Toggle the Enable Akismet spam protection button ON (it will go from gray to blue).
In the Akismet section, you will see two options for how Forminator should handle spam submissions:
Fail Submission – This is the message visitors will see if they fail the spam check. You can customize this to say whatever you like; just type your desired text in the corresponding field.
Mark as Spam – Entries marked as spam will be captured in the database, but not shown in Submissions. Additionally, Payments, Notification emails, and other automatic processes will be blocked.
Enable logged in submission only – Toggle this feature ON, if you want to allow only registered users to submit forms.
Additional Settings
There is an abundance of options available for your form.
So many, in fact, it would require another tutorial completely—and we already have several great ones—so I won’t go into further detail here.
I will however, quickly list some of the many other features, so you can get an idea just how robust forms in Forminator can be.
Lifespan – choose your form’s expiry (never, by date, or by number of submissions)
After Submission Behaviors – use AJAX, or reload the page
Email Notifications – send customized emails to post form submission (includes advanced features)
Third-party Integrations – connect to apps via their APIs (Zapier, MailChimp, Google Sheets, Slack, & more)
Database Storage – set auto-deletion time; multiple option values
Submissions Privacy – choose retention length; handling of erasure requests
Fields – 25 (and growing!); plus e-signatures* (*Pro version only)
Forminator is more than just a great form builder with powerful spam tools baked in.
It also comes loaded with capabilities to create interactive polls, fun quizzes, feedback widgets, and some popular payment options. Truly, something for everyone.
Spam Distress? Try Forms with Finesse
While there’s no way to completely eradicate spam from the web, at least not that we know of presently, there are some incredibly effective tools that you can use.
One great option is to use a robust security plugin—Defender, for example, which uses IP Banning.
Another is to use a Web Application Firewall, which most good hosts nowadays will provide. WAFs often have country lock-out capabilities, so known locations of spammers and bots can be completely cut off.
And of course, as showcased in this post, you can use a plugin that enables a Captcha, Akismet, or Honeypot. With Forminator, you get all three of these top-of-their-game tools, along with easy options to implement them.
Forminator will make a big difference in shoring up your defenses against the nuisance of comment & registration spam, providing a strong—and free—resource, right at your fingertips.
The SmartCrawl SEO plugin just got smarter with the latest release, and now supports regex patterns in your redirects.
URL redirection has gotten some cool new improvements in SmartCrawl, including support for regex, wildcards, and query strings. We’ve also added the ability to bulk import and export redirects using CSV files, and a time-saving search function.
In this article, we’re going to look a little further into each of these, and show you how powerful SmartCrawl’s WordPress plugin redirect feature can be.
Redirects enable you to forward one URL to another. It’s a smart way of sending both users and search engines to a different URL, while preserving your search engine rankings for a particular page.
When visitors request content that was previously available on your site but has since been moved, you want them to be redirected to your content’s new location, not get a 404 error.
Additionally, it’s important that search engines understand content has moved, and whether that move is temporary or permanent.
Giving visitors and search engines the right signals for your website improves user experience, and is essential to your SEO performance.
SmartCrawl harnesses this power by implementing different types of redirects.
URL Redirection in SmartCrawl
First, make sure you install the newest version of SmartCrawl.
SmartCrawl v2.17
You’ll get a popup indicating what features and fixes are new in this version. Click the blue Update button.
Boost that page rank with URL redirects.
You’ll be greeted by the splash screen afterward. Click the gray Awesome, Let’s Go! button.
Unpacking the goods.
Head to Advanced Tools > URL Redirection, and click on the purple Add Redirect button at bottom.
Alternatively, you can use the Add Redirect button at the top of the screen to open the options modal.
Creating a URL redirect.
In the resultant popup window, enter the URL you want to redirect from (the “old”), along with the one you want to redirect to (the “new”).
Out with the old, in with the new… URLs.
You can enter either domain relative or absolute URLs in the entry fields. Which means, you’re either starting with a forward slash /, or an https://.
Your redirect URLs can contain query strings as well. For example, you can take an old URL like this:
And redirect to a new URL with the same or different query string like this:
Next, you’ll select the Redirect Type.
What to do—301 or 302?
Redirect Types
For each URL redirect you create, a Redirection Type will be associated with it.
You can choose 301 (Permanent), and 302 (Temporary). The numbers refer to their corresponding HTTP status codes, which inform search engines that a page has been moved.
The more high quality links a page has (as ranked by SERPs), the more “link juice”—an industry term that describes the number of inbound links to a webpage—it has.
If you want to redirect permanently, then you want to pass the link juice. If the redirection is only temporary, then you want to keep the juice where it is, so it will be retained with the original URL when the redirect is turned off.
Summary:
301 – Permanently redirect a URL and pass the link juice.
302 – Temporarily redirect a URL and do not pass the link juice.
Examples of when to use 301/Permanent redirect types:
There’s a typo in your URL but there are already links to the page.
You’re going to remove a page and want to redirect links to a new one.
SSL has been added to your website so all pages need to move from HTTP to HTTPS.
Examples of when to use 302/Temporary redirect types:
You need to redirect users for a short period while your site goes down for maintenance.
You want to redirect users to a webpage based on their location.
You want to redirect users to a webpage based on their device.
With a 302/temporary redirect, the old URL remains in SERPs, and the redirect does not transfer any link authority to the new URL. Since they are not cached by browsers for as long, you have the option to change your mind.
Testing SmartCrawl’s redirect in the browser.
Advanced Options
There are a few additional menu items that you can dig into when creating your redirect.
To see these, click on the Advanced dropdown at the bottom of the modal.
Creating a label for your redirect is optional, but can be helpful for easy identification, particularly when you have long or similar URLs.
Enter any name in the Label field, or leave it blank.
Creating a label for redirects.
Next, you will need to choose an Expression for your redirect.
From the Regular Expressions section, you will see the two options: Plain Text, which is the default, and Regex.
If your redirect contains a regex pattern, make sure to click on Regex. (For more on Regex, see The “Catch-all” Regex section below.)
Once you’re done, click the Apply Redirect button.
Expression types in SmartCrawl.
To view or access your redirect library at any time, go to your SmartCrawl Dashboard > Advanced Tools > URL Redirection.
To Edit or Remove a redirect from your saved library, click the gear icon in the corresponding row and select the desired action.
Edit or delete your saved redirects.
The “Catch-all” Regex
SmartCrawl now supports regex patterns in your redirects. In this section, we’ll illustrate how helpful this can be.
Regex—short for regular expression—is a valuable shorthand, extremely useful for setting up large numbers of redirects.
Imagine how massive a chore it would be if you had dozens or even hundreds of URLs that you needed to individually create separate redirects for.
Like any language, you need to familiarize yourself with the basics. There are a number of sites that do a great job of this, particularly Learn Regex and Regex for non-programmers.
For learning and testing as you write, Regex 101 is a fantastic resource, providing explanations for why each string does what it does.
The key takeaway is that syntax symbols are used to add specific options to patterns, which indicate what to filter on. Once you understand those, you’re golden.
Regex Example
Consider your site has the below URLs. You want to redirect some of these to a new, consolidated page, which you’ll be calling “book-air”.
The URLs you want to redirect to this new page are the ones that have the single word “air” in them. (Shaded blue in the list below.)
The URLs you don’t want to redirect are the ones that have “air” as a portion of another word, since they’re outside of the scope of the content you’re redirecting. (Shaded pink in the list below.)
You also don’t want to include the “book-air” one, as that’s for the new redirect site itself, and would cause an endless loop. (Shaded green in the list below.)
List of URLS we want redirected.List of URLS we don’t want redirected.
The resultant regex that would meet all of our above parameters would like like this:
What in the gobbledy-gook? Regex looks funny but performs amazingly.
To see that this does indeed work, and why, check out the screenshots from Regex 101 below.
The expression/character strings I input on Regex 101.The explanation of my expression/character strings on Regex 101.
The more criteria you need to filter, the more character strings you will need to incorporate into your regex; the more basic, the fewer strings. It’s really not difficult, just a matter of learning the definitions for the syntax used.
A word of caution: be careful to avoid using very broad regular expressions, because they might end up redirecting URLs that you don’t intend to.
Bulk Options
You can bulk delete or bulk update multiple redirects that you have already set up.
To apply redirects for multiple items at once, tick the checkboxes for the ones you want changed, then click the Bulk Update button.
The bulk update menu.
Enter the New URL you wish to redirect all of them to, change the Redirect Type (if desired), then click the Save button.
Inputting the bulk update info.Viewing the bulk update results.
Now if you look at your list, you’ll see your changed redirects reflected in the New URL column.
Import & Export
SmartCrawl allows you to save and reuse any of your redirect configurations through its Import and Export functions.
Export your configurations to a CSV file, then import that file any time later for a single-click set up of your redirections.
To export your redirects, click the Export button at the top of the screen, and it will download a CSV file. You can rename any of these files, if it makes it easier to identify them later. (Just make sure it remains in the .csv format.)
The exported file downloads to your computer.
To import redirects into a site, click the Import button. From the window popup, click the Upload file button, select the desired CSV file on your computer, then click the Import button.
Uploading a CSV file with saved redirect info from your site.
If you’d like a pre-formatted CSV template for your redirects, we’ve got you! Click the Download CSV template link, then use that file (edited with your configs) for import later.
Redirect Attachments
Every time you upload a file to the WordPress Media Library and choose Link to: Attachment Page, WordPress creates a separate media attachment page for that file. This page consists solely of the media content and its own generated URL.
Redirecting WordPress attachment pages to the posts or pages they belong to makes sense in most cases, and improves your SEO.
By using SmartCrawl’s Redirect attachments feature, you enable users to skip the attachment pages, and redirect them to the post or page they belong to.
To do this, navigate to the options menu in URL Redirection > Settings.
Toggle the Redirect attachments button On (it will go from gray to blue). Tick the checkbox for Redirect image attachments only, if desired. Click Save Settings.
You can even redirect attachments.
Keep in mind that this redirect option only works if the Media Library item was initially uploaded to the original post.
Search
URL Redirection in SmartCrawl also comes with a built-in Search function.
To locate an existing URL Redirect from your list, just start typing in the Search field, and it will display only the items that match your input.
Find what you want, fast, using Search.
This is particularly handy if you have many redirects saved in SmartCrawl.
A New (Re)Direction
Adding a WordPress redirect plugin to your website is an extremely powerful flex when it comes to SEO optimization.
No matter what tools you’re using, it’s a good idea to periodically check which redirects are necessary and which can be cleaned up. Sometimes old redirects could be contributing to strange website behavior. Generally, the most important to keep are URLs that have inbound links and/or get serious referral traffic.
With all of its URL Redirect features, including bulk options, importing & exporting, redirecting attachments, and a smart search, SmartCrawl is ready to elevate and keep your site at the highest standards of SEO. And, if you currently use separate SEO & Redirection plugins, with SmartCrawl you’ll only need the one.
Like all of our plugins, SmartCrawl comes with expert, 24/7/365 support. Try it for free, and create clear, targeted content that will improve your rank with search engines—from Google to Bing.