As a web developer working with WordPress, troubleshooting errors is part and parcel of your journey. One common error you might come across is the dreaded “502 Bad Gateway” error.
In this tutorial, we’ll dive into the meaning of a 502 Bad Gateway error, provide examples to help you identify it, and offer step-by-step instructions on how to troubleshoot and resolve this issue efficiently.
The 502 Bad Gateway error is an HTTP status code that indicates communication failure between two servers, often a web server (like Nginx or Apache) and an upstream server (like PHP-FPM or a database server).
In the context of WordPress, this error typically arises when your web server cannot receive a valid response from an upstream server. Basically, a 502 bad gateway message indicates that something went wrong while connecting with a device that should fetch all the elements your web page needs to load.
The dreaded 502 Bad Gateway error message.
Common Causes of 502 Errors
Server Overload
When a server is overloaded with too many requests, it can struggle to process them all, leading to delayed or failed responses. This overload could be due to sudden spikes in website traffic, misconfiguration, or inadequate server resources.
DNS Issues
Domain Name System (DNS) issues can lead to a “Bad Gateway 502” error. If the DNS server fails to resolve the domain name, the communication between servers breaks down, triggering the error.
Network Connectivity Problems
Disruptions in network connectivity, such as broken connections or high latency, can also contribute to the occurrence of the “Bad Gateway 502” error.
PHP-FPM or Backend Server Issues
PHP-FPM (PHP FastCGI Process Manager) is a highly efficient and configurable alternative to the traditional way of running PHP scripts on a web server. Instead of having the web server handle PHP scripts directly, PHP-FPM manages a pool of worker processes to handle PHP requests and works as an intermediary between the web server (e.g., Nginx, Apache) and the PHP interpreter.
Handling PHP requests and processing these separately from the web server improves resource management and contributes to better performance and stability in serving dynamic content, such as what’s commonly found in WordPress websites.
If your web server relies on PHP-FPM or any other backend service, issues with these servers can lead to 502 errors.
Database Server Problems
If your WordPress site is connected to a database server (like MySQL), database connection problems can result in a 502 error.
Proxy or CDN Configuration
Incorrect settings or misconfigurations within your content delivery network (CDN) or proxy server can also trigger this error.
Plugins or Themes
Faulty plugins or themes that overload or improperly interact with your server can lead to 502 errors.
Recognizing a Bad Gateway Error
When a 502 Bad Gateway error occurs, users visiting your website might see a message like:
“502 Bad Gateway”
“502 Bad Gateway – nginx”
“502 Proxy Error”
“Bad Gateway: The proxy server received an invalid response from an upstream server.”
Troubleshooting and Resolving Errors
It goes without saying that the best way to prevent most server-related issues is to host your sites with a reliable hosting company.
WPMU DEV not only offers award-winning managed WordPress hosting as voted by users, but all of our hosting plans are also built on a self-healing architecture that proactively attempts to restart hosting services during high server loads to prevent issues and minimize disruptions.
If you are a WPMU DEV member, we also recommend activating Uptime from The Hub. Uptime will alert you if your site goes down for any reason, including issues that can lead to a 502 error.
Uptime alerts you when issues like a 502 error cause your site to go down.
Now, let’s delve into the steps you can take to diagnose and resolve the 502 Bad Gateway error on your WordPress site.
Step 1: Refresh the Page
Sometimes, the 502 error might be transient and can be resolved by simply refreshing the page. This could indicate a temporary server glitch.
Step 2: Check Other Sites
Visit other websites to determine if the issue is isolated to your site or affecting multiple websites. This can help you differentiate between a problem on your end or a more widespread issue.
Step 3: Clear Browser Cache and Cookies
Cached data in your browser might be causing the error. Consider clearing server-side caches (e.g. object cache, static cache etc.), then try accessing your website again.
Step 4: Flush DNS Cache
Flushing your computer’s DNS cache can help resolve DNS-related issues that might contribute to the error. See this guide if you need help.
Step 5: Monitor Server Status
Check the status of your web server, backend servers, and database servers. Look for server load issues or errors in server logs.
Step 6: Review PHP and Backend Configuration
Inspect your PHP-FPM or backend server configuration files. Make sure they are properly configured and functioning as expected.
Step 7: Examine CDN and Proxy Settings
If you’re using a CDN or proxy server, review their settings for any misconfigurations. Ensure that requests are being properly forwarded to your web server. Clearing the CDN cache may also be helpful.
Step 8: Disable Problematic Plugins/Themes
Temporarily deactivate all plugins and switch to a default WordPress theme. Gradually reactivate plugins one by one to identify if any are causing the 502 error.
Step 9: Increase Server Resources
If your server is running out of resources, consider upgrading your hosting plan or optimizing your server settings.
Step 10: Consult Hosting Support
If the error persists and you’re unable to identify the cause, reach out to your hosting provider’s support team. They can provide valuable insights and assistance in resolving the issue.
Preventing and Minimizing 502 Errors
Additional measures to help prevent or minimize potential 502 errors include the following:
1. Optimize Server Performance
Invest in robust server infrastructure and optimize server performance to significantly reduce the likelihood of encountering “Bad Gateway 502” errors.
2. Implement Redundancy
Having backup servers ready to take over in case of failure will help to maintain uninterrupted service and prevent errors.
3. Load Balancers
Implement load balancers to distribute incoming traffic across multiple servers. This reduces the risk of overloading a single server and triggering the error.
4. Content Delivery Networks (CDNs)
CDNs store cached copies of websites on servers located globally. This can enhance website performance and reduce the chances of a “Bad Gateway 502” error. If you’re not using a CDN, consider implementing one in your setup.
5. Regular Server Maintenance
Perform routine server maintenance, including software updates and security checks to prevent unforeseen errors.
6. Monitoring and Alert Systems
Implement monitoring tools and alert systems (e.g. Uptime) to notify administrators of server issues in real-time, allowing for swift intervention and error resolution.
7. Distributed Denial of Service (DDoS) Protection
DDoS protection services can safeguard servers from malicious traffic surges, preventing server overload and potential 502 errors.
8. Implement Graceful Error Handling
Graceful error handling refers to the practice of designing a website or application to handle errors and unexpected situations in a smooth and user-friendly manner.
Custom error pages and graceful error handling can enhance user experience by providing informative messages, clear, human-readable explanations of what went wrong and offering actionable steps to resolve the issue instead of presenting users with the standard error codes, confusing error messages, or technical jargon.
Know What To Do When You Get a 502
Facing a 502 Bad Gateway error in WordPress can be frustrating.
If you experience a 502 error, refer to the above information to help you quickly identify possible causes and solutions. Make sure you’re familiar with WordPress troubleshooting tools and our WordPress troubleshooting guide and follow the steps outlined above to identify and address the root cause of the error to ensure your website remains up and running smoothly for your visitors.
And of course, if you are a WPMU DEV member and need additional help troubleshooting errors, you can always access our 24/7 expert support team anytime for assistance with anything WordPress or hosting-related.
Meet Forminator’s powerful PDF Generator Addon…the simplest, easiest and most automated way to create, edit, and send out form-submitted PDFs without leaving your WordPress dashboard!
Forminator plugin users spoke to us about the challenges they face creating and sending out form-generated PDFs on the fly that seamlessly integrate with their business processes.
For example:
“I would like to send a PDF of our forms with email notifications using Forminator. But I don’t want to use the E2PDF method because it’s too limited for us.”
“We need to create a form for our user, and generate a PDF after they write on it, and give them the possibility to pay.”
“Does anyone know how I can generate a PDF from a form submission like Gravity PDF?”
Forminator users, we heard you!
Forminator Pro gives you the ability to integrate, create, generate, and automate PDFs using our nifty PDF generator addon!
Install with just one click and say goodbye to limited free 3rd-party plugins, costly upgrades, and unnecessary integrations!
Built to make it easy for any user to create and customize a PDF file from form submission regardless of their technical level, here are some of the key features of Forminator’s PDF Generator Addon:
Easier PDF Generation
“I am working on a free course for artists who want to start their own websites. They fill out a form and then get a PDF download of their answers. This will serve as a ‘Scope of Work’ for their project.”
Forminator’s PDF Builder uses the same intuitively easy-to-use drag and drop visual interface as the Form builder, providing a seamless user experience with no additional learning curve required.
In fact, the PDF creation option is part of the Form Builder, so it only takes a couple of clicks to create a PDF file.
Customizable PDFs
Forminator gives users high flexibility by not only making it easy to customize the PDF form structure and layout using its form builder, but also customize PDF content using the Rich Text field, add additional form fields, and insert field tags (see “How to Use” section below).
Autogenerated PDFs
PDFs can be autogenerated from your existing form structure and form fields, so you don’t need to create your PDF from scratch.
However, Forminator is flexible enough so that if you want to design your PDF fom scratch, you can.
Attach PDFs to Emails
“It would be great if PDFs could be created of the form submissions and could be attached and sent over emails.”
You can send customized email notifications to admins and visitors with PDF attachments automatically. (see “How to Use” section below.)
Downloadable PDFs
Download the PDFs of the form submissions on the Submissions page.
Unlimited PDFs
No limits on usage of fields, number of pages, or number of PDFs.
PDFs and More PDFs
Create multiple PDFs on the same form.
PDF Templates (Coming Soon)
Generate PDF files for payment receipts, invoices, and quotations in seconds with easy-to-use pre-designed templates.
We also have loads more features coming soon (e.g. payment and quotation fields, more settings to customize PDF form appearance with colors and fonts, allowing form submitters to download PDFs after submission, etc.), so watch this space!
How to Use Forminator’s PDF Generator Addon
As mentioned earlier, one of the key features of Forminator’s PDF Generation Addon is that it works just like the plugin’s Form builder, so once you’ve installed it, configuring your PDF forms is so easy.
Note: This is a Pro feature, so make sure you have Forminator Pro installed, or consider becoming a WPMU DEV member if you are currently using our free Forminator plugin.
Creating PDFs
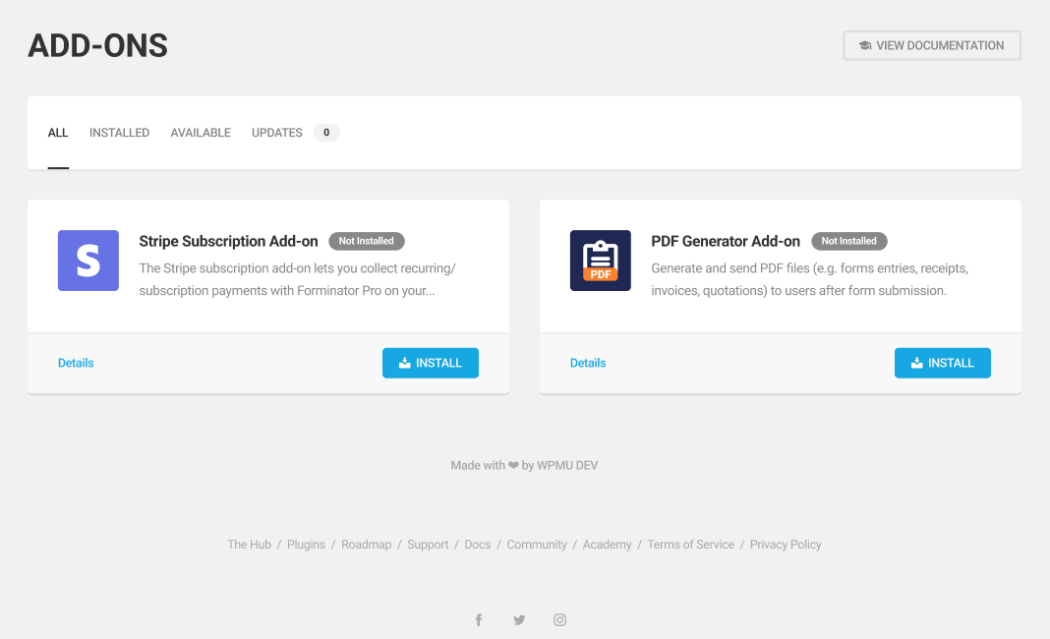
To create PDFs, first make sure to install the addon. You can do this from your WPMU DEV Dashboard plugin, or by going to Forminator Pro > Add-ons.
Install the PDF Generator from Forminator Pro’s Add-Ons section.
Note: to use the PDF Generator Addon, make sure that you have created at least one form on your site. Remember too, that you can generate multiple PDF files for the same form.
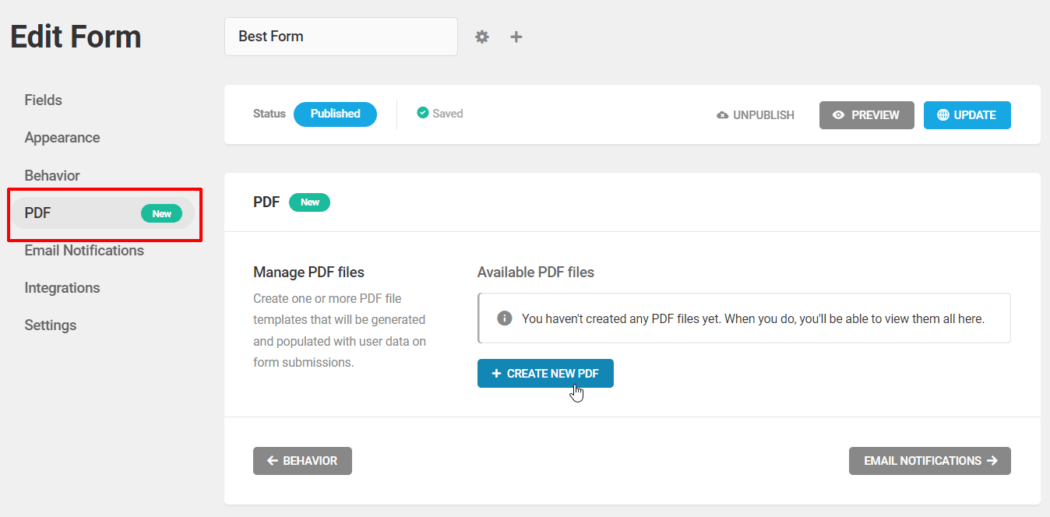
Once the add-on has been installed and activated, edit the form you want to attach a PDF to, and in the Edit Form > PDF section, click on Create New PDF.
Create a new PDF in Forminator’s Edit Form > PDF section.
Give your new PDF a filename and click the + Create button.
Give your PDF a name for internal identification purposes.
Next, choose a template for your PDF. Note: As we develop this feature further, we’ll be adding all kinds of new templates to this section for generating PDF receipts, quotations, etc.
After selecting your template, click the Continue button.
Forminator Pro users can choose from a range of professionally designed PDF templates.
The Preload PDF Content modal gives you the choice of preloading form fields into your new PDF file, or creating your PDF from scratch.
Choose an option and click the Continue button to proceed.
Forminator gives you the choice of preloading form fields or starting with a blank file.
Once your PDF file is created, you can edit it or continue the setup process.
Once your PDF file is created, you can edit it or continue building your form.
If you selected the Preload Form Fields in PDF File option, the fields in your form will load in your PDF file.
Editing PDFs
While the Page Header and Page Footer elements are static and cannot be moved, you can edit the settings and style for all fields by clicking on the gear icon to the right of the fields.
You can also rearrange non-static fields using drag and drop to fully customize the layout of your PDF.
Insert, edit, and preview your form fields.
As well as preloading form fields, you can insert additional fields to add custom text and labels, add page breaks to create multipage PDFs, insert payment and quotation fields, and more.
There are many PDF form field options to choose from.
Note: To add custom text in your forms, use the Rich Text field. Use either a label for the field, or hide the label and add your own text with formatting options like bold, italics, bullet points, and hyperlinks.
You can also insert form fields into the text area to create a customized PDF template that will autopopulate your form details when generated.
Use the Rich Text field to format and style your form field content.
Additionally, you can adjust the appearance of your PDFs using appearance options, which allow you to control how your PDFs will look and their layout.
The Page settings section lets you set the page size from a dropdown menu, with the recommended default being A4. The default page margin is 30 pixels, and you can change this under the Custom tab.
You can also enable the RTL (Right-to-Left) option to output your PDF in languages like Arabic, Hebrew, Farsi, Urdu, etc., and if you’re familiar with CSS, you can use the Custom CSS option to further customize your PDF. Many selectors are included to help you, and if you need further assistance, make sure to contact our 24/7 Live Support team.
After creating or editing your PDF, you can save it as a Draft to continue working on it at a later time. You can also preview, edit, or delete it, and publish or unpublish it.
A Forminator Form with a Forminator generated PDF.
Emailing PDFs
With Forminator’s PDF Generator Addon, attaching PDFs to emails is really simple and easy.
After creating your PDF form, go to Forminator > Edit Form > Email Notifications and select the PDF file(s) to attach to the email notification you have set up.
Select one or more PDFs to attach to the email.
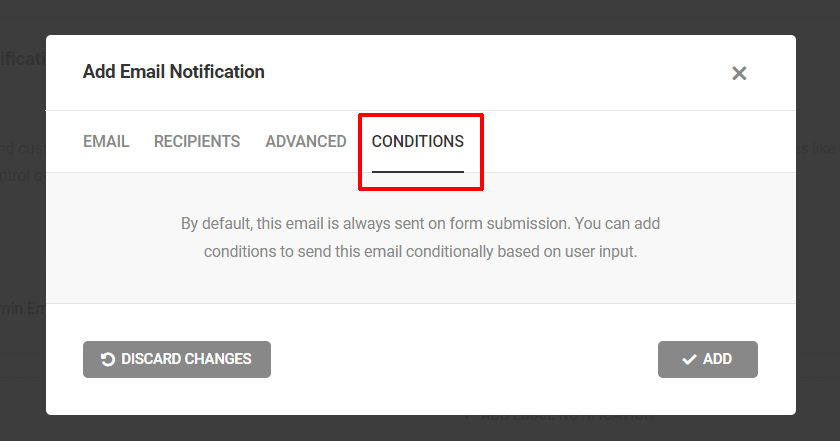
Note: You can also set up conditional email rules to automatically send specific PDFs to specific users.
Use the power of conditional emails to send PDFs to specific users.
Downloading PDFs
You can download PDFs on form submissions from the Submissions page for forms with PDF templates. There are no restrictions on the number of PDFs you can download.
If you have more than one PDF template available for a single form, you can download the form submission PDF for each template separately or the PDFs of all the templates as a zip file.
Download PDFs for all submission forms.
For full details on using the PDF generator addon and all of its features refer to our Forminator documentation.
With Forminator Pro, You Can’t Go PDF’ing Wrong!
Forminator Pro’s new PDF generator allows you to generate an unlimited number of PDFs with your forms and form submissions, customize, edit, and style PDF templates, and a whole lot more.
If you are a WPMU DEV member, there is nothing else you need to purchase to start generating professional PDFs. Simply install the addon in Forminator, tweak the appearance and settings in your forms, and you’re all good to go.
If you’re not a member yet, consider choosing one of our risk-free membership options (Pro or Agency). You’ll not only get all of our Pro plugins, you’ll also get access to everything else you need to use PDFs effectively, including site management, client report, and client billing tools, white label and reseller options, 24/7 expert support on all areas related to WordPress, CSS, hosting, etc, and so much more!
Start using Forminator’s PDF Generator Addon today…it’s PDF’ing great!
[Editor’s note: This post was originally published in August 2023 and updated in April 2024 for accuracy.]
Meet Forminator’s powerful PDF Generator Addon…the simplest, easiest and most automated way to create, edit, and send out form-submitted PDFs without leaving your WordPress dashboard!
Forminator plugin users spoke to us about the challenges they face creating and sending out form-generated PDFs on the fly that seamlessly integrate with their business processes.
For example:
“I would like to send a PDF of our forms with email notifications using Forminator. But I don’t want to use the E2PDF method because it’s too limited for us.”
“We need to create a form for our user, and generate a PDF after they write on it, and give them the possibility to pay.”
“Does anyone know how I can generate a PDF from a form submission like Gravity PDF?”
Forminator users, we heard you!
Forminator Pro now gives you the ability to integrate, create, generate, and automate PDFs using our nifty new PDF generator addon!
Install with just one click and say goodbye to limited free 3rd-party plugins, costly upgrades, and unnecessary integrations!
Built to make it easy for any user to create and customize a PDF file from form submission regardless of their technical level, here are some of the key features of Forminator’s PDF Generator Addon:
Easier PDF Generation
“I am working on a free course for artists who want to start their own websites. They fill out a form and then get a PDF download of their answers. This will serve as a ‘Scope of Work’ for their project.”
Forminator’s PDF Builder uses the same intuitively easy-to-use drag and drop visual interface as the Form builder, providing a seamless user experience with no additional learning curve required.
In fact, the PDF creation option is part of the Form Builder, so it only takes a couple of clicks to create a PDF file.
Customizable PDFs
Forminator gives users high flexibility by not only making it easy to customize the PDF form structure and layout using its form builder, but also customize PDF content using the Rich Text field, add additional form fields, and insert field tags (see “How to Use” section below).
Autogenerated PDFs
PDFs can be autogenerated from your existing form structure and form fields, so you don’t need to create your PDF from scratch.
However, Forminator is flexible enough so that if you want to design your PDF fom scratch, you can.
Attach Emails to PDFs
“It would be great if PDFs could be created of the form submissions and could be attached and sent over emails.”
You can send customized email notifications to admins and visitors with PDF attachments automatically. (see “How to Use” section below.)
Downloadable PDFs
Download the PDFs of the form submissions on the Submissions page.
Unlimited PDFs
No limits on usage of fields, number of pages, or number of PDFs.
PDFs and More PDFs
Create multiple PDFs on the same form.
PDF Templates
Generate PDF files for payment receipts, invoices, and quotations in seconds with easy-to-use pre-designed templates. (Coming soon!)
We also have loads more features coming soon (e.g. payment and quotation fields, more settings to customize PDF form appearance with colors and fonts, allowing form submitters to download PDFs after submission, etc.), so watch this space!
How to Use Forminator’s PDF Generator Addon
As mentioned earlier, one of the key features of Forminator’s PDF Generation Addon is that it works just like the plugin’s Form builder, so once you’ve installed it, configuring your PDF forms is so easy.
Note: This is a Pro feature, so make sure you have Forminator Pro installed, or consider becoming a WPMU DEV member if you are currently using our free Forminator plugin.
Creating PDFs
To create PDFs, first make sure to install the addon. You can do this from your WPMU DEV Dashboard plugin, or by going to Forminator Pro > Add-ons .
Install the PDF Generator from Forminator Pro’s Add-Ons section.
Note: to use the PDF Generator Addon, make sure that you have created at least one form on your site. Remember too, that you can generate multiple PDF files for the same form.
Once the add-on has been installed and activated, edit the form you want to attach a PDF to, and in the Edit Form > PDF section, click on Create New PDF.
Create a new PDF in Forminator’s Edit Form > PDF section.
Give your new PDF a filename and click the + Create button.
Give your PDF a name for internal identification purposes.
Next, choose a template for your PDF. Note: As we develop this feature further, we’ll be adding all kinds of new templates to this section for generating PDF receipts, quotations, etc.
After selecting your template, click the Continue button.
Forminator Pro users can choose from a range of professionally designed PDF templates.
The Preload PDF Content modal gives you the choice of preloading form fields into your new PDF file, or creating your PDF from scratch.
Choose an option and click the Continue button to proceed.
Forminator gives you the choice of preloading form fields or starting with a blank file.
Once your PDF file is created, you can edit it or continue the setup process.
Once your PDF file is created, you can edit it or continue building your form.
If you selected the Preload Form Fields in PDF File option, the fields in your form will load in your PDF file.
Editing PDFs
While the Page Header and Page Footer elements are static and cannot be moved, you can edit the settings and style for all fields by clicking on the gear icon to the right of the fields.
You can also rearrange non-static fields using drag and drop to fully customize the layout of your PDF.
Insert, edit, and preview your form fields.
As well as preloading form fields, you can insert additional fields to add custom text and labels, add page breaks to create multipage PDFs, insert payment and quotation fields, and more.
There are many PDF form field options to choose from.
Note: To add custom text in your forms, use the Rich Text field. Use either a label for the field, or hide the label and add your own text with formatting options like bold, italics, bullet points, and hyperlinks.
You can also insert form fields into the text area to create a customized PDF template that will autopopulate your form details when generated.
Use the Rich Text field to format and style your form field content.
Additionally, you can adjust the appearance of your PDFs using appearance options, which allow you to control how your PDFs will look and their layout.
The Page settings section lets you set the page size from a dropdown menu, with the recommended default being A4. The default page margin is 30 pixels, and you can change this under the Custom tab.
You can also enable the RTL (Right-to-Left) option to output your PDF in languages like Arabic, Hebrew, Farsi, Urdu, etc., and if you’re familiar with CSS, you can use the Custom CSS option to further customize your PDF. Many selectors are included to help you, and if you need further assistance, make sure to contact our 24/7 Live Support team.
After creating or editing your PDF, you can save it as a Draft to continue working on it at a later time. You can also preview, edit, or delete it, and publish or unpublish it.
A Forminator Form with a Forminator generated PDF.
Emailing PDFs
With Forminator’s PDF Generator Addon, attaching PDFs to emails is really simple and easy.
After creating your PDF form, go to Forminator > Edit Form > Email Notifications and select the PDF file(s) to attach to the email notification you have set up.
Select one or more PDFs to attach to the email.
Note: You can also set up conditional email rules to automatically send specific PDFs to specific users.
Use the power of conditional emails to send PDFs to specific users.
Downloading PDFs
You can download PDFs on form submissions from the Submissions page for forms with PDF templates. There are no restrictions on the number of PDFs you can download.
If you have more than one PDF template available for a single form, you can download the form submission PDF for each template separately or the PDFs of all the templates as a zip file.
Download PDFs for all submission forms.
For full details on using the PDF generator addon and all of its features refer to our Forminator documentation.
With Forminator Pro, You Can’t Go PDF’ing Wrong!
Forminator Pro’s new PDF generator allows you to generate an unlimited number of PDFs with your forms and form submissions, customize, edit, and style PDF templates, and a whole lot more.
If you are a WPMU DEV member, there is nothing else you need to purchase to start generating professional PDFs. Simply install the addon in Forminator, tweak the appearance and settings in your forms, and you’re all good to go.
If you’re not a member yet, consider choosing one of our risk-free membership options (Pro or Agency). You’ll not only get all of our Pro plugins, you’ll also get access to everything else you need to use PDFs effectively, including site management, client report, and client billing tools, white label and reseller options, 24/7 expert support on all areas related to WordPress, CSS, hosting, etc, and so much more!
Start using Forminator’s PDF Generator Addon today…it’s PDF’ing great!
WPMU DEV’s award-winning image optimization plugin’s new Ultra Smush unlocks unprecedented image compression levels up to 5x greater than Super Smush, while retaining impressive image quality!
Is your WordPress site filled with images? Do you want those images to load on your pages faster than a lamborghini speeding on the Autobahn and compress them tighter than a full stack developer’s schedule? And do all this with almost no discernible loss of image quality?
Before we get into how to activate and use the new Ultra Smush image compression level and why it can deliver even more impressive results than our already impressive Super Smush feature, let’s share some of the results of using Ultra Smush.
First, here are the results of performing a bulk smush on a test site with 1,000+ large-ish images with only Super Smush activated (CDN, Local WebP, and Lazy Load are inactive)…
Before Ultra Smush: Image compression savings using Super Smush only.
After activating Ultra Smush, we then ran the test again to see if we could squeeze anything more out of an already image-optimized site.
And it did! Ultra Smush squeezed out more than 5x times savings…
After Ultra Smush: More than 5x times savings on an already optimized site!
Early testers reported getting similar results.
Results: Super Smush (Before) vs Ultra Smush (After)
And here are just some of the comments we received from early testers about Ultra Smush’s impact on image quality:
“Ultra is awesome. It was hard to find the difference between qualities. Quality loss is negligible. I am impressed!”
“It looks pretty good, only if I look really close I can see that some of the colors are not as vibrant, and that some edges are not as sharp as on the original.”
“On a medium size image with lots of details, you gotta look very close to see slight color saturation differences. On a big image with a solid but gradient background, transitions between gradients are more visible and the main object seems lees sharp. You really need to look very close and expect it. Though it’s not for a photo site that requires superb quality. All in all: pretty impressive.”
Our plugin development team also did extensive testing, comparing Ultra Smush’s results with Ewww image optimizer and TinyPNG by running DSSIM tests (a quality comparison metric that shows variation from the original image – the lower the score, the better).
Ultra Smush outperformed the competition in most tests and came out the overall winner for both compression savings…
File Size Reduction testing shows that Ultra Smush is the clear winner!
DSSIM testing shows Ultra Smush delivers superior image savings and better quality over the competition.
To be clear, using Ultra Smush will result in Lossy compression, so while you should not expect the original quality, the results will still be ultra-impressive.
How To Enable Smush’s Ultra Mode
Ultra Smush is not just a new feature, it’s an entirely new compression level for Bulk Smushing images.
Ultra mode is a feature of Smush Pro that replaces the Super Smush toggle on the free version of the plugin with additional “Smush Mode” options.
Switching to Ultra mode is ultra easy. If you have Smush Pro installed on your site, simply navigate to the Bulk Smush Settings screen and select Ultra (Higher Compression)by clicking on the button, then save your settings.
Choose the level of compression for bulk smushing images that best suits your needs.
Smush Mode offers three compression levels for Bulk Smush settings:
Basic – Choose this option for minimal file size reduction (low savings), pixel-perfect lossless compression of original image quality, and negligible impact on speed.
Super – For faster page loads, select this setting for substantial file size reduction with excellent image clarity. Super Smush provides up to 2x compression savings for your images (lossy compression).
Ultra – Select this compression option for professional-grade performance compression. Ultra Smush provides compression levels up to 5x greater than Super, while preserving impressive image quality.
After enabling Ultra Smush in your plugin settings, you can monitor results from The Hub’s Performance tab.
View Ultra Smush optimization results inside The Hub.
Notes:
If you would rather continue optimizing images using the Basic (lossless) or Super Smush settings, just select those Compression Level options instead.
If you enable Ultra Smush on a site where Smush is already running, remember to re-check all images and perform a new Bulk Smush to benefit from further optimization savings.
After enabling Ultra Smush, rerun Bulk Smush to optimize your site even further.
How Does Ultra Smush Compare To Super Smush?
While Super Smush provides up to 2x faster image optimization with virtually no visible loss in quality, Ultra Smush’s new compression engine offers up to 5 times file size reduction to achieve exceptional compression results.
Note: Currently, Ultra Smush improves JPEG images only. Features to improve PNG images will be added in future versions of the plugin.
If you are just getting started with WordPress optimization, then it’s important to know that using image compression on websites offers several significant benefits that enhance overall user experience and site performance, such as:
Faster Loading Speeds
Compressed images are smaller in size, which means they take less time to load when someone visits your WordPress website. Faster loading speeds improve user satisfaction and reduce bounce rates. Additionally, page loading speed is a crucial factor for SEO, as search engines tend to prioritize faster-loading websites in their search results.
Improved User Experience
When images load quickly, users are more likely to stay engaged with your content. High-quality, compressed images ensure that visitors can access the visual elements of your website without waiting for prolonged load times. This positive experience can lead to increased user retention and higher conversion rates.
Bandwidth Savings
Compressed images consume less bandwidth, making your website more efficient, especially for users with limited data plans or slower internet connections. This can be particularly important for mobile users, as they often have restricted data allowances.
Reduced Server Load
Smaller image sizes translate to reduced server load, as the server needs to process and transmit less data for each image request. This can help prevent performance issues during peak traffic times and reduce hosting costs.
Higher SEO Rankings
Google and other search engines consider page loading speed as one of the ranking factors. Faster loading times, achieved through image compression, can positively impact your website’s SEO and potentially lead to higher search engine rankings.
Ease of Backup and Restoration
Smaller image files are quicker to backup and restore, making it easier to manage your website’s backups efficiently.
Accessibility Considerations
Faster loading times benefit all users, including those with disabilities who may rely on screen readers or have limited bandwidth access.
The easiest way to implement image compression on WordPress websites is to use a plugin like Smush, which can be easily installed and configured to handle image compression and optimization automatically as you upload media to your WordPress site (both internally to the Media Library and external media directories) without compromising visual quality.
Choose Ultra Smush For Superior Image Optimization
As mentioned earlier, Ultra Smush is a Smush Pro feature. If you’re currently using the free Smush plugin, consider becoming a WPMU DEV member and start enjoying the benefit of extra savings and performance improvements, plus access to the most robust “all-in-one” WordPress management platform available anywhere.
So, if your aim is to significantly reduce image file sizes and automate the entire process, the solution is ultra simple…enable Ultra Smush on all your WordPress sites and experience an optimization boost of up to 5x in image compression savings and impressive image quality.
WordPress runs on PHP, so as a WordPress developer, it’s important to understand the PHP functions enabled on the server that hosts your site(s).
Do you need to set up a plugin or configure an application on a WordPress site and are wondering if a certain PHP function or library is enabled on your server (e.g. cURL)?
In this tutorial, we’ll show you a quick and easy way to find enabled PHP functions on your server using the phpinfo() function in WordPress. We also provide a comprehensive glossary of these PHP functions for reference, and to help you better understand the backend of your WordPress sites.
The phpinfo() function is a built-in PHP function that provides a long list of detailed information about the PHP installation and configuration settings on your server, including all the loaded extensions.
When phpinfo() is called and executed, it generates a comprehensive HTML page that displays various aspects of the PHP environment, including PHP version, extensions, directives, environment variables, and more.
The phpinfo() function outputs information in a tabular format, making it easy to navigate and understand the PHP configuration. This knowledge allows you to leverage the available functions on your hosting environment and optimize your WordPress development process.
The information displayed by phpinfo() can be categorized into different sections that provide specific details about a particular aspect of the PHP environment.
Some common information you can find using phpinfo() includes:
1. PHP version: The version of PHP running on the server.
2. Configuration settings: Various settings and directives defined in the PHP configuration file (php.ini).
3. Extensions: A list of loaded PHP extensions and their configurations.
4. Environment variables: Server environment variables and their values.
5. PHP variables: Information about predefined PHP variables, such as `$_SERVER`, `$_GET`, `$_POST`, etc.
6. HTTP headers: HTTP request and response headers.
For a list of all PHP functions enabled on your server, see the tutorial below.
Notes:
Use phpinfo() with caution. While it provides valuable information for development and troubleshooting purposes, it should not be left accessible on a production server. After obtaining the necessary information, we recommend removing or commenting out the phpinfo() function call for security purposes.
If you only need to know which version of PHP your server is currently running, you can skip the tutorial below and simply go to the Hosting > Overview tab in The Hub.
Check which version of PHP your server is running from The Hub
How to Find Enabled PHP Functions On Your Server Using phpinfo()
By following the steps outlined in this tutorial, you will learn how to easily retrieve a list of information showing all the enabled PHP functions and extensions on your server.
For this tutorial, we’ll show you how to access the list of PHP functions for a WordPress site set up on WPMU DEV hosting. Note that different hosting environments may use different tools and methods to display this information. Reach out to your hosting support if you have any questions or need help.
Step 1: Access your WordPress site’s files
To begin, you need to be able to access the WordPress site’s files stored on your server. You can do this either via FTP or using our File Manager tool.
Step 2: Create a PHP file
Next, create a PHP file using a text editor and add the phpinfo() function shown below:
<?php
phpinfo();
You can name this PHP file anything you like. In the example below, we’ve named the file ‘info.php’ (note: avoid using an existing filename found on the root folder of your WordPress installation to prevent overwriting the original file).
Create a PHP file to call the phpinfo() function.
Save your PHP file and close your text editor.
Step 3: Upload the file to your server
Locate the root directory of your WordPress installation, where the main files like wp-config.php and index.php are located, and upload your file to this folder.
As mentioned earlier, you can do this easily using our File Manager tool.
Upload the file to the WordPress install root directory.
Step 4: Access the phpinfo() output
Open your WordPress site in a web browser and enter the URL of the uploaded PHP file to generate a PHP function report.
You should see the PHP information displayed. The output will contain detailed information about the PHP configuration, including all enabled functions on your server.
PHP function report.
Step 5: Locate the enabled PHP functions
Scroll down the phpinfo() output to find a specific function. Typically, you will find a list of all enabled PHP functions along with their respective settings and configurations in the section labeled “Core.”
That’s all there is to it!
Refer to the Glossary section below if you need to look up any of the functions listed in your generated PHP function report .
Glossary of PHP Functions
This glossary provides a list of various PHP functions and their applications. Feel free to bookmark this page and use it as a quick reference guide to better understand the backend of your WordPress sites.
Configuration
This function deals with setting up PHP to work with the Internet server and to define settings within your PHP scripts.
bcmath – This module enables arbitrary precision mathematics in PHP.
calendar – This function of PHP allows conversions between various calendar formats.
cgi-fcgi – Command for PHP when run in CGI or FastCGI mode.
Core
These are basic PHP functions and classes that form the core of the PHP language.
ctype – A library of PHP that checks if the data type of a variable is a valid character type.
curl – Used for transferring data with URLs and is the backbone of multiple functions in PHP.
date – A group of functions that let you retrieve or format the local or GMT date and time in PHP.
dom – A PHP extension that provides a robust, powerful DOM (Document Object Model) XML API.
exif – PHP function used to work with image metadata.
FFI – Foreign Function Interface is an extension that provides a simple way to call native functions, access native variables, and create/access data structures defined in C libraries.
fileinfo – A PHP extension that helps you to identify a file’s mime type.
filter – This function filters data by either validating or sanitizing it which aids in securing a PHP application.
ftp – FTP PHP functions help establish a connection to a remote FTP server, a crucial part of file sharing.
gd – A library used for dynamic image creation.
gettext – An extension aimed at the internationalization of PHP scripts by providing translation support.
gmp – This is a PHP extension for arbitrary precision mathematics.
hash – This function is used to generate a hash value from a string.
iconv – Provides an interface to the GNU iconv library, which provides conversion of character sets.
igbinary – An alternative to PHP serializer with better performance and smaller size.
imagick – A PHP extension that allows working with ImageMagick, a robust software suite to create, edit, and compose images.
imap – This function provides an API for talking to the internet mail servers using PHP.
intl – This extension helps to perform UCA-conformant collation and date/time/number/currency formatting in PHP.
json – JSON functions in PHP allows for encoding and decoding JSON data.
ldap – LDAP functions connect, bind and disconnect from an LDAP directory.
libxml – A foundation library that offers a set of APIs for manipulating XML, including parsing XML documents and support for other document types like HTML.
mbstring – A non-binary string handling extension that provides multibyte specific string functions.
mcrypt – Provides a variety of encryption functions.
memcache – Memcache module provides handy procedural and object-oriented interface to memcached, high-performance, distributed memory object caching system, generic in nature but intended for use in speeding up dynamic web applications by alleviating database load.
memcached – An extension for interfacing with memcached via libmemcached library.
msgpack – Provides an interface to msgpack.org, which is a binary-based efficient object serialization library.
mysqli – A database driver used to interact with MySQL databases.
mysqlnd – It’s the MySQL native driver for PHP.
openssl – A robust PHP function used for generating and verifying digital signatures.
pcre – Provides functions for ‘perl-compatible regular expressions’.
PDO – PHP Data Objects is a database access layer providing a uniform method of access to multiple databases.
pdo_mysql – A driver that implements the PHP Data Object (PDO) interface to enable access to MySQL databases.
Phar – An archive format combined with a runtime library to help build and load PHP applications bundled into a single file.
posix – Accessors to the POSIX (Unix) system calls.
readline – Provides an interactive line editing capabilities and history functions.
redis – A PHP extension for interfacing with Redis, a high performance key-value storage service.
Reflection – A PHP extension, allows inspection and reverse-engineering of PHP programs using a process called “reflection”.
session – This function enables user session management.
shmop – A simple interface for accessing shared memory segments in PHP.
SimpleXML – An extension that simplifies the work of reading XML files.
soap – SoapClient is a PHP built-in class providing methods for sending SOAP requests and receiving SOAP responses from a URL.
sockets – PHP socket functions let you create and manage network sockets, low-level network communications between servers.
sodium – Sodium is a modern, easy-to-use software library for encryption, decryption, signatures, password hashing and more.
SPL – The Standard PHP Library (SPL) is a collection of interfaces and classes that are part of PHP core.
standard – These are built-in functions and classes provided by PHP which do not rely on external dependencies or PHP extensions.
sysvmsg – It provides an interface to System V message queues.
sysvsem – Offers access to POSIX-style semaphores.
sysvshm – Provides shared memory functions.
tokenizer – The tokenizer functions provide an API that allows converting PHP source code into an array of tokens.
xml – XML (eXtensible Markup Language) Parser functions let you parse XML documents.
xmlreader – An extension that pulls data in and pushes it back out again.
xmlrpc – PHP implementation of XML-RPC protocol used in exchanging data across a network.
xmlwriter – An extension to create XML documents using a simple ‘constructor-like’ style.
xsl – XSL is a language for expressing style sheets to transform XML documents into other XML documents.
Zend OPcache – An open-source component that improves PHP performance by storing pre-compiled script bytecode in shared memory, thereby removing the need for PHP to load and parse scripts on each request.
zip – PHP zip extension is used to read, write, and manipulate zip archives.
zlib – Provides access to zlib compression library.
Additional Modules
These are the underlying software components or libraries that add various functionalities to the PHP scripting language.
Environment
Involved in setting up, configuring, and managing the PHP runtime environment.
PHP Variables
These are used to store data which can be modified during the execution of your script.
DIY or Use Our Support Team
Learning PHP will enhance your ability to troubleshoot, modify and optimize your WordPress site.
Hopefully, this tutorial will come in handy if you need to do a quick look up of your server’s enabled PHP functions. Of course, if your WordPress sites are hosted with WPMU DEV, you can always reach out to our 24/7 support team for expert assistance on anything WordPress and hosting related, or get instant answers with our AI-powered assistant.
And rest assured, our hosting is configured to work with just about all WordPress plugins, applications, and configurations.
Looking for ways to further optimize your WordPress site’s performance? Easy…switch on Hummingbird‘s new Delay JavaScript Execution feature!
Most sites nowadays are laden with JavaScript files and inline scripts, which can be resource intensive and affect site performance and PageSpeed scores in areas like site rendering and load time.
As you will learn in this article, delaying the execution of JavaScript files to prioritise the load of more critical elements first can keep the overall load time of your site in check and improve your PageSpeed scores.
Even better, we’ll show you how to automate the whole process with just one click using our WordPress optimization plugin, Hummingbird.
Why Delaying JavaScript Execution Helps To Optimize Site Performance
As mentioned earlier, sites nowadays are loaded with 3rd-party scripts for serving advertisements, tracking engagement, security verification, etc., which can block pages from rendering quickly on users’ browsers and affect your site’s user experience and search engine rankings.
Holding these scripts off from loading on your site until there’s actual user interaction with the page can significantly improve areas of your site’s performance like:
1. Faster Page Loading Times
By delaying the execution of JavaScript files until users interact with the page, web pages will load faster, allowing users to access and interact with the site more quickly. This helps improve user experience and increase user engagement.
2. Improved Rendering Performance
Browser rendering engines need to process JavaScript before they can display the page content. Delaying JavaScript execution until after users interact the page content has been loaded helps the browser render the page more quickly and efficiently. This means users can see and interact with the web page sooner.
3. Reduced HTTP Requests
Combining JavaScript files and loading them asynchronously can reduce the number of HTTP requests made to the server, which also helps to speed up page loading times.
4. Increased Google PageSpeed Insights Score
Google considers page speed as a ranking factor for search results, and delaying JavaScript execution can improve your site’s PageSpeed Insights score, potentially leading to better search engine rankings.
5. Lower Server Load
By loading JavaScript asynchronously and combining files, fewer requests are made to the server, reducing its workload, and helping to prevent server crashes or slow responses during high-traffic situations.
Improving PageSpeed Score Recommendations
Want to improve your PageSpeed Insights score? Try delaying JavaScript file execution.
Delaying JavaScript execution on your site can improve your Google PageSpeed score by addressing the following recommendations:
Remove unused JavaScript
This recommendation suggests eliminating unused or unnecessary JavaScript code from your web pages. Unused JavaScript can increase your page’s load time, as the browser has to download, parse, and execute the code even if it’s not being used.
By removing any unused JavaScript code, you can decrease the file size and improve your website’s overall performance.
Total blocking time
Total blocking time is a metric that measures the amount of time between the First Contentful Paint (FCP) and the Time to Interactive (TTI) during which the main thread was blocked for long enough to prevent input responsiveness.
In simple terms, it quantifies the duration when the page becomes unresponsive due to processing heavy JavaScript tasks. Lowering the total blocking time makes your website more responsive and improves user experience.
Minimize main thread work
The main thread is responsible for executing JavaScript, style calculations, layout, and other tasks required to display a web page. Minimizing main thread work refers to the process of optimizing the code and reducing the time the main thread spends on heavy tasks. This can be done by removing unnecessary JavaScript, splitting long tasks into smaller chunks, and optimizing the code’s execution.
A lighter workload on the main thread results in faster page loading, improved rendering, and enhanced user experience.
Time to interactive (TTI)
This performance metric measures the time it takes for a web page to become fully interactive and responsive to user input. A page is considered interactive when the main thread is free from heavy tasks, and users can interact with the elements on the screen, such as clicking buttons or scrolling.
Improving the TTI by optimizing JavaScript, splitting large tasks, and reducing render-blocking resources ensures a better user experience by allowing users to interact with the page more quickly.
Reduce JS execution time
Reducing JavaScript execution time involves optimizing the code to execute faster and use fewer resources. This can be achieved through techniques such as code minification, removing unused JavaScript, and optimizing algorithms.
Reducing the execution time leads to faster rendering, decreased total blocking time, and better responsiveness, providing a better user experience.
First Contentful Paint (FCP)
This is a performance metric that measures the time it takes for the browser to render the first visible element (text, image, or other content) of a web page. A faster FCP equates to a quicker initial page load, providing users with a visual feedback that the page is loading. Improving FCP requires optimizing critical rendering paths, delaying non-critical JavaScript execution, and prioritizing the loading of visible content.
A faster FCP significantly contributes to a better user experience and improved web page performance.
Delaying JavaScript Execution Methods
While faster page load times, reduced render-blocking, and prioritized content loading provide many benefits to users and can deliver higher PageSpeed scores, the actual methods available for delaying JavaScript execution on WordPress sites can be challenging for users without technical knowledge or web optimization skills.
For example, these methods can include:
Implement async or defer attributes: This requires you to manually add async or defer attributes to your JavaScript files in the HTML header, which tells the browser not to block the page rendering while processing the JavaScript files.
Combine JavaScript files: Use online tools or WordPress plugins to combine multiple JavaScript files into a single file, helping to reduce the number of HTTP requests and speed up page loading times.
Minify JavaScript files: Use online tools or WordPress plugins to reduce JavaScript file size, which helps to improve page loading times.
Prioritize critical JavaScript: Identify the critical JavaScript that needs to be loaded immediately to ensure proper functionality, and then load the remaining JavaScript files after the page content has been rendered.
While there are a few WordPress plugins available that can handle some of these tasks for you and help you to delay or defer JavaScript execution, our Hummingbird plugin does all of the above and more with the click of a button.
How to Use Hummingbird’s Delay JavaScript Execution Feature
The new optimization feature of Hummingbird delays the loading of all JavaScript files and inline scripts until there is user interaction on the page (e.g. mouse movement, keyboard action or screen tap) and improves all of the PageSpeed recommendations described earlier.
To enable this feature, make sure that Hummingbird is installed and activated on your site, then navigate to Hummingbird > Asset Optimization > Extra Optimization in your WordPress admin and switch on the Enable Delay Javascript toggle button in the Tools > Delay Javascript section, then click Save Changes.
Enable Hummingbird’s Delay JavaScript feature to improve your site’s performance.
Alternatively, you can enable the feature from the plugin’s main dashboard.
Enable Delay JavaScript Execution from Hummingbird’s dashboard.
Once the Delay JavaScript Execution feature has been enabled, it automatically goes to work, delaying the loading of any non-critical JavaScript files on your page that are not required above-the-fold.
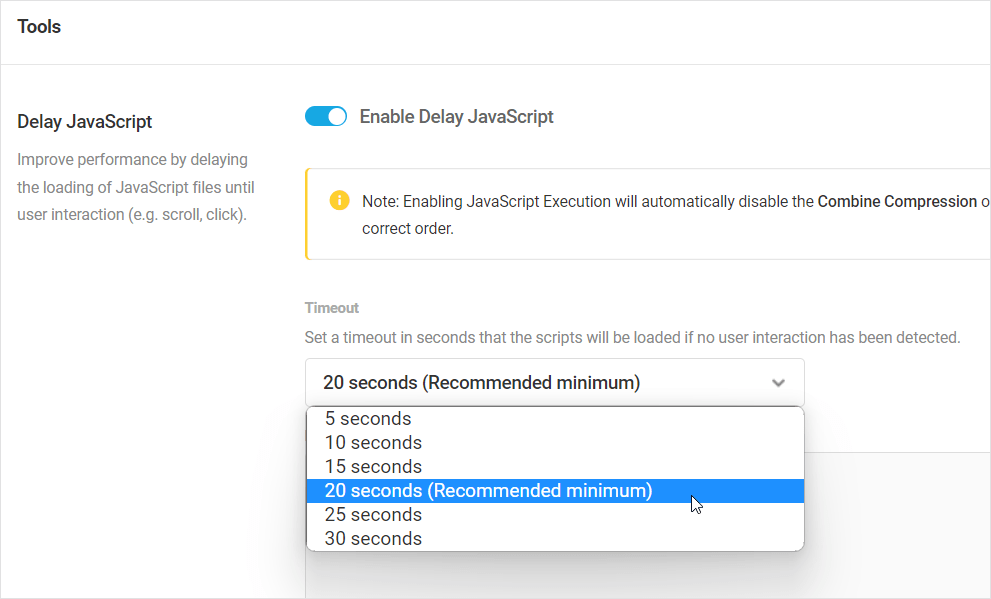
The feature’s settings give you access to options like being able to specify a timeout for the scripts to load if no user interaction is detected, and the option to exclude critical JavaScript files from from being delayed on load by specifying their URLs or keywords.
Hummingbird delays the loading of JavaScript files until a set timeout limit is reached or a user interacts with the page.
If enabling this feature breaks something on your site and you identify additional critical Javascript resources which are essential to render the page, simply add them to the Excluded JavaScript Files area to exclude them from being delayed.
If there is no user interaction on the page beyond a set threshold, the JavaScript assets are forced to load. The default timeout is set to 20 seconds, but you can select a different value from the Timeout dropdown menu (currently ranging between 5-30 seconds).
Select a timeout option from the dropdown menu.
Notes
Enabling JavaScript Execution will automatically disable the Combine Compression option to ensure that your site’s scripts are loaded in their correct order.
The feature will only work when you’re connected to The Hub, as it pulls the list of continuously updated predefined exclusions from the API.
You can easily reverse any changes made by this feature by simply disabling the toggle and clicking save.
Delay JavaScript and Speed Up WordPress
Hummingbird’s Delay JavaScript feature is available in both the Pro and free versions of the plugin. We recommend enabling this feature and testing your site using the PageSpeed Insights tool.
If you experience any issues using Hummingbird, check out the plugin’s documentation or contact our 24/7 support team for immediate expert support.
WPMU DEV’s free all-new and improved Broken Link Checkerplugin saves you the time and tedious hassle of handling crucial link management tasks across all your WordPress sites.
“I have been looking to find an easier way to check for broken links. Thank you for making this tool so accessible.” Dena, WPMU DEV Member
Broken links are a negative indicator of site health and can have a major impact on your PageRank and your reputation. Staying on top of your site links is an essential and crucial aspect of good WordPress site management.
But… manually checking your content for broken links is time-consuming and tedious excruciating, especially if you manage multiple WordPress sites.
“This is potentially going to save a ton of time! Before now I’ve always done a manual check on all sites I create.” TNT Systems, WPMU DEV Member
This article shows you how to use our powerful link checking tool on unlimited WordPress sites – completely re-engineered with a top user-requested feature and a new API that works 20x faster, to deliver better and more accurate results, prevent negative SEO performance issues, and improve user experience.
We also include a comprehensive guide covering all you need to know about why link management is important and how to effectively manage broken links on all of your sites.
Let’s jump right in and take a look at the only tool you’ll ever need to check and repair broken links on unlimited WordPress sites.
WordPress Broken Link Checker (BLC) Plugin
Broken Link Checker is now even better and faster at finding broken links on WordPress sites.
WPMU DEV acquired Broken Link Checker many years back from ManageWP, and since then have implemented many tweaks and fixes to improve its capabilities, growing its popularity to 700K downloads and its user satisfaction to 4/5 stars.
[NB: Special shoutout to Patrick Walker, Team Lead at WP Engine’s Customer Experience Operations Team for his hard work in collaboration with our engineers to get our plugin removed from WP Engine’s and Flywheel’s block list.]
While we plan to continue maintaining and improving the old plugin version for the thousands of users who are still currently using it, starting from versions 2.0 and onward, we’ve also introduced a new cloud-based link checking plugin for WordPress.
Note: We’ll focus the rest of this article on our Cloud Link Checker. For more information on using the old (Local) BLC plugin, visit the plugin download page on WordPress.org.
Why Two Different Link Checking Engines?
The old Broken Link Checker plugin (we now call this version Local Link Checker) is a great tool currently used and loved by thousands of WordPress users to keep their URLs healthy.
If you love it, feel free to keep using it. Keep in mind, however, that it depends on your site’s resources to run scans, which can be affected by your hosting plan’s available resources, and, depending on what plugins are installed on your site, could cause conflicts or WP/PHP errors.
Our latest innovation — a cloud-based plugin — takes things to a whole new level and opens the door to an entirely new scope of possibilities that we couldn’t achieve before by integrating the best of the Local BLC plugin with cloud capabilities directly into The Hub (our all-in-one WordPress platform), all at no additional cost to users.
For example, some of the benefits of the new cloud-based BLC include:
Scalability: Cloud Link Checker runs on WPMU DEV’s engines not the individual site where the plugin is installed, so you can run broken link scans on sites of any size and server type.
Blazing Fast Scans: Being cloud-based means any dependencies on the performance of your server are eliminated, giving your scans a massive speed increase.
No Risk of Blocklisting: Pinging external sites repeatedly from your website raises suspicious flags with internet service providers and puts your site at risk of being blocklisted. Cloud BLC doesn’t use your site’s IP address, so there’s no risk of your site(s) being blocklisted.
Faster Updates and Instant Improvements: No more waiting for plugin version releases or worrying whether you site’s resources can handle the changes. We test, fix, and improve everything on the cloud and your site benefits instantly as soon as we deploy the changes and improvements to our engine..
Eliminate WordPress and PHP Errors: Our cloud-based link checker doesn’t run on your site’s resources, so you won’t experience site resource errors using the plugin.
Crawl Everything: Cloud Link Checker follows the same logic as search engine crawlers, so no URLs are missed on all standard pages and posts, menus, category pages, etc. Even better, use scheduled reports to discover broken links before the search engines see them.
WPMU DEV’s Cloud-based Link Checker provides better performance and faster speed.
Cloud BLC scans your site from top to bottom, monitoring external and internal links in your posts, pages, comments, blogroll – even custom fields.
It detects links that don’t work, as well as missing images and redirects. It will then notify you via the Broken Link Checker section of the Hub, or you can view a summary of the results in the plugin dashboard of your WordPress site.
“Love this new tool, especially since it runs off-site and doesn’t hog server resources.” Levi, WPMU DEV Member
Set Up
Whether you’re an existing Broken Link Checker plugin user or new to the tool, setup is a breeze.
You can set up the plugin from the WordPress dashboard plugin and from WPMU DEV’s Hub.
Let’s look at both methods.
From the WordPress Dashboard
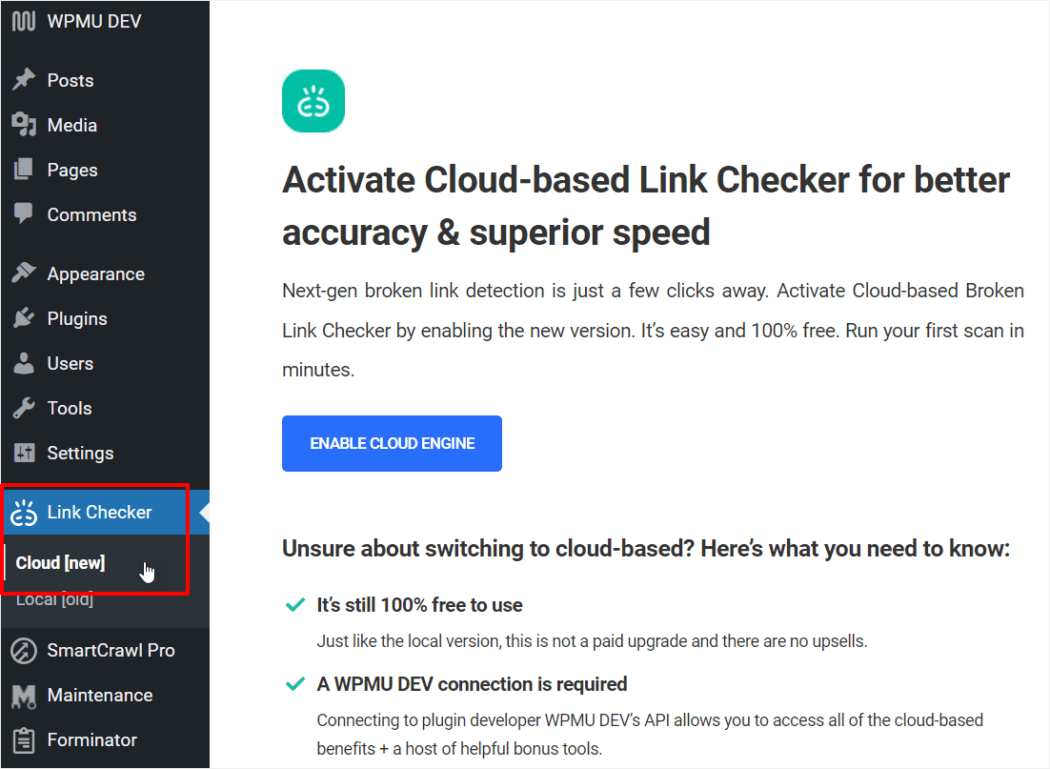
Cloud Link Checker activation in the WordPress dashboard.
Install and activate the plugin.
Go to the Link Checker menu and select Cloud.
If you’re logged into WPMU DEV, click ‘Enable Cloud Engine’ (otherwise, the button will say ‘Connect to WPMU DEV’), and you’ll be taken through The Free Hub onboarding process, as well as the broken links checking tool component. This will lead you directly to the BLC service tab in The Free Hub.
From here, run a new scan. You’ll get a notification once the scan completes, so feel free to look around The Free Hub while you wait.
Once you receive notification that the scan is complete, you can view the results in the Broken Link Checker section of The Free Hub.
From The Hub
Broken Link Checker activation in The Hub.
After logging into The Hub, you’ll see Broken Link Checker listed as a new service in the menu (top & sidebar).
Activate this to install the plugin on the site.
Run a scan to see your results.
However you choose to install the Cloud Link Checker, the WordPress dashboard will display the Summary Report, while The Hub will have the Full Report – including the list of broken and dead links.
Scan results in the WordPress dashboard.
Click View Full Report to see the full scan report in The Hub.
The Hub displays a detailed list of your broken URLs after scanning.
Aside from locating your broken links, missing images, and redirects, the plugin has additional functions that let you schedule scans, send reports by email, search (with built-in filters), and export your lists for download.
Edit/Unlink Broken Links
Our members spoke…and we listened!
One of the most requested features for this tool was the ability to edit and unlink broken links.
We’re thrilled to announce that in addition to ignoring and reporting links as not broken, you can now also easily edit and unlink broken links from The Hub.
Simply click on the vertical ellipsis (3 dots) to the right of any link listed in the Hub’s scan report and select one of the available options.
Edit, Unlink, Ignore, or Report links as Not Broken.
Select Edit Link to point the link to a new URL, Unlink to remove the link and change it to plain text, or select one of the other options to ignore the link or to report false positives (note: we use Not Broken reports to improve BLC’s engine).
Note: New scans are temporarily disabled while the system is performing editing or unlinking operations. You can run a new scan after these processes have completed.
Also, to keep reports manageable, if the scan detects multiple instances of the same broken link URL, the report only displays the first 10 instances and notifies you how many other instances there are.
Scan reports are kept manageable by displaying only the first 10 URLs for the same broken link.
You can choose to edit or unlink only the first 10 visible links, or perform the operation on all instances of that same link.
Edit (or unlink) only the first 10 links or all links.
Note that the tool does not scan hardcoded links written in php files (eg template files, shortcodes, etc.).
Run Manual Scans
You can run a manual scan any time, in both the WordPress dashboard and The Hub. Just hit the blue Run Scan button. This can be helpful if you’ve done some clean up, and want to refresh your view of the list.
Schedule Scans & Send Reports by Email
Scheduling scans is done from the Broken Link Checker plugin section in the WordPress dashboard.
Schedule new scans for broken link checks in your WordPress dashboard.
At least one recipient must be added to schedule reports, so that it can be sent to a party via email.
Click on the cog icon to see the menu options for scanning.
From the Schedule Scan section, click Configure.
Check that you are on the Schedule Date tab from the top menu.
Choose the Frequency, from Daily, Weekly, Monthly.
Select desired time, day, or date from the dropdown options; then click Save.
The plugin provides many options for scheduling scans.
Now we will add recipients (at least one), so the report has a destination to be sent to:
Click on the Add Recipients tab.
You can either Add Users, from the list of those you’ve already added to the site, or Add By Email, for anyone at all. Remember to Save Changes.
Adding recipients to get scan reports via email is fast and easy.
You can deactivate the scheduled scan or change the sending schedule, as well as who it goes to, at any time.
Search
To easily locate your URLs, search results can be filtered from within The Hub.
From the summary screen, you can use the dropdowns to filter by Status or Domain.
Use the built-in filters to locate items more easily in your Broken URL list.
Export Lists
You can export your broken URL lists anytime in CSV format.
To do this, simply click the Export as CSV button from the summary screen in The Hub.
And … that’s it! You’re now a BLC pro.
Keep your site’s links healthy with the best free broken link checker tool for WordPress.
“I love this! Offsetting the resources to the cloud will help so many sites!” PTaubman, WPMU DEV Member
“But I’m happy with Local BLC and I don’t run multiple sites…”
If you want to keep using the older plugin, you don’t have to switch to Cloud Link Checker. Local BLC will keep working just fine and you can easily switch to the cloud version at any time inside your WordPress admin.
You can switch between cloud and local link checker inside the WordPress admin.
Just keep in mind that you can only activate one engine at a time, so if the Cloud engine is running, Local Link Checker will be inactive and vice-versa.
Switch link checker engines inside your WordPress dashboard.
Note: if you run a multisite installation, BLC cloud version will only be available on the main site when network-activated. Due to the complexity of scanning multisite, subsites will continue to use the BLC Local version.
Cloud Link Checker – Perfect For Agencies
Being able to manage all of your sites from one place (The Hub) and send clients white labeled reports makes Cloud Link Checker the perfect solution for agencies, freelancers, and anyone running multiple WordPress sites.
Clients will love you even more when they see you’ve taken care of their broken links.
You can also use the tool with a customized report as a way to generate new clients for your agency and upsell WordPress maintenance services to existing clients.
Use BLC with whitelabel reports to generate new clients and upsell maintenance services.
Compare our plugin with other broken link checking tools and you will quickly see why WPMU DEV’s cloud-based link checker is a no-brainer.
For example, here’s one of our competitors’ offering:
Free version limitations:
Only one website allowed.
Only 200 links checked per month.
Only internal links are checked.
Links are checked once every 3 days.
Cost: $30/month (credit card required to sign up).
Whereas, with WPMU DEV’s Cloud Link Checker…
No limitations:
Unlimited number of websites.
Unlimited number of links.
Internal and External links are checked (Local and Cloud versions).
Set your own schedule (Local and Cloud versions).
Manually check all your sites anytime.
Cost: Free (priority support included for members only).
No credit card required to sign up.
To get the full picture of what our broken links checker can do, see the plugin documentation.
Now that we’ve shared the good news with you about a powerful WordPress troubleshooting tool every web developer (and user) should have in their site management toolbox, let’s take a closer look at the harm broken links can cause if left unchecked and why you need a tool like Broken Link Checker.
How Broken Links Affect SEO
High-quality, relevant, and authoritative links are crucial to a website’s SEO and reputation. Broken links can have several negative impacts on search engine optimization, including:
1. Crawling and Indexing Issues: Search engine crawlers follow links to discover and index web pages. In fact, Google cites good working links as a best practice. When a crawler encounters a broken link, it cannot access the linked page and may struggle to navigate through your website effectively. This can prevent certain pages from being indexed, making them invisible to search engines and reducing their chances of appearing in search results.
2. Increased Bounce Rates: Bounce rate measure how long users spend time on a particular web page before “bouncing” to another one. Visitors who stumble upon broken links may abandon a site altogether. When visitors repeatedly choose to leave a web page almost immediately after landing on it, this leads to a high bounce rate, which sends a “low-quality” signal to search engines about the site.
3. Decreased Search Engine Rankings: Search engines aim to deliver the best user experience by providing relevant and high-quality search results. Websites with broken links may be considered less reliable and valuable by search engines, leading to lower rankings in search results. This can result in reduced organic traffic and visibility for your website.
4. Impact on Internal Link Structure: Broken links disrupt the internal link structure of your website. Internal linking helps search engines understand the relationships between different pages and establishes a hierarchy of importance. When broken links exist within this structure, it can confuse search engines and weaken the overall SEO structure of your website.
5. Lost Backlink Opportunities: Backlinks are an important factor in SEO, as they indicate the authority and relevance of your website. If other websites link to broken pages on your site, it can negatively impact your backlink profile. Broken links may deter other webmasters from linking to your site, reducing your chances of acquiring valuable backlinks.
To mitigate the negative impact of broken links on SEO, it is crucial to regularly monitor and fix them. Conducting regular website audits, using tools to identify broken links like BLC, and implementing redirects or updating links can help improve user experience, maintain search engine rankings, and enhance the overall SEO performance of your website.
Broken Links Can Also Harm Your Business
In addition to impacting your site’s SEO, broken links can also cause serious damage to your business and its reputation. This includes:
1. Poor User Experience: Studies show that 89% of consumers will shop with a competitor after having a poor user experience on a site. Broken links create a negative user experience by leading visitors to dead-end pages or error messages. Users expect links to provide relevant information or resources, and encountering broken links can be frustrating. This can decrease user engagement, increase bounce rates, and ultimately harm your website’s reputation.
2. Negative Impact on Revenue: Broken links can sometimes cause roadblocks in your sales conversion process. Investing money and time into marketing efforts to get potential customers to your site then losing sales because they cannot reach conversion pages means wasted time and lost revenue.
3. Security Vulnerabilities: Broken links can also lead to malicious attacks on your site, phishing scams, and broken links hijacking (see below)
What is Broken Links Hijacking (BLH)?
Broken Links Hijacking (BLH) refers to the practice of exploiting expired, unlinked, or inactive external links found within a webpage.
It involves malicious actors taking advantage of resources or third-party services that are no longer available or valid, such as due to expired domains. These attackers can seize control of these links to carry out various harmful activities, including defacement through acquiring expired domains, impersonation, or even cross-site scripting.
Attack Scenario and Security Risks
Let’s imagine a scenario where a business shuts down or forgets to create a social media page but still has the link to that page on its website. In this case, an attacker can simply create an account using the same name and then proceed to post offensive content or launch phishing attacks while pretending to be the business.
Illustrative Scenario
To illustrate this further, let’s consider a website called thewebsite.com that mentions a LinkedIn page URL but hasn’t actually created the page yet. As a result, when users try to visit the LinkedIn page using the URL (e.g., https://www.linkedin.com/company/the-website/), they encounter a “404 page not found” error.
Exploiting this situation, an attacker creates a fake LinkedIn page and customizes the URL to resemble “the-website.” Consequently, when a regular user accesses the company’s LinkedIn page through the URL, they unknowingly get redirected to the attacker’s controlled LinkedIn page.
What Causes Broken Links?
There are several factors that can lead to broken links. Some of the most common causes include:
1. Typo: Mistakes made when writing the link can result in broken links. This could be a simple error in typing or copy-pasting the URL incorrectly.
2. Deleted Pages: When a page is deleted from a website, any links pointing to that page will become broken. This can happen when content is removed or when a website undergoes restructuring.
3. Renamed Pages: If URLs are changed or pages are renamed without implementing proper redirects, the old links pointing to those pages will no longer work and lead to broken links.
4. Domain Name Change: When a website changes its domain name, any links pointing to the old domain will become broken unless appropriate redirects are in place.
Best Practices to Fix Broken Links
To fix broken links, it is important to follow these best practices:
1. Check Links with a Broken Link Checker (BLC): Use a reliable tool to identify broken links on your website. This will provide you with a list of broken links that need to be addressed.
2. Prioritize High Authority Pages: Start by addressing broken links on pages with high authority or those that receive significant traffic. Fixing these links will have a greater impact on your website’s overall performance.
3. Redirect to Relevant URLs: If a page has been deleted or its URL has changed, set up proper redirects (such as 301 redirects) to automatically send visitors to the relevant new URL. This ensures a seamless user experience and avoids 404 error pages.
Steps to Avoid and Fix 404 Pages
To prevent and resolve 404 pages (page not found errors), consider the following steps:
1. Preserve and Update Content: Instead of deleting pages outright, consider updating or refreshing the content. This helps avoid unnecessary 404 pages caused by removing content that other pages have linked to.
2. Implement 301 or 302 Redirects: If a page’s content still exists but its location or URL structure has changed, use 301 or 302 redirects to redirect visitors to the new page. This ensures they can still access the desired content without encountering a 404 error.
3. Reach Out to Webmasters for Updated Links: If a 404 error occurs due to an external website incorrectly linking to your content, you can try contacting the website’s author or web administrator. Requesting an update to the erroneous link can help resolve the issue, or alternatively, suggest changing the link altogether.
Fixing Broken Links: Manual vs Automated Methods
Fixing broken links has long been considered an essential practice among SEO practitioners. Broken links should be fixed quickly.
Google understands that broken links are a natural happening. However, SEOs know that taking time to correct these issues can significantly impact the site’s performance in search engines.
For these reasons and more, it’s clearly important to keep tabs on all of your site links. A small site with minimal content can easily handle checking for broken links manually. However, the more content your site has, the more difficult it becomes to conduct manual scans of your links.
Fixing broken links manually on a website and using automated methods each have their own benefits:
Benefits of Using Manual Methods to Fix Broken Links
1. Accuracy: When fixing broken links manually, you have full control and can ensure that each link is checked and corrected accurately. This allows for a more precise and tailored approach to resolving broken links.
2. Customization: Manual fixing allows you to review each broken link individually and determine the best course of action. You can update the URL, remove the link, or find alternative resources as needed.
3. Quality control: By manually fixing broken links, you can ensure that the replacement URLs are relevant, trustworthy, and provide value to your users. It allows for a more thorough evaluation of the content being linked to.
4. User experience: Manually fixing broken links allows you to consider the user experience in the process. You can choose appropriate anchor text, update navigation menus, and ensure a seamless browsing experience for your visitors.
5. Content review: While fixing broken links manually, you can review the content surrounding the broken links. This presents an opportunity to update outdated information, improve the overall quality of the content, and enhance the SEO performance of the page.
Benefits of Using Automated Methods to Fix Broken Links
1. Time-saving: Automated tools can scan your website and identify broken links quickly, saving you time and effort compared to manually checking each link individually.
2. Efficiency: With automated methods, you can fix broken links in bulk rather than addressing them one by one. This can be especially useful for large websites with a high volume of broken links.
3. Scalability: Automated tools can handle the detection and fixing of broken links on websites of any size. They can efficiently process a large number of links, ensuring comprehensive coverage.
4. Regular monitoring: Automated methods allow for regular and scheduled scans of your website, ensuring that new broken links are promptly identified and addressed.
5. Consistency: Using automated tools ensures a consistent approach to fixing broken links across your entire website. This helps maintain a unified user experience and prevents oversight of any broken links.
The choice between using manual and automated methods depends on your specific needs, resources, and preferences. The good news is, all of the risks associated with bad links are easily avoided if you make sure they are kept in proper working order.
Even better, is using a quality, automated dead link checker tool like Broken Link Checker removes the tedious and time consuming task of manually tracking and manging your broken links.
Take Link Maintenance to the Next Level with WPMU DEV’s BLC
Over 700,000 WordPress users depend on Broken Link Checker to keep their sites free of errors and performance issues caused by outdated and non-working URLs.
Our new cloud-based plugin version offers even more incredible value — enhanced speeds, no PHP/DB errors, ability to schedule scans and send email reports (including white labeled), plus the ease of managing unlimited sites from one central Hub – all while still (and always) remaining free.
Don’t let your site’s SEO and user experience take an unnecessary hit. Especially when a practical solution is directly within your reach.
Connect, scan, schedule, and fix broken links quickly and easily and keep your sites running optimally with the new Cloud-based Link Checker. Get it for free or as a WPMU DEV member.
SmartCrawl‘s Automatic Linking feature allows you to automatically turn specific keywords or phrases into internal or external links within your site’s content, saving you time and effort, making interlinking a breeze, and boosting your website’s overall SEO.
Interlinking web pages is essentially what makes the web the web. Smart and effective interlinking of web pages will improve your site’s SEO and play a crucial role in increasing the visibility and success of your website.
In this comprehensive guide, we’ll cover practical uses of the SmartCrawl plugin’s Automatic Linking feature and how it can help automate an important aspect of your website’s SEO.
The Importance of Linking Web Content For Improved SEO
Internal and external linking are essential components of SEO that help to improve your site’s visibility and ranking on search engines and user navigation.
Internal linking refers to the practice of linking pages within the same website. It is an effective way to guide users through your website, make it easier for search engines to crawl and index pages, and establish a hierarchical page structure.
Internal linking can also help distribute link equity throughout a website, which can improve the ranking of individual pages.
External linking, on the other hand, involves linking to other websites or pages that are not within the same domain.
External linking can provide additional information or resources for users, and can also help establish your website’s authority and relevance in your particular field or industry.
What is SmartCrawl’s Automatic Linking and How Does It Work?
SmartCrawl’s powerful Automatic Linking feature automates your site’s internal and external page linking and improves your site’s SEO.
It works by allowing you to select the post types for which you want to enable auto-linking and the post types or taxonomies that can be linked to.
This means that you can choose which areas of your website you want to apply the automatic linking feature and select exactly which post type(s) the plugin should automatically insert links in. Every post type active on your site will then be available for keyword linking.
For example, let’s say you run a web development business and you offer a website building, web hosting, and web maintenance package called “Total Business Care Service” which has an information page where clients can purchase the service.
Additionally, let’s say you run a blog on your site where you post articles about topics related to WordPress information and want to link to the WordPress news blog any time you type the words “WordPress news.”
Without the SmartCrawl plugin, you would have to manually create these links each time you write the text in your pages and posts.
With SmartCrawl, you can enable and set up automatic linking in a few simple steps, and save yourself a bunch of time by letting the plugin do the work of linking the text to your internal and external pages automatically.
Let SmartCrawl automatically link to the internal and external pages you specify for certain keywords.
Step-By-Step Guide to Using SmartCrawl’s Automatic Linking
Using SmartCrawl’s Automatic Linking feature is super easy.
First, make sure that you have installed and activated SmartCrawl Pro. Automatic linking is not available on the free version of the plugin.
Next, go to SmartCrawl > Settings > Advanced Tools. Here is where you’ll find the Automatic Links section.
Note: If this is the first time you are using this feature, click the Activate button.
Activate SmartCrawls’ Automatic Linking feature.
This will enable the functionality on your website and display the Automatic Linking screen.
SmartCrawl’s Automatic Linking Screen.
The feature has four main tabs that let you configure exactly how you want the plugin to handle the automatic linking of keywords on your site.
Let’s go briefly through each tab:
Post Types
This tab lets you choose which areas of your website to apply the automatic linking feature. Use this tab to select the post types that you want to insert links from.
Every active post type on your site is available for keyword linking.
After selecting the post types to insert links in, a “Link to” field will display. Use the dropdown menu to select the post types or taxonomies to link to.
Select the post types or taxonomies to link to.
You have now specified the areas of your website where automatic linking will apply.
Remember to save your settings before continuing.
Custom Links
This section is where you take control of your linking strategy.
Add any keywords or key phrases that you want to automatically link to specific URLs (internal or external) here.
Specify your automatic internal and external links in the Custom Links tab.
SmartCrawl will now automatically create links throughout your site using the keywords and URLs you have specified.
SmartCrawl automatically creates the links in your content.
Exclusions
Use the Exclusions tab to ensure that certain keywords or URLs will not be linked to.
Exclude keywords and URLs from being automatically linked.
Settings
The Settings tab lets you specify global settings for your automatic linking strategy when using SmartCrawl.
For example, you can set minimum title and taxonomy lengths, maximum limits for links, allow auto-links to empty taxonomies, prevent linking in heading tags, and even process RSS feeds.
Other options include case-sensitive matching, preventing duplicate links, opening links in new tabs, adding nofollow autolinks, and preventing linking on no-index pages, image captions, and caching on autolinked content.
The Settings tab puts you in complete control of SmartCrawl’s automatic linking feature.
With all of these options, you can customize SmartCrawl to meet your specific linking needs.
Practical Examples of SmartCrawl’s Automatic Linking Usage
So, what are some practical uses of SmartCrawl’s automatic linking feature?
Let’s go through some examples:
Example #1 – Boost Internal Linking to Blog Posts
Suppose you’ve written a great blog post about WordPress themes. You can set up an automatic linking rule in SmartCrawl to target the keyword “WordPress themes” which will automatically link this keyword on all of your existing and new posts to this article.
Example #2 – Automatically Link to Top Product Pages
If you have an eCommerce store, you can use automatic linking to turn your top-selling items’ names into links that direct users to the relevant product pages on your site.
This will help to drive more traffic to your popular and best-selling products and boost sales.
Example #3 – Increase Visibility of Pillar Content
Use automatic linking to increase the visibility and boost the rankings of your cornerstone or pillar content by turning the keywords you are targeting for this content into site wide links.
For example, suppose you have a page that contains an article about XYZ Widget with a step-by-step tutorial and detailed instructions that your customers need to follow to ensure that they use the product correctly. You can create an automatic linking rule in SmartCrawl that targets the keyword “XYZ Widget instructions” and automatically links to this important page.
Example #4 – Cross-Promote Related Content
Use automatic linking to connect topic-related blog posts, guides, or how-to articles on your site, providing users with easy access to related information and keeping them engaged longer with your content and your site.
Example #5 – Link to Useful External Resources
Have you got a relevant resource on an external site that your readers might benefit from? Turn specific keywords mentioning these resources into links that will direct users to those external pages.
Example #6 – Boost Affiliate Marketing Revenue
Similar to the previous example, if you promote affiliate products or services on your site, you can use SmartCrawl’s automatic linking feature to create anchor text links connecting specific brand names or product/service categories to their respective destination pages or sites with your embedded affiliate link.
SmartCrawl’s Automatic Linking feature is perfect for affiliate marketing!
Sitewide Automatic Linking – Faster Than Blinking
SmartCrawl’s powerful and time-saving Automatic Linking feature helps you take your linking strategy to the next level while simultaneously improving your site’s SEO and user navigation experience.
Check out our documentation section to learn more about using the automatic links feature or access SmartCrawl Pro and start boosting your traffic, search rankings, and sales conversions today by becoming a WPMU DEV member.
Asking the right questions to evaluate a digital marketing agency before outsourcing your marketing needs is important. The questions below will help to ensure a perfect fit and a successful long-term partnership.
In this article, we list the essential questions you should ask before outsourcing to find the right agency for your needs and explain why asking these questions is vitally important for the success of your business.
We’ve grouped these questions into the following categories:
Questions To Ask A Digital Marketing Agency Before Outsourcing
Navigating the vast digital marketing landscape can be overwhelming. To ensure your business’s online visibility and growth, it’s important to find the perfect digital marketing agency that can not only provide tailored marketing solutions, but also help you achieve your desired goals through innovative, data-driven strategies.
Asking the right questions is crucial in determining the best fit for your specific marketing needs. To save you countless hours of research and time-wasting, we’ve compiled the list below. It includes all the questions to ask a digital marketing agency before outsourcing your marketing initiatives.
Note: If you’re a digital agency, use the questions below to help you gain a better understanding of your business and to position your services more competitively (go here for details on how to list your agency in our directory).
Agency Background and Experience
The questions below focus on understanding the agency’s overall experience and expertise in digital marketing. Ask these questions to help you determine if the agency has a proven track record of success within your industry or with similar businesses, to ensure they have the knowledge and skills needed to drive results for your business.
1. What is your experience in digital marketing? How long have you been in the industry?
Understanding the agency’s experience and longevity in the industry helps you to evaluate their expertise and stability. This question helps you assess the agency’s expertise and industry knowledge. A digital marketing agency with a proven track record of experience is more likely to have the expertise to handle your marketing needs effectively.
2. What sets your digital marketing agency apart from your competitors?
It’s important to identify the agency’s unique selling proposition, differentiating factors, or innovative approaches that make them stand out. Understanding the agency’s distinctive offerings can help your business make a more informed decision and ensure that you are choosing the right partner to help you achieve your goals.
3. Can you provide examples of digital marketing campaigns or projects you have worked on in the past and their outcomes?
Reviewing the agency’s portfolio and case studies can help you evaluate their past work and outcomes, assess their track record of success, and gauge their creativity, strategy, ability, and effectiveness to achieve results.
4. Do you have experience working with businesses in our industry or similar industries? How do you tailor your digital marketing strategies to different industries?
Businesses with experience in your industry will be better prepared to handle the unique challenges, trends, and audience behavior of your industry and develop targeted and effective marketing strategies and campaigns that cater to these unique needs.
Asking this question will help you find out if the agency has relevant experience and knowledge about the sector and the markets your business operates in.
Digital Marketing Services and Approach
The questions below are designed to gain insights into the agency’s specific digital marketing services and their strategic approach to driving success. This includes their process for developing and implementing digital marketing strategies, as well as their knowledge and experience in specialized areas such as content marketing, SEO, and social media marketing.
5. What digital marketing services do you offer? (e.g. SEO, PPC, social media marketing, content marketing, email marketing, etc.)
Different agencies may have different areas of expertise, like SEO, PPC, or social media. Knowing the agency’s core services will help you to determine if they have the capabilities to meet your digital marketing needs and align with your business goals.
6. How do you approach developing a digital marketing strategy for a business? Can you provide an overview of your process?
A well-defined strategy is essential for successful digital marketing campaigns. This question helps you assess the agency’s strategic thinking and planning process and understand how they create customized marketing strategies and what steps are involved in their process.
7. What is your approach to content creation and content marketing? How do you ensure that the content is aligned with our brand and messaging?
Content is a crucial aspect of digital marketing. Understanding the agency’s approach to content creation, quality, relevance, and alignment with your brand helps to ensure that your content marketing efforts are effective.
8. How do you handle social media marketing? Can you provide examples of social media campaigns you have managed?
Social media is a prominent digital marketing channel. This question helps you assess the agency’s experience and approach to social media marketing, their capabilities and their ability to to create and manage successful social media campaigns that will generate engagement and growth through various platforms.
9. How do you approach search engine optimization (SEO)? Can you provide examples of SEO strategies you have implemented for other clients?
SEO is critical for online visibility. Inquiring about the agency’s approach to SEO and their past strategies and proven successes can help you assess their expertise in optimizing websites for search engines, and evaluate their ability to improve your search engine visibility and drive organic traffic to your site.
10. How do you handle paid advertising campaigns, such as pay-per-click (PPC) or Google Ads? Can you provide examples of successful paid advertising campaigns you have managed?
Paid advertising can be an effective way to boost online visibility. This question helps you evaluate the agency’s expertise and ability to manage paid advertising campaigns effectively and their proficiency to generate desired outcomes a positive return on ad spend.
11. How do you handle email marketing campaigns? Can you provide examples of successful email marketing campaigns you have executed?
Understanding the agency’s approach to email marketing, including their strategy, segmentation, and automation, can help you assess their ability to create and execute effective email campaigns that drive engagement and conversions.
12. What is your approach to website design and development? Do you offer website design and development services or work with external partners?
Your website is a critical digital marketing asset. Knowing the agency’s approach to website design and development helps you assess their expertise in creating websites that are user-friendly, visually appealing, and aligned with your brand.
Tools, Technologies, and Data Security
The questions below are critical for understanding the agency’s technical capabilities and their commitment to data security. Asking these questions will help to elucidate the digital marketing tools and technologies they utilize, any additional costs associated with these tools, and their approaches to ensuring the protection of your business and customer data.
This is important because you will need to trust the agency and provide them with access to everything they need to run your marketing effectively – login details to your site, Google Analytics and social media accounts, etc.
13. What tools and technologies do you use for digital marketing? Are there any additional costs associated with these tools?
Knowing the tools and technologies used by the agency helps you understand their capabilities and efficiency in managing and executing effective digital marketing campaigns, and allows you to assess any additional costs associated with these tools.
14. How do you handle data privacy and security? How do you ensure that our business and customer data are protected?
Protecting your business and customer data is paramount. Data privacy and security are critical concerns, and asking about the agency’s data privacy and security practices ensures that they follow industry standards and will take appropriate measures to safeguard your sensitive information.
Performance Metrics and Reporting
Gauging the success of digital marketing campaigns requires effective tracking and reporting of performance metrics. The questions below address the agency’s process for measuring campaign success, the key performance indicators they track, and their approach to reporting and communicating these metrics to their clients.
15. How do you measure the success of digital marketing campaigns? What metrics do you track, and how do you report on them?
Clear reporting and analysis are crucial for optimizing campaigns and achieving desired results. Understanding the agency’s approach to measuring campaign success and the metrics they track allows you to evaluate their performance and accountability, set up realistic expectations, and evaluate their performance and campaign success over time.
This question will also help you understand if the agency’s performance metrics align with your business goals.
16. How do you handle reporting and communication with clients? How often will we receive reports, and what will be included in them?
Clear and regular communication is essential for a successful partnership. This question helps establish expectations for reporting frequency and content. It’s important to ensure there’s open communication and trust between your business and the agency.
You want clear and consistent communication about the progress of your campaigns in order to make timely adjustments and ensure that the campaign’s messaging and strategy remains aligned with your goals.
Collaboration and Coordination
Partnering with a digital marketing agency often involves extensive collaboration and communication with your internal team. The questions below cover how the agency plans to involve your in-house team, as well as their methods for coordinating with various stakeholders to ensure seamless execution and synergy.
17. How do you handle communication and coordination with our internal marketing team or other stakeholders? How much will you involve the in-house team? Who will be working on our account?
Effective communication, reporting, and coordination with internal teams and stakeholders are key to a successful agency-client relationship and allow for a smooth collaboration between your business and the agency.
If you have an internal marketing team or other stakeholders, coordinating with them is essential for successful digital marketing campaigns.
Asking the agency about their approach to coordinating and collaborating with your internal team or other stakeholders helps you understand how they will work with your team and ensure smooth communication and coordination throughout the campaign.
Knowing the main contact person(s) and the team structure will help to foster a healthy working relationship and keep communication streamlined. Understanding the dynamics of the team that will handle your digital marketing efforts, the agency’s reporting frequency, format, and how communication channels will be maintained helps you ensure that you receive regular updates and insights on your campaigns.
Pricing and Timeline
Understanding the costs associated with digital marketing services is essential for budgeting and decision-making. The questions below focus on the agency’s pricing structure, any additional fees, and their expectations concerning timelines and results. This information will help you plan your marketing efforts more effectively and determine if the agency is a good fit for your financial goals.
18. What is your pricing structure? How do you charge for your services, and are there any additional costs or fees?
It’s important to have a clear understanding of costs associated with outsourcing your digital marketing efforts to the agency. Understanding the agency’s pricing structure, payment terms, and any additional costs associated with their services helps you assess if their services are within your budget and if they provide value for the investment.
It’s important to have clarity on pricing and budget to avoid any surprise costs, hidden fees, or misunderstandings later on.
19. What are your expectations in terms of timelines and results for our digital marketing campaigns?
Setting realistic expectations and understanding the agency’s anticipated timelines and results ensure transparency and optimized goal-setting for both parties.
Additional Questions to Gauge Agency Success
Asking the questions below will provide additional insights into the agency’s overall success and adaptability in the ever-changing digital marketing landscape. Topics covered in this section include staying updated with industry trends, providing references and case studies, internal marketing strategies, expected result timeframes, and the agency’s ability to learn and bounce back from failures.
20. How do you stay updated with the latest trends and changes in technology and the digital marketing landscape?
The digital marketing landscape is constantly changing. It is essential for the agency to stay updated with the latest trends, algorithm changes, and best practices, and be able to adapt their strategies accordingly.
You want to know how flexible and adaptable their strategies are to changes in industry trends and technology to ensure they can adapt to changes in the market, deliver timely, effective and up-to-date marketing efforts, and maintain their relevance and competitiveness.
21. Can you provide references from previous clients or case studies of successful digital marketing campaigns you have executed?
Case studies and client references provide insights into the agency’s credibility, ability to drive results, and client satisfaction. Ask for examples of successful campaigns and whether you can contact existing clients to obtain feedback, verify the agency’s claims, and get insights from their previous clients about their experience, communication, and results achieved.
22. Which strategies do you use for your brand, and what has been working out for you?
This question is important because it helps evaluate the agency’s own digital marketing efforts and identify the strategies that have been successful in promoting their brand. By learning about the approaches they use for themselves, you can better understand their expertise and potential effectiveness in implementing those strategies for your business.
Asking this question also showcases the agency’s ability to adapt and innovate in the digital marketing space, demonstrating their willingness to stay ahead of the curve and continuously test and refine techniques. Furthermore, it shows that they practice what they preach and can be a credible partner for your business.
23. What is the onboarding process for new clients?
Understanding the agency’s onboarding process is crucial to ensuring a smooth and efficient transition into the working relationship. This question helps reveal the agency’s organizational skills, communication strategies, and their commitment to providing a seamless integration for new clients.
The response to this question will offer insights into their process for gathering necessary information, setting expectations and goals, assigning key personnel, and establishing communication channels. Additionally, it allows you to assess the agency’s dedication to understanding your business, objectives, and target audience, which is vital for creating and implementing tailored and effective digital marketing strategies.
A clear and well-defined onboarding process also demonstrates the agency’s professionalism and experience, ensuring that they are well-versed in managing projects and working with different teams. This information helps build trust and confidence that the agency can effectively address your unique digital marketing needs and cultivate a productive partnership.
24. When can I expect to start seeing results?
Setting realistic expectations regarding the timeline for results is crucial for both the client and the agency. This question allows you to gauge the agency’s transparency and the effectiveness of their strategies in delivering quantifiable results. It is essential while forming a suitable partnership, as it prevents potential misunderstandings or disappointments in later stages of the project.
The agency’s response helps you understand the typical timeframes associated with different digital marketing strategies and the time needed to achieve desired outcomes. It also provides an insight into the agency’s ability to deliver on their promises and their overall performance.
25. What are some of your recent failures, and how did you remediate them?
This question is not only about learning from their mistakes but also assessing the agency’s adaptability, transparency, and problem-solving capabilities. The willingness to share and acknowledge their failures demonstrates a proactive learning attitude and a commitment to continuous improvement, which are essential traits for a successful digital marketing agency.
Inquiring about their remediation efforts helps you understand the agency’s resilience when faced with challenges and their ability to bounce back and learn from their mistakes. This insight can inspire confidence in their services and provide a better understanding of their approach to overcoming setbacks and unforeseen obstacles.
Successfully Interviewing Digital Agencies – Additional Tips
It’s important to thoroughly vet and interview digital marketing agencies to ensure they align with your business goals, have the necessary expertise and experience, and can deliver results.
In addition to the questions listed above, the tips below will help you make an informed decision about selecting the right digital marketing agency for your business:
Contract and Terms
Review the agency’s contract and terms of service thoroughly and clarify any doubts before committing to their service. This will help you understand the legal and contractual aspects of the engagement and ensure that you are comfortable with their terms and conditions.
Team Expertise and Qualifications
Ask about the qualifications, certifications, and expertise of the agency’s team members. This will help you assess their skills, knowledge, and experience in digital marketing. A qualified and experienced team is more likely to deliver effective results for your campaigns.
Communication Channels and Response Time
Clear communication channels and timely response are crucial for successful collaboration with a digital marketing agency. Inquire about the agency’s preferred communication channels and their typical response time. This will help you set expectations and ensure smooth communication throughout the engagement.
Flexibility and Adaptability
Digital marketing is dynamic, and strategies may need to be adjusted based on results and changing market conditions. As covered earlier, it’s important to ask the agency about their flexibility and adaptability to changes. This will help you assess their ability to adjust strategies and tactics as needed to optimize results.
Client Retention Rate
Inquire about the agency’s client retention rate. This helps you gauge their ability to retain long-term clients. A high client retention rate is a positive indicator of client satisfaction and successful outcomes.
Ask For a Proposal or Plan
Request a proposal or plan from the agency. This allows you to evaluate their approach, creativity, and strategy in detail. A well-prepared proposal or plan provides insights into their understanding of your business, market, and objectives, and helps you assess their suitability for your digital marketing needs.
Additional Tip: Choose Local
Although we live in a global economy that allows us to do business with anyone, anywhere in the world, keep in mind that international laws can be complicated. Should your relationship with an agency go sour for any reason, you could find yourself in a difficult situation facing complex, challenging, and expensive options for resolution.
For this reason, we recommend hiring an agency within your own country or within the same region your business legally operates in.
Unlock the Full Potential of Your Digital Marketing Strategies with WPMU DEV’s Agency Partner Directory
If you plan to outsource your digital marketing needs to an external agency, it’s important to find the right partner that aligns with your business values, expectations, and objectives.
Asking the essential questions listed above when hiring a digital marketing agency is crucial to assess their expertise, experience, approach, and compatibility with your business goals. It will help you make an informed decision and choose an agency that can effectively meet your digital marketing needs and goals, drive successful outcomes for your business, and provide you with the backing and support you need to run a successful marketing strategy.
WPMU DEV’s Agency Partner directory is an invaluable resource that we have developed to help you find reliable agencies with the expertise and experience to help your business maximize online visibility and growth and ensure that your marketing goals are met and exceeded.
If you are ready to outsource your digital marketing needs, then familiarize yourself with the above questions and search through our directory of digital marketing agencies. You will be sure to find a suitable partner that will perfectly meet your needs.
And if you provide web development or digital marketing services, consider becoming listed on our directory. For more details, go here: Become a Partner.
From cost savings to leveraging expertise, outsourcing your digital marketing needs to our Agency Partners is a smart and cost-effective decision, especially if your business has limited resources.
Is your business struggling to keep up with the constantly changing marketing landscape? Hiring external professionals or agencies to handle certain tasks or functions that would normally be done in-house will provide significant benefits and advantages.
In recent years, outsourcing has become a prevalent business strategy, especially for businesses looking to scale up, and marketing is no exception.
Digital marketing is one of the services that businesses commonly outsource.
Digital marketing is the most outsourced service after accounting and IT. Source: Zippia
In this article, we will explore the many advantages of outsourcing your digital marketing efforts to an agency and why this can turn out to be more cost-effective for your business in the long run.
As part of your own digital marketing strategy, your business will have to decide whether to handle its digital marketing needs in-house, outsource to a digital marketing agency, or a combination of both.
To understand some of the key reasons why you may want to consider outsourcing your marketing, let’s start by looking at content creation, which, according to research on digital marketing trends, is the area that many businesses are increasingly focusing more of their efforts on.
However, businesses also face significant challenges trying to meet their digital marketing strategic goals. These challenges include having limited budget and resources, lacking systems and processes to generate content and collect data, and more.
Businesses need to engage in marketing activities to remain competitive, but many struggle to afford and manage the marketing processes required to create and deliver effective results.
Content creation, however, is only one aspect of your digital marketing needs. What about advertising, analytics and reporting, branding, SEO, email marketing, video marketing, social media, etc.? These are also necessary for an effective digital marketing strategy.
Since we are focusing on whether outsourcing your digital marketing needs is more cost-effective than building an in-house marketing team, let’s start with a brief overview of the benefits of outsourcing.
The Benefits of Outsourcing Your Digital Marketing Needs
Outsourcing your marketing needs to a digital marketing agency offers a number of benefits, including:
Cost Savings
One of the key advantages of outsourcing your marketing needs is cost savings. Hiring and maintaining an in-house marketing team is expensive, as it involves costs such as salaries, benefits, office space, equipment, and training.
Outsourcing will help to avoid these costs as you can simply pay for the services you need on a project basis or through a retainer, depending on your requirements. This will result in significant cost savings and increased ROI, especially for SMEs with limited budgets.
Flexibility and Scalability
Outsourcing provides you with the flexibility to scale your marketing efforts up or down based as needed, without the need for permanent hires or layoffs.
During busy seasons, you can increase your marketing efforts, and during slow seasons, you can scale back, without having to worry about hiring or firing employees.
This flexibility allows your business to adapt its marketing strategies to changing market conditions without the overhead costs associated with an in-house team.
Access to Specialized Expertise and Resources
Marketing is a complex field that requires expertise in various areas such as search engine optimization (SEO), pay-per-click advertising (PPC), social media management, content creation, content marketing, email marketing, and more.
Outsourcing your marketing needs to an agency will give your business access to a team of professionals with specialized skills, expertise, cutting-edge tools, technologies, and resources that may not be available or feasible to invest in-house.
For example, external marketing agencies can provide your business with access to cutting-edge technologies that will help to analyze data, track performance, and optimize your marketing campaigns, resulting in more effective and targeted marketing strategies that will drive better results.
Professionalism and Experience
Marketing agencies are specialized entities with a wealth of experience in handling marketing campaigns for different clients across various industries. They have a pulse on the latest marketing trends, strategies, and best practices, and can leverage their expertise to create effective marketing plans tailored to your business goals.
Additionally, agencies often have a diverse team with specialists in different areas, allowing them to bring a well-rounded approach to your marketing efforts.
Time and Resource Savings
Outsourcing your marketing needs frees up valuable time and internal resources for your business to focus on its core competencies.
Instead of spending time on marketing tasks, your in-house team can concentrate on their primary roles, leading to increased productivity and efficiency.
The Hidden Costs of In-House Digital Marketing
In-house marketing may seem like a viable option, but it also comes with often overlooked hidden costs that can add up over time, making outsourcing to a digital marketing agency more cost-effective in the long run.
Some of the hidden costs of in-house marketing include:
Hidden Cost #1: Training and Development
Keeping up with the rapidly changing marketing landscape requires ongoing training and development.
If you plan to build an in-house marketing team, then expect to invest in continuous education, certifications, workshops, and seminars to ensure that your team stays up-to-date with the latest marketing trends and best practices.
These training costs will quickly add up.
Hidden Cost #2: Employee Turnover
Employee turnover is a common challenge in the marketing industry with professionals often changing jobs or seeking better opportunities elsewhere.
This can result in significant costs associated with hiring, onboarding, and training new employees. Additionally, turnover and mis-hires can disrupt marketing campaigns and strategies, leading to delays and added costs.
Hidden Cost #3: Equipment and Software Costs
An in-house marketing team requires investing in technology and infrastructure like specialized equipment and software tools to support your marketing efforts and execute tasks effectively.
Investing in website development and maintenance, hardware, software licenses, subscriptions, marketing automation tools, CRM systems, analytics platforms, and other marketing technologies is expensive. Moreover, these tools require regular updates and maintenance, which will further increase costs over time.
Hidden Cost #4: Management and Overhead Costs
Managing an in-house marketing team requires additional overhead costs, such as salaries, benefits, office space, utilities, and other operational expenses. This will strain your budget and divert resources from other core functions.
Hidden Cost #5: Opportunity Cost of Diverting Resources
Doing digital marketing in-house requires diverting resources like time, effort, and budget from other areas of the business which results in less focus on other critical business operations.
This opportunity cost of diverting resources from other areas of the business can be significant and could seriously impact overall business performance.
Hidden Cost #6: Performance Monitoring and Optimization Efforts
In-house digital marketing requires investing time and effort into monitoring and optimizing marketing campaigns for optimal performance.
This includes analyzing data, conducting A/B testing, making adjustments to strategies, and continually optimizing campaigns for better results. These ongoing efforts require time and expertise, which may be overlooked when you consider the total cost of in-house digital marketing efforts.
Hidden Cost #7: Risk of Skill Gaps and Burnout
Running an in-house digital marketing team can result in skill gaps and burnout. Your team may need to handle various digital marketing tasks simultaneously, which often results in skill gaps in certain areas or even burnout due to the workload.
The net effect of this is decreased productivity, increased turnover, and additional costs associated with training or hiring new personnel.
Hidden Cost #8: Risks of Campaign Failures
Marketing campaigns do not always yield the desired results and in-house marketing efforts can fail to deliver on expected ROI.
When marketing campaigns do not perform as expected, it often results in wasted resources, lost opportunities, and additional costs to rectify the situation.
This risk can be mitigated by outsourcing to a marketing agency that has the expertise and experience to create effective marketing strategies and campaigns.
Hidden Costs Of Outsourcing Digital Marketing
Like in-house marketing, outsourcing also has hidden costs, so let’s explore these briefly:
Hidden Cost #1: Management and Coordination Efforts
Outsourcing your digital marketing requires spending time communicating with the agency, providing feedback and approvals, and managing the overall relationship.
The amount of effort and time required for managing agency relationships is often underestimated, so you need to have realistic expectations and include these in your cost calculations.
Hidden Cost #2: Lack of Direct Control and Visibility
Outsourcing your digital marketing needs often results in a lack of direct control and visibility over marketing efforts, and challenges monitoring and overseeing the agency’s activities, resulting in potential misalignment with your business objectives or ineffective strategies, and hidden costs in the form of lost opportunities, delays, or rework.
Hidden Cost #3: Dependence on Agency Expertise and Availability
Outsourcing typically leads to some type of dependency on the agency’s expertise, knowledge, performance, and availability. This can result in potential delays or additional costs finding alternative solutions.
Hidden Cost #4: Contractual Obligations and Fees
Outsourcing often involves contractual obligations and fees that your businesse may overlook. These include contract termination fees, additional charges for changes or revisions, or unexpected fees for using certain tools or technologies.
It’s crucial to thoroughly review and understand the contractual terms and fees associated with outsourcing digital marketing to avoid hidden costs.
Hidden Cost #5: Potential Quality or Cultural Misalignment
Another hidden cost of outsourcing is potential quality or cultural misalignment. If the agency’s work does not meet your expected quality standards or align with your business’s values and culture, you could experience additional costs to rectify or align the work. These include rework, revisions, or additional efforts to align the marketing efforts with your brand and messaging.
Outsource Your Digital Marketing Needs or Build An In-House Team?
As we have just seen, while outsourcing your digital marketing needs to an agency has many benefits, there may also be associated hidden costs, so it’s important to evaluate the pros and cons before deciding whether to outsource or run your digital marketing in-house.
Every business has unique needs and preferences, so it’s important to do your own research and cost-analysis.
Before making any decision, first calculate the cost of running your marketing in-house versus outsourcing. Various sites provide comparison tables that can help you with this.
For example, the table below from HubSpot illustrates an estimated general cost of putting together a one-month digital marketing campaign in-house (calculated as 40+ hours of work in-house), versus the cost you could potentially expect to pay if outsourcing to a digital agency (around $6000).
Components of a marketing campaign completed in-house versus potential cost of outsourcing to an agency. Source: HubSpot
Note: When looking at the above, keep in mind that:
a) The table does not take into account additional costs like salaries, training, technology, research, developing marketing expertise, etc.
b) Some of the estimated number of hours depicted in the table assigned to areas like creating blog articles and an email nurturing series seem to underestimate the time it takes to create high-quality content.
WebFX offers a great breakdown of digital marketing costs as illustrated in this summarized table…
There are other sites that provide lists or breakdowns of expected costs associated with outsourcing your digital marketing needs, including the article we wrote on additional marketing services web developers can offer.
Enter your details into a tool like DigitalStoryteller’s calculator to compare the cost of in-house marketing vs outsourcing.
To calculate the cost-effectiveness of using an in-house vs outsourced marketing team, look up estimated salaries using the links provided above and then enter your own figures into the calculator for fields like employee benefits and payroll taxes.
Tips for Outsourcing Your Marketing Needs to an Agency
Let’s say you’ve assessed the marketing needs of your business, done a comparison of costs, and decided that outsourcing is the more cost-effective option. Use the tips below to ensure a successful outsourcing experience:
1. Define Your Business Goals
Before outsourcing your marketing needs, clearly define your business goals and expectations. Communicate your marketing objectives, target audience, budget, and timeline to the agency to ensure that they align with your business objectives.
2. Research and Select the Right Agency
Do thorough research to find a reputable marketing agency that has a proven track record of success. Consider their expertise, experience, client testimonials, and case studies to evaluate their capabilities. Request proposals and compare pricing models to select an agency that fits your budget and requirements.
3. Establish Clear Communication Channels
Communication is key to successful outsourcing. Establish clear communication channels with the agency, including regular meetings, reporting, and updates. Define roles, responsibilities, and expectations to ensure a smooth working relationship.
So, set realistic expectations and understand that it takes time to see results. Trust the expertise of the agency and allow them to implement their strategies effectively.
5. Monitor and Evaluate Results
Regularly monitor and evaluate the performance of your marketing campaigns with the agency. Review reports, analytics, and metrics to measure the success of your marketing efforts. Provide feedback to the agency and collaborate on any necessary adjustments to optimize results.
Outsourcing To A Digital Marketing Agency – Next Steps
When it comes to evaluating whether to outsource or keep your marketing in-house, it all boils down to this:
If it’s more profitable to focus your time and resources on your business and outsource your marketing needs externally, then you are better off outsourcing and utilizing your time and resources to find and serve new and existing clients.
You will experience cost savings in terms of opportunity cost, as you can now potentially generate more revenue from activities that outweigh the expense of outsourcing, focus on your core services, and manage your time and resources more efficiently.
If your research and calculations show that outsourcing your marketing needs:
Is more cost-effective than running an in-house marketing team,
Will help to improve brand awareness, increase website traffic, deliver higher conversion rates, and drive business growth
Provides desirable benefits like cost savings, the flexibility to scale your marketing efforts based on your needs and budget, access to specialized expertise and professionalism, time savings, and more
Then the next logical step is to reach out to a digital marketing agency and begin exploring what services they offer and how they can help you achieve your marketing goals.
If you don’t know where to start, we recommend putting a list of questions together and checking out our digital marketing agency directory.
Our agency partners are experienced professionals who can assist you with all your digital marketing needs.
WPMU DEV can help you find the right digital marketing agency to outsource all your marketing needs.
To view all listed agencies and their available services, visit our Agency Partner directory or contact our 24/7 support team if you have any questions.
Breadcrumbs are now baked into SmartCrawl, along with another hotly requested feature… setting primary categories for posts and products!
SmartCrawl 3.5 gives you the ability to improve your WordPress site navigation for users and search engines with two new powerful features: breadcrumbs, and the ability to specify primary categories when assigning multiple categories to your posts or product pages.
In this article, we explain the benefits of using SmartCrawl’s latest new features and how to get the most out of them. We’ll cover:
In the classic fairytale, siblings Hansel and Gretel left a trail of breadcrumbs when they went deep into the forest so they would not get lost and have a path to navigate on their return.
Aptly named, breadcrumbs are an essential navigation aid that can help visitors and search engines better understand your website’s structure.
And it goes without saying that improving your site’s navigation is also good for SEO, as it helps search engine bots crawl your pages and index your content more efficiently.
Here are some other reasons why you should use breadcrumbs on your WordPress site:
Breadcrumbs help users figure out where they are on your site. Visitors usually land on your site through an article link or search result and need a way to orient themselves quickly. A breadcrumb path can provide this orientation, making it easier for visitors to find what they’re looking for. It can also help to reduce bounce rates (i.e. the percentage of visitors who navigate away from your site after viewing only one page).
Breadcrumbs improve user experience. By providing a clear and concise path, users can understand not only where they are on your website, but also how to get back to previous pages or go up a level or two in your site’s hierarchical structure.
Breadcrumbs can improve your search engine visibility and potentially increase traffic to your site. Google uses breadcrumbs to categorize information on your site, helping it to index and organize your content and present it correctly to users. In fact, search engines like Google display breadcrumbs in search results pages, making them a valuable tool for improving your click-through rates.
Google displays breadcrumbs in search results.
Where Can You Use Breadcrumbs?
Breadcrumbs are a type of secondary navigation scheme that show users the path they have taken to reach a particular page on a website.
They don’t replace your site navigation menu, they support and complement it. So, a good place to put them is at the top of a page, just below your site’s primary navigation menu or the main header section.
You can display a breadcrumb trail at the top of your content.
However, you can also use them at the bottom of your page or even on your sidebar.
As you will see later in this post, you can pretty much add a breadcrumb anywhere on your site using a shortcode.
Don’t know why you’d want to do this, but you can.
The best way to find what works best for your site is to test different locations and use tools like heatmaps or analytics to measure your results.
Test different locations to sprinkle breadcrumbs on your site.
Breadcrumbs and Multiple WordPress Post Categories
What happens if you assign multiple categories to a post? How do breadcrumbs choose which path to display?
Which of these categories gets the breadcrumb?
The answer is… breadcrumbs will choose whichever category you have specified as the primary category for the post.
Make sure you can assign a primary category to posts with multiple categories.
Primary categories are the main classification of your business, product, or service and can help search engines understand the primary focus of your website, so the ability to select primary categories in SEO is important.
This is the category your breadcrumb patch will display.
If you assign a primary category to your posts, breadcrumbs don’t have to guess. It’s as simple as that!
A breadcrumb makes your site less humdrum.
How to Add Breadcrumbs to WordPress with SmartCrawl SEO Plugin
SmartCrawl not only makes it easy to add breadcrumb navigation to your website and assign primary categories to your posts and product pages, but it automatically adds structured data to your breadcrumbs. This helps search engines to understand and categorize your content and present it correctly to users.
Plus, SmartCrawl gives you complete control over how your breadcrumbs appear, making it easy to provide visitors with the information they need to navigate your site.
SmartCrawl’s breadcrumbs give you more SEO for your dough.
To activate SmartCrawl’s breadcrumb feature, go to SmartCrawl > Advanced Tools > Breadcrumb and click on activate.
Activate SmartCrawl’s breadcrumb feature to configure and use it on your site.
Activating the feature gives you access to a range of settings and options for configuring your breadcrumbs.
SmartCrawl gives you loads of breadcrumb customization options.
Configuring Breadcrumb Settings
Let’s go briefly over SmartCrawl’s breadcrumb settings:
Add Breadcrumbs to your Webpage – Add breadcrumbs to any page and anywhere on your website using a shortcode or adding PHP code to the template page.
Preview – This section lets you preview how breadcrumbs will display on your pages.
Breadcrumb Separator – Choose a breadcrumb separator from the list of presets or add your own custom separator using HTML characters.
Configurations – This section lets you enable additional breadcrumbs settings for your site, such as adding a prefix at the beginning of the breadcrumbs, adding home breadcrumbs to the trail, hiding the post title from the breadcrumb trail, or hiding the default WooCommerce product breadcrumb from your site if you use WooCommerce.
Breadcrumb Label Format – Here you can customize various breadcrumb label formats across your site, such as Post, Page, Archive, Search Results, and 404 Error Page label formats.
Deactivate – Deactivate the feature if you no longer want to display breadcrumbs on your site.
Let’s look at a few ways to customize breadcrumbs by tweaking SmartCrawl’s settings.
Choose a Breadcrumb Separator
The Breadcrumb Separator section lets you specify a separator symbol from a list of presets, but you can also add your own by entering HTML characters.
So, for this example, let’s add an emoji into the custom separator field…
Add your custom separator HTML.
Here’s the result…
Create fun trails for users with custom breadcrumbs.
Add a Prefix
You can also add a prefix to your breadcrumbs in the Configurations section…
Add a prefix to your breadcrumbs.
And here’s the result…
Happy trails…
Hide Title in Breadcrumb
Let’s do one more tweak and hide the post title from our breadcrumb trails…
You can hide the post title from displaying your breadcrumbs.
And here’s our customized breadcrumb sans title…
This humble breadcrumb is neither titled nor entitled.
Breadcrumb Label Formats
SmartCrawl gives you additional options to customize breadcrumb label formats across your site.
Customize breadcrumb label formats with a wide range of options.
This allows you to add additional information to your breadcrumbs such as post authors, dates and time, your site title, etc.
Customized breadcrumb label formats? Is there anything SmartCrawl won’t do?
SmartCrawl… the Crumb de la Crumb of Breadcrumbs
Breadcrumbs improve your website’s SEO and search engine visibility, provide visitors with an easy way to navigate your site, reduce bounce rates, and increase click-through rates.
Smartcrawl’s breadcrumb feature is customizable, flexible, user-friendly, SEO-friendly, and compatible with all WordPress themes and plugins.
Additionally, SmartCrawl automatically ads breadcrumb schema markup and the ability to specify a primary category for posts and product pages with multiple categories assigned.
SmartCrawl is the free SEO plugin that lets you have your cake and eat it too… right down to the tastiest breadcrumbs!
See our documentation section for more information on using this feature and, if you have any questions, ask our 24/7 support team or check out our new AI Assistant by clicking the Support tab inside The Hub.
Mind maps can help you visually organize your ideas and information, streamline your development process, and facilitate collaboration. Here are six ways to speed up your WordPress web development process with mind mapping…
But what about tools to help you get your thinking organized before you actually start working on a project? How do you sort, filter and organize everything when there are so many different ideas and paths you can take in the initial stages of a project?
This is where mind mapping can help.
In this post, we look at different ways to use mind maps to get your web development projects done faster and with less costly distractions.
Mind mapping is a cognitive tool that helps you visually organize your thoughts and ideas, as well as make connections between them.
It is a graphical representation of information, typically starting with a central idea or concept and branching out into related topics or sub-topics.
The structure of a mind map is hierarchical, with the central idea serving as the main node from which other ideas radiate. These nodes are connected by lines, which represent relationships or associations between the ideas.
Basic mind map structure where topics and subtopics flow from a central idea.
Mind maps can be used to brainstorm ideas, plan projects, outline information, or solve problems.
In addition, mind maps can include images, symbols, or colors to help emphasize or illustrate certain concepts.
All of these makes mind mapping a valuable tool to help organize your thinking during the initial stages of the web development process.
Benefits of Using Mind Maps in Website Development
The benefits of using mind maps in your web development approach include:
Enhanced creativity: Mind maps encourage the generation of new ideas, making it easier to develop creative solutions.
Improved organization: Mind maps help organize information in a visual and easy-to-understand format, making it simpler to see the big picture and identify potential issues.
Improved efficiency: By outlining your website’s structure and content in a mind map, you can streamline your web development process and save time.
Efficient problem-solving: Mind maps can help developers break down complex problems into smaller, more manageable parts, leading to quicker and more effective solutions.
Enhanced collaboration: Mind maps can be shared and updated in real-time, facilitating collaboration between developers, team members, clients, and stakeholders.
Improved project management: Mind maps can serve as a roadmap for the entire web development project, ensuring that all stakeholders are on the same page and that deadlines are met.
Enhanced communication: Mind maps can be used to explain complex concepts and processes to clients, stakeholders, and team members in a way that is easy to understand.
Increased productivity: Mind maps can help developers stay focused and organized, reducing distractions and increasing productivity.
Now that we understand some of the benefits, lets look at the practical application of using mind maps in your web development business.
6 Ways To Use A Mind Map To Speed Up Your Website Development
Here are several ways to incorporate mind mapping into your website development approach:
1. Organize Website Structure
Mind mapping can help you create a clear and organized structure for a website. By mapping out the website’s content and information architecture, you can easily see the relationships between pages and make sure the user flow is logical and intuitive.
For example, you can use mind maps to visualize the hierarchy of pages on your website, such as the homepage, service pages, blog page, etc.
In the above example, the central topic would be the website name, with each of the major sections (e.g. company, products and services, blog, FAQs, etc) branching out to subsections and individual pages of the website.
By mapping out the relationships between these pages, you can ensure that the user flow is easy to follow and that the website is organized in a way that makes sense to users.
2. Brainstorm Content Ideas
Mind mapping can be a great tool for generating content ideas to match user intent. By brainstorming and organizing content ideas in a mind map, you can ensure that your website content is useful, accessible, and easy to interpret.
For example, you can use mind maps to generate content ideas for your website’s blog. By brainstorming topics that are relevant to your target audience and organizing them in a mind map, you can ensure that your content is aligned with user intent and will be useful to your website visitors.
Use mind maps to brainstorm content ideas.
3. Collaborate with Clients and Team Members
Mind mapping can be a great tool for collaborating with clients and team members. By sharing a mind map, you can get feedback and input from others to ensure that everyone is on the same page and that the website development process is moving in the right direction.
For example, you can use mind maps to collaborate with clients and team members on website design and development. By sharing a mind map of the website’s content and information architecture, you can get valuable feedback on the user flow, content organization, and other aspects of the website development process.
Miro lets you create mind maps collaboratively with your team.
4. Manage Project Tasks
You can use mind mapping to manage project tasks during the web development process. Creating a mind map of project tasks lets you quickly identify the key tasks that need to be completed and assign them to team members.
For example, you can use a mind map to assign tasks to team members, such as “Develop Home Page,” “Create About Us Page,” and “Design Contact Us Form.”
A project management mind map created with Xmind.
5. Save Time and Increase Efficiency
Mind mapping can help you save time and increase efficiency in the website development process. By visualizing the website structure and user flow in a mind map, you can identify areas for improvement and make changes before the website goes live, saving time and reducing the need for post-launch revisions.
For example, you can use mind maps to identify areas of the website that may be causing user frustration or confusion. By making changes to the website structure and user flow in the mind map, you can save time and ensure that the website is optimized for user experience before it goes live.
6. Improve an Existing Website’s UX
Using mind mapping is a versatile and effective technique to improve user experience on a website redesign, map out the ideal user flow for your website visitors, and make the website more user-friendly.
The mind map would include the key pages on the website, the various links and CTAs on each page, and the relationships between different pages. This helps your team understand how data is structured on the website.
By identifying the paths users typically take when navigating through a website and potential issues and areas where they may get stuck, you can make UX decisions to remove roadblocks and improve the user experience, and create a mind map of the target version of the website that is more user-friendly than the existing site. It also ensures that all stakeholders are on the same page throughout the project.
Practical Applications for Mind Mapping in Web Development
Let’s explore now some of the practical ways mind mapping can improve your web development processes.
As mentioned earlier, mind mapping can be used when creating new projects or improving existing websites.
Let’s start with improving an existing website.
A) Using Mind Mapping to Improve User Experience
To use mind mapping to improve user experience, follow these five simple steps:
First, create a mind-map template to understand the current information architecture on the website. List out how data is currently being structured and how you plan to structure it for the future user-friendly version.
Second, map out the ideal user flow by thinking about how you would like your website visitors to engage with your content and what actions you would like them to perform.
Third, compare the ideal user flow to the current behavior flow available on your Google Analytics. This will show you how users are currently engaging with the website’s content and what paths they usually take when navigating through the current information architecture.
Fourth, identify the roadblocks to providing the best user experience, such as poorly structured content, irrelevant features, or too many tools that don’t respond to users’ needs.
Finally, make the appropriate UX decisions to influence user behavior by turning chaos into a logical content hierarchy, trimming irrelevant page elements, and adapting web pages’ content structure to the needs of specific audience segments.
Creating a mind map is just the first step, but turning it into powerful UX decisions should be your main objective. You can turn your mind map into an effective sitemap or customer journey map.
To illustrate this, imagine you’re targeting three different customer personas on your website. You would need to plan three different user flows, grouping web pages into categories corresponding to each audience segment.
Then, do some user behavior mapping to determine how each customer persona should navigate to the corresponding web page and click the CTA placed there.
Make critical UX decisions, such as setting up relations between various pages on your website, designing the best CTA for each type of page, and including key information on a page, depending on the customer persona accessing it.
Now that we have looked at how to improve an existing website using mind mapping, let’s turn to using mind maps when creating new web development projects.
B) Using Mind Mapping for Website Development
WPMU DEV member Lucas from Ondata Marketing shared with us how he uses mind mapping in his web development business to summarize the most important information gleaned from his client briefings.
Here’s what Lucas does, in his own words…
“First, the way to use the mind map is to insert a text or image in the middle, which can be the customer’s name, logo, niche or any other image that makes sense for use at that time.
After this first insertion, you start to draw lines from this highlighted center to another part of the sheet, then inserting another word or summary information, which can also have derivations (and maybe in this part you realize that you should have made the first derivative word less near the end of the sheet).
And after entering all the information, you would have leads, thought paths or subject groupings divided by the sheet, but all visible on the same page. And if all goes well, you will have a sheet where you can more clearly see the subject that the mind map was made and all your information and ideas derived from it.”
Lucas uses mindmaps to create websites in two ways:
Method #1 – Use A Mind Map For Web Development Research
The first way Lucas uses mind maps is for research:
“I put the topic in the middle, I go searching on the internet about the client’s company, about the niche it operates, about competitors or even listening to videos while I do other work tasks that are more automatic.
This is a mind map with less discretion, where I’m actually inserting anything and then, usually after a day or two, I’ll go over it and evaluate what still seems to make sense. And what happens is that generally about half of these things don’t make sense anymore to continue in the project as useful information.”
Method #2 – Use A Mind Map To Organize Website Elements
The other way Lucas uses mind maps is to summarize and organize the information gathered throughout the client briefing.
In his own words…
“After the client brief is done, I organize the information on paper and in my head. For that, I use a method that is to group some specific subjects in imaginary squares.
To explain it better: I imaginatively divide the mind map sheet into 9 squares, where the middle one is the text or image highlighted on the map, and the others are for other subjects. Using yet another analogy, it’s like using a hashtag #, where the middle is already filled with the theme.
And in the remaining 8 squares, I usually divide the insights and issues like this:
1 – Graphic references, font names, colors, branding rules. Simple things like drawing a square or a circle (which is one of the briefing questions I ask: “Think about shapes and images…”.
2 – Tone of voice, personality, brand word, feelings you want to arouse.
3 – Products and services. Except, of course, when there are many, then I just insert a general description of all or categories.
In tables 4 to 8, it’s always something different for each client, but in general terms, I put phrases that the client said in the briefing, the actions that the client expects his end client to do when entering the site, the things that end customer has to know that makes the company different.
The point is that people do not always have the answers to every question, and the answers they may have are not always good for every question, but there will always be some precious jewels among them that your own customer will have said and that will surely also serve to delight your customer’s customer.”
Lucas also provide some essential rules for making a good mind map:
“First rule: there are no rules. Always try to adapt to what makes the most sense for you.
The second rule: don’t fully respect imaginary squares. For each customer, the amount of content will be different in each subject. There is no problem if a large part of the mind map is filled with some kind of content if that content is relevant.
The third rule: be concerned about making sense, but summarize as much as possible. Remember that the mind map is something to organize your thinking, so you should always make it easier to visualize it by writing highlighted words, short sentences, or even simple drawings.
And one last tip: personally I really prefer to use paper. There is something magical about putting ideas and notes down on paper with all the imperfections, misalignments and scrawls that your own fine motor skills can produce. But you can also use other online tools and methods, to do it directly or to clean it up, especially when you need to present it later, or where mind maps become too large to fit on one sheet.”
Speaking of tools, lets look now at some of the most popular mind map tools available.
Mind Mapping Tools
Mind maps can be drawn by hand on paper or created using free or paid digital and online tools.
Website tree structure mind map created with PowerPoint.
However, you can also use the dedicated free and paid mind-mapping tools below, which offer additional benefits over general drawing tools, such as specialized functions, collaborative features, integration with other tools, better organization, more customization, and better visualization options:
Mind Map Pro
Mind Map Pro integrates mind mapping and a dynamic visual sitemap tool into WordPress.
Mind Map Pro is a powerful tool for mind mapping that offers various perspectives, such as map view, tree view, and 3D view.
Its user interface is user-friendly, and it has a simple process to get started. The color and shade of ideas can be changed using the color picker, and the size of idea boxes can be adjusted automatically or manually. Keyboard shortcuts are available to make mind mapping easier, and background images can be moved around the canvas by dragging and dropping. Zoom in and out using icons or a mouse scroll is also available.
Moving ideas and changing their relationships can be done by dragging and dropping, and additional associative links between ideas can be created. Contextual labels can also be added. The doodles can be exported to an Office document or an image, and the mind map can be kept private or public.
Mind Map Pro has a plugin to build a visual sitemap for your website, allowing you to drag-and-drop pages to edit your site’s structure and rearrange the architecture of your site. It can also connect with WordPress, allowing you to stay on track with tasks from your dashboard. You can add tasks from your dashboard or directly from a post or page.
Overall, Mind Map Pro is a versatile tool that can help you explore your ideas in different ways.
MindMup
MindMup – A frictionless online mind map creation tool.
MindMup is an easy-to-use online mind-mapping tool. You can create mind maps for free without registering and export your mind maps as images or an outline document.
The free version offers a number of customizable features but limited capacity. The paid version options includes many additional features and increased capabilities.
MindMeister
MindMeister
MindMeister is a web-based collaborative mind mapping tool with a range of powerful features and versatile tools to help you organize, plan and execute your projects.
MindMeister lets you easily create to-do lists, website planning sheets, and arrange team assignments. The app also allows you to share the workspace online or via mobile devices like Android and iOS, and create email reminders for tasks.
Collaboration is made easy with MindMeister’s cloud-based platform. The “Opinions” feature, lets you get feedback from your team in real-time. Collaborators can vote “yay” or “nay” to individual nodes in your shared mind map and you can divvy up the work via drag-and-drop if you use MeisterTask to manage your projects.
MindMeister offers several different plans and a range of premade templates to help guide you in getting started with your own mind map. The free basic plan supports up to three mind maps at no cost. If you need more and additional features like including multiple users, custom themes, branding, multiple admins, custom domains, or group sharing, then you’ll need to upgraid to one of its paid plans.
MindNode
MindNode
MindNode is a popular and easy-to-use and versatile mind-mapping software available for Mac and Apple iOS devices. It offers a simple and intuitive user interface, which makes it a great option for both beginners and experienced users. With quick entry features, you can start creating your mind map within seconds, allowing you to capture your ideas and thoughts on the go.
One of the best things about MindNode is that it allows you to create simple or elaborate mind maps, making it perfect for brainstorming sessions or organizing your daily tasks. You can even use it to set priorities, make to-do lists, or create annual goals. And with its syncing capability with Apple Watch, iPad, or iPhone, you can access your mind maps on the go, no matter where you are.
MindNode also offers import/export features, which make it an ideal tool to integrate with your workflow. With the ability to attach images, links, and files to your mind map, you can easily visualize and organize your ideas in one central location. And with the ability to fold nodes and use focus mode, you can easily manage complex mind maps without getting lost in the details.
Xmind
A mind map from Xmind’s mind map gallery.
Xmind is a powerful mind-mapping software that offers a range of features to create clear, concise, and customizable mind maps for brainstorming ideas, managing a project, or simply organizing your thoughts. It’s available for Mac, Windows, and iOS.
One of the key features of XMind is the Zen mode, which allows you to focus on a single mind map without any distractions. This feature is especially useful for when you need to concentrate on your thoughts and ideas without any external interference. In addition, XMind also has an equation feature that lets you add mathematical and chemical equations to your mind maps.
With XMind, you have access to a wide range of mind map templates that are designed to suit various needs. The multi-branch colors also help you to identify different nodes, making it easy to navigate your mind maps.
XMind allows you to protect your mind map files with passwords, ensuring that your data is safe and secure. It offers a smooth workflow, responsive graphics engine, distraction-free mode, and all the basic features you need to create and format mind maps. You can also export your mind maps as PNG, PDF, or markdown files, which makes sharing and collaborating with others easy. The mobile app for iOS and Android devices is also available, allowing you to work on your mind maps while on the go.
XMind lets you create mind maps easily using just the keyboard, and there are plenty of formatting options available. The themes and templates are attractive and allow you to jump-start your mind map. XMind also provides a range of useful project management and reference features, including task-based icons, adding notes and file attachments, and hyperlinks to web pages and mind map nodes. The Pro version adds even more features.
XMind is a subscription-based app for personal use, which may not suit everyone. Additionally, there is no cloud sync between devices.
Miro
Miro
Miro is a collaborative online whiteboarding platform that includes a mind mapping feature. The mind mapping software allows you to visually organize and connect ideas in a non-linear format, making it easy to brainstorm, plan projects, and solve problems.
With Miro, you can create and customize mind maps with text, images, and icons, and collaborate in real-time with other team members. The platform also includes features such as comments, voting, and tagging, which make it easy to gather feedback and keep track of important ideas.
Miro is designed for use by teams of all sizes, and can be integrated with a variety of other tools and platforms to streamline workflow and boost productivity.
Coggle
Coggle
Coggle is a web-based mind mapping tool that lets you map out complex processes, connect related ideas, and visualize information with intuitive controls and features for creating, sharing, and collaboration.
Coggle’s drag-and-drop interface lets you add images and text anywhere on the canvas to annotate and organize your map. The software’s advanced features give you complete control over connection paths and styles, enabling you to create loops, join branches, and add multiple central items as starting points to map related topics together in one workspace.
With real-time collaboration and a built-in chat tool, Coggle is a great tool for teams to communicate and co-create diagrams simultaneously, without the need to log in. Plus, Coggle’s change history feature automatically saves all changes, so you can revert to a previous version from any point.
Coggle works seamlessly with Google services, making it easy to share files and collaborate with colleagues using Google accounts. Its template gallery also provides access to pre-built, customizable templates for setting SMART targets, root cause analysis, meeting notes, and more.
While Coggle’s web app interface does not offer all the full-featured native apps’ capabilities, such as themes, images, presentation, and brainstorming mode, its simple and intuitive design, floating text and images, and lively color scheme make it a cool and fun tool to work with. You can even use your smartphone to create or edit mind maps on the go.
Map Out Some Mind-Blowing Web Development
Mind-mapping is a flexible and adaptable tool that can help your web development business in many ways… from note-taking and brainstorming new ideas for websites and content creation to project planning, problem-solving, and decision-making.
There are various tools available to help you create mind maps that will speed up your web development, make your work more efficient, and help you communicate your ideas to clients more easily.
We hope this article has inspired you to expand your mind and map out new approaches to building a better web development business.
***
A special thank you to Lucas from ON|Data Marketing for his contribution to this post. ON|Data helps companies to position themselves professionally and creatively on the internet through WordPress websites.
Would you like to move qualified prospects through your web dev sales process more successfully, deliver consistently better results, and send your sales closing rates soaring? Of course you would, right?!
Well, good news – you’re in the right place to learn how! This no-hype guide to running a hyper successful client briefing session will show you how to boost sales of your web development services.
Q: Which of the following is an absolutely essential “must-have” to conduct a highly successful client briefing session?
A) A fancy office on the top floor of a skyscraper overlooking one of the 7 wonders of the world.
B) Sending out a stretch limo to pick up your prospective clients and drive them back after the briefing.
C) Serving clients chilled champagne, canapes, and caviar as soon as they arrive.
D) Having an impeccable sense of dress matching your suit with your hairstyle and the office decor.
Answer: None of the above.
To conduct a successful client briefing session, you need only two ears and …
A Needs Assessment Questionnaire
A Needs Assessment Questionnaire (NAQ) is an essential tool for your WordPress web development services business.
It’s a crucial part of an effective sales process as it helps you to:
Understand your client’s needs, preferences, and goals so you can provide them with the right solution for their needs.
Ask the right questions and gather the necessary information about the project’s scope, timeline, and budget to provide a realistic plan for the project and an accurate estimate of the project’s costs.
Identify any potential issues or concerns early in the sales process.
Manage the client’s expectations.
Qualify your prospect as being either a good fit for your services or not (yes, sometimes it’s better to let them go) and move them successfully through your sales process.
Establish a strong relationship with the client based on trust and communication.
Your questionnaire should be carefully crafted to glean the necessary information from the client while being concise and easy to understand.
It should also be customized to the client’s specific needs and provide clear instructions on how to complete it correctly, so that anyone in your business can conduct a client briefing session successfully.
By demonstrating a deep understanding of the client’s needs and goals, you can create a website or deliver a project that will hopefully exceed your client’s expectations. This, in turn, can lead to satisfied clients who are more likely to recommend your services to others.
The NAQ, then, is not just any old “questionnaire.” It’s an integral and valuable part of your sales process.
So, before we look at how to develop an effective Needs Assessment Questionnaire that will help you get better results in your business, let’s briefly go over the different stages of an effective sales system so we can have a clear understanding of where the Needs Assessment Questionnaire fits in.
The 7 Stages of an Effective Sales Process
An effective sales process typically consists of the following stages:
Stage 1: Initial Contact – This is the first stage of the sales process, where your potential client becomes aware of your service. They may visit your website, receive an email, phone call or recommendation, or see an advertisement, directory listing, etc.
Stage 2: Needs Assessment – In this stage, you (or your sales rep) asks questions to understand the client’s needs, challenges, and goals. The aim of this stage is try to gather information about the client’s business, industry, and competition and qualify them as a potential client.
Stage 3: Presentation – In this stage, you present a solution to the client’s problem or need. Your presentation may include a demonstration, samples of previous work, or a proposal.
Stage 4: Objections – In this stage, the client may raise objections or concerns about your proposed solution. You (or your sales rep) then address these objections and provide additional information or clarification.
Stage 5: Closing – In this stage, you (or your sales rep) ask for a decision. This may involve negotiating the price, terms, or delivery of the service.
Stage 6: Follow-up – After the sale, your business follows up with the client to provide onboarding (e.g. training), ensure satisfaction with your service, and to address any issues that may arise. You may also look for opportunities to cross-sell or upsell other services.
Stage 7: Referral – The final stage is when your satisfied client refers your business to others who may benefit from your services. This can be a powerful source of new business and growth for your company.
The sales process described above emphasizes the importance of understanding your client’s needs and providing a solution that meets those needs. It also highlights the need for ongoing customer engagement and relationship-building to drive long-term business success.
Your NAQ is vitally important to completing Stage 2 (Needs Assessment) of your sales process successfully.
Assessing your clients’ needs effectively will help you deliver a better solution.
This article focuses on the Needs Assessment stage of the sales process, so let’s take an in-depth look at the role your Needs Assessment Questionnaire plays in it.
The Needs Analysis Presentation
All you need to run an effective sales presentation is an effective script and an effective sales tool.
To illustrate this, let’s say that you are asked to give a slide presentation to an audience about a subject you know little to nothing about.
If you design your slide presentation well using the right content and the right slide sequence, all you would have to do is show a slide, read the words on the slide, show the next slide and repeat the process, and you could run a successful presentation.
More importantly, anyone in your business could consistently and repeatedly deliver a successful presentation by simply following the same process. Even if you went a little off-topic and ad-libbed every now and then, the tool (i.e. the slides) and its built-in script (i.e. the words on each slide) would still guide the presenter successfully through the entire process.
This is essentially what we are aiming to achieve in “Stage 2” of the sales system… an effective and repeatable presentation that delivers consistent results and moves your client successfully to the next stage.
Stage 2, then, is your Needs Analysis Presentation and consists of two main elements:
The presentation script
The Needs Assessment Questionnaire
The “presentation script” is what you say and do during your client briefing session to create the best user experience possible for your client.
This includes how you greet your potential client, what you do to make them feel comfortable (e.g. offer water, tea, or coffee), the words you use to start the briefing session, the questions you ask them during the briefing, how you structure the entire meeting so clients feel relaxed and open to share information that will allow you to assess their needs and qualify them as prospects, the words you use to end the meeting and set up the next stage of the process, and so on.
For example, the “opening script” for your Needs Analysis Presentation might go something like this:
“[Client name], as I mentioned to you when setting the appointment, the purpose of today’s meeting is for us to get a better idea of your business, what it does, what problems you need help solving, what kind of results you expect from your website, and so on.
I’ve done some research on your business and there are some questions I’d like to ask so we can get the full picture of what you need and how we can help you. This will probably take about 30 minutes or so.
I will then review the information carefully with my team and come back to you with a customized solution that will best suit your needs and your budget.
And if it turns out that we are not a perfect fit for working with each other, I’ll let you know and recommend a more suitable solution.
Are you ok for us to get started?”
***
After delivering the opening script above, you then complete the Needs Assessment Questionnaire with your client. This is the tool that will guide you successfully through your Needs Analysis Presentation.
After completing your NAQ, you then deliver the “closing script,” which could be something like this:
“[Client name], thank you… I really appreciate you taking the time to answer all of these questions. This gives me everything I need.
As I mentioned at the start of the meeting, give me a day or so to review this with my team. We’ll put together the solution we think will best deliver what you’re looking for and then we’ll meet again and go through everything in detail and answer any other questions you have.
Are you happy for us to set up the next meeting now?”
The above is Stage 2 in a nutshell. Its purpose is to help you set up the next appointment, where you deliver your solution and hopefully get the client’s business.
The more attention you put into designing and structuring your Needs Assessment Questionnaire, the better the client’s experience will be and the more smoothly, consistently, and effectively your client meetings will run.
Even better, if you plan to scale your business, you will be able to train anyone to run client briefings competently. All they will need to do is learn the opening and closing scripts and use the Needs Assessment Questionnaire to complete this stage.
Now that we understand what the Needs Assessment Questionnaire’s purpose is and where it fits into the sales process, let’s start building an effective NAQ for your business.
Designing Your Needs Assessment Questionnaire
Since there is no “one size fits all” way to build a web development business, this section will provide a general framework to help you design a Needs Assessment Questionnaire customized to suit your specific needs, with a list of sections and suggested questions you can include in your NAQ.
We’ll begin by looking at the steps involved in creating a NAQ.
How To Create An Effective NAQ For Your WordPress Web Development Business
Here are the steps involved in creating an effective Needs Assessment Questionnaire that will enable you to gather the critical information needed to deliver successful WordPress web development services to your clients:
Identify the key areas of information you’ll require: Begin by outlining the main areas of information you need to gather from the client, such as their business goals, target audience, website functionality, content needs, marketing strategies, budget, and timeline expectations.
Determine the types of questions to ask: Once you have identified the main areas of information you need to gather, determine the types of questions to ask. Open-ended questions are ideal as they encourage clients to provide detailed information, allowing you to better understand their needs and preferences.
Develop specific questions: Put together key questions for each area of information to gather more detailed insights. For example, to understand the client’s business goals and challenges, you could ask “What are your top business goals, and what challenges are you facing in achieving them?”
Organize the questionnaire: Ensure that the questions flow logically and are easy for clients to understand. Group similar questions together, and consider using subheadings to organize the questionnaire by topic.
Include instructions and explanations: Provide context for each question by explaining why you are asking it and how the answer will help you develop a customized solution for the client. The best way to do this is to turn this explanation into a “script” and write it into your questionnaire after each of the section headings and subheadings (e.g. “Now, I’d like to ask you questions about your current marketing efforts. This will help us understand what you are currently doing to generate new leads and drive traffic to your site, how these activities are performing, and if there are any issues that we would need to look at or improve…”). Including clear instructions and explanations will help clients understand the purpose of the questionnaire and what to expect in the web development process, and help you to fill it out.
Test the questionnaire: Try out your newly created questionnaire on a few clients to ensure the questions are clear, relevant, and useful. Make any necessary adjustments to ensure the questionnaire effectively gathers the information needed for successful web development projects.
Continuously review and refine: The questionnaire is not set in stone, so adjust and improve it over time based on feedback from clients and your team members. As your business evolves and new trends emerge, make sure that the questionnaire remains up-to-date and relevant.
So that’s the outline of the process. Now, let’s start putting a Needs Assessment Questionnaire together.
1) Decide What Information You Need
As mentioned above, the first step is to identify the key areas of information you need to gather from clients.
Mind-mapping the process at this stage can be useful for brainstorming ideas and organizing your thoughts.
A mind map is a useful tool for planning your NAQ.
2) Define Your NAQ Categories
Once you have a clear idea of what information you need from your client, the next step is to organize this information into question categories. These will form the main sections of your NAQ.
Define the categories you will add to your Needs Assessment Questionnaire.
Think about the logical flow of your questionnaire’s sections, especially when planning subcategories, such as hosting and domains, design, functionality, and content for the website, or marketing-related questions.
For example, when discussing your client’s website needs, should you start by asking them questions about hosting and domains and then follow with questions about design, functionality, and content, or is there are better sequence that you feel would make the discussion flow more smoothly?
Also, consider things like:
Which areas are absolutely essential to get information from the client? Where should you insert this into your NAQ so you can make sure it gets covered in case the meeting is cut short or goes off on a tangent, or the client starts to feel overwhelmed?
Which areas of discussion could potentially blow out and take up a big chunk of the meeting? How can you design the process to quickly rein the client back into focus if this happens?
All of these details are very important when building a process flow for your NAQ’s design.
3) Decide on the Format
How are you going to run your Needs Analysis Presentation and record the client’s answers?
Will your client briefing sessions be done face-to-face, over the phone, online via video conferencing, or a combination of different styles?
Will your NAQ be printed with answers recorded as handwritten notes, in an electronic document, or a custom form application running from a phone, tablet, or laptop?
Probably the easiest and most effective way to start is using pen and paper. A printed questionnaire can serve as your prototype. This will allow you to review, tweak, test, and improve your sections, questions, question flow, accompanying instructions, fields for entering answers, etc, after every client briefing session.
Once you have a NAQ that delivers you consistent results, you can then turn your prototype into a format better suited for your business, like an electronic questionnaire or even an app. Or, just keep using a printed questionnaire if it works for you. Why complicate something when the simplest approach works?
4) Add Questions to Your NAQ Sections
Now that you have planned everything out, the next step is to add questions to each section of your NAQ.
Note: You don’t have to add every suggested question below to your NAQ. Just pick out the ones you need. Also, keep in mind that some questions may overlap for different sections, so include them where you think it would make the most sense for you to ask.
Let’s go over the main sections we suggest you consider including in your NAQ:
1) Overview
Your NAQ is an internal business document. It’s not something that you will leave with the client. So, it’s probably a good idea to add an Overview section. This could include a checklist of everything you need to cover during the session, such as documents or information the client needs to provide, instructions for completing certain sections, even your opening script.
2) Client’s Business
As a website developer, it’s important to understand the client’s business goals and challenges to create a website that meets their specific needs. During the client briefing session, it’s essential to ask the right questions to identify the client’s goals, target audience, unique selling points, and competition.
Questions about the client’s goals can include inquiries about what they hope to achieve with their website, whether they are looking to increase sales, generate leads, or increase brand awareness. Knowing the client’s goals will help you tailor your approach to meet these objectives.
Target audience questions should delve into the demographics of the client’s customers, their interests and behaviors, and what they are looking for in a website. By understanding the target audience, you can create a website that appeals to their audience’s needs and preferences.
Unique selling point questions can help you understand what sets the client’s business apart from the competition. This information will help you highlight these unique selling points on the website and create a competitive advantage for the client.
Finally, questions about the competition can help you understand what other businesses are offering and how the client’s website can differentiate itself. This information will help you create a website that stands out from the competition and attracts more customers to the client’s business.
Here is a list of questions you can include in this section of your NAQ:
Business Details
Prefill some of these details before your client briefing and ask the client to confirm these:
Company name: The legal name of the client’s business entity.
Contact person name: The name of the individual representing the client, such as the CEO or a manager.
Address: The physical address of the client’s business, including the street address, city, state/province, and zip/postal code.
Phone number: The primary phone number for the client’s business.
Email address: The email address of the client’s business or the contact person.
Website URL: The website address of the client’s business (if they have one).
Social media handles: The client’s social media handles (if applicable), such as Twitter, Facebook, Instagram, etc.
Industry: The industry that the client’s business operates in, such as finance, healthcare, technology, etc.
Legal status: The legal status of the client’s business, such as LLC, corporation, sole proprietorship, etc.
Revenue: The annual revenue of the client’s business.
Number of employees: The number of employees working for the client’s business.
Tax ID: The client’s tax identification number (if applicable).
Payment information: The payment information that the client uses to pay for goods or services, such as a credit card, bank account, or payment service.
Additional notes: Any additional notes or comments about the client that may be helpful for future reference.
Note: Some of this information may need to be asked or obtained at a later stage of the sales process if applicable (e.g. Revenue, Tax ID, Payment information).
About Your Business
What is your business and what does your business do?
What are your unique selling points (USPs)?
Who is your target audience?
What are the demographics of your target audience?
What are the interests and behavior patterns of your target audience?
What markets do you sell your products and services in? (Local, Regional, National, Global)
Is your business seasonal?
Your Business Goals
What are your primary business goals and objectives?
What difficulties are you currently experiencing in achieving them?
How do you envision an agency like ours will help you address these challenges?
Your Competition
Who are your main competitors?
What makes your business unique compared to your competitors?
What are the strengths and weaknesses of your competitors’ websites?
What do you like and dislike about your competitors’ websites?
3) Client’s Website
Your Needs Assessment Questionnaire should take into account the fact that a potential client may or may not already have an existing website. If so, it is essential to conduct a thorough assessment of the client’s existing website. This will help you understand their website, identify any issues that need to be addressed, and ensure that the end product is tailored to their specific needs and goals.
Here is a list of questions to ask a potential client during the client briefing session about their website to help you gain a comprehensive understanding of their needs and requirements in terms of functionality, design, content, and performance:
Hosting & Domains
What are your requirements for website hosting and maintenance?
Do you need help with website hosting or domain registration?
Do you have any registered domains?
Have you purchased webhosting for your site?
For existing websites, include the following questions:
Do you have any additional domains?
Do you have any big changes (like a migration) planned within the next 12 months?
General
What is the purpose of your website?
What are your primary business goals for this website? Is it achieving these goals?
What is the estimated size of your website (number of pages)?
Are there any legal or regulatory requirements that need to be considered for your website?
For existing websites, include the following questions:
What are the current issues or challenges you are experiencing with your website?
Design
Do you have any specific design preferences or requirements for your website?
Do you have any specific branding or visual identity guidelines that need to be followed?
What is your preferred color scheme?
Do you have any existing design elements that you would like us to incorporate?
What is your preferred tone of voice for your website?
Functionality
What features and functionalities do you want your website to have (e.g. eCommerce, contact forms, appointment scheduling, user registration, etc)?
Do you require any special integrations (e.g. social media sharing, Google Analytics, email marketing software, etc)?
What are your expectations for website performance (e.g. load time, speed, mobile responsiveness)?
Do you have any specific security requirements for your website?
Do you have a plan in place for website backups and security?
For existing websites, include the following questions:
Is your website mobile-friendly and responsive?
How does your website perform in terms of loading speed?
Is your website optimized for search engines?
Do you have any analytics or tracking tools installed on your website?
Has your website ever been negatively impacted by any core algorithm updates?
Content
How will you be creating and managing content for your website?
What type of media will you be using (e.g. images, videos, audio)?
Will you be updating the website content yourself or do you need ongoing maintenance and updates?
Do you need any help creating new content for your website?
For existing websites, include the following questions:
What content management system (CMS) are you currently using?
How frequently do you update your website’s content?
Do you have any existing website content that you would like to migrate to the new website?
Do you have any existing content that you would like us to use?
Also…
If content services are part of your offering, see the additional “Content Marketing” section below for more questions you can ask.
4) Client’s Marketing Efforts
By understanding your client’s marketing efforts, you can ensure that the website you create for them will be optimized for success.
For example, you can ask about the client’s SEO efforts, including any past keyword research or optimization. It is also important to understand any PPC campaigns the client has run, as well as their social media presence and email marketing efforts. Additionally, you can inquire about any PR campaigns the client has been a part of, including media outlets they have been featured in and soundbites from their representatives.
Here is a list of questions you could ask a potential client during the client briefing session to identify their marketing efforts related to SEO, PPC, social media, email marketing, PR, etc:
Marketing Goals
What are your primary marketing objectives, and how do you plan to achieve these?
Do you have a marketing plan in place for your website?
Have you done any marketing research to identify your target audience’s needs, preferences, pain points, and online behavior?
Have you done any competitive research to understand the strategies they are using to attract and retain customers?
Do you have a content marketing strategy in place? If so, what types of content have you found to be most effective in engaging your target audience?
What are your expectations for the role of your website in your overall marketing strategy, and how do you see it contributing to your business objectives?
Do you have any particular marketing challenges or pain points that you would like us to address through the website development process?
What increase in organic traffic (numbers or percentage) are you aiming for in the next six to 12 months?
How many conversions (leads and sales) would you like to get in the next six to 12 months?
Can you list any freelancers or agencies you have previously worked with? If so, what processes did you have in place with them that you would like for us to continue with, and what would you like to change?
Marketing Channels
How do you plan to promote your content to attract visitors to your website?
Have you ever invested in search engine optimization (SEO) services for your website? If so, what were the results?
Do you currently use pay-per-click (PPC) advertising to drive traffic to your website? If so, what platforms do you use, and what has been your experience with them?
Have you established a presence on social media? If so, which platforms do you use, and how frequently do you post updates?
Have you used email marketing to promote your business or website? If so, what has been your experience with it?
Have you invested in public relations (PR) services to increase brand awareness or promote your products/services? If so, what has been the outcome? Can you provide us with the media outlets you have been published on and existing soundbites from your representatives?
Are there any specific keywords or phrases that you would like your website to rank for in search engine results pages (SERPs)?
How do you plan to allocate your marketing budget across different channels, and what portion of it are you willing to invest in website development and maintenance?
Do you require any specific SEO (Search Engine Optimization) features or services?
Do you need assistance with setting up and integrating social media accounts?
What’s your top acquisition channel?
Marketing Performance
How do you plan to measure the success of your website?
How do you currently measure the success of your marketing efforts, and what metrics do you track?
Are you currently doing anything to acquire links? Do you have a list of websites you’d like us to start with?
Have you ever purchased any paid links or been part of any link schemes?
Has your website experienced any issues with link penalties?
What are the primary calls to action for your website?
Also…
Access to platforms:
Do you have Google Analytics set up on your website? If so, please share access with [your email]
Do you have Google Search Console set up on your website? If so, please share access with [your email]
Do you have Google Ads set up on your website? If so, please share access with [your email]
Access to documents:
We may need access to some existing documents to help us align our campaign with those already running. Can we get access to existing documents?
Can you provide us with keyword research done by previous agencies/staff?
Can you provide us with reports/work done by the previous agency?
5) Content Marketing
The success of a WordPress website is heavily dependent on the quality and relevance of its content. As a result, it’s important to understand the client’s content needs and preferences during the needs analysis. Understanding the client’s content preferences can help the web developer to create a website that aligns with the client’s brand identity and resonates with the target audience.
In addition to gleaning information about your client’s marketing efforts and goals using channels like paid advertising, social media, etc, understanding the client’s content needs and preferences is crucial for the success of their project.
During the needs analysis, it’s important to ask the client about the types of content they want to create and publish on their website. This could include blog posts, videos, infographics, and more. Additionally, the web developer should inquire about the topics that the client wants to cover, the frequency at which they want to publish content, and the overall tone and voice that they want to convey.
Here are some questions you can ask during the client briefing session to gain a better understanding of the client’s content marketing needs and preferences and create a website that supports those goals:
Content Creation
What are the main topics that your audience is interested in?
What topics do you want to cover in your content?
What type of content do you plan on publishing on your website?
What types of media do you plan on incorporating into your content, such as images, videos, or infographics?
How often do you plan on publishing new content?
Who will be responsible for creating content for your website?
What tone and voice do you want your content to convey?
Have you identified any gaps in your content that need to be addressed?
Do you have any existing content that can be repurposed or updated for your new website?
Are there any particular examples of content that you like or dislike?
Do you have any existing content that you would like to repurpose or optimize for SEO?
Will you need assistance creating content?
Content Management
How do you plan to manage your content?
6) Client’s Budget and Timeline
Before starting any project, it is crucial to set clear expectations for the budget and timeline.
Asking the right questions about the client’s budget and their timeline expectations during the briefing session will help you and your client understand the scope of the project and plan accordingly to ensure the success of the web development project.
Here are some questions you can ask a potential client to gain a better understanding of their budget constraints, project scope, and timeline expectations to create a proposal tailored to their needs and budget:
Timeline
What is the scope of the project?
What is the timeline for completing this project?
Are there any important deadlines that we should be aware of or strict deadlines that must be met?
Are there any specific project milestones that you would like to achieve?
How flexible are you with the project timeline?
Budget
What is the budget you have allocated for this project? (Ideal, minimum, maximum)
Have you worked with a website developer before? If so, what was your budget for that project?
Are you looking for a developer to work on a fixed budget or hourly rate?
What is the scope of the project?
Are there any additional services or features that you would like to include in the project?
Are there any budget constraints that we should be aware of?
Do you have a preferred payment schedule or milestone-based payment plan?
Is there any flexibility in the project scope, budget, or timeline?
7) Additional Notes
Create a space in your questionnaire for additional notes. Use this space to record your own thoughts, observations, contact names, things your client says that you can quote, etc.
What to Do Before and After Your Client Briefing Session
The Needs Analysis Presentation is an integral part of your overall sales process. Getting your presentation scripts and Needs Assessment Questionnaire right are vitally important.
But so is what you do before and after this stage.
Let’s look at what you can do to maximize the results from your client briefing sessions.
Before The Client Briefing Session
Here are the steps you should take before conducting your client briefing session to ensure that you are well-prepared and can conduct a successful needs analysis that will lead to a customized solution for your client’s website and marketing needs:
Research the client’s business: Before meeting with the client, research their business and industry to understand their target audience, competitors, and market trends.
Identify the client’s pain points: Determine the client’s pain points by reviewing their existing website, marketing materials, and customer feedback.
Customize the questionnaire: Depending on the format of your NAQ, you may be able to customize the questionnaire for each client based on their specific business, website, and marketing needs. If not, a simple way to do this is to create your ideal NAQ and then simply cross off any unnecessary questions you can skip during the client briefing session, or add any specific questions to the “Additional Notes” section of the questionnaire.
Set clear objectives for the meeting: Determine the objectives for the meeting with the potential client, such as understanding their goals, identifying their website requirements, and discussing their budget.
Schedule the meeting: Schedule the client briefing meeting at a time that is convenient for both parties, and make sure the meeting is held in a distraction-free environment.
Rehearse the presentation: Practise your presentation, review your scripts, and visualize how your client briefing meeting will run to create a positive and successful client experience.
After The Client Briefing Session
After conducting your needs analysis presentation with a potential client, make sure to complete the following steps to maximize your results:
Analyze the information: Review and compile all the information gathered during the needs analysis session. This includes the client’s business goals, website requirements, marketing efforts, and budget. If your analysis qualifies the potential client as a prospect for your business, continue with the steps below. If not, proceed no further with this process. Instead, reach out to the client and explain why you don’t think you will be the best fit for their needs.
Develop a proposal:Develop a comprehensive proposal that outlines your website development process, timeline, deliverables, and costs. The proposal should address the specific needs and goals of the client and should highlight how your WordPress web development services will help the client achieve their objectives.
Customize the proposal: Once developed, customize it to address any specific concerns or questions the client raised during the needs analysis session. Ensure that the proposal reflects the client’s unique requirements and preferences.
Provide a clear quote: A quote that clearly outlines the costs associated with your services should be provided. It should be transparent and easy to understand, and should reflect the services outlined in the proposal.
Provide a timeline: Give the client a detailed timeline for the WordPress web development project that outlines key milestones and deliverables. The timeline should be realistic and achievable, and should reflect the client’s timeline expectations.
Schedule the next meeting: Book in a meeting at a time that is convenient for both parties in a distraction-free environment where you will provide the client with a presentation of your solutions and recommendations.
Depending on how you structure your sales process, you may also want to:
Schedule a follow-up call or meeting with the client to answer any outstanding questions or clarify any concerns or misunderstandings they may have about the proposal, quote, or timeline.
Provide additional information or clarification as needed to ensure the client is fully informed and comfortable moving forward with the proposal, including project scope, timeline, and cost.
Finalize the proposal, quote, and timeline with the client, confirm the client’s agreement and obtain any necessary signatures or approvals to move forward with the WordPress web development project.
As a WordPress web developer, one of the most important steps you can take to ensure the success of your projects is to conduct a thorough needs analysis with your clients. This will help you understand your client’s business, goals, existing website, marketing efforts, content needs, budget, and timeline.
Asking the right questions during the client briefing process is crucial for delivering the best solution that will not only meet their needs and budget, but hopefully also exceed their expectations.
Using a needs analysis tool like a Needs Assessment Questionnaire can save you valuable time during the client briefing and in the process of qualifying prospects for your business.
Additionally, it can help your business to identify potential roadblocks and challenges upfront, allowing you to develop a strategy that addresses these before they become a problem, keep your project on track, on budget, and on time, create customized WordPress solutions tailored to your clients’ unique needs, goals, and challenges, and establish a strong relationship with your client that can lead to repeat business, referrals, and long-term partnerships.
We hope you have found this information useful. Apply it to your business and watch your sales results improve!
WordPress offers endless possibilities for designing and customizing your website. In this article, we’ll share some practical CSS tips specifically for WordPress users, from styling your header to tweaking your fonts.
While WordPress offers plenty of pre-made themes and templates, sometimes you need to take matters into your own hands and make customizations with CSS.
If you have ever asked any of these questions as you work on your WordPress site:
“How do I remove the ‘read more’ button?”
“How can I change the color of this link?”
“How do I make this link unclickable but keep the text on the page?”
…then read on to learn some valuable CSS tricks for your website.
In this code, the position: relative property is used to position the element relative to its nearest positioned ancestor. The top: 50% and left: 50% properties move the element to the center of its container. Finally, the transform: translate(-50%, -50%) property centers the element both horizontally and vertically by moving it back 50% of its own width and height.
Change the link color
.item-class{
color : blue;
}
You can use colors like white, black, blue, red… but you might want to use specific colors.
In this case, you can do it like this:
.item-class{
color : #F7F7F7;
}
If you’re looking to create a color palette for your website design, try using the Paletton tool. It’s very helpful!
Note: If you want to combine elements, it is pretty easy.
For example, let’s say you want to disable the click and put the link back in black.
You can use this code:
.item-class{
pointer-events : none;
color : black;
}
Remove a link
.item-class{
display : none;
}
Note: Sometimes you may need to put an a after your class to make it work, like this:
.item-class a{
display : none;
}
Try adding the a or experimenting without it to see if your code is working or not. Just add your CSS, save, and check your frontend.
Disable a link (link stays visible but users can’t click on it)
Note: It is always better to modify HTML in order to do this, but if CSS might be easier or the only solution possible, use this code:
.item-class{
pointer-events: none;
}
Change the color of links on hover
You can make links change color when a user hovers over them by using the following CSS code:
a:hover {
color: red;
}
In this code, the a:hover selector targets all links on the page that the user is currently hovering over. The color: red property changes the color of the text to red.
Style links
To style links on your website, use the following CSS code:
In this code, the a selector is used to style all links on the page. The color property sets the color of the links, and the text-decoration property removes the default underline. The border-bottom property adds a subtle underline effect. The transition property creates a smooth transition effect when the user hovers over the link. The a:hover selector is used to style the link when the user hovers over it.
In this code, the various properties are used to style a button, including the background-color and color properties for the button’s appearance, the padding property for the button’s size, and the cursor property to change the mouse pointer when hovering over the button.
Change the font of a section
Change the font of a section of your website using the following CSS code:
In this code, the font-family property sets the font to Arial or a similar sans-serif font, the font-size property sets the font size to 16 pixels, and the line-height property sets the spacing between lines of text to 1.5 times the font size.
Create a sticky header
If you want to create a header that stays fixed to the top of the page as the user scrolls, you can use the following CSS code:
In this code, the position: fixed property fixes the header to the top of the viewport, and the top: 0 property positions it at the very top of the page. The width: 100% property ensures the header spans the entire width of the viewport. The background-color, color are used to style the header, and the z-index: 9999 property ensures that the header appears on top of all other elements on the page.
Create a sticky header with a shadow effect
To create a sticky header with a shadow effect that stays fixed to the top of the page as the user scrolls, use this CSS code:
In this code, the position: fixed property is used to fix the header to the top of the page. The top: 0 and left: 0 properties position the header at the top-left corner of the page. The width: 100% property sets the width of the header to be the full width of the page. The background-color property sets the background color of the header, and the z-index property ensures that the header appears on top of other elements on the page. Finally, the box-shadow property adds a subtle shadow effect to the header. The .content selector is used to add padding to the top of the page so that the content doesn’t get covered by the fixed header.
Add a background color to a section
Do you want to add a background color to a section of your website? Then use the following CSS code:
In this code, the background-color: #f2f2f2 property sets the background color to a light gray, and the padding: 20px property adds 20 pixels of space around the content within the section.
Change the background color of the body
Add this code to change the background color of the body of your website:
body {
background-color: #f5f5f5;
}
In this code, the background-color property sets the background color to a light gray.
Change the color of a specific word or phrase
To change the color of a specific word or phrase within a block of text, you can use the following CSS code:
p span {
color: red;
}
In this code, the p span selector targets any span element that appears within a p element. You can then wrap the word or phrase you want to target with a span element in your HTML, like this:
<p>Lorem ipsum dolor sit amet, <span>consectetur adipiscing elit</span>. Sed do eiusmod tempor incididunt ut labore et dolore magna aliqua.</p>
This would make the phrase “consectetur adipiscing elit” appear in red.
Create a border around an image
Here’s how to add a border around an image:
img {
border: 2px solid #ccc;
}
In this code, the border property sets the width, style, and color of the border. The 2px value sets the width of the border to 2 pixels, solid sets the style to a solid line, and #ccc sets the color to a light gray.
Create a hover effect on an image
Use this code snippet to create a hover effect on an image:
img:hover {
opacity: 0.8;
}
In this code, the img:hover selector targets the image when the user hovers over it. The opacity property sets the transparency of the image. In this case, the value is set to 0.8, making the image slightly transparent when the user hovers over it.
Style a form
Style a form on your website with the following CSS code:
form {
background-color: #f2f2f2;
padding: 20px;
border-radius: 5px;
}

form label {
display: block;
margin-bottom: 10px;
}

form input[type="text"], form input[type="email"], form textarea {
width: 100%;
padding: 10px;
margin-bottom: 20px;
border: none;
border-radius: 3px;
box-shadow: 0 0 5px #ccc;
}

form input[type="submit"] {
background-color: #4CAF50;
border: none;
color: #fff;
padding: 10px 20px;
border-radius: 3px;
cursor: pointer;
}
In this code, the various properties are used to style a form, including the background-color, padding, and border-radius properties for the overall appearance of the form. The form label selector is used to style the labels associated with each form field. The form input[type="text"], form input[type="email"], form textarea selector is used to style the various input fields in the form. The form input[type="submit"] selector is used to style the submit button.
Create a responsive layout
If you want to create a responsive layout that adjusts to different screen sizes, use the following CSS code:
In this code, the @media rule is used to specify different styles for different screen sizes. The first @media rule targets screens with a maximum width of 768px, and the second @media rule targets screens with a minimum width of 769px. The various selectors within each @media rule are used to adjust the layout and appearance of the page based on the screen size.
One more CSS tip…
You might find your code not working even though you did everything correctly. This might be because there is already a CSS code saying something different than your code.
To override this, just add !important like this:
.item-class{
pointer-events: none !important;
}
These are just a few examples of practical ways you can use CSS to enhance your WordPress website.
With CSS, the possibilities for customizing your website’s appearance are virtually endless. By learning and applying these tips, you can create a website that is not only visually appealing but also optimized for a better user experience.
Take Your CSS Skills to The Next Level
Whether you’re a beginner or a seasoned pro web developer or web designer, if you want to dive deeper into using CSS with WordPress, these additional CSS tutorials will help you expand your knowledge and skills:
10 Simple Tips For Learning CSS For WordPress – Practical tips for beginners who want to learn CSS specifically for use with WordPress. It covers everything from understanding CSS syntax to using CSS frameworks.
Learning and Referencing CSS for WordPress – A comprehensive guide to learning and referencing CSS specifically for use with WordPress. It covers topics like using the WordPress Customizer, understanding CSS selectors, and working with child themes.
7 Best Sites to Find CSS Snippets and Inspiration – Looking for some inspiration for your CSS code? This article lists seven websites that offer CSS snippets and examples that you can use in your own WordPress website.
How To Style Images on Your WordPress Website with CSS – Images are an important part of any website, and this article offers tips on how to style them using CSS. You’ll learn how to add borders, change image size and alignment, and more.
How to Add Custom CSS to Your WordPress Site – This article walks you through the process of adding custom CSS to your WordPress website, using both the built-in Customizer and plugins.
Free CSS Plugins For Live Editing Your WordPress Site – This article lists some free CSS plugins that allow you to live edit your WordPress website, making it easier to see the effects of your CSS changes in real-time.
14 Cool CSS Animation Tools For WordPress – If you want to add some animations to your WordPress website using CSS, this article lists some cool tools you can use to do it.
Click on the links to learn more and start improving your WordPress website today.
Contributors
Thank you to WPMU DEV member Antoine from Incensy for contributing the idea for this post and several of the CSS examples used above. Check out Incensy’s Agency partner profile for more details.
***
Note: We do not accept articles from external sources. WPMU DEV members, however, may contribute ideas and suggestions for tutorials and articles on our blog via the Blog XChange.
If you’re running a larger WordPress site, you may be facing performance challenges that can impact user experience and search engine rankings. Fortunately, there are several steps you can take to improve your site’s speed and performance. This article covers some of the most common performance challenges for larger WordPress sites and provides tips and solutions for addressing these.
Growing pains… some should be so lucky to have them!
Let’s talk about how to manage a WordPress site that is growing too quickly too soon and causing you or your clients all sorts of pains and problems.
If the issue is temporary, such as dealing with an unexpected traffic spike from a post gone viral (another thing we should be so lucky to experience!), then knowing how to scale your WordPress site when traffic soars can fix this.
However, if problems persist, it may take more than a couple of aspirins and calling the doctor in the morning to make the headaches go away.
When it comes to building large and complex sites, WordPress’s capacity to handle it is not an issue. As WordPress enterprise developer and global SME business adviser Mario Peshev states in his excellent article on building large and complex sites using WordPress…
“WordPress is a proven CMS that handles various applications handling millions of users and tens or even 100M views a month.”
As Mario also states…
“Scaling from 10M to 50M is feasible, 50M to 100M is challenging, 100M–200M is quite complex and 200M+ may require some serious engineering effort.”
So, the capacity of the WordPress CMS platform to handle large and complex sites is not a problem.
The issue is having the skills to handle WordPress enterprise development challenges.
As most developers know, WordPress is not only a widely popular content management system known for its flexibility, ease of use, and affordability, but it is also an excellent platform for small businesses and startups that want to establish a web presence quickly and easily.
However, when it comes to enterprise-grade WordPress development, the amount of information available is as scarce as a developer who hasn’t resorted to cursing loudly at their code editor at least once.
So, before we get into diagnosing the challenges and issues of dealing with large WordPress sites, let’s explore some of the challenges of finding relevant information on WordPress enterprise development.
Here is a summary of the points Mario Peshev makes in his article…
Scarcity of Information on Enterprise-Grade WordPress Development
One of the main reasons why information on enterprise-grade WordPress development is scarce is that only a handful of agencies specialize in building WordPress platforms, applications, plugins, or performing migrations and integrations for the enterprise.
Most vendors profile in small business websites, and only a small chunk of the service providers work with enterprises.
Furthermore, those consultants and agencies often don’t have the time and resources to write tutorials and share their know-how with the industry, or they just don’t care, especially more hardcore engineers who don’t want to bother.
Another reason why information on WordPress enterprise development is limited is that WordPress is often not the core application that enterprises use in the first place. It’s another obstacle for many, like working on the front-end interface as 1% of the main platform running behind the scenes.
However, WordPress developers who want to bid on enterprise projects can focus on several different areas to enhance their expertise.
Focus on Different Areas for Enhancing Expertise
The first area that WordPress developers should focus on is studying the WordPress Core, APIs, and the surrounding ecosystem in-depth. This will give developers a deeper understanding of the platform and how it works.
They should also make sure that they’re comfortable with WordPress coding standards and best practices. This will ensure that the code they write is maintainable and easy to read.
The second area that WordPress developers should focus on is practicing in the main technical areas that enterprises care about, such as performance, security, scalability, and backward compatibility.
Enterprises have high expectations, and it’s essential to demonstrate that you have the expertise to meet their requirements.
These WordPress development resources will help you gain these valuable skills and expertise:
Hosting vendors are strategic players in the field and occasionally work with high-scale applications. Developers can browse their resources and follow their blogs, knowledge base articles, and the like. WordPress is a platform built on top of PHP and SQL, front-end served through HTML, CSS, JavaScript. It runs on a web server like Apache or Nginx using mod_php or php-fpm, connected to a MySQL database on a Linux server.
Most of the heavy lifting for enterprises happens on top of those layers. Therefore, it makes sense to dive deeper into their own communities and resources stressing on those topics.
Follow WordPress Core Contributors and Employees
It always helps to follow WordPress Core contributors, employees at enterprise-grade companies, and the blogs of the leading agencies working with enterprises. You may find some relevant case studies, interviews with clients, or other top engineers that could help you improve even further.
Now that we’ve looked at the first challenges, which is acquiring the expertise to handle large and complex WordPress sites and meeting the expectations of enterprises, let’s turn to addressing common performance issues you may experience working with large WordPress sites.
Common Performance Challenges for Large WordPress Sites
WordPress is used by some of the biggest and most well-known companies, celebrities, and brands in the world, like Intel, Pepsi Cola, PlayStation, American Express, TechCrunch, Fisher-Price, Beyonce, Justin Timberlake, Usain Bolt, and many more.
Someone has to look after these large sites… why not you?
While browsing through WPMU DEV’s member forums (which, by the way, is a treasure trove of information for web developers), I came across this post from WPMU DEV member Charly Leetham, which I am reproducing in full below:
***
I was contacted by a long term client asking for assistance with their client.
The end customer is setting up a rather large website in WordPress and they were having no end of difficulties in keeping the site running. It was so bad, that they had to reboot their Amazon EC2 instance regularly (several times a day regularly).
With trepidation I agreed to take a look and see if I could help. What I found has left me … saddened. For the client, mostly.
The site:
Database: 4Gigabytes (after optimization)
Posts / Pages and other content: Over 900K entries.
This is not a small site.
It was built in Elementor which initially left me concerned, as I know that Elementor is resource hungry.
The EC2 instance was provisioned with 140 Gig storage and 32 Gig memory. More than enough, right? One would think so.
The business had been moved to EC2 by a consultant who had promised them it would improve their performance. Then they told them that the reason the instance kept hanging was because of the high number of transients that were being created.
They created a cron job that deleted the transients every hour and with very little improvement.
I’ve found a number of things during my investigations but the three most concerning things are:
1. Although the server was provisioned with 32G of memory. PHP had been limited 2G and WordPress had been limited to 40M.
It’s no wonder they were having trouble.
Increasing these limits has stopped the hanging but we’re still experiencing memory overflows.
2. The database was provisioned on the same server.
Splitting the database onto a RDS (remote database server) should provide more performance increases.
3. No optimization or performance improvement work had been done.
By implementing Hummingbird, I’ve been able to improve the load time of the site and that’s without doing anything really hard core. That’s still to come.
The main thing I want to highlight for others here, is that it’s the incremental knowledge you bring to the table when working with clients.
Yes, people can build their own WordPress sites but few people can really make them hum. That takes experience and a lot of work.
***
Charly’s forum post is a great example of some of the typical performance challenges you can expect when working with larger WordPress sites and provides a number of useful insights into handling these.
To address these challenges, let’s first summarize the main technical issues Charly described when looking at this client’s site:
The end customer is setting up a rather large website in WordPress with over 900k entries and a 4GB database after optimization, which is not a small site.
The website was built in Elementor, which is resource-hungry and requires a lot of server resources.
The EC2 instance was provisioned with 140GB storage and 32GB memory, but PHP had been limited to 2GB and WordPress had been limited to 40MB, causing performance issues and memory overflows.
The database was provisioned on the same server, which caused performance issues. Splitting it onto a remote database server should provide performance improvements.
No optimization or performance improvement work had been done. By implementing Hummingbird, Charly was able to improve the site’s load time.
The incremental knowledge and experience brought to the table by an experienced web developer is crucial for optimizing and improving the performance of WordPress sites, which can be complex and require a lot of work to make them run smoothly.
We’ve already addressed point #6, so let’s go through the other issues on the list above.
Large WordPress Site Performance Issue #1 – WordPress Database
As your WordPress site grows, so does the size of its database. Your WordPress database can become quite large and may start causing some issues.
Managing a large WordPress database can be a daunting task, so let’s take a look at some of the challenges, best practices, strategies, and solutions for managing your WordPress database on larger sites.
The challenges of having a large WordPress database include:
Slow page load times: A large database can slow down your website, making it difficult for visitors to load pages quickly.
Backup and restore issues: Backing up and restoring a large database can be a challenge, and it may take a long time to complete the process.
Database corruption: A large database can be more prone to corruption, which can cause data loss and other issues.
Difficulty in database maintenance: Maintaining a large database may require more resources and expertise to keep it running smoothly.
Here are some strategies and best practices managing WordPress databases on larger sites:
Initial Configuration
Before you even start thinking about managing your database, it’s important to make sure that it’s set up correctly. When you install WordPress, it creates a new database for you. However, if you’re running a large site, you may want to consider using a separate database server. This will help to improve performance and reduce the load on your web server.
When configuring your database, it’s important to choose the right settings. In particular, you’ll want to pay attention to the database character set and collation. These settings can affect how your content is displayed on your site, so it’s important to get them right from the start.
Where to Keep the Databases
When managing a large WordPress site, you’ll want to think carefully about where to keep your databases.
There are a few different options to consider:
Local Database: You can keep your database on the same server as your website. This is the simplest and most common option, but it can lead to performance issues as your site grows, as Charly referred to in the client example above.
Remote Database: You can keep your database on a separate server, either within your own network or in the cloud. This can improve performance, but it can also increase costs.
Managed Database: You can use a managed database service, such as Amazon RDS or Google Cloud SQL. This can be a good option if you don’t have the expertise to manage your own database.
Database Access Time with Large Numbers of Records
As your WordPress site grows, the size of your database can have an impact on how quickly your site loads.
When you have a large number of records in your database, queries can take longer to run, which can slow down your site.
Caching can help speed up your website by storing frequently accessed data in memory, reducing the need to access the site’s database and PHP. This, of course, depends on the kind of caching being used, e.g. database caching (which includes object caching) or page caching (where the cache of the web pages is stored and presented when a specific page is requested later without needing to be processed by PHP and MySQL).
To improve performance, you can use server-side caching, caching plugins that manage server-side caching solutions, or standalone caching plugins. Our performance-optimizing plugin Hummingbird, for example, has its own caching but also integrates with WPMU DEV’s server-side caching.
Caching can have a significant impact on site performance, particularly for larger sites. However, setting up and managing caching can be complex and time-consuming.
Also, it’s important to regularly monitor your site’s performance to ensure the caching is optimized for your specific needs.
Another option is to use a technique called “sharding,” which involves splitting your database into smaller pieces. This can help to improve performance by spreading the load across multiple servers.
Techniques for Splitting the Data Up
If you’re using a technique like sharding, you’ll need to decide how to split your data up. One option is to split your data by category or tag. For example, you could have one database for posts related to technology, and another for posts related to entertainment.
Another option is to split your data by date. This can be particularly useful if you have a lot of older content that doesn’t change very often. You could have one database for posts from the last year, and another for older posts.
Consider also using a plugin like HyperDB. HyperDB is maintained by Automattic, the parent company of WordPress.
As described on the plugin page…
HyperDB allows tables to be placed in arbitrary databases. It can use callbacks you write to compute the appropriate database for a given query. Thus you can partition your site’s data according to your own scheme and configure HyperDB accordingly.
Basic Indexing
Indexing your database can help to improve performance by making it faster to search for data. When you create an index, the database creates a data structure that makes it easier to search for specific values.
To create an index, you’ll need to use the MySQL command line or a tool like phpMyAdmin.
When you’re creating an index, it’s important to choose the right columns to index. Typically, you’ll want to index columns that are frequently used in queries.
You can also use a plugin like Index WP MySQL for Speed. This plugin adds database keys (also called indexes) to your MySQL tables to make it easier for WordPress to find the information it needs. The plugin page also includes excellent information on database indexing in relational database management systems.
Settings and Logs to Check
To keep your database running smoothly, there are a few settings and logs that you’ll want to keep an eye on. These include:
MySQL slow query log: This log records queries that take longer than a certain amount of time to run. By analyzing this log, you can identify queries that are causing performance issues.
MySQL error log: This log records any errors that occur in the MySQL server. By monitoring this log, you can identify and troubleshoot issues that may be affecting your database.
WordPress debug log: This log records any errors or warnings that occur within WordPress. By monitoring this log, you can identify issues with your WordPress installation or plugins.
Database backups: Regularly backing up your database is important to ensure that you don’t lose any data in case of a server crash or other disaster and can restore your website quickly in case of a problem. You can use a plugin like Snapshot to automate this process, or if you’re hosting with WPMU DEV, you can configure automatic enterprise database backups to perform daily and even hourly. Also, consider storing all backups separately from the server hosting the site, as the backups may be lost if the server crashes.
Other Ongoing Maintenance
In addition to the above, there are a few other ongoing maintenance tasks that you’ll want to perform to keep your database running smoothly.
Optimizing your database tables: Reducing the size of your database and optimizing your database tables helps to improve site performance. You can optimize your database by removing unnecessary data, such as post revisions, trashed items, spam comments, and unused plugins and themes. Check our complete WordPress database optimization guide for detailed instructions and plugins that help you do this.
Monitoring your site for security issues: Large sites are often a target for hackers. You can use a plugin like Defender to monitor your site for security issues and prevent attacks.
In terms of cleaning up your database, Charly mentions a high number of transients as being a possible issue affecting the site’s performance. Although addressing this issue seemed to offer very little improvement in Charly’s client’s case, it’s worth mentioning it here as something to check if you are experiencing issues with your site.
Transients are a type of cache that stores data in the database for a specific period of time. They are used to speed up the loading time of a website by storing the results of a complex or time-consuming query, such as an API request, so that the query doesn’t have to be run every time the page is loaded.
Transients have a set expiration time, after which they are automatically deleted from the database. However, if the website is not properly optimized, transients can accumulate in the database and cause performance issues, such as slow page loading times or database crashes.
To optimize WordPress and avoid issues with transients, there are several steps that can be taken. These include:
Use a caching plugin: A caching plugin like Hummingbird can help reduce the number of database queries and prevent unnecessary creation of transients.
Delete expired transients: Expired transients can accumulate in the database, so it’s important to regularly delete them to keep the database optimized. This can be done manually, or by using a plugin like Hummingbird.
Set a maximum lifetime for transients: By setting a maximum lifetime for transients, you can prevent them from being stored in the database for too long, which can lead to performance issues. This can be done using the set_transient() function in WordPress.
Increase the memory limit: Increasing the memory limit for PHP and WordPress can help prevent memory overflows and performance issues caused by transients.
No matter what size WordPress site you are working on, using WPMU DEV’s Hummingbird caching and site optimization plugin can help to automatically take care of expired transients and eliminate this issue, leading to faster page loading times and a smoother user experience.
Hummingbird can be configured to automatically delete expired transients from your WordPress database.
In terms of increasing the memory limit for PHP, if you are a WPMU DEV member, it’s really easy to check a whole bunch of information about your WordPress site, include current PHP memory limits and max filesize upload settings.
Just log into your WordPress dashboard and navigate to the WPMU DEV dashboard plugin menu. Select Support > System Information > PHP tab.
WPMU DEV’s Dashboard plugin lets you easily check information about your WordPress site.
If you are not a WPMU DEV member, you can still check this information manually.
To find out how much php memory is allocated, create a php and add the following:
<?php
phpinfo();
?>
Call it something like php-test.php and upload it to your server.
Access the file from a browser and search for memory_limit. This will give you two settings – what the local site settings are and what the server default is. It is possible to have different php memory_limits by site.
For WordPress memory, for instance, you might see the following:
define('WP_MEMORY_LIMIT', '64M');
Note that if this entry is missing in the wp-config.php file, then your site is probably working between 40M and 64M.
As you can see, there are quite a number of things you can do to improve the performance of your WordPress database.
Let’s move on, to…
Large WordPress Site Performance Issue #2 – WordPress Core, Themes, And Plugins
Charly mentions that another possible reason for the performance issues her client’s site was experiencing was using a resource-hungry theme.
Rather than focusing on a particular theme, let’s look at themes and plugins in general (btw… if you use Elementor, check out our article on how to optimize Elementor themes. We’ve also written articles on ways to optimize themes like Divi, WPBakery, Astra, and other page builders.)
Here are some of the things you can do:
Theme and Plugin Bloat – Themes and plugins can significantly impact the performance of a WordPress site, particularly if they are not optimized or updated regularly. Some themes and plugins can also be poorly coded, leading to slow loading times and site bloat.
Solution: Be sure to choose a lightweight and optimized theme that is regularly updated by the developer. Avoid using too many plugins and remove any unnecessary ones to reduce site bloat. Always keep your themes and plugins up-to-date to ensure optimal performance.
Choose lightweight and optimized themes and plugins that are regularly updated by their developer.
Check your server logs to identify heavy plugins and themes that could be slowing down your site.
Always keep your themes and plugins up-to-date to ensure optimal performance.
Deactivate and remove unnecessary and non-essential plugins and themes.
As with all WordPress sites, regardless of size, it’s also really important to optimize your client sites.
There are a number of tools you can use to scan your site and measure site performance, including Google PageSpeed Insights and GTmetrix. These tools provide important insights into ways to optimize your sites.
You can also use a developer tool plugin like Query Monitor to help you identify issues, aid in the debugging of database queries, PHP errors, hooks and actions, block editor blocks, enqueued scripts and stylesheets, and HTTP API calls. The plugin also provides advanced features such as debugging of Ajax calls, REST API calls, and user capability checks.
Use Query Monitor to quickly identify poorly performing plugins, themes, or functions in your WordPress site.
Large WordPress Site Performance Issue #3 – Site Content
Large WordPress sites typically have loads of content. In Charly’s case, for example, the client’s website had over 900k entries.
If you’ve gone and optimized the database and you’re still experiencing issues, here are some of the things you can look at:
Perform a content audit: A content audit is essentially performing an inventory of your existing content and assessing and identifying content that’s outdated, obsolete, duplicated, etc, before deciding what to do with it (e.g. update, SEO optimize, trash). It’s a long-term but effective and important strategy for keeping your site’s content manageable and maintained.
Use lazy loading: Lazy loading can help to ensure that media files are only loaded when they are needed, which can significantly improve page load times.
Use a content delivery network (CDN): Consider using a content delivery network (CDN) to distribute cached media files and reduce the load on your server. A CDN can help speed up your website by caching your website’s content on servers located around the world, reducing the load on your server. Popular CDNs include Cloudflare and MaxCDN. Note that all WPMU DEV membership and hosting plans include a CDN. Our Hummingbird and Smush plugins also include a CDN (Hummingbird also offers Cloudflare integration).
Use content optimization plugins: Optimize images, videos, and other media files by compressing them and reducing their file size. If the site contains loads of images, consider using an image optimization plugin like Smush, which significantly reduces image file sizes without compromising on image quality to improve content delivery performance. Smush also includes WPMU DEV’s CDN.
Use a managed WordPress hosting service: A managed WordPress hosting service can provide you with optimized servers and database management tools to help keep your website running smoothly. As discussed in the next section below, WPMU DEV not only offers a best-of-class managed WordPress hosting service, but it is also specifically configured to deliver enterprise-level hosting for WordPress sites of all kinds and sizes.
Large WordPress Site Performance Issue #4 – Hosting
If you are still experiencing problems with the site after fixing issues with the WordPress database and optimizing the site’s core, plugins, themes, and content, the issue may be related to web hosting.
Consider using a managed WordPress hosting service with a company that specializes in WordPress.
Hosting with a reputable host not only means placing your site in the care of an experienced team who will handle areas like server optimization and database management for you, but also migrate your existing website to their servers.
This is very important, as a large WordPress site no doubt has lots of moving parts and active traffic and transactional events taking place, and you don’t want to lose any valuable data or break anything during the migration process.
Additional hosting considerations for a large WordPress site include the ability to handle demands with ample resources, uptime, speed, and customer support.
WPMU DEV offers enterprise-level hosting, 24/7 expert hosting and WordPress support, and migrations by a team of experts who will handle everything for you, including troubleshooting any potential issues with your site.
Additionally, WPMU DEV has been independently rated and reviewed by many users as one of the leading managed WordPress hosting companies, with a near-perfect rating score. G2.com, for example, rates WPMU DEV 4.8 out of 5 stars overall, and 9.8 out of 10 for quality of support.
More importantly and on a practical level, our expert team proactively manages larger sites by regularly checking areas like “PHP error logs” for any errors in the plugins, themes or in the WordPress core and “PHP slow logs” for slow loading scripts (e.g. plugins where scripts exceed 30 seconds to execute), access logs (to see if there’s a DDoS attack or high visitors in general), and load on the server resources, including CPU, RAM, etc.
The team also checks if WAF is enabled, caching is ON, and any non-used profiling software is turned off when not needed, and will perform conflict tests for plugins and themes and run query monitoring scans at the mysql level when required.
We also offer integration with New Relic and Blackfire to profile the site and its pages for all sites, large and small.
Managing Larger WordPress Sites Is A Big Job
A large WordPress site differs from other WordPress sites mostly in the scale and complexity of its management.
Dealing with performance issues in large, complex WordPress sites requires having the skills and the expertise to handle challenges and meet the high expectations of enterprise clients.
Finding information on WordPress enterprise development can be challenging, but focusing on different areas like studying the WordPress Core, APIs, and the surrounding ecosystem, practicing in the main technical areas, and following leading agencies, will help you become more knowledgeable and confident in your abilities as a developer.
Also, managing a large WordPress database can be challenging but there are solutions available to help you manage it. By optimizing your database, using caching and CDN services, using a managed WordPress hosting service, and regularly backing up your database, you can ensure that your website runs smoothly and avoid potential issues.
By addressing common performance challenges and regularly monitoring your site’s performance to identify and address any issues as they arise, you can significantly improve the performance of your larger WordPress site.
Finally, hosting your site on enterprise-level servers with an experienced and reliable managed WordPress hosting partner like WPMU DEV will not only improve your large site’s performance but also help to eliminate problems and issues, as your site will be expertly managed and monitored 24/7.
Special thanks to WPMU DEV member Charly Leethan for her contribution to this post. AskCharlyLeethan provides ongoing support and advice to help small businesses define and refine their processes and plan and build their web presence using current and emerging technologies.
Enjoy the fastest ever image processing times with the latest version of Smush. Spend less time waiting for your images to be optimized with up to 8x more processing speed compared to the competition.
Just when you thought the most popular WordPress image optimizer (currently boasting a 5-star rating and over a million+ active installs) couldn’t get any better… Smush takes it to the next level.
In this article, find out just how much time you can save optimizing images with superior processing speed and see how Smush stacks up against its toughest competitors.
You’ll realize how much time you can save and why this award-winning plugin is breaking speed records for image optimization.
Let’s get to it!
What’s In The Latest Version Of Smush
Our hard-working developers are constantly improving Smush. Here’s what’s included in our Smush updates.
Parallel Processing Speed
As mentioned in the introduction, the processing speed is now better than ever.
Multiple images are processed in parallel, which makes lightning-fast processing speed a reality for your image files.
Before, images were sent to Smush’s API and were processed one at a time. Now, multiple thumbnails (and originals — if enabled) are processed in parallel for multifold improvement in processing speed.
This saves you tons of time. There are no more waiting long periods for images to be processed.
Recovers Gracefully from API Side Issues
Since Smush makes calls to an external service through HTTP requests, there are always possibilities of things failing randomly (e.g. temporary network issue).
We now have a Retry Mechanism that helps recover from any issues without having to show any errors. That means less time you’ll be dealing with failed optimized images.
Before, if a temporary network issue caused the Smush request for one of the image sizes to fail, it also treated all the other sizes as failures.
Now, in Bulk Smush, it’s no longer a problem. With the retry mechanism in place, it prevents all images from failing if there are issues with only one.
With that being said, let’s take a look at…
Smush vs Other Image Optimization Plugins
We wanted to see how Smush’s speed stacked against a couple of the other most popular optimization plugins. So, we decided to give it a go with speed tests.
As you’ll see — testing is easy to implement. We simply set up a few websites, added some images, installed a plugin to each site, and optimized images.
This can all be done for free, and it’s highly recommended that YOU try it out for yourself. We’d love to hear what results you were able to achieve.
Here’s a breakdown of what we did…
Setting Up Testing
To get started, we set up a WordPress site and created a template so that the site was duplicated. We did this instantly with the help of InstaWP.
InstaWP is a quick and easy way to set up a new WordPress site for testing.
InstaWP allows you to set up WordPress sites and templates – at no cost. It streamlines the testing process creating a new site with just a few clicks.
Once the admin of the new WordPress site was created, we added images to the site for free with the Instant Image plugin.
The Instant Image plugin lives up to its name by delivering images – instantly!
With the Instant Image plugin, you can quickly add images to your site with one click. We went through and added 60 images for testing.
The plugin adds them immediately to your media library.
Since we have the site set up, we want to head back to InstaWP and SaveTemplate to duplicate the site we just created.
We’ll create four more websites based on our original site with 60 images. Why? Because we’ll be testing four other plugins, along with Smush.
We’re using the FREE version of each plugin. There are no upgrades or anything else involved.
Finally, we’ll upload one plugin to each site (e.g. Smush to one, Imagify to another, etc.).
And that’s it! We’re ready for testing.
Oh, well…one more thing. Get a stopwatch ready. We’re going to time each one and see how they match up.
It’s a plugin image compression speed test. Ready…set…GO!
Imagify Speed Test
Imagify is ranked highly as a WordPress optimization plugin.
We’ll kick things off with Imagify. Imagify is a popular image optimization plugin with a 4.5-star rating and over 600K active installs.
We installed Imagify, started our timer, and implemented bulk optimization.
Imagify shows you the percentage of its progress.
As the percentage of optimized images kept increasing, all was going well. But then…uh-oh…
Uh-oh… all of my image optimization credits were used up and I’ve barely begun!
The optimization ground to a halt midway (not even midway) through. The free version didn’t have enough credits to optimize my 60 images. It only was able to get to 45% of them.
Imagify gave me a detailed report of what was optimized.
The result was it took 11:08 to optimize 45% of the images.
ShortPixel Speed Test
ShortPixel is smiling anxiously awaiting the speed test!
With a 4.5-start rating and over 300K active installs, ShortPixel is up there in the ranks as a well-known image optimization plugin option.
An indicator to start the optimization process is clearly labeled.
ShortPixel has a 4-step process. It begins with the images you want to optimize, a summary, the progress, and results.
This test has our 60 images ready to be optimized.
You can see there are 60 images and 252 thumbnails in the optimization process.
Once the optimization started, it abruptly ended.
Like Imagify, the lack of credits had us hanging, and the optimization process didn’t complete all the work. In fact, it only processed 18 images.
As you can see, it processed about 30% of our media library.
The race to the finish line wasn’t completed with ShortPixel’s free version. The result was it took 2:28 to optimize 18 images.
Optimole Speed Test
Optimole is an extremely popular image optimizer.
Optimole is another popular image optimizer with 90K active installations and a 5-star rating. With a cloud-based system it banks itself on the “set it and forget it” way of optimizing images in real-time.
Once activated with a license key (which is free), it immediately begins its image optimization process.
However, after waiting an hour, it states it’s still optimizing images…
They mention that optimization is still happening behind the scenes.
Optimole compresses images on the fly so that when an image is requested, it will apply the specific transformation required by the device and send it to your visitors — ensuring each image is perfectly sized for each device.
However, there’s not much more specific information beyond that on its dashboard. After an hour, a couple of images are compressed, .07MB saved file size for the latest ten images, and 70% average compression.
There’s just a message of reassurance that visitors will view the best images from their devices automatically. But, the image optimization process is not completed.
A note that all is well while image compression is being completed.
In other words, it’s not that it’s not working — but a bit in the dark about how well it’s working immediately.
Since it was over an hour and still no solid results of optimization, the final clocks in at hours for 60 images to be completed compressed, though it may offer immediate results — depending on specific images.
reSmush.it Speed Test
A plugin that has “Smush” in its name grabbed our attention.
With bulk image optimization, numerous setting options, and over 200k active installs, reSmush.it is another popular choice when it comes to your WordPress images.
It starts by mentioning how many non-optimized pictures you have, so it’s pointed out the 60 that we’re using to test with.
It states how many it will optimize to a good quality rate.
Once clicking “Optimize All Pictures,” — the race is off! It gives a status of how optimization is going.
At this point, it’s at 7%.
When completed, it gives you the status of how it went by showing you the space saved, total reduction, attachments optimized, images optimized, and total images optimized.
The results are in!
The time it took to compress everything was 16:02. Quite a bit of waiting, but it did get the job done.
Smush Speed Test
We’re #1 for a reason. Part of the reason is, as you’ll see, a need for speed.
We decided to save the best for last. After all, Smush has a lot of advantages — beyond just the speed factor.
For example, there are no credits to buy once you hit an optimization limit. Nope. The free version of Smush will pause at 50 images; however, just click resume, and it starts right back up. That’s not the case with most other image optimization plugins.
So, let’s start at the beginning. We have our 60 images – the same as the other example. And they require compression.
Smush makes it clear how many images you need to compress.
Clicking Bulk Smush gets us moving…
Smush’s progress moves very quick.
When Smush hits 50 images, as I mentioned, it pauses. With a click of a button, it starts immediately back up again, so there was no point in stopping the timer.
When it’s done, it’ll show you the results. This includes a number of images optimized in the media library and your savings.
As you can see, Smush took care of 100% of the images in the media library.
The result was it took 1:38 to optimize 60 images.
Final Results
As you can see, the outcomes were across the board. Some didn’t even make it through the finish line, while a few came out on top. Here are the final results based on time:
1st Place: Smush 1:38
2nd Place: ShortPixel 2:28 (didn’t finish)
3rd Place: Imagify 11:08 (didn’t finish)
4th Place: reSmush.it 16:02
5th Place: Optimole Hours
Of course, other variables can determine the speed of image optimization. That includes good hosting, a strong internet connection, image sizes, and other possible factors.
This speed test was simply created to demonstrate where Smush is at today, and the hope is that you’ll give it a test run yourself against your current image optimization plugin.
Results may vary, but you’ll see that speed is on Smush’s side with speed and other functions – no matter your situation.
Quickly Optimize Images with Smush
As you can see, with up to 8x faster processing, Smush can save time and optimize your images quickly so you can spend time focusing on your WordPress business instead.
Don’t take my word for it when it comes to a speed test. As I mentioned, try your favorite image optimization plugin and see how it compares.
Plus, our developers have some more exciting goodies for Smush coming soon, so stay tuned…
Editor’s note: This article was updated on February 28, 2023, to include new test results against even more of the competition. (Luckily for us, Smush continues to smash it out of the park.) The article was originally published on August 25, 2022.
With The Hub, you can give unlimited users multiple roles on any WordPress site you manage — even if they aren’t WPMU DEV members! Learn how to easily set all this up in minutes and give team members and clients as much or as little access as you’d like.
Plus, With The Hub Client, you can create your own fully branded Hub for your team members, clients, and collaborators … all in just a few clicks!
Oh, and did we mention it’s all free for your users and you’re able to be set up in minutes?
This post’s features are accomplished from the Team tab in The Hub dashboard, except for The Hub Client, accessed by the Hub Client Plugin (which we’ll show you how to activate).
1. Set Up Team Members
The Hub allows you to collaborate with other users by assigning them roles and granting them access to specific areas of your WordPress site(s).
Creating new users in The Hub is the easiest way to allow access to users, all from one place.
From The Hub, click on Team…
Click on Team to get started.
Before inviting people to join your team, make sure that your details are correct, as these will appear on the invitation emails that your new team members will receive and your client portal.
To check, click on the Settings tab. If you haven’t already set this up, enter your name, upload your logo, and click Save to update your settings.
Add your name and logo before inviting team members.
Once this initial step is done, go to Team Members and click the Add First Team Member button to get started.
Click the button to add your first team member.
This brings up the Invite new member form, where you’ll be able to fill in the following details:
Enter their email address and name.
Select all the sites listed on your Hub that you want to give your new user access to. These settings can be changed at any time.
Scroll to select a site or use the dropdown menu and quick-search feature
Select a user role (View & Edit, View Only, or a Custom role). This can also be changed at any time.
Add notes about the user (optional).
Select an add-on service for the user (e.g. access to Support). This is optional too.
After filling in the details, click on Invite.
Fill in the details and click on Invite to add your new team.
This will send out a confirmation email to the new user.
Your new team members will receive an email invitation to join your team.
Once the user gets the email and hits Confirm, they will be redirected to WPMU DEV to set up a free account with their email, name, and password.
Your new team members only need to complete this simple setup and click Join to have access to sites.
New team members don’t need to be members of WPMU DEV, and there’s no cost involved.
When they click Join, they will be added to your Team Hub account, where they will only have access to the sites and roles granted by the admin.
New team members can only access what they have been given roles and permissions to do by the WPMU DEV member.
As the WPMU DEV member and Hub administrator, you can see the new user in the Team Members area.
If the user hasn’t confirmed yet, their account will show as Pending.
This member hasn’t confirmed yet.
Once the member accepts the invite and creates their free account, their status will become active.
This team member is now active.
From the Team Members section, you can quickly and easily add as many users as you need by clicking on the New Team Member button and view the names, emails, roles, addons, and sites that your team members have access to, as well as managing and removing them from your account.
2. Set Up User Roles
Roles give your team members’ access capabilities to one or more sites in your Hub.
With almost two dozen configurable modules, The Hub allows you to provide your team members with access to all areas of your site(s) and/or customize roles to access only specific areas and module settings.
Use Custom roles to configure access to different Hub modules of your site(s) for team members.
When you create a new team member profile (see previous step), you can set the following roles:
View and Edit – All: Team members can view and edit the settings in this area. Note: This is a system role and cannot be modified (only custom roles can be modified).
View Only – All: Team members can view the data and settings in this area but cannot modify them. This limitation only applies to the area associated with the current toggle. This is another system role that cannot be modified.
Custom: Team members have access to an area but are limited to certain tasks or actions within that area.
To create a custom role, click on the Roles tab and then click on + Create New Role.
Let’s create a new custom role.
You can give the new role a unique name and customize it by configuring any of the available permissions and settings however you like.
Let’s take a closer look at how to customize a role.
3. Add User Customization Settings
Customizing access for a role can be determined by clicking on all the available options (e.g. sites, security settings, SEO, etc). Also, choose to have View & Edit or View Only for sites.
Create a custom role by enabling or hiding various Hub modules.
The Custom option lets you configure specific module settings and provides detailed task descriptions about each option.
For example, if you give a team member custom access to the Plugins module, you can allow them to View & Edit all settings in that module, View only, or select which settings you’d like them to have the capability to manage by clicking Custom.
Custom roles give you further options to configure enabled modules.
If you select Custom, a new screen will open giving you further customization options for the module.
You can create a custom role that allows team members to activate or uninstall plugins, and more.
After specifying the options and settings your team members can access for all of the various available modules, click Save to update your custom role settings.
Team members assigned that specific custom role will now see only the modules, options, and settings made available for that role. Everything else will be hidden from view.
You can view all the roles you have assigned to team members under the Role column in the Team Members screen.
The Team Members screen lists all the members you have added to your team and their assigned roles.
To customize which sites team members have access to or to change their roles, simply click on the team member, edit their settings, and resave.
Easily reassign the user roles and sites your team members can access.
Click on the Sites tab to quickly and easily view which team members have access to specific sites being managed in The Hub.
The Users column displays how many team members are assigned to each site.
See how many team members can access each site in the Users column.
Clicking the number in the Users column displays the team members assigned to that site.
View active and pending members assigned to a specific site by clicking on the number of users.
Click on the plus sign by the site’s name to add or remove a user from that site.
Click the plus site to add or remove user access for specific team members.
You can check who has access and whether they’re active or not, uncheck the user to remove their access from the site, invite a new user, or resend an invitation to a pending user.
Click on the checkmark to remove a team member’s access to the site.
Now that we have looked at the basics of setting up new team members, let’s look at how to personalize the area your team members will access information from to collaborate and help you manage your sites.
5. Set Up The Hub Client (THC)
White label your Hub with The Hub Client plugin.
With The Hub Client, you can provide access to clients, collaborators, and users using your personalized white label Hub. It’s your own Hub, the way you and your organization want it, customized to your perfection.
Install The Hub Client via the WPMU DEV Dashboard plugin.
After installing and activating The Hub Client, the next step is to Configure it.
In your WordPress dashboard, click The Hub Client > Client Portal to access the main screen of the plugin.
Let’s configure The Hub Client…
Change the brand name in the Site profile section to replace WPMU DEV on your client portal with your business name and logo.
Brand The Hub Client with your name and logo.
You can change the colors for the Navigation background, Navigation color, and Hover and active color in the Colors area. Do this by visually picking the colors or using hex codes (e.g. #FFFFFF for white).
Pick and choose colors to match your brand.
Next, head over to the Navigation tab to customize your client portal’s navigation menu.
To display links in your portal’s navigation bar, create a custom menu in Appearance > Menus, and then click Add and select the custom menu you’ve created.
Add a navigation menu to your client portal.
In addition to setting up the navigation menu for your portal’s users, you can select a page to be replaced with your client hub and specify a custom URL to be used for the back button on your login page.
The Hub Client creates a default page for your client hub (i.e. yourdomain.tld/hub) but you can select any of your site’s existing pages from the Client Page dropdown menu to replace your client hub instead.
Select where your team members and clients will log in to access site details.
After customizing these settings, users will be greeted with your branded login page.
Your branded client portal login page.
Remember to finish setting up your client portal by clicking on the other tabs and configuring their options.
Go to the Login & Signup tab and select your Terms of Service and Privacy Policy pages. You will need to create these pages first before they can appear in the dropdown menu selector.
Add your Terms of Service and Privacy Policy pages in the Login & Signup section.
Next, click the Client Support tab to add a Help button and offer live chat support to logged in users.
Set up links to your support resources in the Client Support screen.
The Client Hub lets you offer live chat support to users via integrated widgets from various solution providers (Livechat, tawk.to, and HubSpot).
Offer live chat support to users with live chat integration.
You can also set the default language for your client portal pages and widgets added to your site via the Translations area.
Set up your client portal using a different language via the Translations section.
Congratulations! Your team members and clients can now log in and use your very own customized Hub.
Now that we have looked at how to add new team members and assign them specific roles, let’s take a look at how to do the same for clients.
6. Set Up Client Roles
The Hub Client plugin allows you to create a customized Hub for your team members and a portal where your clients can log in and access information about their sites.
As we have seen, adding team members and assigning them roles is done via The Hub’s Team section.
Configuring roles for clients, on the other hand, is done via The Hub’s Clients & Billing module.
Use The Hub’s Clients & Billing section to configure client roles.
In the Clients & Billing section, click on the Clients tab and select Clients to add new clients and view details of your existing clients.
View details of existing clients and add new clients in The Hub’s Clients & Billing section.
To manually add new clients and assign them a specific role, click on the + New Client button.
Add new clients and assign them roles.
Note that if you have installed multiple Client Hubs on various sites, you will need to specify the primary Hub to send out communications to clients (e.g. emails, invoices, etc.).
All communication with clients are sent from the selected primary Hub.
The Hub’s Clients & Billing comes with preset system roles that you cannot edit. You can, however, create new custom roles and assign these to clients.
View existing client roles and create new roles via the Clients & Billing Roles section.
To create a new custom role, click on the +Create New Role button, name it, and use the toggles and menus to configure the role’s permission settings.
Set up custom roles for clients.
For more details on configuring client roles, see our documentation.
There is No Sub for The Hub
You can add an unlimited amount of team members, clients, and collaborators and give them precise access to specific sites, modules, and support. All without leaving The Hub.
And with Reseller’s automated site creation & client billing, your white label Hub becomes your very own SaaS business, automatically adding new clients and assigning them roles and permissions!
There’s just no other substitute out there for an all-in-one platform when it comes to managing all your WordPress sites.
To keep tabs on what’s coming, be sure to follow our Roadmap. And for all Hub-related information, check out The Hub’s documentation and stay tuned to our blog.
Editor’s Note: This post has been updated for accuracy and relevancy. [Originally Published: September 2020 / Revised: March 2024]
Using full-sized images on your WordPress site not only takes up storage space but slows down your site, too. Instead of wasting time and effort compressing them manually, see how Smush can help you do it in bulk.
Smush is an award-winning image optimization plugin that focuses on compressing and resizing your images. It saves storage space and takes some of the load away from your server, which can speed up your site.
When you activate Smush, it automatically combs through your site and takes note of any images that can be compressed.
Smush then displays the number of images in need of attention on its main screen.
This is just one of the methods you can use to smush your images.
Before hitting the Bulk Smush button, it’s worth checking out Smush’s other image compression features.
Let’s go through each of these options.
2. Exclude Selected Image Sizes
First, you can exclude images of certain sizes from being compressed by simply unticking the checkboxes shown below:
If you’re happy for Smush to compress all of your images, you can select ‘All’.
WordPress creates multiple copies of an image. If you run a site that requires your images to be crystal clear, you may not want your larger images to be compressed, however, you can still compress the smaller image versions using these settings.
3. Super-Smush For 2x More Compression (or Ultra-Smush for 5x)
If site speed and storage space are at the forefront of your priorities when it comes to your website, you can take image optimization a step further with Super-Smush.
Choose Super Smush for better performance and load speed without compromising image quality.
Super-Smush works by stripping out as much of your image data as possible without sacrificing quality, reducing the file size by up to twice as much as regular smush.
For even more compression and savings (up to 5x more) with minimal image quality loss, choose the Ultra Smush setting.
Ultra Smush your images for 5x compression.
You can tweak Smush’s settings to ensure it saves a copy of your original images, however, if you’re not quite ready to Super-Smush or Ultra-Smush, there are a couple of other ways to trim off a few extra KBs.
4. Remove Image Metadata
Smush lets you strip unnecessary metadata from your images.
The information that Smush strips serves no purpose on most sites.
With this setting enabled, all of the unnecessary data stored within your images will be removed while preserving the data needed for SEO.
Whilst a lot of the EXIF data stored within a photo is harmless, other details such as the location it was taken and the camera details are better off removed. The location could lead people to where you took the photo (your house perhaps) and if the serial number of the camera is included, it could be used to trace other photos online taken with the same camera and result in an invasion of privacy.
These scenarios may be unlikely, however since all the extra data is clogging up your site anyway, it makes perfect sense to remove it. Luckily, Smush does it for you automatically once you enable this setting.
5. Choose JPEGs Over PNGs
Another way to potentially reduce your file sizes is by converting your PNG images to JPEGs.
If a saving won’t be made, Smush will leave your images as PNGs.
If you’re unsure whether you should enable this setting, a good general rule of thumb is that you should convert photographs to JPEG as there is no noticeable loss in quality. You can achieve a file size of less than 10% of the original if you compress as a JPEG compared to PNG.
If you have graphics, screenshots, or images that contain text, it’s better to leave them as PNGs to ensure they stay crystal clear as JPEGs tend to add a little bit of noise/grain around the text
6. How Smush Handles Original Images
As of WordPress 5.3, large images are automatically resized down to the new maximum image size of 2560px in width/height. WordPress then refers to these resized images as “new originals”.
If you want to upload a photo larger than this, Smush can help you override this setting.
You can select your own new maximum width and height for images.
With this setting enabled, Smush automatically creates a new size for super-large images and reduces these to your new custom sizes, rather than WordPress resizing them to its default maximum size of 2560px.
If you resize your images manually prior to adding them to WordPress then you may not need to enable this setting, however, it saves a lot of time and works if you have many large images you need to display on your site.
Now that you’ve decided how large your original images will be, it’s time to decide what to do with them.
By default, Smush doesn’t compress your original images during a Bulk Smush, it only compresses the thumbnail images that WordPress produces.
Since your original images are what takes up the majority of your storage space, it makes sense to ensure these are smushed too.
Use the top toggle to ensure your full-sized images are smushed.
If you’re smushing all of your original images, you might want to have a backup in case you decide to revert back to the pre-smushed version.
If you upload an image higher than the maximum size your site will support (either WordPress’ maximum or a custom maximum you create with Smush) WordPress stores your image as the original and then creates the new max-sized image to display on your site.
If an image you upload is smaller than the maximum allowed, WordPress will not store this as a separate original – this version will be compressed directly by Smush.
Whilst Smush guarantees no loss in quality when compressing your images, we understand that some people will want a backup, which is why the ‘Store a copy of my small originals’ feature exists.
Enable this to store a copy of your original images in wp-content/uploads.
7. Bulk Smush Images
Compressing your images will free up some of your site’s storage space as well as reduce the time it takes to load onto your visitors’ screens. Now that you’ve worked your way through the different settings, it’s time to compress with Bulk Smush.
When you hit the blue button, Smush will compress the images that it identified upon activation.
Make sure you keep the tab open until Smush has finished compressing all the images.
Once the process has finished, Smush will keep an eye out for new images added to your site that are in need of compression.
When your image total on Smush’s main screen starts to creep up again, all you need to do is hit the Bulk Smush button and all your images will be compressed. It’s much quicker and easier than doing it manually outside of WordPress.
If you’re happy with your first Bulk Smush, you may want to consider enabling Automatic Compression.
You can easily enable or disable this feature using the toggle shown above.
With Automatic Compression enabled, Smush will compress your images as soon as you upload them, which means that you will never need to use Bulk Smush again.
Image Optimization at the Touch of a Button
Compressing your images with Bulk Smush is just the start.
Having well-optimized images on your site means that there’s less pressure on the server when it’s dealing with browser requests. This is also one of the ways that Smush can help you increase your Google PageSpeed score.