5 Chrome Extensions Every Web Designer Should Try

Web designers are continually on the lookout for tools that improve their workflow and productivity. For that reason, we’re highlighting five essential Chrome extensions, covering various aspects such as website analysis, performance optimization, and accessibility. Let’s dive in.

Your Web Designer Toolbox

Unlimited Downloads: 500,000+ Web Templates, Icon Sets, Themes & Design Assets Starting at only $16.50/month!

Wappalyzer

Wappalyzer is an indispensable extension that identifies the technologies used on any website. With just a click, you can get detailed insights into the frameworks, libraries, content management systems, and more, providing valuable context when troubleshooting or researching new projects.

Lighthouse

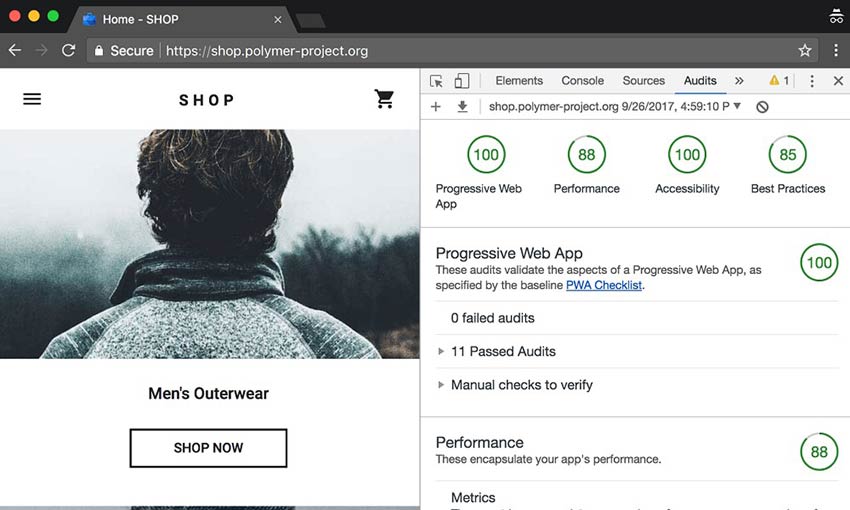
Developed by Google, Lighthouse is a powerful tool for checking a website’s performance, accessibility, and SEO. With this extension, you can quickly generate reports that provide actionable recommendations to improve your site’s overall quality and user experience, ensuring that your project adheres to best practices.

Web Developer

The Web Developer extension equips your browser with a plethora of web design-related tools. It offers various features including DOM manipulation and CSS inspection to form control and responsive design testing. While it may seem more oriented towards developers, as a designer, understanding and using these features can facilitate a healthy collaboration with the development team.

CSSViewer

CSSViewer is a simple yet handy Chrome extension that allows you to inspect the CSS properties of any page element. By hovering over the desired element, you can instantly view its dimensions, fonts, colors, and other CSS properties, making it easier to debug and refine your designs.

Axe

The Axe extension assists in auditing your website for accessibility issues and offers practical guidance on addressing them. This tool is designed to eliminate false positive results, saving you time by focusing on genuine issues.

Bonus Pro Tip

For an additional productivity boost, consider using a Chrome extension like Tab Wrangler to automatically manage and close inactive tabs, reducing clutter and freeing up valuable system resources during your development sessions.

The 3 Best Project Management Tools For Freelancers In 2022

If you are a solo freelancer, running your own business with a team of one, you may not think you need a professional project management system. After all, you don’t have a team to keep track of, communicate with, and make sure you’re all working together on the same page – it all comes down to you and only you! However, that is exactly why you need a place to keep your projects organized. As a freelancer, you wear so many hats – salesperson, project manager, client communicator, accountant, bill collector – and on and on. Every freelancer can use all the help they can find to simplify and consolidate all of these tasks as much as possible, which is where a good project management tool can be lifesaving.

The Freelance Designer Toolbox

Unlimited Downloads: 500,000+ Web Templates, Icon Sets, Themes & Design Assets
All starting at only $16.50 per month


Once you’ve agreed that you need one, finding the right project management tool can be a daunting task. That’s why we’ve gathered some of the best options available right now to save you some of your valuable time. What follows are some of the best project management tools for freelancers we’ve found that you can start using right now, with either free or very affordable pricing.

Kosmo

Kosmo - The Best Project Management Tools For Freelancers In 2022

Kosmo purports to be the best tool to manage clients, projects, invoicing, proposals, contracts, payments, and more, all in one place! It really sounds to good to be true, but based on our research, it actually is.

Features:

  • Unlimited clients with contact information, related invoices, and projects
  • Unlimited projects with goals, files, notes, and more
  • Unlimited branded invoices
  • Unlimited proposals and contracts that can be digitally signed
  • Accept online payments via credit card, ACH transfer, Stripe, and PayPal, with payment tracking and reminders
  • Time and task tracking that can be added to invoices easily
  • Trackable income goals
  • Recurring tasks
  • Branded emails
  • Reminders

For an overview of how it all works you can watch their excellent video.

Pricing

Here’s the best (and almost unbelievable) part: all of these features are absolutely free! We don’t know how they can offer this robust of a project management system for no cost to the user, but they do! The only way you will pay anything is if you want to remove the Kosmo branding and get priority support, which is also very affordable at a cost of $9 per month, and that plan is not even available yet. Still, you can utilize all of their features with your own branding and without limitations 100% free.

Conclusion

Honestly, we’ve never seen a free or even paid project management tool that incorporates all of these elements into a single system, much less do it so well. It’s seamless, intuitive, beautifully designed, and a huge time saver. To be clear, this is not a sponsored post, nor are we receiving any affiliate commissions or any other incentives to rave about Kosmo as much as we are – it’s simply too good to not share! The only caveat we can come up with is that it is a very new tool, so there will be more to come as it gets discovered and grows, but we can’t attest to its longevity at this point. That said, we’re already moving our projects into Kosmo as of this writing, so we can move away from using a variety of separate tools and apps that don’t necessarily integrate well together. In our opinion, Kosmo is the best project management tool for freelancers that is available right now.

ClickUp

ClickUp - project management tools for freelancers

ClickUp says it is “one app to replace them all”, and it doesn’t look like they are kidding! Projects and tasks, chat with clients and team members (if you have a team), goals, and customizable views are just a few of the features they offer yet another well-designed package. ClickUp is a much more complex system than Kosmo, which may or may not be suited to your needs, but if you want a vast amount of features and granular organization and control of every aspect of your work, then ClickUp may be a great tool for you.

Features and Pricing

Honestly, there are way too many features to list here, but you can check out their features page to view them all. here are some of the top level items available in the Free plan to give you an idea.

  • 100MB Storage
  • Unlimited Tasks
  • Unlimited Members
  • Two-Factor Authentication
  • Collaborative Docs
  • Whiteboards
  • Real-Time Chat
  • Email in ClickUp
  • Kanban Boards
  • Sprint Management
  • Native Time Tracking
  • In-App Video Recording
  • 24/7 Support

From there, you can upgrade to the Unlimited plan for only $5 per month, which includes everything in the Free plan, plus the following:

  • Unlimited Storage
  • Unlimited Integrations
  • Unlimited Dashboards
  • Guests with Permissions
  • Unlimited Gantt Charts
  • Unlimited Custom Fields
  • Teams (User Groups)
  • Goals & Portfolios
  • Form View
  • Resource Management
  • Agile Reporting

Conclusion

ClickUp is a massive, robust project management tool that rivals those used by large businesses, and, in fact, it has plans available to accommodate such use cases. For solo freelancers this may be too much, but if you are someone who really likes to dig deep into your project management, planning, and organization down to the finest details, then ClickUp could be your solution. We couldn’t find any invoicing or payment options, however, so if you’re looking to include invoicing in your project management tool, then ClickUp may not be right for you. Otherwise, for the highly detail-oriented freelancer, ClickUp offers just about everything you could possibly need at a very affordable (or even free) price!

Hectic

Hectic - Best Project Management Tools For Freelancers

Hectic is another app that is similar to Kosmo, designed specifically for freelancers with a feature list to manage and grow your business in one place. Client management, proposals and contracts, accounting, invoicing, time tracking, a client portal, a mobile app, and more make Hectic an appealing project management solution.

Features and Pricing

The “Free forever” plan offers pretty much everything you need to get started, without any limits and the ability to upgrade as your business grows.

  • Unlimited clients
  • Client relationship management
  • Project management
  • Invoices & Subscriptions
  • Accept online payments
  • Proposals & Contracts
  • Expenses & Accounting
  • Forms
  • Time tracking
  • Calendar
  • iOS & Android apps

If you want or need even more features, the next tier costs only $11.99 per month and includes everything in the free plan plus:

  • Client portals
  • Custom domain & emails
  • Meeting scheduler
  • Sales pipeline
  • Collaborators
  • Automated expense tracking

Conclusion

Hectic looks to be a freelancer’s project management dream. It is similar to Kosmo in what it has to offer, with additional features that may be more appealing to freelancers who need them. With all of this available for free or a low monthly price, it is easy to see why Hectic made our list.

Which project management tool is the best fit for you?

It’s pretty obvious in which direction we lean as our top pick, but each of these three offerings are great choices. It really depends on what your personal preference and use case is, and determining which one of these tools will best fit. Regardless of which one you choose, we know that utilizing one of these project management tools will help grow and significantly improve your freelance business, so be sure to try and pick one to start wrangling your projects, clients, and entire business under control.

Visualize Airflow Workflows Without Airflow

Apache Airflow has gained a lot of traction in the data processing world. It is a Python-based orchestration tool. When I say "Python-based" it is not just that the application has been developed using Python. The directed acyclic graphs (DAGs) — Airflows term for workflows — are also written as Python. In other words, workflows are code. Many of the popular workflows tools like Informatica and Talend have visual tools that allow developers to lay out the workflow visually. As Airflow workflows are Python code, we are able to visualize the workflow only after uploading it. While this is an acceptable situation, in some cases, it can become problematic because Airflow refuses to load the workflow due to errors. Additionally, during development, it is difficult to visualize all the connections mentioned in Python code.

While looking for a way to visualize the workflow, I came across a Sankey diagram. Not just that, I also came across a gist where Python code has been conveniently packaged into a function. All I had to do was download the gist and include it in my program.

Get a Jump Into GitHub Actions

On January 27, 2021, Angie Jones of Applitools hosted Brian Douglas, aka "bdougie", a Staff Developer Advocate at GitHub, for a webinar to help you jump into GitHub Actions. You can watch the entire webinar on YouTube. This article goes through the highlights for you.

Introduction

Brian Douglas and Angie Jones infographic.

Angie Jones serves as Senior Director of Test Automation University and as Principal Developer Advocate at Applitools. She tweets at @techgirl1908, and her website here

Managing Complex Java Workflows With Unify-flowret

Unify-flowret is a lightweight Java orchestration engine that can scale from the simplest of workflows to the most complex ones. Read more about it on https://github.com/americanexpress/unify-flowret.

You may be wondering... Why another orchestration engine when there are already so many? We have off the shelf commercial “heavyweights,” open-source frameworks like AWS step functions/Uber Cadence/Netflix Conductor, and a host of others. Why another one?

How Engineers and CTOs Can Use a Simple, Universal Prioritization Technique Devised by Eisenhower

Are you familiar with any of the following scenarios?

  • We are never doing anything significant, neither benefitting ourselves nor humankind
  • We are always firefighting, stressed out, and going through mental trauma
  • We are doing considerable work but never on time, so we are missing out on the rewards

Instead, we should be doing substantial work at the right time so that both you and humankind are benefitted from your work. The question is, how.

How to Create a To-Do List in WordPress

Do you want to create a to-do list in your WordPress site?

Getting things done can often be boiled down to having an old-fashioned to-do list. And being able to see your to-do list within WordPress can enhance your productivity.

In this article, we’ll show you how to easily create a to-do list in WordPress.

Creating a to do list in WordPress

Why Create a To-Do List in WordPress?

To-do lists are the ultimate productivity tool. You can use a simple notebook to manage your daily to-do lists.

However, when you are trying to stay productive at work, then you may want to consider more advanced and efficient to-do list apps. This allows you to stay on top of things and ensure that nothing slips through the cracks.

For WordPress site owners, to-do lists can be used to manage an editorial calendar, website design tasks, manage website conversions, and almost any other task you may want to track.

We’ll show you how to create one inside WordPress with a plugin, and then a more flexible solution using one of our favorite productivity tools that we use in our business.

Ready, let’s get started.

Method 1. How to Make A To-Do List in WordPress

For this method, we’ll be using a WordPress plugin to create and manage your to-do list directly from the WordPress admin area.

It basically let’s you create a Trello style to-do list boards inside WordPress admin.

First, you need to install and activate the Kanban Boards for WordPress plugin. For more details, see our guide on how to install a WordPress plugin.

After installation, go to Kanban » Boards in your WordPress dashboard and click the ‘Add another board’ button to create your new board. You’ll see there’s a ‘Kanban board’ by default.
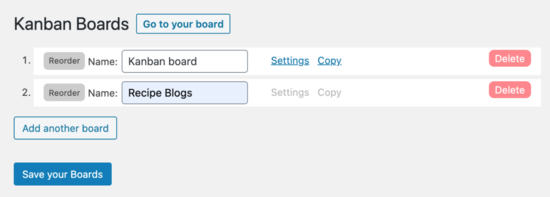
Create your Kanban Board

You need. to click the ‘Save your Boards’ button before you go on.

Next, you want to visit the Kanban » Settings page. You’ll immediately land on the ‘General’ tab. Go ahead and click on the name of the board and select the board you just created.

General settings tab

You need to make sure to select ‘Yes’ on the ‘show all columns’ option, so you can see the entire board on one screen in an upcoming step. Don’t forget to save your settings.

Next, click on the ‘Statuses’ tab to configure the columns on your board. This is where you will build your to-do list.

Create new status

Since this is a brand new board, we are going to create 3 statuses, which indicate how far along you are when working on a task.

We’ll call these three statuses: ‘Task’, ‘In progress’, and ‘Done.’

To do this, click on the ‘add another status button and then name it ‘Task.’

Task on your to-do list

Repeat this process two more times to create all three statuses.
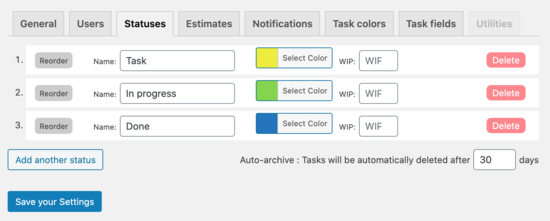
All statuses complete

Now that you have all your statuses created, click the ‘Save your Settings’ button.

Once that’s done, it’s time to go to your board and create your to-do list. Simply click on the ‘Go to your board’ button at the top of your screen.
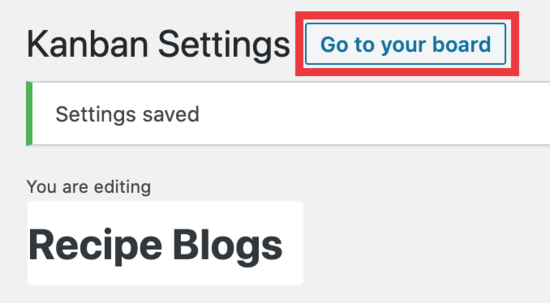
Go to board

Now, you’ll see your board, and it’s time to create some tasks.
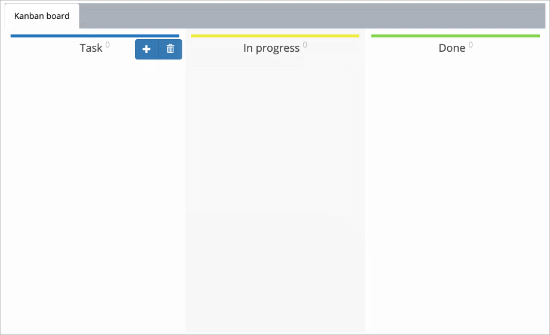
Your Kanban board

When you hover your mouse over one of the status columns, the blue button will appear. Click on the ‘+’ sign to create your first task.

You have two fields to fill out:

  • Add a project
  • Add a title

When you click into those fields, you can fill these out. For our example, we’re creating a project called ‘Quick meals’ and then adding blog post titles.
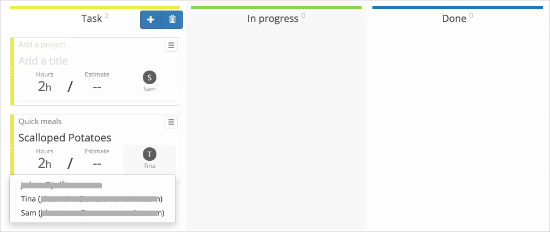
Label your statuses

Inside these statuses, you can set a timeframe for them to be completed. And then you can also select which users to assign the task to.

Once you create your task, you can then move it over to the ‘In progress’ and ‘Done’ column to mark them as being worked on or finished.
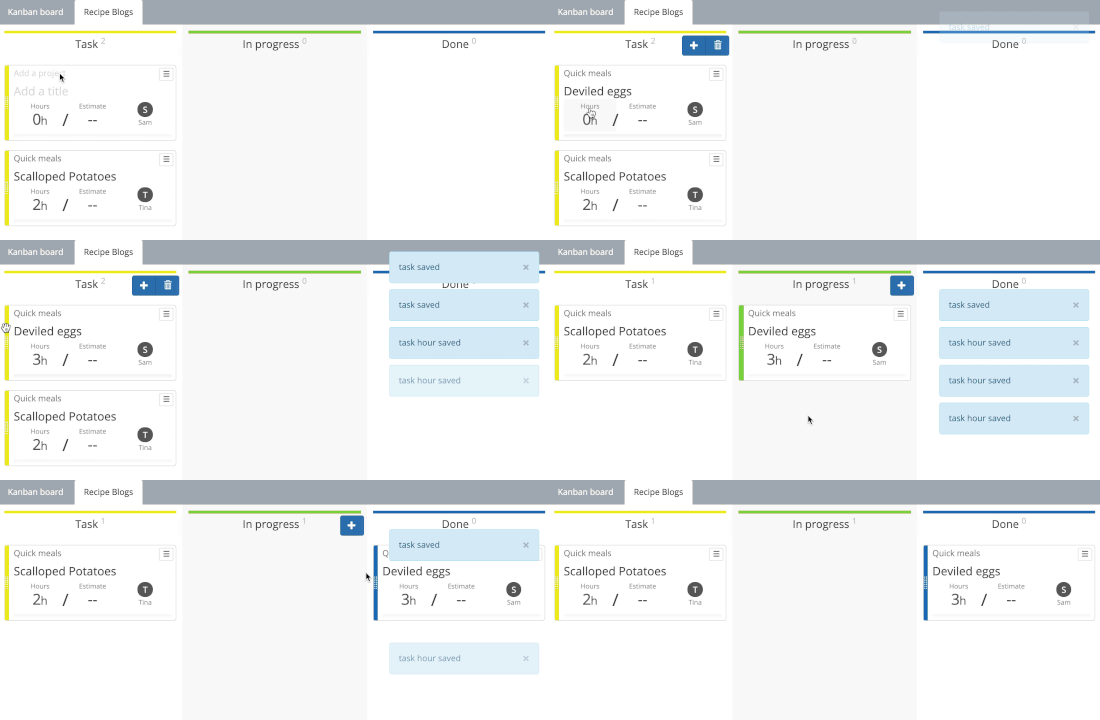
How to move statuses

Lastly, to exit your board and get back to your WordPress dashboard, you will click the ‘settings’ button at the bottom of the screen, and then click on ‘Admin.’
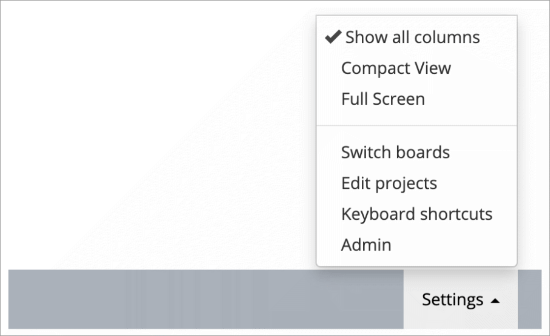
Admin dashboard

Kanban for WordPress is an excellent way to manage to-do lists inside your WordPress admin area.

However, if you need more features or don’t want to give team members access to WordPress admin area, then this next method is for you.

Method 2. Create Your To-Do List With Asana

At WPBeginner and Awesome Motive, we use Asana to manage all our tasks. It is the best project management tool that allows you to keep track of your work and chart your progress along the way.

It is more flexible and offers far more features. You can share access to your Asana project with your team without sharing access to your WordPress admin area.

It is free to get started for small teams and individuals. Plus, it works on mobile devices and has apps for both iOS and Android phones.

That being said, let’s take a look at how to set up and use Asana to create a to-do list for your WordPress website.
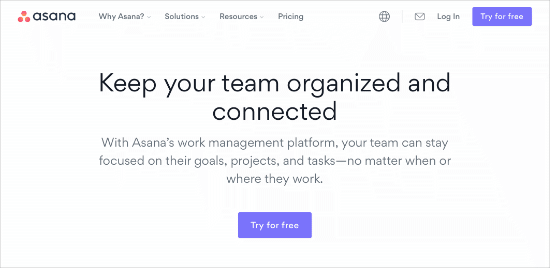
Asana homepage

First, go to the Asana website and click on the ‘Try for free’ button and submit your email to create your account.

Now, check your business email for a verification link. You need to click that link and follow the instructions to finish creating your account.
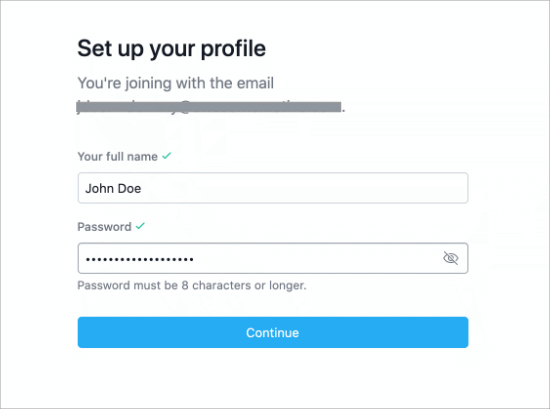
Set up your Asana profile

Once you’re done, it’ll take you straight to your dashboard, which looks like this:
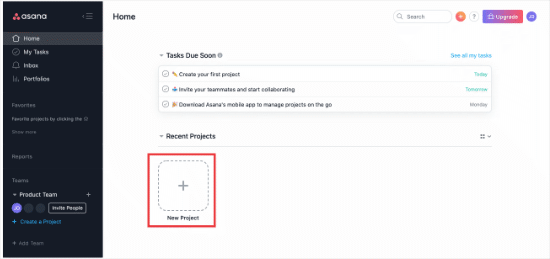
Asana dashboard

Since we’re creating a to-do list for the first time, click on the ‘New Project’ button to get started.
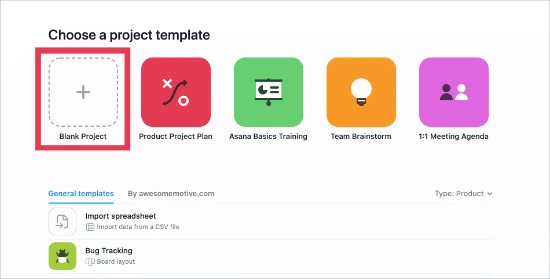
New project

Now, click on the ‘Blank Project’ button to start creating your to-do list. Go ahead and give your project a name. We called ours ‘My To-Do List’ for this example.
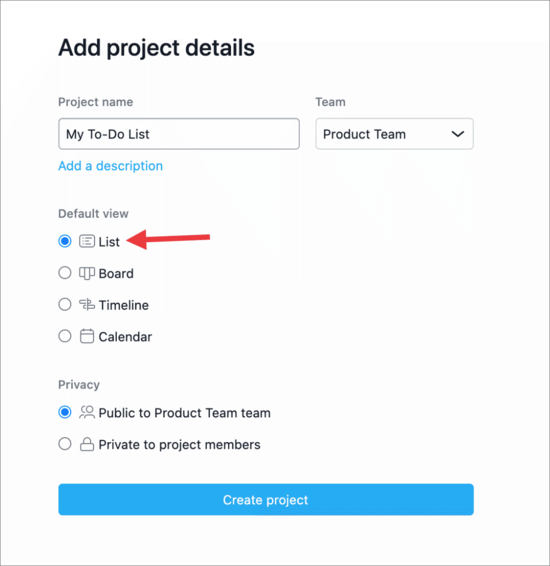
Add project details

Click on ‘Create project’ and now it’s time to add some tasks to your list.

To create new tasks, you need to follow the instructions by clicking in the area that reads ‘Click here to add a task’. If you need to create more tasks, you simply click the ‘+ Add Task’ button at the top of your dashboard.

Here’s what yours could look like after adding a few tasks.
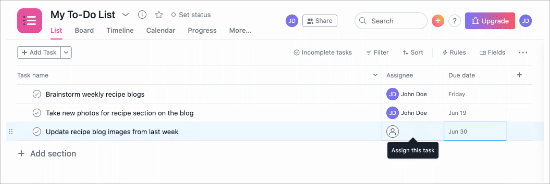
Your tasks

When you finish a task and want to mark it as complete, you simply click on the round circle with a checkmark in it.
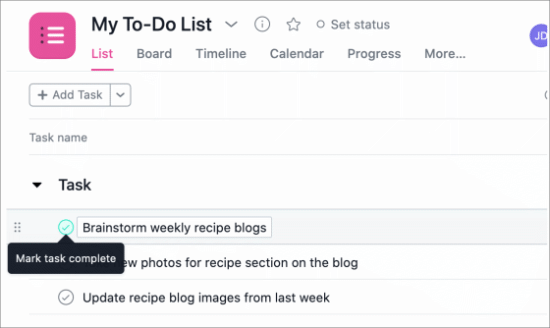
Mark task complete

Add Team Members to Your Project

Asana makes it super easy to invite anyone to join your team. Simply click on the share button at the top of a project for inviting users to join your team.
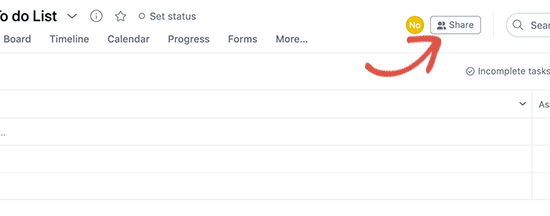
Inviting and adding team members to your projecct

You can then add email addresses of users you want to invite to join your team. You can also remove them at any time you want from your team and control which projects they can edit.
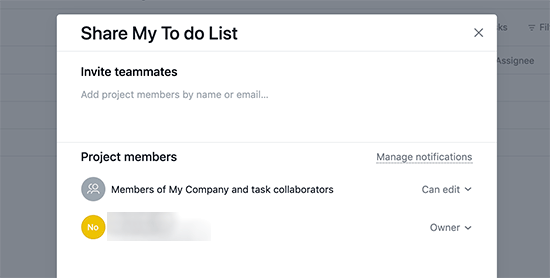
Managing team members in Asana

After these team members join your project, you can assign them items from your to-do list to work on.

Asana is a powerful project management tool. Once you start using it, you’ll be delighted to explore new features like its powerful search, team management, task management, and other built-in tools.

We hope this article helped you learn how to create a to-do list in WordPress. You may also want to check out our must-have WordPress plugins for business websites, and our pick for the best business phone services for remote teams.

If you liked this article, then please subscribe to our YouTube Channel for WordPress video tutorials. You can also find us on Twitter and Facebook.

The post How to Create a To-Do List in WordPress appeared first on WPBeginner.

Componentized Cloud Management: The Way Ahead For AWS Automation

When something gets complex, our primary approach is to break it down — even cloud management. If you’re a part of a growing company that uses the cloud, you can see your infrastructure becoming more complex as you scale and expand. That means its management does, too. 

Earlier, you could put a few scripts together and use them to perform basic management functions, or you could use an external tool for certain functions, but they’re limited in their offering. It’s only backups, or only scheduling, or only monitoring, all of which are a little too siloed. But now these methods simply don’t scale — and it’s not "basic" cloud management functions anymore; we’ve moved on, we’ve become more sophisticated. 

Introducing Trackman: Execute Commands as a Workflow

Trackman? Sounds a lot like Pac-man!

Today, we would like to introduce you to Trackman, the open-source, execute-commands-as-a-workflow tool. In this post, we take a closer look at what it is, why we need it, and how to best implement the tool. Let's get started.

You may also like:   Most Useful Linux Command-Line Tricks

What Is Trackman?

Trackman is a command-line tool and Go library that runs multiple commands in a workflow. It supports parallel steps, step dependencies, async steps, and success checkers.

Securing Developer Workflows

A few weeks ago, Weaveworks and Snyk delivered a webinar, entitled, "Secure GitOps pipelines for Kubernetes." The theme of the webinar was on how to improve the security of your development workflows — from Git to production.

Brice Fernandes, Customer Success Engineer at Weaveworks kicked off the talks with an in-depth look on what GitOps is and how it improves the overall security of your CICD pipelines.

Getting Clients to Work Your Way

They say that “the customer is always right”. And while that may be true (most of the time), it certainly doesn’t mean that we have to bend over backwards for them in every instance. I should know, as I spent years attempting to contort myself to fit whatever clients wanted.

One area that is particularly tough to manage is when it comes to our process for getting things done. If you deal with multiple clients, each one of them has their own distinct way of working. Some are night owls and feel the need to send email when the moon is out. Others expect a lot of in-person meetings – something difficult for a busy web designer to fit into their schedule.

Trying to accommodate each and every client’s way of working often leads to chaos. It makes getting things done more difficult and will leave you scrambling to find some level of consistency in your workflow.

Sound terrible? Sound familiar? If you’re banging your head against the wall, know that change is possible! Let’s take a look at some ideas for getting clients to work in a way that benefits you.

Create Processes That Work for You

During the early part of my career as a freelancer, I really had no process for getting things done. That is, unless you count waking up and walking over to the home office. There wasn’t any real organization to speak of and I haphazardly went back-and-forth between tasks. Sort of like a single-player game of table tennis.

Not only that, I was often running out to meetings and taking a seemingly endless number of phone calls. This led to a lot of stress, and a pile of work that I couldn’t seem to get through. Eventually, I realized that a change was needed.

So, I started putting some processes in place. Each one acts as a bit of a boundary for both my clients and myself. They’re not perfect, but have produced some positive results. Among them:

Limit Meetings

I now avoid going out to meetings when possible, and they are usually reserved for higher-revenue clients. As most of my clients are based at least a half hour from my office, I found that, when accounting for travel, even a short meeting tended to take up several hours of work time. Replacing meetings with phone calls or video chats (which I limit to specific hours) has saved a ton of time, while keeping the lines of communication open.

Reserve Time for Each Task

Understandably, clients tend to want things done “as soon as possible”. At the same time, it’s not always possible to drop everything you’re doing (something I tried and struggled with). So, for non-emergencies, I now carve out time to take care of each task on my to-do list. I let clients know an approximate time for completion, which provides both of us with some certainty. And this little bit of organization also serves as a pretty good stress reducer for the designer.
Remain Flexible, Within Reason

Maybe it sounds counterintuitive, but I still try to maintain some flexibility when working with clients. Why? Because, in a healthy relationship, nobody gets their own way all of the time. And I’ve found that people are generally more willing to work within my guidelines if they know that I’m willing to accommodate some of their requirements, as well. The key is not in abandoning your process, but in making reasonable compromise where possible.

A woman drawing business concepts in a sketchbook.

Making It Stick

While it’s one thing to dream up a list of processes that sound good, adhering to them is a whole other ball of wax. Frankly, this is the most difficult part of the journey – especially if you’re not accustomed to placing limits on others.

I certainly fall into that category. I hate conflict and I’m not one who likes to tell others what to do. But I found that implementing these changes wasn’t about controlling others, so much as it was about self-control. That’s where it all begins.

And one of the best ways to take charge of a situation is to put it in writing. This means letting new clients know how you work. Perhaps these policies are included in your contract or a welcome letter. This sets the standard from the very start and positions you for a productive path forward.
For existing clients, particularly those who are used to doing things the old way, it’s only natural to feel a bit of trepidation. After all, the goal here is not to upset clients or drive them away. This is where clear communication can be a big help.

One way to do it is to write a letter to your clients. Explain your new policies and what it means for them. Most importantly, let them know why you’re making changes. When they recognize the reasoning behind your policies, they’re more likely to accept and adhere to them. Most people are very understanding, you just need to give them a chance.

It’s also worth noting that the transition to a new way of working isn’t always smooth. Old habits will die hard for both you and your clients. But with consistent effort, things can indeed change for the better.
Path through a forest.
The Benefits Are Real

The hardest part about running a web design business is in actually learning how business works. Quite often, we start out as designers first. Therefore, we may not have the necessary tools to run things right from the start.

That can lead to a workflow that is chaotic and disjointed. And the more clients you book, the crazier it all becomes.

However, when you start to implement the right processes, you can bring some sanity to how your business runs. You’ll get things done more efficiently, avoid constant interruption and can better prepare yourself for your projects. All the while, you can still communicate effectively with clients – just in a more structured way.

The result is a more streamlined business that is better-positioned for future growth.

Tools and Guides for Web Design Accessibility

Fifteen years ago, web accessibility wasn’t a thought in many designers’ minds. Online standards did exist as far back as 1996. But they were followed much less often than they are now, leaving many struggling just to use the internet.

Over the past ten years, the web has made huge strides in making sites accessible. But it’s up to you, the designers and developers, to optimize your own websites. Not sure where to begin? These tools and guides for web accessibility will help you design a better web.

Introduction to Web Accessibility

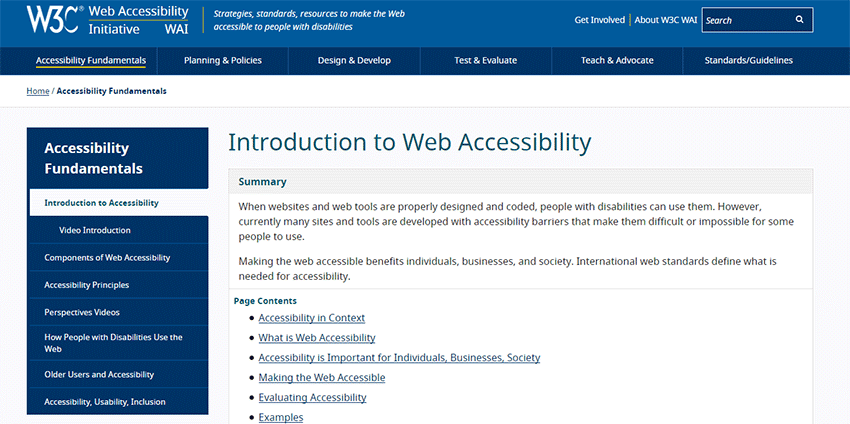
What is web accessibility, why should you implement it, and – most importantly – how can you do so? This invaluable resource introduces you to the basics of accessibility and can help you get started in optimizing your site.

W3C Introduction to Web Accessibility

The A11Y Project

Accessibility isn’t an easy topic to broach. With dozens of standards and hours of reading material, some people just don’t bother. The Accessibility Project aims to make the topic much more approachable, with easy-to-read articles, bite-sized tips, and plenty of helpful guides.

Contrast

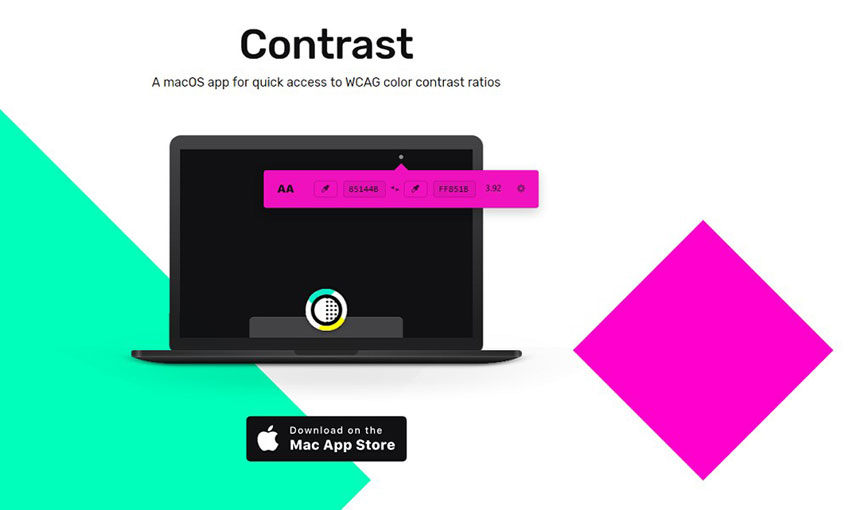
High contrast colors are very important for those with visual impairments. There are tools to check your site’s color contrast, but that disrupts your design flow. This macOS app scores colors instantly. No more guessing or spending minutes inputting hex codes.

Contrast accessibility tool.

Stark

What if there was a tool that let you design with accessibility in mind from the beginning? Stark is an Adobe XD and Sketch plugin that does just that. Check contrast, run colorblind simulations, and get quick color suggestions. Now you can create a site that’s beautiful and accessible even during the mockup phase.

tota11y

Tota11y is an extremely useful tool that activates from your browser bookmarks and notifies you of accessibility violations on a page. It’s open source and comes with many plugins that all detect a range of issues. Activate it on your site and see if you pass!

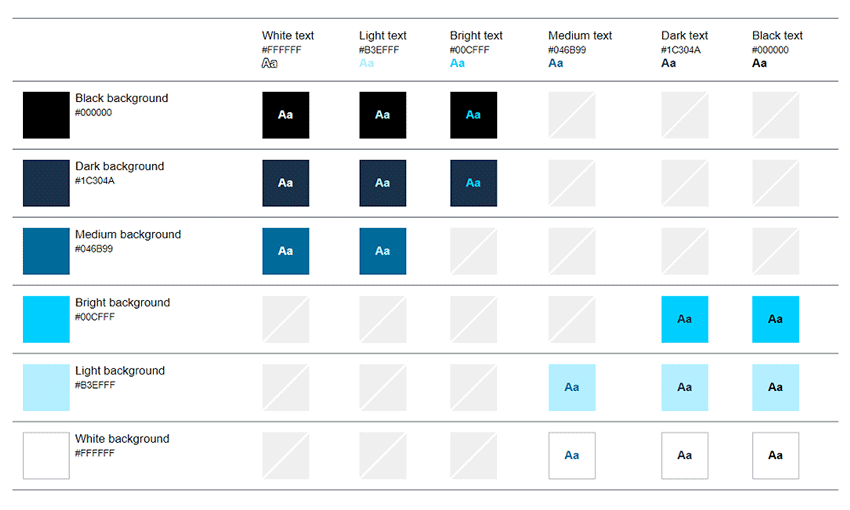
Accessible Color Matrix

Picking a palette? This tool shows you how your palette will work in action, and notes when it doesn’t meet the contrast requirements. Now no one will struggle to read text on your site.

Accessible Color Matrix tool.

WAVE Web Accessibility Tool

WAVE is a webpage checker that runs a page through a variety of standards, reporting back errors, alerts, and correctly implemented features in an interactive panel. While it’s no replacement for human testing, it can help set you on the right design path.

Web Accessibility Checker

This accessibility checker reports issues on a page in a simple list segmented by known, likely, and possible problems. This one also comes with extra features, like the ability to upload or paste an HTML file. You can also check against different standards!

HTML5 Accessibility

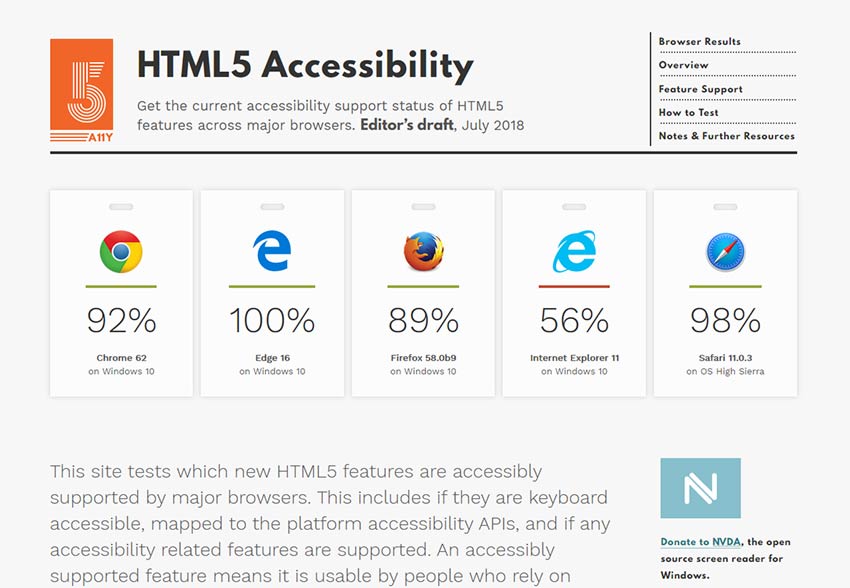
Wondering what accessibility features are supported by major browsers? This nifty resource details info about individual elements and how they test for support by browsers.

HTML5 Accessibility Tool

18F Accessibility Guide

This is a fantastic collection of resources, guides, and articles about web accessibility. If you need even more reading material, start here! It’s also a great source of testing tools for businesses.

AccessLint

GitHub user? This accessibility checker automatically detects and points out violations, simple as that. It also re-reviews code changes to let you know if you’ve really fixed the issue. For open source projects it’s totally free, but you’ll need a monthly subscription if you run a private project.

Lighthouse

Lighthouse is an advanced tool available right from Google Chrome’s developer tools. Along with performance issues it also checks for accessibility errors. You can run it from Chrome, the command line, or as a Node module.

Lighthouse tool for Chrome.

Making the Web More Accessible

Nearly 1 in 5 people in the US have a disability. 3.2 million Americans are visually impaired, while 8.2 million have vision problems, and that number is only growing. You should do your best to follow accessibility standards, so that everyone can browse your site without having to contend with garbled screen reader output, difficulty reading, and headaches.

Something as simple as adding alt text to images and increasing contrast can make a huge difference to your disabled users, but there’s always more you can do. Don’t make accessibility an afterthought.

Bannersnack is an Online Design Tool for Professionals

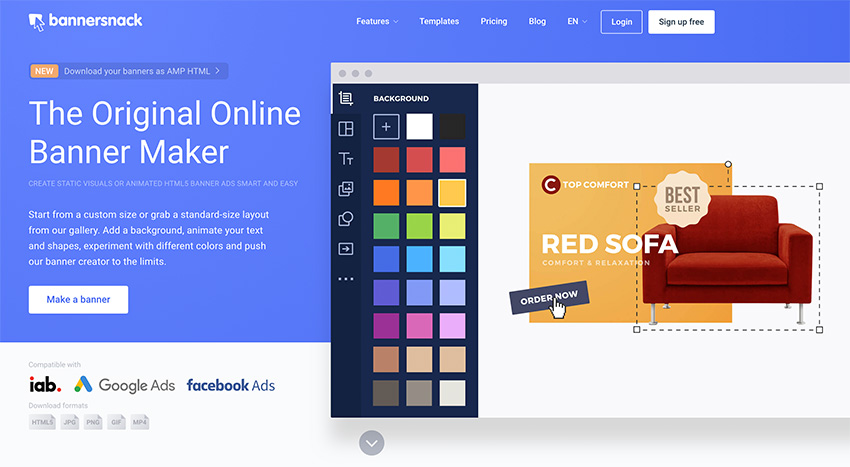
Banner ads made simple – That’s the Bannersnack promise, and the app delivers on that promise.

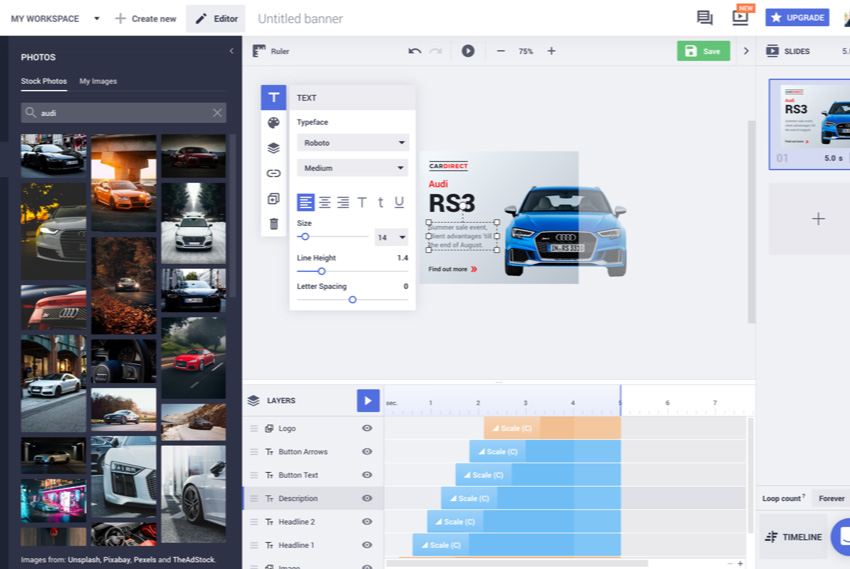
Any new tool in your design arsenal must excel in areas where other programs are lacking. Bannersnack reduces your time investment when making animated and static banner ads or social media headers and other images.

Banner Ad Problems

Designers must address a range of issues when designing banner ads:

  • Clients want everything done today
  • Clients want multiple sizes of banners
  • All banners must be responsive
  • Clients require banners in numerous formats
  • Animated banners are challenging to make
  • Finding templates to base a design on
  • Clients want you to use their fonts and photos
  • You need analytics and heatmaps

Bannersnack addresses each of these problems and allows you to meet client expectations quickly and efficiently.

Check out Bannersnack for yourself to see everything it can do. (Hint: All of the above)

Short Deadlines

All things are possible if you use the right tools. Bannersnack lets you produce more designs in less time, meaning you earn more and clients are happy with your fast turnaround time.

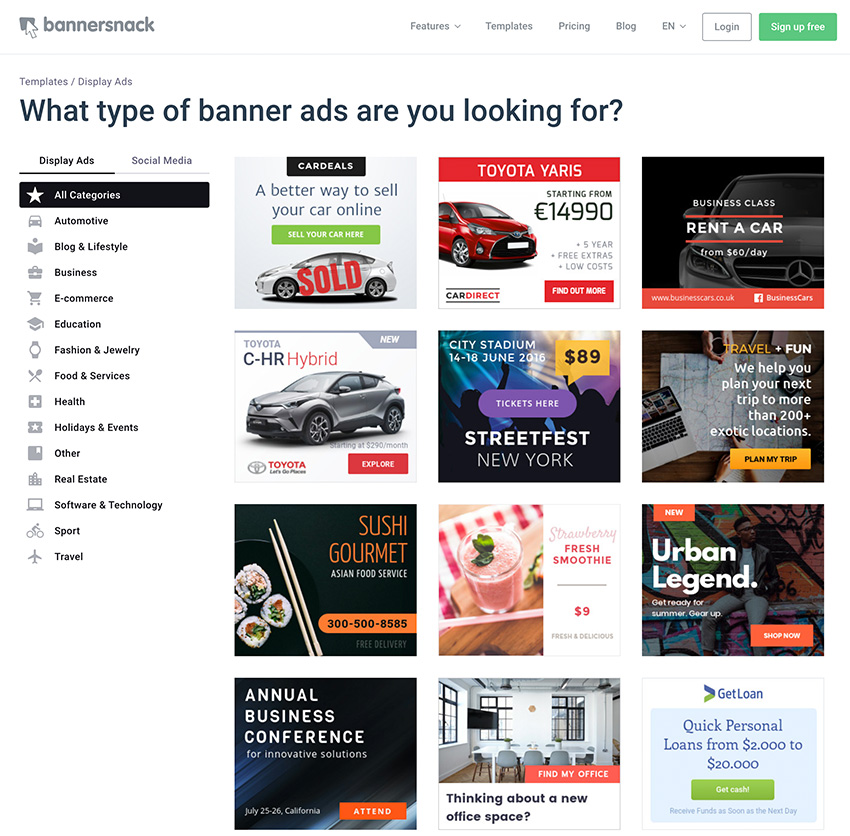
Template-based design can save you hours on a project, while the results are of similar quality to designing from scratch. There are thousands of Bannersnack templates, and each has been created by professionals. You can search by user category to narrow the choice and quickly find a template you can adapt by using your own photo and font choice.

Bannersnack’s templates cover a wide variety of banner ads and social media posts.


When you examine the templates above, the quality of the designs leaps off the screen at you. These templates will work, and no client will know you haven’t done their project from scratch.

Sets of Banner Ads

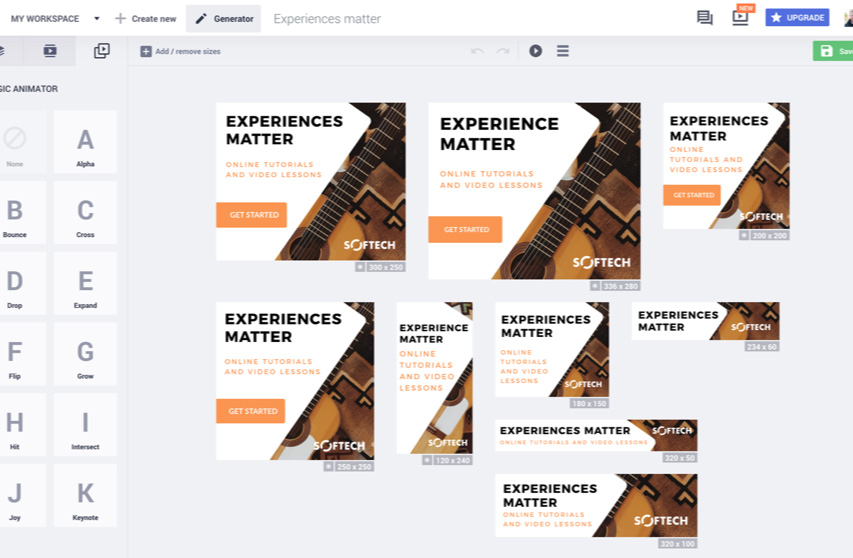
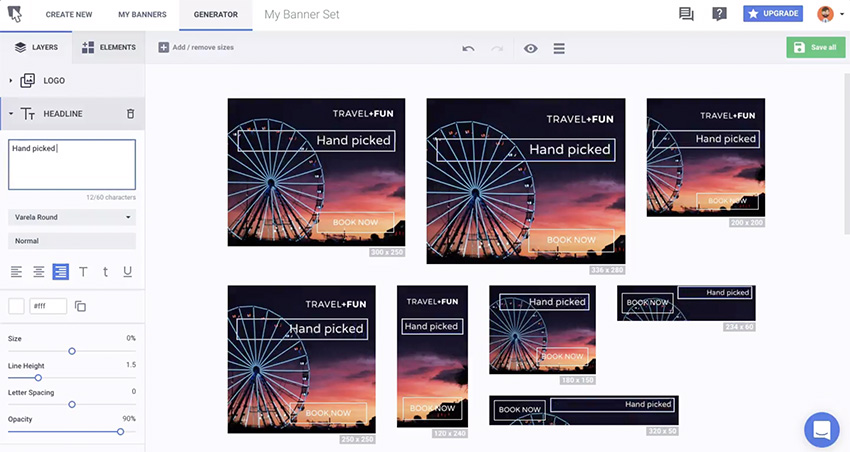
A Pro-Bannersnack subscription includes the use of an ultra-simple banner generator tool that lets you produce sets of different-sized ads based on one design. Imagine the time this would save you. Imagine how happy your client will be when you send a link to preview your work in a seemingly impossible timeframe.

Check out this preview to watch a quick ad generator in action.

Responsive Ads

Everything you design in Bannersnack is responsive. This allows your users to see ads that are optimized for their device and screen size.

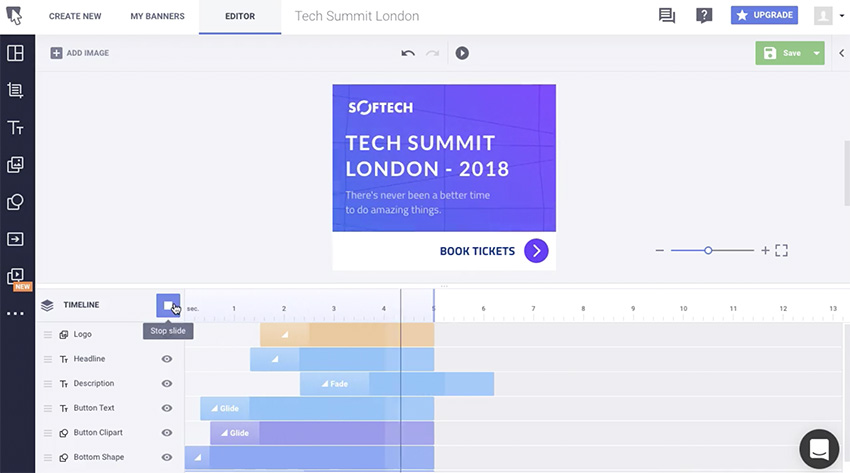
Straightforward Animations

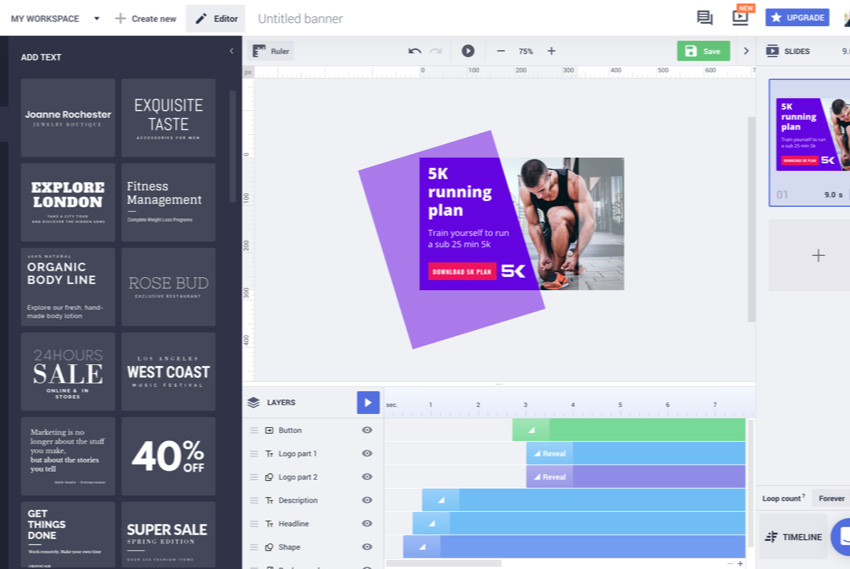
Just as video is more effective than still images, animated ads work better than static ones in some situations. Clients will need to run split tests to determine whether static or animated ads have a higher click-through rate in their market. If you can produce animated ads quickly and cost-effectively, clients are more likely to test animated versus static ads.

The key is to be able to produce animated ads without breaking the budget. Bannersnack has three methods you can use to achieve this:

  • Pre-set animations
  • Custom variables
  • Magic single-click text animations

Pre-set Effects

With 32 pre-set transitions including fades, blurs, and bounces, you’ll be able to produce ad animations very quickly.

Custom Effects

If none of Bannersnack’s built-in pre-set transitions meet your needs then use custom animations to find an animation that works perfectly.

Magic Single-Click Animations

The “Magic” animator is perfect for simple text transitions, with 12 pre-sets to choose from.

Customizations

Every client needs ads that are unique. Bannersnack lets you import clients’ images, or you can use photos from free photo sites in both banner ads and social media headers or posts.

Similarly, ads can be customized with any font you or your client own, or any web font not already included in the extensive library of Bannersnack fonts.

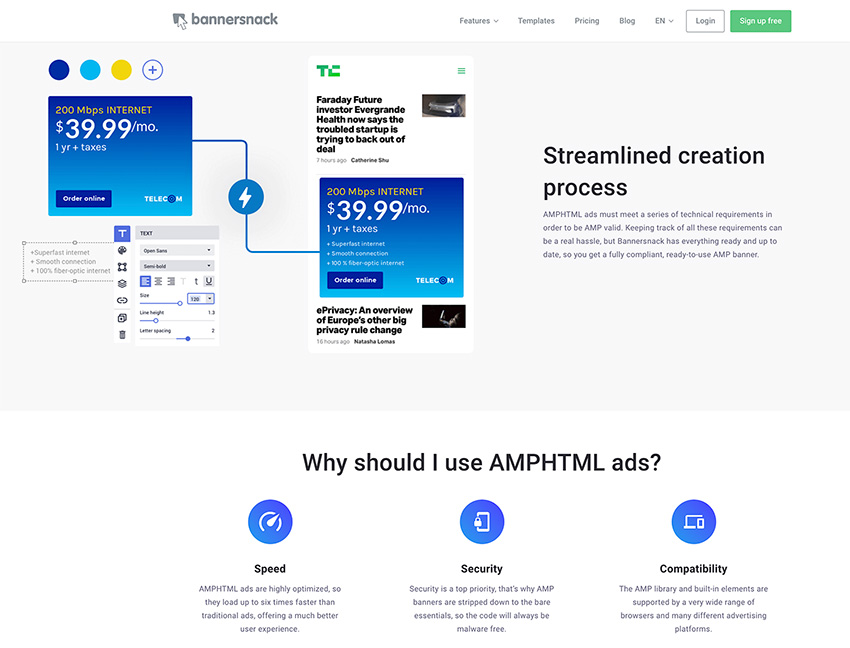
AMP HTML

Speed matters. If ads are slow to load then the user will close the page and go elsewhere. AMP HTML ads solve the speed issue, meaning more users see the ads and your client is happier. With our AMP-compatible ads, you can create them quickly and easily without touching any code.

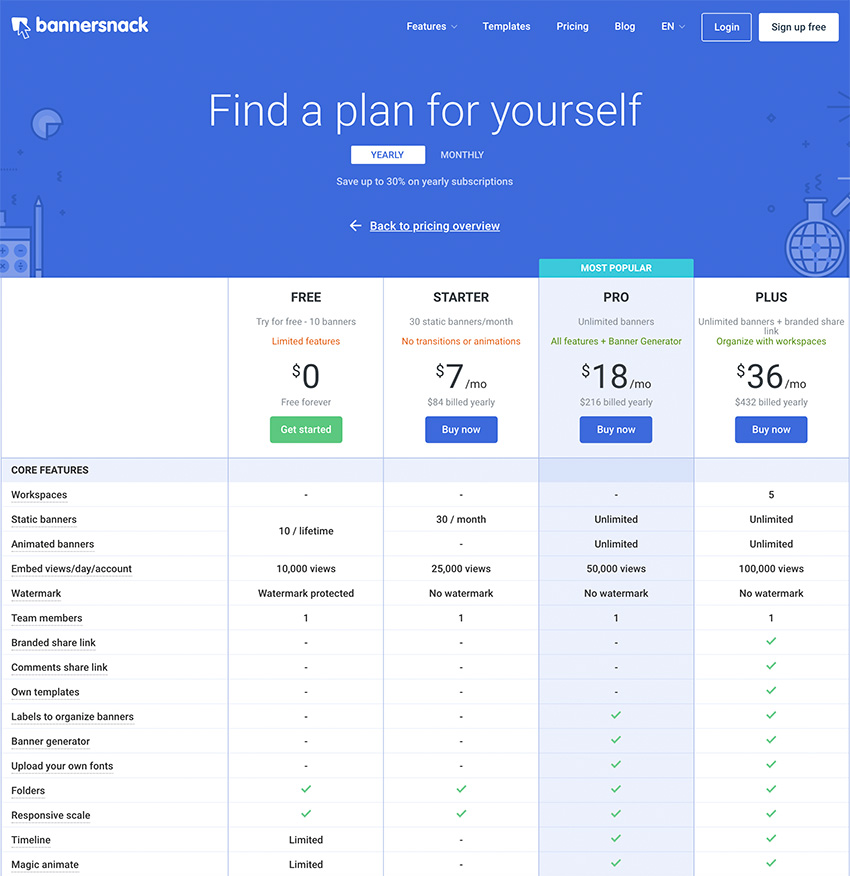
Bannersnack Subscriptions

The table below shows the main features of each subscription level.

Bannersnack also has pricing plans for teams, if that is what you need.

Summary

Bannersnack is a productivity tool for professional designers. It does one thing and does it better than anyone else: banners.

Massive programs like Photoshop have their place on any graphic designer’s computer but single-purpose programs like Bannersnack often offer shorter production times in their specialty areas. This is the case here. Bannersnack excels at producing animated ads quickly, allowing you to run split tests quickly and without over-running your client’s budget.

Top Free Extensions for VS Code

Microsoft’s VS (Visual Studio) Code is a free, open source code editor that is gaining in popularity. It’s very lightweight, flexible and yet still packs some powerful features. Plus, it supports just about every major programming language, including PHP, JavaScript, C++ and a whole lot more.

You might even be surprised to learn that VS Code is also cross-platform. Not only does it work on Windows, but versions for both Linux and Mac are also available for download.

But perhaps the coolest feature of all is the massive extension marketplace. There are free extensions available to support new languages, debug your code or add a variety of other custom functionality. This enables you to customize the editing experience to better meet your needs.

Today, we’ll introduce you to some of the very best VS Code extensions out there. Let’s get started!

GitLens

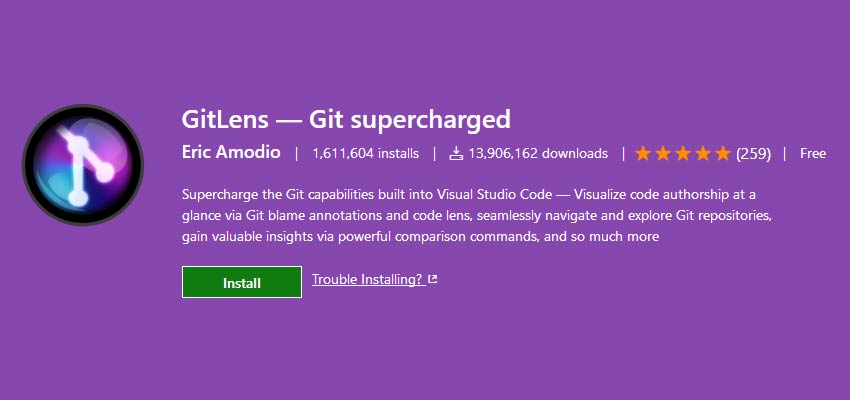
GitLens

While Git functionality is already built into VS Code, GitLens aims to “supercharge” the editor with even more version control goodies. It offers deeper insight into code, showing you when it was changed and who changed it. You can even compare different branches, tags and commits. Overall, this extension will make version control a more visual experience.

Beautify

Beautify

Are you very particular about syntax highlighting? If so, Beautify is just the extension you need. It takes advantage of VS Code’s already existing use of Online JavaScript Beautifier, but allows you to easily make changes to its styles. This means you can set elements like indenting, line wrap and other minutiae to your heart’s content.

ESLint

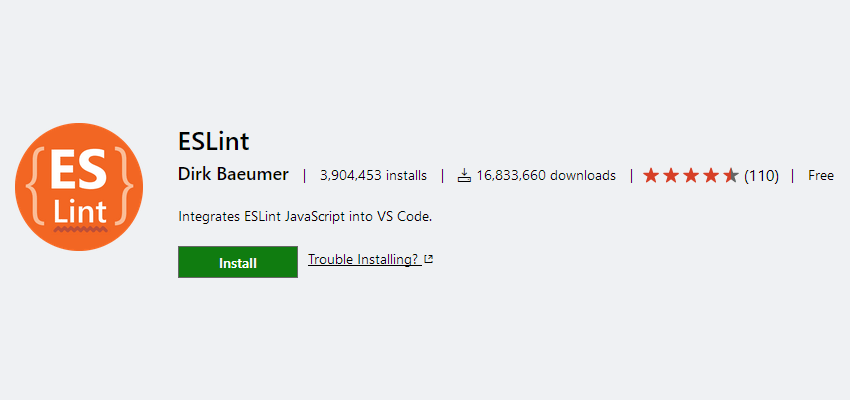
ESLint

JavaScript can be quite difficult to debug. But the ESLint extension for VS Code can make the process much easier. It helps by pointing out potential problems in your code before you even execute it. Better still, the extension lets you create your own linting rules.

Debugger for Chrome

Debugger for Chrome

For developers who’d rather troubleshoot code during runtime, Debugger for Chrome will help you get the job done. There are a number of handy features, including the ability to set breakpoints in your code, watches and a console. Plus, you can choose to run an instance of Chrome within VS Code or attach the debugger to a seperately running instance of the browser.

React Native Tools

React Native Tools

React is among the most buzzworthy JS libraries out there – so much so that the new WordPress block editor (aka Gutenberg) is built on it. If you’re among the many who have jumped on the bandwagon, React Native Tools is a must-have extension. It adds the ability to run react-native commands and will help you debug code.

One Dark Pro

One Dark Pro

When dealing with code, it helps to have an editor that is both visually appealing and comfortable. After all, coding sessions can last for hours on end. One Dark Pro brings the popular “One Dark” theme from the Atom editor to VS Code. You get the familiarity of this iconic look with the other conveniences of Microsoft’s open source app.

Bracket Pair Colorizer 2

Bracket Pair Colorizer 2

Bracket Pair Colorizer 2 is a simple extension, but one that can make code much easier to digest. It color codes matching brackets, allowing you to visually determine where functions begin and end. You can even pick which colors to use.

vscode-icons

vscode-icons

Perhaps one of the most effective visual tweaks for VS Code comes from vscode-icons. It takes a rather bland file listing and adds colorful, language-specific icons to the mix. This makes it easy to tell your PHP files from HTML, for example. Plus, the added personality is a welcome addition to any workspace.

Write Code Your Way

The incredible number of available extensions for VS Code makes it a compelling choice for everyday use. You have the freedom to set things up to match the languages you use and the type of visual space you prefer.

Plus, it offers an interesting mix of both corporate and open source culture. Being backed by Microsoft would seem to ensure that VS Code will be actively developed in the future. And the open source community has created a thriving ecosystem around the software. The result for developers is getting the best of both worlds.

New ActiveCollab is Here!

After months of development, New ActiveCollab, a pioneer of project management software with over a decade of experience, is finally here – the perfect start to 2019.

ActiveCollab is a project management software that serves as a central hub for team communication, collaboration, and project planning. It enables complete management of projects by breaking them down into more actionable tasks. When tasks are assigned to team members and a date with automatic reminders is set, it ensures that missed deadlines will be a thing of the past – since everyone knows exactly what they are working on and when it needs to be done. The option to track time is invaluable in dealing with clients – they will be able to see precisely how much time was spent working on their projects, and those tracked time reports can be used to issue custom invoices.

Their mission – to eliminate busywork and to help make Real Work happen.

New ActiveCollab is a product that immeasurable love and care have been poured into, with every change, tweak, upgrade, new feature and addition being the result of careful planning and communication with customers.

ActiveCollab Logo

It is the collaborative success of dozens of people – developers, designers, marketers, customer care, etc. – each contributing their unique perspectives and special skills. Because of this, we can safely say that New ActiveCollab is not just the best-looking, most powerful version yet, but also – the most personal.

Apart from the fresh, sleek, redesigned look, there are many other substantial improvements and changes all across the board. Here is a list of the most significant ones:

A Brand New Look & Feel

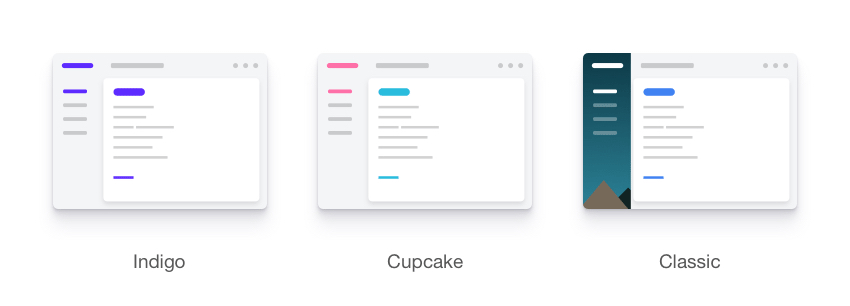
In new ActiveCollab, dozens of refinements that fix and improve the design were added – making the software much smoother and more enjoyable to use. There are also several new themes to choose from.

ActiveCollab Themes

This is much more than just a simple visual redesign – it is an evolution of ActiveCollab. A sleek, fluid tool that’s wonderful to behold and a joy to use.

Task Dependencies With Automatic Rescheduling

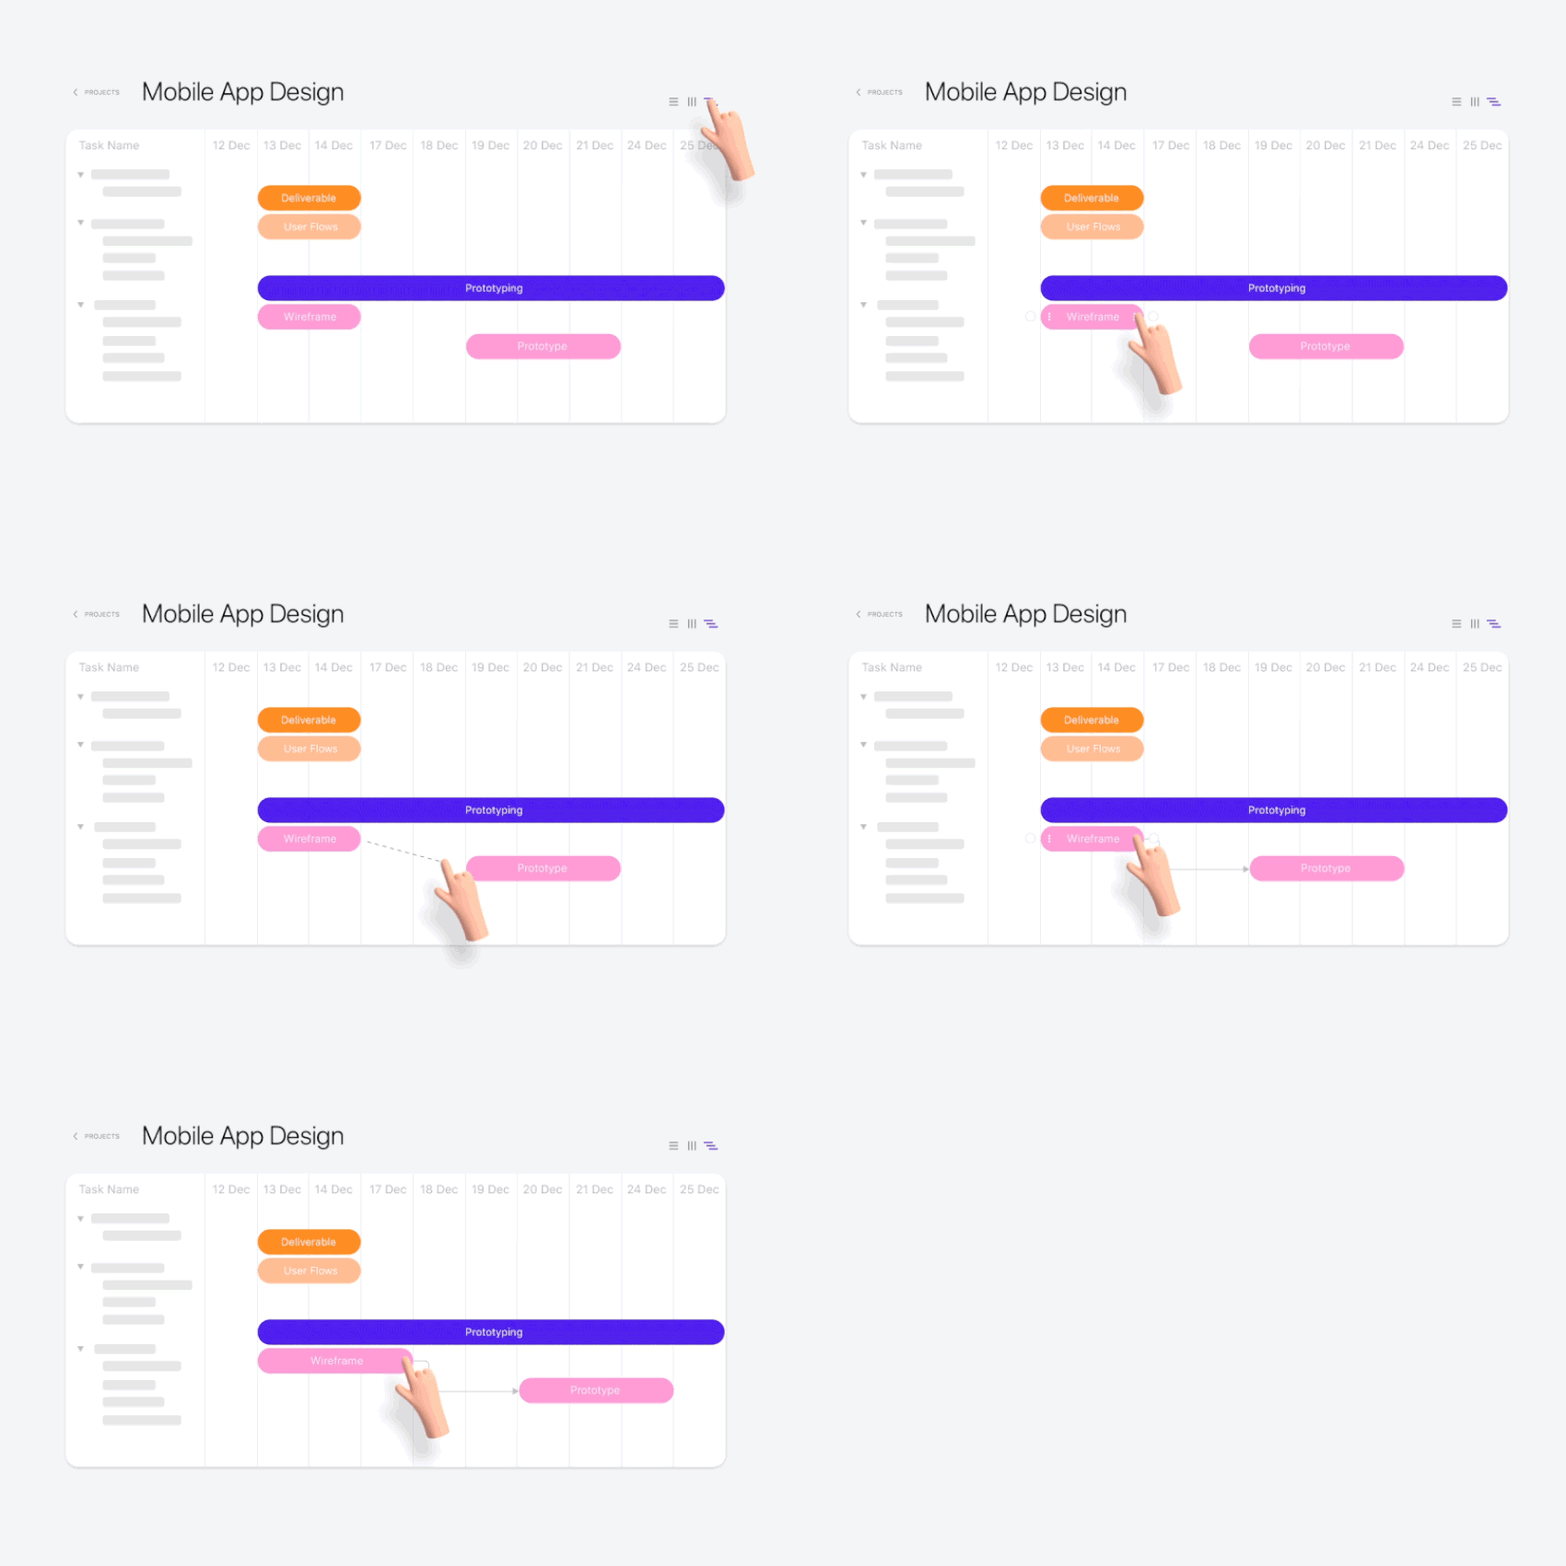
The biggest and most important – as well as most requested – New ActiveCollab feature. Using Task Dependencies, child tasks that are dependent on parent tasks can be set. This allows for greater control over tasks – in which order and when they will be completed, and it opens up a range of advanced management options in every step of the work process.

Task Dependencies Demonstration

This addition will eliminate confusion over the exact turn in which tasks have to be finished, since they will no longer be done out of sequence. Everyone has had work experiences when the projects worked on would slow down because people couldn’t work on their own tasks until another segment was done. Automatic rescheduling means that when a parent task is moved around, their child tasks will automatically adjust their dates as well, and they also take weekends and days off into account.

Since Your Last Visit

All the projects and tasks we are involved in continue to make progress even in our absence. Which means that a lot of time catching up on everything that happened is required. This feature highlights all the comments that were made since the last time the software was visited.

Wasting time sorting new information from the old will no longer be an issue, and Project Managers will be able to devote their time to other more pressing concerns, instead of helping everyone catch up to speed.

Reactions

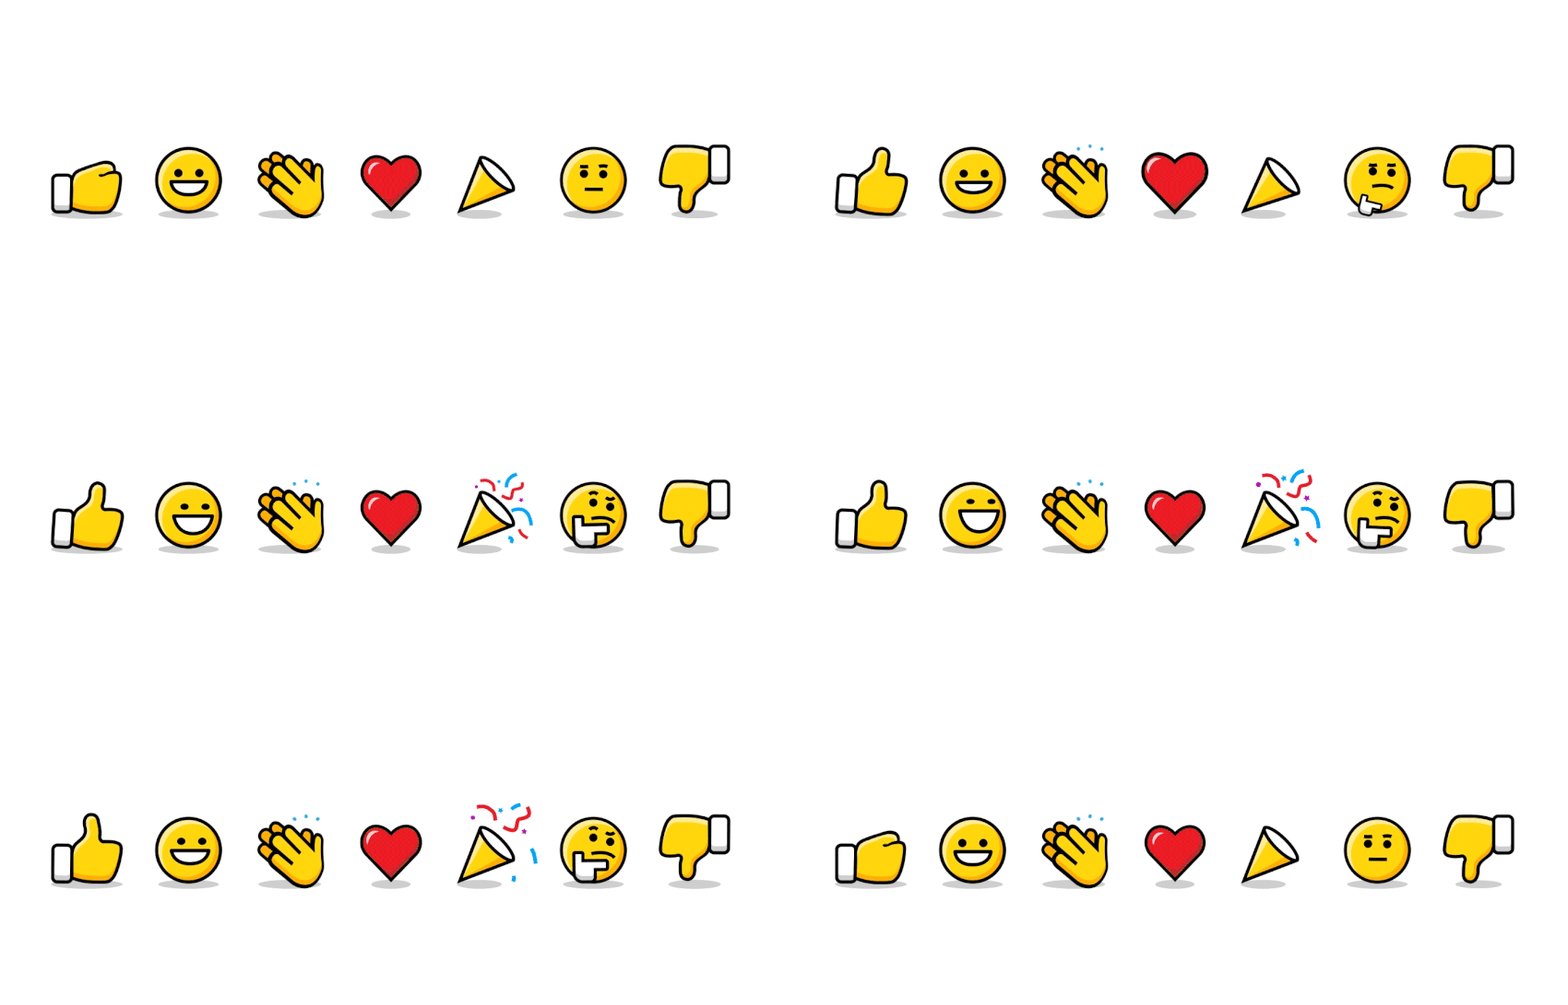
Communication is vital to collaboration, and a single thumbs up is often all you really need to do to get the conversation moving. We took a cue from to-the-point communication of social media, where you can express so much with an emoticon. So now, one of seven reactions can be used instead of typing out an entire lengthy reply. They are: thumbs up, thumbs down, smiley face, clapping hands, heart, party popper, and thinking face.

ActiveCollab Reactions

Live Comments

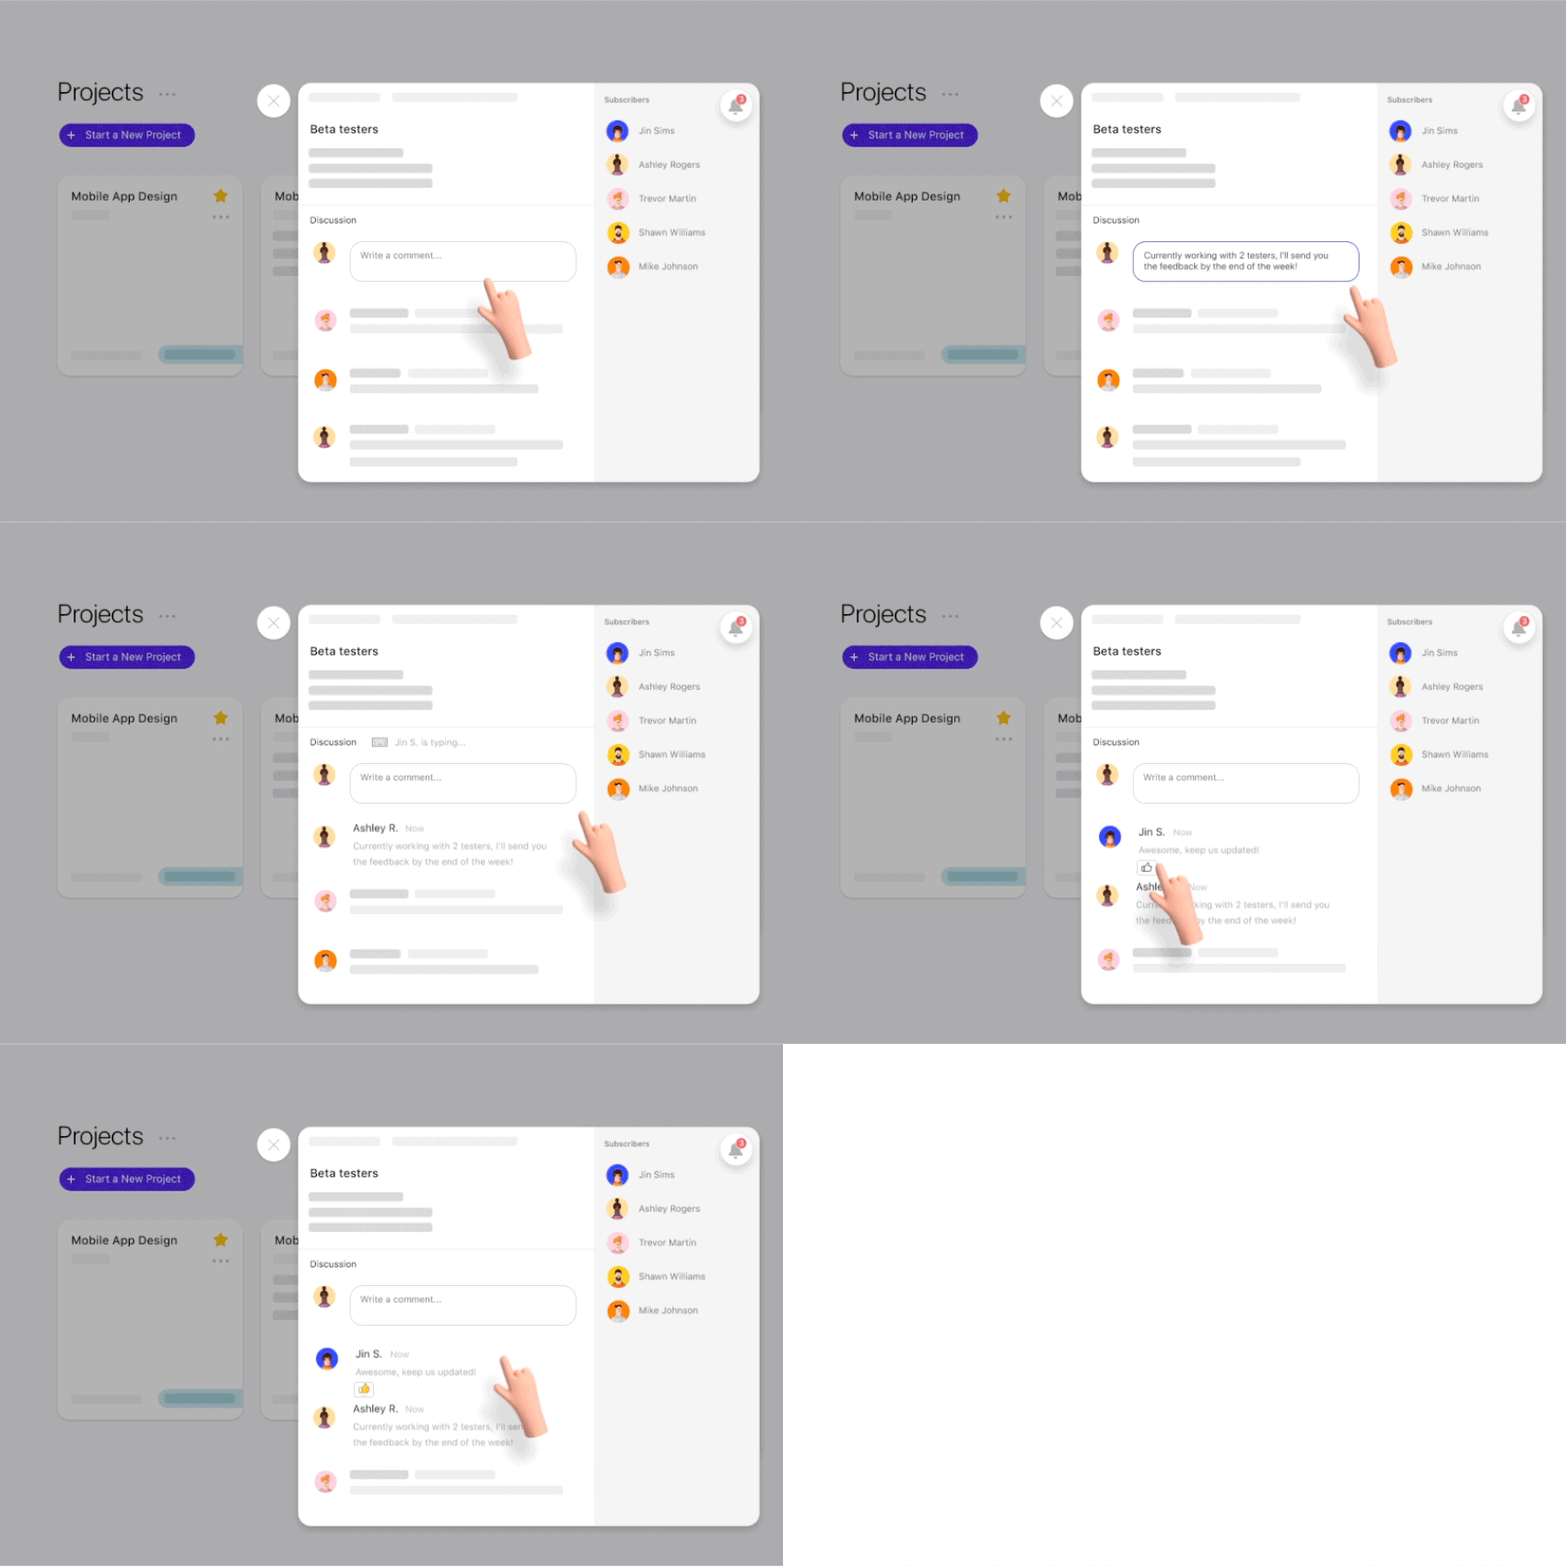
New ActiveCollab is now entirely in real time. Often, more than one user would comment a task at the same time, and they would have to refresh the page to see those other comments.

ActiveCollab Live Comments Demonstration

But now, all the comments – and the user(s) writing them – are visible in real time, meaning that confusion and the busywork of manually refreshing a page to see those new comments are a thing of the past.

Improved Attachment Navigation

A small change, but one that saves a lot of time, especially for designers, or those that have to deal with a lot of attachments. Before, the attachments would have to be navigated individually, one by one – by leaving and reentering the navigation window every time.

Attachment in ActiveCollab

Now, all the attachments can be comfortably scrolled through with the left and right arrow keys, or by clicking the left and right icon buttons. The attachments are sorted according to the time they were added, so the newest file will be shown first.

Experience Real Work With New ActiveCollab

Regardless if you’re a project management pro, or are completely new to it, New ActiveCollab is the way to go. With so many new and exciting additions, ActiveCollab is now more powerful and versatile than ever before, and is so much more than just another Project Management Tool – it’s the proper way to do your Real Work.

Try out New ActiveCollab for a completely free 14-day trial to make Real Work happen.

When Is It Time to Abandon a WordPress Plugin?

One of the biggest reasons to love WordPress is the sheer number of available plugins. It seems like, no matter what type of functionality you need, there is at least one plugin that can do the job.

But it’s no secret that plugins can sometimes outlive their usefulness. As both our needs and WordPress itself change, we can find ourselves looking for better options. That can mean moving on from a plugin that had previously served us well.

Still, it’s not always the easiest decision to make. Sort of like an athlete that’s past their prime, we can let plugins hang around long after their best days have come and gone.

So, how do you know when it’s time to ditch a plugin and start fresh with something new? The following are a few telltale signs to watch out for.

It Hasn’t Been Updated in a Long Time

Think of a WordPress plugin as a living thing. If it’s properly cared for, it will flourish. If not, the results won’t be nearly as good.

Those of us who build websites with WordPress would ideally like to see that a plugin is updated at least on a semi-regular basis. That shows that its author is still actively involved, adding new features and fixing bugs.

That’s never been more important, what with WordPress moving to the Gutenberg editor and PHP 5.x being phased out. If a plugin hasn’t been actively maintained, then it’s likely to fall short of being compatible with either of these major changes. Plus, there could be serious concerns regarding security as well.

Now, that doesn’t mean that a particular plugin has to be updated weekly or even monthly. Depending on its purpose, that may not be necessary. But you will want to look for, at the very least, a couple of updates per year. Anything less than that and you might as well give it one last hug goodbye.

An abandoned cockpit.

Updates Routinely Break

On the opposite end of the spectrum are plugins that, while continuously maintained, have become functionally unreliable. Updates are released frequently, but it’s usually because the previous ones have wreaked havoc on a number of websites.

This is frustrating, as you have a plugin that (at one point) did what you needed it to do. However, an over-aggressive developer has managed to cause as many problems as they have solved (if not more).

Depending on your personality, you may be willing to show some patience in this situation. Sometimes it actually pays off, as even a quality plugin can go through a rough patch and eventually right the ship. But inevitably things have to get better in short order. Otherwise, it’s just not worth the trouble.

Bits of broken glass.

It Has Become Bloated

A plugin quite often starts out trying to solve a specific problem. If it accomplishes that goal, its author may decide to add some related features to make it even more useful. This can be a great thing, if the new additions are well-executed.

The downside is that, over time, some plugins morph from solving a single problem into something that tries to solve every problem. This once terrific piece of software now is more accurately described as bloatware.

This can have negative effects on your website. For one, more features mean more code. The chances of both annoying bugs and hits to performance rise with every new feature.

It can get to the point where a plugin is no longer a good fit. In that case, it’s time to look for one that’s more focused and efficient in its functionality.

A boulder sitting in grass.

There’s Something Better

When it comes to plugins, part of a web designer’s job is to provide clients with the best option available. But just because a plugin was once the best option doesn’t mean it will stay that way forever.

This is especially so when it comes to plugins that occupy overcrowded categories like SEO or photo galleries. It seems like someone always comes along and tops whatever the previous leaders have done.

That doesn’t necessarily mean that we should immediately jump off the bandwagon when something new comes out. But it does suggest that it’s worth keeping an eye on what else is out there. You may find that another plugin offers something that you just can’t pass up.

Sky with the word "CHANGE" written in clouds.

Change Can Be Difficult, but Necessary

Let’s face it. It can be a real pain to swap one plugin for another. The process often involves refactoring or even recreating content that was being used by the old plugin so that it plays nicely with the new one. Therefore, it’s not a decision to take lightly.

Then, there’s always the unknown of how that new plugin will work out. Will there be any unintended consequences from using it? How can you be sure that it will still be around in a few years? Testing helps, but there’s still a leap of faith required when making a switch.

In the end, this is all part of a website’s lifecycle. The good news is that, with so many choices out there, making those changes to a WordPress website will just about always lead you to a better path forward.

How Do I Implement a Workflow From My Code?

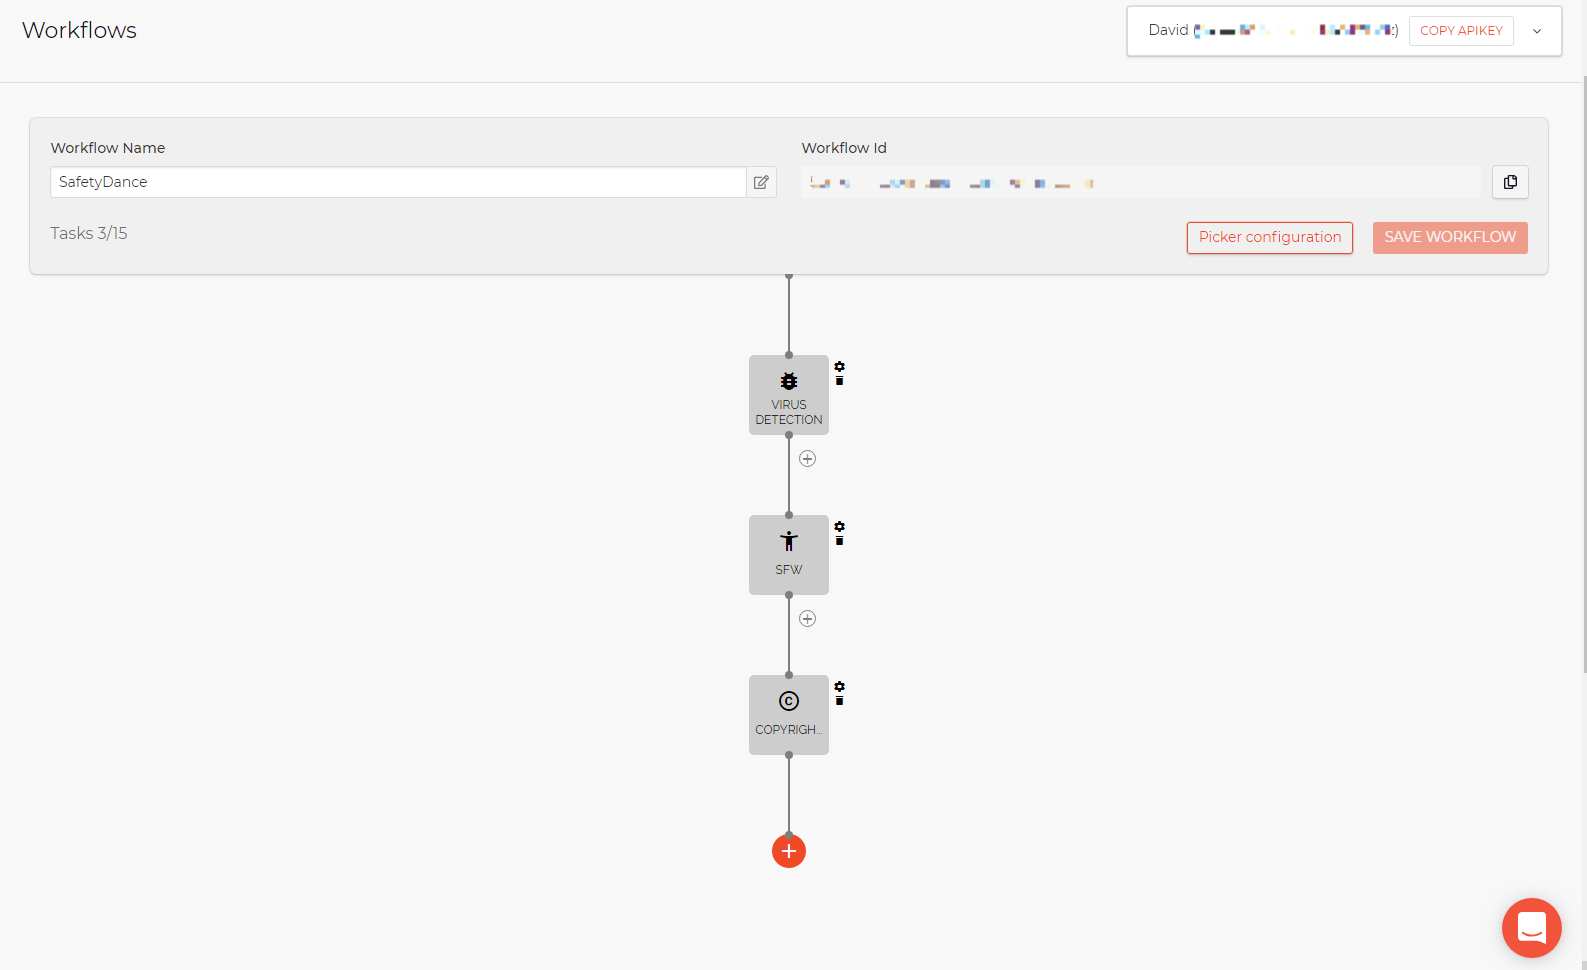
So you’ve configured a Workflow that meets all of your business requirements: you’re scanning all uploads to your website for viruses and malware, making sure the uploads do not contain any NSFW or copyrighted content, and — if the upload is an image — optimizing it for delivery. Now what? How do we invoke this workflow?

There are two places developers need to wire up this workflow: