How to Add an Audio Music Player Widget in WordPress

Do you want to add an audio music player widget in WordPress?

A music player is a great way to share songs, podcasts, interviews, and other audio files with your audience. This can help to create a more interesting and engaging experience on your site.

In this article, we will show you how you can add an audio music player in WordPress.

How to add an audio music player widget in WordPress

Why Add an Audio Music Player Widget in WordPress

A music player lets visitors listen to audio directly on your WordPress website.

If you’re a podcaster or a musician, then featuring audio on your own site can keep your visitors and fans up to date with your work.

It can also encourage people to visit your website directly rather than playing your audio on other platforms. Once these people are on your site, you may be able to make more money by showing ads on your WordPress blog or selling the audio file as a digital download.

Even if you don’t create any original audio, embedding content from third-party platforms such as Spotify is an easy way to create a more engaging website. This can keep visitors on your site for longer and make the experience more fun.

That being said, let’s take a look at how you can add an audio music player in WordPress. Simply use the quick links below to jump straight to the method you want to use.

Method 1. How to Add an Audio Music Player Widget Using the Audio Block (Easy)

With this method you can create a simple audio music player using the built-in WordPress Audio block. You can use the block to play any .mp3, .m4a, .ogg, or .wav file.

The audio player is very simple compared to most audio player plugins. It has a play/pause button, volume controls, a download button, and a button to change the playback speed.

A music player widget created using the Audio block

The built-in Audio block is a good choice if you want to add a few short audio clips to your site, and don’t need any advanced features.

If you embed content from a supported third-party platform such as Spotify or SoundCloud then the Audio block will show the playback controls for that platform. It may also show some extra content from the platform such as the artist’s name and the cover image.

For example, here is an Audio block with embedded SoundCloud content.

Audio player with embedded SoundCloud content

To add a simple audio music player to your WordPress website, open any page or post. Then, click on the + icon.

In the popup that appears, type ‘Audio’ to find the right block. You can then simply click on the Audio block to add it to your page.

The built-in WordPress audio block

At this point you can either add an audio file or embed an audio clip from another platform.

Note: In most cases we recommend hosting your audio and video files on a third party site for many reasons, including quality optimization and saving on bandwidth. Here’s why you should never upload a video to WordPress.

To add an audio file from your computer, click on ‘Upload’ and then choose the file that you want to use. Another option is to click on ‘Media Library’ and then choose a file from the WordPress media library.

Uploading an audio file to your WordPress website

If you upload the full audio then you may want to give visitors the option to support your work as a musician or podcaster by sending you a donation. For a step-by-step walkthrough, please see our guide on how to add a Stripe donate button in WordPress.

Do you want to embed audio from another platform instead?

This is similar to how you embed videos in WordPress where you just paste the URL of a YouTube video and WordPress embeds it automatically.

Just be aware that most platforms only embed a preview of the full audio file. The block may even encourage people to leave your website and visit the third-party platform, in order to hear the full audio.

In the following image, the Audio block is driving visitors towards the Spotify website.

A Spotify playlist embedded in WordPress

If you’re a musician, then this might increase your royalties by encouraging visitors to play your content on other platforms. However, it can also drive people away from your website and onto the other platforms.

To embed audio from a third-party platform, then start by clicking on ‘Insert from URL.’

This opens a small ‘Paste or type URL’ bar.

Pasting an audio file using a URL

You can now enter the URL of the audio clip that you want to embed on your WordPress blog.

Typically, you just need to visit the song or audio that you want to embed, and then open its ‘Share’ settings.

After that, you can copy the URL provided.

As an example, let’s see how you can embed any Spotify song on your site. To start, find the song or playlist that you want to add to your WordPress website.

Then, just click on the three dots that Spotify shows next to the playlist or song.

Adding Spotify audio to a WordPress website

Once you’ve done that, click on Share » Copy Song Link.

To add the audio to a music player widget, just paste the link into the Audio block.

Spotify's 'Share' URL

In our Spotify example, WordPress will turn the Audio block into a Spotify block. This change happens automatically, so it’s not something you need to worry about.

The WordPress Spotify block

After adding an audio file, you can click on the Audio block to see what settings you can configure for that block.

The settings you see may vary depending on whether you uploaded an audio file or embedded a preview from a third-party site. For example, you can often set the audio to autoplay by clicking on the ‘Autoplay’ toggle.

The WordPress autoplay and loop settings

Most of these settings are self-explanatory so it’s a good idea to spend some time trying the different settings to see what works best for your site.

When you’re happy with how the block is set up, you can update or publish the page.

Now if you visit the page on your site, you’ll see the audio music player live. You can also listen to the audio using the block’s playback control buttons.

Method 2. How to Add an Audio Music Player Widget Using a Plugin (More Customizable)

The built-in WordPress audio block is a quick and easy way to create a simple audio player. However, it does have its limits particularly when it comes to customizing the player and the playback experience.

There is also no central place where you can manage your audio players. This means you can’t use the same player multiple times across your site.

If you do want more advanced features and re-usable audio players, then we recommend Html5 Audio Player. This plugin can play any mp3, .wav, or .ogg file.

The plugin can only play one audio file per player. However, you can create as many audio players as you want so you can still play lots of different tracks across your site.

You can even add multiple audio players to the same page.

Multiple audio players on a single page

First, you’ll need to install and activate the plugin. If you need help, then please see our guide on how to install a WordPress plugin.

Upon activation, you’re ready to build your first audio player by going to Html5 Audio Player » Html5 Audio Player.

Here, go ahead and click on the ‘Add Audio Player’ button.

Adding an audio player to your WordPress website

To start, type a name for the audio player into the field that shows ‘Add title.’

This is just for your reference so you can use any title you want.

Creating an audio player widget using a plugin

Once you’ve done that, scroll to the ‘Player Configuration’ section.

Here, you can add an audio file to the player by clicking on the ‘Add Audio’ button.

Adding an audio file to the HTML5 player

You can now select any audio file from the media library or upload a file from your computer.

After choosing a file, you’re ready to customize the audio player. By default, the visitor just needs to click on the Play button and the audio will start playing with the volume already turned up.

This is how most visitors expect an audio player to act, so you’ll typically want to use these default settings.

There are also options to mute the audio by default, autoplay, repeat, and more.

Once you’re happy with how the player is set up, just scroll to the top of the screen and click on the ‘Save’ button.

Adding a new audio player to your WordPress website

Then you can add the audio player to your site using either shortcode or the HTML5 Audio Player block.

The block is the easiest method. However, if you do want to place the player using shortcode, then you’ll find the code towards the top of the screen.

Placing an audio player widget using shortcode

For more details on how to place the shortcode, you can see our guide on how to add a shortcode in WordPress.

To add the audio music player using a block, open any page or post. You can now click on the + button.

In the popup that appears, type ‘HTML5 Audio Player’ to find the right block. Once you click on the ‘HTML5 Audio Player – Insert’ block, it will add the block to your page.

Adding an audio player block to your WordPress site

Next, open the dropdown that shows ‘Select a Player’ to see a list of all the audio players that you’ve created.

You can now click on an audio player to add it to the page or post.

An HTML5 WordPress audio block

The WordPress page editor doesn’t show the audio player.

However if you click on the Preview button then you’ll be able to see how the player will look to the people who visit your website. You can even listen to the audio and test the different playback buttons.

Previewing the audio music widget

When you’re happy with how the audio player looks and functions, you can update or publish the page.

Now if you visit this page on your WordPress website, you’ll see the audio player live.

Do you want to add other audio tracks to your site? Then you can simply follow the process described above to create more audio players and add them to your WordPress website.

We hope this article helped you learn how to add an audio player widget in WordPress. You can also go through our guide on the best web push notification software and how to create an email newsletter.

If you liked this article, then please subscribe to our YouTube Channel for WordPress video tutorials. You can also find us on Twitter and Facebook.

The post How to Add an Audio Music Player Widget in WordPress first appeared on WPBeginner.

WordPress Widgets vs Blocks – What’s the Difference? (Explained)

Are you trying to understand the difference between WordPress widgets vs blocks?

WordPress widgets and blocks are both used to add dynamic content elements to posts, pages, sidebars, and templates. Widgets have been a core part of WordPress for 16 years, while blocks have only been a part of the platform since 2018. They serve similar functions, but they aren’t the same.

In this article, we’ll explain the difference between WordPress widgets and blocks, so you can learn how to use them properly.

Understanding the difference between WordPress widgets and blocks

Here is a quick overview of the topics we’ll cover in this article.

What are WordPress Widgets?

WordPress widgets are dynamic-content elements that you can add to widget-ready areas like sidebars.

Widgets were introduced in WordPress 2.2 (May 2007). The purpose was to provide users with an easy way to add customizable elements to their website without having to repeatedly insert the same element at the end of blog posts, for instance, or edit their WordPress theme files to create a sidebar and manually code in something like Google AdSense tracking codes.

Users could simply insert content or features using widgets that didn’t have to be part of their overall theme files or blog posts.

Widgets made it much easier for users to create their ideal WordPress blog, letting them easily add banner ads or email sign-up forms.

Gradually, almost all WordPress themes adapted widgets by adding widget-ready areas in their design and layouts. These were most often sidebars and footers.

The WordPress widget editor looked like this until WordPress 5.8 was released in 2021.

Old widgets screen

What are Blocks in WordPress?

Blocks are the elements that users can add to an area using the WordPress content editor. WordPress switched to this block-based content editor in WordPress 5.0.

You may also see it referred to as the Gutenberg editor, which was its development codename.

Blocks are very similar to widgets because each one handles a single element of the page or post. Unlike widgets, however, blocks were introduced only as part of the post and page editor, which means they could not be easily added to areas like the site footer or sidebar.

A block can be inserted into a post or page for any element, including a paragraph, an image, a gallery, a plugin-specific feature like email signups, or a video embed.

Block editor in WordPress

There are also blocks to add design layout elements like covers, patterns, tables, columns, groups, and more.

To learn more, see our complete WordPress block editor tutorial which shows how to use the default editor to create beautiful content layouts.

The Difference Between Widgets vs Blocks in WordPress

Until WordPress 5.8, the difference between widgets and blocks was quite obvious.

Users added widgets to their theme’s widget-ready areas. They were primarily used to display elements that were not post/page content. For instance, recent posts lists, important links, banner ads, forms, and more.

However, the difference between widgets and blocks has become quite blurry now.

Widgets are self-contained elements that can be used in widget-ready areas like sidebars on a WordPress website.

Blocks are also self-contained elements that you can access through the block editor. They can be used in posts and pages, as well as widget-ready areas. You can also use them in templates if your theme has enabled the full site editor.

Widgets were the first to allow developers to output other elements like contact forms, testimonials, social media feeds, and more.

However, the same can be achieved using blocks. Many of the top WordPress plugins now come with blocks that you can add anywhere.

Plugin blocks

For instance, WPForms comes with a contact form block that you can add anywhere to display a form.

Similarly, All in One SEO comes with blocks for the table of contents, HTML sitemap, breadcrumb navigation, and more.

The Block-Based Widget Editor

WordPress planned to adapt the block editor for editing all areas of your website including the widget-ready areas.

To make this happen, the new block-based widget editor was introduced in WordPress 5.8.

Users were now able to use blocks in widget-ready areas of their themes.

Block widget editor

Widgets are still located under the Appearance » Widgets menu.

However, if you are using a block-based theme that doesn’t have any defined widget-ready areas, then you may not see it under there. You will see Appearance » Editor instead.

Site editor with no widgets screen

Many of the legacy WordPress widgets already have blocks that can do the same thing.

Click on the add new block button (+) and you will find a bunch of blocks categorized as Widgets.

Widget blocks

These are still blocks, but they are just categorized as widgets so that users can understand that these blocks behave like legacy widgets.

However, if a user still needed to use a legacy widget that doesn’t have an alternative block, then they can do so by using the Legacy Widgets block.

Legacy widget block

If a WordPress plugin has a block that you can add to the posts and pages, you can now also use the same block in widget-ready areas.

Theme developers can also create custom blocks that users can add to different areas of their websites.

The Future of WordPress Widgets

WordPress is moving forward towards using a more intuitive and unified way to edit the content on a WordPress website.

This means that older widgets will no longer be available going forward. WordPress themes and plugin developers are already adapting and adding support for the block editor in their products.

However, many WordPress themes still use older widgets. Similarly, many WordPress plugins still use shortcodes and legacy widgets.

If you still need to use the old widgets, then you can disable block widgets in WordPress.

The simple way would be to do it by using the free WPCode plugin which allows you to customize WordPress without adding dozens of plugins.

It has a pre-made snippets that you can use to disable block widgets.

Select the Disable Widget Blocks snippet from the WPCode library

Alternatively, you can also use Classic Widgets plugin. For more details, see our step-by-step guide on how to install a WordPress plugin.

Upon activation, the plugin will simply replace the block-based widget editor with the older widget page.

Note: Classic Widgets plugin will only be supported until 2024. After then, the plugin will not be updated or maintained this is why we recommend using WPCode to future-proof your customization.

Blocks vs Widgets – Which One is Better?

We recommend users start using the new block-based widgets editor as soon as possible because that’s the direction WordPress development is heading.

It is easy to use, modern, and more flexible than the previous Widgets screen.

If a WordPress plugin or theme on your website doesn’t support block-based widgets, then you can reach out to the developer and ask them to convert their widgets into blocks.

If they don’t have plans to release an update, then you can easily find alternative plugins or themes to replace them.

We hope this article helped you understand the difference between WordPress widgets vs blocks. You may also want to see our pick of the best block plugins for WordPress or see our guide on the difference between the block editor vs page builders.

If you liked this article, then please subscribe to our YouTube Channel for WordPress video tutorials. You can also find us on Twitter and Facebook.

The post WordPress Widgets vs Blocks – What’s the Difference? (Explained) first appeared on WPBeginner.

How to Track WordPress Widget History (Easy Method)

Do you want to track your WordPress widget history to monitor changes made to the widgets on your site?

Widgets are blocks of content that you can add to your website. They allow you to add different elements to your sidebars such as signup forms, images, recent posts, and more. Tracking widget history allows you to easily monitor changes and undo them as needed.

In this article, we’ll show you how to easily track your WordPress widget history.

How to track widget history in WordPress

Why Should You Track WordPress Widget History?

By default, WordPress comes with a feature called revisions for content types like posts and pages. Revisions make it easier to what changes were made by which user, and allow you to easily undo those changes if needed.

However, there is no built-in revisions feature for WordPress widgets.

Tracking widget history will allow you to keep track of changes made to widgets on your WordPress website. You can see which user added, removed, or changed a widget, and then you can keep those changes or undo them by editing your widget.

Similarly, if something in a widget has stopped working, then you can pinpoint which changes caused the problem and fix them manually.

That being said, let’s take a look at how to easily track widget history in WordPress.

How to Easily Track WordPress Widget History

The easiest way to track WordPress widget history is by using the Simple History plugin.

First, you need to install and activate the Simple History plugin. For help, see our guide on how to install a WordPress plugin.

Keep in mind that plugin will only track changes made after the plugin is activated.

After installing the plugin, let’s make a few changes to your WordPress widgets. Simply go to the Appearance » Widgets page and make some changes to your existing widgets.

Make changes to widget

Don’t forget to click on the Update button to save your widget changes.

After that, you can go to the Dashboard » Simple History page inside WordPress admin area.

You’ll see the changes you made to your widgets appear at the top.

Widget changes view

Apart from widget changes, Simple History will also be able to track the following changes and user activity on your website:

  • theme updates
  • plugin installation
  • sidebar widget history
  • Comments history
  • user logins
  • user profiles

If you want to change the settings of the plugin, then you can simply head over to Settings » Simple History from the WordPress admin dashboard.

Go to Simple history settings from the dashboard

From here, you can modify the plugin settings according to your needs.

If you want to track the widget history of your WordPress site directly from the dashboard, then you can check the ‘On the dashboard’ option beside the ‘Show History’ option.

This will allow you to access Simple History by simply heading over to Dashboard » Simple History from the WordPress admin panel.

You can also select the number of items you want to show on your log page as well as your dashboard page.

Additionally, you can enable the RSS feed option by checking the box next to it if you want to receive daily log updates about your website.

Don’t forget to click the ‘Save Changes button at the bottom once you’re satisfied.

Enable RSS Field

Next, you may want to switch to the Debug tab. From here, you can view all the log events displayed as Loggers.

Plus, you will also be able to see the names of tables that plugin has created in your WordPress database.

Debug options

The plugin also allowss you to easily downoad the logs file to your computer.

Siply switch to the Export tab on the plugin’s settings page and choose which format you want to use for the export.

You can choose either JSON or CSV format. We recommend using the CSV option as you can open the CSV files in any spreadsheet software like Google Sheets or Microsoft Excel.

Check CSV option

After that, click on the Download Export File button and plugin will send a download file to your browser.

Here is how it would look when you open it in a spreadsheet software.

Excel file

Final Thoughts

Having an activity log is very important as it helps you keep your website safe. Simple History does that for widgets and many other plugins.

Other plugins like WPForms have added revisions to WordPress form building, and WPCode has also added version control for custom code snippets.

Lastly, if you’re looking for a comprehensive activity log solution for WordPress security, then we recommend taking a look at WP Activity Log plugin.

We hope this tutorial helped you learn how to easily track your WordPress widget history. You may also want to check out our guide on how to start a podcast, and our top picks of the best WooCommerce plugins for your store.

If you liked this article, then please subscribe to our YouTube Channel for WordPress video tutorials. You can also find us on Twitter and Facebook.

The post How to Track WordPress Widget History (Easy Method) first appeared on WPBeginner.

How to Convert a WordPress Widget into a Block (Step by Step)

Are you looking to use a legacy widget in your WordPress sidebar or post content?

In version 5.8, WordPress added a new block-based widget editor. Blocks are more flexible and make it easier to add rich content to your site. Luckily, you can still use classic widgets on your site as well.

In this article, we’ll show you how to convert a WordPress widget to a block.

How to Convert a WordPress Widget to a Block

Here’s what we’ll cover in this tutorial:

What Is the Difference Between a WordPress Widget and Block?

Widgets are used to add blocks of content to the sidebar, footer, or other areas of your WordPress website. They’re an easy way to add image galleries, social media feeds, quotes, calendars, popular posts, and other dynamic elements to your site.

In version 5.8, WordPress introduced a new block-based widget editor that allows you to use blocks to create more engaging widget areas. For instance, you can add buttons, choose colors, group different blocks, and more.

But what if you still rely on a legacy widget that has not been upgraded to a WordPress block? Luckily, you can still use it.

We’ll show you how to easily add legacy widgets to your sidebar and other widget-ready areas. The method you use depends on whether you are using a classic theme or a block theme. On top of that, we will also show you how to add a widget to your posts and pages.

But first, let’s take a brief look at the difference between widgets and blocks from a developer’s point of view.

Can a WordPress Widget Be Simply Converted to a Block?

If you’re a developer who created a legacy widget for WordPress, then you may be wondering whether you can convert it into a new block widget.

While widgets and blocks look similar, they are actually quite different. For example, they are coded using completely different programming languages. Widgets are written in PHP and blocks are written in JavaScript.

This means that there is no simple way to convert a widget into a block.

But that’s not a problem. Your existing widget will continue to work with new versions of WordPress. If you don’t plan to update your widget code, then you can leave it as it is.

However, if you want to continue adding new features to your widget, then it’s best to create a new block to replace the legacy widget. You can follow our guide on how to create a custom WordPress block.

Creating a new custom block

Adding Widgets to Your Classic Theme’s Sidebar in WordPress

If you are using a classic theme, then you can add classic widgets to your sidebar or other widget-ready areas of your site by using the Legacy Widget.

First, you need to navigate to Appearance » Widgets in your WordPress admin area.

Next, you should click the ‘+ Add Block’ button. From the popup, you need to click the ‘Legacy Widget’ icon.

Add the Legacy Widget to Your Sidebar

Note: If you see Appearance » Edit instead of Appearance » Widgets, then you are using a block theme. You’ll need to follow the next method below.

Now you can select the widget you wish to use from the drop down menu.

Select the Desired Widget from the Drop Down Menu

The widget will be added to your sidebar. Make sure you click the ‘Update’ button at the top of the screen to save the new widget.

The Legacy Widget Is Added to the Sidebar

To learn more, see our step by step guide on how to add and use widgets in WordPress.

Adding Widgets to Your Block Theme’s Sidebar in WordPress

Block themes, such as the default Twenty Twenty-Two theme, let you use the Full Site Editor in WordPress. Full site editing offers custom blocks for styling your website’s theme, but doesn’t include the Legacy Widget by default.

That means you won’t be able to access legacy widgets from the Full Site Editor, and when you switch from a classic theme to a block theme, any legacy widgets you were using are not migrated over.

Luckily, you can add legacy widget support using a plugin. Simply install and activate the X3P0 Legacy Widget plugin. For more details, see our step by step guide on how to install a WordPress plugin.

Upon activation, the plugin will add the Legacy Widget to the Full Site Editor. This will allow you to use legacy widgets with newer themes.

The Legacy Widget Is Now Available in the Full Site Editor

Adding Widgets to Your Post Content in WordPress

First, you will need to edit an existing WordPress post/page or add a new one. Once you’re in the WordPress content editor, go ahead and click the ‘+ Toggle block inserter’ button at the top of the screen.

Next, scroll down to the ‘Widgets’ section and find the widget that you want to add to the content. You can then drag the widget onto your post.

Scroll Down to the Widgets Section

You can customize the widget by using the Settings panel on the right of the screen.

Once you’re done, go ahead and publish your blog post or page.

Configure the Widget From the Right Settings Pane

To learn more, see our guide on how to add WordPress widgets in post and page content.

We hope this tutorial helped you learn how to use legacy widgets in WordPress. You may also want to learn how to track website visitors, or check out our list of the best contact form plugins for WordPress.

If you liked this article, then please subscribe to our YouTube Channel for WordPress video tutorials. You can also find us on Twitter and Facebook.

The post How to Convert a WordPress Widget into a Block (Step by Step) first appeared on WPBeginner.

How to Add a WordPress Widget to Your Website Header (2 Ways)

Do you want to add a WordPress widget to your website header area? 

Widgets allow you to add content blocks to specific sections of your theme easily, but not every theme includes a header widget area. 

In this article, we’ll show you how to easily add a WordPress widget to your website header.

How to add a WordPress widget to your website header (2 ways)

Why Add a Header Widget to Your WordPress Site?

Your website header is one of the first things your visitors will see when visiting your WordPress website. By adding a WordPress widget to your header, you can optimize this area to help capture reader attention.

Most website headers will include a custom logo and a navigation menu to help visitors get around your site.

You can also add a header widget above or below this area to feature helpful content, banner ads, limited-time offers, single line forms, and more. 

Here at WPBeginner, we have a header call to action directly below the navigation menu.

Header CTA example

Most WordPress themes have widget ready areas in the sidebar and footer areas of the site, but not every theme adds widget ready areas in the header. 

Editor’s Note: If your theme doesn’t have a widget-ready header area, then you can now create completely custom WordPress themes from scratch (without any coding).

But first, let’s take a look at how to add a WordPress widget to your website header in your existing theme. Simply use the quick links below to jump straight to the method you want to use.

Method 1. Add a WordPress Widget to Your Website Header in WordPress Theme Settings

Many of the best WordPress themes include a header widget area that you can customize to your liking. 

First, you’ll want to see if your current WordPress theme supports a WordPress widget area in the header.

You can find this by going to the WordPress theme customizer or the widget area of your WordPress admin panel. To do this, navigate to Appearance » Customize and see if there is an option to edit the header.

In this example, the free Astra theme has an option called ‘Header Builder’. We’ll show you how to use this feature in Astra, but keep in mind that this will look different depending on the theme you’re using.

Astra header builder

If you click this, it brings you to a screen to edit your header and add widgets. 

At the bottom of the screen, you can completely customize the header, along with the areas above and below the header. Simply hover over one of the empty areas and click the ‘Plus’ icon.

Click plus icon

This brings up a popup menu where you can select ‘Widget 1’. 

There are additional options to choose from, but you’ll need to select one of the ‘Widget’ options to make the header widget-ready.

Select widget 1 option

To add a widget area to your header, click the ‘Widget 1’ box that’s in the header customizer section.

This brings up the option to add a widget.

Click widget 1 box

Next, click the ‘Plus’ add block icon in the left-hand menu. 

This brings up a popup where you can select a widget to add to your header. 

Click plus icon and select widget

You can continue customizing your header and add as many widgets as you’d like.

Once you’re done, make sure to click the ‘Publish’ button to save your changes.

Publish header widget changes

Now you can view your header area with the widget or widgets you added.

Header widget example

Not using Astra?

Another way to see if your theme already has a WordPress header widget is by navigating to Appearance » Widgets in your WordPress admin panel.

Then, see if there’s a widget section labeled ‘Header’ or something similar. 

Go to widgets section for header widget

If there is, then simply click the ‘Plus’ add block icon to bring up the widgets menu.

Then you can add whatever widget you like by clicking on it. 

Header widget section

Make sure you click the ‘Update’ button to save your changes to the header widget area.  

Method 2. Add a WordPress Widget to Your Website Header by Adding Code to WordPress

If your WordPress theme doesn’t currently have a WordPress widget area in the header, then you’ll need to add it manually by adding code to WordPress.

If you haven’t done this before, then see our guide on how to copy and paste code in WordPress.

Then, you can add the following code snippet to your functions.php file, in a site-specific plugin, or by using a code snippets plugin.

function wpb_widgets_init() {

	register_sidebar( array(
		'name'          => 'Custom Header Widget Area',
		'id'            => 'custom-header-widget',
		'before_widget' => '<div class="chw-widget">',
		'after_widget'  => '</div>',
		'before_title'  => '<h2 class="chw-title">',
		'after_title'   => '</h2>',
	) );

}
add_action( 'widgets_init', 'wpb_widgets_init' );

This code registers a new sidebar or a widget ready area for your theme.

If you go to Appearance » Widgets, then you will see a new widget area labeled ‘Custom Header Widget Area’.

Custom header widget area

Now, you can add your widgets to this new area. For more details, see our guide on how to add and use widgets in WordPress.

However, your header widget won’t display live on your website just yet. We’ll show you how to do that next.

Displaying Your Custom Header Widget in WordPress

Now that you’ve created the header widget area, you need to tell WordPress where to display it on your website. 

To do this, you need to edit your theme’s header.php file. Then, you need to add the following code where you want the widget to display.

<?php

if ( is_active_sidebar( 'custom-header-widget' ) ) : ?>
    <div id="header-widget-area" class="chw-widget-area widget-area" role="complementary">
	<?php dynamic_sidebar( 'custom-header-widget' ); ?>
    </div>

<?php endif; ?>

This code will add the widget area you created earlier to your website header area. 

Now, you can visit your WordPress blog to see your header widget area live.

Header widget live

Style Your WordPress Header Widget Area Using CSS

Depending on your theme, you may also need to add CSS to WordPress to control how the header widget area and each widget inside it are displayed. If you don’t know CSS, you can use a plugin like CSS Hero instead.

To learn more, see our guide on how to easily add custom CSS to your WordPress site.

Next, navigate to Appearance » Customize in your WordPress admin panel. 

This brings up the WordPress theme customizer panel. You need to click on the ‘Additional CSS’ tab.

WordPress customizer additional CSS

This lets you add additional CSS directly to your theme and see the changes in real time. 

Here is some sample CSS code to help you get started:

div#header-widget-area {
    width: 100%;
    background-color: #f7f7f7;
border-bottom:1px solid #eeeeee;
    text-align: center;
		padding: 20px;
}
h2.chw-title {
    margin-top: 0px;
    text-align: left;
    text-transform: uppercase;
    font-size: small;
    background-color: #feffce;
    width: 130px;
    padding: 5px;
    }

Simply add the CSS code to the ‘Additional CSS’ box.

Add CSS code and publish

Once you’re finished adding your CSS, make sure to click the ‘Publish’ button to save your changes. 

Here is how the custom header widget looks with the CSS changes live.

Header widget example after CSS

We hope this article helped you learn how to add a WordPress widget to your website header. You may also want to see our guide on how to choose the best WordPress hosting and our expert picks of the best live chat software for small businesses.

If you liked this article, then please subscribe to our YouTube Channel for WordPress video tutorials. You can also find us on Twitter and Facebook.

The post How to Add a WordPress Widget to Your Website Header (2 Ways) first appeared on WPBeginner.

How to Easily Hide Widget Title in WordPress

Do you want to hide the title of a WordPress widget in your sidebar or footer?

WordPress widgets make it easy to drag and drop dynamic content into your theme to create unique layouts. However if you need to hide the widget title, then it typically requires coding knowledge of CSS and HTML.

In this article, we’ll show you how to easily hide the widget title in WordPress (without any code).

Hiding widget title in WordPress

Why Hide Widget Title in WordPress?

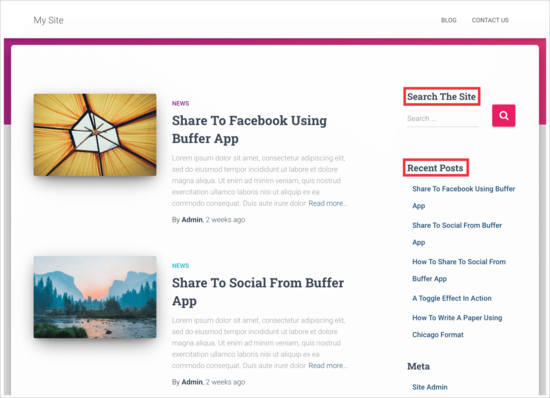
WordPress displays a default title for widgets, and it also allows you to rename them if you want. Most top WordPress themes will then display this title in the sidebar on your site.

Widgets titles displayed in sidebar

However, sometimes you may not want to display the widget title in the WordPress blog sidebar. By default, there is no built-in option to simply switch off widget titles.

That being said, let’s take a look at how you can easily hide the widget title in the WordPress sidebar.

Hiding Widget Title in WordPress

First, you want to install and activate the Widget Options plugin. For more details, please see our complete guide on how to install a WordPress plugin.

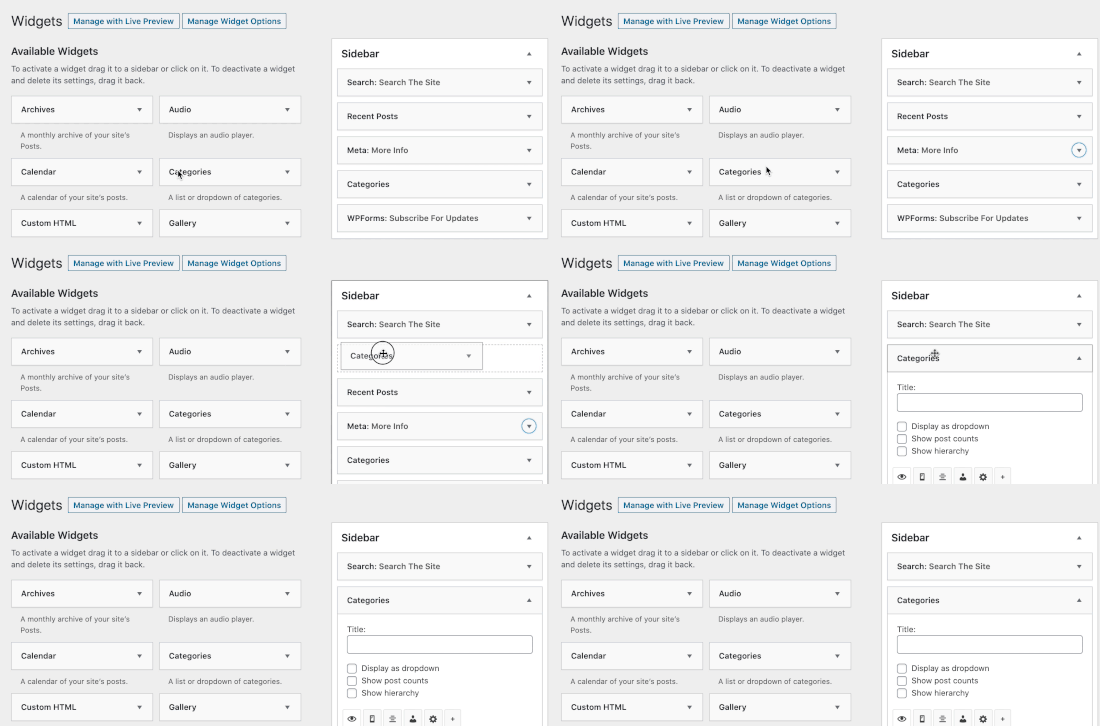
Once the plugin is activated, head over to Appearance » Widgets area in your WordPress admin area. Next, drag and drop a widget to your sidebar or any other widget-ready area on your site.

Drag and drop widget into sidebar

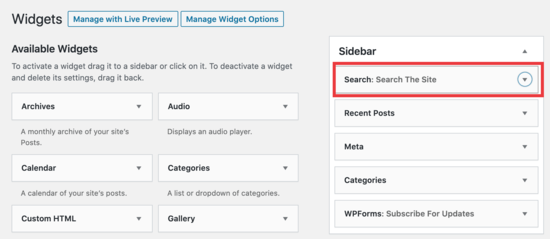
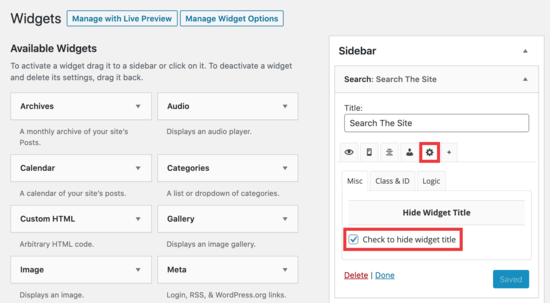
In this example, we’re going to remove the widget title ‘Search The Site’ from our search box in the sidebar.

Sidebar widget view

Simply click the arrow to open the widget and view the options to hide the title.

Hide widget title settings

Make sure you click on the ‘gear’ icon, and then check the box next to ‘Check to hide widget title’ and click the ‘Save’ button.

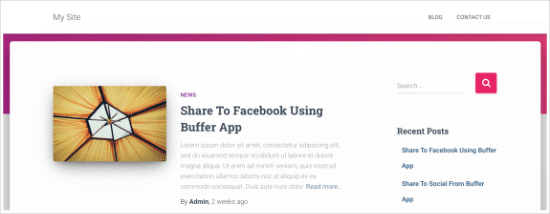
Now, when you view your site, the WordPress search box will appear without the widget title.

Widget title hidden on site

You can use this plugin to hide any widget title. The plugin also comes with multiple settings to hide or display titles based on page or post types and even screen sizes.

We hope this article helped you learn how to easily hide widget titles in WordPress. You may also want to check out our list of the most useful WordPress widgets for your site, and our comparison of the best drag and drop WordPress page builder plugins.

If you liked this article, then please subscribe to our YouTube Channel for WordPress video tutorials. You can also find us on Twitter and Facebook.

The post How to Easily Hide Widget Title in WordPress appeared first on WPBeginner.

25 Most Useful WordPress Widgets for Your Site

Are you looking for useful WordPress widgets for your website?

Widgets allow you to add content, features, and other elements to your WordPress sidebar and other widget-ready areas.

WordPress comes with a handful of built-in widgets that you can use right away. WordPress plugins and themes can also add their own WordPress widgets as well.

In this article, we will share some of the most useful WordPress widgets for your site. These widgets will help you effectively use your website’s digital real estate to improve user experience and grow your business.

Most useful WordPress widgets for your website

1. WP Call Button

WP Call Button

As mobile internet traffic grows, most users find it convenient to just call a business for more information. WP Call Button allows you to easily add a click to call now button to your WordPress site.

You can use it to add a sticky button thats scrolls with the user or use the widget to display the call button in a sidebar.

It works with any landline or mobile phone number, but we recommend using a professional business phone service to make sure that you never miss a call.

For step by step instructions, see our article on how to easily add a click-to-call button in WordPress.

2. WPForms

WPForms

WPForms is the best WordPress contact form plugin on the market. It allows you to quickly create a contact form and add it anywhere on your website.

It comes with a drag and drop form builder, ready-to-use form templates, Gutenberg block, and sidebar widget. It is a premium plugin with a free version available as WPForms Lite.

For details, see our guide on how to create a contact form in WordPress with step by step instructions.

3. RafflePress

RafflePress

RafflePress is the best WordPress giveaway / contest plugin. It allows you to create viral giveaways and contests to instantly get a lot of traffic, new customers, and subscribers.

It allows you to run a giveaway and add it to a post, page, or sidebar widget. You can also create a standalone landing page for your giveaway and promote it across your social profiles.

RafflePress is a paid plugin with a free version called RafflePress Lite.

To learn more, see our guide on how to run a giveaway in WordPress with detailed instructions.

4. Recent Posts Widget with Thumbnails

Recent Posts Widget With Thumbnails

By default, WordPress comes with a recent posts widget, which displays a plain list of your recent posts. Recent Posts Widget With Thumbnails allows you to display recent posts with thumbnails.

It uses the featured image or the first image in a post as thumbnail. You can also adjust the height and width of the image from the widget’s settings screen.

5. Astra Widgets

Astra Widgets

Astra Widgets is widget pack created by the folks behind the popular Astra Theme. It allows you to easily add your business location, social profile links, and an icon list to your WordPress sidebar.

It works with any WordPress theme and is compatible with all popular page builder plugins as well.

6. Simple Social Icons

Simple Social Icons

It is a really simple widget to add social icons to your sidebars. All the configuration options are in the widget’s settings. You can choose which social networks to link to and add your profile URLs.

You can also modify the icon by choosing the background and icon font color. For details, see our tutorial on how to add social media icons in your WordPress sidebar.

This plugin is built by StudioPress, the popular company behind the Genesis Theme Framework (now a subsidiary of WP Engine).

7. Google Maps Widget

Google Maps Widget

An easier way to add a map to your site’s sidebar is by using Google Maps Widget. This simple widget allows you to display a Google map in a widget. When a user clicks on the map, a larger map opens in a lightbox popup.

This is one of the best WordPress widgets for businesses that want to display their address and location on their site. Check out our guide on how to add Google Maps in WordPress for more information.

8. Social Count Plus

Social Count Plus

You may have seen that some popular websites show their social followers count in the sidebar. This adds to the credibility of your website by adding social proof.

Social Count Plus widget allows you to easily display your social media follower count in the sidebar. See our guide on how to display social media followers count in WordPress.

This widget only displays your follower count and not the number of times an article is shared on your website.

If you want to display share counts for individual posts, then we recommend using Shared Counts, which is one of the best social media plugins for WordPress. It will allow you to easily add social sharing buttons to your posts and pages with share count for each social media website.

9. Compact Archives

Compact Archives

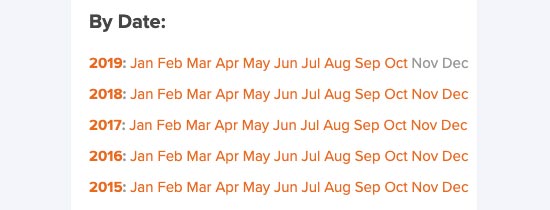
The default monthly archives widget shows your blog archives in a long list of months. This can take up a lot of space. Compact Archives solves this problem by grouping your monthly archives into years and displaying them in a compact form.

It also comes with a Gutenberg block that you can add to in your posts and pages. It also includes a widget that you can use in your blog’s sidebar.

For more information check out our tutorial on how to create compact archives in WordPress.

10. OptinMonster

OptinMonster

OptinMonster is the best WordPress lead generation software on the market. It allows you to easily convert website visitors into subscribers and customers.

It helps you grow your email list by adding sign up forms in sidebar widgets, lightbox popup, floating bars, and more.

OptinMonster is the best WordPress widget for eCommerce sites and businesses who want to boost their conversions.

11. AdSanity

AdSanity

AdSanity is the best ad management plugin for WordPress. It allows you to easily display ads anywhere on your website and comes with a widget to automatically display ads in your blog’s sidebar.

If you are planning to support your website with Google AdSense, banner ads, or affiliate marketing, then AdSanity helps you maximize your ad space and generate more revenue.

12. Testimonials Rotator

Testimonial Rotator

An easy way to add social proof to your website is by adding customer testimonials to your website. Testimonials Rotator allows you to easily add customer testimonials to your website.

It is one of the best testimonial plugins for WordPress and comes with a nifty widget that allows you to display rotating testimonials in a sidebar. This takes less space and allows you to cleverly use sidebars to boost social trust.

For detailed instructions, see our article on how to add rotating testimonials in WordPress.

13. Feature a Page Widget

Feature a Page Widget

This neat plugin allows you to add a page as a featured page in your WordPress sidebar. You can choose to display a page title, featured image, and excerpt. See this article on how to feature a page in WordPress to learn more.

14. Easy Table of Contents

Easy Table of Contents

Easy Table of Contents plugin allows you to easily add a table of contents to your articles. It comes in handy if you often publish long-form articles. Adding a table of contents helps users quickly jump to different sections.

The plugin can automatically insert a table of contents to longer articles or you can manually add it. Additionally, it also comes with a widget to display the table in the sidebar.

For details, see our article on how to easily add table of contents in WordPress.

15. Widget Context

Widget Context

Widget Context plugin allows you to show and hide widgets based on context. For example, you can hide a widget if a user is viewing a specific page.

This comes in handy if you don’t want to display a widget on certain pages or only want to display it on specific sections. For details, see our article on how to show / hide widgets in WordPress.

16. Q2W3 Fixed Widget for WordPress

Q2W3 Fixed Widget for WordPress

The sidebar widgets usually disappear as a user scroll down your website. Q2W3 Fixed Widget for WordPress allows you to change any widget into a fixed widget that stays on the screen as users scroll down.

This comes in handy if you want to display a special offer, important content, or a newsletter sign up form. For details, see our guide on how to create a sticky floating widget in WordPress.

17. WordPress Popular Posts

WordPress Popular Posts

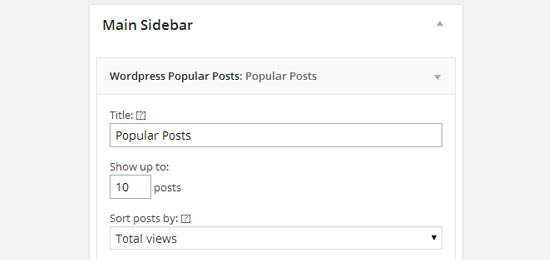
WordPress Popular Posts is the best popular posts plugin for WordPress. As the name suggests, it allows you to display your most popular posts in WordPress.

The plugin comes with a widget that you can add to a sidebar. You can also use the shortcode or a template tag to display popular posts anywhere on your site.

18. WP-PostRatings

WP-PostRatings

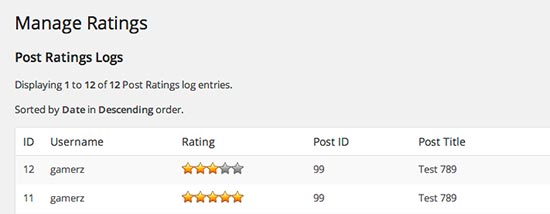
WP-PostRatings plugin allows you to easily add a post rating system to your WordPress website. Your users can then rate articles on your site and provide you with instant feedback.

The plugin also comes with a widget, which you can use to display your top-rated content in your blog’s sidebar.

19. Theme My Login

Theme My Login

Theme My Login is a powerful WordPress plugin that allows you to create a custom login page for your website visitors. It is highly useful if you allow user registration on your website or run a multi-author WordPress blog.

The plugin also comes with a sidebar login widget, which you can use to make it easier for users to log in to their accounts. For details, see our guide on how to create front-end / sidebar login form in WordPress.

20. Advanced AJAX Product Filters

Advanced AJAX Product Filters

Advanced AJAX Product Filters allows you to display an instant product filter for your WooCommerce store. You can allow your users to filter products by price, rating, or attributes by simply adding a filter widget to your sidebar.

21. Google Language Translator

Google Language Translator

Google Language Translator plugin allows you to easily add a language switcher widget to your WordPress site. It uses Google Translate to translate content on your website in any language.

Alternative: TranslatePress allows you to combine Google translate with manual translations to improve the overall quality of your translated content.

22. Widget Importer & Exporter

Widget Importer & Exporter

Now that you have set up your widgets and configured its settings, you may want to move them to another website. This is where Widget Importer & Exporter plugin comes in handy.

It allows you to download all your widgets as JSON file, which you can then import on any other WordPress site. If you are using the same theme and plugins, then all your widgets will be imported exactly as they were.

If you are using a different theme that does not have the same widget areas as the old theme, then those widgets will be imported as inactive widgets. You can then drag and drop them to any widget area you like.

23. The Events Calendar

The Events Calendar

The Events Calendar is one of the best WordPress calendar plugins on the market. It allows you to easily manage event listings on a WordPress website.

You can add new events with full details, display an events calendar in a WordPress post or page, or display upcoming events in a sidebar widget.

24. Yet Another Related Posts Plugin (YARPP)

Yet Another Related Posts Plugin (YARPP)

Yet Another Related Posts Plugin (YARPP) is the best WordPress related posts plugin on the market. It allows you to easily display related content for each article on your website.

It uses an advanced algorithm to match content which allows it to show more contextually related posts than other plugins. It also comes with a widget that you can use to display related posts in a sidebar.

25. Posts in Sidebar

Posts in Sidebar

Posts in Sidebar is a really simple but highly useful plugin. It allows you to show specific posts in a sidebar widget.

You can select which posts you want to show, display them with title, excerpt, and a thumbnail, or plain lists. You can also use it with the Widget Context plugin to show different posts on different areas of your website.

We hope this article helped you find some useful WordPress widgets for your website. You may also want to see our guide on the best WordPress plugins and the best Gutenberg block plugins for your website.

If you liked this article, then please subscribe to our YouTube Channel for WordPress video tutorials. You can also find us on Twitter and Facebook.

The post 25 Most Useful WordPress Widgets for Your Site appeared first on WPBeginner.