How to Easily Remove WordPress Icon from Browser Tab

Do you want to remove the WordPress icon from the browser tab of your website?

Removing the WordPress icon can prove to be extremely beneficial for you as it will allow you to design your own site icon and increase your brand recognition among customers.

In this article, we will show you how to easily remove the WordPress icon from the browser tab.

How to Easily Remove WordPress Icon from Browser Tab

Why Should You Remove the WordPress Icon from Browser Tab

The WordPress icon on your browser tab can make your website look generic and unprofessional. Most users have many tabs open in their browser which results in your website title being hidden.

With your website title hidden, users have no way to recognize your site immediately. With just the WordPress logo in the tab, your users will be unable to identify your site among many others.

By removing the WordPress icon from the browser tab and adding a favicon (aka your site icon), you can use your own brand and make your site more user-friendly for your visitors.

A favicon is a tiny image that appears next to your website’s title in the browser.

Browser tabs

The favicon will help your users immediately recognize your website and switch between different tabs efficiently. More frequent visitors will even build instant recognition for that tiny image on your browser.

How to Remove the WordPress Icon from Browser Tab

The process of removing the WordPress icon and adding a favicon in its place is extremely easy. There are three methods that can be used to remove the WordPress icon from the browser tab.

Today, we’ll be taking a look at all three methods and you can choose the one that feels right for you.

Method 1. Removing the WordPress Icon Without a Plugin

As of WordPress 6.1, the WordPress default theme comes with a full site editor. You can also use this method if you’re using a block theme on your WordPress site to remove the WordPress icon.

At the time of writing this tutorial, the default WordPress 6.1 theme Twenty Twenty-Three doesn’t have a site icon block to change your favicon away from the WordPress logo.

If you navigate to Appearance » Editor from your WordPress admin dashboard, this will open up the full site editor, but you cannot change your favicon from here or remove the WordPress icon from the browser tab.

Go to full site editor from WordPress dashboard

So you can copy and paste the URL below into your browser to open up the theme customizer.

https://example.com/wp-admin/customize.php

Remember to replace ‘example.com’ with your own site’s domain name.

This URL will take you to the Theme Customizer. Once there, simply click the ‘Site Identity’ tab.

Select the Site Identity tab

Now on the ‘Site Identity’ page, scroll down to the ‘Site Icon’ section.

Simply click the ‘Select Site Icon’ button which will open up the WordPress media library.

Click Site Icon button

You can now select any image that you want to use as a favicon to replace the WordPress icon on the browser tab.

For more details on how to create a favicon, you can check out our article on how to add a favicon in WordPress. If the image that you’ve chosen to use as a favicon exceeds the recommended size, then WordPress will allow you to crop it.

Once you’re satisfied with your choice simply click the ‘Publish’ button at the top.

Congratulations! You’ve successfully removed the WordPress icon from the browser tab and replaced it with your own.

Remove the WordPress Icon in a Theme without Full-Site Editing

If you’re using any non-FSE theme, then you can directly navigate to the Theme Customizer at Appearance » Customize to remove the WordPress icon from the browser tab.

In sites that don’t support the full-site editor, the WordPress theme customizer allows you to change details about your site such as the favicon, typography, default colors, footer, and more.

Once in the Theme Customizer, click on the ‘Site Identity’ tab. The process is the same as the one we showcased above. You can remove the WordPress icon simply by uploading a site icon of your choice.

Once you’re happy with your choice, simply click on the ‘Publish’ button to save changes.

Method 2. Removing the WordPress Icon Using a Plugin

You can also use a plugin to remove the WordPress icon and replace it with a favicon. For this tutorial, we will be using the Heroic Favicon Generator plugin.

It is a well-known plugin that is used by many to add a favicon to their website.

Heroic Favicon Generator Plugin

First, all you have to do is install and activate the Heroic Favicon Generator plugin.

For more details, please take a look at our guide on how to install a WordPress plugin.

After the plugin has been activated, simply go to Plugins » Installed Plugins and click on ‘Favicon Settings’ option.

After activating the plugin, click on Favicon Settings

This will take you to the ‘Heroic Favicon Generator Settings’ page. Here, simply click on the ‘Select Favicon’ button under the ‘Select Favicon’ option.

This will open up the WordPress media library. Now, you can choose and upload any image that you want to use as a favicon.

Click on Select Favicon button

After you’ve uploaded your favicon, you can scroll down to the ‘Previews’ section where you will be able to see how the favicon will look on your website.

Once you’re satisfied, simply scroll down and click on the ‘Save Changes’ button.

Previews of favicon

You have successfully removed the WordPress icon and have added a favicon in its place.

We hope this article helped you learn how to remove the WordPress icon from the browser tab. You may also want to see our ultimate WordPress SEO guide to improve your rankings, and check out our article on how to easily move your blog from WordPress.com to WordPress.org.

If you liked this article, then please subscribe to our YouTube Channel for WordPress video tutorials. You can also find us on Twitter and Facebook.

The post How to Easily Remove WordPress Icon from Browser Tab first appeared on WPBeginner.

How to Fix Missing Theme Customizer in WordPress Admin

Do you want to fix the missing theme customizer in the WordPress dashboard?

WordPress themes that support full site editing (FSE) don’t include a theme customizer option in the WordPress admin panel. Instead, you’ll see a new ‘Editor (Beta)’ option under the Appearance menu.

In this article, we’ll show you how to fix the missing theme customizer in WordPress admin.

How to fix missing theme customizer in WordPress admin

What Happened to the Theme Customizer in WordPress Admin?

With WordPress gradually releasing the new full site editor, many themes no longer show the theme customizer option in your WordPress dashboard.

Full site editing allows you to customize your website design using blocks, just like editing a blog post or page in the WordPress content editor. You can add and edit different sections of your theme template using blocks, widgets, and menus.

However, your Appearance menu will look different if you’re using a block-based theme like the default Twenty Twenty-Two theme.

Missing theme customizer from admin panel

You’ll notice that the ‘Customize’ option to open the theme customizer is missing from the Appearance menu. Instead, there’s an ‘Editor (Beta)’ option to launch the full site editor.

By using the full site editor, you should be able to make any changes you would have made with the Customizer tool.

However, you might prefer to use the customizer instead of learning a whole new way of customizing your theme. In that case, we’ve put together a guide on how you can still use the customizer on your WordPress site.

Let’s look at some of the ways you can fix the missing theme customizer.

Fixing Missing Theme Customizer from WordPress Admin

There are 3 simple ways you can use to fix the missing theme customizer from your WordPress admin panel.

We’ll go through each method, so you can choose the one that best suits you.

1. Manually Enter the Theme Customizer URL in Your Browser

If you’re using a WordPress theme that uses the full site editor and want to access the theme customizer, then you can add ‘customize.php’ at the end of your WordPress admin URL.

Your website URL will look like this:

https://example.com/wp-admin/customize.php

Simply replace ‘example.com’ with your own website domain name and enter the link in your web browser. This will launch the theme customizer for your website.

Access theme customizer with URL

However, it’s important to note that the editing options will be limited in the theme customizer for themes using full site editing. For instance, you may only see a few simple settings like site identity, homepage settings, and additional CSS.

If you want to use all the options offered by the theme customizer to edit your site’s theme, then you can use the next method.

2. Switch Your WordPress Theme to Fix Missing Theme Customizer

Another way to solve the missing theme customizer issue is by changing your WordPress theme.

Full site editor is steadily rolling out, and it’s still in the early phases even in the latest WordPress 6.0 version. This means that not many themes fully support site editing at the moment, and those that do can be clunky and tricky to use.

Plus, the block-based themes have limited customization options if you access the theme customizer.

A simple way of restoring the theme customizer menu is by switching your WordPress theme to one that doesn’t include full site editing.

Themes that don't support full site editing

You can see our list of the most popular WordPress themes for plenty of options.

For more details, you can see our guide on how to change your WordPress theme.

3. Use a WordPress Theme Builder to Fix Missing Theme Customizer

You can also use a WordPress theme builder like SeedProd to customize your WordPress website and fix the missing theme customizer from WordPress admin.

WordPress theme builders allow you to customize your site’s theme the way you want without writing any code or hiring a developer. Their drag and drop interface lets you build different theme templates and removes the need to use the WordPress theme customizer.

SeedProd is the best WordPress theme builder and page builder plugin that’s used by over 1 million professionals. It offers pre-built theme templates that you can use to create a custom WordPress theme in no time.

SeedProd website theme templates

After selecting a template, you can use the drag and drop builder to customize your design.

Simply drag any element from the menu on your left and drop it onto the template. Plus, there are options to further customize each element on the template and change its color, size, font, and alignment.

SeedProd even includes WooCommerce blocks, so you can use it to create an online store.

SeedProd drag and drop theme builder

For step-by-step instructions, you can see our beginner’s guide on how to create a custom WordPress theme (no code).

We hope this article helped you learn how to fix missing theme customizer in WordPress admin. You can also see our guide on how to check website traffic for any site, or see our expert pick of the best WordPress SEO plugins to improve your rankings.

If you liked this article, then please subscribe to our YouTube Channel for WordPress video tutorials. You can also find us on Twitter and Facebook.

The post How to Fix Missing Theme Customizer in WordPress Admin first appeared on WPBeginner.

How to Customize Your WordPress Theme (Beginner’s Guide)

Are you looking to learn how to customize your WordPress theme design?

Many WordPress themes come with built-in options to easily customize the design and layout. You can also add more customization options using plugins.

In this article, we’ll show you how to easily customize your WordPress theme and make it your own.

Customizing a WordPress theme for beginners

Following is a list of topics we’ll cover in this guide:

Ready? Let’s get started.

Why Customize Your WordPress Theme

WordPress themes are designed for generic website niches. For instance, there are themes for different types of small business websites, photographers, bloggers, and more.

After picking a theme, you’ll need to customize it to your own requirements.

For instance, you may want to use your own custom logo, brand colors, tweak the layout a little bit, change font sizes, use your own images, and more.

Some of these customizations are necessary to make a website that truly represents your business and brand, and doesn’t just look like everyone else’s.

Depending on which WordPress theme you choose, these options may vary a lot from one theme to another.

For instance, some themes may give you an option to move the sidebar from right to left while others may not even have a sidebar in their layout.

That being said, let’s take a look at how to easily customize your WordPress theme without writing any code, and take it to the next level without breaking your website.

Using the Default Theme Customizer

WordPress came out with a full-site editing experience in WordPress 5.9.

There are currently not very many themes on the market with full support for the new full-site editing feature.

However, we’ll show you how to use it to customize your WordPress theme. We’ll also show you how to use the legacy theme customizer as well as the complete WordPress site builder tool that we recommend for beginners.

Using the Full Site Editor in WordPress to Customize a Theme

If your WordPress theme supports full site editor, then you’ll see the Editor menu under the Appearance option in the WordPress admin sidebar.

Launch new full site editor in WordPress

Clicking on it will launch the full site editor.

This editor is just like the block editor you use to write WordPress posts and pages.

Full site editor

You can add new elements to your templates by adding blocks. Apart from regular blocks, you can also use site-wide blocks like navigation, logo, post query loops, and more.

Each block comes with its own settings, where you can style it differently and change colors, typography, and other options.

Block settings

Your WordPress theme may also provide additional patterns that you can use to quickly create different sections.

You can find these under the Patterns tab.

Add patterns to your layouts

You can edit different areas of your website by clicking on the template name at the top and choosing a different template to edit.

To view more templates, you can click on ‘Browse all templates’ at the bottom.

Borwse templates

This will show you a list of templates available in your theme that you can edit.

Simply click on a template name to open it in the editor.

Select a template to edit

The template will open in the same block editor.

From here, you can edit it any way you want.

Editing posts template

Once you are satisfied with the changes you made to your theme, simply click on the Save button at the top to apply your changes.

Save changes to your theme

The full site editor is a powerful and flexible way to customize your WordPress theme.

However, it is a brand new feature and many WordPress themes don’t support it at the moment.

Using Legacy Theme Customizer in WordPress

If your WordPress theme doesn’t support the full site editor yet, then it will use the legacy theme customizer feature in WordPress.

In that case, you can customize your theme by going to the Appearance » Customize page.

Launching WordPress theme customizer

Clicking on it will launch the Theme Customizer.

You’ll see customization settings on the left side of your screen, and the live preview of your website to the right.

WordPress theme customizer

The editable areas of your website will be highlighted with a pencil icon on the live preview.

You can also expand each option on the left panel to change its settings.

expanded option in theme customizer

The number of options in the left panel will vary from one theme to another.

However, most themes will support the basics like your site’s tagline, widgets, homepage settings, menus, and Additional CSS settings.

For more details, view our guide on how to use the WordPress theme customizer to edit your theme.

Customize Your WordPress Theme with Full Control

The default WordPress theme customization options depend on which WordPress theme you are using.

If your theme supports a feature, you may be able to customize it using customizer or full site editor. This limits your ability to customize a WordPress theme.

What if you want to further customize or even create a custom WordPress theme for your website?

This is where SeedProd comes in.

It is the best WordPress website builder on the market. You can use it to create beautiful website layouts and even create a custom theme without writing any code.

First thing you need to do is install and activate the SeedProd plugin. For more details, see our step by step guide on how to install a WordPress plugin.

Upon activation, you need to enter your license key. You can find this information under your account on the SeedProd website.

After that, you need to choose whether you want to create a custom WordPress theme or create individual pages for your website.

SeedProd can do both and we’ll show you both approaches.

Customize Individual WordPress Pages with SeedProd

This approach is quite flexible and allows you to easily create on-demand page layouts.

For instance, you can design a custom landing page for a product or marketing campaign, or create a thank you page to send visitors after they sign up for your email list.

Simply head over to SeedProd » Landing Pages page and then click on the Add New Landing Page button.

Add new landing page

Next, you need to choose template for your page.

This template is used as an starting point, so you can change everything inside it later on. Alternatively, you can start with a blank canvas.

Select a template

Simply click on a template to continue.

SeedProd will then ask you to provide a title for your page and choose a URL.

Page name and URL

After entering the required information,. click on the Save and Start Editing the Page button.

This will launch the SeedProd page builder interface. This is a drag and drop design tool.

Editing a page layout in SeedProd

To your left, you’ll see blocks and sections that you can add to your page layout with a live editable preview of the page to the right.

You can simply point and click on any element of your page to edit it.

Point and click to edit any element

You can also add new blocks and even complete sections to your layout from the left column.

Add new blocks

SeedProd comes with all the popular web design elements that you’ll need to make your website. It includes contact forms, optin forms, login forms, testimonials, progress bars, accordions, navigation menus, icon box, and a ton more.

It also includes complete support for WooCommerce. You can use WooCommerce blocks to display products anywhere on your website, create a custom check out page, or design a cart page for your online store.

WooCommerce blocks

Once you are satisfied with your page design and layout, you can click on the Save button at the top right.

From here, you can also choose to publish the page or save it as a template.

Save or publish a page

That’s it! You can repeat this process to create more custom pages on your website.

Creating a Custom Theme in WordPress with SeedProd

This approach is highly recommended if you want to create a truly unique design for your blog, business website, or eCommerce store.

With this method, you’ll be designing your own custom WordPress theme from scratch using the same drag and drop page builder.

The best part is that your SeedProd custom theme will work no matter what theme you have installed on your site. That means you don’t need to worry about customizing a standard WordPress theme, but will have total freedom in creating your design.

To get started, simply head over to SeedProd » Theme Bulder page and click on the Themes button.

Create SeedProd theme

SeedProd will now now show you a bunch of starter themes to choose from.

You can completely modify every aspect of these themes.

Choose theme template

Once you have chosen a theme, SeedProd will generate all the theme templates.

Editing a theme template

Simply click on the Edit Design link below a template file to edit it.

You’ll see a live preview of the template in the right column with an editing panel in the left column.

Simply point and click to edit any item or drop elements from the left column.

Add new block to your template

SeedProd also comes with blocks specific to site-wide editing.

These are dynamic blocks that you can use to display content loop (for blog posts), post title, featured image, and more.

Add template tag blocks

Once you are done making changes to a theme, don’t forget to Save your changes.

Repeat the process to edit other templates to your own liking.

Once you are finished, go to the SeedProd » Theme Builder page and toggle the switch next to the ‘Enable SeedProd Theme’ option to ‘Yes’.

Enable SeedProd theme

SeedProd will now replace your WordPress theme with the custom theme you just created.

To learn more about SeedProd WordPress theme builder, see our tutorial on how to create a custom WordPress theme without writing code.

We hope this article helped you learn how to customize your WordPress theme to your own liking.

You may also want to see our guide on how to create an email newsletter, or see our WordPress SEO guide to optimize your website for more search traffic.

If you liked this article, then please subscribe to our YouTube Channel for WordPress video tutorials. You can also find us on Twitter and Facebook.

The post How to Customize Your WordPress Theme (Beginner’s Guide) first appeared on WPBeginner.

How to View the Mobile Version of WordPress Sites From Desktop

Do you want to preview the mobile version of your WordPress site?

Previewing the mobile layout helps you see how your website looks on mobile devices. When your site is under development or even when it’s live, it’s often easier to view the mobile version on a desktop computer. Then, you can quickly make changes and see their effect.

In this article, we will show you how to view a mobile version of the WordPress site from a desktop.

How to view the mobile version of WordPress sites from desktop

Why You Should Preview Your Mobile Layout

More than 50% of your website visitors will be using their mobile phones to access your site. Around 3% will be using a tablet.

This means that having a site that looks great on mobile is very important.

In fact, mobile is so important that Google is now using a mobile-first index for its website ranking algorithm. This means that Google will use your site’s mobile version for indexing. You can learn more by reading our ultimate guide to WordPress SEO.

Even if you are using a responsive WordPress theme, you still need to check how your site looks on mobile. You might want to create different versions of key landing pages that are optimized for mobile users’ needs.

It’s important to keep in mind that most mobile previews will not be completely perfect because there are so many different mobile screen sizes and browsers. Your final test should always be to look at your site on an actual mobile device.

That said, let’s look at how you can view the mobile version of your WordPress website on a desktop.

We are going to cover two different methods for testing how your site looks on mobile using desktop browsers. You can click the links below to jump to any section:

Video Tutorial

If you’d prefer written instructions, then continue reading.

Method 1: Using WordPress’s Theme Customizer

You can use the WordPress theme customizer to preview the mobile version of your WordPress site.

Simply log in to your WordPress dashboard and go to the Appearance » Customize screen.

Go to theme customizer from WordPress dashboard

This will open up the WordPress theme customizer. For this tutorial, we will be using the Astra theme.

Depending on what theme you are using, you may see slightly different options in the left-hand menu.

View options in theme customizer

At the bottom of the screen, simply click the mobile icon.

You will then see a preview of how your site looks on mobile devices.

View mobile screen preview

This method for previewing the mobile version is particularly useful when you haven’t yet finished creating your blog or when it’s in maintenance mode.

You can now make changes to your website and check how they look before you push them live.

Method 2: Using Google Chrome’s DevTools Device Mode

The Google Chrome browser has a set of developer tools that let you run various checks on any website, including seeing a preview of how it looks on mobile devices.

Simply open the Google Chrome browser on your desktop and visit the page you want to check. This could be the preview of a page on your site, or it could even be your competitor’s website.

Next, you need to right-click on the page and select the ‘Inspect’ option.

Right click to open the inspect option

A new panel will open up on the right-hand side or at the bottom of the screen.

It will look something like this:

View the inspect tool

In the developer view, you will be able to see your site’s HTML source code, CSS, and other details.

Next, you need to click the ‘Toggle Device Toolbar’ button to change to the mobile view.

Click the toggle device toolbar

You will see the preview of your website shrink to the mobile screen size.

Your website’s general appearance will also change in the mobile view. For instance, the menus will collapse, and additional icons will move to the left instead of the right of the menu.

View the mobile version in inspect tool window

When you hover your mouse cursor over the mobile view of your site, it will become a circle. This circle can be moved with your mouse to mimic the touchscreen on a mobile device.

You can also hold down the ‘Shift’ key, then click and move your mouse to simulate pinching the mobile screen to zoom in or out.

Above the mobile view of your site, you will see some additional options.

Change the dimensions for responsiveness

These settings let you do several extra things. You can check how your site would look on different types of smartphones.

For example, you can select a mobile device like an iPhone and see how your site will appear on the device.

You can also simulate your site’s performance on fast or slow 3G connections. You can even rotate the mobile screen using the rotate icon.

Bonus: How to Create Mobile-Specific Content in WordPress

It’s important that your website has a responsive design so that mobile visitors can easily navigate your website.

However, simply having a responsive site may not go far enough. Users on mobile devices are often looking for different things than desktop users.

Many premium themes and plugins let you create elements that display differently on desktop versus mobile. You can also use a page builder plugin like SeedProd to edit your landing pages in mobile view.

Previewing a custom page on mobile

You should consider creating mobile-specific content for your lead generation forms. On mobile devices, these forms should ask for minimal information, ideally just an email address. They should also look good and be easy to close.

For more details, you can see our guide on how to create a landing page in WordPress.

Another great way to create mobile-specific popups and lead-generation forms is with OptinMonster. It is the most powerful WordPress popup plugin and lead-generation tool on the market.

Edit campaign design on mobile

OptinMonster has specific device-targeting display rules that let you show different campaigns to mobile users vs desktop users. You can even combine this with OptinMonster’s geo-targeting feature and other advanced personalization features to get the best conversions.

You can see our guide on how to create mobile popups that convert for more information.

We hope this article helped you learn how to preview the mobile layout of your site. You may also want to see our expert picks for the best plugins to convert a WordPress site into a mobile app and learn how to increase blog traffic.

If you liked this article, then please subscribe to our YouTube Channel for WordPress video tutorials. You can also find us on Twitter and Facebook.

The post How to View the Mobile Version of WordPress Sites From Desktop first appeared on WPBeginner.

How to Use WordPress Theme Customizer Like a Pro (Ultimate Guide)

Did you know that WordPress comes with a built-in theme customizer that allows you to easily make changes to your website design in real time.

While every theme has some level of support for the default customizer options, many themes include additional tabs and options to the WordPress theme customizer, so you can easily customize your theme without any coding knowledge.

In this article, we’ll walk you through the default panels and show you how to use the WordPress theme customizer like a pro.
How to Use WordPress Theme Customizer Ultimate Guide

How to Access the WordPress Theme Customizer

Theme customizer is a default WordPress feature, and it is part of every WordPress website.

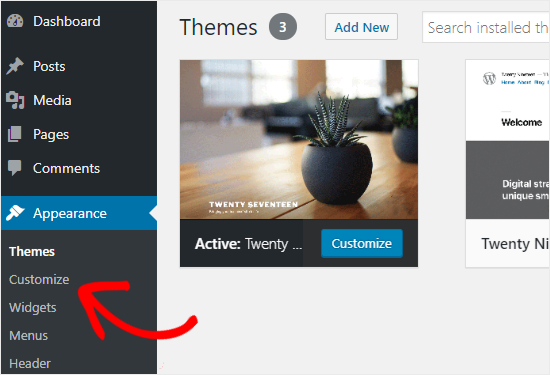
You can access it by logging into your WordPress admin area, and then going to Appearance » Customize from the left sidebar of your WordPress admin panel. This will open the Customizer interface with your current theme.
How to access WordPress Customizer

You can also use the WordPress theme customizer page for any of the installed themes on your website even when they are not active.

This allows you to see a live preview of that theme and make changes before you activate it.

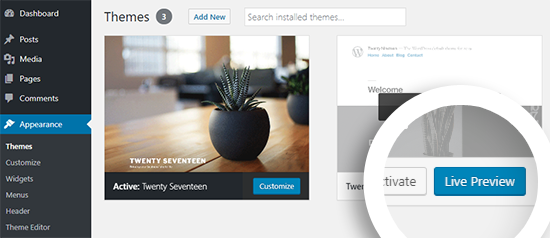
To do that, you need to head over to Appearance » Themes page.

Next, hover your mouse cursor over on any installed theme and click on the Live Preview button to open the WordPress theme customizer page.
WordPress Theme Live Preview Option

How to Use the WordPress Theme Customizer

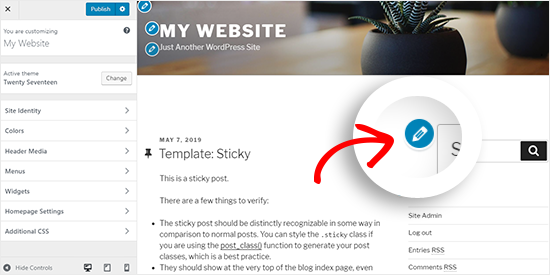
After opening the WordPress theme customizer, you’ll see all customization settings on the left side of your screen, and the live preview of your website on the right side.
WordPress Theme Customizer

WordPress theme customizer comes with a set of default panels regardless of the theme you’re using.

You need to click on the individual panels to make changes to it. You can also click on any of the blue pencil icons on the right side of your screen to open the settings for that particular item.

Note: advanced WordPress themes will add additional setting panels for extra customization options (more on this later).

Let’s take a look at the default options available in the WordPress theme customizer.

Site Identity Panel: Add Title, Logo, and Favicon

The Site Identity panel in the WordPress theme customizer allows you to add or change the title and tagline of your website.

By default, WordPress adds “Just Another WordPress Site” as the site tagline.

It’s recommended to change it after installing WordPress on your site. You can also keep it as blank if you want.
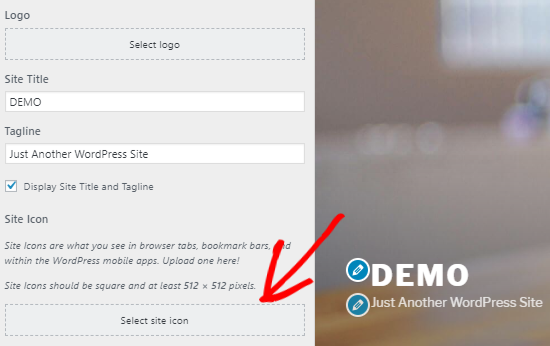
Site Identity Settings to change Site title, tagline, logo, and favicon

Site Identity panel in the WordPress theme customizer also allows you to add your site logo. Simply, click on the Select logo option to upload the logo of your website.

Want to add a favicon to your site? You can do that by clicking on the Select site icon option. For detailed instructions, you can follow our guide on how to create and add a favicon to your site.

WordPress Theme Customizer: Change Colors on Your Website

The controls on the Colors panel will mostly vary depending on the WordPress theme you’re using.

For example, the Twenty Seventeen theme allows you to choose the header text color and select a color scheme for your entire website.
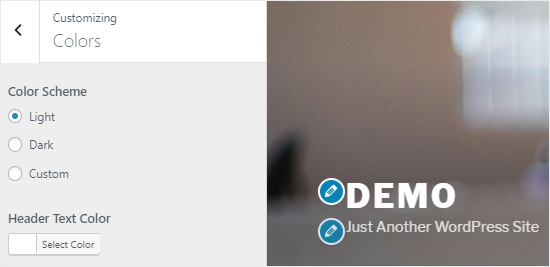
Change Colors on Your Website

Other WordPress themes may offer different color options for site elements like: headings, links, body text, background of your website, etc.

Adding Navigation Menus in Theme Customizer

The Menus panel allows you to create navigation menus and control their location on your website.

On this tabl, you’ll find all existing WordPress menus that you’ve created previously. You can click on the “View All Locations” button to check the available menu locations that your theme supports.
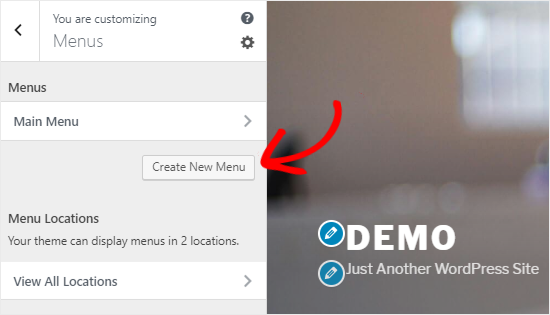
Menus Panel in Theme Customizer

To create a new menu, you need to click on the Create New Menu button.

After that, you will need to give a name to your menu, so you can easily manage it later. You can also select the menu location and then click on Next to proceed.
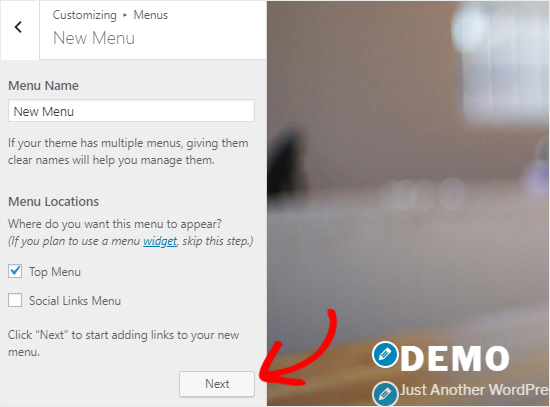
Create a new navigation menu

To add items to this menu, you need to click on the Add Items button to open a new panel. You can now add custom links, pages, posts, categories, and tags as menu items.
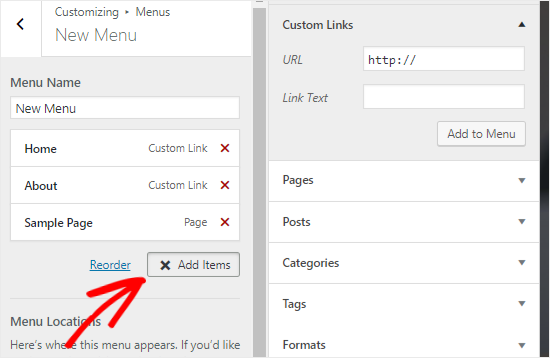
Add items to navigation menu

To reorder the items, you can click on the Reorder link and then use the arrow icons to adjust the menu items.

Control Widgets on Your Website in Theme Customizer

The Widgets panel allows you to add and manage the widgets on your site.

Clicking on it will show you the different locations where you can add widgets. This will vary depending on the theme you’re using.

For example, the Twenty Seventeen theme offers 3 widget locations, whereas the Twenty Nineteen theme comes with just one location.
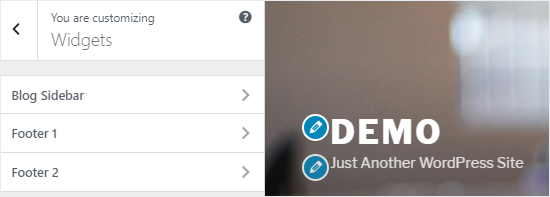
Widgets panel

When you click on any one of them, you’ll see the widgets that you’ve previously added to that location.

To add a new widget, you need to click on the “Add a Widget” button. This will open a new panel where you’ll see a list of all available widgets.
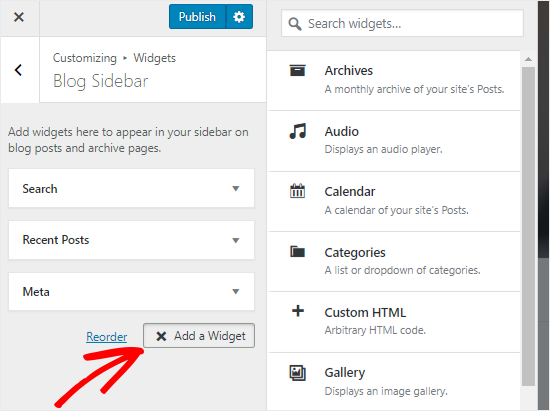
Add Widgets to your site

You need to click on the one that want to add. You can also make changes to the newly added widgets and adjust its position by dragging them up or down.

Homepage Settings Panel in Theme Customizer

By default, WordPress displays the latest blog posts on your homepage.

However for business websites users prefer to use a custom homepage. It allows you to have a proper landing page that displays your products and services.

To use a custom home page, you need to select “A static page” radio button on the Homepage Settings panel.
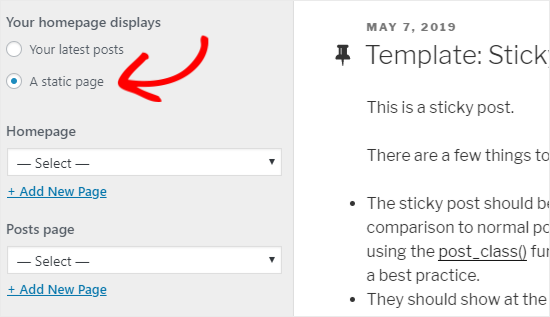
Homepage Settings in theme customizer

This will open up two new dropdown menus that you can use to select a page for your homepage and another for displaying your blog posts.

In case you don’t have the pages on your site, you can create a new one by clicking on the “+ Add New Page” link present below the dropdown menu. This will create a blank page with the name of your choice.

Additional CSS Panel for Adding Custom CSS

Do you want to add custom CSS code to style your website? You can do that in the Additional CSS panel.

Intermediate and advanced WordPress users often customize their site by adding CSS code directly to the style.css file of their theme. This adds additional steps like having FTP access to your WordPress hosting, modifying theme files, etc.

An easier solution for beginners is to add your custom CSS code to the Additional CSS panel in the WordPress theme customizer. This will allow you to make changes to your site and see them live on the right side of your screen.
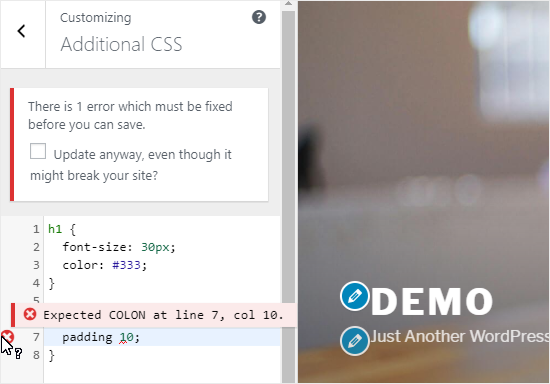
Add Custom CSS code to Additional CSS pane;

When you start writing some CSS code, WordPress will automatically suggest attributes to you based on the letters you type. It will also display error messages if you have not written a proper CSS statement.

Note: If you want to customize your website without writing any code, keep reading. We will share two beginner friendly options that will allow you to easily customize your theme and even create a custom WordPress theme.

Other Theme Customizer Options

Some free and premium themes offer more theme customizer options.

Depending on the theme you’re using, you may be able to change the font style, add a background image, change the layout, modify colors, add random header images, and much more.

You can also add specific features to your theme customizer with the help of plugins. For example, you can add custom fonts in WordPress using the Easy Google Fonts plugin.

Preview Your Website on Different Screen Resolutions

It’s important for every website owner to make sure that their website is mobile responsive and looks good on all screen sizes.

Thanks to the WordPress theme customizer, you can easily check how your website looks on different screen sizes.

At the bottom of the Theme Customizer panel, you’ll find three icons and the “Hide Controls” link.
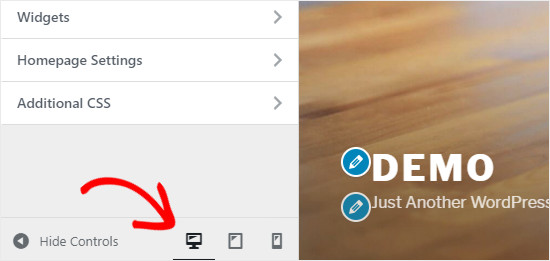
Preview website on different screen resolutions

These icons allow you to test your site on different screen resolutions like desktop, tablet, and mobile devices.

The Hide Controls link is useful for hiding the WordPress Customizer panel so that you can view your site properly on the desktop mode.

Publish, Save, or Schedule Your Customizer Settings

Once you have made the necessary changes, you need to apply them to your site. Otherwise, all your hard work will be lost.

Go ahead and click on the Publish button to apply the changes. Once done, you can click on the close button, present at the top-left corner of your screen, to exit the theme customizer.
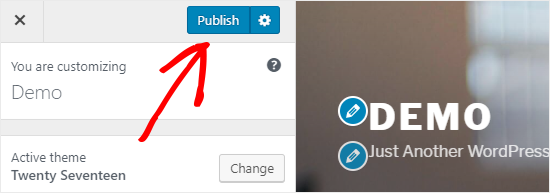
Publish WordPress Customizer settings

What if you need more time to finalize your new design? In that case, you can save it as a draft and even share your new design with someone without giving them access to your admin area.

To do that, you need to click on the gear icon right next to the Publish button. This will open up the Action panel.
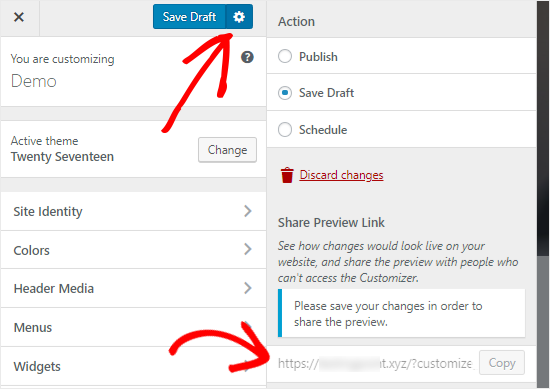
WordPress Customizer Save Draft option

Here you’ll find three options: Publish, Save Draft, and Schedule.

You need to select the Save Draft radio button on the Action panel and then click on the Save Draft button to store your changes.

You can now copy the preview link and share it with others to get feedback.

On the other hand, the Schedule option allows you to publish your changes on a specific date and time. You can use this option for scheduling your theme changes to go live at the time when you receive the least traffic.
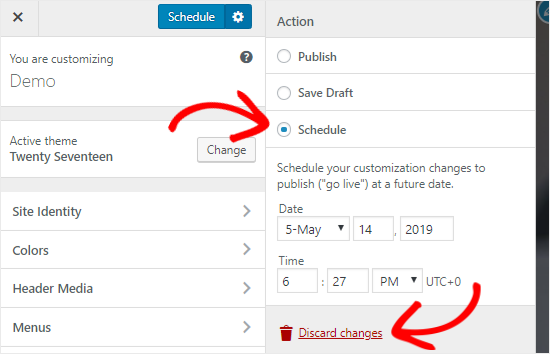
Schedule Customizer settings on a specific date

Lastly, if you want to reset the unpublished changes, then you can click on the Discard changes link on the Action panel.

Preview Different Themes Without Going Live

There are times when you want to check how a new theme would look on your site. However, you don’t want to activate them on your live website.

In that case, you can open the WordPress Customizer to test new themes without going live.

On the Customizer panel, you’ll find the name of your active theme and the Change button.
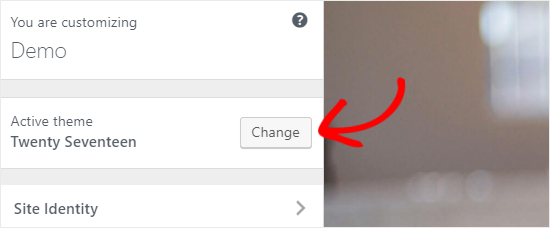
Change WordPress Theme from Customizer

If you click on that button, then WordPress will display all your installed themes on the right side of the page.

To check a particular theme, you need to click on the Live Preview button.
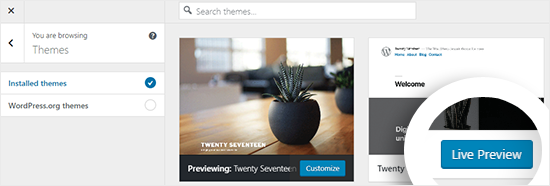
Preview Installed themes on Theme Customizer

You can also preview themes from the WordPress Themes Repository. To do that, you need to select “WordPress.org themes” checkbox on the left panel.

This will show themes from the WordPress.org directory. You can click on the “Install & Preview” button to check the theme you like.
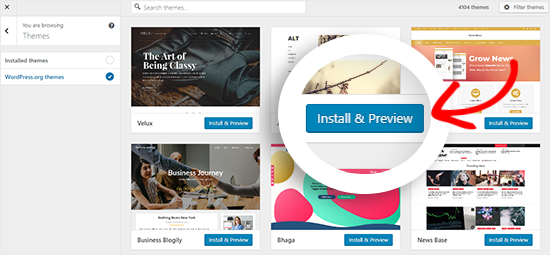
WordPress themes directory

You can also filter the themes by clicking on the Filter Themes button present at the top-right corner of your screen.

Note: we recommend using a WordPress staging website to test out new themes instead of using the customizer on a live site.

Import or Export Theme Customizer Settings

Did you know that you can import and export your theme customizer settings?

This is extremely helpful when you are making changes to your theme on your local server or a staging site. Instead of copying the settings manually to your live website, you can simply export the theme customizer settings to save your time.

For detailed instructions, you can follow our guide on how to import and export theme customizer settings in WordPress.

WordPress Theme Customizer Alternatives

Although WordPress Customizer allows you to make changes to your site, the number of controls will vary depending on the theme you’re using.

What if you like your theme, but wish that it had extra customization options?

In that case, the best solution is to use one of the two customization plugins that works alongside the WordPress theme customizer.
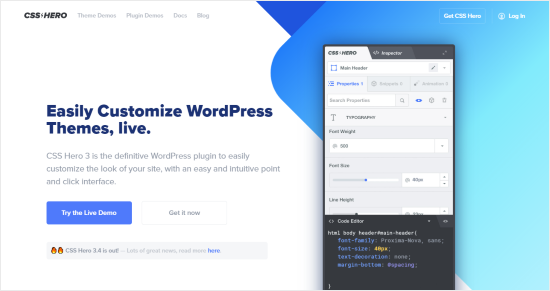
CSS Hero

CSS Hero plugin

CSS Hero is a WordPress plugin that allows you to customize your site without writing a single line of code. You have the freedom to style every element of your site without any hassle.

Do you want to customize the login page of your WordPress site? CSS Hero allows you to do that within a few minutes.

You can also edit and preview the changes in the frontend to make sure that your design looks perfect on every device.
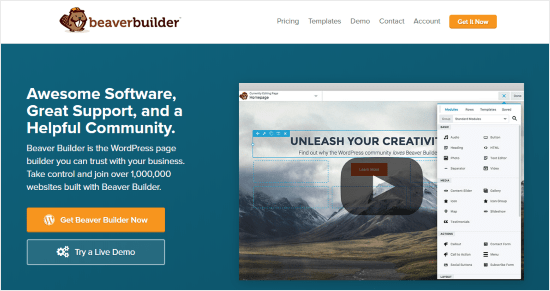
Beaver Builder

Beaver Builder plugin

Beaver Builder is one of the best WordPress page builder plugins in the market. It allows you to build stunning pages for your site using a drag and drop interface.

The best part is that Beaver Builder works with almost every WordPress theme. This allows you to use it with your current theme.

Beaver Builder supports the use of shortcodes and widgets. It also offers different types of modules that you can use to easily style your website. See our guide on how to create custom layouts in WordPress for detailed instructions.

You can also use Beaver Builder to create a completely custom WordPress theme without writing any code.

We hope this guide helped you to learn how to use the WordPress Theme Customizer like a pro. You may also want to see our guide on the best WordPress plugins and tools for your website.

If you liked this article, then please subscribe to our YouTube Channel for more WordPress video tutorials. You can also follow us on Twitter and Facebook.

The post How to Use WordPress Theme Customizer Like a Pro (Ultimate Guide) appeared first on WPBeginner.