How to Share Users and Logins Between Multiple WordPress Sites

Do you want to share users and logins between multiple WordPress sites?

Sharing customer, member, or visitor information between multiple sites can improve the user experience, by allowing them to log into multiple sites with the same account. It can also save you a ton of time if you need to add employees, students, or other users to several sites.

In this article, we will show you how you can share users and logins between multiple WordPress websites.

Automatically share users and logins between multiple WordPress sites

Why Share Users and Logins Between Multiple WordPress Sites?

If you have multiple websites, then you may want to share users and login information between them.

This can save your visitors time and effort since they only need to complete the user registration form once. For example, you might have a WordPress blog and a website where you sell online courses.

If someone purchases a course from your blog, then you can automatically add them to the site that has the learning management system (LMS). The user can then log into the LMS and start working on their course, without having to register using their email address, username, and other information.

If you’re a WordPress development agency or you work on multiple client sites, then you may need to manually create several accounts for each developer, tester, and other staff member. Instead, you can save time by registering each person once and then sharing login information between all the client sites.

With that in mind, let’s see how you can share users and logins between WordPress websites.

How to Share Users and Logins Between Multiple WordPress Sites

The best way to share users and login information is by using Uncanny Automator. It’s the best WordPress automation plugin and helps you create automated workflows that can save you a ton of time and effort.

When it comes to connecting several sites, many people assume you need to set up a WordPress multisite network. However, it’s often easier to use webhooks. These are bits of code that allow different tools and apps to share information in real time.

After installing Uncanny Automator, you can use webhooks to share information between WordPress websites, including user accounts and login details.

To start, you’ll need to install Uncanny Automator on the website where users will create their original account. We’ll call this the ‘source’ website.

You’ll then need to install Uncanny Automator on every website that should receive data from the source site.

Finally, you’ll use automation recipes and webhooks to send user information from the source to all the other websites that need this information.

With that in mind, let’s walk through the steps in more detail.

Add Uncanny Automator to the Source Website

The first thing you need to do is install and activate Uncanny Automator on your source website. For more details, see our step-by-step guide on how to install a WordPress plugin.

Note: There is a free Uncanny Automator plugin that lets you automate many common tasks and comes with 300 automation triggers and actions. However, we’ll be using Uncanny Automator Pro because you need it to use the ‘A user is created’ trigger.

Upon activation, you’ll be asked to install the free version of Uncanny Automator core. The free plugin has limited features, but it’s used as the base for the Pro version.

With that done, you need to head over to Automator » Settings and enter your license key.

The Uncanny Automator automation WordPress plugin

You can find this information under your account on the Uncanny Automator website.

After entering the key, click on the ‘Activate License’ button.

Create a New Automation Recipe

Upon activation, you’re ready to create automated workflows in WordPress. Uncanny Automator calls these workflows ‘recipes.’

You’re going to create a recipe that sends information to a webhook, every time a user registers with your WordPress website.

To get started, simply head to Automator » Add New. Uncanny Automator will now ask whether you want to create a ‘Logged-in’ recipe or an ‘Everyone’ recipe.

Logged-in recipes can only be triggered by logged-in users, but anyone can trigger ‘Everyone’ recipes. With that being said, select ‘Logged-in’ and then click on ‘Confirm.’

Creating a new automated workflow in WordPress

You can now give this recipe a title, by typing into the ‘Title’ field.

This is just for your reference, so you can use anything you want.

How to share login information between multiple WordPress websites

Add Triggers and Actions to the Automated Workflow

Each recipe in Uncanny Automator has two parts called Triggers and Actions.

A trigger is any event that starts the automated workflow, such as adding new users and authors to your WordPress blog. Actions are the tasks the recipe will perform, such as sharing information with another website, blog, or online store.

To start, you’ll need to set the trigger by choosing an integration.

Uncanny Automator supports many popular WordPress plugins including WPForms, WooCommerce, and OptinMonster. The options you see may vary depending on the plugins you’ve installed.

To get started, select ‘WordPress’ and then click on ‘A user is created.’

How to share user information between multiple blogs or websites

Next, you need to tell Uncanny Automator what it should do when the recipe gets triggered.

To do this, click the ‘Add action’ button.

Sharing data between WordPress websites using a webhook

Uncanny Automator will now show all the different integrations you can use in the action.

To send data to a webhook, click on ‘Webhooks.’

How to create user accounts automatically using Uncanny Automator

This adds a new dropdown menu.

Here, select ‘Send data to a webhook.’

Sending data to a WordPress webhook using Uncanny Automator

You’ll now see a new section where you can set up the webhook.

For now, scroll to the ‘Body’ section.

Sharing usernames and emails between multiple websites

Here, you need to specify the data Uncanny Automator should pass to the receiving WordPress blogs or websites. As an example, we’ll show you how to share the user’s email address, first name, and username. We will not be sharing the user’s password via Uncanny Automator.

Instead, Uncanny Automator will generate a random temporary password. Later in this guide, we’ll show you how to send an email containing a password reset link, so users can easily create their own password.

Pro Tip: It is best practice to use a unique password for every account. For more on this topic, please see our ultimate WordPress security guide.

To go ahead and share the user’s email address, click on the field under ‘Key’ and type in ‘Email.’ You’ll be using the key in your webhook, so make a note of it.

Retrieving the user's email address from a webhook

Under ‘Data Type,’ choose ‘Text’ if it isn’t already selected.

Now, click on the asterisk next to ‘Value.’

Getting data from a webhook using an automation plugin

This opens a dropdown with all the different data you can share. For example, you might share the person’s username, first name, and last name.

To share the user’s email address, click on ‘Common’ and then select ‘User email.’

Adding dynamic tokens to an automated WordPress workflow

You’ll typically want to share additional information, such as the user’s first name and last name.

To share more information, go ahead and click the ‘Add Pair’ button.

Adding additional key/value pairs to an Uncanny Automator workflow

Then, type in a key, select the data type, and choose a value from the dropdown menu by following the same process described above.

For example, in the following image, we’re sharing the email, first name, and username.

Adding key/value pairs to an automated workflow

This recipe is almost complete, but you still need to type in the webook’s URL. To get this link, you’ll need to set up Uncanny Automator on the website that will receive the data.

With that being said, leave the source website open in a background tab, and open a new tab.

Receive User Login Information using a Webhook

In the new tab, log into the website, blog, or WooCommerce store that will receive the user information and login data. You can now install and activate the Uncanny Automator plugin by following the same process described above.

With that done, it’s time to create a recipe that’ll retrieve the data from the webhook, and add it to a new user account.

To get started, head over to Automator » Add New. In the popup that appears, click on ‘Everyone’ and then select ‘Confirm.’

How to create a recipe for all users

You can now type in a title for the automated workflow.

Once again, this is just for your reference so you can use anything you want.

How to receive data from a webhook on your website or blog

Under ‘Integrations,’ select ‘Webhooks.’

In the dropdown that appears, select ‘Receive data from a webhook.’

Receiving data from a WordPress webhook

This adds a new section, with the ‘Webhook URL’ already filled in. In a later step, you’ll add this URL to the source website.

For now, scroll to the ‘Fields’ section. Here, you’ll need to configure all the information you’ll retrieve from the webhook. These are simply the key/value pairs you created in the first automation recipe.

Under ‘Key,’ type in the exact key you used for the first piece of information. If you capitalized ‘Email’ earlier, capitalize it here, too.

Adding keys to a WordPress website or blog

After that, open the ‘Value Type’ dropdown and choose ‘Text.’

To configure the next key/value pair, click on ‘Add Pair.’ You can now simply repeat these steps to add all the key/value pairs.

Mapping keys and values in WordPress

With that done, click on ‘Save.’

Set the User Data in Uncanny Automator

If you’ve been following along, then Uncanny Automator will now share the user’s email address, username, and first name with this new website.

As we already mentioned, the recipe will create a password at random, so you’ll need to give visitors an easy way to reset their password.

The easiest way is by sending an email containing a link to your password reset page. You can also include other useful information, such as the person’s username, a link to your website, and your contact information.

To get started, click on the ‘Add action’ button.

Adding actions to an automated recipe in Uncanny Automator

Uncanny Automator will now show all the different integrations you can use.

Go ahead and click on ‘Emails.’

How to send an email automatically

In the dropdown that appears, select ‘Send an email.’

This adds a new section with some settings already filled in. For example, by default Uncanny Automator will send all messages from your WordPress admin email. It will also use your site name as the ‘From name.’

Automatically send emails using an Uncanny Automator recipe

To change any of these settings, simply delete the default value.

Then, either type in the value you want to use instead, or click the asterisk and choose a token from the dropdown menu. These tokens will be replaced with real information when the recipe runs, so they’re a great way to show personalized content to different users.

Changing the default email automation settings

Your next task is getting the user’s email address from the webhook.

To do this, find the ‘To’ field and then click on its asterisk.

Adding dynamic tokens to an automated workflow

Next, click to expand the ‘Common’ section.

When it appears, click on ‘User email.’

How to share logins and user accounts between multiple websites

Uncanny Automator will now show a popup, explaining that you need to specify where the user information will come from.

In the popup, click on ‘Set user data.’

Settings user data in an automation workflow

Now, if you scroll up you’ll see a new ‘Actions will be run on…’ section.

You want to create a new user account every time the recipe runs, so select ‘New User.’

Automatically creating a new user

You now need to map each field to information retrieved from the webhook. Some of these fields are mandatory, such as the username and email address, but others are optional such as the display name.

To get started, simply find the first field where you want to map some data, and then click on its asterisk button.

Mapping data to a webhook

In the dropdown, click to expand the ‘Receive data from a webhook’ section.

You can now choose the information that you want to show in this field. In our images, we’re retrieving the user’s email address from the webhook.

Mapping user data to a webhook

Simply repeat these steps for each field where you want to use the visitor’s information. Just remember to leave the ‘Password’ field empty, so that Uncanny Automator generates a new password at random.

By default, Uncanny Automator will create each new user as a subscriber. If you want to give them a different role, then open the ‘Role’ dropdown and choose an option from the list.

Changing the default user role

For more on this topic, see our beginner’s guide to WordPress user roles and permissions.

Finally, you can tell Uncanny Automator what to do if there’s already an account for this username or email address. Since you don’t want to create duplicate accounts, click on the ‘Do nothing’ radio button.

With that done, click on ‘Save.’

Avoiding duplicate users in WordPress

Create a Password Reset Email

You’re now ready to create the email that Uncanny Automator will send to your users.

To get started, scroll to the ‘Send an email’ section and find the ‘To’ field. You can now click on its asterisk button and select ‘User email’ from the dropdown menu.

Adding an email address to an automated workflow

When that is done, scroll to the ‘Subject’ field.

Here, you can type in any plain text that you want to show in the subject line. You can also personalize the email subject using tokens that Uncanny Automator will replace with genuine user data.

Creating a personalized subject line using dynamic tokens

To insert a token, select the asterisk button and then click to expand the ‘Receive data from a webhook’ section.

You can now choose the token you want to use, such as the person’s username, first name, or last name. In this way, you can create a personalized subject, which may improve your email open rates.

How to create a personalized email subject

When you’re happy with the subject line, it’s time to create the email’s body copy.

Similar to the subject, you can type plain text directly into the editor, or use tokens to create a personalized message. For example, if you’ve retrieved the user’s first name from the webhook, then you can address them by name.

How to automatically email users on a website, blog, or online store

You’ll also need to include a password reset link, so the user can create their own password and keep their account safe.

To include this link, simply click on the asterisk and start typing ‘User reset password URL.’

Adding a password reset URL to an automated email

When the right option shows up, click to add it to the message.

When you’re happy with how the email is set up, click on the ‘Save’ button.

Automatically send an email using Uncanny Automator

With that done, you’re ready to make this automated recipe live.

Simply scroll up and click on the ‘Draft’ toggle so that it shows ‘Live’ instead.

Publishing an Uncanny Automator recipe

Connect Multiple WordPress Websites Using a Webhook

In the ‘Trigger’ section, find the ‘Webhook URL.’ Just be aware you may need to click to expand this section, in order to see the webhook URL.

Getting a webhook URL

The final step is adding this URL to the first recipe you created on your source site. To do this, copy the URL and then switch back to the recipe on your original website.

In this tab, scroll to the ‘Actions’ section and find the empty ‘Webhook URL’ field. You can then go ahead and paste the URL into this field.

Connecting multiple websites using a webhook

As soon as that’s done, the source website is ready to share user login data and information.

To make everything live, just click on the ‘Draft’ toggle so that it shows ‘Live’ instead.

Sharing data using a webhook

At this point, you have two live Uncanny Automator recipes on two separate websites.

Now, every time someone creates an account on the source website, Uncanny Automator will share their information with the second website. The user will also get an email with a password reset link.

Do you want to share users and login information with more websites?

Then simply repeat the steps above to set up Uncanny Automator on more websites. In this way, you can easily share user data with an unlimited number of WordPress blogs, websites, and online marketplaces.

Making Sure Your WordPress Email Is Being Sent Reliably

Sometimes, users may not receive your emails as expected. This is because many WordPress hosting companies do not have the mail function configured properly.

To prevent their servers from abuse, many hosting companies even disable the mail function completely. This can be a big problem, as your users won’t receive information about how to create their passwords and access their accounts.

Luckily, you can fix this easily by using WP Mail SMTP. This plugin lets you send your WordPress emails through a reliable SMTP platform which is configured specifically to send emails like SendLayer, Gmail, and Outlook.

For more details, please see our guide on how to fix WordPress not sending email.

We hope this article helped you learn how to automatically share users and logins between multiple WordPress sites. You may also want to check out our guide on how to create a file upload form in WordPress, or see our expert picks for the best membership plugins.

If you liked this article, then please subscribe to our YouTube Channel for WordPress video tutorials. You can also find us on Twitter and Facebook.

The post How to Share Users and Logins Between Multiple WordPress Sites first appeared on WPBeginner.

How to Host Multiple Websites on One Server (Beginner’s Guide)

Do you want to host multiple WordPress websites on a single server?

You can easily manage multiple domains from a single place by hosting them on one server. Plus, it helps save costs as you won’t need to purchase separate servers for each website.

In this article, we will show you how to host multiple websites on one server.

How to host multiple websites on one server

Why Host Multiple Websites on One Server?

If you’re planning on expanding your business from one website to more, then it’s a feasible option to host them on a single server.

That’s because it is easier to manage them from a single place. It can be time-consuming and inconvenient to log in and out of multiple WordPress websites on different servers. If all your websites are on one server, then you can simply switch between them from the same dashboard.

Hosting multiple sites on a single server will also help save and be more economical for your business.

Many hosting providers offer dedicated hosting where you have full control over the server and allow you to set up more than 1 website.

Instead of purchasing individual hosting plans for each site, you can choose a plan that allows multiple WordPress sites on one server. This will also allow you to fully utilize your server resources.

That said, let’s see how you can host multiple websites on one server.

Select a Hosting Service and Buy Domains

Before you can add any website to a server, the first step is to purchase a hosting service and domain names for your websites.

Choosing a WordPress Hosting Provider

There are many services to choose from, but we recommend Hostinger. It is a fast-growing web hosting provider that offers different types of hosting options.

For instance, you can get premium shared hosting, WordPress hosting, VPS hosting, cloud hosting, managed hosting, and more.

Hostinger website

In the Hostinger WordPress Starter plan, you can add up to 100 websites, get free email, an SSL certificate, unlimited bandwidth, managed WordPress, and more. You also get 1 free domain name, but you’ll need to purchase other domains.

The best part is that WPBeginner users can get up to 81% OFF on WordPress hosting plans. Simply click the link below to claim the offer.

Another advantage of using Hostinger WordPress plans is that WordPress comes pre-installed. You don’t have to manually install WordPress for your websites.

If you’re looking for alternatives, then you can also use Bluehost or SiteGround to add multiple sites to one server.

Purchasing Domain Names for Your Website

After choosing a web hosting platform, the next step is to purchase domain names that you’ll need to host on a server.

Hostinger lets you buy a new domain or transfer an existing domain. To purchase a domain, simply go to the ‘Domains’ tab from your Hostinger dashboard.

From here, simply select the ‘Get a new domain’ option.

Click the get a new domain option

Next, you can search for a domain name.

Go ahead and enter a keyword or brand name in the search bar.

Search your domain name

From here, you’ll see a list of URL options along with different domain extensions and prices.

Simply select an option you want and click the ‘Buy domain’ button.

Buy a domain name

Next, a popup will open with different billing periods for your domain name.

Go ahead and choose a billing period.

Select billing period

After that, you can complete the checkout process by choosing a payment method and purchasing the domain name.

You can repeat this process to purchase as many additional domains as you’d like.

Alternative Method: If you don’t want to buy a domain from Hostinger, then there are many domain registrars that allow you to register a domain name with ease. For instance, you can use Domain.com as it offers top-level extensions, an easy domain registration process, and a bunch of features.

Adding Multiple WordPress Sites to One Server

After selecting a hosting provider and buying domain names, you can add multiple sites to one server.

From your Hostinger dashboard, you can go to the ‘Websites’ tab and click on the + Create or migrate a website option.

Click create or migrate a website

Next, Hostinger will walk you through the process of creating a new website on the same server.

For instance, you can select a website type. This includes an online store, blog, business, portfolio, and other types.

Select your website type

After that, you’ll need to select whether you’d like to create or migrate a website.

If you already have a website on another hosting platform, then you can transfer it to Hostinger. Simply select the ‘Migrate my website’ option and follow the steps.

For this tutorial, we will select the ‘Create a new website’ option.

Select create or migrate option

Next, you can select a platform to build a new website. Hostinger will offer 2 methods, where you can use WordPress with artificial intelligence (AI) or use Hostinger’s website builder with AI to create a site.

Go ahead and choose the ‘WordPress with AI’ option.

Select a platform

From here, you’ll need to enter login details for your account.

Simply choose a language, select an administrator email, enter a password, and click the ‘Continue’ button.

Create login details for new website

In the next step, Hositnger will ask you to add WordPress plugins to your site.

You can simply select the plugins you want to install and click the ‘Continue’ button.

Add plugins to your site

After that, you will need to select a website design.

Hostinger will load the default theme, but you can click the ‘Browse more templates’ option to view more designs.

Select a website design

From here, you can choose a different theme for your website.

You can also click the ‘Show More’ button at the bottom to load more templates.

Once you’re done, simply choose a design and click the ‘Select’ button.

See more website designs

Next, Hostinger will ask you to enter a brand name and a description of your business.

It uses ChatGPT to generate a few pieces of content for your website. Once you are done, simply click the ‘Continue’ button.

Create automated text with AI

You can also skip this step by entering a name and brief description and then clicking the ‘Skip, I will write content later’ option at the bottom.

After that, you’ll need to enter a name for your website. Hostinger will show 2 options, you can either select the ‘buy a domain or ‘use an existing domain’ option.

Enter a name for your site

If you haven’t purchased a domain name yet, then you can select the ‘Buy a Domain’ option and get one with Hostinger.

However, if you already have multiple domains on another provider, then you can select the ‘Use an Existing Domain’ option.

For this tutorial, let’s choose the ‘Use an Existing Domain’ option.

Enter a domain name

Next, you will need to enter the domain name and click the ‘Continue’ button.

A popup window will now open with details for pointing the domain to Hostinger nameservers.

View existing domain name details

You can see your domain’s existing nameservers and the required nameservers you’d need to change in the domain registration service. The instructions will vary depending on the domain registrar you’re using.

If you need help with domain transfer, then Hostinger offers step-by-step guides and documentation. You can also reach out to their support for further assistance.

Note: You’ll also need to ensure that the domain you’re transferring is not locked by the current registrar and that 60 days have passed since initial registration.

After noting down the nameservers, you can click the ‘Continue’ button.

View wordpress installation

Hostinger will then start to set up your website. It will take a few minutes for the setup to complete.

The final step is to click the ‘Connect’ button under the Connect Your Domain option after you’ve set nameservers in your domain registrar.

Click connect your domain

Once connected, you can view your website from the Hostinger dashboard.

Simply visit the ‘Websites’ tab to see your newly added site.

View your newly added site

You can now repeat these steps and click the ‘+ Create or migrate a website’ option to add as many websites as you want to a single server.

Bonus: How to Create More Sites Using WordPress Multisite

A WordPress multisite allows you to run and manage multiple websites from a single WordPress installation. You’ll see multisite networks used by large corporations that need separate domains for each department, universities and schools, news outlets, online businesses, and more.

There is a slight difference between hosting multiple sites on a single server and a WordPress multisite.

In a multisite, you have the same parent domain (example.com), and the new sites are subdomains (blog.example.com). They can share plugins, users, and other elements based on your settings.

On the other hand, hosting multiple sites on a single server means you have different domain names for each website. They’re all completely separate from one another.

You can easily set up a WordPress multisite using any web hosting service, including Hostinger. Once it’s set up, you’ll be able to add multiple sites to the network and manage them from the same dashboard on one server.

Multisite network settings

To learn more, please see our guide on how to install and setup a WordPress multisite network.

We hope this article helped you learn how to host multiple websites on one server. You may also want to see our guide on how much does it cost to build a WordPress website and the best GoDaddy alternatives.

If you liked this article, then please subscribe to our YouTube Channel for WordPress video tutorials. You can also find us on Twitter and Facebook.

The post How to Host Multiple Websites on One Server (Beginner’s Guide) first appeared on WPBeginner.

How to Connect Multiple WordPress Sites Together (3 Ways)

Do you want to connect two or more WordPress websites together?

Having multiple websites is an advantage for your business as you easily segment products and services for different customers and keep your main website secure. However, connecting each site and making them work together can be tricky.

In this article, we’ll show you how to connect multiple WordPress sites together.

How to connect multiple WordPress sites together

Why Connect Multiple WordPress Websites Together?

Let’s say you have multiple websites like a WordPress blog and an online course website. If someone purchases a course from your blog, then you’d have to manually enroll them on to your site that has the learning management system (LMS).

This could take a lot of time, or cost you a lot if you need to hire help to get the job done.

On the other hand, you can automate different tasks and save time by connecting these websites together. When a customer purchases the course, they’re automatically registered and enrolled on a separate membership site. This is good practice to keep your main WordPress site secure.

Many people think of creating a WordPress multisite network when connecting numerous sites together. However, you don’t need to run a multisite network to connect each website together. In fact, that’s usually not the best solution.

We’ll show you 3 simple ways of making different websites work together. You can click the link below to jump ahead to any section you’re interested in:

Method 1: Connect Multiple WordPress Sites Using a Plugin

The best way to connect two websites and make them talk to each other is by using the Uncanny Automator plugin. It’s the best WordPress automation plugin and helps you create automated workflows on your website.

You can think of the plugin as Zapier for WordPress websites. With Uncanny Automator, you can easily create a connection between multiple websites.

The Uncanny Automation WordPress plugin

For this tutorial, let’s consider a situation where you have a WooCommerce store and a membership website.

We’ll show you how to connect both websites using Uncanny Automator. Our goal is to automatically register customers on your membership website when they buy a course from your store.

Note: Before you start, make sure that you’ve added a product to your WooCommerce store and created different membership levels on your membership site.

Next, you’ll need to install the Uncanny Automator plugin on both of your websites. For more details, please see our guide on how to install a WordPress plugin.

Upon activation, you’ll be asked to install the Uncanny Automator free plugin. The lite version offers limited features and is used as a base for the pro version.

After that, you’ll need to go to the Automator » Settings page from your WordPress dashboard and enter your license key. You can find the key in the Uncanny Automator account area.

Enter Uncanny Automator license key

After entering the key, don’t forget to click the ‘Activate License’ button.

You’ll need to repeat the activation steps for both WordPress websites.

Creating a Recipe for Purchasing a Product on Your WooCommerce Store

Next, you’ll need to create a recipe on your WooCommerce store when customers purchase your product. ‘Recipes’ are automations.

To start, you can head over to Automator » Add New from your WordPress admin panel.

After that, you’ll be asked to select a recipe type. Logged-in recipes are triggered by logged-in users only, while ‘Everyone’ recipes can be triggered by all users.

Select logged in users

Go ahead and select the ‘Logged-in users’ as the recipe type, since your customers will be creating an account and logging in to make a purchase. Then click the ‘Confirm’ button.

Next, you can enter a name for your recipe and select ‘WooCommerce’ as the integration. The name is for your reference only, and your users won’t see it.

Enter a name and select WooCommerce as integration

Then, you’ll need to select a trigger for your recipe.

Simply select the ‘A user completes, pays for, lands on a thank you page for an order with a product’ as the trigger.

Select a trigger for your recipe

Next, you’ll be asked to select the trigger condition.

You can select ‘pays for’ as the condition and click the ‘Save’ button.

Choose a trigger condition

After that, Uncanny Automator will ask you to select a product for your recipe.

Go ahead and select the digital product that’s on your WooCommerce store. For example, we’ll choose the WordPress Course: Ultimate Growth Hacking as the product for this tutorial.

Select a product for recipe

Don’t forget to click the ‘Save’ button after selecting a product.

Now you’ll need to choose an ‘Action’ for your recipe.

Click the add action button

To create the action, you’ll need to select an integration.

You can easily send the customer’s registration data to your membership website using a webhook. A webhook is a bit of code that allows different tools and apps to provide information to other apps in real-time.

Don’t worry, you won’t need to know how to code in order to use it. We’ll walk you through all the steps.

Go ahead and select ‘Webhooks’ as the integration.

Select Webhooks as integration

In the next step, you can select an action for your chosen integration.

Simply select the ‘Send data to a webhook’ option.

Choose send data to a webhook

Next, you’ll need to enter your webhook details.

Enter webhook details

Keep this tab open for now.

To complete the recipe on your WooCommerce store and fill in the webhook details, you need to create a webhook on your membership website.

Creating a Webhook on Your Membership Website

First, you’ll want to open your membership site in a new tab. Then head over to Automator » Add New from your WordPress admin panel on your membership site.

Go ahead and select ‘Everyone’ as the recipe type and click the ‘Confirm’ button.

Select everyone as recipe

After that, you will have to enter a name for your recipe and select a trigger integration for your recipe.

Simply click the ‘Webhooks’ as the integration.

Choose webhooks as trigger integration

In the next step, you’ll need to select a trigger for your integration.

Go ahead and select the ‘Receive data from a webhook’ as the trigger.

Select receive data from a webhook

Next, the plugin will show the webbook URL. You can note down the URL in a text file, as we’ll need it later on to finish the recipe on your WooCommerce store.

After that, scroll down to the Fields section. Now enter ‘Email’ under the Key field and select ‘Email’ for the Value type.

Enter field details and cope the webhook link

Don’t forget to click the ‘Save’ button.

Next, you can add an action to your recipe by clicking the ‘Add action’ button.

Click the add action button

There will be different integrations you can choose for your action. Simply select the membership plugin you used to create the membership site.

In our case, we’ll select MemberPress since we used it to set up the membership site.

Choose action integration

After that, you can choose an action for your selected integration.

Since we want our customers to subscribe to a membership automatically, we’ll select the ‘Add the user to a membership’ option.

Add the user as a member

A popup will now appear showing that the action will require WordPress user data.

Go ahead and click the ‘Set user data’ button.

Set user data for MemberPress

Next, you’ll need to choose between an Existing User or a New User.

Simply click the ‘New User’ option.

Select new or existing user

A form will now appear where you can set the user data. You can leave the first name and last name fields blank.

Next, go ahead and click the asterisk icon (*) for the Email field. From the dropdown options, select ‘Field #1 Email’ under Receive data from a webhook.

Click the asterisk sign and select email field

You can repeat this step for the Username field as well. As for other fields, you can leave them blank.

Now, under the ‘What to do if the user already exists’ option, simply choose ‘Do nothing’ and click the Save button.

Select do nothing and save

Next, you can select the membership plan you want the WooCommerce customer to subscribe to by clicking the Membership dropdown menu.

Besides that, you’ll see more fields for subtotal, tax amount, tax rate, status, gateway, and more. You can leave them to the default setting.

Select a membership plan

Don’t forget to click the ‘Save’ button when you’re done.

If you want, there are more actions you can add to the recipe, like allowing WordPress to send a confirmation email or registering the user to a Zoom webinar.

Next, you can now go ahead and publish your recipe. Simply click the ‘Draft’ toggle on the right side of the page and change it to ‘Live.’

Publish your recipe

Finishing Your Purchase Recipe in WooCommerce

Now that your recipe is active on the membership website, it’s time to finish up the recipe on your WooCommerce store.

First, go back to your WooCommerce website and open the recipe we created earlier. Next, enter the webhook link we copied in a text file (when creating a recipe on the membership site) under the ‘URL’ field.

Enter the copied webhook url

Next, you can scroll down and keep the Request Method and Data format to the default setting.

Under the Body section, you can click the asterisk (*) sign for the ‘Key’ field and select ‘Billing email’ as the option. Similarly, you can also select ‘Billing email’ for the Value field.

Add additional data for WooCommerce recipe

There’s also an option to send test data to see if your connection is set up correctly.

When you’re done, don’t forget to click the ‘Save’ button.

Next, go ahead and publish your recipe by clicking the Draft toggle and changing it to Live.

Publish your WooCommerce recipe

That’s it!

Whenever a customer purchases your selected WooCommerce product, they’ll be automatically subscribed to a membership plan on your membership website.

You can use this same method to set up similar automations to connect multiple WordPress sites together.

Method 2: Create a Subdomain to Connect WordPress Websites

Another way you can connect multiple WordPress websites is by creating a subdomain.

However please keep in mind that these websites will not be in sync automatically, and you will have to manually update both of them.

Subdomains are additional parts of your primary domain name and help you organize different sections of your WordPress website. You can use them to separate other functions from your main website.

For example, let’s you want to create an eCommerce store but keep it away from your main domain. In this case, you can create a subdomain for your online store, and your website will look like this:

https://store.yourexamplewebsite.com

Similarly, you can create a subdomain for different locations like uk.yourexamplesite.com or fr.yourexamplesite.com.

At WPBeginner, we also use a subdomain for our video content. You can visit https://videos.wpbeginner.com/ and get access to numerous video tutorials on WordPress.

Video subdomain preview

You can easily create a subdomain using your WordPress hosting account. For more details, you can see our explanation about subdomains and how to create one.

Then, you can see our guide on how to install WordPress to create another WordPress site on the subdomain.

You can also connect multiple WordPress sites together by linking them together. The links will help to boost your WordPress SEO by passing authority (link juice) to each domain.

One common way to do this is by adding a custom link to your main navigation menu.

You can also add a link to your website’s footer.

For example, on WPBeginner, you’ll see that we’ve linked to websites that are part of the WPBeginner family of products along with some site links.

Connect sites in footer

To edit your WordPress footer and add links to another website, please see our guide on how to edit the footer in WordPress.

We hope this article helped you learn how to connect multiple WordPress sites together. You can also see our guide on how to start a WordPress podcast and the best WordPress plugins.

If you liked this article, then please subscribe to our YouTube Channel for WordPress video tutorials. You can also find us on Twitter and Facebook.

The post How to Connect Multiple WordPress Sites Together (3 Ways) first appeared on WPBeginner.

How to Create a WordPress Multisite with Different Domains (4 Steps)

Do you want to create a WordPress multisite with different domains?

WordPress multisite allows you to use a single WordPress installation to create multiple websites. You can even give each site its own domain name.

In this article, we’ll show you how to easily create a WordPress multisite with different domains, step by step.

Creating WordPress multisite with different domains

Why Create a WordPress Multisite with Custom Domains?

The easiest way to make a website is by using WordPress.

However for each website that you set up, you’ll need to manage updates, keep backups, and secure all separate WordPress installations separately. Plus some hosting providers limit their basic plans to a single WordPress install.

An easier workaround to this website management issue is to create a WordPress multisite network.

WordPress multisite is a core WordPress feature that allows you to easily create multiple sites using the same WordPress installation.

The best part is that you can use different domains for each of your websites.

This allows business owners to quickly launch websites without worrying about managing multiple WordPress installations.

From a development perspective, this also gives you flexibility in sharing customers, similar design elements, and more.

The downside is that all your websites use the same resources. This means that if your hosting service ever goes down, then all your websites will be down at the same time.

What Do You Need to Create a WordPress Multisite with Custom Domains?

You’ll need the following items to create a WordPress multisite with custom domain names.

  • A WordPress hosting company that supports multiple domains and WordPress multisite.
  • Domain names that you want to use.

We recommend using SiteGround. They are one of the officially recommended WordPress hosting provider and support WordPress multisite domain mapping out of the box.

This can work on the Starter plan too since technically you’re creating 1 site. This is a creative way to get around the hosting plan limits as long as your sites are low traffic.

For more hosting recommendations, see our comparison of the best WordPress hosting companies.

Next, you need to register the domain names that you want to use for your root site as well as your child sites.

We recommend using Domain.com. They are the best domain registration company on the market with a better domain search, easy to use control panel, and simpler DNS management.

You can use our Domain.com Coupon to get 25% off on your purchase of new domain names.

Step 1. Installing WordPress Multisite

If you are creating a WordPress multisite on a brand new website, then you may need to install WordPress first.

Most WordPress hosting companies, including SiteGround, come with 1-click WordPress installer. If you need help, then follow our WordPress installation tutorial for step by step instructions.

Once you have installed WordPress, the next step is to enable WordPress multisite functionality.

Enabling WordPress Multisite Feature

WordPress multisite functionality comes built-in with WordPress, but it is turned off by default. You’ll need to enable it in order to set up your WordPress multisite.

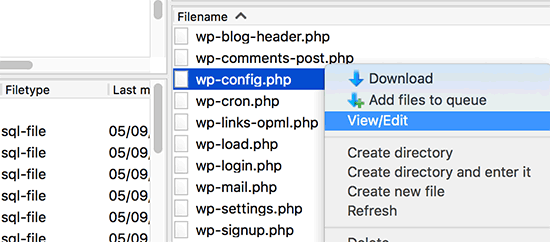
For that, you’ll need to edit the wp-config.php file. It is the WordPress configuration file that contains all the important settings for your WordPress installation.

You can edit it by using an FTP client or the File Manager app in your hosting account control panel. The wp-config.php file is located under the root folder of your website.

Editing wp-config.php file via FTP

Inside this file, you will need to add the following line just above the line that says ‘That’s all, stop editing! Happy publishing’.

define( 'WP_ALLOW_MULTISITE', true );


After that, don’t forget to save your changes and upload the file back to your website.

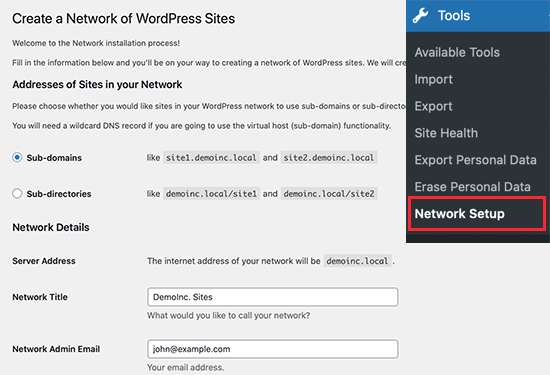
Now you need to switch back to your WordPress admin dashboard and reload the admin dashboard page. After that, you need to visit the Tools » Network Setup page to configure your WordPress multisite network.

Network setup for WordPress multisite

First, you need to choose subdomains as ‘Addresses of Sites in your Network’ provide a title for your multisite network and network admin email address.

Click on the ‘Install’ button to continue.

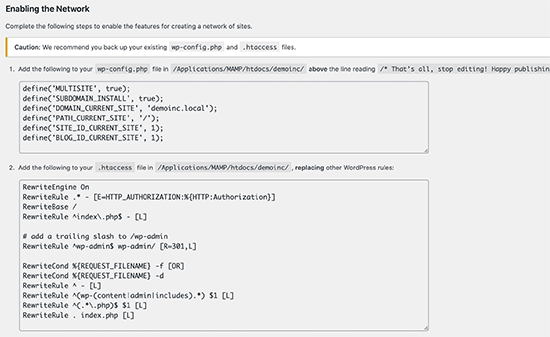
On the next screen, WordPress will ask you to add two pieces of code.

Configuration code required for enabling WordPress multisite

The first one goes into your wp-config.php file just above the line reading ‘That’s all, stop editing! Happy publishing’.

Apart from the code shown by WordPress, you also need to add the following line to your wp-config.php file. This line ensures that users can login to each site.

define('COOKIE_DOMAIN', $_SERVER['HTTP_HOST'] );

The second piece of goes into your WordPress .htaccess file replacing the default WordPress .htaccess rules.

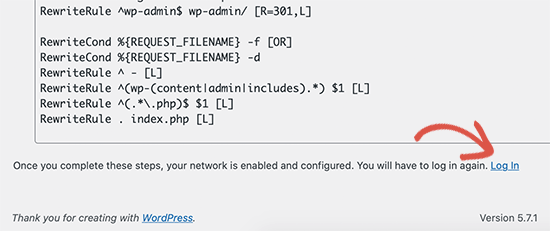
Once you have added both codes to the respective files, you’ll need to login to your WordPress admin dashboard.

Login  link

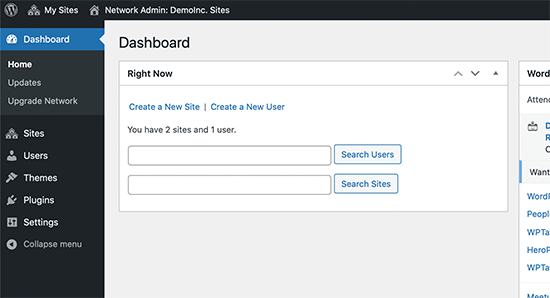
After login, you will see a new menu item in the admin bar titled ‘My Sites’. Take your mouse over it and then select ‘Network Admin » Dashboard’ link.

Network admin dashboard

Step 2. Creating New Sites Using Custom Domains in WordPress Multisite

Now that everything is set up, let’s create your first site using a different domain name.

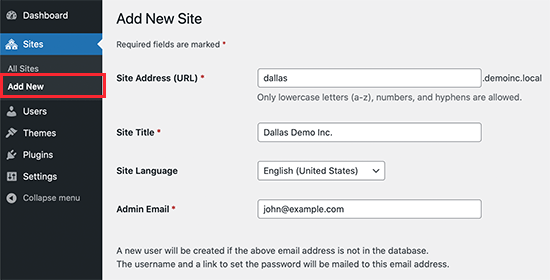
From your multisite’s network admin dashboard, click on the Sites » Add New page.

Create new site

Simply provide a Site Address, Title, select language, and then enter the admin business email address. As for site address, you can add anything here for now because we will change it to your custom domain in the next step.

Click on the ‘Add Site’ button to create your site.

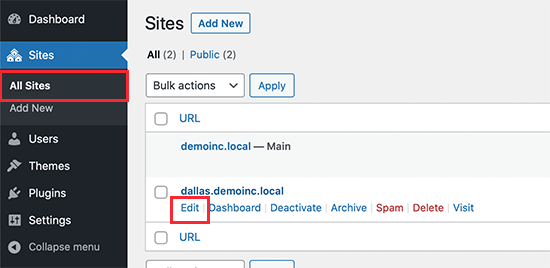
Next, you need to go to Sites » All Sites page and click on the ‘Edit’ link below the site you just created.

Edit your site

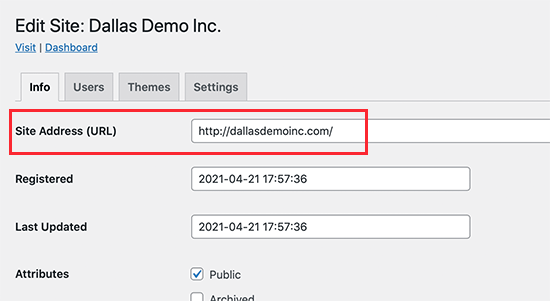
On the site edit screen, you need to add the custom domain name that you want to use for this website under the Site Address field. WordPress comes with built-in domain mapping which will automatically map your custom domains to your Site Address.

Use custom domain as your site address

Don’t forget to click on the Save Changes button to store your settings.

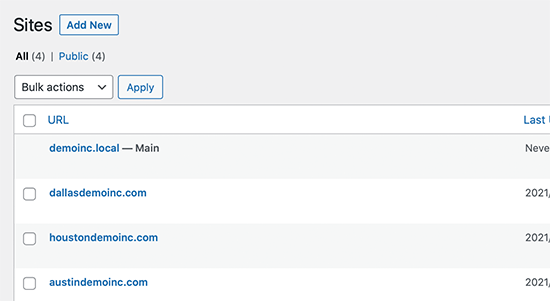
Repeat the process to Add more sites and then change their site address to the custom domain you want to use. Here we have created a few sites with different custom domains.

Custom domains for WordPress sites on a multisite network

However, none of these websites will be accessible as your custom domains don’t point to your WordPress hosting company. Let’s change that.

Step 3. Adding Custom Domains to Your Hosting Account

Most WordPress hosting providers allow you to easily add multiple domains to your hosting account.

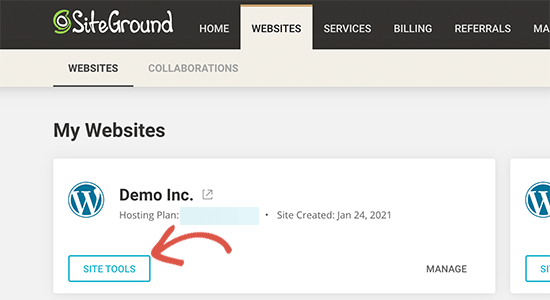
If you are using SiteGround, then click on the Site Tools under your hosting account.

Site Tools in SiteGround

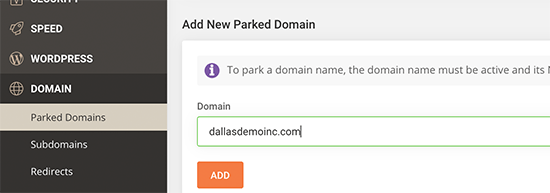
After that, you need visit Domains » Parked Domains and then add your custom domain here.

Add parked domain

Repeat the process if you need to add more custom domains.

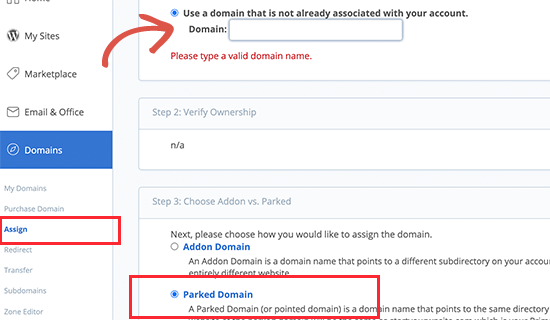
If you are using another hosting service, then the process is still the same. You’ll find the parked domain option under the Domains section of your hosting dashboard. Here is how it looks on Bluehost.

Adding parked domain in Bluehost

If you are using your hosting provider as your domain registrar, then you may not need to update the DNS servers.

However, if you have registered your domain name elsewhere, then you will need to update the DNS information and point it to your hosting account.

First, you’ll need the DNS information for your hosting provider. You can find it under your hosting control panel or you can ask their support staff. Usually, it looks like this:

ns1.siteground204.com
ns2.siteground204.com

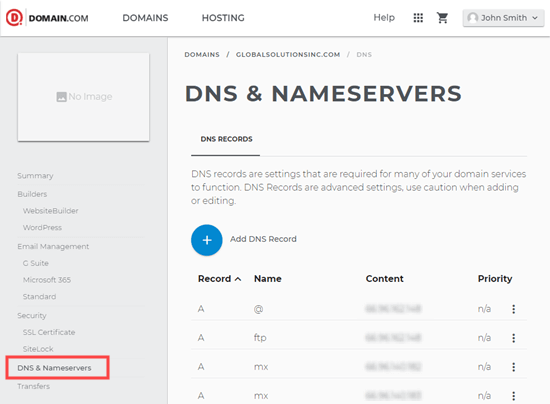
Once you have the DNS information, you need to login to your domain registrar website and click on the DNS & Nameservers section.

DNS management in Domain.com

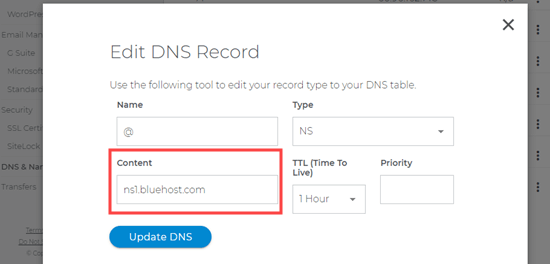
Simply select your domain and edit name server information to replace it with your hosting provider’s DNS.

Changing DNS information in Domain.com

For more details, see our guide on how to change DNS name servers for popular domain name registrars.

Note: DNS information may take a while (2-48 hours) to fully update across the internet.

As DNS information is updated, you will be able to see your WordPress multisite’s childsite for each domain.

Step 4. Managing and Login to WordPress Multisite on Custom Domains

You can perform most administrative tasks like installing plugins, themes, and updates from your root site’s dashboard.

Network admin dashboard

Related: See our pick of the best WordPress multisite plugins.

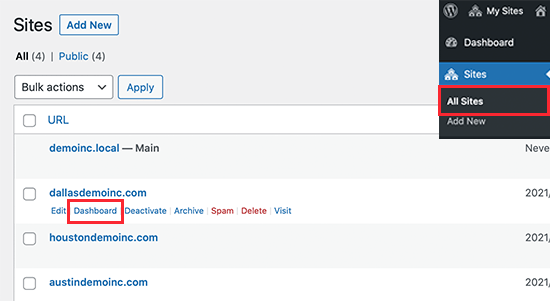
To work on individual sites, you need to visit Sites » All Sites page and click on the Dashboard link below the site you want to work on.

Manage sites

This will take you to that particular site’s admin area, and you may be required to login again. From here, you can create pages, write blog posts, and manage that individual site.

Individual site dashboard

We hope this article helped you learn how to create a WordPress multisite with different domains. You may also want to see our WordPress security guide to keep your WordPress multisite secure, and our pick of the best WordPress page builder plugins to customize your website design.

If you liked this article, then please subscribe to our YouTube Channel for WordPress video tutorials. You can also find us on Twitter and Facebook.

The post How to Create a WordPress Multisite with Different Domains (4 Steps) appeared first on WPBeginner.

How to Install and Setup WordPress Multisite Network

Are you wondering how to set up and install a WordPress multisite network? WordPress has a built-in capability to create multiple websites using a single WordPress installation.

A WordPress multisite network is often used by blogs, schools, and businesses that need to run separate websites but want to manage them under one dashboard.

In this article, we will show you how to install and set up a WordPress multisite network properly.

step by step tutorial on installing and setting up a WordPress multisite network

Since this is a comprehensive article, we have added this table of contents for easier navigation. You can use the quick links below to jump to the section you want to learn about:

WordPress Multisite Basics

  1. What Is WordPress Multisite?
  2. Pros of Using a WordPress Multisite Network
  3. Cons of Using a WordPress Multisite Network
  4. Who Needs a WordPress Multisite Network?

WordPress Multisite Installation and Setup

  1. Requirements for a WordPress Multisite Network
  2. Choosing a Domain Structure for Your Multisite Network
  3. Setting Up Wildcard Subdomains
  4. Setting Up Custom Domain for WordPress Multisite
  5. Enabling WordPress Multisite Network Feature
  6. Setting Up Your WordPress Multisite Network

WordPress Multisite Configuration Settings

  1. Configuring Network Settings
  2. Opening Your Multisite Network for Registrations
  3. New Site Settings
  4. Upload Settings for Your Multisite Network
  5. Plugin Menu Settings

Setting Up Default Content, Theme, and Plugins

  1. Adding New Sites to Your WordPress Multisite Network
  2. Adding Themes and Plugins to Your Multisite Network
  3. Adding Default Content to New Sites

Troubleshooting and FAQs

  1. Troubleshooting WordPress Multisite Issues
  2. FAQs About WordPress Multisite

What Is WordPress Multisite Network?

A WordPress multisite network allows you to run and manage multiple WordPress blogs or websites from a single WordPress installation.

It enables you to create new sites instantly and manage them using the same username and password. You can even allow other users to sign up and create their blogs or websites on your domain.

The WordPress multisite network comes with advanced settings that you can use to customize each website/blog on your network.

Pros of Using a WordPress Multisite Network

In many situations, a WordPress multisite network can be more useful than managing multiple standalone WordPress sites. Here are some of the advantages of using a WordPress multisite network:

  1. As the network administrator, you can easily manage multiple sites from a single dashboard.
  2. Each site on the network can have its admin users. The site admins will have the capability to manage only their website.
  3. You can install plugins/themes and activate them for multiple sites with one download.
  4. A multisite network also makes it easier for you to manage updates. You only need to update your WordPress, plugins, or themes on one “master” install.

Cons of Using a WordPress Multisite Network

Creating a WordPress multisite network is not always helpful for managing multiple sites.

Here are some of the disadvantages that you should keep in mind before setting up a multisite network.

  1. All sites on the network share the same resources. This means that when your network is down, all other sites also go down.
  2. It’s difficult for beginner-level users to manage traffic and server resources. If one of your websites gets unexpected traffic, it will affect all other websites on the network.
  3. If one website gets hacked, all sites on your network get hacked.
  4. Some WordPress plugins may not work well on a multisite network.
  5. WordPress multisite network is not adequately supported by all web hosting providers, which limits your options. We will talk more about this later in the article.

Who Needs a WordPress Multisite Network?

Just because you manage multiple WordPress websites does not mean you need to start using a multisite network.

There are third-party tools to manage multiple WordPress sites from a single dashboard. Tools like InfiniteWP or SolidWP (formerly iThemes) make it easier to maintain multiple WordPress sites under one roof without switching back and forth from one site to another.

Here are some scenarios when creating a multisite network makes sense:

  1. A magazine website with different sections managed by separate teams
  2. A business website with sub-sites for different locations and branches
  3. Government or non-profit websites using WordPress multisite for different departments, locations, and regions
  4. Your network of blogs running on multiple subdomains
  5. Schools and colleges using multisite for different departments, and blogs, or letting students create their websites on school servers

Requirements for a WordPress Multisite Network

All websites on a WordPress multisite network share the same server resources. This means that the most important thing you will need is good WordPress hosting.

If you are planning on having just a couple of websites with low traffic, then you can probably get away with shared hosting.

However, due to the nature of a multisite network, you will typically need VPS hosting or a dedicated server as your sites grow.

We recommend Bluehost because they offer shared hosting and VPS/Dedicated servers. They are also one of the official WordPress hosting partners.

Bluehost website

If you’re looking for an alternative, then SiteGround and WP Engine also provide excellent service for WordPress multisite networks.

Apart from web hosting, you will need the basic knowledge of installing WordPress and editing files using FTP.

Choosing a Domain Structure for your Multisite Network

On a WordPress multisite network, you can add new sites using either subdomains or sub-directories.

Example of subdomain:
http://site1.example.com

Example of sub-directory:
http://example.com/site1/

If you choose subdomains, then you’ll have to configure wildcard subdomains on your server. We will show you how to do that in the next step.

On the other hand, if you choose sub-directories or path-based URLs for sites on your network, you can skip the next step.

Setting Up Wildcard Subdomains

Wildcard subdomains create a placeholder subdomain under your domain name. This placeholder subdomain can then be used to map subdomains that you haven’t already defined.

This setting enables WordPress multisite to create new sites using their own subdomains.

If you decide to use subdomains for websites on your multisite network, then you will need to set up wildcard subdomains.

We will show you how to do that on Bluehost. However, the basic process is the same for all hosting providers.

First, you need to log in to your WordPress hosting account’s dashboard. Locate your site under Websites and click on the ‘Settings’ button.

Bluehost site settings

This will open your site’s Settings page, where you need to switch to the ‘Advanced’ tab.

From there, scroll down to the cPanel section and click the ‘Manage’ button.

Bluehost cPanel under Advanced site settings

This will launch the cPanel dashboard.

Now, scroll down to the Domains section and click ‘Domains’.

Bluehost cPanel domains

It will then show you a list of domains and subdomains on your hosting account.

You need to click the ‘Create A New Domain’ button to continue.

Bluehost cPanel new domain

On the next screen, you need to add a wildcard subdomain under the Domain field.

A wildcard subdomain contains an asterisk sign followed by a dot and your domain name. Like this:

*.example.com

Don’t forget to replace example.com with your own domain name.

Bluehost cPanel wildcard subdomain

The document root field will be automatically filled to match the wildcard.

Just click the ‘Submit’ button to save your domain settings.

Your hosting account is now ready to support WordPress multisite with subdomains.

Setting Up Custom Domains for Each Site

WordPress multisite also allows you to set different domains for each website in your multisite network.

To set up custom domains, you will need to use the domain mapping feature and update nameserver records in your domain registrar account.

Manage sites

We have created a detailed step-by-step guide on how to create WordPress multisite with different domains with the setup instructions.

Enabling the WordPress Multisite Network Feature

The multisite network feature comes built-in with each WordPress installation. All you need to do is install and set up WordPress like you normally would.

After that, you just need to enable the multisite feature. You can also enable the multisite feature on any existing WordPress site.

Before you enable multisite, don’t forget to create a complete backup of your WordPress site.

Then, connect to your site using an FTP client or cPanel file manager, and open the wp-config.php file for editing.

You need to add the following code to your wp-config.php file just before the /* That’s all, stop editing! Happy publishing. */ line:

/* Multisite */
define( 'WP_ALLOW_MULTISITE', true );

Once that’s done, you can save and upload your wp-config.php file to the server.

This code simply enables the multisite feature on your WordPress site. Once enabled, you will still need to set up the multisite network.

Setting Up Your WordPress Multisite Network

Now that you have successfully enabled the multisite network feature on your WordPress site, it is time to set up the network.

If you are setting up a multisite network on an existing WordPress website, then you will need to deactivate all plugins on your site.

Simply visit the Plugins » Installed Plugins page and select all plugins. You need to select ‘Deactivate’ from the ‘Bulk Actions’ dropdown menu and then click on the ‘Apply’ button.

Deactivate all plugins

You can now head over to the Tools » Network Setup page.

Here, you can configure your multisite network.

WordPress multisite network setup

On the network setup screen, you will notice that you need Apache’s mod_rewrite module installed on your server. This module is installed and enabled on all the best WordPress hosting providers.

Next, you need to tell WordPress what domain structure you will be using for sites in your network, e.g., Subdomains or Sub-directories.

After that, you will need to provide a title for your network and ensure the email address in the ‘Network Admin Email’ field is correct.

Click on the ‘Install’ button to continue.

WordPress will now show you some code to add to your wp-config.php and .htaccess files, respectively.

Add WordPress multisite configuration rules to wp-config and .htaccess files

You can use an FTP client or the File Manager in the cPanel to copy and paste the code.

First, edit the wp-config.php file and paste the code just below the line you added in the earlier step.

Secondly, you need to edit the .htaccess file and replace the existing WordPress rules in your .htaccess with the WordPress multisite code you copied.

Don’t forget to save your changes and reupload the edited files back to your server.

Once finished, you will need to re-login to your WordPress site to access the multisite network.

Configuring Network Settings

Now that you have set up the multisite network, it is time to configure its network settings.

Start by logging in to your WordPress website admin area.

After that, you need to switch to the ‘Network Dashboard’ settings to change network settings, add new sites, and configure other settings.

When you take your mouse over to the ‘My Sites’ menu in the admin toolbar, a flydown popup will appear. Click on Network Admin » Dashboard.

WordPress multisite network admin dashboard

This will take you to the multisite network dashboard. You will notice that there are new menu items to manage your multisite network.

You will also see a ‘Right Now’ dashboard widget that allows you to create a new site and add new users.

Multisite admin area

To configure network settings, you just need to click on the ‘Settings’ link in the admin sidebar.

The first option on the network settings page is to set your site title and admin email address. These fields will be filled automatically with the network title and admin email you entered during setup.

WordPress multisite general settings

Opening Your Multisite Network for Registrations

The ‘Registration Settings’ section on the network settings page is probably the most important setting in your entire network setup.

By default, both user and site registrations are disabled on the network.

You can choose to open your site for user registration, only allow existing users to create new sites, or allow both user and site registration.

Allowing user and site registration on a WordPress multisite

If you are opening your multisite network to registration, then you can check the box next to the ‘Registration Notification’ option.

This will allow you to receive email notifications every time a new user or site is registered.

If you want to allow individual site administrators to add new users to their sites, then you can check the box next to the ‘Add New Users’ option.

Additional multisite settings

The limited Email Registration option allows you to limit site or user registration to email addresses from specific domains.

This is particularly useful if you only want to allow people from your own organization to register and create users or sites.

Similarly, you can also ban certain domains from registration.

New Site Settings

The ‘New Site Settings’ section allows you to configure default options for new sites created on your multisite network.

You can modify the welcome emails and the contents of the first default post, page, and comment in these settings.

New site settings for WordPress multisite

As a network administrator, you can change these settings anytime.

Upload Settings for Your Multisite Network

It is important to keep an eye on the usage of your server resources. Under the ‘Upload Settings’ section, you can limit the total amount of space a site can use for uploads.

The default value is 100 MB, which is probably good for at least 100 photo uploads. You can increase or decrease this space depending on how much disk space you have.

WordPress multisite uploads settings

The default upload file types are images, audio, video, and pdf files. You can add additional file types if you want, like doc, docx, odt, and so on.

Afterward, you can choose a file size limit so that users can’t upload insanely large files to the server.

Plugin Menu Settings

Next, you can jump to the Menu Settings. It will allow you to enable the administrative menu for the plugins section on your network sites.

WordPress multisite plugin menu

Enabling this will show the Plugins menu to respective site admins. They can activate or deactivate a plugin on their sites, but they cannot install new plugins.

Once you are satisfied with all the configuration settings, go ahead and click the ‘Save Changes’ button.

Adding New Sites to Your WordPress Multisite Network

To add a new site to your WordPress multisite network, simply click on ‘Sites’ under the My Sites » Network Admin menu in the admin toolbar.

Managing sites on a WordPress multisite

This will show you a list of sites on your current multisite installation. By default, you have your primary site listed as the only site in your WordPress multisite network.

To add a new site, click the ‘Add New’ button at the top.

Adding a new site in a WordPress multisite network

On the ‘Add New Site’ page, provide the site’s address. You don’t need to type the full address, just the part you want to use as the subdomain or sub-directory.

Next, you add a site title and enter the site admin’s email address.

Adding new site details

You can add an admin email address other than the one that you are currently using to manage your multisite network.

If another user does not currently use that email address, then WordPress will create a new user and send the username and password to the email address you enter.

Once you are done, simply click on the ‘Add Site’ button.

A new site will be added to your WordPress multisite network. As the network admin, you will also receive a new site registration email.

If you create a new user, that user will receive an email with instructions to set the password and log in.

Adding Themes and Plugins to Your Multisite Network

By default, individual site administrators in a multisite network cannot install themes and plugins on their own.

As the network admin, you can install the respective plugins and themes so they are available for all sites on your network.

Installing Themes for Your Multisite Network

To add themes, go to the My Sites » Network Admin » Themes page.

WordPress multisite themes

On this page, you will see a list of themes that are currently installed on your WordPress multisite.

You can make a theme available to other sites by clicking on the ‘Network Enable’ option under that theme.

You can also disable a theme by clicking on the ‘Network Disable’ link under the theme. Note: The Network Disable option will only appear when the theme is enabled.

To add a new theme, you need to click on the ‘Add New’ button at the top of your screen and then install a WordPress theme as you would normally do.

Once the new theme is installed, you will be able to make it available to other sites on your network with the ‘Network Enable’ option.

If you need recommendations on which themes to make available to your network, here are our picks of the best WordPress themes that you can use:

Setting a Default Theme for Your Multisite Network

Even if you have added a couple of themes, WordPress will still activate the default WordPress theme for each new site.

If you want to make another theme the default for new sites, then you need to add the following code to your wp-config.php file:

// Setting default theme for new sites
define( 'WP_DEFAULT_THEME', 'your-theme' );

Replace your-theme with the name of your theme. You will need to use the name of the theme’s folder, which you can find by looking at the /wp-content/themes/ folder using FTP or File Manager.

Installing Plugins for Your Multisite Network

Similarly, you can visit the My Sites » Network Admin » Plugins page to install plugins and click on the ‘Network Activate’ link below each plugin to activate it on your multisite network.

Network activate plugins

Here are a few essential WordPress plugins that we recommend for every website:

For more plugin recommendations, see our list of the essential WordPress plugins for all websites.

Note: If you previously enabled the Plugins Menu option for site admins in the ‘Network Settings’, then the site administrators can activate or deactivate installed plugins on their own. Site admins cannot delete or install a new plugin on their own.

Adding Default Content to Multisite Sites

By default, WordPress allows you to add and edit some default content for each site on your multisite network. You can go to Settings » Network Settings page and add this content in the ‘New site settings’ section.

New site default content in WordPress multisite

You can edit the content for the default post, page, and comment. We recommend replacing the default content with something more useful for your site admins.

But what if you wanted additional default content to be added to each new site?

By default, WordPress does not give you an option to create additional default content for new sites. If you want to do that, then you will need to add custom code to your WordPress multisite.

In this example, we are going to add a new default page to be created for each new site. You can add this code to your main site’s functions.php file or by using the WPCode plugin on your main site:

add_action('wpmu_new_blog', 'wpb_create_my_pages', 10, 2);
  
function wpb_create_my_pages($blog_id, $user_id){
  switch_to_blog($blog_id);
  
// create a new page
  $page_id = wp_insert_post(array(
    'post_title'     => 'About',
    'post_name'      => 'about',
    'post_content'   => 'This is an about page. You can use it to introduce yourself to your readers or you can simply delete it.',
    'post_status'    => 'publish',
    'post_author'    => $user_id, // or "1" (super-admin?)
    'post_type'      => 'page',
    'menu_order'     => 1,
    'comment_status' => 'closed',
    'ping_status'    => 'closed',
 ));
   
restore_current_blog();
}

You can use the same code with little modifications to create default posts for new sites. Check out the following code:

add_action('wpmu_new_blog', 'wpb_create_my_pages', 10, 2);
  
function wpb_create_my_pages($blog_id, $user_id){
  switch_to_blog($blog_id);
  
// create a new page
  $page_id = wp_insert_post(array(
    'post_title'     => 'A sample blog post',
    'post_name'      => 'sample-blog-post',
    'post_content'   => 'This is just another sample blog post. Feel free to delete it.',
    'post_status'    => 'publish',
    'post_author'    => $user_id, // or "1" (super-admin?)
    'post_type'      => 'post',
 ));
   
restore_current_blog();
}

Troubleshooting WordPress Multisite Issues

Most common issues with WordPress multisite network setup happen due to the incorrect configuration of wildcard subdomains and domain mapping issues. Make sure that your web host supports wildcard subdomains before setting up multisite.

The following are some other common issues and their quick fixes.

Fixing Login Issues on Multisite Installs

A common issue is that when using WordPress multisite with sub-directories, some users are unable to log in to the admin area of their sites after they add the required code in the wp-config.php file.

To fix this, locate the following line in the wp-config.php file:

define('SUBDOMAIN_INSTALL', false);

Now, simply replace it with the following line:

define('SUBDOMAIN_INSTALL', 'false');

Find Unconfirmed Users

Another issue you may encounter is not being able to find users who registered on your network but didn’t get the activation email.

To fix this issue, see our guide on how to find pending unconfirmed users in WordPress.

Exporting a Site From Multisite to Its Own WordPress Install

Later, you or another site owner may want to export a site from multisite to a separate WordPress install. This can be easily done. For step-by-step instructions see our guide on how to move a site from WordPress multisite to single install.

You may also want to bookmark our ultimate guide to common WordPress errors and how to fix them. This will save you a lot of time fixing the most common WordPress issues quickly.

FAQs About WordPress Multisite Network

Many of our users have asked us plenty of questions about WordPress multisite network and how to use it more efficiently. The following are the most frequently asked questions that we have answered.

1. Would I be able to better manage my sites with a multisite network?

To be honest, the answer really depends on your usage scenario.

For example, if your websites are not related to each other, then you would be better off with a multiple site management tool like InifiteWP.

However, if you manage multiple sites for a restaurant chain, university, or online magazine, then WordPress multisite will be more efficient.

2. Does WordPress multisite make my websites load faster?

Once again, it depends on several factors. Better WordPress hosting with plenty of server resources will allow multisite to be faster, but then again, with these resources, individual WordPress sites will also run faster.

However, on a shared hosting account, traffic spikes will increase memory usage and slow down all websites on the multisite network at the same time. To improve multisite speed, see our guide on WordPress performance and speed optimization.

3. Can I add an online store to a WordPress Multisite Website?

Yes, you can add an online store in the WordPress multisite network. Most likely, you will be using an eCommerce plugin like WooCommerce for that, which is compatible with WordPress multisite.

4. Can I install ‘x plugin’ on my WordPress multisite?

Some WordPress plugins may not be compatible with WordPress multisite. Normally, plugin authors mention it on the plugin’s website, and you can avoid installing a plugin that may not work on a multisite setup. However, if it is not mentioned, then it is safe to assume that it is multisite compatible.

5. How do I share user logins and roles across the multisite network?

By default, a user who is registered on one site cannot register or be added to another site on the same network. That’s because they are already registered in the shared WordPress database. However, they don’t have any user role privileges on other sites.

You can use third-party plugins like WP Multisite User Sync to sync users across the network. However, you need to be careful, as you may end up giving someone admin privileges to a site.

We hope this article helped you learn how to install and set up WordPress multisite network. You may also want to see our step-by-step WordPress security guide to protect and keep your WordPress multisite secure or our expert picks of the best WordPress multisite plugins you should use.

If you liked this article, then please subscribe to our YouTube Channel for WordPress video tutorials. You can also find us on Twitter and Facebook.

The post How to Install and Setup WordPress Multisite Network first appeared on WPBeginner.

How to Migrate a WordPress Multisite: A Step-by-Step Guide

WordPress Multisite has been a highly beneficial addition. While you can’t use it for every new web development project, it’s highly valuable when all the right variables are in place.

In the Ultimate Guide to WordPress Multisite, we talked about how to enable Multisite and create a network of sites from within a single installation of WordPress. If you’ve followed our recommendations, then you should have a fully functioning WordPress Multisite up and running.

But what happens when someone changes their mind and wants to move their site out of the multisite network? Or what if you have a new idea for a site and you want to add it to the network’s umbrella of sites? Or perhaps you rebranded the Multisite network altogether and now need to get all these sites over to the new domain name. What do you do when you want to migrate a WordPress Multisite?

In the following step-by-step guide, I’ll show you how to complete each of the three Multisite migration types.

WordPress Multisite Migration Guide

You have a WordPress Multisite, but you realize something needs moving. There are three kinds of migration scenarios you might consider for a Multisite network:

  • Migrating a single website into an existing WordPress Multisite network.
  • Migrate a single website out of the WordPress Multisite network.
  • Migrating the entire WordPress Multisite network from one domain to another.

While you might be hesitant to move anything around within your network, there’s no need to be. Sure, the process will be a little more complicated than migrating a single site from one domain to another, but that’s expected. Follow along with the steps outlined in the three scenarios below and you’ll have your Multisite migrated in no time.

Scenario #1: Migrate a Single Site into Multisite

In this scenario, you want to move a new website into your Multisite network. Awesome! Here’s what you need to do.

Step 1

Back up both your single site installation and your Multisite network. You can do this with one of these WordPress backup plugins.

Step 2

Next, deactivate all plugins on your single site WordPress installation. This is something WordPress suggests you do in case one of your plugins conflicts with the export process (which is a possibility).

Go to Plugins. Select the bulk “Deactivate” option for all your plugins.

Step 3

One other thing the Codex suggests is that you delete any quarantined spam comments. There’s no need to save and carry that data over with you as you will (and should) never use it.

Step 4

Within your single site installation, go to Tools and click on Export. It is in here where you will export a copy of your site’s files for easier setup on the Multisite.

Select the “All Content” radio dial button and click Download Export File.

Save the XML file to your computer.

Step 5

Log into your Multisite WordPress installation. From here, you must create a new empty site into which you can place the migrated site.

Go to My Sites > Network Admin > Sites, and then click Add New.

Fill in the following details for your new Multisite subdomain:

  • Site Address (this will be the subdomain name on the network)
  • Site Title (which can be the same as it was previously)
  • Admin Email

If you have questions on how to configure this, check out this guide on how to activate and configure Multisite.

Then click Add Site.

Step 6

With the new site added, navigate to the new subdomain on the network. If you hover over “My Sites” in the top admin bar, you will see it there.

The first thing to do is go to the site’s Settings and edit the title and description. If it needs to differ from what it was before, you can change that now. Also, be sure to review the blog and permalinks settings. Anything you want to maintain from the single site, you update it from here.

Step 7

If the Multisite network does not use the same theme or plugins as the single site, you will need to set those up now.

Note that not all WordPress plugins are compatible with Multisite, so be sure that any new plugins you carry over are acceptable to be on the network.

To copy them over, you can do one of three things:

  • You can use a premium plugin (I’ve included a list of those below) to copy and migrate your theme and plugins.
  • You can reinstall all plugin and theme files from-scratch in Multisite (at least the ones that don’t already exist).
  • You can copy the files from your wp-content folder on the single site’s server and into the corresponding Multisite’s folders for this subdomain. To do this, make sure you know the ID number for your new subdomain.

If you’re unsure of what your new subdomain’s ID number is, go out to the Network dashboard. Click on My Sites. Hover over the new site you’ve created and click Edit. You’ll see the address bar something like this:

https://networkname.com/wp-admin/network/site-info.php?id=14

The “id=14” will provide you with the site’s ID number, so you know which database to edit in your directory.

Once your subdomain has all themes and plugins activated, configure and customize them to your liking.

Step 8

Check the subdomain’s Pages, Posts, and Media for dummy content created during the new site setup on the network. If it created anything, delete everything before you import content from the old site.

Step 9

To import the data from your single site, go to Tools and click on Import. Select the WordPress option from the list. (If you haven’t installed the tool yet, do it now).

Upload your saved XML file here.

You’ll next get a prompt about who you want to assign authorship to for your imported posts. You can either assign them to a current user on the network or a brand new one.

Click on the “Download and Import Attachments” checkbox and save your changes.

Step 10

If there were widgets from the single site you want to move into the subdomain, you can easily do this using a plugin called the Widget Importer & Exporter.

Basically, it’s doing the same export/import process as you just did for your site’s content, only just for widgets.

Follow the steps in the plugin and complete the export of your widget data.

Step 11

Now, hop on over to the new subdomain on your Multisite network and give it a look. Does everything seem okay?

  • Are all images in place?
  • Is the primary navigation the correct one?
  • Does it appear that all plugins are working?
  • Are there any theme customizations missed in this transfer?
  • Do the blog posts all have the correct author?
  • And so on.

Give your site a good checkup and make sure everything is as you expect.

Step 12

If you decide that you want to give the subdomain a custom domain (perhaps the old one from its previous single existence), you can use domain mapping to do this.

Step 13

With your site up and loaded on the network, you now need to get rid of the old WordPress site.

If you will not use a custom domain on the Multisite and the migrated single site no longer needs its own hosting, delete the WordPress site and cancel your domain and hosting account.

If you will use a custom domain on the Multisite, then you only need to delete the WordPress site and cancel the hosting account.

Scenario #2: Migrate a Single Site out of Multisite

Shipper lets you easily migrate a Multisite subsite to a single WordPress install in just a few clicks! Avoid the hassle of migrating manually…check out our tutorial here: Migrate Subsite to Single Site

Here is what you need to do to complete the reverse process.

Step 1

Back up your WordPress Multisite network.

Step 2

Purchase a web hosting plan and domain name for your new WordPress site. (If you already purchased a custom domain for domain mapping, then you’ve already finished with the latter part).

Step 3

Log into your new web hosting account and navigate the one-click WordPress install. From here, you can download and get started with WordPress for your new site.

You can also grab a copy of WordPress from here:

Step 4

The export and import of content for migrating out of Multisite is different, as you can only grab that data directly from your database tables.

You can do this by logging into your Multisite’s control panel and navigating to phpMyAdmin.

In the tables that appear under the Network’s folder, find the one that corresponds with the site you want to migrate out of the network. The ID number will match the one from the process described earlier. When you look at the list of sites on your network, click on the Edit button for the migrating site, and you’ll find the ID number appended to the end of the web address.

The URL will be like this:

https://networkname.com/wp-admin/network/site-info.php?id=14

Use the ID number to select all the tables pertaining to that site. Once you’ve selected all of them, click the Export button at the top.

Step 5

The file that exported will be in a .sql format. Make a copy and rename it.

You’ll now want to open it in a code editor like Atom to adjust your site’s domain (if you haven’t mapped it to the custom domain already). On the network, you’ll see the site referred to as:

https://networkname.com/subdomainname/

However, when you import this into the new site, you want it to say:

https://mynewsitename.com/

Do a search and replace in the file and save your changes once you’ve updated all instances of the domain.

Step 6

You must make one more change in this file. Remember that site ID from before? Well, it should not exist when in the database tables for a single WordPress installation. So, anywhere that you find “wp_[ID number]_”, replace it with “wp_”.

Save the file once more.

Step 7

Log into your new single WordPress installation. Because this site will no longer be part of a network of related sites, you’ll probably want to use your own WordPress theme and plugins here. So, go for it! Get those activated and customized before moving on to the next step.

Step 8

Now, you can import the database tables from your old subdomain. To do this, log into this new website’s control panel and find your phpMyAdmin.

WordPress will have automatically created several database tables for you upon installation. You don’t need those duplicates here as you’re about to carry your own over. Delete the following tables (all of them will have “wp_” at the beginning of their name):

  • commentmeta
  • comments
  • links
  • options
  • postmeta
  • posts
  • terms
  • term_relationships
  • term_taxonomy

Once you’ve deleted the tables mentioned above, you can now click the Import button at the top.

Select the newly saved .sql file and click on the Go button.

Once you receive your successful upload message, you’re good to go.

Step 9

If there were widgets from the Multisite network you wanted to copy over to the new domain, you can do so with the Widget Importer & Exporter plugin.

Step 10

Take some time to poke around the Settings of your new WordPress site. Configure your site’s metadata and blog settings as you see fit.

Step 11

Visit your new live website and do a full review of it to confirm that everything is as you want. Because you’re likely starting with a new theme and trying to create a unique experience from the Multisite, you may have already taken care of customization in the plugin and theme setup. But it’s still good to review and make sure everything is in its proper place.

Step 12

When you’re content with your newly migrated site, you can return to your Multisite network and delete your website from the list of Sites on your Network’s dashboard.

Scenario #3: Migrate WordPress Multisite to Another Domain

And finally, let’s talk about WordPress Multisite migration from one domain to another. It doesn’t require much in the way of installing new WordPress installations or configuring WordPress themes and plugins. Instead, this is about renaming all the backend files to reflect the new domain name of your network.

Here is what you need to do:

Step 1

The first thing you need to do: back up your Multisite installation.

Step 2

If you haven’t done so already, buy that fancy new domain name for your network. Then associate it with the same web hosting account that your Multisite lives on.

Step 3

Next, you must edit the wp-config.php file in the root directory of your site. You can access this either through your File Manager or FTP.

Once you’ve located the file, click on the Edit button to open it.

Now, when you configured WordPress for Multisite, you added some code above this line:

/* That's all, stop editing! Happy blogging. */

The line you want to update in this case is this one:

define('DOMAIN_CURRENT_SITE', 'yournetworkname.com');

Update “yournetworkname.com” with the new domain name you want to use.

You then need to add the following two lines of code above the “That’s all, stop editing!” message:

define('WP_HOME','https://newnetworkdomain.com');
define('WP_SITEURL','https://newnetworkdomain.com');

Save your changes and exit.

Step 4

The database files for your Multisite now also need to change to reflect the new domain name of the network. Log into phpMyAdmin.

From here, you will search for your network’s database tables. Specifically, these are the ones that will require an update from the old domain name to the new one (these are all preceded by “wp_”):

  • blogs > domain
  • options > home
  • options > siteurl
  • site
  • sitemeta > siteurl

In addition, you also need to update the following tables for each of the sites that exist on the network. The pound sign (#) below is where you will see the actual site ID number.

  • #_options > siteurl
  • #_options > home
  • #_options > fileupload_url

Once you have renamed the domain in every instance in which it appears throughout your database tables, you can save your changes and close. Your site should now be fully migrated to the new domain name.

Step 5

Don’t forget to change the name of your site and its web address within WordPress. If you want to do any rebranding and redesigning for this domain migration, you can do it now.

Simplify Your Multisite Migration, Ahoy!

There are many plugins you can use to streamline multisite migration, but there’s nothing better than using Shipper Pro to make your life easier.

With Shipper Pro, you can move WordPress sites from one host to another, development to live, local to production, etc.

You can migrate your entire multisite network securely with it to any location with a single click. Migrating WordPress sites has never been this simple!

Ready, Set, Migrate

A WordPress Multisite network isn’t set in stone. You can shift the network and the websites within it as you see fit—and you can migrate WordPress multisite almost as easily as a single site migration.

If you’re looking for expert help, our friendly live support team is ready to help you anytime with all your WordPress migration problems.