How to Display WordPress Form Entries on Your Site

Do you want to show your WordPress form entries on the front end of your site?

Displaying form entries on the front end allows you to show important information to your visitors. You can use it to show positive reviews, create directories, display event calendars, and more.

In this article, we’ll show you how to display WordPress form entries on your site.

How to Display WordPress form entries on your site

Why Display WordPress Form Entries on the Frontend?

Forms are great for keeping in touch with your visitors, getting feedback and suggestions, helping users resolve their issues, and more. Displaying form entries on your WordPress website for your visitors can be helpful in certain situations.

For example, you can display testimonials and product reviews that users submit through an online form. This way, you can leverage social proof to build brand trust and boost conversions.

You can also display form entries to create a business directory, display user-submitted events on a calendar, display statistics, and show other important information collected through online forms on your website.

However, by default, when users submit a form on your WordPress website, their entries are kept private. Only the WordPress admin and other users who have permission can view the form entries.

Let’s see how you can show form entries on the front end of your WordPress website using Formidable Forms and WPForms. You can click the links below to jump ahead to your preferred section.

Displaying WordPress Form Entries by Using Formidable Forms

The easiest way of showing form entries in WordPress is using Formidable Forms. It is a popular WordPress contact form plugin and offers an all-in-one form builder with lots of features for customization.

You can create all kinds of forms like surveys, quizzes, payment forms, and advanced forms like event calendars, directories, and calculators.

First, you’ll need to install and activate the Formidable Forms plugin on your site. If you need help, then please see our guide on how to install a WordPress plugin.

For this tutorial, we’ll be using the Formidable Forms Pro version because it includes the Visual Views addon.

Upon activation, you can go to Formidable » Forms and click the ‘+ Add New’ button at the top.

Add a new form

After that, a popup will appear that will ask you to select a form type, like a contact us form, user registration form, survey, and more.

Go ahead and select your preferred form type. For the sake of this tutorial, we’ll create a contact form to collect testimonials from users.

Select your form type

Next, you’ll need to enter a form name and description.

When you’re done, simply click the ‘Create’ button.

Enter form name and description

Now you can use the form builder to customize your form.

Formidable offers a drag and drop builder which is super easy to use. Simply select any form field you would like to add to your form from the options on your left and place them in the form template.

Build your form

After customizing your contact form, go ahead and embed it anywhere on your website.

The plugin offers multiple options to add your form. The easiest way is to click the ‘Embed’ button in the form builder at the top and then select an existing page or create a new page to add your form.

Embed your form in a new page

Alternatively, you can also use a Formidable Forms block or a shortcode block in the WordPress content editor to embed your forms.

Next, you can give a name to your page and preview it.

When you’re satisfied with its appearance, go ahead and publish your page.

Preview and publish your form

After your form is live, and you start to get entries, then you’ll need to install and activate the Visual Views addon in Formidable Forms.

To do that, simply go to Formidable » Add-Ons from your WordPress dashboard. Next, scroll down to the ‘Visual Views’ addon and click the ‘Install’ button.

Install visual views addon

Once the addon is active, you can go to Formidable » Views from your WordPress dashboard.

After that, simply click the ‘+ Add New’ button at the top.

Add a new view

Next, a popup window will appear where you’ll need to select a view type. The plugin offers a grid, table, calendar, and classic view that you can use.

For this tutorial, we’ll use the ‘Grid’ view to show form entries.

Select a view type

After that, you will have to select a data source for your view.

Go ahead and click on the ‘Use Entries from Form’ dropdown menu and select your form. There’s also an option to enter a view name.

After selecting your data source, simply click the ‘Create a view’ button.

Select data source

This will launch the view builder in Formidable Forms.

To get started, go ahead and click the ‘Layout Builder’ button.

Select a layout builder

Next, you’ll need to select a layout to display your form entries.

Simply choose a layout from the given options at the top. You can add multiple layouts to show form entries.

Build your layout

After selecting a layout, go ahead and click the ‘Save layout’ button.

Next, you can add content to the view builder by clicking the ‘+’ button. There are options to customize the layout of the form entries and add content before and after the form entries.

The plugin also gives options to change the typography, background color, border, and more under the Grid Style Settings panel on your left.

You’ll also see a shortcode under the View Name field, which you’ll need when showing form entries on your site.

Add content to the view

There are more advanced options in the Grid Style Settings panel. In the advanced settings, you can limit the number of entries, page size, and more.

When you’ve customized the view, don’t forget to click the ‘Update’ button at the top.

Next, you’ll need to display your form entries on your WordPress website. To do that, copy the shortcode given under the View Name.

The shortcode will look like this:

[display-frm-data id=2410]

After that, go to any post or page where you’d like to display form entries. Once you’re in the content editor, simply add a ‘Shortcode’ block.

Select shortcode block

Now, enter the shortcode you copied earlier in the shortcode block.

After that, you can preview the page and publish it.

Enter the shortcode

You can now visit your website to see the form entries in action.

Here’s what they look like on our demo website:

Form entries preview

Displaying WordPress Form Entries by Using WPForms

Another way of displaying form entries on the front end of your WordPress website is through WPForms. However, this method requires editing code and is recommended for advanced users who have knowledge about coding.

WPForms is the best contact form plugin for WordPress and lets you create different types of forms using a drag and drop form builder.

Just note that if you want to see your form entries in the WordPress dashboard, then you’ll need the WPForms Pro version. There is also a WPForms Lite version that you can use for free, which sends email notifications of all your form entries.

First, you’ll need to install and activate the WPForms plugin. For more details, please see our guide on how to install a WordPress plugin.

Next, you will need to create an online form using WPForms. You can check out our step-by-step guide on how to create a contact form in WordPress.

Once you start to get form entries, you’ll need to enter the following code into your theme’s functions.php file or in a site-specific plugin. Please see our guide on how to easily add custom code in WordPress for more information.

/**
 * Custom shortcode to display WPForms form entries in table view.
 *
 * Basic usage: [wpforms_entries_table id="FORMID"].
 * 
 * Possible shortcode attributes:
 * id (required)  Form ID of which to show entries.
 * user           User ID, or "current" to default to current logged in user.
 * fields         Comma separated list of form field IDs.
 * number         Number of entries to show, defaults to 30.
 * 
 * @link https://wpforms.com/developers/how-to-display-form-entries/
 *
 * Realtime counts could be delayed due to any caching setup on the site
 *
 * @param array $atts Shortcode attributes.
 * 
 * @return string
 */
 
function wpf_entries_table( $atts ) {
 
    // Pull ID shortcode attributes.
    $atts = shortcode_atts(
        [
            'id'     => '',
            'user'   => '',
            'fields' => '',
            'number' => '',
                        'type' => 'all' // all, unread, read, or starred.
        ],
        $atts
    );
 
    // Check for an ID attribute (required) and that WPForms is in fact
    // installed and activated.
    if ( empty( $atts['id'] ) || ! function_exists( 'wpforms' ) ) {
        return;
    }
 
    // Get the form, from the ID provided in the shortcode.
    $form = wpforms()->form->get( absint( $atts['id'] ) );
 
    // If the form doesn't exists, abort.
    if ( empty( $form ) ) {
        return;
    }
 
    // Pull and format the form data out of the form object.
    $form_data = ! empty( $form->post_content ) ? wpforms_decode( $form->post_content ) : '';
 
    // Check to see if we are showing all allowed fields, or only specific ones.
    $form_field_ids = isset( $atts['fields'] ) && $atts['fields'] !== '' ? explode( ',', str_replace( ' ', '', $atts['fields'] ) ) : [];
 
    // Setup the form fields.
    if ( empty( $form_field_ids ) ) {
        $form_fields = $form_data['fields'];
    } else {
        $form_fields = [];
        foreach ( $form_field_ids as $field_id ) {
            if ( isset( $form_data['fields'][ $field_id ] ) ) {
                $form_fields[ $field_id ] = $form_data['fields'][ $field_id ];
            }
        }
    }
 
    if ( empty( $form_fields ) ) {
        return;
    }
 
    // Here we define what the types of form fields we do NOT want to include,
    // instead they should be ignored entirely.
    $form_fields_disallow = apply_filters( 'wpforms_frontend_entries_table_disallow', [ 'divider', 'html', 'pagebreak', 'captcha' ] );
 
    // Loop through all form fields and remove any field types not allowed.
    foreach ( $form_fields as $field_id => $form_field ) {
        if ( in_array( $form_field['type'], $form_fields_disallow, true ) ) {
            unset( $form_fields[ $field_id ] );
        }
    }
 
    $entries_args = [
        'form_id' => absint( $atts['id'] ),
    ];
 
    // Narrow entries by user if user_id shortcode attribute was used.
    if ( ! empty( $atts['user'] ) ) {
        if ( $atts['user'] === 'current' && is_user_logged_in() ) {
            $entries_args['user_id'] = get_current_user_id();
        } else {
            $entries_args['user_id'] = absint( $atts['user'] );
        }
    }
 
    // Number of entries to show. If empty, defaults to 30.
    if ( ! empty( $atts['number'] ) ) {
        $entries_args['number'] = absint( $atts['number'] );
    }
 
// Filter the type of entries all, unread, read, or starred
    if ( $atts['type'] === 'unread' ) {
        $entries_args['viewed'] = '0';
    } elseif( $atts['type'] === 'read' ) {
        $entries_args['viewed'] = '1';
    } elseif ( $atts['type'] === 'starred' ) {
        $entries_args['starred'] = '1';
    }
 
    // Get all entries for the form, according to arguments defined.
    // There are many options available to query entries. To see more, check out
    // the get_entries() function inside class-entry.php (https://a.cl.ly/bLuGnkGx).
    $entries = wpforms()->entry->get_entries( $entries_args );
 
    if ( empty( $entries ) ) {
        return '<p>No entries found.</p>';
    }
 
    ob_start();
 
    echo '<table class="wpforms-frontend-entries">';
 
        echo '<thead><tr>';
 
            // Loop through the form data so we can output form field names in
            // the table header.
            foreach ( $form_fields as $form_field ) {
 
                // Output the form field name/label.
                echo '<th>';
                    echo esc_html( sanitize_text_field( $form_field['label'] ) );
                echo '</th>';
            }
 
        echo '</tr></thead>';
 
        echo '<tbody>';
 
            // Now, loop through all the form entries.
            foreach ( $entries as $entry ) {
 
                echo '<tr>';
 
                // Entry field values are in JSON, so we need to decode.
                $entry_fields = json_decode( $entry->fields, true );
 
                foreach ( $form_fields as $form_field ) {
 
                    echo '<td>';
 
                        foreach ( $entry_fields as $entry_field ) {
                            if ( absint( $entry_field['id'] ) === absint( $form_field['id'] ) ) {
                                echo apply_filters( 'wpforms_html_field_value', wp_strip_all_tags( $entry_field['value'] ), $entry_field, $form_data, 'entry-frontend-table' );
                                break;
                            }
                        }
 
                    echo '</td>';
                }
 
                echo '</tr>';
            }
 
        echo '</tbody>';
 
    echo '</table>';
 
    $output = ob_get_clean();
 
    return $output;
}
add_shortcode( 'wpforms_entries_table', 'wpf_entries_table' );

After adding the custom code to your website, you’ll need to enter the following shortcode to any page or post to show form entries.

[wpforms_entries_table id="FORMID"]

Just replace the FORMID with your form’s ID.

You can find the form ID by going to WPForms » All Forms and then looking at the Shortcode column.

Find WPForms form ID

To add a shortcode, simply create a new page or edit an existing one.

Next, go ahead and add a ‘Shortcode’ block.

Select shortcode block

After adding the block, simply enter your shortcode.

Now preview your WordPress page and click the ‘Publish’ button at the top.

Enter shortcode to show form entries

Here’s what the preview of our form entries looked like on the front-end:

Display WPForms Entries on Front End

You can further customize the display using custom CSS styles as needed.

We hope that this article helped you learn how to display WordPress form entries on your site. You may also want to see our guide on how to create a custom WordPress theme, or our expert comparison of the best live chat software for small business.

If you liked this article, then please subscribe to our YouTube Channel for WordPress video tutorials. You can also find us on Twitter and Facebook.

The post How to Display WordPress Form Entries on Your Site first appeared on WPBeginner.

How to Add Save & Continue Functionality in WordPress Forms

Do you want to allow your user to save and resume their WordPress forms before submission?

If you have complex and lengthy forms, then having the save and continue functionality is helpful for your users. It helps get more form submissions, as people can save their progress and easily submit once they’ve finished.

In this article, we’ll show you how to add a save and continue functionality in WordPress forms to improve form completion rate.

How to Add Save and Continue Functionality in WordPress forms

When to Use Save & Continue in WordPress Forms?

Often people don’t submit a form if it takes a lot of time to complete. Having a save and resume feature for your WordPress forms can solve this issue.

Save and continue functionality allows your users to save their form’s progress and resume filling it from where they left.

It offers your visitors the flexibility to complete the form whenever they want, as they don’t have to do it in one go. As a result, you get more form submissions and reduce form abandonment.

Save and continue feature works seamlessly if you have long forms like surveys, questionnaires, job applications, or require multiple people to fill out the details at different stages in a workflow.

That being said, let’s look at how you can add the save and continue functionality in WordPress forms.

Adding Save & Continue Functionality in WordPress Forms

The easiest way of adding save and resume fuctionalility in WordPress is by using WPForms. It’s the best WordPress contact form plugin, and over 5 million website owners use it.

WPForms

With WPForms, you can create any type of WordPress form, including contact form, payment form, newsletter signup form, and more. It offers a drag and drop form builder, which makes it beginner-friendly to use.

You also get 300+ pre-built form templates, numerous form fields for customization, and integration with popular email marketing tools and payment collection services like PayPal.

Recently, they released a Save and Resume addon that allows your visitors to save their forms and complete them where they last left.

For this tutorial, we’ll be using the WPForms Pro version because it includes the Save and Resume addon. However, there is also a WPForms Lite version you can gat started with.

First, you’ll need to install and activate WPForms on your website. If you need help, then please see our tutorial on how to install a WordPress plugin.

Upon activation, you can head over to WPForms » Settings from your WordPress dashboard and enter your license key. You can find the key in the WPForms account area.

Enter WPForms license key

After that, you’ll need to activate the ‘Save and Resume Addon’ by navigating to WPForms » Addons from your WordPress admin area and clicking the ‘Install Addon’ button.

Save and resume WPForms addon

Once the addon is active, you can add the save and continue functionality to an existing form or create a new WordPress form. To start, simply head over to WPForms » Add New page.

On the next screen, you’ll see pre-built templates for your form. You can enter a name for your form and select a template to get started.

For this tutorial, let’s select the Suggestion Form template. You can hover over the template and click the ‘Use Template’ button.

Choose a form template

Next, you can edit your form using the drag and drop builder. Simply drag any form field you want to add to your form and drop it onto the template.

Drag and drop form fields

WPForms also lets you edit each field in the form. For example, you can edit its label, add a description, change the order of the choices, make a field required, and more.

Edit form fields

After that, you can head over to the ‘Settings’ tab from the menu on your left and then select ‘Save and Resume.’

Enable save and resume settings

Next, you can click on the toggle for the ‘Enable Save and Resume’ option. This will allow your user to save their form and continue completing it later.

When you enable this option, you’ll unlock more settings to customize the save and resume functionality. For instance, you can change the text that is displayed next to the submit button and let users save their form’s progress.

Besides that, there is an option to enable a disclaimer page, which is shown to users before saving their progress. WPForms also lets you edit the confirmation page settings and change the text displayed on the page.

Edit save and resume settings

Next, there are more options if you scroll down. You can ‘Enable Resume Link’ to allow users to copy the form link and paste it into their browsers to resume later.

There is also an option to ‘Enable Email Notification’ that sends the link to the user’s email address, so they can access their form from their inbox.

You can also edit the email text your visitors will see in their inbox and the display message.

More save and resume settings

WPForms also lets you change the notification settings and the confirmation email that people will get when they submit a form.

When you’ve made the changes, go ahead and click the ‘Save’ button at the top and exit the form builder.

Save your form

Next, you can add your form to any blog post or page. To start, simply edit an existing page or add a new one. Once you’re in the WordPress editor, click the ‘+’ button and add a WPForms block.

WPForms block

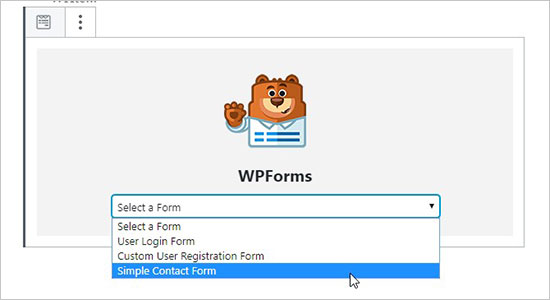
After that, select the form you just created from the dropdown menu and publish your page.

Choose your form

Now, you can visit your page and scroll down to the end of the form to see the ‘Save and Resume Later’ option next to the Submit button.

Save and resume later preview

When someone clicks on the Save and Resume Later option, they’ll see a link to the form, which they can copy. There will also be an option to enter an email address to receive the form link via email.

Message users will see on save and resume

Now, you can also see if someone partially completed their form and used the save and continue option in WPForms.

All you have to do is navigate to WPForms » Entries from the WordPress dashboard and select your form to view its entries.

Select your form to view entries

On the next screen, you can look for entries that have a ‘Partial’ status. These are people that clicked the Save and Resume functionality and saved their form’s progress.

The status will change to Completed automatically when your user returns and completes the form.

View partial entries

We hope this article helped you learn how to add save and continue functionality in WordPress forms. You may also want to go through our guide on how to start an online store and the best WordPress plugins and tools for business sites.

If you liked this article, then please subscribe to our YouTube Channel for WordPress video tutorials. You can also find us on Twitter and Facebook.

The post How to Add Save & Continue Functionality in WordPress Forms appeared first on WPBeginner.

How to Create a Dropbox Upload Form in WordPress

Do you want to create a Dropbox upload form in WordPress?

A contact form with a file upload option could be hard to manage if you are getting too many attachments. You can connect your form to Dropbox and upload those files directly to the cloud.

In this article, we’ll show you how to easily create a Dropbox upload form in WordPress.

Creating a WordPress Dropbox upload form

Why Use Dropbox to Upload Form Attachments

Some times you may need users to upload a file attachment using a form on your website.

For example, a job board website may need a file upload option to upload CV or work samples.

A customer feedback form may need a file upload option so users can send screenshots. A photo contest website may need it for users to upload their entries.

As you receive files, you can store those files on your WordPress website. They will be added to your website’s wp-content folder.
However, if you are expecting to get a ton of entries, and they are not related to your actual website files, then it is a good idea to save them separately.

Uploading form attachments to Dropbox has the following advantages:

  • Keeps form upload entries separate from your WordPress files
  • Dropbox makes it easier to share those files with anyone and you’ll not need to give them access to your website.
  • You can easily browse and manage form attachments from your Dropbox dashboard
  • If you no longer need those files, then you can download, archive, and delete them.

That being said, let’s take a look at how to make a WordPress form with an option to upload files to Dropbox.

Creating a Dropbox Upload Form in WordPress

First you need to install and activate the WPForms plugin. For more details, you should check out our article on how to install a WordPress plugin.

Note: WPForms is a paid plugin built by the same team as WPBeginner, and you’ll need at least their ‘Pro’ plan to access the Zapier addon which we’ll be using in this tutorial.

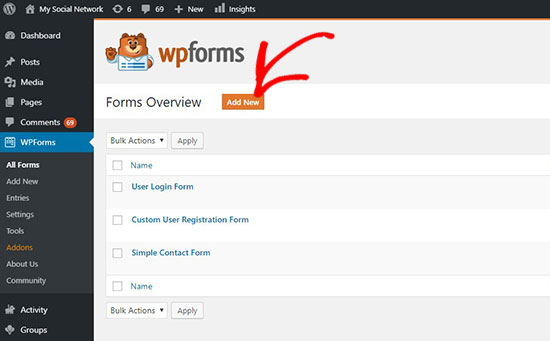
Upon activation, you need to visit WPForms » Add New page in your WordPress admin area.

Add new form

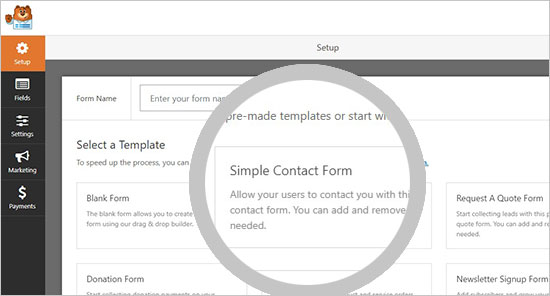
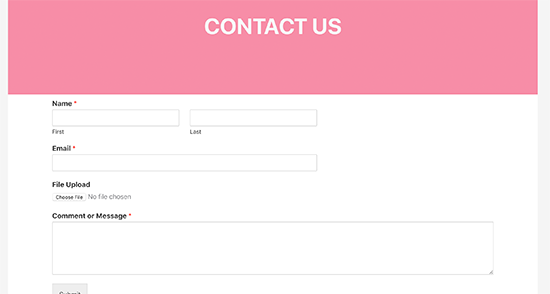
It’ll take you to the WPForms form builder page. Simply provide a name for your form and then select simple contact form template as a starting point.

Select simple contact form

WPForms will load the form template with commonly used form fields. You can click on any fields to edit it, and you can also drag the fields to rearrange them or add new fields to the form.

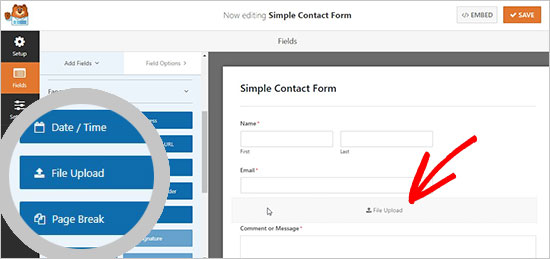
Next, you need to click on the ‘File Upload’ field located under the ‘Fancy fields’ section in the left column.

Add file upload button

This will add the file upload field to your form.

Click on the ‘Save’ button to save your form, and your file upload form is ready.

Integrating Zapier with WPForms

Next, you need to connect your form to your Dropbox account.

We’ll be using a service called Zapier to do that. Zapier allows you to connect different apps to your website without writing any code. In this case, we’ll use it to build a connection between WPForms and Dropbox.

WPForms comes with a ‘Zapier Addon’ that you can use to integrate with over 1500 popular apps, including Dropbox.

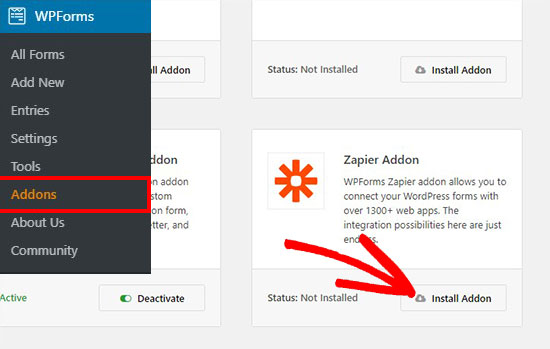
To access this addon, you need to go to WPForms » Addons page. From there, you need to look for the Zapier addon and click on the ‘Install Addon’ button. It will activate the addon automatically.

Zapier Addon

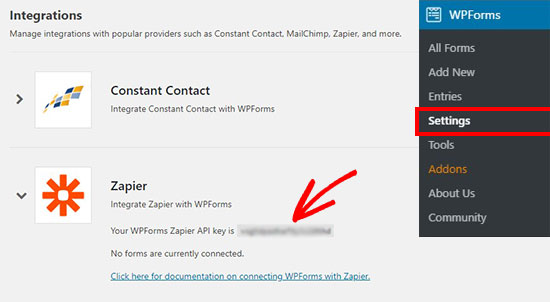
Next, you need to go to WPForms » Settings » Integrations page in your WordPress admin area. From there, you need to copy the ‘Zapier API key’ that you will need to connect your WordPress website with Zapier.

Zapier integration

Once copied, you should go to the Zapier website and login to your Zapier account. Then, click on the ‘Make a Zap’ button to continue.

Make a Zap

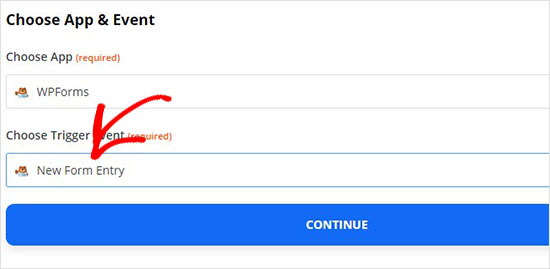
There will be many apps available. Search for ‘WPForms’ and select it as a trigger app.

Choose app

After that, you need to select ‘New Form Entry’ as a trigger event for the WPForms app. It will create a trigger on every form submission.

Choose trigger event

Now, you can go ahead and click on the ‘Sign in to WPForms’ button to connect your Zapier account with WPForms plugin on your site.

To connect Zapier with your website, you need to add your website URL and Zapier API key that you copied earlier.

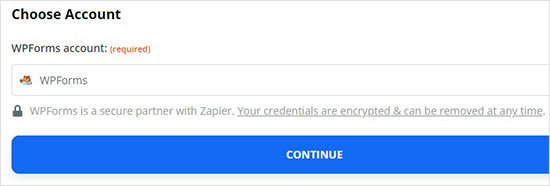
It will display the WPForms account. Click on the ‘Continue’ button.

Choose account

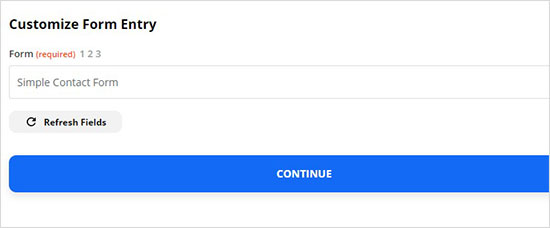
In the ‘Form’ dropdown, you need to select the file upload form that you created previously.

Select form entry

After that, click on the ‘Continue’ button.

Before going to the next step, Zapier will ask you to test the new file upload form to see if all the settings are working properly.

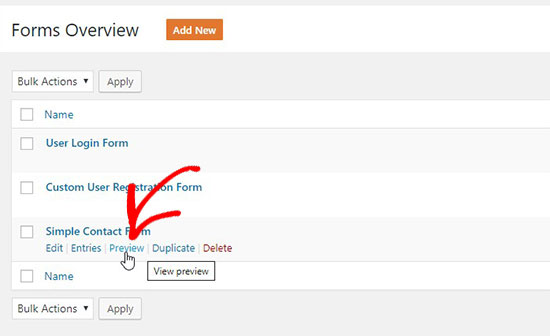
You can visit WPForms » All Forms page in the WordPress admin area and click on the ‘Preview’ link below the file upload form.

Preview form

To make this test smooth, you should upload a file and also add dummy text in the message section. Submit the test entry and go to your Zapier account. Click on the ‘Test & Continue’ button.

WPForms entry

Note: You can check the test entry in the ‘Find Data’ section.

If the test is successful, it will jump to the next step where you can integrate your form with Dropbox.

Connecting WPForms with Dropbox

First you need to visit your Dropbox account and create a new Dropbox upload folder. You can rename this folder as ‘WPForms Uploads’ or give it any name. All your file attachments will upload in this folder automatically.

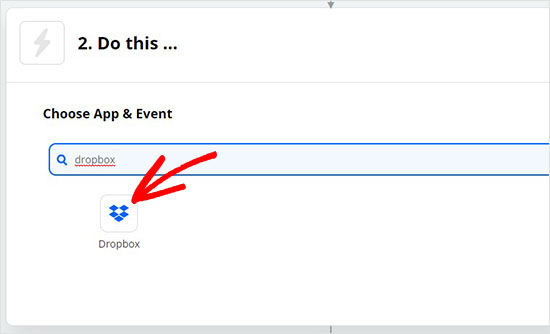
Next, you need to go back to your Zapier account. In the ‘Do this’ section, you need to choose ‘Dropbox’.

Choose Dropbox

It will ask you to create an action for Dropbox. Select the ‘Upload File’ option and click on the ‘Continue’ button.

Choose action

After that, you need to click on the ‘Sign in to Dropbox’ button to select your Dropbox account and connect it with Zapier.

Sign in to Dropbox

Upon connecting the account, click on the ‘Continue’ button.

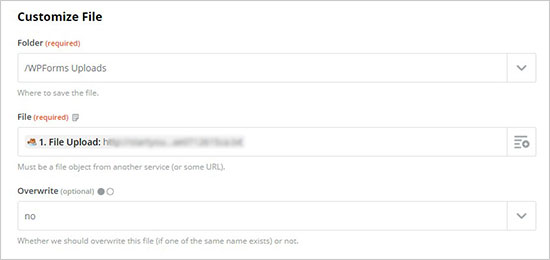
Now, you need to configure the Dropbox file settings. It will ask you for 2 options:

  1. The Dropbox folder where you want to save the file attachments
  2. The WPForms file upload field

Configuration Dropbox

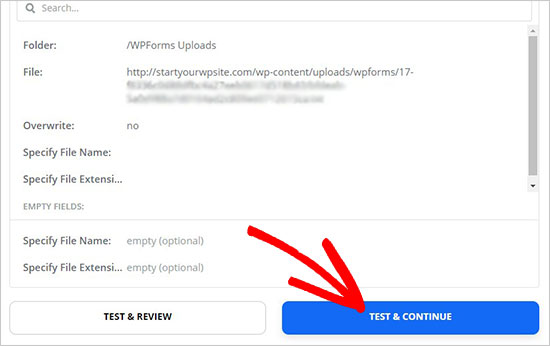
After setting up, you can go ahead and test your configurations. Click on the ‘Test & Continue’ button to continue.

Test file upload

Lastly, click on the ‘Turn Zap On’ button to store these settings. It will take a few seconds, and you will see the Zap status on the top rights corner of the screen.

Turn Zap on

Your online form with file upload option is ready to be added on your website.

Adding the Dropbox Upload Form in WordPress

To add the Dropbox upload form in WordPress, you can edit any page or post where you want to display it.

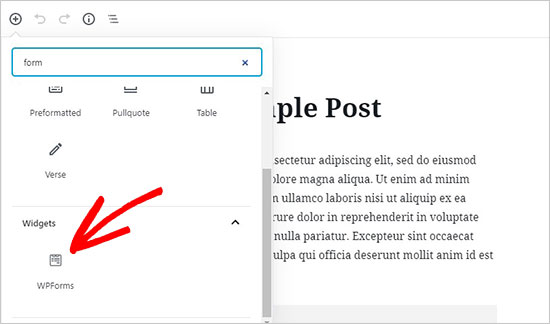
Simply add the WPForms block to the content editor and select the form you created earlier.

WPForms widget

WPForms will load the live preview of your form inside the content editor.

Select form

You can now visit your website to the form in action. You can also test out the form by uploading a file and filling out the form.

Previewing Dropbox upload form

That’s all.

We hope this article helped you learn how to create a Dropbox upload form in WordPress. You may also want to see our guide on how to run a giveaway contest in WordPress to boost user engagement.

If you liked this article, then please subscribe to our YouTube Channel for WordPress video tutorials. You can also find us on Twitter and Facebook.

The post How to Create a Dropbox Upload Form in WordPress appeared first on WPBeginner.