Beginner’s Guide on How to Moderate Comments in WordPress

Are you wondering how to moderate comments on your WordPress site?

WordPress’s built-in comment system allows your readers to engage with your content and interact with you directly. That said, some comments may contain elements that hurt your brand and your website.

In this beginner’s guide, we will show you how to moderate comments in WordPress using the default WordPress features and some plugins.

Beginner's Guide on How to Moderate comments in WordPress

What Is Comment Moderation in WordPress?

In WordPress, comment moderation is a feature that lets users control and filter the comments submitted on their websites.

With comment moderation, you can approve, edit, remove, or mark comments as spam before they appear publicly on your site.

While comments can build your website engagement, they can also pose a significant risk to your WordPress security.

Harmful comments usually come from spambots. These bots can fill the comment section with irrelevant or repetitive messages. As a result, it may be hard for real visitors to find and interact with each other.

Additionally, spam comments may have malicious links that redirect users to phishing websites or spread viruses by encouraging users to download dangerous files onto their devices.

Without comment moderation, your website can provide a poor user experience for your readers. It can also negatively impact your WordPress SEO.

If your site is filled with spammy comments, it can affect your site’s credibility and trustworthiness, leading to lower search engine rankings.

Whenever you build a new WordPress site, the default WordPress comment system will be active. Your blog post will have a comment form displayed at the bottom. Note that it may look different or not appear depending on the WordPress theme you are using.

WordPress comment form example

Generally, anyone with a valid name and email can leave a comment without verifying their identity. However, it doesn’t mean the comment will get approved automatically.

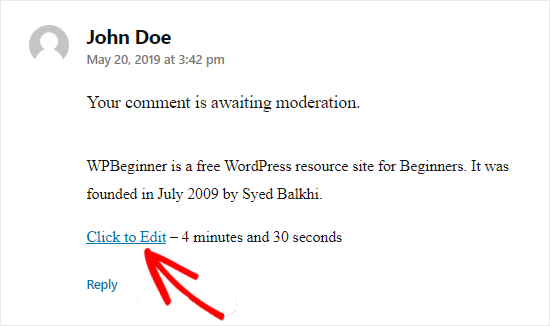
Instead, they will see a preview of it and a message that the comment awaits moderation. This means the website owner will decide whether to approve or delete the comment.

What a comment awaiting moderation looks like on a WordPress website

This basic setting is good enough to filter genuine comments from harmful ones. But there’s actually a lot more that you can do to keep your WordPress blog safe.

With that in mind, let’s take a look at how you can moderate comments on your WordPress website. You can use these quick links to jump between the different sections:

Basics of Moderating WordPress Comments

You can see all comments on your WordPress website by clicking on the ‘Comments’ menu in the WordPress dashboard.

Opening the Comments menu on the WordPress admin panel

To learn more about the Comments page, you can check out our glossary entry on WordPress comments.

In this guide, we will talk more about what you should do when you receive a comment and what factors to look for when moderating it.

First, let’s cover some basics. When moderating comments, you should look for the following signs:

  • A bunch of links, keywords, and strange characters – This is the most obvious type of spam comment. Be careful of clicking any links here, as they could contain inappropriate content in the comment or even viruses.
  • Suspicious or generic names – If you see a comment left by a user named ‘Best Mortgage Rates’ or ‘Cheap Printer Ink,’ then it may be a marketer trying to spam your site for a backlink.
  • Generic messages – Often, spammers rely on generic comments to bypass your spam filter. Examples include Thank You, Really Nice Article, or a generic statement with your post title. It might also be something like, “I agree, beginner’s guide to comment moderation is essential.”
  • Offensive language It’s important for WordPress bloggers to create a respectful space for their audience. Otherwise, you may risk making certain readers uncomfortable.

Now, let’s look at the different comment action links, which will appear when you hover your cursor over a comment. There is Approve, Reply, Quick Edit, Edit, History, Spam, and Trash.

The WordPress comment action links

To accept a comment, you can click on the ‘Approve’ button. This will make the comment publicly visible on your website.

If you want to let users know that their comment is live, read our guide on how to notify users when their comment is approved in WordPress.

To mark a comment as spam, you can click the ‘Spam’ button. It will move the comment to the Spam tab on the Comments page.

If a user complains that their comments are not appearing on your website, then this is the first place you should look. You can go to the ‘Spam’ tab and click the ‘Not Spam’ button below the comment.

Marking a comment as Not Spam on WordPress

You can also click on the ‘Empty Spam’ button to delete all spam comments at once. Even if you don’t, WordPress will automatically delete spam comments after 15 days.

If you find a comment in the All tab that is not necessarily spam but may be harmful to you and your readers, you can click the ‘Trash’ button. This will add the comment to the Trash tab.

Comments in the Trash will stay there for the next 30 days. After this time, WordPress will automatically delete them forever.

If you accidentally deleted a comment, then simply visit the ‘Trash’ tab and click on the ‘Restore’ link below the comment.

Restoring a WordPress comment from Trash

If you want to delete or mark multiple comments as spam, then you can use the ‘Bulk actions’ dropdown menu at the top of the comment list.

Note that doing this may cause your website to slow down while it processes all the comments.

Marking multiple comments as spam using the Bulk action option in WordPress

For more information, you can check out our guide on how to batch-delete spam comments in WordPress.

You can respond to a comment by clicking on the ‘Reply’ link. Once you’ve inserted your response, just click ‘Approve and Reply.’

Note that replying to a comment automatically approves it as well.

Approving and replying to a WordPress comment

The Quick Edit and Edit buttons work similarly. You can use either setting if you want to make the comment’s language clearer for visitors.

The difference is that, with Edit, you will be redirected to the Edit Comment page. With Quick Edit, you can modify the comment right on the Comments page like this:

Selecting the Quick Edit option on a WordPress comment

If you click the ‘History’ button, then you will see all the actions that have been done to the comment.

This feature can be helpful if you work with a team. It can help you track changes and understand how other people moderate comments on your site.

Reviewing the history of a WordPress comment

How to Configure the WordPress Comment Settings

We’ve covered the basics of moderating WordPress comments. We will now discuss the built-in WordPress comment settings, which will help you filter and control what kind of comments will appear on your website.

The comments settings page is located at Settings » Discussion. There are different sections on the discussion settings page, and we will walk you through each option on the page.

Changing the WordPress comment settings

Default post settings

The Default post settings offer three options to manage interactions and comments on your WordPress site:

The WordPress default post settings

The first option allows your blog to notify other blogs when you link to them in an article. The second option accepts notifications when they link to your articles.

These notifications are called pingbacks and trackbacks, and we recommend you uncheck both of these options. The first option can slow down your entire site, and the second option could bring you a lot of spam comments.

The third option on the article settings screen is ‘Allow people to post comments on new posts.’ It enables comments for all new articles you write on your WordPress blog.

Alternatively, you can turn comments on and off for individual articles, which we will show you later.

Other comment settings

WordPress' Other comment settings

In this section, you will notice the first option is ‘Comment author must fill out name and email.’ This option makes it mandatory for comment authors to provide a name and email address with their comments.

You need to check this option unless you want to allow anonymous commenting on your website.

There is also an option to require users to register on your site before leaving a comment. However, in our opinion, it’s not necessary for most sites as it may discourage new users from interacting with your post.

You will also see the option for closing comments on older articles. Some website owners use this to prevent spam, but it’s completely a personal preference.

Next is the ‘Show comments cookies opt-in checkbox, allowing comment author cookies to be set.’ Checking this box will let your website save the commenter’s name, email, and website details for when they want to comment on your post in the future.

Sometimes, WordPress comments can become a long thread that is difficult to keep track of. In this case, we recommend ticking the ‘Enable threaded (nested) comments’ option so that replies to specific comments appear directly beneath the original comment.

Having too many nested comments can negatively affect your page’s readability. The default setting of 5 levels is good enough for most WordPress websites.

If one of your articles becomes popular and gets too many comments, then the comment section will become too long. Users will have to scroll a lot to read the latest comments on the article.

To address this problem, you can check the option to break comments into pages. You can also use the dropdown menu to select whether to show the last or first comment page by default.

The last option is to display your most recent or oldest comments first. If you want to learn more about this, then you can read our guide on how to rearrange comments in WordPress.

‘Email me whenever’ and ‘Before a comment appears’

The WordPress comment 'Email me whenever' and 'Before a comment appears' settings

The next section allows you to receive email notifications whenever a user leaves a new comment on your site or a comment is held for moderation.

As you get more comments, these emails may become annoying, so we recommend turning the comment notifications off.

In the ‘Before a comment appears’ section, the first option is to approve each comment manually. Make sure this box is checked so that no comment can appear on your site without your approval.

Below this, you will see the ‘Comment author must have a previously approved comment’ option.

If this option is checked, then comments from authors with a previously approved comment will appear without explicit approval. Simply uncheck this option to make sure that all comments are manually approved.

Comment Moderation

WordPress Comment Moderation settings

As we’ve discussed before, a common trait among automated spam comments is that they contain a lot of links.

If you have already set your comments to be manually approved, then all your comments will go to the moderation queue regardless of how many links they have. If not, then you can specify to hold a comment in the queue if it contains a certain number of links.

You will also see a larger text area where you can enter words, IP addresses, email addresses, URLs, or browser information that you want to watch out for.

Any comment matching the things you enter here will be sent to the moderation queue.

Again, if you decide to have all comments manually approved, then you don’t need to do anything, as they are all going to the moderation queue anyway.

Disallowed Comment Keys

WordPress Disallowed Comment Keys settings

This setting used to be called the Comment Blocklist in WordPress 5.4. Here, you can set specific words that will automatically move the comment to Trash if used in a comment’s content, author name, URL, email, IP address, or browser information.

Make sure to use this feature carefully because real comments may get removed by mistake.

Avatars

WordPress Avatars settings

The last section on the Comments Settings screen is Avatars. These are the images that appear next to the comment author’s name on your website.

WordPress uses Gravatar, which is a free service that allows users to use the same avatar on all the blogs they visit. For more details, please see our guide on what Gravatar is.

We recommend checking the ‘Show Avatars’ box to make it easy to identify the different commenters on your post. You can also select the maximum rating of Gravatar that can be displayed on your blog.

WordPress uses Mystery Person as the default Gravatar when a comment author doesn’t have an image associated with their email address. You can change this by selecting a default avatar from the list or even adding your own custom default gravatar in WordPress.

That’s it! You have configured your comment settings. Don’t forget to click on the ‘Save Changes’ button to store your settings.

Clicking the 'Save Changes' button on the WordPress Discussion settings page

How to Moderate Comments Using Thrive Comments Plugin (Recommended)

The default WordPress comment system is good, but it can be pretty basic. For access to more comment management and engagement settings, you can install a WordPress comment plugin.

These plugins can not only improve comment moderation but also significantly boost your comment engagement. As a result, your visitors can enjoy a more engaging and safe commenting experience.

Thrive Comments is one of the best plugins to keep comments in check for a great user experience while encouraging user interaction.

For example, with the Comment Conversion feature, you can direct commenters to a custom thank-you page, social sharing buttons, or a related post so that they can discover more of your content.

The Thrive Comments WordPress plugin

To use Thrive Comments, you can purchase it as an individual plugin or get the complete Thrive Themes Suite. This comes with all Thrive products, including Thrive Ovation, which can turn your comments into testimonials for your web pages in one click.

Once you have completed your payment, you will get a plugin zip package to install on your WordPress site. For more information, read our step-by-step guide on how to install a WordPress plugin.

Once installed, you will now see a ‘Thrive Comments Moderation’ menu under the Comments tab on the admin panel. Here’s what the page looks like:

Opening the Thrive Comments Moderation page on WordPress

The interface looks similar to the built-in Comments section. However, there are several differences.

This interface now includes the ‘Unreplied’ and ‘Pending my reply’ tabs.

The first tab collects all comments that have not been replied to. Meanwhile, the second tab has all the comments that have been assigned to you by the website admin so that you can respond to them.

The Thrive Comments Moderation tabs and search menu

Additionally, you can filter comments by page by entering the page name in the ‘View comments on’ field.

If you want to look for specific comments, then you can type in a term from the comment into the ‘Search in comments’ field.

You also get more comment action links. Besides approving, removing, editing, and marking comments as spam, you can click the ‘Delegate’ button to assign a comment to another user.

This feature is handy if you run a WordPress blog with multiple writers.

Clicking the 'Delegate' button on a comment using the Thrive Comments plugin

If you click the ‘More’ button, then you will see the ‘Feature’ option. Selecting it will pin a comment to the top of the comment list on a blog post.

This way, important or noteworthy comments stay visible and easily accessible to all readers. All pinned comments can be found in the ‘Featured’ tab.

Clicking the 'Feature' option in the Thrive Comments plugin

For more details, you can see our guide on how to feature or bury comments in WordPress.

If you want to look at your entire comment activity, then just click the ‘Reports’ button at the top of the page.

You will be redirected to the Comments graph, which is a handy tool for evaluating your user engagement.

Clicking the Reports button on the Thrive Comments Moderation page

Here, you can see a timeline overview of all the comments you’ve received, approved, replied to, featured, marked as spam, and removed.

This is what the graph looks like on our testing site:

Thrive Comments graph report

You can also filter the comment activity using the options at the top. With ‘Show report,’ you can check out different types of reports. Or fill out the blog post title in the ‘View comments on’ field to see a comment graph from a specific post.

With the ‘Date interval’ option, you can change the time period of the graph. On the other hand, the ‘Graph interval’ setting lets you see the graph from a Daily, Weekly, or Monthly perspective.

The different filtering options in the Thrive Comments Reports page

How to Allow Specific Users to Moderate Comments in WordPress

Let’s say you work with a team to run your WordPress website, and you get a lot of comments every day. In this situation, you may want to grant comment moderation access to certain user roles only.

Doing this will let you assign comment moderation responsibilities to relevant team members best suited for the task, like a community manager.

This method not only helps you manage comments better but also keeps your WordPress site secure by allowing only the right users to access comments.

You can allow specific users to moderate WordPress comments in two ways: with the Thrive Comments plugin and the Comment Moderation Role plugin. Let’s take a look at each method.

Thrive Comments

To access the Thrive Comments’ moderation settings, go to Thrive Dashboard » Thrive Comments on your WordPress dashboard. Then, simply navigate to the ‘Comment Moderation’ tab.

Selecting user roles to moderate comments using the Thrive Comments Comment Moderation settings

At the top, you can check off which user roles can moderate comments.

Feel free to also turn on/off the ‘Exclude comments from moderators in the moderation dashboard’ setting as well.

Enabling it will make comments from moderators invisible on the Thrive Comments dashboard. This can help maintain a clear overview of user comments.

The rest of the settings in this tab are the same as the ones you will find on the Settings » Discussion page. If you make changes to these settings in this menu, then they will also be reflected in the default WordPress comment settings.

Comment Moderation Role

WordPress doesn’t offer a default user role that’s dedicated to moderating comments. For this, you can use the Comment Moderation Role plugin.

The plugin is created by our team at WPBeginner, and it allows you to give certain users the role of ‘WPB Comment Moderator.’ Then the assigned user will only see the comment moderation screen in WordPress.

You can assign the WPB Comment Moderator role to existing and new users. For more details, please see our guide on how to allow blog users to moderate comments in WordPress.

If you use Thrive Comments, then you will also see the WPB Comment Moderator role in the Comment Moderation tab, like so:

The WPB Comment Moderator role in Thrive Comments

How to Disable Comments for Specific Posts in WordPress

If you want to close comments on certain posts, then WordPress lets you disable them.

On your WordPress dashboard, simply go to Posts » All Posts. Then, click the ‘Quick Edit’ button for any blog post.

Clicking the 'Quick Edit' button on a WordPress post

After that, just uncheck the ‘Allow Comments’ option.

Then, click ‘Update.’ The comment section will no longer be visible on the blog post.

Disabling comments using the WordPress Quick Edit function

It’s also possible to disable comments on multiple posts simultaneously. All you need to do is check the blog posts and select ‘Edit’ in the ‘Bulk action’ dropdown menu.

Then, go ahead and click ‘Apply.’

Bulk selecting WordPress posts to be edited

From here, you can change the Comments option to ‘Do not allow.’

After that, simply click the ‘Update’ button.

Disabling comments in bulk using the WordPress post Edit function

Finally, you can close the comment section while editing a blog post in the WordPress Block Editor. Simply go to the ‘Discussion’ box from the ‘Post’ settings menu on the right panel.

If you have done that, you can uncheck the ‘Allow comments’ box.

Disabling the comment section on an individual WordPress post

If you want to remove the comment section for good, then just see our guide on how to completely disable comments in WordPress.

How to Filter Spam Comments With Akismet

To filter spam comments on your WordPress website, you can use Akismet. It’s a spam-filtering WordPress plugin developed by Automattic. This anti-spam plugin usually comes installed with your WordPress installation.

For more details, you can check out our guide on what Akismet is and why you should use it.

Once you mark a comment as spam, Akismet will learn to catch similar comments in the future.

If, for some reason, you have hundreds of spam comments in the ‘Pending’ tab, then simply click on the ‘Check for Spam’ button.

This will trigger a spam check on existing comments on your website, and Akismet will move the spam comments from Pending to Spam.

Clicking the 'Check for Spam' button on the WordPress Comments page

One way to combat spam comments further is by removing the URL field in the comment form. To do that, you can read our guide on how to remove the website URL field from the WordPress comment form.

We hope this article helped you learn how to moderate comments in WordPress. You may also want to check out our guide on how to make blog post comments searchable and our expert pick of the best WordPress plugins to grow your website.

If you liked this article, then please subscribe to our YouTube Channel for WordPress video tutorials. You can also find us on Twitter and Facebook.

The post Beginner’s Guide on How to Moderate Comments in WordPress first appeared on WPBeginner.

How to Notify Users When Their Comment is Approved in WordPress

Do you want to notify users when their comment is approved in WordPress?

By default, WordPress doesn’t notify users when you publish their comment. This can leave visitors wondering whether you’ve received their comment, or whether you plan to publish it at all.

In this article, we will show you how to notify users when you approve their comment.

How to notify users when their comment is approved in WordPress

Why Notify Users When Their Comment is Approved in WordPress

Comments allow your website visitors to communicate with you and other readers.

They are a great way to get engagement and feedback, and can help build a community around your WordPress blog.

By default, WordPress puts all new comments into a moderation queue. You can see these comments in the admin area, but they won’t appear on your website until you approve them.

Approving comments in the WordPress admin area

Comment moderation is the best way to keep discussions safe and spam free. However, by default WordPress doesn’t notify users when you approve their comment.

Instead, visitors would need to keep checking your site to see whether their comment has appeared. Most commenters will forget to do that. Sometimes, visitors may even assume that you’ve rejected their comment if they don’t get a notification.

By confirming that you’ve published their comment, you can encourage visitors to come back to your WordPress website. This is great for engagement and can create a more interesting and lively discussion.

With that being said, let’s see how to notify users when you approve their comment.

How to Notify Users When Their Comment Is Approved in WordPress

The easiest way to notify people when you publish their comment is by using Comment Approved Notifier Extended. This plugin is simple to set up and lets you send a custom email to your users.

First, you’ll need to install and activate the plugin. If you need help, then please see our guide on how to install a WordPress plugin.

Upon activation, the plugin works automatically. Every time you approve a comment, WordPress will send a notification to that person’s email address.

A comment approval notification email

If you want to change the email’s content, then simply click on Comment Approved in the WordPress dashboard.

You will now see the default email and all of the different pieces of shortcode that you can use in your message.

How to notify users when their comment is approved in WordPress

When it creates an email, Comment Approver Notification will replace the shortcode with real information. For example, it will replace [commentauthor] with the name the person typed into your WordPress website.

You can either type or paste any shortcode into the small email editor. You can also type in plain text, as you can see in the following image.

Adding shortcode to a comment approval email

When you’re happy with how the email looks, you can simply go ahead and click on the ‘Update’ button.

Now Comment Approver Notification will send the new email to your users.

Email is an important way to communicate with your visitors, users, and customers. With that in mind, it’s a good idea to use an SMTP plugin to improve email deliverability and keep your comment notifications out of the spam folder.

WP Mail SMTP is the best WordPress SMTP plugin on the market. It allows you to easily use any SMTP server to send WordPress emails safely and reliably.

To learn more, see our guide on how to fix WordPress not sending emails.

We hope this article helped you learn how to notify users when their comment is approved in WordPress. You can also go through our guide on how to create an email newsletter and our expert pick of the best live chat software for small businesses.

If you liked this article, then please subscribe to our YouTube Channel for WordPress video tutorials. You can also find us on Twitter and Facebook.

The post How to Notify Users When Their Comment is Approved in WordPress first appeared on WPBeginner.

How to Manage WordPress Comment Notification Emails

Do you want to improve your WordPress comment notification emails?

Comments drive discussion and user engagement on many blogs. However, WordPress doesn’t do such a great job when it comes to notifying users about comment activity.

In this article, we will show you how to better manage WordPress comment notification emails to boost user activity on your website.

How to manage WordPress comment notification emails

Why Improve WordPress Comment Notification Emails

Comments are an important element of many WordPress websites, particularly on news sites and WordPress blogs. More comment activity means a more engaged audience which results in more page views and ultimately more revenue.

However, the comment system that comes with every WordPress website is fairly limited. It sends comment notifications only to site administrators and article authors. Apart from that, there isn’t a default option for other site users to be notified of new comments.

Wouldn’t it be nice if users were able to get comment notifications for the posts they like or when someone replies to a comment they left?

That said, let’s see how you can enhance the default WordPress comment system and notification emails for a more engaging user experience on your website.

The Default Comment Notification Options in WordPress

By default, WordPress does not have an option to send notifications to commenters.

However, it does have an option to send email notifications to site administrators when a new comment is published and when a comment is held for moderation.

You can view these options by going to Settings » Discussion from your WordPress dashboard and navigating to the ‘Email me whenever’ section.

Email me whenever settings

Both these notifications are only sent to the site administrators. However, WordPress also sends an email notification to the post author about new comments.

If you get a lot of comments on your website, you might not want to receive email notifications for all comments held for moderation. You can simply uncheck the box here to disable those.

How to Let Users Know When Their Comment is Approved

If a user’s comment is held for moderation, they will see a message telling them so. However, they will have no idea whether you approve it or not without returning to your site.

Unfortunately, many of these users never return to your website to check, so they won’t ever know that you approved their comments.

You can fix this by using the Comment Approved Notifier Extended plugin. For more details, see our step-by-step guide on how to install a WordPress plugin.

Comment Approved Notifier Extended will notify users when their comment is approved. It works right out of the box, and there are no additional settings you need to configure.

You can also see our list of best plugins to improve WordPress comments.

How to Allow Users to Subscribe to Comments in WordPress

In addition to not knowing if their comment was approved, commenters will not be notified about replies, either.

Once they leave a comment, they will have to manually visit your website again to see if someone has replied.

To solve this, you need to install and activate Subscribe to Comments Reloaded plugin. For more details, see our guide on how to install a WordPress plugin.

It allows your users to subscribe to comments on any article with or without leaving comments. Users can also easily unsubscribe at any time.

StCr settings in WordPress

For detailed step-by-step instructions, see our article on how to allow users to subscribe to comments in WordPress.

How to Allow Users to Subscribe to Just their Own Comments in WordPress

Many users may not want to receive notifications for all comments on an article. However, they may want to know if someone replied only to their own comments.

You can add this feature as well using the same Subscribe to Comments Reloaded plugin. First, you’ll need to install and activate the plugin. If you need help, then please see our guide on how to install a WordPress plugin.

Next, simply visit the StCR » Comment Form in your WordPress dashboard. From here, click on ‘Yes’ next to the ‘Advanced Subscription’ option.

StCr settings in WordPress

Users will now see a new option under the comment box whether they’d like to subscribe to all comments or just their own comments.

For more details, see our article on how to notify users of replies to their own comments in WordPress.

How to Allow Authors to Subscribe to Other Author’s Posts

If you run a multi-author blog, then other authors may want to keep up with discussions across your website. If you already have comment subscriptions enabled, then each author can manually go and subscribe to comments.

However, if you want certain users to receive all comment notifications, then you can do this with Better Notifications for WordPress plugin. For more details, then please see our guide on how to install a WordPress plugin.

Once the plugin is active, you can head to Notifications » Add New from your WordPress dashboard and can enter a title for your notification at the top.

Next, you can select ‘New Comment’ from the ‘Notification for’ dropdown menu. After that, simply add the user roles that will receive these notifications in the ‘Send To’ field.

Comment notifications for certain user roles

The plugin also offers an option to send notifications to the post’s author and even exclude user roles from receiving email notifications for new comments.

How to Create Custom Comment Notification in WordPress

Want to create your own custom comment notifications in WordPress? Custom notifications can allow you to replace the default WordPress notification with your own.

First, you will need to install and activate the Better Notifications for WordPress plugin. For more details, see our step-by-step guide on how to install a WordPress plugin.

Upon activation, you need to visit the Notifications » Add New page from your WordPress admin panel to create your custom comment notifications.

Create a custom notification

You can edit the notifications for new comments, comments awaiting moderation, and comment replies. Additionally, you can send notifications to any user role or to individual users.

The plugin also lets you add email addresses manually that are not even connected to a user on the site.

You have the option to completely customize the comment notification sent by WordPress and use shortcodes inside the email text to add custom tags.

For more details, see our article on how to add better custom notifications in WordPress.

How to Improve Deliverability of WordPress Email Notifications

All the above tips will fail if your WordPress site fails to send email notifications or if those emails are marked spam by email providers.

To fix WordPress email issues and improve email deliverability, you need to install and activate the WP Mail SMTP plugin. For more details, see our step-by-step guide on how to install a WordPress plugin.

Upon activation, visit the Settings » WP Mail SMTP page to configure plugin settings.

WP Mail SMTP settings

This plugin allows you to use SMTP (Simple Mail Transfer Protocol) to send emails. SMTP is a much better and more reliable method than the default mail function used by WordPress.

It works with any email service that supports SMTP. This includes your free Gmail account as well as Google Workspace, Mailgun, and Sendgrid.

Choose Other SMTP as mailer

For details, see our article on how to use SMTP server to send WordPress emails.

We hope this article helped you learn how to manage WordPress comment notification emails. You may also want to see our ultimate step-by-step guide on improving WordPress speed and performance for beginners and how to start an online store.

If you liked this article, then please subscribe to our YouTube Channel for WordPress video tutorials. You can also find us on Twitter and Facebook.

The post How to Manage WordPress Comment Notification Emails first appeared on WPBeginner.

How to Make Blog Post Comments Searchable in WordPress

Do you want to make blog post comments show up in WordPress search results?

By default, WordPress search doesn’t include comments. This can make it difficult for your visitors to find interesting conversations and engage with other users.

In this article, we will show you how you can make blog comments searchable on your WordPress website.

How to make blog post comments searchable in WordPress

Why Make Blog Post Comments Searchable in WordPress?

A lively and interesting comment section can keep people on your WordPress website longer and create a sense of community around your site.

Because of that, comments are valuable content, and you’ll want to do everything you can to get more comments on your WordPress blog posts.

However, since WordPress doesn’t include comments in its search results by default, visitors may struggle to find interesting discussions and connect with other users or revisit a specific comment thread on your WordPress blog.

You might even be using the comment section for your visitors to submit reviews or testimonials. Having searchable reviews can help to boost sales on your online store, since people will be more likely to find the exact product they’re searching for.

That being said, let’s see how you can fix these problems by making blog post comments searchable in WordPress.

How to Make Blog Post Comments Searchable in WordPress

The easiest way to make blog post comments searchable in WordPress is by using the SearchWP plugin.

SearchWP is the best custom search plugin for WordPress, used by over 30,000 websites. It’s easy to use and lets you improve the built-in WordPress search.

You can also easily configure the plugin to include custom post types in WordPress search results, as well as registered users.

To make your blog post comments searchable, you’ll need to install and activate SearchWP. If you need more details, please see our guide on how to install a WordPress plugin.

Upon activation, you will see a popup telling you that SearchWP has already created an engine for you to use. The first step is customizing this engine.

We’ll show you how to change the default engine in this guide, so you can go ahead and click on the ‘Close’ button to exit the popup.

SearchWP's welcome popup

You will now be taken to the SearchWP » Settings page automatically.

On this screen, click on the ‘License’ tab. You can now paste your key into the ‘License’ box.

The SearchWP advanced search WordPress plugin

You’ll find this information in the email you got when you purchased SearchWP and in your account on the SearchWP site.

Once you’ve pasted the license key, click on the ‘Activate’ button next to it.

Next, just click on the ‘Engines’ tab so that you can customize everything that the plugin will display in search results.

The SearchWP Engines tab

You will see here that by default, posts are searchable and are broken into title, content, slug, and excerpt.

To allow comments to be searchable on your site, you want to click on the ‘Sources & Settings’ button near the top-right part of the screen.

Configuring the SearchWP search plugin

A popup will appear in the middle of your screen. Under the ‘Sources’ heading, you’ll see all the different types of content that SearchWP is capable of searching.

By default, the plugin searches your site’s posts, pages, and media.

How to make your WordPress blog comments searchable

Go ahead and check the ‘Comments’ box. You can then click on ‘Done.’

This includes all comments in the search results on your site.

You can further customize how your blog comments are searched by scrolling to the bottom of the ‘Engines’ tab. You’ll see a new section where you can configure how your comments will be searched.

To get started, click on the ‘Add/Remove Attributes’ button.

Configuring your searchable WordPress comments

On this screen, you’ll see sections for the different parts of the comments that SearchWP includes in its search results, such as author name, email, and comment text itself.

SearchWP can search the comment’s author name and email address, plus the content of the comment itself.

In the following image, we’re telling SearchWP to look at the comment’s content by checking the ‘Comment’ box, as well as the name and email address of the person who posted it.

After making your selection, click on the ‘Done’ button.

Searching your WordPress comments

Whatever options you checked will now appear under the ‘Comments’ section of the ‘Engines’ tab.

For each one, SearchWP has an ‘Applicable Attribute Relevance’ scale. This is the weight that SearchWP will give to each attribute when searching the comments on your blog.

Configuring your searchable WordPress comments

Content that matches an attribute with high relevancy will appear higher in the search results. By contrast, content that matches an attribute that has less relevancy will appear lower in the user’s search results.

By default, all the attribute sliders are set to ‘low,’ but you can change that by simply dragging the slider to the right.

Every site is unique, so you may want to try different relevancy settings to see what gives you the most accurate and helpful search results.

Changing the SearchWP relevancy settings

If you decide later that want to remove an attribute from your search, you can simply repeat the steps above, but uncheck the box next to it.

Once you’re happy with how the search feature is set up, you can go ahead and click on the ‘Save Engines’ button.

Saving your WordPress custom search settings

After a few moments, SearchWP will show a message ‘The index needs to be rebuilt.’

If you do get this message, then go ahead and click on the ‘Rebuild Index’ button. This will add all of your site’s comments to the search index, so they appear in relevant results.

Rebuilding the SearchWP search index

Once you’ve done that, SearchWP will look at your WordPress site’s comments when creating its search results.

How to Change SearchWP Settings

Now that your blog post comments are searchable, you may want to enable some advanced settings that will make it easier for visitors to find what they’re looking for.

To take a look at these advanced search settings, click on the ‘Advanced’ tab.

SearchWP's advanced search settings

On this screen, you can change a lot of the plugin’s behavior such as making adjustments for misspellings.

For example, if someone makes a spelling mistake when typing in their search term, then SearchWP can show a ‘Did you mean?’ correction box with results that are similar to what the search query should have been.

The following image shows an example of how this might look on your website.

The SearchWP 'did you mean' feature

To use this feature in your searches, go ahead and check the ‘Automatic “Did you mean?” corrections’ box.

You’ll also need to check the ‘Partial matches (fuzzy when necessary)’ box, since the ‘Did You Mean?’ feature uses partial matches.

Enabling fuzzy search in SearchWP

For more tips on SearchWP’s advanced settings, please see our step-by-step guide on how to improve WordPress search with SearchWP.

We hope this article helped you learn how to make blog comments searchable in WordPress. You may also want to see our picks of the best live chat software for small businesses and the ultimate guide to creating a WordPress membership site.

If you liked this article, then please subscribe to our YouTube Channel for WordPress video tutorials. You can also find us on Twitter and Facebook.

The post How to Make Blog Post Comments Searchable in WordPress first appeared on WPBeginner.

How to Allow Users to Upload Images in WordPress Comments

Do you want to allow users to attach images and files in WordPress comments?

Images and comments are both powerful tools to boost user engagement on your WordPress site. Depending on your site’s niche and target audience, allowing visitors to upload images in comments can significantly increase user engagement on your site.

In this article, we will show you how to allow users to upload images in WordPress comments.

Allow users to upload images in WordPress comments

Why Allow Users to Upload Images in WordPress Comments?

WordPress comments are a great way to communicate with your visitors. People leave feedback, ask questions, and offer recommendations that can be useful for building your brand and improving products.

Allowing users to upload images in comments can further boost the user experience. For example, visitors can share screenshots of their problems in the comments, giving your support team more information to resolve their issues.

Similarly, it can help start engaging discussions where people can share funny pictures and memes. This will help make your comments visually appealing and more fun to read.

Or if you’re running a travel blog, then allowing images in comments can help gather user-generated content. For instance, users can share pictures from their favorite destinations, places they visited, and more.

That said, let’s see how to allow image uploads in WordPress comments.

Allow Users to Upload Images in WordPress Comments

The first thing you need to do is install and activate the DCO Comment Attachment plugin. For more details, see our step-by-step guide on how to install a WordPress plugin.

Upon activation, the plugin will work out of the box and add a file upload option in the WordPress comments area.

You can edit its settings by going to Settings » DCO Comment Attachment from your WordPress dashboard.

Change DCO comment attachment settings

The plugin lets you set a maximum upload file size, make it a requirement to attach files, embed attachments, select an attachment image size, and more.

You can also allow your users to attach different file types, like a document, PDF, PowerPoint presentation, excel spreadsheet, and more by checking the file type option.

There’s also an option to select all users or only allow logged-in users to upload attachments in WordPress comments.

Choose file types to upload

When you’ve made the changes, don’t forget to click the ‘Save Changes’ button.

After that, head over to any post page on your WordPress blog, and you will see an image upload field in the comments area like the screenshot below:

Upload image attachment preview

All images uploaded by users are stored in your WordPress media library. If you want to delete an image uploaded by a user, then you need to go to Media » Library, locate the image, and then delete it.

This will delete the image from the comment without affecting the comment text.

To avoid abuse of this feature, we recommend adding some comment guidelines on your site to let users know what kind of attachments they can upload. You can check WPBeginner’s comment policy page for an example.

You can then add a link to your comment policy text in the WordPress comment form.

Due to the nature of images, you may want to moderate all comments before they appear on your site. You can do this by enabling comment moderation and notifying users when their comment is approved on your site.

To further boost media capabilities in your comments, you can enable oEmbed support for comments in WordPress. This will allow your users to embed YouTube videos, tweets, Flickr photos, and more alongside the images they upload.

We hope this article helped you learn how to allow users to upload images in WordPress comments. You may also want to see our tips on getting more comments on your WordPress blog posts, and how to start an online store.

If you liked this article, then please subscribe to our YouTube Channel for WordPress video tutorials. You can also find us on Twitter and Facebook.

The post How to Allow Users to Upload Images in WordPress Comments first appeared on WPBeginner.

How to Move Comments Between WordPress Posts (Easy Method)

Are you looking for an easy way to move comments between WordPress posts?

You might be writing a new version of a post and plan to redirect it from the original post. Redirects are great for avoiding broken links and preserving your WordPress SEO, but the original comments won’t be moved to the new post.

In this article, we will show you how to easily move comments between WordPress posts.

How to Move Comments Between WordPress Posts

Why Move Comments Between WordPress Posts?

By default, any comments you get on your WordPress site are attached to a specific post or page and can’t be moved.

However, sometimes, you might need to move comments to another post or page.

For example, you might decide to combine several posts together into a new post and then delete the individual ones. Or you may decide that a post would work better recreated as a page or vice versa.

Redirecting those deleted posts is good for your website’s search engine optimization, but it won’t save the comments.

In these scenarios, it would be helpful to move comments from one post or page to a new one instead of losing them or having to recreate them all manually.

How to Move Comments Between WordPress Posts

You can easily move comments between WordPress posts using the free Copy or Move Comments plugin. 

Note: We recommend making a backup of your site before moving the comments since it can’t be reversed. See our expert pick of the best backup plugins for WordPress to get started.

First, you’ll need to install and activate the Copy or Move Comments plugin. If you need help, then please see our guide on how to install a WordPress plugin.

Upon activation, click on Copy/Move Comments in the WordPress sidebar. 

How to move comments between WordPress posts

This WordPress plugin lets you choose between moving or copying comments.

If you choose ‘Copy,’ then it will duplicate all of the original comments and then add them to the new page or post.

When you copy the comments, the original comments won’t be deleted. This means you will end up with duplicate comments on your WordPress blog

If you choose ‘Move’, then the plugin will delete the original ‘source’ comments and then add them to the new ‘target’ page or post. This helps you avoid duplicate content.

Once you have made your decision, open the Action dropdown. You can now select either ‘Copy’ or ‘Move’.

Choosing whether to copy or move comments between WordPress posts

Your next task is choosing the Source. This is the location from where you want to copy your comments.

To get started, click on the ‘Source’ dropdown. 

You can now choose the post type. For example, if you wanted to copy comments from a specific WordPress post, then you would choose ‘post’.

Choosing a source page or post

Next, click on the ‘Select Post’ dropdown. Depending on your selection, this will show all of your pages or all of your posts. 

You can now simply click to select the page or post that you want to use as your source. 

Selecting a source WordPress page or post

The next step is opening the ‘Select Comment Type’ dropdown.

You can choose whether you want to see comments that have replies or ‘Single’ comments. These are comments that have no replies.

How to choose a WordPress comment type

The plugin will show all of the comments that fit your criteria.

Now, you can simply click to select every comment that you want to move or copy. If you want to move all of the comments, then you can click on the checkbox at the top of the column to select them all at once.

A list of WordPress comments

Your next task is to tell the plugin where it should move these comments to.

To do this, scroll down to the Target section at the bottom. After that, open the ‘Select Post Type’ dropdown and choose the destination’s post type. 

How to choose a target WordPress post

Next, click on the ‘Select Post’ dropdown. 

Here, you can choose your target, which is the post or page where you want to move these comments to. 

How to move comments between WordPress posts

After choosing your target, just click on the ‘Perform Action’ button. 

The plugin will now move or copy all of the selected comments to this page.

If you check out the target page or post, you will see that all of your comments have been added to this page.

It’s also worth checking the source page or post. If you chose ‘Copy’, then you should still see all of your original comments. However, if you chose ‘Move’, then all of the original comments should have vanished from this page or post. 

After moving your comments, you may want to change the order in which WordPress displays these comments. By showing newer comments first, you can keep the conversation fresh and get more comments on your WordPress blog.

You can learn how to do this in our step-by-step guide on how to display the most recent comments first in WordPress.

Bonus: Improve WordPress Comments Using Thrive Comments

Now that you know how to move comments to a different post, you might be wondering how to improve your comments section in other ways. The best way to do that is with Thrive Comments, which is a powerful and easy-to-use WordPress comments plugin.

It can save your team time with its flexible comment moderation features. Besides being able to approve comments or mark them as spam, you can also feature positive comments and even mark them as testimonials that can be displayed somewhere else on your website.

Feature comment from dropdown menu

You can show appreciation to your commenters by displaying a message or redirecting them to a Thank You page. You can also award your commenters badges when they reach certain milestones.

Another benefit of this plugin is that you let your users upvote comments by clicking Like and Dislike buttons. This can create a sense of community and increase user engagement without users needing to leave a comment of their own.

We hope this article helped you learn how to move comments between WordPress posts. You may also want to see our guide on how to allow user registration on your WordPress website or our expert pick of the best WordPress comments plugins.

If you liked this article, then please subscribe to our YouTube Channel for WordPress video tutorials. You can also find us on Twitter and Facebook.

The post How to Move Comments Between WordPress Posts (Easy Method) first appeared on WPBeginner.

How to Fix ‘Comments Are Closed’ in WordPress (Beginner’s Guide)

Are you seeing the ‘Comments are closed’ message on your WordPress posts?

This message is displayed when comments have been disabled on a post. However, some users report seeing the message unexpectedly.

In this article, we’ll show you how to fix ‘Comments are closed’ in WordPress.

How to Fix 'Comments Are Closed' in WordPress (Beginner's Guide)

What Is the ‘Comments Are Closed’ in WordPress Error?

The comment area of your WordPress blog allows your website visitors to give feedback, ask questions, offer their own point of view on the topic, and respond to other comments.

Comments are disabled on all WordPress pages by default, and you won’t see the ‘Comments are Closed’ message on pages. However, you can still follow the steps below to open comments on your pages as well as posts.

For blog posts, you can disable comments on specific posts or on your entire WordPress website. For example, you may wish to disable comments on an announcement post.

When you disable comments on a post that has at least one comment, you will see the message ‘Comments are closed.’ This explains to your visitors that even though there are comments on the post, no further comments can be left.

The 'Comments are closed' Message

If you disable comments on a post that has no comments, then you won’t see the ‘Comments are closed’ message. WordPress will simply not display the comment form.

Perhaps you’re seeing the ‘Comments are closed’ message on your website unexpectedly. While WordPress is easy to use, some error messages can be hard to troubleshoot for beginners. That’s why we put together a list of the 50 most common WordPress errors and how to fix them.

This message is most likely being shown because of a WordPress setting that’s not configured correctly. That’s because WordPress has comments settings in multiple areas, which can make it hard for beginners to find the right settings to fix the problem.

In this post, we’ll walk you through all the settings you should check in order to reopen the comments on your blog posts.

With that being said, let’s look at how to fix ‘Comments are closed’ in WordPress.

Enable Comments on Future Posts

Comments are often closed on a WordPress site because at some time in the past a setting was checked was that disables comments on new posts by default.

You can check this setting by navigating to Settings » Discussion. Here you’ll find a set of checkboxes that control how comments are handled on new posts.

Enable Comments for Future Posts from Settings » Discussion

The first setting to look at is ‘Allow people to post comments on new articles’. This box should be checked so that the default setting for future posts is to allow comments.

Next, look at ‘Automatically close comments on articles older than XX days’. This setting is useful if you don’t want users to be able to comment on older posts. However, if you want to allow comments on all posts, then you should make sure this box is unchecked.

Once you’re happy with the discussion settings, make sure you click the ‘Save Changes’ button at the bottom of the screen to store the settings.

This will make sure comments are open on all new posts you create. But it will not enable them on posts that have already been created.

That’s what we’ll do in the next step.

Enable Comments on a Specific Post

This method will show you how to enable comments on existing posts one at a time. However, if you wish to enable comments on many posts, then you should follow the ‘Enable Comments in Bulk’ method that we cover below.

If you use the block editor on your WordPress site, then you need to scroll down the settings pane on the right of the screen until you come to the Discussion panel.

Now you should click on ‘Discussion’ to expand the options, and then make sure the ‘Allow comments’ box is checked.

Allow Comments on a Post or Page

Once you click the Update button at the top of the screen to save the setting, comments will be enabled for this post.

You should repeat these steps to enable comments on other blog posts. You can also follow the same process to enable comments on WordPress pages.

How to Display the Discussions Panel if It Is Hidden

While the Discussions panel is displayed by default, it may be hidden on your website. If you can’t find it, then you will need to click the Options icon at the top right of the screen. This icon looks like 3 vertical dots.

Post Preferences

You then need to click on ‘Preferences’ and navigate to the ‘Panels’ tab. Once there, you can toggle the ‘Discussions’ switch on so that the panel is displayed.

Toggle the Discussions Panel On

Enable Comments on a Specific Post (Classic Editor)

If you are using the classic editor, then the steps for enabling comments on a post are a little different. Here, the Discussion meta box is hidden by default. To display it, you will need to click on ‘Screen Options‘ at the top right of the screen.

Edit the Post and Click Screen Options

Next, you should check the Discussion box under ‘Screen elements’. After that, simply click ‘Screen Options’ again to return to your post.

Make Sure the Discussions Screen Element is Checked

You can now scroll down to the bottom of your post where you will find the Discussion meta box. You should make sure the ‘Allow comments’ box is checked.

Make Sure Allow Comments Is Checked

After you click the Update button to save the setting, comments will be enabled for this post.

Enable Comments on Posts in Bulk

If you need to enable comments on multiple posts, then you can update them in bulk. To do that, navigate to the Posts » All Posts page where you will find a list of all of your posts.

You need to select the posts that have comments disabled by clicking the checkbox next to each post.

After that, you should choose ‘Edit’ from the Bulk Actions dropdown box and then click the ‘Apply’ button. This will open the bulk edit screen.

Edit Multiple Posts at Once With Bulk Actions

Here you need to click the ‘Comments’ drop down menu and then select ‘Allow’.

Don’t forget to click the ‘Update’ button to change the setting for all selected posts.

Allow Comments for Multiple Posts at Once

How to Select All Posts At Once

If you want to enable comments for every post on your website at once, then following the steps above would take a lot of time if you have hundreds of blog posts on your site.

To do it faster, there are a few extra steps you should take. First, you will need to make sure that all posts are displayed on a single page.

You can see a count of all the posts on your website under the ‘Posts’ title at the top of the screen. If you have 20 posts or less, then they are already displayed on one page. If you have more than 20 posts, then you will have to increase the number of items per page.

To do that, you should click ‘Screen Options’ at the top of the page. Then, under Pagination, find the ‘Number of items per page’ setting. Here you will need to type a number larger than the total number of posts on your site.

Ensure All Your Posts Are Displayed on a Single Page

For example, if you have 65 posts on your website, then you could type the number 70.

After that, you need to click the ‘Apply’ button and all of your posts will be displayed on one page. You can now click ‘Screen Options again to hide the settings.

You can now select every post on your site by simply clicking the checkbox next to ‘Title’.

Click the Checkbox Next to Title to Select All Posts

To enable comments on all of these posts, you should click ‘Bulk Actions’ then ‘Edit’, and follow the steps we covered earlier in this section to change the Comments setting to ‘Allow’.

Note: We don’t recommend trying to update hundreds of blog posts at once if you have slow web hosting, since your site may time out or freeze up before completing all the updates.

Check for Incompatible Themes or Plugins

If you have tried all of the steps above and comments are still disabled on your site, then it may be because of an incompatibility with your theme or one of your plugins.

Sometimes poorly coded WordPress themes may wrongly display the ‘Comments are closed’ message even when comments are open.

To check if your theme is the problem, you should navigate to Appearance » Themes and temporarily activate some other theme.

Enable a Different Theme to See if the Issue Is Resolved

If the ‘Comments are closed’ message is now fixed, then your theme is the problem. You can ask the theme developer to fix the issue. For more details, see our guide on how to properly ask for WordPress support and get it.

Alternatively, if you’re an advanced user, then you can try to fix the issue yourself. You need to refer to our guide on how to disable comments in WordPress, and then follow the instructions under ‘Remove “Comments Are Closed” in WordPress’.

If you think a plugin may be causing the issue, then you can head over to Plugins » Installed Plugins and make sure you haven’t installed a plugin designed to disable comments, such as Disable Comments. If you have, then simply disable that plugin and test to see if comments are now working.

If comments are still closed, then you need to test for incompatible plugins. You’ll need to temporarily deactivate one plugin at a time by clicking its ‘Deactivate’ link.

Deactivate Plugins One at a Time to See if the Issue Is Resolved

Now test to see if comments are enabled on your site. If they are still not working, then this plugin is not the problem. Simply click its ‘Enable’ link and move on to the next plugin.

We hope this tutorial helped you learn how to fix ‘Comments are closed’ in WordPress. You may also want to learn how to increase your blog traffic, or check out our list of the best social media plugins for WordPress.

If you liked this article, then please subscribe to our YouTube Channel for WordPress video tutorials. You can also find us on Twitter and Facebook.

The post How to Fix ‘Comments Are Closed’ in WordPress (Beginner’s Guide) first appeared on WPBeginner.

16 Best Plugins to Improve WordPress Comments (2024)

Are you looking for the best plugins to improve WordPress comments?

Comments can help boost user engagement and build a community. The default WordPress commenting system is good, but it’s quite basic. Luckily, there are tons of plugins that can help you create a more engaging comment section.

In this article, we will show you some of the best WordPress comment plugins to improve the default comment section and get more interaction on your site.

Best Plugins to Improve WordPress Comments

Why Should You Use WordPress Comment Plugins?

On its own, the native WordPress comment system includes some basic functions for users to leave blog comments and reply to other people’s comments.

While this is helpful, there’s room for improvement. If you are a WordPress blogger looking to build an audience, then you will need additional tools to make commenting on your blog more fun, exciting, and user-friendly.

You may need tools to keep spam comments at bay and prevent malicious links from endangering your users. Or, you may want to redirect the commenter to a relevant page to keep them on your website for longer.

We tested these plugins: When choosing the plugins for this showcase, we installed each tool on our test site to explore its pros, cons, and features. This allowed us to recommend only the very best WordPress comment plugins.

With that in mind, let’s look at the best plugins to improve your WordPress comments and optimize the user experience.

1. Thrive Comments

The Thrive Comments WordPress plugin

Out of all the comment plugins we’ve tried, Thrive Comments by Thrive Themes is the best. It has everything you need to improve your comments, from an easy moderation feature to post-comment actions that can turn commenters into leads or customers.

Thrive Comments comes with a built-in, keyboard-controlled comment moderation dashboard. With this, you can quickly reply, delete, and even assign comments to other admins, a feature unavailable in the native WordPress commenting system.

When users leave a comment, you can redirect them to a specific URL, show them a related post, or display an email opt-in form using Thrive Leads. It’s a great way to improve your user engagement metrics.

Thrive Comments' post-comment actions

Pros of Thrive Comments:

  • Keyboard-controlled moderation feature for you to quickly manage comments and even assign them to other admins.
  • Post-comment actions to make users stay on your website for longer.
  • Comment engagement features like upvotes/downvotes, likes/dislikes, and reward badges.
  • Allows users to subscribe to a post’s comments in case they get replies.

Cons of Thrive Comments:

  • No free version available.

Why we chose Thrive Comments: If you are looking for the best, overall WordPress comment plugin, then look no further than Thrive Comments. It has all the features needed to build an engaged and interactive community on your WordPress site.

2. Comment Moderation Role by WPBeginner

Comment Moderation Role by WPBeginner plugin banner

Do you work in a team and want to let a specific user moderate comments in WordPress? Then check out Comment Moderation Role by WPBeginner. It’s a simple plugin that creates a new ‘WPB Comment Moderator’ user role in WordPress.

Any user with this role can log in to your WordPress website and moderate comments without accessing other areas of your admin.

This is perfect if you have a support team or staff members who are responsible for moderating comments, but these people don’t need unrestricted access to your entire WordPress admin area.

WPB Comment Moderator role in WordPress admin

Pros of Comment Moderation Role:

Cons of Comment Moderation Role:

  • This plugin has a very specific function, so it’s not suitable if you are looking for a comment plugin with lots of different features.

Why we chose Comment Moderation Role: If you want a no-frills plugin to add a specific user role for moderating comments, then this plugin is your best solution. Once installed, you can immediately change a user’s role to WPB Comment Moderator.

3. SearchWP

The SearchWP homepage

If your blog posts get tons of comment threads, then that’s great for your user engagement. But at times, users may want to look through these long comments to find the information they need.

Meet SearchWP, a WordPress search engine plugin that can make navigating your website much easier. Besides creating a search function to discover pages or posts, SearchWP can also make blog comments searchable.

How to make your WordPress blog comments searchable

SearchWP offers several ways to add a search form through the Modular Search Form add-on: your navigation menu, a Gutenberg block, or a shortcode. You can use the last two to add a search function right above the comment section in your single post template.

Pros of SearchWP:

  • Multiple ways to add the search engine: using a menu, Gutenberg block, or shortcode.
  • Multiple search engine support so that you can make one search engine for your entire website and another specifically for your blog post comments.
  • The applicable attribute relevance feature ensures accurate search results when visitors use the search engine.
  • Search analytics allows you to see which terms users look for the most when they use your search engine.

Cons of SearchWP:

  • While the Modular Search Form plugin is free, the SearchWP plugin itself is not.

Why we chose SearchWP: If you want to improve your comment section with a search feature, then SearchWP makes this super easy to do. As you get more blog comments, you may need to make them searchable so that users can easily find the right information.

4. Uncanny Automator

Uncanny Automator

You will find many plugins on this list that let you optimize your built-in comment section, but what happens after users leave comments? That’s what Uncanny Automator is for.

Maybe besides sending an email notification, you also want to send an SMS notification to users with their comment replies. Or maybe you want to send them a coupon to thank them for leaving comments.

With Uncanny Automator, you can easily create automated workflows for those scenarios on your WordPress site. These workflows can save you time and give the people who visit your website a better experience.

An example of creating a post-comment action with Uncanny Automator

Pros of Uncanny Automator:

  • Beginner-friendly drag-and-drop workflow builder, making it easy to design your automation.
  • Hundreds of customization options to tweak your workflow, with 620+ triggers, 430+ actions, and 60+ conditions.
  • 150+ plugin and app integrations so that you can create comment-related workflows for any purpose.
  • A free plugin is available.

Cons of Uncanny Automator:

  • If you use a paid Uncanny Automator plan, the cost increases after the first year, which could disadvantage long-term users.

Why we chose Uncanny Automator: We know how important it is to keep commenters coming back and engaging with your website. Uncanny Automator lets you set up automatic post-comment actions, turning occasional visitors into regular ones.

5. Better Notifications for WP

The homepage of Better Notifications for WordPress plugin

Do you want to send email notifications to your commenters about new replies? If so, then check out Better Notifications for WP.

By default, WordPress only sends comment notifications to site administrators and the article’s author. But with this plugin, you can change which type of notifications are sent out and who gets these comment notification emails.

For example, you can create a new notification for replies. As a result, users can come back and react to the latest responses to their comments, boosting engagement.

Pros of Better Notifications for WordPress:

  • Easy-to-use interface for setting up notifications and creating email content.
  • Customizable rules for who receives certain emails, which is great for site admins who want to avoid getting too many notifications.

Cons of Better Notifications for WordPress:

  • As with other WordPress email features, you may experience email deliverability issues.

Why we chose Better Notifications for WordPress: Notifying users of new replies is a great way to boost user engagement and get more comments, which is why we recommend this plugin. That said, you may also need an SMTP plugin to make sure your emails are received, which brings us to the next plugin.

6. WP Mail SMTP

WP Mail SMTP

The WordPress not sending emails issue is one of the most common problems WordPress users face. That’s why we don’t recommend using WordPress to send your email newsletter.

That said, there may be cases where you still use WordPress to send emails, like notifications about users’ comments. In this case, you will want to use WP Mail SMTP.

WP Mail SMTP is the best WordPress SMTP plugin that allows you to easily send WordPress emails using secure mail transfer protocol or SMTP. This helps ensure all your WordPress emails are delivered successfully, including comment notifications.

Pros of WP Mail SMTP:

  • The free version is enough to improve email deliverability.
  • Integrations with top mail service providers like SendLayer, Brevo, Gmail SMTP, and more.
  • One-click setup for Gmail SMTP, so you won’t need manual configuration, unlike other SMTP plugins.
  • Premium features to manage emails much more easily, like email resends, email failure alerts, and reports about opens and clicks.

Cons of WP Mail SMTP:

Why we chose WP Mail SMTP: This plugin can ensure that all comment-related emails actually get received and, in turn, your commenters can come back to engage more with your blog posts.

7. Akismet

Akismet's homepage

Trusted by 100+ million websites, Akismet is a popular WordPress anti-spam plugin.

The free plugin includes basic spam filtering and spam protection features. It can spot spammy comments off the bat so that they won’t show up in your comment section. You will also get detailed stats to see how much spam Akismet has blocked.

However, the free plugin includes limited API calls, so if you get many comments, then Akismet cannot check them all. We recommend upgrading to the premium version to get more API calls per month.

Pros of Akismet:

  • Easy to use plugin. Once activated, it will immediately work to mitigate spam.
  • Automatic spam deletion if you don’t review comments in 15 days, so you won’t have to manually remove them.
  • Handy analytics to see how much spam has been blocked and how accurately Akismet has spotted it.

Cons of Akismet:

  • At times, the plugin can mistake genuine comments as spam.

Why we chose Akismet: Spam comments are a common problem in WordPress, and sometimes, WordPress’ moderation feature isn’t enough. Akismet is one of the best comment plugins for easily combatting spam and maintaining a positive user experience.

You can read more about Akismet in our opinion piece on why you should use Akismet.

8. Comment Link Remove and Other Comment Tools

Comment Link Remove and Other Comment Tools plugin banner

Anti-spam tools like Akismet are great for filtering out comments left by automated spam bots. However, you can protect your site further by preventing users from inserting spammy or malicious links into their comments.

Comment Link Remove and Other Comment Tools can help prevent exactly that. It can remove the ‘Website URL’ field from the comment form, as well as the author’s website hyperlink.

This plugin also automatically removes hyperlinks from the existing comments on your WordPress website. So, the URLs will still be displayed in your comments, but they won’t be hyperlinked. This way, visitors can still benefit from any genuine and helpful links.

Pros of Comment Link Remove and Other Comment Tools:

Cons of Comment Link Remove and Other Comment Tools:

  • If your WordPress theme modifies the standard core comment functions, then the plugin may not be able to remove the Website URL field.

Why we chose Comment Link Remove and Other Comment Tools: If you are looking to remove the Website URL field and all existing links from your comments without any code, then this plugin can easily get the job done.

9. Comment Edit Core

Comment Edit Core's landing page for the free version of the plugin

Sometimes a user may submit a comment, only to immediately realize they have made a spelling mistake or some other grammatical error. This isn’t your website’s fault, but it is still a bad experience for your visitors.

Comment Edit Core solves this problem by letting users edit their own comments on your website.

You can use this plugin to specify how long visitors can edit or even delete a comment after posting it. This time limit is important, as it protects your website from spammers who might go back and try to add links to comments that you’ve already approved.

Pros of Comment Edit Core:

  • The timer can be in a Compact format (like 5:00) or a Words format (like 5 minutes). Feel free to choose the one that suits your website best.
  • Choose between Regular, Light, or Dark comment editor themes.
  • Pro features include a comment character limit, Cloudflare Turnstile, and the ability for commenters to choose a custom avatar.

Cons of Comment Edit Core:

  • Some users have reported poor forum support for the free plugin, but the premium version includes email and Slack support.

Why we chose Comment Edit Core: This plugin is simple to use and adds important functionality to improve your commenting experience. For more details on this plugin, check out our guide on how to allow users to edit comments in WordPress.

10. Comments Extra Fields

The landing page for the WordPress Comment Fields plugin

Depending on your website, you may want to add some extra custom fields to your comment form. For example, you might add an extra checkbox for commenters to sign up for your email newsletter.

Comments Extra Fields makes it easy to add custom fields to the standard WordPress comment form.

You can make the information entered in these fields invisible or visible to everyone. Furthermore, you can set rules for when these fields should appear in the comment section, which is great if your blog covers different topics.

Pros of Comment Extra Fields:

  • Beginner-friendly interface to add the custom fields and configure how they look and behave.
  • Multiple field options: single-line text, text area, checkbox, color picker, number, radio buttons, URL, file input, and so on.
  • 10-day money-back guarantee for the premium version.

Cons of Comment Extra Fields:

  • The free version’s field options are limited compared to the premium one.

Why we chose Comment Extra Fields: This plugin offers so many ways to customize your comment section, make it more exciting, and even turn commenters into leads. This can be beneficial if you want to make the most out of your comments.

11. wpDiscuz

wpDiscus 7's landing page

wpDiscuz is an AJAX-powered WordPress comment plugin.

It has a unique inline commenting feature. With this, you can add a handy button within your blog content to encourage discussion. Visitors can simply click on it to express their thoughts on that post’s particular section.

wpDiscuz also comes with live comment bubble notifications. It works like a real-time social proof notification on your website, letting visitors know about new comments as they are being posted and inviting them to join the conversation.

Pros of wpDiscuz:

  • Unique engagement features like real-time comment bubble notifications and inline commenting.
  • Built-in performance optimization features like Gravatar caching and lazy loading.
  • Various add-ons to install on top of the core plugin, like comment report and flagging and widgets to display top commenters.

Cons of wpDiscuz:

  • The live update feature, which automatically displays new comments when visitors are on the blog post, can slow your site down if you are on shared hosting.

Why we chose wpDiscuz: For a free WordPress comment plugin, wpDiscuz is pretty powerful and can be a good option for people looking for a free solution. Just make sure to monitor your site performance if you enable Ajax-powered features like live updates.

12. WP Reactions

WP Reactions' homepage

At times, users might want to react to your blog post but they hesitate to write a comment. Maybe they are not sure what exactly to say or they are just shy.

Ever since social media existed, users have become familiar with giving reactions to posts using emojis. That’s what WP Reactions is for: adding a reaction feature between your blog post content and your comment section.

This plugin offers over 200 emoji reactions to choose from and add to your comment section. As a result, users who are not used to commenting can easily engage with your blog content without typing a long message.

Pros of WP Reactions:

  • Easy drag-and-drop editor to arrange the emojis.
  • Animated emojis are available so the reaction buttons look more interactive than just regular icon images.
  • User-friendly dashboard analytics to collect user feedback based on their reactions.

Cons of WP Reactions:

  • The free version only comes with 14 emojis.

Why we chose WP Reactions: This WordPress plugin provides an easy way for users to engage with your blog post with just one simple click. If you want to learn more about using it, check out our article on how to engage readers with post reactions in WordPress.

13. Super Socializer

The Super Socializer plugin banner

Do you want to enable social login options in your WordPress comments section? If so, then check out Super Socializer. This feature is a great way to make posting comments faster and easier for users.

With this, users won’t need to manually insert their name and email to leave comments. They just need to click a few buttons and they are logged in to their social network. It also prevents users from using fake names in comments.

Other than that, the plugin includes a social commenting feature. This lets you add extra comment sections like Facebook comments. For Facebook users, this lets them skip the login step entirely and just leave a comment right away.

Pros of Super Socializer:

  • Multiple social features, like social logins, social commenting, and social sharing allow users to share blog posts on their accounts.
  • Plenty of social login options, from Facebook and X/Twitter to LinkedIn and Discord.
  • Customizable social network icons to suit your website design.

Cons of Super Socializer:

  • Some users reported that the plugin has made their websites slow, so be sure to use it with caution.

Why we chose Super Socializer: This plugin provides an easy way to enable social logins and make people less hesitant to leave comments. Our article on how to style the WordPress comment form can give you step-by-step instructions on how to use it.

14. YITH WooCommerce Advanced Reviews

YITH WooCommerce Advanced Reviews plugin page

If you are running an eCommerce website using WooCommerce, then your product pages’ comment sections will be changed to review/testimonial sections.

That said, the built-in review feature is basic. For example, customers can’t add photos to their reviews. Because of this, we recommend installing a WooCommerce review add-on like YITH WooCommerce Advanced Reviews.

With this WooCommerce plugin, customers can upload photos to their reviews to describe their experience with your product. Potential customers can also mark reviews as helpful to help fellow users make their purchase decisions.

Pros of YITH WooCommerce Advanced Reviews:

  • Review upvotes and downvotes to mark which reviews are most helpful.
  • Separate ‘Most Helpful Reviews’ tab to make it easier for users to find the most relevant testimonials.
  • Customizable review section, with settings to change the number of displayed reviews and the layout’s colors to suit your WooCommerce WordPress theme.

Cons of YITH WooCommerce Advanced Reviews:

  • It is dependent on other YITH plugins. For example, if you want to enable social logins, then you need to purchase a YITH plugin for that purpose, which can be costly.
  • No free version available, although there is a 30-day money-back guarantee.

Why we chose YITH WooCommerce Advanced Reviews: While this plugin comes at a cost, it offers all the essentials needed to optimize your product review section. You can think of it as an investment to gain more social proof and build your reputation.

15. Lazy Load for Comments

Lazy Load for Comments plugin banner

Have you been getting so many comments that your page load time has slowed way down? If so, then check out Lazy Load for Comments.

This simple plugin adds a lazy loading feature inside your WordPress Discussion Settings page (above the Avatars section). You can choose whether to load the comments upon scrolling or when the user clicks on it.

Lazy loading improves performance by only loading necessary elements when they’re needed, reducing the initial page load time.

Pros of Lazy Load for Comments:

  • Free and simple to use.
  • Supports popular WordPress themes like Genesis and Divi.
  • Translation ready.

Cons of Lazy Load for Comments:

  • Installing this plugin just for its lazy loading feature might feel excessive, especially since there are other comment plugins like Thrive Comments that offer this feature along with other benefits.

Why we chose Lazy Load for Comments: If you just want a simple plugin to lazy load your comments, then this plugin does a great job. However, if you want an all-in-one comment plugin with a lazy loading feature, then consider Thrive Comments instead.

16. Comment Hacks

Comment Hacks plugin banner

Moderating comments in WordPress can be a bit challenging, especially when there are many comment threads to review. If your readers are aware of and adhere to the commenting rules, then the process can become much simpler.

Comment Hacks is a WordPress comment plugin that lets you enable a comment policy for your website.

Users will have to go to the comment policy page and confirm they’ve read it before they can leave a comment. As a result, you can get more genuine and positive comments on your website.

Pros of Comment Hacks:

  • Comment policy feature to maintain a positive comment section.
  • The ability to set a minimum and maximum comment length, which can be great to prevent short, spammy comments.
  • Redirection feature that leads first-time commenters to a specific page, like a thank you page.

Cons of Comment Hacks:

  • The plugin only warns that the comment is too long after the user clicks ‘Post,’ not while they are typing. This could lead to unnecessary time spent editing long comments.

Why we chose Comment Hacks: This WordPress comment plugin is really helpful if you get lots of comments, want to keep things positive, and don’t want any spam. It makes your job easier by stopping bad comments before they show up.

What Is the Best WordPress Comment Plugin?

Out of all the plugins we’ve tested, the best WordPress comment plugin is Thrive Comments.

This plugin is a complete package, offering features to moderate your comment section, make it more interactive, and even convert commenters into leads or customers. While it’s a paid plugin, it’s a worthwhile investment for bloggers looking to build an engaged audience.

That said, many plugins on this list serve various purposes, so we encourage you to give them all a try and see which one is best for your needs.

Best Comment Plugins for WordPress: Frequently Asked Questions

Now that we’ve listed all of the best WordPress comment plugins, let’s answer some frequently asked questions.

Are comments important for SEO?

Yes, comments are important for SEO. They can function as signals telling search engines that people like your brand and engage with it. Other than that, the “free” content that comes from the commenters can add additional value to your articles.

Is it ok to disable your comment section?

If you run a blog and your goal is to build a following, then you should enable your comment section. Allowing comments is also good for increasing your user engagement metrics, which can be good for SEO.

Is the Disqus comment system good for SEO?

Any comment system is technically good for SEO, regardless of the platform.

However, in our experience, Disqus inserted affiliate links and sponsored comments without our permission. This can hurt your site’s SEO, as search engines don’t like it when websites don’t disclose their paid content.

For this reason, we did not include Disqus in our list. You can read more about our experience of why we switched away from Disqus.

Read More Guides to Improve Your WordPress Comments

We hope this article helped you find the best plugins to improve your WordPress comments. You may also want to see our guide on must-have WordPress plugins to grow your website and our ultimate list of blogging statistics, trends, and data.

If you liked this article, then please subscribe to our YouTube Channel for WordPress video tutorials. You can also find us on Twitter and Facebook.

The post 16 Best Plugins to Improve WordPress Comments (2024) first appeared on WPBeginner.

How to Allow Users to Report Inappropriate Comments in WordPress

One of the best part about Facebook groups is that it allows users to report inappropriate comments.

This allows admins and moderators to easily remove offensive, rude, and hurtful comments from the group. Wouldn’t it be nice if WordPress had a solution that allowed users to report inappropriate comments?

In this article, we will show you how to crowdsource comment moderation by allowing users to report inappropriate comments in WordPress.

Why Allow Users to Report Inappropriate Comments in WordPress?

Despite having tools to combat comment spam in WordPress, trolls often find ways to get their negative comments on your posts.

Offensive, rude, and hurtful words appearing on your website can hurt your brand image and negatively impact your business.

If your website gets a lot of comments, then you’d have to read every comment to ensure that negative comments don’t slip through the cracks.

This is extremely difficult if you don’t have the resources.

By allowing users to report inappropriate comments, you can crowdsource this task to your readers similar to how many Facebook groups do.

Reporting inappropriate comment on Facebook

Let your users catch and report inappropriate comments for you to review and remove. If you allow users to report / flag comments, then you’ll be able to quickly respond to bad comments by deleting them.

This allows you to easily catch negative comments, and it give your users a sense of community along with a new way of participation on your site.

Let’s take a look at how you can easily allow users to report comments in WordPress.

Allowing Users to Report Inappropriate Comments in WordPress

First thing you need to do is to install and activate the Zeno Report Comments plugin. For more details, see our step by step guide on how to install a WordPress plugin.

Upon activation, you need to go to the Settings » Discussion page in your WordPress admin area and navigate to the ‘Allow comment flagging’ option.

Next, check the box next to ‘Allow your visitors to flag a comment as inappropriate’ option.

Allow Comment Flagging Option in WordPress Discussion Settings

Once done, you need to click on the Save button to save your settings.

After the settings are saved, you will see additional options below ‘Allow comment flagging’ option.

First, you will see a ‘Flagging threshold’ option. This basically lets you set a number of reports before a comment is flagged for manual review. We recommend having this number set to 1, but you can have it as high as you like.

Second, there is an ‘Administrator notifications’ option which lets you choose whether you would like to receive an email when a comment has been sent for manual moderation.

The third option also lets you enable or disable ‘Administrator notifications.’ You can check the box next to it if you want WordPress to send administrators an email each time a comment is reported as inappropriate.

Zeno Report Comments Plugin Settings WordPress

Depending on the number of comments your site gets, these notifications can become overwhelming. An easier solution is to disable email notifications and simply review your comments every day.

Once you are done configuring the settings, make sure to click the Save button.

To preview how the report a comment option looks on your blog, simply open a blog post on your website.

A link to ‘Report comment’ will start appearing below each comment on your site. Users can click on this link to report a negative comment.

Report Comment Option on WordPress Comments

When a user reports a comment, the plugin will display a quick AJAX feedback.

AJAX feedback after a Comment is Reported in WordPress

When a comment’s report count reaches the flagging threshold, it is pushed back to the moderation queue for a site administrator or editor to review. You have the option to delete or re-approve it.

Reported Comment for Moderation in WordPress

We hope this article helped you to learn how to allow users to report inappropriate comments in WordPress. You may also want to see our guide on how to allow users to edit their comments in WordPress and how to add reCAPTCHA to WordPress comment form.

If you liked this article, then please subscribe to our YouTube Channel for WordPress video tutorials. You can also find us on Twitter and Facebook.

The post How to Allow Users to Report Inappropriate Comments in WordPress appeared first on WPBeginner.

How to Allow Users to Edit their Comments in WordPress

Have you ever felt the need to edit a comment you just left on a website?

Maybe you want to correct a spelling or grammar or error, or maybe you accidentally hit the submit button before finishing your comment.

It happens to all of us. The problem is that most WordPress sites do not allow users to edit their comments once they are published.

If you receive a lot of comments on your website, then you may want to consider allowing users to edit their own comments for a short period of time.

In this article, we’ll show you how to allow users to easily edit their comments in WordPress for a short period of time.

How to Allow Users to Edit their Ccomment in WordPress

Why Allow Users to Edit or Delete their Comments

Most WordPress sites allow users to submit comments on their articles after providing their name and email address. However, users are not allowed to edit or delete their comment.

Sometimes, people want to make changes to their comment after clicking on the submit button.

The most common scenario is to fix their mistakes like a spelling or a grammatical error. Some users may want to modify their comments to add or remove something.

There can also be some rare cases where a user may think about deleting their comment because what they wrote was is completely out of context.

Whatever the case may be, the best solution can be to allow people to edit their comments for a short period of time, maybe for the first 5 or 10 minutes.

During that time, they’ll be allowed to modify or even delete their comments.

The reason for adding the time limit is to make sure that link builders and spammers don’t abuse the comment section by adding links to their approved comments.

That being said, let’s take a look at how to easily allow users to edit their comments in WordPress.

Allowing Users to Edit Comments in WordPress

First thing you need to do is install and activate the Simple Comment Editing plugin. You can see our step by step guide on how to install a WordPress plugin for detailed instructions.

Upon activation, the plugin will allow your users to make changes to their comments within the first 5 minutes.

After the first 5 minutes, users will not able to edit their comments.

You can change this time limit by going to Settings » Simple Comment Editing in your WordPress admin area.

Simple Comment Editing plugin settings

On the settings page, you can change the time in the text field to anything you like.

However, it is recommended to set the limit under 30 minutes since the purpose is to allow users to fix the errors right away.

Once you’ve changed the time, you need to click on the Save Options button to store the changes.

Next, we recommend leaving a test comment on any of your posts, so you can see the plugin in action.

WordPress comment click to edit option

Once you’ve submitted your comment, you’ll find the “Click to Edit” link and a countdown timer below the comment text. The timer is useful for indicating the time within which you can edit your comment.

To modify your comment, you need to click on the Click to Edit link.

This will allow you to make changes to your comment. However, you’ll not be allowed to change your name, email, or website URL.

Edit comment with countdown timer

Once you’re done, you need to click on the Save button to update the comment.

If you want to delete your comment, then you have to click on the Delete button. This will open an alert box asking you to confirm that you want to delete your comment.

Allow users to delete their comments

Go ahead to click on OK to complete the process.

That’s all! We hope that this article helped you to learn how to allow users to edit their own comments in WordPress for a short period of time.

You may also want to see our guide on how to style the comment form of your WordPress site.

If you liked this article, then please subscribe to our YouTube Channel for WordPress video tutorials. You can also find us on Twitter and Facebook.

The post How to Allow Users to Edit their Comments in WordPress appeared first on WPBeginner.