How to Change Margins in WordPress (Beginner’s Guide)

Do you want to change margins in WordPress?

Margins are one of the most important design elements that can significantly improve user experience and the aesthetic appeal of any design. They add spacing between elements so that your content is readable and everything is easily identifiable.

In this beginner’s guide, we’ll show you how to add and change margins in WordPress. We’ll show you various methods to change margins in different areas of your WordPress website.

Add or change margins in WordPress

What are Margins in WordPress and Web Design?

Margins are the space added around a web page or other elements inside a web page.

Think of a typical web page as an empty piece of paper. Margins are the white or blank space around the edges of the paper.

Margins around a page

The purpose of using margins is to ensure that elements inside a web page don’t look squished together.

Similarly, margins can be used around different elements inside the page layout.

For instance, you can change margins around images so they are not too close to the text or add a margin to leave space between your content area and the sidebar.

In this article, we’re going to cover a lot of ground. Click the links below to jump to any section you’d like.

What is the Difference Between Margin and Padding?

Margin and padding are both used to add white space in web design. However, they are used very differently.

Margins add empty space outside an element, and padding adds empty space inside it.

Margin vs padding diagram

Margins are used to add space outside an element. They allow you to ensure there is plenty of space between elements on a web page.

Examples:

1. Adding margins to increase space between an image and text in an article.

Adding margin between an image and surrounding text.

2. Adjusting margins to add space between sections, like the header and content area.

Increasing margins around container elements

Padding, however, is used to add cushion space between content and the edges of a box or element.

Examples:

1. Adjusting padding to increase cushion space in your call-to-action buttons.

Padding to increase empty space inside a call to action button

2. Increasing Padding in a Text Column

Padding inside a text column

Both padding and margins are widely used in web design.

Using empty spaces adds breathing room to any design, which makes it more user-friendly and elegant.

Why You May Need to Add or Change Margins in WordPress?

Margins are a crucial aspect of web design. They make your website look pleasant and easy to use for your users.

WordPress themes handle the design aspect of your WordPress website. Most of them already do an excellent job of setting CSS rules to ensure plenty of white space using margins across your theme’s layout.

Margins used in a typical website layout

However, occasionally, you may need to add margins to adjust things.

For instance, you may not like the margin around your navigation menus or want to add more margin around your call-to-action buttons.

Similarly, you may sometimes feel that items are too close to each other or too far apart.

In that case, you will need to change margins in WordPress by yourself.

How to Add Margins in WordPress?

There are plenty of ways to add margins in WordPress.

Depending on where you want to add margin and the options available in your WordPress theme, you’ll need to choose a method that works for you.

Let’s start with the default built-in options in WordPress itself, as they are the easiest for beginners.

Adding Margins in WordPress Using The Full Site Editor

If you use a block-based theme with full site editor support, you can use the built-in site editor to change margins anywhere on your WordPress website.

First, you need to visit the Appearance » Editor to launch the site editor.

Launch site editor

Once inside the site editor, click to choose a template from the left column or click anywhere on the preview window.

Next, click on the area or element where you want to change margins. In the right column, you will see the option to adjust margins under the Style tab.

Margins in site editor

As you adjust the margins, the editor will highlight the margin area.

You can also choose to add margins to the top, bottom, right, or left side.

Note: The margin option may not be available for all blocks in the site editor. If you cannot see the margin option for an element, try an alternative method below.

Adding Margins in The Block Editor

If you are working on a blog post or a page, you will use the block editor.

Block editor in WordPress allows you to add and change margins for various blocks.

Simply click on the block where you want to add/adjust margins. Under the block settings, switch to the Style tab and scroll down to the Dimensions or Margins option.

Adding margins in block editor

Note: The margin option may not be available for all blocks in the content editor. If you cannot see the margin option for an element, try an alternative method below.

Adding Margins in WordPress Using SeedProd

SeedProd is the best WordPress page builder plugin on the market. It allows you to create custom pages for your website easily. You can even use it to create a custom WordPress theme from scratch.

SeedProd

SeedProd’s intuitive drag-and-drop page builder allows you to adjust margins for any element inside the editor easily.

First, you need to install and activate the SeedProd plugin. For more details, see our tutorial on how to install a WordPress plugin.

Next, you need to visit the SeedProd » Landing Pages and then click on the Add New Landing Page button.

Add new landing page

After that, you will be asked to choose a template for your page.

SeedProd comes with dozens of ready-made templates that you can use as a starting point, or you can start with a blank template.

Choose template

Click to choose your template, and then provide a name for your landing page.

This will launch SeedProd’s page builder.

You’ll see a live preview of your page on the right side. And elements you can add to your page in the left column.

SeedProd page builder

You can point and click on any item on the page to edit it.

Clicking on an element will select it, and you’ll see its options in the left column. From here, switch to the Advanced tab and click the Spacing option.

Adding margins in SeedProd

You can change margins and padding for the selected element from here.

Once you finish editing your page, don’t forget to click the Save and Publish button at the top right corner.

SeedProd save and publish

After that, you can visit your website to see the changes in action.

Change Margins Using Thrive Architect

Thrive Architect is one of the best WordPress page builder tools that lets you use a drag-and-drop interface to design WordPress pages.

It comes with over 200+ templates you can use as a starter point. Plus, you can also use it to edit your WordPress posts and pages, borrowing the layout and style of your existing WordPress theme.

Thrive Architect

To install Thrive Architect, you’ll first need to log into your account on the Thrive Themes website.

From there, you need to download and install the Thrive Product Manager plugin. For more details, see our tutorial on how to install a WordPress plugin.

Download and install Thrive Product Manager

Upon activation, you need to visit the Thrive Product Manager page.

Click the ‘Log into my account’ button to connect WordPress to your Thrive Themes account.

Log into your Thrive Themes account

Once connected, you’ll see the list of available Thrive Themes products under your account.

Go ahead and click on the ‘Install Product’ checkbox under Thrive Architect, and then click on the ‘Install selected products’ button at the bottom.

Install Thrive Architect

Thrive Product Manager will now install the Thrive Architect plugin for you.

After that, you can edit or create a new WordPress post or page and click on the Edit with Thrive Architect button.

Launch Thrive Architect

Thrive Architect will ask you to choose a template if it is a new page.

You can use your theme template to create a Normal Page or a Pre-built Landing Page template.

Choose templating option

If you choose a Pre-built Landing Page option, then the plugin will show you a bunch of templates to choose from.

Simply click to select the one that resembles what you want to create.

Choosing template in Thrive Architect

Whether it is a normal page (using your theme’s styles) or a landing page, Thrive Architect’s page builder would have the same features.

You’ll see a live preview of your page with a toolbar on the right and a settings panel to the left.

Thrive Architect interface

You can point on click on an element to select it. Or click on the add [+] button in the toolbar to add a new element.

Once you click to select and edit an element, its settings will appear in the left column.

From here, click the Layout & Position tab to change the margins and padding.

Adjust margins and padding

You’ll see a visual representation of margin and padding.

Take your mouse over to any side of the margin and drag the handle to increase or decrease the margin.

drag to increase or decrease margins

You can repeat the process to change margins on any of the four sides.

Once you are done, don’t forget to click on the Save Work button and then select Save and Exit to Post Editor option.

Publish or update WordPress post or page

You can now click on the Publish or Save button to save your WordPress post or page.

Changing Margins in WordPress Using CSS Code

This method requires you to add CSS code to your WordPress theme. You’ll also need a very basic understanding of HTML and CSS.

However, this method gives you more flexibility as you can manually choose the area where you want to add or adjust the margins.

Adding and Changing Margins Using Custom CSS in WordPress Theme

WordPress allows you to save custom CSS in your WordPress theme options. However, depending on your WordPress theme, there are multiple ways to do that.

Before you add or change margins using CSS, you may need to find out which element you need to target with your CSS code.

For instance, if you want to change margins around the body of the page, then you can use the following code:

body { 
margin:50px; 
}

The easiest way to find which element to target is by using the Inspect tool in your browser.

Open your website in a new browser tab and take the mouse over to the element that you want to change margins around. After that, right and select Inspect from the browser menu.

Using inspect tool

This will split your browser screen, and you will see the HTML code and CSS behind the page.

You can move your mouse over the code, and your browser will highlight the area affected by it.

Target element

In the code, you can see the HTML element or CSS class you need to target with your custom CSS.

You can even try your margins here to preview how it will look.

Trying margins in the Inspect tool

However, these changes are not saved in your theme and will disappear when you reload or close the browser tab.

Let’s go through different ways you can save this custom CSS in WordPress.

Using Custom CSS to Change Margins in Site Editor

If you are using a block theme with full site editor support. Then, here is how you can add custom CSS to your theme.

First, go to the Appearance » Editor page to launch the site editor and then switch to the Styles panel.

Additional CSS option in site editor

At the bottom of the Styles panel, click on the Additional CSS tab.

This will bring up a text editor where you can add your custom CSS code. Your CSS code will immediately apply, and you will be able to see the changes appear on screen.

CSS margin preview

Once you are satisfied with the changes, don’t forget to click on the Save button to store your changes.

Adding Margins with CSS in Theme Customizer

If you are using a classic theme (without site editor support), then you can save your Custom CSS in the theme customizer.

Go to the Appearance » Customize page to launch the theme customizer.

Launch WordPress theme customizer

The customizer will show different options depending on your WordPress theme.

You need to click on the Additional CSS tab to expand it.

Additional CSS in Theme Customizer

The tab will slide to show you a simple box where you can add your custom CSS.

As soon as you add a valid CSS rule, you will be able to see it applied on your website’s live preview pane.

Adding custom CSS in theme customizer

Once you are satisfied with the changes, click on the Publish button to store your changes.

Change Margins with Custom CSS Code Using WPCode

The easiest way to add Custom CSS code in WordPress is by using the WPCode plugin.

It is the best WordPress code snippets plugin that allows you to add any CSS/HTML/PHP/JavaScript code to your WordPress website without breaking it.

WPCode - Best WordPress Code Snippets Plugin

The advantage of using WPCode is that you won’t lose your CSS changes when switching your WordPress theme.

Note: There is also a free version of WPCode that you can use.

The first thing you need to do is install and activate the WPCode plugin. For more details, see our tutorial on how to install a WordPress plugin.

Upon activation, go to the Code Snippets » + Add New page.

Take the mouse over to the ‘Add Your Custom Code (New Snippet)’ option in the code snippets library, and click the ‘Use snippet’ button.

Use snippet

Next, at the top of the page, add a title for your custom CSS snippet. This can be anything that helps you identify the code.

After that, write down or paste your custom CSS into the ‘Code Preview’ box and set the ‘Code Type’ by choosing the ‘CSS Snippet’ option from the dropdown menu.

Adding custom CSS in WPCode

For instance, if you want to add or change the margins around the entire web page body, then you can use the following CSS code:

body { 
margin:50px;
}

Next, scroll down to the ‘Insertion’ section and select the ‘Auto-Insert’ method to execute the code across your entire WordPress site.

If you only want to execute the code on certain pages or posts, you can choose the ‘Shortcode’ method.

Choose an insertion method

Now, you need to go back to the top of the page and toggle the switch to ‘Active’.

Finally, click on the ‘Save Snippet’ button to store your changes.

Save and activate CSS

You can now visit your website to see your custom CSS in action.

We hope this article helped you learn how to add or change margins in WordPress. You may also want to see our complete WordPress theme development cheat sheet or take a look at our guide on customizing WordPress themes.

If you liked this article, then please subscribe to our YouTube Channel for WordPress video tutorials. You can also find us on Twitter and Facebook.

The post How to Change Margins in WordPress (Beginner’s Guide) first appeared on WPBeginner.

WordPress Widgets vs Blocks – What’s the Difference? (Explained)

Are you trying to understand the difference between WordPress widgets vs blocks?

WordPress widgets and blocks are both used to add dynamic content elements to posts, pages, sidebars, and templates. Widgets have been a core part of WordPress for 16 years, while blocks have only been a part of the platform since 2018. They serve similar functions, but they aren’t the same.

In this article, we’ll explain the difference between WordPress widgets and blocks, so you can learn how to use them properly.

Understanding the difference between WordPress widgets and blocks

Here is a quick overview of the topics we’ll cover in this article.

What are WordPress Widgets?

WordPress widgets are dynamic-content elements that you can add to widget-ready areas like sidebars.

Widgets were introduced in WordPress 2.2 (May 2007). The purpose was to provide users with an easy way to add customizable elements to their website without having to repeatedly insert the same element at the end of blog posts, for instance, or edit their WordPress theme files to create a sidebar and manually code in something like Google AdSense tracking codes.

Users could simply insert content or features using widgets that didn’t have to be part of their overall theme files or blog posts.

Widgets made it much easier for users to create their ideal WordPress blog, letting them easily add banner ads or email sign-up forms.

Gradually, almost all WordPress themes adapted widgets by adding widget-ready areas in their design and layouts. These were most often sidebars and footers.

The WordPress widget editor looked like this until WordPress 5.8 was released in 2021.

Old widgets screen

What are Blocks in WordPress?

Blocks are the elements that users can add to an area using the WordPress content editor. WordPress switched to this block-based content editor in WordPress 5.0.

You may also see it referred to as the Gutenberg editor, which was its development codename.

Blocks are very similar to widgets because each one handles a single element of the page or post. Unlike widgets, however, blocks were introduced only as part of the post and page editor, which means they could not be easily added to areas like the site footer or sidebar.

A block can be inserted into a post or page for any element, including a paragraph, an image, a gallery, a plugin-specific feature like email signups, or a video embed.

Block editor in WordPress

There are also blocks to add design layout elements like covers, patterns, tables, columns, groups, and more.

To learn more, see our complete WordPress block editor tutorial which shows how to use the default editor to create beautiful content layouts.

The Difference Between Widgets vs Blocks in WordPress

Until WordPress 5.8, the difference between widgets and blocks was quite obvious.

Users added widgets to their theme’s widget-ready areas. They were primarily used to display elements that were not post/page content. For instance, recent posts lists, important links, banner ads, forms, and more.

However, the difference between widgets and blocks has become quite blurry now.

Widgets are self-contained elements that can be used in widget-ready areas like sidebars on a WordPress website.

Blocks are also self-contained elements that you can access through the block editor. They can be used in posts and pages, as well as widget-ready areas. You can also use them in templates if your theme has enabled the full site editor.

Widgets were the first to allow developers to output other elements like contact forms, testimonials, social media feeds, and more.

However, the same can be achieved using blocks. Many of the top WordPress plugins now come with blocks that you can add anywhere.

Plugin blocks

For instance, WPForms comes with a contact form block that you can add anywhere to display a form.

Similarly, All in One SEO comes with blocks for the table of contents, HTML sitemap, breadcrumb navigation, and more.

The Block-Based Widget Editor

WordPress planned to adapt the block editor for editing all areas of your website including the widget-ready areas.

To make this happen, the new block-based widget editor was introduced in WordPress 5.8.

Users were now able to use blocks in widget-ready areas of their themes.

Block widget editor

Widgets are still located under the Appearance » Widgets menu.

However, if you are using a block-based theme that doesn’t have any defined widget-ready areas, then you may not see it under there. You will see Appearance » Editor instead.

Site editor with no widgets screen

Many of the legacy WordPress widgets already have blocks that can do the same thing.

Click on the add new block button (+) and you will find a bunch of blocks categorized as Widgets.

Widget blocks

These are still blocks, but they are just categorized as widgets so that users can understand that these blocks behave like legacy widgets.

However, if a user still needed to use a legacy widget that doesn’t have an alternative block, then they can do so by using the Legacy Widgets block.

Legacy widget block

If a WordPress plugin has a block that you can add to the posts and pages, you can now also use the same block in widget-ready areas.

Theme developers can also create custom blocks that users can add to different areas of their websites.

The Future of WordPress Widgets

WordPress is moving forward towards using a more intuitive and unified way to edit the content on a WordPress website.

This means that older widgets will no longer be available going forward. WordPress themes and plugin developers are already adapting and adding support for the block editor in their products.

However, many WordPress themes still use older widgets. Similarly, many WordPress plugins still use shortcodes and legacy widgets.

If you still need to use the old widgets, then you can disable block widgets in WordPress.

The simple way would be to do it by using the free WPCode plugin which allows you to customize WordPress without adding dozens of plugins.

It has a pre-made snippets that you can use to disable block widgets.

Select the Disable Widget Blocks snippet from the WPCode library

Alternatively, you can also use Classic Widgets plugin. For more details, see our step-by-step guide on how to install a WordPress plugin.

Upon activation, the plugin will simply replace the block-based widget editor with the older widget page.

Note: Classic Widgets plugin will only be supported until 2024. After then, the plugin will not be updated or maintained this is why we recommend using WPCode to future-proof your customization.

Blocks vs Widgets – Which One is Better?

We recommend users start using the new block-based widgets editor as soon as possible because that’s the direction WordPress development is heading.

It is easy to use, modern, and more flexible than the previous Widgets screen.

If a WordPress plugin or theme on your website doesn’t support block-based widgets, then you can reach out to the developer and ask them to convert their widgets into blocks.

If they don’t have plans to release an update, then you can easily find alternative plugins or themes to replace them.

We hope this article helped you understand the difference between WordPress widgets vs blocks. You may also want to see our pick of the best block plugins for WordPress or see our guide on the difference between the block editor vs page builders.

If you liked this article, then please subscribe to our YouTube Channel for WordPress video tutorials. You can also find us on Twitter and Facebook.

The post WordPress Widgets vs Blocks – What’s the Difference? (Explained) first appeared on WPBeginner.

How to Convert a WordPress Widget into a Block (Step by Step)

Are you looking to use a legacy widget in your WordPress sidebar or post content?

In version 5.8, WordPress added a new block-based widget editor. Blocks are more flexible and make it easier to add rich content to your site. Luckily, you can still use classic widgets on your site as well.

In this article, we’ll show you how to convert a WordPress widget to a block.

How to Convert a WordPress Widget to a Block

Here’s what we’ll cover in this tutorial:

What Is the Difference Between a WordPress Widget and Block?

Widgets are used to add blocks of content to the sidebar, footer, or other areas of your WordPress website. They’re an easy way to add image galleries, social media feeds, quotes, calendars, popular posts, and other dynamic elements to your site.

In version 5.8, WordPress introduced a new block-based widget editor that allows you to use blocks to create more engaging widget areas. For instance, you can add buttons, choose colors, group different blocks, and more.

But what if you still rely on a legacy widget that has not been upgraded to a WordPress block? Luckily, you can still use it.

We’ll show you how to easily add legacy widgets to your sidebar and other widget-ready areas. The method you use depends on whether you are using a classic theme or a block theme. On top of that, we will also show you how to add a widget to your posts and pages.

But first, let’s take a brief look at the difference between widgets and blocks from a developer’s point of view.

Can a WordPress Widget Be Simply Converted to a Block?

If you’re a developer who created a legacy widget for WordPress, then you may be wondering whether you can convert it into a new block widget.

While widgets and blocks look similar, they are actually quite different. For example, they are coded using completely different programming languages. Widgets are written in PHP and blocks are written in JavaScript.

This means that there is no simple way to convert a widget into a block.

But that’s not a problem. Your existing widget will continue to work with new versions of WordPress. If you don’t plan to update your widget code, then you can leave it as it is.

However, if you want to continue adding new features to your widget, then it’s best to create a new block to replace the legacy widget. You can follow our guide on how to create a custom WordPress block.

Creating a new custom block

Adding Widgets to Your Classic Theme’s Sidebar in WordPress

If you are using a classic theme, then you can add classic widgets to your sidebar or other widget-ready areas of your site by using the Legacy Widget.

First, you need to navigate to Appearance » Widgets in your WordPress admin area.

Next, you should click the ‘+ Add Block’ button. From the popup, you need to click the ‘Legacy Widget’ icon.

Add the Legacy Widget to Your Sidebar

Note: If you see Appearance » Edit instead of Appearance » Widgets, then you are using a block theme. You’ll need to follow the next method below.

Now you can select the widget you wish to use from the drop down menu.

Select the Desired Widget from the Drop Down Menu

The widget will be added to your sidebar. Make sure you click the ‘Update’ button at the top of the screen to save the new widget.

The Legacy Widget Is Added to the Sidebar

To learn more, see our step by step guide on how to add and use widgets in WordPress.

Adding Widgets to Your Block Theme’s Sidebar in WordPress

Block themes, such as the default Twenty Twenty-Two theme, let you use the Full Site Editor in WordPress. Full site editing offers custom blocks for styling your website’s theme, but doesn’t include the Legacy Widget by default.

That means you won’t be able to access legacy widgets from the Full Site Editor, and when you switch from a classic theme to a block theme, any legacy widgets you were using are not migrated over.

Luckily, you can add legacy widget support using a plugin. Simply install and activate the X3P0 Legacy Widget plugin. For more details, see our step by step guide on how to install a WordPress plugin.

Upon activation, the plugin will add the Legacy Widget to the Full Site Editor. This will allow you to use legacy widgets with newer themes.

The Legacy Widget Is Now Available in the Full Site Editor

Adding Widgets to Your Post Content in WordPress

First, you will need to edit an existing WordPress post/page or add a new one. Once you’re in the WordPress content editor, go ahead and click the ‘+ Toggle block inserter’ button at the top of the screen.

Next, scroll down to the ‘Widgets’ section and find the widget that you want to add to the content. You can then drag the widget onto your post.

Scroll Down to the Widgets Section

You can customize the widget by using the Settings panel on the right of the screen.

Once you’re done, go ahead and publish your blog post or page.

Configure the Widget From the Right Settings Pane

To learn more, see our guide on how to add WordPress widgets in post and page content.

We hope this tutorial helped you learn how to use legacy widgets in WordPress. You may also want to learn how to track website visitors, or check out our list of the best contact form plugins for WordPress.

If you liked this article, then please subscribe to our YouTube Channel for WordPress video tutorials. You can also find us on Twitter and Facebook.

The post How to Convert a WordPress Widget into a Block (Step by Step) first appeared on WPBeginner.

How to Add or Remove Blank Space Between WordPress Blocks (4 Ways)

Do you want to add or remove blank space between WordPress blocks?

Adding or removing blank space between your WordPress blocks gives you more control over the design of your WordPress site.

In this article, we’ll show you how to add or remove blank space between WordPress blocks, step by step.

How to add or remove blank space between WordPress blocks (4 ways)

Why Add or Remove Blank Space Between WordPress Blocks?

WordPress makes creating custom pages and posts easy with the built-in WordPress block editor.

However, you may notice that when you add certain blocks, there’s too much or too little spacing. By adding or removing blank space between your WordPress blocks, you can create custom page layouts exactly as you’d like.

With more control over your final WordPress website design, you can offer your visitors a better user experience.

That being said, let’s take a look at how to add or remove blank space between WordPress blocks on your website. Simply use the quick links below to jump straight to the method you want to use.

Method 1. Adding Blank Space Between WordPress Blocks with Block Editor

The easiest way to add blank space between your blocks is using the WordPress block editor. There’s a built-in spacing block that lets you add blank space with a couple of clicks.

To use this, open up the post or page you want to edit and click the ‘Plus’ add block button.

Then, search for ‘Spacer’ and select the block.

Add spacer block to page

This will automatically insert a spacer into the page. 

You can make it bigger or smaller by dragging the block up or down.

Resize spacer block

Once you’re finished, click the ‘Update’ button to save your changes.

Keep in mind, this method only allows you to add space between blocks. To remove space, you will need to use one of the other methods below.

Method 2. Adding or Removing Blank Space Between WordPress Blocks by Adding Custom CSS

Another way to both add and remove blank space between your blocks is by adding custom CSS code to your theme.

If you haven’t done this before, then we recommend you take a look at our guide on how to easily add custom CSS to your WordPress site before you begin.

Next, open up the page or post you want to edit and then click on the block where you want to add or remove the blank space.

Then, click the ‘Block’ menu item in the right hand options panel.

Click block menu option

After that, scroll down to the ‘Advanced’ drop down and click it. This brings up a set of additional options for that block.

Then, in the ‘Additional CSS classes’ box add the following code:

.add-remove-bottom-space

This snippet creates a new CSS class specifically for that block. 

Add new CSS class

After that, click the ‘Update’ button to save your changes.

Next, navigate to Appearance » Customize to bring up the WordPress theme customizer.

Go to WordPress theme customizer

Then, scroll down and click the ‘Additional CSS’ menu option.

This brings up a field where you can add CSS code.

Click additional CSS

Next, paste the following code snippet into the box.

.add-remove-bottom-space {

 margin-bottom: 0;

}

This code snippet sets the bottom margin to zero and will remove the blank space from the block. If you want to add space to the bottom, then simply change the ‘0’ to something like ’20px’.

Add CSS code

Once you’ve made your changes, make sure to click the ‘Publish’ button to make your changes live. 

Saving Custom CSS Code Using a Plugin

By adding custom CSS to the WordPress theme customizer, it will only save for the theme you’re currently using. If you change the WordPress theme, then you’ll need to copy over the CSS code to your new theme.

If you want your custom CSS to apply no matter what theme you’re using, then you’ll need to use the Simple Custom CSS plugin. 

First thing you need to do is install and activate the plugin. For more details, see our guide on how to install a WordPress plugin.

Upon activation, simply go to Appearance » Custom CSS and add your custom CSS code.

Add code with Simple Custom CSS plugin

When you’re finished, click the ‘Update Custom CSS’ button to save your changes.

Method 3. Adding or Removing Blank Space Between WordPress Blocks with CSS Hero

Another beginner friendly way to add or remove blank space between WordPress blocks is by using a WordPress custom CSS plugin. This lets you make visual changes to your WordPress blog without editing any CSS code.

We recommend using the CSS Hero plugin. It lets you edit almost every CSS style on your WordPress site without writing a single line of code. 

Deal: WPBeginner reader’s can get a 34% discount by using our CSS Hero coupon code.

First thing you need to do is install and activate the plugin. For more details, see our beginner’s guide on how to install a WordPress plugin.

Activate CSS Hero plugin

Upon activation, you need to click the ‘Proceed to Product Activation’ button to activate the plugin. You’ll find the button directly above your list of installed plugins.

This brings you to a screen where you need to enter your username and password. Then, follow the on-screen instructions, and you’ll be redirected back to your dashboard once your account is verified.

Next, you need to open up the page or post you want to edit, then click the ‘CSS Hero’ button at the top of your WordPress admin toolbar.

Click CSS Hero

This will open up the same page with CSS Hero running on top of it. The plugin uses a visual editor, so you’ll be able to make your changes in real-time.

When you click on any element on your page, it will bring up a toolbar on the left side of the page for you to make customizations.

CSS Hero page customizer

To remove or add blank space between your blocks, simply click the ‘Spacings’ option and then scroll down to the ‘Margin-Bottom’ section.

Here you can move the slider up or down to add or remove blank space.

CSS Hero change bottom margin

Any changes you make will automatically show up on your page.

Once you’re done making changes, you need to click the ‘Save’ button to make your changes live. 

Method 4. Adding or Removing Blank Space Between WordPress Blocks with SeedProd

SeedProd is the best drag and drop page builder used by over 1 million websites.

SeedProd

You can use the library of 150+ templates to create custom 404 pages, sales pages, landing pages, and much more. SeedProd can even be used to create a custom WordPress theme without writing any code.

With the drag and drop builder, you have full control over the design of your site, and you can easily remove or add spacing to any website element.

To learn more, see our guide on how to create a custom page in WordPress.

As you’re customizing your page, you can add space anywhere by using the Spacer block.

SeedProd spacer block

Simply drag and drop it anywhere on the page where you want to add more space between blocks.

Then you can use the slider to adjust its height.

Use the slider to adjust the height of the SeedProd Spacer block

You can also control the spacing between any block. To do that, simply click on any block that you want to add or remove space from.

This brings up the options panel on the left. Then, click on the ‘Advanced’ tab.

Click advanced tab in SeedProd builder

Next, scroll down to the ‘Spacing’ drop down and click it.

This brings up a menu where you can control the ‘Margin’. Simply enter a number into the bottom margin box to add space, or delete the number to remove any existing blank space.

Change bottom margin

Once you’re finished making changes, click the ‘Save’ button and select the ‘Publish’ drop down to make your changes live.

Save and publish SeedProd page

We hope this article helped you learn how to add or remove blank space between WordPress blocks. You may also want to see our guide on how to start your own podcast and our expert picks of the best free website hosting compared. 

If you liked this article, then please subscribe to our YouTube Channel for WordPress video tutorials. You can also find us on Twitter and Facebook.

The post How to Add or Remove Blank Space Between WordPress Blocks (4 Ways) first appeared on WPBeginner.

How to Edit HTML in WordPress Code Editor (Beginner’s Guide)

Are you looking for an easy way to edit HTML on your WordPress website?

HyperText Markup Language or HTML is a code that tells a web browser how to display the content on your web pages. Editing HTML comes in handy for advanced customization and troubleshooting issues.

In this article, we’ll show you how to edit HTML in the WordPress code editor using different methods.

How to Edit HTML in WordPress code editor

Why Should You Edit HTML in WordPress?

WordPress offers thousands of themes and plugins to change the appearance of your website and customize different elements without touching a single line of code.

However, plugins and themes have their limitations and might not offer the exact features you’re looking for. As a result, you might be unable to style your website the way you want it to look.

This is where editing HTML is really useful. You can easily perform advanced customization using HTML code. It provides a lot of flexibility and control over how your site will look and function.

In addition, learning how to edit HTML can also help you identify and fix errors on your WordPress website when you don’t have access to the dashboard.

Note: If you don’t want to edit HTML, but still want full customization options, then we recommend using a drag and drop WordPress page builder like SeedProd.

That being said, let’s look at different ways to edit HTML in a WordPress website.

We’ll cover how to edit HTML using the block editor and classic editor, and we’ll also show you an easy way to add code to your site. You can click the links below to jump ahead to your preferred section.

How to Edit HTML in WordPress Block Editor

In the WordPress block editor, there are multiple ways to edit the HTML of your post or page.

First, you can use a Custom HTML block in your content to add HTML code.

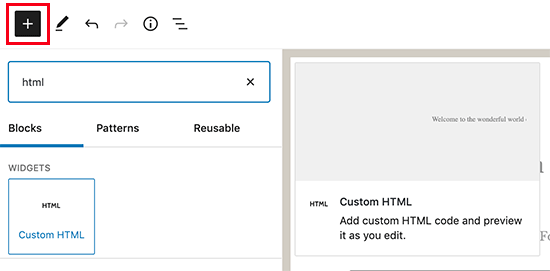
To start, head over to your WordPress dashboard and then add a new post/page or edit an existing article. After that, click the plus (+) sign at the top left corner and add a ‘Custom HTML’ block.

Adding custom HTML block in WordPress

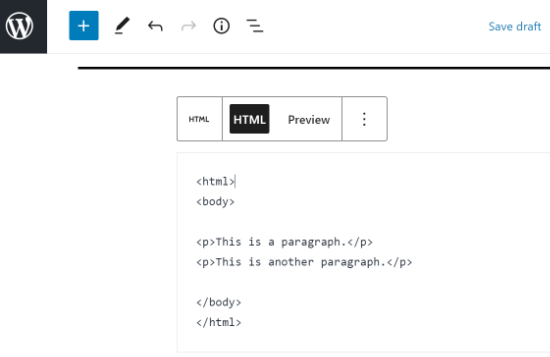
Next, go ahead and enter your custom HTML code in the block. You can also click on the ‘Preview’ option to check if the HTML code is working properly and how your content will look on your live website.

Custom HTML code in WordPress Editor

Another way to add or change HTML code in the WordPress block editor is by editing the HTML of a particular block.

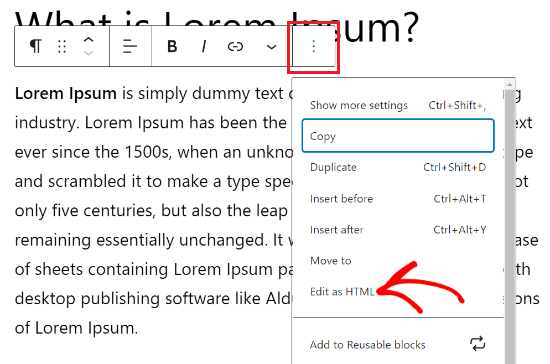
To do that, simply select an existing block in your content and then click the three-dot menu. Next, go ahead and click the ‘Edit as HTML’ option.

Click the three dots and select edit as HTML

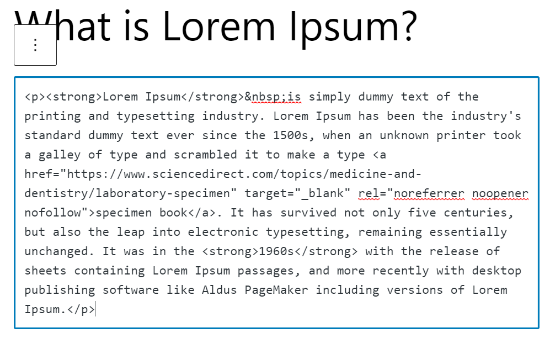
You’ll now see the HTML of an individual block. Go ahead and edit the HTML of your content. For example, you can add a nofollow link, change the style of your text, or add other code.

Edit the HTML of an individual block

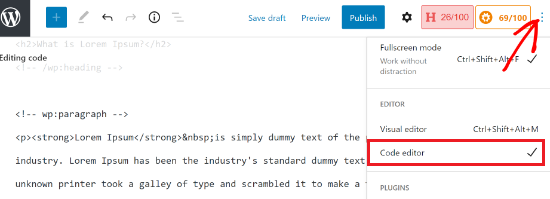
If you want to edit the HTML of your entire post, then you can use the ‘Code Editor’ in the WordPress block editor.

You can access the code editor by clicking the three-dots option in the top right corner. Then select ‘Code Editor’ from the drop-down options.

Access the Code Editor

How to Edit HTML in WordPress Classic Editor

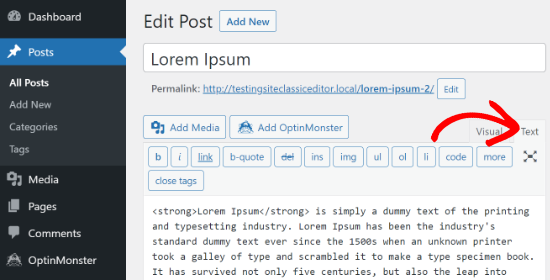
If you’re using the WordPress classic editor, then you can easily edit the HTML in the Text view.

To access the Text view, simply edit a blog post or add a new one. When you’re in the classic editor, click the ‘Text’ tab to see the HTML of your article.

Click on Text in the Classic Editor to edit HTML

After that, you can edit the HTML of your content. For example, you can bold different words to make them prominent, use the italic style in the text, create lists, add a table of contents, and more.

How to Edit HTML in WordPress Widgets

Did you know that you can add and edit HTML code in your site’s widget area?

In WordPress, using a Custom HTML widget can help you customize your sidebar, footer, and other widget areas. For instance, you can embed contact forms, Google Maps, call to action (CTA) buttons, and other content.

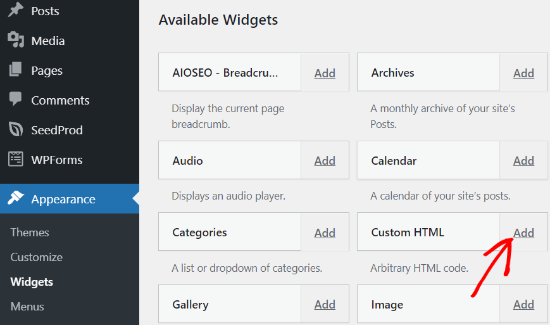
You can start by heading over to your WordPress admin panel and then go to Appearance » Widgets. After that, go ahead and add a Custom HTML widget by clicking the ‘Add’ button.

Add a Custom HTML Widget

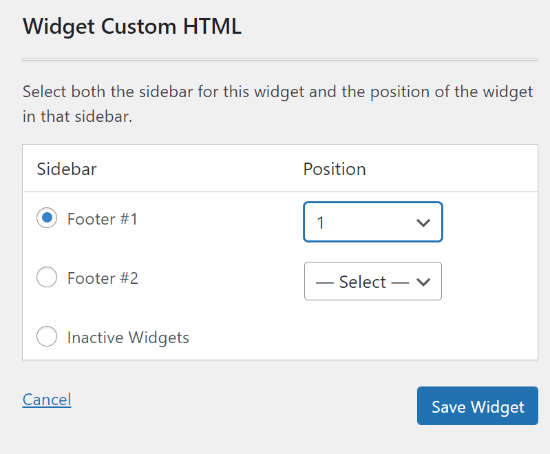
Next, you’ll need to select where you’d like to add the Custom HTML widget and choose a position. The widget area will depend on the WordPress theme you’re using. For example, you may be able to add it to your footer, header, or other areas.

Select the area and position for your Custom HTML widget

Once you’ve selected the widget area and position, go ahead and click the ‘Save Widget’ button.

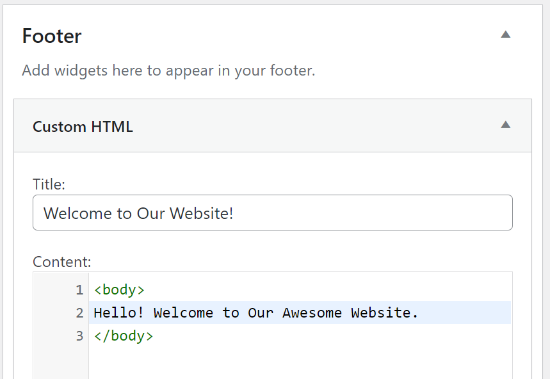
After that, you can click on your Custom HTML widget, enter the HTML code, and then click the ‘Save’ button.

Enter Custom HTML

You can now visit your website to see the Custom HTML widget in action.

Custom HTML Preview

How to Edit HTML in WordPress Theme Editor

Another way to edit the HTML of your website is through the WordPress Theme Editor (Code Editor).

However, we don’t recommend that you directly edit the code in the Theme Editor. The slightest mistake when entering code can break your website and block you from accessing the WordPress dashboard.

Also, if you update your theme, then all your changes would be lost.

That said, if you are considering editing HTML using the Theme editor, then it’s a good idea to backup your website before making any changes.

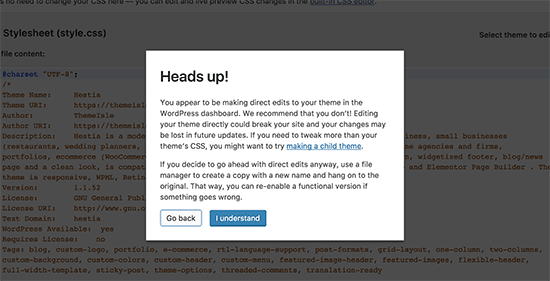
Next, head over to Appearance » Theme Editor from your WordPress dashboard. You’ll now see a warning message about directly editing theme files.

Theme editor warning in WordPress

Once you click the ‘I Understand’ button, you’ll see your theme files and code. From here, you can choose which file you’d like to edit and make your changes.

WordPress Theme Editor

How to Edit HTML in WordPress Using FTP

Another alternative method to editing HTML in the WordPress theme files is by using FTP also known as file transfer protocol service.

This is a standard feature that comes with all WordPress hosting accounts.

The benefit of using FTP instead of the code editor is that you can easily fix issues using the FTP client. This way, you won’t be locked out of your WordPress dashboard if something breaks when editing HTML.

To start, you’ll first need to select an FTP software. We’ll be using FileZilla in this tutorial, as it’s a free and user-friendly FTP client for Windows, Mac, and Linux.

After selecting your FTP client, you’ll now need to log in to your site’s FTP server. You can find the login details in your hosting provider’s control panel dashboard.

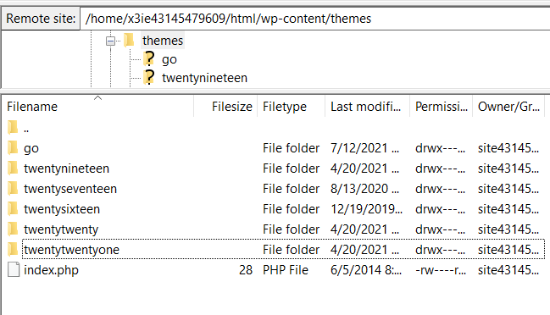
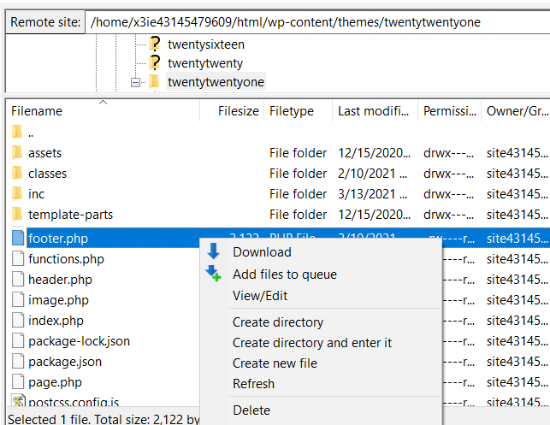
Once you’re logged in, you will see different folders and files of your website under the ‘Remote site’ column. Go ahead and navigate to your theme files by going to wp-content » theme.

You’ll now see different themes on your website. Go ahead and select the theme that you want to edit.

Navigate to your theme files in FTP client

Next, you can right-click on a theme file to edit the HTML. For example, if you want to make changes in the footer, then right-click the footer.php file.

Many FTP clients allow you to view and edit the file and automatically upload them once you’ve made the changes. In FileZilla, you can do this by clicking the ‘View/Edit’ option.

Download and edit your theme file

However, we suggest that you download the file that you want to edit to your desktop before making any changes.

After editing the HTML, you can replace the original file. For more details, we recommend following our guide on how to use FTP to upload files in WordPress.

Easy Way to Add Code in WordPress

The easiest way to add code to your WordPress is by using the Insert Headers and Footers WordPress plugin.

The team at WPBeginner designed this plugin, so you can easily add code to your site in minutes, and we’ve made it 100% free to use.

It also helps organize your code, as it’s stored in one place. Plus, it prevents errors that can be caused when manually editing code.

Another benefit is that you don’t have to worry about your code being erased if you decide to update or change your theme.

The first thing you’ll need to do is install and activate the Insert Headers and Footers plugin on your website. For more details, you can follow our detailed tutorial on how to install a WordPress plugin.

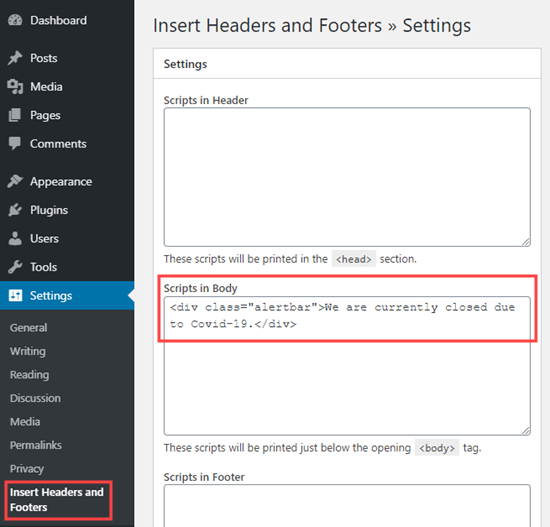
Once the plugin is active, you can head over to Setting » Insert Headers and Footers from your admin panel.

Next, you can add the HTML code to your website in the header, body, and footer boxes.

For example, let’s say you want to display an alert bar on your website. You can simply enter the HTML code in the ‘Scripts in Body’ box and click the Save button.

Adding the HTML code using the Insert Headers and Footers plugin

Besides that, you can add a Google Analytics tracking code and Facebook pixel in the header or add a Pinterest button in the footer of your website using the plugin.

For more details, you can see our guide on how to add header and footer code in WordPress.

We hope that this article helped you learn how to edit HTML in the WordPress code editor. You may also want to look at our guide on how much it really costs to build a WordPress website, or see the most important reasons you should use WordPress for your website.

If you liked this article, then please subscribe to our YouTube Channel for WordPress video tutorials. You can also find us on Twitter and Facebook.

The post How to Edit HTML in WordPress Code Editor (Beginner’s Guide) appeared first on WPBeginner.

How to Disable Fullscreen Editor in WordPress

Do you want to disable the fullscreen editor in WordPress?

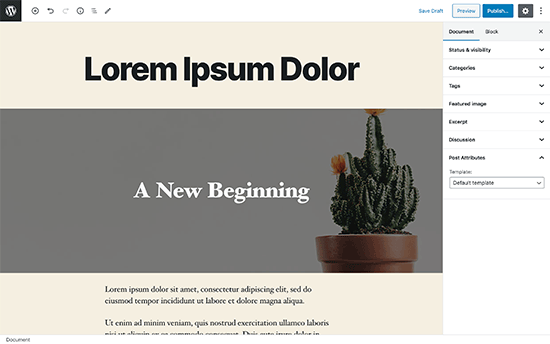
After the update, WordPress 5.4 now opens the post and page editor in fullscreen mode by default. While this distraction-free mode offers a clean and easy to use experience, some users may want to go back to the regular compact view.

In this article, we’ll show you how to easily disable the fullscreen editor in WordPress.

Turning off the fullscreen mode in WordPress post editor

Why WordPress Switched to Fullscreen Mode for The Editor?

WordPress introduced a new editor called The Block Editor (aka Gutenberg) in WordPress 5.0. This new editor allow users to use blocks for common elements and create beautiful content layouts.

It also mimics how your article or pages will look by using the same fonts and colors as your WordPress theme.

However, an admin menu on the left and one on top made it look a bit cluttered. There were just too many options on the screen, which you don’t need if you are focusing on writing content.

WordPress editor without fullscreen mode

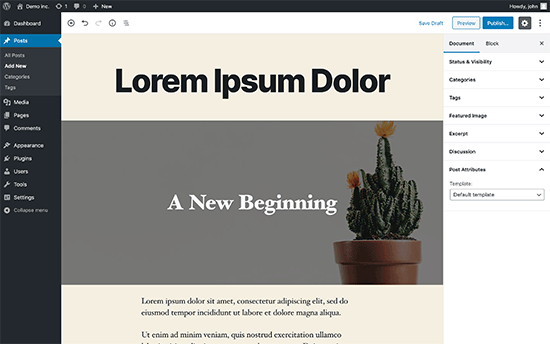
To deal with this, the WordPress core team decided to make the editor fullscreen by default, so users can have a distraction-free writing experience.

Fullscreen editor in WordPress

Now, it’s important to note that this fullscreen mode is nothing new. It was already there, and users were able to turn it on / off.

What’s changed now is that the fullscreen mode will now be the default view when writing posts in WordPress.

How to Disable The Fullscreen Mode for WordPress Editor (Easy Way)

It is super easy to turn off the fullscreen mode for block editor in WordPress.

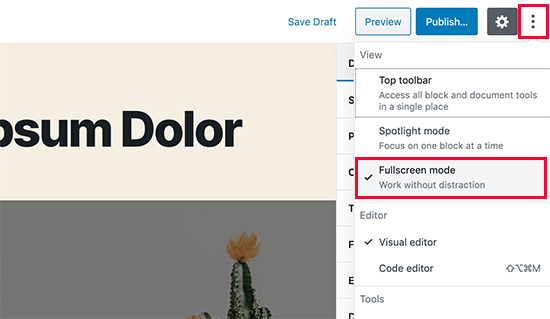
Simply edit a post or page and click on the three-dot menu on the top-right corner of the screen. This will display the settings menu for the post editor.

From here, you simply need to click on the ‘Fullscreen Mode’ to turn it off.

Turn off fullscreen mode in WordPress

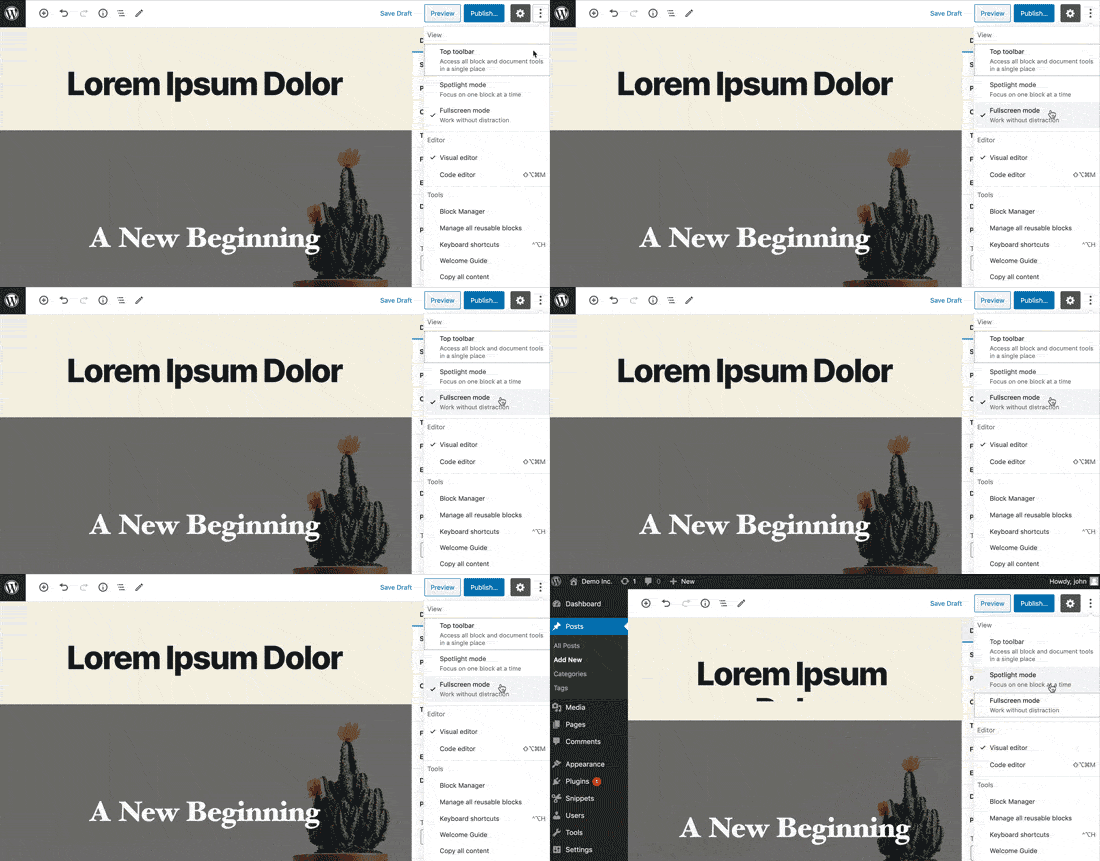
Post editor will instantly exit the fullscreen mode, and it will start showing the admin sidebar and the top toolbar.

Exiting fullscreen mode

WordPress will store your fullscreen mode preference in your browser’s temporary storage.

However if you switched to a different browser, used incognito mode, or accessed the admin area from a different device, then you’ll again see the fullscreen editor.

If you use multiple devices, user accounts, or browsers to access your WordPress admin area, then this may be a little annoying to switch it back every time.

This next method helps you fix that, permanently.

Permanently Disable Fullscreen Mode in WordPress (Snippet)

This method requires you to manually add code to your WordPress site. If you have not done this before, then see our guide on how to easily add code snippets in WordPress.

You’ll need to simply enter the following code in your WordPress theme’s functions.php file, or in a site-specific plugin. You can also use the custom code snippets plugin to add this code to your site without conflicts.

if (is_admin()) { 
	function jba_disable_editor_fullscreen_by_default() {
	$script = "jQuery( window ).load(function() { const isFullscreenMode = wp.data.select( 'core/edit-post' ).isFeatureActive( 'fullscreenMode' ); if ( isFullscreenMode ) { wp.data.dispatch( 'core/edit-post' ).toggleFeature( 'fullscreenMode' ); } });";
	wp_add_inline_script( 'wp-blocks', $script );
}
add_action( 'enqueue_block_editor_assets', 'jba_disable_editor_fullscreen_by_default' );
}

This code first checks if a user is viewing an admin area page. If they are, then it checks the status of the fullscreen editor.

If the fullscreen editor is enabled, then it simply turns it off.

You can still manually turn-on the fullscreen mode from the post edit screen, and your post editor would work just fine.

However, if you return back, then it will automatically turn it off. This behavior applies to all users who can access the post editor on your website.

We hope this article helped you learn how to disable the fullscreen mode in WordPress post editor. For more productivity tips, see our tips for mastering the WordPress content editor.

If you liked this article, then please subscribe to our YouTube Channel for WordPress video tutorials. You can also find us on Twitter and Facebook.

Code credit: Jean-Baptiste Audras

The post How to Disable Fullscreen Editor in WordPress appeared first on WPBeginner.