How to Display Instagram Photos in WordPress Sidebar Widget

Do you want to display your Instagram photos in the WordPress sidebar?

Your Instagram posts make great content for your website. By creating an Instagram feed, you can keep your site fresh and interesting while also promoting your Instagram account.

In this article, we’ll show you how to display your Instagram photos and videos in the WordPress sidebar widget.

How to display Instagram photos in WordPress sidebar widget

Why Add an Instagram Feed to Your WordPress Site?

With more than a billion monthly active users, Instagram is a great place to promote your products, services, and blog posts.

Depending on your industry, Instagram may even be the most important part of your social media strategy. For example, Instagram is particularly popular among top fashion blogs, cooking, lifestyle, and photography websites.

However, people won’t see your Instagram posts if they only visit your website. This can make it difficult to grow your Instagram following and get engagement on your photos and videos.

With that being said, it’s a good idea to add an Instagram feed to your WordPress website. By showing your latest posts, you can promote your Instagram account in an engaging and eye-catching way.

This will get more traffic to your Instagram page and encourage visitors to interact with your posts by leaving comments, clicking on the ‘Share’ button, and more.

The feed will also update automatically every time you make a new Instagram post, so it’s a great way to keep your website fresh.

That being said, let’s take a look at how to easily display Instagram photos in the WordPress sidebar widget.

How to Install an Instagram Photos Plugin

The best way to display Instagram photos in a WordPress sidebar or similar widget is by using Smash Balloon Social Photo Feed. This free plugin lets you show photos from one or more Instagram accounts in a fully customizable feed.

After creating a feed, you can add it to the sidebar using either a shortcode or block.

Embedded Instagram feed example

In this guide, we’ll be using the free version of Smash Balloon, as it has everything you need to embed an Instagram feed. However, there’s also a Pro version that allows you to display hashtag feeds, add Instagram shoppable images in WordPress, and more.

Before getting started, you’ll need to connect your Instagram account to a Facebook page. If you have a personal Instagram account, then you may also want to turn it into a business account, as this allows Smash Balloon to show your Instagram bio and header automatically.

For step-by-step instructions on how to do both of these things, check out our FAQ section at the end of the post.

When you’re ready, go ahead and install and activate the Smash Balloon Social Photo Feed plugin. For more details, see our guide on how to install a WordPress plugin.

How to Connect an Instagram Account to WordPress

After activating the plugin, it’s time to connect your Instagram account to WordPress. Simply go to Instagram Feed » Settings and then click on ‘Add New.’

How to create a new social media feed using Smash Balloon

With Smash Balloon Pro, you can create feeds from tagged posts and hashtags, or even create a social wall with content from lots of different websites, including YouTube, Facebook, and Twitter.

Since we’re using the free version, simply select ‘User Timeline’ and then click on ‘Next.’

Smash Balloon's Instagram settings

After that, you’ll need to choose the Instagram account where you’ll get the photos from.

To get started, click on ‘Add Source.’

Connecting Instagram to your WordPress website

On the next screen, choose whether you want to display photos from a personal or business Instagram account.

If you check the box next to ‘Personal,’ then Smash Balloon won’t include the Instagram avatar and bio in your header by default. However, you can always add the avatar and bio manually in the plugin’s settings.

Connecting a personal or business Instagram account to WordPress

After choosing ‘Personal’ or ‘Business,’ go ahead and click on ‘Login with Facebook.’

You can now check the Instagram account that you want to use and click on ‘Next.’

How to display an Instagram feed on your WordPress website

After that, check the box next to the Facebook page that’s linked to your Instagram account.

With that done, go ahead and click on ‘Next.’

Choose a page to connect to WordPress

Smash Balloon will now show a popup listing all the information it will have access to and the actions it can perform.

To restrict Smash Balloon’s access to your Instagram account, click any of the switches to turn it from ‘Yes’ to ‘No.’ Just be aware that this may affect the photos and videos that you can embed on your WordPress blog or website.

With that being said, we recommend leaving all the switches enabled.

When you’re ready, click on ‘Done.’

Adding permissions to your Facebook app

You’ll now see a popup with the Instagram account you just linked to WordPress.

Simply check the box next to the account and then click on ‘Add.’

Selecting an Instagram account

Smash Balloon will now take you back to Instagram Feeds » All Feeds automatically.

To create a feed, simply check the box next to your Instagram account. Then, click on ‘Next.’

How to create an Instagram social media feed

The plugin will now create an Instagram photo feed for your website, and then open that feed in the Smash Balloon editor.

How to Customize Your Instagram Photo Feed

You can use the editor to fine-tune how Instagram photos look on your website.

On the right, you’ll see a preview of your Instagram photo feed. On the left-hand side are all the settings you can use to customize the photo feed.

Smash Balloon's Instagram feed editor

Most of these settings are self-explanatory, but we’ll quickly cover some key areas.

To start, you can change the feed layout and add padding by selecting ‘Feed Layout’ from the left-hand menu. As you make changes, the preview will update automatically, so you can try different settings to see what works best for your Instagram photo feed.

Smash Balloon's Instagram feed layout settings

By default, Smash Balloon shows the same number of posts on desktop computers and mobile devices.

You can preview how the Instagram feed will look on desktop computers, tablets, and smartphones using the row of buttons in the upper-right corner. By testing different layouts, you can create an Instagram feed that looks great, no matter what device the visitor is using.

Previewing your social media feed on mobile, tablets, and desktop

Smartphones and tablets typically have smaller screens and less processing power, so you may want to show fewer photos and videos on mobile devices.

To do this, simply type a different number into the ‘Mobile’ field under ‘Number of Posts.’

Showing a different number of photos on mobile and desktop

By default, the Facebook feed shows fewer columns on smartphones and tablets, compared to desktop computers. This helps your photos and videos fit comfortably on smaller screens.

After testing the mobile version of your WordPress website, you may be unhappy with how the columns look on smartphones and tablets. If this is the case, then you can show fewer columns by changing the numbers in the ‘Columns’ section.

Showing a different number of Instagram columns on different devices

When you’re happy with the changes you’ve made, click on the ‘Customize’ link.

This will take you back to the main Smash Balloon editor, where you can explore the next settings screen, which is ‘Color Scheme.’

Adding a different color scheme to an Instagram feed in WordPress

By default, Smash Balloon uses a color scheme inherited from your WordPress theme, but it also has ‘Light’ and ‘Dark’ themes that you can use.

Another option is creating your own color scheme by selecting ‘Custom’ and then using the controls to change the background color, edit the button color, change the text color, and more.

An Instagram feed with a custom color scheme

By default, Smash Balloon adds a header to your feed, which is your Instagram profile picture and the name of your page. To change how this section looks, click on ‘Header’ in the left-hand menu.

On this screen, you can change the size and color of the header, and show or hide your Instagram bio.

Adding a header to the Instagram feed on your WordPress website

Sometimes, you may want to show a different profile picture. For example, your Instagram avatar may clash with your WordPress theme.

To do this, simply click on ‘Add Image’ under ‘Show custom avatar.’

You can then either choose an image from the WordPress media library or upload a new photo from your computer.

Adding a custom Instagram avatar in WordPress

Similarly, you can show a different bio. For example, you may want to introduce your Instagram feed or encourage people to follow you for more great content.

To replace the Instagram bio, simply type into the ‘Add custom bio’ box.

Creating a custom social media bio for your WordPress website

Smash Balloon automatically analyzes your Instagram photos and displays them at the best resolution. While we recommend using these default settings, it is possible to make the images bigger or smaller.

To change the image size, click on ‘Posts’ from the left-hand menu. Then, select the ‘Images and Videos’ option.

Changing Smash Balloon's image and video resolution settings

You can now choose between thumbnail, medium, and full-size using the dropdown menu.

If you’re unhappy with the results, then you can return to this screen at any point and select ‘Auto-detect (Recommended)’ from the dropdown menu.

Smash Balloon's automatic resolution detection

By default, Smash Balloon adds a ‘Load More’ button to the bottom of your Instagram feed, which allows visitors to scroll through more of your photos and videos.

Since it’s such an important button, you may want to customize it by selecting the ‘Load More Button’ option from the left-hand menu.

Customizing the social media Load More button

Here, you can help ‘Load More stand out by changing its background color, text color, and hover state.

You can also change the button’s label by typing into the ‘Text’ field.

Adding your own messaging to the Instagram button

Another option is to remove the button completely by clicking the ‘Enable’ toggle. In this way, you can encourage people to visit your Instagram by limiting the number of posts they can see on your website.

If visitors like what they see, they may decide to follow you on Instagram using the ‘Follow on Instagram’ button that Smash Balloon adds automatically.

With that in mind, you may want to help the button stand out by selecting ‘Follow Button’ in the left-hand menu.

Here, you can change the button’s background color, hover state, and text color.

Customizing the social media follow button

By default, the button has a general ‘Follow on Instagram’ label.

You can replace this with your own messaging by typing into the ‘Text’ field.

How to create a custom Instagram photo feed for your WordPress website

When you’re happy with how the Instagram feed looks, don’t forget to click on ‘Save’ to store your changes. You’re now ready to add the Instagram feed to your WordPress sidebar widget.

How to Add Your Instagram Photos in WordPress Sidebar Widget

You can add your feed to the sidebar or similar section using the Instagram Feed block.

If you’ve created more than one feed using Smash Balloon, then you’ll need to know the feed’s code.

Simply go to Instagram » All Feeds and then copy the value in the ‘Shortcode’ column.

In the following image, we’ll need to use instagram-feed feed=1.

Adding Instagram photos and videos using a code

With that done, go to Appearance » Widgets in the WordPress dashboard.

Then click on the blue ‘+’ button.

The WordPress widget editor

In the search bar, type in ‘Instagram Feed’ and select the right widget when it appears.

WordPress has a built-in Instagram widget, so make sure you choose the one that shows the official Instagram logo.

The Instagram Feed block

After that, simply drag the widget onto the area where you want to show the Instagram feed, such as the sidebar or similar section.

The widget will automatically show one of the feeds you created using Smash Balloon.

To show a different feed instead, simply type the feed’s shortcode into the ‘Shortcode Settings’ box and then click on ‘Apply Changes.’

Adding an Instagram feed to WordPress using shortcode

You can now click on the ‘Update’ button to make the widget live. For more information, please see our step-by-step guide on how to add and use widgets in WordPress.

If you’re using a block-enabled theme, then you can add an Instagram feed to the sidebar using the full-site editor. To get started, simply go to Appearance » Editor.

Adding an Instagram feed using the full-site editor

In the editor, simply click to select the sidebar section and then click on the ‘+’ button.

You can then start typing in ‘Instagram Feed’ and select the right block when it appears.

Adding an Instagram feed to a block-enabled WordPress theme

By default, the full-site editor will show one of the Instagram feeds you created using Smash Balloon. To show a different feed, simply add the shortcode following the same process described above.

When you’re happy with how the Instagram feed looks, click on ‘Save’ to make your changes live.

How to Display a Specific Instagram Photo in WordPress

Sometimes you may want to show a specific Instagram post on your website. This might be your most popular photo, an evergreen post, or even a social media contest that you’re currently running.

A single Instagram post, embedded in WordPress

In the past, you could easily embed an Instagram post in WordPress using a protocol known as oEmbed. However, Facebook changed the way that oEmbed works, so you can no longer easily embed Instagram photos in WordPress.

The good news is that Smash Balloon can fix the Facebook and Instagram oEmbed issue. This allows you to easily embed a specific Instagram post in any page, post, or widget-ready area, such as the sidebar.

To enable this feature, simply go to Instagram Feed » oEmbeds. You can then click on the ‘Enable’ button.

Enabling the Facebook and Instagram oEmbed feature

After that, go to Appearance » Widgets and click on the blue ‘+’ button.

In the search bar, type in ‘Embed’ to find the right block.

The WordPress Embed block

When the ‘Embed’ block appears, drag it onto the area where you want to show the photo.

In the ‘Embed’ field, simply paste the URL of the Instagram post that you want to show on your website. Then, click on ‘Embed.’

Adding an embed block to your WordPress website

WordPress will now show the specific Instagram post.

If you’re happy with how it looks, then click on ‘Update’ to make it live.

Publishing an Instagram photo in a sidebar widget

Now, if you visit your website, you’ll see the Instagram post live.

If you’re using a block-enabled theme, then you’ll need to add specific Instagram posts using the full-site editor.

To do this, simply enable Smash Balloon’s oEmbed feature and get the Instagram post’s URL by following the same process described above.

After that, open the full-site editor by going to Appearance » Editor in the WordPress dashboard. Once you’re inside the full-site editor, click on the ‘+’ button in the sidebar section and then type in ‘Embed.’

Adding an Embed block using the full-site editor (FSE)

When the right block appears, click to add it to the sidebar.

You can then add the URL for the post you want to embed and click on the ‘Embed’ button.

Adding an Instagram feed using an Embed block

The full-site editor will now show the Instagram post.

If you’re happy with how it looks, then click on ‘Save’ to publish this photo or video to the block-enabled sidebar.

Adding a specific Instagram post to a block-enabled sidebar

FAQs About Displaying Instagram Posts in WordPress

Smash Balloon makes it easy to create a custom Instagram feed or even display specific Instagram posts on your WordPress website.

That being said, here are some of the most frequently asked questions about showing Instagram posts on WordPress.

How Do I Create an Instagram Business Account?

Smash Balloon can display photos from either a personal or business Instagram account.

However, Smash Balloon can’t automatically fetch the Instagram avatar and bio from a personal Instagram account. Instead, you’ll need to add the avatar and bio manually in the plugin’s settings.

With that being said, you may want to check whether you have a personal or business account, and then switch to a business account if necessary.

To do this, simply visit your Instagram account and click on the lined icon in the side menu.

Checking whether your Instagram page is a business or personal account

After that, click on ‘Settings.’

If you don’t have a business account, then this screen will show ‘Switch to professional account’ as the last option.

How to switch to a business Instagram account

If you currently have a personal account and want to switch to a business account, then simply click on this link.

How Do I Connect a Facebook Page to an Instagram Account?

Before you can display Instagram photos in WordPress, you’ll first need to connect your Instagram account to a Facebook page.

To do this, head over to the Facebook page that you want to use and then click on ‘Settings’ in the left-hand menu.

Once you’ve done that, click on ‘Linked Account.’ You can now select ‘Instagram’ and click on the ‘Connect’ button.

Linking an Instagram business account to a Facebook page

Facebook will now show all the actions it can perform, and the information it can access.

If you’re happy with this, then click on the ‘Connect’ button.

Linking Instagram and Facebook

Just be aware that the people who manage your Facebook page may be able to see your Instagram messages and respond to them. If you want to stop this and keep your messages private, then click to disable the slider.

When you’re ready to move to the next screen, click on ‘Confirm.’

Restricting access to your Instagram messages

This opens a popup where you can type in your Instagram username and password.

After that, click on the ‘Log in’ button.

Logging into your Instagram account

After a few moments, you’ll see a message saying that your Instagram and Facebook accounts are now connected.

We hope this article helped you learn how to display Instagram photos in a WordPress sidebar widget. You may also want to see our guide on how to create a custom Facebook feed in WordPress, or see our expert pick of social proof plugins for WordPress and WooCommerce.

If you liked this article, then please subscribe to our YouTube Channel for WordPress video tutorials. You can also find us on Twitter and Facebook.

The post How to Display Instagram Photos in WordPress Sidebar Widget first appeared on WPBeginner.

How to Embed Discord Widget into WordPress

Are you looking to embed a Discord widget in WordPress?

Discord is a well-known VOIP chat application that allows you to build your own communities and enables your users to communicate with each other through text, voice, and video. As of 2022, Discord has about 150 million active users.

In this article, we will show you how to embed a Discord widget into WordPress.

How to Embed Discord Widget into WordPress

Why Should You Add a Discord Widget to Your Website

Discord chat allows users to communicate with each other over messages, voice calls, and video calls.

By embedding a Discord widget in your WordPress site, you can provide a way for your users to connect with each other. This widget will display the total members of your Discord server, and it will also provide an invite link for new members to join.

Your WordPress users will be able to join your Discord chat rooms through the link provided by the widget, so you can build a huge community for your website.

That being said, let’s see how you can add a Discord widget in WordPress.

How to Embed a Discord Widget in WordPress

To embed a Discord widget in WordPress, you must visit the official Discord website. You will need to create a Discord user account and create a Discord server for your community.

Step 1. Creating a Discord Username and Server

Once there, simply click the ‘Login’ button present at the top right corner if you already have a Discord account.

If you don’t have an account, click the ‘Open Discord in your browser’ button.

Login to your Discord account or create a new account

You will be then asked to choose a username for your Discord account.

This will be your handle for others to find you, but you can change your display name on a server-by-server basis.

Choose a username for your discord account

Next, Discord will take you to the ‘Channels’ page and then ask for your date of birth.

Simply enter your details and click the ‘Next’ button.

Type your date of birth and click Next button

Then, you’ll be asked to create your first Discord server. Now, you can either create your own template or choose any of the premade ones.

For this tutorial, we will be using the ‘Gaming’ server template.

Create a discord server

After that, you’ll be asked to choose a ‘Server Name’ for your Discord chatroom. You can also upload an image for the server.

After choosing a name of your liking and uploading an image, simply click the ‘Create’ button to create your Discord server.

Type a name for your discord server

Lastly, you’ll be asked to provide your email account and choose a password for your Discord account.

Once you provide these details, click the ‘Claim Account’ button.

Provide your email and password

Now, an email will be sent by Discord to the email account you provided to verify your details.

Once you verify your account, your Discord server will be set up.

Email for verification

Now all you have to do is embed the Discord widget in WordPress.

For that, first, you need to click the arrow icon present beside your server name at the top of the Discord ‘Channels’ page.

Click arrow icon beside your server

This will open up a dropdown menu.

Here, you simply have to click the ‘Server Settings’ option to open up your Discord server settings.

Click server settings option

Once you’re on the ‘Server Settings’ page, click the ‘Widget’ option from the sidebar.

This will open up the ‘Server Widget’ section where you simply have to toggle the switch present beside ‘Enable Server Widget’.

Toggle the enable server widget switch

After that, simply scroll down to the ‘Premade Widget’ section and click the ‘Copy’ button present below the ‘Premade Widget’ option.

You can now embed the Discord widget anywhere on your website by pasting this code.

Copy premade widget shortcode
Step 2. Embedding the Discord Widget in WordPress

First, go to the WordPress page or post where you want to embed the Discord widget.

Then, simply choose the ‘Custom HTML’ block from the block editor and paste the code.

embed shortcode in Custom HTML block

After that click the ‘Publish’ button at the top to embed the Discord widget.

This is how your Discord widget will look on your WordPress website.

Discord widget on your website

Note that you can embed the Discord widget in any block-enabled area of your themes, such as a sidebar, header, or footer.

We hope you learned how to embed the Discord widget in WordPress. You may also want to check our top picks of the best VOIP themes in WordPress and our article on the best email marketing services for small businesses.

If you liked this article, then please subscribe to our YouTube Channel for WordPress video tutorials. You can also find us on Twitter and Facebook.

The post How to Embed Discord Widget into WordPress first appeared on WPBeginner.

How to Convert a WordPress Widget into a Block (Step by Step)

Are you looking to use a legacy widget in your WordPress sidebar or post content?

In version 5.8, WordPress added a new block-based widget editor. Blocks are more flexible and make it easier to add rich content to your site. Luckily, you can still use classic widgets on your site as well.

In this article, we’ll show you how to convert a WordPress widget to a block.

How to Convert a WordPress Widget to a Block

Here’s what we’ll cover in this tutorial:

What Is the Difference Between a WordPress Widget and Block?

Widgets are used to add blocks of content to the sidebar, footer, or other areas of your WordPress website. They’re an easy way to add image galleries, social media feeds, quotes, calendars, popular posts, and other dynamic elements to your site.

In version 5.8, WordPress introduced a new block-based widget editor that allows you to use blocks to create more engaging widget areas. For instance, you can add buttons, choose colors, group different blocks, and more.

But what if you still rely on a legacy widget that has not been upgraded to a WordPress block? Luckily, you can still use it.

We’ll show you how to easily add legacy widgets to your sidebar and other widget-ready areas. The method you use depends on whether you are using a classic theme or a block theme. On top of that, we will also show you how to add a widget to your posts and pages.

But first, let’s take a brief look at the difference between widgets and blocks from a developer’s point of view.

Can a WordPress Widget Be Simply Converted to a Block?

If you’re a developer who created a legacy widget for WordPress, then you may be wondering whether you can convert it into a new block widget.

While widgets and blocks look similar, they are actually quite different. For example, they are coded using completely different programming languages. Widgets are written in PHP and blocks are written in JavaScript.

This means that there is no simple way to convert a widget into a block.

But that’s not a problem. Your existing widget will continue to work with new versions of WordPress. If you don’t plan to update your widget code, then you can leave it as it is.

However, if you want to continue adding new features to your widget, then it’s best to create a new block to replace the legacy widget. You can follow our guide on how to create a custom WordPress block.

Creating a new custom block

Adding Widgets to Your Classic Theme’s Sidebar in WordPress

If you are using a classic theme, then you can add classic widgets to your sidebar or other widget-ready areas of your site by using the Legacy Widget.

First, you need to navigate to Appearance » Widgets in your WordPress admin area.

Next, you should click the ‘+ Add Block’ button. From the popup, you need to click the ‘Legacy Widget’ icon.

Add the Legacy Widget to Your Sidebar

Note: If you see Appearance » Edit instead of Appearance » Widgets, then you are using a block theme. You’ll need to follow the next method below.

Now you can select the widget you wish to use from the drop down menu.

Select the Desired Widget from the Drop Down Menu

The widget will be added to your sidebar. Make sure you click the ‘Update’ button at the top of the screen to save the new widget.

The Legacy Widget Is Added to the Sidebar

To learn more, see our step by step guide on how to add and use widgets in WordPress.

Adding Widgets to Your Block Theme’s Sidebar in WordPress

Block themes, such as the default Twenty Twenty-Two theme, let you use the Full Site Editor in WordPress. Full site editing offers custom blocks for styling your website’s theme, but doesn’t include the Legacy Widget by default.

That means you won’t be able to access legacy widgets from the Full Site Editor, and when you switch from a classic theme to a block theme, any legacy widgets you were using are not migrated over.

Luckily, you can add legacy widget support using a plugin. Simply install and activate the X3P0 Legacy Widget plugin. For more details, see our step by step guide on how to install a WordPress plugin.

Upon activation, the plugin will add the Legacy Widget to the Full Site Editor. This will allow you to use legacy widgets with newer themes.

The Legacy Widget Is Now Available in the Full Site Editor

Adding Widgets to Your Post Content in WordPress

First, you will need to edit an existing WordPress post/page or add a new one. Once you’re in the WordPress content editor, go ahead and click the ‘+ Toggle block inserter’ button at the top of the screen.

Next, scroll down to the ‘Widgets’ section and find the widget that you want to add to the content. You can then drag the widget onto your post.

Scroll Down to the Widgets Section

You can customize the widget by using the Settings panel on the right of the screen.

Once you’re done, go ahead and publish your blog post or page.

Configure the Widget From the Right Settings Pane

To learn more, see our guide on how to add WordPress widgets in post and page content.

We hope this tutorial helped you learn how to use legacy widgets in WordPress. You may also want to learn how to track website visitors, or check out our list of the best contact form plugins for WordPress.

If you liked this article, then please subscribe to our YouTube Channel for WordPress video tutorials. You can also find us on Twitter and Facebook.

The post How to Convert a WordPress Widget into a Block (Step by Step) first appeared on WPBeginner.

BuddyPress 9.0 Scheduled for Short Development Cycle to Ship Block-Based Widgets Ahead of WordPress 5.8

BuddyPress 8.0 was just released earlier this month on June 6, but the core development team is gearing up for a short development cycle for 9.0. The release will be specifically targeted at getting BuddyPress core widgets ready for WordPress 5.8’s new block widgets experience. Contributors are aiming to hit the following timeline to ship 9.0 before the next major WordPress release:

  • Beta: July 8.
  • RC: July 12.
  • Final: July 16

BuddyPress entered the world of blocks with the release of version 6.0 in May 2020, allowing users to insert a specific Member or Group into content. Version 7.0, released six months later, introduced blocks for featuring a list of members, a list of groups, and the ability to embed a public activity post. Over the next few weeks, BuddyPress contributors will continue the process of migrating the rest of the BuddyPress component widgets to blocks. These include the following:

  • Blogs Recent Posts Widget: A list of recently published posts from across the network
  • BP Core Login Widget: Shows a Log In form to logged-out visitors, and a Log Out link to those who are logged in
  • BP Core Friends Widget: A dynamic list of recently active, popular, and newest Friends of the displayed member. Widget is only shown when viewing a member profile
  • BP Groups Widget: A dynamic list of recently active, popular, newest, or alphabetical groups
  • BP Core Members Widget: A dynamic list of recently active, popular, and newest members
  • BP Core Recently Active Widget: Profile photos of recently active members
  • BP Core Who’s Online Widget: Profile photos of online users
  • BP Messages Sitewide Notices Widget: Display Sitewide Notices posted by the site administrator

BP Nouveau widgets:

  • BP Latest Activities: Display the latest updates of your community having the types of your choice
  • BP Nouveau Navigation Widget: Displays BuddyPress primary nav in the sidebar of the site. (Must be used as the first widget of the sidebar and only once.)

In addition to building a block for every BuddyPress widget, contributors are aiming to make it possible to transform existing BP widgets into their corresponding BP block.

With the new block widgets screen imminently landing in WordPress, BuddyPress has to make this move forward to keep pace with the progress of the block editor’s march beyond use in the content editor. Otherwise, BuddyPress users would need to disable block widgets with the Classic Widgets plugin in order to maintain access to BuddyPress core widgets.

Contributors are also working on creating a new Follow component, a frequently requested feature which would use the now abandoned BuddyPress Follow plugin as inspiration. The feature will work similar to Twitter following or the Facebook follow button that allows users to see public activity posts for those they are following. The Follow component is being built as a plugin first and will ship with 9.0 if it is ready in time.

Classic Widgets Plugin Disables WordPress 5.8’s Upcoming Block-Based Widgets System

Yesterday, WordPress released a core plugin named Classic Widgets. Core contributors Tonya Mork and Andrew Ozz created the plugin under the WordPress Contributors account. It allows end-users to disable the upcoming block-based widgets system. Support is expected through 2022 or as long as necessary according to the plugin description.

Decided last month by a small group of core leads following a demo, WordPress 5.8 will ship several sub-components from its Full Site Editing project. FSE encompasses several self-contained parts that grant users broader control over the design and layout of their sites. One of those pieces is an overhaul of the widgets system.

Widgets will one day become a legacy feature of the platform. However, they are not disappearing any time soon. During the transition from the pre-block era of WordPress to the eventual incorporation of all the sub-components of FSE, users and theme developers will sometimes need smaller stepping stones. Block-based widgets give users more ways to work with blocks outside of the post content area without diving head-first into an entire block-based experience.

This is the first time many in the larger WordPress user community will be exposed to blocks in a new context. The editor that launched in WordPress 5.0 focused solely on the post content. The widgets system in 5.8 turns classic sidebars into block containers.

In short, users will be able to stick any block in any sidebar.

Widgets screen that turns each theme's sidebar into a block container.
Block-based widgets screen.

This is a welcome step in transitioning users in the long run, especially those who use classic themes, which is still the majority of all users. However, there are cases where the Classic Widgets plugin will be necessary. The biggest will be:

  • Broken themes or quirky output.
  • Users simply preferring the old system.

Whatever the case may be, the plugin handles the switch.

For those wondering why the core development team is not making sure block-based widgets work with all themes, it is because the two systems are not exactly alike. Plus, every theme design handles its sidebar output in its own way. There is no way to ensure 100% coverage.

Many themes will have no issues at all. Some sidebars, depending on the design, could entirely break down. More likely than broken, custom sidebar and widget designs could simply look “off” on the front end.

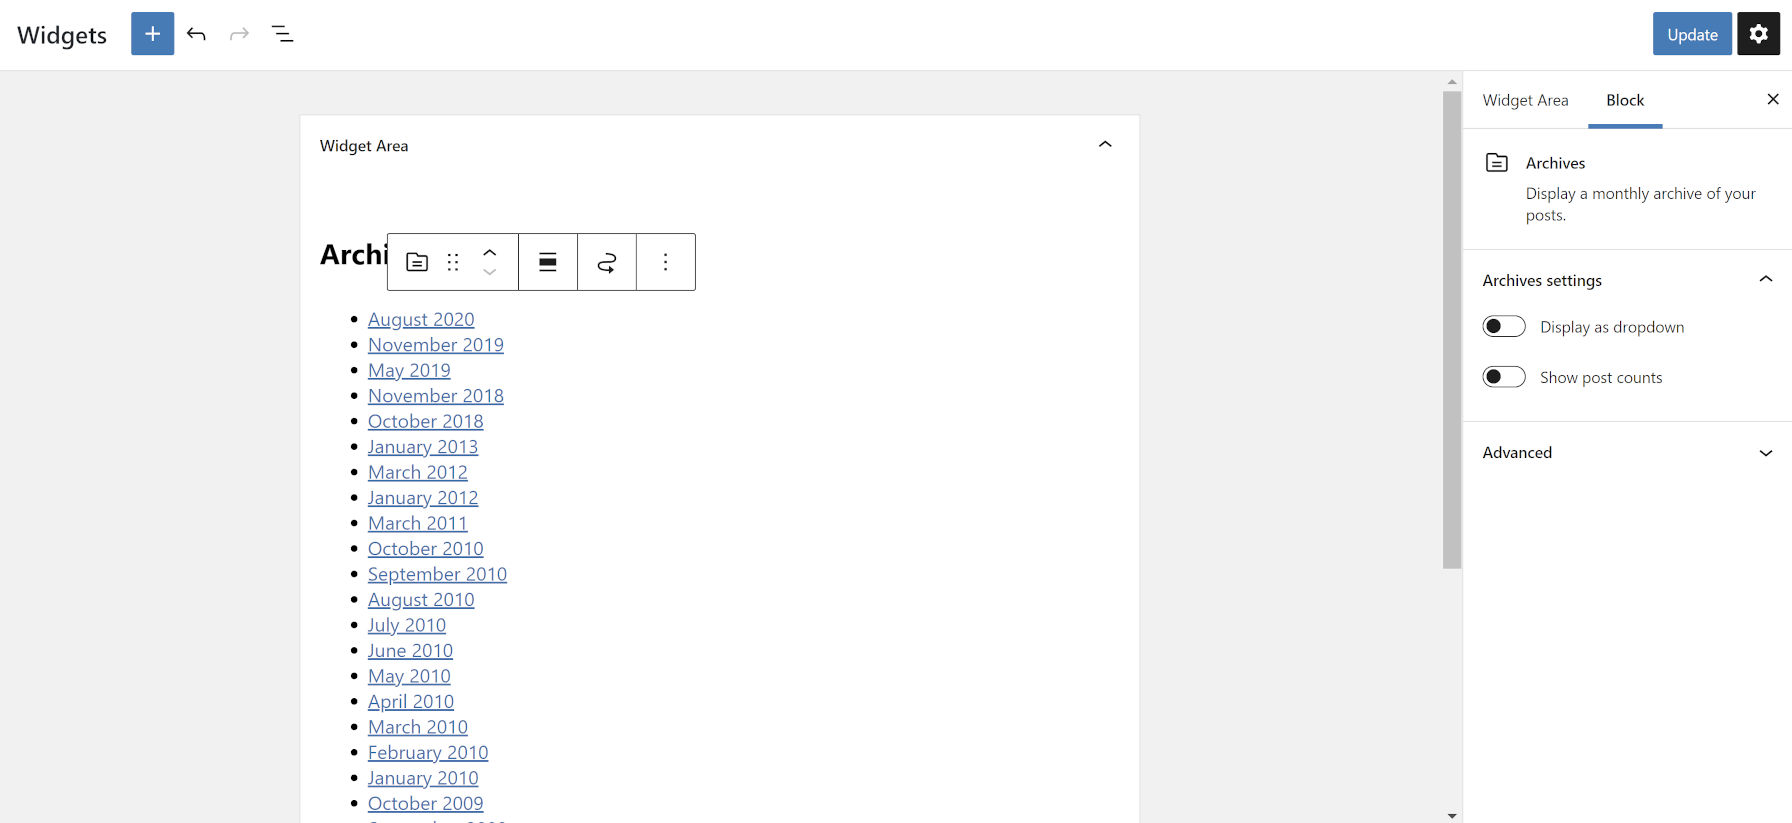
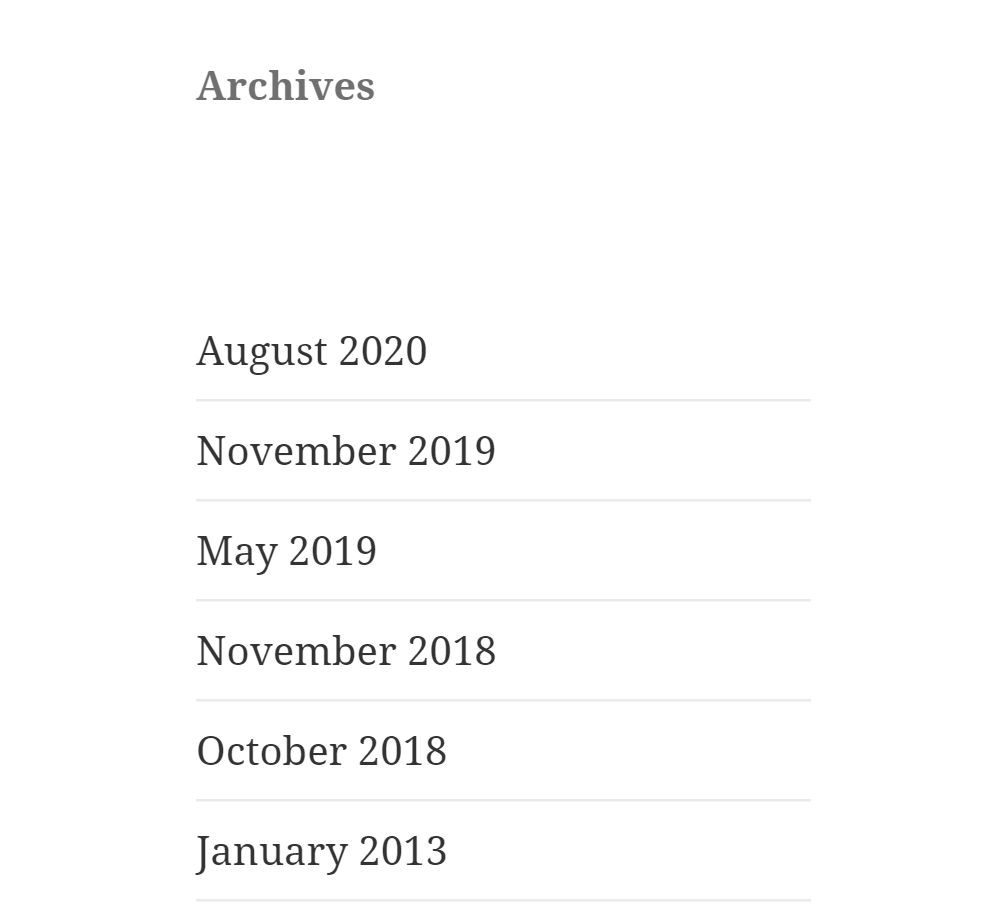
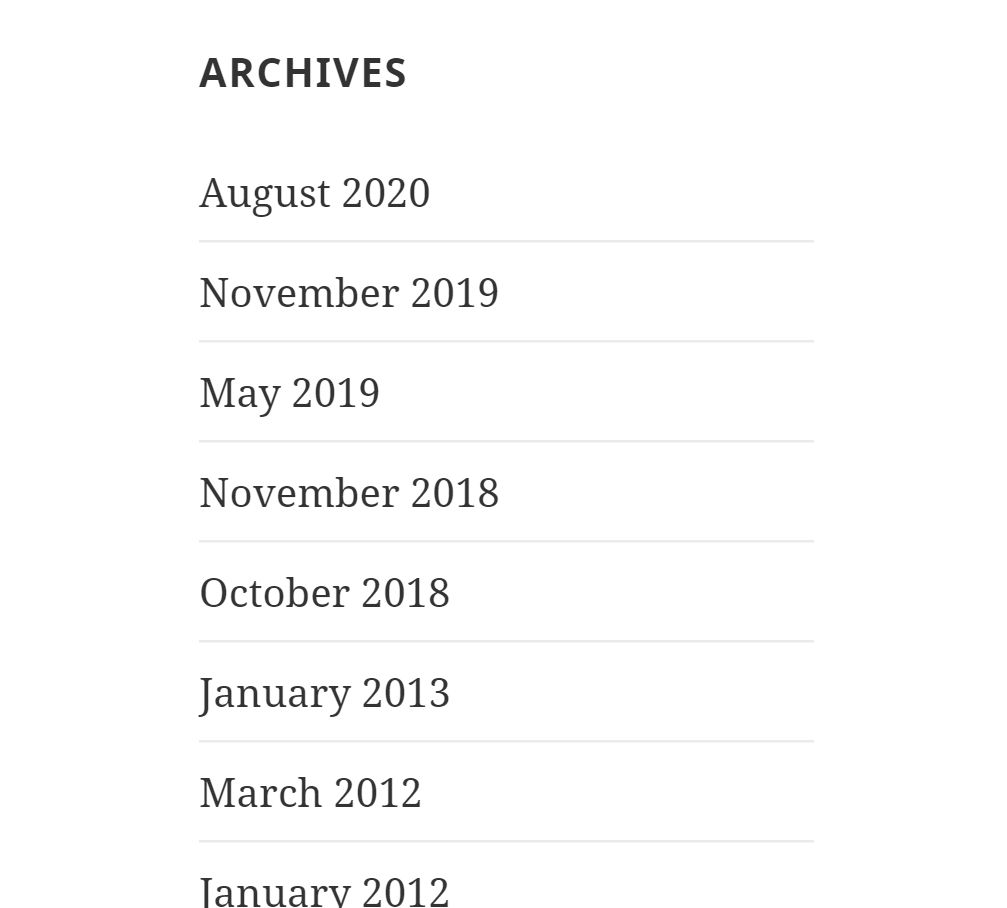
For example, compare a Heading block followed by the Archives block (first image) against the classic Archives widget (second image) when using the Twenty Fifteen theme:

The typography of the Heading is different, and there is too much space below it. That is not an end-of-the-world scenario. It is the sort of quirk that may be common with many themes, at least until theme authors have had time to push out updates.

What Happens When Activating the Plugin?

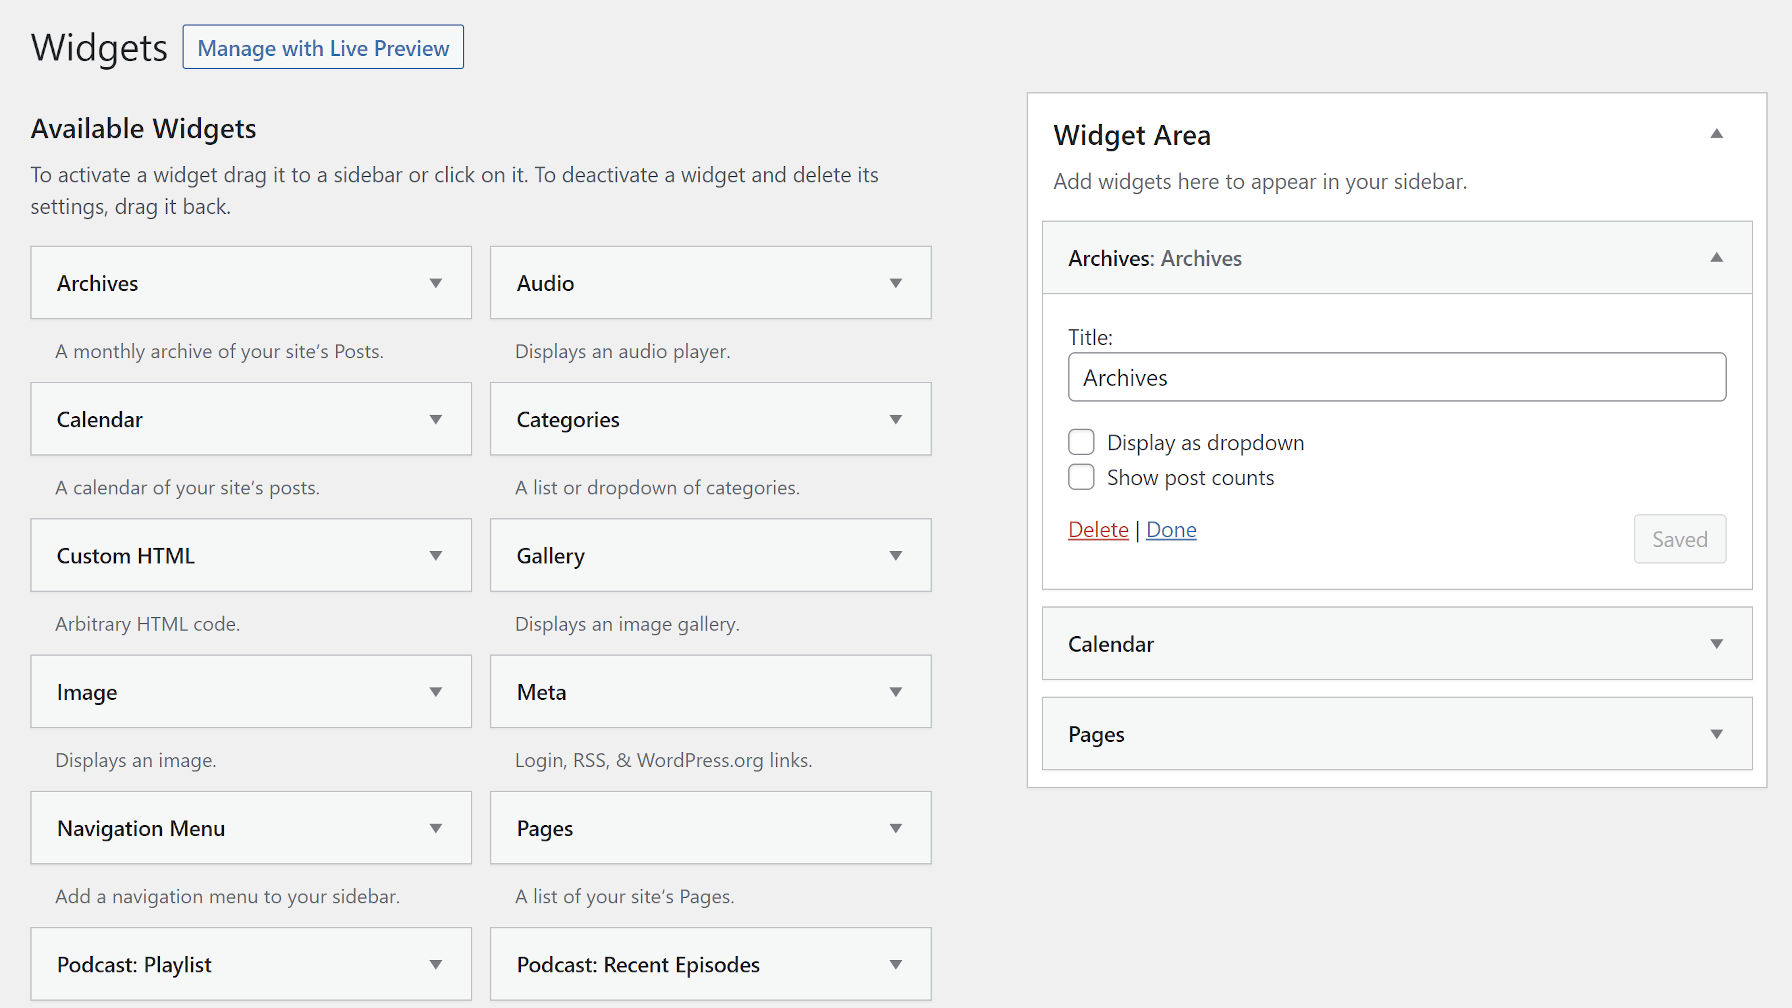
The traditional WordPress widgets screen with draggable widgets and sidebars.
Classic widgets screen.

Classic Widgets has no settings screen or anything to configure. It is a set-it-and-forget-it plugin. Its goal is to simply return users to the traditional widgets system in which they are familiar.

If you start using the new block-based widgets system, you will lose all of your widget blocks upon activating the plugin. There is no going back, so be sure this is what you want. The former blocks will not reappear if you change your mind and deactivate Classic Widgets.

However, if you add traditional widgets to your theme’s sidebars while the plugin is active, you will not lose them. They will still appear on both the front and back end if you deactivate the plugin.

WordPress 5.6 Release Team Pulls the Plug on Block-Based Widgets

Widgets admin screen from the Gutenberg 9.1.1 WordPress plugin.
Current block-based widgets admin screen design.

I was wrong. I assured our readers that “the block-based widget system will be ready for prime time when WordPress 5.6 lands” in my previous post on the new feature’s readiness. I also said that was on the condition of not trying to make it work with the customizer — that experience was still broken. However, the 5.6 team pulled the plug on block-based widgets for the second time this year.

One week ago, WordPress 5.6 release lead Josepha Haden seemed to agree that it would be ready. However, things can change quickly in a development cycle, and tough decisions have to be made with beta release deadlines.

This is not the first feature the team has punted to a future release. Two weeks ago, they dropped block-based nav menus from the 5.6 feature list. Both features were originally planned for WordPress 5.5.

A new Widgets admin screen has been under development since January 2019, which was not long after the initial launch of the block editor in WordPress 5.0. For now, the block-based widgets feature has been punted to WordPress 5.7. It has also been given the “early” tag, which means it should go into core WordPress soon after the 5.7 release cycle begins. This will give it more time to mature and more people an opportunity to test it.

Helen Hou-Sandì, the core tech lead for 5.6, provided a historical account of the decision and why it was not ready for inclusion in the new ticket:

My question for features that affect the front-end is “can I try out this new thing without the penalty of messing up my site?” — that is, user trust. At this current moment, given that widget areas are not displayed anything like what you see on your site without themes really putting effort into it and that you have to save your changes live without revisions to get an actual contextual view, widget area blocks do not allow you to try this new feature without penalizing you for experimenting.

She went on to say that the current experience is subpar at the moment. Problems related to the customizer experience, which I covered in detail over a month ago, were also mentioned.

“So, when we come back to this again, let’s keep sight of what it means to keep users feeling secure that they can get their site looking the way they want with WordPress, and not like they are having to work around what we’ve given them,” said Hou-Sandì.

This is a hopeful outlook despite the tough decision. Sometimes, these types of calls need to be made for the good of the project in the long term. Pushing back a feature to a future version for a better user experience can be better than launching early with a subpar experience.

“The good part of this is that now widgets can continue to be ‘re-imagined’ for 5.7, and get even more enhancements,” said lead WordPress developer Andrew Ozz in the ticket. “Not sure how many people have tested this for a bit longer but having blocks in the widgets areas (a.k.a. sidebars) opens up many new possibilities and makes a lot of the old, limited widgets obsolete. The ‘widget areas’ become something like ‘specialized posts with more dynamic content,’ letting users (and designers) do a lot of stuff that was either hard or impossible with the old widgets.”

After the letdown of seeing one of my most anticipated features of 5.6 being dropped, it is encouraging to see the positive outlook from community leaders on the project.

“You know, I was really hopeful for it too, and that last-minute call was one I labored over,” said Haden. “When I last looked, it did seem close to ready, but then more focused testing was done and there were some interactions that are a little rough for users. I’m grateful for that because the time to discover painful user experiences is before launch rather than after!”

Despite dropping its second major feature, WordPress 5.6 still has some big highlights that will be shipping in less than two months. The new Twenty Twenty-One theme looks to be a breath of fresh air and will explore block-related features not seen in previous default themes. Haden also pointed out auto-updates for major releases, application passwords support for the REST API, and accessibility improvements as features to look forward to.

WordPress 5.6 Beta 1 is expected to ship today.

Adding New Features To an Old Project

At times, it feels like the Gutenberg project has bitten off more than it can chew. Many of the big feature plans continually miss projections. Between full-site editing, global styles, widgets, nav menus, and much more, it is tough to get hyper-focused on one feature and have it ready to ship. On the other hand, too much focus one way can be to the detriment to other features in the long run. All of these pieces must eventually come together to create a more cohesive whole.

WordPress is also 17 years old. Any new feature could affect legacy features or code. The goal is for block-based widgets is to transition an existing feature to work within a new system without breaking millions of websites in the process. Twenty-one months of work on a single feature shows that it is not an easy problem to solve.

“You are so right about complex engineering problems!” said Haden. “We are now at a point in the history of the project where connecting all of the pieces can have us facing unforeseen complications.”

The project also needs to think about how it can address some of the issues it has faced with not quite getting major features to completion. Is the team stretched too thin to focus on all the parts? Are there areas we can improve to push features forward?

“There will be a retrospective where we can identify what parts of our process can be improved in the future, but I also feel like setting stretch goals is good for any software project,” said Haden. “Many contributors have a sense of urgency around bringing the power of blocks to more spaces in WordPress, which I share, but when it’s time to ship, we have to balance that with our deep commitment to usability.”

One problem that has become increasingly obvious is that front-end editing has become tougher over the years. Currently, widgets and nav menus can be edited in two places in WordPress with wildly different interfaces. Full-site editing stands to add an entirely new interface to the mix.

“I think one of the problems that we’re trying to solve with Gutenberg has always been a more consistent experience for editing elements across the WordPress interface,” said Haden. “No user should have to learn five different workflows to make sure their page looks the way they imagined it when it’s published.”

In the meantime, which may be numbered in years, end-users will likely have these multiple interfaces to deal with — overlap while new features are being developed. This may simply be a necessary growing pain of an aging project, one that is trying to lead the pack of hungry competitors in the CMS space.

“There’s a lot of interest in reducing the number of workflows, and I’m hopeful that we can consolidate down to just one beautiful, intuitive interface,” said Haden.

Are Block-Based Widgets Ready To Land in WordPress 5.6?

Two weeks ago, the Gutenberg team put out an open call for block-based widgets feedback. I had already written a lengthy review of the new system earlier in September but was asked by a member of the team to share my thoughts on the most recent iteration. With the upcoming freeze for WordPress 5.6 Beta 1 just a week away, I figured it would not hurt to do another deep dive.

For reference, my latest testing is against version 9.2.0-alpha-172f589 of the Gutenberg plugin, which was a build from earlier today. Gutenberg development moves fast, but everything should be accurate to that point.

Ultimately, many of the problems I pointed out over a month ago still exist. However, the team has cleaned most of the minor issues, such as pointing the open/close arrows for sidebars (block areas) in the correct direction and making it more consistent with the post-editing screen. The UI is much more polished.

Before I dive into all the problems, I want to answer the question I am proposing. Yes, the block-based widget system will be ready for prime time when WordPress 5.6 lands. It is not there yet, but it is at a point where there is a clear finish line that is reachable in the next two months.

I will ignore the failure of block-based widgets in the customizer, which landed in Gutenberg 8.9 and was removed in 9.1. I will also look past the recent proposal to reconstruct the widgets screen to use the Customize API, at least for now. There is a boatload of problems that block-based widgets present for the customizer, and those problems are insurmountable for WordPress 5.6. Long term, WordPress needs to have a single place for editing widget/block areas. Users will likely have to live with some inconsistencies for a while.

Assuming the team does not try to throw a last-minute Hail Mary and implement full editing of blocks in the customizer this round, it is safe to say that block-based widgets are well on their way toward a successful WordPress 5.6 debut.

The User Experience

Adding a widget to the Widget-editing screen in Gutenberg.
Block-based widgets screen.

As a user, I genuinely enjoy using the new Widgets admin screen. The open-ended, free-form block areas create untold possibilities for designing my WordPress sites. Traditional widgets were limited in scope. Users were buckled down to a handful of core widgets, possibly some plugin widgets, and whatever their theme author offered up. However, with blocks, the pool of choices expands to at least triple the out-of-the-box options (I am not counting embed-type blocks individually). Plus, blocks provide a far more extensive set of design options than a traditional widget.

In comparison, traditional widgets are outdated. Blocks are superior in almost every way. However, there are still problems with this new system.

The biggest issue right now is that end-users can exit the Widgets screen without saving their changes. There is no warning to let them know that all their work is about to be lost in the ether. This is one of those OMGBBQ-level items that need to happen before WordPress 5.6 drops.

One nice-to-have-but-not-necessary feature would be the ability to drag blocks from one block area to another. In the old widgets system, users could move widgets from sidebar to sidebar. The current alternative is to copy a widget, paste it in a new block area, and remove the original.

I am also not a fan of not having an option for the top toolbar, which is available on the post-editing screen. One of the reasons for using this toolbar is because I dislike the default popup toolbar on individual blocks. It is distracting and often gets in the way of my work.

Legacy widgets seem to still be a work in progress. The Legacy Widget block did not work at all for me at times. Then, it magically began to work. However, Gutenberg does now automatically add registered third-party widgets to the block inserter just as if they were blocks.

Inserting a third-party legacy widget into Gutenberg's widget system.
Getting a plugin’s widget to work.

This presented its own problems. The only way I managed to make third-party plugin widgets work was to insert the widget, save, and refresh the widgets screen. At that point, the widgets appeared and became editable.

The Theme Author Experience

One of my biggest concerns for theme authors right now is that there does not seem to be any documentation in the block editor handbook. There is plenty of time to make that happen, but there are things theme authors need to be aware of. Having a centralized location, even while the feature is under development, would help them gear up for the 5.6 release.

Some of these questions, which may be answered in various Make blog posts, should exist on a dedicated documentation page:

  • How can a theme opt out of block-based widgets?
  • What are the hooks to add custom styles for the Widgets screen?
  • Can themes target specific sidebar styles on the Widgets screen?
  • Is it possible to consistently style sections like traditional widgets on the front end?
  • Can themes opt into wide and full-alignment within block areas, which could essentially be used similarly to the post content area?

These are some of the questions I would want to be answered as a former theme author. I am no longer in the thick of the theme design game and presume that those who are would have a larger list of questions.

One less-obvious piece of documentation should center on how to handle fallbacks or default widgets. Traditionally, themes that needed to show a default set of widgets would check if the sidebar has widgets and fall back to using the_widget() to output one or more defaults. While theme authors can still do that, we should start to transition them across the board to the block system.

Should theme authors copy/paste block HTML as a fallback? Would the starter content system be better for this, and can starter widget content handle blocks? What is the recommended method for widget fallbacks in WordPress 5.6?

There is still the ongoing issue of how theme authors should handle the traditional widget and widget title wrapper HTML in the new block paradigm. One patch added since the Gutenberg 9.1 release wraps every top-level block with the widget wrapper. If this lands in the 9.2 release, it will likely make the issue worse.

In the traditional system, both the widget title and content are wrapped within a container together. However, if a user adds a Heading block (widget title) and another block (widget content), each block is wrapped separately with the theme’s widget wrappers. The only way to rectify the situation as it stands is for end-users to add a Group block for each “widget” they want, which would require an extensive amount of re-education for WordPress users. It is not an ideal scenario.

Live and code view of incorrect widget wrapper HTML in Gutenberg.
Each block is wrapped as an individual section.

Instead of attempting to directly “fix” this issue, WordPress should instead do nothing to the output. Blocks and traditional widgets are fundamentally different.

Let theme authors take the reins on this one and explore possibilities. However, give them the tools to do so, such as supporting block patterns.

Addressing the Theme Design Problem With Gutenberg’s New Block-Based Widgets System

I could hardly sleep last night. Once in a blue moon, I have an idea I want to try out. While my day job as a writer means I spend far less time breaking sites through the rigorous trials and errors of building plugins and themes, some problems bug me with WordPress, the sort that keeps me from dozing into restful and peaceful dreams.

Last week, Gutenberg 8.9 dropped the experimental flag from its block-based widgets system. Overall, it was a solid first outing for a feature that should land in WordPress 5.6 this December. However, the largest problem centered on how theme authors would be able to style widgets in traditional fashion. Because actual widgets are being phased out and replaced with blocks, theme authors will no longer have access to the standard widget and widget title classes. This is problematic because there is no predictable way to style all widgets of a particular sidebar to look the same.

The classic example is of the boxed widget design. Many themes, such as the popular Colibri, employ such a design for their sidebars as shown in the following screenshot.

Screenshot of the Colibri WordPress theme with a boxed widget design.
Boxed widget design in right sidebar of Colibri theme.

In its current state, there is no reliable way for theme authors to create such a sidebar design via the block-based widgets system. Because there is no way to exert any sort of control over the structure of whatever content users will drop into a sidebar, it would be easy to look at this situation and think that theme designers are losing control.

Based on a recent GitHub ticket and a related Slack discussion from earlier this week, it does not appear that the Gutenberg development team intends to create parity between the old and new widgets systems, at least as far as theme design is concerned.

It bears repeating. I am a fervent supporter of handing over this type of ultimate control to the user. However, we need to balance that with helping them to make smart choices.

Theme authors must begin thinking about how this impacts the work they do and come up with creative solutions for sidebars, widgets, and other areas that will be affected by full-site editing in the future.

A Potential Solution

That thing that kept me up last night was an idea of combining block patterns, one of my favorite features, with widgets. The trouble was that the block-based widgets system does not currently support block patterns. And, until a quick discussion with Mark Uraine, one of Gutenberg’s designers, on a GitHub ticket, the idea did not seem to even be on the table.

For theme authors, the traditional sidebar and widget system of the past was nothing more than a pattern. WordPress provided theme devs with the ability to set a wrapping HTML element for the entire widget and the widget title. It was a rigid and inflexible system, but it was a reliable standard.

Block-based widgets are the complete opposite. They are essentially a free-for-all where users can drop arbitrary content into a “block area.”

What happens when we combine the structure of patterns with the flexibility of blocks inside of sidebars?

That was the idea that got me out of bed and behind the computer screen early this morning after my restless night. It was such a simple concept. Theme authors could provide a “widget” pattern to their end-users. This would provide users with a choice between what the theme author thinks best and forging their own path — the best of both worlds.

Example of using patterns for block-based widgets.
Simple example of recreating a boxed “widget” pattern.

And, here is where the beauty of the block system really comes in. Theme authors can create any number of patterns. This provides even more options for users.

Regardless of whether the Gutenberg plugin currently supports patterns for the block-based widget system, the idea was simple to test. In a sidebar on the new widgets screen, I merely needed to add a new Group block with the widget class. Then, I added an H3 Heading block with the widget__title class. Those classes may even be unnecessary in the context of patterns unless theme authors want to directly target them. Outside of the custom classes, I added a simple background to the Group block and changed the text color of the Heading. I also inserted an empty paragraph where the user’s custom content would go.

Afterward, it was a simple matter of testing it with various blocks.

Using a block pattern to encapsulate a widget.
Faux block pattern in the widgets block editor.

I would love to know what theme authors and the Gutenberg team think of the idea. I think it has some merit while soothing some of the transitional pains between traditional widgets and block-based widgets.

The biggest issue I see is the discoverability aspect. Will end-users know these “widget/block patterns” exist if theme authors went this route?

How to Easily Hide Widget Title in WordPress

Do you want to hide the title of a WordPress widget in your sidebar or footer?

WordPress widgets make it easy to drag and drop dynamic content into your theme to create unique layouts. However if you need to hide the widget title, then it typically requires coding knowledge of CSS and HTML.

In this article, we’ll show you how to easily hide the widget title in WordPress (without any code).

Hiding widget title in WordPress

Why Hide Widget Title in WordPress?

WordPress displays a default title for widgets, and it also allows you to rename them if you want. Most top WordPress themes will then display this title in the sidebar on your site.

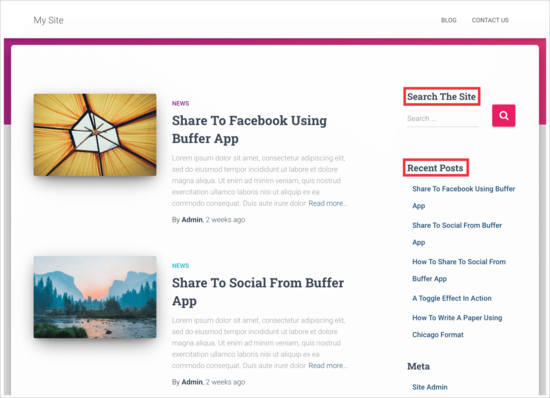
Widgets titles displayed in sidebar

However, sometimes you may not want to display the widget title in the WordPress blog sidebar. By default, there is no built-in option to simply switch off widget titles.

That being said, let’s take a look at how you can easily hide the widget title in the WordPress sidebar.

Hiding Widget Title in WordPress

First, you want to install and activate the Widget Options plugin. For more details, please see our complete guide on how to install a WordPress plugin.

Once the plugin is activated, head over to Appearance » Widgets area in your WordPress admin area. Next, drag and drop a widget to your sidebar or any other widget-ready area on your site.

Drag and drop widget into sidebar

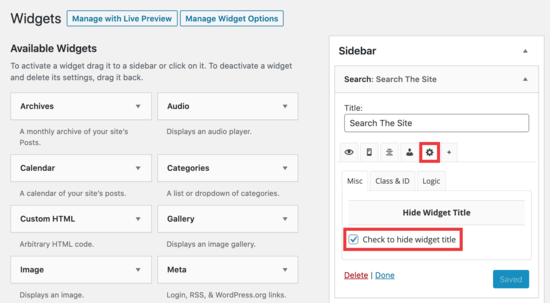
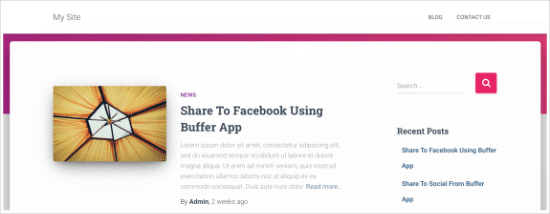
In this example, we’re going to remove the widget title ‘Search The Site’ from our search box in the sidebar.

Sidebar widget view

Simply click the arrow to open the widget and view the options to hide the title.

Hide widget title settings

Make sure you click on the ‘gear’ icon, and then check the box next to ‘Check to hide widget title’ and click the ‘Save’ button.

Now, when you view your site, the WordPress search box will appear without the widget title.

Widget title hidden on site

You can use this plugin to hide any widget title. The plugin also comes with multiple settings to hide or display titles based on page or post types and even screen sizes.

We hope this article helped you learn how to easily hide widget titles in WordPress. You may also want to check out our list of the most useful WordPress widgets for your site, and our comparison of the best drag and drop WordPress page builder plugins.

If you liked this article, then please subscribe to our YouTube Channel for WordPress video tutorials. You can also find us on Twitter and Facebook.

The post How to Easily Hide Widget Title in WordPress appeared first on WPBeginner.

New Block-based Navigation and Widgets Screens Sidelined for WordPress 5.5

The new navigation block and navigation and widget screens that were originally planned for WordPress 5.5 have been pushed back to the next release. These projects are currently available in the Gutenberg plugin experiments screen but are not yet ready to land in core.

Converting the widget-editing areas and updating the widgets UI to use the block editor is a project that has been under development since January 2019. The issue tracking the project and the dedicated project board seemed to have stalled out for the time being, so core editor contributors recommended removing it from the priority features for 5.5.

Similarly, the navigation block and screen have several dozen outstanding issues and discussions that need more time before shipping.

“We’re still missing a few key components: drag and drop in the block and in the sidebar, a couple of PRs that lag and are important for feature parity (#22600#22697) and the ongoing work to support more block types in Navigation,” WordPress contributor Andrei Draganescu said regarding the remaining items necessary to ship the navigation screen.

“I believe we’re in a place where a Gutenberg release after 5.5 will include this new screen, but maybe in the next two weeks some acceleration will occur and prove me wrong.

“I believe that it is wiser that this lands as a part of the plugin first, gets some feedback, and then is shipped into core.”

Despite the navigation and widgets screens getting removed from the 5.5 milestone, this release is set to deliver an impressive array of new features for the block editor, including block patterns, block directory search, a new block inserter panel, expanded design tools, and improvements to block movement capabilities. Beta 1 is expected July 7 and the target date for the official release is August 11.

How to Display Recent Tweets in WordPress (Step by Step)

Do you want to display your recent tweets in WordPress?

Integrating X/Twitter with your WordPress website helps increase user engagement. Your blog visitors can easily discover your tweets, which can also help you get new followers on Twitter.

In this article, we will show you how to display recent tweets in WordPress.

How to Display Recent Tweets in WordPress

Why Display Recent Tweets on Your WordPress Site?

X/Twitter is one of the most popular social media platforms on the market. Displaying recent tweets on your WordPress website can enhance your online presence and engagement in several ways.

For starters, when users visit your website and see your social media feed, they might be intrigued enough to click through to your Twitter account and follow you, increasing your reach.

Plus, tweets can serve as a real-time update about what’s happening on your website or company. This can encourage engagement among your audience, as they can interact with your tweets directly.

Recent tweets can also act as social proof on your WordPress site. You can retweet positive reviews or people recommending your products, helping build trust with subscribers or customers.

With this in mind, let’s look at the different methods of displaying recent tweets on your WordPress website. You can use the quick links below to skip to a specific method:

Method 1: Manually Embed Tweets in the Gutenberg Block Editor (No Plugin)

The first method to display your recent tweets in WordPress is by manually embedding your Twitter profile or timeline on your WordPress page, post, or widget (for classic theme users).

Just like adding a YouTube video, WordPress makes it easy to embed Twitter content like a single tweet or a timeline. Its oEmbed feature can automatically turn a content URL into an embed code when pasted into the block editor.

First, you need to find and copy the URL of the Twitter profile or tweet that you want to embed.

For example, the Twitter profile URL of WPBeginner is https://twitter.com/wpbeginner

Meanwhile, the URL of a single tweet looks like this: https://twitter.com/wpbeginner/status/1604852592827326464

Next, just follow one of the methods below:

Displaying Recent Tweets in a WordPress Post or Page

First, log into your WordPress dashboard and open the block editor for a WordPress post or page.

If you want to create a new post or page, you can do this by going to Posts/Pages » Add New.

Clicking Add New Page in WordPress admin area

Then, simply paste the Twitter profile URL that you copied earlier in the ‘Type / to choose a block’ area.

You can see this highlighted below.

Pasting a Twitter URL to the block editor

Once you’ve done that, the block will immediately turn into a Twitter timeline block showing recent Tweets from that particular account.

In the block settings sidebar, you can choose to resize the block for smaller devices to make it more responsive for mobile viewing.

Additionally, feel free to add more blocks to the page or post to encourage users to follow your Twitter account.

Once done, simply click ‘Update’ or ‘Publish’ to make the changes live.

Publishing a page with a Twitter Feed

This method adds your recent tweets inside a box with a vertical slider. The box includes the 20 most recent tweets and the ‘View more on Twitter’ button at the end.

Here is what our Twitter timeline looks like:

An example of a page with a Twitter Feed made with the built-in Twitter block

If you use a WordPress block theme, then you can also use this same method to embed a Twitter feed in the Full Site Editor and display recent tweets in a pattern or template part.

You can learn more about this in our complete guide to WordPress Full Site Editing.

Displaying Recent Tweets in a WordPress Widget Area

If you use a classic WordPress theme and want to display your latest tweets in a widget area (like a sidebar), then just follow these steps.

First, go to Appearance » Widgets. Then, click the ‘+ Add New’ button in your selected widget area and select the Twitter widget.

Adding a Twitter widget in WordPress

From here, just paste the Twitter account or post URL in the appropriate field.

Then, click ‘Embed.’

Embedding a Twitter profile in a WordPress widget area

You can then update your widgets and preview the Tweets widget live on your site.

Here’s how the timeline appears in our WordPress sidebar:

Example of a Twitter widget in a WordPress sidebar

The second method to add recent tweets to your WordPress site is with a Twitter plugin. The reason why we recommend this method is that it offers a lot more customization options than the previous method, allowing you to adjust the feed to your page design.

For this, we will use Smash Balloon Custom Twitter Feeds. This plugin helps to create beautiful social feeds of different types. You can show tweets based on hashtags, search terms, mentions, timelines, and more.

Note: While there is a free Custom Twitter Feeds plugin, this article will use the Custom Twitter Feeds Pro version. It comes with much more advanced features like timeline filtering and combining multiple Twitter feeds into one.

You will first need to install and activate the WordPress plugin. Once it’s active, go to your WordPress admin area, navigate to Twitter Feed » Settings, and paste your license key into the appropriate field.

After that, you need to activate the license and click ‘Save Changes.’

Activating Smash Balloon's Custom Twitter Feeds Pro license key

Now, just go to Twitter Feed » All Feeds.

Then, click the ‘+ Add New’ button.

Adding a new Twitter Feed with Smash Balloon

If this is your first time adding a Twitter feed using Smash Balloon, then you will be asked to verify your email address.

Just go ahead and click the ‘Connect’ button to do that and follow the on-screen instructions.

Connecting the user's email address with Smash Balloon

Once you are done, you will return to the Custom Twitter Feeds plugin page and be asked to select a feed type.

With Custom Twitter Feeds, you can choose to embed a user timeline feed, a hashtag feed, or a search feed. For the sake of this example, we will use the first option. Once you’ve made your choice, just click ‘Next.’

Creating a User Timeline Twitter Feed with Smash Balloon

On the next screen, you can type in the Twitter handle you want to embed on your WordPress website.

After that, click ‘Next’ again.

Choosing a Twitter Feed source in Smash Balloon

Let’s now pick a Twitter feed template. There are 7 to choose from, and you can always change it later if you don’t think it suits your page design.

After you have made your choice, go ahead and click ‘Next.’

Choosing a Smash Balloon Twitter Feed template

At this stage, you should arrive at the Twitter feed editing interface. You will see a live preview on the right side of the page and a left-hand panel where you can configure how the feed looks.

There are two tabs: ‘Customize’ and ‘Settings.’

The Twitter Feed editing interface in Smash Balloon

Let’s start with Customize. If you choose the ‘Feed Layout’ option, then you can pick between the available feed layouts (like list, masonry, or carousel) set the number of tweets to display, tweak the feed height, and so on.

Note: Because of API limitations, Smash Balloon can only display 1 to 30 tweets at first, but more will accumulate over time.

Once you are done with those settings, simply click the ‘Customize’ button at the top to go back to the main menu.

Customizing the Twitter Feed layout in Smash Balloon

Another thing you can do is enable the Load More button, which will appear below your displayed tweets. It’s a handy feature if you have tons of tweets but cannot show them all on the same page.

Just click the ‘Load More Button’ option, followed by the ‘Enable’ button. After that, you can customize the button’s appearance.

Customizing the Twitter Feed Load More Button in Smash Balloon

If you switch to the ‘Settings’ tab, then you can see options to add more feed sources, apply tweet filters, and use advanced features (like adding custom CSS).

You can also click the ‘Clear Feed Cache’ button to remove the previous feed cache. The next time the plugin needs to display your Twitter feed, it will have to retrieve the latest tweets from X/Twitter’s servers instead of using the old cached data.

Customizing the Twitter Feed settings in Smash Balloon

Let’s try adding filters to your tweets by clicking the ‘Filters’ option.

Here, you can choose to include replies and retweets, show tweets based on which words are allowed or blocked, or hide specific tweets.

Customizing the filters to display the Twitter Feed in Smash Balloon

Once you are happy with how the Twitter Feed looks, you can click the ‘Save’ button.

To add the Twitter Feed to your page or widget area, just click on the ‘Embed’ button at the top-right corner.

After that, a popup will appear, showing you how to display the Twitter Feed: with a shortcode, a block, or a widget.

The Twitter Embed Feed popup in Smash Balloon

Regardless of the method you choose, the first thing you need to do is copy the shortcode because you will need it.

Then, if you want to embed the Twitter feed on a page, click the ‘+ Add to a Page’ button.

Once you do that, you can select an existing page from your WordPress website and click ‘Add.’

Selecting a page to embed the Twitter Feed in using Smash Balloon

You will then be directed to the WordPress block editor of your chosen page.

Click the ‘+’ add block button anywhere on the page and select the Twitter Feed block.

Selecting the Smash Balloon Twitter Feed block in the block editor

Now, the Twitter Feed you created earlier may not show up right away.

If this happens to you, just paste the shortcode into the ‘Shortcode Settings’ field in the block settings sidebar.

After that, click ‘Apply Changes.’

Inserting a shortcode in the Smash Balloon Twitter Feed block

Once done, you can go ahead and click ‘Update’ to make the changes live.

Here is what the Twitter Feed looks like on our demo site:

An example of the Twitter Feed made with Smash Balloon

If you want to display your Twitter Feed in a widget area, then just click the ‘+ Add to a Widget’ option. You will be redirected to the widget editor next.

Then, simply find and select the ‘Twitter Feed’ widget.

Adding the Twitter Feed Smash Balloon widget in the widget editor

Similar to the previous method, just paste the shortcode in the block settings sidebar and click ‘Apply Changes.’

You will then see your newly created Twitter Feed in the live preview.

Inserting the Smash Balloon Twitter Feed shortcode in the widget editor

Finally, click ‘Update’ to make the changes final.

You can then visit your live website to see what the feed looks like:

Example of the Twitter Feed widget made with Smash Balloon

Method 3: Display Latest Tweets in WordPress With Twitter Publish (No Plugin)

The last method lets you add recent Twitter posts using the Twitter Publish feature.

Twitter Publish lets you easily create the embed code for various types of Twitter content, including a tweet, a video, a timeline, or a button (like a Follow or Share button).

This method allows you to customize how the embedded element looks before adding it to your WordPress blog or website. It’s not as powerful as the second method, but it’s worth mentioning because it’s free.

For this tutorial, we will show you how to use Twitter Publish to embed a timeline. First, you need to visit the Twitter Publish website and then paste your Twitter profile URL into the ‘What would you like to embed?’ box.

Once that’s done, click on the arrow icon.

Inserting a Twitter URL in the Twitter Publish website

After that, you will be asked to choose a display option: Embedded Timeline or X/Twitter Buttons.

You should choose the ‘Embedded Timeline’ option, as you want to show your Twitter timeline with recent tweets.

Twitter Publish's display options

Upon selecting the display option, it will instantly create the embed code for your recent tweets. You can go ahead and click ‘Copy Code’ to embed the custom HTML code right away.

Alternatively, click ‘Set customization options’ to customize how the embedded timeline looks.

Customizing the Twitter Feed made with Twitter Publish

Here, you can customize the timeline’s height and width, choose a light or dark mode, and enable a language translation for the tweets if needed.

You can see what the embedded element will look like below the settings. Once done, just click ‘Update.’

Clicking Update in the Twitter Publish website

The embed code will now include the customization settings you have chosen for the timeline.

Simply click ‘Copy Code’ to continue.

Copying a Twitter Publish embed code

Now, go back to your WordPress dashboard and open the block editor for a page, post, or widget area.

After that, just click the ‘+’ add block button anywhere in the editor and select the Custom HTML widget or block.

Selecting the Custom HTML block in the block editor

Now, go ahead and paste the embed code from earlier in the field.

Once done, you can click the ‘Preview’ button to see what the feed looks like.

Pasting the Twitter Publish HTML code in the block editor

After that, feel free to add more elements to the page, post, or widget area. Then, just update or publish it.

Here’s what our demo website looks like:

An example of Twitter Feed made with the Twitter Publish website

Bonus Tip: Add More Social Media Feeds to WordPress

Do you run other social media platforms for your brand or business? If so, then you might want to display other social feeds besides Twitter on your website.

By displaying different social feeds on your WordPress site, you can let visitors know what platforms they can follow you on, increasing your follower count.

Showing off your social feeds also has a key advantage over displaying the usual social icon buttons. It can show visitors what content they would miss by not following you on your social networks, creating a ‘fear of missing out.’

With Smash Balloon, you can display and customize all kinds of social media feeds on your WordPress website. This way, all of the feeds look good with the theme you are using.

Customize TikTok feed layout

Just check out the tutorials below on how to display different social feeds in WordPress:

We hope this article helped you to learn how to show recent tweets in WordPress. You may also want to see our ultimate guide to WordPress SEO (search engine optimization) or our expert pick of the best WordPress social media plugins.

If you liked this article, then please subscribe to our YouTube Channel for WordPress video tutorials. You can also find us on Twitter and Facebook.

The post How to Display Recent Tweets in WordPress (Step by Step) first appeared on WPBeginner.

Gutenberg Team Publishes RFC Document on Widget-Block Interfaces

The Gutenberg team has published a Blocks in Widget Areas RFC (request for comments) document, detailing a technical approach that brings blocks to the wp-admin/widgets.php screen and the Customizer. This is one of the goals on the roadmap Matt Mullenweg outlined in his 9 Projects for 2019 post.
Based on the requirements outlined in the beginning of the document, it looks like the Gutenberg team is working to make the transition from widgets to blocks as seamless as possible:

  • Editing blocks in wp-admin/widgets.php and the wp-admin/customize.php should use the same block editor that wp-admin/post-new.php uses.
  • The block editor should read and update blocks in widget-editing areas via the REST API.
  • Upgrading WordPress must not affect the appearance of the user’s site, or any of their existing widgets.
  • Existing Core and third-party widgets must remain functional in the new block-based interface.
  • Backwards compatibility must be maintained. That is, themes and plugins that use public widget APIs must remain functional.
  • During a transition period, it should be possible to disable the block-based interface and return to the classic widget-editing interface.

The requirements for backwards compatibility are a tall order but will make it much easier for users to trust WordPress during this transition. Content will not be forced into the new interface and users will retain the option to use the classic widget-editing screen if they prefer. The team has not yet announced a date for when widgets will be officially deprecated.
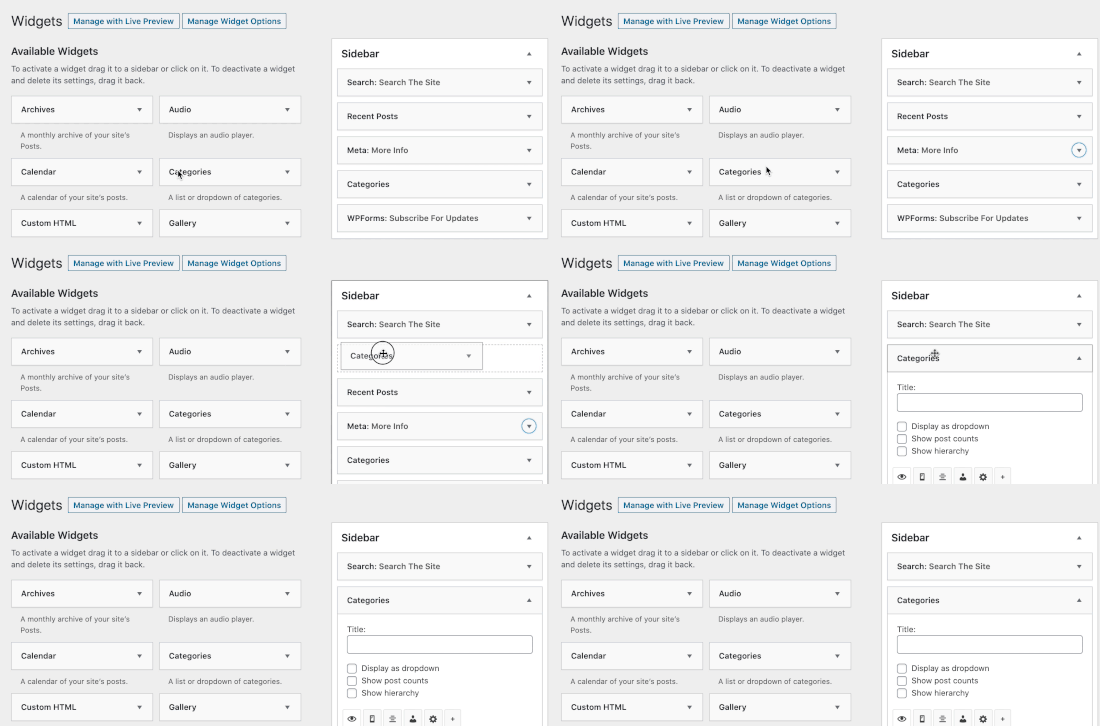
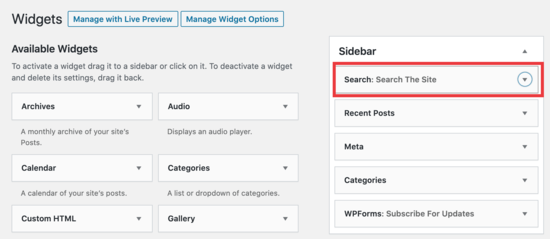
Gutenberg version 5.4 was released last week with vertical alignment support for the columns block, a playsInline option in the video block, and a number of other minor enhancements. It also contains nearly two dozen bug fixes that will be rolled into the next beta of WordPress 5.2.

Gutenberg phase 2 technical lead Riad Bengella also confirmed in comments on the release post that the long-awaited section/container block is coming in the next release of the plugin. This will be an important milestone on the journey to full site editing with the block interface.

Gutenberg Phase 2 to Update Core Widgets to Blocks, Classic Widget in Development

Gutenberg phase 2 development is underway and one of the first orders of business is porting all existing core widgets to blocks. This task is one of the nine projects that Matt Mullenweg outlined for 2019, along with upgrading the widgets-editing areas in wp-admin/widgets.php and adding support for blocks in the Customizer.

Contributors on phase 2 are also developing a Classic Widget, which would function as a sort of “legacy widget block” for third-party widgets that haven’t yet been converted to blocks. There may be many instances where plugin developers have not updated their widgets for Gutenberg and in these cases their plugins would be unusable in the new interface without the option of a Classic Widget. This block is still in the design stage.

The widgets.php admin page will need to be completely reimagined as part of this process. Mark Uraine, a designer who works at Automattic, created some mockups to kick off the discussion about what this screen might look like.

Widgets as blocks

These mockups are just explorations of where widgets may be headed next, and they do not take into account everything that will be required of this screen.

Nick Halsey, one of the maintainers for WordPress’ Customize component recommended abandoning this screen altogether in favor of showing widget block areas in the Customizer:

The widgets admin screen has a fundamental disconnect with the way that widget areas actually work – with different areas showing in different parts of the screen and potentially on different parts of the site. It will be very difficult to clearly reflect the frontend page structure on this screen in a way that users will be able to understand. Experimenting with contextual approaches to this experience in the customizer offers numerous opportunities for this fundamental problem to be solved. Starting with the visible edit shortcuts that are already in core, revamped widgets could be edited directly on the frontend (of the customize preview) or in an overlay that is more directly related to the display on a particular screen. The ability to navigate to different parts of the site within the customize preview solves a problem that this screen will never be able to address.

Getting blocks to work in the Customizer is also part of phase 2, but conversation on the ticket related to wp-admin/widgets.php indicates the team is not going to abandon this screen just yet.

“While this screen will eventually be deprecated in the future, especially as more of the site is built in Gutenberg, it’s a necessary “baby step” to get us all there together,” Uraine said. “Maybe the best thing is to keep the existing layout, but just allow the use of all blocks within the accordion content areas? This will keep our resources and investment minimal on this particular piece with just a few suggested tweaks to the mockup in the initial post. It will also allow us to move to the Customizer more quickly.”

Gutenberg accessibility contributor Andrea Fercia encouraged contributors to address accessibility before creating visual mockups by designing the information architecture first. He encouraged them to organize the required information and controls while thinking about how someone might navigate them in a linear way.

“The customizer is not fully accessible,” Fercia said. “The admin widgets screen is the only place where persons with accessibility needs have a chance to manage widgets without having to face big accessibility barriers.”

Discussion on the future of the widget management screen continues in the ticket and contributors are looking to get more input during this exploration stage. There’s also a project board where anyone can share a blog post with their own explorations.

Porting widgets to blocks has its own project board if you want to follow along or jump in on an issue. Most of the core blocks are already finished and a handful are still in progress.

Updating the widgets management page and bringing blocks into the Customizer is a major overhaul but will further unify WordPress’ interface for editing and previewing content. Widgets have served WordPress well over the years, making it easy for users to customize their websites without having to know how to code. The feature has also survived many evolutions, eventually making its way into the Customizer five years ago in WordPress 3.9. One of the limitations with widgets is that they can only be used in “widgetized” areas. Transforming widgets into blocks removes that limitation and makes it possible to use widgets in posts and pages as well.