How to Create a Truly Anonymous Website (Step by Step)

Do you want to create an anonymous website?

Some users may need to create a website anonymously to protect their privacy and additional security.

In this step-by-step guide, we’ll show you how to easily create a truly anonymous website. We’ll also talk about protecting your identity online.

Creating an anonymous website

Why Create an Anonymous Website?

An anonymous website conceals the identity of who runs or owns a particular website.

Some users may want to remain anonymous for a number of reasons.

  • Whistleblowers trying to expose corruption.
  • Journalists under authoritarian regimes
  • Citizen watchdog groups
  • Or users who just want to remain anonymous for privacy reasons

Creating an anonymous website makes it difficult to find out who created and runs the website.

Important: Please keep in mind that there is no guaranteed way to remain completely anonymous. While you can make it difficult to trace, there is still a chance that it can be tracked.

What Do You Need to Create an Anonymous Website?

You’ll need the following items to create a basic anonymous website.

  • Anonymously purchased domain name and hosting
  • A separate encrypted email account
  • A secure and reliable VPN service

Now, let us explain why you’ll need those things.

First, you will need to create a new separate email account. You’ll be using that account to manage your website.

To remain anonymous we recommend creating an email account using privacy-focused email services like Proton Mail.

Next, you will need to hide is your IP address. The easiest way to do that is by using a VPN service. We recommend using IPVanish.

IPVanish

Once you have created an email account and turned on the VPN on your computer, you can go ahead and buy a hosting plan.

Normally, you can just go to any of the top hosting companies and start a website in a few minutes.

However, many of these companies require credit card information. This means your personal information will be stored and can be traced back to you.

That’s why we recommend using Hostinger.

Currently, they are giving WPBeginner users a generous discount and a FREE domain name. Basically, you can get started for $2.78 per month.

→ Click Here to Claim This Exclusive Hostinger Deal ←

Hostinger is one of the best WordPress hosting companies on the market and allows you to pay using Bitcoin and other cryptocurrencies to keep your purchase as anonymous as possible.

Buying Hosting and Domain Name Anonymously

First, you need to make sure you have VPN turned on whenever you are working on your anonymous website.

After that, you need to visit the Hostinger website and click on the ‘Start Now’ button.

Hostinger start now

This will bring you to the pricing and plans selection page.

We recommend choosing a 48-month plan which gives you the best discount. Plus, you wouldn’t need to worry about future payments for a long time.

Choose your hosting plan

Click to select the plan you want to buy, and then go to the payment section.

From here, first, you need to provide the anonymous email account you created earlier.

After that, you need to select ‘Coingate’ as the payment method and then click on the ‘Submit Secure Payment’ button.

Choose payment method

This will take you to the payment wizard.

First, you need to select a cryptocurrency that you want to pay with and click Continue.

Choose cryptocurrency

Next, you need to enter your anonymous email address and click on the ‘Continue’ button.

Note that you don’t need to create a Coingate account to pay using this method.

Provide email address

On the next screen, you’ll see the QR code to make the payment through your Bitcoin wallet app.

You can also pay manually, by sending the amount to the Bitcoin wallet address mentioned on the screen.

Pay with BitCoin

Upon completion of the transaction, you will be redirected back to the Hostinger website.

You will receive an email from Hostinger with a link to log in to the hosting control panel.

Once you log in to your hosting account control panel, you’ll see a notification to claim your free domain name.

Claim free domain

During domain registration, ICANN requires website owners to provide their personal information such as name, address, email, and phone number.

You need to provide at least the email address you created earlier so that you can be reached for verification.

During the registration, you may also see an option to turn on Domain Privacy.

This feature hides any information you provide during domain registration from WHOIS searches. Anyone who checks will see Hostinger’s proxy info.

After domain registration, you may receive an email to verify your registration.

Installing WordPress to Make Your Anonymous Website

Now that you have completed the domain name and hosting setup, it is time to install WordPress.

Hostinger allows you to easily create a WordPress website. Click on the ‘Manage’ button next to your URL under the hosting panel.

Manage hosting

This will bring you to your back-end dashboard.

From here, you need to visit the Website » Auto Installer page and then click on the ‘Select’ button under WordPress.

Hostinger auto installer

This will launch the auto-installer wizard.

Simply follow the on-screen instructions to finish the setup.

After that, you will see your new website options under the Hostinger control panel.

From here, first, you need to click on the ‘Install’ button next to the ‘SSL Certificate’ option.

Turn on SSL

After that, you need to click on the toggle next to ‘Force HTTPs’ option.

SSL (Secure Sockets Layer) allows your website to use secure HTTPs. Using it improves your WordPress security by encrypting all traffic to and from your website.

Having an SSL certificate is also a factor in ranking well in search engines and a part of a solid website SEO plan.

Finally, click on the ‘Edit Website’ button to launch and start editing your new WordPress website.

Edit website

Working on Your WordPress Website Anonymously

By design, WordPress is privacy-conscious software to the extent that you can choose what information you want to share on your website.

First, you may want to visit the Users » Profile page and choose a pseudonym for the default admin or author of your website.

Change name

Don’t forget to click on the ‘Update Profile’ button to save your changes.

Next, you need to decide whether you want to allow users to comment on posts and pages across your website.

Simply go to Settings » Discussion page to configure comments. Uncheck all options under the ‘Default Post Settings’ section to disable comments, trackbacks, and pingbacks.

Disable comments

Don’t forget to click on the ‘Save Changes’ button to store your settings.

Adding Content to Your WordPress Site

WordPress comes with two default content types called posts and pages. Posts are part of a blog and are displayed in reverse chronological order, meaning that newer posts appear first.

Pages are standalone pages that are not part of a blog. They are used to create a website structure and layout. See our list of must-have WordPress pages for all types of websites.

To add a page, simply visit the Pages » Add New to create one.

WordPress block editor

WordPress comes with a powerful editor called the Block Editor. See our complete WordPress block editor tutorial to familiarize yourself with the interface.

Similarly, to create a post you will need to visit Posts » Add New page.

Choosing a Theme (Template) For Your Website

WordPress comes with a powerful templating engine that allows you to change the appearance of your website by installing themes.

There are thousands of free and paid WordPress themes available. You can choose one that looks closer to what you have in mind for your website.

WordPress Theme Stats

You can look for themes under the Appearance » Themes page. It will show you a bunch of default themes that come with your WordPress install.

For more themes, click on the ‘Add New’ button at the top to find more free themes.

Add new theme

For premium or paid WordPress themes, you can try trusted WordPress theme shops like SeedProd, Thrive Themes, Astra, Elegant Themes, and more.

However, there is such an abundance of WordPress themes that it may become difficult for beginners to decide which theme they want to use.

We recommend choosing a minimalist design with plenty of white space. This provides you plenty of room to customize the theme and make it your own.

For more details, see our guide on how to choose the perfect theme for your website.

Install Privacy Friendly WordPress Plugins

Plugins are like apps for your WordPress website. They allow you to add new features and extend the functionality of WordPress.

There are more than 60,000 free plugins available in the WordPress.org plugin directory alone. Plus, there are premium WordPress plugins sold by third-party developers with priority support and guaranteed updates.

WordPress plugins

However, you also need to consider which plugins you need to use to keep your WordPress website secure, private, and anonymous.

Following are our top picks for the best WordPress plugins to install on your anonymous website.

  • WPForms – It is the best WordPress contact form plugin and allows you to easily create forms for your website.
  • All in One SEO for WordPress – It is the best WordPress SEO plugin on the market and helps your anonymous website get more traffic from search engines.
  • SeedProd – It is a powerful WordPress page builder that allows you to use a drag-and-drop interface to create any type of page for your website.
  • OptinMonster – It is a conversion optimization software, which helps you convert website visitors into email subscribers and customers.
  • MonsterInsights – The best WordPress Google Analytics plugin which helps you see where your visitors and coming from and what they see on your website.

For more plugin recommendations, see our full list of essential WordPress plugins for any kind of website.

FAQs About Running an Anonymous Website

Following are some of the most commonly asked questions about creating an anonymous website.

1. Is it possible to create a fully anonymous website?

Yes, it is possible to create a fully anonymous website. However, you’ll need to be very vigilant about it. Each internet activity creates an information trail leading back to the person who initiated the activity. This trail can be traced by hackers, government agencies, and ISPs. As an anonymous website owner, it will be your job to anonymize all activities.

You can do this by minimizing the activities around your website and using a VPN to hide your IP address. Be careful about any social interactions as they may reveal personally identifiable information.

2. What is anonymous offshore hosting?

Anonymous offshore hosting is a website hosting service that allows users to purchase hosting and domain name without providing real name or credit card information.

Some of these lesser-known companies host their servers in countries with stricter privacy laws. These companies also promise to not store user logs or share them with third-country agencies.

However, these anonymous offshore hosting companies often have very bad customer service and outdated technology.

3. Can a website owner be traced?

Yes, a website owner can be traced even if they are trying to remain anonymous. However, an anonymous website owner can use privacy tools to make it harder to be traced.

Even then if someone is determined to figure out and has the technology, tools, and resources, then they may be able to find out who is running an anonymous website.

4. Can I buy a domain name anonymously?

Yes, you can buy a domain name anonymously from a domain name registrar that accepts cryptocurrencies as a payment method.

Hostinger, also allows you to register additional domain names using cryptocurrencies. During the registration, you can use a separate anonymous email account as the contact address for your domain name.

We hope this article helped you learn how to create a truly anonymous website. You may also want to see our guide on how to create a private blog or take a look at our complete WordPress security guide to keep your anonymous website secure.

If you liked this article, then please subscribe to our YouTube Channel for WordPress video tutorials. You can also find us on Twitter and Facebook.

The post How to Create a Truly Anonymous Website (Step by Step) first appeared on WPBeginner.

How to Find Out Who is Hosting a Certain Website (2 Ways)

Have you ever wanted to know which web hosting service any website is using?

Recently, a user asked us how to find who is hosting their website. It is a common question asked by beginners who hired someone to set up their website initially.

You might also want to find out who is hosting your competitor’s website. In this article, we’re going to show you how to find out who is hosting a certain website (using two methods).

Finding out who is hosting a certain website

Why Find Out Who is Hosting a Website?

All websites on the internet need web hosting. This is where all the files for a website are stored.

Website hosting is different than a domain name. A domain name is the address of a website, e.g. wpbeginner.com.

Finding out who is hosting a website is not that difficult because this information is publicly available.

There are several scenarios when you may need to find out the website hosting service behind a website.

  • A WordPress developer built a website for you. They forgot to tell you who the web host is, or you lost the details.
  • You set up your WordPress website a long time ago. You can’t remember who is hosting it.
  • You’ve seen a website that is fast and performs well. You want to know who the host is so you can use their services too.
  • Another website is stealing your content, and you want to send a DMCA takedown notice to their host.

There are multiple ways to find out who is hosting a website. We’ll show you the two easiest ways to quickly find out which hosting company is used by a website.

Method 1. Use the WPBeginner Theme Detector Tool

Our WordPress Theme Detector tool is a great way to detect what WordPress theme a site is using. It also tells you who is hosting a website.

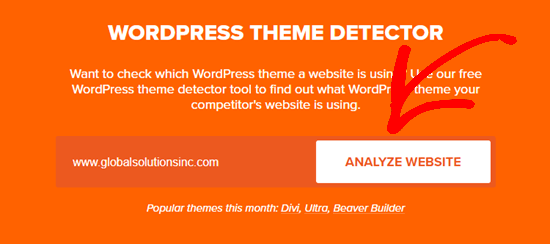
To use it, simply go to the WordPress Theme Detector Tool page and type in the URL (domain name) of the site:

Type in the name of the website you want to analyze

Click on the ‘Analyze Website’ button to continue.

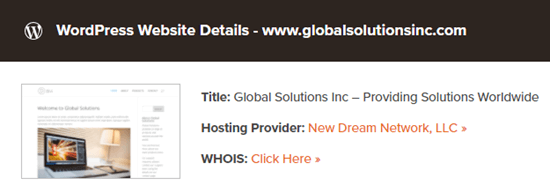
In just a couple of seconds, you will see details about the website. This includes the name of the hosting provider:

The theme detector results, showing the web host for a website

Here are some names you may see coming up:

  • Unified Layer: EIG (Endurance International Group) hosts these sites. EIG is the company behind Bluehost and HostGator. They also own several other smaller web hosting brands.
  • New Dream Network, LLC: DreamHost
  • Media Temple: Media Temple is a web hosting company owned by GoDaddy

In some cases, the theme detector may not be able to tell you the host. For instance, when a website is using a CDN service or a website firewall.

These services route all website traffic through their own servers which means all hosting detector tools will show them as the hosting provider.

One popular CDN service is Cloudflare. They offer a free CDN service which is used by many websites.

You may also see Sucuri, which is a website security and firewall service with their own CDN servers.

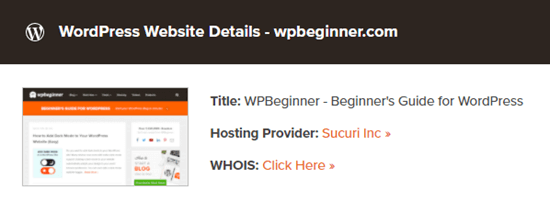
For instance, If you look up wpbeginner.com using the theme detector tool, then it will show Sucuri as the hosting provider.

The theme detector tool lists Sucuri as the host for WPBeginner

We do use Sucuri for our firewall, but WPBeginner is hosted by SiteGround.

If the theme detector isn’t giving you a clear answer, then the second method in this guide can help. It will show you how to dig deeper to find the real hosting company behind a website.

Method #2: Using WHOIS Tools to Find Who is Hosting a Website

Another way to find out a website’s host is to look at their WHOIS information. WHOIS is like a public directory. It lets you look up ‘who is’ responsible for a website.

What is Whois Information?

Most domain names on the internet are managed by a global organization called ICANN. They keep a public directory of all website data which also includes information about where a website may be hosted.

This is publicly available information, and there are many tools you can use to lookup whois information on any website on the internet.

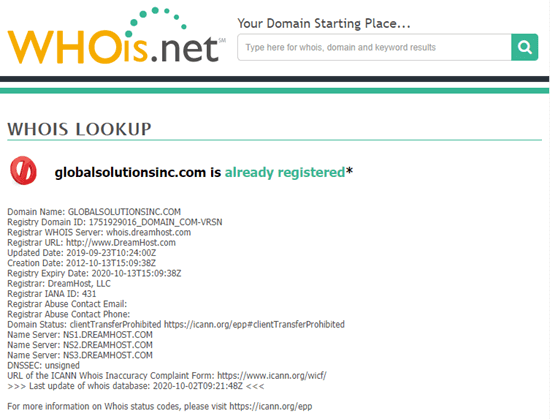
First, you need to go to WHOis.net. Then, simply type in the URL of the website to look it up. You will see a list of information, starting with the domain name:

Looking up website details on whois.net

You just need to look for a ‘Name Server’ entry. This lets you know who is hosting the site:

Examining the nameservers listed in the whois.net data

In this case, the host is Dreamhost. To find out what web host the nameserver relates to, simply search for the nameserver on Google.

Again, you may not always be able to find out the host information. The nameservers may be set for a CDN instead, such as Cloudflare.

Other Ways to Find a Website’s Host

These methods are a little more time-consuming. However, they are worth trying if you are unable to find the host using the above quick methods.

For your own website, you could check your billing records. You have likely been billed for the hosting.

You could also contact whoever set up your website. If you aren’t able to contact them, then check through any information they have sent you in the past.

Finding out who hosts someone else’s website can be harder.

First, you could search the website for information about the web host. This might be on the About page or in the footer. For instance, the WPBeginner footer shows that our site is hosted by SiteGround:

WPBeginner hosting details shown in the footer

If you still can’t find any information, then you could contact the website owner or editor.

You will normally find a contact form on most websites that you can use to reach out. Explain that you like their website and that you wondered who is hosting it.

We hope this article helped you learn how to find out who is hosting a certain website. If you need help finding a great hosting service, then check out our guide on how to choose the best WordPress hosting service, and our comparison of the best WooCommerce hosting companies.

If you liked this article, then please subscribe to our YouTube Channel for WordPress video tutorials. You can also find us on Twitter and Facebook.

The post How to Find Out Who is Hosting a Certain Website (2 Ways) appeared first on WPBeginner.

How to Host a Website (Simple Guide for Beginners) in 2019

Do you want to learn how to host a website? Self-hosted website builders like WordPress offer you full freedom to build any kind of website.

The challenge is that most beginners don’t know the best way to host a website. Many even believe that it requires special technical skills to host their own websites.

That’s simply not true.

If you choose the right approach, then you can easily host your own website within just a few minutes. In most cases, it is just as easy as creating a facebook account.

In this beginner’s guide, we’ll show you the exact steps on how to host a website without learning any technical skills.

We will also explain how it all works behind the scenes. This would help you gain a basic understanding of different ways to host a website.

Ready? Let’s get started.
How to host a website

Here is what you’ll learn in this guide.

What Does it Mean to Host a Website?

Hosting a website means that you put your website files on a special computer called server. This computer makes your website files publicly accessible on the internet, so anyone can visit it.

In order for other people around the world to see the website, these special computers have a particular set of software installed. This software is called a web server.

A web server’s basic job is to receive incoming requests and respond by sending the requested page to the user’s browser.

Hosting a website

Now all of this may sound like bunch of technical jargon, and it is.

However, you don’t need to learn how to do all these things in order to host your website. Luckily, there are thousands of companies that offer this as a service (at very low cost).

All websites on the internet use a web hosting company to host their websites. Even tech giants like Netflix (hosted on Amazon) and PayPal (hosted by Google Cloud hosting) use third-party service providers for their hosting.

There are only a handful of companies like Google, Microsoft, and Amazon that completely host all their services on their own platforms.

They can do this because they have the technical and financial resources to take on such a huge task. All other businesses (including us) use a web hosting company to host their website.

What Do You Need to Host a Website

You will need the following two things to host a website.

  • Web hosting service provider
  • Domain name

Web hosting service providers offer you ready-to-use web servers to host your website. They take care of all the technical stuff and provide website owners with easy to use tools to manage their hosting.

Now, how do users reach your self-hosted website? This is where domain names come in.

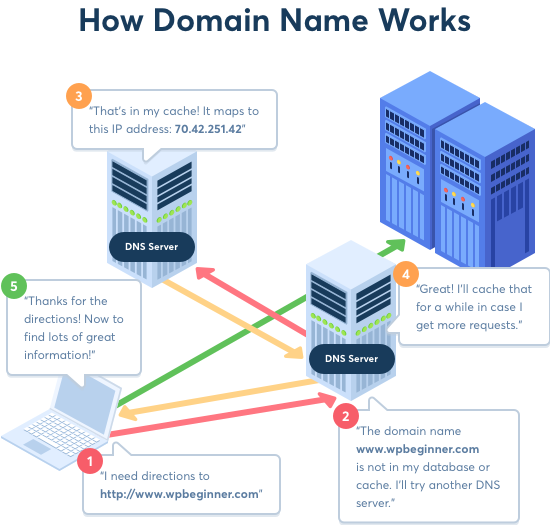
A domain name is the address of your website that people type in the browser to visit your website. For example, wpbeginner.com will bring you to this website.

Basically, a domain name is a human-friendly way to connect user’s browsers to the website server associated with that domain name. To learn more, see our guide on what is a domain name and how do domains work.
how domain names work

You can purchase a domain name from one of these top domain registrars. These are companies licensed to sell domain name registrations.

To understand the relationship between hosting and domains, see our guide on the difference between web hosting and domain name.

Note: later in this article, we will show you how to get a domain name for free.

But first, let’s take a look at different types of web hosting plans and evaluate which one would be the right fit to host your website.

Types of Website Hosting Services

Not all websites are the same. Some are smaller and have low traffic while others are larger with more content and visitors.

A smaller website requires fewer resources. On the other hand, a larger and more popular website will need more resources to run efficiently.

Website hosting companies provide different types of hosting offers designed to address specific website needs. Here are some of the most common hosting services.

1. Shared Hosting

A shared hosting service is suitable for small websites, blogs, and small businesses who are just starting out.

They are able to keep their costs down by allowing multiple websites to share the same server resources. This makes hosting your website affordable.

Pricing: Starting from 2.75 per month to $7.99 per month

Suitable for: Starting a new blog, small business website

Our recommended shared hosting provider: Bluehost

To learn more see our guide on the truth about best shared web hosting.

2. VPS Hosting

VPS hosting (Virtual Private Server hosting) is still a shared hosting environment. However, it offers a flexible set of resources to handle large traffic spikes.

You get a partitioned of private server for your website that you can manage from your hosting control panel. This gives you the best of both worlds, the low cost of shared hosting with the flexibility of dedicated resources.

Pricing: Starting from $29.99 / month

Suitable for: Medium-sized businesses, popular blogs, and eCommerce stores.

Our recommended VPS hosting company: HostGator

To learn more, see our article about when you need VPS hosting for your site.

3. Managed WordPress Hosting

Managed WordPress hosting is a specialized hosting service made specifically for WordPress. It is like a concierge service for your WordPress website.

On a managed hosting platform, the hosting company takes care of updates, backups, and caching of your website. This allows you to focus on creating content and growing your business.

Pricing: Starting from $35.00 per month

Suitable for: Popular blogs, business websites, membership websites

Our recommended managed WordPress hosting company: WP Engine

For more details, see our article explaining when do you really need a managed WordPress hosting.

4. Dedicated Hosting

A dedicated server hosting gives you the entire server dedicated to your own website. You get all the resources of the server, advanced tools for server management, ability to install your own software and even your own operating system.

You’ll be managing your own server which may require some technical skills. It is an advanced option for larger websites that need high-performance to tackle higher traffic volume.

Pricing: Starting from $79.99 month

Suitable for: Enterprise level businesses, hugely popular websites, eCommerce stores

Our recommended Dedicated hosting company: SiteGround or HostGator

Note: We use HostGator custom dedicated servers to host the WPBeginner website.

Choosing The Right Plan to Host a Website

As you can see, all different hosting plans come with different server configuration and pricing. You’ll need to choose a plan that suits your needs and budget.

At WPBeginner, we recommend users to start with a low cost shared hosting plan and then upgrade as their business grows. This allows you to save money and only pay for the services that you actually need.

Shared hosting plans start from $7.99 per month (paid annually) and $14.99 for a domain name.

Now if you are just starting out, then this is still a significant investment.

Luckily, Bluehost has agreed to offer our users a discount on hosting and free domain name. Basically, you’ll be able to get started for $2.75 per month.

They are one of the largest hosting companies in the world and an officially recommended WordPress hosting provider.

→ Click Here to Claim This Exclusive Bluehost Offer ←

For other shared hosting plans, see our comparison of the best hosting companies.

Once you have signed up for a hosting account, the next step is to create your website. For detailed instructions, see our guide on how to make a website.

How Much It Cost to Host a Website

So far we have covered the costs of web hosting companies. However, your costs of hosting a website may vary depending on several factors.

The first thing is the hosting plan you choose. We recommend starting with smaller shared hosting plans and then upgrade as your business and website grows.

Once you start building a website, you may need to spend money on other things as well such as website templates, software extensions, and other services.

Your goal would be to only buy what you actually need and use free tools whenever you can.

We have an excellent guide on the cost of building a WordPress website and how to avoid overspending.

How to Host a Website on Your Computer

We are often asked by our users if they can host a website on their own computer.

Yes, you can.

However, the only reason you should host a website on your computer is when you want to test a site locally before putting it on the internet.

A lot of beginners find it useful to learn web development, WordPress, and coding by installing a local server on their computer.

See our tutorials on how to set up local server on Windows and Mac.

This will allow you to install a local server without making it publicly available.

We don’t recommend using a local server to host a website and make it publicly available. However, we will show you how to do that for users who are feeling adventurous.

Putting Your Local Host Server Online

Once you host a website on your local server, it will only be available to you. You’ll need to change its settings to put your website on the internet.

First, locate your web server software’s configuration file called httpd.conf.

If you are using WAMP on Windows, then you’ll find it under C:\wamp\bin\apache\apache[version#]\conf] folder.

MAMP users on Mac will find it inside /Applications/MAMP/conf/apache/ folder.

You can open this file using a plain text editor like Notepad or TextEdit. After that, you need to find the line that begins with

Listen 80

You need to replace it with your IP address and port number. You can find your IP address by simply Googling ‘what is my ip address’ it will show you a numeric string separated by dots. Here’s an example of what that code should look like with your IP:

Listen 64.233.160.1:80

Next, you need to find the following line:

ServerName localhost:80

Go ahead and change it by replacing localhost:80 with your IP address.

ServerName 64.233.160.1

Next, you need to find the following line for WAMP:

<Directory "c:/wamp/www/">

If you are using MAMP, then look for the following line:

<Directory "/Applications/MAMP/htdocs">

Below this line you’ll see the access permissions, which you need to replace with the following:

Order Allow,Deny
Allow from all

You can now save your configuration file and restart your local server with the new permissions.

Now anyone can use your IP address to access your website instead of localhost. This is not an ideal situation as it would be hard for your users to remember the IP address.

That’s where domain names come in handy.

Pointing Your Domain Name to a Locally Hosted Website

Pointing your domain name to a website that you are hosting on your own computer will allow users to access it as they would do with any other site.

First, you need to edit your domain name’s DNS settings. We’re using Domain.com in our screenshots below:
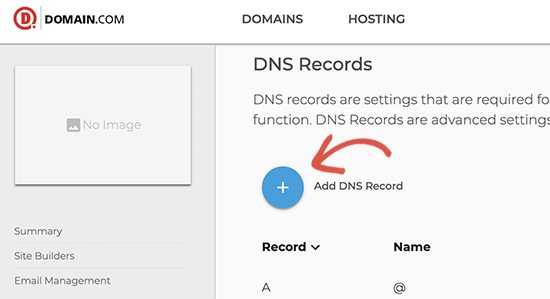
Editing DNS settings for your domain name

After that, you need to edit the A name record with @ sign as the Name. If you don’t have one, then click on Add new record button to proceed.
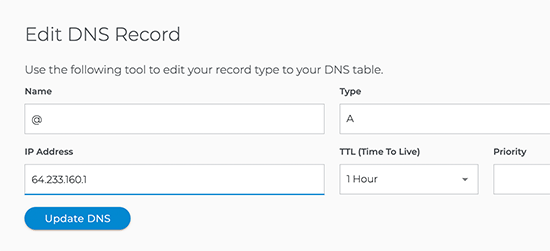
Adding A record for your domain

In the value field, you need to enter your computer’s IP address and click on the Update DNS button to save your changes.

If the computer with your local server is connected to the internet directly, then you are all done.

However, if your computer is connected to the internet via router then you need to forward ports. To do that, you need to login to your router’s admin interface by entering the router’s IP address in your browser address bar.

Depending on the manufacturer, your router interface may look slightly different. You will need to find the option labeled port forwarding, virtual server, or NAT.
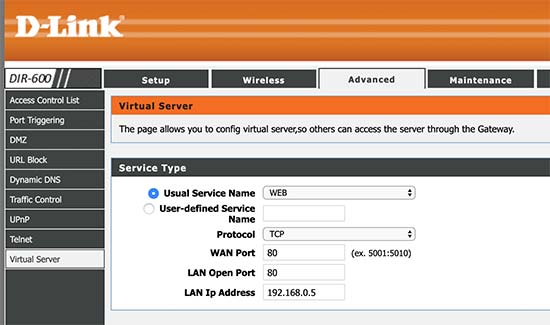
Port forwarding

Next, you need to forward web or HTTP traffic to port 80. In the IP address field, you need to enter the IP address of your computer on the local network. This IP address is the internal address that identifies your computer on the local network.

After that, you need to apply the changes and restart your router.

Disadvantages of Hosting a Website by Yourself

Hosting your website on a local computer is a bad idea. This is why even the tech giants with enough resources, skills, and know-how prefer to go with a hosting service provider.

Following are just a few disadvantages of hosting a website on local computer.

  • In order to run a web server, you need to put it on a computer connected to a high-speed internet connection 24 hours a day.
  • You also need to install updates for the web server software, keep backups, plan on a backup server, and more.
  • The computer hosting your website will also be open to hacking attempts, malware injection, and DDOS attacks. This could also affect the security of all other computers on your network.
  • You will need to purchase a static IP address from your internet service provider, which will cost you extra.

Doing all this will require a lot of time, effort, and technical skills. This is why it is a bad idea to host your website on a local computer by yourself.

FAQs about Website Hosting

Having helped thousands of beginners start their own websites, we have heard every possible question. Following are some of the most commonly asked questions from people who want to host a website.

1. Why do I need a hosting provider to host a website?

Hosting service providers specialize in maintaining a platform to serve websites. They have engineers and system administrators in their staff that monitor their servers 24/7.

This allows you to focus on building your website and growing your business instead of managing server software.

2. Can I buy a domain name and hosting from two companies?

Yes, you can. However, buying them from the same company allows you to manage both of them under the same dashboard. Also some providers like Bluehost even offer a free domain as an incentive to use their service.

3. Can I buy a domain name and host my website later?

Yes, you can buy a domain name alone. However, it will not be pointing to your website until you choose a hosting provider.

We recommend Domain.com for registering a domain name. They offer beginner friendly domain management tools, which will make it easy to connect your domain to any hosting provider later.

4. Can I host my website on my local computer and later move it to a hosting provider?

Yes, you can do that. However, if you are serious about making a website, then it is better to start with a hosting provider.

5. Can I host a website with one provider and then change it to another provider?

Yes, you can move your website to any other hosting company at any time. See our article on how to move your website to a new host for detailed instructions.

6. Where do I host my website?

There are so many hosting companies out there, that it becomes difficult for beginners to make the right choice.

Over the years, we have worked with all the top hosting companies on the market. This has given us insights into what makes a good hosting platform.

For starter websites, we recommend Bluehost. They automatically install WordPress, and they offer a beginner friendly dashboard, built-in caching, security, and more. On top of it, they are offering WPBeginner readers discount on hosting + free domain name.

For more recommendations, see our complete list of the best hosting companies with their pros and cons.

There are few companies offering free web hosting, but we recommend that you be very careful about those.

We hope this article helped you learn how to host your website. You may also want to see our guide on how to get a free business email address for your website.

If you liked this article, then please subscribe to our YouTube Channel for WordPress video tutorials. You can also find us on Twitter and Facebook.

The post How to Host a Website (Simple Guide for Beginners) in 2019 appeared first on WPBeginner.