How to Show Product Recommendations in WordPress (7 Easy Ways)

Do you want to show product recommendations in WordPress?

Displaying product recommendations can encourage users to make additional purchases, boosting your sales and revenue. It can also improve user engagement by convincing visitors to stay longer on your site.

In this article, we will show you how to easily show product recommendations in WordPress, step by step.

Show Product Recommendations in WordPress

Why Show Product Recommendations in WordPress?

If you have an online store, then showing product recommendations on the cart or checkout page can increase the average order value on your site.

By suggesting relevant products, you can help customers discover items they might be interested in, leading to a more satisfying shopping experience.

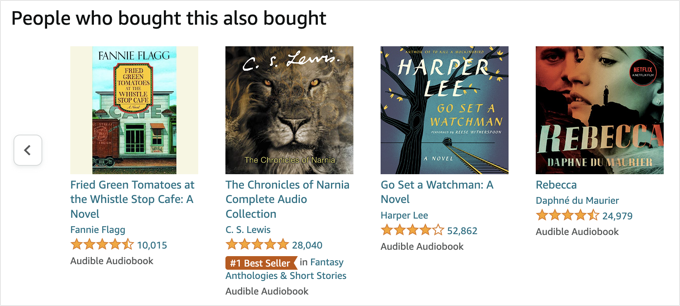
For instance, if a customer purchases a hat in your clothing store, you can recommend sunglasses because both these options protect from the sun and are often bought together.

You can show these recommendations as a slide-in cart, order bump, upsell, or cross-sell products, and even send automated emails to users upon purchase to gain traction.

Having said that, let’s take a look at how to easily show product recommendations in WordPress.

For this tutorial, we will be using multiple methods, so you can use the links below to jump to the one of your choice:

Method 1: Show Product Recommendations on the Products Page

If you want to show relevant recommendations on the products page, then this method is for you.

You can easily do this using the default upsell feature in WooCommerce, so you won’t need any other plugin for this method.

Upsells basically means recommending a more premium version of the product the user is purchasing. However, you can also add other relevant products in this section.

First, you must visit the Products » Add New page from the WordPress dashboard to create a new product. You can also edit an existing one if you want.

How to add a new product in WooCommerce

Once you have added the details, scroll down to the ‘Product Data’ section and switch to the ‘Linked Products’ tab from the left column.

Here, you can add different products to your WooCommerce store in the ‘Upsell’ section. To do this, just enter the name of the product, and you will be shown the search results from which you can choose a product to add.

Add products in the Upsell section

After that, scroll back to the top and click the ‘Publish’ button to store your settings and make your product live.

Now, visit your WooCommerce store to view the upsell products under the ‘You may also like’ section.

View upsell products

For more details, see our tutorial on how to upsell products in WooCommerce.

Method 2: Show Product Recommendations on the Cart Page

If you want to display product recommendations on the cart page just as the customer is moving to the checkout, then this is the method to use.

WooCommerce offers the default cross-sell option that allows you to show relevant and complementary products without using any plugin.

First, open the product of your choice in the WooCommerce editor and scroll down to the ‘Product Data’ section.

Here, switch to the ‘Linked Products’ tab where you can add relevant products to be displayed on the carts page in the ‘Cross-sells’ section.

Add products in the cross sell section

Once you are done, just click the ‘Publish’ or ‘Update’ button at the top to store your settings.

Now, visit your store and add a product in the cart to head over to the Cart page. Here, you will notice that the product recommendations are displayed in the ‘You may be interested in…’ section.

Cross sell product recommendations preview

Method 3: Show Product Recommendations as a Sliding Cart

You can use this method if you want to show product recommendations in a sliding cart.

FunnelKit is a popular WooCommerce plugin that lets you add a sliding cart to your store and also show relevant recommendations within this cart to encourage users to make more purchases.

First, you need to install and activate the Sliding WooCommerce Cart by FunnelKit plugin. For details, see our tutorial on how to install a WordPress plugin.

Upon activation, head to the FunnelKit » Cart page and toggle the ‘Enable Cart’ switch to ‘On.’

Enable sliding cart

After that, you can select the sliding cart visibility, icon position, coupon field, summary, and checkout settings from the section below. For more details on this, see our tutorial on how to easily add a sliding cart in WooCommerce.

Once satisfied, you must switch to the ‘Upsells’ column from the left and toggle the ‘Enable Cart Upsells’ switch to ‘On.’

Note: Keep in mind that you will need the pro version of the plugin to unlock the upsells feature.

How to add upsells and cross-sells to WooCommerce

This will open new settings on the page from where you can configure the display layout for product recommendations. You will be able to see a preview for each layout style on the right corner of the screen.

After that, you must select if you want to show cross-sell or upsell products as recommendations. You can also choose the ‘Both’ option.

Then, you can add a heading to be displayed at the top of product recommendations and choose the number of recommendations to be displayed.

Configure upsell and cross sell settings

Once that is done, scroll down to the ‘Upsells and Cross-Sells’ section to view the list of all the products on your online store.

From here, expand a product’s tab and click the ‘Add Upsell’ or ‘Add Cross Sell’ button to add recommendations.

Remember that upsell products are like the premium version of the product that the customer has added to the cart, while cross-sell products are the ones that are related to the product the user is purchasing.

FunnelKit's advanced conversion features

Upon clicking on one of the buttons, a popup will open on the screen from where you can search and add the product that you want to be displayed in the recommendations.

You can follow the same process for all the products on your online store.

Adding a linked product on your online store

Once you are done, just click the ‘Save’ button at the top to store your settings.

You can now visit your WooCommerce to view the sliding cart with product recommendations.

An example of a cross-sell promotion, created using FunnelKit Funnel Builder

Method 4: Show Product Recommendations as Order Bumps

Use this method to display relevant product recommendations as an order bump, which is a technique used on the checkout page to show relevant products to customers at a lower price point.

This can often convince them to buy it right before finishing the checkout process.

To create order bumps, you will need to install and activate the Funnelkit Builder. For details, see our step-by-step guide on how to install a WordPress plugin.

Note: FunnelKit Builder has a free plan, but you will need the pro version to unlock the order bumps feature.

Upon activation, visit the FunnelKit » Settings page from the admin sidebar and switch to the ‘License’ tab in the left column.

Then, enter your license key and click the ‘Activate’ and ‘Save Changes’ button to store your settings. You can get this information from your account on the FunnelKit website.

Activating the FunnelKit license key

Next, you will need to create a checkout page on your WooCommerce store using FunnelKit. For more information on this, see our tutorial on how to customize your WooCommerce checkout page.

Once that is done, go to the FunnelKit » Store Checkout page from the WordPress dashboard and click the ‘Add Order Bump’ button.

Clicking the Add Order Bump button on FunnelKit

This will open a popup where you must add a name for the order bump that you are creating and click the ‘Add’ button.

The plugin will now add the order bump to your checkout funnel. Here, click the ‘Edit’ button to start the process.

Clicking the Edit button on an order bump in FunnelKit

This will take you to a new screen where you must click the ‘Add Product’ button to open a popup.

Here, just type and add the products that you think will complement the buyers’ purchase and then click the ‘Add Product’ button.

Adding products to a FunnelKit order bump

Next, you can select a discount type for the products that you chose from the dropdown menu and can even offer more than one quantity for each item to customers.

Once you have done that, just click the ‘Save Changes’ button to store your settings.

Configuring the product offer's discount type in FunnelKit

Then, scroll down to the ‘Order Bump Settings’ section, where you can select the order bump’s behavior and display position during checkout.

For instance, if you select the  ‘Add Order Bumps to Cart Items’ option as the bump behavior, then customers will be suggested these products to add as an extra purchase.

However, when choosing ‘Replace Order Bumps with a Cart Item (used for upgrades)’, you give customers the option to replace their purchase by upgrading to a higher-end version of the product.

FunnelKit's Order Bump Settings section

After that, switch to the ‘Design’ tab from the top. Here, you can configure how the order bump offer will look to customers.

You can add a title and description and change the text colors, background color, toggle color, border, font size, price display, and box padding and width. Once you are satisfied, just click the ‘Save’ button to store your settings.

Clicking Choose Skin in the FunnelKit Order Bump Design tab

Now, it is time for you to switch to the ‘Rules’ tab, where you have to click the ‘Add Rules’ button.

This will display some new settings on the screen that you can use to display the order bump for specific products. The rules can be based on the cart, customer, geography, or date and time.

For example, if you want to display the order bump on the checkout for a specific product, then you must choose the ‘Customer Product Purchased’ option from the dropdown menu on the right.

After that, just add the product name in the text field on the right and click the ‘Save Changes’ button to store your settings.

An example of the order bump trigger rules in FunnelKit using the AND button

Now, visit your WooCommerce to view the order bump on the checkout page of a specific product.

If you want to know more about trigger rules for order bumps, then you can see our beginner’s guide on how to create an order bump in WooCommerce.

What FunnelKit's order bump looks like in checkout

Method 5: Offer Post-Purchase Recommendations With Emails

If you want to send a post-purchase recommendation email to customers, then this method is for you. For this, you will need FunnelKit Automations, which is a powerful automation plugin.

You can create a workflow with it that will automatically send a recommendation email to users sometime after their purchase.

First, you need to install and activate the FunnelKit Automations plugin. For instructions, see our tutorial on how to install a WordPress plugin.

Note: You can sign up for the FunnelKit free plan to do this.

Upon activation, visit the FunnelKit Automations » Automations page from the WordPress dashboard and click the ‘Create Automation’ button.

Click the Create Automation button

This will take you to the ‘Add Automations’ page, where you will see a list of premade templates offered by the plugin.

From here, switch to the ‘WooCommerce’ tab and select the ‘Post Purchase Sequence’ template.

Select post purchase sequence template

Doing that will open a preview of the automated workflow in a new tab from where you must click the ‘Import Recipe’ button.

This will open a new prompt. Here, add the name for the workflow that you are making and click the ‘Create’ button.

Import a recipe and add a name for it

The FunnelKit Automation editor will now be launched on the screen. You can start by clicking on the ‘Order Created’ tab. This is the trigger that will start the workflow.

A popup will appear on your screen, where you will have to select the order status. For instance, if you select the ‘Processing’ option, then the email will be sent to users after they place their order.

However, when choosing the ‘Completed’ option, customers will receive an email after they get the order at their address. Just configure these settings and click the ‘Save’ button.

Select the order status

Once you do that, click the ‘Delay’ tab.

This will open the prompt on the screen where you can choose how long after the purchase the email should be sent to users. For example, you can choose 1 hour from the dropdown menu.

After that, click the ‘Save’ button to store your settings.

Choose a delay period for your email

Next, click the ‘Action’ tab in the editor to open its settings in the popup. Here, you can start by configuring the subject line of the email.

Then, click the ‘Merge Tags’ option at the top.

Click the Merge tags button

On doing that, a popup will open up where you have to switch to the ‘Orders’ tab.

Next, scroll down to the ‘Order Cross Sells’ option and click the copy button next to it.

Click the Copy button next to the Cross Sells option

The prompt will now automatically close, and you can scroll down to the text builder in the ‘Action’ popup.

Here, you can change the email content according to your liking and add the cross-sells tag. Now, users will see a list of relevant products that you added for the purchased product using WooCommerce or FunnelKit.

Once you are done, just click the ‘Save and Close’ button.

Add the merge tag in the text editor and click the 'Save' button

You can now view your automated workflow again to see if you want to make any changes.

After that, toggle the ‘Inactive’ switch at the top to ‘Active’.

Activate the workflow

Now, your customers will receive an email with product recommendations exactly an hour after purchase.

Recommended products email preview

Method 6: Show Product Recommendations in Popups

If you want to show product recommendations in popups, then this method is for you.

For this, you will need OptinMonster, which is the best lead generation and conversion optimization tool on the market. It allows you to create popups, gamified spin the wheels, banners, and floating bars using its premade templates and visual editor.

It also has exit intent technology that lets you display product popups to users just as they are planning to leave your store.

To create a product recommendation popup, you will need to create an account on the OptinMonster website.

Click the Get OptinMonster Now button

Once you do that, open your WordPress dashboard and install the free OptinMonster plugin, which will connect your website with the tool.

Upon activation, the OptinMonster setup wizard will open up, where you must click the ‘Connect Your Existing Account’ button. You can then follow the onscreen instructions to complete the process.

Connect your existing account

Next, visit the OptinMonster » Settings page and click the ‘Auto Generate Keys + Connect WooCommerce’ button.

If you don’t do this, then campaigns created with OptinMonster won’t be shown in your store.

Auto generate keys and connect WooCommerce

Once that is done, head over to the OptinMonster » Templates page from the WordPress dashboard and select ‘ Popup’ as the campaign type.

Next, click the ‘Use Template’ button for a template that you want to use. For this tutorial, we have used the ‘Product Recommendations’ template.

Choose a template for the product recommendation popup

This will open a prompt where you can add a name for the campaign that you are creating.

Once you do that, OptinMonster’s drag and drop builder will be launched on the screen. Here, you can use different blocks to add an image, details, and CTA for a product. For more instructions, see our tutorial on how to create a WooCommerce popup to increase sales.

Then, click the ‘Product Details’ button in the popup preview to open its settings in the left column. You can now add the URL for the product’s page in the ‘Redirect URL’ field.

Add product URL in the popup

Now, switch to the ‘Display Rules’ tab from the top. Here, you will be setting conditions for the product recommendation popup appearance.

To do this, open the ‘Time on Page’ dropdown menu and choose the ‘Page Targeting’ option.

This will allow you to show your popup to users on a specific product’s page, letting you cross-sell or upsell the product.

Upon choosing this option, select ‘contains’ from the dropdown menu in the middle and then add the URL of the product page where you want to display the specific recommendation popup.

Choose page targeting for product recommendation popup

You can also choose the ‘Exit Intent’ option to display the popup as the user is about to leave your store.

If you want, you can change the feature’s intensity to show it to more customers.

Use exit intent technology for popups

Finally, switch to the ‘Publish’ tab from the top.

Here, click the ‘Publish’ button to make your popup live. Then, click the ‘Save’ button to store your settings.

Publish the product recommendations popup

You can now visit your online store to view the product recommendations popup in action.

If you selected a specific page for the popup, then you must head to that page to view the results.

Product recommendations popup preview

Method 7: Display Product Recommendations in Easy Digital Downloads

If you sell digital downloads on your online store, then the above methods may not be suitable for you.

In that case, you can use Easy Digital Downloads, which is the best plugin for selling digital goods, to show product recommendations.

First, you need to install and activate Easy Digital Downloads. For details, see our guide on how to install a WordPress plugin.

Note: EDD has a free plan, but you will need the pro version to unlock the Cross-sell and Upsell add-on.

Upon activation, visit the Downloads » Settings page from the WordPress admin sidebar to enter your license key. You can get information from under your account on the EDD website.

Then, click the ‘Activate’ button.

Add a license key for your easy digital downloads plugin

Once you have done that, you must set up your store to start selling products. For instructions, see our beginner’s guide on how to sell digital downloads in WordPress.

Next, head over to the Downloads » Extensions page and locate the ‘EDD Cross-sell and Upsell’ addon, and click the ‘Install’ button under it.

Once the addon is installed, it will automatically show an activated toggle like this:

Activate the EDD Cross-sell Upsell addon

Now, it’s time for you to visit the Downloads » Settings page and switch to the ‘Extensions’ tab.

From here, you can configure the heading for upsell and cross-sell products. Remember that the upsell products are like a premium version of the product the user is purchasing, while cross-sell products are the ones that are related to the purchased products.

You can add your headings according to your liking and also adjust the number of product recommendations to be shown from the dropdown menus.

After that, just click the ‘Save Changes’ button to store your settings.

Add headings for cross sell and upsell sections

Now, open the digital product where you want to add product recommendations.

Once the block editor appears, simply scroll down to the ‘Cross-sell and Upsell’ section, where you can add custom headings for each section.

If you don’t add a heading, then the default headings you configured will be added to the page.

After that, select the upsell product recommendations from the dropdown menu. You can follow the same process for cross-sell products as well.

Add upsell and cross-sell products

Once you are done, just click the ‘Update’ or ‘Publish’ button to store your settings.

Now open the product page on the website front-end, and you will see that the upsell product will be recommended on the product page.

Upsell product recommendation preview

On the other hand, the cross-sell products will be recommended to users when they are on the checkout page.

This is how the cross-sell products looked on our demo website.

Cross-sell product recommendation preview

Bonus: Properly Set Up eCommerce Tracking In WordPress

Once you have added product recommendations, it is time for you to set tracking for your online store to find your top-selling products, see which campaigns perform the best, and understand how people find and use your website.

This will help you find what kind of products customers are likely to buy along with others in your store. For example, you may notice that anyone who is buying sunscreen is also purchasing a hat.

With this information, you can show relevant product recommendations to customers and boost your conversions.

To do this, you will need MonsterInsights, which is the best Google Analytics solution on the market.

MonsterInsights Website

Upon plugin activation, simply connect your website with Google Analytics. For details, see our tutorial on how to install Google Analytics in WordPress.

Then, head over to the Insights » Addons page from the WordPress dashboard and install the eCommerce addon.

Enable eCommerce tracking

Now visit the Insights » Settings page and switch to the ‘eCommerce’ tab. Here, you must toggle the ‘Use Enhanced eCommerce’ switch to ‘On.’

Once you do that, MonsterInsights will start recording analytics and find the data you need, including conversion rate, transactions, revenue, average order value, and top products.

Use enhanced ecommerce option

For details, see our tutorial on how to properly set up eCommerce tracking in WordPress.

We hope this article helped you learn how to show product recommendations in WordPress. You may also like to see our beginner’s guide on how to pass payment processing fees to customers in WordPress and our top picks for the best email marketing services to grow your email list.

If you liked this article, then please subscribe to our YouTube Channel for WordPress video tutorials. You can also find us on Twitter and Facebook.

The post How to Show Product Recommendations in WordPress (7 Easy Ways) first appeared on WPBeginner.

14 Ways to Increase Average Order Value With WordPress

Are you looking for ways to encourage customers to spend more money in your online store? You should immediately start tracking the average order value (AOV) metric.

Focusing on AOV is an effective way to grow a business, especially if you are running an eCommerce store. While working closely with numerous online stores over the last decade, I have tested a ton of strategies to see what increases AOV and what doesn’t.

From this experience, I can show you 14 ways that are sure to increase average order value with WordPress to improve your bottom line.

Note: This is a guest post by Chris Klosowski, the president of Easy Digital Downloads, the best digital eCommerce plugin for WordPress. This is an expert column that we publish every other Thursday, where we invite a WordPress expert to share their experiences with our readers.

Ways to Increase Average Order Value With WordPress

What Is Average Order Value (AOV)?

Running an online store is all about meeting the needs of your customers while covering your costs and making a profit. Luckily, there are quite a few ways you can increase your bottom line.

For example, you can try to increase the amount of traffic coming to your website or encourage more of your visitors to make a purchase. This will increase the number of conversions or transactions in your store, leading to more revenue.

A different approach is to try to increase the amount of money you make from each individual transaction. This is known as ‘average order value’ or AOV and is the topic of this article.

AOV is all about how much your customers are spending per order. You can calculate it by dividing your total revenue by the number of orders you received.

Here’s the formula for calculating AOV:

AOV = Total Revenue / Number of Orders

For example, let’s say your online store generated a total revenue of $10,000 from 200 orders in a month. Your AOV would be:

AOV = $10,000 / 200 orders = $50 per order

Understanding and analyzing your AOV can help you gain valuable insights into your eCommerce business. You can then use these insights to make data-driven decisions that improve your profitability and overall success.

Overall, if you sell multiple digital products, then focusing on increasing your average order value can be an easy way to grow your business.

With that being said, to increase your store’s average order value, you simply need to give your customers a reason to spend more.

Let’s take a look at 14 ways you can increase average order value with WordPress.

1. Track the Average Order Value (AOV) Metric on Your Online Store

Your first step is to start tracking AOV on your WordPress website. You can use this data to learn which strategies are working and which aren’t.

My team makes this simple in Easy Digital Downloads by offering built-in reporting so that you don’t have to set up separate tracking software and analytics solutions. All you have to do is go to Downloads » Reports in your WordPress dashboard.

WooCommerce also lets you easily find AOV within their dashboard.

Tracking AOV in Easy Digital Downloads

For eCommerce tracking, I highly recommend setting up eCommerce tracking using Google Analytics on your WordPress site.

2. Get Your Pricing Structure Right

Finding the right pricing structure for your products is crucial. It needs to cover your costs and let you make a profit while also offering fair prices that encourage customers to make a purchase.

There’s a lot to consider here. So, my team created a detailed guide on the Easy Digital Downloads blog that will help you structure your digital product pricing for success.

Optimizing your pricing structure may involve some experimentation. Sometimes, you might find that lowering your price raises your AOV because it makes it easier for your customers to purchase more products.

But you won’t know what is working if you don’t measure it. Tracking your store’s AOV metric is a great way to discover what is working and what isn’t.

3. Offer Product Bundles

When considering the pricing structure of your store, don’t limit your thinking to individual products. Bundling different combinations of products can help your customers feel they are getting extra value.

In my last expert column, I mentioned that product bundling makes it easier for customers to make a purchasing decision. Better still, it can encourage them to purchase more, increasing your average order value.

For example, one of our customers, SmashBalloon successfully uses bundling to encourage their customers to try their products in a bundle for a heavily discounted price.

bundle aov

Bundles offer your customers a bulk discount that typically costs 60-80% of the total value of those products. The right combinations of products will cater to the user’s tastes, needs, and budget.

For instance, you could bundle products that are often purchased together. A gaming store might bundle a console together with a game and controller, or you could bundle an eBook with its audiobook version.

Bundles can also encourage customers to purchase more products than they were planning. Someone who just wants to purchase a few stock photos of home offices may be tempted by an affordable ‘Home Office Bundle’.

Bundle Example

4. Offer Payment Plans

Sometimes, your customers can only make a small purchase simply because they don’t have enough money to buy more right now.

’Buy Now Pay Later’ payment plans allow users to make the purchase now and pay for it over time. At the same time, your store will receive the full amount right away.

Currently, 35% of consumers use pay-later plans for most of their purchases.

Because they make it easier for your customers to make a purchase, these plans help improve conversions and your store’s AOV.

If you’re selling digital downloads, you can use payment options like Klarna and Afterpay to set up Buy Now Pay Later with Easy Digital Downloads. Alternatively, you could use the WP Simple Pay plugin to offer a pay-later payment option with other eCommerce solutions.

5. Make It Easy to Check Out

A lengthy or confusing checkout process can overwhelm customers, meaning they spend less time and effort on their purchases or even quit before completing the payment. An easy checkout process encourages customers to spend more.

Simplifying the process reduces the cognitive load on customers by reducing the amount of brainpower needed. It lets buyers focus on completing the purchase without feeling overwhelmed, which may lead to them adding more items to their cart.

You can reduce friction by offering multiple payment options in various currencies, allowing your customers to check out as guests without needing to create an account, and including clear instructions.

EDD includes these options on its fast-loading checkout page. You can choose an extension to add the payment methods you wish to use, including Stripe, PayPal, and many others.

The Easy Digital Downloads Checkout Form

You can also customize the checkout page in WooCommerce and other eCommerce plugins to optimize it for conversions and increased AOV.

6. Offer Upsells and Cross-Sells

In my experience, one of the most effective ways to encourage customers to spend more money when making a purchase is using order bumps. This is when you offer the buyer extra products or deals during checkout.

Industry reports estimate that order bumps contribute to 35% of Amazon’s total revenue. They do it well, and it pays off.

Take a look at a screenshot of how a WordPress theme company can upsell a related product.

checkout-cross-sells

The main types of order bumps are upsells and cross-sells. Here are some examples to help you see the difference:

  • In a paint shop, an upsell would be to encourage a customer to buy UV-resistant paint instead of normal paint. It costs more initially, but lasts much longer, offering better value and saving money in the long term.
  • A cross-sell would be to offer the customer other products they will need while painting their house. These might include paint brushes, rollers, drop sheets, paint trays, and more.

This is simply good customer service. You are making sure the customer purchases the product they actually need, and they have everything they require to do the job. They appreciate it.

It also helps you increase the visibility of products that aren’t purchased frequently. And because the customer spends more money on the order, it increases your AOV.

It’s easy to add order bumps to your online store using the Easy Digital Downloads cross-sell and upsell extension, which is available for paid members.

It lets you add other digital products to your product pages and checkout page. This can generate some impulse purchases, allowing you to boost the average order value.

This is also super easy to set up in WooCommerce stores with a plugin like FunnelKit. For more details, just see the WPBeginner guide on how to create an order bump for WooCommerce.

7. Promote Products With High Margins

While you are recommending products to your customers, it helps to showcase and promote items with higher profit margins.

Compared to your other products, high-margin products will generate more profit per unit sold.

By promoting them strategically, you can increase your overall profit even if the sales volume remains the same or even decreases slightly. This can lead to a higher AOV without requiring an increase in the number of orders.

If you have a digital product store, then you can use the EDD Recommended Products extension to prominently display your high-margin products on your downloads and checkout pages.

Amazon does something like this on its product pages by displaying ‘People who viewed this also viewed’ and ‘People who bought this also bought’ recommendations. These can encourage customers to purchase additional products they are interested in.

Amazon Recommends Products on Its Product Pages

Another approach is to bundle high-margin products with related lower-margin ones. This can incentivize customers to purchase the bundle and potentially increase their overall spending.

8. Offer Smart Coupons

Smart coupons are a great way to get more sales, keep your customers happy, and encourage brand loyalty. They can motivate your customers to add more items to their cart so that they qualify for a discount.

For example, you could encourage customers to spend more by offering a free gift or free shipping when their cart total reaches a certain amount.

Or you can create ‘buy one get one’ (BOGO) coupons to convince shoppers to add more items to their cart. Or when they buy a certain item, you can offer them a second item at a discounted price instead of free.

Offer Additional Products at a Reduced Rate to Encourage Buying

The EDD Discounts Pro extension lets you create advanced discounts that are automatically applied to the checkout screen based on specific conditions.

Alternatively, if you have a WooCommerce store, then you can create smart coupons with the Advanced Coupons plugin. It lets you create all kinds of coupons, rewards, and discounts to get more sales and grow your business.

9. Optimize the User Journey

I have already touched on improving the checkout experience in your online store, but there are plenty of other ways you can optimize the user journey to improve customer experience.

A smooth and positive customer journey fosters a sense of trust and satisfaction. This can encourage customers to spend more and return for future purchases.

FunnelKit, formerly WooFunnels, is a WordPress sales funnel builder that lets you optimize the path users take on your website to become customers. It lets you improve your checkout, offer one-click upsells, use beautiful page layouts, and much more.

WooFunnels One Click Upsell

Customers have a positive experience on a website that’s easy to navigate and find the products they need. This helps them feel more confident about their purchases and complete larger orders.

10. Use of the Fear of Missing Out (FOMO) to Create Urgency

Creating a sense of urgency and excitement can encourage customers to purchase immediately to avoid missing out on a valuable opportunity. This is known as FOMO, or the fear of missing out, and is a well-known sales tactic.

When using FOMO strategies, you need to be genuine and transparent. If your customers sense that you are trying to manipulate them by creating a false sense of urgency, then you may lose their trust.

Urgency is typically created by running a limited-time holiday sale, such as on Black Friday. The customer needs to make a purchase before the sale is over to get the discount.

When running a limited-time discount, I recommend displaying a countdown timer to make sure customers act before the offer expires.

Countdown Timer Example

Scarcity is another way to create a sense of urgency. For example, you can inform customers when stock is low or offer exclusive limited edition products.

11. Use Social Proof to Earn Trust

New customers may be reluctant to spend much money in your online store. They simply don’t have a reason to trust you yet.

In fact, 92% of consumers are hesitant to make a purchase when there are no customer reviews available.

This is the power of social proof, where potential customers can be strongly influenced by the experiences of people who already made a purchase and had a good experience with your store.

This means that you can earn the trust of new customers by displaying product reviews and testimonials on your website from genuine customers. Once you gain the trust of new visitors, they will be much more confident about adding items to their carts.

Smash Balloon Reviews Feed Pro demo

EDD users can do this using the Reviews extension. This lets you enable customer reviews with star ratings on the products you choose.

Alternatively, you can use other leading WordPress social proof plugins like Smash Balloon Reviews Feed Pro and TrustPulse.

12. Create Loyalty Programs

Many of my customers successfully use loyalty programs to encourage shoppers to spend more. When you award extra points for orders over a certain amount, you can increase the average order value just as effectively as cross-selling and upselling.

Think of a Starbucks Rewards card. Every time you buy a drink, you are closer to a free coffee.

Starbucks Loyalty Card

EDD offers several extensions that can help you create a loyalty program, such as the Purchase Rewards extension.

This lets you reward customers with a discount code after making a purchase. You can set a minimum purchase amount that will encourage them to add more to their cart.

On the other hand, WooCommerce users can easily create a loyalty program with the Advanced Coupons Loyalty Program plugin.

13. Recover Abandoned Carts

Most online stores have huge numbers of users leaving their sites from the checkout page. On average, a massive 69% of shoppers are abandoning their carts. Why not try to get some of them back and recover those lost sales?

These customers showed genuine interest in your products, which makes them valuable leads. Remind them of their abandoned cart and offer some incentives to complete the purchase. You might successfully convert them into paying customers, and this can contribute to your AOV.

You may be able to catch them just before they leave your site. OptinMonster’s exit-intent technology studies mouse movements to know when someone is about to leave your site, and shows a popup at that exact moment.

Exit intent example

If an abandoning visitor has already left your site, then you can send them a push notification using PushEngage. Or you can send an automated email using EDD’s Recapture extension to regain their attention.

You can offer the customers an incentive to complete the purchase and present them with relevant upsell or cross-sell options, such as adding complementary products to their cart or offering a bundle discount. This is particularly effective if you use a personalized approach.

These targeted suggestions can encourage them to spend more, potentially increasing the overall order value.

For more details, you can see these guides on how to reduce cart abandonment in WordPress and how to send abandoned cart emails.

14. Test Multiple Strategies

Now that you’ve seen my list of ways to increase your store’s AOV, you can get to work and start testing multiple strategies.

But don’t try them all at once.

It’s better to make one change at a time and measure the effect it has on the value of your orders. This will let you see which approaches work and which don’t so that you can make data-driven decisions for your business.

Remember, increasing AOV is an ongoing process. By using a combination of these strategies and continuously monitoring and analyzing the results, you can effectively raise your average order value and boost the overall revenue in your online store.

I hope these tips help you grow your online business by increasing the average order value (AOV) in your store. You may also want to see these guides on how to create a landing page with WordPress or the best WordPress giveaway and contest plugins.

If you liked this article, then please subscribe to our YouTube Channel for WordPress video tutorials. You can also find us on Twitter and Facebook.

The post 14 Ways to Increase Average Order Value With WordPress first appeared on WPBeginner.

How to Upsell Products in WooCommerce (5 Easy Ways)

Are you looking for ways to upsell products on your WooCommerce store?

Upselling is a great way to boost your sales and earn more money. You can encourage customers to purchase a more expensive version of your product.

In this article, we’ll show you how to upsell products in WooCommerce.

How to upsell products in WooCommerce

Why Upsell Products in WooCommerce?

Upselling is a sales technique that you can use to encourage shoppers to purchase a higher-priced product instead of the one they already have in their shopping cart.

These products provide more value to your customers because they have higher quality, include more features, and are more lucrative for your business.

For example, let’s say a customer adds a hiking shoe to their cart. You can offer them higher-quality hiking shoes that are more comfortable, durable, and versatile. Similarly, if you’re selling software or plugins on your WooCommerce store, then you can offer upgrades and addons to customers.

Since upselling persuades customers to buy a higher-priced product, you get to increase your average order value and boost the revenue of your online store. It also helps to increase the visibility of products that aren’t purchased frequently.

That said, let’s see how you can upsell products in WooCommerce. We’ll cover multiple methods, so you can click the links below to jump ahead to your preferred section:

Adding Upsell Products in WooCommerce

In WooCommerce, you can link different products and show them as upsell on the product page.

To start, you’ll need to go to Products » Add New from the WordPress dashboard. You can also edit an existing product.

Creating a new WooCommerce product

Next, you can scroll down to the Product Data section and click on the ‘Linked Products’ tab.

Here, you’ll be able to add different products under the ‘Upsell’ section. Simply enter a name and search for the product your want to upsell.

Add products to upsell

Go ahead and update your product page.

You can now visit your WooCommerce store and see the upsell products under the ‘You may also like’ section.

View upsell products

Creating a WooCommerce Popup to Upsell Products

A great way to upsell your products is by displaying a lightbox popup on your WooCommerce store. It can instantly grab your users’ attention and help boost sales.

You can offer discounts or limited-time offers on high-value goods. Plus, you can show it on specific pages, when a user spends a particular time on a page or is about exit your store.

Upsell popup preview

The best way to create a WooCommerce upsell popup is using OptinMonster. It is the best WordPress popup plugin and lead generation software in the market.

You can choose from multiple pre-built popup templates and campaign types.

Choose a campaign type and template

Plus, you can use the drag-and-drop campaign builder to customize your upsell popup.

You can edit different blocks, including the existing ones in the template.

Customize your upsell popup

After customizing your popup, you can head to the display rules tab and configure when you’d like to show it to your customers.

OptinMonster offers powerful options, including the Exit Intent technology. This allows you to show your campaign just as the user is about to leave your website. Plus, there are many eCommerce-related display options.

For example, you can display your campaign when a visitor views a particular product on your WooCommerce store or adds a certain number of items to a cart.

Popular display rules

For more details, you can see our guide on how to create a WooCommerce popup to increase sales.

Offer One-Click Upsells on Checkout Page

Another way to upsell in WooCommerce is by showcasing your products at different points in the customer journey.

For instance, you can display high-priced products on the checkout page and allow users to instantly add them to the cart before placing an order. This helps you optimize your sales funnel, boost sales, and earn more revenue.

The easiest way to upsell products during checkout is by using FunnelKit, formerly known as WooFunnels. It is the best WordPress sales funnel and automation plugin, and it offers a one-click upsell option that you can add to your checkout page.

First, you’ll need to install and activate the Funnel Builder Pro plugin. If you need help, then please see our guide on how to install a WordPress plugin.

Upon activation, you’ll see the FunnelKit setup wizard. You can start by entering the license key and following the onscreen instructions to configure the plugin.

Enter your WooFunnel license key

Once the plugin is set up, you can go to FunnelKit » Funnels from your WordPress dashboard.

After that, simply click the ‘Add new funnel’ button.

Add a new funnel button

FunnelKit offers different funnel templates for your WooCommerce store, including store checkout, sales funnel, and lead generation funnel.

Go ahead and select a template for your online store. We’ll use the ‘Optic’ store checkout template for this tutorial.

Select a funnel template

Next, you can preview the template and choose whether you’d like a one-step, two-step, or three-step funnel. The difference between these is that you can show different checkout steps on other pages.

For example, in one-step checkout, all the information is displayed on a single page. On the other hand, a three-step checkout would show basic information, shipping details, and payment on multiple pages.

After that, click the ‘Import This Funnel’ button at the top.

Import the template

Next, a popup window will open where you’ll need to enter a name for your funnel.

Go ahead and click the ‘Add’ button.

Enter a name for your funnel

FunnelKit will now import the template.

On the next screen, you’ll see different pages in the funnel. You can edit each of these pages and add additional steps.

To add a one-click upsell option, simply click the ‘Add Order Bump’ button under the Checkout step.

Edit your funnel and add new steps

After that, a popup window will open.

Go ahead and enter a name for your Order Bump and click the ‘Add’ button.

Add an order bump

You should now see your Order Bump as a sub-step under the Checkout page.

To add products for upselling, you can edit the order bump page.

Edit the order bump page

Next, you’ll need to add products you’d like to show on checkout.

Simply click the ‘Add Product’ button to continue.

Add product to your bump offer

After that, a popup window will open to add your products.

You can search for the products and then click the ‘Add Product’ button.

Search and add products to upsell
Next, you will see the products you just added. FunnelKit lets you rearrange its order if there are multiple items.

You can also change the behavior and display position of the goods you’d like to upsell on the checkout page. For example, the plugin lets you show upsell products below the payment gateways, above or below the order summary, inside the mini cart, or above the checkout form.

Change bump offer settings

FunnelKit also offers options to change the design of your order bump.

Simply switch to the ‘Design’ tab to edit the title, description, and style. There are different skins to choose from and additional options to further customize each skin.

Edit design of your bump offer

Once you’re done, go back to the Store Checkout dashboard in FunnelKit.

Next, click on the dropdown menu next to the title of your store checkout and change the status to Publish.

Publish your store checkout page

Your one-click upsell will now be active on your WooCommerce store. You can now visit your online store to see it in action.

For instance, our upsell offer appears after the payment gateway on the checkout page. Customers can add the item to their order with a single click.

One click upsell preview

Upsell Products on a Custom WooCommerce Thank You Page

In addition to showing products during checkout, you can create a custom thank you page and upsell products on your WooCommerce store.

Many WordPress website owners might think of a thank you page as a small part of their eCommerce store, but it can have a huge impact on your sales. It gives you the opportunity to recommend more valuable items, offer a discount coupon, and increase your sales.

Thank you page preview

With SeedProd, you can easily create a custom WooCommere thank you page. It is the best website builder and landing page plugin for WordPress.

The plugin offers different pre-built page templates and lots of customization options.

Thank you page template

You can use the drag-and-drop page builder to customize your thank you page.

For example, there are blocks for adding text, images, buttons, contact forms, countdown timers, social profiles, and more. Plus, you can control and edit each element on your template.

Customize your custom thank you page

The best part is that SeedProd offers WooCommerce blocks as well.

You can add a product grid or simply add your best-selling, recent, featured, or top-rated products to the thank you page.

Add WooCommerce blocks

For step-by-step instructions, please see our guide on how to create a custom WooCommerce thank you page.

Automatically Add Products to Cart Using a Coupon

Did you know that you can upsell products by automatically adding them to the customer’s cart? For example, when a customer purchases over $200 worth of goods, you can give them a free gift bag.

With the help of the Advanced Coupons plugin, you can set up personalized coupons in WooCommerce and automatically add products to the cart when a coupon is applied.

You’ll need at least the Advanced Coupon Growth plan to add products via coupons. Once you’ve set up the plugin, go to Coupons » Add New from your WordPress dashboard.

Add a new coupon code

Next, you can enter a coupon code at the top or click the ‘Generate coupon code’ button to automatically create a random code.

After that, scroll down to the Coupon data section and switch to the ‘Add Products’ tab.

Add a product

From here, you can search for the product you’d like to automatically add to your cart when the coupon code is applied.

There are also options to set the order quantity and add a price or discount for the selected product.

Search for your product to add for coupon code

Once you’ve selected a product, click the ‘Add’ button.

You should see your product under the Add Products section. Don’t forget to click the ‘Save Add Products Data’ button.

Save your add products data

Besides that, Advanced Coupon also lets you set up cart conditions.

This way, you can set up rules for applying your coupon code. For example, the coupon code will only work if the cart quantity or subtotal is more than a certain amount, or a customer adds products from a specific category.

Add cart conditions

After setting up these conditions, you can publish your coupon code.

Now, your product will automatically add to the cart whenever a customer enters the discount coupon on checkout.

Automatically add products using coupon

For more details, please see our guide on how to auto-apply coupons in WooCommerce.

We hope this article helped you learn how to upsell products in WooCommerce. You can also see our guide on the best WooCommerce plugins and how to speed up your WooCommerce performance.

If you liked this article, then please subscribe to our YouTube Channel for WordPress video tutorials. You can also find us on Twitter and Facebook.

The post How to Upsell Products in WooCommerce (5 Easy Ways) first appeared on WPBeginner.

How to Create a WooCommerce Popup to Increase Sales (6 Proven Methods)

Do you want to create a WooCommerce popup to boost sales?

Lightbox popups allow you to easily grab customer attention and nudge them into making a purchase. You can use WooCommerce popups to offer coupons, promote sales, get visitors onto your email list, and more.

In this article, we’ll show you how to easily create a WooCommerce popup to increase sales. We will show you different types of popups and how to apply them to your store.

Creating a WooCommerce popup to increase sales

Why You Need to Create a WooCommerce Popup

Have you ever wondered why you keep seeing popups on all major eCommerce websites?

It’s because popups do a great job of converting website visitors into paying customers. They help online stores to quickly grab customer attention by showing them targeted messages at just the right time.

If you run a WooCommerce store, you can use popups to help you:

  1. Increase sales by delivering timely messages to your customers. For instance, you could make the popup appear when users are about to leave your store.
  2. Recover abandoned cart sales by offering a coupon or free shipping.
  3. Sell more products through cross-sells (promoting related products) and upsells (promoting a better featured product).
  4. Build your email list, social following, or remind your customers of ongoing sales and promotions.

That being said, let’s take a look at how to use WooCommerce popups to boost sales and conversions on your store.

We’ll be using OptinMonster for this tutorial. OptinMonster is a powerful conversion optimization tool that lets you turn abandoning website visitors’ into subscribers and customers.

It seamlessly integrates with WooCommerce and have powerful personalization options built specifically for WooCommerce stores.

Tip: To create coupons for your offers, we recommend using Advanced Coupons. It allows you to create lots of different smart coupons for your WooCommerce site.

Getting Started with OptinMonster

Before you begin creating a WooCommerce popup, you need an OptinMonster account that’s connected to your WordPress site.

First, go to the OptinMonster website and sign up for an account.

Tip: OptinMonster’s Pro plan lets you use most of the features we’ll be covering. If you want to create a ‘spin to win’ campaign, you need the Growth plan.

Once you’ve signed up for OptinMonster, you need to connect your OptinMonster account to your WordPress site. To do this, you first need to install and activate the OptinMonster plugin on your WordPress site. For more details, see our step by step guide on how to install a WordPress plugin.

Upon activation, you should see the OptinMonster welcome screen in your WordPress admin. Simply click the ‘Connect Your Account’ button.

Connecting your OptinMonster account to WordPress

Now, follow the on-screen instructions to connect your OptinMonster account with your WordPress site.

Once you’ve done this, you will see the Campaigns page. Here, you need to click on the ‘Create New Campaign’ button:

Click the button to create a new campaign in OptinMonster

In the rest of this tutorial, we’ll cover several different types of WooCommerce popups. You can use these quick links to jump straight to the instructions for each one.

How to Create a WooCommerce Coupon Popup

Coupons are a great way to increase sales. You can use a popup to ensure that customers know about your coupon and encourage them to use it.

To create a coupon popup, simply select the ‘Popup’ campaign type. Then, select your template by bringing your mouse over it and clicking the ‘Use Template’ button. We’re going to use the ‘Coupon’ template:

Select your campaign type and choose a template

OptinMonster will prompt you to name your campaign and choose which site you want it to load on.

Give your WooCommerce coupon popup a name

Now, it’s time to design your coupon. Simply click on any part of the coupon to edit it. You can change the text, font, colors, and more. Here, we’re editing the header text for the coupon:

Editing the text on your WooCommerce coupon popup

You can also remove parts of the coupon. For instance, you might decide that you don’t want to have an email sign up box. You could simply display a coupon code within the popup to encourage the customer to use it instantly.

Tip: The default coupon code is SAVE25. This is displayed on the screen after the customer enters their email address. It’s easy to change or remove this under the ‘Success’ view for your popup.

Don’t forget to click the ‘Save’ button once you’re finished with making changes to the coupon design:

Save your popup coupon once you're done creating it

For more help, take a look at our step by step instructions on creating a coupon popup. That tutorial also explains how to integrate OptinMonster with your email list.

Once you’ve created your coupon popup, you need to set the display rules. Click the ‘Display Rules’ tab in the top bar. By default, the coupon will appear after 5 seconds have expired, on all pages of your site.

Setting the display rules for your popup coupon

You might want to change this to a longer or shorter duration, or base it on how long the visitor has been on your site as a whole. You might also want to only show the coupon on certain pages of your site.

We’re going to get our coupon popup to appear after our potential customer has been on our site for at least 15 seconds. This means they’ll see the coupon even if they move between several different product pages rapidly:

Setting your WooCommerce popup coupon to display after 15 seconds on site

The final step is to publish your coupon popup and make it live on your site. Follow our instructions at the end of the article for help with this.

How to Create a WooCommerce Cart Abandonment Popup

You may be losing a huge amount of money to cart abandonment.

A popup is a great way to prompt visitors to finish checking out. You can create a special WooCommerce popup to appear when a user is on the shopping cart page and moves to leave your site.

First, create a new campaign in OptinMonster. You need to select ‘Popup’ for the campaign type. Then, go ahead and choose a template for your popup. We’re going to use the ‘Abandoning Checkout’ template:

Select a popup campaign then choose your template for your cart abandonment popup

Now, give your popup campaign a name and click the ‘Start Building’ button:

Name your cart abandonment popup and start building

Your chosen template will open up in the campaign builder. You can change the text, colors, fonts, and more. Simply click on the element you want to change:

Changing the text of your WooCommerce cart abandonment popup

Once you’ve finished making changes, don’t forget to click the Save button on the top right.

Save your OptinMonster campaign

Now, it’s time to set your popup so that it displays on your WooCommmerce shopping cart page. First, click the ‘Display Rules’ tab at the top of the screen.

Click the ‘time on page’ dropdown here if it’s not already selected, then click on ‘Exit Intent’. OptinMonster’s exit intent technology allows you to show your message at the precise moment user shows the intent to leave your website.

Setting up an exit intent display rule in OptinMonster

Next, scroll down the page. Leave the first dropdown here as ‘current URL path’ and set the second dropdown to ‘exactly matches’. In the box that appears, enter the URL of your shopping cart page.

Setting a current URL path rule in OptinMonster

Don’t forget to save your changes. Then, go to the Publish tab to put your coupon live on your online store. You can find instructions on this later in our tutorial.

How to Create a WooCommerce Cross-Sell Popup to Promote Related Products

Another great way to boost sales is to cross-sell your products. Cross-selling is when you promote a product that goes with something the customer is already buying.

For instance, if your customer buys a summer shirt, then they might also be interested in buying a sun hat. Or if they buy greetings cards, then they may also want wrapping paper.

To create a cross-sell popup in OptinMonster, you first need to create a new campaign. Make sure you select ‘Popup’ for the campaign type, then choose any template you want.

We’re going to use the ‘Shopping’ template for our popup.

Choose a popup campaign and select a template in OptinMonster

Next, OptinMonster will prompt you to name the campaign and choose which website you want to load it on. Once you’ve done this, simply click the ‘Start Building’ button.

Name your cross-sell popup and click to start building

You will be taken into the campaign editor. Here, you can change any aspect of your template by clicking on it. We’ve uploaded a different image for our campaign:

Uploading a different image for the WooCommerce cross sell popup

It’s easy to change the text, buttons, and more. You can even include the coupon straight away like we have, by deleting the email newsletter signup field. We added extra text blocks to our popup to give the coupon code:

Adding text blocks to your cross-sell popup

If you keep the email sign up, make sure you edit the ‘Success’ view of the popup to display your chosen coupon code.

Tip: If you do use the email sign up, you also need to link OptinMonster to your email provider under the ‘Integrations’ tab. There are instructions on this in our step by step guide on creating a coupon popup.

Once you’ve finished creating your campaign, don’t forget to click the ‘Save’ button on the top right.

Save your OptinMonster campaign

In order to show your campaign to customers with specific products in their carts, you need to connect OptinMonster with WooCommerce.

To do this, click on the OptinMonster tab in your WordPress dashboard and then click on the ‘WooCommerce’ tab.

Autogenerate the WooCommerce keys to connect OptinMonster and your WooCommerce store

You should see a message letting you know that WooCommerce is connected with OptinMonster:

OptinMonster and WooCommerce are now connected

Now, go back to the OptinMonster app and edit your chosen campaign. Click on the ‘Display Rules’ tab, then select ‘the WooCommerce cart contains’ and your chosen product for your rule:

Setting a 'cart contains' rule for your OptinMonster popup

You need to set up a separate rule for each product that you want the cross-sell to apply to. Simply click to add a new ‘OR’ Rule:

Adding a new OR rule to add other products

Then, add your rule as before:

Setting 2 rules for different products in your store

Don’t forget to click the ‘Save’ button on the top right of the screen. Now, you just need to follow the instructions at the end of this tutorial to put your popup live on your site.

How to Create a WooCommerce Upsell Popup to Get Customers to Spend More

An upsell popup lets you encourage customers to buy a product that’s more expensive than the one they were considering.

For instance, if you sell a software package, you might offer a special deal on a higher-priced plan.

To create your upsell popup, you first need to create a new OptinMonster campaign. Select ‘Popup’ for the campaign type and choose any template that you want to use. We’ll be using the ‘Flash’ template:

Choosing a template for your WooCommerce upsell popup

Once you’ve selected your template, OptinMonster will prompt you to name your campaign and select the site you want to run it on. Once you’ve done this, simply click the Start Building button:

Naming your WooCommerce upsell popup in OptinMonster

You can now change anything you like about the campaign by clicking on the item. We’re going to switch the timer to become a dynamic (evergreen) timer. This means it will be set individually for each customer:

Editing the timer for your upsell popup

If you want to give customers the coupon straight away, simply remove the email field. It’s easy to use the ‘Add Blocks’ feature to add a text field with a coupon code here instead.

Adding blocks to your upsell popup

Once you’re happy with your coupon, click the ‘Save’ button on the top right. Then, click the ‘Display Rules’ tab.

Simply follow the instructions above for cross-sell coupons to connect OptinMonster and WooCommerce. Then, set a display rule to show the popup when the user is looking at a specific product:

Using a product targeting rule in OptinMonster's display rules

Tip: Don’t want to go through the steps of connecting OptinMonster and WooCommerce? You could instead use OptinMonster’s page targeting rule to target the URL of your product page instead.

Once you’ve set your display rules, go ahead and save your popup. Then, simply put it live on your site by following the instructions at the end of this tutorial.

How to Create a Gamified WooCommerce ‘Spin to Win’ Popup

The spin a wheel popup we’re going to look at is a bit different. The gamified ‘spin to win’ popup gives the customer a special offer or coupon. It’s a fun alternative to boost conversions and overall engagement.

First, create a new campaign in OptinMonster and select the Gamified campaign type. There are 3 templates you can choose from. We’ll be using the blue wheel:

Creating a gamified coupon wheel campaign in OptinMonster

OptinMonster will prompt you to give your campaign a name and choose which website to load it on. Once you’ve done this, just click the ‘Start Building’ button.

Naming your gamified spin to win WooCommerce campaign in OptinMonster

You will now see the coupon wheel template in the OptinMonster editor. Simply click on any element that you want to change. To edit the different options on the wheel, click on it then click the ‘Edit Wheel Sections’ button:

Editing the different sections of your spin to win wheel

Once you’re happy with your coupon wheel, click the ‘Save’ button at the top of the screen:

Make sure you save your completed spin the wheel popup

Just follow our step by step guide to creating a ‘spin to win’ popup if you want more help with setting up your coupon wheel.

You also need to link OptinMonster to your email system. To do that, simply click on the ‘Integrations’ tab then click the ‘Add New Integration’ button:

Adding email integration to your spin the wheel popup

Next, you need to select your email provider from a dropdown list:

Select your email provider from the dropdown

Follow the on-screen instructions to connect OptinMonster with your email provider. Don’t forget to click the ‘Save’ button again at the top of the screen after doing so. Now, you can put the popup live on your site by following the instructions at the end of this tutorial.

How to Create a Fullscreen Popup for WooCommerce

Another very effective popup you can create for your online store is a fullscreen WooCommerce popup. This lets you welcome new visitors and encourage them to join your email list. You could offer them a special discount in return.

To create a fullscreen popup in OptinMonster, create a new campaign and choose the Fullscreen campaign type. Then, select a template. We’re going to use the Estate template for our popup:

Choose the fullscreen campaign type and then pick a template

Next, you need to enter a name for your campaign and choose which site it will display on. Once you’re ready, click the ‘Start Building’ button.

Name your fullscreen campaign in OptinMonster

You’ll now see your fullscreen welcome mat in the OptinMonster builder. You can edit the text and the image to suit your store. Simply click on whatever you want to change.

We’re going to change the text by clicking on it and editing it in the left hand pane:

Editing your welcome mat

Go ahead and make any other changes you want.

Next, you need to integrate OptinMonster with your email list by clicking the ‘Integrations’ tab. For instructions on this, take a look at our guide to spin the wheel popups above.

Once you’re happy with your welcome mat, don’t forget to click the ‘Save’ button. You can then move to the ‘Display Rules’ tab:

Save your welcome mat design then move to the Display Rules tab

For the display rules, you want to set your welcome mat to only display to first time visitors. To do this, click on the ‘time on page’ dropdown and select the ‘New Visitor’ option:

Change the 'time on page' dropdown to target new visitors

If you want the welcome mat to display on all pages of your site, simply leave the ‘current URL path’ dropdown set to ‘is any page’. Don’t forget to click the ‘Save’ button at the top of the screen:

Our welcome mat will display for new visitors to the site, whichever page they arrive on

You can now go ahead and put your popup live on your site by following the instructions below.

For more tips, check out our guide to creating a welcome mat for your WordPress site. You’ll find some useful examples there, too.

Putting Your WooCommerce Popup Live on Your Site

After creating any popup, you need to make it live before it will show up on your website. First, you need to click the ‘Publish’ tab in the OptinMonster app. Then, click the ‘Status’ toggle to set it to Live.

Make your OptinMonster coupon live so you can add it to your site

Note: Your popup will not be live straight away. You still need to go live with it in WordPress.

Now, go back to your WordPress admin and click on the OptinMonster menu item.

Refresh your list of OptinMonster campaigns in WordPress

You should then see your popup listed here:

Your WooCommerce popup should now appear in your list of campaigns

You need to click the ‘Go Live’ button to put your campaign live:

Click the Go Live link to put your campaign live on your WooCommerce site

It’s always a good idea to check your site to make sure your popup is displaying as intended. Here’s our cross-sell campaign in action, promoting sun hats when there’s a summer shirt in the customer’s cart:

The cross sell popup appearing when a summer shirt is in the customer's cart

We hope this article helped you learn how to create a WooCommerce popup to increase sales. You might also like our list of the best WooCommerce plugins for your store, and our comparison of the best WooCommerce hosting providers to speed up your store.

If you liked this article, then please subscribe to our YouTube Channel for WordPress video tutorials. You can also find us on Twitter and Facebook.

The post How to Create a WooCommerce Popup to Increase Sales (6 Proven Methods) appeared first on WPBeginner.