16 Best WordPress Typography Plugins to Improve Your Design

Are you looking for WordPress typography plugins to improve your website design?

Your font choice plays an essential role in your web design. Improving your website typography makes your site easier to read and offers visitors a better experience.

In this article, we’ll show you some of the best WordPress typography plugins you can use with your WordPress site.

16 best WordPress typography plugins to improve your design

Why is Typography Important for Your WordPress Site?

Your website typography is a very important part of your overall design. Choosing beautiful and easy to read fonts will increase your website engagement and boost the time your users spend on your site.

Many of the best WordPress themes come with access to Google Fonts and allow you to tweak the typography to suit your needs.

There are built-in settings within the post and page editor that give you more control over your fonts and layouts.

However, there’s a lot more you can do with your typography, like add subtitles, use drop caps, include footnotes, let users resize fonts, and much more.

By choosing the right WordPress plugins, you can improve the typography on your WordPress website without writing any code.

Having said that, let’s take a look at some of the best WordPress typography plugins that you can try on your website.

1. Google Fonts for WordPress

Fonts Plugin

Google Fonts for WordPress has a library of over 1,455 stylish fonts that you can use on your WordPress site. It comes with a live preview for each font to help you select the font for your headings and content.

The plugin has Adobe Fonts integration and also supports thousands of Google Fonts. You can also upload custom fonts and change font size, color, weight, and line height in the plugin settings.

For more details, see our guide on how to add custom fonts in WordPress.

Deal: If you want to get the premium version of the plugin, then make sure to use our Google Fonts for WordPress coupon for a 20% discount.

2. wp-Typography

wp-Typography

wp-Typography is a free WordPress typography plugin. It gives you more control over special characters like hyphens, ellipses, trademark symbols, fractions, and more.

The plugin supports over 70 different languages and can help to provide an improved reading experience for your visitors.

3. Zeno Font Resizer

Zeno Font Resizer

Zeno Font Resizer gives your visitors the option to change the font size on your website with a couple of clicks. This can improve your user experience for those who prefer larger text.

The plugin makes it easy to add a font resize option to your WordPress sidebar. It also uses jQuery, so your visitors can adjust the font without the page reloading.

4. Page Title Splitter

Page Title Splitter

Page Title Splitter is a unique plugin that lets you split longer post titles into two lines. This lets you use longer and more descriptive post titles while making sure they’re still readable.

This works for all posts, pages, and custom post type titles. It gives you complete control over the layout of your title on desktop and mobile devices.

5. Secondary Title

Secondary Title

Secondary Title is a simple plugin that lets you add subtitles to your posts and pages. This is common with popular websites like Buzzfeed, Medium, Mashable, and more.

Adding secondary titles, or subtitles, lets you explain your title and gives you a better chance to hook your readers and encourage them to read your content.

For more details, see our guide on how to add subtitles for posts and pages in WordPress.

6. Toolkit for Block Theme

Toolkit for Block Theme

Toolkit for Block Theme is a WordPress block editor plugin to customize your theme design and styles. It lets you change fonts, integrate Google Fonts, and use additional global styles to make a perfect website for your business.

It gives you the option to host Google Fonts locally, so you can import any font family and use it on your website. The plugin has several other options for WordPress block themes.

7. Editor Plus

Editor Plus

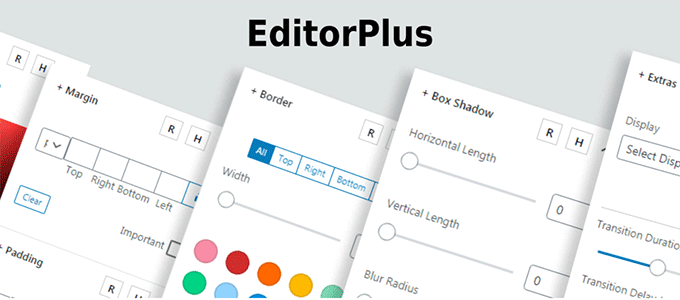
Editor Plus is an advanced WordPress customization plugin. It comes with typography controls and a panel to manage your font properties.

The plugin lets you change the font weight, font style, font size, letter spacing, line height, and color. You can also control the font display on different screen sizes and devices easily.

8. Text Hover

Text Hover

Text Hover is a plugin that lets you add a text hover box to your content and make your site more interactive.

This can be helpful when displaying phrases, definitions, explanations, acronyms, and more. It helps to give your readers more context when reading your articles.

9. Custom Adobe Fonts

Custom Adobe Fonts

Custom Adobe Fonts lets you add popular Adobe (formerly Typekit) fonts to your website.

The plugin works with the most popular page builders, so you have a larger font library to choose from when customizing your site.

10. Font Awesome

Font Awesome

Font Awesome lets you add icon fonts to your website. Icon fonts are simple pictograms you can use to improve your buttons, feature boxes, navigation menus, and more.

For more details, see our guide on how to easily add icon fonts to your WordPress theme.

11. Use Any Font

Use Any Font

Use Any Font lets you upload custom fonts to WordPress. This is great if you have custom fonts downloaded to your computer that you want to use.

You can also use fonts from the font library, which has over 23,000 different fonts to choose from.

12. Styleguide

Styleguide

Styleguide lets you customize your theme’s fonts and colors in your WordPress theme customizer.

This lets you change the appearance of your fonts without having to add custom CSS to your website. It’s compatible with most WordPress themes.

13. OMGF

OMGF

OMGF is a plugin that will optimize your Google Fonts. It lets you host your fonts locally to speed up loading times.

The plugin helps to minimize DNS requests, reduces layout shifts, and leverages browser caching to improve performance. It’s very beginner friendly and runs quietly in the background.

14. SeedProd

SeedProd WordPress Website Builder

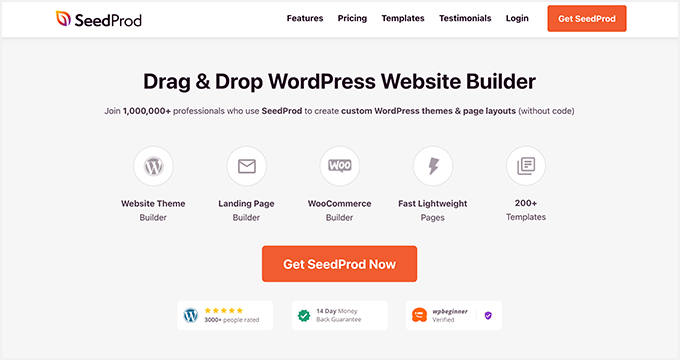
SeedProd is the best WordPress theme and website builder on the market. It comes with ready-made template kits that you can use to launch your website in just a few clicks.

SeedProd is also the best WordPress page builder. With this plugin, you can create custom pages and have complete control over the appearance of your fonts.

You can even use the dynamic text feature to create animated headlines to attract your visitors. Plus, you get access to the entire Google Fonts library to use on your website.

15. Thrive Themes

ThriveThemes

Thrive Themes has a popular WordPress website builder and offers a powerful suite of tools to grow your online business. It’s a 1-stop solution for beginners to set up a business website and add growth tools all at once.

Moreover, it comes with a quiz builder, an A/B testing tool, a testimonial plugin, and more. All their tools work with your WordPress theme seamlessly.

Thrive Builder lets you customize font styling, font size, and font color within the website builder settings. You can also integrate any custom font plugin with Thrive Themes to add more fonts to your WordPress site.

Thrive Builder lets you change the default source to import fonts, and you can add new fonts of your choice easily.

16. WP Rocket

WP Rocket

WP Rocket is the best WordPress caching plugin in the market. It’s very beginner friendly and helps you speed up WordPress.

There’s a unique caching option that will optimize your Google Fonts with a single click. If you run a website speed test, this is one of the most common speed issues users report.

For more details, see our guide on how to install and set up WP Rocket in WordPress.

We hope this article helped you find the best WordPress typography plugins for your website. You may also want to see our expert picks of the best virtual business phone number apps and our guide on how to get a free email domain.

If you liked this article, then please subscribe to our YouTube Channel for WordPress video tutorials. You can also find us on Twitter and Facebook.

The post 16 Best WordPress Typography Plugins to Improve Your Design first appeared on WPBeginner.

How to Add Custom Fonts in WordPress

Do you want to add custom fonts in WordPress? Custom fonts allow you to use beautiful combination of different fonts on your website to improve typography and user experience.

Apart from looking good, custom fonts can also help you improve readability, create a brand image, and increase time users spend on your website.

In this article, we will show you how to add custom fonts in WordPress using Google Fonts, TypeKit, and CSS3 @Font-Face method.

Adding custom fonts in WordPress

Note: Loading too many fonts can slow down your website. We recommend choosing two fonts and use them across your website. We’ll also show you how to properly load them without slowing down your website.

Before we look at how to add custom fonts in WordPress, let’s take a look at finding custom fonts that you can use.

How to Find Custom Fonts to Use in WordPress

Fonts used to be expensive, but not any more. There are many places to find great free web fonts such as Google Fonts, Typekit, FontSquirrel, and fonts.com.

If you don’t know how to mix and match fonts, then try Font Pair. It helps designers pair beautiful Google fonts together.

As you are picking your fonts, remember that using too many custom fonts will slow down your website. This is why you should select two fonts and use them throughout your design. This will also bring consistency to your design.

Video Tutorial

If you don’t like the video or prefer the written guide, then please continue reading.

Adding Custom Fonts in WordPress from Google Fonts

Preview of Google Fonts

Google Fonts is the largest, free, and most commonly used font library among website developers. There are multiple ways you can add and use Google Fonts in WordPress.

Method 1: Adding Custom Fonts Using Easy Google Fonts Plugin

If you want to add and use Google Fonts on your website, then this method is by far the easiest and recommended for beginners.

First thing you need to do is install and activate the Easy Google Fonts plugin. For more details, see our step by step guide on how to install a WordPress plugin.

Upon activation, you can go to Appearance » Customizer page. This will open the live theme customizer interface where you’ll see the new Typography section.

Customizer typography

Clicking on Typography will you show different sections of your website where you can apply Google Fonts. Simply click on ‘Edit Font’ below the section you want to edit.

Typography settings

Under the font family section, you can choose any Google Font you want to use on your website. You can also choose font style, font size, padding, margin, and more.

Depending on your theme, the number of sections here could be limited and you may not be able to directly change font selection for many different areas of your website.

To fix this, the plugin also allows you to create your own controls and use them to change fonts on your website.

First, you need to visit Settings » Google Fonts page and provide a name for your font control. Use something that helps you quickly understand where you will be using this font control.

Font control section

Next, click on the ‘Create font control’ button and then you will be asked to enter CSS selectors.

You can add HTML elements you want to target (for instance, h1, h2, p, blockquote) or use CSS classes.

You can use Inspect tool in your browser to find out which CSS classes are used by the particular area you want to change.

Add CSS selectors

Now click on the ‘Save font control’ button to store your settings. You can create as many font controllers as you need for different sections of your website.

To use these font controllers, you need to head over to Appearance » Customizer and click on the Typography tab.

Under Typography, you will now see a ‘Theme Typography’ Option as well. Clicking on it will show your custom font controls you created earlier. You can now just click on the edit button to select the fonts and appearance for this control.

Theme typography option

Don’t forget to click on the save or publish button to save your changes.

Method 2: Manually Add Google Fonts in WordPress

This method requires you to add code to your WordPress theme files. If you haven’t done this before, then see our guide on how to copy and paste code in WordPress.

First, visit the Google fonts library and select a font that you want to use. Next, click on the quick use button below the font.

Select font styles you want to use

On the font page, you’ll see the styles available for that font. Select the styles that you want to use in your project and then click on the sidebar button at the top.

Get the font embed link

Next, you will need to switch to the ‘Embed’ tab in the sidebar to copy the embed code.

There are two ways you can add this code to your WordPress site.

First, you can simply edit your theme’s header.php file and paste the code before the <body> tag.

However, if you are unfamiliar with code editing in WordPress, then you can use a plugin to add this code.

Simply install and activate the Insert Headers and Footers plugin. For more details, see our step by step guide on how to install a WordPress plugin.

Upon activation, go to Settings » Insert Headers and Footers page and paste the embed code in the ‘Scripts in header’ box.

Add font code to your WordPress site

Don’t forget to click on the Save button to store your changes. The plugin will now start loading the Google Font embed code on all pages of your website.

You can use this font in your theme’s stylesheet like this:

.h1 site-title { 
font-family: 'Open Sans', Arial, sans-serif; 
}

For more detailed instructions see our guide on how to add Google fonts in WordPress themes.

Adding Custom Fonts in WordPress Using Typekit

Typekit Adobe Fonts

Typekit by Adobe Fonts is another free and premium resource for awesome fonts that you can use in your design projects. They have a paid subscription as well as a limited free plan that you can use.

Simply signup for an Adobe Fonts account and visit the browse fonts section. From here you need to click on the </> button to select a font and create a project.

Add typekit font to a project

Next, you’ll see the embed code with your project ID. It will also show you how to use the font in your theme’s CSS.

You need to copy and paste this code inside the <head> section of your website.

Typekit font embed code

There are two ways you can add this code to your WordPress site.

First, you can simply edit your theme’s header.php file and paste the code before the <body> tag.

However, if you are unfamiliar with code editing in WordPress, then you can use a plugin to add this code.

Simply install and activate the Insert Headers and Footers plugin.

Upon activation, go to Settings » Insert Headers and Footers page and paste the embed code in the ‘Scripts in header’ box.

Adding Typekit by Adobe Fonts in WordPress

That’s all, you can now use the Typekit font you selected in your WordPress theme’s stylesheet like this:

h1 .site-title { 
font-family: gilbert, sans-serif;
} 

For more detailed instructions check out our tutorial how to add awesome typography in WordPress using Typekit.

Adding Custom Fonts in WordPress Using CSS3 @font-face

The most direct way of adding custom fonts in WordPress is by adding the fonts using CSS3 @font-face method. This method allows you to use any font that you like on your website.

First thing you need to do is download the font that you like in a web format. If you do not have the web format for your font, then you can convert it using the FontSquirrel Webfont generator.

Once you have the webfont files, you would need to upload it on your WordPress hosting server.

The best place to upload the fonts is inside a new “fonts” folder in your theme or child theme‘s directory.

You can use FTP or File Manager of your cPanel to upload the font.

Once you have uploaded the font, you need to load the font in your theme’s stylesheet using CSS3 @font-face rule like this:

@font-face {
	font-family: Arvo;  
	src: url(https://www.example.com/wp-content/themes/your-theme/fonts/Arvo-Regular.ttf);  
	font-weight: normal;  
}

Don’t forget to replace the font-family and URL with your own.

After that you can use that font anywhere in your theme’s stylesheet like this:

.h1 site-title { 
font-family: "Arvo", Arial, sans-serif; 
}

Loading fonts directly using CSS3 @font-face is not always the best solution. If you are using a font from Google Fonts or Typekit, then it is best to serve the font directly from their server for optimal performance.

That’s all, we hope this article helped you add custom fonts in WordPress. You may also want to checkout our guide on how to use icon fonts in WordPress and how to change the font size in WordPress.

If you liked this article, then please subscribe to our YouTube Channel for WordPress video tutorials. You can also find us on Twitter and Facebook.

The post How to Add Custom Fonts in WordPress appeared first on WPBeginner.