9 Best SMS Marketing Plugins for WordPress (Expert Pick for 2023)

Are you looking for an SMS marketing plugin for your WordPress website?

SMS marketing plugins are tools that will help you promote your products or services through text messages to users. They can increase sales and bring more traffic to your WordPress website.

In this article, we have hand-picked some of the best SMS marketing plugins for WordPress.

Best SMS marketing plugins for WordPress

Why Use SMS Marketing Plugins on Your WordPress Website?

SMS marketing plugins allow you to send SMS updates, promotions, and other messages to customers or subscribers on your WordPress website.

By using SMS marketing plugins, you can send personalized SMS messages to users to increase user engagement, drive traffic, and boost sales on your site.

This can be highly effective for bringing back existing customers to your website or online store by reaching out and keeping them informed about promotions, sales, or events.

WordPress SMS marketing plugins are also typically super easy to use and cost-effective compared to other marketing channels.

Plus, open rates for SMS messages are significantly higher than email marketing. This means you are more likely to capture your audience’s attention and encourage them to take action.

That being said, let’s look at some of the best WordPress SMS marketing plugins that can help you promote the products and services offered on your WordPress website.

1. OptinMonster

OptinMonster website

OptinMonster is the best conversion optimization and lead generation software that comes with several marketing tools to help you turn website visitors into subscribers and customers.

It also allows you to create SMS campaigns by integrating with popular SMS marketing software like Brevo (formerly Sendinblue), Drip, and HubSpot.

The plugin comes with over 50 pre-built templates and a drag-and-drop builder, making it super easy to create engaging and attractive SMS messages for marketing campaigns.

Optinmonster drag and drop builder

Once you have done that, you can easily connect OptinMonster with an SMS marketing platform to send text messages to your users.

First, you will need to head over to the OptinMonster » Integrations page from the WordPress admin sidebar. Then, just click the ‘Connect’ button under the SMS marketing platform option of your choice.

Next, add your account name and API key to connect the platform with the plugin. After that, you will be able to launch your SMS campaign and send messages to your users.

Provide API key

Pros

  • Its user interface is super easy to navigate as it comes with a drag-and-drop builder.
  • OptinMonster allows you to create automated text messages triggered by specific actions like user behavior, demographics, or location.
  • It creates analytics reports to help you measure the effectiveness of your campaigns.
  • The tool makes it super easy to A/B test your SMS marketing campaigns and optimize your results.
  • With OptinMonster, you can also send personalized text messages using HTML elements.
  • It also offers other features like geolocation targeting, exit intent technology, an inactivity sensor, campaign scheduling, and more.

Cons

  • It’s a paid tool and doesn’t offer a free version.

Why we recommend OptinMonster: Overall, OptinMonster is the best SMS marketing tool for WordPress as it easily integrates with popular SMS marketing services, has 50+ pre-built templates, offers analytics and campaign scheduling, sends automated text messages, and more.

Plus, you can also use OptinMonster to create popups, floating bars, Yes/No forms, and spin-the-wheel popups, making it the ultimate choice for your WordPress site.

2. Nextiva

Nextiva website

Nextiva is a well-known communication platform that offers a CRM (customer relationship manager), VOIP phone call, fax service, team messaging, video conferencing, and more.

It is the best call center software on the market and even offers built-in help desk software for customer support.

With Nextiva, you can easily launch an SMS marketing campaign for your website because the tool allows you to send text messages to large groups of people at once.

You can integrate it with your website using the NextivaONE plugin. Then, you can manage all your text messages, voice calls, call routing, and more in a central space.

Pros

  • It is a cloud-based tool, which makes it ideal for remote teams.
  • Nextiva can segment your contact list and send targeted SMS messages to different groups.
  • You can schedule your SMS marketing campaigns in advance.
  • You can also personalize your text messages by including the customer’s name, purchase history, or other relevant information.
  • It provides detailed analytics on your SMS marketing performance.
  • Nextiva can also integrate with other tools and offers automation, social media management, reputation management, and more.

Cons

  • Nextiva is more expensive than some of the other tools on this list.
  • It has a learning curve and can be difficult to use for beginners.

Why we recommend Nextiva: Overall, Nextiva is an ideal choice if you have a small business because it offers SMS marketing, automation, CRM, business phone number service, customer support software, and so much more. It is also a good choice if you have a remote team because it’s a cloud-based tool.

3. Joy Of Text

Joy of Text

Joy Of Text is an amazing text messaging plugin that uses a Twilio account and phone number to send messages to your WordPress subscribers, customers, or users.

The plugin allows you to send automated SMS notifications, create custom messages for different events, allow opt-in subscriptions, and use two-way messaging.

Pros

  • Joy Of Text can segment your audience based on different demographic factors to create personalized SMS campaigns.
  • You can integrate Joy Of Text with popular form builders plugins like WPForms and Gravity Forms to send text messages to users who subscribed using your forms.
  • It allows you to create and send text-to-voice messages.
  • Joy Of Text includes analytics reports, bulk user import, searchable message history, and integration with the WordPress user database.
  • It has a free version.

Cons

  • The free Joy Of Text plugin does not allow you to send scheduled SMS messages.
  • It offers limited support, so you may have to troubleshoot problems yourself.
  • You cannot integrate the plugin with other SMS marketing platforms like Brevo.

Why we recommend Joy Of Text: Joy Of Text is a great choice if you are on a budget, as its free plan offers user-friendly features to create an SMS campaign. It’s also a good option for sending text messages to your email list if you collect subscribers using WPForms.

4. Brevo (formerly Sendinblue)

Brevo

Brevo (formerly Sendinblue) is a well-known email and SMS marketing platform.

It makes it super easy to create highly personalized SMS messages with the recipient’s name, location, and more for your marketing campaigns.

Brevo allows you to segment your contact list based on different parameters like demographic, geographic, or behavioral data. This makes sure that your SMS messages reach the right audience.

Plus, Brevo even lets you manage all of your SMS marketing from your Brevo account or by using the Newsletter, SMTP, Email marketing, and Subscribe forms by Sendinblue plugin.

Pros

  • It lets you create automated SMS messages triggered by specific actions and perform A/B testing.
  • You can manage opt-in and opt-out requests to comply with SMS marketing regulations.
  • You can integrate Brevo with other popular applications, including eCommerce platforms, landing page builders, and CRMs, to streamline your SMS marketing workflow.
  • Brevo lets you measure the open rates, click-through rates, and conversion rates of your SMS messages.

Cons

  • Brevo’s SMS marketing features are more limited than other tools on this list. For example, it doesn’t allow you to send scheduled SMS messages.
  • Brevo does not offer live chat support.

Why we recommend Brevo: If you have a small business website, then you should consider choosing Brevo. It’s super affordable, comes with powerful features, and allows you to easily manage opt-in and opt-out requests.

5. HubSpot

HubSpot

HubSpot is a well-known marketing platform that comes with a drag-and-drop builder and makes it super easy to launch SMS campaigns.

It has a suite of tools, including a CRM that allows you to personalize your email or SMS messages based on device type, country, list membership, or any other custom information for an individual subscriber.

Other than that, HubSpot even allows you to automate your SMS marketing campaigns so that you can send messages to customers after they subscribe to your newsletter, fill in a form, make a purchase, or more.

Pros

  • HubSpot comes with a free plugin that you can use on your WordPress site.
  • It lets you segment your contact list based on different demographics.
  • HubSpot provides you with detailed analytics about your SMS marketing campaigns.
  • It offers other features like live chat software, chatbots, A/B testing, marketing automation, drip campaigns, a website builder, a form builder, and more.

Cons

  • HubSpot’s SMS messages are limited to 160 characters, which can be restrictive for some businesses.
  • Its paid plan can be expensive for some users.

Why we recommend HubSpot: If you are looking for a suite of tools that let you create and manage your website easily, then HubSpot is a great option. It has a website builder, form builder, email and SMS marketing features, and more.

6. Texty

Texty

Texty is a free WordPress plugin that lets you send text messages to WordPress users’ phones, WhatsApp, or Telegram numbers.

It’s a lightweight and mobile-responsive plugin that must be integrated with a gateway like Twilio, Vonage, Plivo, or Clickatell to send SMS messages.

Pros

  • Texty offers many different customizable designs, including popups and banners.
  • It offers multilingual support and A/B testing.
  • Texty lets you segment your messages based on different criteria.
  • It can send automated messages to your users. For example, if you integrate Texty with WooCommerce, then you will be able to send automated messages that keep customers updated about their order status.

Cons

  • As the plugin is completely free, it offers limited features.
  • It does not offer great customer support.

Why we recommend Texty: Texty is a great free SMS marketing plugin if you have a small business website and are looking for a budget-friendly solution.

7. Omnisend

Omnisend

Omnisend is another powerful SMS and email marketing platform that allows you to create and automate SMS campaigns.

The tool comes with a drag-and-drop builder, an A/B testing feature, and integrates with platforms like WordPress, WooCommerce, help desk software, live chat software, and more.

With Omnisend, you can also allow your customers to respond to your SMS messages to open a communication channel or provide support.

Pros

  • It lets you create drip campaigns and segment your contact list based on different criteria.
  • You can run contests and giveaways via SMS messages.
  • It allows you to automate your SMS marketing campaigns based on triggers.
  • It has a free plan that offers most of the features required for setting up an SMS marketing campaign.

Cons

  • Omnisend has a lower deliverability rate for SMS than some of the other tools on this list. This means that sometimes your text messages may end up in the spam folder.
  • Its paid plan can be expensive for small businesses.

Why we recommend Omnisend: Overall, Omnisend is a great software that lets you create email and SMS marketing campaigns. We recommend it if you have an online store or need an omnichannel platform for managing your SMS, WhatsApp, and email messages in one place.

8. Formidable Forms + Twilio Add-On

Formidable Twilio addon

Formidable Forms is an advanced form builder plugin that can be used to create contact forms, registration forms, subscription forms, and more.

By integrating the Twilio add-on, you can use Formidable Forms and Twilio to create SMS marketing campaigns for your WordPress site.

Pros

  • Using your Twilio phone number, you can send automated text messages to all the users who have filled out a form on your website.
  • Twilio allows you to receive a text message from your subscribers.
  • Formidable Forms also allows you to integrate your website with Zapier, Constant Contact, or MailChimp.
  • It offers an analytics feature that can help track your SMS marketing campaigns.

Cons

  • Formidable Forms does not offer a free plan.
  • It only allows you to send text messages to users who are part of your email list.

Why we recommend Formidable Forms + Twilio: Formidable Forms + Twilio addon is an ideal choice if you built an email list using the Formidable Forms plugin. Then, you can easily send SMS messages to all the users who are part of your email list.

9. Drip

Drip

Drip is another powerful email and SMS marketing platform that can easily be integrated with WooCommerce and WordPress using its free plugin.

With Drip, you can create a series of automated text messages that are sent to subscribers based on specific triggers, such as a new sign-up, a purchase, or a customer support interaction.

Pros

  • Drip also allows you to send one-off text messages to announce events or sales in your online store.
  • It comes with A/B testing and an analytics reports feature.
  • Drip allows you to personalize text messages and segment them based on different criteria, including location, purchase history, and interests.
  • It enables you to track the links in your text messages to see how many people click on them and track replies to your messages to improve user engagement.

Cons

  • Drip is a paid service.
  • Its user interface is a bit difficult to navigate, so it may take some time before you get the hang of it.
  • It does not allow you to create SMS drip campaigns.

Why we recommend Drip: If you have a WooCommerce store, then Drip is the ideal eCommerce SMS and email marketing plugin, as it comes with automation tools, email/SMS segmenting options, store revenue attribution features, and even lets you send emails and SMS in bulk.

Bonus: Collect More Phone Numbers With WPForms

Before you can start sending SMS campaigns, you will need phone numbers from your readers and customers. You can easily collect more phone numbers for SMS marketing using WPForms.

WPForms is the best contact form plugin on the market that makes it super easy to build your phone and email list for WordPress.

First, you need to install and activate the WPForms plugin. For detailed instructions, see our guide on how to install a WordPress plugin.

Note: There is also a free WPForms plugin that you can use to create forms on your website. However, you will need to upgrade to the paid plugin to use the Phone field.

Upon activation, head to the WPForms » Add New page from the WordPress admin sidebar.

Once you are there, just select a template for your form. You can now make a contact form, registration form, subscription form, or any other form of your choice.

Creating a new form using ready-made templates

Upon choosing a form template, you will be taken to the drag-and-drop interface, where you will be able to customize your template.

From here, simply drag and drop the Phone field from the left column into the form.

Add the Phone field to the form

After that, click on the field to open up its settings in the left column.

You can now change the name of the Phone field and even provide a description for it. You can also toggle the ‘Required’ switch to active so that users won’t be able to submit the form unless they fill in the ‘Phone’ field.

Once you are done, simply click the ‘Save’ button at the top to store your settings.

Configure Phone field settings

To add the form to your website, you need to visit a new or existing page from your WordPress admin sidebar.

Once there, click the ‘+’ button in the top left corner of the screen to find and add the WPForms block to the page.

After that, just pick your form from the dropdown menu in the block.

Add the WPForms block

Finally, click the ‘Publish’ button to save your changes.

Now, you will be able to collect new phone numbers every time someone fills out the form.

You can even view your phone numbers and email list by visiting the WPForms » Entries page from the WordPress admin sidebar.

Here, all the phone numbers submitted on your site will be listed under the ‘Phone’ column.

This will help you collect more phone numbers for your SMS marketing.

WPForms entries

What Is the Best SMS Marketing Plugin for WordPress?

In our expert opinion, we believe that OptinMonster is the best SMS marketing plugin for WordPress because it can be integrated with multiple SMS providers, has 50+ customizable templates, and is easy to use.

However, if you have a WooCommerce or Easy Digital Downloads store, then we recommend using the Drip plugin, as it has specific features for online stores.

If you want to use an all-in-one communication platform that allows you to manage phone calls, voice messages, text messages, and video conferencing, then Nextiva is an excellent option.

Similarly, if you are looking for a free solution, then Joy of Text and HubSpot are great choices.

Frequently Asked Questions About SMS Plugins

If you have any questions about SMS marketing or WordPress SMS plugins, we will answer them here.

What is SMS marketing?

SMS marketing means sending text messages to your users to promote your website or business and open a communication channel with them.

You can use SMS messages to inform customers about their purchases, promote sales or events, send customer service notifications, and more.

By using SMS marketing plugins, you can even send personalized messages to your users to bring them back to your website and increase conversions.

Moreover, SMS marketing is more cost-effective than email marketing, making it an ideal option if you have a small business.

Which SMS marketing plugin is right for me?

In our expert opinion, OptinMonster is the best WordPress SMS marketing plugin. However, the right plugin for you can depend on your specific needs.

For example, if you have a WooCommerce or EDD store, then Drip or Omnisend are great choices, as they come with built-in features for online stores.

Similarly, if you are looking for an affordable option, then Brevo, HubSpot, and Texty are good options as well.

On the other hand, if you want to send text messages to your email list, then you can use the Formidable Forms + Twilio addon or the Joy Of Text plugin, which easily integrates with WPForms.

Best WordPress Guides for SMS and Email Marketing

If you liked this article, then please subscribe to our YouTube Channel for WordPress video tutorials. You can also find us on Twitter and Facebook.

The post 9 Best SMS Marketing Plugins for WordPress (Expert Pick for 2023) first appeared on WPBeginner.

How to Send Twilio SMS Notifications from WooCommerce (Step by Step)

Do you want to send Twilio SMS notifications from WooCommerce?

With SMS notifications, you can stay in touch with your customers, notify them of order updates, send coupon codes, and more.

In this article, we’ll show you how you can add Twilio SMS notifications from your WooCommerce online store.

How to send Twilio SMS notifications from WooCommerce

Why Add SMS Notifications to WooCommerce?

SMS notifications are the best way to give your customers information about their orders. Text messages are highly personal, and they are usually viewed and opened within seconds of receiving.

You can use SMS notifications to give your WooCommerce buyers updates about their orders. You can also deliver special coupon codes to encourage buyers to shop again.

SMS notifications give you creative ways to stay in touch with your customers and deliver value.

  • You can send out flash sale notifications
  • Alert your customers their favorite products are back in stock
  • Use SMS messages to deliver promo and coupon codes
  • Send order confirmation and shipping messages

Step 1. Set Up Your Twilio SMS Account

First thing you’ll need is a Twilio account.

Twilio is an online service that offers phone, voice messaging, and SMS services you can use with applications like WordPress and WooCommerce.

You can take advantage of the free trial to set up your account and experiment with the service. You’ll pay $0.0075 per message sent, with bulk messaging rates available.

To start, head over to the Twilio website and sign up for the free trial.

Twilio website sign up

On the signup page, you’ll be asked to enter your personal information.

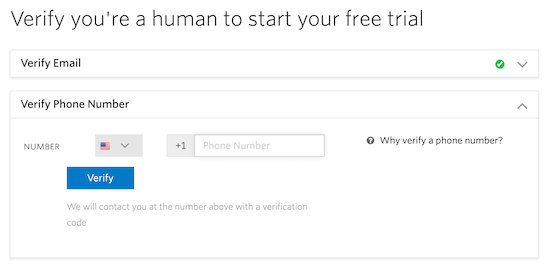
Then, you’ll need to verify your email address and your phone number.

Verify Twilio account

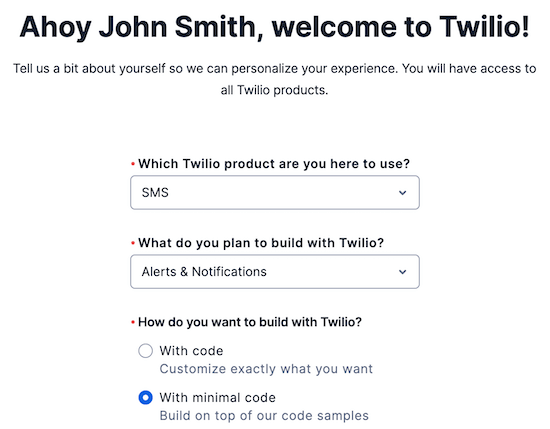
After that, select the products you want to use. In this case, it’s ‘SMS’ and ‘Alerts & Notifications’.

Then, select the ‘With minimal code’ option and ‘PHP’ below that.

Twilio sign up information

Once you enter your information, click ‘Get Started with Twilio’.

After you sign up for an account, you’ll be taken to the Twilio dashboard. You need to click the ‘Get your first Twilio number’ button to get a phone number for your account.

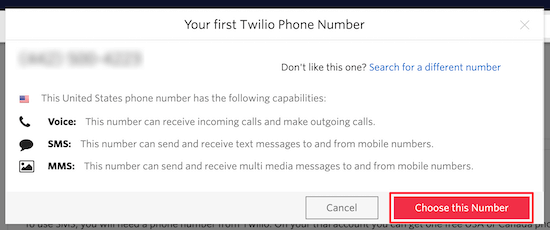
This will bring up a popup that contains your new number.

Twilio phone number

If you like the number, then click ‘Choose this Number’ to keep it.

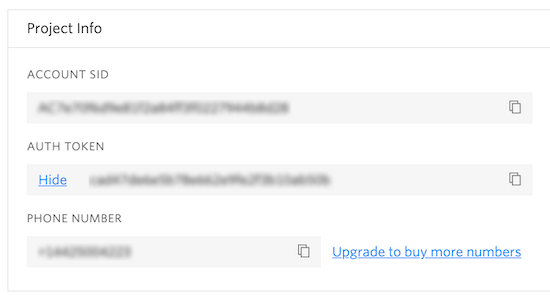
Your Account SID, Auth token, and new Twilio number are also listed on this screen.

You’ll need this information later, so keep this tab open.

Twilio project info screen

Step 2. Install and Activate Uncanny Automator

To send SMS messages from WooCommerce, we’re going to be using an automation plugin.

The best WordPress automation plugin is Uncanny Automator. It acts as a bridge between different WordPress plugins and applications and lets them talk to each other.

Uncanny Automator plugin

This plugin is like Zapier for WordPress websites. It’s incredibly beginner-friendly and comes with all kinds of automated workflows you can set up in a couple of clicks (no coding needed).

For more details, see our guide on how to create automated workflows in WordPress with Uncanny Automator.

Step 3. Create an SMS Notification with Uncanny Automator

Once Uncanny Automator is activated and set up, you can add a WooCommerce SMS notification.

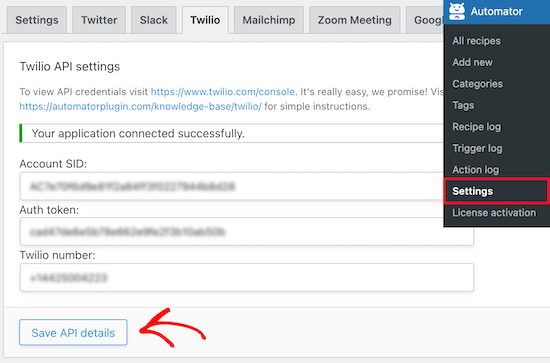
First, you’ll need to connect your Twilio account to the Uncanny Automator plugin.

To do this navigate to Automator » Settings. Then, click the ‘Twilio’ option.

Here you’ll enter your Account SID, Auth Token, and your Twilio number.

Connect Twilio account

Then, click ‘Save API Details’.

Now, you can set up a notification, so when a user places an order in WooCommerce, it’ll automatically send them an SMS message.

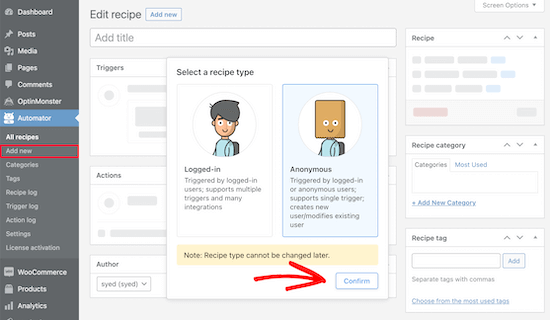
To do this, navigate to Automator » Add new. Then, you’ll be prompted to choose ‘Logged-in’ or ‘Anonymous’.

We’re going to choose ‘Anonymous’ so all users will receive an SMS notification, even if they check out with a guest account.

Uncanny Automator anonymous recipe

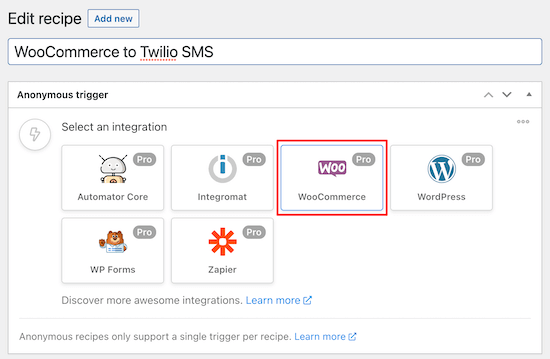
Next, you can give your recipe a name.

After that select ‘WooCommerce’ in the ‘Anonymous trigger’ meta box.

Select WooCommerce integration

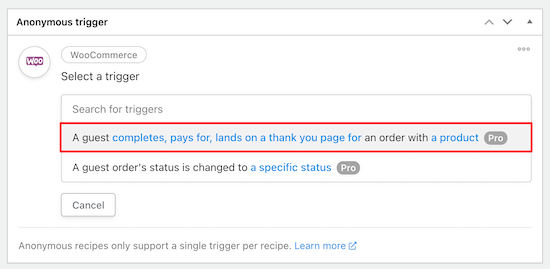
Now, you can choose your trigger.

We’ll use the first option since they’re all related to making a WooCommerce purchase.

Add WooCommerce trigger

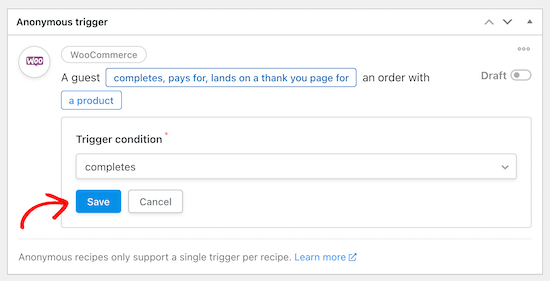
Next, choose the trigger condition.

From the drop-down menu, select ‘completes’, to trigger the automation when a customer completes a purchase. Then, click ‘Save’.

Completes order trigger

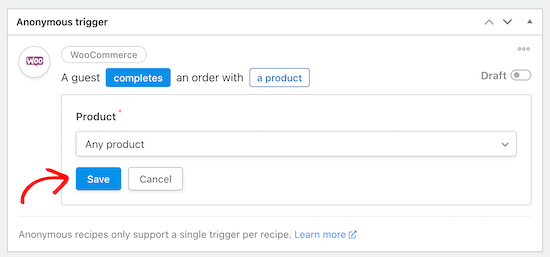
Once you’ve done that, you can choose a specific product or any product in your store.

To choose all products in your store, select the ‘Any product’ option, then click the ‘Save’ button.

All products trigger

The Automator will now save your trigger, and you can move on to the Actions section. You’ll see different options depending on if you choose anonymous or logged-in recipes.

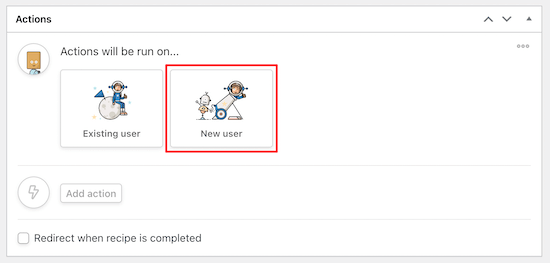
Since, we chose an anonymous recipe, there’s the option to perform the action on an Existing user or New user.

Set action on new users

To continue, click on ‘New user’.

Automator will now have you set the user data you want to use.

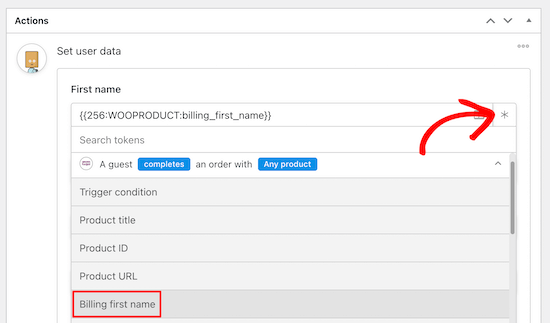
You need to click the ‘Asterisk’ sign next to each field and select the corresponding WooCommerce field. For example, we’ll be using ‘Billing first name’ for the ‘First name’ field.

Set user data WooCommerce first name

Below you’ll see the user role setting and what to do if the user already exists. You can select subscriber as the user role and ‘Do Nothing’ for existing users.

Then, click the ‘Save’ button to continue.

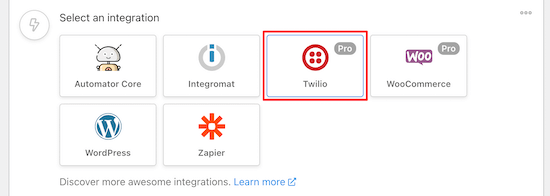
After saving, click the ‘Add action’ button and select the ‘Twilio’ integration.

Select Twilio integration

From the drop down menu, select ‘Send an SMS message to a number’.

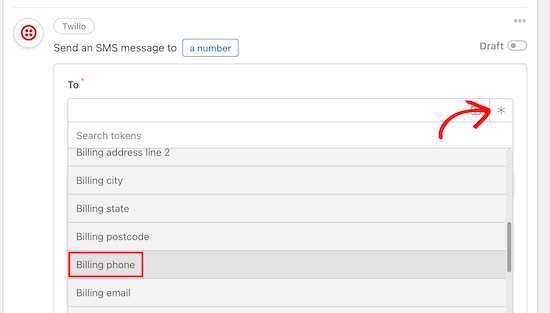
This will bring up a new box where you can add the To address and the Body of your text message.

In the ‘To’ field, you need to click the ‘Asterisk’ button and select ‘Billing phone’ from the drop down list.

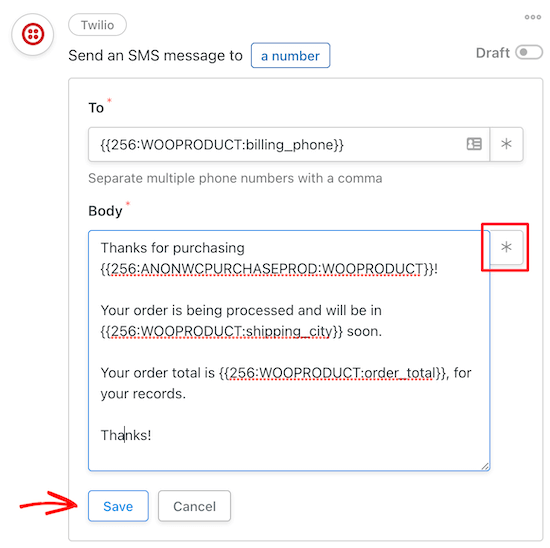
Then, you can customize the text message content you want to send to your customers. By clicking the ‘Asterisk’, you can add data from their order, like the name of the product, city, total price, and more.

Customize Twilio SMS message

Once you’re satisfied with your message, click ‘Save’.

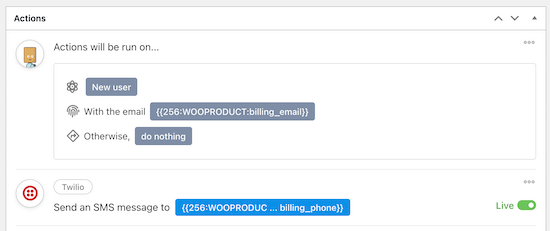
Now, you can view the full action summary.

Twilio full trigger and action setting

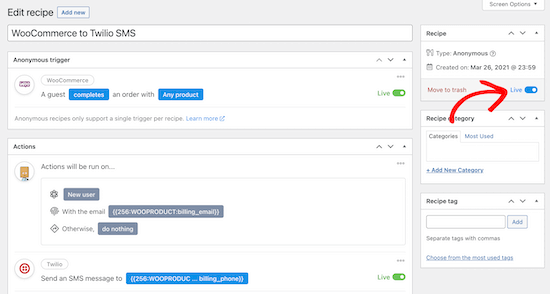
After that, you can go ahead and make this recipe active.

At the top of the editor in the ‘Recipe’ box, you can switch the ‘Draft’ toggle to Live.

Make recipe live

Your new recipe will now be active, and you’ll automatically send Twilio SMS notifications to your customers once they complete a purchase in WooCommerce.

Make sure to test your workflow to see that the recipe is triggered and the correct action is performed.

We hope this article helped you learn how to send Twilio SMS notifications from WooCommerce. You may also want to see our ultimate WooCommerce SEO guide and our expert list of the best WooCommerce plugins for your store.

If you liked this article, then please subscribe to our YouTube Channel for WordPress video tutorials. You can also find us on Twitter and Facebook.

The post How to Send Twilio SMS Notifications from WooCommerce (Step by Step) appeared first on WPBeginner.

Twilio Vs. MirrorFly: Who Is the Future of Real-Time Communication?

Introduction

The COVID-19 pandemic has forced the corporate business world to network with associates and communicate with potential clients using online communication tools. Hence, given the current market conditions – having a functional and efficient communication system has become the need of the hour. Due to which platforms offering text, voice, and video chat features must ensure they offer enterprise-level models. These platforms must be customizable and scalable. It is also important for the communication platform to be of a certain standard that supports a huge number of users with minimal latency rates. Nevertheless, with multiple options in the market, it can be difficult to choose the right real-time communication platform.

Twilio

So, what is Twilio? Twilio is one of the top-rated cloud communication platforms in the market that uses a PaaS model. Twilio offers developers tools or software-based platforms to integrate voice, video, or messaging into any mobile app. Twilio is basically a developer’s platform, which means that this platform cannot be used by a marketer or a non-developer. Twilio as a communication platform provides a powerful API system for phone services offering companies to make and receive phone calls and send and receive text messages instantly.

Leveraging CloudAMQP Within My Heroku-Based SaaS Solution

In the "Using Heroku to Quickly Build a Multi-Tenant SaaS Product" article, I documented the foundation for a new SaaS solution that I am building (initially for my sister-in-law) — utilizing the Heroku ecosystem. Using Heroku allowed me to deploy the app quickly, without having to worry about infrastructure, DevOps, scalability when the app gets popular, etc. The "Integrating Twilio Into My SaaS Solution In Heroku" publication provided an example of how easy it is to create a Twilio instance and integrate the solution into my Fitness-based SaaS solution. This current journey has resulted in a feature set that both trainers and their clients have been able to enjoy.

This article is going to focus on invoicing clients for services that have been performed and will utilize messaging solutions within the Heroku ecosystem. The goals of the invoice process are as follows:

How to Get SMS Text Messages From Your WordPress Forms

Do you want to get SMS text messages from your WordPress forms?

Receiving text messages on your phone makes it easy to stay on top of new form submissions, leads, product orders, registrations, and more. This can improve your response rate and increase customer satisfaction.

In this article, we will show you how to easily get SMS text messages from your WordPress forms, step by step.

Get SMS text messages from your WordPress forms

Why Get SMS Text Messages From Your WordPress Forms?

Getting SMS text messages from your WordPress forms lets you receive instant alerts on your phone. This can be very useful for small business websites with smaller teams.

For instance, if you run a restaurant website, then you may want to get an instant alert for food order forms.

Similarly, if you have an appointment or booking form on your website, then an instant text message can notify you of a new booking.

This can help improve customer satisfaction by helping you respond to your customers as quickly as possible.

Having said that, let’s see how to easily get SMS messages from your WordPress forms.

How to Get SMS Text Messages From Your WordPress Forms

You can easily get text messages from your WordPress forms by connecting WPForms with Twilio.

WPForms is the best contact form plugin on the market, used by over 6 million websites. Similarly, Twilio is a leading text messaging service for sending SMS texts.

Since our goal is always to show no-code solutions for beginners, we will be using Zapier to act as a bridge between the two apps. This will let you set up everything without having any coding knowledge.

Ready? Let’s get started.

Setting Up Your WordPress Form Using WPForms

First, you need to install and activate the WPForms plugin. For more details, see our step-by-step guide on how to install a WordPress plugin.

Note: WPForms has a free version. However, you will need at least the Pro plan of the plugin to unlock the Zapier addon.

Upon activation, visit the WPForms » Settings page from the WordPress admin sidebar to enter the plugin license key.

You will find this information in your account area on the WPForms website.

Entering the WPForms license key

Once you have done that, it’s time to create your first form. To do this, head over to the WPForms » Add New page from the WordPress dashboard.

This will take you to the ‘Select a Template’ page, where you can start by typing a name for the form that you are creating.

After that, you can select any of the premade templates offered by WPForms by clicking the ‘Use Template’ button.

For this tutorial, we will be creating a simple contact form.

Choose the contact form template

The template of your choice will now be launched in the WPForms form builder, where you will notice a form preview on the right with its settings in the left column.

From here, you can drag and drop any form field from the left column into the form.

For detailed instructions, you can see our tutorial on how to create a contact form in WordPress.

Configure form entry

Once you are satisfied, just click the ‘Save’ button at the top to store your settings.

Now, to add your WordPress form to your website, open a page/post from the WordPress dashboard. Then, you need to click the add block ‘+’ button in the top left corner of the screen to open the block menu.

Find and add the WPForms block to the page, and then choose the form that you created from the dropdown menu in the block itself.

Add the WPForms block

Finally, click the ‘Publish’ or ‘Update’ button at the top to save your changes.

Once you have done that, you will need to submit a test entry in order to set up Zapier. Here’s our test entry in our custom form:

Add a form entry

Preparing to Connect WPForms and Zapier

We are now going to use Zapier to connect WPForms and Twilio. To do this, you will first need to install and activate the WPForms Zapier addon.

For this, visit the WPForms » Addons page from the WordPress dashboard and find the Zapier addon.

Once you have done that, click the ‘Install Addon’ button.

Add Zapier addon

The Zapier addon will now be installed and activated for you.

Now, you need to visit the WPForms » Settings page from the admin sidebar and switch to the ‘Integrations’ tab.

Here, just click on the Zapier logo to see your Zapier API key.

You will need this key in a later step to connect Zapier to WPForms. Go ahead and copy it somewhere safe, or just leave the tab open.

Copy the Zapier API key

Preparing to Connect Twilio and Zapier

Now, it’s time for you to create a Twilio account. Twilio is a leading SMS service, and they offer a limited free account that you can use.

First, you need to visit the Twilio website and click the ‘Start for free’ button.

Sign up for your Twilio account

You will now be directed to a new screen where you have to create a free Twilio account by providing login details.

Once you have set up an account, you will be sent a verification email that you will need to click on to activate your account.

View Twilio email to verify your account

Once you have verified your account and filled in some additional details, your Twilio dashboard will open up on the screen.

From here, you will have to choose a phone number that will send you text messages every time someone fills out a form on your WordPress website.

To do this, click the ‘Get phone number’ button on the dashboard.

Click the Get Phone Number button

Then, the phone number will be automatically displayed instead of the button by Twilio.

Next, you have to scroll down to the ‘Account Info’ section, where you will see your Twilio Account SID and Auth Token. You will need these when you set up Zapier. You could copy them to a safe place or leave your tab open.

Copy Twilio account information

Creating a Zap to Send an SMS When Your Form is Submitted

Zapier is an automation tool that can be used to connect different apps and services so that they can automate repetitive tasks.

In this tutorial, we will be connecting WPForms and Twilio using Zapier.

To do this, you need to sign in on the Zapier website. If you don’t have an account, then simply create a free one.

Once you have set up an account, click the ‘+ Create Zap’ button in your dashboard.

Click Create Zap button

Note: Zapier uses the word ‘Zap’ for a process that includes a trigger and an action. Our trigger will be someone submitting the form. Our action will be sending an SMS message.

You will now be taken to a new screen where you can start by typing a name for your Zap.

Then, you need to click on the ‘Trigger’ tab to set up WPForms as the trigger.

Click the Trigger option

This will open a prompt on the screen where you have to type ‘WPForms’ into the search bar.

Now, once the WPForms icon comes on the screen, simply click on it.

Choose the WPForms as the trigger integration

Upon choosing WPForms as the trigger integration, you must select the event that will actually trigger the action.

To do this, select the ‘New Form Entry’ option from the ‘Event’ dropdown menu in the right column. After that, click the ‘Continue’ button.

Choose form entry as the trigger event

Zapier will now prompt you to connect to WPForms.

Go ahead and click the ‘Sign in’ button to continue.

Click Sign in button next to the WPForms option

This will launch a new window on your screen where you have to provide your WPForms API key and your website URL (domain name).

Once you have done that, just click the ‘Yes, Continue to WPForms’ button.

Add the WPForms API key

Now that you have connected your WPForms account with Zapier, you must choose a WordPress form from the ‘Form’ dropdown menu in the right column.

After that, click the ‘Continue’ button. Now, every time someone fills out this WordPress form, you will receive an SMS alert.

Choose a trigger form froom the dropdown menu

Next, Zapier will ask you to test your trigger. This will use the test data that you submitted through your form.

Go ahead and click the ‘Test trigger’ button.

Click the Test Trigger button

You will now see the data from the demo form entry that you submitted earlier on your website.

From here, click the ‘Continue with selected record’ button to move forward.

Click Continue with selected record button

This will open the ‘Change Action’ prompt on the screen, where you need to type Twilio into the search bar.

Upon finding this tool, simply click on the Twilio icon.

Choose Twilio as action integration

Next, select the action that Twilio will take every time a WordPress form is submitted.

From here, select the ‘Send SMS’ option from the ‘Event’ dropdown menu in the right column and click the ‘Continue’ button.

Select the Send SMS option as the action event

In the next step, you will have to connect your Twilio account with Zapier.

To do this, click the ‘Sign in’ button next to the ‘Connect Twilio’ option.

Click the Sign in button next to the Twilio

This will open a new window on the screen where you have to provide your Twilio account SID and Auth token that you copied earlier.

On providing the details, click the ‘Yes, Continue to Twilio’ button to move ahead.

Add Twilio Account SID and Auth token

You now need to customize your SMS message settings from the right column.

First, click on the ‘From Number’ dropdown menu, where you should see the free phone number from your Twilio account. Simply select this.

After that, type your own phone number into the ‘To Number’ field. This will be the number where you will receive SMS notifications.

For the message, you can type in any text you like. You can also select from your WPForms input fields.

For example, you can add the Name, Email address, or Comment fields to the message. This means that the SMS message you get will show these details from the form submission.

After that, click the ‘Continue’ button at the bottom to move ahead.

Customize SMS message

Zapier will now show you the data that will be sent through your Zap.

From here, click the ‘Test step’ button to test the Zap that you have created.

Click the Test Step button

You should now see a message on the screen saying that the SMS was successfully sent.

You should also check your mobile phone to see if you received the SMS message.

SMS message

Once you are happy, simply click the ‘Publish’ button and then toggle the switch at the top to ‘Active’.

Your Zap has now been activated, and you will now get SMS text messages from your WordPress forms.

Publish your Zap

Bonus Tip: Send SMS Messages to Users to Increase Engagement

SMS is a powerful marketing tool that can help you communicate with your customers and increase sales. Apart from receiving form submission messages, you can also send SMS to users to increase engagement on your WordPress site.

For example, if you have an online store, then you can send SMS notifications to your customers for order confirmations, cart abandonment, and more.

You can even offer them coupon codes or alert your customers that their favorite products are back in stock.

This can help open a two-way channel of communication with users. It can even increase conversions because SMS messages have open rates of over 98% and click-through rates of over 36%. This is significantly higher than other marketing channels, including email marketing.

For more detailed instructions, please see our tutorial on how to send SMS messages to WordPress users.

We hope this article helped you learn how to get SMS text messages from your WordPress forms. You may also want to see our comparison of the best business phone services and our guide on how to create a free business email address.

If you liked this article, then please subscribe to our YouTube Channel for WordPress video tutorials. You can also find us on Twitter and Facebook.

The post How to Get SMS Text Messages From Your WordPress Forms first appeared on WPBeginner.
Fake News’ Foe: Machine Learning and Twilio

Fake news has become a huge issue in our digitally-connected world and it is no longer limited to little squabbles — fake news spreads like wildfire and is impacting millions of people every day.

How do you deal with such a sensitive issue? Countless articles are being churned out every day on the internet — how do you tell real from fake? It's not as easy as turning to a simple fact-checker which is typically built on a story-by-story basis. As developers, can we turn to machine learning?