You wouldn’t buy a brick and mortar business without getting a lock for the front door, right? I imagine you’d probably even get an alarm system and install some cameras.
These security measures are taken to prevent break-ins, from losing money, sustaining property damage, or putting sensitive information at risk.
Your internet business is at risk for these very same things. It may even be at greater risk — the Internet makes it possible for cybercriminals to break into your website without having to leave their couch: On average, 18.5 million websites are infected with malware at any given time. The average website gets attacked 44 times per day. Of the roughly 90,000 websites that get hacked each day, 83% of them are using WordPress.
That’s why you need to take as many precautions as possible when it comes to properly securing your website.
Don’t have the “it won’t happen to me” mentality. Nobody is immune to vicious attacks. Even retail giants like Target have had data breaches that affected more than 41 million customers. That one security breach cost the company over $18 million in settlements. Something like this can be extremely damaging to your company’s online reputation.
I could go on and on all day about why your website needs to be secure, but I think I’ve made my point.
So how can you install the security you need?
To start, WordPress has some built-in security features. It’s also crucial for you to choose a secure web hosting company — with a host like WP Engine a lot of the security features are built into your hosting plan. Beyond these steps, you can take additional measures to beef up your protections with a WordPress security plugin.
There are so many different security plugins available for your website. How can you know which one is the best WordPress security plugin?
Rather than taking weeks to go through and research all of them, you can just review the ones that I’ve listed in this guide. I’ve identified the top seven WordPress security plugins of 2021. Use this information to increase your WordPress security and add credibility to your website.
The MalCare security plugin is trusted by the likes of GoWP, WPBuffs, and Cloudways — so you know you’re in good company with them.
This is a security plugin you should get if you want to save time and energy. Their malware removal is fully automated, removing viruses and bad actors in less than a minute. They also protect your website from their own servers. That means you’ll never experience a slowdown on your site when they scan for viruses.
MalCare also comes with a powerful firewall to protect your website 24/7. It’ll also block any IP addresses that have been flagged for malicious intent from the thousands of sites on their network, according to their website.
Though it might not be for everyone, I really appreciate the fact that they have a host of features aside from security like their WordPress management plugin. It helps you manage multiple sites on WordPress and allows you to manage permissions so your team can collaborate on all fo them. This service also allows you to make 90 day backups of your websites so you never have to worry about losing data.
Pricing for MalCare is also relatively affordable for the features you’ll be receiving. It starts at $99 / year for one site and includes automatic malware removal, a website firewall, and complete website management.
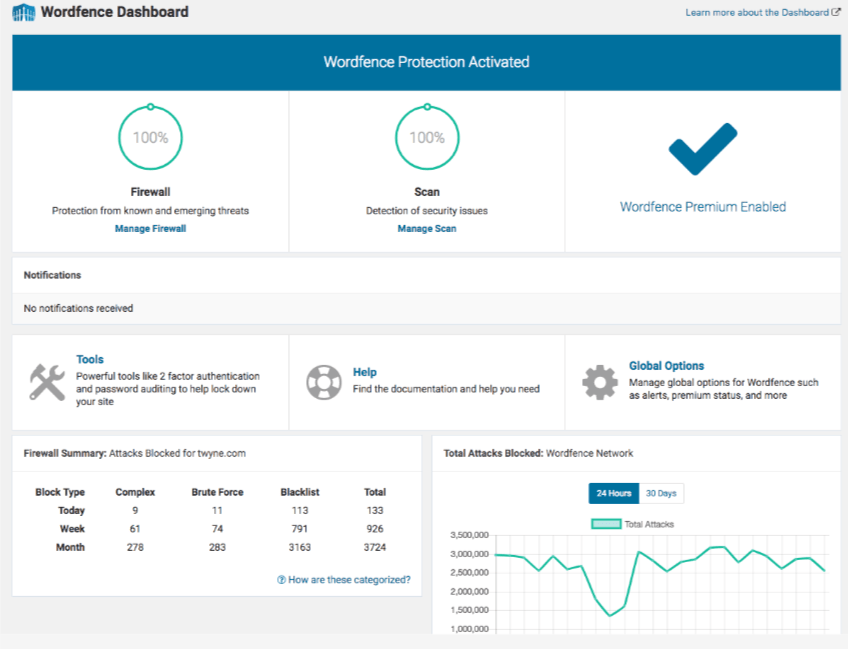
With over two million active installs, Wordfence Security — Firewall & Malware Scan is one of the most popular WordPress security plugins available. It fights spam, malware, and other threats in real time. Unlike other plugins, Wordfence Security offers a dashboard that’s extremely user friendly. You don’t have to be a tech wizard, have a background in IT, or study cybersecurity to use this plugin.
One of my favorite parts of this plugin is the ability to see data about your overall website traffic trends. These reports will show you any attempted hacks on your site. You’ll be able to tell if traffic is coming from humans, Google crawlers, or potentially malicious bots.
Another great feature of this plugin is the country blocking option. You can block attacks that come from specific geographic regions known for high rates of cybercrime.
The free version of Wordfence Security offers plenty of features that will keep your website safe. They definitely give you more out of the box than other free security plugins. You’ll get firewall blocks and brute force attack protection.
Premium pricing starts at $99 per year. The premium version comes with added features like two-factor authentication, direct customer support assistance, and real-time IP blacklisting. The real-time IP blacklist feature blocks requests from any IP address that has attacked another WordPress website that is also using Wordfence Security. When it comes to the safety and security of your website, that’s a pretty good deal in my opinion.
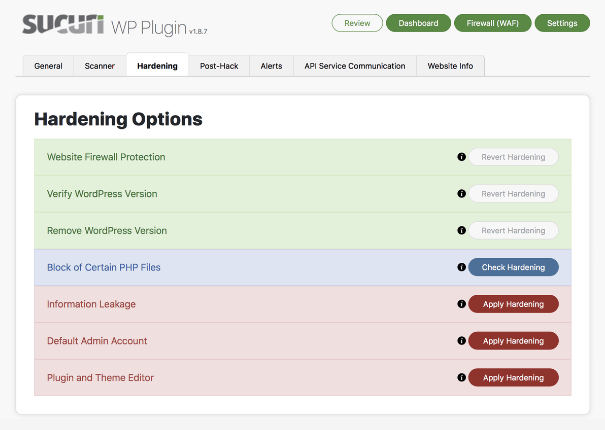
3. Sucuri Security — Auditing, Malware Scanner and Security Hardening
The name of this plugin alone shows all of the extensive security features it offers. When you install Sucuri Security, you’ll benefit from things like:
Firewall integrity monitoring
Malware scanning
Blacklist monitoring
Security audits
Security hardening
Notifications
Post-hack security procedures
Website firewall
All of these features, except for the website firewall, come with the free version of Sucuri Security. If you’re looking for a cost-effective way to protect your WordPress website, Sucuri Security is a top choice. For most sites, you don’t necessarily need the website firewall offered in the premium version.
In the event of a hack or attack, Sucuri Security offers actionable steps to help you proceed with repairing any damage. Now, some of you might not love the idea of hearing something like this. But in all reality, it’s nearly impossible for any website to be 100% impenetrable. There is always the chance of something going wrong. When something goes wrong, you’ll instantly receive a notification about it so you can act immediately.
Sucuri Security is upfront about that. They aren’t going to sit there and promise that the plugin is 100% effective. Rather than making false promises, this plugin has added a feature to assist you if your site is compromised in any way. I really like that.
The security hardening provided by Sucuri Security is exceptional. It’s easy to go through and check the status of the different elements of your website to add additional security.
If you have questions, problems, or run into any trouble when you’re using the Sucuri Security plugin, you can reach the customer service team via live chat or email.
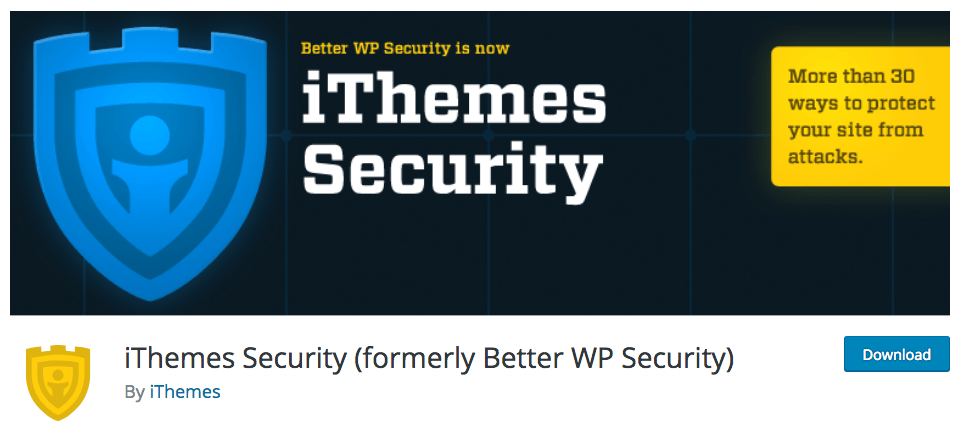
Formerly known as Better WP Security, the iThemes Security plugin is another popular choice for WordPress users. Unlike the other plugins we’ve looked at so far, iThemes Security doesn’t offer as many free benefits, so it’s in your best interest to upgrade to the pro version if you’re going to install this plugin. The free version comes with basic security, but you won’t have access to the pro features, such as:
Two-factor authentication
Scheduled malware scans
Google reCAPTCHA
User action logs
WordPress security keys
Importing and exporting capabilities
Dashboard widgets
File comparisons
Password security and expiration
As you can see from this list, it’s definitely worth upgrading to iThemes Security Pro, which starts at $52 per year.
With iThemes Security, users will automatically be banned after attempting too many invalid logins, which will help prevent a brute force attack on your site.
There is also a scanning feature that will identify any potential vulnerabilities for an attack. Once those areas have been identified, the plugin shows you how to repair the problems in a matter of seconds. iThemes Security even helps strengthen the security of your server. The plugin forces SSL for admin pages, posts, and other pages on supporting servers. The plugin will hide the most common WordPress security vulnerabilities that are usually targeted by hackers. You’ll receive a notification via email anytime there is a problem or potential security threat on your WordPress site.
This plugin fully integrates with your WordPress dashboard as well, which is a nice touch. It doesn’t feel like it’s intrusive, and you don’t need to navigate to any third-party platforms to add security to your site. iThemes Security also offers extensive video tutorials, which I found to be extremely helpful.
All In One WP Security & Firewall is packed with free features. The interface is extremely easy to use, and you don’t need to be a technology or security expert to figure things out.
One of the reasons why this plugin made my list is because of the visual elements on the dashboard. You can get reports with graphs that explain all of the metrics related to your website’s security. Furthermore, the plugin tells you which actions you can take to improve the security of your WordPress website.
Each security feature is segmented into three categories:
Basic
Intermediate
Advanced
You have the ability to apply certain firewall rules progressively in a way that won’t hinder the functionality of your website. As a result, the speed of your website won’t be slowed at all.
The plugin scans your WordPress website for vulnerabilities. After these vulnerabilities have been checked, the plugin will assist you in implementing changes to enhance your security. Everything is measured by a grading system. The grades are based on different levels of security for each element on your website.
Another top feature offered by All In One WP Security & Firewall is spam security for your comments section. Getting lots of comments on your blog posts or other website pages can be extremely beneficial for SEO purposes, but not if those comments are spam. Instead of manually checking all of your comments and deleting spam on your own, this plugin can do the work for you. It automatically detects IP addresses that are known for producing spam and blocks them from commenting. If certain addresses have exceeded a specific number of spam comments, they will even be blocked from accessing your site altogether.
I haven’t even mentioned the best part of all. This plugin is free. That’s right, 100% free. Unlike free versions of other plugins, All In One WP Security & Firewall doesn’t withhold top features and pitch upsells. It’s completely free to all WordPress users.
The BulletProof Security WordPress plugin isn’t necessarily as popular as some of the other plugins out there, but that doesn’t mean you shouldn’t consider it as a top choice for your website.
It claims that in the last seven years, none of the 45,000 websites that installed BulletProof Security Pro have been hacked. Impressive, though this number has some contingencies and doesn’t account for things like server hacks.
This plugin is extremely easy to install and get up and running in just a couple of clicks. The free version of BulletProof Security gives you access to features like:
Security logs
Security monitoring
Malware scans
Database backups
Database restores
Anti-spam tools
Anti-hacking tools
I really like BulletProof Security’s maintenance mode. It will keep your site secure while you’re going through front-end as well as back-end updates and maintenance, times when your site would normally be more vulnerable to hacks or breaches.
While the installation and setup wizard is easy for anyone to do, overall I’d say this security plugin is geared more toward advanced WordPress developers. BulletProof Security allows you to customize so many different security settings. So, I’d say start with that version before you decide if you want to upgrade. That will at least give you a feel of the interface and navigation. If you go with the paid version, BulletProof Security offers a 30-day guarantee, so there’s no risk there either.
Jetpack is considered a WordPress powerhouse. It helps improve performance and protect your site in countless ways, including advanced security, automatic backups, easy-to-decipher analytics, marketing tools, site speed enhancements, and more. Plus, with more than 5+ million activations and frequent plugin updates, you know you’re in good hands.
While Jetpack offers dozens of different features, its advanced security functionality is incredibly powerful on its own. As such, this WordPress security plugin is excellent for anyone needing real-time security scans, backups, and anti-spam protection.
With it, you get real-time backups that automatically trigger anytime you make changes. So, your backups are always up-to-date and can be reverted back to if anything goes wrong. With your subscription, you get unlimited storage for backups so you never have to worry about running out of space.
Furthermore, you proactively prevent security threats using Jetpack’s scan feature. You can set it up to automatically scan new files and content, or you can run it daily. It scans your entire website on the hunt for malware and malicious software to find vulnerabilities and stop attacks before they happen.
Another standout feature is the ability to block and clear spam submissions through comments and input forms on your site. Without this, you may unknowingly end up with hundreds of spam comments creating an awful visitor experience for anyone unlucky enough to scroll to the bottom of your latest post.
Not only that, but you have to manually delete them rather than blocking them from going through in the first place.
Jetpack also delivers various other security features, including:
Brute force attack protection
Downtime monitoring so you learn about issues before your visitors do
Detailed activity log outlining every site change that’s made
There are dozens of pricing options to choose from, depending on what you need. If you want all of Jetpack’s security features, you’re looking at $55.95 per month for real-time security or $19.95 for daily security.
Alternatively, you can get Jetpack’s full suite of tools, including security, marketing, design, SEO, CRM, and more, for $79.95 per month. If it’s within your budget, this is a great way to simplify your plugin stack.
But if you’re on a tighter budget, you can purchase security features separately. Each of the three major tools (daily backups, daily scans, and anti-spam) is $7.95 per month individually.
Conclusion
What’s the best WordPress security plugin?
It’s tough to name one as the definitive best, but I’ve been able to narrow down the top seven for you to consider in 2021. It all depends on what you’re looking for.
Some of these plugins have more advanced features than others, which aren’t always necessary for all websites. Some plugins are easier for beginners, while others are better for advanced developers.
Do you want a free WordPress security plugin? Or do you want a pro version with annual charges?
All of this needs to be taken into consideration when you’re picking the best security plugin for your website. I’m confident you’ll find what you need on the list above.
You might think your website is fast — but is it enough? You may be surprised that 47% of Internet users expect web pages to load in two seconds or less and they mean it: 40% of people will abandon websites that don’t load within three seconds.
That’s right. A second could cost you 40% of your website traffic. And of the 40% of visitors who abandon your site, 80% of those people won’t return.
Let’s say your website has 1,000 unique visitors per week. You have a 5% conversion rate, and your average order value is $100.
This translates to $5,000 per week and $260,000 per year. Not bad, right?
But if your website took longer than 3 seconds to load, you’d lose 40% of that traffic, and you’d actually earn $104,000 less than that.
Bottom line: Slow loading times could be costing you hundreds of thousands of dollars every year.
Fortunately, there’s a way for you to speed up your website loading times. What’s the solution? Caching.
What is caching?
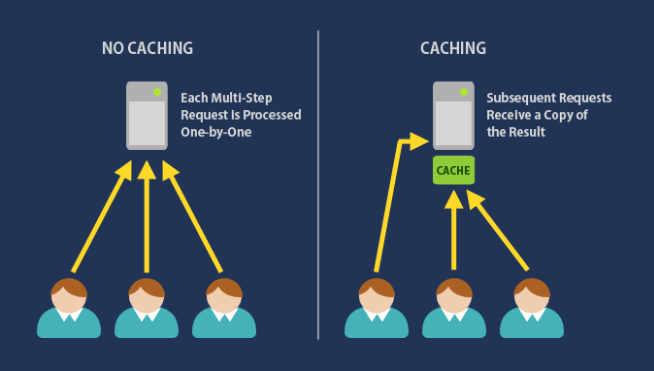
Let’s start with the basics. A request to your server is required each time someone visits a page on your site. The server sends those results to the user’s web browser.
On the user’s end, they see your website as the final product. Your website is complete with things like headers, menus, images, videos, blog content, and everything else that makes your site unique.
The server needs to process each request before delivering the final page to the user. Depending on the complexity of your website, sometimes this can take a long time.
That’s where caching comes into the equation. Caching stores recently viewed content, such as a web page, so server requests won’t be as in depth.
Simply put, caching means less work is required for pages to be viewed on your website. As a result, your site will load much faster.
Why do you need a WordPress caching plugin?
Without a WordPress caching plugin, requests for every element of your website need to be made to the server each time someone visits your site, even if they’ve seen the content before.
A caching plugin will:
Speed up your website
Increase the user experience
Reduce the strain on your server
Improve SEO
Lower your TTFB (time to first byte)
Caching plugins will generate a static HTML page of your site, which will be saved on your server. Whenever someone visits your site, the plugin will display the lighter HTML version as opposed to the heavy PHP scripts.
There are tons of caching plugins out there that claim to speed up your website. How can you possibly know which one to install? Truthfully, it’s nearly impossible to determine which plugin is the fastest. Depending on the website content, what works for one site may not work as well for another. With that said, there are definitely certain caching plugins that stand above the rest. I took the time to identify the best WordPress cache plugins for you to consider.
The 5 Best WordPress Cache Plugin
After reviewing dozens of the top WordPress cache plugins, I’ve narrowed it down to the five very best ones. They are:
W3 Total Cache
WP Rocket
WP Super Cache
Hyper Cache
Comet Cache
Check out our in-depth reviews below for more on each.
1. W3 Total Cache
With more than one million active installs, W3 Total Cache is one of the most popular WordPress cache plugins on the market.
W3 Total Cache is an open-source plugin, which is completely free to use. A free install gives you access to all of the features, and you won’t be pitched any upsells after the fact.
I included this on my list of best WordPress cache plugins because it offers minifications that save bandwidth, HTTP compression, as well as feed optimization.
This plugin works for both mobile and desktop versions of your website. W3 Total Cache integrates with your website’s CDN. It’s also helpful for sites with SSL certificates, making it a top choice for ecommerce websites.
You should keep in mind that W3 Total Cache can be a bit complex to use. Even though it’s a popular choice, it may not be the best option for WordPress beginners. There are 16 pages in the settings section of this plugin, for example. However, you won’t have to manually configure all of these options. The default settings work well right out of the box. So unless you’re a developer who has lots of experience with these options, I’d recommend sticking to the defaults.
If you want that type of added customization, there is a separate setting for each type of caching. You can have different settings for things like:
Object caching
Page caching
Browser caching
Database caching
The list goes on and on. It’s tough to find this type of in-depth customization for free on other WordPress cache plugins.
2. WP Rocket
The overall simplicity of WP Rocket t is what makes it one of the best WordPress cache plugins, which is why it’s great for beginners.
You can install this plugin and get it set up quickly. However, WP Rocket also has advanced settings that can be customized by developers or site owners who have a bit more technical knowledge.
Pricing starts at $49 per year for one website. WP Rocket also has a developer plan that’s $249 annually for unlimited sites.
I know what some of you are thinking: Why should I pay for this when there are so many free WordPress cache plugins available?
Simply put, you get what you pay for. For $50 per year, I’d rather have a plugin with an easy setup and smooth interface.
Plus, WP Rocket comes with extra features that you won’t find in free cache plugins. It indexes your website on search engines to help improve your SEO ranking and all JavaScript, HTML, and CSS files get minified to boost page loading speed.
Another benefit of this plugin is the “images on request” feature. This means that images only get loaded when they are visible on the screen. So if you have pages with lots of images deeper in the scroll, they won’t be loaded initially. This dramatically improves your loading time.
This plugin also helps optimize your Google Fonts, which is something that’s not offered by most cache plugins I’ve used.
Overall, WP Rocket is one of the best WordPress cache plugins for beginners and experienced developers alike.
3. WP Super Cache
WP Super Cache has more than two million active installations. I’m not saying you should always follow what other people are doing, but numbers this high are usually a pretty good indication of quality.
This plugin is completely free as well. So it’s a great option if you’re hesitant about spending money on a WordPress plugin.
WP Super Cache creates static HTML files and displays them instead of heavier PHP scripts. The plugin offers three different modes of caching:
Simple
Expert
WP-cache caching
Most of you can get away with using simple mode. You’ll need a custom permalink, but this option is much easier to configure and doesn’t require you to change your .htaccess file. The majority of web pages will still be dynamic in simple caching mode.
As you might have guessed, expert mode is a bit more complex. Unless you’re experienced with coding and web development, I would not recommend this setting to you. It requires an Apache mod_rewrite module as well as modifications to your .htaccess file. If you don’t know what you’re doing, improper modifications of these files can be detrimental to your website.
WP-cache caching mode is used to cache content for known website visitors. This is ideal for those of you who have users who are logged in, leave comments, or need to be shown custom content.
If you don’t want to things to get too complicated, you can always just stick with simple mode, but the fact that WP Super Cache has so many other options makes it one of the best WordPress caching plugins.
4. Hyper Cache
Hyper Cache was designed with WordPress blogs in mind. It will work on every blog, without any complex configurations. Hyper Cache optimizes your bandwidth and ultimately boosts the page loading speed of your WordPress blog.
You can install Hyper Cache with ease and the process is very fast. I’d say this is one of the best WordPress cache plugins for users who are beginners and don’t want to manage tons of different cache settings. With this plugin, you can implement the “set it and forget it” mentality. So once you have it installed, you don’t have to do much of anything after the initial configuration.
You’ll notice that some of the settings may have some odd names that you’re unfamiliar with but Hyper Cache comes provides recommendations and detailed information about which should be activated and how each setting impacts your website.
Like some of the other options on our list, Hyper Cache is free. It offers CDN support and has mobile-friendly caching as well. It’s a great tool to have for those of you who have blogs with lots of comments.
Something that I found interesting about Hyper Cache is the way that this plugin completes website backups. The cache folders aren’t included in your backups, meaning the backup files will be smaller and save you space.
While this plugin should be a top consideration for WordPress bloggers, I wouldn’t recommend it for more complex sites, such as ecommerce platforms. If you fall into that category, you’d be better off with a more advanced plugin from this list.
5. Comet Cache
Comet Cache has a quick and easy installation process. Once installed, you’ll find that the navigation on the dashboard is extremely user friendly.
I like this plugin because it’s so informative. You’ll find tons of resources that will tell you everything there is to know about caching. This will help you configure the settings to optimize the performance of your own WordPress site.
You’ll have plenty of different options for caching with Comet Cache:
Pages
Posts
Tags
Categories
If you’re looking for simple customization, this plugin is definitely one that you should consider. The ability to cache users who are logged in makes Comet Cache a top option for membership websites.
Comet Cache has both free and paid versions. Most of you can probably get away with the free WordPress plugin, but the paid upgrades offer better features. If you upgrade your plugin, you’ll have the option for automatic and intelligent cache clearing. Basically, this feature allows you to configure all of your settings from the beginning, and then have a “hands-free” approach moving forward.
Conclusion
Installing a WordPress cache plugin will boost your website speed and improve the user experience. Now that we’ve established why caching plugins are important, the question becomes, Which is the best WordPress cache plugin?
It depends what you’re looking for. Some plugins are designed for ecommerce websites, while others are intended for WordPress blogs. Some cache plugins are made for beginners, while others have more complex settings for advanced developers.
Do you want a free WordPress cache plugin? Or are you looking for a paid version?
Based on all of this information, I narrowed down my list to the top five options to consider. There is something for everyone on this list, based on the type of website you have, your technical experience, and the type of settings you want to apply. Use this guide as a reference to help you find the best WordPress cache plugin for your website.
Want my quick answer? BlogVault and BackupBuddy are the best WordPress backup plugins out there.
If your website crashes, you need a way to get it up and running ASAP.
That’s why you need a good WordPress backup plugin. Your website could become the victim of user errors, vicious attacks, or malware.
When that happens, expect a hit to your SEO ranking, and damage your relationship with customers and website visitors. On top of rebuilding your website, you’ll also need to run campaigns to improve your online reputation.
Backup plugins help you avoid these situations. It’ll restore all of your WordPress website content if you ever have any problems.
So what’s the best WordPress backup plugin?
6 Best WordPress Backup Plugin
There are tons of options to choose from. The last thing you want is to install a backup plugin as a fail-safe and have it cause more problems. That’s why I narrowed down the list to the six best WordPress backup plugins for you to consider.
BlogVault is trusted by 400,000+ websites for their backup needs—and for good reason.
In between its affordable pricing ($7.40 / month) and it’s great features, it’s sure to give you everything you would need out of a WordPress backup plugin.
It’s also incredibly intuitive. Even the newest WP user will be able to learn the ropes quickly.
They also offer easy migration in case you’re changing web hosts.
One other very nice feature is the fact that BlogVault backs up your website even if your website is down. You’ll be able to access any backups via your BlogVault dashboard while you wait for your site to go back up.
BlogVault also creates multiple backup copies of your website, allowing you to upload them into a third-party storage site like Google Drive or DropBox for even more protection against lost data. And with daily automatic backups, you’re sure to have the most up-to-date backups as possible.
Recovering your website is a snap too. With just one click, you’ll be able to restore your backed up website and return it to what it was the day before the hack or loss of information occurs.
BlogVault allows you to add sites to their service to. You’ll be able to manage all of your website backups on one dashboard, and generate reports and analytics for each one.
Pricing for BlogVault starts at $7.4 / month and includes real-time backups, a 90-day backup archive, and one site. Try BlogVault now.
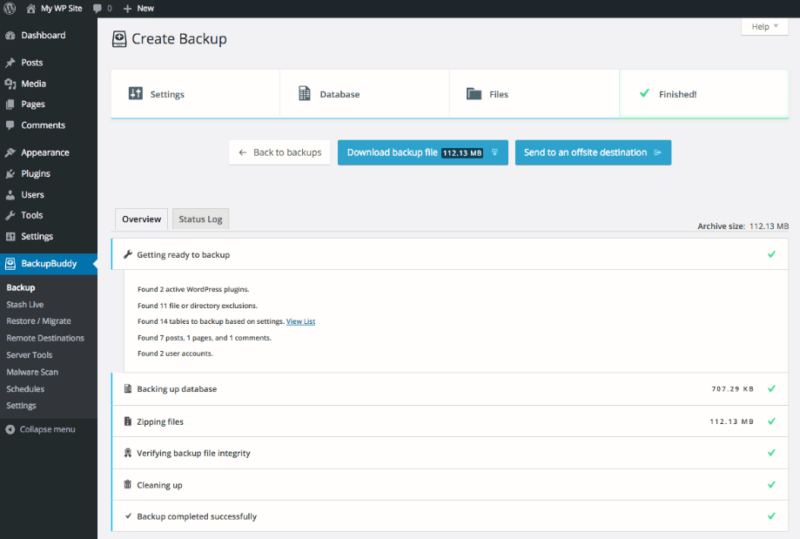
The BackupBuddy WordPress plugin has been around for nearly a decade. Other backup plugins on the market only backup your database, but BackupBuddy covers the entire WordPress installation.
Website pages
Posts
Comments
Widgets
Users
Database
Core files
Custom posts
Categories
Tags
Images
Videos
Plugin files
Settings
Themes
All of these components will be backed up with this plugin. The files are backed up and stored off-site in a location that’s safe and secure. Each time a backup is completed, you can download a zip file to have another copy on your hard drive. You can also send backups to remote storage locations such as Dropbox, Google Drive, and BackupBuddy Stash.
If you ever have a problem and need to recover content, BackupBuddy makes it easy to quickly restore your entire WordPress site.
While this plugin can back up nearly every element of your WordPress site, that doesn’t mean you have to do so. For one reason or another, you may only want to backup certain components, like a database or specific files. You can completely customize the backups to fit your needs.
Another reason why BackupBuddy is a top choice is because you can schedule automatic backups, so you won’t have to remember to do this manually.
BackupBuddy is extremely helpful when it comes to user error as well. If you accidentally delete a post, you can restore the content in just a few clicks.
If you ever need to change domains or hosts for your WordPress site, the BackupBuddy plugin will help you do so with ease. The WordPress migration tool makes this plugin a popular choice for developers who create custom websites for clients on a temporary domain before moving the site over to a domain that’s live.
BackupBuddy also runs malware scans, which can potentially identify any problems before they happen.
All of these features make BackupBuddy one of the best WordPress backup plugins available.
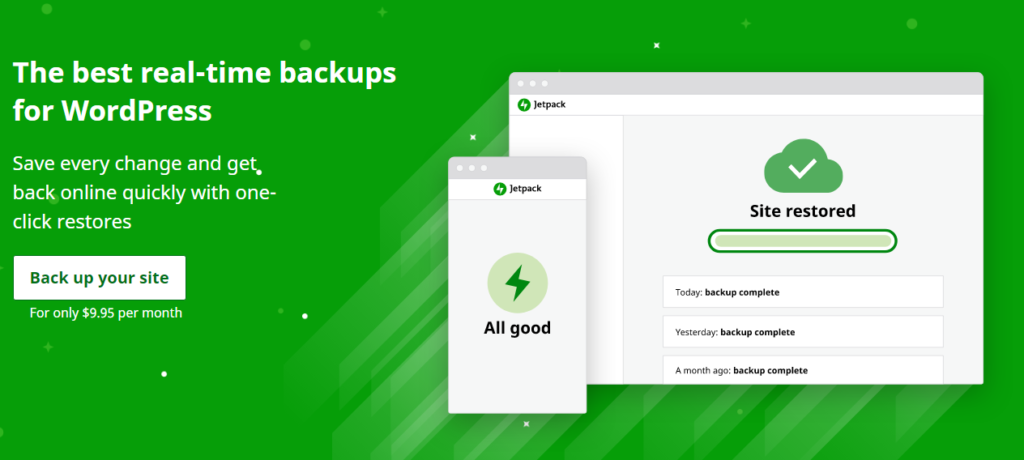
Jetpack offers a suite of WordPress plugins to help backup you WordPress website and scan the website for malware.
True to its name, it backups your website at jet-like speeds. Their real-time backup package means you’ll be able to make changes to your website with peace of mind, as the plugin backs up your changes in real time.
The daily backup package offered by Jetpack is also pretty good. It’ll automatically back up your website once a day, with a 30-day backup archive to draw on. That means if your website goes down, or a change that you make to it causes it to crash, you’ll have the past month of backups to revert back to.
Their one-click restore from desktop or mobile means you’ll be able to get your website up and running no matter where you are (so as long as you have an Internet connection of course).
As mentioned they offer two different plans: Real-time backups and daily backups. Both come in monthly or yearly billing (though you’re saving more money with yearly billing).
Real time backups per month cost $49.95 per month and $479.40 per year. With that you’ll get real-time backups, unlimited backup archives, unlimited log of site changes, and one-click restore.
Daily backups cost $9.95 per month and $95.40 per year. This comes with automatic daily backups, 30-day backup archive, 30-day log of site changes, and one-click restore.
Personally, I’d go with the yearly real-time backups. Nothing beats the peace of mind of knowing if something goes wrong, you’ll be able to revert it back at any point.
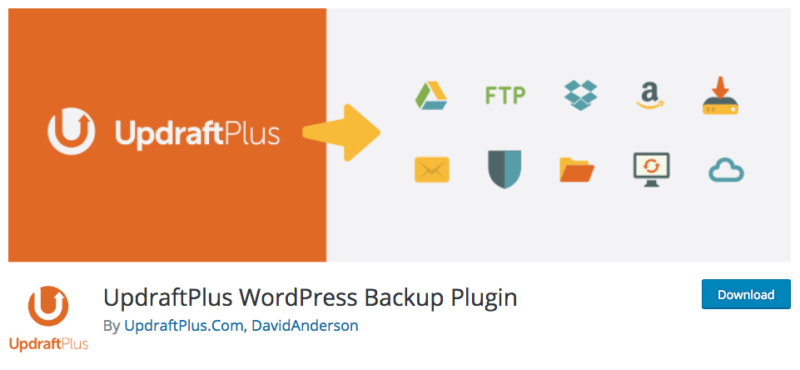
Over two million active websites have installed UpdraftPlus as a WordPress backup.
UpdraftPlus gets my vote of confidence because it’s so easy to use. Even if you don’t have much technical experience, the interface is very straightforward. The simplicity allows you to backup and restore content in just a click or two.
The free version of UpdraftPlus lets you run full backups, manual backups, and scheduled backups. You can also back up and restore your plugins, themes, and database with the free version.
Automatic backup options range anywhere from hourly to monthly. If you want to manually manage UpdraftPlus, you’ll clearly see the restore, clone, and migrate options in addition to the backup buttons. You can access all of your current backups directly from the dashboard. It’s easy for you to restore or delete older versions that you no longer need.
Like other backup plugins, UpdraftPlus gives you remote storage options to places such as Google Drive, Dropbox, OneDrive, and many more.
UpdraftPlus is fast. So it uses up fewer server resources. This is a great feature for those of you who are using shared web hosting services.
It’s comforting knowing that there are free WordPress backup plugins out there with so much functionality. With that said, you can upgrade to a premium plan that’s extremely affordable, starting at $42 per year to get these additional features and reports:
Incremental backups
Migrator
Multisite/multi-network compatible
Backs up non WP files and databases to multiple remote destinations
The incremental backup feature is one of the best reasons to upgrade this plugin. Instead of having to back up your entire site when you make a change, such as adding an image, this option only backs up those new files.
If you have any issues with this plugin, the customer support team is exceptional.
You can tell that UpdraftPlus is a reliable plugin just by the sheer number of active installs on other websites. The plugin wouldn’t be so popular if all of those people had problems.
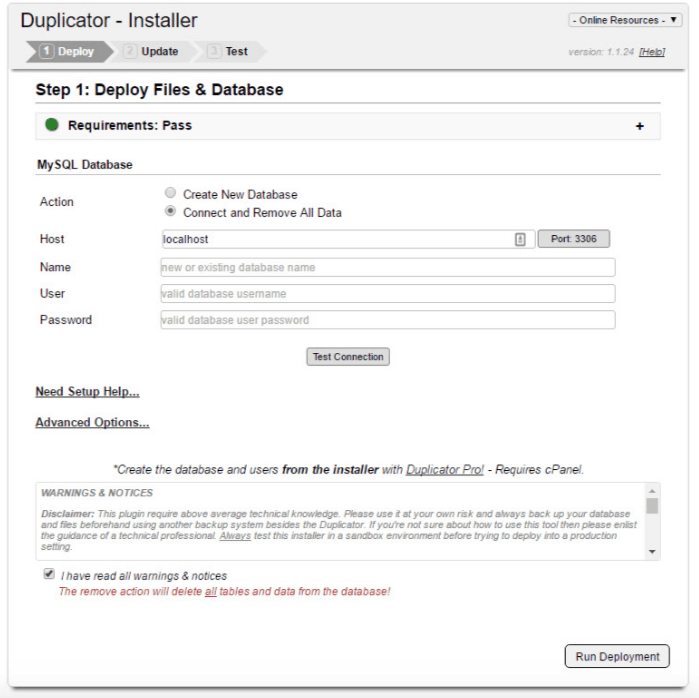
With over one million active installations, Duplicator is another popular choice. As the name implies, the primary function of this plugin is to migrate, move, or clone a WordPress website between domains. This can be accomplished without any downtime, which can’t be said for other plugins out there. You can also use Duplicator to transfer your WordPress website between hosts.
This plugin lets you duplicate a live website to a staging area, or duplicate your staging area to a live site. Duplicator allows you to execute a full migration in WordPress without having to import and export SQL scripts.
This plugin is a great option, but I can’t say I’d recommend it to beginners. It’s definitely better for those of you who have some technical knowledge. Don’t get me wrong; you don’t need to be a coding expert, but you should have a basic understanding of how things work before you attempt to use the Duplicator plugin on your website.
It’s great for developers who are tired of manually configuring themes and sets of plugins each time they build a new site. You can just do this once and bundle it with Duplicator, then just use that as your template by migrating it over to different locations for each client.
Here’s how it works: All of your website content, plugins, themes, and database get bundled into a zip file, which is referred to as a “package” by Duplicator.
In addition to these features, you can also benefit from scheduled backups by upgrading to Duplicator Pro. The pricing is pretty affordable; it starts at $79 per year.
Backups can be stored locally, or in remote locations. You can also set up email notifications for updates on the status of your backups.
I’d say this WordPress plugin is more suitable for developers who have the need for migrations and things of that nature. So if that’s what you’re looking for, Duplicator can fulfill the requirements. It’s great for developers who are tired of manually configuring themes and sets of plugins each time they build a new site. You can do this once and bundle it with Duplicator, then just use that as your template by migrating it over to a different locations for each client.
But if you just want a basic backup plugin, you’ll probably be better off with one of the other choices on our list.
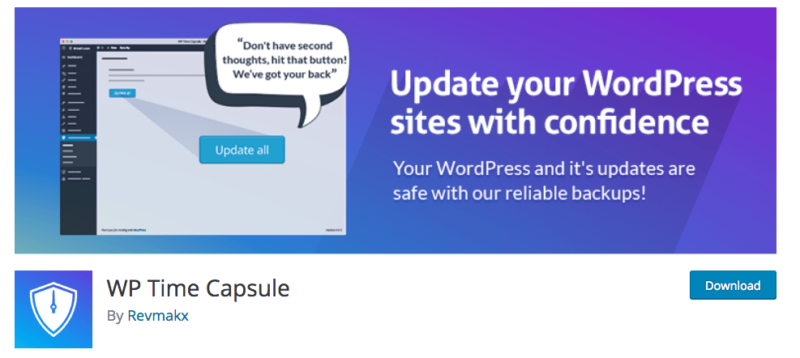
WP Time Capsule seamlessly integrates with your cloud storage applications. This WordPress backup plugin is definitely one of the easiest options available. So unlike other options that we’ve seen, even a novice user can handle all of the features. Once the plugin is installed and set up, it’s pretty hands-off moving forward.
After you install this plugin, the first thing you’ll need to do is connect it with one of the cloud storage locations:
Google Drive
Dropbox
Amazon S3
Wasabi
Once that happens, the plugin will automatically start creating your first backup.
Next, you just simply have to set your backup schedule and the WP Time Capsule plugin will take care of the rest.
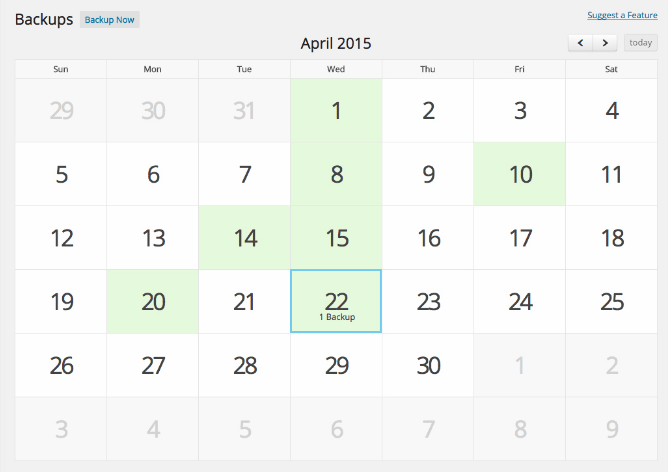
Another great feature of the WP Time Capsule is the calendar view option. This is extremely helpful if you want to restore content from a specific date.
As you can see, this is very straightforward. All you have to do is click on the date, and decide if you want to view or restore files from your selection.
Since WP Time Capsule backs up your site incrementally, you won’t have multiple copies of files. This means less disk space will be used. WP Time Capsule doesn’t create zip files either, so fewer server resources are used compared to other backup methods.
If you want a backup plugin that’s simple, straightforward, user-friendly, and easy to use, WP Time Capsule is a top choice to consider.
Conclusion
What’s the best WordPress backup plugin?
I narrowed down the top six options for you to consider. Each of these plugins is slightly different from the others, so what’s best for your site will depend on what you’re looking for.
For those of you who want to go with a popular choice for WordPress backups, then you should take a closer look at BackupBuddy and BlogVault.
If you’re a developer, a bit more tech-savvy, and plan to use a backup plugin for cloning, migrations, and moving content between servers, you’ll want to consider Duplicator.
Maybe you just want a simple backup plugin that’s easy to use, has automatic backups, and stores content in your personal remote storage accounts. In this case, you’ll want to go with WP Time Capsule.
If you want added security functionality in addition to WordPress backups, VaultPress has what you’re looking for.
A good part of my career has been working for some of the folks in this list.
In fact, I was personally responsible for setting annual revenue goals and hitting those goals while I was the Senior Director of Growth and Product at I Will Teach You To Be Rich. In that case specifically, I’m extremely familiar with revenue totals and what drove that revenue.
Not to mention the affiliate commissions that were paid out to some of the people on this list, numbers that were shared in confidence after a few too many drinks, and second-hand rumors that I picked up along the way.
Unfortunately, I’ve got sad news.
I’m not going to share any of that insider knowledge. Sorry.
Some folks don’t mind publishing their revenue numbers but others keep it extremely private. If I shared that kind of info on how their blogs make money, I’d shatter the trust they placed in me. I take that trust very seriously.
For this post, I’m only going to be sharing revenue numbers that have been shared publicly.
Now here’s what I can do for you.
With the background that I have in this space, there are some common rules of thumb for figuring out revenue. They’re not perfect rules but they do tend to get the right number of digits. And after a while, you get a general sense for people’s revenue based on the size of their audience.
For most folks on this list, I’ll give a guess based on their public audience size and any hints that they’ve released publicly about their revenue. I’ll clearly label at is as a guess and you should take it with a grain of salt.
If you poke around the site a bit, it’s pretty obvious that the blog makes most of its money from infoproducts.
Ramit is absolutely at the top of his game when it comes to infoproducts and I consider this site one of the best to learn from if you’re considering monetizing your own blog with infoproducts. Make sure to sign up for his email list — you’ll start getting the launch funnels and you’ll be able to see how it all works.
There are also a few products available for purchase from the products page. That’s a great source for inspiration to see what an amazing infoproduct sales page looks like.
Marie has been blogging for a while now. She also put in a lot of work into her YouTube channel.
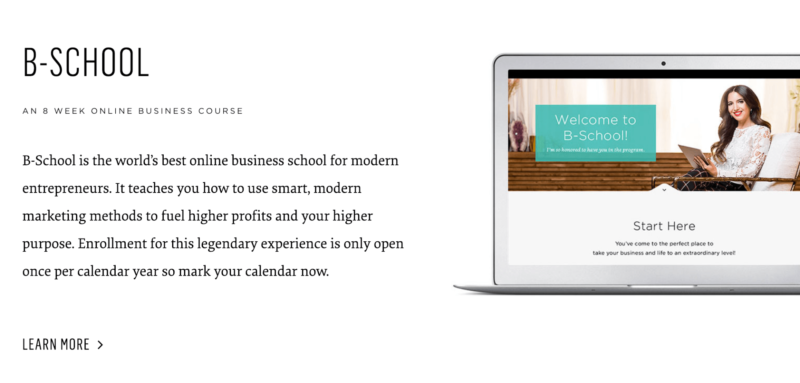
He content has a great reputation and her copy is world class. I assume most of her revenue comes from infoproducts, particularly her flagship program B-School. It’s been a while since I followed Marie closely but for a period, she launched B-School once per year.
She’s an amazing person to study if you want to learn how to produce high-quality positive content. She’s also brilliant at balancing valuable content with going for the sale in an authentic way.
According to this post, Steve’s doing over seven figures with his business. It’s a mix of infoproducts, coaching, and bootcamps. He also wrote a book called Level Up Your Life.
What I love most about Steve’s business is how he’s chosen a specific segment of the market and differentiated himself from other fitness blogs. The fitness space is crazy competitive but by branding his entire business around fitness for nerds, he clearly separates himself from that competition. Even in the most competitive categories, there are still opportunities to target a niche with your blog and make real money with it.
Revenue = At least $2–3 million per year, maybe more
Amy’s About page states that she’s built a multi-million dollar business, something that I absolutely believe based on her audience size.
I’m assuming that the vast majority of her revenue is from her infoproducts, but it looks like she does some affiliate promotion too. Her affiliate page is pretty classy and well done. It’s a great example of how to promote products in an authentic and non-pushy way.
In this post, Jon states that he’s doing over $100K per month in affiliate revenue which is pretty impressive.
He also has several of infoproducts available for purchase on his site. I bet these do about $30–50K per year on their own. I’m not sure what Jon’s email funnels look like but if he’s pushing launch funnels aggressively, he could easily have another few million in revenue from infoproducts on top of his affiliate revenue.
Problogger has been around since 2004. That’s an eternity in online marketing. It’s one of the original “how to blog” blogs. Darren also owns Digital Photography School which has 8X as much traffic and revenue as Problogger.
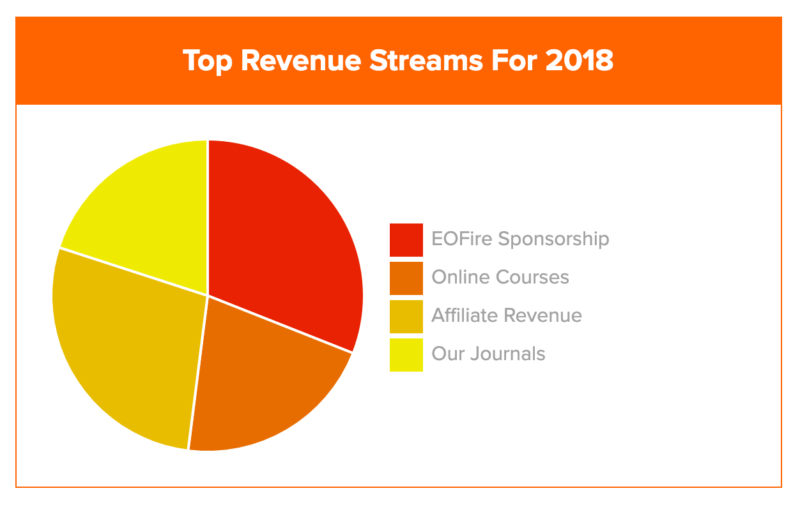
Darren did do a income report on the first half of 2016. At that time, 46% of his revenue from both sites came from affiliates, 31% came from infoproducts, and the rest from a smattering of different categories.
Seth Godin had plenty of success before his blog: he’s written 18 books, built and sold a company to Yahoo, and then was a VP at Yahoo. And his blog has cemented him as the leading marketing thought leader. If you were trying to come up with an ideal example of a thought leader, you’d have a hard time finding a better example than Seth Godin.
Seth’s blog is the original, longest running, and possibly highest value blog in marketing. He’s posted every day for like 20 years or something.
For a long time, he never montized it. Unless you consider featuring his books occasionally to count as monetization. Recently, he has done a few infoproducts including the altMBA and The Marketing Seminar. I went through The Marketing Seminar myself and quite a few people were in the community, so it sold well. Seth’s site says that over 5,000 people took the course in total. At $800 per sale, that’s about $4 million in total spread over several years. Plus all the revenue from altMBA.
I worked for Neil when he was a co-founder of KISSmetrics. He’s the one that originally hired me. Also worked with him on some other projects after that. I’m not going to even hazard a revenue guess here since I don’t want to reveal anything that Neil would prefer to keep private.
In this article, Selena reported that she made $1.6 million in 2017. I assume the majority of her revenue comes from infoproducts that she launches to her email list periodically. Considering the stage of her business, she’s built out a pretty impressive infoproduct portfolio along with some higher ticket mastermind offers.
Sam gives a few hints on what he makes with his site. First, he does give the revenue of his infoproduct ebook which is $36,000 per year.
Funny enough, he chooses not to include his Adsense revenue or affiliate revenue as “passive” income within any of his passive income reports. Most folks in the industry would consider these revenue sources to be passive.
Sam does break down some hypothetical revenue amounts of blogs of different sizes here. One example includes a personal finance blog that’s generating about one million visitors per month. I remember Sam stating somewhere along the line that he has about that much traffic. The traffic estimation tools like Ahrefs also put his site in the range. So, the example that he gives should be close to his actuals. Using his projections as a guide and knowing that he has plenty of affiliate links along with Adsense on his site, a $1 million per year estimate should be close.
He launches infoproducts to his email list a couple of times per year. I believe he has a course on SEO and one on YouTube. With his traffic volume, each of these launches should be doing upper six figures, possibly $1 million per launch.
This is a great example of a business that’s focused really heavily on generating traffic, turning that traffic into email subscribers, then monetizing via a few infoproduct launches per year. It can seem magical to have a business with ridiculous profit margins at this stage. Most of us would love to have a $1 million per year business with a super small team and a handful of moving pieces.
James used to publish his annual revenue in his annual state of the blog posts but stopped as his blog became more well known. Here’s his 2019 state of the blog. His last reported income was $187,862 in 2014. He does mention multiple times that he’s now running a seven-figure business, so his current revenue is at least $1 million per year.
He does have a book by the same name. Looking through his site, the majority of his revenue comes from affiliates, ads, and sponsorships.
His email list is extremely small for the size of his blog — it’s only 21,725 subscribers. And with a small email list, any infoproduct launch is going to be limited to five figures. He does have an infoproduct on creating your own financial plan for $499. If he focused on conversion to email and got good at infoproducts, he could add another $1–2 million in revenue to his business.
Tim has a massive blog that’s been around for a long time. He started it before he even launched his first book, The 4 Hour Workweek.
Currently, I assume that the majority of Tim’s income comes from his podcast sponsorships. I have seen ads on his blog in the past but it doesn’t look like there are any right now. I don’t think he’s ever done an infoproduct or pursued affiliate ads aggressively.
According to this form, his podcast sponsorships go for $36K per slot. At 4–5 slots per episode, that’s $144,000 per episode at least. Tim averages about six podcasts per month, which would produce $864,000 per month or $10,368,000 per year.
The reason I’m not going to even guess is that I don’t have any experience buying or selling podcast sponsorships which I assume are his main source of income right now. Also, sites with Tim’s reach tend to start breaking standard revenue rules. Having one of the largest and highest rated podcasts can give you a lot of leverage, allowing you to charge more than normal on each sponsorship slot.
Timothy has been around for a while now, predominantly selling infoproducts on how to invest in penny stocks. According to this interview with Nathan Latka, Timothy was on track to do $25–27 million in revenue in 2016, $20 million of which came from infoproducts.
Timothy is a great person to follow if you want to see how an infoproduct business looks at scale.
Revenue = Did $11 million per year in 2015, could be as high as $50–70 million per year now
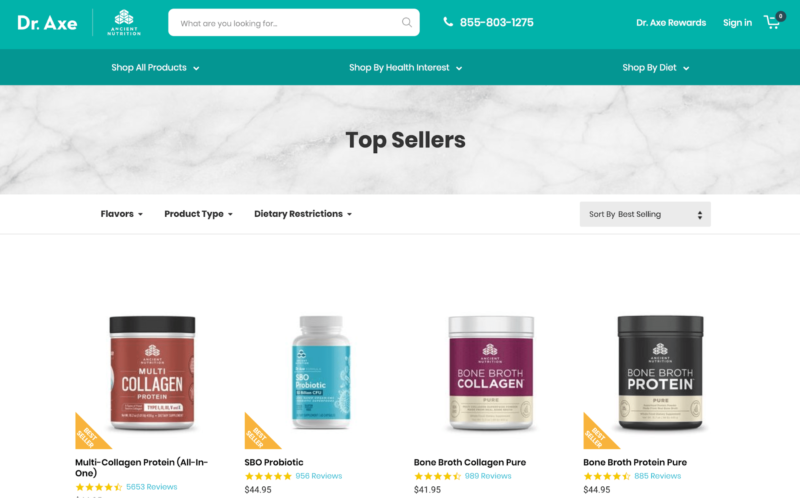
Dr. Axe is a massive site with a huge audience. According to this press release, it has 17 million visitors per month, which is insane. They also push products pretty hard via their email list. It’s obvious that they know what their doing. Their revenue is a mix of infoproducts, affiliates, and supplements.
Supplements are a great category with nice margins. I only have a little experience in the health and fitness category but the advice I always get from the health and fitness experts is to go hard on supplements.
I did hear that they have a solid paid marketing engine going for their funnels. If that’s true, they could be doing easily $50–70 million per year by now.
I consider Dr. Axe to be a great example of what a health and fitness blog looks like when taken to its absolute height. If you’re considering a health and fitness blog, I’d study Dr. Axe closely
According to this article from the New Yorker, Peter pulled in about $400,000 per year as of 2016. Ahrefs reports that Peter’s traffic has been static since the 2016 period. If that’s true, I would expect his current revenue to be around $400,000. Sounds like the majority of the revenue, possibly even all of it, comes from affiliates.
Jordan Harbinger didn’t reveal exact revenue but did say that it’s multiple seven figures per year. Based on the fact that the revenue is mostly infoproducts and the overall size of the audience, my guess is that Art of Charm does $5–10 million per year in revenue.
Not sure if Pat decided to stop but it doesn’t look like he’s posted any new income reports since 2017. Regardless, I highly recommend reading through the first few years of income reports from Pat. That’ll give you a strong sense for what it takes to start making money with a blog.
The majority of Pat’s revenue comes from affiliate offers and his own infoproducts, about 50/50 between the two. He also has a few books published, How to Be Better at Almost Everything and Will it Fly? Other than the months he received the advance from the publisher, I bet these books have a negligible direct impact on revenue.
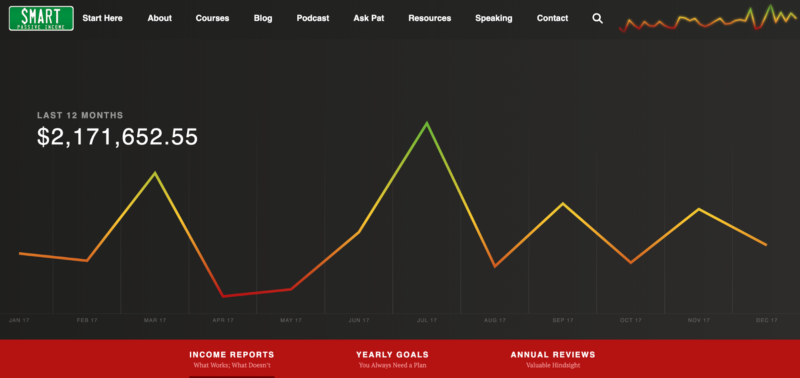
To get a sense for how blogs really make money, I highly recommend you read through the monthly income reports from the last 12 months for Entrepreneur on Fire. You’ll get an excellent feel for what a seven-figure blog looks like. I also recommend you read through the income reports from 2012 and 2013, which will show you what revenue looks like at the beginning and how it changes over time on the path to $1 million per year.
Navid is in the online marketing space and offers infoproducts on virtual summits. According to his About page, he’s earned over a $1 million dollars in “a few years.” Safe to say he’s easily doing six figures off his blog. Hence my guess above.
Revenue = At least $100,000, possibly $1+ million per year
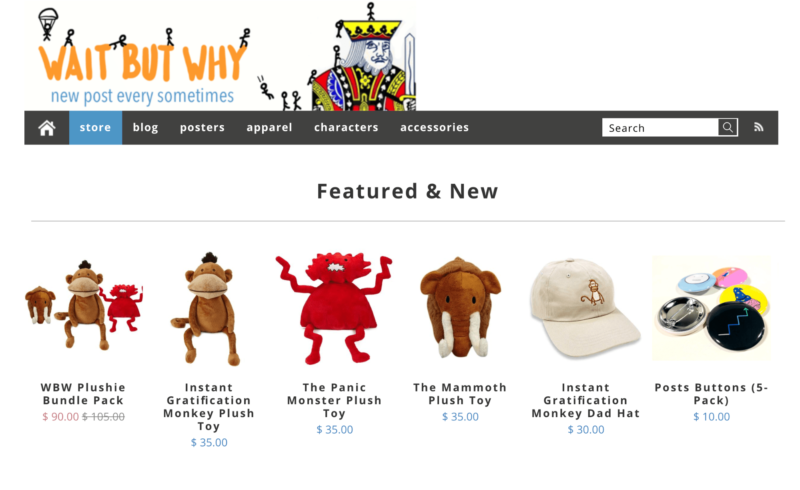
Tim Urban got crazy popular and his blog posts were being shared all over the place for a while.
This is probably an example of what most people dream of when they start a blog. They plan to write a bunch of stuff, a rabid fan base will appear out of nowhere, they’ll offer some t-shirts, posters, and a Patreon account to make tons of passive income. They’ll finish by riding into the sunset of eternal blogging glory.
For Tim Urban, that’s basically what happened. And he absolutely deserves it. His content is phenomenal. It’s so good that people have been angry because he hasn’t posted in a while. Very few of us can write content that good. I can promise you no one gets upset when I stop blogging. So for us mortals, we should look to some of the other examples on this list for how to monetize our blogs.
I know that I gave a really broad range on the revenue here. Blogs like this are really tough to guess. Tim clearly has a massive, adoring audience. That doesn’t necessarily mean he’s swimming in gold. Although he might be. Blogs with massive audiences like this sometimes make a ton of money, and sometimes they make very little. It also looks like his main source of revenue is his ecommerce store. Unlike consulting, speaking, infoproducts, or affiliates, the margins on ecommerce products are much smaller. It’s entirely possible that he’s making a ton of top-line revenue but only enough profit to live a decent lifestyle.
That’s pretty common with ecommerce entrepreneurs. They claim that they’re making millions of dollars with their business but only take home $50–100K per year. Once you factor in costs of goods sold and overhead, there isn’t a ton left over. I have no idea if Tim Urban falls into this bucket. I simply don’t know.
This system of related businesses is one of his tips for growing a successful business. He thinks of these businesses like a pyramid — KingSumo helps grow your business with giveaways, Sumo (which is the core product) arms those businesses with the tools they need for marketing, and BriefcaseHQ and AppSumo provide the rest of the tools. Creating a system of interlocking tools means you don’t need to find new customers; you can simply market to the customers you already have.
This reminds me of Target adding in groceries. They increased their revenue by asking, What are our existing customers buying that they aren’t buying from us? What do they need that I could sell them?
Noah has an even better analogy: it’s like buying another book from an author you already love. If you love a book an author’s written, of course you’re going to but their next book and their next book.
He’s also got a lot of thoughts on setting the right pricing structure, leveraging recurring revenue, and bundling that’s all worth studying as well.
Revenue: It’s all been reinvested into the business, plus speaker fees
Shane started his blog to track his own personal learning and development — he didn’t have any grand ambitions for the project, and the original url, 68131.blogger.com, shows it. Today his newsletter has 200,000 subscribers and Farnam Street gets 1M pageviews a month.
How does he make money? Well, “earn money” vs. “make money” is a good distinction here. Shane says he’s reinvested most of the money back into the business, “In 2014, I think we actually lost money. In 2015, we didn’t lose money, which was good. … I will say that I’ve never actually personally made a penny off Farnam Street. It’s all been reinvested back into content, experience, trying new things, and that’s the way that hopefully I foresee the future.”
He makes money in a variety of ways: he first paid his expenses with Amazon affiliate links, then in 2014 he started his first 9-month partnership deal, newsletter sponsorships, conferences, speaker fees, infoproducts, a podcast, a forthcoming book, and a membership plan for his site that you can choose what you pay, currently either $149 or $249. His model is based on providing free content to many and creating a base of super fans who’ll pay for more of that content, subsidize the free content to give back, and gain access to even more: a book club, a discussion group, and private Ask Me Anythings. If 5% of his 200,000 newsletter subscribers convert (that’d be 10,000 members), and each of them signed up at the $149 level, that’d be $1.5M a year.
Shane regularly turns down speaking engagements for $20,000 because it’s not how he wants to make money, and he doesn’t optimize his in-person workshops for revenue. He’s always asking what’s in the best interest of the business. That means the bulk of the revenue comes from memberships.
I agree with his advice: “The audience will grow if you put out good content.” And, “I know how easy it is for people to copy our content and even our business model. So that drives a lot of what we do. We want to do things that are hard to copy and that means we can’t cherry-pick what’s easy, because there is a lot of competition in easy.”
Ready to build you own blog that makes money?
I know the list above is full of people making serious money.
Here’s the crazy part.
For every blogger making a million dollars, there are thousands that make enough money to quit their job and work on their blog full time.
The list is too long to keep track of — I wouldn’t be able to put it together.
It is absolutely reasonable to start a blog with the goal of quitting your job and being your own boss. So many people have already done it you’d be walking a well-traveled path at this point.
I also believe that there’s still a ton of opportunity to be made blogging. I see new up-and-coming bloggers every year. It’s still possible to start a blog today and have it support you. I put together a 12-step guide on how to start a blog here. It’ll walk you through the whole process.
Turning a profit requires a few more steps than hobby blogging (doing it just for fun and not worrying about consistency, SEO, and monetization). Here are the steps you need to know about how to start a blog:
You can jump straight into blogging if you already have a name and an idea for your blog.
Just head over to Hostinger and sign up for a Single WordPress plan. This is the best hosting service for beginners and the easiest way to start a new blog.
Plans start at just $1.99 per month. This rate is based on a four-year contract, but it’s the best deal in web hosting if you want reliable service from a reputable provider. In addition to web hosting, you’ll get a free domain name, website builder, email accounts, and everything else you need to get started.
The registration process is simple. Hostinger will walk you through a series of steps that are very straightforward. Here’s a quick overview that you can follow:
Select Blog when you’re asked what type of site you’re creating.
Claim your free domain when prompted unless you have already purchased one elsewhere.
Install WordPress when asked to select a CMS (content management system).
Choose a theme to determine your site layout. You can always change this later, so don’t overthink it.
Click Finish Setup once you’ve reviewed and confirmed the selected options.
Now you can log into your new website and start blogging immediately.
Monetizing your blog is the next step. There are lots of different ways to make money from your blog, and we’ll cover that later on. For now, let’s dive straight into the entire blog creation process from the beginning.
Step 1: Find a Blog Idea
This is the most important step for your blog.
Choosing your blog’s topic (or niche) determines the rest of the website’s future. This is what you’re going to be writing about and — hopefully — making money from.
The good news: There’s practically an audience out there for every single topic you might be interested in.
But some topics tend to perform better than others. You need to find a topic that appeals to a big audience while still appealing to you.
To find the perfect blog niche, you’ll need to answer two questions:
What am I interested in?
What topic do you love? What are you obsessed with?
This is the basis of your blog niche. After all, if you don’t love the topic, you’re not going to want to write about it day after day.
To help answer this question, I suggest looking toward several areas:
Talents. Is there something you’re naturally talented at? Maybe a sport, game, or musical instrument.
Expertise. What skills and knowledge have you built up over the years? Maybe there’s something you went to school for that you can write about now. Think about academic subjects or skills like languages and car repair. Even having a wealth of lifestyle knowledge can be shared.
Career. Your current career can be a fantastic place to write about. For example, if you’re a developer for a startup, you can start blogging about front-end development or the tech industry. Likewise, if you’re an experienced photographer.
Hobbies and passions. Is there a topic you just love learning about? Think about the things you do in your free time. Maybe it’s reading books, working on your fantasy novel, or repairing that old car in your garage. These can be great topics to write about in your blog.
ACTION STEP: Write down 10 – 15 topics you’re interested in. Pull up a blank document or sheet of paper and write this down. It’ll help you keep your ideas focused. Plus, you can refer back to it later when you make your final decision.
What are other people interested in?
This area is a bit trickier.
You need to find out what other people are interested in as well. Otherwise, you might find yourself with a blog that doesn’t draw in a lot of people.
For example, you might think that a blog all about how wonderful your dog is is super interesting — but is that going to draw in a lot of people?
On the other hand, a blog about how to take care of and train dogs appeals to a much bigger audience of readers.
You need to take your personal interest and find a way to make it universal. Think back to how you initially gained interest in the topic. How did you gather expertise in the topic?
Think of all the questions and confusions you had when you started out and what helped you gain expertise.
To help, here are a few popular categories that always do well:
Personal finance
Fitness
Online business
Investing
Productivity
Real estate
Careers
Test prep
Freelancing
Pro tip: Use Google’s Keyword Planner tool to see how often people search for a specific category or niche. It’ll reveal what people are and aren’t interested in.
ACTION STEP: Take a look at your list from before. Do any of them fall under these categories? If not, that’s okay! There’s probably still an audience out there for one of your topics.
For now, I want you to choose a topic from your list that you want to turn into a blog. Once you do, you’re going to make it even more specific and niche it down.
For example, you might want to start a personal finance website. Niching it down might mean you make a personal finance website for millennials making $100,000 a year. Or for 30-somethings who want to retire early.
Look back at the different topics you generated in Step 1. Can you blend two topics you like writing about to hone in on a niche?
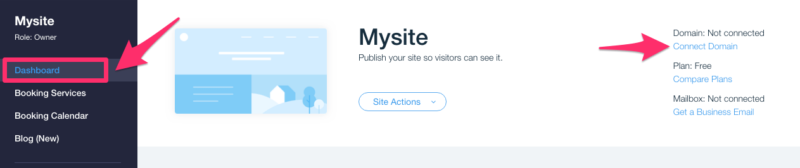
Step 2: Find the Perfect Domain Name
Now the fun part: choosing your blog’s name. For this, I have good news and bad news.
Bad news: Most of the very “best” domain names are already taken. The Internet is decades old. Makes sense.
Good news: That doesn’t matter because we’re going to find the best one for you.
Here are a few good rules of thumb to keep in mind when choosing a good name:
Keep it short. Don’t force potential visitors to have to type a bunch of words to visit your website. We recommend no more than 14 characters.
Choose a .com, .org, or .net. These are the easiest ones for people to remember.
Easy to spell and pronounce. You don’t want to spell it out constantly for people when you mention your blog’s domain.
Avoid numbers and hyphens. Not only does it look clunky in the URL, it’s also difficult to type out when you add hyphens.
Use your name. It’s pretty likely that your name is available as a domain. That makes it the perfect choice for a personal blog. I’ll speak more on this later.
When you come up with a domain you like, head to Hostinger to see if it’s available using their domain tool.
If it is, great! If not, you now have two options:
Search until you find an available domain. I highly recommend you do this until you find a domain that’s available. If you’re going to write a blog, sharpen your synonym skills by searching for other words and phrases that might be available. Trust me. As a working writer, this is a VERY crucial skill.
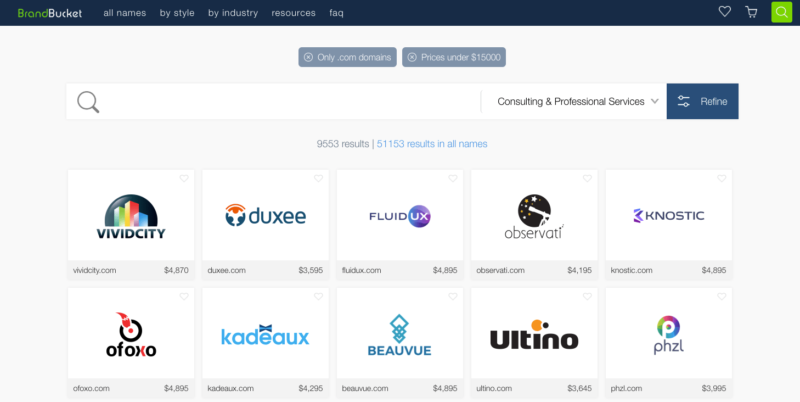
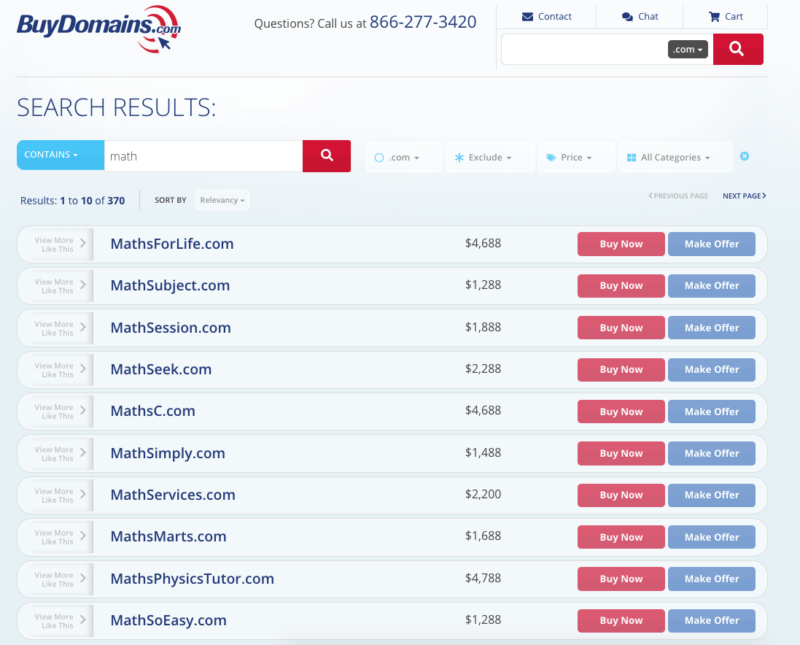
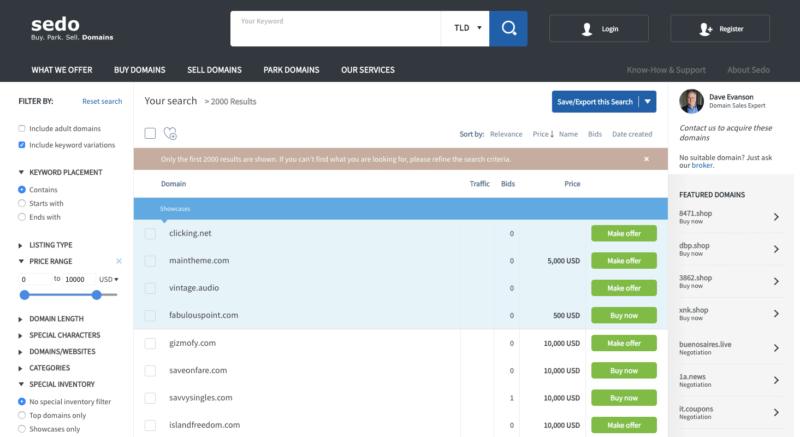
Purchase a domain name. While it is possible to buy a domain from someone who already has it, that’s an advanced option and can get expensive fast. Low-quality domains will usually go for a few thousand dollars. Highly quality domains that are two words can easily go for $10,000 to $50,000. I’ve even been in discussions to purchase domains for over $100,000, and the really hot ones can break seven figures. Not to mention all the hassle that comes from finding the person who owns the domain, negotiating with them, and transferring the domain if you even reach an agreement.
Your best bet is to keep going until you find a domain that you like and can purchase directly from a domain registrar for about $10.
We go into lots of detail on which domain registrar to use here. But I highly suggest you buy a web host that allows you to register a domain for free. That means going with Hostinger.
Using your personal name as the domain
If this is your first blog and you’re not completely sure what you want to blog about, I recommend that you use your personal name.
The reason is that changing your domain later will mean that you have to start over from scratch. There are a lot of mistakes in blogging that can be corrected later; having the wrong domain isn’t one of them.
Let’s say you pick a domain like fitnessfordoctors.com. Then after six months, you realize you’d rather be doing personal finance blogging for doctors. You’d need to get a new domain and start over from scratch.
Personal domains are much more flexible — it’s just a name after all. So if you jump categories after a few months, it’s not a big deal. Take down any old content that’s not relevant to your new direction, start posting new content, and you’re good to go.
That said, personal domains have two major downsides:
Scalability. It’s much more difficult to recruit other writers or grow your blog beyond your personal identity later on.
Profitability. Personal blogs, even if they’re generating serious cash, are much harder to sell. Prospective buyers want a site that isn’t dependent on a single person.
However, these are pretty advanced problems to have. If this is your first blog, the benefits of using your name as the domain greatly outweigh the costs that only show up down the road.
ACTION STEP: Pick a domain name and run with it.
While it’s important to pick a good, brandable domain name, the most important thing to do in this step is to make a decision and go. You don’t want to be stuck in the dreaded state of “paralysis by analysis.” Instead, just choose one based on the system above and run with it.
Every website needs to have a web hosting provider. Your web host runs the servers where your site will “live” on the internet—making it possible for people to visit your blog.
This is one of the most important steps in this process, so don’t rush through it.
Having a quality web host ensures that your site loads quickly, performs well, and doesn’t crash unexpectedly.
Hostinger is straightforward and affordable, which is exactly what new blogs should be looking for in a web host.
For such an affordable price, Hostinger also performs at a really high level. So you’re still getting a high-quality hosting service at an entry-level price tag.
Speaking of price, you can get Hostinger for just $2.59 per month when you sign up using our special discount link. This is an amazing value when you consider all the features you’re getting.
Get Hostinger for the special rate of $2.59 per month.
The great part about Hostinger is that it can grow with you as your blog scales. So as you start getting more traffic over time, you can simply upgrade your plan to the next tier as needed.
If you’re looking for a simple and reliable web hosting service, look no further than Hostinger.
Step 4: Install WordPress
Your website needs a content management system (CMS) in order to function. This CMS is what allows you to create and manage blog posts.
WordPress is the world’s most powerful cms platform.
In reality, there are far more options than just WordPress, but trust me when I say that it’s the only one you should use.
Why?
Because WordPress is one of the (if not the) most powerful, easy-to-use, and customizable CMSs out there.
Here’s proof: WordPress powers roughly one-third of the internet. Pause on that for a moment – one-third of the entire internet. That’s a lot.
So, that’s why I stated from the beginning to just use WordPress for your blog, end of story.
Since WordPress is one of the most popular CMSs in existence, most web hosts offer a one-click install for WordPress making the setup a quick and painless experience.
There’s always the option to use a dedicated blogging platform like Medium or even LinkedIn. Both are great for sharing ideas, but they are quite difficult to generate any revenue from. WordPress, on the other hand, gives you plenty of ways to turn a profit, which is why it’s one of the most popular choices.
So, if you’re trying to make money blogging, WordPress is definitely the better choice.
ACTION STEP: Install WordPress on your host.
Hostinger makes it really easy–you will actually handle the WordPress install during the signup process.
Once you tell Hostinger the type of site you want to create (a blog, in this case), it will offer you a few appropriate CMS options. Simply select WordPress:
Complete the rest of the signup process, and launch your site. Once it’s ready, Hostinger will prompt you to activate WordPress the first time you sign in.
Anytime you want to interact with your WordPress site, you can find it on the lefthand sidebar of your Hostinger dashboard.
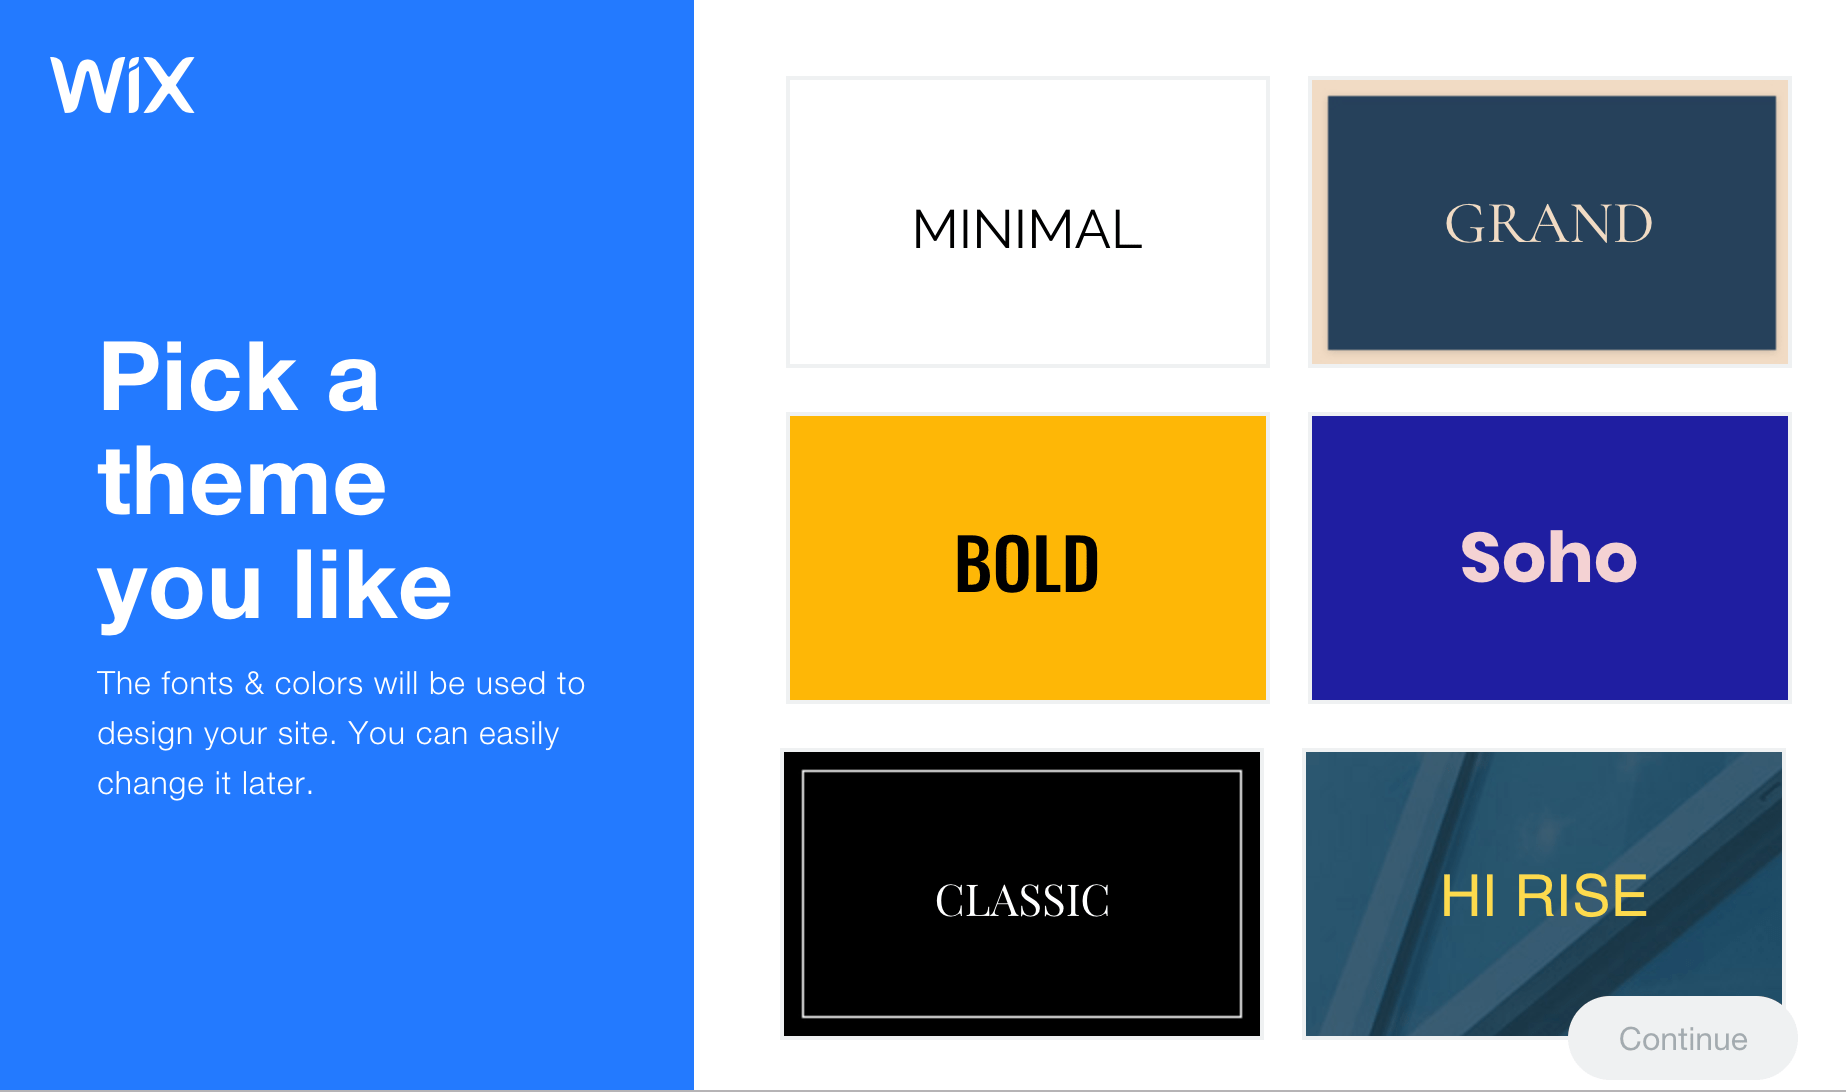
Step 5: Pick a Fitting WordPress Theme
It’s very easy to change your site’s look and feel with WordPress.
The best part: No coding knowledge is required.
That’s because WordPress uses “themes.” These are little packages of code that can be swapped in and out. Whenever you change your theme, your site will also change, but your blog content stays the same.
This makes it very easy to evolve your site over time without having to rebuild your entire site from scratch.
Hostinger actually has you choose a theme during the setup process, just after you select WordPress as your CMS.
Hostinger offers a bunch of free themes for you to get started. There were 38 when I signed up.
Choose something that you like, but don’t get too precious about it at this point. You can switch up your theme later with very little work.
The number of themes out there makes me dizzy. There are thousands of free and paid themes out there already, and the WordPress community is always creating more.
When picking a theme for my blogs, I go straight to StudioPress. The themes are a bit more expensive at $130. (Most themes go for $20–50.) But it’s totally worth it.
StudioPress was purchased by WP Engine and WP Engine now includes all the StudioPress themes as part of its hosting package. It’s a nice freebie if you are already planning on hosting your site with WP Engine.
If you want a wider selection of WordPress themes at standard prices, Themeforest is the most popular WordPress theme marketplace.
Because it’s so easy to select your first theme with Hostinger (one click during the setup process), I want to show you how to switch up your theme in the future. It’s not much harder at all.
ACTION STEP: Purchase a theme and add it to your website.
After you purchase your theme, log into your WordPress blog, go to the Theme section which is under Appearance in the WordPress sidebar menu. Then follow the instructions for adding the theme.
You’ll have to upload the theme files to WordPress and activate the theme from within WordPress. You can find the upload option by going to Themes > Add New, a button towards the top. Then you’ll see this option to upload:
You’ll be able to manage any themes you’ve uploaded to your WordPress blog from your Themes section:
You can always use free themes if you don’t want to pay for one, helping to keep your startup costs low. Just be aware that some free themes lack the features and customization options that come with premium themes. Some free themes are poorly coded, which could slow down your site or open you up to security vulnerabilities.
Step 6: Install WordPress Plugins
One of the best parts about WordPress is that it’s infinitely customizable. Since it’s open-source, you can change it to do whatever you want.
The easiest way to make changes is with plugins. Plugins are little batches of software you can install within WordPress to get extra functionality. This is how you’ll add a bunch of extra features to your site without having to code anything yourself.
Be careful here and try not to go overboard.
Some bloggers will install dozens of plugins on their blogs. That can cause a bunch of problems later on.
Not only can plugins cause unexpected conflicts with each other, they become a security liability since it’s unlikely that every plugin owner will maintain the plugin over time. They also become a huge headache to manage.
When you have that many plugins, you’re never sure which plugin is causing a particular problem.
I like to keep my selection limited to 5–10 amazing plugins.
ACTION STEP: Download helpful plugins
Here are a few of my favorites:
Akismet – Required for every blog, it automatically filters a ton of comment spam which is a problem for every blogger. This is one of the few plugins that I happily pay to upgrade.
Yoast SEO – The most highly recommended SEO plugin, it handles a bunch of SEO tasks automatically for you and also makes on-page SEO tasks a lot easier.
Contact Form 7 – The most popular contact form out there. Set up a contact page on your site, and then use this plugin to create a contact form that will email you any time someone fills out the form. Super easy.
TinyMCE Advanced – A bunch of improvements to the WordPress editor that makes writing in WordPress a lot easier. These days, I usually skip this one. I write all my posts in Google Docs and then format them in WordPress using its default HTML editor.
MailChimp for WordPress – More on this below. It’s the easiest way to connect your WordPress site to a MailChimp account, create an email signup form, and start collecting email subscribers.
WordPress Popular Posts – Easiest way to add a list of your most popular posts to your blog sidebar. The list will update automatically.
Step 7: Install Google Analytics
Google Analytics is a free tool that will help you monitor key performance metrics related to your blog traffic.
You can use it to see how many site visits you’re getting, the demographics of your visitors, and see which pages are driving the most traffic.
With that said, Google Analytics can get tricky if you don’t know how to use it. That’s why we’re going to ignore the majority of what the tool can do—at least for the moment.
Right now, you just need to create a Google Analytics account and install it on your blog.
While there are dozens of reasons why Google Analytics should be installed on your site, there are two major ones that we’re going to focus on right now.
First, Google Analytics tracks your data over time. So when you’re ready to dive deeper into the weeds later on, you’ll be happy that you’ve been collecting data from day one.
Second, it’s encouraging to watch people visit your blog in the early stages. This can give you the motivation you need to continue putting in the work required to scale your blog.
Google Analytics is also really easy to set up. Here’s how you do it:
Log into Google Analytics
This is simple. Go to Google Analytics and click on Start Measuring.
If you’re not logged into a Google account, it’ll ask you to log in to your Google account. If you have one, do so. If not, create one and log in with that.
Create your Google Analytics Account
The tool asks you to provide an account name. Use the name of your website or blog for this.
Don’t worry about the boxes with the checkmarks for now. You can always change them later.
Once you do that, click on Next at the bottom.
Choose what you want to measure
This screen asks you to choose whether you want to measure a website, an app, or a combination of both.
Choose Web since you’re creating a blog.
Then click Next.
Fill in the property details
Now fill in some details about your website, including its name, the URL, your industry category, and your timezone.
Once you’ve done that, click on Create at the bottom.
Copy and paste the tracking code onto your site
Once your account is created, you’ll have a unique JavaScript tracking code for your site. When you copy and paste that snippet of code into your site, Google Analytics will start collecting data for you.
Voila! That’s it. You are now tracking Google Analytics for your website.
Step 8: Set Up Your Email List
Every marketing engine I’ve built for companies has relied on emails at its core.
And there’s a good reason for that: Email lists are the best marketing tool. Period.
Think of your email list as a giant laser ray; you can focus on any offer you want. Selling consulting? Pitch your list to the reader.
Publishing a new blog post? Pitch your list at the bottom of the blog post.
A podcast just interviewed you? Pitch your list to the podcast’s audience.
Of all the marketing channels that have come and gone over the years, nothing compares to the power of a high-quality email list.
Even if you’re not sure what to send your email subscribers, that’s okay. The important thing is you start gathering a list of subscribers and build the foundation early.
ACTION STEP: Create an email list.
Using Constant Contact or other email marketing services, start collecting emails on your blog so that the list is ready for you as soon as you need it. It takes time to build a decent size list so your future self will be extremely grateful if you set it up now.
Even a super basic opt-in in your blog sidebar is enough to get you started, like this one from Divalicious Recipes.
Divalicious Recipes, a food blog, uses the promise of low carb bread tips to get readers to sign up for its email list.
Don’t even worry about sending any emails yet unless you want to. The main thing is that you’re collecting email subscribers from the beginning. Email lists can be a gold mine once you have a few thousand subscribers, and the money really rolls in once you have 10,000 subscribers and above.
Step 9: Pick a Blogging Cadence
Writing blog posts isn’t a sprint, it’s a marathon. Actually, it’s more like a multi-day backpacking trip.
The best bloggers settle into a consistent writing pace they can maintain for a few years. That’s right, years.
Here are a few posting frequency rules of thumb:
At the bare minimum, find a way to post once per week. This needs to be a substantial post, too: 2,000 words at least. Long-form content receives twice as many page views, and Google’s algorithms favor content that is 3,000 words or longer. I recommend you start here.
Serious bloggers will post 2-3 times per week.
Larger sites quickly get to 5-7 posts per week. This requires multiple authors.
The heavy hitters who push things to the limit will do 25-50 posts per week. No joke, this is for large businesses using content marketing as their primary customer acquisition channel. HubSpot is a classic example of this.
That said, don’t fall into the trap of writing your blog for search engine optimization (SEO) rather than for your readers. While SEO is important and can help increase your visibility, it shouldn’t come at the cost of creating quality content.
AI-based content creation tools can help to scale up your writing quickly, but you should always make sure to review the output before publication.
For example:
SEO optimization tools like Clearscope are helpful for showing you keywords to include, but good “content grades” on these tools don’t equate to actual good content.
AI content generators can help you write blogs faster, but they don’t know your audience, your subject matter, or your personal writing style. They also produce content at all costs, so they occasionally produce content that is completely false.
Software like Grammarly is great for catching typos, but don’t listen to all of its suggestions—your English teacher isn’t grading your blog and your audience won’t respond to perfect-sounding sentences and robotic grammar.
Your posts that generate the most traffic won’t always be the ones with the highest volume. If anything, highly targeted posts with fewer, more engaged readers will end up making you the most money.
It will get easier to publish posts the more you do it. Getting several posts out the door each week might sound like a lot now, but over time, every part of your process will get quicker.
The important thing is to start your blogging cadence off on the right foot. Begin with a weekly publishing rhythm, and build from there.
ACTION STEP: Start posting at least once a week.
I know writing isn’t easy. After writing blog posts full-time for three months, I always want to throw my MacBook out the window. It’s a grind for all of us. This is why I recommend starting at one post per week.
That still gives you the majority of the week to focus on other aspects of your site while also giving you a break from writing blog posts all the time.
A really great post should take you two days to complete. The first day is for research and outlining, along with as much writing as you can complete. The second day is for finishing the writing, proofreading, and publishing the post in WordPress.
Also, push quality as hard as you can. The key to building a site and traffic over time is to write posts that are more valuable than what other people have already published in your category.
Step 10: Build an Audience
There’s a super famous article in blogging circles: 1,000 True Fans.
Basically, getting 1,000 true fans means you can fully support yourself. You can quit your job, work wherever you like, and be in complete control of your life. All from hitting a very reasonable goal of 1,000 true fans.
With blogging, you’ll build your audience of 1,000 true fans slowly and consistently.
As long as you keep at it, you will get there. Typically, it takes a few years.
That said, it’s possible. 77% of internet users read blogs, and all you need is a tiny fraction of them to make a substantial living.
ACTION STEP: Use this system to get 1,000 true fans.
Here’s what to focus on in order to get there faster:
Always post at least once per week. Never skip a week.
Start posting 2-3 times per week if you can.
On every post, push on quality as hard as you can. Google the topic and see what other people have done, then ask yourself how you can write something even better.
Write stuff that hasn’t been written to death already. Find a new take or perspective on your topics that other people haven’t already covered.
Find your voice and be authentic so people can get to know you. This builds connections with your audience faster. A quick hack for this is to pretend that you’re writing your posts to a close friend.
Allow your readers to comment. Disqus has a ton of users and allows readers to leave feedback, praise your post, or leave criticism for it. If you’re up to engaging your first core readers, leverage this to make a solid connection with them.
To push even harder, get active in other online communities. Post in Facebook groups, subreddits, on Twitter, do podcast interviews, get speaking engagements when you can – anything and everything. Be as helpful as you can be in these communities.
For all of your content, constantly ask yourself, “How can I make this as valuable as possible?
Infoproducts. Online courses, webinars, e-books, etc.
Affiliate programs. You work with a brand to promote their products and you get a cut of any sales.
Freelancing and consulting. You use your blog as a platform to find clients and customers for your own services.
Here’s a quick primer on how they work:
How info products work
I could write a book on info products. For now, we’ll keep it simple. Here’s the model:
Get people to visit your site.
Then, give them a reason to subscribe to your email list.
Once they’re an email subscriber, run them through a launch funnel. These are email funnels specifically designed to sell info products. Usually, these are courses that include a bunch of video lessons.
Depending on your volume and target market, you’ll convert about 0.5% to 1% of new email subscribers into a customer for $500-$2,000 for your course. At volume, that adds up fast.
Now, this sounds too good to be true. While there are a few catches, it’s mostly true. What are the catches?
First, you’ll need to get extremely good at direct-response copy.
Second, it helps to be in the right category. People want money, status, and relationships.
How affiliate programs work
Affiliate marketing is pretty simple: You go about creating as large of an audience as possible. Then, throughout your content, you recommend products that are helpful to that audience.
When your audience clicks through the link of that recommendation, they get a special tracking code. If they end up purchasing, you get a cut of the sale.
You have no doubt seen affiliate disclosures on websites for years, like this one for Outside Magazine’s online edition.
The Federal Trade Commission requires that all affiliate marketing relationships be publicly disclosed, like Outside Magazine does here.
The main downside is that only a small percentage of people will ever click through and an even smaller percentage of people will purchase. So it really helps to have a massive amount of traffic in order to make enough money from your blog.
It’s safe to say that Outside magazine has a big enough following to make affiliate links profitable for them.
How freelancing and consulting works
While info products and affiliates are the main ways to make serious money, you also need serious traffic in order to make them work. At least if you want them to work well enough to make six figures per year.
That’s why I believe freelancing and consulting are the best ways for beginners to start making money fast while blogging.
To make money quickly, this is by far your best option. It’s also the easiest to do.
Freelancing programs have taught thousands of people how to get started freelancing. What always blew me away was how life-changing those first few freelancing gigs are.
Anyone can create a blog and use it for freelancing lead generation. It’s enough to build a client base that pays you $3,000 to $5,000 per month. That’s enough to quit your job. That’s life-changing.
And it’s a much easier goal to hit than a fully ramped-up affiliate or info product marketing machine. You always have the option to build that stuff later anyway.
What about all those other monetization methods?
Most of them are a waste of time. The impact on revenue is marginal, it’s a complete distraction. A few are worth doing for marketing and branding. The rest should be ignored entirely. Here’s the list that bloggers always try at some point:
Books – Great for marketing. Adds a ton of credibility to your brand. But you likely won’t feel the impact on revenue at all when it comes to royalities. However, they are great marketing and lead generation tools.
Events – I loathe events with every fiber of my being. All the risk is front-loaded, all contracts get locked up ahead of time, they’re a pain to sell, and you don’t even know if you’ll make any money until right before the event. Even if you do make money, the margins are terrible. For me, these are complete distractions and a huge opportunity cost for the business.
Banner ads (Google Ads, formerlly Adsense, for example) – The last time these made any decent money was around 2003. These days, I’m not even sure it’s possible to get banner ads to cover your hosting bill. I’m only partially joking.
Speaking – Done the right way, occasional speaking can be a great brand builder. And while it sounds amazing to get paid $20,000 per speaking gig, it’s not nearly as amazing once you learn most speakers never get paid, it takes months worth of work to create a talk that commands that kind of fee, you really need a New York Times Bestseller in order to charge real fees, and you’ll get so sick of hotel rooms after the first year that you’ll never want to travel again. Do speaking gigs when good opportunities come up; don’t build a business on them.
Don’t let this discourage you though. The important thing is that you get started building your blog and writing. Do it consistently and stick to the system, and you’ll find that success comes quicker than you think.
That brings us to our last action step…
LAST ACTION STEP: Keep Growing! Read articles on how to start and grow a successful blog
We’ve been writing about blogging and how to make money blogging on Quick Sprout for years. Check out Everything About Blogging for an annotated list of what you should read next.
Starting a Blog: Your Top Questions Answered
Can anybody start a blog?
With so many simple and straightforward blogging tools available, anybody can start a blog today. All you need to begin is an idea and a website. To get started, make sure to choose a blogging platform that can help you reach your long-term goals. Some platforms are better for turning a profit while others are great for making connections. Do some research beforehand to make sure the platform you choose is a good fit.
To make starting a blog easy for anyone, many website builders offer simple drag-and-drop visual editors. That means you don’t need any web development skills to build a customized blog. If you’re beginning from scratch, you can sign up for Hostinger’s WordPress hosting plan, which gives you web hosting, a free domain name, a website builder, and all the tools you need to start blogging today.
How do bloggers get paid?
Bloggers are paid by using affiliate links on their posts, selling infoproducts like online courses and webinars, and offering freelancing and consulting services. While there are other ways you can make money through your blog, these are the three options with the biggest upside. Affiliate marketing is the easiest way to start monetizing your blog, as you’ll just need to sign up for an affiliate program and create content that appeals to your audience. As a new blogger, you should also focus on growing your email list so you’ll have a database of prospective customers at your fingertips when you’re ready to launch new products.
How do I start a blog with no money?
You can start a blog with no money by using a free website builder to create your blog and taking advantage of all the free resources available online for bloggers. For instance, there are free SEO tools that can help you with keyword research so you know what kinds of topics potential readers are interested in. These tools can also provide you with reports and analysis to measure what’s working and what’s not. Also be sure to take advantage of free email marketing tools to help grow your blog and free image sites to make your posts visually appealing.
Keep in mind that if you build a website for your blog, it’ll need a web host. Some free website builders offer free web hosting as well, so make sure you do your research before signing up.
How do I make sure my blog is successful?
To make sure your blog is successful, it’s important to choose a niche that you’re interested in and actually want to write about. Consistently post quality content on your site, and take the time to learn about SEO best practices. It’s important to do keyword research about potential blog topics so you can write about the content that prospective readers are interested in. Finally, make sure you’re interacting with your readers. Respond to comments and messages within 24 hours. This will help you build connections with your audience and create an active and engaged community.
Whether you want to start affiliate marketing to drive sales, a blog to bring in new business, or showcase your creative portfolio, you’ll get everything to build an entire website in one place with any of the options above.
If you want to turn a profit on your blog, use WordPress, Wix, or Squarespace. You’ll be in complete control of your site and everything that’s on it. For people who want to blog with WordPress, we recommend using Hostinger as a web host to keep your speed high and costs low.
We’ll also cover options like Medium and LinkedIn that are great for hobby blogs and making connections–but not blogs for making a living. They are free, but you don’t get to choose how your blog looks, and adding your style is half the fun.
What makes these blogging platforms great? Where could they be better? To find out, we interviewed active users of each platform about where these platforms excel, and where they are falling behind.
It’s a highly customizable content management system (CMS) for bloggers who want to build out a site for their business. It’s also great if you plan to scale your blog for profit.
The reason? WordPress is open source. That means they don’t keep their source code a secret. Developers can go in and create widgets, plugins, and other tools to customize WordPress blogs—so youcan create any kind of blog you want.
There are virtually limitless options for WordPress plugins, meaning you can quickly find one that does exactly what you need…no coding required on your part.
What this means for WordPress users is that no matter the action or functionality they need, there is probably a plugin or widget already available that does it. And it is incredibly simple to add that functionality to your website. You simply find the tool you need, install it with just a few clicks, then easily customize it to your specifications.
This dramatically streamlines your website customization and eliminates the need for you to know how to code or hire a developer to create something for you. Chances are, there’s a plugin already out there that does exactly what you want. It doesn’t get much easier than that when it comes to making your website your own.
One user on our panel, who has stuck with WordPress for four years, describes the CMS as “blogger-friendly” with plenty of SEO features baked in. Their experience is echoed by many of our other users.
That said, there is a bit of a learning curve. To get the most out of WordPress in terms of customizability, you’ll need to be more hands-on with the plugins and widgets you choose and how you manage the backend.
However, even this is fairly straightforward in WordPress—and it didn’t take long for our users to learn the ropes at all.
“With no knowledge of WordPress when I started, it was a bit of a steep learning curve but I figured everything out quickly enough,” said one user. “WordPress is very intuitive and if you can’t figure something out, you just have to Google it or check on YouTube and you will likely find an answer.”
Another echoed that sentiment. However, they also said that “it’s fairly easy to use” after blogging on the platform for a few days.
WordPress is easy to use for All bloggers, including beginners.
The tradeoff is well worth it, as you’re able to get a fantastic website fully customized to your exact specifications. That’s what makes it perfect for creating a website that’s primed for audience growth and profit.
One user was also able to promote items for third parties in order to generate even more revenue. “I was able to monetize my blog using affiliate marketing, along with info products like ebooks and minicourses once my audience got big enough,” they said.
They were also able to leverage plugins to help them build their audience—and generate revenue growth.
“One thing that helped with that was creating an email subscriber list and a newsletter using the Mailchimp plugin,” they added. “It’s a must-have if you really want to monetize your blog.”
With the sheer number of plugins and the ability to customize your site, you will be able to find any option you want to include on your site. As your blog and audience grow, you can continue adjusting your site to accommodate it in whatever direction you want to go.
Blogging with WordPress
Confession time: WordPress is actually the CMS we use here at Quicksprout—so we’re a bit biased.
In fact, we’re very biased.
If you plan on building out a blog that draws in thousands or even millions of readers—not to mention monetizing it—we can’t recommend WordPress enough. But the users are right when they say it’s a bit tricky to learn at first.
At first blush, the blog dashboard for WordPress seems more complex than most. But once you jump in, it’s fairly easy to wrap your mind around. And you’ll get used to it relatively quickly.
The WordPress Gutenberg editor makes the blogging and editing process very straightforward. You really don’t have to know HTML unless you want to get crafty. All the fundamentals you need to publish a blog are point and click.
Sure, it’s not quite like the drag-and-drop functionality as Wix and Squarespace have since you can’t edit the entire page—but it’s pretty darn close.
You can fully customize your blog and content within the wordpress editor.
I’ve also found WordPress to be incredibly scalable. No matter what you want to build or how big you get, the platform will grow with you as long as you choose the right plugins.
A quick tip: Don’t make the rookie mistake of downloading a ton of plugins and widgets. It’s easy to think you need everything—but sometimes, less is more.
Plus installing a ton of plugins is an easy way to sloooooooow down your page’s loading speed.
One plugin we do recommend you get is the Yoast SEO plugin. This is an incredibly popular WordPress plugin that helps you set up your posts to be as SEO-friendly as possible with a few guided steps. It’s honestly a must-have if you’re using WordPress.
Yoast SEO is one of our favorite WordPress plugins here at Quicksprout.
And if you really want, you can start changing the code yourself. Since WordPress is open-source, that means you can do whatever you want with it. If you know PHP or are willing to hire a developer, you can change WordPress however you like.
One user put it best: “WordPress gave me everything I needed to create the blog I wanted. It gave me an easy interface to post my blogs, as well as everything I needed or wanted in my blog: a subscription box, an author area; just the look I wanted and the flexibility to change things as needed.”
Choosing a Host
To build your own site using WordPress, you’ll need to buy a domain name, get web hosting, and set up your account.
hostinger has wordpress-specific hosting plans that are perfect for new blogs.
Hostinger is one of the most popular web hosts, especially for WordPress users. That’s because they run servers that only have WordPress sites on them–this allows Hostinger to configure servers specifically for WordPress security and performance.
This means–with no extra work on your part–you can have a faster, safer WordPress site simply by signing up with Hostinger.
With just one click, you’ll be able to get your WordPress site up and running within minutes. I’m serious. You simply select WordPress as your desired CMS during the signup process, and it’s automatically installed for you.
The price was a big factor for most of the users we spoke with. Hostinger comes in at the very low end price-wise, yet it’s jam-packed with features to help you grow. Starting at $1.99 per month, you’re going to get the ability to:
Use your own domain name for free for the first year
Create up to 100 different websites
Create up to 100 email accounts tied to your domain
If you want to create additional sites or email people from a professional address @yourdomain.com, that’s going to cost extra with some of the other platforms.
Another helpful aspect of going with Hostinger is the 365/24/7 support via live chat. Most of your WordPress-related questions can be answered with a simple Google search–as the world’s most popular blogging platform, there’s a ton of info out there.
Cons of Blogging with WordPress
The user panel gave me varying feedback about WordPress’s beginner-friendliness. Some said that it was easy enough, while others pointed out that it was tough on novices at the beginning.
“I don’t like how it does take a bit of a learning curve to use,” said one user. Their thoughts showed that WordPress won’t be the easiest option, especially when building your first site. “Sometimes I’d like to have my hand held more through the blog creation process rather than having to look up a bunch of YouTube how-to videos to learn how.”
After testing and building sites myself using WordPress, I can say that it takes a bit to get the hang of it—but once you do, you’ll be glad you put the work in.
But even if you’re uncomfortable with it at first, it’s still the best option if you’re willing to learn and grow into the role of managing your website site.
Another flaw that one of our surveyed users mentioned is that WordPress lacks comprehensive customer support.
“I wish there was a help desk that you could contact either by email or by chat,” one user told us.
That is one other good aspect of signing up with Hostinger. There is someone you can reach out to via live chat any time of day or night. Their support teams handle a lot of common WordPress questions and may be able to help you out.
Final Thoughts on WordPress
Along with performing very highly across all criteria, WordPress with Hostinger is a great place to start if you really want to build a blog that will grow with you no matter how big you get.
This is especially good if you plan on monetizing your blog and optimizing it for traffic/growth. Eventually, you’ll need to add more resources some other platforms might not be able to offer you. WordPress and Hostinger can do that.
Some WordPress users had minor issues with the platform’s learning curve, they all said that they were able to create their ideal blog once they got the hang of it. They especially liked WordPress’s level of customization — with some of them monetizing their websites using the site builder’s many plugins and widgets.
Bottom line: Building a WordPress website takes more time than a Wix website. However, the tradeoff is your website is much more customizable (and powerful). And Hostinger makes it easy to host your WordPress site. As such, we highly recommend this combination for bloggers who want to really grow their traffic and/or profit margins.
Wix – Best for Beginners Building a Professional Blog
Wix is perfect for beginners because it doesn’t require any coding skills and you can start a new blog in minutes. Sign up for a free Wix account today.
Wix gives beginners a way to make it look like professionals designed their blogs—all without needing to learn code or web development.
In fact, one user told me, “I think it’s as straightforward as it can get for people with no coding background.” They created their site with ease without running into any stifling restrictions.
Another user called out the drag-and-drop editor’s intuitive UI and its tools to create individualized layouts and designs.
We jumped in and tested it out for ourselves and found they were right. You can create a blog in just a few minutes. Wix even walks you through the entire process step-by-step if you need it.
selecting a template is much easier than starting from a blank page.
They offer hundreds of templates across many different categories of websites. For example, they have templates for travel blogs, simple portfolios, or photography galleries. We love how you don’t need to have any coding knowledge to move assets around and create the blog you want.
Another user agreed that Wix offered a very intuitive blog-building experience while adding, “If I’m unsure about a certain topic, it’s quick to find it via their support.”
Wix offers both live support via a 24/7 callback service (if you’re in the United States) and a massive knowledge base with articles to help beginners out when they’re stuck.
The Wix knowledge base is comprehensive and a great resource as you’re building your website.
But you can also just let Wix’s ADI builder handle most of the dirty work entirely. This tool leverages artificial intelligence to help you build the exact website you want by just answering a few questions.
And, if security or reliability is a concern, Wix nails both with a robust 99.98 percent uptime rate and a team of security professionals on the job 24/7 monitoring the Wix ecosystem for potential cyber threats. All this protection lets you focus exclusively on creating great blog content.
Blogging with Wix
Wix’s blog manager is indeed simple and intuitive, with analytics and SEO built right in.
It’s simple to add the basic features you might want on your blog, too—elements like social tools, likes, comments, hashtags, categories, and subscriber forms.
Once you have a template, you customize the other on-page elements of your blog in the wix editor.
There’s a blog template category, which is a great place to start. Once you have your template selected, I suggest updating the font, colors, and logo to personalize your template and help it stand out from the rest.
Writing a post is as simple as clicking Create a Post, writing your copy, and adding images. You can save drafts or even give other contributors writing privileges for your site. This is all just as easy from a mobile device as from a desktop—no app required.
The blogging process is as intuitive and easy to use as folks described—but there were also some other additions that surprised me.
Wix offers Seo-friendly tools for bloggers.
You can easily add alt tags to images and nofollow tags to links without getting into the HTML. This stuff is really important for ranking high in search results, and with Wix, you don’t have to know a whole lot to get your SEO ducks in a row. For more tips like this, you can refer to our SEO for blogs guide.
All your posts automatically get a read-time count to show readers roughly how long it’ll take to go through your post (something Medium also offers) and is a great feature to have for readers.
We also like the ability to use live chat to interact with your readers in the Wix app. If you build a real community in your blog or are open to answering reader questions in real time—say, about an online course you’re offering or a webinar that’s coming up—then it’s a cool feature.
Most Wix blogs tended to look great across mobile, tablet, and desktop—something our users said helped them draw in readers. “Since my website runs very smoothly on any device,” said one user, “it made it easier for an audience to browse through my work and contact me immediately.”
Cons of Blogging with Wix
There are a few downsides to Wix — but even from our panel of users, it seemed their major complaints boiled down to a couple of points.
The platform sometimes doesn’t play well with mobile devices if you’re trying to do more ambitious scrolling designs, like parallax scrolling. One user said that “my scrolling effect cannot be achieved on mobile so I had to make a simpler version [of my website] separately.”
There’s also the matter of the subscription fee that—while fairly affordable—could cause some burgeoning bloggers to cringe (especially if you plan to be more bootstrap). If you plan on recouping some of that money with their ecommerce tools, you’ll still have to account for paying for a pricier plan for that functionality.
The panel of users rated Wix fairly low on monetization too—but that’s not to say it can’t be done. Occasionally Wix will feature stand-out blogs that use their platform, and that can lead to new opportunities as was the case with one of our users.
“Being featured on Wix did get me some freelance opportunities, and ultimately landed me my full-time job,” they said.
Ultimately, we think that despite the downsides, Wix is absolutely worth it for the platform’s ease of use and out-of-the-box blogging features.
Final Thoughts on Wix
Wix offers the best blogging platform for beginners. It offers a wide array of themes that’ll fit any type of blog and website you want to build.
You’ll also be able to easily change the look and feel of those themes to make your blog look the way you want it to—no coding knowledge needed.
The users we talked to praised Wix’s ease of use and the ability to customize their blogs on the platform. Our own hands-on research verified that. We could create a great-looking blog with zero experience with Wix in literal minutes. Imagine what you could do with more time.
And if you really want to take the guesswork out of designing your website, you can even let Wix take care of it for you by answering a few questions and letting their advanced AI take care of the rest.
Wix unique AI website-building platform requires you to answer just a few questions and it does the rest.
When you choose to let Wix create a site for you, the Wix AI website-building platform, called Wix ADI, basically does the rest. You simply identify a theme you like, from multiple color and font combination options, and then Wix prompts you with a variety of homepage designs to choose from.
From there, you choose the pages you want to include on your site and that’s it. Your site is up and running in less than two minutes. Of course, all elements of your new AI-designed website are still fully customizable, so you’re not locked into anything. But this is a great option for those who don’t want to devote time to building their site from scratch.
Bottom line: We highly recommend Wix to beginner bloggers who want to easily build a great-looking blog that’s both reliable and secure. Even experienced website builders will find there’s a lot they can get out of Wix. And with tools like its ecommerce functionality and Wix email marketing, you can grow and shape your website to optimize for things like profit and audience growth. For even more insights, refer to our in-depth Wix review to see how it works and how to get started.
Squarespace – Best Blog Builder for Artists and Designers
Squarespace is ideal for creative professionals because it has stunning designs and built-in tools for monetizing blogs. Sign up now to start your free trial.
The first thing I notice whenever I go onto a Squarespace blog is how gorgeous it typically looks.
Photography and graphic designs seem to leap off the screen. The blog owners themselves seem to always be artistically-minded like illustrators, photographers, graphic designers, home decor experts, and more.
Our panel was no exception. They were made up of a website design expert who teaches readers how to make stunning sites, a gardening influencer who frequently showcases mouth watering photos of his homegrown vegetables, and an interior designer who likes to flex their room designs off in gallery posts.
And there’s a reason they all chose Squarespace as their platform.
The trio rated Squarespace very highly across the board. Many of the users had glowing words to say about its ease of use and designs.
“I think I had my blog up and running within a day,” said the user who runs an interior design blog. Their site frequently showcases captivating photographs of eclectically designed rooms. “Squarespace offers clean, beautiful templates that you can easily tweak.”
squarespace shines above alternative options with its modern and beautiful design options.
Their claims are backed up by my own research of hundreds of Squarespace blogs. Each of the platform’s templates is created by their team of exceptional designers—and they all look stunning.
Blogging with Squarespace
Editing your blog—from the contacts page, to the about page, to the home page, to your portfolio, to the actual blog itself—is very easy with Squarespace. Like Wix they have a drag-and-drop tool. And unlike WordPress, users don’t have to deal with an occasionally confusing backend editor.
“They have a great What You See Is What You Get builder,” said one user. “That means when you’re building the page, you see what the page will look like as you’re building it.”
you can change the layout of your squarespace blog with a single click.
That user is also known as Paige Brunson. She discovered the wonders of Squarespace years back and loved it so much she created a thriving career helping other people design on it too.
She believes that Squarespace’s backend editor is superior to that of WordPress because you can see changes as you make them.
“Sometimes, like in WordPress, you’re editing your site in the backend, but then you have to go to the front end to see what it’ll look like when you’re finished,” she said. “With Squarespace, as you’re building the blog post, you’re seeing the changes happen at the same time. And I think that’s really, really useful. That’s one aspect that makes it really easy to use.”
Squarespace also gives you tools to add an ecommerce portion to your blog along with a newsletter integration. That can really help you scale and transform your blog for profitability and audience growth.
Squarespace has built-in tools to monetize your blog and grow your audience.
“There are quite a few built-in features in Squarespace to build your business the way you want like a shop, integrated email marketing, a members area and podcast support,” said another user. “Plus they have many resources on their website about every feature and how to use them.”
Cons of Blogging with Squarespace
Where our panel of users found Squarespace lacking can be boiled down to one word: Customization.
While the platform does offer ways to add email marketing, ecommerce, and membership functions to your site, it’s still relatively limited when it comes to overall customization when compared to a CMS like WordPress.
“Custom CSS is only available in the Business Plan,” said one user. “It’s doable for my website, I found some great tutorials on the internet for extra CSS customization and I had to buy a sidebar plugin because it wasn’t integrated in my template. For more complex websites this might be a problem.”
While Paige is an evangelist for Squarespace, she believes that it could be better when it comes to its mobile customization.
“The mobile editor is the thing which my students find the most annoying,” she says. “With Squarespace, building a website takes time [on desktop], and then you have to literally go build the thing a second time [for mobile]. It’s just a lot more time consuming of a process.”
Another user also had minor issues with Squarespace’s intuitiveness saying, “It could be more obvious what to perform certain actions. Sometimes you have to hunt and click here and there. Every now and then I’ve accidentally deleted a blog because I’ve clicked the wrong button.”
Final Thoughts on Squarespace
Squarespace users had extremely positive things to say about the platform’s stunning templates and overall usability.
Users might be turned off by the platform due to its lack of features. You also can’t access tools like the Yoast SEO plugin from WordPress. On top of all that, you need to pay a higher price for access to custom CSS.
It will cost you a bit more to maximize Squarespace’s ecommerce capabilities, as you need to opt into a more expensive plan.
Bottom line: Squarespace offers great looking templates, easy drag-and-drop designs, and an opportunity to show off your art, photographs, and more. Give Squarespace a try today.
LinkedIn gives you a built-in audience of over 740 million business professionals. The audience comes from all stripes, including HR, digital marketing, finance, tech, and more.
Many of them are highly active on the site, frequently sharing thought leadership and articles with one another via their LinkedIn feed.
So if you’re interested in establishing yourself as an influencer or thought leader in your business space, the audience on LinkedIn is your bread-and-butter.
The platform has a ready-made culture and set of expectations that a business blogger would dream of creating on their own site. The challenge for you is creating compelling and share-worthy content to build a following.
linkedin has simple and straightforward publishing options.
After all, LinkedIn is a social network. Your influence grows in proportion to the size of your network. The more posts you publish, the more connection requests and followers you’ll attract.
Since it’s a social network for industry professionals, that makes it a great channel to access prospects and get quick feedback from peers on your B2B-style articles. You have an opportunity to put your thought leadership in front of everyone from potential clients and customers, to recruiters, to influencers in your field.
And, you can turn your audience into partners and customers.
Each of the users on our panel leveraged LinkedIn blogging to make key networking connections and develop an audience.
“So far, I have experienced getting higher-quality clients through LinkedIn by blogging and writing content on the platform,” said one user I talked to.
It might seem painfully obvious, but not a lot of people realize that the platform can be incredibly lucrative if you’re in business. The folks on LinkedIn are typically high-earners. They’re C-Suite executives. They’re industry movers and shakers who want to innovate and build lasting businesses.
And they’re willing to pay a premium to the right person who will get them there.
Said one user, “I can probably make $1,000 or so from LinkedIn every month indirectly if I really tried.”
Blogging on LinkedIn
Creating a blog on LinkedIn is very simple and just requires a profile, which is free. From there, it’s just a matter of clicking on a Facebook-like status button and creating an article.
Like Medium, LinkedIn uses that Gutenberg-style editor that’s fairly intuitive. Our panel also found it very usable, with one saying, “The article feature is pretty easy to use. I simply add images, write the text, and publish—and I’m done. No crazy misalignment or formatting issues.”
It’s also worth noting that there are differences between a LinkedIn post and article.
A post is a smaller update you’d share with your feed and connections. Think along the lines of a quick anecdote or pro tip. They’re limited to 1,300 characters, which is about 5 lines.
Articles are longer and more in-depth, of course. They’re something that the broader LinkedIn audience would be interested in reading. And who knows, maybe your post will get picked up by one of LinkedIn’s blogs on marketing or sales.
your linkedin blogs have a chance of being viewed by a wider audience.
A person who reads your article can also follow you from there, so they’ll be alerted when you publish your next article. Any articles you publish will appear in the Articles section of your LinkedIn profile.
Is one better than the other? It depends, of course. After all, you might have a great idea for a long-form article that your audience will love.
But, one of the users on our panel thinks that the shorter the better. As such, they recommend avoiding making articles entirely.
“Go all in on multimedia posts and short status update posts,” said one user. “Do not post full articles here. If you want to get a lot of traction, post the right kind of content and figure out a way to divert that attention away to products or services that you can sell people on.”
Cons of Blogging on LinkedIn
While LinkedIn does offer a lot of opportunities for building your brand and creating thought leadership, it lacks in some vital areas.
For one, there’s no intuitive way for folks to access an archive of your past articles like you might find in Medium or a normal Wix, Squarespace, or WordPress blog.
Instead, the article will live in your Activity feed, which requires you to click on your profile, then your Activity feed, and then scroll down to your article. That’s a lot of work to find just one article.
“There’s not great discoverability for people who want to read my past blog posts on LinkedIn in my opinion,” said one user who went on to opine about the lack of a newsletter feature to help promote their blog.
That user also had a strong condemnation of blogging on LinkedIn as a whole, saying, “Articles notoriously get horrible reach in the feed. Creating an actual blog on LinkedIn, for me, is worthless.”
You also shouldn’t be using LinkedIn blogs a tool for attracting candidates. It’s much easier to use recruiting software.
Final Thoughts on LinkedIn Blogs
LinkedIn is a social networking platform first and foremost. Everything else comes secondary to that goal.
The same goes for their articles. It’s not a blogging platform per se in the traditional sense—but it can be a very effective blogging tool to grow your network and make connections.
And some of our users have made a lot of money by using their blogs to make these connections.
“I make money indirectly from LinkedIn. I have to make a post, then throw a link to a webinar in the comments section. Some people sign up and then purchase my course through the webinar later on,” one user explained.
But ultimately, it’s not a very effective blogging platform if blogging is all you want to do. We’d recommend going with any of the previous options if that’s your goal and supporting your blog by sharing your posts on LinkedIn.
Bottom line: LinkedIn is a decent blogging platform only if you’re using it to support a platform you own, like your business’s website. You can’t directly monetize it, and you’re entirely dependent on an algorithm for reach and engagement.
But if you’re blogging about business subjects like management or marketing, LinkedIn is a good opportunity to grow your network and audience. There’s a pre-existing community of people there talking about those topics and ready to read your posts.
Medium is great for people that want don’t want to build an audience from scratch because it already has over 60 million readers and the opportunity to get paid through their partner program. Sign up now to try Medium for free.
Medium is easily one of the most polarizing platforms out there—and it’s certainly the most controversial one on our list.
It’s home to bloggers focused on crafting niche content for readers. It’s also where you can find some of the most thought-provoking, incendiary content online.
What really makes Medium stand out for writers is its built-in communities of readers. People can browse a vast library of publications and topics, find your blog, and subscribe to it with a single click–they can even choose to get your blog posts sent to their email inbox every time you post. Writers can post pieces under their personal account, a publication they own and run, or submit their writing to publications for a chance to be published on other Medium blogs and put in front of even more readers.
“It’s just plugging and chugging and going,” one user told us. “Even if you have no writing experience, and just want to write, it’s not hard to get started and find an audience.”
The ability to tap into a well of readers was a draw for many users—especially after their less-than-stellar experience on another platform on this list. A huge draw of Medium is not having to try to drive traffic to your own independent website.
“I definitely recommend not even starting with a traditional WordPress blog,” one user said. “Just go on Medium because it works as a blogging tool and a social media platform. Naturally, there’s going to be a much larger audience there for people to read your work.”
Medium also gives you the ability to get paid for writing through the Medium Partner Program. This allows writers to get paid for their work based on the amount of engagement their articles get.
Some bloggers routinely make six figures a year from their posts—though even Medium is quick to point out that only 7% make more than $100 per year. All this makes it a good platform if you want to find and cultivate an audience of fans of your writing, and make a little bit of cash along the way.
you can use medium to get paid for your blog posts.
Blogging on Medium
There are two primary ways to blog on Medium:
Publish to your own publication. This involves creating your own Medium publication page that can be focused on whatever topic you want. You then craft content that will specifically be published on that page. This is the easiest way to get published right away.
Submit to other publications. This is when you write an article in the hopes of getting it published in another Medium blog. While this is a good way to tap into an established publication’s audience, it does mean you need to write an entire article beforehand with no guarantee that it’ll get published in the publication. Note, however, that if you do NOT get accepted into a publication, you can still put your article on your own page or publication you run.
After using Medium to do both, I can attest to it being incredibly simple to use.
All you have to do is click “Write a Story” and you can get started writing a Medium article. The dashboard is a lot like WordPress’s Gutenberg editor, so it’s fairly intuitive. Once you’re finished, add a few tags and click “publish” and it’s out in the world.
Submitting to other publications is a good way to access audiences. However, you’ll be writing on spec. And there’s a chance they might reject your article entirely.
The alternative to that is creating your own Medium publication which I definitely recommend.
This gives you the option to add other writers and editors to your blog, along with the ability to accept submissions. This can really help pad out your editorial calendar with little effort on your part—so you can have access to a stream of content for your readers.
Starting a publication on medium allows you to publish more content with minimal effort.
One of the users on our panel actually helped found one of the biggest and most popular publications on Medium: The Writing Cooperative. In fact, they currently boast about 226,000 followers on the site and publish multiple times each and every day.
“The Writing Cooperative began on Medium in 2014. In some regards, we’ve grown up with the platform” said co-founder Justin Cox. “[…] The Writing Cooperative’s content is often recommended in user feeds, which is a great way to grow an audience.”
Justin went on to say that he doesn’t make a living off of the Writing Cooperative, but he and his co-founder are able to generate some income by setting up a Patreon for the publication as well as launching a coaching program for their community. “Everything we do is geared towards supporting and encouraging writers,” he added.
You also have the option to accept submissions from other writers when you create a publication. That could be really great to help grow your blog while making connections with more users.
Cons of a Medium Blog
While our panel of Medium bloggers found that the platform was overall easy to use, they had varied perspectives on how it ultimately works to build an audience.
One of our users was simply not happy with the way the platform compensates them and signal boosts (or rather, doesn’t signal boost) their content.
“Medium did help me grow my audience by pushing my best content towards external promotions and new Medium users, but lately, this has stopped and I presume it is because of the large volume of new writers,” the user said. “When it comes to attracting new readers, I feel like Medium can do a lot more.”
They went on to explain how they were also frustrated by the platform’s payment system and the lack of transparency surrounding it. In fact, they even had to go a step further to help better market their blog.
“I had to invest money from my own pocket to publicize the publication which I think attracted new readers, but my efforts didn’t really get recognized by Medium,” they explained.
Another user expressed a similar opinion in regards to the payment program. “I make a few bucks,” they told me. “It does not pay nearly enough to justify the time and effort I put into writing.”
Inherent to the platform’s structure is a very Hunger Games-style of gaining readers and making money. You’re constantly competing against other articles for people’s attention, and fighting against bigger and more established publications.
This can be very discouraging for some bloggers—especially if you’re trying to launch a publication for the first time.
“Sometimes, even if your article is posted into those huge exclusive publications, they don’t even get much engagement in the first place,” said another user. “So, it’s kind of like you’re fighting for nothing.”
That’s some strong criticism that I can’t help but agree with to a certain extent. Medium is a platform for bloggers willing to put in the hours and craft content that people want to read, but it can be very discouraging both at the outset and after you start to gain traction.
Final Thoughts on Medium
Medium is a big player in the blogging space with the likes of former President Barack Obama and A-list celebs like Chrissy Teigen using the platform. Big brands like Patagonia also leverage the site to host their own blogs.
It’s a good platform for building an audience if you’re diligent at it and publish consistently—but its lack of transparency when it comes to the algorithm, as well as its Partner Program, resulted in a lower rank on the list.
Bottom line: Medium is a good all-around traditional blogging platform that gives you the opportunity of getting your writing in front of more people and potentially make some money blogging. Like our user panel said: It’s a blogging platform along with a social media platform.
The downside is that there are limits on how high you can go as a part of Medium. You won’t own the traffic, and you won’t be able to do things like sell ad placements, for example, so your profit potential is quite limited.
You can use Medium to get a feel for blogging, find your voice, and start attracting an audience. But once you gain a following, you’re better served jumping ship to another platform, like WordPress, that you have full control over.
How We Chose Which Products to Review
We chose our top five blogging platforms by focusing on four essential qualities:
We researched dozens of the most popular and prominent blog builders and platforms using the four elements above as a way to judge the blog builder’s quality.
This process involved “lighter” research that looked different from platform to platform. We created accounts and built out simple test blog pages. We also looked at each of the platform’s features and tools across their payment plans if they had them.
By doing this, we were able to get a sense of each blog site’s strengths, weaknesses, and target users.
Finally, we narrowed down our list from 12+ to five once we felt like we had a set of products that exemplified each of the criteria in unique ways.
We had a good amount of general knowledge, and some insights into the user interface for each platform at this point.
But we didn’t know what it was like to use each product for years or what it was like to depend on these blogs for business. So we set out to find people who did.
How We Reviewed Each Product
The best way to understand the quality of a blogging platform is by talking to actual users.
They’re the ones who have hands-on experience with the product, having spent anywhere from hours to years building their blogs. They know what’s working, what they love, and what needs to be improved.
To get real reviews from real users, we reached out to users across each of the platforms in order to attain a panel of three users each.
In all, we reached out to 116 users in order to gain our results. To verify they were actually users of the blog platform, we:
Used an advanced search query that gave us results for bloggers using the platform for Squarespace and Wix.
Read featured lists of actual users officially published by Wix and Squarespace.
Scoured LinkedIn for prolific bloggers and influencers and made sure that they had posted more than ten article posts to LinkedIn and posted recently sometime in the past calendar year.
Went through Medium for bloggers and publications to make sure that they had posted more than ten Medium posts and posted recently sometime in the past calendar year.
Once verified, we asked each user if they would be willing to either be surveyed or interviewed about their experience on the blog platform.
What We Learned on Choosing the Best Blogging Platform
Our biggest takeaway from our research: There simply isn’t a one-size-fits-all approach to blogging.
A person using Medium is going to be a different blogger than a person using WordPress. The right platform for you is ultimately going to be unique to your needs.
However, there are a few elements that we believe are universally applicable when it comes to looking for the right blogging platform.
Easy Learning Curve
If you’re a new blogger, you probably don’t want to start out with an overly complex platform. You might feel ambitious and want to learn how to create a big website, but I highly recommend not doing so for two reasons:
1. You’re going to get burned out—fast. It’s easy to bite off way more than you can chew in the beginning. When that happens, you’re going to end up getting tired of your blogging project very fast. You might even abandon it completely as a result.
2. There are much easier (and better) ways to do it. All of the platforms on this list are easy to use, but some are easier to pick up than others.
So find a platform that lets you launch quickly, cheaply, and easily.
Medium and LinkedIn are fairly straightforward to get started: You just create an account and you can start publishing immediately after. You also don’t have to worry about things like domain names, web hosting, or even page customization with these choices. The platforms take care of all that for you.
But if you’re a beginner who wants to own their platform with a personal blog site, Wix is the standout choice. Add a button, image, or embed a video–it only takes a few clicks.
wix makes it easy to add videos, audio, buttons, and other visual enhancements to posts.
They have the easiest learning curve of any blog builder we’ve seen yet. And the users that we talked to had glowing reviews of their own experience using the platform.
“[Wix’s] very intuitive and has great tools to create individual website designs,” one Wix user told us.
So if you’re not afraid to get your hands a little dirty, then I highly recommend Wix. They’ll ultimately give you the best combination of simplicity and website power.
Niche-Friendly Customization
Perhaps the most important decision you can make for your blog is what topic you’ll be writing about. This is going to determine your audience, its size, and your ultimate success.
No matter what you choose, you’re going to want to make sure that your blog allows you to customize its look and feel to fit your topic’s niche. This helps develop your blog and brand’s identity, and create a stronger relationship with your audience.
As you can see above, the websites that we reviewed do not all have the same level of customization. For example, WordPress gives you many more opportunities to customize everything, from your website’s colors and article layouts to your domain name and the fonts that you use.
If there’s something you can’t do right from your dashboard, you can simply install a plugin or a widget to get it done for you (or get your hands dirty with a little code).
Both Wix and Squarespace follow WordPress in terms of customization. Each of these platforms offers thousands of themes you can use in order to choose the exact look and feel you want from your blog. They’re the best option if you want to go for a more traditional blog and own your own platform.
Platforms like Squarespace even offer native tools to do things like add an ecommerce store to even further customize your blog.
squarespace is perfect for bloggers who want to monetize content by selling products.
“One of the reasons why I recommend Squarespace to small businesses or bloggers is because you don’t need to go get a third-party plugin to add a shop or to have your Instagram in the footer, or create your email newsletter collection,” said Paige Brunton, the Squarespace design coach on our panel. “It’s really an all-in-one system, which is really wonderful.”
Websites like LinkedIn and Medium offer limited customization options, only giving you the ability to change your logo and the images in your blog posts. However, the tradeoff is that they offer better ways to grow your audience.
Audience-Building Tools
Good blogging platforms offer you different tools to grow your audience. This could come in the form of SEO tools (to help your posts rank better in search results) or they could help connect you with new readers on their own platform.
For example, Medium is a great blogging platform if you want to tap into a large, existing audience and go viral. Be warned: It’s going to take work—and even then, success isn’t guaranteed. You’re beholden to their algorithm and that’s always going to come with risk.
“Medium did help me grow my audience by pushing my best content,” one user told us. “But lately, this has stopped […] When it comes to attracting new readers I feel like Medium can do a lot more.”
Wix, Squarespace, and WordPress have a variety of marketing tools, such as integrations with Google Analytics and SEO dashboards to help grow traffic. In fact, any tool that helps you elevate your search engine rankings can really help turbo-charge your audience building efforts.
There’s a reason WordPress’s Yoast SEO tool is as popular as it is. When you focus on getting organic traffic, it saves you money you’d otherwise spend on digital ads on Facebook or Google. Overall, this is great if you want to have a much more hands on, under-the-hood approach to your growth strategy.
Platforms like LinkedIn lack these tools. However, they can be a part of a bigger growth strategy by allowing you to make vital connections with influencers and change-makers in your industry. Those connections can really help grow your blogging reach as well.
However, the blog platform you ultimately choose is going to have a massive impact on how much money you can possibly make and how you make it.
For example, with LinkedIn, you’ll be the most limited in your profit making potential. That’s because the platform won’t allow you to implement typical blog profit-making strategies such as on-page advertising—but you can still make money by promoting things like webinars, ebooks, and online courses.
Medium offers its Partner Program that allows writers to earn money on their articles based on “member engagement.” That means if other people read, comment, and like your story, you’ll be paid by Medium on the strength of that.
But, you still won’t be able to earn money from advertising. And also, their Partner Program seems to be a fairly difficult way to make a living of any sort. We even had one user tell us that they had to invest their own money to publicize their publication.
Of course, you can still use those sites to make money via strategies like affiliate marketing or coaching and other freelance services. But remember: You’ll also be completely beholden to their algorithm for traffic. That means one algorithm change can mean the difference between making money and completely shuttering your business.
That’s not an exaggeration either. Algorithm changes have been notorious for shutting down once successful blogs by throttling their traffic.
If making money is important to you, then I highly recommend controlling your own platform by building your own blog with WordPress. You’ll be able to fully customize your site and build out your blog to optimize for profit.
Platforms like Squarespace and Wix offer native ways of monetizing your blog by giving you tools to add ecommerce stores to your website. However, they don’t boast the same level of customization that WordPress does—and so you’ll be more limited in how you can make money and grow your blog.
Wix, WordPress, and Squarespace give you a way of truly owning your blog at the end of the day. It’s your platform, so you can do with it what you want. You won’t have to worry about algorithm changes ruining your traffic. You’ll also be able to implement as many or as few profit-making methods as you please.
Best Blogging Platforms: Your Top Questions Answered
What is the best platform for blogging?
WordPress is the best blogging platform because it’s easy to set up, customize, and scale. It has a built-in content editor that enables bloggers to write and publish directly on the platform.
As an open-source blogging platform, WordPress is the most popular CMS on the market today. There are thousands of free WordPress plugins that can be used to extend the functionality of a blog. You can use these plugins to collect email addresses, sell digital products, and even manage your affiliate programs.
What is the best platform for a beginner blogger?
Wix is the best platform for beginner bloggers due to its simplicity. As one of the most user-friendly website builders in existence, you can use Wix to create a website in minutes by selecting a professionally-designed template or using the Wix ADI.
The vast majority of Wix templates already come with a blog. But if not, you can add a blog to your Wix site with just a few clicks. From there, it’s easy to start publishing content to your blog without having to hire a developer or write a single line of code.
How do beginner blogs make money?
Beginner blogs make money through ads, affiliate programs, and selling digital products or services. The great part about blogging is that you can implement multiple monetization strategies that align with your skills and goals.
Blogging is a great side hustle because it doesn’t require a full-time commitment. You can spend as much or as little time as you want running a blog in addition to your full-time job. Some bloggers choose to spend just one or two days a week writing content for their blogs, while others spend an hour or two per day.
While it may take some time to earn money, blogging is a popular side hustle because of its passive income opportunities. As your blog scales and gets more traffic, you can generate revenue while just maintaining your blog.
Alternatively, you can create a WordPress site for free and publish your blogs there. Just be aware that this route will require you to pay for a web hosting service. In this case, we recommend using WordPress with Hostinger.
The Top Blogging Platforms and Blog Sites in Summary
Your unique needs will determine the blogging platform you ultimately choose. I can see how some people would naturally gravitate to Wix as the easiest drag-and-drop blogging tool. But WordPress has everything you need to get the most out of your blogging experience.
You’ll be able to find what you’re looking for using our list above and methodology to guide you.
More than 2 million users have chosen to make their store on Shopify, and that number is growing every year.
Are you looking to make the switch? This guide will help you transfer your store to Shopify in four easy steps. I’ll walk you through each of them, so you can move your store to Shopify without any hiccups.
Top Ecommerce Platforms Compared
We rated Shopify as the top ecommerce platform and recommend you migrate your online store there.
In mapping out these steps, I’ve assumed that you have a store that’s generating revenue, and you want to keep that revenue going while you build your new store.
Moving your website to Shopify is easy when you follow these instructions:
During this step, don’t worry about your new Shopify store conflicting with your old store. Your Shopify store will be locked behind a password, so no one will be able to see it until you’re ready to launch your new store. You’ll control when it becomes publicly accessible.
The new store will be built on a Shopify subdomain that looks like this: company.myshopify.com — this means there won’t be any conflicts with your current store, which will still be live on your current URL. Traffic and revenue will keep coming into your current store like normal.
You’ll sign up for Shopify, find the temporary subdomain (which doesn’t need to be perfect since no one will ever see it), and pick a theme. From there, you’ll load your products, build out your pages (About Us and the Homepage), and set up payments.
Shopify is one of the world’s most popular and powerful ecommerce solutions.
For some of this, you’ll have to build it by hand. You’ll need to add the elements to the homepage yourself, for example. It’s definitely tedious, but once it’s done, you’ll be so glad that you moved everything over. The benefits of Shopify drastically outweigh this one-time transfer.
Transferring your store to Shopify from WooCommerce
If you’re transferring from WooCommerce, you’re in luck. Shopify does have an import process that should allow you to import the bulk of your product info into Shopify.
As you create your Shopify store, Shopify will ask you if you’re transferring stores and which platform you’re transferring from. If you select WooCommerce, you’ll see an import option in your store dashboard as soon as your store is created.
Batch importing products and customers to Shopify with a CSV
Even if you’re not moving from WooCommerce, you can import your products and customers from a CSV file. (You can’t import your order history unless you have Shopify Plus. More on that below.)
To import your products to your new Shopify store, you’ll go to Products in the admin panel. Near the top, there’s a small text link that says Import. There’s a sample CSV — format yours like the sample.
The process for importing customers is similar. Format your CSV per the guidelines, then navigate to Customers from the admin panel, then Import customers.
Another option is to use a migration app from the Shopify App Store. Here’s one called Cart2Cart. Price is based on how many products you want to import.
Shopify also has the option to hire a store expert through its Services Marketplace to help with the transfer.
Transferring your store with Shopify Plus
If you have Shopify Plus, the enterprise version of Shopify, this transfer process is even simpler. You’ll have access to the Transporter app.
Shopify Plus comes with premium support, including a personalized migration experience and 24/7 priority technical assistance.
I highly recommend that you also import all your historical customers and order info if you have access to Shopify Plus. Getting all your core business data in one place avoids lots of headaches with reporting later.
Step 2: Get your redirects ready
There are two major reasons why you need to prepare a list of redirects when transferring your site to Shopify.
First, this step ensures that any customer using an old URL will end up on the correct page of your new site—even after the switch. So you won’t lose revenue from visitors who would otherwise land on dead pages.
Second, proper redirects will transfer the page authority that’s already been established on your site. So Google won’t treat your Shopify site as brand new pages starting from scratch. The link authority will be passed on and help prevent a dip in search traffic after the switch.
Shopify makes it easy for anyone to add redirects to a new store. From your Shopify dashboard, you can locate the URL Redirects option within the Navigation menu of the Online Store tab.
If you follow this process, all of your redirects will automatically go live when your Shopify store launches.
Just make sure you create a redirect for every URL that has a different location in Shopify. For example, products in Shopify have a URL like this: company.com/products/product-name
If your old product URLs use a different URL structure, you’ll need to create a redirect for each product. Repeat this process for all pages with a different location in Shopify.
Check the URL path of every page and product that you create in your new Shopify store. If they’re the same as your old store, there’s nothing you need to do. If they have a new URL path, create a redirect for them.
Do I have to redirect every URL from my old site?
You don’t necessarily have to redirect every URL from your old site when you’re switching to Shopify. Here’s the rule I like to follow:
Redirect every URL that has a clear corresponding page on the new site. 404 everything else.
404s simply tell anyone landing on an old URL that nothing is there.
A few years ago, I was very anti-404. I used to think that every single URL needed a proper redirect and I went a bit overboard on a site.
Eventually, our hosting provider reached out and told us that we had too many redirects on our site — we needed to cut them down to 1,500. We had about 2,500 at the time.
They were right, we did have too many. I was paranoid about trying to help users land on the right page. I was also worried about losing any traffic from Google and I thought 404s might reduce our rankings. I was wrong on both counts.
First, users struggle a lot more with weird redirect paths than a 404. A 404 gives a super clear message: the page you’re looking for doesn’t exist. But weird redirects can be tough for site visitors to understand.
Second, Google prefers 404s for pages that no longer exist. It’s a clear signal for them and they don’t reduce rankings for sites that have 404s. They’ve publicly stated numerous times how they only want sites to add redirects for pages that have a one-to-one relationship.
Definitely build out your list of redirects for the pages that have changed URLs in Shopify. For everything else, don’t build a redirect and allow the page to 404 once you switch your site to Shopify.
Step 3: Go live and point your domain to Shopify
Now it’s time to go live!
It is possible to buy a domain directly from Shopify, which sets everything up for you. But I’ll assume you already have a domain with another domain registrar since you’re transferring your site to Shopify.
In this case, you’ll need to get your domain to point to Shopify so when people visit your site, they find your Shopify store.
You’ll need to log into your domain registrar and edit your DNS settings. You’ll be adding an A record and a CNAME.
As soon as you save these DNS settings, your domain will start pointing to Shopify, so make sure you’re completely ready to make the switch before doing this step.
It’ll also take up to a few hours for the changes to go live completely. This is because the DNS servers of the internet don’t update instantaneously. It takes a while for them all to spot new changes.
It’s very normal for you to see the change but for someone else to still get your old site. Nothing’s broken — it’s just taking some time for the new DNS settings to reach everyone.
If you have a smaller ecommerce site and you’re not too worried about having a few hours when visitors are routed to both sites, feel free to do the switch any time.
If you want a cleaner cut between the two sites, the most popular method is to do the switch during your lowest-traffic time. For most sites, it’s usually in the middle of the night on a weekend.
For major sites with tons of revenue and users, that’s typically when “maintenance windows” occur. For most of us, picking the middle of the night during the week works really well. This causes the least disruption and is standard practice these days.
My advice on when to switch your site
If the stakes are high and you have a lot of revenue coming in, do the domain switch in the middle of the night, even though it’s inconvenient.
If you’re not too worried about the switch, do it on a Monday morning. That gives you all week to fix gaps or put out any fires that come up with the new site. As a general rule, you don’t want to release anything on Friday because if something goes wrong, you’ll spend all weekend trying to fix it.
What happens if something goes horribly wrong?
Keep your old ecommerce site live during the transition. The domain and all your URLs will point to your new site, but you want the old stuff on standby in case something critical breaks during the transition.
What if new orders stop processing?
What if traffic plummets and doesn’t come back?
What if conversions fall off a cliff and people stop ordering even though everything technically still works?
There’s an endless list of weird scenarios that could seriously impact revenue and your business. The odds are slim that any of these will pop up, but you want a foolproof backup plan just in case.
If something horrible happens, your backup plan is to point your domain back to your old site. It’ll take a few hours for all the changes to reverse themselves but they will reverse.
I like to keep my old site for at least 30 days to make sure everything is healthy.
Step 4: Shut down your old ecommerce site
Once everything has been switched over, and you have at least 30 days of healthy activity on your new ecommerce site, it’s time to take the old ecommerce site down entirely.
Skipping this step can cause problems later on.
I personally find it easy to neglect infrastructure cleanup items. For the time being, it doesn’t cause problems. But sooner or later, I get hit with a random fire that I’m not expecting.
On one site I was managing, I found old ecommerce checkouts that were still live years after they should have been shut down. Occasionally, a customer did manage to find the page themselves and use it. This created all sorts of fulfillment problems.
Not to mention the fact that you’re probably paying for another ecommerce tool at this point. Better to get it shut down and reduce your monthly software expenses.
This step should be pretty easy. Once you cancel your subscription to your old ecommerce software, that company should turn everything off for you. Other than logging into your old account and hitting the cancel button, there shouldn’t be anything else that you have to do.
Then you’ll be completely transitioned to Shopify without any loose ends to worry about.
In this guide, I’ll walk you through all the details of where you should set up your online store — if WordPress ecommerce is right for you or not. I’ll answer questions including:
Or should I monetize my blog with one of the WordPress ecommerce integrations, like Bluehost with WooCommerce?
What’s the Shopify buy button? Should I use that?
Once I choose where to build my store, how do I create it — which WordPress ecommerce plugins do I need, and how do I install them? Etc.
To cut to the chase, the answer is pretty simple. It comes down to one question: Are you creating a site that’s focused on content? Another version of this question is: Is your marketing strategy SEO?
Take a minute and really answer that two-part question. It’ll determine which route you go.
Top-Rated Web Hosting for WordPress to Create an ECommerce Website
If you want to create an ecommerce website, you’ll need a web hosting for WordPress solution. Here’s the best options.
Bluehost – Best for creating your first WordPress website
Hostinger – Best for hosting hundreds of sites on a shoestring budget
The choice here is easy. If you’re building a site that’s 100% focused on content or 100% focused on ecommerce, the best choice on how to build your site is very clear.
What WordPress does best: Content.
WordPress is over a decade old and is still the reigning champ for managing sites with a ton of content. If you plan on pursuing an SEO or content marketing strategy for your business, WordPress is the only legitimate choice for your site.
Nothing else comes close to giving you all the features that you need to manage so much content along with all the extra functionality for SEO and other traffic sources. It’s the default content management platform for a reason.
What Shopify does best: Ecommerce.
If you want to sell stuff with an ecommerce store, Shopify is by far your best choice. There really aren’t any legitimate contenders anymore; it’s the best ecommerce platform right now. The functionality, ease of use, and price are unmatched.
Even more impressive, Shopify will scale with your business no matter how large it gets — they’ve pushed into the enterprise segment in the last few years and are now considered ”best-in-class” at all tiers of ecommerce. From trying to sell your first product to selling one million products, Shopify is the default choice.
Why You Should (Almost) Always Use Shopify for Ecommerce
As much as I personally love WordPress, it just doesn’t compare to Shopify when it comes to ecommerce, even if you add an ecommerce plugin to WordPress.
There are a bunch of unique features that any ecommerce site needs:
Shopping carts
Check-out and payment flows
Integrations with payment providers
Fulfillment options and integrations
Integrations with shipping providers
Easy ways to manage all your product pages
Revenue reporting
Refund and return management
Integrations with ecommerce platforms like Amazon
Shopify was built from the ground up around all of these features. WordPress wasn’t.
With Shopify, you get every ecommerce feature you could ever need right out of the box. A bit of easy configuration and your site is ready to go. Of course, Shopify also has the ability to deeply customize anything you could want. With how popular Shopify has been, there’s now a large community of developers and marketers that can use the more advanced features of Shopify to tailor it to your exact situation.
When you’re ready to build your Shopify site sign up here
The only real weakness to Shopify is it’s blogging functionality. Yes, you can technically publish a blog on Shopify, using that for your content. But you won’t want to.
The blogging features in Shopify are so bare-bones that they’re only fit for the occasional company updates every few months. But if you’re only posting a few times a year, you might as well skip the blog entirely.
In other words, the only companies that would get value out of the Shopify blog feature shouldn’t have a blog in the first place.
What to do?
We’ve hit on the real problem between WordPress and Shopify is knowing what to do when you have a content and an ecommerce site?
This is when things get a bit trickier and more nuanced.
Let’s say that you have your core ecommerce store on Shopify. It’s going great. But you also want to start a high-caliber blog that could generate some serious traffic and help increase sales.
Your best best bet will be to use Shopify for your store and WordPress for your blog. You’ll be on both platforms.
Using multiple platforms on the same site is very common. Lots of sites do it.
The Easiest Way to Use Both Shopify and a WordPress Blog
Put one of them on a subdomain and the other on your main domain, like this:
WordPress installed at company.com
Shopify installed at store.company.com
This is easy enough that you’ll be able to get this set up with your WordPress host, domain registrar, and Shopify account on your own. There’s no need to hire a developer to do anything fancy. Simply set up WordPress on your main domain like normal while setting Shopify up on a subdomain.
Should Shopify or WordPress go on the subdomain?
In the example above, I put Shopify on the subdomain at store.company.com. The reverse also works by putting WordPress on a subdomain while Shopify is on the main domain, like this:
WordPress installed at blog.company.com
Shopify installed at company.com
Which one should you do? Which goes on the subdomain?
I would make this decision based on your marketing strategy.
If you’re pursuing an SEO strategy for your online store, your goal will be to get product pages to rank for keywords. In other words, your main SEO priority is the product pages within your store. In this case, you’d want Shopify to be on your main domain.
Why?
In SEO, the main domain will always carry a bit more weight than a subdomain. It’ll have an easier time ranking for any given keyword. So if your main goal is to get your product pages to rank for search terms in Google, install Shopify on your main domain so it gets as much help as possible.
Now let’s switch it up. What if you have a large blog and you’re using content to obtain the vast majority of your traffic? In this case, install WordPress on your main domain and put Shopify on a subdomain.
To recap, decide whether it’s a bigger priority for you to rank your WordPress content or your Shopify product pages for SEO. Once you’ve made a decision, put your first choice on your main domain and the other one on a subdomain.
What if I don’t care about SEO?
Then it doesn’t really matter. If you’re focusing on paid marketing or some other strategy for your ecommerce site then it’s completely up to you. In this situation, I’d use a subdomain for whichever tool hasn’t been installed yet since the main domain will already be taken.
When to Use WordPress for Ecommerce
It does make sense to turn your WordPress site into an ecommerce store if you meet these conditions:
You already have a large WordPress site built with lots of content.
You have a small store that you want to build out, in the range of 10–20 products.
You don’t plan on putting a ton of energy behind the store; you view it as a “one-and-done” project.
In this situation, you’re already on WordPress, so you’ll want to keep that. You also have enough products to warrant a store section on your site, you’ll need more than just a few buy buttons. But it doesn’t make sense to get an entire ecommerce platform set up on your site since you don’t plan on making it a major priority.
The best bet is to keep everything on WordPress and use an ecommerce WordPress plugin to add a store to your site. The most well-respected ecommerce plugin is WooCommerce. It gets plenty of great reviews.
Or if you really love WordPress and hate the thought of adding another tool to your site, WooCommerce is still a legitimate option. Feel free to use it if you’d prefer to spend as much of your time as possible within WordPress.
An Easy Way to Test Ecommerce on Your WordPress Site
Shopify also has Shopify Starter for $5 per month. It’s perfect for adding buy buttons to your WordPress site or your Facebook page and is not a separate ecommerce store. So even if you want to run a few small tests to see if you can sell items on your site, it’s still worth starting with Shopify.
It was free and allowed you to “manage all of your pages and posts in WordPress, but you’ll have Shopify to manage everything else: payments, secure checkout, shipping and fulfillment, inventory, and taxes—all the hard things about selling online.” It also promised that “with just a few clicks, you can now make any WordPress page or blog post shoppable using the free Shopify Ecommerce Plugin.”
However, they discontinued the plugin a year later. In April 2017, a Shopify spokesperson said the plugin was “outdated and difficult to maintain.” In its place, we have the buy button, “which is a better way of selling in WordPress.”
With the buy button, we have access to:
Updated features
Better fonts
Colors
Layouts
Buttons
Multiple images on variants
To add the Shopify buy button to your WordPress shop, it’s as easy as embedding a YouTube video, and the steps are very similar:
Create your buy button from your Shopify admin panel.
Copy the Embed Code.
Go to the Post you want to add the buy button to in your WordPress dashboard. (If you haven’t started it yet, you’ll create New Post.)
Click the Text editor tab, so you’re not in Visual anymore.
Paste the code in.
From here, I recommend clicking Preview to make sure your buy button looks the way that you want it to.
I really can’t over-hype the benefits of using Shopify — they’ve done an amazing job at building a tool to solve the needs of any ecommerce business owner.
Shopify’s content element does not compete with WordPress. If this post were about the right CMS to pick or how to start a blog, then my answer would be totally different. (As I type into the WordPress backend of Quick Sprout… which is not an ecommerce site, but a content site.)
The tl;dr is this: The benefits of Shopify are so large that it’s not worth trying to contort WordPress into an ecommerce site.
Every successful online business starts and ends with a great website. If you haven’t made one before, don’t let that stop you. After all, your first sale isn’t going to happen by itself—and online shopping is standard and common for most product categories.
Getting into the ecommerce industry now is your chance to win a share of the growing profits. The sooner you start, the sooner you can establish your brand and get the word out.
With the tools available on the market today, building your ecommerce website is easier and more intuitive than ever.
The most popular ecommerce website builder in the world is WooCommerce. It’s free to use, but it requires web hosting and a WordPress site.
We’ll show you how to get the best deal on web hosting, install WordPress in one click, and launch your very own WooCommerce site today.
7 Steps to Create an Ecommerce Website
Creating an ecommerce website is easy. Just follow the step-by-step instructions below:
There are so many opportunities to thrive and succeed in the world of ecommerce. Consumers globally have already embraced the convenience of online shopping, and it’s become the new normal for many people.
This means that there’s already a vast customer base that’s willing to buy your stuff.
You can even sell your products to international consumers if you partner with the right couriers and fulfillment solutions. There are no virtually no geographical barriers when you’re selling online.
Just focus on making a site that’s well-optimized for users. If you sell high-quality products and provide excellent customer service, everything else will take care of itself.
Low Costs for Creating Your Ecommerce Website
Hostinger offers affordable web hosting options for ecommerce sites using wordpress.
Thanks to all of the great website builders on the market, making an ecommerce website has never been easier. Platforms like Hostinger, WordPress, Wix, and Squarespace are just a handful of options to simplify this process.
Getting started here is as easy as creating an account and selecting a plan.
Best of all, these plans are very affordable. You can have a new ecommerce site up and running within a few hours for as little as $3.99 per month using WordPress + Hostinger. You can always upgrade to a more powerful subscription or tier as your business grows over time.
Creating Your Ecommerce Website
WooCommerce Hosting From Hostinger Makes it easy To Start and Launch Your Ecommerce Site.
With Hostinger and WooCommerce, you can get started in just a few clicks. Just install WordPress and add the WooCommerce plugin. This lets you create an online store without having to hire a web designer or code anything on your own.
WooCommerce lets you add ecommerce functionality to any WordPress site. It’s the easiest way to sell online if you want to power your site with WordPress.
Personalizing Your Ecommerce Website
There are plenty of wordpress themes that will help your online store stand out from the crowd.
Using WordPress also means you’ll have access to thousands of themes that can help you build the perfect WordPress site. You can tailor everything specifically to your own unique needs and accommodate the tastes of your potential customers.
Even if you’re not using WordPress, you can still get started by choosing an ecommerce-specific theme on whatever platform you’re using.
You’ll still have total control over how your site looks and feels. But using a theme or template is much easier than starting from a blank screen.
The Hard Parts of Creating an Ecommerce Website
Creating and launching your ecommerce site is easy. But success in the ecommerce space can be challenging.
If your site takes too long to load or has low-quality product images, you’ll lose out on sales opportunities. Your ecommerce site should also be mobile-friendly and have seamless navigation.
You also need to consider how trustworthy your site is to new visitors. Some people might be hesitant to buy if you’re a new company and they’ve never heard of you.
Establishing trust requires third-party proof that your site is secure through things like SSL certificates and security authentication trust marks. People won’t give you their credit card details or personal information if they think your site is untrustworthy.
Payment processing and shipping logistics are other common ecommerce challenges.
Every consumer has a different payment preference. So if your site doesn’t offer their favorite methods, they may end up abandoning the purchase. For example, if your online store only accepts payments via PayPal and your customer wants to pay using a credit card, they may not buy your product.
Ecommerce stores typically rely on third parties for shipping, which creates lots of room for error. While shipping problems and damaged goods may be out of your control, it’s still a poor reflection of your brand in the eyes of the customer.
Step 1: Sign Up With an Ecommerce Builder
Before you can have an ecommerce website, you’ll need an ecommerce account.
This is a crucial step, where you make tons of important decisions. You have to choose a reliable website builder, decide on a domain name, and create your account.
A common mistake that many ecommerce sellers make is rushing through these seemingly insignificant decisions. Don’t be one of them.
Take your time, weigh the pros and cons, and then make the final payment.
It’s a tad more expensive than their WordPress hosting, but it comes with everything you need to build an online store.
It’s fully customizable and secure, gives you a free SSL certificate and domain name, AND gives you access to excellent WooCommerce tools to help you build, promote, and start selling from a secure online store!
Let’s jump in.
Head Over to Hostinger’s Website
First, you need an account with Hostinger. You’ll set up your WordPress account during the signup process for Hostinger’s WooCommerce hosting page.
Tip: Follow the link above. You can go to Hostinger’s homepage, but I haven’t always seen the WooCommerce hosting option available in the drop-down menu.
Once you’re there, you’ll see the different pricing plans they have available.
Each plan comes with a different amount of hosting resources (like storage, RAM, and bandwidth) as well as tools to help you build your online store. You’ll find a complete list of everything that comes with each plan on the site.
Maximize Your Discount
Once you have selected a plan, you’ll be asked to select how long you want to sign up for.
Your options are paying month-to-month, or agreeing to a 1-year, 2-year, or 4-year commitment.
The longer you sign up for, the greater your discount and lower your eventual renewal price. Renewing a 1-year plan costs $9.99 per month, whereas a 4-year term renews at $7.99.
I recommend signing up for as long as possible. Yes, you have to pay upfront, but the savings are significant over time. Lock in the low promotional rate for as long as you can.
Once you’ve input your billing terms, complete the signup process. All you need to do is enter an email to create your Hostinger account and fill out the payment information.
You’ll receive an email confirmation with further instructions shortly after you submit your payment.
Step 2: Create Your WordPress Website
Follow the links in the confirmation email to verify your email address and log into your new Hostinger account.
It’s going to ask you what type of site you want to create. Select E-commerce.
You’ll then be prompted to claim your free domain name that comes with all Hostinger WooCommerce packages.
Enter the domain name you want into the Domain Checker tool. It will let you know if it’s available, or if you have to choose something else.
Get inventive with your domain name ideas. Brainstorm words and phrases that make sense with your online store.
I recommend .com domain extensions, but you may have more luck with a different one, like .net, or .biz.
For ecommerce, some of the newer domain extensions can also work very well, such as:
.store
.gift
.supply
.shop
Hostinger will automatically display other options and domain extensions if the one you want is not available:
Even though you aren’t paying for your domain name now, you will have to renew it next year. This isn’t a Hostinger thing, this is just the way domains work.
What’s important now is taking a close look at the renewal pricing. In the image above, each domain costs less than $5, but some of them renew for more than $50.
Install WordPress + WooCommerce
After you have selected a domain, Hostinger will prompt you to install a content management system (CMS). This is the system you will use to publish and maintain content online.
Select WooCommerce, which as you can see from the two logos, is actually the WordPress platform and the WooCommerce plugin.
You’ll be prompted to create a WordPress account. Write your username and password down, because you’ll need them again shortly.
After that, you can choose from any of the free WooCommerce themes. These themes determine the basic layout of your online store, but of course, you can customize them to fit your brand.
Over time, you’ll work with different themes to find out what you like. You might even spend money on a paid theme down the line.
For now, you can choose a free theme that looks good, or just skip this step and finish setting up your website. You can pick a new theme at any time.
At the bottom of the page, you’ll be able to review all the details. Double-check everything. Make sure the domain name is spelled right and the email account is correct.
Once you’re sure, click Finish Setup and Hostinger will start building your site.
In my experience, it really did take less than three minutes for Hostinger to get everything pushed online.
Step 3: Connect Your WordPress Site With WooCommerce
Once your account is ready to go, Hostinger takes you to a new screen that helps you finish setting up your site. You’ll find walkthroughs for activating your SSL certificate, launching WordPress, and installing WooCommerce.
I’ll cover the key points here, but you can always check out this in-depth tutorial on WooCommerce setup from Hostinger that walks you through each step of getting your store online.
You should be able to log right into your WordPress account with the credentials you created in the last step.
Install WooCommerce Plugin
Once you are in the WordPress dashboard, you will need to install WooCommerce. Here’s some guidance about how to install WordPress plugins if you’ve never done it before.
Follow the prompts once WooCommerce is installed. The setup could not be easier.
WooCommerce is one of the most popular plugins for transforming a basic WordPress website into a full-fledged ecommerce store—and not without reason.
It’s free, user-friendly, and an open-source platform. From product pages to implementing payment gateways to automated tax calculations, WooCommerce is a true lifesaver for ecommerce sellers.
Let’s walk through getting the nuts and bolts of your new online store set up.
Add Your Basic Information
Here, you’ll find yourself entering all kinds of information related to your store, industry, product type, and business.
From your address to the industry to the kind of product you want to list on your side, you’ll have to answer them all.
Choose Your Ecommerce Website Theme
At this point, you can either continue using the theme you chose in Step 2, or you can change your mind and proceed with another one.
I want to continue with Astra, so I’ll click on Continue with my active theme.
And that’s it! You’ll now see a popup welcoming you to your WooCommerce store’s online HQ.
Step 4: Fine-Tune Your Ecommerce Website’s Settings
This step focuses on setting up the must-have elements of an ecommerce website, including payment gateways, shipping options, and automatic tax calculations.
Now, this may sound intimidating, but it really isn’t. You only need the right guidance, which is exactly what this guide provides.
Set Up Payment Options
Click on Set up payments under the Get ready to start selling section of your WooCommerce dashboard.
Select the payment options you want to accept through your store: Stripe, Razorpay, PayU, or direct bank transfer.
The setup process is very straightforward, and you’ll have to connect your respective accounts with your website after clicking Set up. Remember, Stripe will allow you to take credit card payments.
You can also enable cash on delivery, but make sure you have the logistics in place. PayPal is another option.
Clicking on Set up tax from the WooCommerce dashboardlets you configure your tax rates payable by your customers. Click Configure.
You’ll then be directed to the Tax tab, where you can configure your standard tax rates, among other tax options.
Set Up Shipping Options
To add shipping options, select Set up shipping from the list of displayed options on your WooCommerce dashboard.
While WooCommerce will automatically recognize the area you are in, you can choose your shipping rates. What’s more, you can either set a fixed price for every zone or set it as free.
Once done, click Complete task.
Personalize Your Ecommerce Website
Stand apart from your competition by creating a custom homepage, uploading your company logo, and adding a store notice. Do this by clicking on Personalize my store onthe WooCommerce dashboard.
WooCommerce allows you to customize everything that goes on your website. So you never have to worry about restricting your creative side.
Click Complete task once you’re satisfied with how everything looks.
Step 5: Add the Products You Want to Sell
It makes no sense to have an ecommerce website if you have nothing to sell. Precisely why the next step is to add the products you want to sell.
Select Products from the WordPress menu sidebar on the left, followed by Add New.
At this stage, you have a blank canvas.
You will fill in the product’s name, price, and description and set the product category. You can also add product images, as well as any additional gallery images.
In addition to the above, you’ll also find other tabs—General (the one you’re currently in), Inventory (track your inventory and add SKUs), Shipping (product dimensions and shipping costs), Linked Product (upselling complementary products), and Attributes (size, color, etc.)
For more information on how the product categories and other attributes work, check out this detailed guide from WooCommerce.
Click on Publish when done.
If you click on All Products from the Products side menu bar, you’ll find your product list along with the previous examples.
Here’s a quick checklist to ensure you’re adding the products correctly before hitting Publish.
Write the product title.
Enter the long product description and short description for the product you want to upload. Try to incorporate SEO words to rank higher in the SERPs.
Add product images.
Upload your product to your WordPress dashboard.
Organize each product by category to keep everything organized.
Step 6: Add Plugins and Extra Content to Boost Conversions
You’ve done everything at this point to create a new ecommerce website. Next, we discuss tactics that can help you bring more traffic to your website and, in turn, earn more revenue.
Install Plugins
You may have already noticed the Jetpack tab on the WordPress menu bar.
You can activate this plugin, along with several other plugins like Yoast SEO, Securi, and Site Reviews—all of which will work excellently to activate payment setups and automate taxes, implement SEO best practices, enhance security, and add social proof, respectively.
Click on Plugins from the side menu bar, followed by Add New.
Enter the name of the plugin you want to install in the search bar and press Enter.
Click on the Install Now or Activate button to add the plugin to your website.
WooCommerce’s setup wizard will then take over from here, guiding you through the rest of the setup process.
Add Necessary Content
With the plugins sorted, your next focus should be on adding relevant copy and content to your ecommerce website. This includes the following:
UX copy or Microcopy (CTAs, error messages, navigational copy). Every single word matters here, so I recommend taking your time and writing with care. For instance, “Buy Now” can sound too pushy if it’s early in the buying stage. Something more subtle like “Learn More” might be better. It depends on your goals and where the customer is in the purchasing process.
Product Descriptions. As mentioned, you should take the initiative and write SEO-optimized product descriptions. But in addition to that, you should also structure it correctly and ensure it is descriptive. I highly recommend using bullet points to separate technical information from the prose.
About Us. Especially as a new site, customers will want to know more about you and the company. Great about us page copy tells the story of you and your business, including your vision. Customers enjoy knowing more about the people behind a brand.
Contact Page. You absolutely need a contact page where any customer can reach out with questions or if they need support. It can be very simple with fields for a name, email address, and message. You can easily find free contact page plugins or create your own.
Depending on the complexity of your product selection, you may want to add a few other content pages. For example, if you would like to emphasize that you offer returns or a money-back guarantee on your products, having a page that explains the rules for these items is a good idea.
For sites with a large number of products, you may want to sort them into categories. The category page gives you the chance to explain the background on the products in a little more detail than a simple product description. If your product categories have some unique aspects to them, a category page is a good place to highlight those aspects.
Step 7: Make Your Ecommerce Website Public
Are you happy with the way your website looks, works, and feels? Then it’s time to make it public and start selling!
Launch Your Website
Go to Settings from the WordPress sidebar, and click on Privacy.
The first thing is to sort out your privacy settings. A privacy policy is a crucial aspect of every website—ecommerce or not. In fact, WordPress won’t let you go public unless you choose a privacy policy page. Luckily, there’s already a template in place, but you can also edit it or write up your own.
Lastly, make sure all your website’s must-haves—homepage, contact page, about page, and any other content—are all set and look the way you want.
Finally, click Launch Your Site.
Congratulations! You have your ecommerce website up and running!
Your responsibilities aren’t over when the website is published. Running a successful ecommerce store requires constant monitoring, especially in the early stages.
While your site will never be perfect, you should take every possible step to optimize your site for conversions.
Pay attention to key analytics like bounce rates, shopping cart abandonment, page loading time, average order value, conversions, and more. This will help you determine which pages or products on your site need improving.
For example, you might discover that your site has a really high add-to-cart rate, but that 70% of those visitors are abandoning their carts when prompted to choose a shipping option. This type of information is extremely valuable and may prompt you to offer free shipping or additional shipping options.
You can also experiment with different design and navigation elements on your ecommerce site. Subtle changes can significantly improve the user experience and lead to more conversions and revenue.
When your site first goes live, you should verify that everything works as intended. Sometimes new ecommerce shops have broken buttons, images that don’t load, or invalid product pages. Identifying those as soon as possible will provide a smoother shopping experience for your customers and improve the way your site is ranked for SEO factors.
Creating an Ecommerce Website: Your Top Questions Answered
How do I create an ecommerce website myself?
You can create a website yourself by signing up for an ecommerce website builder. WooCommerce hosting from Hostinger is the most straightforward approach, as it walks you through installing WordPress and WooCommerce to your account.
Then you need to set up your payment settings, configure your taxes, and select your shipping options. From there, you can add products to your ecommerce website and customize the way it looks and feels with additional plugins and extensions.
How do I create an ecommerce website for free?
You can create an ecommerce website for free by using a free website builder. However, even free ecommerce website builders will require a paid subscription if you want to sell online. You’ll be able to build and design the site for free, but payment will be required when you’re ready to add ecommerce functionality.
Alternatively, you can take advantage of free trials and promotions to create an ecommerce website for free. Check out our list of the best ecommerce website builders to compare your options. Shopify, Wix, BigCommerce, Squarespace, and Weebly all have free trials.
How much does it cost to build an ecommerce website?
It costs about $4 per month to build an ecommerce website with Hostinger. If you sign up for a 48-month Hostinger + WooCommerce plan, you can lock in this introductory rate for under $200 today and be covered with hosting for the next four years.
WooCommerce is free to install, but you may choose to purchase premium features for things like tax calculations and shipping extensions. You can always select a free theme, but paid themes will help your store stand out from the crowd, and they cost about $20 to $100 per year.
Is WooCommerce good for ecommerce?
WooCommerce is an excellent option for ecommerce because it’s a free WordPress plugin. Since WordPress is an open-source platform, you’ll have endless options for customization and functionality. Other ecommerce platforms on the market may be a bit more limiting in terms of what you can customize and what third-party tools you can integrate with.
But with WooCommerce, you can add shopping cart functionality to any WordPress website with a single plugin installation.
Starting an online store isn’t only about having a brilliant idea—you also need to market it well to maximize your reach.
Get it right and you’ll watch sales start to roll in. Get it wrong and you’ll just have a very time-consuming hobby on your hands. In this post, I’ll show you how to create an online store today and how to get your first customers to show up.
Top-Rated Ecommerce Website Builders to Create an Online Store
If you want to create an online store, you’ll need an ecommerce website builder. Here are the best options.
Create a solid marketing strategy that helps you achieve your short-term and long-term business goals. While this may not look too hard, how well you choose your marketing strategy can make or break your online store.
Generally, successful online stores use one of the following three tactics:
SEO
Paid marketing
Platform marketing
Let’s discuss them in more detail.
SEO for Online Stores
This marketing strategy is pretty simple: find keywords for products that you want to offer, then get your site to rank in Google for those keywords.
In this example, IKEA, Target, and Amazon rank very well organically (the ones underneath the carousel and the ads) for the search term “bookcase.” That means when hundreds of people search the term bookcase every day, they’ll be led directly to these websites where they can purchase bookcases.
If you get this strategy to work for your business, you can make a lot of money with your online store.
SEO has a few benefits that are ideal for a business:
The traffic streams are very dependable, which means dependable revenue for your business.
Search traffic usually has the highest volume of traffic of any traffic source.
Even at scale, search traffic can be enormously profitable.
Dependable, high volume, and profitable. It’s everything you want.
There is one major downside: SEO takes a lot of time and effort. Even if you’re pursuing a product category without any competitors, it can still take a good 3–6 months to see your site appear on the first or second page of search results for a keyword.
And traffic volume will be pretty small until you get your page into the top 1–3 rankings on a keyword. If your category is even modestly competitive, it can take years of effort to get to that point.
If you go with SEO as the marketing strategy for your online store, you’ll focus on three things:
Optimizing your product pages for product keywords.
Building useful and engaging content for non-product keywords that are also in your category. This helps your product pages rank.
Making your content so good that people will link to it as a resource.
When playing the SEO game, there are only two things that matter: content and links. So that’s where you’ll spend the bulk of your time.
Paid Marketing for Online Stores
Some online stores do exceptionally well with paid marketing. This includes sponsored posts on Instagram and Facebook, and paid results in Google searches. Paid marketing involves ad placements you buy.
But is paid marketing right for your business? My general rule of thumb: paid marketing is a great option if your product is the type of thing that could be featured in a mall.
Why?
The biggest paid marketing channels right now are Facebook and Instagram. Instagram in particular has gotten very popular for online stores in the last few years.
But think of the frame of mind someone has while scrolling through their Facebook or Instagram feed. They’re relaxing for a few minutes, laughing at a few photos, and leaving quick messages for a few friends. They’re enjoying themselves. It’s a lot like how people shop at a mall.
Sometimes, people are looking for a particular item, but a lot of people go to the mall to enjoy themselves. Malls have known this for a long time and stores have optimized around this browsing experience.
Products that sell effectively in a mall are also likely to do well with a paid ad on Facebook or Instagram. These products typically are:
Consumer products. Business products have a much harder time on these channels.
Highly visual and eye-catching. This is why apparel companies do so well in malls and why apparel companies have been really aggressive on Instagram in the last few years.
Simple to understand. The offer needs to be understood within 3 seconds. If you have a more complicated sales process that requires more explanation, people will have scrolled past your ad long before you have a chance to make the sale.
An impulse-friendly price point. If the price is too high that people need to carefully think through the decision, they’ll skip your ad and quickly forget it.
If your product meets all these criteria, you should seriously consider going the paid marketing route.
Google Ads (formerly AdWords) is one exception to this. Since you’re bidding on keywords within Google, you put your ad in front of people who are already actively searching for that type of product. As long as the keyword has enough search volume and the ad bids aren’t too competitive, it’ll work very nicely.
The biggest downside to paid marketing is that you’ll have to invest a bunch of money upfront before you know whether or not you can turn a profit. Many of us don’t have those thousands of dollars to invest without a reliable chance of getting it back.
Most paid campaigns don’t turn a profit initially; they usually take a lot of iteration and work before they start making a profit. Most professional paid marketers need 3–6 months before their campaigns become profitable.
So be careful and make sure you don’t invest more than you can afford to lose here. If cash is tight, choose one of the other marketing options.
Platform Marketing for Online Stores
This is a completely different direction than the two methods above.
Instead of creating your own store and using a type of marketing to acquire traffic, you’ll leverage one of the main ecommerce platforms:
Amazon
Etsy
eBay
It’s definitely possible to be successful at any of these three. I recommend most folks go after Amazon. Amazon’s audience is much larger which gives you more upside and just about every product niche already exists on Amazon.
The main exception is if you’re doing a craft business of some kind, like making your own bookends to sell to people. In that case, Etsy is a better fit since the audience expects more craft-oriented products.
eBay is still great if you’re doing a bunch of buying and reselling. But if you’re producing the same types of items consistently, the potential on Amazon is much greater.
You treat whichever platform you choose as your marketing channel. First, you’ll create your store on that platform and list all your products. Second, you’ll optimize your store to the best of your ability so the platform wants to feature your products.
Optimizing your store usually involves focusing on two areas:
Targeting your product pages to specific terms searched for within the platform
Getting as many 5-star reviews on your products as possible
As you improve your search terms and reviews, more people will see your products on that platform, which will produce more sales for you.
How to Choose the Best Type of Online Store for You
The type of online store you open will be directly tied to your marketing strategy. Those options include:
SEO — Focusing on content and links, which requires time and patience.
Paid Marketing — You’re paying for exposure. This strategy requires money upfront, an easy-to-understand product, a friendly price point, and about three to six months of work to pay off.
Existing platforms like Amazon, Etsy, and eBay — You’ll focus on winning the search terms within that marketplace and stacking up 5-star reviews. Success here requires a commitment to that platform.
I strongly recommend that you pick one of these and build your entire business around it. That’s right, just one.
Why can’t you do more than one?
I’ve made this exact mistake so many times myself. After a decade of working in online marketing alongside some of the most well-respected marketers out there, I’ve noticed one overwhelming trend—businesses that are good at one type of marketing are generally pretty bad at the others.
Here’s why it’s hard to be good at multiple types of marketing:
Every marketing channel is completely unique. While some marketing principles apply across all channels, you’ll have to learn all the tactics from the ground up. Constantly trying to learn new channels really slows you down.
Online marketing channels constantly change. What works today won’t work next year. Even though I’ve spent a decade doing SEO, I still feel like I’m relearning it every year. If you’re focused on a single marketing channel, you’ll have a much easier time keeping up.
Online marketing channels are power laws. This means the majority of the profits go to a few big players, and everyone else fights for scraps. If you’re not one of the winners, you won’t be making much.
If you stick with one marketing channel, you’ll get through the learning curve a lot faster. The faster you unlock your marketing channel, the sooner you’ll be making real money with your online store.
This step is crucial, so don’t rush through it. Landing on the right choice here will set up the foundation for your online store.
Step 2: Find the Right Product Niche for Your Online Store
After choosing your marketing strategy, picking your product niche is the most important decision you’ll make.
One tip: Don’t just jump into product categories. Yes, being personally interested in the category really helps with building the business. But it’s also an easy trap.
You might pick a category that won’t support a thriving business. It doesn’t matter how much time and energy you put into it. If there’s no demand, the business won’t succeed.
Here are some of the things I look for in a good product category for an online store:
Avoid picking a category that’s too niche
A common best practice in marketing is to differentiate yourself. And this is powerful advice — it’s a huge advantage when you have it.
It’s also tricky to find a genuine way to differentiate yourself that the market is willing to pay for. There are countless ways to differentiate any given product, but only 1–2 actually matter.
Does the top-rated toothbrush holder on Amazon need to do something wacky and unique? Not at all. It needs to be simple, easy to use, reliable, affordable, and have a ton of reviews on Amazon. That’s it.
Instead of trying to differentiate yourself from every other product in your category, find a category with competitors that aren’t dominating their marketing channel.
Are the Amazon reviews low for all the top products? Are the SEO results of low quality? Are there no companies putting serious ad dollars behind a product? If the answer is yes, there’s an opportunity for you to out-compete them with your marketing.
A moderate price is key
Avoid any product category with too low of a price.
After all, if you only earn $1 in profit for each sale, you’ll have to sell 100,000 products every year to support yourself. After taxes and overhead, that’ll give you about $50–60K per year to live on.
Selling 100,000 of anything is a lot of work.
Is it terrible? Not necessarily. Could it be better? Definitely.
Now let’s assume that you’re selling something for $80 and making $40 in profit on each sale. To make $100,000 per year, you’ll only need to sell 2,500 items. That’s much more manageable.
However, you also want to avoid selling something at a price that’s too high. As pricing changes, so does buyer behavior. Prospects demand more proof. They may even demand a completely different buying process.
How many people buy cars without test driving them first? Not many. They want to see the car and talk to a real person before making a purchase that big. Cars require a lot of extra work and sales skills to sell effectively because of their higher price point.
We recommend finding a product that you can sell for between $50 and $100 dollars. It’s high enough that sales will add up quickly for you. Yet it’s also low enough that the buying process will be straightforward.
When trying to find the right price for the product you want to sell, it is important to accurately assess the costs involved.
Setting the proper price for your items requires a lot of research. Determine what it will cost for you to obtain, store, and ship the products. Check out the competition for what kinds of price ranges you will be going against.
If you estimate you will make a $40 profit, but you really only end up making a $20 profit, you will need to sell twice as many items to make that $100,000 per year we referenced. It is vital to accurately research your costs when you are looking for a product with a moderate price.
Make sure there’s demand.
You can tell if there’s demand by doing some easy research using the marketing channel of your choice.
For SEO, Google Ads has a Keyword Planner that tells you how many times something is searched in Google every month. If the keyword for your product gets less than 1,000 searches per month, it’s probably too small to build a business on.
Same with Amazon. If you have trouble finding products in your category with more than 100 reviews, it’s probably too small.
These days, I’d much rather pick a category that I have zero experience in but has genuine demand. That’s much better than realizing that a passion category of mine has zero demand later on.
Step 3: Pick a Name for Your Brand
Heads up: This is a TOUGH step.
That’s because a lot of the good names have been claimed. The websites are taken, the best names have been trademarked, and you’ll feel like you’re hitting dead-end after dead-end.
You might feel tempted to cut corners. You might even want to choose a less-than-ideal name just to get on with it.
Do not do this.
It’s 100% worth the effort to find a good one. It will pay off.
Here’s the naming checklist I use:
Easy to spell. I never want any friction when people are trying to find my site.
3 words or fewer. I like to keep it as short as possible so it’s easier to remember. One or two words is ideal, three is still good…more than that is too many.
Pass the bar test. I should be able to say the name in a noisy bar without repeating it. That’s a great sign that it’s easy to understand. This is huge for word-of-mouth marketing later.
Can get the .com domain. Every online store needs a .com. It’s become too much of a standard. Some folks use weird domains like company.online or company.io. In my opinion, this causes problems later because whoever owns company.com will know how valuable it is once you try to buy it. I either buy the domain early or find one that’s instantly available.
Relevant to your category. Make sure the name relates to your product category in some way.
No trademark conflicts. Any corporate law firm can do a quick check for you on this. Since legal time is expensive, find 3–5 name options that check all the above items. Then have an attorney check for the trademarks all at the same time. It’s rare to not have at least one of them work.
Once you have your name picked, grab the domain using your domain registrar. Or if you’re buying the domain from someone, get it transferred into the domain registrar that you want to use for the long term.
Step 4: Open Your Online Store
If you’re pursuing an SEO or paid marketing strategy, this is a crucial step.
Why? Simple: The quality of your site has a huge impact on how much of your traffic will turn into buyers.
To make sure you make the highest-quality site, we recommend you use Hostinger.
Hostinger offers a great deal on WooCommerce (starting at $3.99 per month), and they make the setup of your online store as easy as humanly possible.
Even if you have never built a website before, let alone an online store, Hostinger offers a truly plug-and-play solution. You can be adding your first products in less than an hour of signing up, even if you’re an ecommerce rookie.
If you plan on carrying thousands of items, or have multiple inventory locations (brick & mortar stores, warehouses, etc.), you probably want something like Shopify or BigCommerce that is built to scale. Learn how to set up your Shopify store in our in-depth guide. WooCommerce is still a solid choice, but those two platforms handle bigger operations better.
But for most people starting their first store, running WooCommerce on Hostinger is all they need at a lot lower price.
Every ecommerce platform I’ve recommended comes with built-in marketing tools. You” also be able to connect your online store to social networks, like Instagram and Pinterest, as well as marketplaces, like eBay and Amazon.
Let’s talk about how to drive some digital foot traffic to your new shop.
Step 5: Do a 60-day Marketing Burst
There’s a good chance you’re starting small when your online store launches.
So looking for quick wins to build momentum will really help you out in these early stages. You still need to get your first review, first page that ranks on Google, and first purchase from a paid ad.
Don’t worry about scalability, efficiency, and optimizing your systems in these first few days. Instead, find easy ways to build momentum—even if it takes lots of personal outreach and effort on your end.
Examples include:
Tap into your personal network to see if anyone is willing to do an interview, and publish it on their own website. This will help you get your first few backlinks.
Ask personal friends and relatives to leave reviews on Amazon.
Spend some of your own cash on paid ads to test the offer.
These obviously aren’t sustainable strategies over the long term, but they’ll get you some quick wins.
Do some research on your marketing channel and create a list of 50 ideas that you could do on your own. Then prioritize those ideas and create a 60-day Marketing Bust. The idea here is to ship as many ideas as you possibly can within those 60 days.
Be reasonable with your time and effort here. You don’t need to put in 90-hour weeks and burn yourself out. But expect to roll up your sleeves and put in some work.
By the end of this 60-day burst, you should have your first handful of sales. That sales stream should be enough to start building your marketing flywheel.
Step 6: Build Your Marketing Flywheel
Once you have some initial momentum, it’s time to start building the marketing flywheel that will grow your business around the clock without you having to personally accomplish every task.
What’s a flywheel? It’s a big wheel in an engine that helps create and preserve energy. We’re taking the same concept to your marketing plan to create big growth.
In the early days on Amazon, you’ll need to personally ask for a lot of your first product reviews. But that’s not sustainable.
Instead, look for marketing tactics that help create Amazon reviews for you without you asking for them.
Here’s an example:
A popular tactic on Amazon is to ask customers to leave a review. Some will even promise a discount code on the next purchase if a review is published.
You can automate that tactic. Have an assistant send the same templated email to every new customer, asking for a review and promising a discount code on their next order. All the platforms allow you to message customers personally through the platform.
There is a ton you can do with email marketing that doesn’t cost a dollar.
A quick side note on this review tactic: Before you try something like this, make sure to check the guidelines and policies of the platform you’re on. There are always rules about these sorts of things and every platform is slightly different. Be careful to not push things too far, putting your store in danger of getting removed entirely.
Look for as many of these repeatable marketing flywheels as you can.
Instead of creating content yourself, can you pay someone for content?
If you did the keyword research, made a list of requirements that you want on each piece of content, and hired someone else to write the post itself, you could create a lot more content to help you win with an SEO marketing strategy. That’s a flywheel.
Instead of optimizing your paid ads yourself, can you delegate that? If your conversion rates are consistently improving and your cost to acquire a customer is going down, that lets you buy more customers with the same amount of capital. That accelerates your business without your personal effort. Another flywheel.
Focus on your core marketing channel and then build a marketing flywheel that will keep your online store growing without any effort from you. This is the key to opening an online store, generating sales quickly, and accelerating its growth.
Start your free trial with Hostinger today and start your online store in just minutes. Then follow the rest of my tips above to get an edge on the competition.
With the wrong web host, you’ll end up paying for more than bad service. You have to get this right because a reputable web host keeps your site online and helps you avoid unnecessary downtime.
This guide explains the best types of web hosting for different situations. Use these reviews to find the best web host without breaking the bank.
The Top 10 Best Web Hosting Providers
Best of 2023: A2 Hosting, Bluehost, DreamHost, HostGator, Hostinger, InMotion, Nexcess, Scala Hosting, SiteGround, and WP Engine.
Whether you’re setting up your first website or adding to an existing portfolio, all of my top picks give you all the tools you need. However, five providers stood out to our researchers in terms of performance, value, and ease of use.
All of the hosts above are well-rounded providers that make launching your next website a breeze.
Our research team reviewed and tested dozens of web hosting providers to narrow it down to the five on this list. In addition, we reviewed a handful of other hosting providers that are excellent for more specific situations.
Each review covers the highlights and pricing for each web host. After the reviews, we include a buying guide to help you compare the best options.
Hostinger offers dependable web hosting at an incredible price. Shared hosting plans start at $1.99 per month, which includes free weekly backups and enough bandwidth for 10,000 visitors to your site.
Normally you have to back up your site yourself or pay extra, but you get that peace of mind for free with Hostinger.
The most popular option is the Premium Shared Hosting plan which costs $2.99 per month. This lets you create up to 100 websites and host 25,000 visitors. You’ll also get a free domain for one year and a free Let’s Encrypt SSL certificate to secure your website.
Save up to 80% when you sign up for hostinger.
The Premium Shared Hosting plan provides 100 GB SSD storage, which is enough for various website content. Should you need more space, upgrade to one of their VPS or cloud hosting plans.
Hostinger uses its own control panel called hPanel. Thanks to the eye-catching and well-organized navigation icons, it’s user-friendly and easy to navigate. It also comes with an auto installer that lets you set up WordPress or other content management systems using only a few clicks.
Hostinger’s control panel makes it easy to manage content in wordpress.
Another great feature is their dedicated WordPress dashboard on hPanel.
You can manage several tasks, such as updating the core WordPress version, activating or deactivating plugins, and enabling maintenance mode from the hPanel. A navigation button lets you access your WordPress dashboard via hPanel with a single click.
LiteSpeed Cache for WordPress (LSCWP) is automatically installed when you set up WordPress. Its server-level cache and other optimization features help you accelerate the website for a better user experience.
DreamHost is home to more than 1.5 million websites. People trust DreamHost because they provide fast websites, at great prices, in clear terms.
The company has a 100% uptime guarantee and will compensate you if your site goes down. After signing up, if you are not happy with the performance, you can cancel within the first 97 days to receive a full refund.
There are no surprises, just a streamlined web hosting experience that beginners can master quickly. Advanced users will be happy to find that they can access anything they need without having to upgrade plans.
You can install wordpress to dreamhost with a single click.
As far as shared hosting goes, DreamHost provides the most value of any web host out there.
Free daily backups of your site? Unlimited traffic? It sounds too good to be true, but it’s not.
As long as you’re running a legitimate website, you never have to worry about bandwidth or backups, even on DreamHost’s most budget-friendly hosting plans.
Dreamhost keeps your contact information from being registered publicly with your domain. Almost all of web hosts charge a fee for this, but it’s free with DreamHost.
It’s also a great option for WordPress hosting. DreamHost is one of three web hosts that is officially recommended by WordPress. It’s virtually hassle-free with one-click WordPress installation and automatic updates.
Dreamhost is officially recommended by wordpress.
If you have a WordPress site, DreamHost will migrate it free of charge.
They also include a no-code WordPress website builder with every hosting plan. Roll out a new site quickly and make changes going forward, even if you’ve never built a site before.
DreamHost shared hosting starts at $2.59 per month for one website with a Shared Starter plan. This is a great price for everything many small organizations will ever need.
Ticketed customer service is available 24/7, and you will always communicate with one of DreamHost’s in-house team. Phone support is an add-on for shared hosting plans, but you will be able to get help through email and live chat.
SiteGround is built to deliver top-class speed and rock-solid security for WordPress hosting. Currently, it’s running a huge promotion. You can get 80% off all annual hosting plans and a free website transfer. It makes a good deal even better.
Hosting on SiteGround means you won’t have to worry about speed or security at all. It starts with the technology the hosting is built upon. SiteGround utilizes Google Cloud to maintain swift and stable connections and SSD persistent data storage to ensure low latency.
Of course, you’re not on the hook for any of this–you just have to sign up for SiteGround and launch your WordPress site–they’ll take care of the heavy lifting on the backend.
SiteGround offers web hosting, WordPress Hosting, and WooCommerce Hosting Solutions.
SiteGround security is on constant alert. It runs server health checks every 0.5 seconds, and its AI-driven anti-bot system blocks between 500,000 and 2 million brute force attack attempts every hour.
This combination of speed and security can work for most sites. But as one of WordPress’ recommended web hosts, SiteGround is particularly skilled at delivering this performance for WordPress sites and includes an extra layer of security just for those sites.
Plus, all SiteGround plans—not just the WordPress hosting options—include one-click WordPress installation, the WP Starter site builder, easy-to-use interfaces, and auto-updates for both the WordPress platform and its plugins.
Siteground makes it really easy to manage all tasks related to website maintenance with its graphical client interface.
For a limited time, you can receive up to 80% off all annual Site Ground hosting plans:
StartUp: $2.99/month for one year, paid annually
GrowBig: $4.99/month for one year, paid annually
GoGeek: $7.99/month for one year, paid annually
Keep in mind that each plan will renew at a higher rate after one year. SiteGround also gives you options at checkout to pay for a 24-month or 36-month term instead– and gives nice discounts on renewals longer than one year. Two-year renewals get a 20% discount on the base renewal rate, and three-year renewals get 30% off.
So, in terms of long-term value, you’re still getting the best deal by capitalizing on their great intro rate for one year upfront.
Altogether, SiteGround offers the best technology and services to host your site and keep it fast and safe for all visitors. Refer to our full SiteGround review for more information.
Bluehost is one of the most popular web hosting companies in the world, especially among people launching their WordPress websites. Bluehost is one of three hosts that is officially recommended by WordPress, and we agree.
They offer great rates and a beginner-friendly platform that makes every aspect of running a WordPress website easy. You can certainly build other types of websites on Bluehost, but it is definitely set up to work best with WordPress.
Most of the time Bluehost will walk you through a task the first time, like setting up a blog or email account on your site.
If you get stuck or have a problem, Bluehost has 24/7 support by phone or live chat. The support number and live chat options are listed right on the site, so you can reach out for help within two clicks.
As a Quick Sprout reader, you can start using Bluehost for the exclusive rate of $2.75 per month.
Installing WordPress takes one click, as do hundreds of other apps available in Bluehost’s deep app marketplace.
Bluehost also offers fantastic marketing tools, analytics, and SEO tools to track how well your website is ranking for specific keywords. This gives you a good idea of how you should optimize your site for the best search rankings.
Bluehost includes marketing tools to boost your site’s presence and help attract new customers.
The Basic shared hosting plan is usually $9.99 per month, but there are major discounts if you are a new customer. If you sign up for three years and lock in the price, you can get it at $4.75 per month.
Like other hosts, renewal pricing is higher than promotional pricing, so I recommend signing up for a longer contract to lock in the low price.
If your site keeps growing and you want to upgrade, Bluehost gives you lots of options: managed WordPress hosting, VPS hosting, and dedicated hosting. When you are ready for more server power and control, you can grow and stick with the same provider.
Bluehost is a very safe play for people who want to build their site with WordPress. If you want to use another content management system besides WordPress, there will probably be a little extra legwork and backend maintenance.
Try Bluehost today and test-drive their web hosting with a risk-free, 30-day, money-back guarantee.
Maybe you’ve been running your website on shared hosting for a while and you’ve outgrown it. Or maybe you have an ambitious new website idea and you know the lower speed and security of shared hosting isn’t going to cut it.
No matter your reason, Scala Hosting offers the best way to take the first step up from shared hosting into something more powerful and secure.
Choose the Perfect Hosting Plan for Your Website with Scala Hosting’s Competitive Pricing.
While they offer an array of competitively priced shared hosting packages (starting at $2.95 per month), Scala’s Entry Cloud plan is a potent combination of server resources and premium features for boosting and fortifying the sites you host on it.
First, you’re getting the dedicated resources that come with cloud hosting. No more worrying about how other sites that share server resources with yours are dragging down your site’s performance. You’re guaranteed two CPU cores for processing power and 2 GB of RAM that no one else is going to tap into on Scala’s cloud hosting.
Entry Cloud also comes with the helpful features you’d expect from a step up from shared hosting. Scala provides 50 GB of NVMe storage space, which you can upgrade as needed. Simply pay a one-time fee to add anywhere from an extra 10 GB to a whopping 2 TB to your disk space.
Experience Fast and Reliable Web Hosting Solutions along with 24/7 Managed Support with Scala Hosting.
You also get one year of a custom domain for free, free SSL certificates, daily secure backups of your site data, and additional premium features such as:
24/7 SShield malware monitoring
OpenLiteSpeed caching for faster site loading times
Dedicated IP address
Priority support from Scala Hosting
Dedicated firewall
Custom access role for site and hosting management
It’s a really potent package that will set your site up for success. Scala’s Entry Cloud plan is faster, more reliable, and more secure than any form of shared hosting.
Best of all? It’s one of the most affordable cloud hosting plans you’ll find.
Scala Hosting offers Entry Cloud for as little as $14.95 per month when you commit to a three-year term. That means you’ll lock in 36 months of upgraded hosting for just over $538 at checkout.
While that might be a lot to spend up front, consider that some of the other providers on our list charge between $30 per month to $100 per month for comparable plans.
Don’t want to commit to three years? Entry Cloud’s rate rises for shorter terms, but not by too much. A one-year contract will lock in a rate of $19.95 per month while month-to-month billing will cost you $29.95.
Another benefit of going for a longer term with Scala Hosting is that you save on the renewal rate as well. One-year and three-year terms renew at $24.95 per month, five dollars less than the base monthly rate.
HostGator offers all the hosting essentials you need at a great price, plus comes with a 45-day money-back guarantee. If you just need a standard business info website with products, services, “our story”, and so on, HostGator makes it as easy as possible.
HostGator offers an extensive list of how-to guides for technical support. If you don’t find the answers you need, you can turn to phone, live chat, and email support. You can also purchase optional services like their SEO package, which is especially helpful for those who aren’t sure where to start to optimize their website.
Unlike some hosts, HostGator does include support in all its plans. If you want a hosting plan that’s cheap and includes support, this is the host for you.
If you want to get your hands dirty, there is a bit of a learning curve to taking advantage of their advanced options.
HostGator does offer Windows hosting in addition to Linux, as well as a variety of options to upgrade, including cloud hosting, VPS hosting, managed WordPress, and a dedicated server. Shared hosting plans normally start at $2.75/month with a three-year contract.
lock in the lowest rate with HostGator’s introductory offers.
If you’re interested in trying HostGator, I recommend taking full advantage of the 45-day money-back guarantee and testing out their support thoroughly before committing.
Overall, this is a great web host for simple deployment and uses like a company website that doesn’t necessarily see a ton of traffic each month. However, with VPS options, it’ll allow you to scale if you need.
A2 Hosting stands out for its great speed and low prices. It’s what the company is known for.
At every hosting tier (shared, VPS, dedicated), A2 Hosting beats other hosts on speed. If you’re coming from another shared web host, you’re likely going to see an improvement in loading speed once you migrate to A2.
With their Turbo Boost and Turbo Max plans, you’ll get access to their Turbo Servers. They boast that it’s 20x faster than their other servers and includes:
40% faster AMD EPYC CPU performance
2x faster to first byte
Manage 9x more traffic
3x faster read/write speeds with NVMe drives
A2 Hosting also has a 99.9% uptime commitment on all plans so you know you’ll have a reliable host that won’t be down often.
For blazing-fast hosting speeds, look no further than A2 Hosting.
They offer free site migration with each plan too. If you’ve set your site up on a bad host and want to migrate, this is a fantastic deal. It’ll save you dozens of hours trying to get your site rebuilt. The A2 Hosting team takes care of it for you.
Like many of the other web hosts, there are 1-click installs for all the popular CMS tools like WordPress, Magento, and Drupal.
Plans start at $2.99 per month for a single website.
If you plan on hosting multiple websites, you’ll need to get the Drive plan which is an extra $2/month after the promotional period ends.
One trick to save money with A2 Hosting: the promotional prices end on renewal. To lock in the 63% discount for as long as possible, go for the tri-annual billing which will bill for three years at once. You’ll get 2 years of hosting for free.
InMotion is the host for you if you’re looking for a virtual private server (VPS). They have the best pricing around, along with top-notch customer support as an added value. Something you usually have to sacrifice for a better price. But not with Inmotion.
With VPS hosting, you get more control over the server than you do with shared hosting. This is great, but you definitely need to know what you’re doing configuring a server.
If you’re not super confident in the command line, you can opt for a managed VPS plan from InMotion. They’ll handle the technical side of things and keep an eye on security for you.
For the developers out there, InMotion VPS includes optional root access with every plan. You won’t have to upgrade to make the changes you want to the server.
inmotion offers exceptional benefits for its vps customers.
Whenever questions come up, you can reach out to the company’s excellent customer support team. Don’t believe it? Try for yourself. InMotion’s 90-day free trial period gives you plenty of time to test out the quality of support.
Managed hosting, great support, and the latest technology–these are the reasons people choose to go with InMotion. This is covered extensively in our InMotion web hosting review.
I highly recommend this option for ecommerce. Online shoppers like a fast experience with no hiccups. With InMotion VPS you can ensure that your site has the resources it needs to handle any traffic spike.
There are also a number of fail-safes built into the hosting platform. If anything happens to your server, InMotion will automatically spin your site back up almost instantly on a server in the same cluster.
You also won’t have to worry about SSL certificates, which keep your shoppers’ credit card info private. All InMotion VPS plans include AutoSSL, which lets you enable this crucial protection for every website visitor with a single click.
VPS hosting with InMotion gives you the speed you need along with the peace of mind that your site will always be safe and secure.
Managed VPS hosting starts as low as $19.99 per month. Visit InMotion to find out if you can get an even better deal today.
WP Engine is one of the best (if not the best) WordPress hosts out there. Full stop.
They provide a truly excellent product, that’s highly optimized for WordPress websites. If you want all the storage and speed you can get for your WP blog or online store, this is the host for you.
It does come at a price though. A fully managed WordPress host is noticeably more expensive than shared hosting providers.
WP Engine’s lowest-priced plan is $20/month, and that’s only for one 10GB site with max 25,000 visitors/month. You get two months free when you sign up for a year, however, and can get an even better deal signing up through Quicksprout.
WP Engine is perfect For Websites that want a managed wordpress hosting solution.
Yes, the price tag is higher than other hosts, but when you factor in what WP Engine does, it’s an incredibly appealing option for WordPress site owners.
As a managed WordPress host, WP Engine only provides service to WordPress users, which means its entire infrastructure can be optimized for WordPress. Your site will be wicked fast, there’s virtually no downtime, and lots of maintenance tasks get taken care of automatically.
It also offers special plans for people who are running an online store with WordPress. These are much more expensive than managed WordPress hosting, but you’ll get access to premium WordPress ecommerce themes and other tools that would cost hundreds of dollars sold separately.
Customer support is also laser-focused on WordPress, which makes for highly competent knowledgeable support staff available through tracked tickets and on live chat 24/7.
To see how WP Engine stacks up against the crowd, I recommend reading our complete WP Engine review.
Bottom line: If you want a blazing-fast WordPress site where everything is taken care of automatically, you’ll want WP Engine. You’ll be paying more in order to get a lot more.
So it’s no real shock that Nexcess makes my list of best web hosts. Where it really shines is managed ecommerce hosting. This is ideal for people who need a speedy site, but don’t want to be the one configuring the backend.
Nexcess really specializes in these managed hosting arrangements, and offers a great selection of ecommerce platforms to build on:
Again, all of these are managed ecommerce hosting plans–you won’t be on the hook for configuring the server or troubleshooting issues that pop up.
Need more speed? Not a problem. The Nexcess Cloud Accelerator—a feature that adds a layer to the cloud stack–increases the speed of your website’s loading time. That’s a huge boon because speed is everything when it comes to keeping your customers on your website and browsing.
nexcess Has Hosting options built specifically for ecommerce platforms.
Pricing starts at $15.83 per month with an annual contract for WordPress. There are many more plans and rates available for each type of hosting, it just depends on the resources you need.
This makes Nexcess perfect for any growing business looking to scale. No matter where you are with your business, there’s likely a plan for you with Nexcess.
On top of that, it has a dedicated support team available 24/7 to help you address any technical issues as they occur.
Nexcess gets a special shout out for its great 24/7 customer support.
If you’re running an ecommerce website or if you have a startup that you know will grow quickly, Nexcess should definitely be in consideration.
Prices vary depending on which CMS platform you want to use. But WordPress plans start at $13.30 per month.
Additional Web Hosting Reviews
In a broad top list post like Best Web Hosting, I considered how different options stack up against one another and how they fit within the general category.
But there are more things to think about, like taking a deeper dive into individual hosting providers to learn more about their strengths and weaknesses. Likewise, you also want to think about the different types of web hosting available, and check out reviews of the providers that excel in those different categories.
The following information will be helpful to you as you make your decision about the best hosting provider for your unique needs.
Hosting Company Reviews
Narrowed your list to a few top options? Before you make that final decision, check out our detailed company reviews on some of the most popular web hosting services out there today.
Not clear on the different kinds of web hosting available? Wondering who is the best in a given category? No matter which criteria is most important to you, be sure to read up to learn more about it all in the following posts.
You do not have to know anything about web development to get hosting.
But knowing how to assess a few key factors helps a lot.
I’ll hit on each one in this section. You’ll be able to assess your options, get something that works for you, and not have to worry about hosting again for a while.
Featured Web Hosting Partner
Hostinger offers the most affordable premium hosting plans. With plans starting as low as $1.99/month you will not find a better deal. Plus get a FREE domain name and SSL certificate when you sign up for premium today. Get The Best Deal
So how do you evaluate web hosts? What actually matters?
Let’s go through all the key items.
Site Uptime
Uptime is the most crucial component of a good web host. If your site isn’t up, you won’t make money or gain an audience.
First and foremost, you want a web host with great uptime. This means your site is always available and never goes down.
To try to avoid the “just trust us” promise of near-perfect uptime, most hosts provide some sort of guarantee of at least 99.9 percent uptime. However, that guarantee isn’t much of a guarantee. It just means your bill can be discounted in the event of any unplanned downtime.
HostGator, for example, will credit you one free month of hosting if your uptime ever dips below 99.9%.
There’s a lot of fine print on these guarantees, too, including not accepting self-reported or third-party uptime data, and not providing refunds for downtime that was out of the host’s control (for example, a hurricane).
Site Speed
Site speed impacts everything related to your site. Want search rankings? Get a fast site. Want conversions on your site? Make it fast. Want happy users? Speed it up.
When looking at different web hosts, make sure you’re choosing a host that can serve every page lickety-split.
There is some nuance with site speed.
In the early days, you need a host that’s fast “enough.” It doesn’t have to be blisteringly fast, but it needs to be fast.
Think of Amazon. Back in the day when Amazon just sold books, its site needed to be fast but it didn’t need to be instantaneous.
But now that many people use it for all their shopping, Amazon’s site can’t be fast enough.
In other words, the bigger you get, the faster you’ll want to be. If you’re planning on building a high-traffic site, you’ll want a host that can maintain crazy-fast speeds on large sites.
Customer Support
Take advantage of hostinger’s assisted site migrations.
When running your own site, web host customer support is the single most important thing a web host can offer.
Digging through use reviews doesn’t always give you a conclusive answer on the quality of support at a particular web host.
Watch out for glowing reviews on top publications, they don’t always reflect reality.
There is one true test for assessing the customer support quality at any host.
The free trial customer support test.
Pretty much every web host has some sort of money-back guarantee on their shared hosting plans, which means you can set up your website and see what you think of the service with relatively low stakes — just your time and any add-on fees you opt into, like paying for domain registration.
I recommend going to town with customer support during that trial period. Get on live chat, open tickets, and hop on the phone as much as possible to see if you like what you’re being served up.
Most web hosts offer some sort of free trial period. I recommend using this time to really dig into your host’s customer support — its knowledge center and especially support staff across all channels. That’ll tell you the real story.
Traffic Volume
The amount of traffic that you get has a huge impact on the hosting that you need.
For a site that gets 300 visitors every month, pretty much any standard hosting package will be good enough. As long as your web host has strong customer support, you’re good to go.
As you get bigger, all sorts of small details start to matter a lot more.
Is the PHP on your server being updated regularly? Do you have a CDN for your content?
Is your site being backed up daily and can you restore it within 15 minutes if something goes wrong?
Do you have an SSL certificate? Can your server handle a giant traffic spike during a marketing promotion?
Whenever I have a larger site, I look for premium hosting that takes care of all this for me. And if I’m planning on building a large site, I look for a host that can easily scale to millions of visitors per month. I’m happy to pay a premium price in order to guarantee easy upgrades in the future.
Of course, not everyone has aspirations to go big. If that’s you and you plan to stay under 50,000 visitors/month, get a standard shared hosting package. It will simplify your life, trust me. There’s no reason to worry about the advanced stuff.
Price
While you don’t want to overpay on hosting, you definitely don’t want to underpay either.
That being said, avoid choosing a host exclusively on price.
Most basic web hosting plans are in the $10-$20/month range. Yes, there are cheaper options. Some of them are promotional offers that go away at renewals. Others are hosting plans with terrible support and uptime.
My rule is if the price sounds too good to be true, it probably is. For example, you may find a very attractive introductory rate for just a few dollars per month and lock that price in for one or more years. However, when the time comes to renew your hosting, you will likely find the price will jump, sometimes by a lot.
If you don’t like the renewal price you either have to live with it or change hosts. Changing hosting services can be a huge hassle, especially if you’re not tech savvy. You definitely do not want to be moving your sites every year or two, and that is what can happen if you start choosing a host based exclusively on price.
I don’t worry about chasing promotional offers to save a few dollars. For every site I’ve ever managed, I used the same host without ever switching. Once you have a host you’re happy with, changing to save a few bucks isn’t going to be worth it. Promotional offers come and go pretty quickly.
Migration Features
The ability to easily and quickly migrate an existing site will save you weeks of time.
First you have to set up a new WordPress install on your new host. Then you need to export the database of content from your old site and import it into your new one. Finally, you have to re-configure everything in WordPress like the theme, plugins, and settings.
And if something doesn’t go quite as planned? You might be stuck with a website that doesn’t function. Fixing errors can sometimes take days, meaning your site is out of commission. Not something any website owner wants to see happen.
Fortunately, it is possible to skip all these steps and mitigate your risks, too. Some hosts will offer a one-click migration for popular site builders like WordPress.
If you’re switching hosts and handling the migration yourself, look for an easy migration feature. This is a great way to make the final decision on which hosting service is best for you, once you’ve narrowed it down to a few final options.
If you are really concerned, A2 Hosting has a team of specialists that will migrate your site for you free of charge.
Switching to A2 Hosting is Easy, as Plans come with free site Migrations handled for you.
Managed Hosting
Here’s how a normal host works:
After you sign up, you get a login.
The login takes you to cPanel. The cPanel is an app on your server that lets you manage it through a UI without needing to know how to code anything.
You configure your server however you want.
There’s an FTP option to upload files manually to your server.
There are also quick options for installing WordPress and other site software if you want.
You get full access and can do anything you want. It’s a “choose your own adventure.” Install WordPress, Drupal, Magento, or code your entire site by hand.
Alternatively, there are managed web hosts. These hosts customize the hosting environment and manage a lot more of it for you.
WP Engine is the best example, they’re a managed host for WordPress. Instead of getting a cPanel login that lets me do anything I want, WP Engine gives me a login to their custom interface that’s built to manage WordPress sites specifically.
When a web host is optimized exclusively for WordPress, three key things happen:
Faster-performing sites than shared hosting. Everything can be tailored to make WordPress work its best, whether that’s optimizing website caching or tinkering with the command line tools. The host only needs to know how to support WordPress, as opposed to, say, Joomla and a Node server and some sort of custom-made site and on and on.
More security and stability. A managed WordPress host can build a system that predicts, accommodates, and patches all of WordPress’s vulnerabilities. That means fewer malicious attacks and less downtime.
Admin and site maintenance get a lot easier. And that service is vital because managed WordPress hosting is significantly more expensive than shared web hosting services.
While I give up some flexibility from not having a basic web server like other hosts, a managed host takes care of a lot of ongoing tasks that I’d normally have to handle myself.
If you have a small business site, a normal host is fine. If you’re building a larger site, a managed host will save you a ton of time in the long run and is worth the extra cost.
Best Web Hosting: Your Top Questions Answered
Do I need a host for my website?
Yes, you need a host for your website. Without a hosting provider, your website won’t function.
Here’s how it works: your website is a collection of files, and the files are stored on your web host’s server. When somebody types in your website address, their computer connects them to your website’s server, which gives them access to view your site. These servers are typically located in physical data centers that are managed by web hosts.
Even simpler, you can think of it as the web host is where your website lives. Without it, no visitors can come check out all the cool things you have to offer.
This is why choosing the right web hosting provider is key when setting up your site. If your chosen web host has frequent downtime, people won’t be able to access your files–which means they won’t be able to access your website. You don’t get a second chance to make a great first impression. Make sure you choose a web host that delivers consistently high uptime rates so you don’t lose potential visitors–and potential customers.
What is the best web hosting service for beginners?
The best web hosting service for beginners is Hostinger. Hostinger makes it easy for anyone to run a website. Along with quality web hosting services, it offers a free domain and drag-and-drop website builder. It’s the perfect solution for anyone who is building their first website from scratch.
We also love Hostinger’s simple and intuitive admin dashboard. Even if you have no prior experience with web hosting or managing a website, the interface is super easy to navigate, and everything is clearly labeled so you always know exactly where to find the tools you need.
If you do run into issues, Hostinger’s 24/7/365 customer support can help you instantly. This means if your site crashes in the middle of the night, you aren’t waiting until morning to get it back up. We’ve tested Hostinger’s support firsthand and received a response in less than a minute after asking for help. Even better, their instructions were clear, simple, and easy to follow.
How do I choose the best web hosting company for my website?
To choose the best web hosting company for your website, you need to evaluate each web host’s site uptime, site speed, price, security features, and customer support. Additionally, you should look at your total monthly traffic volume in order to pick a plan that can accommodate your site’s needs. And while most people overlook migration features, you’ll help yourself in the long run if you pick a hosting company that offers easy migration. Some companies, like A2 Hosting, even offer free account migration services.
If you’re launching a brand new website, you may not get more than a couple hundred monthly visitors at first. In this case, you’re probably fine to pick a standard hosting package. As you grow, you can upgrade your plan accordingly.
How much does it cost to host a website?
The cost to host a website varies based on web hosting provider, hosting type, and the package you choose. On the lower end, Hostinger offers packages that start at just $2.99 per month for premium web hosting. While lower costs sometimes mean lower quality, that’s not the case here. With the premium package, you get a free domain name, unlimited bandwidth, unlimited free SSL, Cloudflare protection, and access to its 24/7 customer support.
Most basic website hosting plans range anywhere from $10 to $20 per month. Additionally, most web hosting companies offer lower introductory rates for new users. While these deals can be enticing, make sure to read the fine print so you know exactly what you’re signing up for. You don’t want to sign up for a service at a lower price only to be unexpectedly hit with a much higher bill when it’s up for renewal.
What are the different types of web hosting?
There are six types of web hosting you should know about: shared hosting, VPS hosting, WordPress hosting, cloud hosting, dedicated hosting, and reseller hosting.
Shared hosting is ideal for beginners and smaller websites, and it’s usually the cheapest type of web hosting available. This is a great option for bloggers, small business owners, and anyone running a simple website with less than 20,000 monthly visits. If your website outgrows a shared plan, you can upgrade to VPS hosting. VPS hosting typically has higher uptime rates and faster loading speeds than shared hosting. It works great for small or medium-sized businesses, as well as for websites with large media files.
Dedicated hosting is the next step up from VPS hosting. Typically, you only need to look at dedicated hosting options if you run an enterprise-level website with more than 100,000 monthly visits. If you want an alternative to traditional hosting, you can look into a cloud hosting plan, which comes with multiple servers so that if one goes down, another can take its place. This is a solid option if your website traffic is rapidly growing and you think it’s going to keep scaling upward.
WordPress hosting and reseller hosting are each types of hosting that fall into one of the other four categories. If you run a WordPress website and want hosting that caters to the specific needs of the platform, make sure you sign up for a WordPress hosting plan. Most web hosting companies like Hostinger offer WordPress-specific plans. Finally, reseller hosting is a niche type of hosting that you’ll only need to look into if you’re planning to sell hosting services to clients.
The Top Web Hosting Providers in Summary
The best hosting providers offer different types of web hosting, including shared hosting, cloud hosting, VPS hosting, WordPress hosting, and managed hosting. You also need to evaluate factors like uptime, site speed, and support.
As your traffic grows, you need a hosting provider that can scale with your site. Whether you’re starting a new website or looking to switch providers, this guide has you covered.
Featured Web Hosting Partner
Hostinger offers the most affordable premium hosting plans. With plans starting as low as $1.99/month you will not find a better deal. Plus get a FREE domain name and SSL certificate when you sign up for premium today. Get The Best Deal
Every business needs a website. They used to be much harder to create, cost a lot of money, and require serious expertise. That’s not the case any more.
I know it can still be intimidating, but you can create a website today in hours. I’ll show you how.
I imagine you’re on board with creating a website and I don’t need to tell you that it doesn’t matter what kind of business you’re launching it — whatever it is, it needs a website. Even if it’s just a very basic “digital business card,” you need to have a website to increase your reach and establish a digital presence. It’s 2020 and that’s just the way it is.
The most basic version of a website is a place people can find essential information about you and/or your company: your location, phone number, and email address. If you’re going to sell products and services online, your website will facilitate those transactions.
Is your website a blog? If you want to make money with your blog, you’ll want to build it on your website. If not, you have a few other options to pick from for your blog platform. Check out our guide on choosing the best blog platform for you, for all of that advice.
Before we get ahead of ourselves, let’s get back to the task at hand: how to create a Wix website. There are tons of different website builders out there, but Wix is the one I recommend. I think it’s the best website builder. I like that it has an AI-powered engine that will help you do things like pick a template, match your site design to your logo colors, and upload pictures from your social media accounts. When I used it for the first time, I was really surprised by how much of the creative work Wix did for me. I was already expecting Wix to make coding simple with its drag-and-drop builder, but it helped in ways I didn’t know I wanted help on.
Wix is free to start. You’ll eventually want to upgrade to one of the premium plans, which are very affordable, but we’ll talk about that in greater detail later on.
14 day free trial
Paid plans start at $11 per month
Wide range of templates
Easy to setup and use in minutes Try Wix for free
Even though it’s easy to make a Wix website, you can still cut some of the trial and error out by using this step-by-step guide as a reference. I’ll show you the sites I built using the AI generator and what it’s like if you skip that feature.
1. Create an account.
Like almost anything else you do online, the first thing you need to do is set up your account. It’s really simple and should only take you a few seconds.
From the Wix homepage, click on the “get started” CTA in the center of the screen.
If you’ve been doing research and find yourself on another one of the Wix pages, you can still “get started” without having to navigate back to the homepage. Just look for the CTA, which might be worded slightly differently depending on the content that you’re looking at. For example, from the “Explore” page, you’ll want to click “Create Yours Today.”
It should be pretty self-explanatory, but if you’re struggling, you can always go back to the homepage, or just click here to create your account.
Unlike other platforms that ask for nearly everything but a blood sample to sign up, Wix asks for just two things:
email address
password
It’s optional, but Wix will ask you some follow up questions to help you create exactly what site you’re looking for. These questions help Wix’s ADI builder create a site you like faster.
Who are you creating a Wix site for?
yourself
a client
company you work for
someone else
What type of site Wix site are you building?
business
online store
music
designer
blog
portfolio
events
photography
restaurants and food
accommodation
beauty and wellness
What is your level of expertise building websites?
built sites professionally
created many websites
made a few websites
never done this before
Here’s an example of what this might look like for you, depending on the options that you’ve selected above.
From here you’ll have two options:
You can allow the Wix ADI to create a website for you. All you need to do is answer some questions, and it’ll make a site for you in just a few minutes, complete with custom text and images. It’s almost magical how good it is — you should definitely try it out.
Alternatively, you can use the Wix Editor to make a website on your own. For our learning purposes today, I’ll first walk you through using the assistant. (It’s easier, and you don’t give up any control in the end.) Then, I’ll show you how to do it on your own.
2. Answer the questions.
Creating a Wix website is like doing your taxes with TurboTax — you don’t have to be an expert and you don’t have to guide the conversation. Simply grab a cup of coffee and answer every question that comes your way.
The questions start out really easy, and honestly they don’t get much harder from here. First up, the name of your website. If you don’t have a name yet, Corry wrote a great post about coming up with a name and buying the domain here. So, if you haven’t done that yet, you can start over there. Or, you can create your Wix website and come back and update it later. Everything you create today will be private until you press Publish. I’ll share you the screenshots I took along the way. You’ll even have an option to upload your logo. If you don’t have one yet, Corry also wrote a post about that. It’s called How to develop your first brand identity on a budget.
At this point, you may be thinking, Oh crap, I don’t have a logo or colors or any of that — breathe in. It’s totally OK. You can start in any of these places, with a name, a brand, or a website. Once you get the other pieces in place, you can go back and update the others. Don’t let the number of different parts of this process slow you down. Just keep cranking. Remember, it’s just like doing your taxes: answer the questions and don’t freak out. The software is here to help.
At Quick Sprout, we do have a logo, so I uploaded it. The Wix AI pulled together a trendy color palette that looks great. It’s clean, modern and professional. Honestly, it’s the type of color palette I’d have to expect to pay a lot for.
Next, you’ll be asked to pick a theme you like. This is different from a template. It’s more about picking the look and feel of your site. Think about the type of person who’ll visit your site. Imagine your ideal customer. What do you want them to think about when they get to your site. What words will pop into their mind about you? Or, if you want to keep it simple, which look do you like best? For my test site, I chose Minimal. It suits the clean and straightforward growth approach we have at Quick Sprout. Grand was a little too grand, Soho a little too fresh or hip. I considered Bold — it was definitely my runner up.
3. Choose a template.
At this point in the process, Wix will give you a few ready-made options:
Pretty great that I did that in about five minutes, maybe fewer. The pages look great and I could happily stop here. Scroll through each of them and pick the one you like best. This doesn’t have to be a perfect match. You’ll still have a chance to change every feature in the following steps.
If you don’t use the Wix AI tool, you’ll jump into the process here at the template level. If you know what you want already this is a good place to start. Also, if you don’t like what the AI builder came up with, you can always jump over to picking your own template. You’re never locked into anything.
There are hundreds of standard Wix templates available at no charge. You can search for a template based on category. For example, let’s say you want to create a Wix business website. Some popular categories include:
automotive & cars
advertising & marketing
consulting & coaching
finance & law
pets & animals
real estate
services & maintenance
technology & apps
All of the template options are located on the left side of the dashboard. Take some time to scroll through and find one that fits best for the type of website you want to build.
Check out the first template on this page. It’s a “Coming Soon” landing page. Even if your website isn’t built just yet, it’s important to least start off with this type of landing page. For startup companies, creating a website may be the first thing you do, even before you actually register your business name or create an LLC. Wix understands this, which is why they give you this option.
Alternatively, you can select a blank template and build your own from scratch. While this is definitely something you can consider, I recommend going with one of the pre-designed templates. This will make your life much easier in the long run, especially if you’ve never made a Wix website before. If you’re up for a challenge and want to be a bit more unique, go ahead and give the blank template a try.
When you hover your cursor over each template, it will tell you if it’s free or if you have to pay. Once you find a template that you like, just click “edit” to continue.
4: Edit your site
After you select a template, you’ll be brought to the Wix Editor. I went with a template I picked on my own, so my Wix auto palette isn’t applied.
Basically, this is what your website will look like if you decide to publish it right now. It’s up to you to make the necessary changes to make the website your own.
Here’s a basic look at what you’ll see when you’re editing the content on your future site:
Anything can be changed just by clicking on it. Start with the basics, like replacing the template company with the name of your actual business.
For our purposes, let’s just say I am redesigning the Quick Sprout homepage with Wix.
In less than one minute, look at what I was able to accomplish.
I replaced the Axis Group with Quick Sprout on the center of the page, as well as the in the top left corner of the menu bar. I also swapped out the dash on a red background with the letter “Q” on a green background in the left corner of the menu bar.
The financial consulting texted was changed to “Grow your business, faster.” You can also see that I changed the red “get started” CTA to a green “contact us” CTA.
Look at the menu options at the top of the screen as well. The original template had a “news and updates” page. I clicked on that and changed it to “blog” because that makes more sense for the site that I’m building.
Again, I made all of these changes in less than a minute. All you have to do is click on what you want to change, and follow the instructions on the screen. It’s that simple.
You can replace images when any custom photos you’ve taken for your website. Or you can refer to our guide on the best places to get website images (paid and free).
It’s easy to drag and resize any of the content on each page, too. The Wix Editor allows complete customization based on your personal preferences.
Step 5: Optimize your site for mobile devices
The mobile version of your website should not look the same as the desktop version. Part of having a good website means that it needs to be easily accessible from smartphones and tablets.
If you don’t have a good mobile site, you could lose more than half your customers: more than 52% of all Internet traffic comes from mobile devices.
Fortunately, Wix makes it easy to optimize your web design for mobile users. Just click on the mobile icon at the top of the screen to switch between desktop view and mobile editing.
Wix does a great job of changing the content for you, so it’s automatically optimized. However, you may want to manually make some changes on your own. The changes you make here won’t impact the desktop version of your site.
Before your site goes live, make sure you go through the mobile version of each page to ensure that’s it’s properly optimized to your liking.
Step 6: Connect your domain
Before you can publish your site and have it go live, you’ll need to connect your domain name.
The easiest way to do this is from the dashboard. Just click “Connect Domain” to proceed.
By default, your website domain will be: yourusername.wixsite.com/mysite
You’ll have the option to change the “my site” portion of that domain for free. But, that’s definitely not how you want your site domain to look.
When was the last time you went to a legitimate and credible site that had all of that extra stuff, including the website builder in the domain name? It’s not a good look for your business.
Wix gives you the option to buy a domain name directly from their platform or connect a domain name that you already own. I recommend not buying your domain from Wix, but at a place that specializes in domain names, and putting a lot of thought into get the right domain. If you haven’t done this yet, refer to our recent guide on how to buy a domain name.
Wix lets you create a website for free, but you’ll eventually want to upgrade to a premium account. This is when (and why) you want to do that. Without paying for a premium account, you’ll be stuck with the “wixsite” in your domain name.
Packages start at $11 per month, but if you’re using this site for business purposes, you’ll want to pay more than that. Even Wix’s most expensive business plan is just $35 per month. It comes with features such as:
accept online payments
unlimited bandwidth
connect your custom domain
free domain for one year
50 GB of storage
$300 ad vouchers
So review all of the premium plans to find the one that’s best for you. Depending on what you select, it will only cost you between $132 and $420 per year. That’s pennies considering how much money you can make with a website.
Conclusion
It’s that simple. You’ve learned how to make a Wix website.
There’s not much to it — just six easy steps.
Once you go through everything outlined above, all you need to do is publish your website, and it will be live on the Internet for everyone to see.
To recap, create a Wix website for the first time by following these simple instructions:
Once you complete the steps, you can publish your site and start generating leads, driving traffic, and selling products online. Your opportunities are endless.
My quick take? I prefer Domain.com over other top registrars. They have great prices and super easy to use. It’s the registrar that I personally use and always recommend.
You need a domain name.
More specifically, you need the RIGHT domain name.
This is like choosing the name of your child. You want to get it right the first time.
Don’t just register whatever domain name is available and call it a day. That’s a big mistake.
In this guide, I want to walk you through my process for buying a domain name, starting with how I go about coming up with a name in the first place.
If you already have a name you want to buy, awesome! Head on down to the next section.
If you want to see if your domain name is actually good (or if you don’t know what domain name to pick), keep reading.
This is crucial. It’s the name you’ll use for your business, or a campaign, or a blog. You want to try your best to nail this on the first try.
Create a Concept List
Take your project and write down of all the words, descriptors, phrases, ideas, mantras, etc. that come to mind. Come up with as many words as possible. Use a thesaurus to help. I like to call this a concept list. It’s the list before your final name list. It isn’t necessarily names, but for now, just concepts.
Some high level rules:
Don’t worry about SEO or keywords — that doesn’t matter.
Avoid hyphens.
Stick with a .com only. If you are in the UK, Australia, etc. then of course a .co.uk, .au, etc. is also good.
The shorter the better, generally speaking.
I personally find a mind map useful for this process.
Concepts are intrinsically more generative than specific words because concepts can include other concepts. —Operative Words
Choose Potential Domain Names
Once you have a thorough concept list, you can develop a more refined list of potential names. Start by listing all the names you like. Since you might not have an unlimited budget, make sure to dig deep here. You can’t be too picky yet, because that will end up limiting your options. Write down everything you think might work.
I recommend browsing through the following websites to get more ideas. You might get lucky and find something you like just by browsing. If you do, add those to your list as well.
BrandBucket — They put together more creative, brandable domain names and then sell them. I’ve found a lot of names here I would not have thought of on my own.
BuyDomains.com — They have a huge selection of domain names for sale. They have transparent pricing and offer a seamless experience. This is always my starting point, and preferred approach to acquiring a domain name.
Sedo.com — Probably the biggest selection of domain names and the most well known place to acquire a name.
BuyDomains.com and Uniregistry are the biggest players in selling domains. More times than not, if a domain name is for sale when I type it into my browser, it is one of those two companies that is behind the sale. I find them to be the most reasonable. HugeDomains.com is another one I have bought from.
More Naming Tools to Come Up with Concepts
If you get stuck, I recommend listening to this podcast episode with Anthony Shore from Operative Word, a company that specializes in naming things. Recently, he’s named the on-demand fitness system Tonal (love how it’s a word that conveys fitness tone and some sense of the futuristic) and Virgin Voyages (formerly Virgin Cruises, which really, who wants to take a cruise when you can take a voyage?). He uses a variety of tools, too, which I’ll list here:
OneLook.com – This is like a thesaurus juiced up with killer capabilities and wildcarding options. Say you want a name that starts with Bl and ends with rd, and it’s seven letters long — you can literally search for that.
RhymeZone – Pretty self explanatory. Bet you didn’t know that Quick Sprout rhymes with six out, big trout, this crowd, clear out, and sixth round. In addition to rhymes, you can also find synonyms and adjectives.
Sketch Engine – This is very intense corpus linguistics database; it uses a large body of real world language that it runs through a computer to organize and tag that language. Anthony sets his to all the news articles from 2014–2017. You can look up words that are used near or in relationship with other words. Basically, you’re finding words that are already natural together. This makes your name more relatable, credible, and adoptable. He talks about it more on the How Brands Are Built podcast.
MRC Psycholinguistic Database – He talks about this more in the podcast — it’s a pretty advanced way to search for words with certain criteria. You can use it to find words that start or end a certain way for example.
Now that you have a giant list of options it’s time to narrow down the list.
Narrow Down the List According to Viability
Narrow your list down quickly by typing in the .com for each name that you like. Type it into your browser and see what is there.
If there is an established website built on the domain name, cross it off your list. It is very unlikely to be a viable option.
If nothing comes up at all, then keep it on your list. That could mean that the domain name isn’t registered yet, which is great!
If a landing page with ads comes up, the domain name is parked. It is owned by someone already, but might be an acquisition target. Keep this on your list.
If the domain name is for sale, that’s the best case scenario. It’s exactly what we are looking for. Keep this option on your list, and take note of the listed price if there is a listed price.
The best domains are typically the ones for sale unfortunately. But if you have the budget for it, it’s well worth the investment.
Once you have the narrowed down list, the next step is to dig even deeper to determine what your final options will be.
Choose Your Name
It’s now time for the big decision.
Remember the rules-of-thumb:
Don’t worry about SEO or keywords — that doesn’t matter.
Avoid hyphens.
Stick with a .com only. If you are in the UK, Australia, etc. then of course a .co.uk, .au, etc. is also good.
The shorter the better.
Then, ask yourself these 10 questions about each of your domain name options:
Do you feel good about the name?
Do you like it?
Are you confident when you say it?
Does it feel good when you write it down?
When you read it?
Is it brandable?
Is it unique, easy to remember and meaningful?
Is it easy to read and spell?
Does it pass the Google test? Google the name. Ideally there are not any other organizations that pop up. If there are, you at least want to make sure they are not in the same industry, or even in a closely related industry.
If it passes the Google test, you are probably good to go, but just in case is it trademarked?
The Starter Domain Approach
An approach that I am a fan of is to use the starter domain approach. The idea here is that you can start with a domain name with the intention to move to another one down the road.
Let’s say you identify a domain name that you really like, but it is out of range for your budget. For example, when I was coming up with a name for my latest company, I really liked GoodLife.com. Someone else owns it and isn’t necessarily looking to sell it. If I wanted to buy it, I would have to offer a lot of money — a lot more than I was ready to pay. If I wanted to take the starter domain approach, I could have gone with the name Good Life Media, and acquired GoodLifeMedia.com which is for sale for $24,500. (That price must have gone up, because it wasn’t that high when I was actually considering this as an option.)
Anyway, I could start with GoodLifeMedia.com and eventually try to acquire GoodLife.com. It would be very easy to rebrand from Good Life Media, to Good Life. Internally, we would just go by “Good Life.” The day that we eventually acquire GoodLife.com would be a huge milestone and would create a built-in company goal that we could go after as a team.
If you want a real life example, The Wirecutter just recently rebranded to Wirecutter.
Considerations for the starter domain approach
Make sure the names will translate cleanly. The two names have to be very closely related. Ideally they’re so close you could use the desired name everywhere outside of the actual domain name, including in your logo.
It’s a risk — there is no guarantee your desired target domain name will be there when you are ready.
I recommend getting into discussions with the broker or domain owner of your desired name as soon as possible. Even if you know there isn’t any chance you can afford it today. They don’t need to know that. This is actually a huge advantage for you, because it is common that over time the owner will drop the price as they realize their high price isn’t going to happen.
A Note on Social Handles
In a perfect world, you’d pick a domain name whose social handles are also available. This isn’t a perfect world. My take on this is that it’s hard enough to get a good domain name. Don’t make it even harder or nearly impossible by also adding this criteria. When it comes to picking up the social handles, you’ll have options. You can get creative, or even potentially acquire the handles from the current owners.
It’s a good idea to consider social handles when making your final decision, but don’t let that stop you from picking the right name.
How Much Domain Names Cost
There are two options when it comes to getting your domain name:
Register a name that isn’t already currently registered.
Buy a name that is already registered from the person that owns it.
Regardless of which option you go with, you’ll pay an annual registration fee of $7–$15/year on average. If you are acquiring the name on top of that, you’ll pay an additional acquisition price.
There’s nothing wrong with registering a domain name that is available, as long as you’ve thought it through and are intentional about it. In fact, I encourage that.
The issue is that in many cases, people don’t even realize that there are other options. Getting your hands on the optimal name is more doable than you might think.
I suggest you put some budget behind your domain name — especially if it’s for your business. The tighter your budget, the more limited you’ll be more limited in what you can do.
Like most things you don’t pay for, a domain you get for free sometimes shouts to your customers that you’re cheap. I agree with Anthony Shore of the naming agency Operative Words that a non-natural word name probably won’t serve your brand well because it comes off as he puts it in this podcast, “domain desperation.” It’s not a good look.
At this point you should have a narrowed down list of viable options for your domain name. The next step is to own it.
Each of your options should fall into one of three categories:
The domain name is available and unregistered.
The domain name seems to be acquirable, but it is not clear.
The domain name is clearly for sale.
We’ll tackle each one of these situations.
What to Do If the Domain Name is Unregistered
In this case, all you need to do is go to Domain.com and register the domain name (get 25% off with coupon code QUICKSPROUT).
You’ll find out for sure if that is an option or not once you type the domain name into the search bar.
You’ll go through a straightforward process here. Don’t buy any of the add ons or worry about web hosting or any of that yet except for “privacy protection”. It’s what will keep your name off a bunch of spam call lists. You want to use Domain.com to register your domain name and keep your information private (get 25% off with coupon code QUICKSPROUT). That’s it. They are the best domain registrar and I use them exclusively. I do not use them for anything else because there are other companies that I use for the rest of my web needs. I’m a huge proponent of going to the expert in each area of my business.
After you finish registering the domain name, you’re done! You are officially the proud owner of your new domain name. All you have to do moving forward is renew the domain name each year. If you fail to renew it, then someone else will be able to replace you as the owner. I recommend setting your domain to auto-renew. It’s just one less thing to worry about.
What to Do If the Domain Name Seems Acquirable
If the domain name seems acquirable, but it isn’t clear — you have two options. Either you can try to figure out who owns the domain name yourself and reach out to them. Or, you can hire a broker to do it for you.
If you hire a domain broker, there isn’t much risk. Typically, the only way you will have to pay a fee is if you buy the domain name. That’s the biggest downside.
In the case of doing it yourself, you can start with a WHOIS search to try to figure out who owns the domain name. Googling the domain name and seeing if it is tied to any social media profiles or other websites is also a good approach.
More times than not, I will fail at finding out who owns the domain name myself. It is common for people to use privacy features that hide their contact information. Most domain registrars offer this for free, so people tend to do it by default. (Like I said above, you should definitely opt into this feature.)
The benefit of a domain broker is that they have a huge network. They almost always know who owns what, and if they don’t, they have ways of figuring it out. Back to my GoodLife.com example. There is no way I would have figured out who owns that domain name if I didn’t have a broker figure it out for me. Of course, I still do not know who owns that domain name, but at least I have a broker who does.
Another benefit of a broker is that you do not have to deal with the awkwardness of negotiating price. You have a middle man who can be the bad guy for you.
What to Do If the Domain Name Is Clearly for Sale
Domain names that might be acquirable, as outlined above, can be challenging. I much prefer to focus on names that are clearly for sale. These are easy.
If the name is already for sale, the process is straightforward. The only thing you really need to think about is negotiating price.
Negotiating Price
There is often opportunity to negotiate price. Depending on who you are dealing with, there could be some room to get the price down. I don’t recommend pushing too hard or overthinking this. That might just lead to wasting time and potentially losing out on the name. However, there is no harm in giving it a shot and doing some level of negotiating.
If you’ve always wanted to create an ecommerce brand but don’t have the time, space, or desire to store inventory and ship products yourself, consider starting a dropshipping business. This simple business model allows people to sell products online without taking on inventory, shipping, or fulfillment.
Dropshipping offers a lot of potential for people with a knack for marketing.
The 11 Best Dropshipping Companies, Suppliers, Databases, and Tools
Best of 2023: Shopify, Dropified, SaleHoo, Printful, Spocket, Wholesale2b, Inventory Source, Worldwide Brands, Modalyst, Importify, and DSers.
From finding the right ecommerce platform to locating suppliers, I’ve narrowed down the wide world of dropshipping and reviewed the best options on the market. In doing so, six companies stood out above the others.
Wholesale2B — Versatile supplier and dropshipping hub
Whether you’re starting a new online store from scratch, looking for new suppliers, adding new products to an existing store, or expanding to new markets, the companies above work well for just about anyone.
It can be hard to break into dropshipping because most dropshipping businesses don’t like to share their items or their suppliers. Their concern is that you’ll just replicate their shop and eat into their market.
I’m here to help. The following are my top picks for dropshippers, databases, and suppliers — along with what each does best.
Shopify offers one of the most popular ways to build an online store, and it comes ready to integrate with a long list of dropshipping services. In fact, many of the other dropshipping companies on my list recommend using Shopify as your base of operations.
The reason is simple: Shopify is a true plug-and-ecommerce platform. It works as well for dropshipping as it does for traditional online stores.
Make a Shopify account for free to explore more than 70 different dropshipping apps. Link up with a variety of wholesalers, suppliers, and warehousing services and start selling.
Shopify makes it easy to try out multiple dropshipping apps after you create an account.
Like any other dropshipping company, all the inventory and logistics are handled by third parties. You just have to get the word out there about your products. That’s where Shopify’s built-in marketing tools come in handy.
Create ads for TikTok, Facebook, and Pinterest, or showcase your items on marketplaces like eBay. The Shopify dashboard automatically tracks where customers are coming from, so you can focus on selling where it counts.
There are plenty of resources on Shopify if you are new to dropshipping, as well as live chat and email support 24/7.
Dropified is a very useful Shopify app that you can use to stock your store and automate your orders on AliExpress (including shipping addresses).
There’s no Dropified marketplace–it’s a browser plugin that’ll let you pull products from anywhere on the web.
What used to be a long process is now just a few clicks. On AliExpress, Alibaba, and eBay, you’ll be able to get new products in front of your customers faster.
Making use of Dropified simplifies the process of placing new products in front of your customers.
To speed up the process even further, you can set up margin parameters and rules for changing the price points in your store.
There’s a 14-day free trial; after that, it’s $47 per month for the Retro plan or $39 per month for the annual plan.
The Channel Management plan, which costs $127 per month or $97 per month with annual billing, recently added a profit dashboard, Zapier integration, and an unlimited high-speed captcha solver.
If you have a Shopify store and you are ready to start dropshipping, Dropified can help you make your work as efficient and profitable as possible.
SaleHoo is a great dropshipper that offers a massive supplier database to draw on.
A $67 yearly membership with SaleHoo grants you access to this database of 8,000+ wholesalers and dropshippers. They’re all screened by SaleHoo before they’re added to the directory. There’s a 60-day free trial period, and the customer service gets high marks in public reviews.
The best part is that you don’t have to worry about something being too good to be true if it’s on SaleHoo. If it made it onto the site, it has been vetted and confirmed.
SaleHoo offers an impressive free-trial period of 60 days.
You can make back the yearly membership fee with a single sale.
Along with access to fully vetted suppliers, you also get SaleHoo’s Market Research Lab. Look at the trends and play with the data to find out what really matters to your market right now.
Within the Market Research Lab, you can see competition for the product among other dropshippers, compare profit potential between items, and spot emerging trends. Data like this allows you to strike while the iron is hot (or before other sellers are hip to the trend).
With SaleHoo, access to the wholesaler database is just half of it. The other half is the unprecedented agility you’ll gain compared to other dropshippers.
Printful is a full-service print-on-demand dropshipper that allows you to sell branded, custom-designed merchandise to anyone in the world.
Just head over to the Printful website and add your own custom designs or use something from their library of designs on anything. The experts at Printful will print, package, and ship the orders to your customers.
When you have a Printful account, you can add your logo to hundreds of products.
You can put your design or logo on seemingly anything. Printful offers over 330+ different options, including men’s, women’s, and children’s clothing, wall art, hats, mugs, water bottles, stationery, bags, blankets, and more.
Best of all, the platform integrates with almost every ecommerce platform you can think of:
Shopify
Bigcommerce
WooCommerce
Amazon
Etsy
Squarespace
Wix
Big Cartel
Storenvy
Gumroad
Tictail
Ecwid
Weebly
Inktale
The list goes on and on. So no matter what platform you’re using to power your dropshipping business, integrating with Printful shouldn’t be an issue.
If you need help with your designs or company branding, Printful goes a step further by offering several options for adding your branding to your orders. These services include branded stickers on your packages, your logo on t-shirt labels, and even adding stickers or business cards to your packaging.
It’s free to sign up, and there are no monthly subscription fees.
You simply pay the cost per item plus a markup fee to Printful. When someone places an order on your site, they pay your price, and then Printful does a second transaction charging you for the product, fulfillment, and shipping. You keep the difference.
Spocket gives you a great database app for dropshipping items that works especially well for people shipping in the US and beyond. They allow you to sort by country and simply upload the products into your Shopify store.
They make it easy to find US and EU items that’ll ship within your country rather than from China, cutting down on slow ship speeds. This also keeps costs lower–for you and your customers.
Lower costs and faster shipping times? Spocket is the answer for people who want to dropship around the world.
Spocket offers a free plan, which will let you check out their database of products. Once you are ready to start selling, you can upgrade to one of the paid plans.
The Starter plan (25 products with unlimited orders) is $24.99. Upgrading to Pro is $49.99 per month for 250 products and branded invoicing.
The Empire plan unlocks unlimited products for $99.99 per month.
Wholesale2B is one of my favorite dropshipping suppliers. They offer more than 1 million products you can start selling right now.
Think of them as a one-stop shop for anything related to drop shipping. You’ll get access to a massive directory and all the tools you need to process orders.
You can sign up for free (no credit card required), and start reviewing Wholesale2B’s massive inventory of products. Take your time–you won’t be charged until you’re ready to start dropshipping.
On top of that, they allow you to sell products on:
eBay
Amazon
WooCommerce
Shopify
Magento
Weebly
BigCommerce
Your own Wholesale2B store
Handle the orders yourself by becoming a registered reseller with each supplier. Or pay Wholesale2B a 3% fee to handle that for you.
Wholesale2B starts free and includes their 1 million products, customer support, and a lifetime free account.
Inventory Source is an automation tool built specifically for dropshippers. If you are looking to cut down the time it takes to fulfill orders, this could be the tool you’re missing.
It allows you to either sync the suppliers’ products with your page (inventory automation) or to sync the entire customer purchase flow so that your orders are automatically placed with your supplier (full automation).
Inventory Source has pre-built integrations with more than 230 suppliers. Many companies say that it’s “easy” to connect your site with a supplier’s inventory–but it’s not always so easy. Inventory Source’s integrations really work, and the company puts a ton of effort in making sure they continue to perform flawlessly.
Inventory source makes it easy to automate your dropshipping process with its integrated supplier network.
This cuts down on busy work big time. You choose a new product, and Inventory Source automatically uploads the quantities, weights, colors, titles, and more. This data is coming directly from the supplier’s feed, so it’s always up-to-date.
Inventory automation is $99 per month, and full automation is $199 per month. However, getting just a directory account that allows you to view all dropship suppliers and preview product feeds is free. Nothing beats that, right?
For $299, you can get a lifetime subscription to Worldwide Brands’ database of wholesalers and dropshippers. It’s a great budget-friendly solution for those competing to sell products on Amazon, eBay, and Etsy.
They carry every category of consumer goods: electronics, home & garden, clothing, shoes, accessories, sporting goods, art, health & beauty, books, and much more.
With a subscription to Worldwide Brands, you can cut out the middleman and increase your own profits. It’s a one-time subscription, so you will always have direct access to the best possible deals.
They are constantly updating their database, which is easy to search and filter results.
Give yourself the edge by relying on Worldwide Brand’s team of specialists. You’ll get the most up-to-date information without any extra work on your part.
Worldwide Brands distinguishes itself with its extensive upper-market wholesale directory of certified dropshippers and its reliable and quick-to-respond support team. The lifetime membership certainly doesn’t hurt either, with many similar services charging you each month or year.
Modalyst seamlessly automates your dropshipping business. You’ll be able to add suppliers (for free), set your own prices, and showcase a large inventory however you want.
Where Modalyst really shines is their integration with Wix, the popular website builder. With just a single click, you’ll be able to install their app and get started selling to your customers.
In fact, Wix acquired Modalyst back in 2021 as a way to expand its ecommerce footprint. So it should come as no surprise that the two platforms integrate so seamlessly with each other.
Modalyst also integrates with BigCommerce, Shopify, and other platforms. But if you are using Wix for dropshipping, this is what I would choose.
It’s so easy to connect with suppliers and get your customers the products they need. Modalyst has a long list of suppliers of products including clothing, jewelry, accessories, and more.
Modalyst simplifies dropshipping for wix websites.
Modalyst is also centralized—making it very easy to use. You’ll be able to connect with suppliers from a single dashboard, and they even have an app for easy communication.
You can start for free, adding millions of products to your site with just a few clicks.
In fact, the Modalyst Basic plan is $0 per month to sign up. There’s a 5% transaction fee and a 25-product limit, but it’s completely free.
Upgrading to the Start Up ($35 per month) or Pro ($90) per month unlocks more suppliers, shorter shipping times, and more.
If you are thinking about dropshipping, use Modalyst’s free option to get started. Plug it into your ecommerce site and supercharge your inventory overnight.
Importify handles product importing and automation for dropshipping stores running on WooCommerce, Shopify, Wix, or Jumpseller.
With so many dropshipping tools focusing almost entirely on Shopify stores, Importify stands out as one of the best all-purpose platforms for improving your WooCommerce-based WordPress operation.
It starts with its research and sourcing tool, allowing you to find products through notable wholesalers such as:
DHGate
Costco
Walmart
Sears
Kohls
com
Bonanza
Etsy
Flipcart
Geekbuying
Find what you want to sell and import it to your WooCommerce store in just one click.
Importify makes it easy to switch suppliers on a product if one runs out or you find a better deal elsewhere. You can set pricing rules before you import as well, so you can go from sourcing to selling even faster.
You also get a product listing editor, a Chrome extension for even easier product importing, and 24/7 support.
Everything I’ve described comes on Importify’s Basic plan for $14.95 per month.
If you want to import products from Amazon and Aliexpress, upgrade to the Premium plan for $27.95 per month.
High-traffic dropshippers will want Importify’s Gold plan, which runs $37.95 per month. That unlocks the platform’s automation for order fulfillment. You can automatically have customer addresses filled out on supplier forms, and product variants picked so you can sell and ship faster than ever at high volume.
DSers (pronounced “dee-zers”) offers an excellent plugin service that works through AliExpress. Its directory offers you all the products you need and is a trusted partner of Shopify, Wix, and WooCommerce.
DSers does bulk order fulfillment and has over 150,000 merchants you can choose from.
DSers supplier page makes it easy to find products.
Every time you make a sale, DSers will handle product selection and fulfillment for you. That frees up your time to focus on driving traffic to your store. All plans, including the free version, have features like shipping method pre-selection, automated order status updates, supplier optimizer, automated address fixing, and more.
The DSers app is available in six languages:
English
German
French
Brazilian Portuguese
Italian
Spanish
DSers does have a free Basic plan with bulk ordering, basic mapping, and up to three stores and 3,000 products. It also offers an Advanced plan for $15.90 per month billed annually for up to 10 stores and 20,000 products and a Pro plan for $39.90 per month billed annually for 25 stores and 75,000 products. They also offer an Enterprise plan starting at $399 per month. See pricing and features here.
DSers has a 5-star rating with over 7,000 reviews in the Shopify app store. You can try one of the paid plans now with a 14-day free trial.
What’s the best dropshipping company for me?
Naming just one brand as the best overall dropshipping company is nearly impossible. That’s like asking for the best product available on Amazon—it depends on what you’re looking for.
But the best dropshippers have a lot in common. They offer fast shipping and great communication. All products arrive on time, in one piece, and match the photographs and descriptions online.
All of the dropshipping companies on my list meet this description. Finding the best one for your unique situation ultimately depends on what you’re interested in buying and selling to your customers. You need to find a company that can reliably offer those products at a price point that allows you to satisfy your customers and simultaneously turn a profit.
Most dropshipping companies use platforms like Shopify or Wix combined with an automation app like Modalyst. So if you’re new to the dropshipping game, this is definitely the easiest way to get started.
Why Shopify is the best way to start your dropshipping business
That means you are basically setting up the equivalent of any ecommerce store. For ecommerce stores, the clear winner is Shopify. It’s been the frontrunner for a while.
What’s most important about that for dropshipping is that the app store is super robust. Most stores use Shopify, so developers looking to make a high-quality app develop it for the Shopify app store.
I don’t recommend dropshipping with eBay.
Selling on a marketplace like eBay requires less work — you don’t have to start a website, pay a subscription, etc., as you do with Shopify. But it’s not the way to go, in my opinion.
First of all, Shopify is super excited and helpful with new dropshipping businesses, whereas eBay is growing more and more against them. Here are the sticking points for me:
Your store’s reputation is on the line — eBay is not forgiving and will downgrade accounts with reports of slow shipping
You’re probably not the only one selling that item
Your business case isn’t clear — why should someone buy that item from you, just another eBay store?
eBay has been cracking down on dropshippers and resellers, asking for proof of having the item in possession and freezing your store until you send in that proof. Proof could be a photo of your ID card with the item — not a photo of the item from a different listing.
If you do want to build your dropshipping business with eBay, I’d spend a few weeks or months in the seller forums to understand the specific risks and challenges of dropshipping on eBay.
How to start a dropshipping company
1. Find items to sell
First, find your niche.
There’s lots of chatter on the internet about finding your dropshipping niche, but this is just a trendy buzzword for product-market fit: are there people who want to buy your product? From you?
If not, you won’t have a successful business.
You’ll have the most success dropshipping a product if there’s an audience that wants to buy it and doesn’t have an easy way to access it. That’s where you come in.
Some ways to find your niche: brainstorm rabid fan groups or audiences with a common need or interest (dog lovers, anime fans, parents who love to dress up their kids in matching outfits, sailors, very tall people, people who love 90s throwback tees). These are purchase-ready populations looking to love and buy things that they’re interested in.
Then, see what’s trending on Facebook.
Doing a quick search of a phrase like “Get yours here” or “Buy now” and looking at the videos featuring items for sale that are getting traction. This can give you a sense of which products are interesting to people on Facebook right now.
Look for a high number of views in a short period of time, then search for the item at a dropship supplier like Salehoo.
Consider the price point of the item in the video and the assets you can create for it. Can you replicate — or improve on — the current trending video? If so, you may have an item worth dropshipping.
I have a few pieces of advice after you’ve taken care of all that:
Don’t sell anything dangerous or copyrighted
If you’re a beginner, don’t start with something that goes in or on a person’s body. If you do not know the quality and source of the ingredients, and something goes wrong, do you have coverage for that liability?
Also, if there’s a celebrity or character from a movie franchise on the item, it could get you in trouble. Steer clear of mice with big round ears.
Look at seller’s reviews and order a test product
How long has the seller been selling? What feedback have they been getting? When you order a test product, does it meet your expectations? What do you need to tell your customers, so they’ll be happy when they receive the product?
Consider dropshipping only some items
Just because you’re dropshipping some things doesn’t mean you need to dropship everything. Perhaps it makes sense to use dropshipping for large, bulky, high-priced niche items.
Say, for example, you have an online store that sells nautical gear. You may want to personally store and ship some items but dropship the anchors. For items like this, your customers may also be more accommodating to longer shipping times since it’s a large and more considered purchase.
The same goes for home goods: perhaps you keep small items in stock but dropship the couches. You can increase your inventory breadth very simply this way.
Go directly to a supplier and build a dropshipping relationship with them
This is a killer plan: there’s guaranteed to be less competition. You’re basically creating a new audience for an under-marketed product that’s not getting seen by a ready-to-buy audience. If you use a database, every single other subscriber is using that same database.
2. Nail the basics
You want to invest in a good domain name. It’s a key component of any ecommerce operation.
Once you’ve done that, then you can set up your website.
If you go with Shopify, you’ll be up in minutes. Lots of dropshippers recommend the Shopify Brooklyn theme with a good font choice. You can also use another ecommerce option. Here’s my review of the best ecommerce platforms if you’re interested in exploring them.
You can get a professional logo for your site for a reasonable price (and no design expertise) with 99Designs. See my post about how to get your first brand identity on a budget for more details and how to run a logo design contest.
Make sure to set up professional email addresses for your dropshipping store. It should be a sensible start (help@, support@) with your own domain name. I recommend getting Google Workspace for $6 a month per user. There’s nothing to trust about emailing customer service that’s at yahoo.com or gmail.com.
Here are some other key elements to factor into your planning and setup:
Give your customer strong trust signals
One of the ways to gain trust among your customers is through the use of high-quality photos and unique item copy. Don’t forget to spend time creating a real and robust About Us page, as customers want to know more about your store. Make use of things like discounted prices and pop-ups. Displaying trust logos and writing some FAQs are a good idea, too.
As you create the site, ask yourself: Would I buy from this store? Would I feel comfortable suggesting it to a friend or family member? If the website has simple text errors or has poor-quality images, you probably wouldn’t recommend it.
Set shipping time expectations
With shippers like Amazon providing two-day shipping or even same-day shipping in some locations, dropshipping’s shipping times may disappoint some of your customers. A dropshipment can take around 30 days, which feels like an eternity by comparison.
The key to overcoming customer disappointment is through setting clear expectations. You need text on your website that spells out the likely amount of time the shipment will take to arrive to head off customer complaints regarding shipping times.
I’ve seen very straightforward copy, like “All our items ship directly from our suppliers in China. Shipments are processed the day of your order and arrive in 25–30 days.”
Make sure your orders go through
Bundle credit card orders, so your bank doesn’t cancel your numerous orders. Let your bank know what types of orders and in what quantities you’ll be placing so that they’re not flagged as fraudulent. There is no pain so rich as having to reorder orders you’ve placed (you do have a business credit card, right?).
Prepare for returns and cancellations
Although having significant success with a dropshipping business is the hope and expectation, you have to anticipate that things will not go perfectly smoothly every time. Even if you do everything right, something could go wrong that’s completely out of your control.
Set up a policy to figure out how you plan to deal with unhappy customers. You need to set up a return policy. If you need to make returns of payments, how will you do this? Will returned items be shipped to you or to your distributor? How will that work? Like with anything in business, it’s important to anticipate problems and prepare to deal with them. This gives you a better chance at success.
Set aside money to pay taxes
If you’re using Shopify as your payment gateway, once you get to a certain sales threshold, Shopify will automatically report your sales to the government. You’ll want to make sure you have money available to pay applicable taxes.
I also recommend getting an accountant and a lawyer (I’ve heard good things about UpCounsel and LegalZoom) and setting up Quicken.
3. Differentiate yourself
Studies show that the global dropshipping market is expected to reach $476.1 billion by 2026. The massive growth in this space can be attributed to more competition, meaning you must find a way to differentiate your brand from competitors to succeed.
A great way to stand out right from the jump is to make your store listings and ads unique.
Remember, if you can quickly and easily set up a dropshipping order for a specific product, it’s likely another store will be able to do the same. You will need to find an edge: why would someone order from you or find your store selling the product and not your competitor?
Make sure people know about your store. This can be through word of mouth, social media ads, viral memes, influencer programs, SEO, or a newsletter. You’re going to need visitors to make sales.
Take your own pictures. Write your own copy. Shoot unique social videos. Really put thought into how to best convey the product and why a person would want it: What problems does it solve? Can it make them feel joy?
If you’re using AliExpress, you can import the user reviews. No one likes being the first to buy something.
Consider offering free shipping, too. That can really entice customers. Do all orders have free shipping or only when a certain order spend is hit? What threshold or minimum spend works best?
I do not recommend offering “Free products — you pay shipping.” Many customers would rather know the price up-front than go through a purchase flow that says $0 the whole way through and then slaps on a $15 shipping charge.
4. Iterate, iterate, iterate
Use ads to gather data and test strategy. I’m assuming that you’ll be buying ads. If you do, buy and use the data to test what’s working. What gets traction? Double down on it. What doesn’t? Trash it.
This may lead you to change your products, your ad style, or your audience. Following the early traction means you head toward what’s working and away from what’s not.
Get analytical with your sales trends, as well. What’s selling well? What’s not selling at all? Is there any common theme in the items? Replicate what you can. Stop what’s not working.
Best Dropshipping Companies: Your Top Questions Answered
What platform is the best for dropshipping?
Shopify is the best platform for dropshipping. It’s an all-in-one ecommerce platform with everything you need to start selling online, and you can browse over 70 wholesalers, suppliers, and warehousing services directly from Shopify.
Since Shopify is so popular, there’s a good chance that your suppliers will integrate seamlessly with the platform. All you need to do is power the website, and you’ll never have to touch your inventory or fulfill orders.
Is dropshipping profitable?
Dropshipping can be highly profitable if you find the right products to sell online. You’re not manufacturing products or handling inventory, which means your overhead costs are much lower compared to other business models.
Whenever a product is sold through your site, you’ll get charged the wholesale price from the supplier, and the rest of the profits are yours to keep. You just need to pay for your ecommerce platform, marketing, and payment processing. But you can mark up your products as much as you want to get the highest possible profits.
Is it easy to start dropshipping?
It’s easy to start dropshipping because you don’t need to purchase any inventory or secure storage space. All you need to do is start an online store and connect it with your dropshipping suppliers. When a customer orders something from your site, the supplier will get notified and ship the product directly to the consumer on your behalf.
Using a database like SaleHoo is the best way to find dropshipping suppliers. You can browse through thousands of suppliers from a single platform, which is much easier than trying to look up one at a time through other sources.
The best part about using SaleHoo to find dropshipping suppliers is that all companies in the database have already been screened and vetted for quality. SaleHoo is also really affordable. Sign up for $67 per year, or get lifetime access for a single payment of $127.
How do I get products for dropshipping?
The best dropshipping products are simple and in high demand. It’s also better to get niche-specific dropshipping products, as this simplifies your marketing strategy and helps you avoid costly competition. Look for products with high profit margins and avoid products that are big, bulky, or fragile. If you can find and sell products that solve consumer problems, you’ll have a much easier time turning a profit.
Dropshipping can be a lucrative ecommerce strategy. But it all starts with the right partner.
Choosing the best dropshipping company for you depends on the type of products you want to offer your customers, the supplier’s quality, and how well the service integrates with your process.
There is so much to think about and so much to do.
It’s hard enough trying to figure out how to build and grow a business. The last thing you want to think about is figuring out how to put together an operating agreement or pick the right accounting system.
The good news is that all of the things that need to get done in order to start your business have been done a million times before. You don’t need to reinvent the wheel or waste brain power on figuring out what to do.
There are at least 23 things that you should do when starting a new business and I will walk you through each one of them step-by-step. These are the exact steps I take and the tools I use to start my businesses.
I cannot stress enough the value of building like you are going to grow from day one. I get that you are probably the only person in your business right now. You should operate as if you are an organization of people, not just yourself. This will save you an incredible amount of headache down the road, and also leave you room to try and fail in areas that you won’t want to fail when you do have a sizable organization.
I’m going to assume you already have a business idea, and I’m not going to show you how to build or grow your business in this article. These are the practical steps necessary to begin operations.
First, define your business
1. Put together a very high level and basic business plan
Don’t overthink this. You just need to be able to answer two big questions:
What do you need to do in order to get to profitability?
How are you going to pay for the things that you need to do in order to get to profitability?
If you think long and hard about these questions, you’ll end up with a good starting plan. Be realistic about what it’s going to take. Do your research, and know your numbers. Put it all to paper, and the business plan will evolve into a useful tool and true north for at least the first 6–12 months.
2. Come up with a name
Coming up with a name can be harder than doing the business plan! Your name is…well…your name. It has to be good. It does not have to be perfect and it does not have to be a fancy, made up word like Google or Yahoo. But, you will be saying this name a lot and it will be your url, too, most likely.
I wrote an entire guide to How to Buy the RIGHT Domain Name, which you might want to check out. Generally speaking, here is what matters:
You have to be confident in the name. Honestly, this is probably all that really matters. It’s definitely the most important aspect of coming up with a name. If you don’t love it, then you can’t sell it. You’re going to be selling it 24/7/365 for a long time. At least that is the plan!
You need to pick something unique. The general rule of thumb is that when you search Google for the name there isn’t an established business or product that already has the same name.
Your name must be memorable, brandable and simple. You don’t want to make it harder than it already is to be found and known.
You need to have the .com of your name. This is critical! It’s unbelievable how many people take this for granted and just completely disregard their domain name. If you want people to take your business seriously, make sure you have the .com.
A good process for coming up with a business name
Brainstorm words, concepts, ideas, beliefs, descriptors, etc.
Brainstorm names based off your initial brainstorm in step 1.
Check the names in Google. Delete any options that are already a known business — especially not one in your space.
Make sure the domain name can be acquired. Check out our guide on how to buy a domain name for help here. Do not expect to register a domain name for $7/yr and call it a day. You really need to invest in a domain name for your business name. If you have a tight budget, get creative! You can get a great name that checks off all the boxes for under $1,500 if you put in the effort.
More tips for coming up with a name
Imagine your name with a logo on a big sign in your future office space.
Imagine your name on a T-shirt.
Say your name out loud. “Hi, I’m Name from Business Name.” How does it feel? Do you like how it sounds?
Bounce your options around and talk to people about it.
Spend some time thinking about it and let it sit for a while. Do you continue to come back to the same name?
Next, create your business and marketing collateral (V1)
3. Buy your domain name
Again, do not take this lightly!
Your domain name is not an area it makes sense to be cheap. I use Domain.com or Namecheap to buy my domains — you can read more about why in our review of the best domain registrars.
Depending on your business, you might say the url as much or as often as you say the actual name of your business. The more budget you have for your domain name, the more you’ll be able to do.
4. Secure social media accounts
It’s tough enough to find a good name where buying the .com is possible. Chances are, you won’t get exact match social media handles as well. Do everything you can to get them, but if that fails — get creative. Your social media handles / urls are much less important than your website, but they’re still worth putting effort into.
You can choose how much effort to put into your social media right off the bat — you can simply get the name and hold them, you can populate them with a few images and pieces of information, or you can go all out. That’s up to you. For now, I just want you to make sure you have the handles.
5. Develop a brand identity
It’s nice to have a logo, colors, fonts and a general look and feel to go along with your name. You can always update your brand identity down the road, so the initial run just needs to be good enough. 99 Designs is a great option for a full brand identity package. You can run a design contest that allows you to pick from hundreds of options.
Unlike your business name, your brand identity isn’t locked in stone. It’s more than OK to go with a “starter approach” here — it doesn’t need to be perfect (or expensive); it just needs to get done. You can always come back around and do another design round — most businesses do.
6. Set up a G Suite account
G suite is the most important tool for our business. I do almost everything using G Suite. My team’s emails and calendars are all on G suite, too. We also rely heavily on Google Drive / Docs.
You’ll need to get this set up as soon as you have your domain name. Then you can easily get your business accounts set up. As of April 1, 2019, a Basic account is $6 per user.
7. Create a basic, foundational website
Your website can be a very big project depending on your business. In some cases your website could be the business. That’s why the focus here is simply on a basic, foundational website.
It’s good to have a one-page site live with information about your company. Then you can build further from there.
You can be up and running in the matter of minutes with Squarespace. Once you’re ready to do a full feature website, it’s easy to switch over to WordPress, using our guide on how to create a website with WordPress.
8. Get some business cards
Your brand identity package from 99 Designs will come with business card designs. You can use them to get business cards printed online by Vista Print.
This might seem like an antiquated idea to you, but believe me. Once you start your business, you’ll be talking about it and every person you talk to should be handed a card with your information on it. I like to keep my phone number off the card, and hand-write it on there for people who I would actually want to call me. It makes it easier to hand the cards out freely — and it lets the people who I do give my number to know that I really mean it.
Now, get your business legally squared away
9. Find an accountant and an attorney
This one is easy to put on the back burner. You’ll save yourself a lot of hassle and potentially save your business altogether by getting ahead here. Line up the legal and tax pros ahead of time. There are lots of great options and your accountant and attorney can both be remote.
I haven’t personally used it, but I’ve heard a lot of good things about Upcounsel.
10. Set up an LLC
You can use your attorney for this, or you can use a service like LegalNature. Setting up an LLC is simple, so it’s a good spot to save some money by using a service like LegalNature or Legal Zoom.
11. Get an EIN
Getting your Employer Identification Number is something you can take care of along with the LLC. They typically go hand-in-hand. You’ll need that to do just about everything, including business banking.
12. Create an operating agreement
Even if it’s just you, an operating agreement is needed. Unless you have other people involved with your business, you can definitely get away with LegalNature here. Chances are, things will evolve and you will update your operating agreement down the road anyway. If you do have other people involved, have your attorney help out here.
13. File necessary paperwork with your state
If you’re using a lawyer, they can do all of this for you. Otherwise you’ll need to do some research into the requirements in your state, which also vary depending on the type of business you’re starting.
14. Open a business bank account
Pretty straightforward. You’ll need that EIN. It’s typically most convenient to go with the same bank you’re already using for your personal accounts.
One thing to watch out for is a the upselling that many of the bigger banks do. For example, with Bank of America, I went ahead and took them up on an offer for Intuit Payroll. It ended up being a terrible user experience. The people at Intuit recommended that I sign up for a new account directly with Intuit because they couldn’t figure out how to solve some of the problems we were having. They put the blame on Bank of America. This ended up working out because instead of signing up for Intuit Payroll, I researched other options and found Gusto, which is much better.
The point here is to use your bank account for a bank account and be wary of using them for other offers or services.
Sign up for your key operating tools
15. Set up a payroll service for employees and contractors
As I said, I really like Gusto. They are very good. I use them and find the service to be superior to Intuit Payroll.
You won’t need to worry about this until you start paying employees or contractors. It’s good to have it ready and on deck though. Not only will the service automate your payroll, but it will also take care of taxes and forms that need to be filed.
16. Set up QuickBooks
A QuickBooks account is essential from day one. This is how you’ll manage your books and ensure you always have good records. Going back and importing historical data isn’t fun. The sooner you get it set up the better.
17. Put a basic accounting system in place
The best bet here is to work closely with your accountant. A good approach is to ask your accountant what you need to be doing throughout the year to make things easier when tax season comes and to make sure all quarterly obligations are met.
QuickBooks does all of the heavy lifting, but there are still things you’ll need to stay on top of. There is some crossover with what’s already been outlined here, but Shopify put together a good guide on small business accounting.
18. Start using a project management solution from day one
The biggest thing here is to get in the habit of tracking all of your work. Even if you are the only person in your company, you should operate like an organization because someday you will have no choice. The other benefit besides creating good habits is the historical information and data that will come from working like this starting day one.
It’s very valuable for new people to come into your organization and be able to look back at what work has been done in the past. It’s context that will help them (and your business) be successful going forward.
It doesn’t matter what tool you use. You’ll likely change it a bunch of times anyway. We use Trello. There are dozens of great tools.
19. Build an internal wiki system from day one
Just as you should use a project management tool from the very early stages, it’s extremely valuable to start documenting everything right away.
If you ever want to scale your startup, you’ll need your brain to scale too. Your internal wiki is like your brain. Giving your future team instant access to your brain is huge. If you already have a disciplined approach to documenting things in the wiki, your team will follow suit.
It’s not fun figuring out the value of a wiki system 3 years down the road, 50 people deep. You’ll think of an endless number of documents you wish you’d have written out as you went along.
Everyone loves Slack. It just works. Mobile communication is key. There is a Free plan that’s a good place to start. It’s about $7 per user per month for the next plan up, which grants you controls like guest access to different channels, and more storage and app connections.
21. Set up 1Password
By now you are starting to see the theme here: Reduce future headache! Set up your systems now and you’ll be able to focus on growth moving forward.
1Password is an excellent tool for managing all of your passwords and sensitive data. It makes it easy to securely share logins with your team — which is key because Centrify estimates that lost passwords cost $416 in productivity per person.
22. Create a subscription tracker
This is easy but often overlooked. 1Password is great for keeping track of your subscription logins. You still need some way to quickly see everything you have and what you are paying for, especially as you grow and have more people using and signing up for different tools and subscriptions.
A simple spreadsheet is all you need. Track the subscription, cost per month or year, terms (if any), payment method (what account or card is it tied to?), and renewal date.
Now, plan your goals for your first year in business
23. Create a strategic plan for the next 12 months
Like your business plan, your strategic plan doesn’t need to be complicated.
Here’s how to write a simple startup business plan for year one
Come up with one big goal for the next 12 months.
Determine what you need to do in order to reach your goal. What projects or activities will you need to perform?
Figure out what metrics or parameters you can use to monitor progress. Put in place a system for tracking them.
Review and challenge monthly. Make any necessary adjustments.
Even in a one-person shop, taking the time to do this will force strategic thinking and purposeful action. It will help you avoid being reactive and randomly doing whatever comes your way.
It becomes even more important when you have a team that needs to know what direction to march. They will need that context in order to do their jobs.
Other guides written on how to start a business are pretty general. I don’t see a lot of value in reiterating what is already out there, so here is a list of guides that I would recommend for further reading on how to start a business:
Want to jump straight to the answer? The best web hosting for most people is Hostinger or Cloudways.
While it’s true that you can use any web host for your WordPress website, a WordPress-specific web hosting solution delivers better service, performance, and support for WordPress sites. If you’ve been feeling frustrated with your non-WP-specific web host and want something better suited to WordPress, you’re in the right place.
I’ve gone through dozens of available hosts and ranked the best options on the market today, including providers WordPress itself recommends. The solutions below provide the best security, performance, and reliability for websites built on WordPress.
The Top 9 WordPress Web Hosts for 2023
Best of 2023: Bluehost, Cloudways, Flywheel, Hostinger, Kinsta, Nexcess, Scala Hosting, Siteground, and WP Engine.
My team and I spent countless hours pouring over every detail from price and performance to ease of use, migrations, and features. Along the way, we identified five hosts that outshine the rest.
Cloudways – Best for flexibility and extensive options
Siteground – Best for ecommerce websites with easy site migration
Bluehost – Best for creating your first WordPress website
Scala Hosting – Most freebies with WordPress hosting plans
Whether you’re looking for something affordable and easy to use, a lot of bang for your buck, or a host with limitless flexibility, you can’t go wrong with any of the hosts above.
Depending on your goals, one of my recommended hosting providers may work better than another for your specific needs.
Below you’ll find in-depth reviews that explain my recommendations, followed by a brief tactical section to help you assess your options.
Hostinger stands out for its low prices and stellar loading times.
How low? Hostinger’s current managed WordPress plan starts at just $1.99 per month for a single website—which is unbeatable compared to other web hosts out there. While that is promotional pricing, even the contract renewal price of $3.99 per month is very affordable.
But here’s the kicker: for just one dollar more per month (currently $2.99), you can build 100 websites along with 100 GB of SSD storage, free email, and unlimited bandwidth.
That’s right, for the price of a single cup of coffee each month, you’ll be able to host up to 100 websites. That’s an amazing deal.
Hostinger delivers a good value and excellent performance with its wordpress hosting.
With their great prices, does that mean you’ll be sacrificing quality? Nope. In fact, you’re going to get solid uptime reliability with Hostinger.
Loading times are speedy, too. According to the Hostinger website, server response time clocks in at around 43 milliseconds, which is very fast. To give you a comparison, that’s just 13 milliseconds “slower” than a lightning strike. In our testing, every Hostinger hosting type (shared, VPS, and WordPress hosting) averaged well under one second for loading.
Hostinger recently implemented a new feature for page speed insights, where you can measure your site’s speed and see its performance history with just one click. If you find that you want to improve your loading speed, the new server transfer feature will recommend what to do.
You can test your site’s loading speed with Hostinger’s built-in speed tester.
The company also recently added an advanced malware scanner and a WordPress staging tool so you can test changes without actually changing your entire live site.
Overall, this is a great web host if you want good prices with quality hosting. If you want to maximize the number of sites you can host at a low cost, get signed up with Hostinger today.
Cloudways – Best for Flexibility and Extensive Options
Cloudways has been providing managed WordPress hosting for over 11 years and has hosted 600,000+ WordPress websites. Another impressive statistic is that Cloudway has access to more than 120,000 active servers!
Cloudways strives to provide flexibility to all of its clients. Some examples of this flexibility are offering unlimited WordPress websites, pay-as-you-go pricing with hourly plans (so you only pay for what you actually use), one click to add more server space, unlimited staging URLs, and more.
And with an extensive knowledge base and 24/7 expert support, you don’t have to be a technical expert yourself to jump in with Cloudways.
Cloudways keeps the startup process easy, so you can jump in and have success.
Cloudways currently has 62 data centers in 15 countries and 33 cities, so no matter where you are in the world, you will get speedy, reliable performance.
For plans and pricing, the rates depend on several factors, including selecting from five Infrastructure-as-a-Service (IaaS) providers, plus the level of RAM, processor cores, storage, and bandwidth you need. The IaaS provider options are:
Linode
DigitalOcean
Vultr
AWS
Google Cloud
The managed WordPress plans run the gamut of pricing. The least expensive is $12 per month including DigitalOcean Standard hosting charges, with 1 GB of RAM, 1 core processor, 25 GB of storage, and 1 TB of bandwidth. The most expensive is $3569.98 per month including the AWS hosting charges. That plan includes 384 GB of RAM, 96 vCPU, 20 GB of storage, and 2 GB of bandwidth.
All plans come with 24/7/365 support, free SSL, CDN add-on, free migration, unlimited application installation, 24/7 real-time monitoring, automated backups, advanced caches, auto-healing, and more.
You can try Cloudways for free with a three-day free trial to test their managed WordPress hosting and how it will work for your needs.
SiteGround — Best for Ecommerce Websites with Easy Site Migration
SiteGround is another of WordPress’ recommended web hosts. It offers incredibly affordable managed hosting solutions–that are incredibly powerful as well.
Where SiteGround really shines is in how easy it makes:
Migrating to their host. Their free migrator tool lets you easily port your old website over to their website in just a few days’ time. No development or coding knowledge is required.
Setting up an online store. With the powerful combination of WordPress and WooCommerce, you’ll be able to set up an ecommerce site to start making money in a snap. Seriously, it just takes a few clicks.
I also like its advanced features for WordPress, like automatic updates and enhanced security on all SiteGround plans. You’ll also get free daily backups. That’s an amazing deal for the lowest-tier pricing.
This covers most of the problems you could run into, freeing up more of your time to focus on your business or project. You can read even more about their offered services in my complete SiteGround hosting review.
I recommend the StartUp plan. It gives you 10GB of space and up to 10,000 visitors for one site. This intro-level plan is $2.99 per month for your first year (paid upfront).
SiteGround gives you multiple options to match your WordPress hosting needs.
You can boost your WordPress or WooCommerce site even further by going one step up to GrowBig. That lets you tap into SiteGround’s own Ultrafast PHP to speed up the visitor experience even more. Plus, you get the safety of on-demand copies of your site backups, all for $4.99 per month. The biggest plan is GoGeek for $7.99 per month with 40 GB web space, priority support, staging + Git, and the ability to white-label clients.
All told, this is a great host for web stores on WordPress, ecommerce sites who want to switch to a better host, and anyone who wants solid security and easy site backups for their pages.
Bluehost is a favorite for many because it is one of the three web hosts that WordPress officially recommends for people to use. That’s about as good of an endorsement as you can get for WordPress hosting.
The main reason people enjoy Bluehost? It’s simple to get started. Once you get started, you can install WordPress immediately and you’ll have your bare-bones site live within just 15 minutes. From there, you can follow our full guide on how to create a website so that you can get your site looking and functioning just the way you want it.
Another reason that Bluehost is a fan favorite is that it has millions of users, which means that the kinks and issues with setup and the continued hosting of websites have generally been worked out. In the rare case that you do run into an issue, help is just a call away. You can reach out 24/7 to Bluehost’s award-winning customer support team if you find yourself with any questions or concerns.
If that doesn’t have you convinced to try Bluehost, how about this: Bluehost has some of the lowest pricing around, with plans as low as $2.75/month. That’s incredibly cheap, especially for a brand that’s so reliable, trusted, and easy to use.
Bluehost has some of the lowest prices available for WordPress hosting.
As you might imagine, these traits make Bluehost the perfect host to choose if you’re just starting out.
Yes, you will be on shared hosting. So if you or someone else on your server gets a huge spike of traffic, your site could go down. But honestly, this almost never happens. I’ve had websites on shared hosting for over a decade and never had a site go down.
If and when you want to upgrade, Bluehost also offers managed WordPress hosting that starts at $9.95/month. Not the absolute lowest price point I’ve seen, but it’s still one of the lower-cost options out there for managed hosting.
Bottom line: Bluehost is a great option for the vast majority of people reading this—but especially those who are just getting started.
Scala Hosting — Most Freebies with Every WordPress Hosting Plan
WordPress hosting can be deceiving. While a lot of providers will boast about WordPress optimization on their servers, what more are you getting from them specifically?
Scala Hosting not only makes sure its servers help your WordPress site perform better, it also throws in a ton of useful features on almost every plan.
It starts with a free website migration, which not every provider offers. And it’s not just one website—Scala’s specialists will carry over as many WordPress sites as you need to their service, free of charge.
These experts will handle the migration and verify everything’s working before you point the site to your new servers. That way, there’s no downtime for your sites whatsoever in the process.
Scala takes the guesswork out of moving your site with its free migration and 24/7 tech support.
Security features are also prevalent in all Scala WordPress hosting plans. You get a dedicated firewall installed on your behalf, plus a brute force attack blocker, custom security rules that Scala’s team implements without you having to lift a finger, malware scans and removal, and automated updates to prevent vulnerabilities from arising.
All Scala plans also include:
Seven daily backups with restore points kept for a week
Free content delivery network
Free SEO analysis and tools
You can also unlock additional useful features by going with plans above Scala’s entry-level WP Mini (one website, 20 GB storage) package. Those are:
WP Start: unlimited websites, 50 GB storage, double the CPU power of WP Mini
WP Advanced: unlimited websites, 100 GB storage, quadruple the CPU power of WP Mini
On those plans, you get managed service, meaning Scala’s support team of WordPress experts will help you with everything from plugin issues to overall troubleshooting.
You also get a free domain if you opt for WP Advanced. And not just one year, either, like most providers. Each year that you prepay for hosting, you get a free year of your domain. That’s a very nice bonus.
Scala gives you a number of useful advanced features for your WordPress hosting needs.
Scala’s pricing is also very competitive with other providers on this list and in the WordPress hosting space at large:
WP Mini: $3.95 per month for a three-year commitment, $4.95 for two years
WP Start: $5.95 per month for a three-year commitment, $7.95 for two years
WP Advanced: $9.95 per month for a three-year commitment, $10.95 for two years
Give Scala Hosting a try or get connected with a representative to learn what more they can do for you. If you want worry-free WordPress hosting at a competitive price, Scala Hosting should be near the top of your list.
More Good WordPress Web Hosting Options
WP Engine — Best for Hosting Multiple WordPress Sites with Tons of Traffic
For pros, I recommend WP Engine. In fact, WP Engine is what we use here at Quick Sprout—and for very good reason. If you’re trying to get serious and build a high-traffic blog or business on WordPress, it’s by far the best managed WordPress host out there.
But I don’t recommend it for anyone who’s just starting out, since it’s much more expensive. We’re talking between $30 to more than $100 each month versus a range of $4 to $15 with other products on my list.
Most WordPress sites would do much better with Bluehost or Siteground. You’ll save a lot of money and won’t be paying for WP Engine’s advanced features you don’t need.
For $20 per month paid annually, you can use the Startup plan to host one 10GB site with a limit of 25,000 monthly visitors. The Professional tier of service is $50 per month for three sites and 75,000 monthly visitors.
WP Engine is a solid selection for those who need managed WordPress hosting.
That might seem like a lot of money for fewer resources (especially when compared to services like Hostinger and Bluehost, and especially given the fees you’ll pay if you exceed the visitor limits during a big traffic spike) but, remember, this is managed WordPress hosting.
As a managed host, WP Engine professionally maintains speed and security at the server level—meaning you don’t have to do anything to maximize performance on your end.
Nor do you have to carve out time to install and update your plugins, run backups, or implement security features to ward off brute force attacks. WP Engine takes care of it all behind the scenes.
The customer service is also excellent, with 24/7 support that includes trackable service tickets and a comprehensive knowledge base.
WP Engine’s support staff are WordPress experts, providing detailed answers to your questions and issues.
Every time I’ve had to reach out to customer support, I’ve always been impressed. The speed, thoroughness, and expertise are world-class.
Nexcess, by Liquid Web, is a powerhouse designed to service other powerhouses, like if you’re an enterprise customer or are charged with manning multiple WordPress sites.
What I really love about Nexcess, though, is how easy it allows you to stage a website. Its one-click staging tool allows you to easily create a facsimile of your website that you can edit and test to your heart’s content—without worrying that you’re screwing up the actual website.
The company also offers a ton of great plans that make it easy to scale. Prices start at just $15.83 per month for one website (as long as you pay for the entire year up front). You also can pay $19 per month if you prefer to pay month by month.
If you need more features than the lowest-priced tier provides, the cost jumps quite a bit. The Maker tier costs $65.83 per month in the annual plan, but you get up to five sites and 40 GB storage with that plan. Nexcess calls its most popular plan the Designer tier, which offers up to 10 sites and 60 GB of storage for $90.83 per month. These plans offer a discount for the first three month.
In all, the platform offers seven plans. The most expensive plan is the Enterprise tier, which provides up to 250 sites and 800 GB of storage. If you’re an agency or freelancer who plans to host websites for clients, one of the higher-end plans is a great solution for you.
Nexcess simplifies the process of setting up and running your WordPress website.
If you need more control but doing everything yourself through AWS isn’t appealing, then Nexcess is for you, too. You won’t have to do nearly as much setup and upkeep as AWS while still having a lot more control than other hosts give you.
It also automatically updates WordPress and your plugins. That’s fewer headaches for you and your team.
You’ll get all-level access to MySQL, SFTP, and SSH. You also get Git version control. Security, speed, and customer support are virtually unparalleled.
Nexcess is obviously not right for everyone. Small businesses should choose one of the other options, as Nexcess plans would be overkill.
Flywheel is a managed WordPress host that really puts the “support” in customer support.
The company offers a great migration service that takes care of the often stressful process of site migration for you. It has a dedicated team that handles the entire process of moving your site to its web host so you don’t have to.
The best part: it’s absolutely free.
That’s right. They’ll take care of everything at no extra cost.
Flywheel is also fantastic because of great features like “blueprints” that allow you to save customized themes and plugins you use over and over again.
You’ll also have 14 days on a free, password-protected demo site to show your work before having to pay. You can also easily transfer billing on any of your sites to a client.
That makes FlyWheel an excellent option if you’re an agency or freelancer working on client websites. If you build sites for clients, we highly recommend you start using Flywheel.
Flywheel offers a single-site plan with 5,000 monthly visitors and 5GB of disk space for $13/month. From there, you can scale up to a souped-up single-site plan for $25/month, or accommodate more sites in the two highest packages. If you need more than 30 sites, you will have to reach out to Flywheel for a custom quote.
When you want excellent customer service with WordPress hosting, Flywheel is a strong choice.
Bottom line: I’d use Flywheel if I were looking for a hassle-free migration experience and/or developing websites for clients.
Kinsta is a great alternative to WP Engine if something about WP Engine doesn’t gel with you.
What truly separates it from WP Engine, though, is its auto-scaling feature. In the event of an unexpected surge in traffic, its servers will automatically allocate more CPU and RAM to your website.
That means you won’t have to worry about your website slowing down or crashing when you get an influx of readers. Instead, Kinsta takes care of it for you.
That’s great for websites that frequently see infrequent spikes in traffic like when a blog post goes viral or if you have sporadic product launches in your ecommerce store. It can also be very good for websites that experience inconsistent traffic performance (e.g., viral videos, big product launches).
Kinsta also offers a ton of pricing plans for excellent scalability. In fact, it offers a whopping 10 plans as well as a customizable enterprise solution.
If you want the ability to scale your site, Kinsta delivers multiple pricing tiers.
Pricing starts at $35 per month for 25,000 monthly visitors and scales up from there. If you need more than 2.5 million visitors per month, you can contact the Kinsta sales team to put together a custom plan. All plans come with a 30-day money-back guarantee.
Bottom line: Kinsta can handle any volume of traffic that you need. You won’t have to worry about outgrowing them.
One especially nice thing about Kinsta is that you get access to the same features across every plan, as opposed to upgrading to a higher-priced plan to unlock something.
It also makes Kinsta’s pricing super simple. Pick the plan based on your traffic and you’re good to go.
How to Choose the Best Web Hosting for WordPress
Now that you know about some of the best choices for hosting your WordPress site, it’s time to find the best one for you and your business. Here are some of the major considerations to decide among the top options.
Note: We intentionally didn’t include speed, security, and uptime on the following list of WordPress hosting factors. They are certainly important, but our recommended hosting providers have these responsibilities locked down. We wouldn’t recommend them otherwise.
Multi-Site vs. Single-Site Hosting
Every provider on our list offers different solutions if you plan to host multiple sites. That’s why it’s important to make sure the provider you choose can support all the sites you’ll be hosting in the future. The price and features for each package must be taken into consideration here.
For example, WPEngine offers a few great packages if you’re managing multiple websites. Their multi-site hosting packages start at $44.25 per month with three sites included. You’ll also get 125 GB of bandwidth each month along with 15 GB of storage.
It scales up from there to their Growth package that’s $86.25 per month—quite the jump. But you end up getting 10 sites included in that package with more bandwidth and storage.
Kinsta is also another excellent option to consider if you’re looking for multi-site WordPress hosting. These packages are also built to scale. So if you end up getting more clients who need websites, you can just upgrade your package as needed.
Providers like Bluehost offer unlimited websites at just $5.45 per month. But there’s a catch—it is completely unmanaged.
That means it doesn’t come with the level of customer support and automatic maintenance you’d get with managed hosting.
Customer Support That’s Actually Supportive
You want your website must operate as smoothly as possible. This is especially important if you’re making money from it. So when something goes wrong, like an outage or security breach, you want someone in your corner to get you out of the jam.
That’s why good customer support is an important consideration when you’re deciding on a WordPress host.
WordPress hosting platform WPEngine offers one of the best-reviewed customer support teams. The team is on hand 24/7/365 to help you with any and all issues that arise.
The trade-off here is that it’s a managed WordPress host, which means it comes at a steeper cost. With that price tag comes a stellar hosting service, though, along with a support team that’ll be at your disposal whether you need to optimize your website or guide it through any down times.
Even better, the help desk and support staff of a managed WordPress site are WordPress experts. They understand your site and the plugins you’re using. They are essentially trained to help you—unlike a general host with customers running all sorts of applications.
Managed hosts have built their business model on providing timely, reliable service. Conversely, cheaper hosts don’t put much of an emphasis on helping customers in their time of need.
That’s not to say that all unmanaged options offer inferior customer support. In fact, hosts like Bluehost offer award-winning 24/7 customer support for all of your needs. They just might not know your site as well as a managed WordPress host does.
Managed vs. Unmanaged Hosting
This is one of the most important decisions to make when it comes to choosing a WordPress web host from this list. It determines everything from your level of customer support to security to price.
First, let’s talk about the WordPress hosting most people are familiar with. You get a regular web host and that host usually gives you an easy way to install WordPress. You have a host, WordPress is installed, and that’s it.
This is known as unmanaged WordPress hosting—and most WordPress hosting works like this. After a one-click install, you get the basic version of WordPress, the same version that you’d get if you installed WordPress on a server that you owned.
Instead of a basic host with WordPress installed, everything is built from the ground up with WordPress in mind. This hosting infrastructure is tailored specifically to WordPress, and the hosting provider usually customizes WordPress itself to make it better.
Your site will be a lot faster and more secure with a managed plan. You’ll also benefit from much better support since the hosting team specializes in WordPress.
The downside is that managed WordPress hosting is more expensive, but this makes sense. You’re getting more value for the higher price tag.
Headache-Free Site Migration
WordPress hosting is typically an upgrade from old shared hosting solutions. So there’s a good chance you’re migrating your website to a new web host altogether.
A quality web host will help you migrate your website between web hosts easily and seamlessly. You might get a dedicated technician work through the process for you, or have a customer support team to guide you through the process yourself. Some might even charge you a little more in order to migrate your site—and it’s usually worth the price in my opinion.
See which hosting providers offer site migration as you’re reaching different options. For example, SiteGround has a free migrator tool you can use to get your website over to its host.
WPEngine is another host that offers a migration plugin. Once downloaded, the plugin takes care of all the complicated work for you.
Flywheel has experts on hand to help you migrate your website. Their migration team will take care of the whole process, so you don’t have to.
If you want to transfer your website to a new host, be sure to check what the WordPress hosting provider offers to help transfer your website. You’ll want as much assistance as you can get to make the transition smooth.
Best Web Hosting for WordPress: Your Top Questions Answered
What is the best WordPress hosting service?
Hostinger is the best WordPress hosting service for most websites because it’s affordable, easy to use, and delivers an excellent value for the quality of hosting you get in return. Hostinger has everything new websites need to create, launch, and maintain a website on WordPress.
New WordPress users can get a free domain name for one year when signing up for Hostinger. You’ll also get a free SSL certificate, and plans are backed by a 30-day money-back guarantee.
How much does WordPress hosting cost?
On average, WordPress hosting costs $5 to $15 per month. Some providers offer WordPress hosting for less than $5 per month, while others have WordPress hosting plans that start around $20 or $30 per month.
Your rate depends on the provider you choose, the features included in your plan, and how long your contract is. Most web hosting providers offer promotional rates to new customers, and it’s cheaper if you pay in full for a two or three-year contract. Managed WordPress hosting also tends to cost more than traditional WordPress hosting.
What is the cheapest WordPress hosting plan?
Hostinger is the cheapest WordPress hosting provider—offering WordPress hosting plans starting at $1.99 per month. This is a special price for new Hostinger customers, but the plan renews at just $3.99 per month, which is still a fraction of the cost compared to promotional rates from other WordPress hosting plans from other providers on the market.
The best part about using Hostinger for WordPress hosting is that the low price doesn’t mean you’re sacrificing quality. All Hostinger plans are fully-managed and backed by a 99.9% uptime guarantee.
Can I host my WordPress site for free?
Yes, there are ways to host your WordPress site for free—but they’re not recommended. Free web hosting providers may put untrustworthy ads on your site or force you to use a branded subdomain. Neither of these is ideal for websites that want traffic from real users.
It’s worth it to pay to host your WordPress site if you’re launching a business website and you want to scale your traffic while appearing in search engine results. You can get WordPress hosting from Hostinger for just $1.99 per month, which is as close to free as it comes without sacrificing the quality or integrity of your site.
The Top Web Hosting For WordPress in Summary
WordPress web hosting puts your site on a server that’s only used for WordPress. This improves security and performance and enhances the overall experience for your website visitors.
Factors like site traffic, technical experience, and scalability are all important factors to consider here. Beginners launching a new WordPress website likely won’t use the same solution as a high-traffic site that wants to switch hosts.