Unlike some of the other web hosting providers on the market, iPage isn’t as well-known. But the company has been around for more than 20 years and hosts over one million websites with its two data centers.
If you stumbled upon iPage for web hosting, it’s probably because you were looking for an inexpensive hosting plan.
With hosting plans offered as low as $1.99 per month, that’s the major draw for this web host.
But the cheapest web host on the market isn’t always the best—or is it? That’s what inspired me to write this guide.
I’ve been getting lots of questions lately about my opinion on iPage. How does its low-cost factor into its performance?
For those of you who are looking for a budget web host, iPage might be an option for you to consider. But before you make that decision, read through this review to make sure you have as much information as possible.
iPage Web Hosting Plans
Before we talk about the pros, cons, and performance of iPage, I want to give you a brief overview of the plans that they offer. For a low-cost web host, they actually have quite a few options for you to choose from.
Shared hosting
Like most web hosts, the shared hosting plan from iPage is the least expensive option.
But what’s unique about this web host compared to other providers on the market is the lack of shared hosting plan options. Typically, web hosts offer at least two or three different pricing tiers for shared hosting, each with different features and benefits.
iPage, on the other hand, just has this one plan.
If you decide to use iPage’s shared hosting service, you’ll also get:
Free domain
Free SSL certificate
Free email addresses
You can host an unlimited number of domains on the shared plan as well.
Pricing starts at $1.99 per month if you sign up for a three-year contract. Rates for a two-year contract and one-year contract start at $2.49 per month and $2.99 per month, respectively.
VPS hosting
If you’re interested in a virtual private server, iPage has what you’re looking for. Unlike the shared plan, VPS hosting with iPage does come with different pricing tiers and plan options.
Basic VPS
Business VPS
Optimum VPS
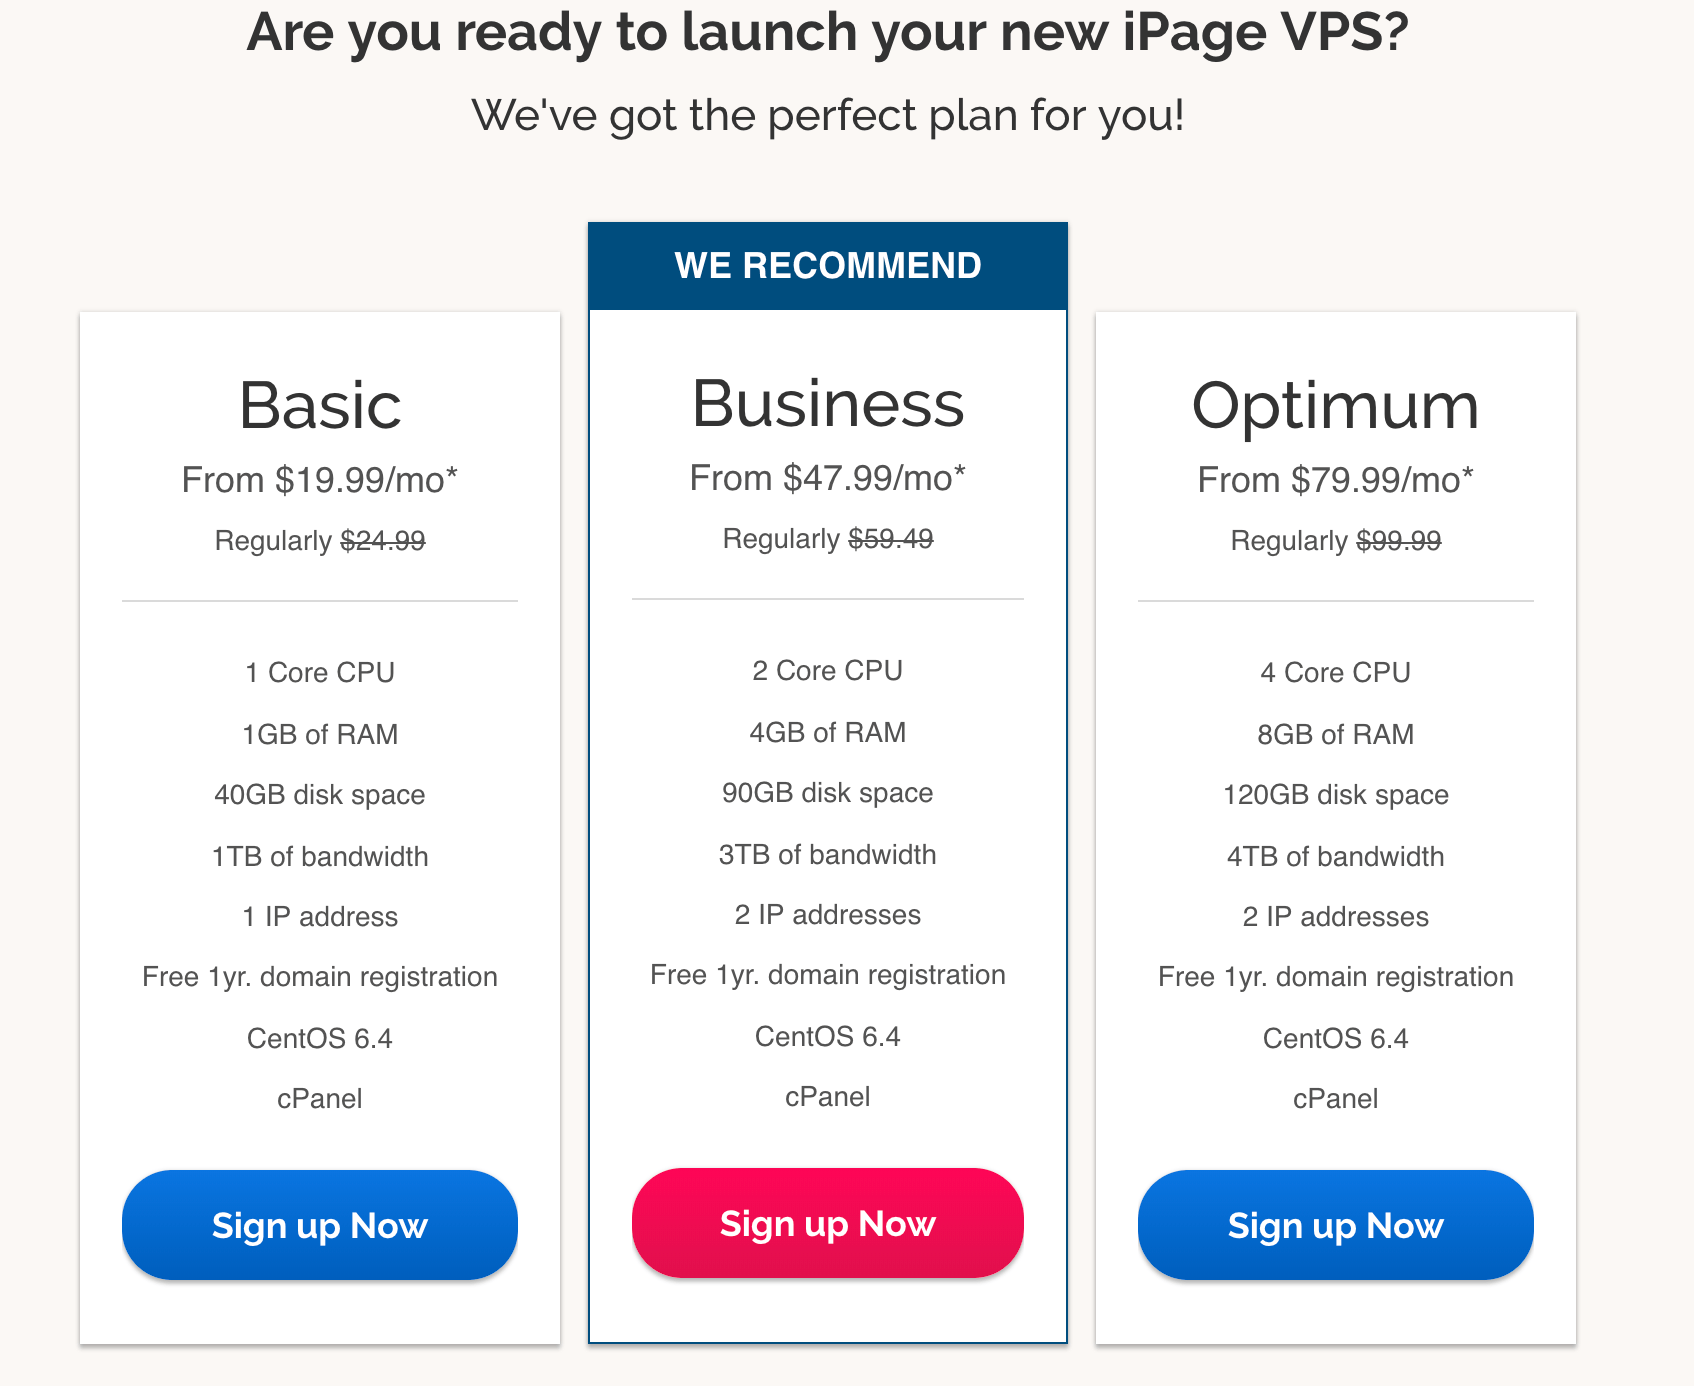
Here’s a comparison of those three plans.
As expected, the more you pay, the more features you’ll get. CPU, RAM, disk space, and bandwidth increases at each tier.
While iPage has a reputation for being a low-cost web hosting provider, their VPS plans are not necessarily cheaper than other web hosts on the market. Their VPS services are priced about even to or higher than some other well-known hosting providers.
All of the pricing you see from the image above is the introductory offer for a three-year plan. Rates will increase when your plan renews and if you commit to a shorter term contract length.
With a VPS plan, you’ll have more customizable options. iPage will give you root access and the ability to customize your software and hosting environment.
Dedicated servers
The dedicated servers from iPage are a step above the VPS plans. You can get up to 16GB of RAM, 1,000 GB of disk space, 15 TB, of bandwidth, and 5 IP addresses with a dedicated server
Introductory rates for a three-year contract are as follows:
Startup — $119.99 per month
Professional — $151.99 per month
Enterprise — $191.99 per month
Those plans renew at $149.99, $194.99, and $239.99. Again, for a budget web host, I wouldn’t necessarily say that those price points are cheap.
But the dedicated servers give you complete customization. There are no restrictions to your software and hosting environment, these plans were made for those of you with more technical skill levels.
You won’t be sharing any resources with other websites if you use a dedicated server from iPage.
These rates are definitely more aligned with iPage’s reputation of being a low-cost web hosting provider.
Both plans come with unlimited storage, unlimited bandwidth, customized control panel, as well as some pre-installed themes and plugins. The WP Essential plan also has automatic malware removal, added security, and expert WordPress support.
The rates renew at $7.49 and $10.49 per month.
Benefits of iPage for web hosting
Now that you’ve had a chance to review the hosting options offered by iPage, it’s time for us to look at the best parts of this web host.
Low pricing
Based on the plans we’ve covered, you can see that iPage has a wide range of options to choose from. There are some budget hosting solutions, as well as some higher-end offers with added features and functionality.
But ultimately, iPage is best-known for its low pricing. With shared plans offered as low as $1.99 per month, it’s very appealing to new website owners who are on a budget.
The only drawback of this low pricing is that you need to commit for three years and pay for it upfront to get that rate. Unlike other web hosts on the market, iPage does not offer month-to-month plans.
Money-back guarantee
While iPage doesn’t offer free trials or month-to-month rates, the provider still stands behind their services. All plans come with a 30-day money-back guarantee.
It’s a “no questions asked” policy. If you’re unsatisfied for any reason, iPage will fully refund your hosting fees.
However, there is a non-refundable $15 fee if you registered your domain with iPage. They set this up to ensure that you won’t lose your domain if you want to transfer it to another provider.
I usually wouldn’t recommend a hosting provider that doesn’t offer some type of money-back promise. So the fact that iPage does this for their customers is definitely a positive. You can try them out knowing that you have a month to change your mind.
High uptime
At the end of the day, performance is really what matters the most. If your web host can’t keep your website up and running, then it’s essentially useless.
So, how well do iPage’s low-cost plans perform? Let’s take a look.
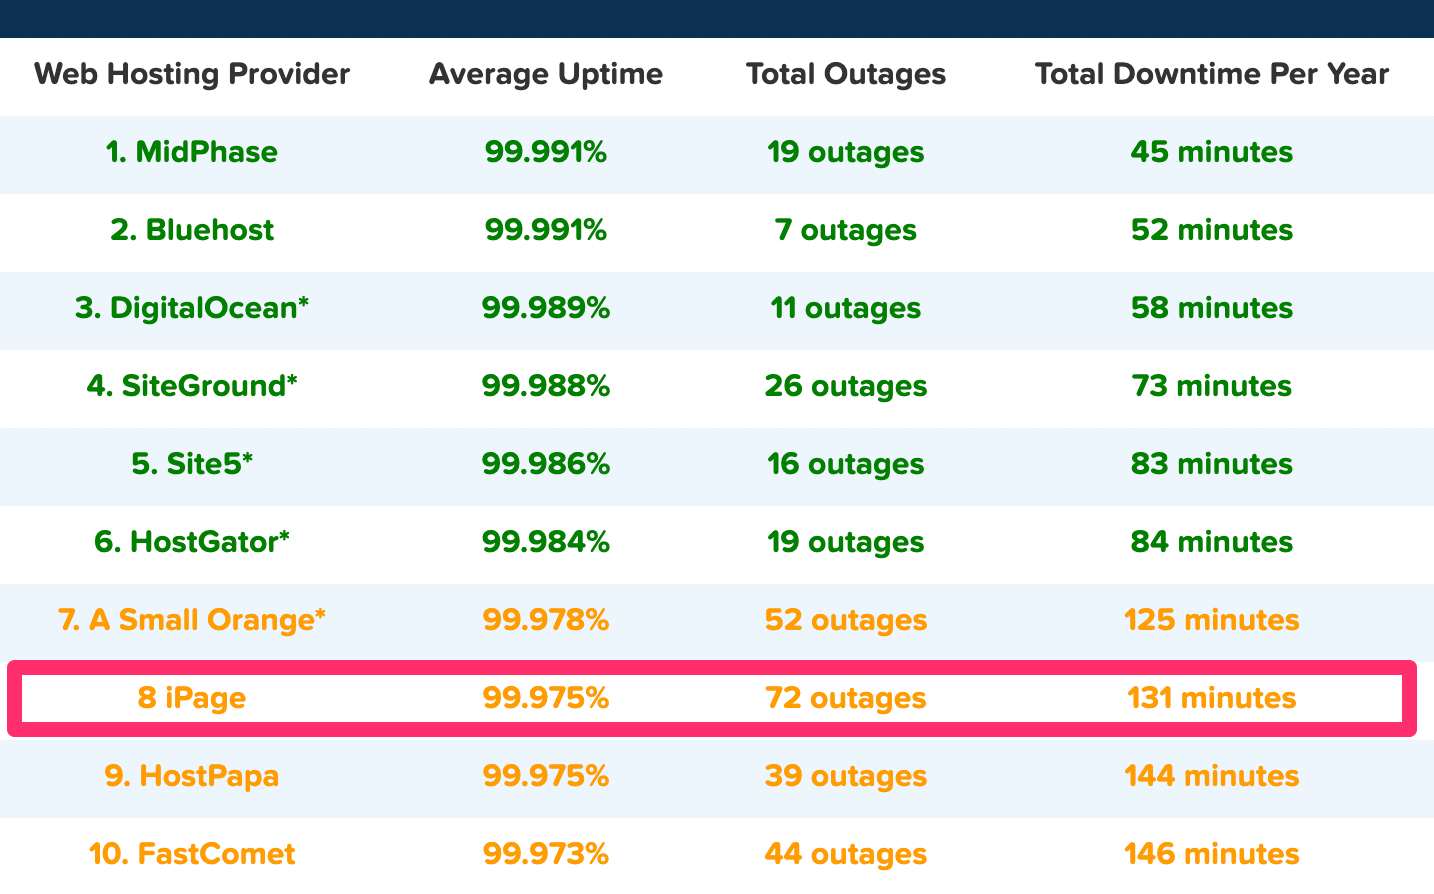
Hosting Facts conducted a study on the performance of 32 different web hosts. They calculated the average uptime rates for each host throughout the course of one year.
As you can see from the chart, iPage cracked the top 10, ranking eighth out of the 32 web hosts in the study. The average uptime rate of 99.975% in 2018 was good enough to land this provider in the top 25% of web hosts.
Overall, that’s a very strong uptime. I’d definitely be happy with that number, especially considering the fact that it’s achievable at such a low cost.
With that said, the length of their downtime was nearly triple the amount of the top host on the list. But I truthfully wasn’t expecting iPage to compete with those figures.
It’s also worth noting that unlike other web hosts, iPage doesn’t guarantee a certain uptime rate. So if they fail to meet a certain standard, you won’t be refunded or compensated in any way. However, they do offer uptime monitoring, so you’ll be notified if your site goes down.
Third-party tools
iPage is compatible with lots of third party tools and platforms. Here’s a list to name a few.
CMS tools:
WordPress
Drupal
Joomla
Forum tools:
Gbook
phpBB
SMF
Blogging tools:
PixelPost
B2evolution
Photo gallery tools:
ZenPhoto
Gallery2
iPage is also compatible with ecommerce solutions like Zen Cart, OpenCart, PrestaShop, AgoraCart, TomatoCart, and OSCommerce.
Helpful support
We already talked about the money-back guarantee. But beyond that, iPage also offers 24/7 phone and live chat support.
They also have an extensive knowledge base, with informative guides, tutorials, and lots of other helpful information about their platform, tools, and services.
So no matter what type of question you have or problem you run into, I’m confident that you’ll be able to get that solution resolved quickly and efficiently with iPage support.
Other considerations
As expected with a low-cost web hosting provider, iPage has its fair share of flaws. I’ll let you know about some of the downsides of using their services. You can use this information to see if these drawbacks are worth the low price.
Loading speed isn’t ideal
Again, performance is key when it comes to web hosting. Aside from uptime, which we already discussed, loading speed usually the next metric that we look at.
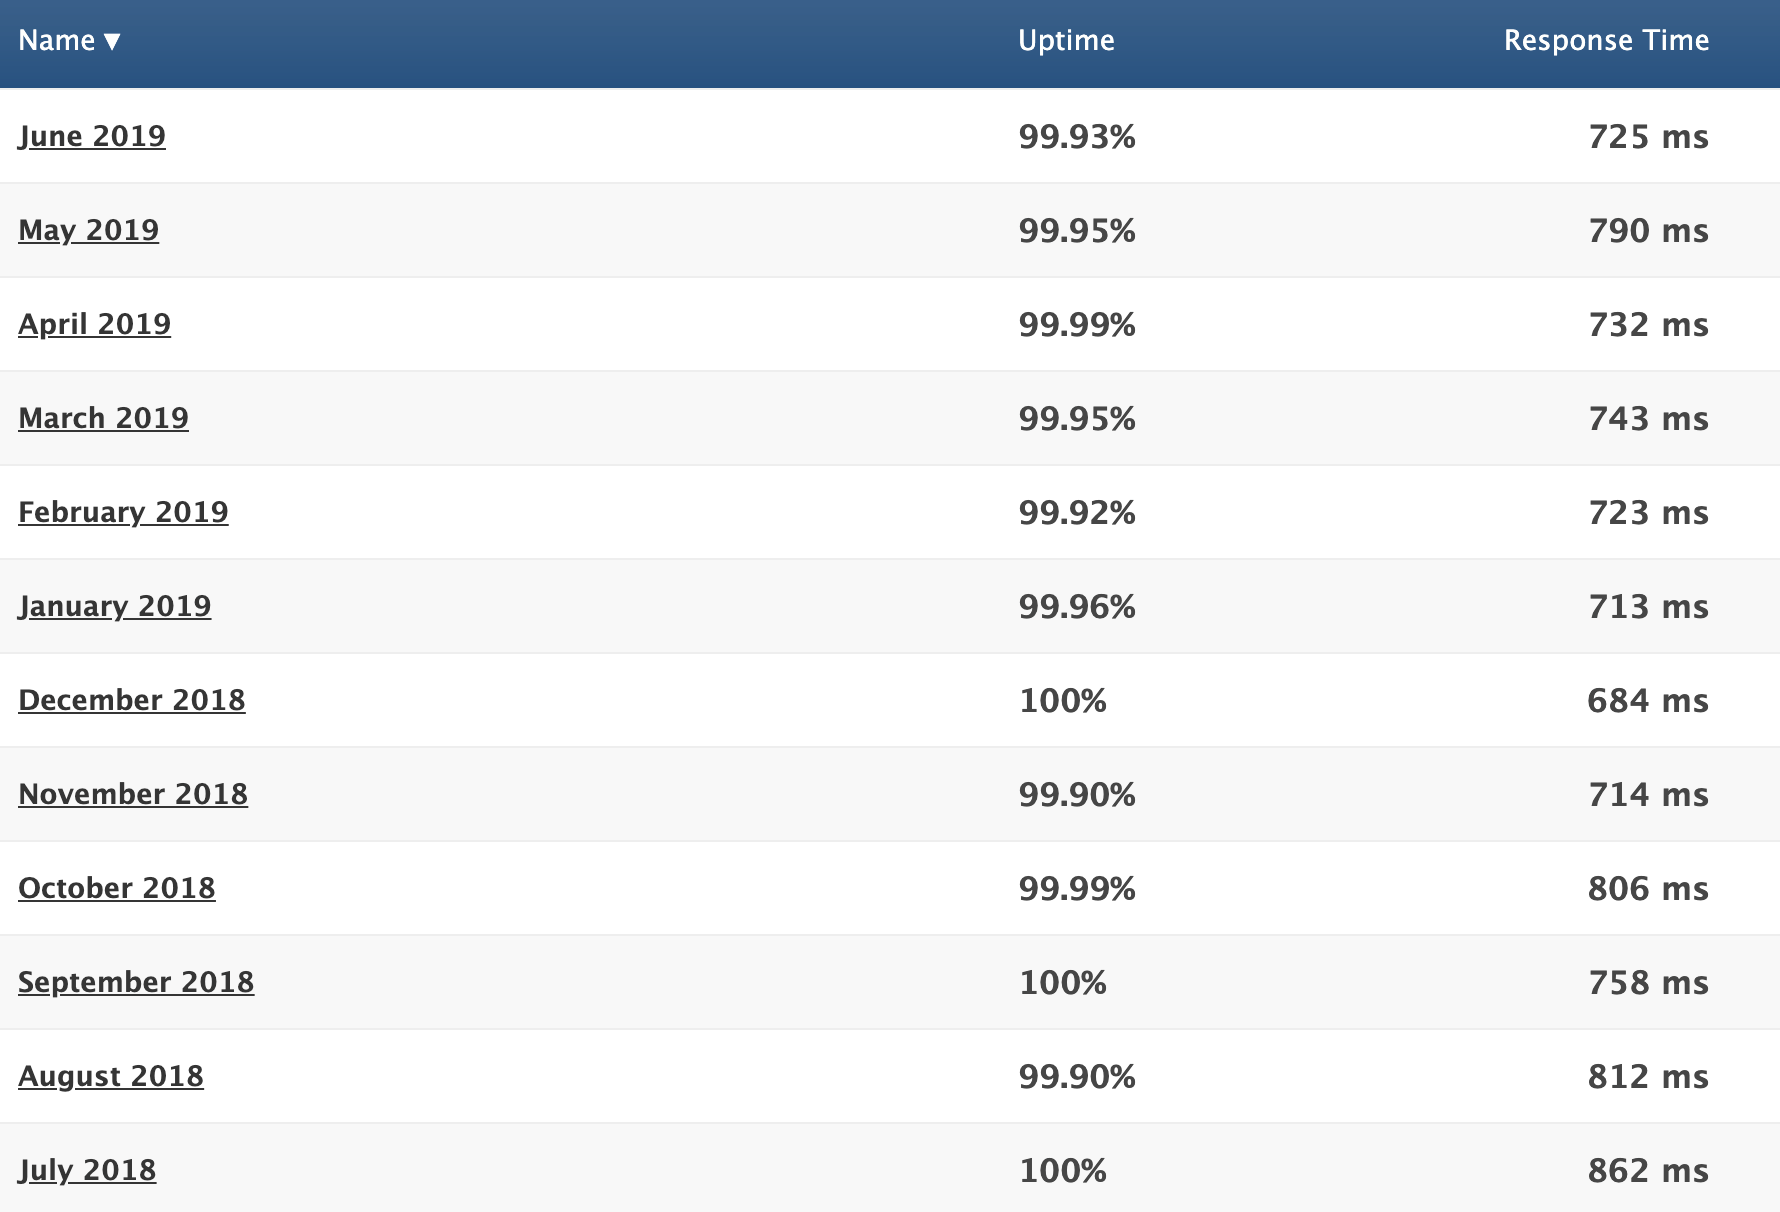
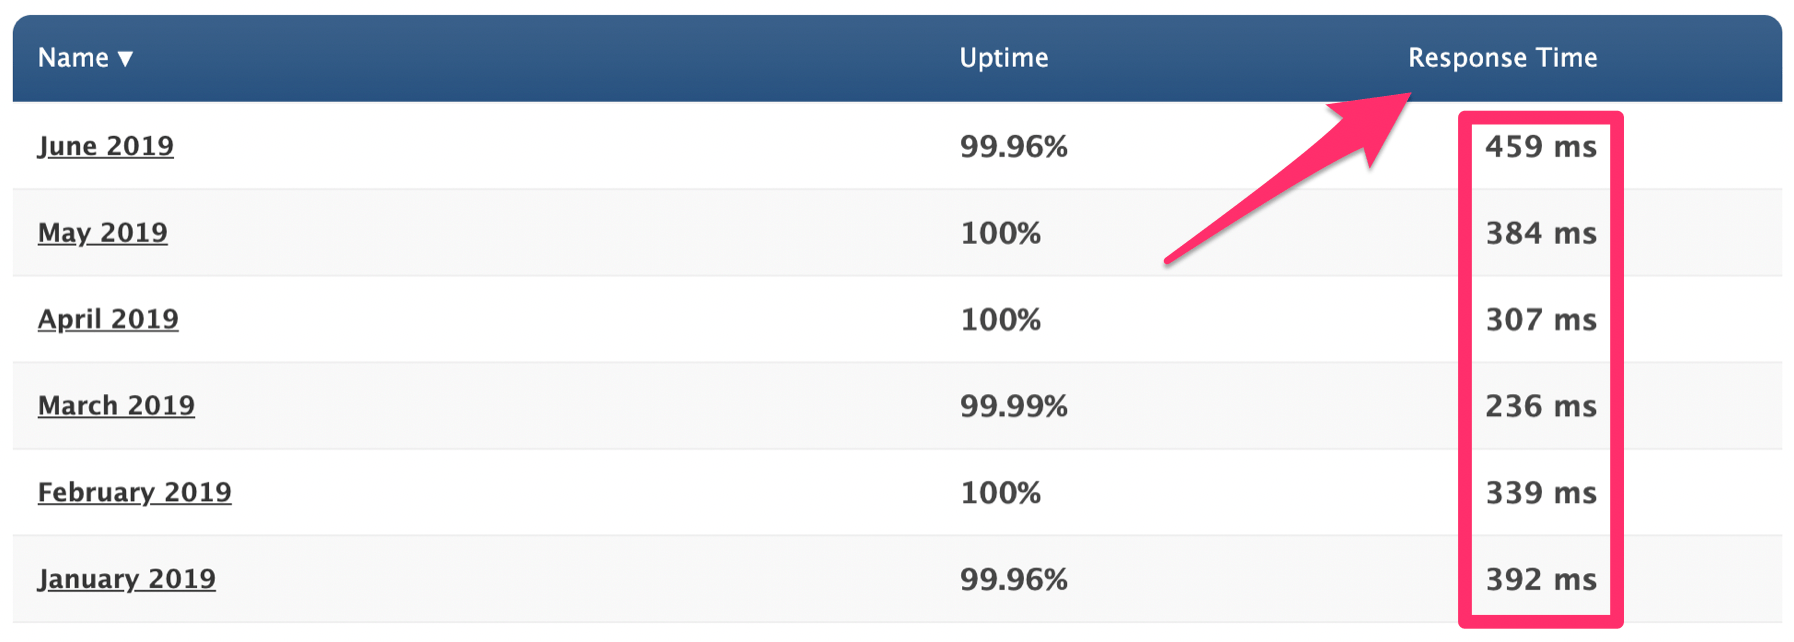
Check out the response times for an iPage test site over the past 12 months.
The average response time from this sample is 755 ms.
Honestly, it’s not terrible. But this number is a little too close to a full second page loading time for my liking.
Plus, this is just a test website. If you’re going to be adding pictures, video, and other media files to your site, it will slow down even more.
While iPage definitely doesn’t have the worst loading times we’ve seen, they certainly don’t have the best either.
Not a “green” web host
This may not be a big deal for some of you, but I figured it was still worth mentioning.
iPage used to have environmentally-friendly web hosting. They had a landing page explaining that they ran on wind power and had a certified green certificate. However, as of late last year, this page has been removed from their website. I tried to Google it and got a 404 error instead.
iPage is a low-cost web hosting provider. I think it’s safe to say that we established that. However, their services end up costing more than you might think.
Even if you choose the lowest plan of $1.99 per month for three years, you’ll still have to pay extra for things like:
Domain privacy
Website security
Site backup and restore
Website builder
These are things that usually come free with other hosting providers.
So in your head, you might be thinking $2 per month for 36 months is just $72. Not a bad deal, right?
But as you can see from this checkout page, you’ll end up paying significantly more than that amount for some pretty basic features.
Paid site migrations
To entice customers to switch providers, most web hosts will offer a free site migration. But iPage doesn’t do that for new customers.
It will cost you $150 for their tech support to move your site to iPage servers. That cost only covers one website, which is expensive. To put that into perspective for you, Bluehost also charges $150 for site migratations, but they’ll move up to five sites for that same rate.
Unless you’re a tech wizard, you probably don’t want to try and migrate your website on your own. So this is another cost that you’ll have to incur.
In short, yes. They have low-cost shared hosting plans, as well as options for VPS, dedicated servers, and WordPress hosting.
Just be aware that those advertised rates have some conditions attached to them. You’ll need to commit for three years to get the best price, and then your rates will go up when it’s time to renew. Plus, you’ll need to pay extra for all of your add-ons.
With all of that in mind, iPage is still a reputable and reliable web host with high uptime rates and great customer support.
For those of you who are on a budget but still aren’t sold on iPage, check out my list of the best cheap web hosting services for some alternative solutions.
If you’re in the market for a new web hosting service, HostGator is certainly an option that will come on your radar. It’s a reputable company within the web hosting industry.
Like most web hosts, HostGator has a wide range of plans, options, and hosting types to accommodate the needs of different websites.
Today, I want to put more emphasis on the HostGator Cloud.
Cloud hosting is new compared to other types of web hosting. Rather than your website being hosted on a local server, it’s hosted on multiple remote servers.
One of the biggest benefits of cloud hosting is the ability to scale on-demand. So it’s a great option for fast-growing websites with high volatility in their site traffic.
For those of you who are interested in using the cloud to host your website, I strongly recommend that you review my analysis of HostGator Cloud. I’ll cover their plans, pricing, benefits, and everything else that you need to know before finalizing your decision.
HostGator Cloud Web Hosting Plans
There are three cloud plans offered by HostGator. The cloud uses premium hardware, low-density servers, and multiple layers for caching. As a result, this speeds up your page loading times.
As your traffic increases, HostGator Cloud plans make it possible for you to increase your resources with a click on-demand. All of this happens without any downtime, reboots, or data migrations.
Regardless of the plan you choose, you’ll have access to HostGator’s intuitive dashboard. From here, you’ll be able to monitor all of the metrics related to your website’s performance.
That’s what you’ll use to allocate any additional resources accordingly. Basically, you have complete control of your usage with the HostGator Cloud.
Let’s take a closer look at each individual cloud hosting plan.
Hatchling Cloud
The Hatchling Cloud is the entry-level cloud hosting plan from HostGator. It’s made for hosting one domain and has 2 GB of RAM.
Like all cloud plans, the Hatchling comes with a free SSL certificate.
Pricing for this plan starts at $4.95 per month as an introductory offer. Your contract will renew at $8.95 per month.
You can add on SiteLock monitoring, CodeGuard site backups, professional email, and HostGator SEO tools for additional annual fees.
This plan is best for new websites that want to be hosted on the cloud. Even though you can allocate new resources on demand, you’ll likely want to upgrade as your total monthly traffic increases.
Baby Cloud
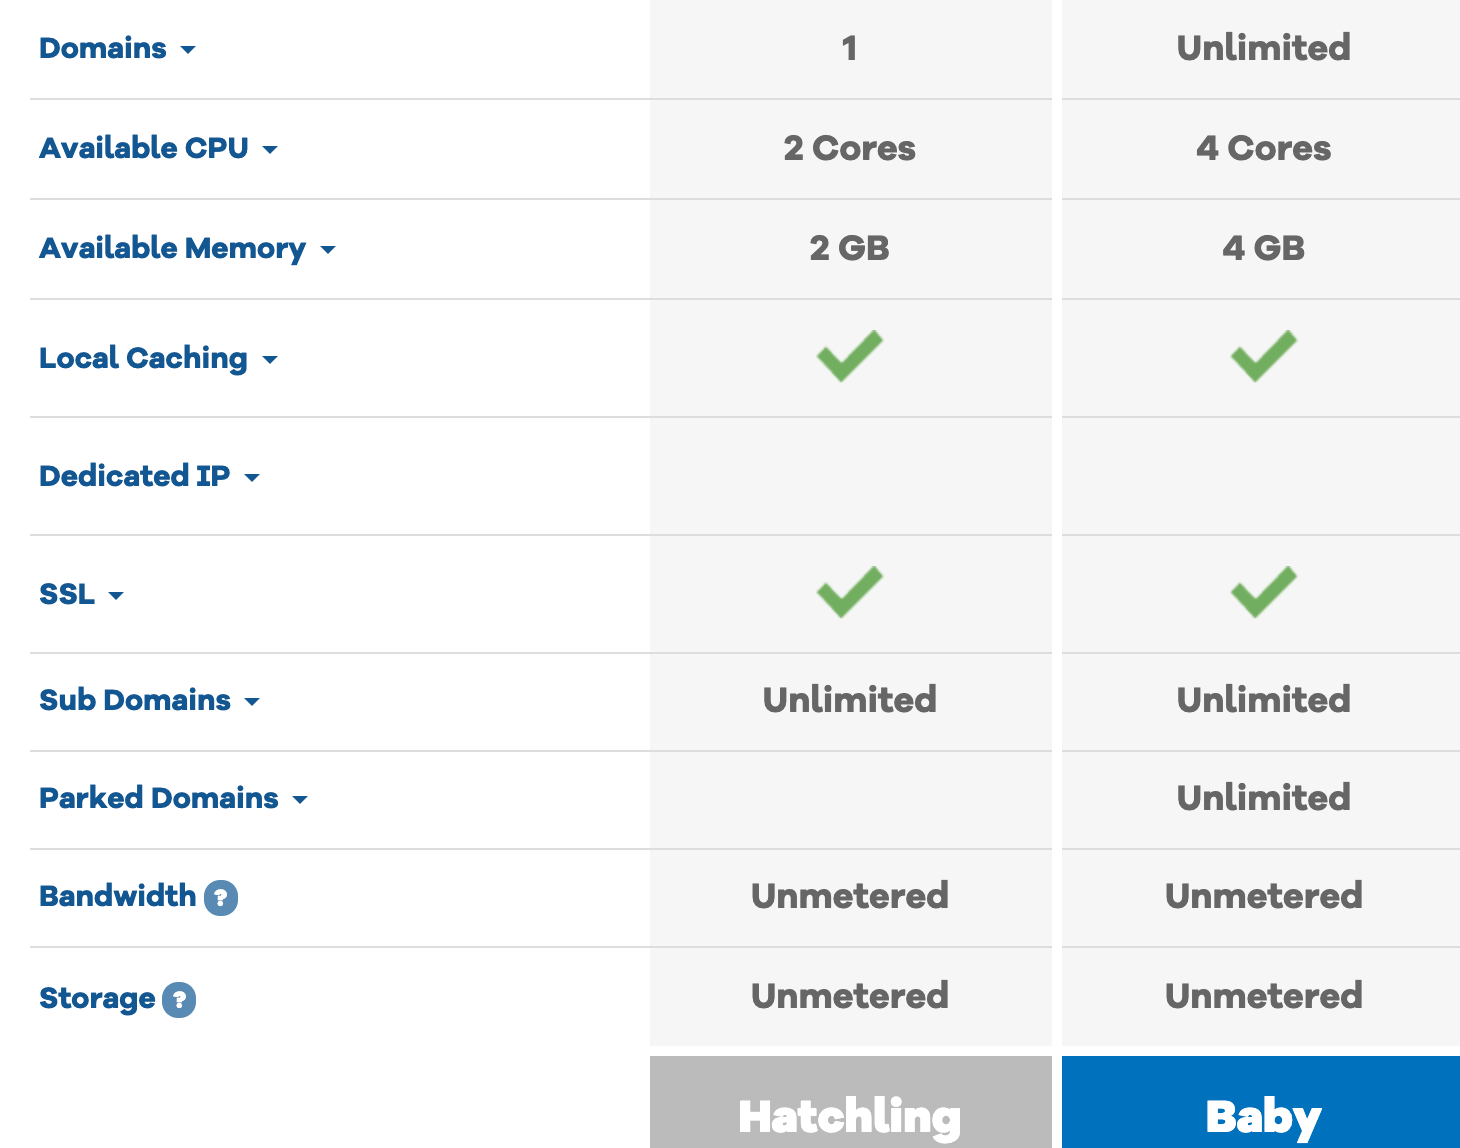
Here’s a quick glance at what the Baby Cloud offers compared to the Hatchling.
As you can see, the Baby Cloud can host unlimited domains, and has twice as much available CPU space, and double the memory.
The rate for new cloud customers is $7.95 per month, before renewing at $11.95 per month. Right now they’re running a deal where you can actually get the introductory rate reduced down to $6.57 per month, which is a great value.
All you need to do is sign up and the discount will automatically be applied at the checkout.
This is the most popular cloud hosting plan offered by HostGator. I’d say it will likely be the option that’s the most suitable for the majority of you.
Business Cloud
The Business Cloud is HostGator’s top-tier cloud hosting plan. Like the Baby Cloud, it also hosts an unlimited number of domains on a single plan.
However, the Business plan comes with access to 6 cores, as opposed to just 2 or 4 cores on the Hatchling and Baby plans. Your HostGator Business Cloud also has access to 6 GB of RAM.
It’s the only cloud hosting plan that comes standard with a dedicated IP address. This feature is not available on the Hatchling plan and it costs an additional $4 per month on the Baby Cloud plan.
Considering that the Business Cloud starts at $9.95 per month, that extra feature is a great value. However, it’s worth noting that renewals jump up to $17.95 per month once your initial contract expires.
Alternative Hostgator hosting options
While the primary focus of this review is on the HostGator Cloud, I would be doing you a disservice if I didn’t mention the other hosting options offered by this provider.
Cloud hosting isn’t for everyone. So if you’re in the market for a more traditional type of web hosting plan, you may want to consider one of these options as an alternative.
Dedicated server hosting
With a dedicated server, your website will be renting a physical server from HostGator. This server will only be used for your site.
It’s a faster option than shared or VPS hosting since you won’t be sharing any resources, storage, or bandwidth with other websites.
Dedicated servers are ideal for those of you who are a bit more tech-savvy. If you want complete control over your server in terms of security and flexibility, this is your best bet.
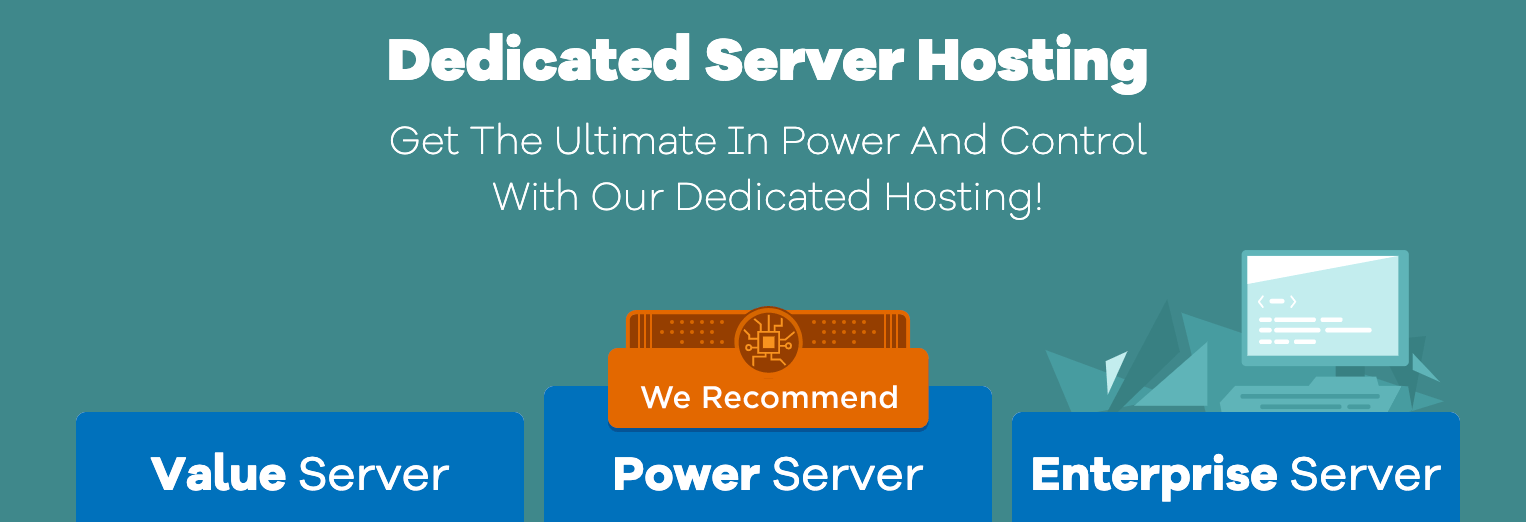
Pricing for HostGator dedicated servers starts at:
$118.99 per month for the Value Server
$138.99 per month for the Power Server
$148.98 per month for the Enterprise Server
Compared to the cloud hosting plans, these dedicated servers are priced significantly higher.
VPS hosting
Virtual private servers from HostGator give you flexible software options. You’ll gain full root access, which gives you added control in your environment.
The VPS plans are a step up from shared hosting, but not quite as in-depth or expensive as the dedicated servers. For comparison purposes, let’s take a look at how these VPS plans are priced, so you can weigh them as an option against cloud hosting.
Snappy 2000 — $29.95 per month
Snappy 4000 — $39.95 per month
Snappy 8000 — $49.95 per month
If you’re already using cPannel for web hosting, SiteGround will migrate you to VPS hosting for free.
Shared hosting
If you’re on a budget and don’t want to use the cloud, shared hosting is the bottom-tier plan offered by HostGator.
Plans start at $2.75 per month, $3.95 per month, and $5.95 per month, respectively.
The problem with this option is that you’re going to be sharing resources with other websites. So if those sites have traffic spikes or higher volumes of visitors, it will impact the metrics on your site as well.
So if you want to save some money, but don’t want to sacrifice performance, cloud hosting will be a better option for you. Shared hosting doesn’t give you the flexibility to manage your resources the way that cloud hosting does.
Benefits of HostGator Cloud for web hosting
Now that you’ve had a chance to see some of the other types of web hosting offered by HostGator, let’s get back to focusing on the HostGator Cloud.
The following benefits refer specifically to the cloud plans. So for those of you who are considering one of those alternative options, I can’t guarantee the same advantages.
High uptimes and fast load times
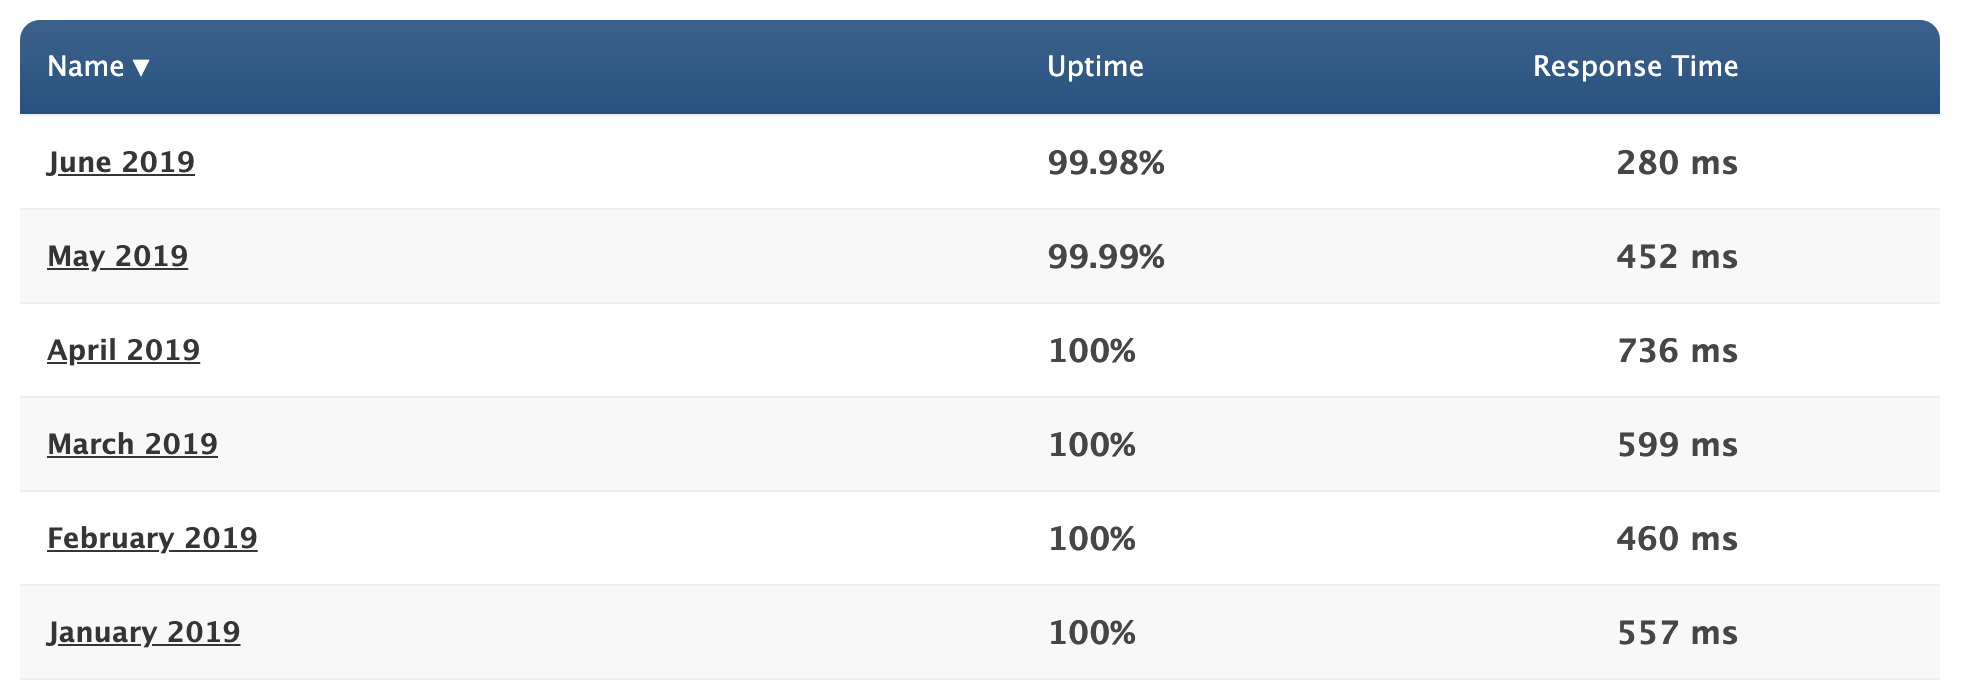
When measuring the performance of a web hosting service, uptime and page loading speeds are two of the most important metrics to consider. Let’s take a look at how a HostGator Cloud test website performed so far this year.
Over the past six months, HostGator Cloud had a 99.995% average uptime rate. That’s about as exceptional as it gets.
As you can see from the table above, the page loading speed fluctuates quite a bit so far this year. The fastest average monthly response time was 280 ms, while the slowest was 736 ms. But on average, the response time in 2019 is 514 ms.
Truthfully, it’s definitely not the fastest loading time we’ve seen. But with that said, it’s still very fast, and far from the slowest.
Based on these numbers, I can’t say that you’ll be disappointed with your uptimes or loading speed if you decide to go with a cloud hosting plan from HostGator.
User-friendly
HostGator Cloud is very easy to use. It’s a great option for beginners, as well as users who have more experience with web hosting.
The cloud plans make it possible for you to allocate your resources as needed whenever you’re experiencing traffic spikes. That’s not the case with their other plans, which would require you to upgrade as you reached limitations on resources.
Even if you’ve never done this before, the interface is very easy to manage.
Another reason why HostGator Cloud is so user-friendly is because you won’t have to worry about outrageous pricing. These plans don’t surprise you with monthly overage fees when you exceed your plan limits. That’s a major downside of other web hosting plans.
Lots of freebies
The reason why cloud hosting from HostGator is so fast is because it doesn’t rely on typical servers. Instead, the servers from remote data centers work in unison with a person’s web browser to limit the number of resources required to host the website.
Things like managed cloud resources, data mirroring, and integrated caching make this possible, which comes free with your cloud hosting plan.
Furthermore, you’ll get free server monitoring to alert you if there are any hardware problems.
When you sign up for HostGator cloud, you’ll have access to cPannel as well. As I said before, you’ll get a free migration if you’ve been using cPannel with your current web host.
Easy access to customer support
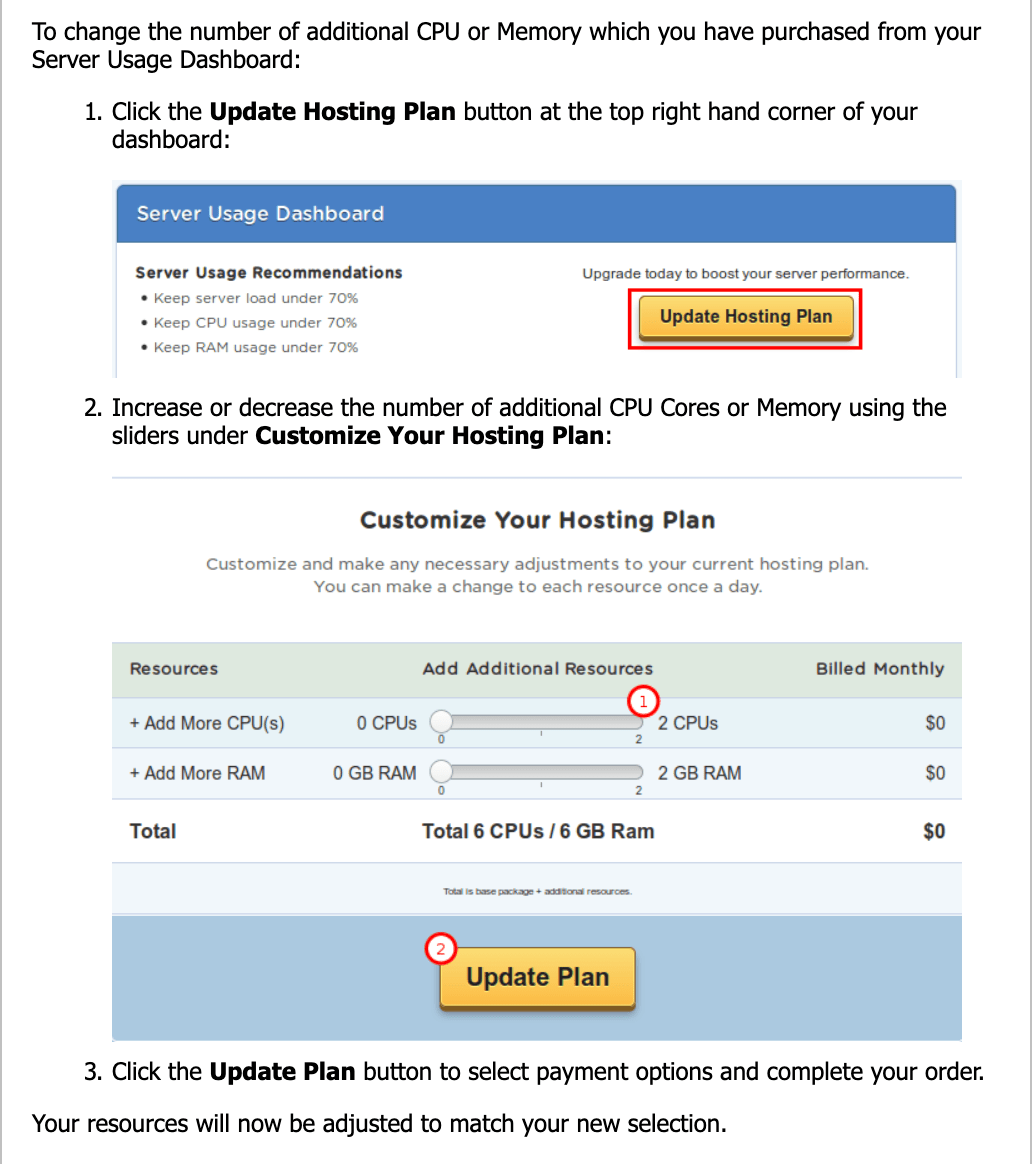
HostGator Cloud comes with 24/7/365 customer support, which is crucial for web hosting. My favorite part about this is their support portal.
Rather than having to pick up the phone or chat online, there’s a good chance you can find the answer to your question here.
Here’s an example of a tutorial that explains the step-by-step process of how to add resources to your cloud hosting plan.
HostGator has tons of these for nearly every aspect of cloud hosting. It’s a quick way to find a solution to your problem.
With that said, phone support and live chat is always available as well. Personally, I prefer live chat as opposed to picking up the phone. But you’ll have both options depending on your personal preference.
Other considerations
Based on the benefits that we just discussed, I think we’ve established that HostGator Cloud is a top choice to consider if you want to use cloud hosting. But with that said, there are a couple of things that you need to keep in mind before you make that decision.
I briefly touched on this earlier when we discussed the cloud hosting plans, but the initial rates are just introductory offers. When your contract renews, you’ll be paying more.
Depending on your plan, you can expect prices to increase by roughly 80%.
While HostGator has its fair share of freebies, there are also some upsells along the way as well. Some of these are automatically checked off in your shopping cart, so make sure you review that page thoroughly before you commit to anything.
Conclusion
Overall, HostGator is a reputable name in the web hosting space. Their cloud hosting service is a great option for those of you who want to take advantage of cloud website hosting.
If you compare those plans to their standard shared hosting options, the cloud is the superior choice in my opinion.
However, if you don’t think cloud hosting is for you then you could always consider VPS or dedicated server hosting from HostGator as well.
For those of you who still aren’t convinced on the HostGator Cloud, you can check out my list of the best web hosting services for some other viable options.
If you’re on the hunt for a new web hosting service, Bluehost is definitely a top option to consider. This platform powers more than 2 million sites across the globe.
All web hosting services are not created equally.
I see so many new webmasters make the mistake of just going with the cheapest web host or the web hosting site that appears first in their Google search results.
For something as important as web hosting, you can’t rush this decision. It’s crucial that you take the time to weigh your options in order to find the best web hosting plan for your needs.
That’s what inspired me to write this guide. Since so many of you will likely come across Bluehost during your search, I wanted to give you as much information about this web hosting service as possible.
I’ll explain all of their hosting plans, pricing, and discuss the best parts about using Bluehost. I’ll even tell you about a couple of cons associated with Bluehost, just to make sure you have all the facts before you sign up.
Bluehost Web Hosting Plans
Not every website has the same web hosting needs. Bluehost knows this and has three different types of web hosting options for you to choose from.
Shared
VPS (virtual private server)
Dedicated server
Choosing which kind of web hosting plan to go with will vary based on how much you want to pay, your expected site traffic, and the type of website you have. If these terms are foreign to you, I recommend reading my guide on everything you need to know about web hosting. This will give you a more detailed description of the differences between these hosting options.
Shared hosting
If you have a new website and you’re on a tight budget, shared hosting might be your best option. Bluehost offers four different pricing plans for its shared hosting services.
Basic — $3.95 per month
Plus — $5.95 per month
Choice Plus — $5.95 per month
Pro — $13.95 per month
I know what some of you are thinking. If Plus and Choice Plus are priced the same, wouldn’t you automatically go with Choice Plus?
All Bluehost plans go up in price once you renew. The advertised prices above are just the introductory rates. It’s worth noting that Plus renews at $10.99 per month, while Choice Plus renews at $14.99 per month.
Bluehost has managed shared hosting platforms, meaning you won’t have to worry about managing servers or anything like that.
VPS hosting
VPS hosting from Bluehost is the middle-tier option of the three plans. There are three pricing options for a Bluehost virtual private server.
Standard — $19.99 per month
Enhanced — $29.99 per month
Ultimate — $59.99 per month
The biggest differences in these plans are the cores, SSD storage, RAM, bandwidth, and IP addresses.
With the Standard plan, you’ll get 1 core, 30 GB of SSD storage, 2 GB of RAM, 1 TB of bandwidth, and 1 IP address. Cores, SSD storage, and RAM double at each tier for the Enhanced and Ultimate packages.
Using Bluehost for a VPS gives you dedicated server resources. You’ll be able to use your RAM, CPU, and disk space, no matter what other users on the same server are doing. VPS hosting also has increased security, since you won’t be sharing an operating system with any other Bluehost users.
Dedicated hosting
Picking a dedicated server plan from Bluehost means you’ll be taking advantage of their top of the line services. These plans are made for those of you who are tech-savvy and want complete control over your server.
Standard — $79.99 per month
Enhanced — $99.99 per month
Premium — $119.99 per month
As you can see, top-tier plans come at higher price points. With VPS hosting, you’re maxed out at 120 GB of SSD storage, 8 GB of RAM, 3 TB of bandwidth, and 2 IP addresses. But dedicated servers from Bluehost go all the way up to 1 TB of storage, 16 GB of RAM, 15 TB of bandwidth, and 5 IP addresses.
These plans will probably exceed the needs and uses for what most of you are looking for. But with that said, as your website grows and your traffic scales, you might want to consider a dedicated server in the future.
Benefits of Bluehost for web hosting
Now that you have a better understanding of the plans offered by Bluehost, it’s time for us to discuss what makes Bluehost a great choice for web hosting.
Low pricing options
If you have a brand new website, you don’t need to be spending thousands of dollars per year on web hosting. With Bluehost, you won’t have too.
As you’ve already seen, the introductory rates for Bluehost shared web hosting starts at just $3.95 per month. Being able to host your site for less than $50 is a great deal.
All Bluehost shared hosting plans come with a free SSL certificate and free marketing credits. When you factor in the storage and bandwidth you’re getting, that’s a fairly decent value for the price.
Overall, this is one of the lowest prices you’ll see for a legitimate web host.
Great security
Even though Bluehost has some inexpensive pricing options compared to other web hosts on the market today, it doesn’t mean that they’re inferior when it comes to crucial security features.
I’ve already mentioned that an SSL certificate comes standard, regardless of which plan you choose.
Furthermore, their plans have a feature to hide the personal information that you used when signing up for a private domain. Lots of times hackers will target this information from website owners.
Bluehost has features to prevent malware attacks, as well as tools used for automatic daily backups. You’ll also get a security tool that offers spam protection for the email address associated with your website.
Again, this is all a great value considering how much these plans go for.
Top loading speeds
Page loading speed is something that always needs to be taken into consideration when you’re shopping around for the best website host.
If your site takes too long to load, it’s going to kill your engagement metrics. People will abandon your site, and you won’t be able to drive conversions. It’s as simple as that.
So let’s take a look the response time for a Bluehost test website.
The average response time for Bluehost so far in 2019 is 352 ms. To put that into perspective, refer to my SiteGround web hosting review. SiteGround’s average response time over the same period of time was 662 ms, which is still fast.
Bluehost nearly cuts that time in half.
Easy to use
You don’t need to be a tech expert to host your website with Bluehost. Nearly anyone, regardless of their experience level, can find a beginner hosting plan from this platform.
That’s definitely not the case with all web hosting providers on the market today. There are plenty of web hosts out there that are specifically designed for advanced webmasters.
Whether you’re using WordPress or taking advantage of the Bluehost website builder, everything will be pretty straightforward and easy to follow.
Excellent support
Even though Bluehost is easy to figure out, you may still find yourself in a situation where you need some help or guidance.
In most cases, you should able to find an answer through their knowledge base page. This is essentially a support center that has how-to guides, tutorials, and articles with instructions for troubleshooting and FAQ. Simply search what you’re looking for, and there will likely be a resource to help you out.
Furthermore, Bluehost has 24/7 phone support, which is great for those of you who like to be talked through problems.
If you’re like me, you’ll probably just take advantage of their live chat agents. It’s a fast and easy way to get an answer without having to leave their website.
High uptimes
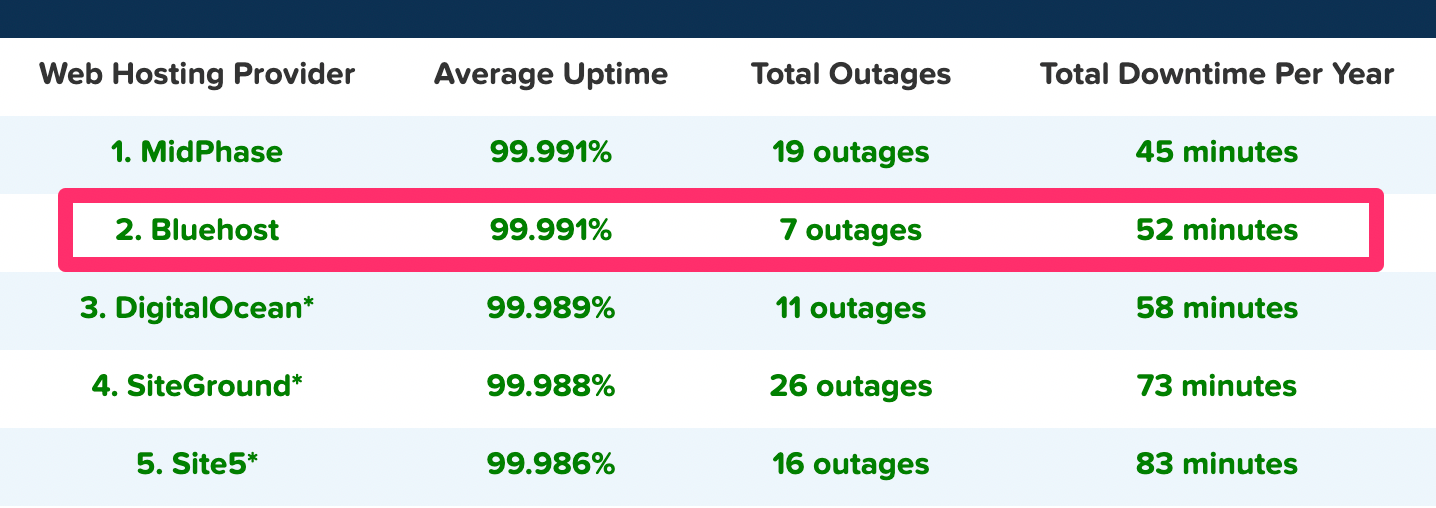
You can’t give a web hosting review without referring to uptime rates. Take a look at where Bluehost stacks up compared to other web hosting providers in this recent study.
Bluehost ranked second on the list with a 99.991% average uptime for the year. That percentage is identical to MidPhase, which ranked first on the list.
Furthermore, you can see that Bluehost only had seven total outages on the year, which was the lowest for all hosts in the top five, including the top-ranking provider on the list.
It really doesn’t get much better than that. So if you host your website with Bluehost, you can rest assured knowing that your site isn’t going to have much downtime throughout the year.
Money-back guarantee
Like most web hosting services, you won’t get a free trial to try them out. But with that said, Bluehost does offer a 30-day money-back promise.
So if you’re on the fence about using Bluehost, it’s comforting to know that you’ll get refunded if you’re not ultimately satisfied in the first month.
But with that said, it’s worth noting that the refund only applies to web hosting costs. So if you use Bluehost for a domain name or other add-ons, those purchases are final.
WordPress hosting
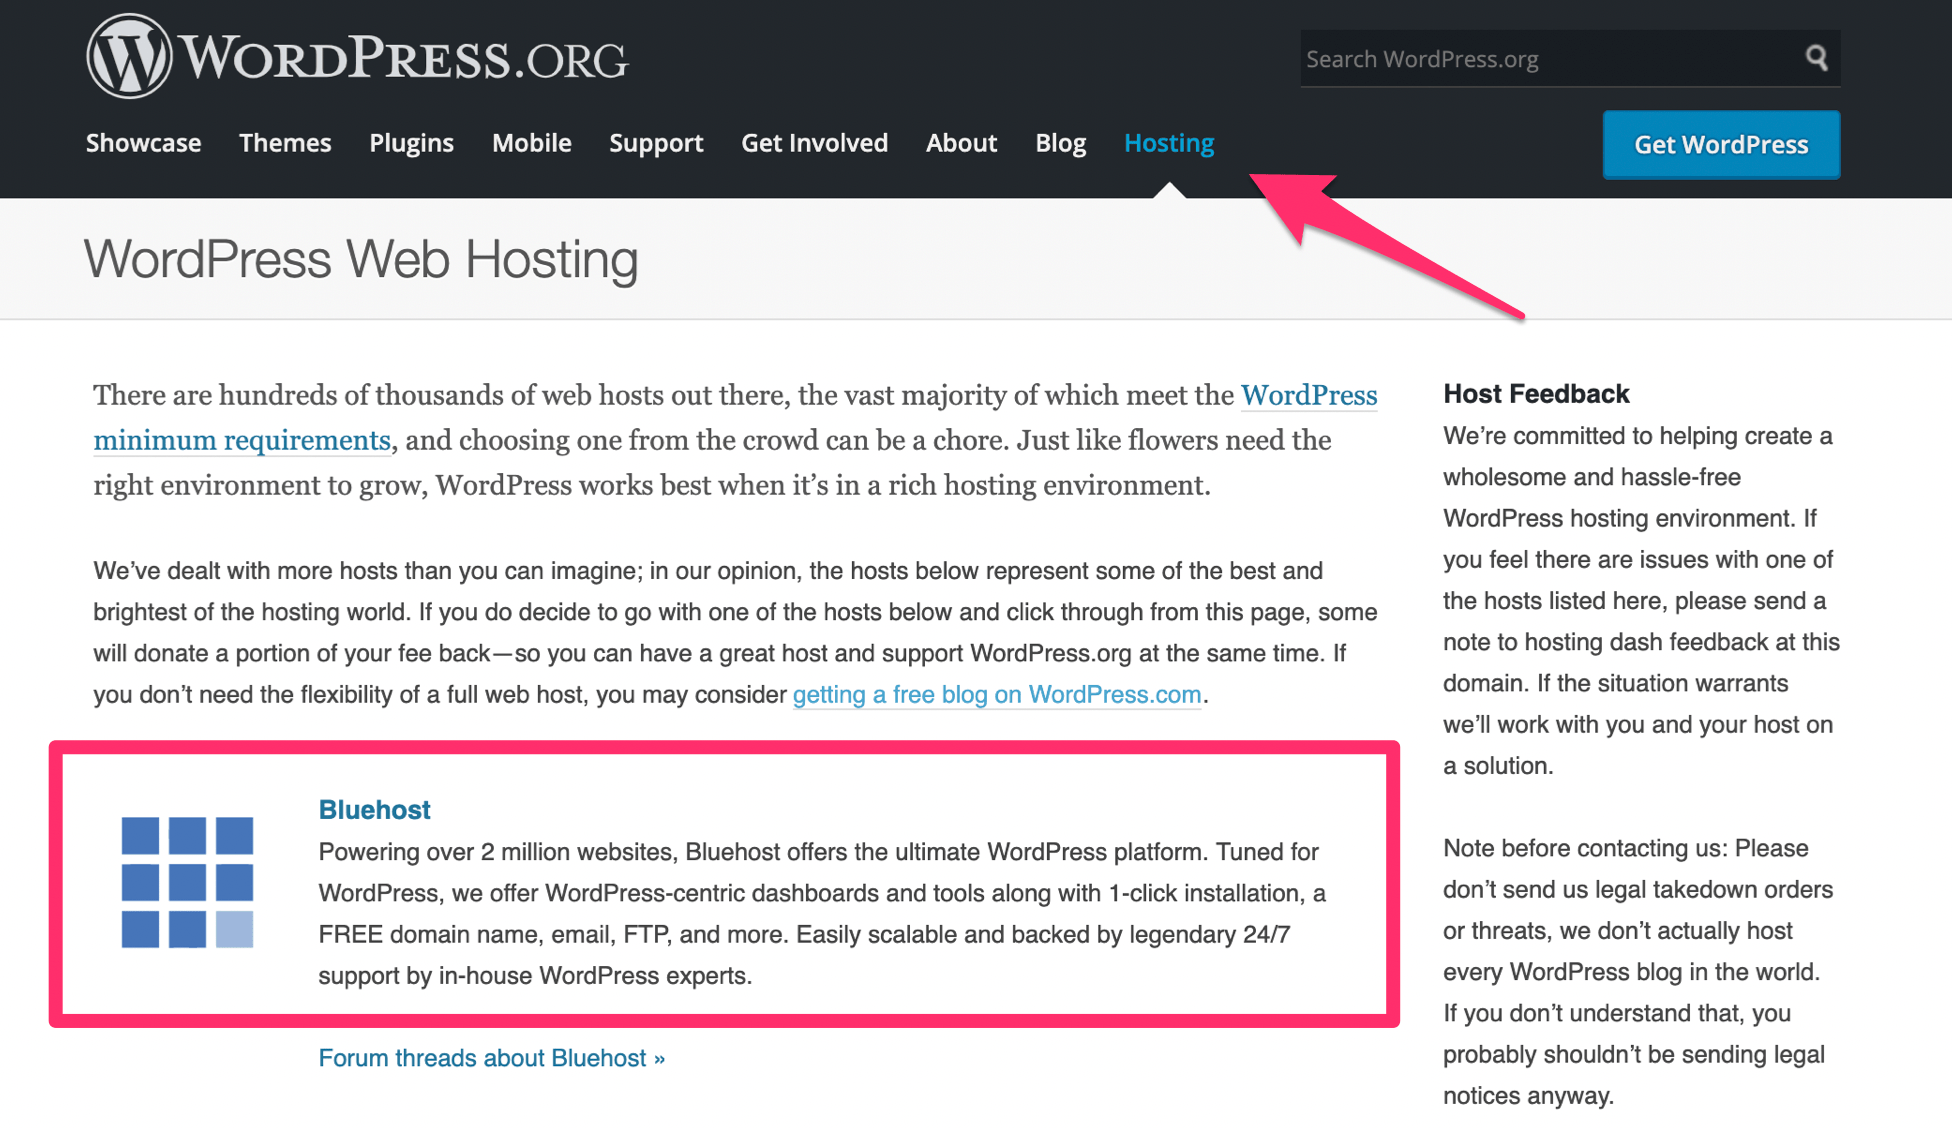
If you’re using WordPress, Bluehost is definitely a top option for you to consider. That’s because this web host is just one of the three “official” recommended choices from the WordPress website.
DreamHost and SiteGround are the other two recommended web hosting services on this WordPress resource.
With that said, you can still use nearly any other web hosting service on the market to create your WordPress website. But it’s definitely a positive sign that Bluehost is recognized as a WordPress partner.
Other considerations
While Bluehost has its fair share of positive characteristics, it’s still not perfect. I wouldn’t be doing my job if I didn’t mention some of the shortcomings of this web host.
High renewal rates
I briefly mentioned this before when we were discussing the different plans and pricing options. Like many other web hosting services, Bluehost jacks up the prices once you renew your subscription.
Depending on your plan, the monthly rate will change as follows:
$3.95 to $7.99
$5.95 to $10.99
$5.95 to $14.99
$13.95 to $23.99
$19.99 to $29.99
$29.99 to $59.99
$59.99 to $119.99
$79.99 to $119.99
$99.99 to $159.99
$119.99 to $209.99
As you can see from this list, in some instances the price more than doubles. So it’s in your best interest to commit to a longer term plan if you want to get the best rate for the longest amount of time.
Bluehost offers plans for 12, 24, or 36 months. So if you know that you’re ready to commit to this web host, I’d recommend going with a three-year contract when you first sign up. It will save you money down the road.
Costly site migrations
It seems like the majority of web hosting services out there will migrate your current website to their service at no cost. This is a major selling point for new customers.
However, Bluehost does not offer free website migrations.
For $149.99 they’ll migrate up to five websites and 20 email accounts. This gets handled by experts at Bluehost, so you won’t have to do any heavy lifting.
But with that said, you do have to pay for it, which can be a turn-off for those of you with an existing site.
Conclusion
Simply put, I definitely recommend Bluehost as a web hosting provider. There’s a reason why it’s one of the most popular services on the market today.
Bluehost has exceptionally fast loading times as well as one of the highest uptime rates we’ve seen in the last year.
They offer different hosting types, plans, and options to meet the needs of any website. I’m sure you’ll be able to find a plan from Bluehost that is suitable for your web hosting needs.
Do I recommend it? Yes! SiteGround is a great web host for websites of all sizes.
SiteGroundis one of the most popular web hosting services out there—and for good reason.
They offer hosting options and plans suitable for a wide range of websites and businesses. Small personal websites, business websites, and large ecommerce sites alike can all use SiteGround.
That’s why more than 2 million websites trust SiteGround for their hosting needs.
If you’re just starting out, I can’t recommend SiteGround enough.
It’s also a great choice for anyone who wants to switch hosting providers. They offer a great WP Migrator plugin. This is a free plugin that makes the transfer of WordPress sites very easy.
Let’s dive into the plans, types of hosting, and top benefits offered by SiteGround. Use this guide to make an informed decision to determine if SiteGround is the best web hosting plan for your needs.
Benefits of Using SiteGround Web Hosting
There is plenty of upside to using SiteGround as a web hosting service. Below are the biggest benefits I think you’ll find from SiteGround.
High uptimes
When it comes to measuring how good a web host is, uptime is the ultimate metric. This is the amount of time that a server stays up and running.
Every second your site is down spells problems for your company. Customers can’t reach you, and employees can’t get what they need.
SiteGround runs on Google Cloud, which is one of the most secure and resilient networks in the world. How many times has Google been down for you?
High uptimes ensure that your site will nearly always be up and running around the clock. That’s why you’ll want a good host like SiteGround that’ll help ensure your site stays up — and making you money.
Fast load times
Just because your site is up, doesn’t mean it will be fast. Luckily, that’s not an issue with SiteGround.
Their hosting plans come with a free content deliver network (CDN). This is simple to enable, and delivers your site faster to your visitors screen.
Everywhere possible, SiteGround is using the latest technology to deliver their customers the fastest speeds. Their servers use SSD drives, which cut down on load time over HDD drives. They use a variety of caching tools to boost speed even further.
At the end of the day, what you do on your site is going to impact speed. In addition to using a good web host, you should also know the other top principles that boost website loading times.
Great customer support
In the event that you run into a problem, have a question, or need some assistance, it’s nice to know that they provide excellent customer support.
You can access phone support as well as live chat 24/7. As I mentioned earlier, you’ll have priority support if you have a GoGeek plan. This means that you’ll be connected with the most experienced SiteGround technicians whenever you need help.
Free features
Web hosts like to hit you with upcharges when you go to check out. SiteGround throws in some great features but at no extra charge.
Your membership comes with one free site migration. This can be done with their migrator plugin, which we talked about earlier.
SiteGround plans also come with a free CDN and free SSL certificate.
Cloudflare CDN keeps images, videos, and other large files off of your server. As a result, your server is always fast. Since SiteGround users servers all over the globe, the CDN makes sure that files are stored closer to website visitors for fast delivery.
The SSL certificate is required for all websites. It protects private information being transmitted between devices and websites. SiteGround throwing this in for free is a nice touch since you’d need to get one regardless.
Flexible
SiteGround is great whether you’re a beginner or a seasoned pro.
You don’t need to be tech-savvy to understand how the platform works and get your site hosted. But if you like to be more hands-on with the server and take advantage of certain features, SiteGround has plans with you in mind.
There are also enough options on SiteGround to accommodate different web hosting needs, such as shared hosting and cloud hosting.
They have plans suitable for a wide range of average site traffic as well. So as your website scales, you can always upgrade to a plan that will meet your needs.
Money-back guarantee
SiteGround offers a 30-day money back guarantee for their shared hosting plans. That means they stand behind their offer.
Dedicated servers and cloud hosting plans have a 14-day money back guarantee, which is still enough time to tell if you’re happy with your service.
SiteGround will also refund you if they fail to meet a 99.9% uptime rate. This is clearly written in their terms of service.
This relates back to what we talked about earlier, in terms of their high uptime rates. There’s a reason why it’s so high: SiteGround has a promise to stand behind.
Other considerations
While SiteGround is great, there are a few downsides that you should be made aware of before you proceed.
Note: We don’t believe that they’re dealbreakers by any means — but they should definitely be kept in mind when making a decision.
Renewal rates
SiteGround’s promotional pricing is a heck of a deal.
However, you need to keep in mind that those are only promotional rates. When you renew, your rates will jump… a lot.
The cost essentially triples across the board.
I’d recommend locking in the longest contract possible when you first sign up, which is 36 months. This will guarantee you a low rate for a while before you’re forced to renew.
Limited budget plan
For those of looking for the best cheap web hosting service, SiteGround’s StartUp plan for $2.99 per month is definitely attention-grabbing.
It’s a great choice for those of you with smaller websites, but it’s fairly limited for anyone who plans on getting more than 10,000 visitors per month. You may have to upgrade faster than you anticipated if you start with their lowest priced web hosting plan.
Compare SiteGround Web Hosting Plans
SiteGround offers three tiers for their hosting sites:
StartUp
GrowBig
GoGeek
The prices of these three plans remain the same across the board for shared hosting, WordPress hosting, and Woocommerce hosting. Cloud hosting is the only one that differs.
We’ll dive deeper into those plans later in this guide. For now, I’ll focus on the pricing and features of the three most popular plan options offered by SiteGround.
StartUp
As the name implies, the SiteGround StartUp plan is ideal for new or smaller websites (less than 10,000 monthly visits). Rates start at $2.99 per month.
You can only host one website with the StartUp plan, and it comes with 10 GB of web space. Other top features include:
Free site builder
Free SSL and HTTPS
Free email accounts
Free CDN
It’s a basic plan, but definitely appropriate for new websites that are starting from scratch. For those of you who want more features and better performance, you’ll need to upgrade. You’ll also outgrow the StartUp plan as your traffic increases (which is a good thing).
GrowBig
The GrowBig plan starts at $4.99 per month. This is ideal for medium-sized websites averaging up to 25,000 monthly visits. GrowBig has 20 GB of web space and can host an unlimited number of sites.
Unlike the StartUp plan, GrowBig has enhanced caching ability. The SiteGround Supercacher has three levels.
Level 1 — Static content caching
Level 2 — Dynamic data caching
Level 3 — Database queries caching
StartUp only caches at the first level, but GrowBig caches on all three levels.
If you sign up for the middle-tier plan offered by SiteGround, you’ll also get free on-demand backups, as well as a staging feature for WordPress and Joomla sites. I’d say that the GrowBig plan will be suitable for most of you who are reading this guide.
GoGeek
GoGeek can accommodate up to 100,000 monthly visits and has 40 GB of web space. Obviously, this plan is made for bigger websites with high volumes of traffic.
Rates for GoGeek start at $7.99 per month, but the plan comes with all of the bells and whistles. In addition to everything that’s available in the GrowBig plan, GoGeek offers:
Advanced priority support (expedited customer service to the most experienced agents)
White label hosting feature (also known as reseller hosting)
Git pre-installed (for creating repositories on your site)
The name for this plan was inspired by technology geeks. So it’s made for those of you who want more control of your site. If you don’t understand some of the tech lingo that’s being mentioned in the GoGeek plan, it’s probably not for you. The only other reason why you’d need to upgrade to GoGeek is if you’re getting tons of monthly site traffic.
WordPress hosting
SiteGround offers hosting options specifically designed for WordPress users. This will save you time since you won’t need to manually download, install, and configure WordPress.
With SiteGround, you can take advantage of their automated process that’s as simple as clicking a button. This plan also makes it easier for you to customize your WordPress site by choosing a theme, picking your site functionalities, and installing marketing tools.
The WordPress Starter Kit from SiteGround is a great added feature for new WordPress sites. You don’t need any technical knowledge or experience to set this up.
If you have an existing WordPress site, SiteGround offers a free WordPress transfer. The SiteGround Migrator plugin takes care of everything for you. This is a secure way to transfer your site.
Alternatively, you can get your WordPress site migrated by one of the experts at SiteGround. This is a paid feature but could be worth the price if it’s in your budget.
WooCommerce hosting
SiteGround also has hosting options for ecommerce shops using WooCommerce.
The quick install and integration with WooCommerce is an easy way for you to create a professional theme for your online store. You can get the site up and running in minutes.
Just migrate your WooCommerce site using the migrator plugin. Just like WordPress hosting, WooCommerce migrations done by a SiteGround expert is free for one website if you’re on the GrowBig or GoGeek plan. Then you’ll have to pay $30 per each additional site.
Cloud hosting
Cloud hosting is a new way to host websites. The process uses multiple remote servers and is a great option for those of you who have websites that have outgrown the shared hosting plans.
With cloud hosting, SiteGround gives you guaranteed resources to meet your needs. Your own RAM and CPU won’t be shared with any other websites.
It’s also easy for you to scale your website with this type of web hosting.
You can upgrade your RAM, CPU, and disk space on-demand at any time. You don’t need to get approval to do this, and it happens without any website downtime.
Rather than always doing this manually, you can set up automatic scaling with SiteGround. It will adjust your CPU and RAM to meet the needs of unexpected traffic surges, but you still have control of all the parameters.
There are four plans for SiteGround Cloud hosting. As you can see from the image above, the plans range from $100 to $400 per month. So there’s definitely plenty of options to choose from.
I’d say that the business plan will likely be a suitable choice for most of you who are using a cloud hosting service for the first time.
Conclusion
Bottom line: I definitely recommend SiteGround for web hosting.
They have hosting plans for any size business. It doesn’t matter if you’re a startup or if you’re an established company. SiteGround stacks up well compared to its competitors in terms of features and performance.
While the hosting service it’s perfect, it still gets the nod from us here at Quick Sprout. I’m confident that it will fulfill your web hosting needs.
Our recommendation for most people is Shopify because it has everything you need to start accepting ecommerce payments immediately. Try Shopify free for three days, no credit card required.
Every ecommerce site must be able to accept payments from customers online. After all, your entire business model revolves around getting paid.
After researching and reviewing dozens of payment gateways, we narrowed down the best options on the market today. Whether you have an existing ecommerce business or you’re starting a new one from scratch, this guide will help you find the right payment method for you.
The Top 11 Payment Methods for Ecommerce Sites
Best of 2023: Shopify, Square, Payment Depot, Stax, Helcim, Payoneer, 2Checkout, Stripe, PayCafe, PayPal, and PaymentCloud.
From complete ecommerce platforms to specialized payment options, our research team narrowed down my top picks to the best three this year using the methodology outlined below.
Our favorite ecommerce payment methods for 2023 are:
If you haven’t yet started your online store, Shopify is the way to go. But if you’re already selling online, Square and Payment Depot won’t steer you wrong.
Shopify provides everything people need to start selling goods and services online. It’s a payment processor, online store builder, and ecommerce marketing solution all in one.
Because everything is included and works so well together, we highly recommend Shopify for people launching new stores. That said, people on a different ecommerce platform may be convinced to switch once they experience the convenience of Shopify.
Shopify Payments is activated once you sign up for an account. There’s no wait time to start accepting major credit cards and other digital payments.
Every transaction is tracked and displayed automatically. There’s minimal busy work necessary to stay on top of your sales, payments, and monthly numbers.
Shopify is convenient for your customers, too. Once you have an account, you will be able to accept a wide range of popular ecommerce payment methods, including:
Visa
Mastercard
American Express
Discover
PayPal
Google Pay
Apple Pay
Facebook Pay
Shopify Payments comes as part of every Shopify plan. There are integrations with dozens of other ecommerce payment methods, but those have transaction fees. There is no transaction fee when you use Shopify Payments.
There are a variety of ways to get set up with Shopify.
Shopify Starter is $5 per month, and lets you create shoppable links. Sell directly on social media, text, and email, and Shopify handles the rest.
Basic Shopify is $39 per month and includes everything we’ve reviewed so far. Build a store, ship products, sell services, and start making money. Upgrading your Shopify plan will bring your credit card processing fees down.
You do get a discount on Shopify’s website plans if you switch to annual billing, with the Basic plan coming down to $29 per month.
It makes a good deal even better. Learn more about Shopify and take a free trial, no credit card required.
Square — Best for Restaurants, Retail, and Services
Square is a great choice for those of you who have physical locations and plan to start selling online.
Why? It’s simple: they’re known for their stellar POS system that seamlessly integrates with their payment method solutions. That makes them a great option if you’re planning to open retail locations in addition to your ecommerce shop.
Don’t have a shop yet? Square offers a fantastic ecommerce website builder too. They don’t skimp on the builder either, offering you tons of great-looking drag-and-drop themes that allow you to create the ecommerce store of your dreams—no coding knowledge needed.
Square is priced competitively compared to the other methods on our list.
There is no monthly fee for adding the Square payment gateway to your website. They charge you 2.9% + $0.30 per transaction, just like Stripe and PayPal.
Integrating Square into your ecommerce platform is easy. Some of their ecommerce partners include:
Wix
WooCommerce
GoCentral Online Store
Ecwid
3DCart
OpenCart
Magento
Miva
Drupal Commerce
X-Cart
Zen Cart
ShipStation
Mercato
Unbound Commerce
WordPress
nopCommerce
WP EasyCart
Sociavore
So if you’re currently using one of these platforms for your ecommerce shop, adding Square will be a breeze. Click here to learn more at Square.
Payment Depot touts itself as the “Costco of credit card processing” for its membership fee-based pricing model as well as its completely transparent pricing.
Payment Depot goes with a single membership fee, rather than charging you per transaction. You can purchase a membership package based on the financial amount of the transactions you do annually.
This is a different business model than many payment processing services, which may charge you a percentage of your transaction amounts. As long as you are doing a significant amount in financial transactions per year, Payment Depot should save you quite a bit on fees.
Payment Depot’s updated plans and prices include:
Starter — $59 per month: Process up to $125,000 per year
Starter Plus — $79 per month: Process up to $250,000 per year
Growth — $99 per month: Process up to $500,000 per year
Transaction fees are 0.00% + $0.08 on swiped/chip transactions and 0.00% + $0.18 on online transactions.
Should you need to process more than $500,000 in transactions annually, you can request a custom price quote from the company.
However, if you’re a smaller business, you might end up paying a bit more for the monthly membership fee. That’s why we really don’t recommend this brand if you make less than $25,000 per month.
If you go with an annual membership, Payment Depot offers a 90-day money-back guarantee. That means you can cancel within three-ish months and send your equipment back, and you’ll get a complete refund.
Visit Payment Depot to get great rates for your heavy transaction processing. Note that this program is exclusively for companies based in the US.
Stax is ideal for any small business. Not only does it accept all payment types and integrate with most terminals and point-of-sale (POS) systems, but it is also a subscription-based pricing model with a flat monthly fee.
This means Stax can save you money per transaction, especially once you factor in the 0% markup on interchange fees. More sales do not mean higher fees from Stax.
For your ecommerce store, Stax has flexible options so you can integrate it with the shopping cart plugin or function you already use or use one of Stax’s pre-built templates (or design your own) to create your own custom shopping card quickly with no coding skills required.
Stax’s one-click shopping cart integrates with all of the top payment gateways, such as BigCommerce, Magento, WooCommerce, Salesforce, and more.
Stax’s ecommerce tools include:
Heatmaps to keep track of staff and sales trends
Inventory tracking for online and in-person stock
Reporting and analytics to get real-time reports on customer behavior and patterns
Integration with QuickBooks and Google My Business
Stax’s pricing is very straightforward. It is a monthly subscription with no long-term contract and transparent fees. All three subscription tiers come with wholesale interchange pricing (0% markup), $500,000 in annual processing, a large knowledge base, and 24/7 customer support.
By having a flat-fee monthly subscription, your ecommerce business knows exactly what you’ll pay each month, and if you have a lot of transactions, you’ll pay less per transaction, making it very affordable.
Pricing starts at $99 per month, which includes ACH processing, analytics, and more. Transaction fees are 0.00% + $0.08 on swiped/chip transactions and 0.00% + $0.18 on online transactions.
It’s important to note that this program is exclusively for companies based in the US. Learn more about Stax.
Helcim is another “one-stop-shop” solution for your payment needs. From point-of-sale hardware to ecommerce payments, it has what you need to get started selling.
Where it really stands out is its unique fee structure, which includes no monthly fees.
Pricing is highly customized depending on your monthly volume of sales and the price of your average transaction. That means the more sales and/or the higher the price of the average transaction, the more you save.
You can save even more due to the fact that they have:
$0 monthly fees
$0 set up fees
$0 cancellation fees
$0 compliance fees
$0 bank deposit fees
That’s a big difference from other payment method solutions out there, which typically charge for all of the above.
However, I wouldn’t actually recommend Helcim if you have a high volume of sales. If you’re an enterprise business that deals in a lot of monthly transactions, we recommend Payment Depot instead. They’ll offer the best overall rate if you’re a big business.
But we do recommend Helcim for mid-sized companies. You’ll get the best overall rate if you do anywhere between $25,000 and $50,000 per month.
It’s worth mentioning there’s even a platform for you to create an online store through Helcim. It’s on the Helcim site and comes with its payment processor built in. It’s also highly customizable and comes default with some great-looking themes.
If you already have an online store, Helcim has you covered. Its fully-hosted payment pages allow you to add payment options to your site without any coding knowledge. This solution can be integrated with some third-party software you might already be using such as QuickBooks, Drupal, and Magento.
There’s a deal going on right now where you can get the first three months for free. After that, it’s $20 per month. Try Helcim today!
An ecommerce site that is already established in global selling knows there’s still room for improvement. That could take the form of growing into untapped markets, keeping more of the money you make on international sales, or finding better ways to work with suppliers.
Payoneer knows the way to accomplish any and all of these improvements and has the software to prove it.
First, Payoneer eliminates the pain of costly wire transfers and currency conversion with an easy way to set up localized receiving accounts, so you get payments in USD, EUR, or one of several other options.
In just three easy steps, you can set up accounts, email customers info on how to pay you, and automatically have those payments sent to your Payoneer account.
It should be noted: Payoneer isn’t a merchant account provider. That means it does not give you the ability to accept payments via debit or credit cards. Instead, it sets up a local bank within the region you want to attain money for and allows for bank transfers instead. This is particularly helpful for some specific business types.
For example, global businesses lean hard on their network of suppliers and vendors. So, Payoneer makes it a cinch to pay them when you need to. By paying them directly from your Payoneer account balance, payments are sent instantly and for free. Plus, you can send in batches of up to 200 for convenience.
If you’re struggling to make headway in some global markets, you can even lean on Payoneer’s network of partners. From shipping and sourcing services to legal assistance, translation, and advertising, you can fill in the gaps by connecting with vendors based in the markets you’re trying to sell to.
Payoneer does charge low-cost fees for some transfers and there is an annual account fee, but it’s a scant $29.95/year.
Your growing business can’t worry about the reliability of its payment processing. When you’re striving to make inroads into new markets or break into global business, that detail needs to already be taken care of.
That’s where 2Checkout excels. It’s a modular solution that is very scalable with no stress on your end.
With this software, you can handle global payments, subscription billing, taxes, and any other ecommerce payment needs. Start with what you need right now and when you’re ready to take the next step up, 2Checkout has a feature to help.
But, above all, this software is the perfect partner for international selling.
The distinction between this and Payoneer is that 2Checkout will actually facilitate payment processing via typical ecommerce methods such as credit card, debit card, PayPal, and more.
With any of 2Checkout’s modules, you can start selling in over 200 countries in no time. And, if you utilize their 2Monetize platform, you can rest easy knowing that they’ll handle the heavier stuff, like VAT and regulatory compliance.
Even better—you can start on any of 2Checkout’s solutions for free. You only have to pay once you start selling.
That’s a huge boost for those of you who want to really test drive the software before committing.
Once you do start selling, you pay a fraction of each sale plus a small fee. On 2Checkout’s base-level plan, 2Sell, that runs you 3.5% + $0.35 on each transaction.
Stripe is one of the top payment methods on the market today because it’s so versatile.
It’s a great choice for ecommerce shops, subscription services, or on-demand marketplaces. For those of you who operate a business with multiple processes and services, this is definitely something that you should take into consideration.
Where Stripe really shines though is how developer-friendly it is. It offers great tools that let any team customize their payment methods.
From the easy-to-use API, the library for coding languages, and the comprehensive integrations, a developer can get everything they need to out of Stripe.
Another top feature of Stripe is the ability for you to set up recurring payments from your customers.
It supports payments online, as well as in-person. So if you currently have a brick-and-mortar store, you can add a Stripe POS system in addition to the gateway on your ecommerce site. This way you can remain consistent across both marketplaces.
Studies show that brands using Stripe have increased revenue by 6.7% after implementing the payment gateway. With Stripe, you’ll have 81% fewer outages and 24% lower operating costs compared to competing payment methods.
Another reason why I love Stripe is that you’ll have the option to customize your checkout process with the Stripe UI toolkit.
Stripe accepts all major credit cards and debit cards from all countries, including:
Visa
Mastercard
American Express
Discover
JCB (Japan)
UnionPay (China)
You can also integrate some alternative payment options into your Stripe payment gateway. Some of these we’ll discuss in greater detail as we continue through this guide.
Stripe’s standard pricing is simple. As a merchant, it will cost you 2.9% + $0.30 for every card charge. There will be an additional 1% charge for international cards.
For ACH transfers, your cost is 0.8% of the transaction with a $5 maximum fee.
Additionally, Stripe offers customized pricing options for those of you who have a unique business model or have large volume payments. You’ll get discounts for volume and multi-product rates, as well as some country-specific rates if you’re targeting an international market.
Stripe has exceptional tech support and customer service. You can reach representatives 24/7 via phone, live chat, or email. Overall, it’s definitely one of the top payment methods for you to use on your ecommerce site.
PayCafe offers some of the best fraud and chargeback protections we’ve seen out there.
Seriously, the only other one we consider a contender to their level of protection is PaymentCloud.
That’s because it offers an automated, machine-learning algorithm that scans each transaction for fraud. Once it detects it, you’ll be notified and the troublesome transaction will be blocked. Of course, if there’s a mistake you’ll be able to undo it and put the transaction through.
PayCafe also has tools in place to handle credit card disputes. From an early warning dispute alert system to highly-detailed records of each transaction, it’ll arm you with the tools you need to tackle pesky chargebacks and win.
Some of their other features and benefits include:
Recurring bills. PayCafe automatically bills your customers daily, weekly, monthly, or annually depending on how you set it up.
International card and currency. This allows you to accept payments for all major credit cards in every country across 135+ currencies.
Flexible payment methods. Accept payments from places like PayPal, direct deposits, and even cryptocurrencies.
In-depth reporting. Dive into the crunchy analytics of your business. That way, you can improve your numbers over time.
On top of all that they even give you 24/7 customer support every single day of the year. That’s a must-have when it comes to ecommerce payment processing.
You never want to be in a position where something breaks and you can’t immediately address it. Learn more at PayCafe.
PayPal — Best for Creating Your First Online Store
PayPal is a name that I’m sure most of you are already familiar with. The company has a reputation that speaks for itself when it comes to ease of use, reliability, and security.
Hundreds of millions of people trust PayPal and use it every day for their business.
This is why we highly recommend PayPal if you’re just starting out. Not only does everyone already use PayPal, but it’s also very easy to add and integrate into practically any online store.
For those of you who don’t have a well-established name brand yet, the PayPal button can help put your customers at ease. They know that PayPal has their back for security.
Plus, people might have a PayPal balance that they want to use for spending, as opposed to charging a credit card or debit card.
PayPal is the most commonly used digital wallet in the world. With PayPal for ecommerce, you can accept:
Credit cards
Debit cards
PayPal
Venmo
PayPal Credit
PayPal offers many different payment options that you can offer to your customers, which enhances its popularity. You can deliver the precise way you want to let your customers pay. Options include:
Online checkout on the website
Online checkout through an app
Pay later in installments
Charge recurring subscription payments
Online checkout through social media
Accept payments in person
PayPal also has an option that will allow you to generate estimates when bidding on a job and invoices for your completed jobs, saving you time.
Standard credit card and debit card payments carry a 2.99% fee rate (based on the transaction amount) plus a $0.49 fixed fee in the United States. For other transaction options, fee rates range from 1.9% to 3.49%. Most of them have small fixed fees as well.
International sales’ fee rates typically will be 4.49%, plus a fixed fee, depending on the country where the purchase originated.
PaymentCloud is another one of our recommendations. Not only can it provide you with an easy way for customers to purchase your products and services, but it also offers top-notch security features, including fraud and chargeback protection.
What really sets it apart, though, is its clientele. While most merchant solutions restrict who they work with to “low-risk” businesses, PaymentCloud is one of the rare ones who have systems in place to work with higher-risk businesses.
These are the businesses that typically deal in matters with sticky compliance issues—or might get more chargebacks than your average ecommerce sites. A few industries they won’t shy away from (though others might) are:
Cannabis
Guns and ammunition
Adult products
Alcohol
Bail bonds
Vape products
Tobacco products
Credit repair
Debt consolidation
Couple that with its chargeback and fraud protection feature, and you’ve got a match made in heaven if you’re a higher-risk business.
It’s also an all-in-one ecommerce merchant. Instead of needing to Frankenstein together different shopping cart solutions and find a separate way to take mail and phone orders, you can take care of them in one fell swoop.
The provider’s payment gateway works well with just about any ecommerce platform you could use, including:
Big Commerce
WooCommerce
Magento
Shopify
Shift4Shop
Ecwid
OpenCart
Volusion
So, you’ll never have to worry about its integrative capability.
PaymentCloud allows you to accept debit and credit cards, as well as e-checks. The payment gateway lets you accept payments anytime, set up invoices and subscriptions, and ensure safe transactions at both ends. All payment information goes through five layers of security.
You can also set up a shopping cart on your ecommerce store through PaymentCloud or integrate it with one that you like using already. You get the same ease of use (on both ends) and security from PaymentCloud’s shopping cart as you do its payment gateway and processing service.
There are no setup or cancellation fees and processing rates and PaymentCloud’s fees are competitive—its processing fee is identical to Square’s and the payment gateway fee tends to run at about $15-$20 per month.
Get a secure payment processing platform and a shopping cart together by going with PaymentCloud. Connect with them to apply for free—and, if you’re shopping for a replacement for your current ecommerce payment platform, PaymentCloud will provide cost comparisons for free.
How to Find the Best Payment Method for Your Ecommerce Website
Not every ecommerce website is the same—and your payment methods shouldn’t be either. But narrowing down the perfect option can be tough with so many options to choose from.
Below are the exact criteria we used to determine our list. Use it over the course of your research to help find the perfect payment method for your ecommerce website.
Fair (But Affordable) Processing Fees
Every payment method charges fees for its services. They typically come as:
Monthly fees — Flat prices you have to pay each month for their services. Payment Depot, for example, utilizes this method.
Processing fees — Fees you’ll have to pay with each transaction. These are occasionally variable (i.e., interchange processing rates), or they’ll offer a fixed rate, as with ProMerchant.
Many merchant services typically charge both a monthly fee and a processing fee for their services. But the ultimate price varies depending on the service.
For example, Shopify, Square, Stripe, PayPal, and Payment Cloud charge 2.9% + $0.30 per transaction. That’s a pretty typical standard for the industry.
Other solutions have a unique way of charging you for their services. For example, Helcim customizes the price for you depending on your monthly sales and the average price of your transactions. The more you sell each month and the higher your average transaction is, the less your rate is going to be.
Helcim is great because there are no fees outside of the transaction fees. That means no monthly, setup, or cancellation fees.
When researching, be sure to take a look at how the payment method you’re considering charges you—and by how much.
In the end, it’s a bit of a balance between monthly fees and processing fees. Higher monthly fees typically mean lower processing fees (and vice versa). If you don’t have a ton of transactions each month, it might make more sense to pay a lower monthly fee and go with the high processing fees.
Payment Methods That Meet Your Customers Where They Live
Selling globally can be tricky for ecommerce businesses—especially if you’re just starting out. You have to worry about exchange rates, and you also have to consider what entails typical payment methods in that country.
For example, Alipay is one of the most popular payment methods in China. PayPal probably takes the crown in America.
Not every payment method gives you the option of completing purchases internationally.
Payoneer is an excellent payment method if your business plans to sell overseas. They’ll help you set up localized receiving accounts so you can receive payments in USD, EUR, GBP, CNH, JPY, AUD, CAD, SGD, and MXN.
2Checkout is another method you should consider if you want to handle global payments. You can get set up to sell in more than 200 countries in just a few minutes.
That means you’ll be able to literally open up your store to the entire world—tapping into a global market of potential customers. You can also convert your funds into different types of currencies, so you’re not restricted to just receiving money in USD.
If you plan on selling internationally, definitely look into how the payment method you’re considering handles non-USD currencies, if they can at all.
Checkout So Simple Customers Never Abandon Their Cart
You need to make sure the user experience is effortless for your customers. For ecommerce stores, this process is arguably most important when it comes to the payment method.
A single hiccup or irritating moment while they’re at checkout could result in a higher cart abandonment rate for you—causing a sizable hit to your bottom line.
You can prevent this easily with the right payment solution. With PaymentCloud, for example, your customers can simply enter in their purchase information and be on their way in less than a minute. The same goes for Square, which offers a very seamless ecommerce experience.
You’ll also want to make sure that the payment method offers a clear way for your customers to see:
The items they want to purchase.
The items’ costs.
Exactly where to enter their purchase information.
How to check out.
It might seem self-evident, but you’d be surprised at how often a payment gateway makes its customers jump through hoops in order to actually make a purchase.
Payment Methods for Your In-Store and Online Customers
Are you currently selling items in person? Do you plan to open a retail location in the future?
If so, you’ll want to get a payment method that plays nicely with your business as a whole. If you don’t, it could end up the squeaky wheel that winds up costing you.
Want your website to support your payment solution? Create them in the same place!
Shopify, Square, and Helcim offer great ecommerce website builders to help you create an online store for free. You’ll be able to use their payment methods for every customer purchase.
Shopify, Stripe, and Square all offer fantastic physical hardware solutions for POS systems.
This is perfect if you have a brick-and-mortar store—or if you run a customer-facing business such as a farmers market stand or a food truck. You’ll even be able to accept multiple forms of payment from your phone.
Best Payment Methods for Ecommerce: Your Top Questions Answered
Which payment method is the best for ecommerce?
Shopify is the best payment solution for ecommerce because it’s a fully integrated ecommerce platform with a built-in payment system. This means you can get everything you need to sell products online and accept payments from a single provider—without having to go through a third-party gateway or payment processor.
The great part about Shopify is that it does support other payment methods as well, in addition to Shopify Payments. So if you want to change the way you accept payments in the future, you can still keep your Shopify store and just integrate your new payments system to your existing site.
What are the most commonly used payment methods in ecommerce?
Credit cards and debit cards are the most commonly used payment methods for ecommerce purchases. But alternative payment methods like PayPal, Apple Pay, Google Pay, Amazon Pay, Facebook Pay, and digital wallets are growing in popularity.
Ecommerce shops should offer a wide range of different payment methods that appeal to all customers. If you don’t accept a customer’s preferred payment method, there’s a chance you could lose out on potential sales.
What is the safest payment method when selling online?
Accepting credit cards through a payment gateway is the safest way to get paid when you’re selling products or services online. Payment gateways will securely verify the card’s funds and authorization with the bank and credit card network. This ensures that the card is active, the customer is authorized to use the card, and the account has sufficient credit to cover the purchase.
Payment gateways also encrypt the cardholder information and credit card data so that customers are protected. They can also help ecommerce stores with information storage, PCI compliance, and integration with payment processors.
What is the best payment gateway for Shopify?
Shopify has a wide range of payment gateways, including 2Checkout, Authorize.net, PayPal, QuickBooks Payments, Amazon Pay, Chase Paymentech, WorldPay, and more.
The best Shopify payment gateway for your ecommerce site depends on the location of your business. Shopify supports different payment gateways by region, and there are more than 100 different options to choose from.
The Top Payment Methods For Ecommerce in Summary
Every customer has a different payment preference. The best online payment gateways and shopping cart solutions accept multiple payment types to accommodate everyone’s needs.
All of the options recommended in this guide are industry leaders with low fees. While Shopify is the best solution for most, every provider reviewed on our list is worth considering—it all depends on what you’re looking for.
That’s why I took the time to identify the best WordPress plugins for the most popular categories. I’ve already created extensive guides for each one of these 13 categories.
Every guide contains a list of the best WordPress plugins in each segment.
And if you’re after something specific, you should check out that post — many of plugins I recommend are for particular use cases.
In-Depth Reviews of the Best WordPress Plugins in 13 Categories
This my the complete list of my in-depth plugin reviews for…
Each of those posts reviews multiple plugins in each category. But most people don’t need to go that deep. That’s why I made this best of the best list. This is a resource to identify the top must-have plugin for each category.
The plugins on this list are not the niche options; these are the plugins that will appeal to the masses. They’re the WordPress plugins I’d recommend broadly.
Best SEO Plugin for WordPress — Yoast SEO
There are hundreds of WordPress plugins that will help improve your SEO strategy, but one stands above the rest.
Yoast SEO
Yoast SEO is an all-in-one solution for your WordPress SEO needs. With more than five million active installations, it’s one of the most popular WordPress plugins on the market. I’m not saying you should always follow the crowd, but a number that big is a great indication of quality.
Why I like it:
Create and manage XML sitemaps without having to code on your own
Identify and avoid duplicate content on your website
Comes standard with templates for meta-descriptions and titles
Cost: Free; $89 per year for premium
Best Google Analytics Plugin for WordPress — MonsterInsights
MonsterInsights is the best WordPress plugin for Google Analytics.
Google Analytics gives you in-depth knowledge and insights about your website traffic.
By installing a plugin, you can have access to all of your Google Analytics reports without leaving your WordPress dashboard.
This plugin lets you add your Google Analytics code to your website without any manual coding required. It’s advanced and versatile enough to handle analytics for all websites, including ecommerce shops. No wonder it has two million active installations.
Why I like it:
Detailed reports about your audience and their behavior on your website
Helps ecommerce sites track KPIs like conversion rates and average order value
Identifies your best content and top performing landing pages
Cost: $99.50 for a basic website, $199.50 for ecommerce sites, and $499.50 for agencies and developers — all plans billed annually
Best Membership Plugin for WordPress — MemberPress
Membership websites drive recurring revenue with a subscription business model.
Think of those blogs or web newspapers you see online that ask you to subscribe for their content. You can offer premium features and content to your paid members.
In order to set this up, you’ll need to install a plugin to manage memberships and payments on your WordPress site.
MemberPress is the best plugin for this category. It makes it easy for you to convert your existing website into a membership site, without having to start from scratch.
All you have to do is add the details of your payment gateway and set up your products and content in a members-only area.
Why I like it:
It supports payment gateways like PayPal and Stripe
Integrates with your email marketing software
Comes with pricing page templates for membership options
Cost: $129 per year for Basic, $249 per year for Plus, and $349 per year for Pro
Best WordPress Backup Plugin — VaultPress
In the event of a crash or malicious attack on your website, a backup plugin will be there to restore your content and minimize downtime. It will also act as a fail-safe against human error on your WordPress dashboard.
We’ve been using VaultPress here on Quick Sprout since 2011. So naturally, I think it’s the best WordPress backup plugin, or else I’d switch to something else. It’s so easy for you to set up and automatically back up your website content. You don’t need to be a tech wizard to use this plugin.
Why I like it:
Great for site migrations, restores, and file repairs
The calendar view allows you to locate and restore content from old backups
Built-in file scanning and spam defense helps reduce chances of malware, viruses, spam, or a malicious attack
Cost: Plans range from $39 to $299 per year
Best WordPress Cache Plugin — WP Rocket
Adding a cache plugin to your website will help you speed up your page loading times. Out of more than 900 cache plugins available, one stands out as the best.
The WP Rocket WordPress plugin is extremely versatile. It’s simple enough for beginners to figure it out, but has advanced features that can meet the needs of developers with more technical experience.
Why I like it:
Quick setup and simple navigation
Image on request feature (images are only loaded when the scroll depth is reached)
Minifies JavaScript, CSS, and HTML files to speed up loading times
Cost: $49 per year for one website, $99 per year for three websites, and $249 per year for unlimited websites
Best WordPress Security Plugin — WordFence Security
Roughly 90,000 websites get hacked every day — 83% of those websites use WordPress. Clearly, security needs to be at the top of your priority list. You can install a WordPress plugin to help beef up your website security.
More than two million WordPress websites are currently using the WordFence Security plugin as a security solution. The plugin fights against malware, spam, and other threats in real time. It’s a great option for those of you who don’t have a background in IT or cybersecurity. You’ll still be able to secure your website with WordFence Security.
Why I like it:
Block attacks from specific regions that are known for cybercrime
See trends and reports about any attempted hacks on your website
Firewall blocks and brute force attack protection comes standard
Cost: Free; premium version starts at $99 per year with other add-ons available for purchase
Best Form Plugin for WordPress — Ninja Forms
Website forms are crucial for collecting information. It’s the best way to get your website visitors to sign up for something, like your email subscription list.
Ninja Forms is great because of its seamless integration into your WordPress dashboard. Once you have this plugin installed, you can create your first form in just minutes. That’s why it’s no surprise that more than one million websites use Ninja Forms.
Why I like it:
Can integrate with your email marketing software
Collect payments with Stripe, PayPal Express, and Elavon
Export and analyze the data that’s submitted through forms
Cost: Free; $99 per year for Personal, $199 per year for Professional, $499 per year for Agency. Add-ons range from $29 to $129 per year.
Best WordPress Gallery Plugin — NextGEN Gallery
WordPress has a basic image gallery. However, I wouldn’t recommend using it because it’s so limited. For truly improving the visual appeal of your website, you’ll need something extra. A gallery plugin is ideal.
NextGEN Gallery is one of the best WordPress plugins because you’ll have so many different gallery options to choose from. Other plugins just give you a couple of basic templates for adding images. It’s a great option for photographers and artists.
Why I like it:
Customize slideshows with effects, transitions, and timing
Add watermarks and hotlink protection to your images
Ecommerce integration for selling images on your site
Cost: Free; paid versions available for $79, $99, and $139 per year
Best WordPress Slider Plugin — Smart Slider 3
Do you want to add a slider to your website? You can make sliders, carousels and blocks using a slider plugin. My favorite is Smart Slider 3, because it’s easy to use, reliable and super flexible.
Using Smart Slider 3, you’re able to create a slider on your WordPress website using powerful design tools, and pre-built templates.
There’s a free version and a pro version.
Why I like it:
Easy to build a slider with layers
Several different slider types to choose from
Prebuilt template and slider library
Cost: Free; aid versions available for $35-$250 depending on how many sites you want to implement the plugin on.
Best Social Media WordPress Plugin — Super Socializer
Your website needs to be integrated with your social media profiles. Otherwise, you’re not maximizing the potential of your social media. WordPress plugins can help you increase the exposure of your website content on social media.
There are so many social media WordPress plugins designed for specific features. But Super Socializer is more of an all-in-one solution. So if you don’t want to install multiple social media plugins, I’d definitely recommend Super Socializer.
Why I like it:
Site visitors can use their social login information to create an account on your website
Add social sharing icons to your pages
You can get more blog comments by enabling social comments
Cost: Free
Best WordPress Calendar Plugin — EventON
Every business needs to stay organized. Calendar plugins can help you manage events, tasks, and bookings on your website. Some of these plugins are more advanced than others, but overall, there’s one that shines above the rest.
EventON allows you to create calendars that will “wow” your website visitors. We’ve all seen websites with boring calendars that look like they were designed a decade ago without any updates. That definitely isn’t be the case here. EventON has modern designs that are visually appealing and fully functional.
Why I like it:
It can manage events lasting for multiple days, weeks, or months at a time
Add images to your event listings and integrate them with Google Maps
Sell event tickets with Woocommerce support
Cost: $24; add-ons sold separately
Best WordPress Directory Plugin — Directories Pro
Directories are extremely versatile. Whether you want to add a directory to your site for internal purposes or create a global platform of business directories, the right WordPress plugin can help you meet those needs.
No matter what type of directory you want to add to your website, the Directories Pro WordPress plugin will make it possible. This plugin is highly responsive and uses caching to boost your website’s performance. Make sure to enable reviews for your directory to enhance the content. You can even integrate listings with Google Maps.
Why I like it:
Drag-and-drop editor makes it easy for you to customize the directory without coding
Include an option for websites to claim their listing in your directory
Add paid listings to your directory
Cost: $39
Best WordPress Popup Plugin — Layered Popups
Do you want to add popups to your website? Popups can be great for getting email subscribers, driving downloads, generating sales, or enticing other actions on your website. Regardless of your intention, you’ll need a WordPress plugin to make it work.
Layered Popups is great because you can create popups that are visually appealing, so you have a chance to get creative. These popups will clearly stand out to your website visitors. It’s a chance for you to make unique popups compared to what people are used to seeing on other websites.
Why I like it:
Integrates with 56 of the most popular email marketing platforms
Run A/B tests to fully optimize the performance of each popup
Multiple options for triggering popups (such as exit intent or scrolling depth)
Cost: $21
Best WordPress Booking Plugin — Bookly
Booking plugins are necessary for any website that takes appointments or reservations. Online booking systems will optimize your process on the back end while simultaneously improving the customer experience. If you’re not allowing online bookings, you’re ignoring the preferences of the majority of your customers — 70% of people prefer to book appointments online with service providers.
Bookly has a sleek and modern design on both the frontend and backend. Booking options are completely customizable and fully responsive. You’ll definitely want to install Bookly if you’d like to take your customers through a quick and easy booking process.
Why I like it:
Custom pricing and availability for different employees (such as trainers at a gym)
Option to process payments or collect deposits at the time of booking
Customers can set up recurring appointments or get added to a waiting list
Cost: $89; add-ons sold separately
Best Website Builder Plugins — ZeGuten
ZeGuten is a website builder plugin. Instead of building your site line-by-line with code, you’ll use “blocks” to put it altogether. It works with everything from an online store to a fitness blog. It’s also responsiveness right out of the box so your website will looks great on mobile.
There are 17 easy-to-customize blocks that you’ll work with to build each page on your site. This is the perfect option if you want to customize your WordPress site beyond a basic theme but don’t want to code the whole thing yourself.
Why I like it:
No coding required, make your WordPress site look exactly the way you want
A bunch of extra design features like animation
SEO-friendly and requires no coding skills
Cost: $15
What exactly is a WordPress plugin?
It’s essentially an app for your website.
I love how WordPress is designed to be lean out of the box. This prevents code bloat — your website isn’t dragged down by bulky code for things you don’t need or use. The core of WordPress is simple. You can customize it with plugins.
The core of WordPress is designed to be lean and lightweight, to maximize flexibility and minimize code bloat. Plugins then offer custom functions and features so that each user can tailor their site to their specific needs.— WordPress Codex
Installing a plugin to your WordPress site provides you with advanced features that aren’t available with the bare bones version of WordPress.
These are the best overall options for each of the essential categories. Keep in mind, I identified these as the best because they appeal to the widest possible audience. Some of you may want plugins that have more specific features and functionality within each category.
For example, you might want an SEO plugin that specifically helps you identify relevant keywords while you’re blogging. Or maybe you want a social media plugin that just adds your Instagram feed to your website.
Do you want a Google Analytics WordPress that’s made for tracking specific events on your website? There’s a plugin for that too.
There are caching plugins that are better for things like the cloning and migrating content between servers. The list goes on and on.
So I’d definitely recommend reviewing the individual guides for each category as well. That way you’ll know for sure that you’re installing a plugin that meets your specific needs.
Ecommerce website builders are the fastest and easiest way to start selling online. These tools support inventory, payments, shipping, and everything else you need to run an ecommerce site on a single platform.
Whether you’re starting a business from scratch or taking your established store online, this guide has a solution for you.
The Top 8 Best Ecommerce Website Builders
Best of 2023: BigCommerce, Shift4Shop, Shopify, Squarespace, Square Online, Weebly, Wix, and Hostinger.
All of my top picks are great options, but some are better than others for specific situations. While figuring out which is best for who, our researchers found four ecommerce platforms that stand out for balancing ease of use, simplicity, pricing, and features.
Our favorite ecommerce website builders for 2023 are:
Shopify — Best all-around ecommerce website builder
Wix — Best for launching an online store in minutes
BigCommerce — Best site builder for multichannel selling
No matter your starting point or requirements, you’ll likely find everything you need in one of our top picks.
I’ll explain the top features, benefits, prices, and specific use cases for each platform below. I’ll point out any potential downsides or drawbacks, as well.
I’ve also included the key factors to consider when selecting the ecommerce website builder that’s best for your needs.
Shopify – Best All-Around Ecommerce Website Builder
Shopify is one of the most popular ecommerce platforms out there. It is a true plug-and-play option for people looking to start an online store with minimal hassle.
We like it for beginners because Shopify is the best way to start on the right foot. You can sell as many products on as many channels as you like. There are no annoying limits or tradeoffs that you typically find with solutions as easy as Shopify.
In terms of designing your online store, Shopify offers more than 100 free and paid themes to choose from. Each theme has settings that allow you to customize everything to your liking. Add features and functionality to your store by installing apps from the Shopify App Store.
I like that all payments are handled directly through the platform. With the Shopify Payments gateway built-in to your plan, you won’t need to connect to any third-party processors to accept payments. So you can start selling immediately.
When you use Shopify’s payment gateway, you can start selling without any third-party integrations.
Keep in mind you can always use another payment gateway by choosing from one of the over 100 payment processors that integrate with Shopify.
All plans come with web hosting, unlimited email forwarding, unlimited bandwidth, and a content delivery network for optimal performance. You’ll also benefit from marketing and SEO tools, mobile optimization, and analytics.
Shopify offers 24/7 customer support via phone, email, and live chat.
With Shopify, you have the potential to set up dropshipping, customer accounts, target abandoned carts, and manage your shipping rates.
Here’s an overview of Shopify’s plans and prices:
Shopify offers three pricing plans to suit all ecommerce needs—from startup to scale.
Basic Shopify – This plan costs $39 per month and has everything you need to set up an online business from scratch. You get critical features, including an online store, unlimited products, a sales channel, and abandoned cart recovery.
Shopify – This plan costs $105 per month and is ideal for expanding an existing store. You get three extra staff accounts and additional functionality like ecommerce automation and cheaper credit card and debit card rates. You also save more on third-party transaction fees if you choose a different payment processor.
Advanced – This plan costs $399 and provides all the enterprise features you need to scale your business. You get up to 15 staff accounts, up to eight inventory locations, and advanced reports. You also save more on credit and debit card fees and third-party payment processing fees.
Consult with a Shopify sales expert if you’re building a high-volume ecommerce shop and need an enterprise-level solution. You can try Shopify free for three days.
Wix – Best for Launching an Online Store in Minutes
Wix is one of the most popular website builders out there. The company has made the process of creating a site as easy and enjoyable as possible.
So it’s no surprise that their web store solution, Wix eCommerce, makes it every bit as easy to start selling online in no time.
Wix has grown in recent years by adding serious muscle to the ecommerce capabilities they offer users. Wix eCommerce is not just a store add-on to their regular site builder; it’s a complete integrated online business solution packing a full suite of impressive tools and features.
Wix eCommerce makes it easy to set up and run your online store, no matter your experience level.
It’s very intuitive. Use one of the hundreds of templates available to quickly whip up your storefront. Just tweak the colors and add your logo to match your branding, and then add your products.
Or, lean on the artificial intelligence of Wix’s ADI builder, which will create it all for you (in mere minutes) after you answer a few questions.
As long as you have an image in your mind of what you want, Wix gets you there.
Wix is the shortest distance between having no store and launching a professional ecommerce site.
If you’re creating a new ecommerce site for the first time, the simplicity of Wix will make your life much easier. Its incredibly versatile platform is practically tailor-made for someone with no web development experience.
But just because Wix eCommerce is easy to use, that doesn’t mean it skimps on important features.
Every plan offers unlimited bandwidth for your web store, plus a free domain for one year and unlimited products.
You also get a generous $300 in digital ad vouchers so you can drum up awareness of your new online store. That’s $100 each for Google Ads, Bing Ads, and local listings.
It’s also worth noting that all online payments from your Wix store are 100% commission free. This is a huge benefit, as a lot of other ecommerce platforms take a cut from your revenue.
Wix eCommerce is jam-packed with features to help grow and nurture your web store.
You can track and manage orders, payments, inventory, conversion rates, and revenue with ease from the Wix dashboard. You’ll get the hang of it really quick.
And every ecommerce package allows you to sell subscriptions and implement pricing plans in addition to selling your products. You can even save the payment methods and delivery addresses of loyal customers to give them an easier checkout experience.
And speaking of customer checkout, Wix is serious about payment protection. Every Wix eCommerce site is compliant by default with the Payment Card Industry Data Security Standards (PCI DSS). The checkout process is secure for both merchants and buyers, and merchants can choose from 50+ secure payment providers.
Wix is also super reliable, with an uptime rate of 99.98 percent. That means no matter when your customers want to shop, your site will be up and open for business. And your site data is secure, too. Wix saves your site backup data across 20 data centers and backup servers in diverse locations.
We’re really just scratching the surface here. Wix eCommerce plans also include:
Abandoned cart recovery
Mobile optimization
Wix chat
50+ payment methods
Global shipping
Coupons and discounts
Restaurant features (online orders, reservations, menu)
Tickets and event management
Online appointment booking
24/7 site security monitoring and optimization
Wix’s SEO tools are another big standout. With Wix, you can build a robust SEO infrastructure that automatically optimizes things like product page data and customizable URLs. You can also seamlessly manage SEO efforts with personalized checklists and easy-to-modify settings.
Wix offers robust SEO tools to help maximize the impact of your online store.
Wix also helps you optimize your website for mobile by creating an automatic mobile-friendly version of your website as you customize it. They also get your site listed on Google within 60 seconds.
Wix’s AppMarket provides more than 250 excellent apps from services like MailChimp, Quickbooks, and HubSpot to seamlessly integrate into your website. That way, you can take advantage of their offerings to grow your business.
Wix eCommerce pricing comes in three plans:
Business Basic — $27/month
Business Unlimited — $32/month
Business VIP — $59 per month
Each tier adds more useful features to your web store’s arsenal, including support for multiple currencies, dropshipping tools, custom reporting, loyalty programs, and more. Our complete Wix review covers these plans in greater detail.
There’s also an all-encompassing, fully custom Wix Enterprise plan that starts at $500 per month.
Wix does have cheaper plans, but they’re for personal or portfolio sites. If you want to accept online payments, the Business Basic plan is the lowest plan available that’ll work for your needs.
To save some money, you could always sign up for a free Wix plan without the ability to accept online payments, build a personal website with Wix for no cost at all, then upgrade to a Wix eCommerce plan once you’re ready to start selling.
Hostinger offers a straightforward way to get your new online store up and running fast. It gives you an all-in-one solution that pairs website building with website hosting at a super affordable monthly cost. For anyone looking for a simple approach to building an ecommerce store, Hostinger can’t be beat.
You don’t need any coding skills to make it happen, either. A clean and minimalist interface with drag-and-drop functionality takes the guesswork out of creating and editing your site.
hostinger’s drag-and-drop functionality takes all the guesswork out of building your website—no coding skills required, either.
There’s also a gallery of designer-made templates to choose from to streamline the process even more. And Hostinger’s library of royalty-free images means you won’t waste time searching for the perfect pictures to complement your ecommerce shop.
Pre-built templates are available to speed up ecommerce store design even more.
There are also robust built-in SEO tools that will help you optimize your site to improve your site ranking in Google search results. A variety of marketing integrations for tools like Hotjar and Google Analytics give you the real-time data you need to optimize shop performance.
One of the really cool features that Hostinger offers is their integrated suite of AI functions. This really takes the guesswork out of creating key elements of a great website.
AI logo maker: create a unique logo in just a few minutes
AI writer tool: write compelling website copy that converts
AI heatmap tool: identify where your shop visitors engage (or don’t) and tweak accordingly
Hostinger’s AI feature lets you create logos in record time.
Ecommerce is front-and-center of Hostinger’s website builder, too. Features include inventory and order management, the ability to sell up to 500 products, functionality for clients to book appointments, and the option to accept 20+ global payment options.
Security is critically important to anyone running an ecommerce shop, and Hostinger has you covered there, too. The web builder package includes free unlimited SSL security certificates, Cloudflare-protected nameservers, automatic file backups, and a 99.9% uptime guarantee.
Hostinger lets you get started with its website builder for just $2.99 per month and you also get two months free. This price includes:
Free domain
Up to 100 free email domain addresses
Ecommerce features
Marketing integrations
24/7 customer support
Up to 100 websites
Unmetered traffic (unlimited GB)
Unlimited free SSL certificates
Web hosting included
Hostinger offers very attractive pricing to get started.
You can lock in the introductory $2.99/month price for 12, 24 or 48 months. At renewal, the monthly price will go up to $6.99 per month, but this is still a pretty good deal for everything you get. To see how Hostinger stacks up to other ecommerce website builders, check out our Hostinger review.
Straightforward and easy-to-use, plus all the extras to keep your ecommerce shop secure and online—it’s what landed Hostinger on our favorites list. Get up to 75% off Hostinger Web Builder today.
BigCommerce – Best Site Builder for Multichannel Selling
BigCommerce is a reputable and trustworthy ecommerce site builder.
It’s also very versatile. It has B2B-specific features like bulk pricing rates, quote management, customer groups, and custom price lists.
BigCommerce specializes in multichannel selling. Every plan comes with the ability to sell on Facebook, Instagram, Pinterest, Google Shopping, eBay, Amazon, and POS.
So for those of you who want to leverage omnichannel sales, BigCommerce should be at the top of your list.
The website builder itself is very intuitive and includes a drag-and-drop tool that makes creating the website easy.
BigCommerce is packed with lots of essential features right out of the box. Compared to other platforms on this list, it’s probably the most extensive feature list you’ll find.
But there’s a catch: It’s not the most beginner-friendly website builder. That’s because the extra features tend to make things more complex.
The platform is designed to help larger ecommerce sites scale quickly. So, if you’re just starting out, you’ll most likely be paying extra for features you won’t be using.
However, if you want the ability to have tons of ecommerce and website customization features at your disposal without paying extra for apps or extensions, BigCommerce is perfect for you.
All BigCommerce stores benefit from enterprise-level security and high uptime rates. You’ll also get 24/7 customer support via phone, live chat, and email.
Here’s a look at the price points for BigCommerce:
Standard — $39 per month or $29 per month with an annual plan
Plus — $105 per month or $79 per month with an annual plan
Pro — $399 per month or $299 per month with an annual plan
Save up to 25% on your subscription when you pay annually for any BigCommerce plan. If you’re torn on which plan to get, our in-depth BigCommerce review can help guide you in the right direction.
These rates are almost identical to Shopify. While Shopify is a bit easier to use, BigCommerce comes loaded with more features. So if you’re deciding between those two options, you’ll need to determine which features are the most important to you.
Squarespace offers ecommerce functionality built directly into its plans, which is not the case for most traditional website builders. Perhaps the reason most people love them, though, is their beautiful and award-winning template designs.
And Squarespace makes it easy to connect your site to social media accounts. Push new content to Facebook, Instagram, and more in real-time.
It doesn’t matter if you’re a seasoned pro who loves to jump in and craft a website to your exact design specs or a complete beginner who just wants a fantastic looking website straight from a template.
Anyone can build a modern and visually appealing ecommerce store using Squarespace.
Every element of every page is easily customized using the intuitive and highly-responsive, drag-and-drop builder.
Squarespace has award-winning templates that are specifically designed for online stores. Whether you’re selling products, services, subscriptions, or digital goods, Squarespace has a solution.
The Squarespace mobile app allows you to manage and edit your website on the go. You can also use it as a POS solution, too.
Squarespace has built-in SEO tools, analytics, blogging tools, and everything else you need to make your online store a huge success.
There are hundreds of apps built-in to Squarespace. However, there is not an app store or marketplace for one-click installations. If you want to install a third-party app that’s not already built-in to Squarespace, you’ll need to use code to accomplish that.
Squarespace has four different plans, three of which have fully-integrated ecommerce capabilities:
Personal — $14 per month
Business — $23 per month
Basic Commerce — $27 per month
Advanced Commerce — $49 per month
Save up to 30% with an annual subscription.
Online selling starts with the Business plan, but I recommend the Basic Commerce option as the bare minimum for most people.
This option has 0% transaction fees, POS, ecommerce analytics, customer accounts, and other features you’ll want at your disposal once you start selling online. It’s well worth the extra $8 per month.
As your business scales and you want more advanced features, you can always upgrade to the Advanced Commerce plan. But you may not need that on day one if you’re starting a new store from scratch.
However, they also have a great ecommerce website builder that comes packed with features for free.
It’s especially great if you already use Square for your in-store POS system. The website will be able to seamlessly integrate with Square POS. You’ll also be able to accept all major credit cards, sync with your existing Square POS, and streamline your inventory management.
This is where Square really shines. By using both Square POS and their website builder, you’ll be able to easily sync your inventory so you can see your real time stock. This helps prevent overselling—and keeps customers happy.
You’ll also be creating a centralized database for your sales. No longer will you have to manually input your sales for the day, week, or month into a separate database since it’s all one system. With their analytics and reporting tools, you’ll be able to take a deeper look at the metrics behind your sales and improve them.
Square is very flexible in how you connect with customers too, allowing you to sell through Instagram, on your website, or local pickup and delivery.
Setting up the website is a snap too. You don’t need to know a bunch of code, or even hire a developer. All you need is a computer or mobile device and you can get started.
Square also gives you SEO tools to help your website reach even more potential customers.
Prices start free with 2.9% + 30 cents per transaction. Complete pricing is as follows:
Free: $0 / month and 2.9% + 30 cents per transaction
Professional: $12 / month and 2.9% + 30 cents per transaction
Performance: $26 / month and 2.9% + 30 cents per transaction
Premium: $72 / month and 2.6% + 30 cents per transaction
Weebly is a well-known website builder. It’s affordable and very straightforward to use. For people running their own business looking for something that requires minimal maintenance, this is a good option.
It’s not going to let you sell thousands of items with hundreds of variations like BigCommerce, but if you don’t need that, you’ll appreciate the sleek platform.
The drag and drop site builder allows you to launch your store with minimal effort and no coding. Building a polished website with an online store takes very little time at all.
Weebly makes it easy for entrepreneurs to establish an online presence and expand with ecommerce. You can accept payments with popular gateways like PayPal, Stripe, and Square.
Since Weebly is powered by Square, it’s very easy to integrate the Square POS with your online sales system as well. You’ll be able to manage your products and inventory all in one place.
You’ll get tools for email, SEO, site stats, shipping, inventory, and more. Help your customers find what they’re looking for by adding Weebly’s product search to your online store. Add badges to products when items go on sale or when availability becomes limited.
These are Weebly’s prices for online stores:
Free — $0
Personal — $6 per month
Professional — $12 per month
Performance — $26 per month
The Personal plan is pretty basic, but it’s affordable if you don’t need any complex ecommerce features. It’s essentially just a shopping cart with the ability to accept payments.
If you want to get the most out of Weebly, you’ll need a Professional plan at a minimum.
Shift4Shop is certainly not the most popular ecommerce website builder on the market. But that doesn’t mean you should sleep on it.
Formerly 3DCart, Shift4Shop offers enterprise-grade ecommerce functionality that’s 100% free. Unlike other free services out there, Shift4Shop doesn’t skimp on the features. You still get all of the features and tools that you’d expect from an enterprise-level website builder, including SEO tools, 100+ themes, unlimited products, and more.
Here’s the catch. You have to use the Shift4 payment platform and be based in the United States to take advantage of this free ecommerce plan.
Shift4’s processing fees start at 2.9% + $0.30 per transaction. This is considered to be the industry standard with ecommerce businesses, which makes it a fantastic deal for you.
This is especially great for seasonal businesses. That way, you don’t have to be on the hook for a monthly website fee during slow months since you only have to pay the payment processing fees when you make transactions.
Shift4Shop also comes with features and benefits like:
API access
Unlimited products
Mobile-ready themes
Web hosting
Unlimited bandwidth
No transaction fees
Built-in blog
The completely free ecommerce platform is tempting. But you can still use Shift4Shop if you have your own payment processor. You’ll just need to sign up for one of the traditional subscriptions:
How to Find the Best Ecommerce Website Builder For You
My team tested all of the ecommerce platforms above using rigorous criteria, allowing us to discover the strengths and weaknesses of each one. We also identified what makes each tool stand out from one another.
You can use the same methodology we used in your own decision-making process. But ultimately, the best one for you will be unique to your needs. After all, the humble online store selling homemade goods is going to have different needs than the seven-figure dropship company.
Despite these differences, the following criteria are universally important when considering a platform:
Easy to Use (Without Sacrificing Quality)
If you’re creating your first ecommerce website, you may have little to no experience building websites. And without knowledge of code or web design, creating a site from scratch can be frustrating.
That’s why you want to find a platform that makes it easy to create a beautiful yet powerful site—even if you don’t know anything about coding.
Drag-and-drop, easily customizable website builders help you launch faster, it’s true, but they also save you time and money. Like, a lot of money. Web designers can charge over $10,000 to build an ecommerce site.
Even if you have more complex needs, such as multiple digital storefronts or significant product inventories, you still want a website builder that comes with a simple learning curve.
Good website builders simplify the process. For example, Wix uses powerful AI technology to help you create a website from the ground up. If you’re looking for the most straightforward option, go with Wix.
Many of the websites on this list, such as Squarespace and Hostinger, use drag-and-drop technology so you can easily customize your website. This allows you to customize your website’s appearance without typing a single line of code.
If you have more complex needs but still want to benefit from an easy-to-understand-no-computer-degree-needed builder, try a platform like BigCommerce. It’s packed with features, such as bulk pricing rates and customer groups, to help larger ecommerce businesses grow quickly.
3DCart is another option. It offers API access to let more seasoned ecommerce store builders exert more control over their sites.
Depth of Customization
While we looked for ecommerce website builders that were easy to use, we also wanted to make sure those who wanted more robust customization for their site could do so.
The builders on this list include a lot of tools and features to help make your website more customizable. For example, Shopify has a ton of different integrations and plugins—like Google and Facebook integrations, email marketing tools, and live chatbots—to build the right site for your business.
Social media integrations can be especially helpful if you plan on having an omnichannel ecommerce business.
If that’s something you’re interested in, you’ll want to definitely take a look at platforms like Shopify and BigCommerce. Each of BigCommerce’s plans, for example, comes with the ability to sell on Facebook, Instagram, Pinterest, Google Shopping, eBay, Amazon, and other channels.
If you have a warehouse with inventory, you’ll want easy integrations with your warehouse management system and logistics/shipping systems. Once again, BigCommerce is a great option for that.
Another area where these platforms offer customization is through SEO tools. Some offerings like Wix, Shopify, and Weebly help you build Google-friendly web pages and articles with suggestions as you customize your site.
Often these tools are optional and come in the form of plugins or dashboard features. Overall, they can be incredibly helpful if you plan on using SEO marketing as part of your growth strategy.
The templates offered by these websites offer varying levels of customization, too. You’ll want to make sure they give you options you need to fit your brand.
Quality and Variety of Templates
Each of the website builders on this list comes with a variety of templates for you to easily create a great website for your ecommerce business. When reviewing the templates for each of the builders on this list, we looked at two areas:
Quality: We wanted to ensure the templates offered were eye-catching and visually appealing. We believe it’s better to offer a dozen really beautiful templates than 100 “meh” templates.
Variety: While the templates needed to look good, we also wanted a healthy variety to choose from. This helps ensure the ecommerce website builder can be a good fit for your unique brand and won’t make you look identical to others.
The templates offered by each platform differ—sometimes drastically.
For example, Squarespace puts a lot of emphasis on visuals—splashy and vibrant photos, beautiful art, and gorgeous design. If your ecommerce website has a lot of products that create strong images (e.g. photography and art businesses), Squarespace is a no-brainer.
If you’re looking for an ecommerce site that also relies heavily on a blog for content marketing purposes, I highly suggest something like Wix. It offers 500+ templates, with most including a blog along with an ecommerce component. Wix easily offers the most options for templates on this list, too.
It’s worth mentioning that Weebly is another incredibly versatile platform, allowing you to do a lot of different things with your site.
If you want to run just a pure ecommerce site and really hone in on that, Shopify, BigCommerce, and Square are platforms I highly recommend. Their design templates let you optimize for sales and create the best site for your specific products.
Additional Considerations (But Not Deal Breakers)
There were other elements I took into consideration as well, but they weren’t deal breakers when it came to my ultimate decision with this list. They might be important to you, and they bear mention.
Responsive customer support: You want to make sure the ecommerce website builder you choose can quickly help you out with any questions. After all, if your site crashes in the middle of a product launch you’ll want that fixed ASAP.
Any downtime can cost you money. Not only are you missing out on potential sales while the site is down, but it’s also a poor reflection of your brand if customers can’t access your site. Responsive customer support can get you back up and running quickly if something goes wrong.
Analytics and reporting. This helps you track your website’s traffic and engagement. Understanding this data can help you improve your site’s performance.
Beyond performance, these tools can help you better understand how different pages and products are performing. Then you can make the necessary adjustments to ensure your site is converting at the highest possible rate.
Email integration. If you plan on scaling your business and want to get serious with branding, you’ll want a branded email address using your ecommerce store’s domain. Some platforms like Wix allow you to create a branded email address or purchase one from their website.
It’s pretty unprofessional if you’re sending emails and managing customer support through an email domain that doesn’t match your store. In some cases, this can even impact the message’s deliverability and open rates. So don’t overlook this when you’re comparing different options.
Pricing: Don’t get me wrong, pricing is important. However, it wasn’t necessarily a deal breaker for how this list was arranged. That’s because all of the offerings on this list have pricing in line with what I consider to be the industry standard.
An ecommerce website builder like Shopify might be on the more expensive end of the spectrum, but nothing too outrageous considering their quality and strong offerings.
The price tiers for each offering on this list are roughly equivalent to one another, and they tend to offer a free version with minimal features or (at the very least) a free trial. So don’t let a few dollars keep you from getting the plan you need, as the difference will be pretty marginal in the long run.
Best Ecommerce Website Builders: Your Top Questions Answered
What is the best website builder for an online store?
Shopify is the best website builder for an online store because it comes with everything you need to build, launch, manage, and scale an ecommerce website. It has over 100 different themes that are fully customizable and built specifically for showcasing product inventories.
You can launch and get paid instantly using Shopify’s built-in payment system or connect to a third-party processor of your choice. If you’re also selling items in person, Shopify’s POS will integrate with your online store so all of your inventory and sales are updated automatically—regardless of the sales channel. To get started, follow our step-by-step guide on how to build a Shopify website.
What is the cheapest ecommerce platform?
With plans starting at just $2.99 per month, Hostinger is the cheapest way to start an ecommerce site. You’ll get ecommerce features bundled with web hosting, a website builder, free SSL certificates, and free email—all included in one plan.
Just be aware that the $2.99 price is an introductory rate for new customers, and it will renew at $6.99 per month when your contract expires in 12, 24, or 48 months. But even at $6.99 per month, Hostinger is still less than half the price of other reputable ecommerce platforms.
Is Wix good for ecommerce?
Wix is great for ecommerce due to its simplicity and built-in ecommerce features. You can build and launch an online store in less than an hour by selecting a Wix ecommerce template or letting the Wix ADI design the store for you using AI technology.
In addition to your website, Wix makes it easy to sell on third-party marketplaces and social media platforms. Wix also has a native payment processing solution, so you can accept credit cards, debit cards, Apple Pay, and more, without having to secure your own merchant solutions provider. Check out our complete Wix review for more information.
Is Shopify better than Wix?
Shopify is the best all-around ecommerce website builder on the market. It’s better than Wix because of its robust inventory tracking tools and vast options for payment integrations and shipping. Shopify is also better for managing larger ecommerce sites at scale, and it’s even compatible with online stores that currently or plan to operate brick-and-mortar retail locations.
Wix is cheaper than Shopify. So if you’re planning to run a simple store with a smaller inventory, Wix is still a solid option to consider. You can also check out our full list of Shopify alternatives for other recommendations.
Is Wix better than Squarespace?
Wix is better than Squarespace for ecommerce if you want a more user-friendly website builder and need to launch your store as fast as possible. But Squarespace is better than Wix for ecommerce stores seeking higher-quality designs and templates. Wix has better SEO tools, and Squarespace is better for selling photography, art, and other items in a creative portfolio.
Both Wix and Squarespace are viable options for anyone who wants to start an ecommerce store, and neither requires any technical knowledge or coding experience. You can read our full Squarespace vs. Wix comparison to learn more about the pros and cons of these platforms.
The Top Ecommerce Website Builders in Summary
Ecommerce website builders take the guesswork out of selling online. You can focus on sales without worrying about the backend complexities of creating and running a website.
The best solutions support omnichannel sales, offer multiple payment methods, and provide a seamless experience for your customers. Some even integrate with POS solutions for your brick-and-mortar stores. Ultimately, the best ecommerce builder for you is driven by your unique needs, budget, and goals.
When I first started using SEO tools and tried to figure out which one was right for me, I was pretty confused.
There are a bunch of tools in the space, they seem to overlap a lot, and there are way too many specialist tools to sort through.
And which one’s have data that I can trust?
After using all these tools for years and years, I’ve come to realize there are only a few choices you need to make.
First, there are three main tools in the market: SEMrush, Ahrefs, and Moz. Everyone uses one of those three. We’ll get to our recommendations for these down below.
I call them the SEO workhors — and all three of them qualify as one of the best seo tools. These workhorses carry the bulk of the weight in any SEO program, but you only need one SEO workhorse.
Any serious SEO program absolutely needs a SEO workhorse. The rank tracking, keyword research, and link analysis are all too difficult or time consuming without one. I’ve tried to get away without paying for them; that was a mistake. I could have gained a lot more traffic by using one of these tools from the beginning.
After you pick your main SEO workhorse, I highly recommend you take full advantage of the free tools. Google Analytics and Google Search Console are both world class and I consider them both required tools in day-to-day SEO operations. Plus they’re free.
Beyond that, there are a few specialty tools worth picking up if you’re doing those types of tasks.
Pretty simple all-in-all.
Here’s how your decision process will go:
Pick SEMrush, Ahrefs, or Moz as your SEO workhorse.
Install a SEO plugin if you’re on WordPress.
Add an advanced SEO crawling tool if your site is massive.
Add an outreach tool if you’re doing link building.
Get the free SEO tools in place: Google Analytics and Google Search Console.
Best SEO Tool for Beginners: SEMrush
If you’re new to this whole SEO thing, I highly recommend that you go with SEMrush.
Compared to the other “SEO workhorse” tools, it’s by far the easiest to use. Ahrefs definitely has a learning curve and Moz has never clicked with me — I can never understand where to find anything.
SEMrush’s rank tracking reports are also the best in the industry. I check our reports every morning. Within a few minutes, I feel like I’m in complete control of what’s going on. All the other tools spread stuff out all over the place. Or the reports coddle me too much and don’t have enough density. SEMrush has that perfect balance of usability and depth with its reporting. You’ll have everything you need without getting overwhelmed.
SEMrush has all the other essential parts of a SEO workhorse: link analysis, keyword research, and competitive analysis. All of them are more than good enough to hold their own against the other SEO workhorses.
Just for Quick Sprout fans, SEMrush is offering a 7-day free trial, which they don’t normally do. In order to give you full access to their pro plan, they will ask for a credit card before starting the trial.
Best SEO Tool for Advanced Folks: Ahrefs
If you’re more comfortable with all this SEO stuff and want a tool to really flex your skills, go with Ahrefs.
They’re the “new” SEO kid on the block and I have to admit, their tool has a ton of depth to it. Every time I log in, I find a hidden feature or report that makes me giddy.
That’s also the one weakness, I’m still discovering new features I had no idea existed. Ahrefs doesn’t hold your hand at all. For an SEO expert, it’s liberating. The tool is denser than granite. But I’ve watched SEO beginners try to get their heads around it and they really struggle. After poking around a bit, they stop logging in altogether.
Ahrefs is perfect if you know exactly what you want and are determined to get it.
On specific features, I prefer the link analysis in Ahrefs over the other tools. So if you’re planning on doing a lot of link building, it’s worth getting through the learning curve.
Best SEO Plugin for WordPress: Yoast
There are probably thousands of SEO plugins for WordPress.
I consider it a required plugin on any WordPress site. It automates a ton of SEO tasks and makes things like meta titles and descriptions super easy to update.
I don’t spend any time on this decision — I install Yoast and move on.
Just use the free version of Yoast; there’s no reason to upgrade.
There’s one type of SEO task that the main SEO tools struggle with: crawling and auditing huge sites.
When you have a site with thousands of URLs, there’s just no way to go through the site on your own. And the audit tools in SEMrush, Ahrefs, and Moz are pretty basic.
For a massive site that needs a huge audit, a dedicated crawling tool makes the task so much more manageable. The entire UI and all the workflows are built around having to manage thousands of pages at once. There’s no extra clicking or back and forth. And the tool automates as much of the process as possible. You’ll instantly find all the broken links, missing meta descriptions, bad redirects, and duplicate content on your site.
Screaming Frog SEO Spider is our preferred site crawler. It’s been around the longest and has site crawling dialed.
You didn’t hear this from me, but since site audits are usually a one-and-done type project, you can sign up for the tool, pay for a few months while doing your site cleanup, then cancel it once you’re done.
The only folks I know who have long-term subscriptions are SEO consultants who do multiple audits every month for clients.
Best Outreach Tool: Pitchbox
I remember the days when you could get away without doing any link building in SEO. That’s how we built the KISSmetrics marketing blog to over 700,000 visitors per month. We just posted a ton of great content over an 8 year period.
Nowadays, that’s not nearly enough. SEO has just gotten too competitive.
My rule is that if I’m not willing to do outreach for link building, I shouldn’t be focusing on SEO for traffic. I should find another strategy to grow my business.
I’ve done a bunch of outreach projects out of Gmail and a Google Sheet. It’s such a pain. Especially when a team is involved. Keeping track of who contacted who, updating last status, remembering to send follow-ups, coordinating and updating templates, it’s all a massive pain that takes up way too much time.
And outreach is painful enough, no reason to make it any harder.
These days, I always use an outreach tool when link building. I don’t even consider the option of skipping it. A good outreach tool automates the majority of the outreach. It’s a game-changer. I used to hate outreach with every fiber of my soul, now I don’t mind it.
Our favorite tool for outreach is Pitchbox. It’ll find contacts for you, automate email follow ups, and keep track of all your outreach contacts. Seriously, use it.
Make Use of Google’s Free Tools
Google Analytics is our favorite website analytics tool. And the search data in Google Search Console is a gold mine. Don’t bother trying to pay for any of the paid analytics tool. Google Analytics gives you more than you’ll ever need and it’s completely free.
After you get Google Analytics installed, go set up Google Search Console too. It’s completely free and you’ll get access to your data once Google Search Console verifies your Google Analytics account. Other than the authentication to prove that you own the site, there’s nothing else you need to set up for Google Search Console.
Google Search Console is the one and only place to get real keyword data from Google. Every other tool is a best guess. It also records all the errors Google picks up on your site, tells you what’s been indexed on your site, and gives you impression and click-through data on all your keywords. I can’t overhype it enough — use it.
We never work on websites without installing both of them and they’re completely free. Even if they were paid, they’d be worth every penny.
Choosing the right WordPress theme is important for everyone, but it’s especially crucial for ecommerce businesses: Your theme will ultimately have a direct impact on your conversion rates. As you know, conversions translate to dollars in the ecommerce world.
Here’s the thing — selling products online is extremely competitive. You’re up against global giants like Walmart and Amazon, as well the other smaller ecommerce shops in your industry. It’s unlikely that you have the same budget or resources to a pay a developer to build your site as the major online retailers. However, you still want your site to stand out and to convert visitors to customers. You might feel like a plankton swimming with whales.
The right WordPress theme solves this dilemma for you.
As a small business, your theme will be your website designer, developer, and a part of your tech support. Choosing the right one is crucial. There are thousands of WordPress themes on the market. Plenty of them are stylish, good-looking, and seem like they’d do the job, but not all of them are designed with ecommerce shops in mind.
When you’re trying to find the best ecommerce WordPress theme for your business, you need to look for ways to optimize the customer experience. What will they see when they land on your site? How are the products displayed? What’s the navigation like? You want everything to be easy to find and be visually appealing at the same time.
As an expert in this space, I’ve researched the best ecommerce WordPress themes and narrowed down the top five for you to consider. Use this guide as a reference as you research the best option for your ecommerce shop.
1. Artemis
Artemis is a great option for ecommerce shops that sell products with WooCommerce. This theme adds class and professionalism to your WordPress website.
Artemis has a modern design that’s extremely versatile. The theme comes with tons of different layouts and design options and it gives you the option to highlight what matters most to you on your homepage. You can showcase featured products, specific collections, discounts, and more.
It has a visual composer that lets you customize the page by simply dragging and dropping elements where you want them. You can start with a pre-built template and customize it to fit your needs and design style.
It’s great for sites that sell clothing but has the flexibility to reach niche categories as well. For example, let’s say you sell something unique, such as bicycles or watches. The theme makes it easy for you to emphasize specific features of your products with a combination of images and text descriptions.
I love that this theme supports videos in the product gallery. Rather than just showing your customers different angles of each product (which you should be doing), you can also include a video demonstration of the product. The theme is fully responsive and comes with the Slider Revolution plugin for free, so you can easily create a slideshow or presentation of your products as well.
With Artemis, you can also set up a shopping cart dropdown function on your site. Visitors can add items to their cart and continue shopping without being redirected. There’s also a wish list feature. These elements will help you increase the average order value for your ecommerce store.
Another benefit of this theme is the product quick view option. When a user clicks on a product, the image enlarges and shows a quick description of the item, as opposed to redirecting to a new landing page. This feature helps ensure you always have fast loading times.
Artemis is stylish, dynamic, and overall one of the best ecommerce WordPress themes you can buy. In my opinion, it’s well worth the $59 price tag.
2. Vitrine
If you want your ecommerce shop to stand out from all of the cookie cutter designs out there, I’d definitely recommend the Vitrine WordPress theme.
This is one of the best ecommerce WordPress themes because it’s so easy to use. You can import and install a demo with just one click. Other themes require complex downloads and configurations that are confusing and time consuming. You won’t have that problem with Vitrine.
There are more than 30 shortcodes available that make it easier for you to customize the content on your website. This theme is fully ajaxified as well.
Vitrine lets your customers add items to their wish lists, quick view items, and compare different products on your website. The theme also has extensive options for add-to-cart functionality.
I also like the sticky add to cart feature that this theme offers. Rather than putting your most important CTA at the top or bottom of the screen, where it can be hidden or out of view, the sticky button ensures that it’s in plain sight at all times.
Another reason why this is one of my favorite ecommerce WordPress themes is because it comes with blog design templates as well. Blogging is a great way to drive organic traffic to your website and keep people coming back, even if they’re not always shopping. But, your blog layout shouldn’t look the same as your product catalogs. Vitrine recognizes this with designs made specifically for ecommerce blogging.
Social media marketing is also vital for ecommerce shops — and the Vitrine theme makes it easy. Instead of downloading a separate social media WordPress plugin for that specific feature, there’s a built-in Instagram feed plugin. I love this because it amplifies the work you’re already doing on social and helps convert visitors into followers. You want to make sure your website visitors follow you on social media so you can continue to market to them in the future.
Vitrine employs lazy loading, which is great for websites with lots of photographs. Rather than loading all the images at once, they’ll only be loaded as the user scrolls. With lazy loading, you won’t have to worry about slow page loading times on product pages with tons of images. (And you want tons of images.)
The Vitrine WooCommerce WordPress theme costs $40.
3. Halena
I’d recommend Halena to anyone who wants a modern and minimal theme on their ecommerce site. The layouts are very simple, which is great for showcasing top products on the homepage.
The layouts offered by Halena remind me of luxury websites. But that doesn’t mean you need to charge $10,000 for a watch to use this theme. You can transform any ecommerce site into one that’s elegant and tasteful by using Halena.
The designs are of high quality and really showcase your images in a way that is more creative, unique, and somewhat abstract. It’s certainly not a conservative or traditional theme.
Unlike other WordPress themes, the content and settings on different Halena demos can be mixed and matched. With all of the configuration options, I’m sure you’ll be able to create a design you’re completely satisfied with.
This theme has a comprehensive ajax product filter. It allows customers to narrow their searches down by selecting multiple attributes and filters from the side menu.
One of my favorite features of this theme is the unique lookbook. Here’s how it works: Let’s say you’re selling clothing on your ecommerce site. You can show images of models wearing different items, and allow website visitors to click on articles of clothing that grab their attention. By adding hotspot pins that are ajax enabled, users can add those items to their cart by directly clicking on the image, as opposed to navigating to a product page to buy it.
Don’t know how to code? No problem. Halena has a visual page builder that is simple enough for anyone to use, regardless of technical skill level.
Hundreds of free fonts come standard when you install this WordPress theme, which is priced at $49.
4. Shoptimizer
Shoptimizer is optimized for speed and conversions — two of the most important elements for every ecommerce website.
This plugin is unique in the sense that it’s built differently. Rather than focusing on the latest design trends, the developers analyzed data. After researching the top ecommerce websites on the Internet, they came up with themes that follow those best practices.
The first best practice: speed. The reason why Shoptimizer is so fast is because the theme automatically minifies the main CSS files on your website. It also creates a critical CSS file that loads content nearly instantly from the viewpoint of your website visitors. In addition to lightning fast page loading times, Shoptimizer is also made to improve your organic reach by improving your SEO strategy.
Next, a distraction-free cart. With Shoptimizer, the checkout process clean and keeps the user focused. By removing clutter and steps from checkouts, it will decrease your shopping cart abandonment rates while increasing conversion rates.
Shoptimizer also has a sticky bar for the product details. When people scroll on a product page to get more information, the title, product thumbnail, price, and add to cart button stay at the top of the page in plain sight. This theme includes critical information next to the add to cart button for every product. I’m referring to things like:
You can also leverage FOMO and scarcity on your product pages. This theme has an option for a sales countdown timer, as well as a real-time availability tracker. These persuasive techniques will help you drive more conversions.
The theme is built for accessibility, making it easier for you to reach as many customers as possible, including people with impairments or disabilities.
Speed and conversions aside, the theme is also beautifully designed. You can purchase this ecommerce WordPress theme for $99.
Pro Tip: If you want to buy this theme, add it to your cart but don’t check out right away. I left it in my cart for a couple of minutes, which triggered a popup offering it for $49 instead.
5. Hugo
You’re a business owner, not a website designer. Hugo recognizes the fact that not all ecommerce webmasters are skilled in design. Some website owners just want to sell without having to deal with complex configurations on their sites.
If this sounds like you, then you’ll definitely want to take a look at the Hugo WordPress theme.
The layouts offered by Hugo are extremely simple. If you want to make any changes, just to use the drag-and-drop page builder. It’s responsive and hassle-free to set up. Instead of spending days or weeks setting up your ecommerce shop, you can be up and running in no time at all.
Overall, the styles on Huge are modern. You can choose different color schemes to match your company logo and make sure that you’re appealing to the right audience.
Hugo’s biggest differentiation from other ecommerce WordPress themes that we’ve seen is the backend simplicity. It’s perfect for new WordPress users or ecommerce shop owners who aren’t concerned with minor design details. If you’d rather spend time selling as opposed to playing around with endless customized elements on your website, this is the best ecommerce WordPress plugin for you.
Conclusion
What’s the best ecommerce WordPress theme?
With so many options to choose from, it’s a difficult question to answer, but after extensive research, I’ve been able to narrow down the top five.
Each one of the themes on my list has something that makes it unique or stands out from other options. So take the time to review each to see which theme fits the needs of your ecommerce site. No matter which theme you choose, I’m confident that it will improve the overall design, layout, and performance of your ecommerce website.
There are more than 30 million bloggers in the United States alone. So how can you make your blog stand out from the millions of other blogs? You need to find an appealing WordPress theme.
Obviously, your blog isn’t competing with every other blog on the planet. But, the competition is still fierce, even in niche categories.
You may be an outstanding writer, but you’ll still struggle to get readers if your content isn’t visually appealing. In fact, 38% of people stop engaging with sites with unattractive layouts. That means nearly four out of every ten visitors won’t even read your blog if your website has design flaws.
The best WordPress themes for blogs are also optimized for search engines. That’s right, adding a theme to your WordPress blog can improve your visibility and organic reach.
My 10 Favorite Blog Themes for WordPress
There are thousands of WordPress blog themes on the market, which can be extremely overwhelming. How can you possibly know which one is the best for your website?
For starters, you need to make sure that the theme matches your content and appeals to your audience. I’ve done my research and narrowed down the top ten WordPress themes for blogs in 2019. This guide can serve as a reference to help you pick the best theme for your blog.
1. Newspaper
Newspaper is a paid WordPress theme. You can add this theme to your blog for $59. Now I know what some of you are thinking, With so many free WordPress themes available, why should I pay for one?
In my opinion, this theme is well worth the price.
The design is professional and modern. I’ll admit, the name of this theme is a bit misleading since it’s extremely versatile. While it is a popular choice for magazine and newspaper sites, this theme can also be customized to fit a review website or blog. It doesn’t matter which category or niche you’re in; this theme can meet your needs.
The versatility and easy customization both make Newspaper one of my favorite options. It has a drag and drop editor so you can easily change more than 100 different elements on the page.
I’d recommend starting with one of the sleek pre-built templates and then making any changes you see fit. You don’t have to be tech savvy or know how to code to do this, which makes this theme a solid choice for literally anyone.
You’ll also have tons of options for customizing the header and footer of your blog. The theme lets you implement a grid design to highlight specific pages, categories, and tags. It’s easy for you to stay organized on the backend, while your website visitors can navigate seamlessly on the frontend.
Newspaper has fast page loading speeds and is AMP ready. In addition to being extremely responsive, it’s compatible with Woocommerce and Google AdSense. The Newspaper WordPress theme is mobile friendly and applies SEO best practices as well.
It’s one of the most versatile WordPress themes you’ll find, and I’d recommend it for any blog.
2. CheerUp
CheerUp is another versatile WordPress blogging theme. While it can be used for nearly any blog, it’s designed for bloggers who are a bit more tech-savvy, as opposed to the average WordPress user.
This theme is made to work in unison with the custom sets of tools, widgets, and plugins that webmasters use to enhance their WordPress site. So if your blog is using lots of add-ons, this is definitely a top option for you.
CheerUp comes with 12 different designs. While that may not seem like much at first glance, these 12 designs come with more than 1,000 layout variations. This helps ensure that your blog is unique among the other websites using the same theme.
Once you select and customize a design, you’ll also be able to choose unique styles for your posts. For example, you could have a full-width text or magazine-style text. Add a cover image to the top of your blog, or omit that option. The choice is completely up to you.
This theme is also AMP supported, optimized for search engines, has fast loading times, and is highly responsive. You can purchase CheerUp for $59.
3. Kale
As the name implies, the Kale WordPress theme is designed for food bloggers. Unlike the other options we’ve looked at so far, this is a free template.
If you’re a blogger in this niche category, you know how difficult it can be to stand out from your competition. This theme can give you an edge since it eliminates clutter on your blog, while still showcasing your images.
While this theme is intended for all things related to food, cooking, and recipes, it’s versatile enough to be applied to blogs in the fashion industry — particularly because both niches are so photocentric.
There are tons of layouts, sidebar options, multi-level menus, and color overlay options for banners and sliders. And all YouTube videos are automatically responsive with Kale. That’s an extremely important feature if you’re a food blogger who includes video demonstrations embedded in your posts.
It’s very easy to install the theme and get started in minutes. Kale has WooCommerce integration as well, for those of you who are selling in addition to blogging.
4. Stockholm
Modern. Clean. Trendy. All of these words come to mind when I think about the Stockholm WordPress theme.
As a blogger, you need to make sure it’s easy for your website visitors to access your content, navigate on the page, and engage with your writing. The Stockholm theme can help you accomplish all of these things.
It’s so versatile that it’s a top choice for blogs in every category. Start with one of the simple but elegant designs and customize it to meet your specific needs. You’ll be able to do this without any coding or design knowledge.
This theme will enhance your entire website, going far beyond your blog. It has specific layouts designed for ecommerce shops, restaurants, and architecture. So if your blog falls into one of these three categories, I’d definitely recommend looking into this option.
Stockholm can be purchased for $59.
5. Jevelin
I like this option because it’s versatile enough for blogs in so many different industries. Some popular categories offered on the Jevelin WordPress theme are:
Education
Food & Drink
Portofolio
Fitness
Photography
Events
Medical
Finance
Beauty
The theme can be installed to your blog with just one click. It’s easy to customize as well. Once you pick a pre-built layout, you can adjust every element on the page. Jevelin lets you do this without having to do any coding. It’s quick, easy, responsive, and shows you live previews of your changes in real time.
I also like the different layout options that are specific for blogs. Some of the best ones include:
Masonry
Creative
Grid
Adding one of these layouts to your blog will definitely make it more visually appealing. Nobody will navigate to your pages and think that they look boring.
This is another paid theme. It costs $59.
6. Editorial
The Editorial WordPress theme has a magazine style layout, which is great for bloggers who want to showcase their content with featured images. This format also makes it easier for you to prioritize your best work.
With Editorial, you’ll have access to a live editing feature to easily move sections around and see all of your changes in real time.
For those of you who have tons of blog content but don’t know how to organize it, consider this theme. It’s great because your readers won’t feel overwhelmed when they visit your website.
This theme also has plenty of widgets that allow for added customization. You don’t have to be a tech wizard to figure all of it out either.
Another great benefit of Editorial is that it’s free with free support.
7. GoBlog
The GoBlog theme is perfect for bloggers who want to take a simple, minimalist approach to their website design.
I like this theme because it supports eight different post formats.
Gallery
Standard
Quote
Video
Image
Link
Status
Audio
It’s extremely easy for you to embed audio and video content into your posts. This will ultimately help you run a successful video blog.
GoBlog is highly responsive on both desktop and mobile devices. You can also add sliders below the headers, which are perfect for text introductions. With a simple theme like GoBlog, you can prioritize your content without having too many complex distractions.
You can purchase the GoBlog theme for $54.
8. Flat
Flat is a trendy WordPress theme. If you want your blog to be bold, modern, and colorful, consider this option. You should also educate yourself on the top trending website color schemes.
This theme uses Javascript, HTML5, and CSS3 to ensure that all interaction and engagement on is fully responsive and beautiful. You can add different effects for transitions as users scroll through your content. Some of those include:
Fade-ins
Slide-ins
Drop-ins
Fly-ins
Progress bars
Animated circles
Flat also comes with extra shortcodes and options for custom post types. The best part of this theme is arguably the drag-and-drop builder. It makes it easy for anyone, regardless of their technical or design ability, to customize the content blocks. The drag-and-drop builder can be used on the front end of your website, so you can see exactly what your visitors will see.
Another reason why this theme is great for bloggers is because it’s optimized for search engines. You’ll also have access to Google Fonts for styling options on each page.
Unlike other themes that aren’t updated frequently, Flat guarantees that it will always work with the latest WordPress versions. Updates are made automatically, without having to make any additional installations.
Pricing for Flat starts at $59. There is also a developer option for $69. For those of you who are currently using another WordPress theme, Flat will give you 50% off of your purchase for switching to them. It’s an enticing offer to consider.
9. WPVoyager
WPVoyager is another $59 theme, but specifically made for travel blogs. That’s because the theme is fully integrated with Google Maps so your content can be displayed in a map view, as shown with the screenshot above.
This is a unique approach to organizing blog posts on your website. Visitors can browse for blogs simply by navigating on the map to points of interest.
It’s the perfect solution for travel bloggers who take lots of photos during their adventures as well. The map feature does much more than just show your visitors the location that you’re blogging about. Let me give you an example.
The screenshot above is pretty straightforward. The title of the post is “5 Reasons You Need to Visit Budapest,” with Budapest marked on the map. But when you click on the post, take a look at how the map changes.
Now there are five points marked within the city. If you click on each one, a photo pops up with a brief description. As you scroll down the page and navigate away from the map, the blog is shown in a more traditional format.
The possibilities with this theme are nearly endless for travel bloggers and photography bloggers. If I were in this niche, I would definitely use this theme on my WordPress site.
10. Vixen Blog
The Vixen Blog theme is simple, elegant, and beautiful. This design has a deliberate feminine touch. You can create a visually appealing blog with this WordPress theme, even if you don’t have any experience with design. It’s fully responsive on both the frontend and backend.
Vixen Blog is optimized for search engines, made for readability, and has a compatible Instagram feed feature. So it’s easy for you to integrate your blog with your social media strategy.
Pricing for this theme starts at $34. There is also an extended license for $2,200. This is made for developers who can then sell those licenses to their clients.
Conclusion
What’s the best WordPress theme for blogs? With thousands of options to consider, it’s tough to name just one. There isn’t a one size fits all blog theme. Your blog is unique, so it’s important for you to find a theme that fits your style and needs.
Some of these themes appeal to certain niches, such as travel, photography, or food blogs. Other options are bold, modern, and trendy, while some themes take a more minimalist approach. There are paid themes, free WordPress themes for blogs, and licenses made for developers as well.
Whenever I write a review like this, I try to include something for everyone so no matter what category you fall into, you’ll be able to find a them you like in this guide.
I’ve had a dream for a while to quit my job and build my own business.
Recently, I did just that. One of my businesses pays the bills while I build another one up.
I gotta say, it’s as amazing as I dreamt about it all those years. I wake up relaxed, calmly walk down the street and grab coffee, work on stuff that I want to work on all day, then hit the gym for a few hours. No rushing, no stress, no dead-end projects from my manager. Every day is a great and enjoyable day.
I didn’t make this happen on the first try. I have a closet full of failed sites and businesses that never went anywhere.
Looking back, a few things finally made it all come together. But hiring a web designer for my site wasn’t one of the critical pieces. Horrible site designs didn’t hold me back, nor did it finally give me the freedom to quit my job and build my business.
I’m going to be blunt.
By the end of this post, I’m hoping to convince you that a hiring a website designer is a waste of your time and money. Not only are there cheaper ways to get a great-looking site (I’ll show you them below), there are also much more important things to focus on before getting a fancy website design.
Reason #1: A Website Design Won’t Help
After countless business and site failures, I’ve learned a few things about what to prioritize.
Here’s what I obsess about when I’m starting a new business:
Do I have an extremely compelling offer that a specific market really wants?
Can I define that market precisely?
Have I proven a repeatable process for acquiring customers from that market?
Is it an attractive business model with healthy cash flow?
Do the challenges in this industry align naturally with my personal instincts?
How can I de-risk the opportunity as much as possible?
Guess what’s not on that list?
Website design.
Don’t get me wrong, website design can have a tangible impact on a business. But that opportunity happens at a much later stage.
If you don’t have enough revenue coming in to cover your rent or mortgage, hiring a website designer won’t change that fact. You’ll still be struggling to pay the bills. The only difference is that your savings with have gotten smaller by several thousand dollars.
I’ve used a personal blog to attract consulting clients for years. It also helped me get a few jobs that accelerated my career quite a bit. Have I ever paid a designer to give it a great design? Nope.
First I bought a $30 theme from Themeforest. Then I paid for Thesis (a WordPress framework) for about $100 and used the sample theme for years. Recently I bought Genesis (another WordPress framework) for $60 and currently use its sample theme.
After almost a decade, I put less than $200 into my website design. That didn’t stop me from landing speaking gigs, getting amazing jobs, closing clients, doing paid workshops, and having enough income to support myself while I quit my job to start another business.
Before getting a custom site design, I make absolutely sure I have a great offer that customers are paying for, a specific target market, and I know how to get in front of that market consistently. Any money spent on website design before hitting these milestones is a waste.
These days, there are plenty of low-cost ways to get great design assets anyway.
Reason #2: Buy a Theme for $60 Instead
What would you rather do at this stage of your business?
Hire a website designer for $10,000
Spend a few hours looking for a new theme for $60
To get a good website design that’s worth the extra hassle and time, $10,000 is a pretty conservative estimate.
For me, this decision depends entirely on the stage of the business. For a larger site that’s making real money, the $10,000 option makes perfect sense. The site has enough unique requirements that a theme really isn’t an option any more.
But when I’m just starting a new site, I’ll gladly use the $60 theme until the site is large enough to warrant a bigger design budget.
There is a catch to all this.
In order to buy a theme, you need to build your site with a tool that allows themes to be installed.
For blogs and basic sites, WordPress is perfect and has an enormous theme ecosystem. There’s an endless list of professional themes for $30–60. Our favorite web hosts all have one-click installs for WordPress which makes this option super easy. After you’ve installed WordPress, head over to Themeforest and pick the theme you want.
You’ll get a great-looking site for a fraction of the cost it would take to hire a website designer.
Reason #3: Or Use Squarespace for $12/month
What if this whole WordPress or Shopify thing is too complicated? Is there an even easier way to get a website built?
You betcha!
Squarespace is your best option, it’s considered the market leader for website builders. These are tools that make building a website as easy as possible. It’s all drop-and-click and basic text editing. No programming or complicated settings to figure out.
It’s kind of like WordPress in that Squarespace is the tool that runs your site. Then you’ll pick a theme that changes how your site looks.
The main differences are that Squarespace is much easier to use and the theme is included in the monthly price. Pricing starts at $12/month which is very reasonable. Squarespace is your best option if you need a basic website that describes your business. A homepage, an About page, a Contact page, and that’s about it.
If you’re building an ecommerce business, use Shopify.
If you’re building a blog or want to focus on SEO, use WordPress.
Regardless of which option you choose, you don’t need a website designer for any of them.
Reason #4: Use These Logo Hacks Instead
Any designer that’s really good will charge a boatload for a logo. For a major corporation that depends on its brand identity, it’s well worth the cost.
But when I’ve started websites and businesses, the last thing I want to spend money on is a logo. I need to conserve every dollar I have to get the business off the ground.
Among online business owners, there’s a hack for getting a great logo at a reasonable price.
It’s a platform for connecting designers to clients. And it works like a contest. You put in your design spec, a bunch of designers submit designs, you give feedback on the top 3–5 that you like, then you pick the winner based on the one you like the most.
I’ve done a bunch of these over the years and have always ended up with a great logo.
It’s super easy to run and you’ll have a great logo for $299. Other than your website theme, this is the only money that you should spend on design in the early days.
What if $299 is too steep? Is there a cheaper way to get a logo?
Yes, a lot of folks have been using Fiverr recently. You can nab a logo for as low as $10. Keep in mind that these logos will be very derivative and basic. The designer has a bunch of basic logo templates and styles they’ve used in the past. They’ll take your company name and plop it right into one of these standard logos. It’s the only way to crank out logos for $10. As long as you’re okay with that, Fiverr has my full support.
Reason #5: The Best Website Designers Aren’t Available
When I was running website growth and optimization teams, I’d occasionally come across a good designer available for a reasonable rate. Can you guess what I did next?
I hired them full-time and took them off the market.
I had more than enough work to keep them busy and a good designer is indispensable to a larger site. I’d quickly employ them full-time and give them more than enough work that they’d stop freelancing.
This happens all the time.
Senior designers know their worth and are super expensive. Younger designers with talent that exceeds their cost are only available for brief periods. Either a client brings them in-house or they figure out what they’re really worth and up their rates. Regardless, it’s super hard to find talent at reasonable rates for a new business.
The last thing I’d do is pay through the nose when I’m just getting a business off the ground.
Reason #6: Cheap Designers Won’t Do Much Design Anyway
I can’t believe I’m about to tell this story.
Years ago, when I was just getting my career going, I did a bunch of freelance online marketing. I ran AdWords accounts, did conversion optimization, wrote copy, and built a lot of websites. Building websites was the bulk of the work that I brought in. A bunch of small businesses needed them and asked if I could help. Of course I said yes because I was living out of a barn and needed the cash.
So I teamed up with a good friend of mine who was a front-end developer.
Here’s the problem: we had no design skills whatsoever.
I wrote solid copy, my friend could build whatever you wanted, but we couldn’t design our way out of a paper bag.
Clients would ask me if I could design a website, I’d say yes, then I’d go buy a WordPress theme that was 90% of what they needed. We’d tweak it just enough to make it look unique.
Here’s the part that will make you cringe.
I’d pay like $30 for the WordPress theme. Then I’d charge the client thousands of dollars for the website. I never felt too bad about since we spun the site up, wrote all the copy, and got everything in place. But still, that’s a lot of extra money you don’t really need to spend.
And this was back when WordPress themes weren’t that good. You could tell the difference between a theme and a real site in those days. Themes are so good these days that if I was a junior designer, I’d play this theme arbitrage game all day long.
Moral of the story: if you find a cheap designer, they’re charging you to find a theme and make a few basic edits.
Reason #7: Website Designs Age Fast
If you find a great designer who charges you thousands or tens of thousands of dollars for your website, you’ll be thrilled with the design.
For about a year.
Then it will start to age.
By years two and three, you’ll desperately want a new design.
Design trends online charge so fast, I can barely keep up myself. They change so quickly that I’ve accepted the fact that my sites need major overhauls every 2–3 years. Instead of a website design being an investment in the future, it behaves more like a fixed cost.
A great design only looks great if it’s better than everyone else’s site. A great design from 5 years ago does not look great anymore – it looks pretty shabby.
Let’s say you buy a WordPress theme for $60. In 3 years, you can easily buy another WordPress theme for $60 that looks more up-to-date. Now you’re spending $20/year to keep your website fresh.
What if you get a spiffy site custom built? If you spend $9,000 on the design (a very conservative estimate), that works out to a budget of $3,000 per year. For a lot of small businesses, that’s a hefty price tag.
I Only Hire a Website Designer When I Can Afford One Full Time
Here’s my rule: I only start doing custom website designs once I have the budget to hire a full-time designer. I might choose a website design agency or a freelancer instead if I don’t have enough ongoing work for a full-time role, but my business should be large enough that I could hire a designer full-time if I really needed. Otherwise I stick to templates and small design projects.
A good social media WordPress plugin lets visitors engage with you on social media.
It also helps social media followers convert on your website.
Let’s look at an example: You wrote and published a killer blog post. A reader loves your post and wants to share it with their friends on social media. How do they do this?
Without the proper tools, the person would have to copy your blog link, navigate to the social platform, login, and manually paste the link before sharing it.
They might even decide it’s not worth it to share your post. Or they might get distracted and forget to do it.
Social media WordPress plugins can make it easy for website visitors to share with just one click.
That’s just one example of why you need to install a social media plugin to your WordPress site. As we continue through this guide and review the best social media WordPress plugins, you’ll learn about the additional benefits.
The 6 Best Social Media WordPress Plugins
After taking a look at dozens of social media WordPress plugins, I’ve narrowed it down to the six best:
Social Locker is definitely one of my favorite social media WordPress plugins. Personally, I love the whole concept behind how this plugin works.
Here’s the thing. Just adding social sharing icons to your website doesn’t necessarily give people a reason to follow you or share your content. You can increase those chances by installing this plugin.
That’s because Social Locker restricts your premium content. For example, let’s say you have an ebook on your website. As opposed to charging for downloads, you use social media engagement as a currency. If someone follows, likes, or shares content on your website, the ebook is unlocked.
Here’s an example of what this would look like from the perspective of a website visitor:
For those of you who normally charge for various types of content on your website and don’t want to give it away for free, you can use these social engagements to generate discounts for that content.
Maybe you have an online video tutorial that you normally charge to view. With Social Locker, you can choose to offer the video at a discount if a user shares your content.
This plugin helps you drive social media traffic while simultaneously gaining quality followers. It’s a great way to generate new leads and drive conversions with social media integration on your website.
Social Warfare is considered among the best social media WordPress plugins because it’s so simple. Other plugins have a reputation for slowing down your website, but that shouldn’t happen with Social Warfare.
This plugin is designed to increase shares by adding social sharing icons to your website. You can add buttons for the most popular social media networks, including:
Facebook
LinkedIn
Twitter
Pinterest
If you upgrade to Social Warfare Pro, you’ll gain access to share buttons for other platforms like Reddit, WhatsApp, Buffer, Tumblr, Pocket, and more.
Social Warfare also lets you choose exactly where you want to place the sharing buttons. You can add them above your content, below your content, in both of these locations, or manually place them on your pages. This plugin offers floating share icons as well — as a user scrolls your site, the sharing buttons remain in view at all times.
Social Warfare allows you to track your results with UTM parameters. You can view analytics to see how well your sharing icons are performing so you can tweak them, if necessary.
The Smash Balloon Photo Feed WordPress plugin lets you share your Instagram content directly on your website.
By adding your Instagram posts to your website, visitors will have a better idea of what type of content you share on that platform. And, they won’t have to search for your profile on Instagram. This is a great way to increase your Instagram followers. It’s also a great way to keep your site updated with the fresh images you’re posting on Instagram.
Setting up the plugin is easy. All you need to do is link your Instagram account and determine where you want the feed displayed on your website.
There is a premium version of this plugin that comes with features like:
Shoppable feeds
Ability to filter content based on hashtags
Popup lightboxes
Hashtag feeds
Advanced moderation for hiding or showcasing specific posts
Post comments for user feeds
For one website, you can purchase the pro license for $39. But if you just want the basic feed on your website, you can stick with the free version and save a few bucks.
Allowing your website visitors to create a customer profile benefits everyone.
The user will receive more personalized content, and you’ll be able to learn more information about your customers so you can target them accordingly. It’s a win-win situation.
But your users need to be able to create a profile at all. That’s easier said than done.
Think about it for a minute: What steps does someone need to take to create a profile? At a minimum, they need to provide you with some personal information and create a username and password. People have so many accounts to keep track of on various websites. Is your site important enough to them to go through this?
You can increase your chances of getting more visitors to do this by integrating your sign up and login process with social media. Super Socializer is perfect for this.
Now users can create an account and login with just one click since they’re likely already signed in to their social media profiles. Plus, they won’t have to remember a new username and password.
Another benefit of this plugin is that you’ll get access to more information about your website visitors. You can target people accordingly based on their social media likes and habits. You can also enable social comments with Super Socializer. This is a great way to drive conversation and get more comments on your blog posts.
Overall, this plugin definitely has more advanced features and functionality that goes far beyond simple social sharing icons, although it does have those options as well. If you want an all in one plugin for social logins, social comments, and social sharing, Super Socializer is worth checking out.
What happens to your blog posts after you publish them? In a perfect world, they remain relevant in terms of SEO forever, but that doesn’t necessarily help you out on social media.
Here’s another question for you. How are you deciding what to share on your social platforms each day? It’s not always easy to come up with ideas for social media posts.
The Revive Old Post WordPress plugin by Revive Social provides a solution to both of these questions. This plugin automatically shares your previously published content on your social media platforms like:
Facebook
Twitter
LinkedIn
Tumblr
Pinterest
Revive Old Post can share more than just your blog posts. It can also share pages, custom posts, and media from your website. The plugin will automatically fetch images from your content and attach them to the social media post.
You’ll have complete control over how each post is shared. Maybe you just want the title of your post or page. Some of you may want more, such as a hashtag or additional text.
Revive Old Post can be integrated with your Google Analytics profile. This is ideal for campaign tracking to see how well these links are performing. Overall, it’s a great way to automate your social media posting while simultaneously driving traffic to your website.
BONUS: Revive Network
Revive Social has another plugin, called the Revive Network. This plugin is designed specifically for Facebook and Twitter. It’s made for sharing content from other websites in your industry on social media. This is a great way to expand your professional network, in addition to sharing relevant information on your website. It’s great for those of you who don’t have an active blog or lots of content of your own.
Kiwi Social Share is designed for the average WordPress user. If you’re looking for a plugin that’s easy to install, setup, and won’t confuse you with too many complex features, you’ll definitely want to take a closer look at this option.
With Kiwi Social Share, you’ll be able to create custom icons for social media sharing on your website. You can customize the position of the icons, as well as enable a floating bar that’s always in view. Kiwi Social Share also gives you the option to change the size and shape of the sharing buttons.
It has a “click to tweet” function for specific phrases as well. So if you’re writing a blog and want to highlight one of your favorite quotes, users can share that quote via Twitter with a link back to your blog.
Kiwi Social Share doesn’t slow down your website and lets you create social sharing icons that are visually appealing to your visitors. Installing this plugin puts you in a great position to increase engagement on your website and gain more exposure on social media.
Top features to look for in a social media WordPress plugin
Before we analyze specific plugins, I want to take a moment to identify some of the functionalities to keep your eye on when searching for a social media plugin:
Social icons — This shows your website visitors that you have social media pages. If they click on an icon, they’ll automatically be directed to the corresponding profile.
Social logins — Allow people to sign into customer profiles using their social media accounts. This makes it easier on your customers since they won’t have to create brand new usernames and passwords to access content on your website.
Social sharing icons — Website visitors can share content from your site to their social media profiles with just one click.
Social feeds — Showcase your social media feeds directly on your website. This feature gives your website visitors an idea of what to expect if they follow your profiles.
Social locking — Restrict your best content with a social locking tool. Content can be unlocked if a website visitor makes a specified action, such as following you or sharing content on social media.
Social comments — Enhance the conversation in your comments section by adding social media comments to your posts. This is a great way to drive engagement and get more blog comments.
Automated posting — Instead of manually posting your website content on social media, you can take advantage of plugins that do this for you.
Now that you know the top features of the best social media WordPress plugins, it’s time to check out the top options to consider.
Conclusion
It’s obvious that your website and social media profiles need to be working together to generate optimal results. So what’s the best social media WordPress plugin? It depends on what you’re looking for.
Some of you might just want to add something simple, like social sharing icons to your blog posts or Instagram feeds to your landing pages. While others might be looking for features that are a bit more advanced, like restricting content based on social media actions.
Maybe you want an all-in-one plugin that also has features like social signups and logins.
Do you want to automate your social media posts with your previously published content? There’s a plugin for that too.
As you can see from this guide, there’s a social media WordPress plugin for everyone based on your specific needs. Now, share this post with a friend who needs it. Naturally, there are social buttons right here for you to do just that.
Are you thinking about building a membership website? Great idea.
Membership websites generate recurring revenue by offering premium content and features to members. It’s also a great way for you to establish your value within your niche. By offering memberships, you’re telling people that your content is so valuable you don’t have to offer it for free.
In order for your membership business model to function properly, you need to install a membership plugin that adds this feature to your website to manage memberships, payments, and other user information.
If you have a WordPress site, there are tons of membership plugins to choose from. I found 746 in my search. Luckily, you don’t have to do too much in-depth research — I’ve done all of the heavy lifting for you and narrowed down the top seven membership plugins. You can use this list as a reference, instead of to trying to find all of the pros and cons on your own.
1. LearnDash
LearnDash is for websites that create and sell online courses. It gives you the option to control the enrollment for all of your courses. You’ll set the pricing, and determine if the course is available to the public or exclusive to members.
There are a few different ways to set this up. In addition to a membership that offers access to all of your content, you can add one-time pricing to give users the opportunity to buy individual courses.
This plugin also lets you use automation to your advantage. You can schedule content delivery. That way you can create all of your courses at once, but distribute them at later dates automatically. This is more much efficient than approaching this manually. If a user doesn’t have automatic renewal enabled for their membership, you can set up automatic renewal notifications to encourage them to renew.
With LearnDash, you can also create a system of points, badges, and certificates to reward users based on their progress. There are also engagement triggers that users can interact with as they are going through your courses.
Support and resources are exceptional too. There are helpful video tutorials and an active community forum to discuss ideas or potential problems with other site owners. If you still need help, you can always contact the LearnDash customer support team.
It’s tough to find another plugin that outperforms LearnDash when it comes to managing a membership site for online courses.
2. MemberPress
MemberPress allows you to switch your existing site into a fully-functioning membership website with ease. A seamless transformation isn’t necessarily the case with every other plugin out there, but it’s an important feature to consider for those of you who already have a website that’s up and running.
With MemberPress, it’s as simple as installing the plugin, adding the details of your payment gateway, setting up your products, and inviting people to join.
It’s very easy for you to manage your content with this plugin. You can restrict access to specific posts, pages, or files. You can do this for content that was already published before you installed the plugin.
This plugin also comes with pricing page templates, which is another top feature. This will help you generate more profit by focusing on your pricing strategy. In addition to the pricing templates, MemberPress supports payment gateways like Stripe, PayPal, Authorize.net and more. MemberPress integrates with some of the most popular email marketing platforms as well.
At the end of the day, your membership website will only be successful if people actually join and pay for content. So you need to treat this like any other product or service. Installing a plugin alone won’t necessarily generate sales for you. With that said, MemberPress makes your job much easier.
3. WooCommerce Memberships
WooCommerce Memberships is another plugin that’s ideal for integrating with your website’s existing content. Like we’ve seen before, this plugin allows you to drip content, so you can automatically schedule when members will have access to premium features.
I’d recommend WooCommerce Memberships to those of you who want to add a membership site to your ecommerce platform. The plugin allows you to sell memberships along with product purchases.
From the user end, memberships can be purchased as a standalone product, or as a bundle. For example, let’s say you have a fitness brand. If a customer purchases diet supplements, you could give them access to the training programs section of your website for free. So, if you want complete customization and fewer restrictions for your memberships and products, the WooCommerce Memberships plugin might be your best bet.
Here is a look at some of the custom functionality offered from the plugin dashboard:
WooCommerce Memberships makes it easy for you to import or export your members. So if you want to combine these memberships with existing services or subscriptions you offer, you’ll be able to do so without having to go through everything manually.
With that said, there are times when you might want to go the extra mile to please one of your customers. For example, let’s say someone has a problem with one of their orders purchased from your site. This customer also pays for a membership to access exclusive content. To rectify the situation, you could easily change their membership to complementary for a specified time. You won’t get this type of flexibility and customization with some of the other membership plugins on the market.
WooCommerce also has an option for selling memberships to groups, teams, or corporations. But that’s a different extension that would have to be purchased and installed separately.
4. aMember Professional
I should preface by letting you know that aMember Professional isn’t a native plugin for WordPress. It’s software that’s built with PHP, making it possible for you to integrate it with WordPress.
However, since it’s not native and specifically designed for WordPress, there could potentially be some compatibility problems with other plugins you’re using.
I like it because it’s another all-in-one option for membership websites. There are unlimited membership levels and items for you to add to your site. They also have more than 200 payment systems that you can use to manage memberships.
From the administrative dashboard, aMember Professional lets you run customized reports about your members. You can also manage your email lists, set up autoresponders, and contact users who aren’t set up for auto renewals with reminder messages.
I really like the access control features for aMember Professional. In addition to controlling who can access different types of content, this software has features to prevent access sharing between users. It tracks the number of IP addresses being used to access content, so if a limit is reached, that user will get locked out of the system and be reported to the admin.
Unlike other membership plugin options, aMember Professional is just a one-time purchase, as opposed to a recurring subscription, making it one of the most cost-effective ways to set up your membership sit.
5. Restrict Content Pro
Restrict Content Pro also offers a cost-effective pricing option. Their plans range from $99 to $249 annually, but you can spend $499 one-time for lifetime access. It may seem like a lot initially, but this pays for itself in two to five years, depending on the plan you were considering. It’s definitely worth it if you’re planning to have a membership site for an extended period of time.
Cost aside, Restricted Content Pro is extremely easy for to use if you’re going to manage basic content and membership levels on your website. You can create and share an unlimited number of discount codes to entice your website visitors to make purchases based on the best value. Restrict Content Pro also has built-in payment integrations so that you can accept credit cards, alternative payment options, or multiple payment methods at the same time.
What really separates this plugin from the crowd is the way you can analyze performance by generating custom reports to view the latest month, or specified date ranges to see how well your memberships are doing. This information is extremely helpful when it comes to assessing your pricing, promotions, and things of that nature.
6. MemberMouse
With MemberMouse, you can easily sell memberships along with subscriptions and products on your website. This versatility definitely makes it a standout membership plugin. It’s great for websites that want to add memberships for content restriction, as well as for ecommerce sites that want to add membership features.
The reason why I love this plugin is because it’s designed for website owners who aren’t too tech-savvy. It’s easy for anyone to use, regardless of your technical expertise. Simply restrict content on your website with password protection for members. When you create content, you can customize how it’s delivered based on things like membership levels, length of memberships, or the referring affiliate.
MemberMouse lets you set up free memberships as well. This is a great opportunity for you to get users to join your site, without having to pay first. Once they join and see your free features, they may be more inclined to upgrade to a paid membership.
While it doesn’t necessarily offer anything different from the other plugins we’ve covered so far, it does have a free option. So for those of you who are new to this and don’t want to spend much money setting up your membership site, you won’t have to pay a dime to use Paid Membership Services. But, you won’t have access to premium features, such as content dripping, unless you upgrade to a paid plan.
Another reason why Paid Member Subscriptions made my list is because the interface is user-friendly and extremely straightforward. If you get intimidated by new software or technology that’s out of your comfort zone, you shouldn’t have a problem using this plugin.
Conclusion
Building a membership website is an effective way to improve your content strategy, establish brand authority, and generate recurring revenue. In order to create a membership site with WordPress, you’ll need to install a plugin.
So what’s the best membership plugin for WordPress?
It depends on what you’re looking for. I created this list to give a wide range of options based on specific features. Some plugins are designed for managing memberships with online courses, while others are better for ecommerce websites that need to integrate memberships with product purchases. There are plugins on this list that are all-in-one solutions, and options that are cost-effective as well. Since there is so much variety in this guide, I’m sure you’ll be able to find what you’re looking for to meet the needs of your website.
I’ll get straight to the point. If your company takes reservations or appointments, you need an online booking system — period.
Take a moment to analyze your current process. How does a customer schedule their appointment?
Without an online booking system, I’m willing to bet that the process looks something like this:
The customer looks up your phone number.
If they’re lucky, someone answers quickly. Otherwise, they wait on hold or reach your voicemail.
The customer explains the service they’re looking for and asks for your availability.
After some back and forth discussion repeating dates and times, the customer scrambles to find a piece of paper to write on so they don’t forget.
That’s assuming you can clearly understand each other over the phone. We all know sometimes it’s difficult to hear based on things like reception, accents, and background noise. Oh yeah — that’s also assuming nobody else called you while you were on the phone. Then you’re forced to let the incoming call go to voicemail, or place your current caller on hold.
Each time someone calls, it takes you away from the task you’re working on. Sure, there are some alternative solutions. You could pay someone to sit by a phone and answer calls all day. But do you really want to incur that added cost? This still isn’t your most efficient option.
Why you need a WordPress booking plugin
Adding a booking plugin to your WordPress site will do more than just improve your operational efficiency. This new system will optimize the customer experience.
Furthermore, 36% of people said that waiting on hold too long when booking over the phone was their biggest pain point for scheduling appointments and 20% of people said the biggest inconvenience was having to wait to call during office hours to book.
By adding a booking plugin to your WordPress site, you’ll eliminate more than half of the biggest pain points for consumers while simultaneously providing them with their most preferred booking option.
When evaluating a new service provider, 94% of consumers say they are more likely to choose one that has online booking options compared to a provider that doesn’t.
In short, adding online booking options to your website will:
Improve your efficiency
Enhance the customer experience
Reduce the time it takes to book appointments
Increase the chances of getting new customers
Give you a competitive advantage
I think I’ve made myself clear. Now that you know the importance of having a WordPress booking plugin, you need to install one to your site.
How do you choose? What’s the best WordPress booking plugin?
Use this guide as a reference to help you decide which one is the best for your business.
1. Bookly
Bookly is fully customizable and extremely responsive. Its sleek design on both the front and backend is modern and visually appealing.
One of the features that makes Bookly one of the best WordPress booking plugins is the option for different employees to create custom pricing and availability. For example, let’s say you own a gym. Each personal trainer can set their own rates. Your customers would have the option to choose the trainer they want from a dropdown menu when booking a session.
From the user end, Bookly takes them through a quick four-step process on your website.
Select the service with the options for categories and employees, if applicable.
Choose a date and time.
Enter personal details like name, phone, email, and additional notes.
Pay.
That’s right. Bookly even processes payments or deposits. This is great for those of you who are getting lots of no-show appointments and missing out on those earnings. If you don’t want to force your customers to pay in advance, you can set an option for paying on-site at the appointment.
You can also set up automatic text and email notifications with Bookly. Those notifications remind the customer as well as your staff members about upcoming appointments.
Bookly also lets your customers translate the booking process into their native language. This solves the problem that I talked about earlier in terms of having trouble communicating with certain customers over the phone.
Bookly lets you create promo codes to discount your services. The plugin tracks all of the data, so you can determine which deals are working the best.
With Bookly, customers can set up recurring appointments, get added to a waiting list pending cancellations, attach files, and rate your services. This WordPress plugin even has a feature for group booking.
Overall, Bookly is one of the most complete WordPress booking plugins you’ll find.
2. EDD Bookings
EDD Bookings is definitely another top option to consider. In addition to booking standard services, this plugin is great for those of you who offer rentals.
Maybe you have a business by the beach and rent out bikes, skateboards, surfboards, and paddleboards by the hour. All of this can be managed through your website with the EDD Bookings plugin.
It’s one of the easiest plugins to integrate into your ecommerce platform. For those of you who are already using Easy Digital Downloads solutions for ecommerce, I highly recommend this plugin.
Customers can book appointments or rentals in just seconds on your website with EDD Bookings. All they need to do is:
Choose the appointment type or equipment type.
Pick a date.
Select a time.
It’s as simple as that.
The EDD Bookings plugin makes it easy for you to manage all of your appointments in one place with different calendar views. They provide you with extensive details for your day, week, and month. You can color code your appointments as well to keep track of different types of services.
The plugin integrates with payment gateways, email lists, Zapier, and Slack as well. EDD will also provide you with reports and detailed analytics. EDD Bookings has a responsive design for desktops, smartphones, and tablets.
Compared to other similar plugins, it’s very affordable. Pricing for the EDD Bookings plugin starts at $80 per year.
3. Booqable
Booqable gives you everything you need for your rental business. Once you add the plugin to your WordPress site, you can start accepting rantals immediately. It works with any theme and is super easy to set up.
You’ll be able to get rentals going today, that’s how easy it is.
It has a host of other features too:
Request a quote: if you’d prefer to send quotes instead of letting customers book directly, that’s built right in.
Embed products: add individual products or collections for rental.
Mobile friendly: the plugin works beautifully on every mobile device.
Control your rentrals: add blockout dates, time slots, and prevent last minute reservations.
Real-time availability: time slots and stock are tracked automatically so nothing is every double booked.
Advanced pricing: Easily set up flat-rates, fixed fees, and any other pricing structure you want.
Built-in payments: Accept payments from Stripe, Paypal, all major credits cards.
Customizable design: Easily match the plugin to the design of your brand. It’ll look like a seamless experience that you had custom-built from a professional designer. It also works with any WordPress theme.
The Booqable plugin comes for free once you sign up for Booqable’s rental software. It’s a perfect way to get a fully-featured rental tool along with an amazing WordPress plugin to make installation really easy.
4. Booked
The Booked WordPress plugin makes it easy for customers to book appointments on your website. I like this plugin because it comes with great add-ons for things like integrating payment options with WooCommerce, calendar integrations with Google Calendars and iCal, as well as front-end appointment management.
It’s a great option for beginners because it’s essentially ready to go right out of the box. You don’t need to worry about any custom coding. The interface is smooth and easy to navigate.
Booked makes it easy for you to add custom time slots to your schedule. This is great for adding in holidays or vacation days. The plugin also comes with some great shortcodes, making it possible to embed your booking calendar nearly anywhere on your site.
Booked is another option for managing calendars for multiple members of your staff. So let’s say you own a barbershop or hair salon. Customers can book with their preferred stylist online with ease.
This plugin also offers guest booking, so website visitors don’t need to be registered or logged into their profile in order to schedule a service or appointment on your website.
5. Booking Calendar
Booking Calendar has been around for ten years and is a top solution for those of you who are in the hospitality industry.
In addition to appointments, this plugin is commonly used to book stays at hotels, resorts, or a bed and breakfast. That’s because the system is designed to accommodate days-long bookings, as opposed to just an hour time slot for an appointment. Not every WordPress booking plugin offers this feature.
Booking Calendar is extremely responsive on both the frontend and backend. For those of you who aren’t too tech-savvy, you shouldn’t have any problems installing this plugin to your WordPress website. All you need to do is insert the booking shortcode into a page or post on your site.
Your bookings are stored in the Booking Calendar dashboard, so you won’t need any third-party services or accounts to manage them.
The plugin will automatically prevent double bookings based on this information. Again, this is ideal for those of you who are offering a service such as rooms in a hotel building.
Booking Calendar supports multiple languages, so you can accommodate website traffic that’s coming from other countries. The plugin also syncs with third-party platforms such as Booking.com and TripAdvisor, to make sure your availability dates are updated in real-time all over the Internet.
6. Team Booking
As the name implies, the Team Booking plugin is designed to accommodate the booking schedules of multiple members on your staff. We’ve seen some other plugins on our list that have this feature, but none that have it has their primary point of emphasis.
Team Booking integrates with Google Calendar, which makes it easy for managing appointments based on everyone’s unique availability.
But don’t let that that dissuade you if you’re a solopreneur. While this plugin was designed with teams in mind, you can still use it on your own if you’re providing an individual service.
This plugin allows you to set up multiple form fields to collect additional information about your customers.
Team Booking also has a map feature, which is another differentiating element. When a customer books an appointment, the map can pop up with the location. All of the directions are displayed in real time from the customer’s address.
You can collect payments or deposits with Team Booking as well. The plugin is supported by PayPal and Stripe.
Team Booking is a top choice for those of you who don’t want to spend a ton of money on a booking plugin. Pricing for this license starts at $28.
7. Amelia
Amelia is an automated booking specialist. This plugin is great for those of you who offer multiple types of services.
For example, let’s say you own a car repair center. Your customers can schedule things like tire rotations, oil changes, brake replacements, and other services that you offer. You can even set it up so they can choose a specific mechanic to service their vehicle, based on availability, of course.
This plugin is also great for law consultants. Your clients can schedule meetings based on the type of help they need. You can collect deposits and payments through this booking plugin as well.
As you can see, the applications for Amelia reach far and wide. Its versatility makes it one of the best WordPress booking plugins on the market.
You can install Amelia to your WordPress site in just a few clicks. You don’t need to be a technology wizard or have experience with coding to get it up and running.
I also like how this plugin has an administrative dashboard that lets you track and measure KPIs with graphs, tables, and charts. This provides you with deep insights into your performance.
The design of the booking calendar is completely customizable, so you can choose the colors and other design elements that compliment your website color schemes.
Conclusion
You need to have online booking options on your website. If you’re not allowing online booking, you’re leaving money on the table. Now that you’re aware of the importance of this feature, it’s time to find a plugin that fits your needs.
What’s the best WordPress booking plugin?
The answer will vary based on who you ask. I created this with all different types of businesses in mind. Depending on your needs, I’m confident you can find what you’re looking for.
Do you want to collect payments with your plugin?
Do you need to manage appointments for multiple staff members?
Are your customers booking a service, making a reservation, or renting equipment?
Some plugins specialize in these features, so think these questions through and install a plugin that meets the needs of your business.
In fact, your website might already be listed on some directories right now.
Directories like Yelp help consumers find a restaurant or service in their area. While a directory like Angie’s List connects people with contractors for things like electrical work, landscaping, and plumbing.
Both of these websites are very different—and they are both directories.
There’s a good chance you can find a way to implement a directory on your website. Law firms use website directories to list their lawyers and employees. Real estate companies have directories for their listings as well as their agents. A retail chain probably has an online directory for its store locations.
If you’re using WordPress, adding a directory to your website is simple. You just need to install a plugin.
It offers some of the key features that I look for in a directory plugin:
Media support
Customized form fields
Payment processing
You can also purchase add-ons to enhance your directory with the Business Directory Plugin. If you’re going to use these add-ons, I’d recommend buying the package.
The combo pack is $199.99 for a single site and $399.99 for multiple sites. It may sound pricey initially, but considering the price for each add-on starts at $69.99 and $139.98 (for a single site and multiple sites, respectively), it’s actually a great deal.
They have add-ons for premium features like:
2Checkout gateway
Discount codes
Ability for businesses to claim listings on your site, similar to Yelp
Google Maps integration
File attachments module
PayPal gateway
Ratings
Stripe integration
Even though you’ll have the option for premium add-ons, you can install and use this plugin right out of the box for free. The plugin also comes with a built-in reCAPTCHA tool to avoid spam listings on your directory.
The Business Directory Plugin also has a featured-levels module. This is perfect for those of you who are using this directory to generate recurring sales by implementing subscriptions. Here’s how it works: You can set up your site to offer specific features for paid listings.
For example, a business that pays to be listed can have unlimited character counts, images, and maps, whereas a free listing wouldn’t get these features. Business Directory Plugin even lets you specify between payment tiers based on the features you offer.
This plugin really gives you all of the tools that you need to compete with the giant names in the directory industry. I’m not saying that all of you should try to be the next Yelp or TripAdvisor, but if that’s your goal, you should definitely consider trying the Business Directory Plugin. I think it’d be super smart to create a directory in a very niche area that’s not well-represented or easily searched for in an existing directory.
GeoDirectory has one of my favorite search interfaces, allowing you to create a massive global directory on your website.
This is a great option for those of you who are looking for a free WordPress directory plugin as well.
They make it easy for website visitors to find exactly what they’re looking for without sacrificing the look and visual appeal of your website.
This plugin offers a front-end form that allows other businesses and users to submit listings, so scaling your directory is limitless.
When someone searches for a business on your website, the listings are displayed by proximity, so users can see the closest and most relevant options to them first.
The plugin integrates with Google Maps. There is a large and clickable map next to every listing in the directory. Users can find directions to the location directly from that map without having to leave your website.
While most of the features are free, you can buy add-ons for things like:
Paid listings
Reviews
Multi location support
Advanced search
Events
Option for businesses to “claim” their listing
GeoDirectory is also multi-site compatible, so I recommend it to developers who will add it to their clients’ sites or to those of you who plan to build a network of directories.
If you’re building your directory website from scratch, you could also consider purchasing the directory themes from GeoDirectory as well. But, this plugin will work with any theme, so you’re not obligated.
Merchants with listings on your directory will have access to Google Analytics data. This feature will show them how much your site is helping their company. You can use that to potentially justify your pricing if you plan to charge for listings.
Overall, GeoDirectory is a top option for anyone who wants to build a large and scalable business directory.
You can use it as a platform for Craigslist-style classifieds, or use it for something like a directory of movie ratings.
Maybe you want to add a travel guide directory, wedding directory, restaurant guide, or real estate portal to your website. All of these options are possible with the Advanced Classifieds & Directory Pro plugin for WordPress.
This plugin is free to install. But it offers premium add-on features that you can purchase.
One of my favorite add-ons is the listings slider/carousel. That allows you to easily show off pictures of your listing in a user-friendly slider format.
The plugin has a simple interface for businesses to manage their listings on your website. This area also lets those businesses see their payment history and renew their listings directly from the platform. This plugin can integrate with Stripe, PayPal, and WooCommerce for payment processing, and even supports offline payments, meaning you can accept checks from local businesses that don’t want to pay online. This can be a way for you to save some money by avoiding a payment processing add-on. Merchants will automatically be notified via email when their listings expire. They will also receive a confirmation message when payments have been received.
Advanced Classifieds & Directory Pro lets you organize listings by category, which is something you should take advantage of. An advanced search widget is also available from Advanced Classifieds and Directory Pro, so users can narrow their options by category, location, keywords, and more. All of these flexible features make this one of the best WordPress directory plugins you’ll come across.
Toolset Directory provides all of the key features you will need for an advanced directory website without using complex PHP coding.
The plugin is targeted at both experienced programmers and coding novices. Developers will be able to add features such as front-end forms quickly and without needing to waste valuable time coding PHP. Meanwhile, beginners will be able to create complex directory websites that they didn’t think were possible for someone of their level.
Use Toolset Directory to create a number of features including:
Custom post types, fields and taxonomies
Custom search with multiple filters
Maps with distance filters
Front-end forms
Paid listings
Email notifications
Payment support thanks to WooCommerce integration
It’s easy to customize these features as well. For example, you have flexibility over how your search results are displayed – whether it’s in a grid, a table or on a map.
If you are building a multilingual directory website then you will be pleased to know that Toolset Directory was created by the team behind WPML so they are completely compatible.
Toolset Directory is also integrated with other popular plugins such as Elementor, WooCommerce and Yoast SEO. In addition, it works with the major themes on WordPress.
The full Toolset Directory package on three websites costs $149. But its versatility means that you can use it to also build other types of websites such as e-commerce, membership and brochure websites. Therefore, you don’t need to download multiple plugins if you are planning on building various websites.
LDD Directory Lite is extremely easy to install, which means you can get a directory up and running on your site in just minutes.
It’s another free WordPress directory plugin with add-on options available for purchase. Compared to some of the other plugins out there, these premium upgrades are fairly inexpensive, ranging around $10 to $20.
The LDD Directory Lite shortcode makes it possible for you to add a directory to any page or post on your WordPress site. Once the shortcode is added, the directory gets generated automatically. This solution makes it one of the most lightweight (hence the name) directory plugins available.
Once the plugin is installed, you have seemingly endless customization options. You completely control how the directory looks and feels on your site. Some of the top add-ons include social media and Google Maps integrations.
By using this plugin, you’ll benefit from a modern design. It’s ideal for WordPress users who aren’t too tech-savvy and don’t want to play around with confusing features, but still want a good looking result.
LDD Directory Lite is compatible for front-end submissions. It’s easy for website visitors to view your listings and navigate without any trouble as well.
You can set up email notifications related to listings. Businesses that have listings on your site have the power to customize and make edits from the front end as well.
I recommend it to anyone who wants a simple directory plugin that’s powerful and won’t weigh down your website.
Last, but not least, is the Directories Pro WordPress plugin. It’s extremely responsive and uses caching to optimize the performance of the directories from both desktop and mobile devices.
The plugin offers an advanced search and filter for your visitors. You can even enable an auto-suggest feature in the search forms.
All of the fields are completely customizable. Each listing can have fields like tags, locations, reviews, and categories.
One of the best features of Directories Pro is the content display editor. It’s easy for you to use the drag and drop editing options to customize the directory without having to use any code. Some of the other top features include:
Map integration
Paid listings
Claim listings
CSV import and export
Customized email notifications
With Directories Pro, customers can rate and review the listings on your directory without having to register, login, or create an account. So you’ll likely get more reviews that will improve your directory.
It’s easy to build multiple directories with this plugin as well. You also have the option to clone or migrate your directories from one site to another. All of these features make Directories Pro one of the best WordPress directory plugins for developers and average users alike.
Key features of a WordPress directory plugin
Since the word “directory” is so vague and has tons of potential applications, it can be a bit challenging at times to find the best WordPress directory plugin for your website. So before I go through my list of the top options for you to consider, I want to briefly explain what to look for in a directory plugin.
Payment options (for those of you who will charge for directory listings)
Location-based searches with integrated maps
Fully customizable form fields
Easy ways to add and adjust directory listings
Ways for customers to rate and review businesses
Back-end tools
Front-end submission features
Shortcodes that make it easy to add a directory anywhere on your site
Media support
You won’t necessarily need every feature on this list. It really depends on your company, your website’s purpose, and the type of directory you’re trying to create. As we continue through this guide, you’ll see these features and many more offered by the directory plugins I’ve listed. So use this list as a reference to help you find the best WordPress directory plugin for your site.
Conclusion
There are so many different ways to add a directory to your website.
Some of you might be trying to create giant business directories that will compete with the big players in this industry. Other websites will create local directories in niche categories. You might even just want a directory for something simple, like your staff.
Regardless of your situation, you can add a directory to your WordPress site with ease by installing a plugin. So use this guide to narrow your search. Look for the option that has the specific features you need to help you find the best WordPress directory plugin for your website. If you are planning to create a large directory make sure you have a fast web host. Check out my list of the best wordpress hosting companies if you need a new host.
Looking for a good way to collect more leads? Or maybe draw in newsletter subscribers? Or maybe you just need some customers to participate in a survey?
A WordPress popup plugin helps get you there.
According to a study from Sumo that analyzed nearly two billion popups, the average conversion rate for a website popup is 3.09%. The top 10% of high-performing popups convert at an average rate of 9.28%. Some websites saw conversion rates that topped 50%.
According to a recent study from Impact, the average conversion rate for any website landing page is 2.35%. The top 10% of websites have an average conversion rate of 11.45%.
Bottom line: The average popup outperforms the average traditional landing page. And, the average conversion rate of the highest performing popups are still in the ballpark of the highest performing landing pages.
I created this guide to help you choose the right popup plugin for your WordPress site. I’ve narrowed down the top seven options. Let’s dive right in.
Ninja Popups is one of the most popular WordPress popup plugins on the market. I’m not saying you should always follow the crowd, popularity is usually a telling sign when it comes to quality.
Of the reason why Ninja Popups is one of my favorite plugins is because they offer an extensive list of features, the popups are extremely responsive and work well on mobile devices in addition to desktop browsers and it’s easy for anyone to configure this plugin, even if you don’t have any coding experience.
With Ninja Popups, you can customize the design of your popups to match your trending website color schemes. Ninja Popups also lets you customize things like the size of your popups and colors of the buttons. This is important because this plugin also offers A/B testing. You can try different variations of your popups to see which is the most effective and yields the highest conversions. In addition to the A/B tests, Ninja Popups has a detailed analytics page. You can see other KPIs with charts to help you improve your popups. This plugin has page level targeting as well, so you can have different popups for each page on your site depending on your goals.
The regular license for a single website starts at $26, making this plugin extremely affordable. It’s ideal for nearly any type of popup campaign you want to run.
Getsitecontrol is a powerful popup plugin for WordPress. It comes with a variety of different widgets to help you generate leads effortlessly and seamlessly.
You’ll also be able to manage all of your widgets in a single, powerful dashboard that lets you manage your popups across multiple different websites. It also allows you to manage the popups’ appearance, target audience, and integrations.
Speaking of, with integrations to apps and software such as Google Analytics, Hubspot, AWeber, ConvertKit, and SendGrid, you can rest easy knowing that Getsitecontrol will play nice with your business’s existing workflow.
Along with popups, you’ll also get:
Template galleries
Mobile popups
CSS editor
Direct links to widgets
Picture and GIF search
A/B testing
Segmentation
Multi-page widgets
Unlimited users
Pricing starts at $7 a month that includes 10,000 monthly widget views. Getsitecontrol also comes with a 7-day free trial with no commitment or credit card needed.
3. Popups by OptinMonster
OptinMonster is a popular lead generation software. However, it also helps you with other marketing tactics. More than 700,000 websites have used OptinMonster for something. In addition to its standard lead generation solutions, OptinMonster also has a WordPress plugin called Popups by OptinMonster.
You don’t need highly technical skills to use it. Its drag-and-drop builder is dead simple to use. In addition to popups, this plugin allows you to create other campaigns like:
Slide-in forms, or scroll triggered boxes
In-line forms
Mobile-specific forms
Floating headers
Footer bars
Welcome gates
OptinMonster has advanced targeting based on personalized behavior for each unique website visitor. This technology is made to trigger popups at the most optimal time to drive conversions. They specialize in popups with exit intent technology. The software can determine when a website visitor is going to leave your page based on their browsing behavior. For example, if they open a new tab, there’s a good chance they are going to navigate to that tab. So that’s a time when an exit intent popup would be triggered. This is great because you don’t want popups to be intrusive to a user’s browsing experience, but you do want to catch visitors before they leave.
OptinMonster claims that this plugin has helped some websites boost conversion rates by up to 785%. While I can’t guarantee you’ll get those same results, I’d definitely say it’s worth a try.
All of the campaigns built with the Popups by OptinMonster plugin are mobile friendly and highly responsive. The plugin integrates with your email marketing software as well. You can run A/B tests with this plugin. And you’ll have access to Google Analytics data for all of your campaigns.
4. Layered Popups
The Layered Popups plugin lets you create popups that are, you guessed it — layered. Basically, these popups can have multiple layers, which can attract the attention of website visitors and let you get creative. I’d recommend this to anyone who wants to implement website popups that are far from boring and separate themselves from the crowd.
This plugin has a visual editor, which makes it easy for anyone to create and make changes to the design of these popups. Layered Popups has several options for display modes as well. These are some of the options for triggering a popup:
Layered Popups is also compatible with some of the top email marketing platforms on the market. As a matter of fact, the plugin supports 56 of these email systems, but some of the biggest names include:
When you install Layered Popups to your WordPress site, you’ll have access to more than 150 templates. You can also create an unlimited amount of A/B tests for different elements of your popups. With pricing starting at just $21, this is definitely one of the best WordPress popup plugins available.
5. ConvertPlus
The ConvertPlus WordPress plugin is designed for driving conversions with popups. Here’s what the plugin offers
Popups, of course
Fullscreen popups
Top bar information
Bottom bar information
Slide-ins
Sticky boxes
One of my favorite features of ConvertPlus is the template selection. You can take one of the 100+ templates and make slight tweaks to personalize it for your own website content.
ConvertPlus has more than 700 fonts that will make your popups stand out. They offer custom CSS, animations, and background settings as well. You’ll also benefit from real-time analytics for your popups and other campaigns. This information will help you track KPIs like views, clicks, and conversions.
This plugin integrates with email marketing software, as well as other CRM solutions such as:
WooCommerce
Contact Form 7
Zapier
WP Registration Form
6. Bloom
The Bloom WordPress plugin is designed specifically for email opt-ins. There are six different ways to display these opt-in forms on your website.
Automatic popups
Automatic fly-ins
Inline opt-in forms
Below content forms
Widget area forms
Required opt-in for content unlock
The last option is something that’s unique, and makes this plugin stand apart from other available options. Here’s how it works: Depending on what your website is offering, you can restrict content to the average user. This is a great way to entice opt-ins or registrations. In order for a website visitor to gain access to premium content, they’ll need to opt-in first.
Popups can be triggered based on a number of different actions.
Delay based on time
Triggered based on scrolling
After comment popups
Post-purchase popups
Inactivity popups
Bloom also works with 16 different email marketing platforms, including:
Campaign Monitor
AWeber
MailChimp
GetResponse
SalesForce
HubSpot
iContact
ActiveCampaign
Bloom has hundreds of templates for your popups. You can also customize things like the borders and edges of your popups. The color options are virtually unlimited, so you won’t have to worry about finding a color scheme to match your website design.
7. Elementor Pro
With Elementor Pro, you can build any type of website popup from scratch. Its jam packed with features that will help any site grow.
You can create popups for specific reasons like:
Capturing leads
Making announcements
Keeping users on the page with exit intent notifications
Growing your email list
Content lock and upgrades
Full screen welcome mats
Generate sales by showcasing products and upsells
Build login forms
Elementor Pro offers advanced targeting options as well. For example, you can trigger a popup after a specified number of page views or a specified number of sessions. You can even control popups by the device a user is browsing from.
Popups are triggered based on actions such as scrolling, clicks, page loading, inactivity, and exit intent. You can show certain popups on posts with specific tags, authors, or categories. This plugin also offers WooCommerce integration.
You can also hide popups for users who are logged in. That way you won’t be asking for an email address that’s already been added to your subscriber list.
Subscriptions start at $49 per year for Elementor Pro, which is a bargain, in my opinion, considering all of the advanced features you’ll get for that price, plus design elements that are second to none. You can create beautiful popups that are visually appealing and attractive to your audience.
Conclusion
Do popups work? That’s a conversation for another day.
For those of you who are ready to add popups to your website, you’ll need to install a WordPress plugin that will make this process much easier for you.
So what’s the best WordPress popup plugin?
It all depends on what you’re looking for. I’ve narrowed down the top seven options for you to consider.
You’ll want to install a plugin that lets you create the type of popups you want, but also integrates smoothly with any other software you are using.
Some plugins have more templates and custom design features than others. While other popup plugins offer better analytics, A/B tests, and advanced targeting options. You’ll even find some options with all in one features.
Heck, for those of you who have a new website, you’re probably wondering if your site is even working—let alone how much traffic you have, where your visitors are coming from, and what pages are performing well.
To answer those questions, you’ll want to turn to Google Analytics.
If you’re using WordPress, you can integrate Google Analytics with your site through plugins. They allow you to view all of these insights without having to leave your WordPress administrative dashboard.
It doesn’t matter if you’re website is new or old. It doesn’t matter if you have an ecommerce site or blog. Every website can benefit from Google Analytics plugins.
Check out my list to determine which plugin is best for your situation. I took the time to research and identify the best Google Analytics plugins for WordPress.
More than two million WordPress websites are using the MonsterInsights plugin.
I love this plugin because it’s so easy to install and use. You can get the plugin configured in just minutes.
It is dead simple. And it’s easier than manually adding your Google Analytics code, set up your event tracking, configure your ecommerce tracking (if applicable), and deal with the learning curve of Google Analytics.
MonsterInsights simplifies everything for you, directly from your WordPress dashboard. You can enable specific Google Analytics features with just one click. There is no coding required.
The plugin provides you with extensive reports about your website. I’ll go through each one briefly and list the benefits.
Audience Report
Gender
Age breakdown
Device (desktop, mobile, tablet)
Location
Categories
You could learn that the majority of your traffic is coming from men in the United States between the ages of 25 and 34. These users are browsing from mobile devices.
Behavior Report
Sessions
Pageviews
Average session duration
Bounce rate
Referrals
Search terms
Outbound links
If you identify specific outbound links on your website that are very popular, you can use that as a potential partnership opportunity. You’ll also be able to focus on referral channels that are driving the most traffic.
Content Report
The content report shows you the top performing landing pages. You’ll see the visits, average duration and bounce rate for each page. Based on these results, you can optimize those pages to drive conversions.
Obviously, this report is specifically for ecommerce websites. It’s useful information that will help you increase conversions and revenue.
You can’t go wrong by installing the MonsterInsights plugin. The only catch is that it’s not free. Pricing starts at $99.50 per year. But if you have an ecommerce site, you’ll want to go with the pro version that’s $199.50 annually. MonsterInsights even has a plan for agencies and developers, which costs $499.50. That’s not bad considering you can use it on 25 sites. Buy it now.
In fact, this plugin has more than one million active installations.
With the Google Analytics Dashboard for WP, you’ll be able to use the latest Google Analytics tracking code to monitor your WordPress site. This is great for those of you who don’t want to manually insert the tracking code. Once installed, you’ll be able to view all of your Google Analytics statistics from the WordPress dashboard. This makes things much easier for you.
You’ll be able to track key stats in real-time, such as:
Real-time visitors
Real-time acquisition channels
Real-time sources of traffic
The plugin also helps you track specific events on your site. Some of these include emails, downloads, page scrolling depth, and affiliate links. You can even create notated HTML elements that allow you to track custom events and actions.
The plugin also offers front-end viewing options. As an administrator, you can set up your reports on the front-end of any page on your site. You can also allow these front-end viewing permissions for other people who work on the website like editors, authors, and contributors.
Some of the most popular reports you can view with the Google Analytics Dashboard for WP include:
Google Analytics recently launched a new feature for enhanced ecommerce statistics. That’s what this plugin focuses on.
It’s fast and easy to install. Once you install it, you’ll be able to track the behavior of your website visitors across your entire ecommerce site. You’ll learn about everything they do from the home page to the product views, all the way to the thank you pages.
Here some of the reporting they offer:
Shopping behavior report
Checkout behavior report
Product performance report
Sales performance report
The plugin tracks product impresses, clicks, and add-to-cart rates on every page. If you don’t want to bounce back and forth between your WordPress dashboard and Google Analytics dashboard, this plugin will let you view everything from one place. Try it today.
Analytify is another plugin eliminates the need for you to manually add your Google Analytics tracking code to your site. All you need to do is install the plugin and authenticate it with one click to automatically add the code.
This is especially nice for anyone who’s nervous about messing with your website’s code. Let’s be honest: It can be scary. Without any coding experience, even a simple copy and paste can be a bit intimidating.
Analytify has all of the standard Google Analytics reports and statistics. You can view all of them from your WordPress dashboard. What makes this plugin stand apart from other options are the extras. They offer premium add-ons for things like WooCommerce and Easy Digital Downloads integrations.
Depending on the type of website you have, you may want to show website visitors your statistics as well. For example, let’s say you have a business directory site. The companies that are listed on your site would want to know certain metrics. So you can enable front-end viewing reports.
The Analytify WordPress plugin is great for ecommerce businesses. They have enhanced ecommerce tracking. You’ll know how many visitors added items to their shopping cart and also gain insights for when people are leaving the cart. This information will help you reduce shopping cart abandonment by optimizing your checkout process.
You’ll also see things like:
Transactions
Revenue
Average order value
Product checkouts
Unique purchases
Product clicks
Product detail views
They also provide you with automated email reports — which is amazing. You can gain deeper insights for specific campaigns, posts, and pages.
The shortcodes offered by Analytify allow you to integrate your data into custom templates.
Furthermore, you can manage your UTM campaigns with Analytify as well. For those of you who aren’t familiar with this or want to learn more, refer to my guide on how to track your leads with UTM parameters. It’s nice knowing that you can monitor those campaigns directly from this WordPress plugin.
Pricing for Analytify starts at $39 for one site. Add-ons are purchased separately. Those all fall within the $19 to $49 range. Analytify also offers an all-in-one bundle for $129 per year that includes your Analytify install and every add-on. This is the most cost-effective deal if you’re planning to purchase add-ons.
Google Analytics already offers insights for event tracking. This allows you to monitor specific user interactions with content on your website.
Think: clicks, downloads, flash element or AJAX embedded element interactions, video plays, and gadgets. This helps monitor custom metrics that aren’t based on something simple (e.g. page views). Just because someone navigated to your homepage, it doesn’t tell you if they scrolled to view your pricing table.
The only problem is these events can be tough to manually set up and configure with Google Analytics.
Without a plugin, you’ll have to some extra work based on the type of event that you want to track:
Then you’ll have to write commands. When it’s done, it will look something like this:
Here’s another example:
Again, it’s complicated. Even the Google Analytics developer page with these instructions says, “tracking outbound links and forms can be tricky.”
The WP Google Analytics Events plugin simplifies this process. You can do all of this without having to worry about any coding.
So if you want more detailed information with how users are interacting with specific pages on your website, you’ll want to install this plugin. It’s much easier and less complex than the standard coding process for event tracking. You can download and install the WP Google Analytics Events plugin to your WordPress site for free.
Conclusion
Every website can benefit from Google Analytics.
(You’ve already installed, right? If not, do it now. Right now. Go. Install it now. Here’s our guide to help.)
But you can simplify your insights by getting all of your reports and information directly from your WordPress dashboard. All you need to do is install a plugin. So what’s the best Google Analytics plugin for WordPress?
For those of you who want a free all in one plugin, you should consider Google Analytics Dashboard for WP. If you’re a developer, have an agency, or want added reports for an annual premium, you should look into MonsterInsights.
Maybe you don’t want all of these features, and you’d rather focus on something specific, like event tracking. If that’s the case, WP Google Analytics Events will be your best bet.
No matter what type of website you have, I know there’s a Google Analytics plugin for you on this list.
You can create a website in less than 20 minutes. You don’t need to be a tech wizard either.
It doesn’t matter if it’s for business or pleasure. You don’t need a fancy designer or an expensive developer. Just follow the simple steps below and you’ll be online in no time at all.
Quick Start Checklist To Create A Website
Want to just get your website running as quickly as possible? Follow these two steps to get your own piece of internet real estate up and running in 15 minutes or less.
1.Sign up forHostinger. Select their Single Shared Web Hosting plan for just $1.99 per month. It’s a four-year contract, but it’s the best deal out there and you get a free domain name, too. Follow the steps to create an account and purchase the plan.
Voila! In less time it takes to watch an episode of your favorite show on Netflix, you can have your new website live.
If you want to create a website that builds an audience and makes you money the right way, there is a bit more to do. But don’t worry! Everything you need to know is covered in the rest of this post.
9 Steps to Create a Website
Here’s a summary of the steps to build your website:
Feel free to use these links to jump around to the section you need as you create your website.
Step 1: Choose the Perfect Domain
Choosing a domain is the most important decision you can make for your site. It literally says how you want to be represented to the world. It’s the address for your site and the way people will remember who you are.
While many of the best domains are taken, that doesn’t mean you won’t be able to find a perfect domain for your brand.
When brainstorming good domain names, consider the following elements:
Easy to say and spell. Potential visitors should be able to say your domain name out loud to someone without them having to ask twice how to spell or say it.
Short and sweet. We recommend no more than 14 characters. You don’t want an overly long domain name that’s hard to remember and say.
Go with .com, .org, or .net. While there are plenty of domain name systems out there, it’s best to stick with the tried-and-true. You want people to be able to remember it, after all.
Use your name. A particularly great choice for a personal blog, website, or portfolio.
Avoid numbers and hyphens. This just makes it look weird in the URL. Plus it makes it harder for people to say your URL to others.
Come up with a few potential domain names in case your top choice is already taken. The Hostinger Domain Checker is free, and it will let you know if the domain name you want is available.
Type your desired name into the Domain Checker. If it’s available, fantastic. If not, Hostinger will automatically provide a few recommendations that are close to what you are looking for.
Maybe one of the recommendations works for you. Maybe you have to try a different approach.
I recommend you brainstorm ideas and search until you find an available domain you like, rather than taking something that isn’t quite right just because it is available. If you get stuck, you can always try one of many other free domain name generators to kickstart your creative flow.
It’s possible to buy a domain that’s already taken—but I don’t recommend doing that because it’s very expensive. In fact, quality domains typically cost a few thousand dollars at a minimum. I’ve seen it go as high as six or seven figures for a domain.
My advice is to get scrappy, get creative, and be flexible. You will be able to find one that’s available at a reasonable price.
Don’t add the domain to your cart at this time–you can get a domain for free by signing up for their Premium Shared Hosting service, which is what I recommend.
I’ll walk you through that process next.
Step 2: Get Web Hosting and Free Domain Registration With Hostinger
A website needs just two things to go live: A domain name and a web host.
You just came up with your domain name. Now it’s time to put it to use with a good web host.
We highly recommend you use Hostinger for your website’s host. They offer fast and reliable web hosting. Hostinger also allows you to register your domain free of charge.
It’ll give you three options for shared hosting, which is the type of hosting most people want to create a new website.
Hostinger offers three options for shared hosting: Single, Premium, and Business:
Select your hostinger shared hosting plan to continue.
I recommend signing up for Premium unless you already have a domain name.
My reasoning is that the Single Shared Hosting plan does not come with a free domain, whereas Premium and Business plans do. Since you need a domain name in order to have a website, the vast majority of users looking to create a site are going to want both domain + hosting bundled together.
Both Premium and Business plans come with the ability to create 100 websites, 100 email accounts, and other tools to keep your site at top performance.
The Business plan comes with more storage and bandwidth, so your site will be able to handle more traffic than with a Premium plan.
Once you select the best plan for you, Hostinger will ask you how long you want to sign up. Here’s what that looks like if you choose the Premium plan:
Locking in a longer term is the best way to save money with Hostinger.
I chose the 48-month period for my Premium plan so that I could max out the discount. As you can see, I’ll wind up paying less than $100 for four years of hosting!
That’s a phenomenal price, especially when you consider that many other hosting providers charge extra for things like SSL certificates, website builders, email accounts, and other critical features that Hostinger bundles in for free.
After selecting the length of your hosting agreement, complete the rest of the information on the page.
Register an account with Hostinger. You can use an email address, or signup via an existing Google, Facebook, or GitHub account. Whatever you choose, make it an email or account that you check regularly, as this is how Hostinger will communicate with you about any issues that come up.
Enter payment details. Hostinger accepts all major credit cards and a variety of online payment gateways, such as PayPal, GooglePay, and CoinGate.
Click “Submit”. Once you submit your payment, you have 30 days to try Hostinger risk-free. If you are not happy with your service, cancel within the first month for a refund.
Once your payment goes through, and you confirm your email address, you’ll be able to begin setting up your site.
If you need managed WordPress hosting, WPEngine is a fantastic option.
As a managed host, WP Engine professionally maintains speed and security at the server level, so you don’t have to do anything. To learn more, check out our WPEngine Review.
You’ll receive a welcome email from Hostinger once your payment gets processed. From there, you can simply follow the onboarding instructions to log in and finalize your account.
Hostinger will prompt you to answer a series of simple questions about your new website.
The questions are all very straightforward, and you can get through this step in just a few minutes.
If you signed up for a Premium or Business Shared Hosting plan, you’ll have the option to claim your free domain at this time.
You’ll also have the option to purchase additional domains or connect any domains that you already own. If you’re connecting an existing domain and want to change the domain name to something new, now is a good time to do that, too.
Your domain is only free for one year, and it will automatically renew at a higher rate. This is common practice for every web hosting provider that offers free domains.
Just keep an eye on the renewal price as you’re completing this step to avoid any surprises down the road.
The quicksprout.store example above is 50 times higher than its starting price. This is highly unusual, but it can happen if you’re not careful.
The quicksprout.link example fits more within the reasonable range for domain renewal rates.
Step 4: Install WordPress with Hostinger
Now it’s time to choose your CMS (content management system), and WordPress is my top recommendation.
You’ll have other options to choose from through Hostinger. But unless you have a niche-specific reason to do so, WordPress is the best option for the vast majority of new websites. It’s simple, affordable, and gives you complete control over your site creation.
Create a new WordPress account and select your theme.
The theme is essentially the layout of your site—controlling the way it looks and feels.
Don’t overthink this too much right now. You can always change your theme and customize the layout later on. We’ll cover those steps in greater detail shortly.
But for now, just confirm that your information is correct to proceed.
Double-check everything closely. If Hostinger has your site located in the wrong region, you can adjust it by clicking the pencil edit icon.
Click Finish Setup once you’ve confirmed everything looks right. The setup process will take about five minutes to complete.
Congrats! You now own a piece of the internet!
Step 5: Access WordPress in Hostinger Dashboard
Hostinger offers a very convenient dashboard for you to manage your site. It’s known as hPanel, and is very welcoming to new users, as far as website control panels go.
You’ll be prompted to use WordPress to create your site. If you miss the prompts or skip them for any reason, you can always log in to WordPress using the left-side dropdown panel in the dashboard:
Hostinger’s hPanel makes creating and managing your WordPress site easy.
Click on WordPress on the left side of the screen. You’ll see a new screen that includes a button to Edit Website. Click it, enter your credentials if prompted, and start customizing your new website.
You can access your new WordPress site easily through the Hostinger hPanel.
Step 6: Design Your Website with Customizable Themes
You already selected a WordPress theme to build your site, and if you are happy with the way it looks, great!
If you want to see what else is out there, you can explore tens of thousands of themes on WordPress.org. A lot of them are free. There are also some you need to pay for.
Pro tip: Don’t worry too much about this section. It’s easy to get caught up with perfectionism and think that you need to get your theme right the first time. That’s not true.
The most important thing you can do is choose a basic theme and go with it. You can always change your theme later.
Go to your WordPress website’s administration dashboard. You can do this through the Hostinger dashboard, or you can use the URL [your website name].com/wp-admin. Then simply use the username and password you got in the previous step.
Once you’re in the admin dashboard, go to your sidebar and click Appearance>Themes>Add New Theme.
This will allow you to add any theme you want from WordPress’s library. Choose one now.
For this article, we’ll be using OceanWP. This is a free theme that’s very flexible. Whether you need a blog, ecommerce store, or whatever else, OceanWP can get it done.
Search for the theme using the search bar. Once you find it, click Install.
Once it’s finished installing, click on the Activate button. This will implement the theme onto your website.
You can now customize the theme to your liking by clicking on the Customize button.
You’ll now be able to change any aspect of your website you want. This includes things like your website’s colors, menu options, header images, and more.
After clicking on customize, you’ll see a look at your website as you customize it as well as a left sidebar with different customization options.
Each theme offers different options, but there’s a lot of overlap between themes. We’re going to go into more detail about what each option does—and whether or not it’s vital:
Site Identity. Important. This area will allow you to change your site’s title as well as a sub-head or tagline. In most instances, you’ll also be able to upload a site icon as well. This is the image that appears in new browser tabs when people are on your website.
Colors. Optional. Change your website’s color palette. For OceanWP, this section only allows you to change the color of the title text.
Menus. Very important. It allows you to create a navigation menu for your website. Your reader will use this menu to discover and navigate to specific pages of your website. You’ll also be able to choose where the menu appears (e.g. top, footer, sidebar).
Widgets. Optional. These are different tools you can place throughout your website such as archives, calendars, search bars, and more. Completely optional, but can be helpful depending on what website you have.
Homepage Settings. Optional. This controls whether or not you have a static homepage, or if your website automatically shows your latest blog posts. Again, this is completely optional and dependent on your website’s needs.
Additional CSS. Optional. This is where you can add further customization options using CSS code. This can be incredibly powerful if you have the right resources and knowledge to change your website.
General Options. Important. This section allows you to customize a ton of different aspects of your website. It includes things like the size of your header, the icons you can use, the titles of your pages, the layouts, and more.
Typography. Important. This is where you can customize all things font related. That includes the size of the font, what type of font you want to use, and where those fonts will appear. For example, you might want to go with Helvetica for your H2 headers, but you might want to go with Comic Sans for your title (please, don’t actually do this; it is just an example).
Top Bar. Optional. This edits the top area of your website. You can add social links here, buttons to other pages, and more.
Header. Important. Allows you to fully customize the header area of your website. Add images or logos, change the font and colors, or whatever else you want to do to make the website yours.
Blog. Optional. This allows you to change the layout of your blog as well as which posts appear on your website’s main page.
Sidebar. Optional. You can add a sidebar to your website. This is completely optional since your readers can just use the top navigation bar to get around your site.
Footer widgets. Optional. Add tools and customize your footer.
Footer Bottom. Optional. This is the part of the website with the copyright and contact information. It’s potentially important–especially if you’re running a business.
Now, customize your website to your heart’s desire. Once you’re finished, click Publish, and voila! Your website will update automatically to reflect your changes.
Your website’s still going to look a little sparse. We need to create some pages for it.
Step 7: Build Your Website’s Architecture
If your website is a house, it’s currently an empty lot. It has a solid foundation and it’s connected to essential utilities—but it needs the walls and rooms.
To build those, you need to create web pages. These are documents on the internet that readers access through your website.
But you should think of them as the rooms of your house. These are the areas visitors will see and get to know you and your website.
While there are a lot of different types of web pages that exist, the most essential ones are:
Homepage. This is the main page for your website. It’s what readers see first, so it’s very important.
Contact page. This page shows how your users can contact you. This can be vitally important, depending on your business.
About page. This page tells new visitors all about your website and/or business. Typically, businesses will put their “brand story” here about how they came to be.
Online store. This is where your readers can purchase products and services from you. An online store can also be vitally important depending on your business.
Blog page. Blog page. This page is where all of your blog posts go. If you plan on publishing articles for readers to read (which you should—61% of buyers make purchase decisions based on blog content), this will be a very important part of your website.
Creating pages on WordPress just takes a few clicks. Let’s jump into how you can create the most important page now for your website.
How to Create a Homepage
OceanWP gives you two different ways to create a homepage:
Your latest posts. Your homepage showcases your latest blog posts.
A static page. You create a page to become your home page.
The first option is straightforward: Create blog posts and the homepage will automatically show all your latest blog posts.
That’s why we want to walk you through creating a static page for your website. This can be especially useful for companies that just want a branded page to introduce their audience to the website.
It’s also much more customizable than a page showing your latest blog posts.
First, head back to your WordPress website dashboard and click on Pages>Add New.
Now, you’ll be in WordPress’s page editor mode. This area allows you to create a page by adding text, images, videos, memes, or whatever else you want to showcase on your homepage (or any other page for that matter).
In the Add title box you can create the — you guessed it — title for your home page. This will display a big piece of text at the top. Below that is the content box where you can add text or media.
On the top left, you can click on the + button to add new content blocks.
This is a very important area that allows you to easily add media, quotes, pull quotes, new paragraphs, headings, and more.
On the top right, you’ll see five buttons:
Save Draft. This allows you to save your progress as you edit your homepage.
Preview. This gives you a look at what your page will look like once you publish it.
Publish. This actually publishes the draft.
Settings (Gear Icon). This area allows you to do a number of things including editing the font size for each block (under the Block section). You’ll also be able to set the visibility for your homepage, schedule a time to publish the page, change the URL, set the featured image, and allow for comments (under the Page section).
Extra tools (Three Dots). This menu includes a number of extra tools you can use to change the visualization of your page editor.
Create a basic homepage now by adding a title and content. It doesn’t need to be fancy. We’re just doing this as a test run. You can always change it later.
Once you’ve done that, click Publish in the top right. The website will now be live!
But that doesn’t mean it’s your homepage yet. Go to Appearance>Customize on the sidebar.
Then go to Homepage Settings. You can now click on A static page underneath your homepage displaying settings. This will allow you to select the homepage you just created in the dropdown menu underneath Homepage.
Select that page, then click on Publish at the top.
Congrats!! You just created your very first homepage.
How to Create an About, Contact, Landing, or Any Other Page
Creating any other page for your website will consist mostly of the same steps as your homepage.
First, head back to your WordPress website dashboard and click on Pages>Add New.
And in the page editor create the page you want to create. It’s really as simple as that.
However, if you allow your readers to easily discover that web page, you’ll have to create some navigational elements for them.
Step 8: Connect Your Web Pages with Menus
Creating menus is going to vary from theme to theme. However, in OceanWP it’s fairly simple.
From your WordPress dashboard, click on Appearance>Customize.
Then click on Menu>Create New Menu.
Here you’ll be able to give your menu a name and choose where you’d like it to appear.
For now, we’re going to go with the very creative name “New Menu” and choose Top Bar for the menu location. You can always change this later. Then click Next.
Now it’s time to add some links. Click on + Add Items to start building your menu.
From here you can add pages via the pages that you have already created, custom links to different websites, blog posts, categories, tags, and more.
For now, we’re going to add our Home, Contact, and About pages (which we created in the previous parts) onto the menu.
Click on the pages under the Pages section to do so.
They will now appear in the top bar menu of your main website.
One thing to note is that you can create drop-down menus for bigger categories you can think of.
For example, let’s say we want to add our Contact page to our About section. You can do so by dragging the Contact menu underneath the About section when customizing the menu (see below).
Your About menu will now include a dropdown where visitors can access your Contact page.
Once you’re finished making the menus, click on Publish at the top.
And you’re done! You just created your very first website.
Check out your new website in all its glory:
Okay, we admit: It’s a little underwhelming right now—but that’s because you haven’t gone about branding it or adding any real content yet!
We showed you how to get your website up and running. Now it’s YOUR turn to make it with content.
Step 9: Create Compelling Content for Your Website
What you ultimately choose to include in your website for content is entirely up to you.
However, there are two areas that we’ve found to be the most important when it comes to successful websites: design and content.
Below are our best resources for leveling up both:
You can create your own website for free using a free website builder. These platforms come with everything you need to design and launch a site without any money. Just be aware that if you want to go live, your site will have a free subdomain that you don’t actually own. So it’s better to pay if you want to create a website that’s designed for real traffic.
It’s not hard at all to build a website from scratch. With the help of a website builder, you can build and launch a new website without writing a single line of code. Simply select a professionally designed template as a starting point, and then customize it with your own content and branding materials.
You can use drag-and-drop website builders to design your site and manage everything without having to hire a developer.
How long does it take to create a website?
It takes less than two hours to create a website. With Hostinger, you can get your domain and hosting from a single provider, which helps speed up and simplify the process. Then install WordPress with just one click, and you’ll be able to create your website from there.
While getting your site ready to go live only takes a couple of hours, it will likely take several days or even weeks to fully build out all of your pages.
How much does it cost to create a website?
It costs less than $100 to create a website. Your domain name and hosting service are your only upfront costs. Hostinger gives you a free domain for one year with your hosting plan, which is a great way to lower the cost. You can also pay upfront for 48 months of hosting at a rate of $1.99 per month, which is less than $96 in total.
Your hosting plan will renew at a higher rate after the promotional period ends. But by then, your site will be live for several years and likely make enough money to cover the marginal cost increase.
Congrats on creating your first website! Seriously, you should pat yourself on the back.
Now that you’ve signed up for Hostinger and installed WordPress, there’s still some work to be done once your website is up and running—the journey has just begun.
You’ll still need to tweak and make adjustments to your site regularly to optimize its performance and ensure it’s meeting your audience’s needs. If you want to put your website to work for you and make some extra cash, check out these excellent resources on monetizing your site: