

When I was working on a project that needed an editor component for source code, I really wanted a way to have that editor highlight the syntax its typed. There are projects like this, like CodeMirror, Ace, and Monaco, but they are all heavy-weight, full-featured editors, not just editable textareas with syntax highlighting like I wanted.
It took a little finagling, but I wound up making something that does the job and wanted to share how I did it, because it involves integrating a popular syntax highlighting library with HTML’s editing capabilities, as well as a few interesting edge cases to take into consideration.
Go ahead and give it a spin as we dig in!
The problem
First, I tried using the contenteditable attribute on a div. I typed some source code into the div and ran it through Prism.js, a popular syntax highlighter, on onkeyup via JavaScript. Seems like a decent idea, right? We have an element that can be edited on the front end, and Prism.js applies its syntax styling to what’s typed in the element.
Chris covers how to use Prism.js in this video.
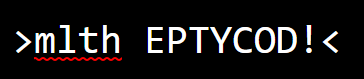
But that was a no-go. Each time the content in the element changes, the DOM is manipulated and the user’s cursor is pushed back to the start of the code, meaning the source code appears backwards, with the last characters at the start, and the first characters at the end.
Next, I tried about using a <textarea> but that also didn’t work, as textareas can only contain plain text. In other words, we’re unable to style the content that’s entered. A textarea seems to be the only way to edit the text without unwanted bugs — it just doesn’t let Prism.js do its thing.
Prism.js works a lot better when the source code is wrapped in a typical <pre><code> tag combo — it’s only missing the editable part of the equation.
So, neither seems to work by themselves. But, I thought, why not both?
The solution
I added both a syntax-highlighted <pre><code> and a textarea to the page, and made the innerText content of <pre><code> change onkeyup, using a JavaScript function. I also added an aria-hidden attribute to the <pre><code> result so that screen readers would only read what is entered into the <textarea> instead of being read aloud twice.
<textarea id="editing" onkeyup="update(this.value);"></textarea>

<pre id="highlighting" aria-hidden="true">
  <code class="language-html" id="highlighting-content"></code>
</pre>
function update(text) {
let result_element = document.querySelector("#highlighting-content");
// Update code
result_element.innerText = text;
// Syntax Highlight
Prism.highlightElement(result_element);
}
Now, when the textarea is edited — as in, a pressed key on the keyboard comes back up — the syntax-highlighted code changes. There are a few bugs we’ll get to, but I want to focus first on making it look like you are directly editing the syntax-highlighted element, rather than a separate textarea.
Making it “feel” like a code editor
The idea is to visibly merge the elements together so it looks like we’re interacting with one element when there are actually two elements at work. We can add some CSS that basically allows the <textarea> and the <pre><code> elements to be sized and spaced consistently.
#editing, #highlighting {
  /* Both elements need the same text and space styling so they are directly on top of each other */
  margin: 10px;
  padding: 10px;
  border: 0;
  width: calc(100% - 32px);
  height: 150px;
}

#editing, #highlighting, #highlighting * {
  /* Also add text styles to highlighting tokens */
  font-size: 15pt;
  font-family: monospace;
  line-height: 20pt;
}
Then we want to position them right on top of each other:
#editing, #highlighting {
  position: absolute;
  top: 0;
  left: 0;
}
From there, z-index allows the textarea to stack in front the highlighted result:
/* Move the textarea in front of the result */
#editing {
z-index: 1;
}
#highlighting {
z-index: 0;
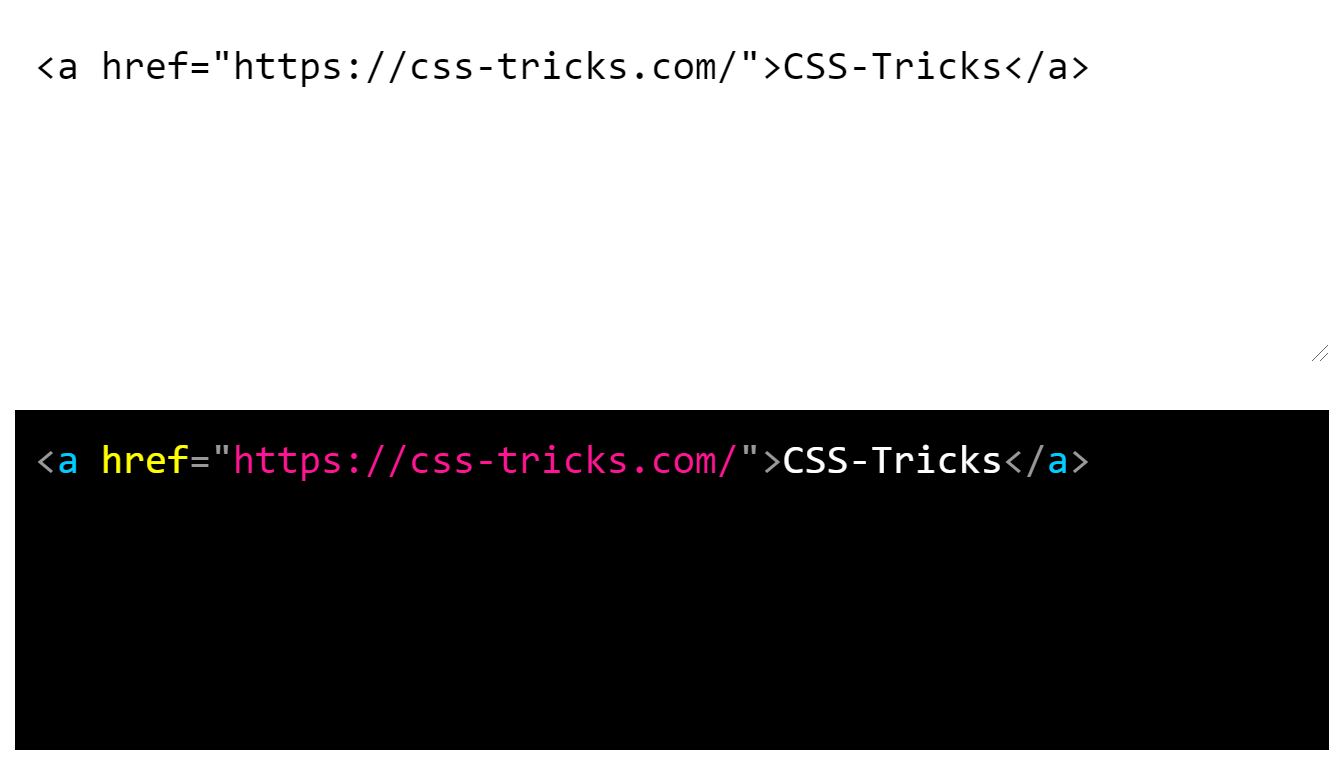
}If we stop here, we’ll see our first bug. It doesn’t look like Prism.js is highlighting the syntax, but that is only because the textarea is covering up the result.

We can fix this with CSS! We’ll make the <textarea> completely transparent except the caret (cursor):
/* Make textarea almost completely transparent */
#editing {
  color: transparent;
  background: transparent;
  caret-color: white; /* Or choose your favorite color */
}
Ah, much better!

More fixing!
Once I got this far, I played around with the editor a bit and was able to find a few more things that needed fixing. The good thing is that all of the issues are quite easy to fix using JavaScript, CSS, or even HTML.
Remove native spell checking
We’re making a code editor, and code has lots of words and attributes that a browser’s native spell checker will think are misspellings.

Spell checking isn’t a bad thing; it’s just unhelpful in this situation. Is something marked incorrect because it is incorrectly spelled or because the code is invalid? It’s tough to tell. To fix this, all we need is to set the spellcheck attribute on the <textarea> to false:
<textarea id="editing" spellcheck="false" ...>Handling new lines
Turns out that innerText doesn’t support newlines (\n).
The update function needs to be edited. Instead of using innerText, we can replace the open bracket character (<) with <. This prevents new HTML tags from being created, allowing the actual source code displays instead of the browser attempting to render the code.
result_element.innerHTML = text.replace(new RegExp("<", "g"), "<"); /* Global RegExp */
Scrolling and resizing
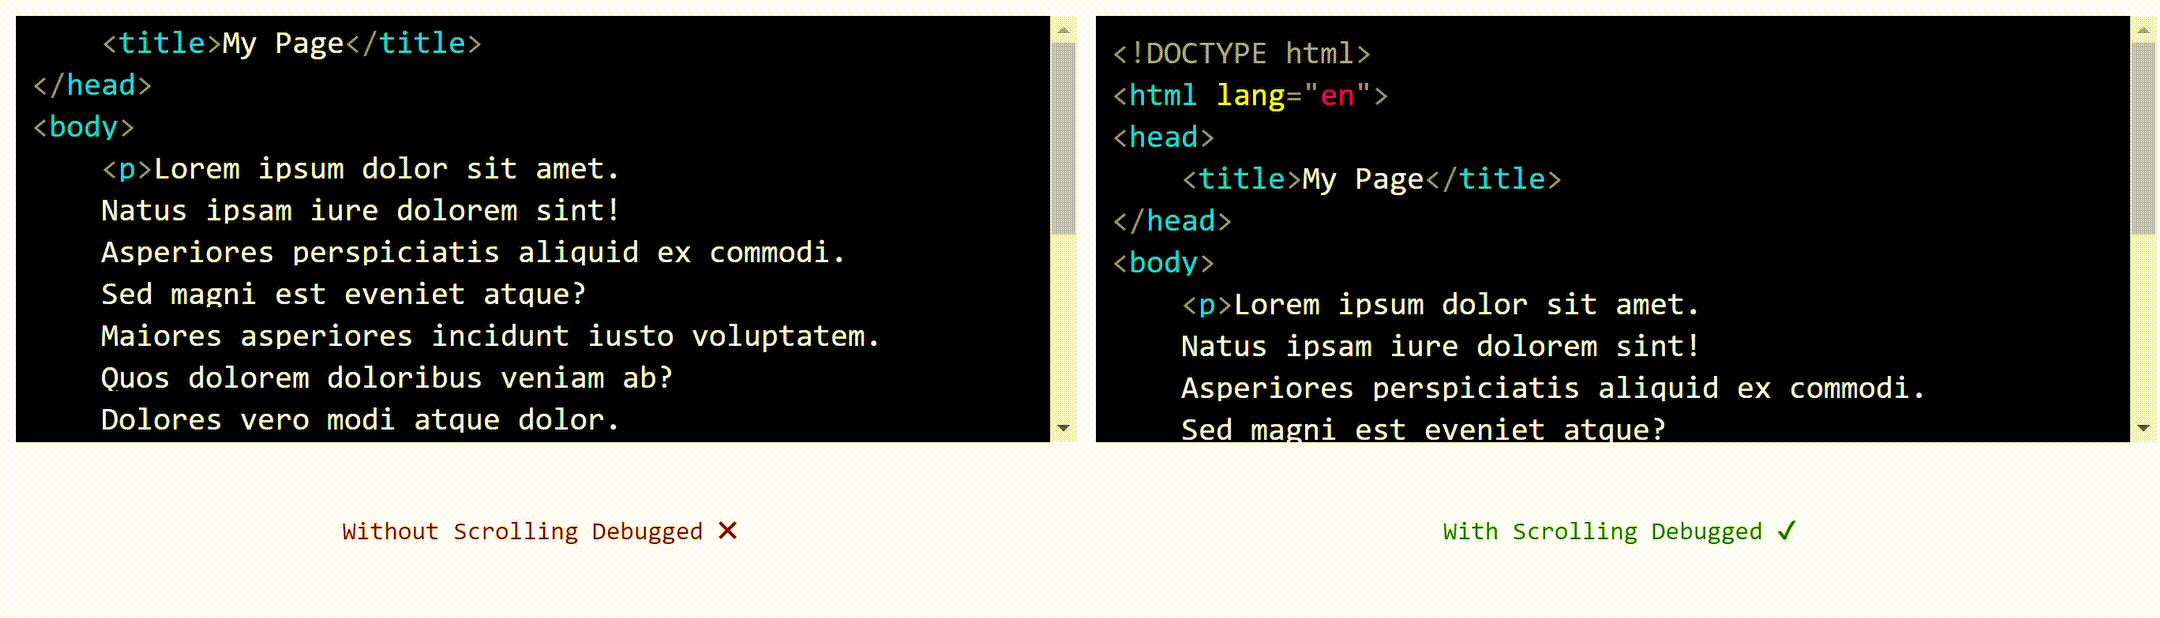
Here’s another thing: the highlighted code cannot scroll while the editing is taking place. And when the textarea is scrolled, the highlighted code does not scroll with it.
First, let’s make sure that both the textarea and result support scrolling:
/* Can be scrolled */
#editing, #highlighting {
  overflow: auto;
}
Then, to make sure that the result scrolls with the textarea, we’ll update the HTML and JavaScript like this:
<textarea id="editing" onkeyup="update(this.value); sync_scroll(this);" onscroll="sync_scroll(this);"></textarea>function sync_scroll(element) {
/* Scroll result to scroll coords of event - sync with textarea */
let result_element = document.querySelector("#highlighting");
// Get and set x and y
result_element.scrollTop = element.scrollTop;
result_element.scrollLeft = element.scrollLeft;
}Some browsers also allow a textarea to be resized, but this means that the textarea and result could become different sizes. Can CSS fix this? Of course it can. We’ll simply disable resizing:
/* No resize on textarea */
#editing {
  resize: none;
}
Indenting lines
One of the trickier things to adjust is how to handle line indentations in the result. The way the editor is currently set up, indenting lines with spaces works fine. But, if you’re more into tabs than spaces, you may have noticed that those aren’t working as expected.
JavaScript can be used to make the Tab key properly work. I have added comments to make it clear what is happening in the function.
<textarea ... onkeydown="check_tab(this, event);"></textarea>function check_tab(element, event) {
let code = element.value;
if(event.key == "Tab") {
/* Tab key pressed */
event.preventDefault(); // stop normal
let before_tab = code.slice(0, element.selectionStart); // text before tab
let after_tab = code.slice(element.selectionEnd, element.value.length); // text after tab
let cursor_pos = element.selectionEnd + 2; // where cursor moves after tab - 2 for 2 spaces
element.value = before_tab + " " + after_tab; // add tab char - 2 spaces
// move cursor
element.selectionStart = cursor_pos;
element.selectionEnd = cursor_pos;
}
}The final result
Not too crazy, right? All we have are <textarea>, <pre> and <code> elements in the HTML, a new lines of CSS that stack them together, and a syntax highlighting library to format what’s entered. And what I like best about this is that we’re working with normal, semantic HTML elements, leveraging native attributes to get the behavior we want, leaning on CSS to create the illusion that we’re only interacting with one element, then reaching for JavaScript to solve some edge cases.
While I used Prism.js for syntax highlighting, this technique will work with others. It would even work with a syntax highlighter you create yourself, if you want it to. I hope this becomes useful, and can be used in many places, whether it’s a WYSIWYG editor for a CMS, or even a forms where the ability to enter source code is a requirement like a front-end job application or perhaps a quiz. It is a<textarea>, after all, so it’s capable of being used in any form — you can even add a placeholder if you need to!
The post Creating an Editable Textarea That Supports Syntax-Highlighted Code appeared first on CSS-Tricks.
You can support CSS-Tricks by being an MVP Supporter.
