In previous articles, we've covered how chmod works. In this article, we'll be covering how to use chown. chown is closely connected to chmod since it affects who owns a file, and which group it belongs to.
In our article on chmod we cover how different user types (i.e. owners, groups, and all other users) have different permission sets. That means who owns or in which group a file belongs, can affect who can run it, and might even affect if a system process can run or open a file.
When we create a file or folder on a Unix-based system like Linux or MacOS, it has a set of permissions and access modes. These are most often manipulated using the chmod command, which allow us to change who can access and run different files.
Let's look at how chmod works. To begin, the chmod command has the following syntax, where [OPTIONS] are optional settings, [MODE] are the permissions we want to give the file or folder, and x is the file we want to apply chmod to.
On Linux and UNIX-like systems, like Mac, we use mkdir to make a new directory from the terminal. To do this, open up a new terminal, and make sure you're in the right directory using the cd command.
The syntax for mkdir looks like this, where dir_name is the name of your new directory, and [OPTIONS] are optional settings.
On a Linux or UNIX-based system, ls is one of the most useful commands you can know. Fundamentally, it tells you information of files and folders on your system - and is extremely useful when you only have access to a server or computer via a terminal window. Let's look at how it works, and discuss some of the features of ls that you may not know.
The syntax for ls looks like this, where [OPTIONS] are optional settings, and [FILE|FOLDER] is an optional link to the file or folder we want to check. If we only type ls, it will check the current folder.
The cd command in Linux stands for change directory and is used to change directory when you have a terminal window open. It's used frequently, so it is useful to know.
Sometimes it’s useful to get visual feedback from a script. For example when the script or cron job completes. Or when the long-running build fails. Or when there is an urgent problem during script execution. Desktop applications can do this with popup notifications. But it can be done from the script too! You can use script commands to send yourself desktop notifications and reminders. Check this out:
The below code has been written and tested on Linux. What about MacOS? Well… it can be done too, with a bit of effort. See the last chapter for some hints and tips.
Xcode is one of the best Integrated Development Environments (IDEs) for writing, testing, and deploying Apple apps. Creating applications for Mac and iOS devices is a lot easier with Xcode. Despite being a super app development tool with several benefits, Xcode has one huge downside: it’s a data hog.
The (latest version of the) app is about 11GB on the App Store. During usage, Xcode also creates a lot of temporary cache files that consume an insane amount of storage space. In the long run, these temp files may cause the app (and your Mac) to freeze or malfunction during usage.
Images take up to 50% of the total size of an average web page. And if images are not optimized, users end up downloading extra bytes. And if they’re downloading extra bytes, the site not only takes that much more time to load, but users are using more data, both of which can be resolved, at least in part, by optimizing the images before they are downloaded.
Researchers around the world are busy developing new image formats that possess high visual quality despite being smaller in size compared to other formats like PNG or JPG. Although these new formats are still in development and generally have limited browser support, one of them, WebP, is gaining a lot of attention. And while they aren’t really in the same class as raster images, SVGs are another format many of us have been using in recent years because of their inherently light weight.
There are tons of ways we can make smaller and optimized images. In this tutorial, we will write bash scripts that create and optimize images in different image formats, targeting the most common formats, including JPG, PNG, WebP, and SVG. The idea is to optimize images before we serve them so that users get the most visually awesome experience without all the byte bloat.
Our targeted directory of images
Our directory of optimized images
This GitHub repo has all the images we’re using and you’re welcome to grab them and follow along.
Set up
Before we start, let’s get all of our dependencies in order. Again, we’re writing Bash scripts, so we’ll be spending time in the command line.
Here are the commands for all of the dependencies we need to start optimizing images:
SVGO and svgexport are Node packages that optimize SVG assets
OK, we have our images in the original-images directory from the GitHub repo. You can follow along at commit 3584f9b.
Note: It is strongly recommended to backup your images before proceeding. We’re about to run programs that alter these images, and while we plan to leave the originals alone, one wrong command might change them in some irreversible way. So back anything up that you plan to use on a real project to prevent cursing yourself later.
Organize images
OK, we’re technically set up. But before we jump into optimizing all the things, we should organize our files a bit. Let’s organize them by splitting them up into different sub-directories based on their MIME type. In fact, we can create a new bash to do that for us!
The following code creates a script called organize-images.sh:
#!/bin/bash

input_dir="$1"

if [[ -z "$input_dir" ]]; then
  echo "Please specify an input directory."
  exit 1
fi

for img in $( find $input_dir -type f -iname "*" );
do
  # get the type of the image
  img_type=$(basename `file --mime-type -b $img`)

  # create a directory for the image type
  mkdir -p $img_type

  # move the image into its type directory
  rsync -a $img $img_type
done
This might look confusing if you’re new to writing scripts, but what it’s doing is actually pretty simple. We give the script an input directory where it looks for images. the script then goes into that input directory, looks for image files and identifies their MIME type. Finally, it creates subdirectories in the input folder for each MIME type and drops a copy of each image into their respective sub-directory.
Let’s run it!
bash organize-images.sh original-images
Sweet. The directory looks like this now. Now that our images are organized, we can move onto creating variants of each image. We’ll tackle one image type at a time.
Convert to PNG
We will convert three types of images into PNG in this tutorial: WebP, JPEG, and SVG. Let’s start by writing a script called webp2png.sh, which pretty much says what it does: convert WebP files to PNG files.
#!/bin/bash

# directory containing images
input_dir="$1"

if [[ -z "$input_dir" ]]; then
  echo "Please specify an input directory."
  exit 1
fi

# for each webp in the input directory
for img in $( find $input_dir -type f -iname "*.webp" );
do
  dwebp $img -o ${img%.*}.png
done
Here’s what happening:
input_dir="$1": Stores the command line input to the script
if [[ -z "$input_dir" ]]; then: Runs the subsequent conditional if the input directory is not defined
for img in $( find $input_dir -type f -iname "*.webp" );: Loops through each file in the directory that has a .webp extension.
dwebp $img -o ${img%.*}.png: Converts the WebP image into a PNG variant.
And away we go:
bash webp2png.sh webp
We now have our PNG images in the webp directory. Next up, let’s convert JPG/JPEG files to PNG with another script called jpg2png.sh:
#!/bin/bash

# directory containing images
input_dir="$1"

if [[ -z "$input_dir" ]]; then
  echo "Please specify an input directory."
  exit 1
fi

# for each jpg or jpeg in the input directory
for img in $( find $input_dir -type f -iname "*.jpg" -o -iname "*.jpeg" );
do
  convert $img ${img%.*}.png
done
This uses the convert command provided by the ImageMagick package we installed. Like the last script, we provide an input directory that contains JPEG/JPG images. The script looks in that directory and creates a PNG variant for each matching image. If you look closely, we have added -o -iname "*.jpeg" in the find. This refers to Logical OR, which is the script that finds all the images that have either a .jpg or .jpeg extension.
#!/bin/bash

# directory containing images
input_dir="$1"

# png image width
width="$2"

if [[ -z "$input_dir" ]]; then
  echo "Please specify an input directory."
  exit 1
elif [[ -z "$width" ]]; then
  echo "Please specify image width."
  exit 1
fi

# for each svg in the input directory
for img in $( find $input_dir -type f -iname "*.svg" );
do
  svgexport $img ${img%.*}.png $width:
done
This script has a new feature. Since SVG is a scalable format, we can specify the width directive to scale our SVGs up or down. We use the svgexport package we installed earlier to convert each SVG file into a PNG:
We’ve done a lot of great work here by creating a bunch of PNG files based on other image formats. We still need to do the same thing for the rest of the image formats before we get to the real task of optimizing them.
Convert to JPG
Following in the footsteps of PNG image creation, we will convert WebP, JPEG, and SVG into JPG. Let’s start by writing a script called png2jpg.sh that converts PNG to SVG:
#!/bin/bash

# directory containing images
input_dir="$1"

# jpg image quality
quality="$2"

if [[ -z "$input_dir" ]]; then
  echo "Please specify an input directory."
  exit 1
elif [[ -z "$quality" ]]; then
  echo "Please specify image quality."
  exit 1
fi

# for each png in the input directory
for img in $( find $input_dir -type f -iname "*.png" );
do
  convert $img -quality $quality% ${img%.*}.jpg
done
You might be noticing a pattern in these scripts by now. But this one introduces a new power where we can set a -quality directive to convert PNG images to JPG images. Rest is the same.
#!/bin/bash

# directory containing images
input_dir="$1"

# jpg image quality
quality="$2"

if [[ -z "$input_dir" ]]; then
  echo "Please specify an input directory."
  exit 1
elif [[ -z "$quality" ]]; then
  echo "Please specify image quality."
  exit 1
fi

# for each webp in the input directory
for img in $( find $input_dir -type f -iname "*.webp" );
do
  # convert to png first
  dwebp $img -o ${img%.*}.png

  # then convert png to jpg
  convert ${img%.*}.png -quality $quality% ${img%.*}.jpg
done
Again, this is the same thing we wrote for converting WebP to PNG. However, there is a twist. We cannot convert WebP format directly into a JPG format. Hence, we need to get a little creative here and convert WebP to PNG using dwebp and then convert PNG to JPG using convert. That is why, in the for loop, we have two different steps.
#!/bin/bash

# directory containing images
input_dir="$1"

# jpg image width
width="$2"

# jpg image quality
quality="$3"

if [[ -z "$input_dir" ]]; then
  echo "Please specify an input directory."
  exit 1
elif [[ -z "$width" ]]; then
  echo "Please specify image width."
  exit 1
elif [[ -z "$quality" ]]; then
  echo "Please specify image quality."
  exit 1
fi

# for each svg in the input directory
for img in $( find $input_dir -type f -iname "*.svg" );
do
    svgexport $img ${img%.*}.jpg $width: $quality%
done
You might bet thinking that you have seen this script before. You have! We used the same script for to create PNG images from SVG. The only addition to this script is that we can specify the quality directive of our JPG images.
bash svg2jpg.sh svg+xml 512 90
Everything we just did is contained in commit 884c6cf in the repo.
Convert to WebP
WebP is an image format designed for modern browsers. At the time of this writing, it enjoys roughly 90% global browser support, including with partial support in Safari. WebP’s biggest advantage is it’s a much smaller file size compared to other mage formats, without sacrificing any visual quality. That makes it a good format to serve to users.
But enough talk. Let’s write a png2webp.sh that — you guessed it — creates WebP images out of PNG files:
#!/bin/bash

# directory containing images
input_dir="$1"

# webp image quality
quality="$2"

if [[ -z "$input_dir" ]]; then
  echo "Please specify an input directory."
  exit 1
elif [[ -z "$quality" ]]; then
  echo "Please specify image quality."
  exit 1
fi

# for each png in the input directory
for img in $( find $input_dir -type f -iname "*.png" );
do
  cwebp $img -q $quality -o ${img%.*}.webp
done
This is just the reverse of the script we used to create PNG images from WebP files. Instead of using dwebp, we use cwebp.
bash png2webp.sh png 90
We have our WebP images. Now let’s convert JPG images. The tricky thing is that there is no way to directly convert a JPG files into WebP. So, we will first convert JPG to PNG and then convert the intermediate PNG to WebP in our jpg2webp.sh script:
#!/bin/bash

# directory containing images
input_dir="$1"

# webp image quality
quality="$2"

if [[ -z "$input_dir" ]]; then
  echo "Please specify an input directory."
  exit 1
elif [[ -z "$quality" ]]; then
  echo "Please specify image quality."
  exit 1
fi

# for each webp in the input directory
for img in $( find $input_dir -type f -iname "*.jpg" -o -iname "*.jpeg" );
do
  # convert to png first
  convert $img ${img%.*}.png

  # then convert png to webp
  cwebp ${img%.*}.png -q $quality -o ${img%.*}.webp
done
Now that we are done converting stuff, we’re one step closer to optimize our work. But first, we’re gong to bring all of our images back into a single directory so that it is easy to optimize them with fewer commands.
Here’s code that creates a new bash script called combine-images.sh:
#!/bin/bash

input_dirs="$1"
output_dir="$2"

if [[ -z "$input_dirs" ]]; then
  echo "Please specify an input directories."
  exit 1
elif [[ -z "$output_dir" ]]; then
  echo "Please specify an output directory."
  exit 1
fi

# create a directory to store the generated images
mkdir -p $output_dir

# split input directories comma separated string into an array
input_dirs=(${input_dirs//,/ })

# for each directory in input directory
for dir in "${input_dirs[@]}"
do
  # copy images from this directory to generated images directory
  rsync -a $dir/* $output_dir/
done
The first argument is a comma-separated list of input directories that will transfer images to a target combined directory. The second argument is defines that combined directory.
Let us start by optimizing our SVG images. Add the following code to optimize-svg.sh:
#!/bin/bash

# directory containing images
input_dir="$1"

if [[ -z "$input_dir" ]]; then
echo "Please specify an input directory."
exit 1
fi

# for each svg in the input directory
for img in $( find $input_dir -type f -iname "*.svg" );
do
  svgo $img -o ${img%.*}-optimized.svg
done
We’re using the SVGO package here. It’s got a lot of options we can use but, to keep things simple, we’re just sticking with the default behavior of optimizing SVG files:
bash optimize-svg.sh generated-images
This gives us a 4KB saving on each image. Let’s say we were serving 100 SVG icons — we just saved 400KB!
The result can be seen in the repo at commit 75045c3.
Optimize PNG
Let’s keep rolling and optimize our PNG files using this code to create an optimize-png.sh command:
#!/bin/bash

# directory containing images
input_dir="$1"

if [[ -z "$input_dir" ]]; then
  echo "Please specify an input directory."
  exit 1
fi

# for each png in the input directory
for img in $( find $input_dir -type f -iname "*.png" );
do
  optipng $img -out ${img%.*}-optimized.png
done
Here, we are using the OptiPNG package to optimize our PNG images. The script looks for PNG images in the input directory and creates an optimized version of each one, appending -optimized to the file name. There is one interesting argument, -o, which we can use to specify the optimization level. The default value is 2 **and values range from 0 to 7. To optimize our PNGs, we run:
bash optimize-png.sh generated-images
PNG optimization depends upon the information stored in the image. Some images can be greatly optimized while some show little to no optimization.
As we can see, OptiPNG does a great job optimizing the images. We can play around with the -o argument to find a suitable value by trading off between image quality and size. Check out the results in commit 4a97f29.
Optimize JPG
We have reached the final part! We’re going to wrap things up by optimizing JPG images. Add the following code to optimize-jpg.sh:
#!/bin/bash

# directory containing images
input_dir="$1"

# target image quality
quality="$2"

if [[ -z "$input_dir" ]]; then
  echo "Please specify an input directory."
  exit 1
elif [[ -z "$quality" ]]; then
  echo "Please specify image quality."
  exit 1
fi

# for each jpg or jpeg in the input directory
for img in $( find $input_dir -type f -iname "*.jpg" -o -iname "*.jpeg" );
do
  cp $img ${img%.*}-optimized.jpg
  jpegoptim -m $quality ${img%.*}-optimized.jpg
done
This script uses JPEGoptim. The problem with this package is that it doesn’t have any option to specify the output file. We can only optimize the image file in place. We can overcome this by first creating a copy of the image, naming it whatever we like, then optimizing the copy. The -m argument is used to specify image quality. It is good to experiment with it a bit to find the right balance between quality and file size.
See that? With a few scripts, we can perform heavy-duty image optimizations right from the command line, and use them on any project since they’re installed globally. We can set up CI/CD pipelines to create different variants of each image and serve them using valid HTML, APIs, or even set up our own image conversion websites.
I hope you enjoyed reading and learning something from this article as much as I enjoyed writing it for you. Happy coding!
When I open my local project for this very site, there is a 100% chance that I need to run this command before anything else: gulp. I set that up fresh less than a year ago so I’m on the latest-and-greatest stuff and have my workflow just how I like it. I did a few more tweaks a few months later to make things a smidge nicer (even adding a fancy fun little dock icon!).
That’s when I learned about VS Code Tasks. Generically, the can just run command line tasks that you configure whenever you choose to run them by name. But I’m particularly compelled by the idea that they can run when you open a project.
Except… that started to fail on my machine. I use nvm to manage Node versions, and despite my best effort to nvm alias default to the the correct version of Node that works nicely with Gulp, the Node version was always wrong, and thus running gulp would fail. The trick is to run nvm use first (which sets the correct version from my .nvmrc file), then gulp runs fine.
That works fine in a fresh terminal window, but for some reason, even making the command run two tasks like this (chaining them with a semicolon):
"command": "nvm use; gulp",
…it would still fail. It didn’t know what nvm meant. I don’t know what the heart of the problem is exactly (why one terminal doesn’t know the same things that another terminal does), but I did manage to sort out that the global nvm has a shell script with one job: defining the nvm command. So you “source” that, as they say, and then the nvm command works.
Many development environments require running things in a terminal window. npm run start, or whatever. I know my biggest project requires me to be running a big fancy Docker-based thing in one terminal, Ruby on Rails in another, and webpack in another. I’ve worked on other projects that require multiple terminal windows as well, and I don’t feel like I’m that unusual. I’ve heard from several others in this situation. It’s not a bad situation, it’s just a little cumbersome and annoying. I’ve got to remember all the commands and set up my command line app in a way that feels comfortable. For me, splitting panels is nicer than tabs, although tabs for separate projects seems OK.
tmux was the most popular answer. I’m very sure I don’t understand all it can do, but I think I understand that it makes “fake” panes within one terminal session that emulates multiple panes. So, those multiple panes can be configured to open and run different commands simultaneously. I found this interesting because it came literally days later my CodePen co-founder let us all know the new dev environment he’s been working on will use tmux.
I was pointed to kitty by a fella who told me it feels like a grown-up tmux to him. It can be configured into layouts with commands that run at startup.
There are native apps for all the platforms that can run multiple panels.
macOS: I’ve long used iTerm which does split panels nicely. It can also remember window arrangements, which I’ve used, but I don’t see any built-in option for triggering commands in that arrangement. The native terminal can do tabs and splitting, too, but it feels very limited.
There are npm things for running multiple scripts, like concurrently and npm-run-all, but (I think?) they are limited to running only npm scripts, rather than any terminal command. Maybe you can make npm scripts for those other commands? But even then, I don’t think you’d see the output in different panels, so it’s probably best for scripts that are run-and-done instead of run-forever.
Being a Mac guy, I was most interested in solutions that would work with iTerm since I’ve used that anyway. In lieu of a built-in iTerm solution, I did learn it was “scriptable.” Apparently, they are sunsetting AppleScript support in favor of Python but, hey, for now it seems to work fine.
It’s basically this:
The Code
tell application "iTerm"

  tell current window

    create window with default profile
    tell current session of current tab
      set name to "run.sh"
      write text "cd '/Users/chriscoyier/GitHub/CPOR'"
      write text "./run.sh"
    end tell

    create tab with default profile
    tell current session of current tab
      set name to "Rails"
      write text "cd '/Users/chriscoyier/GitHub/CPOR'"
      write text "nvm use"
      write text "yarn"
      write text "bundle install"
      write text "yarn run rails"
    end tell

    create tab with default profile
    tell current session of current tab
      set name to "webpack"
      write text "cd '/Users/chriscoyier/GitHub/CPOR'"
      write text "nvm use"
      write text "yarn"
      write text "yarn run dev"
    end tell

    # split vertically
    # tell application "System Events" to keystroke "d" using command down
    # delay 1

    # split horizontally
    # tell application "System Events" to keystroke "d" using {shift down, command down}
    # delay 1

    # moving... (requires permission)
    # tell application "System Events" to keystroke "]" using command down

    end tell

end tell
I just open that script, hit run, and it does the job. I left the comments in there because I’d like to figure out how to get it to do split screen the way I like, rather than tabs, but I got this working and then got lazy again. It felt weird to have to use keystrokes to have to do it, so I figured if I was going to dig in, I’d figure out if their newer Python stuff supports it more directly or what. It’s also funny I can’t like compile it into a little mini app or something. Can’t Automator do that? Shrug.
The other popular answer I got for Mac folks is that they have Alfred do the work. I never got into Alfred, but there clearly is fancy stuff you can do with it.
The developer’s debugging console has been available in one form or another in web browsers for many years. Starting out as a means for errors to be reported to the developer, its capabilities have increased in many ways; such as automatically logging information like network requests, network responses, security errors or warnings.
There is also a way for a website’s JavaScript to trigger various commands that output to the console for debugging purposes. These commands are contained in a console object available in almost every browser. Even though these features are mostly consistent between browsers, there are a few differences. Some of these differences are simply visual in nature while others do have slight functional differences to keep in mind.
This guide covers what’s available in the console object of Firefox and Chrome as they are often the most popular browsers for development and they do have a few differences in various aspects of the console. The new Chromium-based Edge is essentially the same as Chrome in many ways so, in most cases, the console commands will operate much the same.
The first thing we can do is log the console object itself to see what your browser of choice actually offers.
console.log(console);
This command will output the various properties of the console object as the browser knows them. Most of them are functions and will be rather consistent regardless of browser. If there are differences in the properties of the console object from one browser to another, this way you can see the differences. One such difference I can point out between Firefox and Chrome is that Chrome provides a “memory” property that outputs some basic memory usage stats. Firefox doesn’t provide this property and yet has a “name” property that Chrome does not have.
Thankfully, most of the differences between the browsers tend to be just as trivial. That way, you can be fairly confident that your code will output much the same regardless of the browser in use.
First things first: clear()
With heavy usage of the console comes a very crowded output of text. Sometimes you just want to clear things out and start with a fresh console. Browsers typically provide a button in DevTools that performs this task. However, the console object itself also provides a command to handle this:
console.clear();
This will clear the console and will helpfully inform you of that by outputting a message like "Console was cleared."
Common usage: debug(), error(), info(), log(), and warn()
There are five commands that at first glance seem to do the exact same thing. And, technically, they do. But browsers provide additional features tied to the five commands to give each their own distinct benefit.
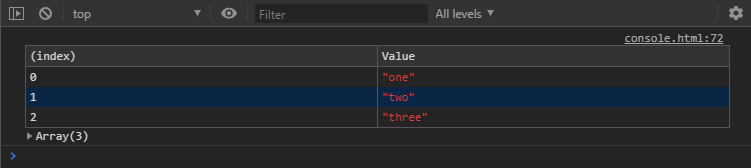
I’m sure many of you have seen console.log() before (I mean, we just talked about it up top) and have probably used it before. Before we get into what you can log in these five commands, let’s see our first minor difference between Chrome and Firefox.
Chrome console showing debug, error, info, log, and warn
This is an example in Chrome of each command outputting a string, such as console.debug('console.debug()');. Notice that some of them have a color treatment to give a visual indication of the type of output it is. The error and warn outputs have an additional icon for even easier identification.
Firefox console showing debug, error, info, log, and warn
Here is the same list in Firefox and, while it looks similar, there are three minor differences. For example, console.debug() is not color-coded and console.info() has an additional icon next to it. In Chrome, both console.error() and console.warn() can be expanded to show additional information about the output while Firefox only does this with console.error(). This additional information provides a trace of the lines of code involved to get to where the particular command was called.
One thing that is useful about these five commands is that the browsers provide filtering options to show or hide each type as you wish. Firefox has them right there at the top of the console above the output while Chrome hides them in a dropdown, labeled “All levels” which you can see in the earlier Chrome console screenshot. “All levels” is there because I have all five set to be shown. If you were to choose the “Default” option then the debug output (listed as "Verbose") is hidden while the others are shown. Unchecking "Info", "Warnings", or "Errors" causes the dropdown to display a different title such as "Custom levels" or "Errors only" depending on what is selected.
The intentions for usage of error and warn are easy to determine; how to use the other choices is up to you. If you do make extensive use of the different options then you might consider documenting the expectations of each as to not confuse things late in the project — especially if it is a team project.
Now, let’s discuss what we can actually log inside these commands. Since they all behave the same, I’ll just focus on logging as the example.
The simplest examples involve just passing a string, number, object, or array into the log command. Technically, any of JavaScript’s data types can be used, but for most of them, the output is much the same.
Chrome string, number, object, and array log examples
I’m showing these examples in Chrome with the object and array already expanded. They are normally collapsed but the output next to the arrow is consistent between both states. Firefox displays a little differently but, for the most part, the output is the same. Firefox does tell you whether it is displaying an object or array before expanding, but shows the same as Chrome while expanded.
One interesting thing to add is that you can pass more than one item to the log as parameters and it’ll display them inline.
Chrome strings, numbers, objects, and arrays examples
Often when I’m working with x and y coordinates, such as what can be outputted by mouse events, it’s useful to log the two together in one statement.
String substitution
The different console logging commands provide string substitution that allows inserting different values into the string for output. This is useful for describing a variable in the log to make it clear as to what’s being reported.
console.log('This is a string: %s', 'string');
console.log('This is a number: %i', 42);
console.log('This is an object: %o', {object: 'object'});
Chrome string substitution examples
Here is a list of the data types that can substituted into the output string:
Data type
Substitution symbol
Objects and arrays
%o or %O
Integers
%d or %i
Strings
%s
Floats
%f
The first parameter would be the string to output with the symbols placed in the appropriate locations. Then each parameter after that is the value to substitute inside the first parameter’s string. Keep in mind that you’ll have to keep the substitution types and the parameters in the specific order or you’ll get unexpected results.
If your console supports template literals, it’s a bit easier to get similar results as string substitutions.
console.log(`This is a string: ${'string'}`);
console.log(`This is a number: ${42}`);
console.log(`This is an object: ${{object: 'object'}}`);
Chrome template literal examples
Notice that the object is handled a bit better with the string substitution, so pick the appropriate choice for your requirements. Since it’s possible to insert more than one value in the output, let’s compare the two.
console.log('This is a string: %s. This is a number: %i', 'string', 42);
console.log(`This is a string: ${'string'}. This is a number: ${42}`);
Chrome string substitution and template literals
With the string substitution each value is added as a parameter to be inserted into the output. With template literals, on the other hand, you add them wherever they need to be in the output. Also, you can combine them.
console.log(`This is a number: ${42}. This is an object: %o`, {object: 'object'});
Chrome string substitution with template literals
So, there are lots of options to pick and choose from so you can go with the best options for your needs.
Styling the output
Another potentially useful and fun thing is that you can apply CSS styles to the console’s output. It works just like the string substitution method where you insert a %c variable for styles to be applied from the parameters.
Here’s a simple example:
console.log('%cThis is large red text', 'color: red; font-size: 30px;');
Chrome styling in the console
This time there is a slight difference in the Firefox output:
Firefox styling in the console
Not really that much of a difference, but something to keep in mind.
What essentially happens is that %c reads the strings in the parameters to determine what styling to apply. So, say there’s a second styling being passed, %c moves on to the next parameter, much like with string substitution. An empty string in the parameter list resets the styling back to default.
console.log('This is %cred text %cand this is %cgreen text.', 'color: red;', '', 'color: green;');
Using multiple styles in the Chrome console.
The styling properties available are rather limited when compared to typical CSS styling on a webpage. You can look at it as a sort of inline block of text that allow you to manipulate a limited set of styling properties.
With some work and experimenting, you could create interesting messaging within the console. One idea is to draw extra attention to a particular log, especially an error of some sort.
In this example, we can see that the CSS is a bit verbose, but there is something we can do to mimic the class system that we leverage in CSS. The values of each parameter for styling can be stored in variables to allow for repeated use without having to duplicate the string of styles in each parameter.
There are several things going on here, so let’s break it down a bit. First, we have a collection of variables that holds our styling strings. Think of each as a sort of class to be reused in the parameters of the console log.
We are also using a template literal in the log, which means we can have line breaks in our output. Then, for each %c in the text, there’s a corresponding variable used in a parameter to define the styles for that particular part of the output text. In addition to each variable that holds styling, there is also a clearStyles argument that can be used to reset styles to prepare for the next set of styling. You could just use an empty string as in previous examples, but I like the clear intention that comes from using the variable name. The last parameter shows that the variables can be combined, which opens up more possible ways of handling the styles.
Now, that’s a great deal of text covering essentially five console commands that only output text to the console. So, let’s move on to other commands of the console object. Although, some of these can still use many of the features described so far, we won’t focus on that aspect as much with the following commands.
Being assertive: assert()
The console.assert() command is similar to the error command mentioned previously. The difference is that asserting allows for the usage of a boolean condition to determine whether it should output the text to the console.
For example, let’s say you wanted to test the value of a variable and make sure it wasn’t larger than a certain number value. If the variable is below that number and the condition resolves to true, the assert command does nothing. If the condition resolves to false, then the output text is displayed. This way you don’t have to wrap a console.error() command with an if statement to determine if the error message is needed in the first place.
let value = 10;
console.assert(value <= 7, 'The value is greater than 7.');
Chrome assert example
We can see that assert has the same appearance as the error command, except that it also prepends “Assertion failed:” to the output text. Chrome can also expand this output to show a trace of where the assertion came from.
The trace can be quite helpful with common patterns of functions within functions calling other functions and so on. Although, you can see in the example above that the line the assert came from doesn’t tell you how the code got to that line.
let value = 10;


function function_one () {
  function_two();
}


function function_two () {
  function_three();
}


function function_three() {
  console.assert(value < 7, 'This was false.');
}


function_one();
Chrome assert with trace
This sequence is actually in reverse order in terms of the code. The last line shows an anonymous entry (which is an HTML script tag in this case) on line 78. That’s where function_one was called. Inside that function, we have a call for function_two, which, in turn, calls function_three. Inside that last function is where the assert is located. So, in this development world of functions sharing other functions; a description of the path to that point of the assert is quite handy.
Unfortunately, this trace is not provided in Firefox with the assert command, as it is with the error command.
Firefox assert example
Keeping count: count() and countReset()
Ever wonder how many times a certain thing happens in your code? For instance, how many times does a particular function get called during a sequence of events? That’s where the console.count() command can help out.
By itself, the count command is rather simple and has limited use. If you use the command in its default state you only get a simple count. For example, if we call it three times in a row, we get a sequential count.
As you can see, we get a simple count from one to three. The default behavior means that count is merely incrementing the output by one each time it runs, no matter where it shows up in the code. You do get the line number in the code where it happened, but the count is a simple total no matter the situation.
To make this command a bit more useful, we can provide a label to keep a separate count for that label.
Even though using the count command with labels causes the output to alternate between labels, each one keeps its own count. One scenario where this comes in handy is placing a count inside a function so that every time that function is called, the count is incremented. The label option makes it so that a count can be kept for individual functions to provide for a good idea of how many times each function is being called. That’s great for troubleshooting performance bottlenecks or simply seeing how much work a page is doing.
There’s a way to reset the count. Let’s say we have a loop that gets called multiple times, but the number of iterations of the loop can be dynamic. This is done with the console.countReset() command with the same label from the count command.
console.count();
console.count();
console.countReset();
console.count();


console.count('this is a label');
console.count('this is a label');
console.countReset('this is a label');
console.count('this is a label');
Chrome count reset example
Each count — with and without a label — is called twice and console.countReset() is applied right before another count instance. You can see that Chrome counts up to two, then restarts when it encounters countReset. There’s nothing in DevTools to indicate the reset happened, so an assumption is made that it did happen because the count started over.
And yet, the same code is a bit different in Firefox.
Firefox count reset example
Here, the reset is indicated by the count being set all the way back to zero. That is the indicator that the reset was called, whereas we have no such indication in Chrome.
As for label options, just about anything can be used. I suppose a simple way to describe it is that if you give it anything that can be resolved to a string, it’ll probably work as a label. You could even use a variable that has values that change over time, where count will use the current value of the variable as a label each time it is encountered. So, you could keep count of the values as they change over time.
Describe that thing: dir() and dirxml()
The main idea behind these two commands is to display either properties of a Javascript object with console.dir() or descendant elements of an XML/HTML element with console.dirxml(). It appears Chrome has these implemented as expected, while Firefox just uses both as aliases for console.log().
Let’s give console.log(), console.dir(), and console.dirxml() the same simple object to see what we get. Keep in mind that you normally would not log an object with console.dirxml().
Firefox gives us much the same, except the console.dir() is automatically expanded.
Firefox simple dir() and dirxml() example
Another simple comparison to console.log() is to repeat the object in the same command.
Chrome dir() and dirxml() double exampleFirefox dir() and dirxml() double example
Not really that much different other than that Chrome doesn’t show the second object in console.dir() like Firefox does. Which makes sense because Chrome is trying to display properties of an object (ignoring the second) while Firefox is just aliasing everything to a console.log(). So, for situations like this with objects there is little difference between console.log(), console.dir(), and console.dirxml() in the browsers.
A useful benefit of console.dir() in Chrome that I can point out is how DOM elements are handled. For example, here’s how console.log() displays in Chrome and Firefox when given a DOM element.
Chrome console.log() DOM example.Firefox console.log() DOM example
Now, I’ve always liked how Firefox outputs a DOM element inside a console.log(), as it gives you all the properties of that DOM element. So, when I wanted to look up a specific property of a DOM element to manipulate with JavaScript, it’s only a console.log() away to find it. Chrome, on the other hand, gives us the HTML code of the DOM element in the console.log() just like it would in console.dirxml().
To get the properties in Chrome, use console.dir() with the DOM element. I was quite happy to find that console.dir() in Chrome provides the properties of a DOM element just as I came to rely on that information in Firefox.
As for console.dirxml() in Chrome, it can be useful for displaying an HTML element and its children outside of the clutter of the DOM Inspector. You can even edit some of the existing HTML live in the console, but you won't have the same level of abilities as in the DOM Inspector.
Let’s get together: group(), groupCollapsed(), and groupEnd()
Here’s a simple one: Group different console outputs together to show a form of relationship among them. It is somewhat limited in features so its usefulness will depend a great deal on how you plan to use it. This is the console.group() command.
console.group();
console.log('one');
console.log('two');
console.log('three');
console.groupEnd();


console.group('this is a label');
console.log('one');
console.log('two');
console.log('three');
console.groupEnd();
Chrome group() example
In the first block of code we call console.group() in its default state, have three logs, and then finally call console.groupEnd(). The console.groupEnd() simply defines the end of the grouping. The second block has a string as a parameter that essentially becomes the label for that group. Notice that in the first block without a label it just identifies itself as a console.group in Chrome while in Firefox it shows as <no group label>. In most cases, you’ll want a proper label to distinguish between groups.
Also notice the arrow next to the labels. Clicking on that collapses the group. In the code examples above, if we change console.group() to console.groupCollapsed(), they start collapsed and must be opened to see the output.
You can also nest the groups. The console.groupEnd() command simply refers to the last opened group.
Just as a quick note, if you want the group label to stand out a bit more in a list of output in the console, you can style it just as we did with strings earlier.
In previous examples, we’ve seen what happens when we put an array or object inside a console.log() or console.dir(). There’s another option for these data types for a more structured display, which is console.table().
Here’s a simple example with an array:
let basicArray = [
  'one',
  'two',
  'three'
];
console.table(basicArray);
Chrome basic array table() example
Here’s the same example in Firefox for comparison.
Firefox basic array table() example
A slight visual difference, but pretty much the same. That said, Chrome does still give you the expandable output under the table, much like you’d see in console.log(). Chrome will also provide basic column sorting if you click on the heading.
So, that was a pretty simple example with basic outputs. How about something a little more complex and is often used in coding projects? Let’s look at an array of objects.
As you can see, this gets us a nice layout of objects with repeating keys as column labels. Imagine data along the lines of user information, dates, or whatever might be data often used in loops. Keep in mind that all the keys in each of the objects will be represented as a column, whether there is corresponding keys with data in the other objects. If an object doesn’t have data for a key’s column, it appears as empty.
An array of arrays is similar to the array of objects. Instead of keys being labels for the columns, it uses the index of the inner arrays as column labels. So if an array has more items than the other arrays, then there will be blank items in the table for those columns. Just like with the array of objects.
So far, simple arrays and objects have simple output displayed. Even a slightly more complex array of objects still has a solid, useful structure. Things can get a bit different with mixing the data types though.
For example, an array of arrays where one of the inner array items is an object.
Chrome array of arrays with object table() example
Now, to see what is contained in those objects in the third column, we’ll have to expand that array output below the table. Not that bad, really. Here’s how Firefox handles the same output.
Firefox array of array with object table() example
Firefox just lets us expand the object within the table.
How about mixing the data types the other way, where we have an object with arrays as values for each key? It works much the same as the array of arrays. The difference is that each row is labeled with a key instead of the index. Of course, for each level of data type you add to the mix will result in a more complex looking table.
This is all about: time(), timeLog(), and timeEnd()
Here we have a simple way to log how long something takes to complete. We call console.time() with a label, call console.timeLog() with the same label for an update, and call console.timeEnd() again with the same label to stop the timer.
console.time('this is a timer');
console.timeLog('this is a timer');
console.timeEnd('this is a timer');
The output for Chrome and Firefox is much the same. Here’s an example output with code that logs the time every second for five seconds and then stops.
Chrome time() exampleFirefox time() example
Notice that the reported times are not quite the same, but probably close enough for most requirements. Also, Firefox is nice enough to note that the timer has ended while Chrome requires an assumption once the label stops appearing. The first four lines of output come from the call console.timeLog('this is a timer'); and the last line is from the call to console.timeEnd('this is a timer');.
Dropping breadcrumbs with: trace()
The console.trace() command is actually similar to console.error() and console.warn(). Calling this command will output a stack trace to the console showing the path through the code to that call. We can even pass it a string as a form of label, but other data types such as arrays or objects can be passed. The behavior of passing data like that is the same as what we would get from a console.log() call. It’s a simple way to pass along some information to the console without triggering a more dire looking console.error() or console.warn() call.
debugger
This is a simple command to trigger a pause in the console’s debugger, if it exists. It is similar to placing a breakpoint in the debugger, or the browser’s equivalent, to cause the same type of pause while executing code. Here’s a simple example:
function whatsInHere() {
  debugger;
  // rest of the code
}
In this particular example, the open console’s debugger will pause code execution and the browser will open up the source file to show the line of code as soon as the function is called. It could be useful for easy breakpoints with some complicated projects.
Technically, the debugger command isn't a part of the console object in the browser. It's a useful feature that the console will respond to from JavaScript code.
Some additional console utilities
That’s a good look at most of the standard commands available to us in the console object. Each of these will work more-or-less the same across modern browsers. There may be some differences between browsers, as we saw in some of the examples. But there are a few more things I’d like to take a moment to point out, as they might prove useful in various ways.
The following examples can be considered more like console “utilities.” They are not a part of the console object like most of the previous examples. Therefore they are not called with a leading console object reference. These utilities are supported directly by the browsers themselves. They cannot be called from JavaScript code but must be typed directly in the console to be used. In some cases the utility might be unique to a particular browser, in others the utility is supported much the same way in several browsers. Your mileage may vary based on your browser of choice.
$0, $1, $2, $3, $4
These five commands are extremely handy. The first one, $0, represents the currently selected element in the DOM inspector. This essentially provides a shortcut instead of having to use more traditional DOM methods, such as getElementById or a querySelector. You can use it in various ways, within various console commands, or by itself to get information about the currently selected element. For example:
console.log($0);
The other commands in this set represent elements that were previously selected. Think of them as a form of selection history. $1 is the previous element, $2 is the previous before that, and so on. Although the first command is available in Firefox, the commands for previously selected elements are not.
$(‘element’), $$(‘elements’)
If you find yourself typing out document.querySelector('element') in the console repeatedly, there’s a shortcut. You can just type $('element') and it performs the same function. The shortcut might remind many of jQuery, but to select multiple elements reminds me of MooTools. To select multiple elements, you’d use $$('elements') instead of document.querySelectorAll('elements').
$x(‘//element’)
This is a shortcut for XPath that will return an array of elements that match the expression. An easy example is $x('//div'), which will present an array of every div element on the page. This isn’t that much different than using $$('div') like we did with $('element'), but there are many options for writing XPath expressions.
One example of a simple step up in a XPath expression is $x('//div[descendant::span]') (thanks to Neil Erdwien for the correction), which would return the div elements on the page that happen to contain a span element. This is the equivalent of :has in CSS Selectors Level 4 draft, which isn’t supported in browsers yet.
These are just basic examples that only scratch the surface of XPath.
clear()
This is another version of console.clear(), but without the “Console was cleared” message.
getEventListeners(object)
This command, when given a DOM element, will report the event listeners registered to that element. For example, using the $0 example from above we can use getEventListeners($0) to get something like this:
Chrome getEventListeners() example
Expanding each item in the array provides various information about that event listener. This function isn’t supported in Firefox, but it does offer something similar that can be found in the DOM inspector.
Firefox DOM Inspector events information.
Clicking on the “event” badge next to the element provides a list of events registered to the element. Then each event can be expanded to show the code involved with the event.
That’s it for now!
I’ll end it here, with a large amount of information detailing various commands that can be used in the browser’s console output or with JavaScript. This isn’t everything that is possible — there’s simply too much to cover. In some cases, each browser has its own capabilities or utilities that can be leveraged. We looked at the bulk of what we might find in Chrome and Firefox, but there’s likely more out there. Plus, there will always be new features introduced in the future. I invite you to dig deeper to discover more ways to leverage browser DevTools for your coding projects.
As a backend developer, I always need to monitor something — the state machine in the database, records count, message queue lag, custom application metrics, system performance, progress of my deployment scripts.
For a long time, I was trying to find a tool that could do keep everything in one place, alert me on a trigger, and be as fast and nimble as a local development tool. Heavy production monitoring systems can't help with such tasks; I needed a swiss army knife — something that could be configured in a minute and give me results right away.
Git is command-line-driven software, but that doesn't mean you have to use the command line to make it work. There are lots of options! Some of the deepest programmer nerds I know prefer to use GUIs for Git (Graphic
User Interface, or you know, software you can see things and click stuff), and some near pure-designers I know prefer working with the command line for Git. Swear to Git.
Lemme round up what look like the major players for Git GUIs these days.
No matter how much you love the CLI, don't GUI-shame. Lots of perfectly amazing programmers like working with GUIs, and it's perfectly fine.
There's some weird gatekeeping tendencies centered around the command line. #DevDiscuss
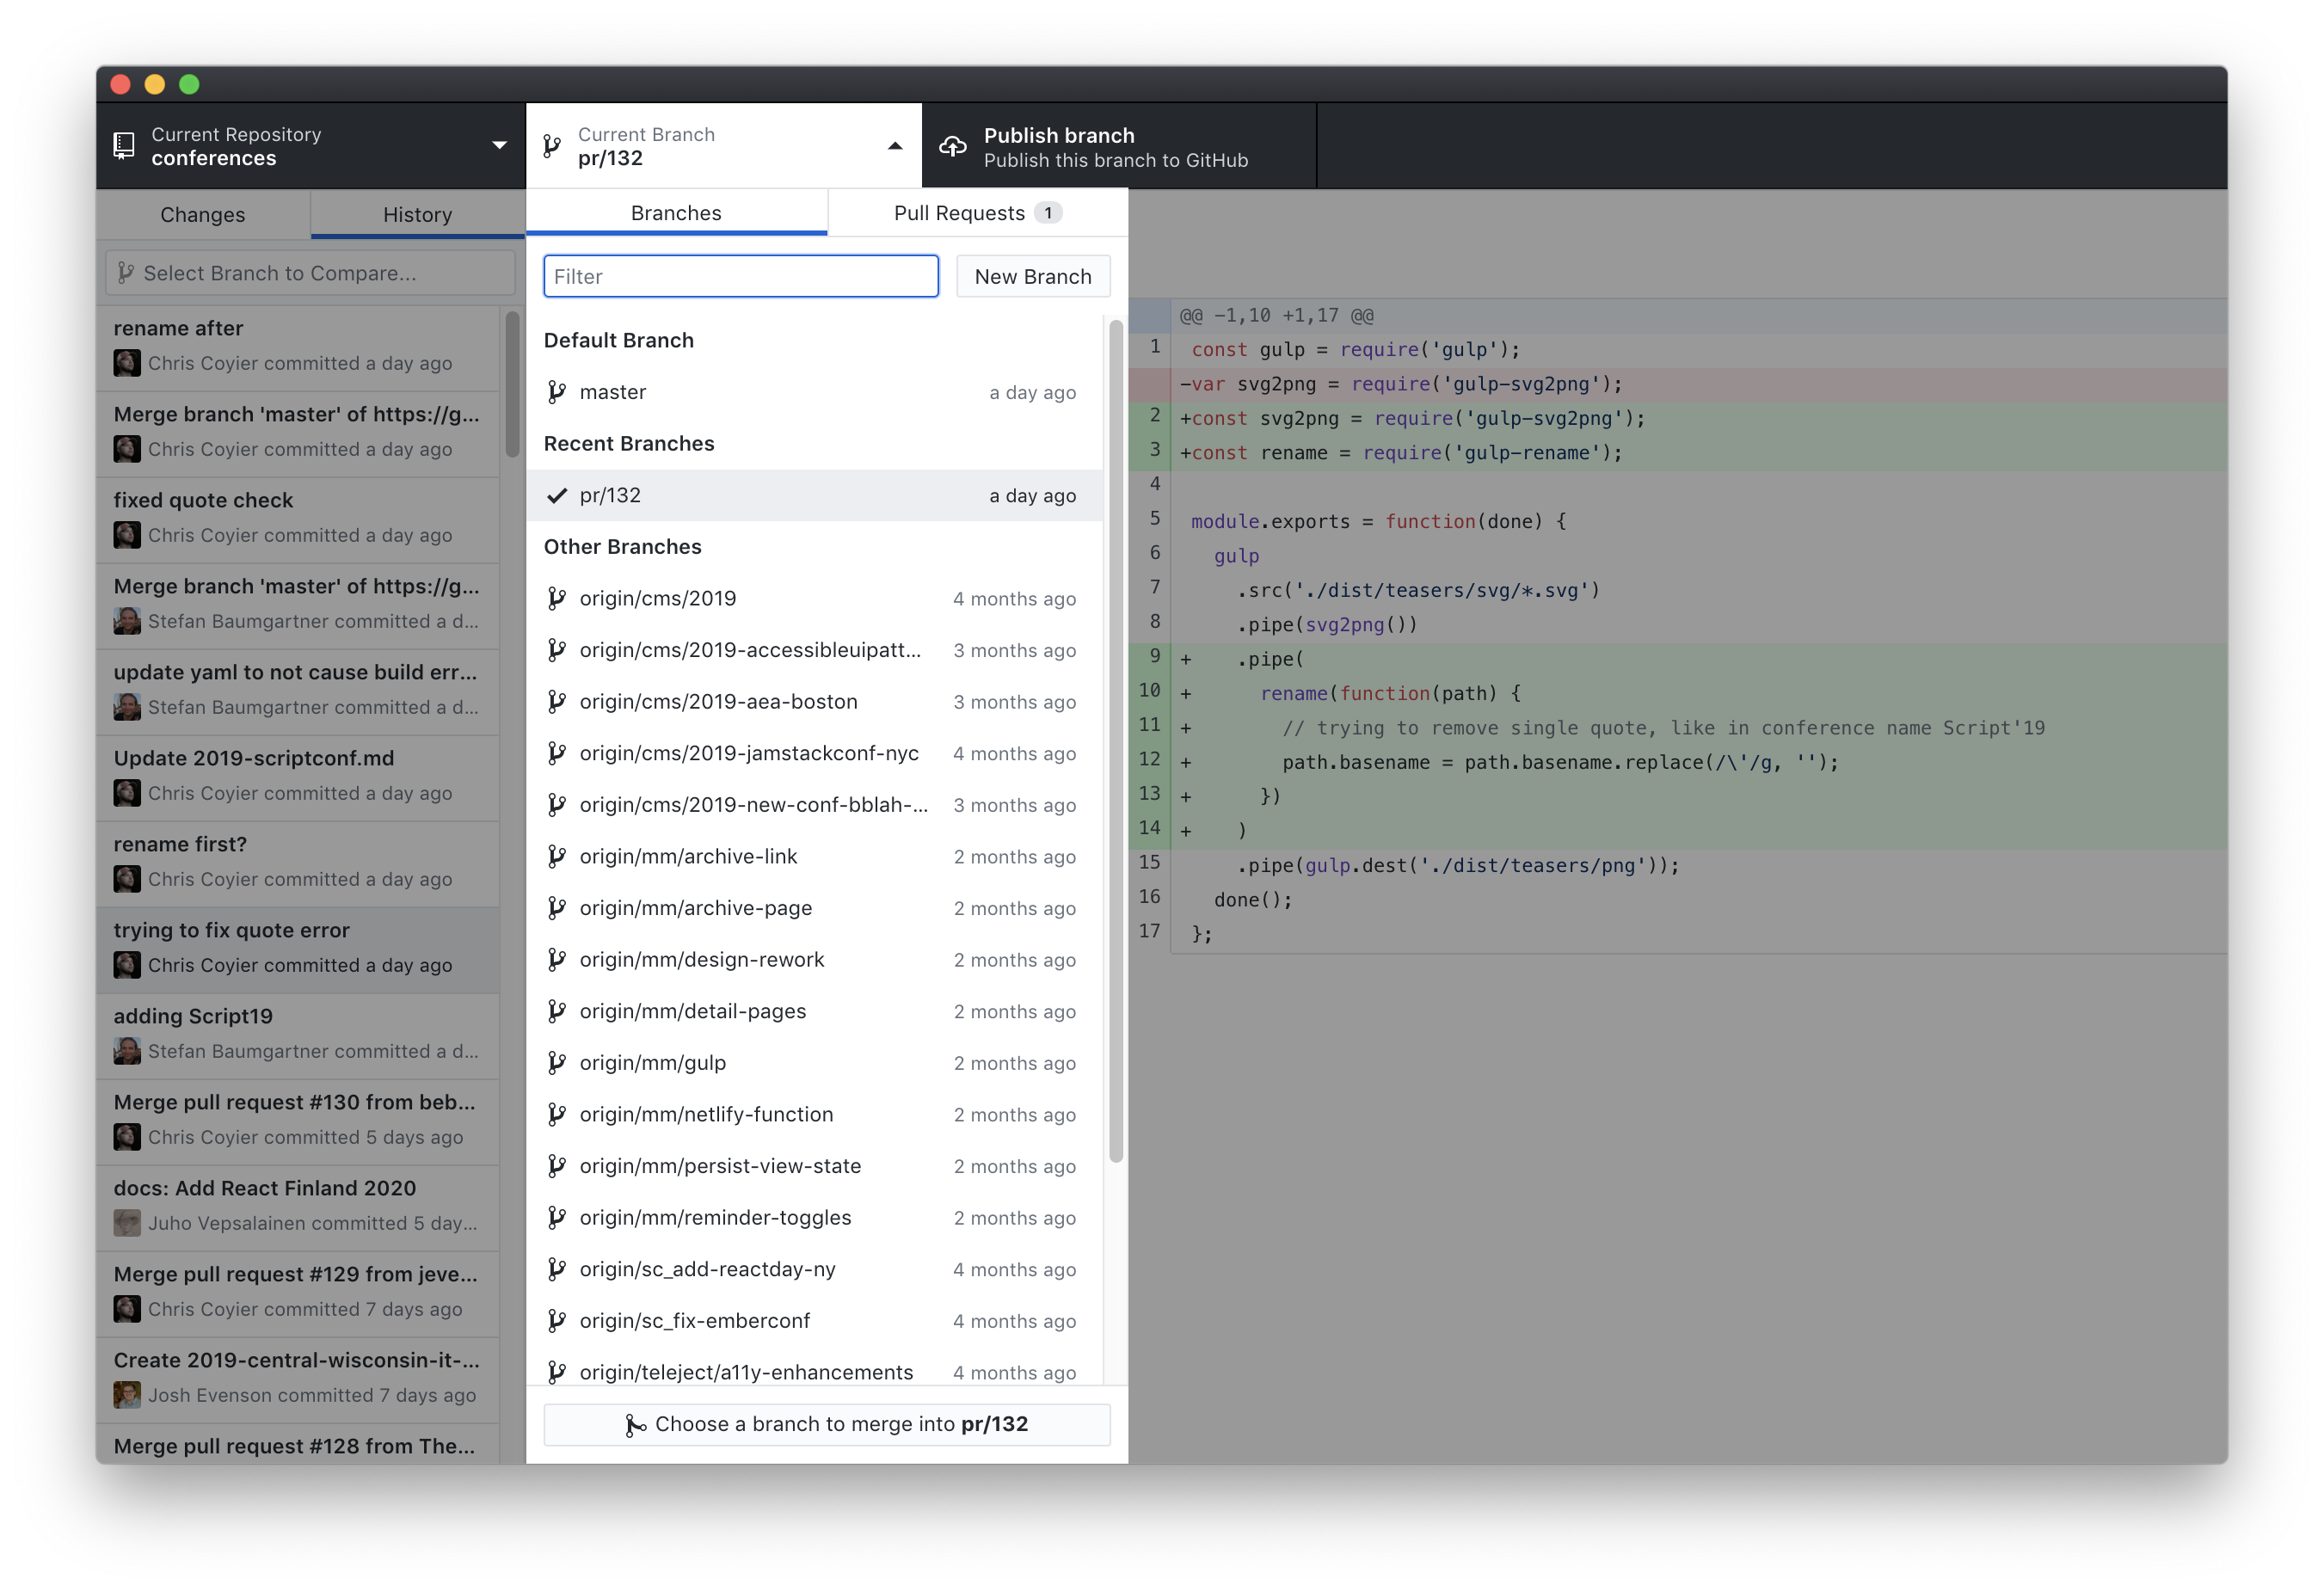
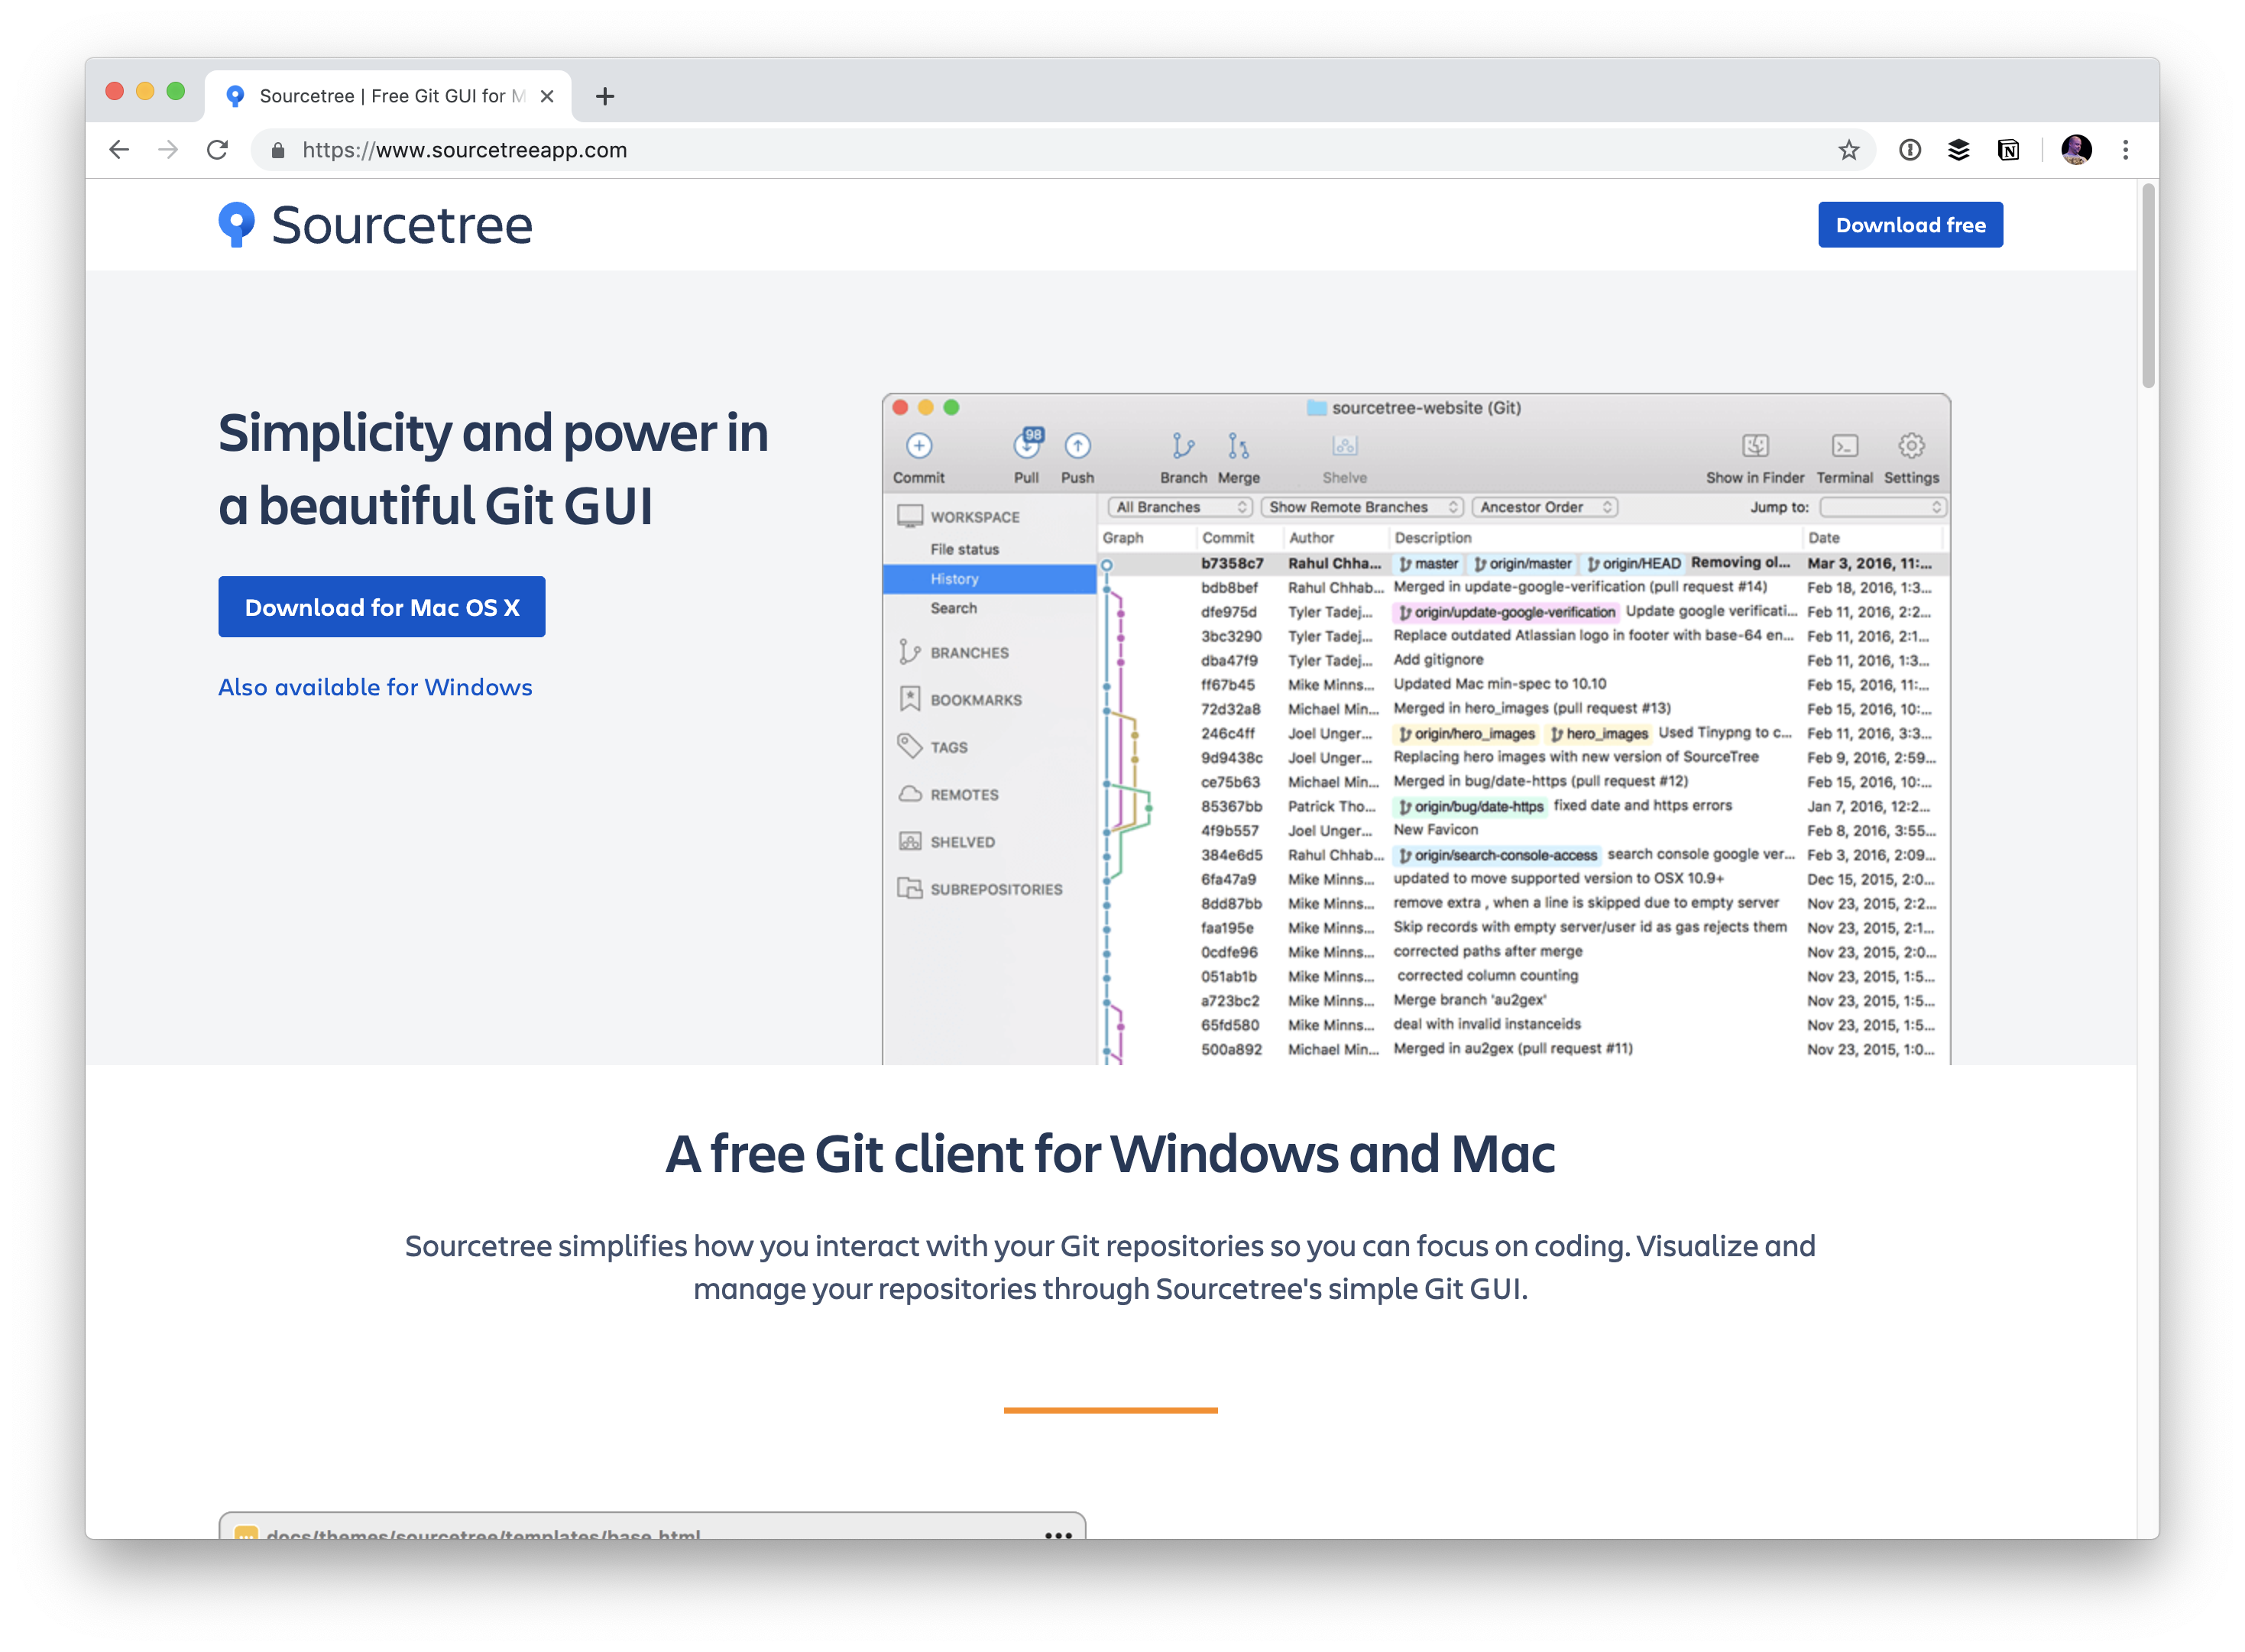
I've used Tower for ages and it's the one used the most. I'm not sure the exact release dates of all these, but I feel like Tower was an early player here. They've been around a long time and continuously improve, which I always respect.
This is a 2.0 of the original GitHub Desktop. I had some gripes with the 1.0 version in that its terminology was weird (to me) and seemed to vastly deviate from Git, which was more confusing than it was worth (again, to me). This version cleans most of that up. It's deeply integrated into GitHub so it makes GitHubb-y things (e.g. pull requests) feel like first-class citizens, but it will still happily work with any Git repo.
I'm pretty intrigued by this one. Upgrading (monthly cost) to get the in-app merge conflict tool seems worth it, but you also have to upgrade to access private repos. It seems highly feature rich, but I think my favorite part is the dark-with-rainbow-accent-colors theme.
You might be compelled by Sourcetree if you're a big Bitbucket user because they are both Atlassian products. I know it works for any Git repo though. I imagine there is some smooth Bitbucket integration stuff with this, similar to the GitHub/GitHub Desktop connection.
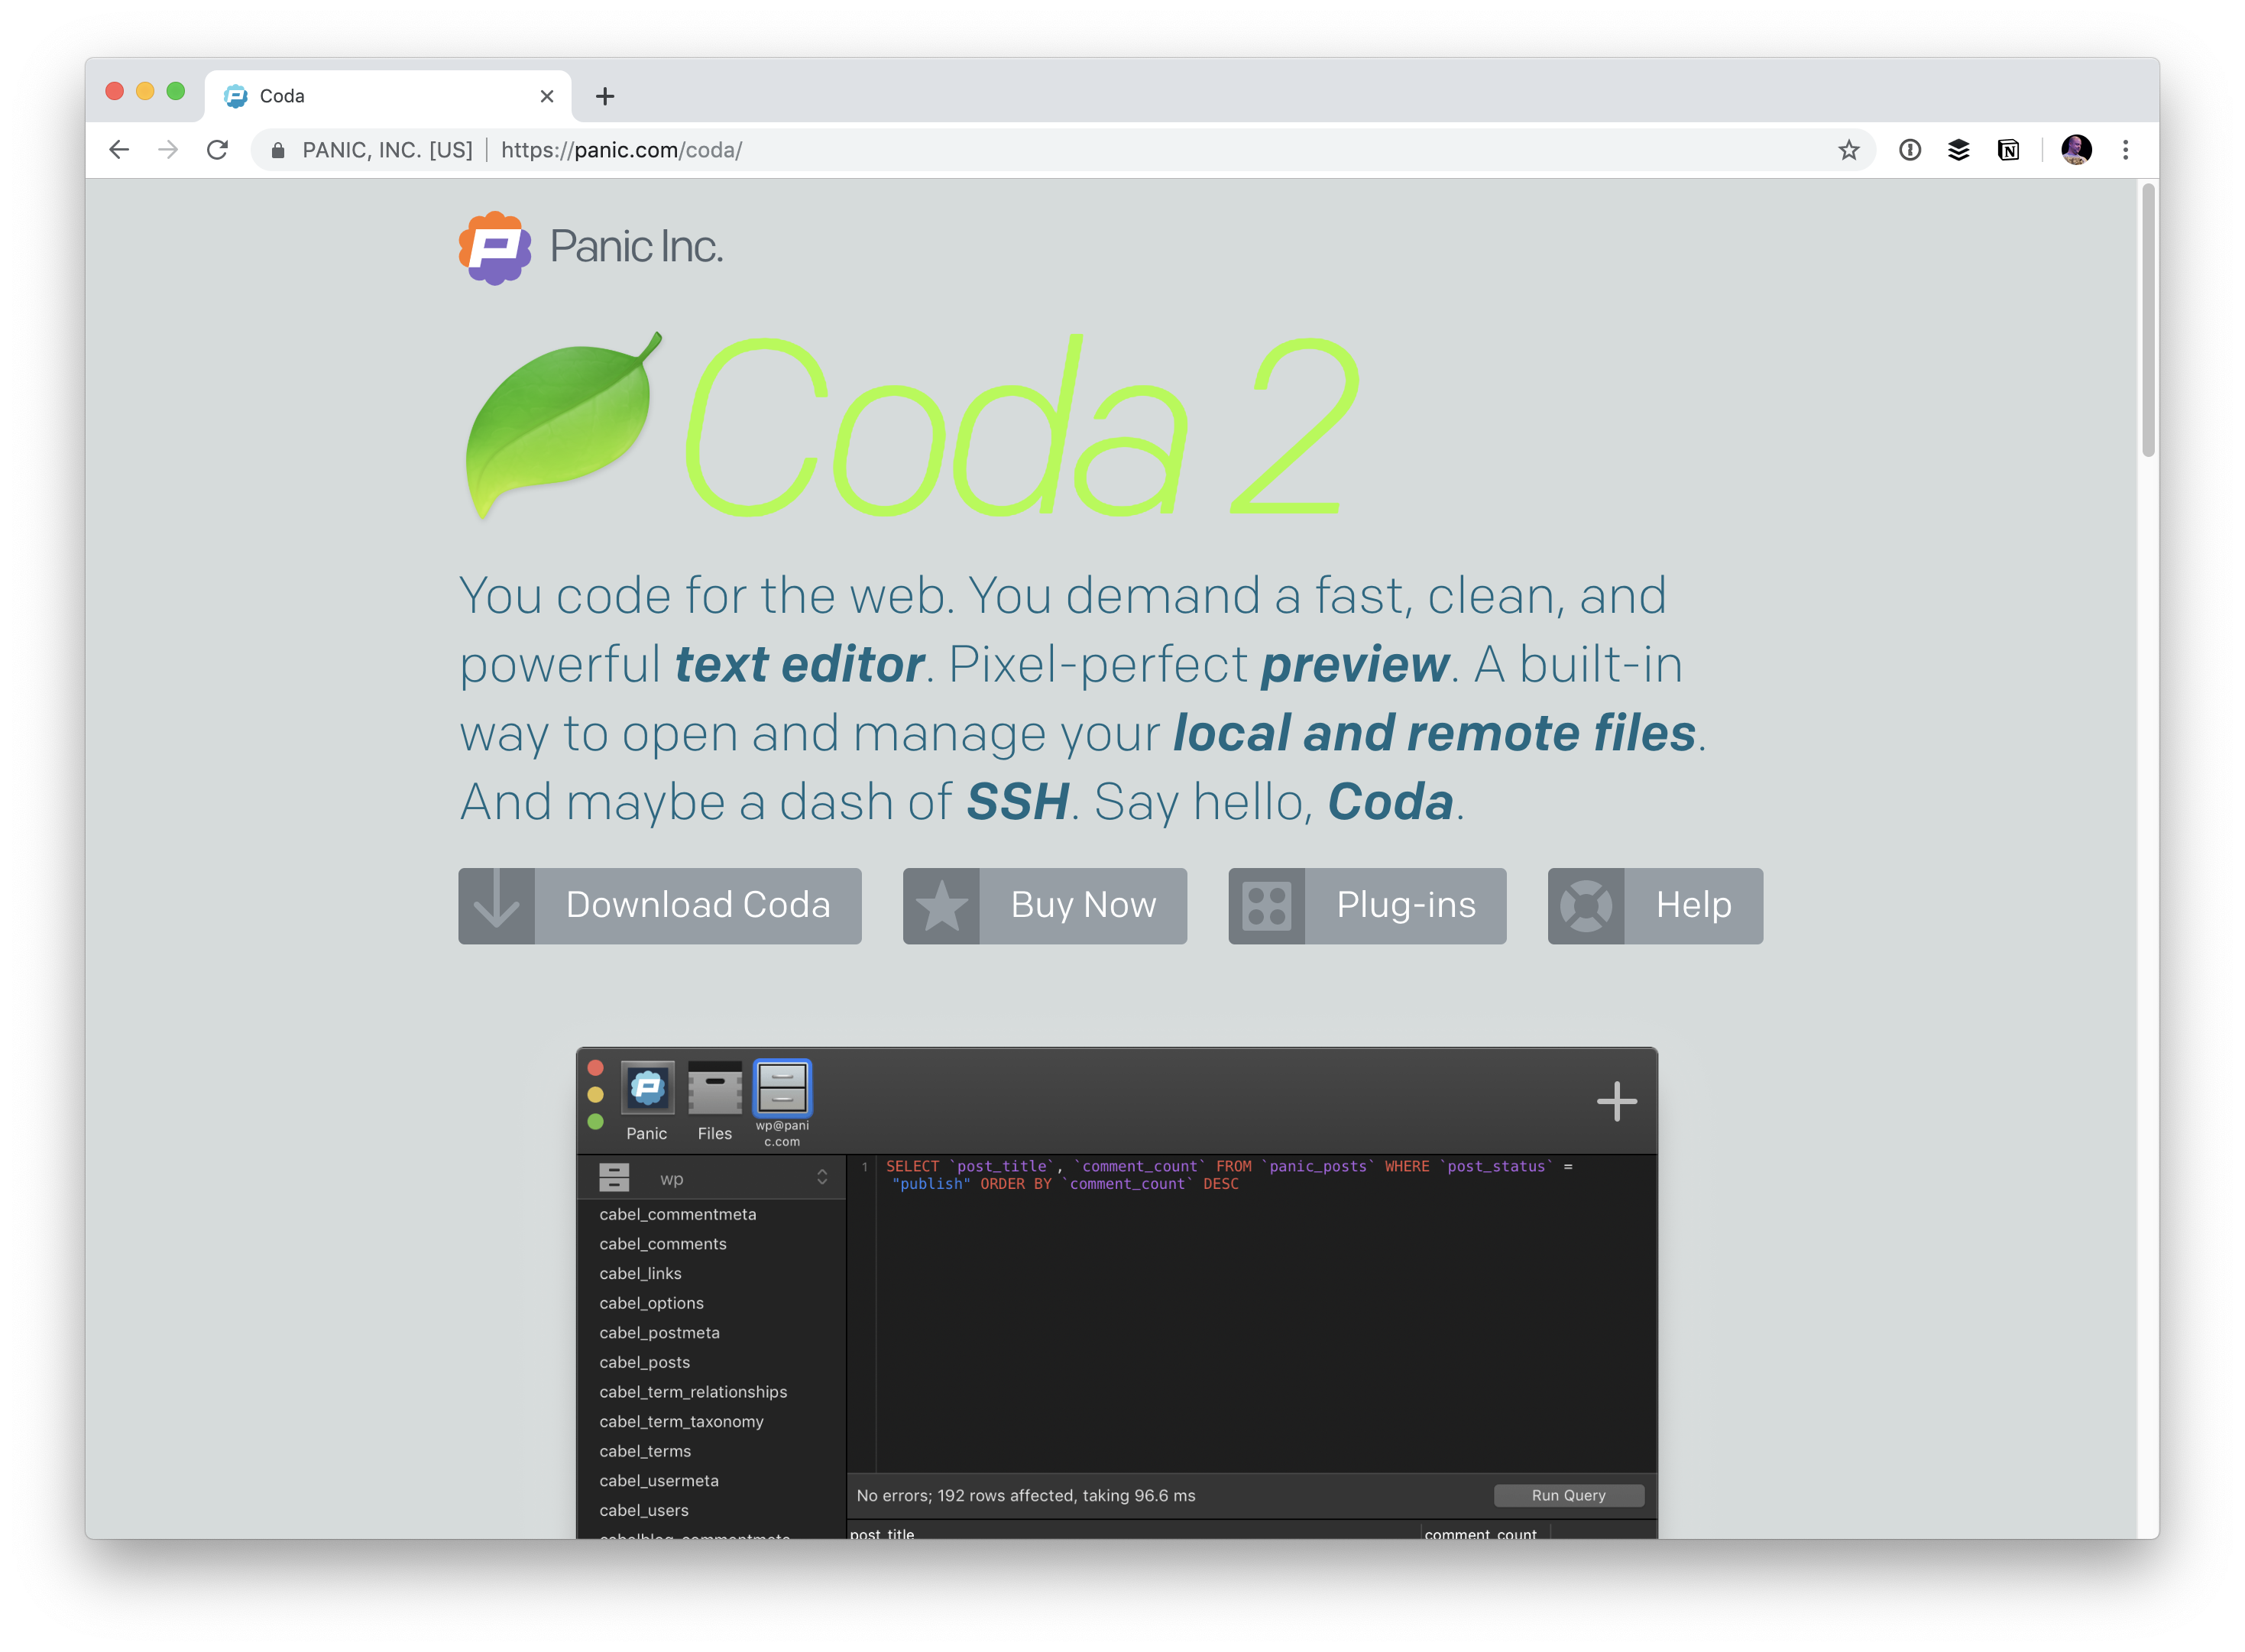
You don't really think of Coda as a version control tool (it's more of a direct-to-FTP thing), and even though I'd argue the support for it is fairly half-baked, it does work! Seems likely the next evolution of Coda will address this.
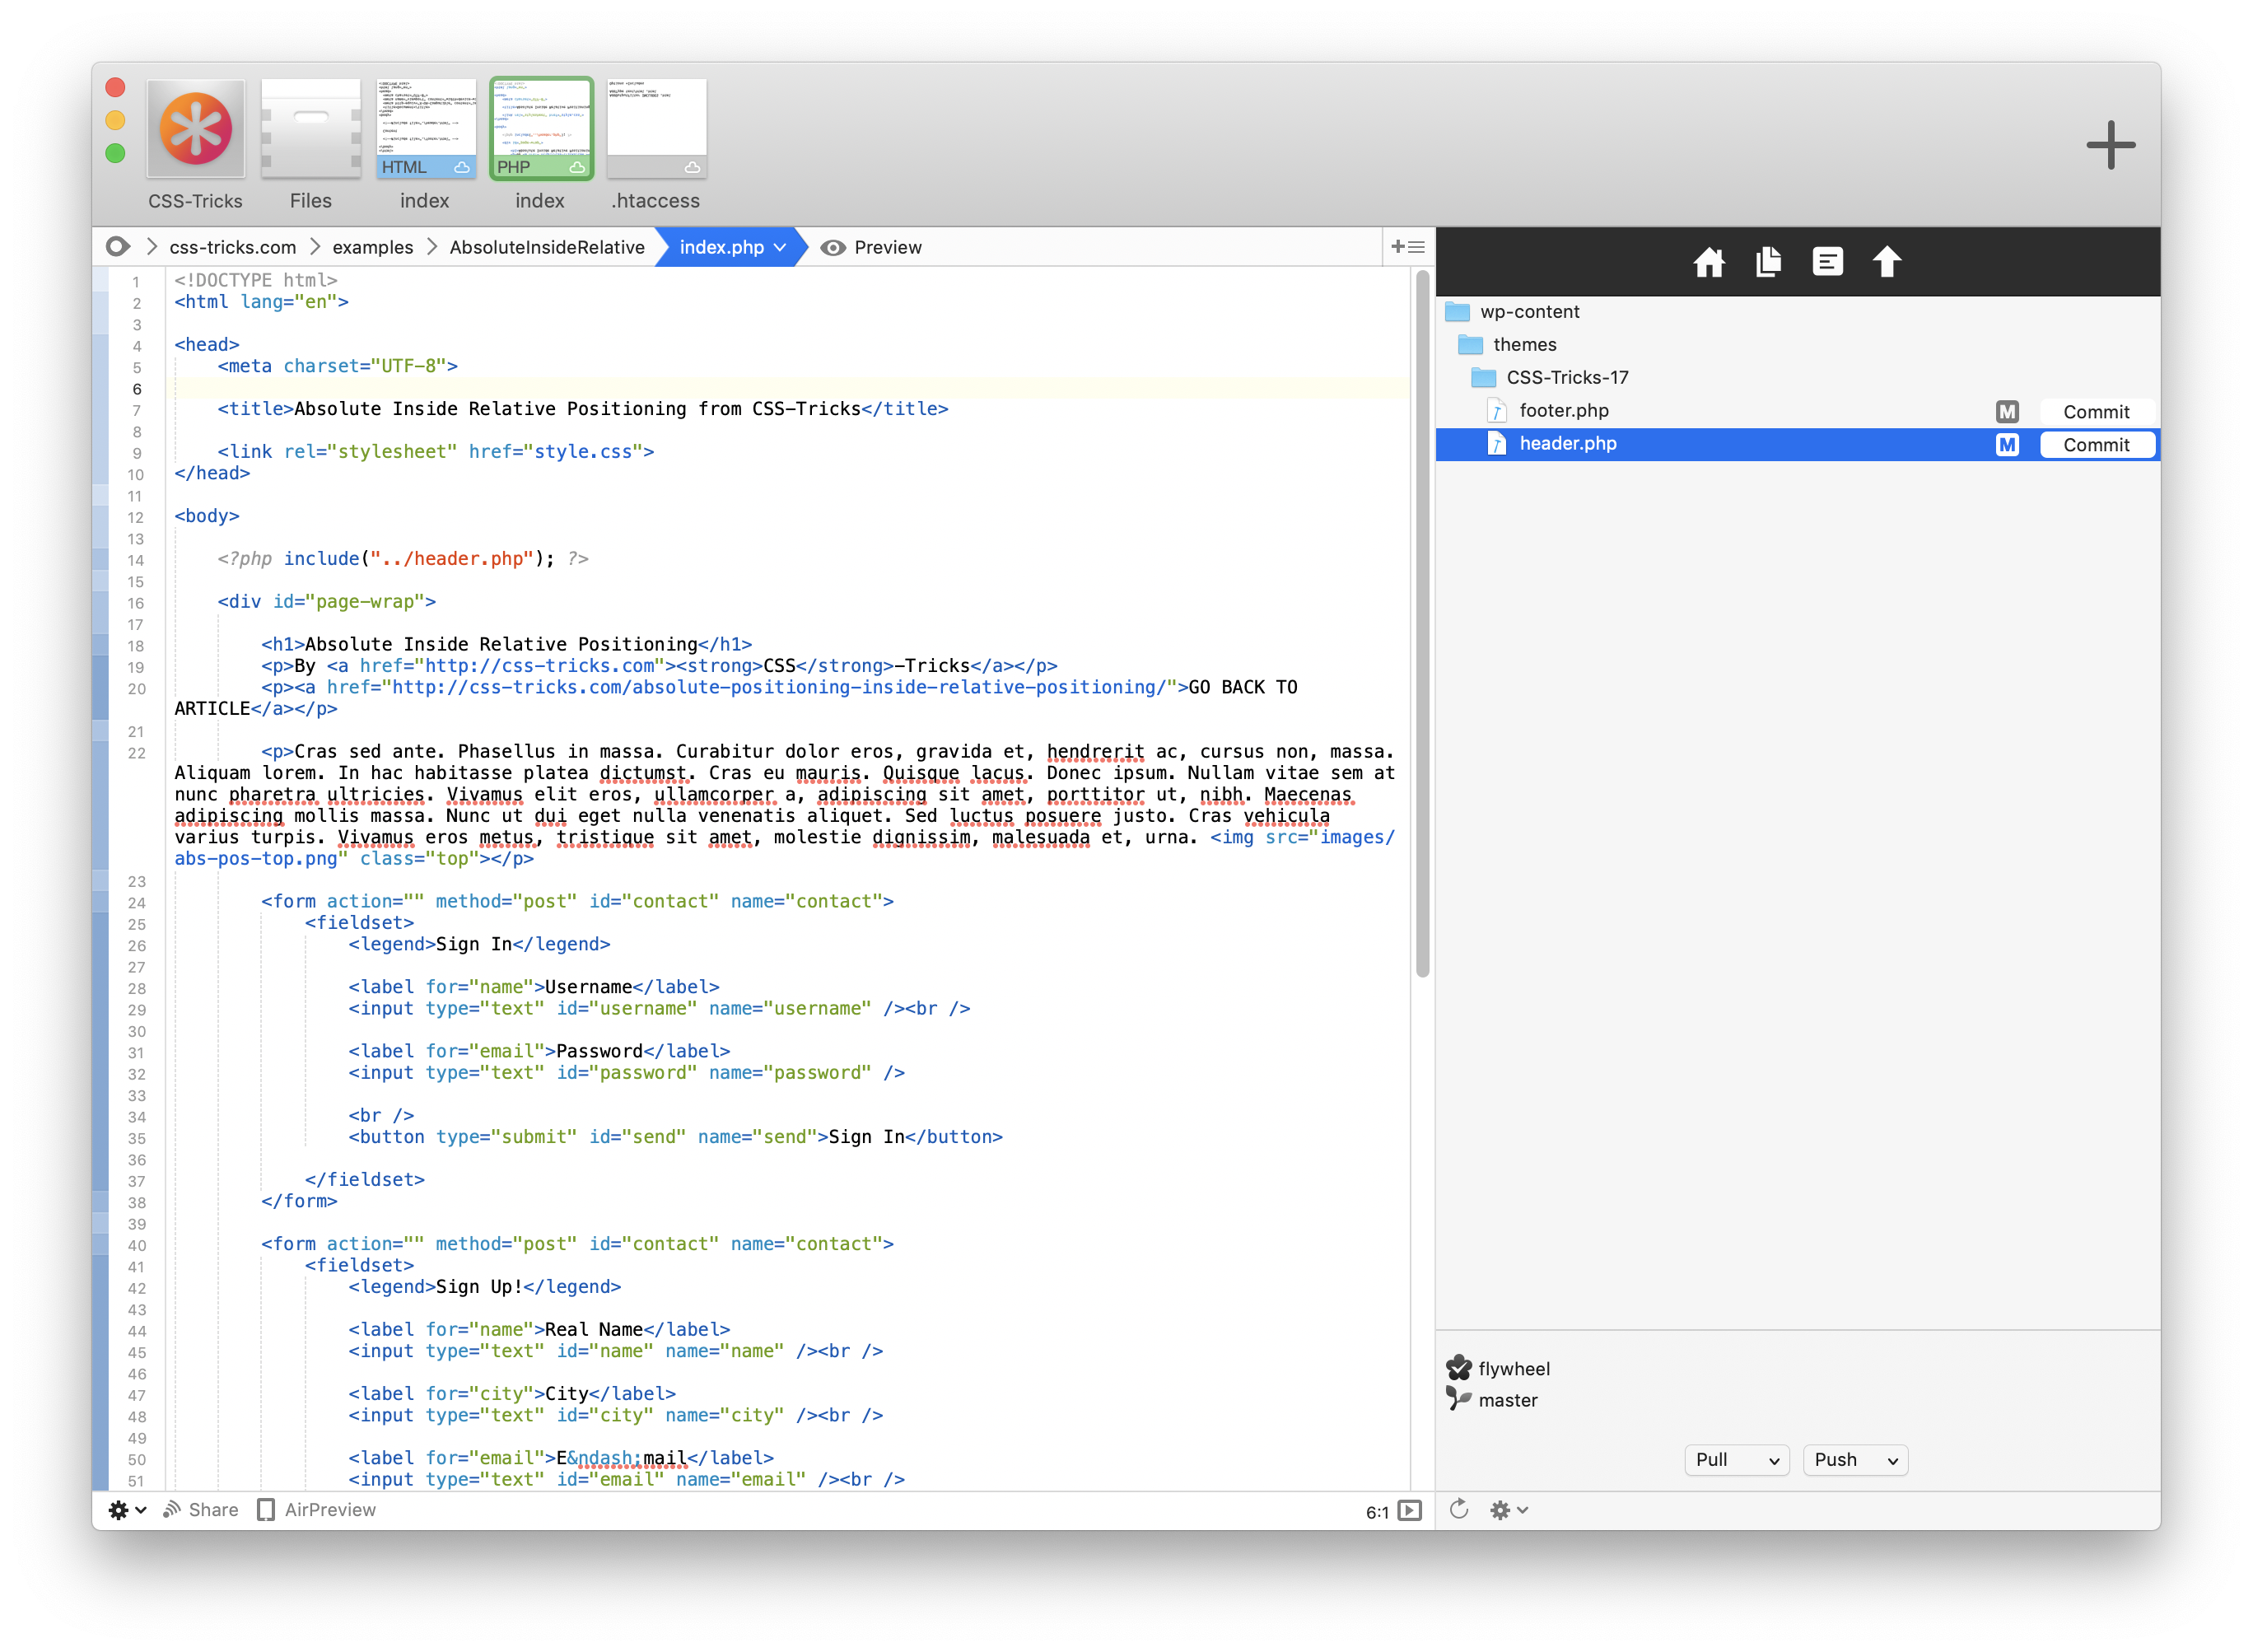
Having version control right in your IDE like this, to me, feels like kind of a tweener between GUI and CLI. There are a lot of features here, but it's not really a full-blown GUI to me, but you've got a terminal built in right there so it almost encourages that. A lot of Git usage is pretty basic pulling, committing, and pushing — so having this right within the app is kinda sweet.
(I imagine there are lots of other IDEs that offer version control features. PHPStorm, etc.)